
How to Use LeaderGuide Pro™ – It's Easy!
How to Use LeaderGuide Pro™ – It's Easy! Step by Step Instructions for creating Training Materials with LeaderGuide Pro™ 7 PLUS v7.6 in Word 2007 How to Use LeaderGuide Pro™ – It's Easy! Acknowledgements LeaderGuide Pro™ is a product of Great Circle Learning. Originally developed for our internal use, it has evolved into the powerful tool you have today thanks in part to input from amazing users like you. A special thank you goes to Holly Mills, who singlehandedly delivers “above and beyond” customer support. And most especially, thanks to the incredible talent of Richard V. Michaels, President & CEO of Great Circle Learning and the developer genius who has been the driving force of LeaderGuide Pro™ from day one. Trademarks & Copyright Acknowledgements LeaderGuide Pro™ is a trademark of Great Circle Learning, Inc. This instruction manual was created with a product of Great Circle Learning, Inc. www.leaderguidepro.com 1857 San Marco Road, Unit C-201, Marco Island, FL 34145 USA Tel: 239-389-2000 // Fax: 239-389-0569 Email: [email protected] and [email protected] Websites: http://www.gclearning.com http://www.leaderguidepro.com http://www.george4ppt.com http://www.trainingcontent.com Instruction Manual Table of Contents Table of Contents INTRODUCTORY MATERIAL Getting Started vii Learn Your Way vii How to Use this Instruction Manual viii Navigating in this Manual Additional Ways to Get Instruction & Help ix xi 24/7 Web Options xi Web-based User Training xii On-site User Training xiii Service and Maintenance Agreements xiv Training At A Glance xv MODULES Activating and Deactivating your LeaderGuide Pro™ Software 1 About Activating and Deactivating LGPro 2 Activating LeaderGuide Pro™ 4 Deactivating LeaderGuide Pro™ A Few Things Every User Should Understand 12 16 Accessing your LeaderGuide Pro™ software 17 Macros – LGPro Macros are Safe 18 How to Set Your Macros in Word 2007 20 Accessing the LeaderGuide Pro™ Utilities 21 When Working in LGPro You are in Word 23 LeaderGuide Pro™ Terminology 24 The LGPro Ribbon and Buttons 25 LGP Blocks 26 © 2009 Great Circle Learning. All rights reserved. Rev. Date 12/03/2009 Page i Table of Contents Instruction Manual The LeaderGuide Pro Library Folder 27 Leader Guide Document Structure 29 Places to Add Content in a Leader Guide 30 Cover Page 31 Acknowledgements Page 32 Table of Contents 33 Program in Perspective Page 34 Program Preparation Page 35 Training At A Glance Page 36 New Module Overview Page 37 New Lesson Page 38 Paragraph Marks and Non-printing Characters 39 Section Breaks 40 Red Text 41 Use LGPro Functionality First 42 Word Commands You will Use 43 LGPro Styles 44 Copying & Pasting 45 Do You Know Where Your Cursor Is? 46 How to Use ParticipantGuide Pro™ 47 Scenarios 48 Create a Leader Guide from Scratch 49 Create a Leader Guide from a PowerPoint File 52 Create a Leader Guide from Multiple Slide Files 54 Update a Leader Guide Created with Multiple PowerPoint Files 57 Create a Leader Guide from Archived Content 60 Create a Leader Guide from Non-LGPro Content 62 Create a Leader Guide from a Participant Guide 64 Update Slides in a Leader Guide 66 Numbering – The Best Way to Apply Numbers to Items and Lists 68 Page ii How to Use LeaderGuide Pro™ – It's Easy! Instruction Manual Table of Contents Inserting Multiple Pages of Text into an LGP Block 69 I Need More than One Customized LGPro Template 70 Functionality – How to Use the LGPro Ribbon Buttons 73 Opening LeaderGuide Pro™ 74 Blank Page Button – Create a new LGPro document 75 Folder Button – Open an Existing Leader Guide 79 Update Template Styles Button 80 New Module Button 81 New Lesson Button 86 Continue Lesson Button 90 New Break Button – Coffee Cup 93 Librarian Button 98 Librarian Registry File 100 Librarian Local Library and Master Library 101 Librarian/Archive Modules or Lessons 102 Librarian/Insert Archived Modules or Lessons 107 Librarian/Delete Modules or Lessons 111 Librarian/Reorder Modules or Lessons 114 Librarian/Add a New Master Record for a Course to the Librarian Registry 117 Librarian/Update an Existing Course Master Record 121 Librarian/Remove an Existing Course Master Record 124 Librarian/Associate this Document's Source File with an Existing Master Record 127 LGP Text Formatting Buttons – Title, Text, Bullet 1, Bullet 2 131 Text Formatting Example –Speaker Notes Block 133 Paste Special – Clear Source Formatting and Apply LGPro Text Formatting 135 Break Table Button – How to Get a Paragraph Mark to Appear in between LGP Blocks 137 How to Get a Paragraph Mark to Appear Before a Page Break 138 Insert Table Button 139 Controls Group 144 © 2009 Great Circle Learning. All rights reserved. Rev. Date 12/03/2009 Page iii Table of Contents Instruction Manual TAG Button – Training At A Glance 145 Update All Fields Button 148 Instructional Term Shortcuts Button – Auto Text for Trainers 149 List of Instructional Term Shortcuts 151 Go To Button – Navigation Method 153 Special Button – Importing and Exporting Functions 154 Special/Import Finished Slides 155 Special/Import Finished Slides – Replace 158 Special/Import Finished Slides – Replace: More about Using this Function 159 Special/Import Finished Slides – Add: About the Options You Have When You Add Slides 161 Special/Import Finished Slides – Add 164 Special/Import Finished Slides – Add/Slides and Notes 165 Special/Import Finished Slides – Add/Advanced Import 167 Special/Extract Text for Slides 171 Special/Extract Participant Guide Text 175 Special/Export Assessments, Cases and Handouts 179 Special/Mark Selective Blocks for Extract 182 Special/Set Bracketed Areas for Extract 183 Special/Attach LGPro Template 184 LGP Blocks and Other Automated Entry Elements – About 186 LGP Blocks – Adding Them and Working with Them 188 Projected Image Block – a.k.a. Slides Block 189 Projected Image Block – Creating Slides in your Leader Guide 190 Projected Image Block –Using it as a Placeholder 193 Transition Blocks 195 Assessment Blocks 197 Case Study Blocks 202 Handout Blocks 204 Empty Block 206 Capture Notes Functions 207 Page iv How to Use LeaderGuide Pro™ – It's Easy! Instruction Manual Table of Contents Capture Lines 210 Speaker Notes Block 212 Custom Blocks 213 Text Entry Elements 215 LGPro Utilities – Customizing Tools 217 How to Access the Utilities 218 Colors and Logo Utility 219 Convert to V7 Utility 223 LGP Blocks Utility 224 LGPro Styles Utility 227 PGPro Blocks Utility 229 PGPro Styles Utility 230 Setup Master Library Utility 231 Update Library Registry Utility 233 Customize your Librarian Registry Record Form Meta tags 235 Restoring the LGPro Template Defaults 236 Editing your LGPro Template Customizations 237 Reapplying your LGPro Template Customizations 238 Sharing your Template Customization Worksheets with Colleagues 239 Organization & Macrostructure: Working in the Sections of a Leader Guide 242 The Cover Page 243 The Table of Contents 245 Introductory Material 247 Modules 249 Lessons 252 Working in a Leader Guide after Importing a PowerPoint File 253 george! george! Troubleshooting 258 259 260 The LGPro Ribbon Buttons Don't Work 261 © 2009 Great Circle Learning. All rights reserved. Rev. Date 12/03/2009 Page v Table of Contents Instruction Manual Adding a Graphic or More Text on my Cover Page 262 The Word Undo or Redo button didn’t work 264 Track Changes is Not Working Right 265 Training At A Glance Isn't Updating Properly 266 Pasted in Content is Not All Showing in a Block 268 How to Check for LGPro Styles 269 I Accidentally Pasted in Formats from Source Documents 270 Page vi How to Use LeaderGuide Pro™ – It's Easy! Instruction Manual Getting Started Getting Started Learn Your Way This Instruction Manual is designed to meet your needs You do not need to read this manual cover to cover Suggested Reading We do suggest that you read through the section titled “A Few Things Every User Should Understand”. Yes, it looks like a lot of pages, but there’s plenty of white space, it’s easy to read and you will gain fundamental knowledge that will make using LeaderGuide Pro™ easier You will find three types of focused help in this manual Typical Work Scenarios Detailed instruction sets on using each LGPro function Troubleshooting guidance Let your mouse do the walking The page numbers in the Table of Contents link to the actual pages – Place your cursor before a page number, press the Control (Ctrl) key on your keyboard and click your mouse and you will be taken to the page you selected Links to more… On many pages you will find links to more information. Click the link to follow it to another page in this document. We suggest that you note the page you are currently on before following the link, so that it’s easy to go back to. © 2009 Great Circle Learning. All rights reserved. Rev. Date 12/03/2009 Page vii Getting Started Instruction Manual How to Use this Instruction Manual Use the Table of Contents to locate and navigate to the information you need This Instruction Manual contains a number of different sections, including Activating and Deactivating the Software Learn Your Way A Few Things Every User Should Understand Scenarios – Practical Guidance to Help You Accomplish Common Work Tasks Better, Faster and Easier Functionality – How to Use the LGPro Ribbon Buttons and Functionality Organization & Macrostructure – How to Work in the Various Sections of a Leader Guide Troubleshooting Additional Ways to Get Instruction & Help A Few Things Every User Should Understand We recommend that you read through this section to gain fundamental knowledge about LGPro that will make it easier to use the software and to use the instruction sets in this manual Time required: 30 – 40 minutes Two different learning paths Page viii Scenario-driven – Steps to follow to use LGPro to accomplish your daily work tasks more efficiently Functionality-driven – Step-by-step detailed instruction, illustrated with screenshots, on how to use all of the LGPro functions How to Use LeaderGuide Pro™ – It's Easy! Instruction Manual Getting Started Navigating in this Manual There are several quick ways to move around this Manual when viewing the Word version Use the Word Ctrl+Click function to follow the hyperlinks – in the Table of Contents – in the pink shaded page references following the phrase “Learn more on page” such as Learn more on page 16 Before you follow a link, check the page number you are on so that it’s easy to return to – Use the Scroll Bar Pull button on the right side of your screen to determine what page you are currently on (click on it) – and to quickly return to the page you were on after following a link (click and pull up or down) Use the LGPro Go To function, for instance – Go To Next Module takes you to the next section/topic in the Manual – Go To Next Lesson takes you to the next subtopic within the Module you are in – Once you click on “Go To Next…” the double up and double down arrows in the lower right corner of your screen will take you to either the previous (up) or the next (down) occurrence © 2009 Great Circle Learning. All rights reserved. Rev. Date 12/03/2009 Page ix Getting Started Instruction Manual Navigating in this Manual, continued In the PDF version of this manual Page x Contents Click on the Bookmarks button to open the Table of Click on the topic or subtopic you would like to go to How to Use LeaderGuide Pro™ – It's Easy! Instruction Manual Additional Ways to Get Instruction & Help Additional Ways to Get Instruction & Help 24/7 Web Options Go to www.leaderguidepro.com Search our Knowledge Base FAQs Watch our Instructional Videos © 2009 Great Circle Learning. All rights reserved. Rev. Date 12/03/2009 Page xi Additional Ways to Get Instruction & Help Instruction Manual Web-based User Training Sign up for a 90 minute, one-on-one user training session Hands on instruction and guidance on how to use LeaderGuide Pro™ to meet your needs Purchase sessions at www.leaderguidepro.com Page xii How to Use LeaderGuide Pro™ – It's Easy! Instruction Manual Additional Ways to Get Instruction & Help On-site User Training One-day and two-day user training at your location Customized to meet your needs Hands on instruction on how to use all of the LeaderGuide Pro™ functionality Contact us at [email protected] to set up a time to discuss your needs Purchase sessions at www.leaderguidepro.com © 2009 Great Circle Learning. All rights reserved. Rev. Date 12/03/2009 Page xiii Additional Ways to Get Instruction & Help Instruction Manual Service and Maintenance Agreements Annual Service and maintenance agreements available Receive phone-based incident resolution services, automatic upgrades to new product releases and discounts off the purchase of additional licenses Contact us to request a quote for your annual service agreement [email protected] Page xiv How to Use LeaderGuide Pro™ – It's Easy! Instruction Manual Training At A Glance Training At A Glance Time 5 minutes Module Description Activating and Learn how to Activate and Deactivate LeaderGuide Deactivating your Pro™ LeaderGuide Pro™ Software 5 minutes per A Few Things Every User Should topic Understand A tool is only as good as the person using it. Read through this section to gain a fundamental understanding of LeaderGuide Pro™ as a tool. As you gain proficiency in using LeaderGuide Pro™ you will improve and streamline your work process and strengthen your ability to document instructional scenarios in a clear, consistent and professional manner. 10 -15 minutes per scenario Scenarios Read through a scenario that sounds like something you need to do to get ideas and guidance on what to think about and how to use LGPro to accomplish the scenario goal 5 – 10 minutes per button Functionality – How to Use the LGPro Ribbon Buttons Look up the LGPro button you need to know how to use and follow the instructions. These instructions also apply to ParticipantGuide Pro™ 5 – 10 minutes per utility LGPro Utilities – Customizing Tools Look up the Utility you need to use and follow the instructions provided 5 – 10 minutes per section Organization & Macrostructure: Working in the Sections of a Leader Guide Look up the section you need to know more about © 2009 Great Circle Learning. All rights reserved. Rev. Date 12/03/2009 Page xv Training At A Glance 5 minutes george! 5 minutes per Troubleshooting issue Page xvi Instruction Manual Get to know george! He is an add in to PowerPoint and he gives you more control over importing and updating PowerPoint files in your leader guides and participant guides. Look up the issue you are having trouble with How to Use LeaderGuide Pro™ – It's Easy! Instruction Manual Activating and Deactivating your LeaderGuide Pro™ Software Activating and Deactivating your LeaderGuide Pro™ Software Goal The purpose and goal of this module is make sure that you know how to activate your LeaderGuide Pro™ software for your ongoing use, and to also make sure that you understand what you need to do should you want to transfer your license to another user or to another computer. Time 5 minutes Overview Learn how to Activate and Deactivate LeaderGuide Pro™ Materials Needed Instruction Manual © 2009 Great Circle Learning. All rights reserved. Rev. Date 12/03/2009 Page 1 Activating and Deactivating your LeaderGuide Pro™ Software Instruction Manual About Activating and Deactivating LGPro The Activation and Deactivation process is not complete until you Submit your Activation or Deactivation form to Great Circle Learning Online Registration – Requires an internet connection and communicates to Great Circle Learning automatically Manual Registration – Requires you to attach your Activation or Deactivation form to an email and send it to [email protected] The red Pro button at the beginning of the LGPro ribbon Opens a dialog box that provides information about the version of LeaderGuide Pro™ that is installed on your computer and any software updates that may be available And contains the buttons you use to Page 2 Activate the software Deactivate the software How to Use LeaderGuide Pro™ – It's Easy! Instruction Manual Activating and Deactivating your LeaderGuide Pro™ Software About Activating and Deactivating LGPro, continued Activate Means that you want to register as a licensed user Requires that you enter a Product Key Once Activation is complete the LeaderGuide Pro™ software is – unlocked for use – by the registered user – on the computer is it installed on Deactivate Means that you want to disable LeaderGuide Pro™ on the computer it is currently registered on to free up the Product Key for reassignment Requires that you complete the Deactivation process on the computer that you want to deactivate LGPro on Once Deactivation is complete – The Product Key associated with the deactivated license is available for use to Activate LeaderGuide Pro™ on another computer FYI LeaderGuide Pro™ is licensed per computer and user In other words, every person who will be using LeaderGuide Pro™ will need a license Product Key Available for purchase at www.leaderguidepro.com – We suggest you save a copy of your Product Key in a safe place – Your Product Key will be required any time you need to Activate your license to LeaderGuide Pro™ on a new computer Once purchased – Your Product Key information will always be available to you in the My Account area at www.leaderguidepro.com © 2009 Great Circle Learning. All rights reserved. Rev. Date 12/03/2009 Page 3 Activating and Deactivating your LeaderGuide Pro™ Software Instruction Manual Activating LeaderGuide Pro™ Steps to Follow to Activate LeaderGuide Pro™ Purchase a Product Key at www.leaderguidepro.com Open LGPro by clicking on either the RED desktop icon, or Start/All Programs/LeaderGuide Pro 7 Plus/LGPro 7 Plus Click on the red Pro button in the About group on the LGPro ribbon You will see this dialog box; Click on Activate – You will receive a message letting you know that Word will close during the Registration process; if you have any other Word documents open you should save them before continuing (Continued on next page) Page 4 How to Use LeaderGuide Pro™ – It's Easy! Instruction Manual Activating and Deactivating your LeaderGuide Pro™ Software Activating LeaderGuide Pro™, continued Steps to follow to Activate LeaderGuide Pro™, continued After clicking on the Activate button you will see this dialog box Complete the form – You will need your Product Key – Be sure that the product you are activating is the one that is checked © 2009 Great Circle Learning. All rights reserved. Rev. Date 12/03/2009 Page 5 Activating and Deactivating your LeaderGuide Pro™ Software Instruction Manual Activating LeaderGuide Pro™, continued Steps to follow to Activate LeaderGuide Pro™ by Registering Online Click on Register Online – Requires an internet connection – Follow the prompts Your Activation will be completed within moments FYI: If you see this dialog box, Click on Yes and register manually Steps to follow to Activate LeaderGuide Pro™ by Manual Registration Click on Register Manually; and if you haven’t already done so, complete the Registration Form; You will need your Product Key (Continued on next page) Page 6 How to Use LeaderGuide Pro™ – It's Easy! Instruction Manual Activating and Deactivating your LeaderGuide Pro™ Software Activating LeaderGuide Pro™, continued Steps to follow to Activate LeaderGuide Pro™ by Manual Registration, continued Click on Register Manually again – you will be asked to verify your email address and then you will see this dialog box This dialog box is telling you that you must – send an email to [email protected] with a copy of a file named “LGProLicense.docx” attached to the email – and with “Register LeaderGuide Pro” in the email subject line It is also showing you the file path to your LGProLicense.docx file – the file path should be pointing you to your User Registration Form subfolder in your LeaderGuide Pro Library folder in your Documents Directory in Windows Explorer Click on the User Registration Form folder to open it to access your LGProLicense.docx file (Continued on next page) © 2009 Great Circle Learning. All rights reserved. Rev. Date 12/03/2009 Page 7 Activating and Deactivating your LeaderGuide Pro™ Software Instruction Manual Activating LeaderGuide Pro™, continued Steps to follow to Activate LeaderGuide Pro™ by Manual Registration, continued Within one business day of sending us your LGProLicense.docx file You will receive an email back from us with a file by the same name: LGProLicense.docx Save the file we are sending you in – Documents/LeaderGuide Pro Library/User Registration Form – REPLACING the form that’s already there with the same name Page 8 Open LeaderGuide Pro™; you will see this dialog box How to Use LeaderGuide Pro™ – It's Easy! Instruction Manual Activating and Deactivating your LeaderGuide Pro™ Software Activating LeaderGuide Pro™, continued Steps to follow to Activate LeaderGuide Pro™ by Manual Registration, continued Click on the green text that says Click Here to Begin Demo Use You will be told you have no more demo uses remaining, and you will see the LGPro ribbon along the top of your screen Click on the red Pro button and you will see a dialog box like this – Click on Activate (Continued on next page) © 2009 Great Circle Learning. All rights reserved. Rev. Date 12/03/2009 Page 9 Activating and Deactivating your LeaderGuide Pro™ Software Instruction Manual Activating LeaderGuide Pro™, continued Steps to follow to Activate LeaderGuide Pro™ by Manual Registration, continued Page 10 After you click on Activate you will see this dialog box, with your information in it Click on Register Manually and you will receive this message Click on OK and you can begin using LeaderGuide Pro™ How to Use LeaderGuide Pro™ – It's Easy! Instruction Manual Activating and Deactivating your LeaderGuide Pro™ Software Activating LeaderGuide Pro™, continued Once the Activation process is complete This license to LeaderGuide Pro™ will be available – for use on the computer it is registered on – by the registered user Should you need assistance, contact us at [email protected] FYI LeaderGuide Pro™ is licensed per computer and user In other words, every person who will be using LeaderGuide Pro™ will need a license © 2009 Great Circle Learning. All rights reserved. Rev. Date 12/03/2009 Page 11 Activating and Deactivating your LeaderGuide Pro™ Software Instruction Manual Deactivating LeaderGuide Pro™ Steps to Follow to Deactivate LeaderGuide Pro™ On the computer that you want to deactivate LeaderGuide Pro™ on Open LGPro by clicking on either the RED desktop icon, or Start/All Programs/LeaderGuide Pro 7 Plus/LGPro 7 Plus Click on the red Pro button in the About group on the LGPro ribbon You will see a dialog box like this – Click on the Deactivate button (Continued on next page) Page 12 How to Use LeaderGuide Pro™ – It's Easy! Instruction Manual Activating and Deactivating your LeaderGuide Pro™ Software Deactivating LeaderGuide Pro™, continued Steps to follow for Online Deactivation – requires an internet connection After clicking on Deactivate you will be taken into the Registration form for the computer you are on Click on the red Deactivate Registration button in the lower right corner of the form You will receive this message letting you know that you are about to deactivate this computer’s e LGPro software registration When you click on Yes, if you have an internet connection your Deactivation will be completed within minutes and this license will be available for reassignment © 2009 Great Circle Learning. All rights reserved. Rev. Date 12/03/2009 Page 13 Activating and Deactivating your LeaderGuide Pro™ Software Instruction Manual Deactivating LeaderGuide Pro™, continued Steps to follow for Manual Deactivation If you do not have an internet connection you will see this message after clicking on Yes And then you will see this message This dialog box is telling you that – you must send an email to [email protected] with a copy of a file named “LGProLicense.docx” attached to the email – and with “Deactivate LeaderGuide Pro” in the email subject line It is also showing you the file path to your LGProLicense.docx file – the file path should be pointing you to your User Registration Form subfolder in your LeaderGuide Pro Library folder in your Documents Directory in Windows Explorer – Click on the User Registration Form folder to open it to access your LGProLicense.docx file (Continued on next page) Page 14 How to Use LeaderGuide Pro™ – It's Easy! Instruction Manual Activating and Deactivating your LeaderGuide Pro™ Software Deactivating LeaderGuide Pro™, continued Steps to follow for Manual Deactivation, continued The last message you will see is this message Within one business day of sending us your LGProLicense.docx file you will receive an email back from us confirming that this license to LGPro has been deactivated and is available for reassignment Once the Deactivation process is complete This license to LeaderGuide Pro™ will be available for Activation (Registration) on another computer The Product Key associated with this license will be required to complete the Activation process Your Product Key information is always available to you in the My Account area at www.leaderguidepro.com Should you need assistance, contact us at [email protected] FYI LeaderGuide Pro™ is licensed per computer and user In other words, every person who will be using LeaderGuide Pro™ will need a license Transition to A Few Things Every User Should Understand © 2009 Great Circle Learning. All rights reserved. Rev. Date 12/03/2009 Page 15 A Few Things Every User Should Understand Instruction Manual A Few Things Every User Should Understand LeaderGuide Pro™ is a powerful tool. It comes into play when you are ready to create the instructional materials that support your training programs. LeaderGuide Pro™ is intuitive and easy to use. You will soon be wondering how you ever worked without it. It will change for the better the way that you do your work, resulting in: Improved and streamlined work processes Improved ability to address instructional scenarios with clearer thinking and better documentation Time 5 minutes per topic Overview A tool is only as good as the person using it. Read through this section to gain a fundamental understanding of LeaderGuide Pro™ as a tool. As you gain proficiency in using LeaderGuide Pro™ you will improve and streamline your work process and strengthen your ability to document instructional scenarios in a clear, consistent and professional manner. Materials Needed Page 16 Instruction Manual How to Use LeaderGuide Pro™ – It's Easy! Instruction Manual A Few Things Every User Should Understand Accessing your LeaderGuide Pro™ software Click on the LeaderGuide Pro™ 7 Plus desktop icons To open LeaderGuide Pro™ 7 Plus to create a new leader guide or to open an existing leader guide click on the red LGPro 7 Plus icon To open ParticipantGuide Pro™ 7 Plus to create a new participant guide or open an existing participant guide click on the turquoise PGPro 7 Plus icon To open this LeaderGuide Pro™ 7 Plus Instruction Manual click on the red Question Mark icon Or, click on the Start button in the lower left corner of your computer screen And then click on All Programs LeaderGuide Pro 7 Plus You will see these options – Click on LGPro 7 Help to open this Instruction Manual – Click on LGPro 7 Plus to open LeaderGuide Pro™ 7 Plus – Click on PGPro 7 Plus to open ParticipantGuide Pro™ 7 Plus © 2009 Great Circle Learning. All rights reserved. Rev. Date 12/03/2009 Page 17 A Few Things Every User Should Understand Instruction Manual Macros – LGPro Macros are Safe You MUST enable Macros in Word for LeaderGuide Pro™ to function Depending on your computer settings, Macros may automatically run when you open an LGPro document and you will not need to take any action However… If you see a Security Warning like this Click on Options… – And in the dialog box that appears, click on Enable this content Troubleshooting See next page… Page 18 How to Use LeaderGuide Pro™ – It's Easy! Instruction Manual A Few Things Every User Should Understand Macros – LGPro Macros are Safe, continued If you can see the LGPro ribbon, but the buttons won’t work Do you actually have a LeaderGuide Pro™ document open? After opening LGPro, you must then either – Click on the Blank page button to Create a new leader guide – Or, click on the Folder button to Open an existing leader guide If you have opened a new or existing LeaderGuide Pro™ document and you see the LGPro ribbon, but the buttons won’t work Look for the Macros Security Warning in the upper left corner of your screen – just above your LeaderGuide Pro™ document – and just under the LGPro ribbon – It is small and easy to miss – Click on Options/Enable this content If you do not see the Macros Security Warning – You need to take action to set your Macros to ensure that you receive the Security Warning so that you have the option to allow the LGPro macros to run – Learn how to do this on page 20 © 2009 Great Circle Learning. All rights reserved. Rev. Date 12/03/2009 Page 19 A Few Things Every User Should Understand Instruction Manual How to Set Your Macros in Word 2007 You may need to set your Macros To ensure that you receive the Security Warning that gives you the option to allow the LGPro macros to run Open a Word document and Click on – the Office button in the top left corner of your screen (1) – Word Options (2) – Trust Center (3) – Trust Center Settings (4) – Macros Settings (5) – Disable all macros with notification (6) – Click OK This will ensure that you receive the Macros Security Warning – So that you can select the option to “Enable this content” – which allows the LGPro macros to run 1 Page 20 How to Use LeaderGuide Pro™ – It's Easy! Instruction Manual A Few Things Every User Should Understand Accessing the LeaderGuide Pro™ Utilities Click on the Start button in the lower left corner of your computer screen All Programs LeaderGuide Pro 7 Utilities – Select the Utility you want from the drop down menu Colors and Logo; Learn more on page 219 Convert to V7; Learn more on page 223 LGP Blocks; Learn more on page 224 LGPro Styles; Learn more on page 227 PGPro Blocks; Learn more on page 224 PGPro Styles; Learn more on page 227 Setup Master Library; Learn more on page 231 Update Master Library; Learn more on page 233 Customize your Librarian Registry Record Form Meta tags While this is not listed in your Utilities Menu, it is an important customizing feature; Learn more on page 235 (Continued on next page) © 2009 Great Circle Learning. All rights reserved. Rev. Date 12/03/2009 Page 21 A Few Things Every User Should Understand Instruction Manual Accessing the LeaderGuide Pro™ Utilities, continued When you are going to run a Utility Meaning that you are going to make changes to your LGPro Template using a Utility Worksheet Make sure that you close out of everything else on your computer This is not necessary if all you are doing is opening a Utility to familiarize yourself with it Page 22 How to Use LeaderGuide Pro™ – It's Easy! Instruction Manual A Few Things Every User Should Understand When Working in LGPro You are in Word LeaderGuide Pro™ documents are Word documents When you create a new LGPro document or open an existing LGPro document you are in Word with LeaderGuide Pro™ open too Anything you can do in Word you can do in a LeaderGuide Pro™ document You will see the LGPro tab along the top of your screen, just before the Word Home tab When the LGPro tab is selected the LGPro ribbon is showing and is available for use Clicking on any of the other Word tabs will bring up that tab’s ribbon To return to the LGPro ribbon, click on the LGPro tab You can share your LGPro documents with others Anyone you share your LGPro documents with will be able to – Open them like any other Word document – Work in them like any other Word document – They do not need to have LeaderGuide Pro™ installed on their computer However, they will not have access to the LGPro ribbon and the LGPro functionality unless they have LeaderGuide Pro™ installed on their computer Always keep a master copy of any LGPro document you share with non-LGPro users Because, it is easy for those not familiar with LeaderGuide Pro™ to inadvertently delete things that will have a negative impact on your ability to use all of the LGPro functionality the next time you open the document © 2009 Great Circle Learning. All rights reserved. Rev. Date 12/03/2009 Page 23 A Few Things Every User Should Understand Instruction Manual LeaderGuide Pro™ Terminology You say tomato… Leader Guide – the printed manual used by your trainers Program Name – the title of your training program/course/class Module – a topic/section/chapter in your training program Lesson – a subtopic within a Module Participant Workbook – a.k.a. Participant Guide Trainer – a.k.a. Instructor or Facilitator Important Note – an LGP Block formatted to call attention to something important the trainer needs to know Paste Special – a.k.a. Insert Unformatted. Strips out source formatting of copied text and applies the LeaderGuide Pro™ formatting associated with the paragraph mark you place your cursor next to when you click on the Paste Special button TAG or TAAG – the Training At A Glance, which builds and updates each time you click the TAG button Update All Fields –click on this button to update page numbers, Table of Contents, page headers and footers, slide numbering, changes made to the Program Name, Program Rationale, Learning Objectives, Module Name, Module Time, Module Process, and Lesson Name fields Compress/Unlink Graphics – click this button after importing slides or graphics to compress their file size and remove links to their source documents, thus reducing the leader guide file size Break Table – inserts a paragraph mark in between LGP Blocks LGP Title – applies the LGPro Title style of Arial Bold 12 point font with 9 points before and 9 points after LGP Text – applies the LGPro Text style of Book Antiqua 12 point font with 0 points before and 9 points after LGP Bullet 1 – applies a bullet, like the one you see here – LGP Bullet 2 – applies a sub-bullet, like the one you see here Page 24 Promote Text – changes selected text to the previous, higher style Demote Text – changes selected text to the next, lower style Text Entry Elements – inserts a small graphic and pre-formatted default text into LGP and PGP blocks How to Use LeaderGuide Pro™ – It's Easy! Instruction Manual A Few Things Every User Should Understand The LGPro Ribbon and Buttons When you open LeaderGuide Pro™ You will see the LGPro tab in the top left corner of your screen, just before the Home tab and the LGPro ribbon will be showing You are in Word with LeaderGuide Pro™ also open Clicking on any of the other Word tabs will bring up that tab’s ribbon To return to the LGPro ribbon, click on the LGPro tab The LGPro ribbon contains these button groups – About – Start – Module/Lesson Control – LGP Text/Table Formatting – Controls – LGP Blocks and Other Automated Entry Elements Hovering over a button will provide information about what it does Learn how to use all of the LGPro ribbon buttons in the Functionality section of this Instruction Manual – The Table of Contents lists each button – Navigate to the page you need from the Table of Contents using the Ctrl+Click function © 2009 Great Circle Learning. All rights reserved. Rev. Date 12/03/2009 Page 25 A Few Things Every User Should Understand Instruction Manual LGP Blocks LGP Blocks like this one are what you use to build your leader guide An LGP Block is a row in a table – Consisting of two cells The cell on the left contains an icon (graphic) to – Visually cue the trainer as to what to say or do next The cell on the right contains text to – Grab the trainer’s attention with a headline, and – Provide a manageable chunk of content related to the headline, directing the trainer as to what to say or do When you click on an LGP Block button An LGP Block will be inserted into your leader guide just below the spot where your cursor is You can insert LGP Blocks in any order To remove an LGP Block from a leader guide Highlight the entire Block (row) and CUT it To move a Block to somewhere else in your leader guide Highlight the entire Block (row) and CUT it Highlight the Block you want your cut Block to appear before/above Paste it in – use the regular Word Paste function to do this If you want a different icon graphic in a Block that you have inserted Put your cursor in the block you want to change Insert your preferred Block right below it, from the LGPro ribbon Copy the old Block content and paste it into the new Block Do not copy an icon graphic from one Block and paste it over the icon graphic in another block – this will cause problems later when you want to extract content Page 26 How to Use LeaderGuide Pro™ – It's Easy! Instruction Manual A Few Things Every User Should Understand The LeaderGuide Pro Library Folder LeaderGuide Pro™ adds a folder to your Documents directory in Windows Explorer that is named LeaderGuide Pro Library The LeaderGuide Pro Library Leave this folder in place – don’t delete it or move it This is your LOCAL Library - it contains the following subfolders: – George Documents – Only included if you have george! installed on your computer – Leader Guides – LGP Lesson Archive – LGP Module Archive – LGP Template Customizations – Participant Guides – PGP Lesson Archive – PGP Module Archive – PGP Template Customizations – PowerPoint Slides – User Registration Form – zLGPro Librarian Registry Files (Continued on next page) © 2009 Great Circle Learning. All rights reserved. Rev. Date 12/03/2009 Page 27 A Few Things Every User Should Understand Instruction Manual The LeaderGuide Pro Library Folder, continued LGPro will default to this Library folder and the appropriate subfolder when you Save your Leader Guides and Participant Guides Archive Modules and Lessons Save your LGPro and PGPro Template customizations Accept this and Archive/Save to these LGPro Library locations AND - LeaderGuide Pro™ also adds a second Library folder to your Documents directory in Windows Explorer This folder is named LeaderGuide Pro Master Library You will move this folder to a shared location once your company’s Master Library is set up The subfolders in your Master Library Folder mirror the subfolders in your Local Library – Except for the User Registration Form folder, which is unique to you and is stored in your Local Library only Page 28 How to Use LeaderGuide Pro™ – It's Easy! Instruction Manual A Few Things Every User Should Understand Leader Guide Document Structure Every time you create a new LGPro document it contains the following sections in the same order Cover page – Do not delete the Page break at the end of this page Acknowledgements page – Do not delete the Section break at the end of this page Table of Contents – Automatically builds for you as you add Modules and Lessons Getting Started – About This Guide – The Program In Perspective – Program Preparation Training At A Glance (unless you select LGPro Express) – Do not delete the red text and Section break at the end of this page New Module overview page – Do not delete the placeholders for important information on this page New Lesson page – Do not delete the red text and paragraph mark at the end of this page; this must always be the very last thing in your leader guide © 2009 Great Circle Learning. All rights reserved. Rev. Date 12/03/2009 Page 29 A Few Things Every User Should Understand Instruction Manual Places to Add Content in a Leader Guide Add content to these places in a leader guide at any time in any order Cover page – Displays your Program Name – If you need to change your Program Name, change it on this page – Learn more on page 243 Acknowledgements page – Contains your copyright information, legal notices and acknowledgements – Do not delete the Section break at the end of this page Getting Started section; Learn more on page 247 – Program in Perspective page – Add key information about the Program Rationale, Learning Objectives, Program Timing, Class Size – Learn more on page 34 – Program Preparation page – Add key information about Pre-work, Required Materials, Room Set-up, Instructor Preparation – Learn more on page 35 New Module (Topic) – An overview page that provides concise summary information about just this topic within your training program – Learn more on page 37 New Lesson (Subtopic) – Every Module has at least one Lesson – Lessons are where you add LGP Blocks, into which you add your instructional content – what you want the trainer to say and do to run this segment of the training session – The very first New Lesson page in every new leader guide contains non-printing red text that must always be the very last thing in your leader guide – Learn more on page 38 Page 30 How to Use LeaderGuide Pro™ – It's Easy! Instruction Manual A Few Things Every User Should Understand Cover Page The Cover page is the first page of every new leader guide It displays the Program Name that you entered into the “Create a LGPro document” dialog box when you clicked on the Blank Page button to start a new leader guide Use the LGPro Colors & Logo Utility to customize this page Start/All Programs/LeaderGuide Pro 7 Utilities/Colors and Logo; Learn more on page 219 “Program Name” repeats at various places inside your leader guide If you need to change the Program Name, make your changes on the Cover page – Click on the Update All Fields button to update references to the Program Name elsewhere in your document; Learn more on page 148 Do not change the LGPro Program Name Style associated with your program name/course title; Learn more on page 44 To add graphics or additional text to the Cover page You may need to adjust the “points before and points after” format setting for the Program Name; Learn more on page 262 © 2009 Great Circle Learning. All rights reserved. Rev. Date 12/03/2009 Page 31 A Few Things Every User Should Understand Instruction Manual Acknowledgements Page The second page in a new leader guide is the Acknowledgements page You must leave this page in place in a two-sided leader guide Do not delete the Section break at the end of this page To remove the default content that is always included on this page – Highlight the entire Block (row) and CUT it; Learn more on page 186 Page 32 The Program Name repeats along the top of this page; Learn more on page 31 and on page 148 How to Use LeaderGuide Pro™ – It's Easy! Instruction Manual A Few Things Every User Should Understand Table of Contents Table of Contents You will have the option to refresh the Table of Contents every time you click on the Update All Fields button; Learn more on page 148 Displays the Introductory Material and the Modules and Lessons in your leader guide – Modules (Heading 1) – Lessons (Heading 2) © 2009 Great Circle Learning. All rights reserved. Rev. Date 12/03/2009 Page 33 A Few Things Every User Should Understand Instruction Manual Program in Perspective Page The Program in Perspective page Always appears in the same place in every leader guide Provides placeholders prompting you to add important information about – Program Rationale – Learning Objectives – Program Timing – Class Size Information you add regarding Program Rationale and Learning Objectives is automatically carried over to a Participant Guide if you later run a Participant Guide extract You can add LGP Blocks to this page to include other important information; Learn more on page 188 Page 34 How to Use LeaderGuide Pro™ – It's Easy! Instruction Manual A Few Things Every User Should Understand Program Preparation Page The Program Preparation page Always appears in the same place in every leader guide Provides placeholders prompting you to add important information about – Pre-Work – Required materials – Room set-up – Instructor Preparation You can add LGP Blocks to this page to include other important information; Learn more on page 188 © 2009 Great Circle Learning. All rights reserved. Rev. Date 12/03/2009 Page 35 A Few Things Every User Should Understand Instruction Manual Training At A Glance Page The Training At A Glance page Always starts out as a blank page, other than the heading Build it by clicking on the TAG button; Learn more on page 145 Refresh it by clicking on the Update All Fields button; Learn more on page 148 Add information about new Modules and refresh current information every time you click on the Update All Fields button followed by the TAG button Do not delete the red text and Section Break The Training At A Glance draws its content from the Module Overview pages you add to your leader guide Learn more on page 81 and on page 145 Page 36 How to Use LeaderGuide Pro™ – It's Easy! Instruction Manual A Few Things Every User Should Understand New Module Overview Page LGPro always includes the first New Module overview page for you It always appears in the same place in every leader guide and provides placeholders prompting you to add important information about – Module Name, Time, Overview, Materials Needed A Module is a Topic in your training program Insert New Modules into a leader guide by clicking on the New Module button; Learn more on page 81 Modules you add always start on a new page and – are preceded by a Transition Block at the end of the previous Lesson page (added by LGPro when you add a New Module); Learn more on page 195 – are listed in both the Training At A Glance and the Table of Contents – the current Module name always appears in the page header © 2009 Great Circle Learning. All rights reserved. Rev. Date 12/03/2009 Page 37 A Few Things Every User Should Understand Instruction Manual New Lesson Page LGPro always includes the first New Lesson page for you In the same place in every leader guide, right after the first New Module page The first New Lesson page in a leader guide starts out blank other than – a Lesson Name placeholder and – non-printing red text, which must always be the very last thing in your leader guide This page is where you begin adding your instructional content What you want the trainer to do and say to lead the class To work in this page – Name the Lesson – Insert an LGP Block and add content to the Block – Continue adding Blocks and content – Learn more on page 188 Insert additional Lessons by clicking on the New Lesson button; Learn more on page 86 New Lessons always – start on a new page – are listed in the Table of Contents, as a subheading under the Module they are in Page 38 How to Use LeaderGuide Pro™ – It's Easy! Instruction Manual A Few Things Every User Should Understand Paragraph Marks and Non-printing Characters ¶ LeaderGuide Pro™ turns on the Paragraph Marks in Word Paragraph marks look like this: ¶ Leave them turned on when you are working in LeaderGuide Pro™ and ParticipantGuide Pro™ documents They help you know precisely where your cursor is in your document, which is important when using LeaderGuide Pro™ If you would like to turn them off – Click on the ¶ button in the Paragraph group on the Home tab of the Word 2007 Ribbon – To turn them back on, click on the ¶ button again When the Paragraph Marks are on You will also see other non-printing characters in your document that you might not be used to; everything highlighted in purple below is a non-printing character You can’t delete them, just ignore them, they do not print They disappear from your screen when you turn your paragraph marks off, and when you go into Print Preview © 2009 Great Circle Learning. All rights reserved. Rev. Date 12/03/2009 Page 39 A Few Things Every User Should Understand Instruction Manual Section Breaks Section Breaks looks like this Do not delete the Section Breaks you see in your LeaderGuide Pro™ and Participant LeaderGuide Pro™ documents They control the setup of the Headers and Footers Deleting them will cause errors in your page numbering and in your header and footer text When your Paragraph Marks are turned off – you will not see the Section Breaks, which means it will be easy for you to inadvertently delete them In a new leader guide there are two Section Breaks, found at the end of these two pages Page 40 The Acknowledgements page The Training At A Glance page How to Use LeaderGuide Pro™ – It's Easy! Instruction Manual A Few Things Every User Should Understand Red Text Red Text You will see red text in your Leader Guides in two places – at the end of the Training At A Glance – on the last page of your document – this must always be the very last thing in your leader guide The red text is: – non-printing – there to call your attention to and stop you from deleting the Section Break and paragraph mark it backs up to Do not delete the red text and anything that follows it You will also see non-printing red text if you insert Assessment Blocks, Case Study Content Blocks and Handout Content Blocks Don’t delete the red text – If you delete the red text around these blocks, your assessments, cases and handouts will not extract into other documents Example of red text around Assessment Blocks © 2009 Great Circle Learning. All rights reserved. Rev. Date 12/03/2009 Page 41 A Few Things Every User Should Understand Instruction Manual Use LGPro Functionality First Use the LGPro (or PGPro) buttons to perform the functions you need Only when you need a function that LGPro doesn’t perform should you use the Word functions; such as – Save – Close – Cut Because LeaderGuide Pro™ – frees you from having to be a Word expert – is faster and more efficient – automates many of the advanced features of Word – allows you to click one LGPro button to execute a series of Word commands to achieve a desired result To Undo or Redo To Undo an action – Use the Word Cut or Delete functions rather than clicking on the Word Undo button To Redo an action, – Execute the command again from the LGPro ribbon rather than clicking on the Word Redo button Because: When you click an LGPro button you are often executing a series of Word commands, while clicking on the Word Undo or Redo button only addresses one command (the last one), so you may not get the result you want with the Undo and Redo buttons Page 42 How to Use LeaderGuide Pro™ – It's Easy! Instruction Manual A Few Things Every User Should Understand Word Commands You will Use Here are Word commands you will use when working in LGPro documents It is handy to have them on your Word Quick Access Toolbar Show/Hide ¶ – So that you can easily turn your Paragraph Marks off if needed and then on again Print Preview – Because it’s helpful to see how your Lesson pages are laying out after you’ve been working in your document a while Styles – To display the Styles Window so that you can check the Style associated with ant text you highlight, and so that you can apply an LGPro style if needed Table Properties – To open the Table Properties dialog box so that you can select the option to “Allow Row to break across pages” when you have more content for an LGP Block than will fit on one page Increase Indent – To create third and fourth level bullets – LGPro provides first and second level bullets Save, Save As and Close A best practice when you are ready to close an LGPro document is to 1. Save the document 2. Close the document using the Word Close command – instead of the X, which is for exiting Word and forces a document close in the process 3. And then exit out of Word if you want to © 2009 Great Circle Learning. All rights reserved. Rev. Date 12/03/2009 Page 43 A Few Things Every User Should Understand Instruction Manual LGPro Styles LeaderGuide Pro™ relies on its Style Names to perform many of its functions Do not change the Style Name associated with any of the LGPro styles However, you can change (Customize) the type of font used and the style characteristics of these seven key LGPro Styles – Program Name – Heading 1, Module Title (appears in the Table of Contents) – Heading 2, Lesson Title (appears in the Table of Contents) – LGP Title (the first line in any LGP Block) – LGP Text (the body text in any LGP Block; dictates the look of the LGP Bullet 1 and LGP Bullet 2) – zLGP Header – zLGP Footer Customize these styles using the LGPro Styles Utility; changes can be made to everything but the Style Name; Learn more on page 227 Learn how to check for an LGPro style on page 269 The LGPro Styles associated with your current LGPro template Meaning the font and style characteristics of the seven key LGPro Styles listed above Will automatically be applied to every – new LGPro document you create – existing LGPro document you open through LGPro using the Folder button This means that an existing leader guide that was built using different styles will automatically be updated to the font and style characteristics of your current LGPro template, which you will see reflected in the seven key LGPro Styles If you don’t want the styles of an existing leader guide to be updated to your current styles Page 44 Reapply the Custom LGPro Styles that match the leader guide you need to open before you open it; Learn more on page 238 How to Use LeaderGuide Pro™ – It's Easy! Instruction Manual A Few Things Every User Should Understand Copying & Pasting LeaderGuide Pro™ will maintain a consistent document format for you To ensure that your training documents have a professional appearance Do Use Paste Special – To paste content from other documents into your leader guide or participant guide. Place your cursor where you want your content to appear and click on the Paste Special Button on the LGPro ribbon; Learn more on page 135 – If what you paste in does not reflect the appropriate LGPro style, use the LGP Text Formatting buttons on the LGPro ribbon to change the style to meet your needs; Learn more on page 131 Always insert LGP Blocks from the LGPro ribbon – Each LGP Block icon graphic is uniquely coded with its own LGPro Style Name so that you can easily extract content into other documents; Learn more on page 186 Don’t Copy an LGP Block icon (graphic) and Paste it over the icon graphic in another LGP Block – This will result in you not getting everything you want when you run an extract Be careful When you need to retain the source formatting of content you are adding you can use the regular Word Paste function; however Pasting in Section Breaks will impact headers, footers and page numbering; remove Section Breaks before you paste in if possible Pasting in Heading 1 and Heading 2 styles will result in content with those styles taking on the look of LGPro Module and Lesson headings and this content will appear in the Table of Contents once you Update All Fields; adjust source styles before you paste in Consider SnagIt to capture your source content as a graphic; then use the Word Insert/Picture from File function to add it; this will alleviate issues related to Section Breaks and Heading 1 and Heading 2 styles © 2009 Great Circle Learning. All rights reserved. Rev. Date 12/03/2009 Page 45 A Few Things Every User Should Understand Instruction Manual Do You Know Where Your Cursor Is? Always make sure your cursor is where it should be before you click on an LGPro button For instance, when you Add a new Module – you should be at the spot in your document where you want your Module to begin; same with a new Lesson Add an LGP Block – It will go in just below where your cursor is Import content using Librarian – It will insert at the spot where your cursor is When you format font – It will change the style of the paragraph your cursor is sitting in Page 46 How to Use LeaderGuide Pro™ – It's Easy! Instruction Manual A Few Things Every User Should Understand How to Use ParticipantGuide Pro™ When using ParticipantGuide Pro™ refer to this manual for guidance The ribbon buttons and functionality are virtually the same The big differences are There is no Training At A Glance in a Participant Guide There are no Module Overview pages in a Participant Guide – Although the Module/Lesson structure is there There is a Show/Hide button on the PGPro ribbon that allows you to make the PGPro Block icon graphics non-printing – So even though you will still see them on your computer screen, they will not print – The icons are necessary for the extract functionality You can choose from three different template styles for participant guides Transition to Scenarios © 2009 Great Circle Learning. All rights reserved. Rev. Date 12/03/2009 Page 47 Scenarios Instruction Manual Scenarios Goal The purpose and goal of this module is to help you think through how to use LeaderGuide Pro™ to improve the way you deal with common work challenges related to the development of training materials Time 10 -15 minutes per scenario Overview Read through a scenario that sounds like something you need to do to get ideas and guidance on what to think about and how to use LGPro to accomplish the scenario goal Materials Needed Page 48 Instruction Manual How to Use LeaderGuide Pro™ – It's Easy! Instruction Manual Scenarios Create a Leader Guide from Scratch Objective Use LeaderGuide Pro™ to create a new leader guide Assumptions LeaderGuide Pro™ is installed and registered on your computer You’ve read through “A Few Things Every User Should Understand” Think about… The agenda for this class Outline the topics that will be addressed in this training program – Include subtopics in your outline Steps to Follow Open LGPro by clicking on either – the RED desktop icon, or – Start/All Programs/LeaderGuide Pro 7 Plus/LGPro 7 Plus Click on the Blank Page button in the Start group on the LGPro ribbon – Complete the Create a New Leader Guide dialog box as best you can and click Continue; Learn more on page 75 Save the document – You are now in your new leader guide, in Word, with LGPro open You will be on the Cover page; Learn more on page 243 – If you need to add to or change the Program Name, do it on this page Begin adding content; Learn more on page30 – Look at your outline – Add content in logical, manageable chunks – The hierarchy is Module, Lesson, LGP Block – You will truly begin adding the content that guides your trainer through opening the class and delivering the training program in your first Module and its first Lesson (Continued on next page) © 2009 Great Circle Learning. All rights reserved. Rev. Date 12/03/2009 Page 49 Scenarios Instruction Manual Create a Leader Guide from Scratch, continued Steps to Follow, continued The New Module page – Type in the name of your first topic – Add the other information called for on this page if you have it; don’t remove anything from this page right now – Learn more on page 81 The New Lesson page – Highlight “New Lesson” and type over it with the name of your first Lesson, the first subtopic in your current Module – This is where you begin adding LGP Blocks to tell your trainer what to say and do as the class opens – Leaving your cursor in the Lesson name, click on an LGP Block; Type in a headline, hit Enter and type in the content you want in this Block – Leaving your cursor in the Block, click on another LGP Block; Type in a headline, hit Enter and type in the content you want in this Block – Learn more about LGP Blocks on page 186 and on page 188 When copying content from another source, use the LGPro Paste Special button to add the content; Learn more on page 135 Maintain a consistent and profession page appearance by using the LGP Text Formatting buttons; Learn more on page 131 When you are ready to move on to your next Lesson (subtopic) – Place your cursor at the spot where you want to your next Lesson to start – Click on the New Lesson button; Learn more on page 86 When you are ready to move on to your next Module (topic) – Place your cursor at the spot where you want to your next Module to start – Click on the New Module button; Learn more on page 81 (Continued on next page) Page 50 How to Use LeaderGuide Pro™ – It's Easy! Instruction Manual Scenarios Create a Leader Guide from Scratch, continued Steps to Follow, continued To update your Table of Contents – Click on the Update All Fields button in the Controls group on the LGPro ribbon; Learn more on page 148 To generate your Training At A Glance – Click on the TAG button in the Controls group on the LGPro ribbon; Learn more on page 145 To update your Training At A Glance – Click on the Update All Fields button – And then click on the TAG button © 2009 Great Circle Learning. All rights reserved. Rev. Date 12/03/2009 Page 51 Scenarios Instruction Manual Create a Leader Guide from a PowerPoint File Objective Use LeaderGuide Pro™ to create a new leader guide from a PowerPoint file Assumptions LeaderGuide Pro™ is installed and registered on your computer You’ve read through “A Few Things Every User Should Understand” Think about… The agenda for this class. Outline the topics that will be addressed in this training program; include subtopics Steps to Follow Create a new Leader Guide; Learn more on page 75 From anywhere in your leader guide, click on – the Special button in the Controls group on the LGPro ribbon – Import Finished Slides; Learn more on page 154 Click on the PowerPoint folder that is now available to open along the bottom of your screen – Navigate to the PowerPoint file you want, highlight it and click Open In the Importing Slides dialog box; Learn more on page 155 – Click on Add – Select your Add preferences; Learn more on page 161 – Click on Continue Wait until you see a message that the Import is complete, click OK You now have one or more Modules in your leader guide, with one Lesson per Module – All of your slides are in LGPro Projected Image Blocks; Learn more on page 189 – If you imported notes too, they are in Speaker Notes Blocks below the slides they associate with; Learn more on page 212 Page 52 Start with the first Module and begin editing and adding content around your slides and notes; Learn more on page 253 How to Use LeaderGuide Pro™ – It's Easy! Instruction Manual Scenarios Create a Leader Guide from a PowerPoint File, continued Steps to Follow, continued Maintain a consistent and profession page appearance by using the LGP Text Formatting buttons; Learn more on page 131 When you are ready to move on to your next Lesson (subtopic) – Place your cursor at the spot where you want to your next Lesson to start; this can be in a Block or by a paragraph mark – Click on the New Lesson button; Learn more on page 86 When you are ready to move on to your next Module (topic) – Place your cursor at the spot where you want to your next Module to start; this can be in a Block or by a paragraph mark – Click on the New Module button; Learn more on page 81 To update your Table of Contents – Click on the Update All Fields button in the Controls group on the LGPro ribbon; Learn more on page 148 To update your Training At A Glance – Click on the Update All Fields button – And then click on the TAG button; Learn more on page 145 © 2009 Great Circle Learning. All rights reserved. Rev. Date 12/03/2009 Page 53 Scenarios Instruction Manual Create a Leader Guide from Multiple Slide Files Objective Use LeaderGuide Pro™ to create a leader guide from multiple PowerPoint files Assumptions LeaderGuide Pro™ is installed and registered on your computer You’ve read through “A Few Things Every User Should Understand” Think about… Create an outline of your training program by – Modules (topics) and – Lessons (subtopics) Is it feasible to merge the PowerPoint files into one for import purposes? If so, proceed to running an advanced import; if not, read on – there is more to think about Associate your PowerPoint files with your Modules and Lessons – You will be using the LGPro Special/Import Finished Slides/Add function so it is important for you to think through ahead of time which slide files belong where – And, for each of your PowerPoint files you will have the option to add slides only, or slides and notes, or notes only so you also need to think about this ahead of time. You can handle each PowerPoint file as needed, you don’t have to make the same choice for each file – Learn more about Add on page 161 If you know that some or all of the PowerPoint files you plan to import will ultimately undergo some changes as you work through your program development process – Then, at some point in the future, you will also be using the LGPro Special/Import Finished Slides/Replace function to update your leader guide with edited PowerPoint files – So it will be time well spent now to anticipate as best you can what the changes might be; This will help you take steps now to ensure that the updating process is efficient and painless when the time comes – Learn more about Replace on page 159 (Continued on next page) Page 54 How to Use LeaderGuide Pro™ – It's Easy! Instruction Manual Scenarios Create a Leader Guide from Multiple Slide Files, continued How LGPro brings PowerPoint files into a leader guide Add – Places slides into Projected Image Blocks and notes into Speaker Notes Blocks and adds them in their chronological order to the last page of your leader guide, just ahead of the red text Add/Advanced Import – Places the first slide and/or notes in your PowerPoint file into the first Lesson in the first Module in your leader guide, adding the Module and Lesson names for you based on what you specify – And, will insert additional Modules and Lessons in between the rest of the slides and/or notes within the PowerPoint file you are importing, as per your specifications Add/Advanced Import/Add behind existing modules – This option automatically inserts new Modules and their first new Lessons for you, after your existing Modules and Lessons – Places the first slide and/or notes in your PowerPoint file into the first Lesson in the first Module that you are adding – And, will insert additional Modules and Lessons in between the rest of the slides and/or notes in your PowerPoint file Replace – Relates to slides only; will not replace/update notes; and does not affect the first line in Projected Image Blocks - “Show Slide #: “ followed by a slide title if you typed one in – Performs a one-for-one Find and Replace service for you, beginning with the very first Projected Image Block in your leader guide and moving on from there; replacing existing Block content with the slides in the PowerPoint file you are importing – If the file you are importing contains more slides than you have Projected Image Blocks for in your leader guide, the extra slides will be added to the very end of your leader guide, placed in Projected Image Blocks – Alternatively, if you are importing fewer slides than the number of Projected Image Blocks in your leader guide, the extra Projected Image Blocks in your leader guide will not be affected © 2009 Great Circle Learning. All rights reserved. Rev. Date 12/03/2009 Page 55 Scenarios Instruction Manual Create a Leader Guide from Multiple Slide Files, continued Steps to Follow After thinking through how your PowerPoint files relate to your leader guide Modules and Lessons – Follow the same steps as for creating a leader guide from a PowerPoint file; Learn more on page 52 You may follow those steps more than once, depending on – How your slide files relate to your Modules and Lessons – How you decide to structure your leader guide to streamline the anticipated updating process at a later point in time If each of your slide files associate with a different Module in your leader guide – Run multiple imports, in order – After the first import you can either – insert a New Module at the end of your leader guide and do a simple Add import – or you can do an Add/Advanced Import/Add behind existing modules import, setting up your new Module and Lesson in the Advanced Import dialog box and letting LGPro insert them for you during the import process; Learn more on page 167 If multiple slide files belong in one Module – Run multiple imports, in order – After the first import do simple Add imports to bring in the rest of the PowerPoint files that belong in this Module – After any import you can insert a New Lesson at the end of your leader guide if the next slide file you are importing belongs in a new Lesson Page 56 You can always use the Librarian Reorder Modules and Lessons function if you need to move things around later, or if you forget to add a file in the correct order; Learn more on page 114 How to Use LeaderGuide Pro™ – It's Easy! Instruction Manual Scenarios Update a Leader Guide Created with Multiple PowerPoint Files Objective Use LeaderGuide Pro™ to update a leader guide created from multiple PowerPoint files Assumptions LeaderGuide Pro™ is installed and registered on your computer You’ve read through “A Few Things Every User Should Understand” Think about… Associate your updated PowerPoint files with your Modules and Lessons – You will be using the LGPro Special/Import Finished Slides/Replace function to update your leader guide with the edited PowerPoint files How LGPro updates Projected Image Blocks in a leader guide Replace – Performs a one-for-one Find and Replace service for you – Relates to slides only – Will not replace/update notes – Does not affect the first line in Projected Image Blocks - “Show Slide #: “ followed by a slide title if you typed one in – Begins with the first Projected Image Block in your leader guide – Replaces whatever is currently in existing Projected Image Blocks with the slides in the PowerPoint file you are importing FYI: our new product george! for PowerPoint 2003 will update both slides and notes – Learn more at www.george4ppt.com (Continued on next page) © 2009 Great Circle Learning. All rights reserved. Rev. Date 12/03/2009 Page 57 Scenarios Instruction Manual Update a Leader Guide Created with Multiple PowerPoint Files, continued Steps to Follow Step One Approach this one Module and one associated PowerPoint file at a time Open your leader guide and use Librarian to archive the Modules that you are going to be working with; Learn more on page 102 If you have PowerPoint files associated with discrete Lessons, archive the Module the Lesson(s) are in anyway and then delete the unnecessary Lessons in Step 3 Step Two Once everything is archived – Create a new leader guide; it doesn’t matter what you name it, this is just a temporary document that will serve as the vehicle for you to easily run the Import/Replace function Step Three Place your cursor before the red text at the end of the leader guide and use Librarian to insert one of your archived Modules; Learn more on page 107 – Then use Librarian to delete the New Module in your leader guide so that the only Module in your leader guide is the one you just imported; Learn more on page 111 If the PowerPoint file you are importing contains more slides than you have Projected Image Blocks for – insert placeholder Projected Image Blocks in the appropriate places so that all of the slides you are importing will be placed in the spots where they belong; Learn more on page 193 If you are importing fewer slides than the number of Projected Image Blocks in this Module, remove (Cut) the Projected Image Blocks that are no longer needed After making sure that the number of slides you are going to import matches the number of Projected Image Blocks in the Module, run the Import/Replace; Learn more on page 158 – Click on the Update All Fields button and Save; You will get the slide numbering back in true order after you add all of your updated Modules back into your master leader guide Page 58 How to Use LeaderGuide Pro™ – It's Easy! Instruction Manual Scenarios Update a Leader Guide Created with Multiple PowerPoint Files, continued Steps to Follow, continued Step Four Use Librarian to archive your updated Module, naming it so that it is clear this is your new, updated Module; if you really have just a Lesson that’s been updated, archive just the Lesson Place your cursor before the red text at the end of the leader guide and use Librarian to insert another of your archived Modules that needs updating Use Librarian to delete the first Module in your leader guide, which is the one you just finished updating and re-archiving, so that the only Module in your leader guide is the one you just inserted Make sure that the number of slides you are going to import matches the number of Projected Image Blocks in the Module, and run the Import/Replace Click on the Update All Fields button and Save Repeat Steps Three and Four as needed until all of your Modules have been updated Step Five Open your master leader guide Place your cursor at the spot where your first update Module belongs – Use Librarian to insert your first archived updated Module – Use Librarian to delete the old version of this Module Repeat until all updated Modules have been inserted and all old Modules have been deleted Click on the Update All Fields button followed by the Training At A Glance button Save your leader guide © 2009 Great Circle Learning. All rights reserved. Rev. Date 12/03/2009 Page 59 Scenarios Instruction Manual Create a Leader Guide from Archived Content Objective Use LeaderGuide Pro™ and Librarian to create a leader guide from archived Modules and Lessons Assumptions LeaderGuide Pro™ is installed and registered on your computer You’ve read through “A Few Things Every User Should Understand” Think about… The outline for this training program The order in which you need to insert the archived Modules and Lessons into your leader guide Are there additional Modules and Lessons that you will be creating without building off of existing, archived content? How do they fit into your program outline? Cursor placement is important When you insert archived Modules and Lessons they will insert into your leader guide at the spot where your cursor is sitting Steps to Follow Open LGPro Click on the Blank Page button and create a new leader guide Scroll through to the New Lesson page, which is currently the last page in your leader guide Place your cursor – by a paragraph mark on the page below the New Lesson title area and above/before the red text on this page – or at the spot in your leader guide where you want your imported content to appear Click on the Librarian button in the Module/Lesson Control group on the LGPro Ribbon – Click on Insert Archived Modules or Lessons (Continued on next page) Page 60 How to Use LeaderGuide Pro™ – It's Easy! Instruction Manual Scenarios Create a Leader Guide from Archived Content, continued Steps to Follow, continued Follow the prompts to navigate to either your local or master Library Click on – the folder that contains the file you need – the archived content you want to insert And then click on Open to Insert the content into your leader guide You will be taken back to the Librarian Insert Archived Modules or Lessons dialog box, with a message that the Insertion is complete To add another archived Module or Lesson immediately after the one you just inserted, click on the Insert button again Or, click on Done Once back in your leader guide You will be on the last page of your inserted content Check the page breaks before and after the inserted content Click on the Update All Fields button to update your headers and footers, slide numbering (if any), page numbers and Table of Contents If you’ve inserted one or more Modules, click on the TAG button to update your Training At A Glance © 2009 Great Circle Learning. All rights reserved. Rev. Date 12/03/2009 Page 61 Scenarios Instruction Manual Create a Leader Guide from Non-LGPro Content Objective Use LeaderGuide Pro™ to create a leader guide from source content in other documents Assumptions LeaderGuide Pro™ is installed and registered on your computer You’ve read through “A Few Things Every User Should Understand” Think about… The outline for this training program, in terms of Modules (topics) and Lessons (subtopics) The nature of your source content and how you will migrate it into LeaderGuide Pro™ format; for instance – Is it a Word document? If not, can you access a Word version? – Is it heavily formatted? – Are there a lot of bulleted or numbered lists? – Are there Tables and forms? – How much of the source formatting needs to remain, if any? If you have multiple files, think about the order in which you will draw on them as you create your leader guide Maintaining a consistent font and page layout style is important Most of the time you will be stripping out the source formatting either before or as you are adding the content to your leader guide so that the LGPro styles can apply; Learn more on page 44 and on page 45 Steps to Follow Familiarize yourself with the macro structure of a LeaderGuide Pro™ document before you begin adding content – Learn about leader guide document structure on page 29 – Learn about places to add content on page 30 – Learn about Modules on page 37 and on page 81 – Learn about Lessons on page 38 and on page 86 – Learn about LGP Blocks on page 26 and on page 188 Page 62 How to Use LeaderGuide Pro™ – It's Easy! Instruction Manual Scenarios Create a Leader Guide from Non-LGPro Content, continued Steps to Follow, continued Open LGPro, click on the Blank Page button and create a new leader guide If you have content to add to the Program in Perspective or Program Preparation sections go ahead and add it – Use Paste Special; Learn more on page 135 – Use the LGP Text Formatting buttons; Learn more on page 131 – Add LGP Blocks if needed; Learn more on page 188 Complete the first new Module page Add a Lesson name to the New Lesson page, which is currently the last page in your leader guide Place your cursor by a paragraph mark on the page below the New Lesson title area and above/before the red text on this page Click on an LGP Block to use to contain your first chunk of content Copy the content from your source document Place your cursor back in your LGP Block and click on the Paste Special button to add your source content to your leader guide Continue in this way, adding new Lessons and new Modules as needed Alternative Steps to Follow Create a new leader guide a described above Click on Special/Attach LGPro Template – Follow the steps for this on page 184 – Work with your attached content as described Insert the content into your leader guide using Librarian Also, review the Copying & Pasting guidelines on page 45 © 2009 Great Circle Learning. All rights reserved. Rev. Date 12/03/2009 Page 63 Scenarios Instruction Manual Create a Leader Guide from a Participant Guide Objective Use ParticipantGuide Pro™ to create a leader guide from a Participant Guide Assumptions LeaderGuide Pro™ is installed and registered on your computer You’ve read through “A Few Things Every User Should Understand” You have a Participant Guide created using ParticipantGuide Pro™ And you used PGPro Blocks to contain (most of) the content you want to export to a leader guide Think about… Your leader guide and participant guide documents will not be linked Steps to Follow Open ParticipantGuide Pro™ Open the Participant Guide you want to extract content from to create a leader guide If you have content that you want to move into your leader guide that is not inside of a PGPro Block – Highlight it and then click on Special/Set Bracketed Areas for Extract; Learn more on page 183 – Repeat as needed If there are only certain instances of a particular Block that you want to move into your leader guide – Go to the first instance and place your cursor at the beginning of the first line of text in the Block – Click on Special/Mark selective Blocks for Extract; Learn more on page 182 – Repeat as needed (Continued on next page) Page 64 How to Use LeaderGuide Pro™ – It's Easy! Instruction Manual Scenarios Create a Leader Guide from a Participant Guide, continued Steps to Follow, continued The steps that follow are the same as the steps to extract a participant guide from a leader guide, explained in detail with screen shots beginning on page 175 and summarized below Click on Special/Extract Leader Guide Text – Check Manually Selected if you’ve Set Bracketed Areas and/or Marked Selective Blocks – Check the PGPro Blocks you want to extract – If you have Assessments, Cases and/or Handouts in your Participant Guide that you’d like to extract to your leader guide check that specification as well – Click on Continue You will be prompted to allow the extraction process to continue You will be prompted to name and save your new leader guide Your screen may jump and flash – this is normal Wait until you receive a message that the extract is complete and click OK You will be in your leader guide and your Participant Guide will also still be open © 2009 Great Circle Learning. All rights reserved. Rev. Date 12/03/2009 Page 65 Scenarios Instruction Manual Update Slides in a Leader Guide Objective Update the slide images in Projected Image Blocks in an existing leader guide Assumptions LeaderGuide Pro™ is installed and registered on your computer You’ve read through “A Few Things Every User Should Understand” You have an updated PowerPoint file Think about… Your leader guide and PowerPoint files will not be linked Associate your updated PowerPoint files with your Modules and Lessons – You will be using the LGPro Special/Import Finished Slides/Replace function to update your leader guide with the edited PowerPoint files How LGPro updates Projected Image Blocks in a leader guide Replace – Performs a one-for-one Find and Replace service for you – Relates to slides only – Will not replace/update notes – Does not affect the first line in Projected Image Blocks - “Show Slide #: “ followed by a slide title if you typed one in – Begins with the first Projected Image Block in your leader guide – Replaces whatever is currently in existing Projected Image Blocks with the slides in the PowerPoint file you are importing (Continued on next page) Page 66 How to Use LeaderGuide Pro™ – It's Easy! Instruction Manual Scenarios Update Slides in a Leader Guide, continued Steps to Follow Open LGPro and open your leader guide If the updated PowerPoint file you are importing contains more slides than you have Projected Image Blocks for in your leader guide – insert placeholder Projected Image Blocks in the appropriate places in your leader guide so that all of the slides you are importing will be placed in the spots where they belong If you are importing fewer slides than the number of Projected Image Blocks in your leader guide – remove (Cut) the Projected Image Blocks that are no longer needed After making sure that the number of slides you are going to import matches the number of Projected Image Blocks in your leader guide – Click on Special/Import Finished Slides/Replace – Learn more on page 158 Click on the Update All Fields button to update your slide numbering Save your file Alternative Steps to Follow if you have george! If you used george! to send this PowerPoint file into a leader guide in the first place, you can use george! to run the update Open your PowerPoint file Click on the george! tab and click on Update Locate the leader guide file you need to update Clear any other files from the update dialog box (unless you want to update them too) Run the update That’s it! Note: You still need to make sure that the number of slides you are going to import matches the number of Projected Image Blocks in your leader guide © 2009 Great Circle Learning. All rights reserved. Rev. Date 12/03/2009 Page 67 Scenarios Instruction Manual Numbering – The Best Way to Apply Numbers to Items and Lists Objective Create numbered lists in your leader guide Assumptions LeaderGuide Pro™ is installed and registered on your computer You’ve read through “A Few Things Every User Should Understand” Steps to Follow Open LGPro and open your leader guide Highlight the line of text or the list that you want to number Click on the Home tab Click on the Clear Formatting button in the Font group – This will remove the LGPro Style from your highlighted text – This is necessary to ensure that your numbering will carry over if you extract this numbered content into a Participant Guide – Most likely, your highlighted text is now in a different font; you can adjust the font using the Word Font button Page 68 Use the Word numbering function to apply your numbers Repeat as necessary Save your file How to Use LeaderGuide Pro™ – It's Easy! Instruction Manual Scenarios Inserting Multiple Pages of Text into an LGP Block Objective To paste a lengthy chunk of source content into one LGP Block and allow it to flow over multiple pages Assumptions LeaderGuide Pro™ is installed and registered on your computer You’ve read through “A Few Things Every User Should Understand” Steps to Follow Open LGPro and open your leader guide Go to the place in your leader guide where you need to add your content Insert the LGP Block you want to use Place your cursor in the Block Click on the Word Layout tab – Click on Properties – In the dialog box that appears, click on Row – Check the box next to Allow row to break across pages – Click OK This will allow the Block to break and flow across as many pages as needed to display all of your content Copy the content you need from your source document Place your cursor in the Block and click on the Paste Special button to add the content to your Block Click on the Update All Fields button to update your Table of Contents Save your file © 2009 Great Circle Learning. All rights reserved. Rev. Date 12/03/2009 Page 69 Scenarios Instruction Manual I Need More than One Customized LGPro Template Objective To have more than one customized LGPro Template available for use to create leader guides for different products or clients Assumptions LeaderGuide Pro™ is installed and registered on your computer You’ve read through “A Few Things Every User Should Understand” Think about… Make a detailed list of the exact custom specifications for each custom LGPro Template you will need Make sure you have access to the appropriate size and dpi logos and graphics you plan to use; Learn more on page 224 You can only run ONE customized LGPro Template at a time, and the styles associated with it will apply to all new leader guides you create as well as to any existing leader guides you open with it What you can customize at the template level Use the LGPro Utilities to add a logo and custom colors to the cover page, customize the seven key LGPro Text styles (Learn more on page 44 ), and customize the LGP Block icon graphics and default text What you must customize in an actual leader guide document The default content that loads in the first 12 pages of every new leader guide How to save, maintain and use your custom LGPro Templates Set up a special Folder for each custom leader guide to store all of your LGPro Custom Utilities Worksheets and your master custom base leader guide Always use your saved LGPro Custom Utilities Worksheets to reapply styles when needed Always use your saved master custom base leader guide as the basis from which to create new leader guides (Continued on next page) Page 70 How to Use LeaderGuide Pro™ – It's Easy! Instruction Manual Scenarios I Need More than One Customized LGPro Template, continued Steps to Follow to Create a Customized Leader Guide Template Create one custom leader guide at a time, ending with the one you need to use currently Start by using the LGPro Utilities to customize at the template level – Remember to carefully save the Custom Worksheets you are about to build in a special designated folder that you can easily find when you need it – To add a logo and custom colors to the cover page, follow the instructions on page 219 – To customize the seven key LGPro Text styles, follow the instructions on page 227 – To customize the LGP Block icon graphics and default text, follow the instructions on page 224 Next, open a new leader guide – In the Create a New leader guide dialog box, name this file something like “Master Custom Style XX Leader Guide” and then set up the footer info just the way you will always need it when using this custom leader guide – Make any further adjustments to the look of the cover page; Learn more on page 31 – Edit the default content in the 12 pages in this new leader guide as needed – Save this base master custom leader guide in your special designated folder along with your Custom Worksheets Repeat this process as needed to create additional Custom Leader Guide Templates, ending with the one your currently need (Continued on next page) © 2009 Great Circle Learning. All rights reserved. Rev. Date 12/03/2009 Page 71 Scenarios Instruction Manual I Need More than One Customized LGPro Template, continued Steps to Follow to maintain and use your custom LGPro Templates You can only use one custom LGPro Template at a time, and the template level customizations that are currently in use will apply to all new leader guides you create all existing leader guide you open through LeaderGuide Pro™ When you need to create a new leader guide using your current styles Open LGPro and open your master custom leader guide for this style Immediately use the Word Save As function and save this file with new name (and to any location you want to) – This will preserve your master leader guide for reuse When you need one of your other custom LGPro Templates Before you open an existing leader guide that was created with a different custom template, or to create a new leader guide with a different custom template – Use your saved LGPro Custom Utilities Worksheets to reapply the styles you need; Learn more on page 238 – Now open existing files – Or, to create a new leader guide in this style, open your master custom leader guide for this style, immediately use the Word Save As function and save this file with new name If you open one style leader guide while another style LGPro Template is in place Don’t panic, just close it and reapply the proper custom template styles Open the file again under its proper template and the styles will update to what they should be Transition to Functionality – How to Use the LGPro Ribbon Buttons Page 72 How to Use LeaderGuide Pro™ – It's Easy! Instruction Manual Functionality – How to Use the LGPro Ribbon Buttons Functionality – How to Use the LGPro Ribbon Buttons Goal The purpose and goal of this module is to teach you how to use every button on the LGPro ribbon Time 5 – 10 minutes per button Overview Look up the LGPro button you need to know how to use and follow the instructions. These instructions also apply to ParticipantGuide Pro™ Materials Needed Instruction Manual © 2009 Great Circle Learning. All rights reserved. Rev. Date 12/03/2009 Page 73 Functionality – How to Use the LGPro Ribbon Buttons Instruction Manual Opening LeaderGuide Pro™ To open LGPro 7 Plus Click on – the RED icon on your desktop Or: – Start\All Programs\LeaderGuide Pro 7 Plus \LGPro 7 Plus After opening LGPro your screen will look like this Page 74 The LGPro tab is showing and you see the LGPro ribbon To start get started, click on either the – Blank Page button to Start a brand new leader guide – Folder button to Open an existing leader guide How to Use LeaderGuide Pro™ – It's Easy! Instruction Manual Functionality – How to Use the LGPro Ribbon Buttons Blank Page Button – Create a new LGPro document Click on the Blank Page button to create a new leader guide Assumption: You have opened LeaderGuide Pro™ This button is found in the Start group on the LGPro ribbon Hovering over the button reveals the button description – Create a new LGPro Document After clicking on the Blank Page button you will see this dialog box Create a New Leader Guide dialog box If you simply click on Continue your new leader guide will set up with “Program Name” as the title of your training program on the Cover and Acknowledgements page, in the even numbered page footers, and in several places in the Introductory Material section “© 2009” in the odd numbered page footers “Rev. Date xx/xx/xxxx” below the Copyright in the odd numbered page footers Set up for two-sided printing, with full LGPro functionality © 2009 Great Circle Learning. All rights reserved. Rev. Date 12/03/2009 Page 75 Functionality – How to Use the LGPro Ribbon Buttons Instruction Manual Blank Page Button – Create a new LGPro document, continued Working in the Create a New Leader Guide dialog box Enter the name of your training program – You can change it at any time later on – Do this in your leader guide, on the Cover page; Learn more on page 31 Enter your copyright information, such as – © 2009 My Company, Inc. All rights reserved. – You can also type over the default copyright text to enter anything else you prefer to have in the footer – If you have more text than will fit in the space provided, enter the rest once in your document by clicking on the text in the footer to open the footer – In a two-sided leader guide your copyright information appears in the odd numbered page footers Rev. Date = Revision Date – If you click on “No” the revision date will disappear and will not show in your footer – If you leave “Yes” checked the revision date you see will show up in your footer. The date that you see in the dialog box (the current date) will appear in your document as a fixed date – You can type over the default Rev. Date with anything you would prefer to have showing in your footer – In a two-sided leader guide this text appears under your Copyright in the odd numbered page footers Page 76 How to Use LeaderGuide Pro™ – It's Easy! Instruction Manual Functionality – How to Use the LGPro Ribbon Buttons Blank Page Button – Create a new LGPro document, continued Regarding the Printing and Functionality Options Page set up for Printing (1) If you accept our default of Two-sided printing – LGPro will set up your page headers and footers and margins properly for a professional appearance in a finished two-sided printed book If you select One-sided printing – LGPro will set the pages up for printing on one side of the paper only If you want to change this setting after you get into your document you will have to do it manually, using Word’s Page Layout function – If you don’t know how to do this it is best to decide now how you will print and let LGPro handle the page set up for you LGPro Functionality (2) Generally you will always want FULL LGPro functionality Selecting EXPRESS disables the – Training At A Glance functionality – Go To navigation – Automatic insertion and updating of Transition blocks between Modules Use Express when you – have a very short training program – don’t need the Training At A Glance – want to delete parts of or all of the Introductory section © 2009 Great Circle Learning. All rights reserved. Rev. Date 12/03/2009 Page 77 Functionality – How to Use the LGPro Ribbon Buttons Instruction Manual Blank Page Button – Create a new LGPro document, continued Once you click on Continue you will be taken into Windows Explorer To your Leader Guides subfolder (1) in your LeaderGuide Pro Library folder; Learn more on page27 Your file name will show with the phrase “Leader Guide” after it (2) Even though you are working in Word 2007 the file will be saved as a Word 97-2003 document (2) – For the sake of compatibility should you share this file with individuals using an earlier version of Word You have the option to change the location where you store your leader guide (3) and – The file name and file type Page 78 How to Use LeaderGuide Pro™ – It's Easy! Instruction Manual Functionality – How to Use the LGPro Ribbon Buttons Folder Button – Open an Existing Leader Guide Click on the Folder button to create a new leader guide Assumption: You have opened LeaderGuide Pro™ This button is found in the Start group on the LGPro ribbon Hovering over the button reveals the button description – Open an existing LGPro document Once you click on the Folder Button you will be taken into Windows Explorer To your Leader Guides subfolder in your LeaderGuide Pro Library folder – Browse to find your document – Learn more about the LeaderGuide Pro Library folder on page 27 and on page 101 Opening your existing LGPro documents this way will ensure that: Your LGPro template is always attached to the document Macros enable for you, which is necessary for LGPro to run; learn more on page 18 Saved LGPro documents are Word documents While you can open saved LGPro documents the same way you open any other Word document, if you want the LGPro ribbon available, you will need to enable the Macros and you may need to attach the LGPro template Save yourself the bother and simply make it a habit to open existing LGPro document through LeaderGuide Pro™ as described above Sharing saved LGPro documents Anyone who has access to your leader guides can open them the same way they open any other Word document work in them like any other Word document They will not have the LGPro ribbon and functionality available to them © 2009 Great Circle Learning. All rights reserved. Rev. Date 12/03/2009 Page 79 Functionality – How to Use the LGPro Ribbon Buttons Instruction Manual Update Template Styles Button Update My LGPro Template with the LGPro Styles from this document Click on this button to make the LGPro styles in the current leader guide your standard leader guide template styles This button is found in the Start group on the LGPro ribbon Hovering over the button reveals the button description – Update My LGPro template with the LGPro styles from this document Once you click on the Update My LGPro Template button Your screen will jump and flash while your leader guide template is updated When complete, you will still be in your current leader guide Your updates styles will apply to – all new leader guides, and to – any existing leader guides that you open using the LGPro Folder button You can also update your leader guide template styles by Page 80 Using the LGPro Styles utility; Learn more on page 227 How to Use LeaderGuide Pro™ – It's Easy! Instruction Manual Functionality – How to Use the LGPro Ribbon Buttons New Module Button Click on the New Module button to insert a new Module into your leader guide Assumption: You have placed your cursor in the spot where you want the new Module to appear This button is found in the Module/Lesson control group on the LGPro ribbon Hovering over the button reveals the button description – New Module When you start a new leader guide The first New Module is inserted for you, along with the first New Lesson page; Learn more on page 37 Insert a New Module every time you are about to begin a new Topic LeaderGuide Pro™ asks you to organize your training program into Modules and Lessons, or said another way, Topics and Subtopics A Module (topic) is a self-contained portion of your training program – like a chapter in a book – a Lesson is a subtopic within a Module From a pure document structure point of view a Module is a onepage Overview of the topic – This page contains placeholders for 5 categories of information that pertain to just this portion of the training program – Module Name – Goal – Time – Overview – Materials – Leave these placeholders in place to avoid future errors with your Training At A Glance This page provides you trainer with a summary overview of the topic that is about to be covered to help your trainer manage the class effectively © 2009 Great Circle Learning. All rights reserved. Rev. Date 12/03/2009 Page 81 Functionality – How to Use the LGPro Ribbon Buttons Instruction Manual New Module Button, continued Steps to follow to add a New Module to a leader guide Place your cursor in the spot where you want to add the module – Either in an LGP Block in your current Lesson that you want to move into the first Lesson in your new Module, or by a paragraph mark below the last Block in your current Lesson Click on the New Module button – A Page Break will be inserted and you will be taken to the top of the next page, your new Module overview page FYI: If you scroll back to the previous page, you will see that a Transition Block was automatically added to the end of that Lesson page – This happens every time you add a New Module, because Transition Blocks are necessary for building the Training At A Glance – Learn more on page 195 Steps to follow to work in the New Module page Do not change the style of, or bullet, or number the text you add to the Time and Overview Blocks on this page New Module – Type over this phrase with your Module title – To change what you’ve typed in, either highlight the entire name and type over it, or backspace Goal – Briefly explain the objective of this Module – Or, list the learning objectives that are addressed Time – Enter the time allotted for just this module Overview – Briefly describe what the trainer will do in just this module Materials Needed – List the materials the trainer will need to run this module Page 82 How to Use LeaderGuide Pro™ – It's Easy! Instruction Manual Functionality – How to Use the LGPro Ribbon Buttons New Module Button, continued Steps to follow to Update your Table of Contents with this New Module From anywhere in your document, click on the Update All Fields button; Learn more on page 148 – Say Yes to the question about updating the Table of Contents – You can use the Go To button to navigate to your Table of Contents to see your changes; Learn more on page 153 – And then you can navigate back to this Module page from the Table of Contents using CTRL + Click by the page # in the Table of Contents Steps to follow to Update your Training At A Glance with information about this New Module From anywhere in your document, click on the TAG (Training At A Glance) button – You will be taken to your Training At A Glance page – Learn more on page 145 The following information from your Module overview page will appear in the Training At A Glance – Module Name – Time – Overview To change what appears in the Training At A Glance, return to the Module page to make your edits – After making your edits, click on the Update All Fields button If the Training At A Glance does not reflect the info you have entered on your Module page – It may be that the Style Names associated with the Module Name, Time and Overview have inadvertently been changed; Learn more on page 266 © 2009 Great Circle Learning. All rights reserved. Rev. Date 12/03/2009 Page 83 Functionality – How to Use the LGPro Ribbon Buttons Instruction Manual New Module Button, continued This is a New Module overview page Page 84 How to Use LeaderGuide Pro™ – It's Easy! Instruction Manual Functionality – How to Use the LGPro Ribbon Buttons New Module Button, continued Example of a completed Module overview page © 2009 Great Circle Learning. All rights reserved. Rev. Date 12/03/2009 Page 85 Functionality – How to Use the LGPro Ribbon Buttons Instruction Manual New Lesson Button Click on the New Lesson button to insert a new Lesson into your leader guide Assumption: You have placed your cursor in the spot where you want the new Lesson to appear This button is found in the Module/Lesson Control group on the LGPro ribbon Hovering over the button reveals the button description – New Lesson The first New Lesson is inserted for you when you start a new leader guide Right after the first New Module page; Learn more on page 38 New Lesson pages start out blank other than – a Lesson Name placeholder and – if your New Lesson page is currently current last page in your leader guide – non-printing red text, which must always be the very last thing in your leader guide This page is where you begin adding your instructional content that details exactly what you want the trainer to do and say to lead the class Page 86 How to Use LeaderGuide Pro™ – It's Easy! Instruction Manual Functionality – How to Use the LGPro Ribbon Buttons New Lesson Button, continued Steps to follow to insert a New Lesson ALWAYS stay ahead of/before the red text, which must always be the very last thing in your leader guide Place your cursor in the spot where you want the new Lesson to appear – Either in an LGP Block in your current Lesson that you want to move into the new Lesson you are about to add, or by a paragraph mark below the last Block in your current Lesson Click on the New Lesson button – The first thing you will see after clicking on the New Lesson button is this dialog box Type in a Lesson Name – You can change it any time later in your leader guide – Always go to the first page of a Lesson to change the name A Page Break will be inserted and you will be taken to the top of the next page, your new Lesson page New Lessons always – Start on a new page – Appear in the Table of Contents as a subheading under the name of the Module they are in Your new Lesson page will contain – Your Lesson Name and nothing else (except the red text if this is currently the last page of your leader guide) – Unless you had your cursor sitting in an LGP Block in your previous Lesson when you clicked on the New Lesson button, in which case that Block and any other content that followed it will appear on the page © 2009 Great Circle Learning. All rights reserved. Rev. Date 12/03/2009 Page 87 Functionality – How to Use the LGPro Ribbon Buttons Instruction Manual New Lesson Button, continued Steps to follow to work in the New Lesson page Insert an LGP Block and add content to the Block; Learn more on page 186 Continue adding Blocks and content; Learn more on page 188 If you have a lot of content to add to a Block and it seems to disappear into the bottom of the page, you must either – chunk it out into multiple Blocks – or use the Word/Layout/Table Properties function to “Allow row to break across pages”; Learn more on page 268 If you want to move a Block to the next page, click on the Continue Lesson button; Learn more on page 90 When it is time to move on to a new subtopic in the current Module, click on the New Lesson button When it is time to move on to a new topic, click on the New Module button Always work before/ahead of the red text – do not delete the red text or work below/after it Steps to follow to Update your Table of Contents with this New Lesson From anywhere in your document, click on the Update All Fields button – Say Yes to the question about updating the Table of Contents – You can use the Go To button to navigate to your Table of Contents to see your changes; Learn more on page 153 – And then you can navigate back to the first page of this Lesson from the Table of Contents using CTRL + Click by the page # in the Table of Contents Page 88 How to Use LeaderGuide Pro™ – It's Easy! Instruction Manual Functionality – How to Use the LGPro Ribbon Buttons New Lesson Button, continued Sample Lesson page © 2009 Great Circle Learning. All rights reserved. Rev. Date 12/03/2009 Page 89 Functionality – How to Use the LGPro Ribbon Buttons Instruction Manual Continue Lesson Button for you The Continue Lesson button performs two functions Adds a “Lesson, continued” heading on each page in the Lesson you are in, other than the very first page of the Lesson Moves LGP Blocks to the top of the next page Assumption: You have placed your cursor in the correct spot This button is found in the Module/Lesson Control group on the LGPro ribbon Hovering over the button reveals the button description – Continue Lesson Steps to follow to add a “Lesson, continued” heading on each page in the Lesson you are in, other than the very first page of a Lesson Place your cursor in the first LGP Block on the second page of a Lesson Click on the Continue Lesson button; it will – insert a Page break and – add a light gray shading that is non-printing and – add “, continued” after the Lesson Name on each page in the Lesson you are in Example, as you see it on your computer screen Here is the same example viewed in Print Preview mode Page 90 How to Use LeaderGuide Pro™ – It's Easy! Instruction Manual Functionality – How to Use the LGPro Ribbon Buttons Continue Lesson Button, continued Steps to follow to move content to the next page Place your cursor in any Block anywhere in the Lesson other than the first LGP Block on the second page of a Lesson Click on the Continue Lesson button; it will – insert a Page break – and, move the Block your cursor was in to the top of the next page, followed by all the content that was behind that Block – and, add a light gray shading that is non-printing and the word “, continued” after the Lesson Name on each page in the Lesson you are in If you change your mind and delete a page break that comes before a “Lesson, continued” heading The “Lesson, continued” heading may remain, showing up on your current page, as in the example below © 2009 Great Circle Learning. All rights reserved. Rev. Date 12/03/2009 Page 91 Functionality – How to Use the LGPro Ribbon Buttons Instruction Manual Continue Lesson Button, continued Steps to follow to remove a “Lesson, continued” heading Page 92 Highlight the “Lesson, continued” heading and any paragraph marks that may precede it Cut the highlighted area to remove it How to Use LeaderGuide Pro™ – It's Easy! Instruction Manual Functionality – How to Use the LGPro Ribbon Buttons New Break Button – Coffee Cup The New Break button inserts a new page in your leader guide with a Module heading that will appear in your Table of Contents and your Training At A Glance to signal the trainer to take a scheduled Break, like Lunch Assumption: You have placed your cursor in the place in your leader guide where you want the Break to appear This button is found in the Module/Lesson Control group on the LGPro ribbon Hovering over the button reveals the button description – New Break The New Break button impacts your document structure Clicking on the New Break button inserts a – Transition Block and a page break at the end of the current Lesson page, and a – New Break page Inserting this type of Break is like inserting a new Module; references to it will appear in your – Training At A Glance – Table of Contents – Page header You must insert a New Module right after this type of Break – because you need to change the page header from referencing the Break back to referencing a Module topic – so, if you aren’t really starting a New Module after this Break, insert a New Module anyway, naming it something like “Previous Module Name, continued” – or, use a different method to cue the trainer to take a break © 2009 Great Circle Learning. All rights reserved. Rev. Date 12/03/2009 Page 93 Functionality – How to Use the LGPro Ribbon Buttons Instruction Manual New Break Button – Coffee Cup, continued Steps to follow to insert a Break Place your cursor in the spot in your leader guide where you want the Break to appear – Preferably by a paragraph mark outside of an LGP Block – If your cursor is in a Block, it will be moved onto its own page, after the Break, outside of any Lesson or Module – You can either Cut the Block and move it back into the end of the Lesson before the Break if that’s where it belongs; or put your cursor in the Block when you insert the New Module that will follow the Break, which will set the Block as the first one in the Lesson that goes with your new Module Click on the New break button – You will see a dialog box like this; enter a Break name and click OK - for instance, Lunch Break A Transition block will be inserted at the end of the current Lesson, followed by a page break You will be taken to the top of the next page – your New Break page Page 94 How to Use LeaderGuide Pro™ – It's Easy! Instruction Manual Functionality – How to Use the LGPro Ribbon Buttons New Break Button – Coffee Cup, continued Steps to follow to complete the New Break page Enter the New Break information – Be careful not to change the styles in the Time and Overview Blocks; Learn more on page 266 In the Overview Block – Type in something like “Take a break” – Or type in anything the trainer should do while participants take a break, such as distribute handouts for an activity that will occur right after the break, modify the room set up, etc. Don’t remove the Blocks on this page, they relate to the Training At A Glance © 2009 Great Circle Learning. All rights reserved. Rev. Date 12/03/2009 Page 95 Functionality – How to Use the LGPro Ribbon Buttons Instruction Manual New Break Button – Coffee Cup, continued Steps to follow to add a New Module after the Break page Place your cursor next to the Page Break on the Break page – Or by a paragraph mark below the last Block on the Break page Click on the New Module button – Name the Module and then name the first Lesson in this new Module Complete the new Module page info and move on to the Lesson Steps to follow to add the Break and new Module and Lesson to the Table of Contents Click on the Update All Fields button – Say “yes” to the Table of Contents question Steps to follow to add the Break and new Module to the Training At A Glance Page 96 Click on the TAG button How to Use LeaderGuide Pro™ – It's Easy! Instruction Manual Functionality – How to Use the LGPro Ribbon Buttons New Break Button – Coffee Cup, continued Can’t I add a Break without it showing up in the Training At A Glance and the Table of Contents? Yes! Add an LGP Block and type in “Take a Break” – One of the custom icon graphics available to you is a red Coffee Mug – Or, use the Time Block because it displays a Clock icon – Or, you could use the “Take a Break” Text Entry Element; Learn more on page 215 Take a Break © 2009 Great Circle Learning. All rights reserved. Rev. Date 12/03/2009 Page 97 Functionality – How to Use the LGPro Ribbon Buttons Instruction Manual Librarian Button Clicking on the Librarian button brings up this menu Librarian automates the management of content within the current leader guide AND automates the curriculum record keeping function facilitator ALL of your training programs The Librarian button is found in the Module/Lesson Control group on the LGPro ribbon Hovering over the button reveals the button description – Librarian Some of the functionality available to you through the Librarian button is also available through the Update Library Registry Utility; Learn more on page 233 The Librarian button performs these functions related to content in your current leader guide with a couple of mouse clicks Archive Modules and Lessons from your current leader guide for – reuse in other leader guides and training documents and sharing with colleagues Page 98 Create a Librarian Registry Record of the content you are archiving for curriculum management purposes; Records are stored in an automated Excel workbook Insert previously archived Modules and Lessons into the current leader guide Delete existing Modules and Lessons from the current leader guide Reorder existing Modules and Lessons within your leader guide How to Use LeaderGuide Pro™ – It's Easy! Instruction Manual Functionality – How to Use the LGPro Ribbon Buttons Librarian Button, continued In addition to all of the content management functionality just described… The Librarian button automates the creation and maintenance of training program (course) records A mouse click brings up an easy to use record form that is customized to your company; Learn more on page 235 The form will transfer the record information you add to the Librarian Registry that was set up when you installed LeaderGuide Pro™ This is a special type of Excel record that you will use with ease, whether you know how to use Excel or not! To access the records and the data base that you are creating, you will open your Excel Librarian Registry by going to – Documents/ LeaderGuide Pro Library/zLGPro Librarian Registry Files/LGPro Local Registry (v76007) – You may want to add a shortcut to this location on your desktop Using Librarian, you are able to Add a new master record for a course to the Librarian Registry File Update an existing course master record Remove an existing course master record Associate the current leader guide’s source file with an existing course master record Librarian accesses the Librarian Registry Files subfolder in the LeaderGuide Pro Library folder to store and retrieve your records; Learn more on page 100 © 2009 Great Circle Learning. All rights reserved. Rev. Date 12/03/2009 Page 99 Functionality – How to Use the LGPro Ribbon Buttons Instruction Manual Librarian Registry File The Librarian Registry File is a special automated Excel workbook You will add records to this file by completing easy to use record forms that you will access by using the Librarian button when in LGPro; Learn more on page 98 Or the Update Library Registry Utility; Learn more on page 233 Customize the Librarian Record Form meta tags to make them specific to your company, for the areas listed below – Curriculum – Subject Area – Competency/KPI – Target Audience – Delivery Source – Owner/Author – Meta Tag 2 – Meta Tag 3 Customize your local Librarian Record form meta tags to be consistent with your Master Librarian Record form meta tags Learn how to customize your Librarian Registry Record form meta tags on page 235 Page 100 How to Use LeaderGuide Pro™ – It's Easy! Instruction Manual Functionality – How to Use the LGPro Ribbon Buttons Librarian Local Library and Master Library Local Library and Master Library Librarian can access TWO Library folders to archive and retrieve content and records your Local LeaderGuide Pro Library your Master LeaderGuide Pro Library You or someone in your company will – setup the Master Library in a shared location and communicate that file path name to everyone using LeaderGuide Pro™ so that everyone can access one shared resource of archived content and curriculum records To access the Master Library Setup worksheet go to Start/All Programs/LeaderGuide Pro 7 Plus Utilities/Setup Master Library – Learn more about this utility on page 231 Learn more about the LeaderGuide Pro Library Folder on page 27 © 2009 Great Circle Learning. All rights reserved. Rev. Date 12/03/2009 Page 101 Functionality – How to Use the LGPro Ribbon Buttons Instruction Manual Librarian/Archive Modules or Lessons Click on the Librarian button to bring up the Librarian menu The Librarian button is found in the Module/Lesson Control group on the LGPro ribbon Next, click on Archive Modules or Lessons The Archive Modules or Lessons command is found on the menu that appears after you click on the Librarian button This functionality is also available through the Page 102 Update Library Registry Utility; Learn more on page 233 How to Use LeaderGuide Pro™ – It's Easy! Instruction Manual Functionality – How to Use the LGPro Ribbon Buttons Librarian/Archive Modules or Lessons, continued Steps to follow to Archive a Module or a Lesson After clicking on Archive Modules or Lessons you will see a dialog box like this – it will show the Modules and Lessons in your leader guide Highlight the Module or Lesson you would like to Archive – Do this one at a time – Modules start with (M0#): Module Name – Highlighting a Module will archive all of its Lessons with it © 2009 Great Circle Learning. All rights reserved. Rev. Date 12/03/2009 Page 103 Functionality – How to Use the LGPro Ribbon Buttons Instruction Manual Librarian/Archive Modules or Lessons, continued Steps to follow to Archive a Module or Lesson, continued Next you will be taken to your LGP Module Archive folder in your (local) LeaderGuide Pro Library folder in your Documents in Windows Explorer – It makes sense to accept this default location as the place to store your archived Module – Because when you Insert Archived content, LGPro will default to this location to retrieve the stored content, so it’s efficient – The Module you highlighted will be showing in the File name area, with the phrase “_Archived Module” added – Click on Save Next you will be given the option to also archive this Module to your Master (shared) Library – You must select either “Yes” or “No” – Selecting “Yes” will place a copy of this Module in your company’s shared library location, making it available to your colleagues Page 104 How to Use LeaderGuide Pro™ – It's Easy! Instruction Manual Functionality – How to Use the LGPro Ribbon Buttons Librarian/Archive Modules or Lessons, continued Steps to follow to Archive a Module or Lesson, continued Next you will have the option to create a Librarian Registry record of the Module you are Archiving – You have the option to click Cancel and skip this step Assuming you want to create a record – Click the arrows in the various areas on the form to select the information you want, or type in your information – When you have entered all of the information you want to add, click Done © 2009 Great Circle Learning. All rights reserved. Rev. Date 12/03/2009 Page 105 Functionality – How to Use the LGPro Ribbon Buttons Instruction Manual Librarian/Archive Modules or Lessons, continued Steps to follow to Archive a Module or Lesson, continued Next you will see this dialog box, click OK If you Archived to your Master Library as well as your Local, and you created a record, then LGPro will automatically add the record to your Master Registry too, and will display this dialog box; Click OK Next you will be back in the Librarian Archiving dialog box – Under the Cancel button will be a message telling you that your first archiving task is done – You can highlight another Module or Lesson to archive, or click on Done Page 106 Once you click on Done, you will be back in your leader guide, on the Cover page Use Go To/Table of Contents and then the Ctrl+Click function to navigate to where you would like to be in your document How to Use LeaderGuide Pro™ – It's Easy! Instruction Manual Functionality – How to Use the LGPro Ribbon Buttons Librarian/Insert Archived Modules or Lessons Before you follow the steps below Place your cursor at a paragraph mark outside of an LGP Block at the spot in your leader guide where you want your archived content to be placed Click on the Librarian button to bring up this menu The Librarian button is found in the Module/Lesson Control group on the LGPro ribbon Next, click on Insert Archived Modules or Lessons The Insert Archived Modules or Lessons command is found on the menu that appears after you Click on the Librarian button © 2009 Great Circle Learning. All rights reserved. Rev. Date 12/03/2009 Page 107 Functionality – How to Use the LGPro Ribbon Buttons Instruction Manual Librarian/Insert Archived Modules or Lessons, continued Steps to follow to Insert Archived Modules or Lessons After clicking on the Insert Archived Modules or Lessons command, you will see this dialog box – Indicate whether you want to import content from your Local (personal) Library or your company’s Master (shared) Library Page 108 Next you will see this dialog box, click OK Next you will be taken to your Local or Master LeaderGuide Pro Library folder in Windows Explorer How to Use LeaderGuide Pro™ – It's Easy! Instruction Manual Functionality – How to Use the LGPro Ribbon Buttons Librarian/Insert Archived Modules or Lessons, continued Steps to follow to Insert Archived Modules or Lessons, continued Select the folder you want to open to access archived content to insert Select the archived content you want to insert and click on Open in the lower right corner of the Explorer window © 2009 Great Circle Learning. All rights reserved. Rev. Date 12/03/2009 Page 109 Functionality – How to Use the LGPro Ribbon Buttons Instruction Manual Librarian/Insert Archived Modules or Lessons, continued Steps to follow to Insert Archived Modules or Lessons, continued Next you will be back in the Insert dialog box – Under the Cancel button will be a message telling you that your insertion task is done – You can insert another Module or Lesson, or click on Done Once you click on Done, you will be back in your leader guide, on the last page of your inserted content – you will see one last dialog box, click OK After checking the page breaks, you should click on the – Update All Field button And if you inserted archived Module(s), you should also click on the TAG button – The Transition Blocks associated with the archived content you just inserted will update with the correct information as soon as you click on the Update All Fields button followed by the TAG button Page 110 How to Use LeaderGuide Pro™ – It's Easy! Instruction Manual Functionality – How to Use the LGPro Ribbon Buttons Librarian/Delete Modules or Lessons Click on the Librarian button to bring up this menu The Librarian button is found in the Module/Lesson Control group on the LGPro ribbon Next, click on Delete Modules or Lessons The Delete Modules or Lessons command is found on the menu that appears after you click on the Librarian button © 2009 Great Circle Learning. All rights reserved. Rev. Date 12/03/2009 Page 111 Functionality – How to Use the LGPro Ribbon Buttons Instruction Manual Librarian/Delete Modules or Lessons, continued Steps to follow to Delete Modules or Lessons After you click on the Delete Modules or Lessons function, you will see a dialog box like this, listing all of the Modules and Lessons in your leader guide Highlight the Module or Lesson you want to delete – Highlighting a Module will also delete all of its Lessons – You must select Modules or Lessons to delete one at a time Page 112 How to Use LeaderGuide Pro™ – It's Easy! Instruction Manual Functionality – How to Use the LGPro Ribbon Buttons Librarian/Delete Modules or Lessons, continued Steps to follow to Delete Modules or Lessons, continued Next you will be prompted to confirm your request Next you will be returned to the Delete dialog box – Under the Cancel button will be a message telling you that your delete task is done – You can delete another Module or Lesson, or click on Done Once you click on Done, you will be back in your leader guide, on the Training At A Glance page with a message reminding you to check the page breaks before and after the deleted content area © 2009 Great Circle Learning. All rights reserved. Rev. Date 12/03/2009 Page 113 Functionality – How to Use the LGPro Ribbon Buttons Instruction Manual Librarian/Reorder Modules or Lessons Click on the Librarian button to bring up this menu The Librarian button is found in the Module/Lesson Control group on the LGPro ribbon Next, click on Reorder Modules or Lessons The Reorder Modules or Lessons command is found on the menu that appears after you click on the Librarian button Reordering creates a NEW leader guide that contains your reordered Modules and Lessons Page 114 And it preserves your original leader guide in its original order How to Use LeaderGuide Pro™ – It's Easy! Instruction Manual Functionality – How to Use the LGPro Ribbon Buttons Librarian/Reorder Modules or Lessons, continued Steps to follow to Reorder Modules or Lessons After clicking on the Reorder Modules or Lessons command you will see this dialog box If you say “Yes” to the Reorder modules only question – You will see a listing of only the Modules in your leader guide – A Reordered Module will include all of its original Lessons If you say “No” to the Reorder modules only question – You will see a listing of the Modules and Lessons in your leader guide – A Reordered Module will not include any of its original Lessons – You will reorder Lessons as well as Modules Sample Reorder dialog box with Modules and Lessons © 2009 Great Circle Learning. All rights reserved. Rev. Date 12/03/2009 Page 115 Functionality – How to Use the LGPro Ribbon Buttons Instruction Manual Librarian/Reorder Modules or Lessons, continued Steps to follow to Reorder Modules or Lessons, continued To Reorder, click on to highlight, one at a time – the Module or Lesson you want to appear first, second, third, etc. in your reordered leader guide and click on Add You will see your new order building in the right hand dialog box window – If you include something in your reorder and change your mind, highlight it and click on Remove Reordering creates a NEW leader guide that contains your reordered Modules and Lessons And it preserves your original leader guide in its original order When you are done reordering You will have TWO leader guides open – Your original leader guide and – Your reordered leader guide Page 116 How to Use LeaderGuide Pro™ – It's Easy! Instruction Manual Functionality – How to Use the LGPro Ribbon Buttons Librarian/Add a New Master Record for a Course to the Librarian Registry Click on the Librarian button to bring up the Librarian menu The Librarian button is found in the Module/Lesson Control group on the LGPro ribbon Next, click on Add New Master Record for a Course to the Registry The Add New Master Record for a Course to the Registry command is found on the menu that appears after you click on the Librarian button This functionality is also available through the Update Library Registry Utility; Learn more on page 233 © 2009 Great Circle Learning. All rights reserved. Rev. Date 12/03/2009 Page 117 Functionality – How to Use the LGPro Ribbon Buttons Instruction Manual Librarian/Add a New Master Record for a Course to the Librarian Registry, continued Steps to follow to Add New Master Record for a Course to the Registry After you click on the Add New Master Record for a Course to the Registry command you will see this dialog box Next you will see this dialog box, giving you the option to use key information in your current leader guide as the basis for this new master record If you say “Yes” LGPro will populate some of the fields in the record form with information from the Program in Perspective and Program Preparation sections of your leader guide – Program Name – Program rationale – Learning objectives – Program timing – Class size – Pre-work Page 118 If you say “No” you the record form will be blank and you will type in the record information How to Use LeaderGuide Pro™ – It's Easy! Instruction Manual Functionality – How to Use the LGPro Ribbon Buttons Librarian/Add a New Master Record for a Course to the Librarian Registry, continued Steps to follow to Add New Master Record for a Course to the Registry, continued Here is a sample of the record form, populated with information Add the additional information by using the options available when you click on an arrow in one of the field boxes, or by typing in the information Once the form is complete – Click on Find, to make sure that you aren’t about to overwrite a record for this course that already exists; and then click on Add © 2009 Great Circle Learning. All rights reserved. Rev. Date 12/03/2009 Page 119 Functionality – How to Use the LGPro Ribbon Buttons Instruction Manual Librarian/Add a New Master Record for a Course to the Librarian Registry, continued Steps to follow to Add New Master Record for a Course to the Registry, continued After clicking on Add you will be – notified that a record has been added to your Local Registry – asked if you would like to also add this record to your Master Registry – prompted to use Find again to make sure that you aren’t about to overwrite a record for this course that already exists – and then given the option to click on Add, to add the Master Course Record to your company’s Master Registry Page 120 Once this process is complete, you will find yourself back in your leader guide How to Use LeaderGuide Pro™ – It's Easy! Instruction Manual Functionality – How to Use the LGPro Ribbon Buttons Librarian/Update an Existing Course Master Record Click on the Librarian button to bring up the Librarian menu The Librarian button is found in the Module/Lesson Control group on the LGPro ribbon Next, click on Update Existing Course Master Record The Update Existing Course Master Record command is found on the menu that appears after you click on the Librarian button This functionality is also available through the Update Library Registry Utility; Learn more on page 233 © 2009 Great Circle Learning. All rights reserved. Rev. Date 12/03/2009 Page 121 Functionality – How to Use the LGPro Ribbon Buttons Instruction Manual Librarian/Update an Existing Course Master Record, continued Steps to follow to Update an Existing Course Master Record After clicking on the Update Existing Course Master Record command you will see a dialog box asking you to select the type of Course Record you want to update In the example below, a Classroom based Record is selected – The next step is to identify the record to be updated, which will appear in the Master program Record name field once the arrow is clicked – Select the Program you want to update – Click Find to bring up its form Page 122 How to Use LeaderGuide Pro™ – It's Easy! Instruction Manual Functionality – How to Use the LGPro Ribbon Buttons Librarian/Update an Existing Course Master Record, continued Steps to follow to Update an Existing Course Master Record, continued Once your record form is up, make the necessary changes and click on Update After clicking on Update you will be – notified that the record has been updated to your Local Registry – asked if you would like to also update this record to your Master Registry – prompted to use Find again to make sure there is an existing record to update – and then given the option to click on Update, to update this Master Course Record to your company’s Master Registry Once this process is complete, you will find yourself back in your leader guide © 2009 Great Circle Learning. All rights reserved. Rev. Date 12/03/2009 Page 123 Functionality – How to Use the LGPro Ribbon Buttons Instruction Manual Librarian/Remove an Existing Course Master Record Click on the Librarian button to bring up the Librarian menu The Librarian button is found in the Module/Lesson Control group on the LGPro ribbon Next, click on Remove Existing Course Master Record The Remove Existing Course Master Record command is found on the menu that appears after you click on the Librarian button This functionality is also available through the Page 124 Update Library Registry Utility; Learn more on page 233 How to Use LeaderGuide Pro™ – It's Easy! Instruction Manual Functionality – How to Use the LGPro Ribbon Buttons Librarian/Remove an Existing Course Master Record, continued Steps to follow to Remove an Existing Course Master Record After clicking on the Remove Existing Course Master Record command you will see a dialog box asking you to select the type of Course Record you want to remove In the example below, a Classroom based Record is selected – The next step is to identify the record to be removed, which will appear in the Master program Record name field once the arrow is clicked – Select the Program you want to remove – Click Find to bring up its form © 2009 Great Circle Learning. All rights reserved. Rev. Date 12/03/2009 Page 125 Functionality – How to Use the LGPro Ribbon Buttons Instruction Manual Librarian/Remove an Existing Course Master Record, continued Steps to follow to Remove an Existing Course Master Record, continued Once your record form is up, click on Remove After clicking on Remove you will be – notified that the record has been removed from your Local Registry – asked if you would like to also remove this record from your Master Registry – prompted to use Find again to make sure there is an existing record to remove – and then given the option to click on Remove, to remove this Master Course Record from your company’s Master Registry Page 126 Once this process is complete, you will find yourself back in your leader guide How to Use LeaderGuide Pro™ – It's Easy! Instruction Manual Functionality – How to Use the LGPro Ribbon Buttons Librarian/Associate this Document's Source File with an Existing Master Record Click on the Librarian button to bring up the Librarian menu The Librarian button is found in the Module/Lesson Control group on the LGPro ribbon Next, click on Associate this Document's Source File with an Existing Master Record The Associate this Document's Source File with an Existing Master Record command is found on the menu that appears after you click on the Librarian button This functionality is also available through the Update Library Registry Utility; Learn more on page 233 © 2009 Great Circle Learning. All rights reserved. Rev. Date 12/03/2009 Page 127 Functionality – How to Use the LGPro Ribbon Buttons Instruction Manual Librarian/Associate this Document's Source File with an Existing Master Record, continued Steps to follow to Associate this Document's Source File with an Existing Master Record After clicking on the Associate this Document's Source File with an Existing Master Record command you will see a dialog box asking you to select the type of Course Record you want to remove In the example below, a Classroom based Record is selected – The next step is to identify the record you want to associate with, which will appear in the Master program Record name field once the arrow is clicked – Select the Program you want to associate with – Click Find to bring up its form Page 128 How to Use LeaderGuide Pro™ – It's Easy! Instruction Manual Functionality – How to Use the LGPro Ribbon Buttons Librarian/Associate this Document's Source File with an Existing Master Record, continued Steps to follow to Associate this Document's Source File with an Existing Master Record, continued Once your record form is up, click on Register After clicking on Register you will be – notified that the document has been associated with the Master Record in your Local Registry – asked if you would like to also associate this document with the Master record in your company’s Master Registry – prompted to use Find again to make sure there is an existing record to associate with – and then given the option to click on Register, associate this document with the Master record in your company’s Master Registry Once this process is complete, you will find yourself back in your leader guide © 2009 Great Circle Learning. All rights reserved. Rev. Date 12/03/2009 Page 129 Functionality – How to Use the LGPro Ribbon Buttons Instruction Manual Librarian/Associate this Document's Source File with an Existing Master Record, continued When you go into the Registry for this record you will see Your Master Course listing – And the leader guide listed under it – Along with all of the rest of the information in this record Page 130 How to Use LeaderGuide Pro™ – It's Easy! Instruction Manual Functionality – How to Use the LGPro Ribbon Buttons LGP Text Formatting Buttons – Title, Text, Bullet 1, Bullet 2 There are 6 LGPro buttons you can use to easily manage text styles LGP Title Bullet 2 LGP Text Promote Text Bullet 1 Demote Text Step to follow to format text you are about to add to your leader guide Place your cursor by a paragraph mark where you want to add text Click on the appropriate LGP Text Formatting button – This will apply its style to the paragraph mark Type in your text, or click on the Paste Special button to add text copied from another document Step to follow to format existing text in your leader guide Place your cursor anywhere in the word, line or paragraph of text you want to format – For multiple paragraphs of text, highlight all of the text Click on the appropriate LGPro Font button to apply its style LGP Blocks are pre-formatted with two Text styles These two styles automatically apply when you place your cursor in a Block and start typing. The first line in every Block is LGP Title. Once you hit Enter and move down a line into the body of the Block, the text style changes to LGP Text The LGPro default font and style characteristics for LGP Title is Arial bold 12 point font, left justified, 9 points before and 9 points after The LGPro default font and style characteristics for LGP Text is Book Antiqua regular 12 point font, left justified, 0 points before and 9 after There are also two bullet styles; both have the same font as LGP Text This LGP Bullet 1, with 0 points before and 6 points after – This LGP Bullet 2, with 0 points before and 6 points after © 2009 Great Circle Learning. All rights reserved. Rev. Date 12/03/2009 Page 131 Functionality – How to Use the LGPro Ribbon Buttons Instruction Manual LGP Text Formatting Buttons – Title, Text, Bullet 1, Bullet 2, continued Steps to follow to Promote or Demote text that is already in one of the 4 main LGPro Text formats Place your cursor anywhere in the word, line or paragraph of text you want to Promote or Demote – For multiple paragraphs of text, highlight all of the text Click on the Promote button to apply the next higher style – For instance, placing your cursor in a Bullet 1 line and clicking on the Promote button will change the text from Bullet 1 to LGP Text Click on the Demote button to apply the next lower style – For instance, placing your cursor in a Bullet 1 line and clicking on the Demote button will change the text from Bullet 1 to Bullet 2 Steps to follow to remove source formatting when Paste Special does not completely clear it Highlight the text and click on the Home tab Click on the Clear Formatting button – found in the upper right corner of the Font group – Or, click on Clear All in the Word Styles Window Suggestion for bulleted lists Because Paste Special may not clear away characters associated with source bulleting or dashes – Whenever possible, clear the source formatting using one of the methods described above before you bring the content into your leader guide – You will still add the content to your leader guide using the LGPro Paste Special function; Learn more on page 135 When all else fails, delete any unwanted characters manually Page 132 How to Use LeaderGuide Pro™ – It's Easy! Instruction Manual Functionality – How to Use the LGPro Ribbon Buttons Text Formatting Example –Speaker Notes Block When you import slides and notes from PowerPoint The notes will be put into Speaker Notes Blocks and they will not display LGPro text formatting You will need to apply the LGPro Text formatting by either Using the LGP Text formatting buttons, or If you are cutting the text out of a Speaker Notes Block, use Paste Special when you add the text to another LGP Block For example Here is a Speaker Notes Block as it appears right after an Import Here is the same Block with the text moved into LGPro Text formats There are 3 LGP Text Formatting styles used in this example – LGP Tile to the first line – Bullet 1 to the bulleted text – LGP Text to the last line in the Block – See details on next page © 2009 Great Circle Learning. All rights reserved. Rev. Date 12/03/2009 Page 133 Functionality – How to Use the LGPro Ribbon Buttons Instruction Manual Text Formatting Example –Speaker Notes Block, continued Steps followed to format this Speaker Notes Block Place cursor in the first line of text and click on the LGP Title Formatting button The result is Next, highlight all of the bulleted text and click on the Bullet 1 LGP Text Formatting button The result is Page 134 How to Use LeaderGuide Pro™ – It's Easy! Instruction Manual Functionality – How to Use the LGPro Ribbon Buttons Paste Special – Clear Source Formatting and Apply LGPro Text Formatting Click on the Paste Special button to Clear source formatting as you paste in copied text And apply the LGP Text Formatting associated with the paragraph mark you are pasting in next to The Paste Special button is found in the LGP Text/Table Formatting group on the LGPro ribbon Steps to follow to use Paste Special Place your cursor by a paragraph mark or in the spot on your page where you want your copied text to appear Click on the Paste Special button – The text you add will pick up the LGP Text formatting associated with the paragraph mark your cursor is next to Adjust the text formatting by using the LGP Text Formatting buttons found in the LGP Text/Table Formatting group on the LGPro ribbon; Learn more on page 131 Steps to follow to remove source formatting when Paste Special does not completely clear it Highlight the text and click on the Home tab Click on the Clear Formatting button, found in the upper right corner of the Font group – Or, click on Clear All in the Word Styles Window © 2009 Great Circle Learning. All rights reserved. Rev. Date 12/03/2009 Page 135 Functionality – How to Use the LGPro Ribbon Buttons Instruction Manual Paste Special – Clear Source Formatting and Apply LGPro Text Formatting, continued Suggestion for bulleted lists Whenever possible, clear the source formatting of content the includes bulleted lists before you bring the content into your leader guide – Because Paste Special may leave ghost characters that were associated with source bulleting or dashes – And you may have to delete these unwanted characters manually Even when you do clear source formatting before you add the content to your leader guide – It is still a good idea to add the content to your leader guide using Paste Special Page 136 How to Use LeaderGuide Pro™ – It's Easy! Instruction Manual Functionality – How to Use the LGPro Ribbon Buttons Break Table Button – How to Get a Paragraph Mark to Appear in between LGP Blocks Click on the Break table button when you need a paragraph mark to appear between two LGP blocks Such as – inserting a New Module or New Lesson – or when you have content to add from another document that doesn’t lend itself to being placed inside an LGP Block Steps to follow to break the table and insert a paragraph mark between two LGP Blocks Place your cursor in the Block just below the spot where you need the paragraph mark Click on the Break Table button A paragraph mark will appear in between your Blocks With your cursor by the paragraph mark – hit Enter on your keyboard to add more paragraph marks © 2009 Great Circle Learning. All rights reserved. Rev. Date 12/03/2009 Page 137 Functionality – How to Use the LGPro Ribbon Buttons Instruction Manual How to Get a Paragraph Mark to Appear Before a Page Break ¶ Page 138 To get a paragraph mark to appear before a page break Place your cursor next to the page break (left side of page) Hit Enter on your keyboard and you will see a paragraph mark How to Use LeaderGuide Pro™ – It's Easy! Instruction Manual Functionality – How to Use the LGPro Ribbon Buttons Insert Table Button The Insert Table button adds a 2, 3 or 4 column table outside of an LGP Block formatted in a way that is consistent with the LGP Block style Click on the Insert Table Button to view the menu options Steps to follow to insert a table in your leader guide Place your cursor in the Block or by a paragraph mark just above the spot where you need the table Click on the Insert Table button Select the table option you need from the menu: 2, 3, or 4 column A paragraph mark will be added directly under the Block your cursor is in, and the table will insert just below, aligned with the right-hand cell of your LGP Block, as in the sample below The inserted table will have 2 rows – a heading row and a content row © 2009 Great Circle Learning. All rights reserved. Rev. Date 12/03/2009 Page 139 Functionality – How to Use the LGPro Ribbon Buttons Instruction Manual Insert Table Button, continued Steps to follow to add more rows to your table Place your cursor in a cell in the last row of your table – right click your mouse – click on Insert in the dialog box that comes up – click on Insert Rows Below (or Above) Or, place your cursor by the End of Row mark – and hit Enter on your keyboard Page 140 How to Use LeaderGuide Pro™ – It's Easy! Instruction Manual Functionality – How to Use the LGPro Ribbon Buttons Insert Table Button, continued Example Here is an example of a 4-column table created using the Insert Table function. It is sitting in between two LGP blocks: Steps to follow to join your table to your LGP Blocks above it and below it Delete the paragraph marks above and below the table Steps to follow to insert LGP Blocks after a table Place your cursor by a paragraph mark below your table Click on the LGP Block button you want to insert The Block will insert right above the paragraph mark where your cursor was © 2009 Great Circle Learning. All rights reserved. Rev. Date 12/03/2009 Page 141 Functionality – How to Use the LGPro Ribbon Buttons Instruction Manual Insert Table Button, continued What if I have a table from another document that I want to add to a leader guide Place your cursor by a paragraph mark outside of an LGP Block – and use the Word Paste function to add it, or Use SnagIt to capture an image of the table and either – use the SnagIt Send to Word function or – insert the image into your leader guide like any other graphic, using the Word Insert/Picture/From File function Place your cursor in an LGP Block – and use the Word Paste As Nested Table function – see below – FYI: This is the least desirable method because you will very likely have issues with the size of the table not fitting well into the LGP Block; and we have found that pasting tables into tables can create instability in the document Steps to follow to extract a table Into a Participant Guide – Use the Special/Set Bracketed Area for Extract function first – Use the Special/Extract Participant Guide Text function – Be sure to check “Manually Selected” As a standalone document – Use the Special/Set Bracketed Area for Extract function – Use the Special/Export Assessments, Cases and Handouts function – Check the option for Manually Selected Blocks and Bracketed Elements Page 142 How to Use LeaderGuide Pro™ – It's Easy! Instruction Manual Functionality – How to Use the LGPro Ribbon Buttons Insert Table Button, continued To Insert a Table into an LGP Block using the Word Paste As Nested Table function Copy the table from the source document Position your cursor in the LGP Block that you want to insert your table into Right click your mouse – A drop down box will appear – Click on the option that says Paste as Nested Table Your table will now be in your LGP Block To adjust the size of your table for a proper fit inside an LGP Block Position your cursor inside the table you just inserted Right click your mouse; the drop down box will appear again – Hover over AutoFit – Click on the option that says Auto Fit to Window Your table should now be properly positioned inside your LGP Block If this does not work – you will need to adjust the size manually – it may be best to undo your paste, re-size your source table and try the Paste as Nested Table again – HINT: Change your table text font to Arial Narrow Example of a table inserted into an LGP Process Steps Block © 2009 Great Circle Learning. All rights reserved. Rev. Date 12/03/2009 Page 143 Functionality – How to Use the LGPro Ribbon Buttons Instruction Manual Controls Group The Controls Group The buttons in this group allow you to manage global updates to your document, control the Instructional Term Shortcuts, navigate throughout your document, and execute special commands related to importing and exporting content – Generate the Training At A Glance – Update All Fields (including the Table of Contents) – Compress and Unlink Graphics (to reduce file size) – Turn Instructional Term Shortcuts On and Off – – Page 144 Go To – document navigation Special – provides powerful functionality related to importing and exporting slides and other content and attaching the LGPro Template to other documents How to Use LeaderGuide Pro™ – It's Easy! Instruction Manual Functionality – How to Use the LGPro Ribbon Buttons TAG Button – Training At A Glance Every new leader guide has a Training At A Glance page like this Do not delete the red text and Section Break Do not type anything on this page Click on the TAG button to generate the Training At A Glance This button is found in the Controls group on the LGPro ribbon Hovering over the button reveals the button description – Generate Training At A Glance Steps to follow to generate a Training At A Glance From anywhere in your leader guide, click on the TAG button You will see a dialog box like this; click OK You will be taken to your Training At A Glance page © 2009 Great Circle Learning. All rights reserved. Rev. Date 12/03/2009 Page 145 Functionality – How to Use the LGPro Ribbon Buttons Instruction Manual TAG Button – Training At A Glance, continued If you click on the TAG button before adding any content to your first new Module page your Training At a Glance will look like this The Training At A Glance draws its content from the Module overview pages Specifically, from the content you add to these three areas – Module Name – Time – Overview These three areas are linked back to the Module pages they draw from Which means you can navigate from the Training At A Glance by placing your cursor in a Module time, name or description and go to that spot on that page using Ctrl+Click Learn more about the Module Overview page on page 81 My Training At A Glance does not reflect the content I entered on a Module page More than likely, one or more of the necessary LGPro styles on your Module Overview page have been changed You must re-apply the proper styles; Learn more on page 266 Page 146 How to Use LeaderGuide Pro™ – It's Easy! Instruction Manual Functionality – How to Use the LGPro Ribbon Buttons TAG Button – Training At A Glance, continued To refresh and update the Training At A Glance as you add new Modules and edit content on existing Module pages Click on the Update All Fields button, and then Click on the TAG button Sample Updated Training At A Glance © 2009 Great Circle Learning. All rights reserved. Rev. Date 12/03/2009 Page 147 Functionality – How to Use the LGPro Ribbon Buttons Instruction Manual Update All Fields Button Click on the Update All Fields button to refresh the – Table of Contents – Page numbers – Headers and Footers – Program Name references through the leader guide – Slide numbering – Existing content in the Training At A Glance if you have made edits to content on existing Module pages This button is found in the Controls group on the LGPro ribbon Hovering over the button reveals the button description – Update All Fields Every time you click on the Update All Fields button the first thing you will see is this dialog box It’s fine to always say “yes” Steps to follow to the Update All Fields Page 148 From anywhere in your leader guide, click on the Update All Fields button Say “Yes” or “No” to the Table of Contents question All fields in your leader guide will be updated You will remain in the same spot in your leader guide How to Use LeaderGuide Pro™ – It's Easy! Instruction Manual Functionality – How to Use the LGPro Ribbon Buttons Instructional Term Shortcuts Button – Auto Text for Trainers Clicking on the Instructional Term Shortcuts button turns the LGPro Instructional Term Shortcuts ON or OFF Think of the Instructional Term Shortcuts as Auto Text for Trainers The Instructional Term Shortcuts On/Off button is found in the Controls group on the LGPro ribbon – It is a toggle switch – If they are on and you want them off, click once – If they are off and you want them on, click once Instructional Term Shortcuts are a quick way to type in frequently used words or phrases To use them you type in the equals sign = immediately followed by the Instructional Term Shortcut you need For instance, when you type =ssl and keep typing or hit Enter on your keyboard, =ssl will expand to Say something like: Instructional Term Shortcuts are always available to you, whether you are in an LGPro document or not However, the Instructional Term Shortcuts button and the on/off functionality is only available on the LGPro or PGPro ribbon, so you must open LeaderGuide Pro™ or Participant Guide Pro™ to use this button Steps to follow to use an Instructional Term Shortcut Assumption: Your Instructional Term Shortcuts are On Type the equals sign = immediately followed by the shortcut And then – Keep typing – Or hit Enter on your keyboard The full word or phrase will automatically replace the shortcut © 2009 Great Circle Learning. All rights reserved. Rev. Date 12/03/2009 Page 149 Functionality – How to Use the LGPro Ribbon Buttons Instruction Manual Instructional Term Shortcuts Button – Auto Text for Trainers, continued To control the case characteristics of Instructional Term Shortcuts Instructional term shortcuts will take on the case characteristics they are typed in Shortcuts typed in all lower case will appear in all lower case – =lo will result in learning objectives Shortcuts typed in all upper case will appear in all upper case – =LO will result in LEARNING OBJECTIVES Shortcuts typed in upper and lower case will appear in upper and lower case – =Lo will result in Learning objectives To control the style of Instructional Term Shortcuts Instructional term shortcuts will take on the style of the line they are typed into or the paragraph mark that are typed next to Shortcuts typed into – LGP Title will appear as Title text – LGP Text will appear as Text – Bullet 1 will be bulleted – Bullet 2 will be sub-bulleted See a list of Instructional Term Shortcuts on the next page Page 150 How to Use LeaderGuide Pro™ – It's Easy! Instruction Manual Functionality – How to Use the LGPro Ribbon Buttons List of Instructional Term Shortcuts Shortcut Instructional Term apq Answer any participant questions. cofc Capture participant responses on a flip chart. conp (Continued on next page) Use this at the end of a Block if the Block content continues on the following page. This phrase is pre-formatted for consistency dpit Divide participants into teams of Complete this phrase with the number of participants per team fr, frs facilitator, facilitators ir, irs instructor, instructors lada Lead a discussion about lg leader guide lgp LeaderGuide Pro™ lo learning objectives nn Note: © 2009 Great Circle Learning. All rights reserved. Rev. Date 12/03/2009 Comments Use this within a Block to call the instructor’s attention to an important detail that doesn’t warrant a full-blown Important Note Block. This phrase is preformatted for consistency Page 151 Functionality – How to Use the LGPro Ribbon Buttons Instruction Manual List of Instructional Term Shortcuts Page 152 Shortcut Instructional Term Comments pn the leader guide program name as it appears on the leader guide cover page Use this whenever you want to refer to the name of your training program. It will automatically update if you change the program name on the cover page pgpn the participant guide program name as it appears on the participant guide cover page Use this whenever you want to refer to the name of your training program. It will automatically update if you change the program name on the cover page pt, pts participant, participants pw participant workbook ssl Say something like: tr, trs trainer, trainers Use this to introduce sample scripts for the instructor How to Use LeaderGuide Pro™ – It's Easy! Instruction Manual Functionality – How to Use the LGPro Ribbon Buttons Go To Button – Navigation Method Click on the Go To button to bring up a menu of all the places in a leader guide that you can navigate to Partial list shown here Click on the document section or LGP Block that you would like to go to To continue navigating to additional occurrences of that same item, you have two options: – click on the double down or double up arrows in the bottom right corner of your screen, depending on whether you want to move forward or backward in your document – Or use Go To again – this option will only take you forward in your document, not backwards © 2009 Great Circle Learning. All rights reserved. Rev. Date 12/03/2009 Page 153 Functionality – How to Use the LGPro Ribbon Buttons Instruction Manual Special Button – Importing and Exporting Functions When you click on the Special button you bring up a menu of powerful options related to Importing and exporting content between – a leader guide or participant guide and PowerPoint – a leader guide and a participant guide – a leader guide or participant guide and a standalone Word document And, Attaching the LGPro template to another document Click on the menu command you want to execute and follow the prompts to complete the action – Import Finished Slides – brings PowerPoint files directly into a leader guide or participant guide – Extract Text for Slides – sends text only (no graphics) from Projected Image Blocks in your leader guide into PowerPoint – Extract Participant Guide Text – sends selected leader guide content into a new ParticipantGuide Pro document in Word – Export Assessments, Cases and Handouts – sends content into a new standalone Word document – Mark Selective Blocks for Extract – identifies certain instances of a particular Block to be included in a Participant Guide extract or to a standalone document – Set Bracketed Areas for Extract – identifies certain sections of content (text and graphics) to be included in a Participant Guide extract or to a standalone document – Attach LGPro Template – attaches the template and its functionality to another document Page 154 How to Use LeaderGuide Pro™ – It's Easy! Instruction Manual Functionality – How to Use the LGPro Ribbon Buttons Special/Import Finished Slides This function allows you to import PowerPoint files into your leader guide, one file at a time Assumptions – your PPT file is finished and ready to import; and your PPT file is closed Click on the Special button to open its menu Click on Import Finished Slides You will see this dialog box; click OK Along the bottom of your screen you will see that a PowerPoint folder is available to open Click on that PowerPoint prompt – It will take you into Windows Explorer, opening the PowerPoint subfolder in your LeaderGuide Pro Library folder – Navigate to locate your slide file Highlight the PowerPoint file you want to import and click Open Note to users of previous versions of LeaderGuide Pro™ - You no longer have to send your PPT file to Word before running the import. © 2009 Great Circle Learning. All rights reserved. Rev. Date 12/03/2009 Page 155 Functionality – How to Use the LGPro Ribbon Buttons Instruction Manual Special/Import Finished Slides, continued Next you will see the Importing Slides dialog box Replace or Add – You decide which type of import to run Replace is checked; Replace applies to slides only assumes that you have existing Projected Image Blocks in your leader guide; Learn more on page 189 means that when you click on Continue – the slides in the PowerPoint file you just selected will replace whatever is in the existing Projected Image Blocks in your leader guide will not add slide notes to your leader guide will not affect or change the first line in every Projected Image Block that says – “Show Slide #: “ followed by a slide title you may have typed in Learn more about Replace on page 158 (Continued on next page) Page 156 How to Use LeaderGuide Pro™ – It's Easy! Instruction Manual Functionality – How to Use the LGPro Ribbon Buttons Special/Import Finished Slides, continued Replace or Add – You decide, continued Add applies to slides and notes – you can add just slides, or slides and notes, or just notes assumes that you do not have existing Projected Image Blocks in your leader guide or if you do have existing Projected Image Blocks in your leader guide, the assumption is that you want to add your currently selected PPT file after the existing slides in your leader guide means that when you click on Continue – the slides and notes in the PowerPoint file you just selected will be added to the end of your leader guide – the slides will be placed inside Projected Image Blocks; one slide per Block – the notes will be placed inside Speaker Notes Blocks; one set of notes per Block; directly under the slide they pertain to Learn more about Add on page 161 © 2009 Great Circle Learning. All rights reserved. Rev. Date 12/03/2009 Page 157 Functionality – How to Use the LGPro Ribbon Buttons Instruction Manual Special/Import Finished Slides – Replace Steps to follow to Import Finished Slides/Replace Follow the initial steps to Import Finished Slides; Learn more on page 159 Make sure Replace is checked in the Importing Slides dialog box Click on Continue – Your screen may jump and flash – this is normal Allow time for the import to take place When the import is complete you will see this message from LGPro – If you notice along the bottom of your screen that PowerPoint, or the PowerPoint file you just imported, is open you may want to close it unless you need it open for some other purpose You can now continue working in your leader guide – Learn more on page 253 Page 158 You can run the replace function as often as you need to How to Use LeaderGuide Pro™ – It's Easy! Instruction Manual Functionality – How to Use the LGPro Ribbon Buttons Special/Import Finished Slides – Replace: More about Using this Function Replace assumes that you have existing Projected Image Blocks in your leader guide Replace performs a one-for-one Find and Replace service for you It replaces the content of the first Projected Image Block in your leader guide with the first slide in the PPT file you are importing – whether what is in that Projected Image Blocks is a slide image or just text that you had typed in; Learn more on page 158 Then it finds the second Projected Image Block in your leader guide and replaces its content with the second slide in the PPT file you are importing NOTE: Replace will not affect or change the very first line in your Projected Image Blocks, which says “Show Slide #: “ followed by a slide title, if you typed one in The Import/Replace process continues in this way until all of the slides in the PPT file you are importing have been brought into your leader guide – even if there aren’t any more Projected Image Blocks in your leader guide to replace For example: – Your leader guide contains 12 Projected Image Blocks – Your are about to run an Import/Replace with a PPT file that contains 19 slides – The first 12 slides that are imported will replace whatever is in the 12 Projected Image Blocks in your leader guide – The remaining 7 slides you are importing will be added to the end of your leader guide, placed in Projected Image Blocks When using Replace, you usually will want to make sure that the number of slides in the PowerPoint file you are importing using Replace matches the number of Projected Image Blocks in your leader guide If there is a difference between these two numbers correct for the difference in your leader guide © 2009 Great Circle Learning. All rights reserved. Rev. Date 12/03/2009 Page 159 Functionality – How to Use the LGPro Ribbon Buttons Instruction Manual Special/Import Finished Slides – Replace: More about Using this Function, continued In other words…if you are importing 27 slides there should be 27 Projected Image Blocks in your leader guide This means that if your leader guide contains only 22 Projected Image Blocks and you are importing 27 slides You should insert 5 more Projected Image Blocks in the places in your leader guide where the extra 5 slides belong This means that you must determine how/where those 5 extra slides relate Were 5 slides added to the end of the PPT file? – In which case, add 5 Projected Image Blocks after the first 22 in your leader guide in the places where those new slides belong Or, were 5 slides added to the PPT file in various spots, such as a new slide after slide 2 and another new slide after slide 11, etc.? – In which case, add a new Projected Image Block after the second one in your leader guide, and after the 11th one, etc. – Use Go To/Next Projected Image to move efficiently from one Projected Image Block to the next After adding the extra Projected Image Blocks to your leader guide Update All Fields to verify that you do now have the same number of Projected Image Blocks as slides that you are importing What if… I only have 9 Projected Image Blocks in my leader guide and I want to import a PPT file with 16 slides, replacing my 9 Projected Image Blocks, and simply add the last 7 slides I am importing to the end of my leader guide. Do I still have to add 7 placeholder Projected Image Blocks into my leader guide? No, in this scenario, LGPro will add the remaining 7 slides to the end of your leader guide, placing them into Projected Image Blocks for you. With that said, if you know exactly where those last 7 slides belong in your leader guide; then add the placeholder Projected Image Blocks so that LGPro can insert the slides exactly where you want them. Page 160 How to Use LeaderGuide Pro™ – It's Easy! Instruction Manual Functionality – How to Use the LGPro Ribbon Buttons Special/Import Finished Slides – Add: About the Options You Have When You Add Slides When you ADD a PowerPoint file to a leader guide You have greater control over exactly what you import and how you structure the import Assumption – you have followed the initial steps to Import Finished Slides, which brings you to this dialog box –Learn more on page 155 Add gives you these options related to the PowerPoint file Add slides only to your leader guide – placing the slides into Projected Image Blocks – Learn more on page 164 Add slides and notes – placing slides into Projected Image Blocks – and placing slide notes into Speaker Notes Blocks, following each slide that has notes – Learn more on page 165 Add notes only – placing slide notes into Speaker Notes Blocks As well as the options to – Add other LGP Blocks to appear after/below your slides and notes; learn more on next page – Run an Advanced Import; Learn more on page 167 © 2009 Great Circle Learning. All rights reserved. Rev. Date 12/03/2009 Page 161 Functionality – How to Use the LGPro Ribbon Buttons Instruction Manual Special/Import Finished Slides – Add: About the Options You Have When You Add Slides, continued The option to Add Blocks following Finished Slides Will insert other LGP Blocks after/below your slides and notes Page 162 Check the LGP Blocks you’d like to appear after your slides and notes and click on Continue – that’s it! LGP Blocks you add will appear under/after each imported slide or notes How to Use LeaderGuide Pro™ – It's Easy! Instruction Manual Functionality – How to Use the LGPro Ribbon Buttons Special/Import Finished Slides – Add: About the Options You Have When You Add Slides, continued Advanced Import will add your slides and notes within Modules When you click on Click on Advanced Import you bring up the Advanced Import dialog box The Advanced Import dialog box allows you to – set up your leader guide with the Modules it will contain – placing the slides and notes you are importing into the Modules in chronological order In other words, you are distributing the slides and notes that you are importing across Modules in your leader guide – resulting in a more advanced leader guide document when the import is complete, and – reducing the amount of work you have to do in your leader guide – Learn more on page 167 © 2009 Great Circle Learning. All rights reserved. Rev. Date 12/03/2009 Page 163 Functionality – How to Use the LGPro Ribbon Buttons Instruction Manual Special/Import Finished Slides – Add Steps to follow Follow the initial steps to Import Finished Slides; Learn more on page 155 Select Add and then select one of these three options – slides only, or – slides and notes, or – notes only – Learn more on page 161 Click Continue Your computer screen may jump and flash…This is normal. Don’t click your mouse. In a moment you will see this message Page 164 Click OK Continue working in your leader guide; Learn more on page 253 How to Use LeaderGuide Pro™ – It's Easy! Instruction Manual Functionality – How to Use the LGPro Ribbon Buttons Special/Import Finished Slides – Add/Slides and Notes Steps to follow Follow the initial steps to Import Finished Slides; Learn more on page 155 Select Add/slides and notes Now you can click on any one of these options – Advanced Import; Learn more on page 167 – Add Blocks; Learn more on page 161 – Continue; Learn more on page 164 In the Importing Slides dialog box you will see this red text, which may or may not apply to you – see next page © 2009 Great Circle Learning. All rights reserved. Rev. Date 12/03/2009 Page 165 Functionality – How to Use the LGPro Ribbon Buttons Instruction Manual Special/Import Finished Slides – Add/Slides and Notes, continued Depending on your computer… You may or may not have to pay attention to the message in the red text, which says: If you want the PowerPoint Notes pages transferred into your leader guide, the file you are importing must be in the Notes page format from PowerPoint. See LGP Help if you have questions. Following each slide, the transferred notes will appear in a special Speaker Notes block of LGP. We have found that – on some computers we can import slides and notes no matter which PowerPoint page view we are in, – while on other computers it is necessary to set the file to the Notes Page view Page 166 How to Use LeaderGuide Pro™ – It's Easy! Instruction Manual Functionality – How to Use the LGPro Ribbon Buttons Special/Import Finished Slides – Add/Advanced Import Steps to follow Follow the initial steps to Import Finished Slides; Learn more on page 155 Select Add and – slides only – or slides and notes – or notes only Click on Advanced Import After clicking on Advanced Import, you will see the Advanced Import dialog box (Continued on next page) © 2009 Great Circle Learning. All rights reserved. Rev. Date 12/03/2009 Page 167 Functionality – How to Use the LGPro Ribbon Buttons Instruction Manual Special/Import Finished Slides – Add/Advanced Import, continued Steps to follow to complete the Advanced Import dialog box LGPro lists your first slide number as #1 – Accept this In the first line, next to #1 – Change “Module Name” to the name of the Module Slide 1 will be in; learn more about Modules on pages 37 and 81 – Type in the name of this Module’s first Lesson – You can add more Lessons to this Module once in your leader guide; learn more about Lessons on pages 38 and 86 In the next line, enter the – chronological # of the first slide in this next Module – Module name – Name of the first Lesson in this Module Continue in this way until all of your slides are accounted for in their Modules – Just enter the starting slide # for each Module – So if a Module contains slides 17 – 31 you only enter # 17 Page 168 How to Use LeaderGuide Pro™ – It's Easy! Instruction Manual Functionality – How to Use the LGPro Ribbon Buttons Special/Import Finished Slides – Add/Advanced Import, continued Steps to follow to complete the Advanced Import First Time Add? If this is – the first time you are adding slides to your leader guide – and there are no Modules already in your leader guide other than the first New Module page that LGPro adds for you Add Behind Existing Modules? Click on this option if – this import is adding slides to a leader guide that already has existing Modules in it After selecting either First Time Add or Add After Existing Modules, click on Continue You will be taken back to the main Importing Slides dialog box Click on Continue to run the Import NOTE – Add Blocks? If you want to add other LGP Blocks as placeholders for additional content and you have not already done so Click on Add Blocks and follow the simple prompts Any blocks you select will be added – in the order you see them in the Add Blocks dialog box – after each occurrence of your slides and notes © 2009 Great Circle Learning. All rights reserved. Rev. Date 12/03/2009 Page 169 Functionality – How to Use the LGPro Ribbon Buttons Instruction Manual Special/Import Finished Slides – Add/Advanced Import, continued Example of completed Advanced Import dialog box In this example we have a slide file containing 43 slides and notes – Slides 1 – 5 belong in the Introduction module – Slides 6 – 16 belong in the Communication Basics module – Slides 17 – 27 belong in the Communication Styles module – Slides 28 – 36 belong in the Interacting with Others module – Slides 37 – 43 belong in the Summary & Close module Page 170 The notes for each slide will go into the leader guide right under the Projected Image (slide) block in a Speaker Notes block It’s OK if some of the slides don’t have notes How to Use LeaderGuide Pro™ – It's Easy! Instruction Manual Functionality – How to Use the LGPro Ribbon Buttons Special/Extract Text for Slides This function copies text from the Projected Image Blocks in your leader guide and pastes it into a basic PowerPoint template Allows you to capture your thoughts about necessary slides as you build your leader guide or participant guide Assumption You have Projected Image Blocks in your leader guide that contain text for slides; Learn more on page 190 Click on the Special button to open its menu Click on Extract Text for Slides Steps to follow to extract text for slides You will see this dialog box; click Yes (Continued on next page) © 2009 Great Circle Learning. All rights reserved. Rev. Date 12/03/2009 Page 171 Functionality – How to Use the LGPro Ribbon Buttons Instruction Manual Special/Extract Text for Slides, continued Steps to follow to extract text for slides, continued Next you will see this dialog box; click OK That’s all there is to it! When the extraction is complete you will be in PowerPoint, in your new slide file Here’s what to do now In PowerPoint – treat your slides with your slide template – add your graphics – Save your PPT file and close it Back in your leader guide – Click on Special/Import Finished Slides; Learn more on page 155 – Follow the process to Replace; Learn more on page 158 See before and after samples on next page Page 172 How to Use LeaderGuide Pro™ – It's Easy! Instruction Manual Functionality – How to Use the LGPro Ribbon Buttons Special/Extract Text for Slides, continued Sample leader guide page with text-based Projected Image Blocks ready to Extract Same leader guide with finished slides imported, using “Replace” Finished slides in Projected Image Blocks, across two pages © 2009 Great Circle Learning. All rights reserved. Rev. Date 12/03/2009 Page 173 Functionality – How to Use the LGPro Ribbon Buttons Instruction Manual Special/Extract Text for Slides, continued IMPORTANT NOTE Your PowerPoint and Word files are not linked Once in PowerPoint, if you add or delete slides in your new PowerPoint file – Go back to your leader guide and add or delete Projected Image Blocks accordingly Conversely, if you add or delete Projected Image Blocks in your LeaderGuide – Go back to your PowerPoint file and add or delete slides accordingly Update All Fields to update your slide numbering in your Projected Image Blocks in your leader guide Best Practice Tip Other than entering a few slide blocks and running an extract just to test it and see how this feature works… It is best to wait until you have added all of your Projected Image Blocks into your leader guide before doing the extract – because every time you run an Extract you create a new PowerPoint file However, if you want a separate slide file for each Module you create in your leader guide – Run the extract as you go, after you complete each Module – After your first extract, use the PowerPoint Slide Sorter view to delete the slides that have come in from your previous modules, if any Page 174 How to Use LeaderGuide Pro™ – It's Easy! Instruction Manual Functionality – How to Use the LGPro Ribbon Buttons Special/Extract Participant Guide Text Special/Extract Participant Guide Text This feature allows you to pull content from your leader guide directly into a participant guide as a new Word document Assumption - You know what you want to extract AND you have marked your Manual Extractions and Bracketed Areas for extract if there are any Note: You can also extract from a participant guide to a leader guide Close all LGPro documents except the one you want to extract from and click on the Special button to open its menu Click on Extract Participant Guide Text You will see the Extract and Create a Participant Guide dialog box © 2009 Great Circle Learning. All rights reserved. Rev. Date 12/03/2009 Page 175 Functionality – How to Use the LGPro Ribbon Buttons Instruction Manual Special/Extract Participant Guide Text, continued Steps to follow to extract Participant Guide text In the Extract and Create a Participant Guide dialog box – Check the Blocks you want to extract into a Participant Guide – Check Manually Selected if you have Manually Selected any Blocks or Set Bracketed Areas for Extract; – Manually Selected - Learn more on page 182 – Set Bracketed Areas for Extract – Learn more on page 183 – Check Assessment, Case Study, Handouts if you have any of these in your leader guide that you would like extracted to your Participant Guide – Accept the default “Structured with Icons” extract format unless you want to literally reformat every line of text that you are extracting Click on Continue About the Extract Formatting Options Both options will carry over – Program Rationale and Learning Objectives info from the Program in Perspective section of your leader guide – Module and Lesson titles Structured with icons – Will look just like your leader guide LGP Blocks Custom structure – Content will be pasted in unformatted; You will need to use the PGPro and Word formatting functions to format your document to your unique specifications Page 176 How to Use LeaderGuide Pro™ – It's Easy! Instruction Manual Functionality – How to Use the LGPro Ribbon Buttons Special/Extract Participant Guide Text, continued Steps to follow to extract Participant Guide text, continued After clicking Continue in the Extract and Create a Participant Guide dialog box, you will see this dialog box – Click on Yes Next you will see the Create a New Participant Guide dialog box – Complete the information as best you can Your Printing selection – One-sided or Two-sided – will impact the options you have for Participant Guide style – Note that you can print Samples of each style After selecting your preferred style, Click on Continue © 2009 Great Circle Learning. All rights reserved. Rev. Date 12/03/2009 Page 177 Functionality – How to Use the LGPro Ribbon Buttons Instruction Manual Special/Extract Participant Guide Text, continued Steps to follow to extract Participant Guide text, continued Follow the prompts to Save your new Participant Guide – LGPro will default to saving this document in your Participant Guide subfolder in your LeaderGuide Pro folder in your Documents in Windows Explorer Your screen may jump and flash – this is normal Wait until you see this dialog box – Click OK Now you are in your new Participant Guide with all of your leader guide content imported Begin working in your new Participant Guide to edit imported content and add content as needed – Follow the same steps as used in a leader guide to insert PGP Blocks, Add New Lessons, Add New Modules, etc. – Note that your participant guide does not have a – Training At A Glance – Module Overview page Page 178 NOTE: Your leader guide and participant guide files are NOT linked How to Use LeaderGuide Pro™ – It's Easy! Instruction Manual Functionality – How to Use the LGPro Ribbon Buttons Special/Export Assessments, Cases and Handouts Special/Export Assessments, Cases and Handouts This feature allows you to pull Assessments, Cases and Handouts and any content that you have Set as a Bracketed Area for Extract from your leader guide directly into a standalone Word document. Assumption – You have an Assessment, Case or Handout or Bracket Area in your leader guide ready for extract Note: To include these elements in a participant guide, run the Special/Extract Participant Guide Text function; Learn more on page 175 Click on the Special button to open its menu Click on Export Assessments, Cases and Handouts Steps to follow to Export Assessments, Cases and Handouts After clicking Export Assessments, Cases and Handouts you will see this dialog box – Check the items you want to extract – If you have more than one of any item, they will all extract © 2009 Great Circle Learning. All rights reserved. Rev. Date 12/03/2009 Page 179 Functionality – How to Use the LGPro Ribbon Buttons Instruction Manual Special/Export Assessments, Cases and Handouts, continued Steps to follow to Export Assessments, Cases and Handouts, continued After selecting what you want to extract and clicking on Continue, you will see this dialog box – Click on Yes When the extract is complete you will see this dialog box – Click on OK Now you will be in your new Word document with your exported Assessment, Case, Handout or manually selected or bracketed area content – Your leader guide is also still open We suggest that you go ahead and Save your new document right away – You can work in your new document as needed – Remember to Save your new document before you close it Page 180 NOTE: Your extracted document is NOT linked to your leader guide How to Use LeaderGuide Pro™ – It's Easy! Instruction Manual Functionality – How to Use the LGPro Ribbon Buttons Special/Export Assessments, Cases and Handouts, continued About the Extract Assessments, Cases and Handouts dialog box Checking All Assessments means that – every assessment in your leader guide will extract into one Word document – in the order they occur in your leader guide Checking more than one box means that – every instance of the items checked will extract into one Word document – in the order they occur in your leader guide This function also serves as the mechanism for extracting – Manually Selected LGP Blocks and – Bracketed Areas for Extract – Use this aspect of functionality to extract just one instance of an assessment, case or handout – Simply highlight the assessment, case or handout you want to extract, use Special/Set Bracketed Areas for Extract to mark it, and then use this function to extract it © 2009 Great Circle Learning. All rights reserved. Rev. Date 12/03/2009 Page 181 Functionality – How to Use the LGPro Ribbon Buttons Instruction Manual Special/Mark Selective Blocks for Extract Special/Mark Selective Blocks for Extract This feature allows you to pull individual LGP Blocks from your leader guide into a participant guide and/or into a standalone Word document Click on the Special button to open its menu Click on Mark Selective Blocks for Extract Steps to follow to Mark Selective Blocks for Extract BEFORE clicking on Special/Mark Selective Blocks for Extract Place your cursor in the text at the beginning of the Block you want to mark Click on Special/Mark Selective Blocks for Extract You will see that LGPro has inserted a marker that looks like this – [**LGPro Extract Block**] – This marker will stay in your leader guide until you run the extract Page 182 Continue marking select blocks as needed Once you complete the extract LGPro will clear these markers from your leader guide How to Use LeaderGuide Pro™ – It's Easy! Instruction Manual Functionality – How to Use the LGPro Ribbon Buttons Special/Set Bracketed Areas for Extract Special/Set Bracketed Areas for Extract This feature allows you to mark sections of content in your leader guide for extract into a participant guide and/or into a standalone Word document AND, the content does NOT have to be inside of an LGP Block Click on the Special button to open its menu Click on Set Bracketed Areas for Extract Steps to follow to Set Bracketed Areas for Extract BEFORE clicking on Special/Set Bracketed Areas for Extract Highlight the content you want to mark Click on Special/Set Bracketed Areas for Extract You will see that LGPro has inserted a markers before and after your highlighted content that look like this – [**LGPro Extract Start**] – [**LGPro Extract End**] – These markers will stay in your leader guide until you run the extract Continue marking areas for extract as needed Once you complete the extract LGPro will clear these markers © 2009 Great Circle Learning. All rights reserved. Rev. Date 12/03/2009 Page 183 Functionality – How to Use the LGPro Ribbon Buttons Instruction Manual Special/Attach LGPro Template Special/ Attach LGPro Template This feature allows you to attach the LeaderGuide Pro™ Template to a Word document that was not created using LGPro Assumption – You have LeaderGuide Pro™ open Click on the Special button to open its menu Click on Attach LGPro Template Steps to follow to Attach LGPro Template After clicking on Attach LGPro Template, you will see this dialog box – Click OK This will take you into Windows Explorer – Navigate to find the document you want – Double click on it – Or highlight it and click Open (Continued on next page) Page 184 How to Use LeaderGuide Pro™ – It's Easy! Instruction Manual Functionality – How to Use the LGPro Ribbon Buttons Special/Attach LGPro Template, continued Steps to follow to Attach LGPro Template, continued You will see this dialog box – Click OK Save the document with a New Name – Such as “Attached My Document” You will see the LGPro ribbon is now available to you This function is useful when… You have a significant amount of source material that you want to move into LGPro format without a lot of copying and pasting back and forth between documents, because by attaching the template you can Move content into Modules, Lessons and LGP Blocks within the attached document – And then EITHER copy and paste these bigger chunks into your leader guide – OR, easier – use Librarian to archive the content you’ve moved into LGPro Modules and Lessons and then use Librarian to insert the archived content into your leader guide; Learn more on page 102 and on page 107 Isolate and archive discrete sections of this attached document for insertion into your leader guide as is, without moving all the content into LGP Block format – Simply insert a New Module and Lesson, or just a New Lesson, at the beginning of the section that you want – And insert a New Module and Lesson, or just a New Lesson, just after the section that you want – You won’t need this one, you are just doing this to mark the end of the content you want – Now, use Librarian to archive the first Module (or Lesson) and then use Librarian to insert the archived content into your leader guide © 2009 Great Circle Learning. All rights reserved. Rev. Date 12/03/2009 Page 185 Functionality – How to Use the LGPro Ribbon Buttons Instruction Manual LGP Blocks and Other Automated Entry Elements – About Think of LGP Blocks and Other Automated Entry Elements… As the building blocks you will use to create your leader guide LGP Blocks and Other Automated Entry Elements – Format, chunk and contain the content in your leader guide LGP Blocks, like this one – Visually cue the trainer with an icon graphic – Catch the Trainer’s attention with a headline (like the first line in this Block) – And provide direction and guidance as to what the trainer is to do or say in the main body of the Block, like this The buttons in this group allow you to insert LGP Blocks to guide the trainer as to what to say or do build Assessments, Case Studies and Handouts insert Capture Notes Blocks and/or Capture Notes pages insert lines within Blocks insert your Custom Blocks insert Text Entry Elements into Blocks and/or by paragraph marks outside of Blocks to – dress up your pages – provide additional direction as to what to say or do – and call attention to Block content Always add LGP blocks from the LGPro ribbon Do not copy and paste icon graphics over each other This will interfere with any extraction to a Participant Guide you may later want to do Page 186 How to Use LeaderGuide Pro™ – It's Easy! Instruction Manual Functionality – How to Use the LGPro Ribbon Buttons LGP Blocks and Other Automated Entry Elements – About, continued Certain LGP Blocks contain default text You can delete or change this text as needed in each individual leader guide You can also use the LGP Blocks Utility to remove or customize this default text in your LGPro Template; Learn more on page 224 KEY POINT – This does NOT apply to Projected Image Blocks Do not change or delete the default text and Slide numbering in the Projected Image Blocks – Clicking on Update All Fields updates the slide numbering Changing or deleting this text will interfere with the – slide extract function – Update All Fields function Show Slide 1: This is an example of a Projected Image Block The text that you must not delete or alter in any way is – Show Slide #: LGP Blocks STOP at the end of a page LeaderGuide Pro™ expects you to add content in brief, manageable chunks of content, which are easier for trainers to deal with If you paste more content into an LGP Block than will fit in the space available on the page – The Block will move to the top of the next page – AND, if there is more content than can fit on this page – Your excess text will seemingly “disappear” into the bottom of the page To remedy this you can allow the Block (row) to break across pages; Learn more on page 268 Or, cut most of the text out of the block, insert a new block before this one, paste your cut text in, go back to your trouble Block and repeat this process until all of your content is visible © 2009 Great Circle Learning. All rights reserved. Rev. Date 12/03/2009 Page 187 Functionality – How to Use the LGPro Ribbon Buttons Instruction Manual LGP Blocks – Adding Them and Working with Them Steps to follow to add LGP Blocks to your leader guide Assumption – You have an LGPro leader guide document open and you are on a Lesson page with your paragraph marks turned on Place your cursor at the spot in your document where you want a Block Click on the button for the Block you want to add The Block will appear in your leader guide just below wherever your cursor is at the time that you click on the Block button Add Blocks to your leader guide in any order Steps to follow to … Insert Blocks in between existing Blocks – Place your cursor in the top block, click on the Block button you want to insert, and it will appear in between the two original Blocks Remove/Delete a Block – Highlight the entire Block (a Block is a row in a table) – Cut it (not delete) Move a Block – Highlight the entire Block – Cut it (not delete) – Highlight the entire Block you want your cut Block to appear before/ahead of – Paste it in (not Paste Special) Allow a Block to flow across multiple pages – Use the Word/Layout/Table Properties function; Learn more on page 268 Page 188 How to Use LeaderGuide Pro™ – It's Easy! Instruction Manual Functionality – How to Use the LGPro Ribbon Buttons Projected Image Block – a.k.a. Slides Block The Projected Image Block is what holds your imported slides It is found at the top of the first column in the LGP Blocks and Other Automated Entry Elements group on the LGPro ribbon Hovering over the button reveals the button description – Projected Image These Blocks do not link to your PowerPoint files Show Slide 2: This is a Projected Image Block Do NOT delete, edit, or change the phrase Show Slide #: To remove a (slide) Projected Image Block – Highlight the entire Block and CUT it To move a slide Projected Image Block – Highlight the entire Block and CUT it – Highlight the LGP Block that you want this slide to appear before/ahead of – Paste the cut Projected Image Block in, using the regular Word Paste function To update Slide numbering after moving or removing Projected Image Blocks or adding Projected Image Blocks in between other ones – Click on the LGPro Update All Fields button LGPro automatically inserts Projected Image Blocks for you when you import finished slides You can also add the Projected Image Block from the LGPro ribbon to use as a placeholder for a finished slide Which you will do in one of two circumstances, both of which ultimately relate to using the REPLACE option when Importing Finished Slides – Either, you are creating slides in your leader guide as you build your training materials; Learn more on page 158 – Or, you have made changes to a PowerPoint file you had previously imported, and one of the changes is that you have added some slides; Learn more on page 159 © 2009 Great Circle Learning. All rights reserved. Rev. Date 12/03/2009 Page 189 Functionality – How to Use the LGPro Ribbon Buttons Instruction Manual Projected Image Block – Creating Slides in your Leader Guide You can insert Projected Image Blocks in your leader guide to capture your thoughts about necessary slides as you build your leader guide – Don’t add graphics, but make a note in the Blocks about any graphics you want to use – you will add them once you send this info to PowerPoint When you have added all of your slide content into Projected Image Blocks in your leader guide – You will use the Special/Extract Text for Slides function to send this content over to PowerPoint, where you can finish creating your slides. Learn more on page 175 When your PowerPoint file is ready – You will use the Special/Import Finished Slides/Replace function to send your slides into your Projected Image Blocks in your leader guide, replacing your rough notes. Learn more on page 158 This is the Projected Image Block It is found at the top of the first column in the LGP Blocks and Other Automated Entry Elements group on the LGPro ribbon Steps to follow to create Slides in your Leader Guide Place your cursor in the LGP Block just above where you want your Projected Image Block – or by a paragraph mark Click on the Projected Image Block button – You will see a Projected Image Block like this Page 190 Leave the default text and slide number as is After the slide number, enter a Slide Title and hit Enter on your keyboard (Continued on next page) How to Use LeaderGuide Pro™ – It's Easy! Instruction Manual Functionality – How to Use the LGPro Ribbon Buttons Projected Image Block – Creating Slides in your Leader Guide, continued Steps to follow to create Slides in your Leader Guide, continued Enter in any text or bullet points you want on this slide Note any graphics you want to add once in PowerPoint Sample completed Projected Image Block Leaving your cursor in the Projected Image Block – Click on the button for the next LGP Block you want in your leader guide Add content to the next Block Continue adding Blocks and content, and adding Projected Image Blocks as needed Points to Remember The only content you should put in a Projected Image Block is – the content you want on that slide – and any notes about how to treat the slide once in PowerPoint, such as graphics to add, etc. Notes about what you want the trainer to say or do in relation to a slide – should be placed in a different type of LGP Block just below the Projected Image Block BECAUSE – everything in your Projected Image Blocks except the very first line with the Slide # and your Slide Title will be replaced with your actual finished slide image when you ultimately run Special/Import Finished Slides/Replace © 2009 Great Circle Learning. All rights reserved. Rev. Date 12/03/2009 Page 191 Functionality – How to Use the LGPro Ribbon Buttons Instruction Manual Projected Image Block – Creating Slides in your Leader Guide, continued IMPORTANT NOTE Your PowerPoint and leader guide files are not linked Once in PowerPoint, if you add or delete slides – Go back to your leader guide and add or delete slides accordingly Conversely, if you add or delete slides in your LeaderGuide – Go back to your PowerPoint file and add or delete slides accordingly Click on Update All Fields to update slide numbering in your leader guide Best Practice Tip Other than entering a few slide blocks and running an extract just to test it and see how this feature works… It is best to wait until you have added all of your slide blocks into your leader guide before doing the extract because every time you run the extract you create a new PowerPoint file However, if you want a separate slide file for each module you create in your leader guide, then run the extract as you go, after you complete each module – With this method, after your first extract, once in PowerPoint use the slide sorter view to delete the slides that have come in from your previous modules, if any Page 192 How to Use LeaderGuide Pro™ – It's Easy! Instruction Manual Functionality – How to Use the LGPro Ribbon Buttons Projected Image Block –Using it as a Placeholder Using a Projected Image Block as a Placeholder You will use a Projected Image Block as a Placeholder in one of two circumstances You are building a leader guide and – you have existing slides that you haven’t imported yet – so you are inserting Projected Image Blocks as placeholders to indicate the exact places in your leader guide where a slide will ultimately sit You are updating an existing leader guide that already has imported slides in it and – part of the updating involves bring in an edited slide file – and the edited slide file contains more slides than are currently in your leader guide Steps to follow when you are building a leader guide and have slides that you haven’t brought in yet Every time you come to a spot where the trainer should show a slide – insert a Projected Image Block as a placeholder – you may want to type in a slide title after the phrase Show Slide #: – there is no need to type anything else into the Block – anything you type into the body of the Block will be replaced by your slide image once you import your PPT file To move or remove Projected Image Blocks – Cut and Paste them – Or to update slide numbering, click on Update All Fields – Learn more on page 189 Once all of your slide placeholders are in your leader guide – Run the slide import with the Replace option – All of your Projected Image Block placeholders will be populated with your actual slide images – Learn more on page 158 © 2009 Great Circle Learning. All rights reserved. Rev. Date 12/03/2009 Page 193 Functionality – How to Use the LGPro Ribbon Buttons Instruction Manual Projected Image Block –Using it as a Placeholder, continued Steps to follow when you are updating an existing leader guide with an edited slide file that has more slides in it than you have in your leader guide In your PowerPoint file – Note the slide numbers associated with the slides you have added to this file In your leader guide – Start by clicking on the Update All Fields button to ensure that the slide numbering in your Projected Image Blocks is accurate – Next, starting at the beginning of your leader guide, use the Go To function to Go To/Next Projected Image – In chronological order, navigate through your Projected Image Blocks to the places where you need to insert a new Projected Image Block as a placeholder – Place your cursor in the Block just above/before the spot where you need to add the new slide and click on the Projected Image Block button – Add a Slide Title if you want to – Do NOT manually change the slide numbering – After you have added all of your Projected Image Block placeholders, click on the Update All Fields button to update your slide numbering – Lastly, you may now want to start at the beginning of your leader guide and use Go To/Next Projected Image to move through your Projected Image Blocks to verify that you have – the correct number of Projected Image Blocks – in the correct places in your leader guide Once you are confident that your leader guide is all set – Run the Special/Import Finished Slides/Replace function; Learn more on page 158 Page 194 How to Use LeaderGuide Pro™ – It's Easy! Instruction Manual Functionality – How to Use the LGPro Ribbon Buttons Transition Blocks The Transition Block is important in LeaderGuide Pro™ It is found at the top of the sixth column in the LGP Blocks and Other Automated Entry Elements group on the LGPro ribbon Hovering over the button reveals the button description – Transition Transition to This is a Transition Block Transition Blocks are automatically added to the end of the current Lesson every time you add a New Module Because they are necessary for building the Training At A Glance These Blocks start out saying only “Transition to” Once you click on – the Update All Fields button; Learn more on page 148 – followed by the TAG button (Generate the Training At A Glance); Learn more on page 145 – the Transition Blocks will automatically fill in with the name of the next module – and they will update every time you click on the Update All Fields button (reflecting any changes you might make to your module names) When you export from a participant guide to a leader guide Transition blocks will be added for you The very last Lesson in your leader guide will not have a Transition Block – Unless you choose to add one; LeaderGuide Pro™ doesn’t need it If you delete (cut) the Transition blocks that LeaderGuide Pro™ adds for you, they will be added back by LGPro every time you click on the TAG button (Generate Training At A Glance) If you import archived modules, your Transition Blocks will update with the correct information as soon as you click on the Update All Fields button followed by the TAG button © 2009 Great Circle Learning. All rights reserved. Rev. Date 12/03/2009 Page 195 Functionality – How to Use the LGPro Ribbon Buttons Instruction Manual Transition Blocks, continued You can also add Transition Blocks into your leader guide as needed For instance, you may want to use them for transitions between Lessons Complete them according to your needs – LeaderGuide Pro™ will not automatically populate or update the “Transition to” line in Transition Blocks that you add Steps to follow to add a Transition Block to your leader guide Place your cursor in the Block just above the spot where you want the Transition Block to insert Click on the Transition Block button on the LGPro ribbon Steps to follow to remove a Transition Block from your leader guide Page 196 Highlight the entire Block (row) and CUT it Before you can complete the Cut you will see this dialog box Click on Yes How to Use LeaderGuide Pro™ – It's Easy! Instruction Manual Functionality – How to Use the LGPro Ribbon Buttons Assessment Blocks Assessment Blocks allow you to add pre-formatted test questions into your leader guide When you click on the Assessment Block button, you will see these options The Assessment Blocks button is found at the top of the eighth column in the LGP Blocks and Other Automated Entry Elements group on the LGPro ribbon Hovering over the button reveals the button description – Assessment Blocks Steps to follow to add an Assessment Block to your leader guide Place your cursor in the Block just above the spot where you want the Assessment Block to insert Click on the Assessment Block button on the LGPro ribbon Click on the Assessment option you need and add the information Continue as needed See next pages for detailed guidance on working with the various Assessment Blocks Steps to follow to extract an Assessment from your leader guide As a standalone document Click on Special/Export Assessments, Cases and Handouts ; Learn more on page 179 Into a Participant Guide Click on Special/Extract Participant Guide Text; Learn more on page 175 © 2009 Great Circle Learning. All rights reserved. Rev. Date 12/03/2009 Page 197 Functionality – How to Use the LGPro Ribbon Buttons Instruction Manual Assessment Blocks, continued Working in an Assessment Block Other than the Assessment Instructions Block, Assessment Blocks insert into your leader guide with Non-printing red text around them This is necessary for extraction purposes Do not delete the red text if you intend to extract your Assessment into a Participant Guide or as a standalone document Example of a leader guide page with Assessment Blocks Page 198 How to Use LeaderGuide Pro™ – It's Easy! Instruction Manual Functionality – How to Use the LGPro Ribbon Buttons Assessment Blocks, continued Steps to follow to… Add a Question in an Assessment Block Place your cursor in the first blank row and type in your question or statement Add Answers Since you are in the leader guide, you probably want to type in the correct answer for each question Note that the answers will be included when you extract the Assessment into a Participant Guide or a standalone Assessment document – Remove the answers in your extracted documents Numbering your Questions You may number your questions if desired As you add other Assessment Blocks, adjust the ongoing numbering accordingly Add a new row to an Assessment Block Right click in a row and select – Insert/Insert Rows Above or Insert Rows Below After inserting a row, it will look like this You must type a letter into the first cell – it will be a non-printing character, in red – Example © 2009 Great Circle Learning. All rights reserved. Rev. Date 12/03/2009 Page 199 Functionality – How to Use the LGPro Ribbon Buttons Instruction Manual Assessment Blocks, continued Example of a True/False Assessment Block Example of a Fill In the Blank Assessment Block Example of a 2-Column Match Assessment Block Page 200 How to Use LeaderGuide Pro™ – It's Easy! Instruction Manual Functionality – How to Use the LGPro Ribbon Buttons Assessment Blocks, continued Example of a Multiple Choice Assessment Block In this type of question, if you need more than 4 choices for a given question – Insert an additional row above the “Last choice” row for the given question, and adjust the choice lettering as needed To add more Multiple Choice questions – You may find it easier to copy and paste an entire Q & A segment rather than inserting rows © 2009 Great Circle Learning. All rights reserved. Rev. Date 12/03/2009 Page 201 Functionality – How to Use the LGPro Ribbon Buttons Instruction Manual Case Study Blocks Case Study Blocks allow you to build formatted cases in your leader guide When you click on the Case Study Block button, you will see these options The Case Study Blocks button is the second button in the eighth column in the LGP Blocks and Other Automated Entry Elements group on the LGPro ribbon Hovering over the button reveals the button description – Case Study Blocks Steps to follow to add a Case Study to your leader guide Place your cursor in the Block just above the spot where you want the Case Study Block to insert Click on the Case Study Blocks button on the LGPro ribbon Select the Case Study option you need Add content to the block Steps to follow to extract a Case Study from your leader guide As a standalone document Click on Special/Export Assessments, Cases and Handouts ; Learn more on page 179 Into a Participant Guide Page 202 Click on Special/Extract Participant Guide Text; Learn more on page 175 How to Use LeaderGuide Pro™ – It's Easy! Instruction Manual Functionality – How to Use the LGPro Ribbon Buttons Case Study Blocks, continued Working in Case Study Blocks The Case Study Instructions Block inserts and works like any other LGP Block The Case Study Contents Block inserts into your leader guide with Non-printing red text – This is necessary for extraction purposes Do not delete the red text if you intend to extract your Case Study into a Participant Guide or as a standalone document Example of a leader guide page with Case Study Blocks Steps to follow to work in the Case Study Content Block Click on the gray [Title of the Case Study] text and type in the case study title Click on the gray [Text of the Case Study] text and type in or paste in the case study content – You may want to use Paste Special to maintain your consistent leader guide formatting; Learn more on page 135 Do not delete the non-printing red text To allow your Case Study Content Block to flow across multiple pages in your leader guide – place your cursor in the Block and – click on the Word Layout tab – click on Properties/Row/Allow row to break across pages – Learn more on page 268 © 2009 Great Circle Learning. All rights reserved. Rev. Date 12/03/2009 Page 203 Functionality – How to Use the LGPro Ribbon Buttons Instruction Manual Handout Blocks Handout Blocks allow you to build formatted handouts in your leader guide When you click on the Handout Blocks button, you will see these options The Handout Blocks button is the third button in the eighth column in the LGP Blocks and Other Automated Entry Elements group on the LGPro ribbon Hovering over the button reveals the button description – Handout Blocks Steps to follow to add a Handout Block to your leader guide Place your cursor in the Block just above the spot where you want the Handout Block to insert Click on the Handout Blocks button on the LGPro ribbon Select the Handout option that you need Add content to the Block Steps to follow to extract a Handout from your leader guide As a standalone document Click on Special/Export Assessments, Cases and Handouts ; Learn more on page 179 Into a Participant Guide Page 204 Click on Special/Extract Participant Guide Text; Learn more on page 175 How to Use LeaderGuide Pro™ – It's Easy! Instruction Manual Functionality – How to Use the LGPro Ribbon Buttons Handout Blocks, continued Working in Handout Blocks The Handout Instructions Block inserts and works like any other LGP Block The Handout Content Block inserts into your leader guide with Non-printing red text – This is necessary for extraction purposes Do not delete the red text if you intend to extract your Case Study into a Participant Guide or as a standalone document Example of a leader guide page with Handout Blocks Steps to follow to work in the Handout Content Block Click on the gray [Handout Title] text and type in the handout title Click on the gray [Text or image of the Handout] text and type in or paste in the handout content – You may want to use Paste Special to maintain your consistent leader guide formatting; Learn more on page 135 Do not delete the non-printing red text To allow your Handout Content Block to flow across multiple pages in your leader guide – place your cursor in the Block and – click on the Word Layout tab – click on Properties/Row/Allow row to break across pages – Learn more on page 268 © 2009 Great Circle Learning. All rights reserved. Rev. Date 12/03/2009 Page 205 Functionality – How to Use the LGPro Ribbon Buttons Instruction Manual Empty Block The Empty Block does not contain an icon graphic When you click on the Empty Block button, you will insert an LGP Block like this The Empty button is the first button in the ninth column in the LGP Blocks and Other Automated Entry Elements group on the LGPro ribbon Hovering over the button reveals the button description – Empty Steps to follow to add an Empty Block to your leader guide Place your cursor in the Block just above the spot where you want the Empty Block to insert Click on the Empty Block button on the LGPro ribbon Add content to the Block Steps to follow to extract an Empty Block from your leader guide As a standalone document Place your cursor at the beginning of the content you have added to the Block – Click on Special/Mark Selective Blocks for Extract; Learn more on page 182 – Click on Special/Export Assessments, Cases and Handouts/Manually Selected Blocks and Bracketed Elements; Learn more on page 179 Into a Participant Guide Place your cursor at the beginning of the content you have added to the Block – Click on Special/Mark Selective Blocks for Extract; Learn more on page 182 – Click on Special/Extract Participant Guide Text/Manually Selected; Learn more on page 175 Page 206 How to Use LeaderGuide Pro™ – It's Easy! Instruction Manual Functionality – How to Use the LGPro Ribbon Buttons Capture Notes Functions Capture Notes Functions allow you to add LGP Block formatted notes space in your leader guide Which your trainer can use to add personal notes to the leader guide When you click on the Capture Notes Functions button, you will see these options The Capture Notes Functions button is the second button in the ninth column in the LGP Blocks and Other Automated Entry Elements group on the LGPro ribbon Hovering over the button reveals the button description – Capture Notes Functions Steps to follow to add a Capture Block to your leader guide Place your cursor in the Block just above the spot where you want the Capture Block to insert Click on the Capture Block button on the LGPro ribbon – You may want to place your cursor in the body of the block and hit Enter a few times on your keyboard to add more space to the block Capture your notes here. This is a Capture Block Steps to follow to add a Capture Page to your leader guide Place your cursor in the Block just above the spot where you want the Capture Page to insert Click on the Capture Page button on the LGPro ribbon – A page break will be inserted – The Capture Notes Page will begin at the top of the next page in your leader guide © 2009 Great Circle Learning. All rights reserved. Rev. Date 12/03/2009 Page 207 Functionality – How to Use the LGPro Ribbon Buttons Instruction Manual Capture Notes Functions, continued Sample Capture Notes Page in a leader guide Steps to follow to carry over your Lesson name on your Capture Page Page 208 Place your cursor by the Page Break that was inserted just before the Capture Page Click on the Continue Lesson button On the top of the next page you will see your Lesson name with a paragraph mark and a page break right under it – delete the paragraph mark and the Page Break How to Use LeaderGuide Pro™ – It's Easy! Instruction Manual Functionality – How to Use the LGPro Ribbon Buttons Capture Notes Functions, continued Steps to follow to carry over your Lesson Name heading onto the leader guide page after your Capture Page Place your cursor in the first LGP Block that comes at the end of your Capture Page Click on the Continue Lesson button On the top of the next page you will see your Lesson name and your LGP Block Steps to follow to adjust how your Capture Page fits your leader guide page Highlight some of the rows in the Capture Page and Cut them © 2009 Great Circle Learning. All rights reserved. Rev. Date 12/03/2009 Page 209 Functionality – How to Use the LGPro Ribbon Buttons Instruction Manual Capture Lines Capture Lines allow you to add lines to a leader guide page Within LGP Blocks And simply on a page, outside of the Block format The Capture Lines button is the third button in the ninth column in the LGP Blocks and Other Automated Entry Elements group on the LGPro ribbon Hovering over the button reveals the button description – Capture Lines Steps to follow to add Capture Lines to an LGP Block in your leader guide Place your cursor at a paragraph mark in the Block at the spot where you want the Capture Lines to insert Click on the Capture Lines button on the LGPro ribbon – Two lines will insert, with a paragraph mark right below them – To add more lines, place your cursor by the paragraph mark right below the lines you added and click on the Capture Lines button again Sample Capture Lines Page 210 How to Use LeaderGuide Pro™ – It's Easy! Instruction Manual Functionality – How to Use the LGPro Ribbon Buttons Capture Lines, continued Steps to follow to add Capture Lines to a page in your leader guide, outside of an LGP Block Place your cursor at a paragraph mark outside of a Block at the spot on your page where you want the Capture Lines to insert Click on the Capture Lines button on the LGPro ribbon – Two lines will insert, with a paragraph mark right below them – To add more lines, place your cursor by the paragraph mark right below the lines you added and click on the Capture Lines button again Sample Capture Lines below and outside of an LGPro Participant Workbook Block © 2009 Great Circle Learning. All rights reserved. Rev. Date 12/03/2009 Page 211 Functionality – How to Use the LGPro Ribbon Buttons Instruction Manual Speaker Notes Block The Speaker Notes Block is new – It holds notes imported from PowerPoint Speaker Notes Blocks are automatically inserted when you Import Finished Slides and Notes; Learn more on page 165 You can also add Speaker Notes Blocks from the LGPro ribbon The Speaker Notes button is the top button in the tenth and last column in the LGP Blocks and Other Automated Entry Elements group on the LGPro ribbon Hovering over the button reveals the button description – Speaker Notes Steps to follow to add a Speaker Notes Block to your leader guide Place your cursor in the Block, or by a paragraph mark, just above the spot where you want the Speaker Notes Block to insert Click on the Speaker Notes button on the LGPro ribbon Set the LGPro Text Style to maintain consistency; the Speaker Notes Block is the only LGP Block that is not pre-formatted with the proper LGPro Text styles – Your cursor will be flashing at the beginning of the Block – Before you start typing, click on the LGPro Title Text Formatting button to set the text style properly for the first line in a Block – After typing in your first line and hitting Enter on your keyboard, the text style should automatically change to LGPro Text; if not, adjust it using the LGP Text Formatting buttons; Learn more on page 131 and on page 133 This is a Speaker Notes Block There is something special about Speaker Notes Blocks… If you use george! to send PowerPoint slides and notes into a leader guide, george! will later update your slides and notes as long as your slide notes remain in Speaker Notes Blocks in your leader guide Learn more about george! on page 259 Page 212 How to Use LeaderGuide Pro™ – It's Easy! Instruction Manual Functionality – How to Use the LGPro Ribbon Buttons Custom Blocks The Custom Blocks button allows you to access the six custom LGP Blocks you may have added to your LGPro Template When you click on the Custom Blocks button, you will see these options The Custom Blocks button is the second button in the tenth and last column in the LGP Blocks and Other Automated Entry Elements group on the LGPro ribbon Hovering over the button reveals the button description – Custom Blocks Steps to follow to insert Custom Blocks on a leader guide page Assumption: You have added Custom Blocks to your LGPro Template using the LGPro Blocks v7 Utility Place your cursor in the Block just above the spot where you want the Custom Block to insert Click on the Custom Blocks button on the LGPro ribbon Click on the Custom Block you want to insert Steps to follow to add Custom Blocks to your LeaderGuide Pro™ Template Click on Start/All Programs/LeaderGuide Pro 7 Plus Utilities/LGPro Blocks v7 Follow the prompts and instructions Learn more on page 224 © 2009 Great Circle Learning. All rights reserved. Rev. Date 12/03/2009 Page 213 Functionality – How to Use the LGPro Ribbon Buttons Instruction Manual Custom Blocks, continued About the Custom Blocks dialog box options LGPro will always refer to your custom blocks as Custom Block 1, Custom Block 2, etc. Do NOT change the names of the Custom Blocks. To refresh your memory about your Custom Blocks – refer to the Graphics Cues page in the Getting Started section of your leader guide Your custom block icon graphics will appear on the Graphic Cues page Sample Graphic Cues page Page 214 How to Use LeaderGuide Pro™ – It's Easy! Instruction Manual Functionality – How to Use the LGPro Ribbon Buttons Text Entry Elements The Text Entry Elements button gives you access to a number of preformatted text and graphical elements That you can insert into LGP Blocks or simply on a leader guide page outside of the Block format to – Further call attention to an action you want the trainer to take – Dress up your page When you click on the Text Entry Elements button, you will see this dialog box The Text Entry Elements button is the third button in the tenth and last column in the LGP Blocks and Other Automated Entry Elements group on the LGPro ribbon Hovering over the button reveals the button description – Text Entry Elements © 2009 Great Circle Learning. All rights reserved. Rev. Date 12/03/2009 Page 215 Functionality – How to Use the LGPro Ribbon Buttons Instruction Manual Text Entry Elements, continued Steps to follow to add a Text Entry Element into an LGP Block in your leader guide Place your cursor at a paragraph mark in the Block at the spot where you want the Text Entry Element to insert Click on the Text Entry Elements button on the LGPro ribbon Click on the Text Entry Element you want to insert Sample Text Entry Element Take a Break Steps to follow to add a Text Entry Element to a page in your leader guide, outside of an LGP Block Place your cursor at a paragraph mark outside of a Block at the spot on your page where you want the Text Entry Element to insert Click on the Text Entry Elements button on the LGPro ribbon Click on the Text Entry Element you want to insert Sample Text Entry Element below and outside of an LGP Say Block Transition to LGPro Utilities – Customizing Tools Page 216 How to Use LeaderGuide Pro™ – It's Easy! Instruction Manual LGPro Utilities – Customizing Tools LGPro Utilities – Customizing Tools Goal The purpose and goal of this module is to teach you how to use all of the LGPro Utilities Time 5 – 10 minutes per utility Overview Look up the Utility you need to use and follow the instructions provided Materials Needed Instruction Manual © 2009 Great Circle Learning. All rights reserved. Rev. Date 12/03/2009 Page 217 LGPro Utilities – Customizing Tools Instruction Manual How to Access the Utilities Click on the Start button in the lower left corner of your screen Page 218 Click on All Programs/LeaderGuide Pro 7 Plus Utilities to rveal the drop down menu Click on the Utility you need to open it How to Use LeaderGuide Pro™ – It's Easy! Instruction Manual LGPro Utilities – Customizing Tools Colors and Logo Utility Use this Utility to change the default Cover page logo and colors Changes you make using this utility will – change your LGPro and PGPro templates so that they will open with your logo and your colors – apply to all NEW leader guides and participant guides you create, and will not affect existing documents Close all other files, programs and applications including Outlook before running this utility Steps to follow to place your logo on the cover page in your LGPro Template So that every time you create a new leader guide the cover page will have your logo in place Have a small size logo file available for use Assumption – you have opened the LGPro Colors and Logo Utility worksheet; Learn more on page 218 Follow the instructions provided in the Utility worksheet, summarized below Under LeaderGuide Pro Settings in the Utility Worksheet – Highlight the Great Circle Learning logo (Continued on next page) © 2009 Great Circle Learning. All rights reserved. Rev. Date 12/03/2009 Page 219 LGPro Utilities – Customizing Tools Instruction Manual Colors and Logo Utility, continued Steps to follow to place your logo on the leader guide cover page, continued Along the top of your computer screen, click on the Insert tab, and then click on Picture in the Illustrations group This will take you into Windows Explorer Navigate to the logo file you want to use – Highlight the logo file – Click on Insert If your logo doesn’t fit well into the space where the default logo was, you should consider having it resized to fit Repeat this process for ParticipantGuide Pro OR, if you are not making any other changes Click on the LGPro tab and then click on the red Pro Update button Follow the prompt to Save your Custom Color and Logo as of xx-xxxx – Save this file in Documents\LeaderGuide Pro Library\LGP Template Customizations Page 220 Your LeaderGuide Pro™ master template will be updated with your changes Open LGPro and Create a new leader guide to view your changes How to Use LeaderGuide Pro™ – It's Easy! Instruction Manual LGPro Utilities – Customizing Tools Colors and Logo Utility, continued Steps to follow to change the Colors on the cover page in your LGPro Template So that every time you create a new leader guide the cover page will have your colors in place Assumption – you have opened the LGPro Colors and Logo Utility worksheet; Learn more on page 218 Follow the instructions provided in the Utility worksheet, summarized below Under LeaderGuide Pro Settings in the Utility Worksheet – Place your cursor in the Cover Panel Along the top of your computer screen, click on the Home tab – In the Paragraph group, click on the arrow to the right of the tipping over paint bucket (the Shading button) – Select your color – If you do not want any color on the cover page, select White – Do not select “No Color” Repeat this process for the Header and Footer if desired Repeat this process for ParticipantGuide Pro if desired (Continued on next page) © 2009 Great Circle Learning. All rights reserved. Rev. Date 12/03/2009 Page 221 LGPro Utilities – Customizing Tools Instruction Manual Colors and Logo Utility, continued Steps to follow to change the Colors on the cover page in your LGPro Template, continued When you are done making changes Click on the LGPro tab and then click on Update Follow the prompt to Save your Custom Color and Logo as of xx-xxxx – Save this file in Documents\LeaderGuide Pro Library\LGP Template Customizations Page 222 Your LeaderGuide Pro™ master template will be updated with your changes Open LGPro and Create a new leader guide to view your changes How to Use LeaderGuide Pro™ – It's Easy! Instruction Manual LGPro Utilities – Customizing Tools Convert to V7 Utility Use this Utility to update existing leader guides to your current LGPro Template You can update leader guides created with earlier versions of LGPro and existing v7 leader guides created prior to your current customizing Convert to V7 updates – LGPro Styles and – LGP Blocks (icon graphics and default text) – to match your current LGPro 7 Plus template Changes you make using this Utility will apply only to the existing leader guide you select to Convert Steps to follow to Convert to V7 Assumption – you have opened the LGPro Convert to V7 Utility worksheet; Learn more on page 218 Follow the instructions provided in the Utility worksheet, summarized below Click on the Run Convert button Follow the prompts to select the file you want to convert and to run the conversion for the file Save the converted file with a new name This Utility updates all of the LGP Blocks that are in use in the leader guide you are converting according to the STYLE associated with them not according to the graphic (visual) that you see on the page In other words… – If in the leader guide you are converting you had inserted a “Say” Block and later pasted over the Say icon graphic with a Flipchart icon graphic… – the Convert process will insert your v7 Say icon graphic into that Block, not a Flipchart icon graphic © 2009 Great Circle Learning. All rights reserved. Rev. Date 12/03/2009 Page 223 LGPro Utilities – Customizing Tools Instruction Manual LGP Blocks Utility This Utility opens a Worksheet with all of the LGP Blocks that are available for use in LeaderGuide Pro™ leader guides Example of an LGP Block with alternative graphics as it appears in this Utility Use this Utility to add Up to six custom LGP Blocks And use this Utility to change LGP Block icon graphics – We offer alternative graphics for most Blocks – To use your own graphics or clip art as icons in the Blocks – size them at .72” x .72” – make sure they have a dpi of no less than 240 – insert them properly, using the Word command Insert/Picture from File or Insert/Clip Art LGP Block default text – Edit or remove the phrases that insert as the first line in some of the LGP Blocks – Add content to any of the Blocks If you want to change the fonts and text styles in the Blocks Use the LGP Block Styles Utility NOTE: The PGPro Blocks Utility Worksheet works the same way Page 224 How to Use LeaderGuide Pro™ – It's Easy! Instruction Manual LGPro Utilities – Customizing Tools LGP Blocks Utility, continued Steps to follow to run the LGP Blocks Utility to change icon graphics Assumption – you have opened the LGP Blocks Utility worksheet; Learn more on page 218 Close all other files, programs and applications including Outlook before running this utility Do not change the default style of any cell Follow the instructions provided in the Utility worksheet, summarized below Delete the icon you want to change Copy one of the recommended alternative icons Paste it into the left column cell of the block OR, after deleting the existing icon Place your cursor in the left cell where the icon belongs Use the Word Insert/Picture function to insert your own graphic – Your custom icon size should be.72” x .72” – And it should have a dpi of no less than 240 You will see your changes on the Graphics Cues page in the Getting Started section of your leader guide and when you insert any of your customized LGP Blocks into a leader guide You will not see your changes in the LGPro ribbon Suggestion – Print your Custom LGP Blocks Worksheet as a reference – Find this in Documents/LeaderGuide Pro Library/LGP Template Customizations/Custom Leader Guide Blocks as of xx-xx-xx © 2009 Great Circle Learning. All rights reserved. Rev. Date 12/03/2009 Page 225 LGPro Utilities – Customizing Tools Instruction Manual LGP Blocks Utility, continued Your changes will apply to All new leader guides that you create after you run the Utility Not to existing leader guides Suggestion – To apply these changes to an existing leader guide, Run the Convert Utility; Learn more on page 223 Steps to follow to run the LGP Blocks Utility to change the default text in the LGP Blocks, or to add text Assumption – you have opened the LGP Blocks Utility worksheet; Learn more on page 218 Close all other files, programs and applications including Outlook before running this utility Do not change the default style of any cell Follow the instructions provided in the Utility worksheet, summarized below Highlight the text you want to change Type over it with your edits, or simply delete it if you do not want any default text to appear when the block is inserted – Do not Paste text in from another source Check the Styles of any text you add to make sure that – The first line is LGP Title – And the following paragraph (which includes the end of cell mark) is LGP Text or LGP Bullet List – Learn more about styles on page 44 and about how to check them on page 266 How to Apply your Changes Click on Update on the LGPro Tab – Be sure to Save your Custom LGP Blocks Utility Worksheet Open LGPro and create a new leader guide to see your changes Page 226 How to Use LeaderGuide Pro™ – It's Easy! Instruction Manual LGPro Utilities – Customizing Tools LGPro Styles Utility Use the LGPro Styles Utility to customize the following LGPro Style types – Program Name – Module Title – Lesson Title – LGP Title Text – LGP Text – LGP Header – LGP Footer You can alter the font and paragraph characteristics of each of these LGPro Styles, including – Font type, font size, and font characteristics such as Bold, Italic, Underlined, Centered, etc. Changes you make to the LGPro Styles using this Utility will become the standard for all leader guides you create or open with the LeaderGuide Pro™ template on your computer IMPORTANT NOTE Do not change the STYLE NAMES you see in this Utility Worksheet Example of a Style Name (highlighted in green) What you can change are the style characteristics of the text inside the blue box, which in this case is Module Titles © 2009 Great Circle Learning. All rights reserved. Rev. Date 12/03/2009 Page 227 LGPro Utilities – Customizing Tools Instruction Manual LGPro Styles Utility, continued Steps to follow to run the LGPro Styles Utility Assumption – you have opened the LGPro Styles Utility worksheet; Learn more on page 218 Close all other files, programs and applications including Outlook before running this utility Follow the instructions provided in the Utility worksheet, summarized below Highlight the entire BLUE box of the LeaderGuide Pro Style you want to change Click on the Word Home tab and use the functions in the Font and Paragraph groups to adjust the Font and/or Paragraph characteristics, such as – Font type; such as Book Antiqua, Arial. Verdana, etc. – Font size – Bold, Italic, Underline, Case (All Upper Case, all lower case, etc.), Font Color, Highlighting, Spacing (Single, Double, Points Before, Points After, etc.) How to Apply your Changes Click on LGPro Tab Click on the Update button Be sure to Save your Custom LGPro Styles Worksheet Open LGPro and create a new leader guide to see your changes Page 228 How to Use LeaderGuide Pro™ – It's Easy! Instruction Manual LGPro Utilities – Customizing Tools PGPro Blocks Utility Steps to follow to run the PGPro Blocks Utility Assumption – you have opened the PGPro Blocks Utility worksheet; Learn more on page 218 Close all other files, programs and applications including Outlook before running this utility Follow the same steps as for the LGP Blocks Utility – Learn how on page 224 Running this Utility will customize the PGPro Blocks in ALL THREE of your PGPro Templates Classic Modern Elegant © 2009 Great Circle Learning. All rights reserved. Rev. Date 12/03/2009 Page 229 LGPro Utilities – Customizing Tools Instruction Manual PGPro Styles Utility There are three PGPro Templates Classic Modern Elegant Each one has a different set of fonts and style characteristics associated with these seven key PGPro styles – PGP Program Name – PGP Module Title – PGP Lesson Title – PGP Title – PGP Text – PGP Header – PGP Footer When you open the PGPro Styles Utility you will be asked to indicate which PGPro template you want to customize Steps to follow to run the LGPro Styles Utility Assumption – you have opened the PGPro Styles Utility worksheet; Learn more on page 218 Close all other files, programs and applications including Outlook before running this utility Follow the same steps as for the LGPro Styles Utility – Learn how on page 227 Page 230 How to Use LeaderGuide Pro™ – It's Easy! Instruction Manual LGPro Utilities – Customizing Tools Setup Master Library Utility LeaderGuide Pro™ 7 creates a “local library” folder and a “master library” for you to use to store your LGPro training material files Learn more about the LeaderGuide Pro Library folders on page 27 The purpose of having two library folders is to provide you with a source document backups and the ability to easily share archived Modules and Lessons, as well as complete leader guides and participant guides with your colleagues The Setup Master Library Utility guides you through the process of setting up the Master LGPro Library on a shared network drive Steps to follow to run the Setup Master Library Utility Assumption – you have opened the Setup Master Library Utility worksheet; Learn more on page 218 Close all other files, programs and applications including Outlook before running this utility Follow the instructions provided in the Utility worksheet, summarized below VERY IMPORTANT: Step 1 should be done just once, by a member of your team who has LeaderGuide Pro installed on their computer Step 1 – Open Windows Explorer and go to the current location of your LeaderGuide Pro Master Library, which is listed in your Utility Worksheet – Highlight the LeaderGuide Pro Master Library folder – NOT the folder named LeaderGuide Pro Library (which is your local library and must stay where it is) – Move the LeaderGuide Pro Master Library folder to a shared network location that your colleagues can access – Move via Copy & Paste, Cut & Paste, or Drag & Drop Complete Steps 2 - 5 (see next page) and then – Share the full new file pathname with your colleagues who have LGPro installed on their computer, directing them to open their Setup Master Library Utility, skip Step 1 and complete Steps 2 5 © 2009 Great Circle Learning. All rights reserved. Rev. Date 12/03/2009 Page 231 LGPro Utilities – Customizing Tools Instruction Manual Setup Master Library Utility, continued Steps to follow to run the Setup Master Library Utility, continued Step 2 – Everyone with LGPro installed on their computer should copy and paste the new full file pathname for the LeaderGuide Pro Master Library into the box provided in Step 2 on the Utility Worksheet Step 3 – Make sure the pathname ends with “LeaderGuide Pro Master Library\” – You may need to type in the ending backslash Step 4 – Click on the Update button on the LGPro ribbon – The Utility Worksheet will refresh and your new master library location will be reflected in the document – Follow the pathname to verify it – If you’ve made a mistake, execute these steps again Step 5 - If you Copied and Pasted your LeaderGuide Pro Master Library folder instead of moving it or cutting it – You now a Master Library in your personal Documents directory and on your shared network drive – Delete the duplicate LeaderGuide Pro Master Library folder from your personal Documents directory – DO NOT delete the folder named LeaderGuide Pro Library For the one person executing Step 1 After completing the rest of these steps remember to – Share the full new file pathname with all members of your team who have LGPro installed on their computer – Direct them to open their Setup Master Library Utility, skip Step 1 and complete Steps 2, 3, 4 and 5 Page 232 How to Use LeaderGuide Pro™ – It's Easy! Instruction Manual LGPro Utilities – Customizing Tools Update Library Registry Utility Use this utility to add and update Master Records for ALL of your instructional materials and courses into the LGPro Librarian Registry It is alternative means to add to and update the Registry – particularly useful for adding and updating records for nonLGPro generated materials Master Records describe the specific Courses offered within given a given Curriculum and Subject area – Courses are also “tagged” to specific Target Audiences, Core Competencies (or KPI), and other customizable Meta Tags – Each Course in the Registry is further described with a brief overview, learning objectives, length, prerequisites, and more You can access this same functionality using Librarian button on the LGPro ribbon when you are in an LGPro document – Learn more on page 98 Steps to follow to run the Update Library Registry Utility Assumption – you have opened the Update Library Registry Utility worksheet; Learn more on page 218 Follow the Utility Worksheet instructions, summarized below When you open this Utility you will be in Word Click on the LGPro Librarian tab to access its ribbon Use the Master Records of Courses buttons above on the left to – Add a Master Course Record; Learn more on page 117 – Update a Master Course Record; Learn more on page 121 – Remove a Master Course Record; Learn more on page 124 Click on the button for the action you want to take Complete the Registry Record form that comes up and follow the prompts to Save the Record (Continued on next page) © 2009 Great Circle Learning. All rights reserved. Rev. Date 12/03/2009 Page 233 LGPro Utilities – Customizing Tools Instruction Manual Update Library Registry Utility, continued Steps to follow to run the Update Library Registry Utility, continued Click on the LGPro Librarian tab to access its ribbon Use the buttons in the Source Materials Records group, above on the right to – Archive leader guide and participant guide content for sharing and reuse; Learn more on page 102 – Associate electronic source material files that are contained in the Library or other storage locations with specific Master Course Records, so that the source material records will be listed within the Master Record when you bring up a Master Record; Learn more on page 127 Page 234 Click on the button for the action you want to take Complete the Registry Record form that comes up Follow the prompts to save the Record How to Use LeaderGuide Pro™ – It's Easy! Instruction Manual LGPro Utilities – Customizing Tools Customize your Librarian Registry Record Form Meta tags The Librarian Registry File is a special automated Excel workbook You will add records to this file by completing easy to use record forms that you will access by using the Librarian button when in LGPro; Learn more on page 98 Or the Update Library Registry Utility; Learn more on page 233 Customize the Librarian Record Form meta tags to make them specific to your company, for the areas listed below – Curriculum – Subject Area – Competency/KPI – Target Audience – Delivery Source – Owner/Author – Meta Tag 2 – Meta Tag 3 Customize your local Librarian Record form meta tags to be consistent with your Master Librarian Record form meta tags Steps to follow to customize your Librarian Registry Record Form Meta Tags Access your local Librarian Registry Forms Customization worksheet in Windows Explorer in – Documents/LeaderGuide Pro Library/zLGPro Librarian Registry Files/LGPro Custom Meta Tags Follow the instructions on the form Resave this document in the same LGPro folder and with the same file name Follow this process again for your LeaderGuide Pro Master Library Find your Master Forms Customization worksheet in either – Documents/LeaderGuide Pro Master Library/zLGPro Librarian Registry Files/LGPro Custom Meta Tags – OR where your shared Master Library folder is stored © 2009 Great Circle Learning. All rights reserved. Rev. Date 12/03/2009 Page 235 LGPro Utilities – Customizing Tools Instruction Manual Restoring the LGPro Template Defaults How to restore the LeaderGuide Pro™ template defaults Close all other programs and applications Go to Start/All Programs/LeaderGuide Pro 7 Utilities Open the Utility you want to restore and follow the prompts to Save the default Utility Worksheet – Do not change anything in the Utility Worksheet Click on the Update button on the LGPro tab Your LGPro template will be restored to the LGPro defaults in the Utility Worksheet Your changes will automatically be applied to – New LGPro documents you create – Existing LGPro documents you open through the LGPro Folder button The same instructions apply for restoring your PGPro Template defaults Page 236 How to Use LeaderGuide Pro™ – It's Easy! Instruction Manual LGPro Utilities – Customizing Tools Editing your LGPro Template Customizations How to keep some of your Customization changes and alter others Close all other programs and applications Go to Documents\LeaderGuide Pro Library\LeaderGuide Pro Template Customizations\ Open the appropriate Custom LGPro Worksheet Make your changes in the Worksheet Click on the Update button on the LGPro tab – It will prompt you to save the Worksheet document and will then automatically close Your LGPro template will be customized according to your Worksheet specifications Your changes will automatically be applied to – New LGPro documents you create – Existing LGPro documents you open through the LGPro Folder button The same instructions apply for editing your PGPro Template defaults © 2009 Great Circle Learning. All rights reserved. Rev. Date 12/03/2009 Page 237 LGPro Utilities – Customizing Tools Instruction Manual Reapplying your LGPro Template Customizations How to reapply Customizations you made in the past for use in prior LGPro documents Close all other programs and applications Go to Documents\LeaderGuide Pro Library\LeaderGuide Pro Template Customizations\ Open the appropriate Custom Worksheet – Do not make any changes Click on the Update button on the LGPro tab – It will prompt you to save the worksheet document for your records and will then automatically close Your LGPro template will be customized according to your specifications and your changes will automatically be applied to – New LGPro documents you create – Existing LGPro documents you open through the LGPro Folder button This is useful when you need to open existing documents created with a different set of LGPro Template Customizations If you do not reapply the customizations that were in place when you created the existing document – and you open it through LGPro – your current LGPro Template will apply its styles and update the appearance of the document If you want to maintain the custom styles associated with the document – you must reapply the LGPro Template Customizations that were in place when the document was created – before you open the document The same instructions apply for reapplying your PGPro Template defaults Page 238 How to Use LeaderGuide Pro™ – It's Easy! Instruction Manual LGPro Utilities – Customizing Tools Sharing your Template Customization Worksheets with Colleagues The LeaderGuide Pro™ and ParticipantGuide Pro™ templates reside uniquely on each user’s computer Each user will need to make changes to their leader guide and participant guide templates using the LeaderGuide Pro 7 Utilities If common customizations are desired One person can set up the agreed upon template customizations Everyone else will access the Customized Utility Worksheets and run them on their computer Customizations will apply to – all new leader guides created after the customizations are made – all existing leader guides opened through LGPro after the customizations are made Step One To be completed by the person designated to set up the Custom Utility Worksheets One at a time, follow the steps provided in the Utility Worksheet and in this Instruction Manual to customize your LGPro template to your company’s specifications – Learn how to access the Utilities on page 218 – Learn how run the Colors and Logo Utility on page 219 – Learn how run the LGP Blocks Utility on page 224 – Learn how run the LGPro Styles Utility on page 227 – Learn how to run the Setup Master Library Utility on page 231 – Learn how to Customize your Librarian Registry Record Form Meta tags on page 235 Follow the prompts to Save your Custom Worksheets to your local Documents/LeaderGuide Pro Library/LGPro Template Customizations folder Verify that the customizations are as expected (open LeaderGuide Pro™ and check) Place a copy of each Utility Custom Worksheet in a shared location and alert your colleagues that the Worksheets are available © 2009 Great Circle Learning. All rights reserved. Rev. Date 12/03/2009 Page 239 LGPro Utilities – Customizing Tools Instruction Manual Sharing your Template Customization Worksheets with Colleagues, continued Step Two - All other LGPro users Complete the following steps for the – Colors and Logo Utility – LGP Blocks Utility – LGPro Styles Utility – PGPro Blocks Utility – PGPro Styles Utility See next page for guidance on the Setting up your Master Library and Customizing your Library Form Meta tags Save the file to your Documents/LeaderGuide Pro Library/LGPro Template Customizations Pay attention to which Utility you are working with With the Worksheet open, attach the appropriate LGPro Utility template to the worksheet (or PGPro) click on – the Developer Tab along the top of your screen – If your Developer Tab is not showing, see next page – the Document Template option – the Templates tab – Attach – Navigate to Templates/LeaderGuide Pro 7/Utilities (it should be showing) – Highlight the proper Utility template – Click on Open or double click to select – Click OK Once you have attached the proper Utility template to your Custom Worksheet – Click on the LGPro Tab and click on the red Pro Update button – Follow the prompts to Save your Custom Worksheet Page 240 Repeat this process as needed, for each Custom Utility Worksheet How to Use LeaderGuide Pro™ – It's Easy! Instruction Manual LGPro Utilities – Customizing Tools Sharing your Template Customization Worksheets with Colleagues, continued Step Two for Master Library and meta Tags - All other LGPro users Once you receive your Master Library shared file path information, you will follow steps 2 – 5 of the Setup Master Library Utility – Learn more on page 231 Learn how to Customize your Librarian Registry Record Form Meta tags on page 235 If your Developer Tab is not showing in Word Click on – the Office button in the top left corner of your screen – Word Options along the bottom of the dialog box that appears – Add-Ins In the bottom of the Add-Ins dialog box, next to Manage – Click on Templates from the drop down menu and click Go In the new dialog box that appears – Click on the Templates tab if it is not already showing – Click on Attach – If it is not showing, navigate to Templates/LeaderGuide Pro 7/Utilities – Select the proper Utility template – Click on OPEN or double click to select – Click OK In your Customized Worksheet, click on the Update button Transition to Organization & Macrostructure: Working in the Sections of a Leader Guide © 2009 Great Circle Learning. All rights reserved. Rev. Date 12/03/2009 Page 241 Organization & Macrostructure: Working in the Sections of a Leader GuideInstruction Manual Organization & Macrostructure: Working in the Sections of a Leader Guide Goal The purpose and goal of this module is to help you understand each section of a leader guide and know what to do and what not to do Time 5 – 10 minutes per section Overview Look up the section you need to know more about Materials Needed Page 242 Instruction Manual How to Use LeaderGuide Pro™ – It's Easy! Instruction ManualOrganization & Macrostructure: Working in the Sections of a Leader Guide The Cover Page After you save your document you will be on the Cover page This is the first page of your new leader guide You will see the Program Name you entered in the Create a New Leader Guide dialog box Customize the look of this page Add your own logo and change the colors using the Colors and Logo utility; Learn more on page 219 Change the font and characteristics of the Program Name using the LGPro Styles utility; Learn more on page 227 You can add anything else you want to this page You are in Word so anything that you can do in Word you can do in this document © 2009 Great Circle Learning. All rights reserved. Rev. Date 12/03/2009 Page 243 Organization & Macrostructure: Working in the Sections of a Leader GuideInstruction Manual The Cover Page, continued About the Program Name that appears on the Cover page The Program Name is a field that will repeat at various places in your leader guide To add the Program Name yourself to any spot in your leader guide – use the LGPro Instructional Term Shortcut =PN To change your program name simply highlight it and type over it – And then click on Update All Fields to update all references to the Program Name throughout your document The Program Name is formatted with 200 points before and 60 points after to position it properly on the page – To Adjust Points Before and Points After – Place your cursor in the Program Name – Click on the Page Layout tab – In the Paragraph group, adjust Spacing by adjusting the points Before and/or After as needed – There is no set formula for this – you need to play with the spacing to get it to look right for what you are trying to do on this page Page 244 How to Use LeaderGuide Pro™ – It's Easy! Instruction ManualOrganization & Macrostructure: Working in the Sections of a Leader Guide The Table of Contents About the Table of Contents The base LGPro template loads with this starting point Table of Contents The Table of Contents Displays the Modules in a Heading 1 format and Lessons in a Heading 2 format – Modules (Heading 1) – Lessons (Heading 2) To build and update the Table of Contents Every time you click on the Update All Fields button You will have the option to refresh the Table of Contents © 2009 Great Circle Learning. All rights reserved. Rev. Date 12/03/2009 Page 245 Organization & Macrostructure: Working in the Sections of a Leader GuideInstruction Manual The Table of Contents, continued Steps to follow to Update your Table of Contents Click the Update All Fields button; Learn more on page 148 The following box will appear; Click on Yes This dialog box will appear every time you click on the Update All Fields button Get to your Table of Contents from anywhere in your document Click the Go To button; Learn more on page 153 A drop down dialog box will appear Click on Table of Contents Navigate from your Table of Contents Page 246 Place your cursor over the page number you want to go to Press the CTRL key on your keyboard and click your mouse This will take you to the desired page How to Use LeaderGuide Pro™ – It's Easy! Instruction ManualOrganization & Macrostructure: Working in the Sections of a Leader Guide Introductory Material About the Introductory Material Every time you create a new leader guide the base LGPro template includes an Introductory Material section as its starting point. The Introductory Material is comprised of two Modules Getting Started Training At A Glance The Getting Started Module contains these Lessons About This Guide The Program in Perspective Program Preparation The Training At A Glance contains A table that builds once you start building your leader guide, pulling content from your Module Overview pages All of these sections of the Introductory Material Provide the trainer with important information Always appear in the same place in every leader guide Always contain the same combination of – default text that you can edit as needed, and – prompts to remind you to add key information the trainer will need to prepare for and deliver the training program effectively Steps to follow to work in the Getting Started Module Edit, add and delete content as needed Work within the LGP Block and Text formats to maintain a consistent, professional look – Learn more about LGP Blocks on page 186 – Learn more about LGPro Text formatting on page 131 Keep the Module and its Lessons in place so that your trainers can count on always finding information in the same places in your leader guides If you want to delete all or most of this section from a leader guide and you do not need the Training At A Glance, select the EXPRESS option when in the Create a new LGPro document dialog box © 2009 Great Circle Learning. All rights reserved. Rev. Date 12/03/2009 Page 247 Organization & Macrostructure: Working in the Sections of a Leader GuideInstruction Manual Introductory Material Steps to follow to work in the Training At A Glance The Training At A Glance page always starts out as a blank page, other than the heading There is never a time when you will need to type on this page Build it by clicking on the TAG button; Learn more on page 145 – It builds based on information you add to your Module Overview pages; Learn more on page 81 Refresh it by clicking on the Update All Fields button; Learn more on page 148 – If you want to edit something you see on this page, go to the source Module Overview page and make your edits there, and then refresh this page Navigate from this page using the Word Ctrl+Click function Navigate to this page using LGPro Go To/Training At A Glance To add information about new Modules and refresh current information – Click on the Update All Fields button – And then click on the TAG button Page 248 Your Training At A Glance will flow over multiple pages as needed Do not delete the red text and Section break at the end of this page – this must always be at the end of your Training At A Glance Changing the name of this page can cause future errors in the building and updating of your Training At A Glance How to Use LeaderGuide Pro™ – It's Easy! Instruction ManualOrganization & Macrostructure: Working in the Sections of a Leader Guide Modules A Module is a Topic in your training program From a Table of Contents standpoint, it is like a chapter in a book From a document macrostructure standpoint, it is the first page of a section of content in your leader guide. That section of content is further broken down on subsequent pages into subtopics, which are referred to as Lessons The first Module Overview page is always included for you when you create a new leader guide always contains the same placeholders for key information supplies the content that builds your Training At A Glance – Learn more about the first New Module on page 37 – Learn more about inserting new Modules on page 81 – Learn more about the Training At A Glance on page 145 Sample Module Overview page © 2009 Great Circle Learning. All rights reserved. Rev. Date 12/03/2009 Page 249 Organization & Macrostructure: Working in the Sections of a Leader GuideInstruction Manual Modules, continued Steps to follow to work in the Module Overview page There are two keys to working in the Module Overview page Keep the page intact – keep it as you see it when it inserts; don’t delete/cut Blocks from this page – This relates directly to the Training At A Glance Maintain the styles that LGPro applies on this page - don’t change the styles – This also relates directly to the Training At A Glance Maintain the Module/Lesson hierarchy – Module Overview pages contain summary information about the topics within your training program to help orient your trainer – Every Module Overview page is followed by at least one Lesson – Lessons start on a new page – Lessons contain the content that you want your trainer to deliver – what you want your trainer to say and do to run the class Steps to follow to work in the Blocks on the Module Overview page The Goal Block – Type in the objective the trainer should strive to accomplish in this segment of the training program, and/or the learning objectives for this segment – The Program in Perspective section of the leader guide provides an overall program rationale and lists all of the learning objectives for the entire program; Learn more on page 34 The Time Block – Type in the amount of time the trainer should allow to complete this segment of the training program – The timing for the entire trainer program is provided in the Program in Perspective section of the leader guide (Continued on next page) Page 250 How to Use LeaderGuide Pro™ – It's Easy! Instruction ManualOrganization & Macrostructure: Working in the Sections of a Leader Guide Modules, continued Steps to follow to work in the Blocks on the Module Overview page, continued The Overview Block – Type in a brief description of what the trainer will do to meet the goal for this segment of the training program The Materials Needed Block – Type in the materials the trainer will need to run the activities and deliver the training associated with this segment of the training program – A full list of all materials needed for the entire training program is in the Program Preparation section of the leader guide; Learn more on page 35 © 2009 Great Circle Learning. All rights reserved. Rev. Date 12/03/2009 Page 251 Organization & Macrostructure: Working in the Sections of a Leader GuideInstruction Manual Lessons A Lesson is a subtopic with a Module in your training program From a Table of Contents standpoint, it is like a subtopic within a chapter in a book From a document macrostructure standpoint, it is a discrete section of a Module, consisting of a number of pages The first New Lesson page always follows the first New Module Overview page and is always included for you when you create a new leader guide is always blank other than the Lesson Name, until you begin adding content contains the content that guides your trainer through the delivery of your training program is built using LGP Blocks – which provide a mechanism to visually cue your trainer as what he/she is to say or do – and which help you chunk your into manageable parts that are easy for your trainer to work with Learn more about the first New Lesson on page 38 Learn more about inserting New Lessons on page 86 Learn more about the LGP Blocks that you use to build Lessons on page 186 Steps to follow to work in a Lesson page Page 252 Insert LGP Blocks to the page from the LGPro ribbon If you have content that does not lend itself to insertion into an LGP Block, add it at a paragraph mark outside of a Block Use the Continue Lesson button to move Blocks to the next page Use the Word Layout/Table/Properties/Allow row to beak across pages function when you have more content than can fit on one page Use the LGP Text Formatting buttons to apply LGPro styles to your content for a consistent, professional document appearance Use Paste Special to add content copied from other sources How to Use LeaderGuide Pro™ – It's Easy! Instruction ManualOrganization & Macrostructure: Working in the Sections of a Leader Guide Working in a Leader Guide after Importing a PowerPoint File When you see this message your slide import is complete Click OK You will most likely find yourself on the Training At A Glance page Place your cursor in your first Module Name and use Ctrl + Shift to go to that page Your slides and notes start on the next page, in the first Lesson Other ways to navigate to your first imported slide or notes Click on – Go To/Next Projected Image, or – Go To/Next Speaker Notes © 2009 Great Circle Learning. All rights reserved. Rev. Date 12/03/2009 Page 253 Organization & Macrostructure: Working in the Sections of a Leader GuideInstruction Manual Working in a Leader Guide after Importing a PowerPoint File, continued This sample page is showing the first 2 imported slides They are on the New Lesson page, in the first Module in the leader guide You can now Page 254 add LGP Blocks before the first Projected Image Block and in between Projected Image Blocks add New Lessons and New Modules before and in between LGP Blocks How to Use LeaderGuide Pro™ – It's Easy! Instruction ManualOrganization & Macrostructure: Working in the Sections of a Leader Guide Working in a Leader Guide after Importing a PowerPoint File, continued Show Slide 3: This is a Projected Image Block Do NOT delete, edit, or change the phrase Show Slide #: To remove a Projected Image Block – Highlight the entire Block and CUT it – Click on the Update All Fields button to update the slide numbering for the remaining slides in your leader guide To move a Projected Image Block – Highlight the entire Block and CUT it – Highlight the LGP Block that you want your cut Block to appear before/ahead of – Paste the cut Projected Image Block in, using the regular Word Paste function – Click on the Update All Fields button to update the slide numbering Steps to follow to add content around your first slide Above your first slide you will see a Lesson Name heading To insert an LGP Block before your first slide – Place your cursor in the Lesson name – Click on the button for the LGP Block you want to add To insert a Block in between other Blocks – Place your cursor in the first Block – Click on the button for the LGP Block you want to add – It will insert in between the two Blocks that were originally there As you add content to Blocks, use the – Paste Special button to add content copied from other documents; Learn more on page 135 – LGP Text Formatting buttons to maintain a consistent, professional page appearance; Learn more on page 131 © 2009 Great Circle Learning. All rights reserved. Rev. Date 12/03/2009 Page 255 Organization & Macrostructure: Working in the Sections of a Leader GuideInstruction Manual Working in a Leader Guide after Importing a PowerPoint File, continued Steps to follow to Insert a New Lesson – Place your cursor in the Block that will start your new Lesson or at a paragraph mark just below the last block in the current Lesson – Click on the New Lesson button on the LGPro ribbon – Name the Lesson and click OK – You will be in your new Lesson, on a new page – Learn more on page Insert a New Module – Place your cursor in the Block that will start your new Module or at a paragraph mark just below the last block in the current Lesson – Click on the New Module button on the LGPro ribbon – Name the Module and click OK – Name the Lesson and click OK; every Module has at least one Lesson – You will be on your new Module overview page; the Lesson begins on the next page – Learn more on page Steps to follow to Update your Table of Contents – Click on the Update All Fields button Update your Training At A Glance – Click on the Update All Fields button – Click on the TAG button To edit content in the Training At A Glance – Go to the appropriate Module Overview page and edit – Click on the Update All Fields button to reflect your edits in the Training At A Glance Page 256 How to Use LeaderGuide Pro™ – It's Easy! Instruction ManualOrganization & Macrostructure: Working in the Sections of a Leader Guide Working in a Leader Guide after Importing a PowerPoint File, continued Sample leader guide page with LGP Blocks added in between Slide 1 and Slide 2 Slide 2 is now on the next page in this leader guide Transition to george! © 2009 Great Circle Learning. All rights reserved. Rev. Date 12/03/2009 Page 257 george! Instruction Manual george! Goal The purpose and goal of this module is to introduce george! Time 5 minutes Overview Get to know george! He is an add in to PowerPoint and he gives you more control over importing and updating PowerPoint files in your leader guides and participant guides. Materials Needed Page 258 Instruction Manual How to Use LeaderGuide Pro™ – It's Easy! Instruction Manual george! george! george! is an add-in to PowerPoint that interacts with LeaderGuide Pro™ 7 Plus george! sends PowerPoint slides and notes into Word as Speaker Notes and Session Handouts LeaderGuide Pro™ 7 Plus leader guides and participant guides Greater Control When you use george! to send PowerPoint slides and notes into a leader guide you have complete control over the size of the slide images that are brought into your leader guide whether or not there is a frame (border) around the slide images that are brought into your leader guide the distribution of your slides and notes across Modules and Lessons in your leader guide – george! takes the LGPro Special/Import Finished Slides/Advanced Import functionality to an even higher level – george! allows you to add ALL of the Lessons that will be in each of your Modules, distributing your slides and notes accordingly Easier Updating If you use george! to send PowerPoint slides and notes into a leader guide you can update your leader guide slides and notes directly from PowerPoint after making your changes in PowerPoint george! is available now! At http://www.george4ppt.com Download the software for free Try george! in free trial mode – we think you’ll like him Purchase a Product Key to unlock his full functionality Transition to Troubleshooting © 2009 Great Circle Learning. All rights reserved. Rev. Date 12/03/2009 Page 259 Troubleshooting Instruction Manual Troubleshooting Goal The purpose and goal of this module is to help you address problems Time 5 minutes per issue Overview Look up the issue you are having trouble with Materials Needed Page 260 Instruction Manual How to Use LeaderGuide Pro™ – It's Easy! Instruction Manual Troubleshooting The LGPro Ribbon Buttons Don't Work If you can see the LGPro ribbon, but the buttons won’t work Do you actually have a LeaderGuide Pro™ document open? After opening LGPro, you must then either – Click on the Blank page button to Create a new leader guide – Or, click on the Folder button to open an existing leader guide If you have opened a new or existing LeaderGuide Pro™ document and you see the LGPro ribbon, but the buttons won’t work Look for this Macros Security Warning – It is usually found in the upper left corner of your screen – just above your LeaderGuide Pro™ document – and just under the LGPro ribbon – It is small and easy to miss Click on Options – In the dialog box that appears, click on Enable this content If you do not see the Macros Security Warning You need to take action to set your Macros to ensure that you receive the Security Warning so that you have the option to allow the LGPro macros to run Learn how to do this on page 20 © 2009 Great Circle Learning. All rights reserved. Rev. Date 12/03/2009 Page 261 Troubleshooting Instruction Manual Adding a Graphic or More Text on my Cover Page The Program Name on the Cover page is formatted with 200 points before and 60 points after to position it properly on the page To add a graphic or other text before or after the Program name Adjust the points before and after the Program Name – Place your cursor in the Program Name – Click on the Home tab (Word) – Click on the arrow in the lower right corner of the Paragraph group – Click on the Indents and Spacing tab if it isn’t showing – Use the up/down arrows to adjust Spacing: Before/After Page 262 How to Use LeaderGuide Pro™ – It's Easy! Instruction Manual Troubleshooting Adding a Graphic or More Text on my Cover Page, continued Also, be careful not to carry over the Program Name style… If you put your cursor next to the Program Name and hit Enter on your keyboard, the paragraph mark you generate may well have the LGPro Program Name style associated with it If you then insert a graphic next to this paragraph mark or add some text, this will cause strange things to happen in your leader guide in all the places where the program name automatically appears So, with your cursor next to your new paragraph mark or in any text you’ve typed in or next to any graphic you’ve added – Click on the Clear Formatting button in the Font group on the Word Home ribbon (Click on the Home tab to get there) to remove the LGPro Program Name style – Or, Click on one of the LGP Text Formatting buttons to apply a different LGPro style © 2009 Great Circle Learning. All rights reserved. Rev. Date 12/03/2009 Page 263 Troubleshooting Instruction Manual The Word Undo or Redo button didn’t work When you want to Undo or Redo something: To Undo: – Cut or Delete rather than clicking on the Word Undo button To Redo: – Execute the command again from the LGPro Ribbon rather than clicking on the Word Redo button Because: – When you click a button on the LGPro Ribbon you may actually be executing a series of Word commands. – And when you click on the Word Undo or Redo button you are only asking Word to address one command (the last one). – So, you may not get the result you want with the Word Undo and Redo buttons Page 264 How to Use LeaderGuide Pro™ – It's Easy! Instruction Manual Troubleshooting Track Changes is Not Working Right The Word Track Changes function can cause trouble in Word documents with tables Microsoft acknowledges that Track changes can cause table corruption issues, which can lead to a big mess for you since LGPro documents end up being big tables Suggestions Instead of Track Changes, use the Word Text Highlighting function to highlight edits and comments Font Color function to change the color of added/edited content and comments If dropping Track Changes is just not feasible Use the LGPro Librarian function to archive your Modules Submit a copy of your archived Modules for review, instead of your full master leader guide file – This option also has the advantage of not overloading or confusing the reviewer because you can isolate discreet sections of your document and send just those sections for review If your reviewers need to see the entire document, use Librarian to insert your archived Modules and Lessons into a new leader guide that you can use as your review file When you receive the reviewed material back, if everything seems fine, you can take your next steps related to any changes and the use Librarian to – archive this revised content – insert it into your master leader guide file – delete the old modules for your leader guide © 2009 Great Circle Learning. All rights reserved. Rev. Date 12/03/2009 Page 265 Troubleshooting Instruction Manual Training At A Glance Isn't Updating Properly If your Training At A Glance is showing an error message that says “Error reference source not found” Click on the Update All Fields button Then click on the TAG button If this doesn’t help…Go to the appropriate Module page in your leader guide Highlight the text that you typed or pasted in for Module Name, Time, or Overview – Don’t highlight the entire box, just highlight the text you added Click on the Home tab In the Styles group, click the arrow in the lower right corner In the Styles box that appears scroll until you find a style that has a blue outline box around it – this is the current style of the text you have highlighted If the Style in the blue box isn’t correct, scroll through the Styles until you find the style that you need and click on it to apply it to your highlighted text – Module Name – the style should be: Heading 1, Module Title – Time – the style should be: zLGP Module Time – Overview – the style should be: zLGP Module Process – Repeat this process as needed Click on the Update All Fields button Then click on the TAG button If your Training At A Glance is not reflecting all of your modules, even though they all show up in your Table of Contents Go to the Module overview page just before the Module that isn’t appearing in your TAG Check the Styles associated with the text that you have entered for each of these fields, and update any that are not correct: – Module Name – the style should be: Heading 1, Module Title – Time – the style should be: zLGP Module Time – Overview – the style should be: zLGP Module Process Page 266 Click on the Update All Fields button Then click on the TAG button How to Use LeaderGuide Pro™ – It's Easy! Instruction Manual Troubleshooting Training At A Glance Isn't Updating Properly, continued How to check the Style of your text – do this one style at a time: Highlight the text that you entered in for the Module Name, (Don’t highlight the entire box with the words, just highlight what you typed in or pasted in as a Module Name) Click on the Home tab In the Styles group, click the arrow in the lower right corner In the Styles box that appears scroll until you find a style that has a blue outline box around it – this is the current style of the text you have highlighted If the Style in the blue box isn’t correct, scroll through the Styles box until you find the style that you need and click on it to apply it to your highlighted text Repeat this process with the Time and Description (Don’t highlight the words “Time” and “Description”- just highlight what you typed or pasted in) © 2009 Great Circle Learning. All rights reserved. Rev. Date 12/03/2009 Page 267 Troubleshooting Instruction Manual Pasted in Content is Not All Showing in a Block Allow your LGP Block to flow over multiple pages If you’ve pasted in a lot of content into an LGP Block and it seems to be buried at the end of the page Place your cursor in the LGP Block Click on the Word Layout tab and click on Properties in the Table group In the dialog box that appears, click on Row Check the box next to Allow row to break across pages Click OK – This will allow the Block to break and flow across as many pages as needed to display all of your content Page 268 How to Use LeaderGuide Pro™ – It's Easy! Instruction Manual Troubleshooting How to Check for LGPro Styles The LGPro template has pre-set styles Do not change the LGPro style names Learn more on page 44 How to check the Style of your text – do this one style at a time Highlight the text that you want to check Click on the Home tab (Word) In the Styles group, click the arrow in the lower right corner In the Styles box that appears scroll until you find a style that has a blue outline box around it – this is the current style of the text you have highlighted If the Style in the blue box isn’t the LGPro Style that you need to be associated with your highlighted text – scroll through the Styles box until you find the LGPro Style that you need – click on it to apply it to your highlighted text © 2009 Great Circle Learning. All rights reserved. Rev. Date 12/03/2009 Page 269 Troubleshooting Instruction Manual I Accidentally Pasted in Formats from Source Documents If you are copying text from source documents Paste it into your LGP blocks using the Paste Special button found in the LGP Text/Table Formatting group on the LGPro ribbon The text you add using Paste Special will pick up the LGP formatting associated with the paragraph mark you put your cursor next to Adjust the LGP text formatting by using the LGP text formatting buttons found in the LGP Text/Table Formatting group on the LGPro ribbon Place your cursor in the text you want to change and click the appropriate button – Hovering over each button tells you the style it applies Page 270 How to Use LeaderGuide Pro™ – It's Easy!


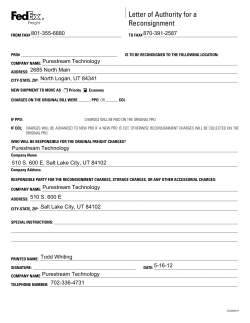

© Copyright 2026