
©
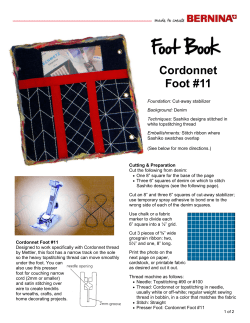
©Tracy L. Chapman & Sew Thankful Inc. September 2008. All rights reserved.
Permission to copy and distribute this complimentary pattern at no charge to others, for personal or NON-PROFIT use, for guild and group projects is granted provided all
copyright information and references to Sew Thankful are kept in tact one each and every pattern copy printed/distributed.
Permission is also granted to individual crafters (NOT shops) making small quantities of finished items to sell at craft fairs.
If shops wish to make finished items to give (at NO CHARGE) as a promotion for their shop (i.e., at a shop hop), permission is ONLY granted if a COMPLETE printed copy of
this entire pattern with all copyright information and reference to www.sewthankful.com is included along with the finished item at NO CHARGE to EACH recipient.
Sign up for the FREE eNews at www.sewthankful.com for notice of future complimentary projects.
Please read entire pattern carefully all the way through before beginning.
Materials required:
•
•
•
•
•
Fabric of your choice – enough to make 2 Extra-Large Yo-Yo’s using Clover Quick Yo-Yo Maker
2 buttons – size & style of your choice
1 Lazy Girl Handy Tab (coordinating or contrasting, preference of your choice)
1 1 ¼” Split Ring
Strong coordinating thread to stitch yo-yo’s together (a 2nd thread may be desired for securing button)
Recommended Tool: Clover Extra Large Circle Yo-Yo Maker
Instructions:
Make 2 yo-yos using Clover Extra Large Yo-yo Maker OR your favorite method.
Stitch 1 button to the gathered side of one yo-yo; make sure to stitch several times so button is very
secure; knot & tie off thread securely on back (flat) side of yo-yo. Repeat with the other button & yo-yo.
Place Lazy Girl Handy Tab with “open ends” on back side of one yo-yo & button unit and folded end
extending approximately ½” past the edge of the yo-yo as shown below.
Hand stitch across “open tail ends” securing to back side of yo-yo but being careful not to show stitching
on front side of yo-yo.
Place remaining yo-yo/button unit against the “tabbed” yo-yo/button unit with the button sides out. Begin
at the right side of the “Lazy Tab” and whip stitch all the way around perimeter of yo-yos with
coordinating thread. Carefully stitch through all layers at the “Lazy Tabs”, making two passes over the
“Lazy Tab” area. Knot, secure & bury thread.
Slide the split ring on to “Lazy Tab”.
Enjoy your new key chain!
We ask for no money in return for providing this and other complimentary patterns; however, we do hope that if you should have
need of threads, sewing patterns, fiber art, supplies, quilting and/or various other supplies you will consider looking for them at
www.sewthankful.com
Shopping at Sew Thankful helps ensure that Tracy will have the opportunity to continue designing and sharing more fun patterns and
projects from time to time
Page 2 of 2


© Copyright 2026