
Streetwise Cycling NORTH CAROLINA A GUIDE TO SAFE BICYCLING IN
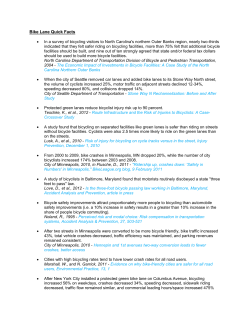
Streetwise Cycling-UnLinked-Web
11/27/06
5:50 PM
Page 2
Streetwise
Cycling
10 OUT BOUND
1166
A GUIDE TO SAFE BICYCLING IN
NORTH CAROLINA
NC Department of Transportation
Division of Bicycle & Pedestrian Transportation
401 Oberlin Road, Suite 250
Raleigh, NC 27699
Phone: (919) 807-0777
Fax: (919) 807-0768
Web: www.ncdot.org/transit/bicycle
Traffic skills to help you get where you’re going
Emergency moves that can save your life
Equipment that can make your cycling safer
NC Department of Transportation
Division of Bicycle & Pedestrian Transportation
Streetwise Cycling-UnLinked-Web
11/27/06
5:50 PM
Page 4
Streetwise
Cycling
A GUIDE TO SAFE BICYCLING IN
NORTH CAROLINA
The purpose of the Streetwise Cycling guide is to explain the
rights and duties of bicyclists, as vehicle operators on North
Carolina's roads. Additional information on traffic riding,
handling skills, and equipment is included to encourage more
proficient riding.
Streetwise Cycling-UnLinked-Web
11/27/06
5:50 PM
Page 2
2
3
Table of Contents
North Carolina is for Bicycling
You’re the Driver of a Vehicle............................................................................4
Fit & Equipment................................................................................................8
Parts of the Bicycle................................................................................10
A 13-Point Quick Check........................................................................11
Protecting Your Bike from Theft............................................................12
Protecting Your Brain in a Crash............................................................13
Riding in Traffic....................................................................................14
Where Do You Ride...............................................................................21
Night-time Riding.................................................................................22
Basic Riding Skills................................................................................24
Advanced Riding Skills.........................................................................26
Five Mistakes to Avoid..........................................................................30
In Case of Trouble.................................................................................31
What about dogs? ................................................................................32
Share the Road.......................................................................................33
For More Information............................................................................36
Disclaimer
Every attempt has been made to provide complete and thorough information on the North
Carolina laws pertaining to bicycles. NCDOT cannot be held responsible for any exclusions,
omissions nor deletions of relevant laws. If you have questions or concerns regarding North
Carolina law pertaining to bicycles, you may wish to consult an attorney.
Streetwise Cycling was originally published in 1988 and was authored by John E. Williams.
This update of Streetwise Cycling was published November, 2006.
Photos by Tom Norman, John Williams, G.L. White and Mark Smith. 1,000 copies produced at a cost of $0.56 per copy
North Carolina Department of Transportation
Start with a climate that offers good
cycling year-round. Add an excellent
network of roads, both urban and rural.
Throw in the special bicycle maps,
facilities and street improvements provided by state and local governments. Then,
round out the formula with an active population of bicyclists—commuters, tourists,
racers, mountain bicyclists fitness riders,
and around-town cyclists—and it's easy to
see why “North Carolina is for Bicycling.”
From the mountains to the sea, bicycling opportunities are unlimited. If you
tour, there are thousands of miles of lightly-traveled roads waiting to be explored.
To make it easier for you to find your way,
the Division of Bicycle and Pedestrian
Transportation has selected and mapped a
system of “Bicycling Highways.” Nine
routes cover the state, with a route guide
for each, which details information on
terrain, road condition, available services
and points of interest. Maps of local
bicycle routes have also been produced.
More are in the works. Check the last page
of this booklet for a list of publications and
resources, and their web links.
As for events, each year there are
hundreds of tours, races, festivals, bi- and
triathlons and outings of all kinds. So
many, in fact, that the Division of Bicycle
and Pedestrian Transportation publishes a
yearly online calendar to help you keep
track. Sponsored by the fifty-or-so bicycle
clubs and organizations as well as various
community groups, these events draw
thousands of participants—from novice
riders to internationally-ranked racers.
Governments, too, have begun to
address bicyclists' needs. In some places,
special signs, bicycle lanes, greenway
paths and bicycle parking facilities have
been in place for years. More recently,
money from the federal government to the
Department of Transportation has made
providing additional bicycle improvements easier. Across the state, efforts are
underway to increase cyclists' safety on
the road.
Ultimately, however, your safety is in
your own hands. Statistics show that 75%
of all bicycle/motor vehicle accidents are
the fault of the bicyclist. Learn and obey
the traffic laws and practice the safe riding
techniques outlined in this booklet. A
skilled cyclist, riding responsibly, can
enjoy bicycling in North Carolina for
years to come.
Division of Bicycle and Pedestrian Transportation
Streetwise Cycling-UnLinked-Web
11/27/06
5:50 PM
Page 4
4
5
You're the Driver of a Vehicle
As the driver of a vehicle, you've got some
important rights and duties. The most important right is to safely use the roads to get
where you're going. The most important duty
is to ride cooperatively and obey the laws.
Riding a bike on the road isn't a game. Cyclists
who ignore their duties endanger their right—and
the rights of others—to use the roads.
The following highlighted statutes that
apply to the operation of a bicycle are
excepted from the Motor Vehicle Laws of
North Carolina.
Cyclists must stop at stop
signs and red lights
What the Law says:
Bicycles are Vehicles
“Vehicle: Every device in, upon, or by
which any person or property is or may be
transported or drawn upon a highway,
excepting devices moved by human power
or used exclusively upon fixed rails or
tracks; provided, that for the purposes of
this Chapter bicycles shall be deemed vehicles and every rider of a bicycle upon a
highway shall be subject to the provisions
of this Chapter applicable to the driver of a
vehicle except those which by their nature
can have no application.” §20-4.01 (49).
Just like any other drivers, you must stop
at stop signs and yield to cross traffic. By
the way, “cross traffic” includes any
pedestrians crossing the street in the
crosswalk.
Red lights also mean stop. And, unless
you're turning right, you must wait for
the green light. If you find a signal that
doesn't change for you, that means it's
not responsive to bikes. Contact the local
traffic engineers and suggest they install
signals that detect bikes. For more information, contact the Division of Bicycle
and Pedestrian Transportation.
North Carolina Department of Transportation
What the Law says: Stop Signs
and Stop Lights
“When a stop sign has been erected or
installed at an intersection, it shall be
unlawful for the driver of any vehicle to
fail to stop in obedience thereto and yield
the right-of-way to vehicles operating on
the designated main-traveled or through
highway…” §20-158 (b) (1).
“When a steady or strobe beam stoplight
is emitting a red light controlling traffic
passing through an intersection, an
approaching vehicle facing the red light
shall come to a stop and shall not enter the
intersection. After coming to a complete
stop and unless prohibited by an appropriate sign, that approaching vehicle may
make a right turn.
b. Any vehicle that turns right under this
subdivision shall yield the right-of-way
to... Other traffic and pedestrians using
the intersection...” §20-158 (b) (2) (a).
Keep in mind that ignoring stop signs and
red lights leads to about one of every ten
car-bike crashes. It's also one of the
biggest complaints motorists have against
bicyclists.
Cyclists must go with the
flow of traffic
Legally, you must ride on the right with
traffic, not against it. There's a lot of confusion about this. Some people believe the
law says just the opposite, but pedestrians
are the only ones who should travel against
traffic (and that's on roads without sidewalks see §20-174(d) of the Motor Vehicle
Laws of North Carolina). Riding against
traffic has never been legal in the U.S. and
—if we're lucky—never will be.
What the Law says:
Which Side of the Road
“Upon all highways of sufficient width a
vehicle shall be driven upon the right half
of the highway…”§ 20-146 (a).
Nationwide, nearly 1/4 of all car/bike
crashes are caused by wrong way riders.
They believe that it's safer to ride facing
traffic because they can “see the cars
coming.” It's not safer. Motorists don't
look for cross traffic on the wrong side on
the road.
Cyclists must use lights and
reflectors at night
The law requires at least some sort of
headlight and a red rear reflector or taillight. That's not much and you should
consider getting more.
In the United States, nearly half of all
cycling deaths involve a cyclist riding at
night without lights. In the late 1970's,
night-time accidents led to only about
30% of the crashes, so the picture is getting worse, not better. Some researchers
say only 3% of all cycling happens after
dark, proving just how deadly night-time
riding is without the proper equipment.
What the Law says: Lights
“Lamps on Bicycles: Every bicycle shall
be equipped with a lighted lamp on the
front thereof, visible under normal atmospheric conditions from a distance of at
least 300 feet in front of such bicycle, and
shall also be equipped with a reflex mirror or lamp on the rear, exhibiting a red
light visible under like conditions from a
distance of at least 200 feet to the rear of
such bicycle, when used at night.”
§20-129 (e).
Slow moving vehicles must
keep to the right side
If you are going slower than the speed
limit, you must ride in the right through
lane or as close to the curb as practicable.
However, you can move to the left to
make a left turn or pass another vehicle
going the same direction. What does
practicable mean?
Division of Bicycle and Pedestrian Transportation
Streetwise Cycling-UnLinked-Web
11/27/06
5:50 PM
Page 6
6
7
What the Law says:
Slow Moving Vehicles
“Upon all highways any vehicle proceeding at less than the legal maximum speed
limit shall be driven in the right-hand lane
then available for thru traffic, or as close
as practicable to the right-hand curb or
edge of the highway, except when overtaking and passing another vehicle proceeding in the same direction or when
preparing for a left turn.” §20-146 (b).
There is no hard and fast definition. In
one situation, it might mean two feet; in
another, eight feet. Just how close “practicable” is depends on the road, the surface, the traffic, the speed of the rider, and
other factors. For example, you can ride
far enough to the left to avoid a roadside
hazard (like a drain grate, a parked car
door, right turning cars or debris).
Cars must pass bikers
safely
Motorists must give bicycles enough
space when they pass. According to the
law, they must allow at least two feet of
clearance and not move back to the right
until it's safe. At the same time, bicyclists
What the Law says:
Passing and Being Passed
“(a) The driver of any such vehicle overtaking another vehicle proceeding in the
same direction shall pass at least two feet
to the left thereof, and shall not again
drive to the right side of the highway until
safely clear of such overtaken vehicle…
“(b) Except when overtaking and passing
on the right is permitted, the driver of an
overtaken vehicle shall give way to the
right in favor of the overtaking vehicle
while being lawfully overtaken on audible signal and shall not increase the speed
of his vehicle until completely passed by
the overtaking vehicle.” §20-149.
being passed can't speed up while being
passed. And, if the passing motorist
honks a horn, the bicyclist must give way
to the right.
On two-lane roads, drivers can't legally
pass on the crest of a grade or on a curve
where they can't see what's coming for
500 feet; nor can they pass where passing
is prohibited by signs or markings.
What the Law says:
Making Turns
“(a) Right Turns. Both the approach for a
right turn and a right turn shall be made as
close as practicable to the right-hand curb
or edge of the roadway.
“(b) Left Turns. The driver of a vehicle
intending to turn left at any intersection
shall approach the intersection in the
extreme left-hand lane lawfully available
to traffic moving in the direction of travel
of that vehicle, and, after entering the
intersection, the left turn shall be made
so as to leave the intersection in a lane
lawfully available to traffic moving in
the direction upon the roadway being
entered.” § 20-153.
Bikes make turns like any
other vehicles
Bicyclists, like other vehicle drivers,
should make turns in predictable ways. To
make a right turn, move over towards the
right edge and signal. To make a left turn,
look back, signal, merge towards the left
when safe (into a left turn lane, if one is
available) and make your turn. This is the
standard method.
You can also, if you like, pull to the curb
and make your turn like a pedestrian,
walking across each street. Which
approach you use depends on how skilled
you are, the road and the traffic situation.
North Carolina Department of Transportation
What the Law says:
Signaling Turns
“(a) The driver of any vehicle upon a
highway or public vehicular area before
starting, stopping or turning from a direct
line shall first see that such movement
can be made in safety…and whenever the
operation of any other vehicle may be
affected by such movement, shall give a
signal as required in this section,
plainly visible to the driver of such other
vehicle, of the intention to make such
movement…
“(b)…Whenever the signal is given the
driver shall indicate his intention to start,
stop, or turn by extending the hand and
arm from and beyond the left side of the
vehicle as hereinafter set forth.
“Left turn—hand and arm horizontal,
forefinger pointing.
“Right turn—hand and arm pointed
upward.
“Stop—hand and arm pointed downward…” § 20-154 (a) and (b).
Cyclists must signal turns
with their left hands
Signaling turns is an important part of
sharing the road. It lets others know what
you want to do. It's required any time
your move could affect another driver.
On the other hand, simply giving a signal
doesn't give you the right to turn in front
of someone. Your signal is a request, not
a demand.
You make a left turn signal by holding
your left arm out straight to the side. To
signal a right turn, hold out your left arm
with the hand pointed up. To signal a
stop, hold your left arm out with the hand
pointed down.
Reckless cycling is just as
illegal as reckless driving
If you get a ticket for “reckless driving”
while bicycling, you could be in a lot of
trouble. While it's a misdemeanor, the
penalty is serious: up to six months in jail
and/or a fine of $500.00. It's up to the
judge to decide what your sentence will
be. Is it worth the thrill of flying down
the street, ignoring traffic laws and the
rights of others?
At the same time, motorists who endanger bicyclists by harassing and dangerous
moves could be cited for reckless driving.
What the Law says:
Reckless Driving
“(a) Any person who drives any vehicle
upon a highway or any public vehicular
area carelessly and heedlessly in willful
or wanton disregard of the rights or
safety of others shall be guilty of reckless
driving.
“(b) Any person who drives any vehicle
upon a highway or any public vehicular
area without due caution and circumspection and at a speed or in a manner so as to
endanger or be likely to endanger any
person or property shall be guilty of
reckless driving.
“(d) Reckless driving as defined in
subsections (a) and (b) is a class 2 misdemeanor. §20-140.
Summary
While there are other traffic laws that affect
bicyclists, these are the laws that are most
often misunderstood. In this discussion, we
have tried to give both the legal language
(shown in shaded area) and a brief explanation of what the laws mean.
If you want to learn more go to the North
Carolina General Statutes online. The
Motor Vehicle Laws of North Carolina
are all essentially found in Chapter 20 of
the North Carolina General Statutes.
This chapter can be found at
www.ncleg.net/gascripts/statutes/statutes
toc.pl. The laws are subject to change, so
check the web site for new laws and
proposed legislation. For more information on
laws affecting bicyclists, please see the Guide to
North Carolina Bicycle and Pedestrian Laws,
online at www.ncdot.org/transit/bicycle/
laws/resources/lawguidebook.html.
Division of Bicycle and Pedestrian Transportation
Streetwise Cycling-UnLinked-Web
11/27/06
5:50 PM
Page 8
8
9
Fit & Equipment
What kind of bike is
for you?
It used to be that people thought “a bike
is just a bike.” But today, you'll find many
different kinds in the shops. Now more
than ever, the bicycle you should get
depends on what you want to do with it.
Do you want to go on long distance tours,
carrying your own luggage? Look seriously at a heavy-duty touring bike with
dropped handlebars, fairly wide aluminum rims, 21 or more speeds, fenders
and racks.
Do you plan to do mostly fast 40 to 100mile one-day fitness rides? Consider a
semi-racing style bike with a lightweight
responsive frame, 18 to 24 speeds and
1"-wide high pressure tires.
Will you bicycle on dirt roads and trails?
Test ride a mountain bike with 1-1/2" to 21/2" aluminum wheels, 15 speeds and
indexed shifting for positive gear changes.
Maybe you'll just be riding around town?
Mountain bikes and hybrid styles are
popular for that purpose too, Think about
the kinds of places you'll be parking your
bike. Can you find secure locations? Can
you bring your bike inside? If not, consider getting a “beater bike” (an old-looking
clunker) for town riding.
Facing page: Bike shops have a wide assortment of bicycles to suit almost every riding style.
Above left: You should be able to stand over the bike with a little clearance; just how much depends on the
type of bike and what you want to do with it.
Above right: Your leg should be straight when you put your heel on the pedal in its lowest position. When you
pedal with the ball of your foot, you'll have a slight bend at the knee.
Sizing your bike:
For greatest comfort and safety, you'll
want to adjust your bike to fit just right.
It takes a little time but is well worth it
in the long run. There are many
variables involved in fitting your bike
precisely to your way of riding and your
body. Here are some rules of thumb.
Start with them and gradually modify
your bike a little at a time as you learn
what is and isn't comfortable.
Whatever bike you choose, getting
one that fits right is very important for your
safety and comfort. The basic test is
whether you can straddle the bike flat-footed with an inch or two of clearance at the
frame's top tube. Clearance for a hybrid
bike should be approximately 2”. For a
mountain bike, you need 3” - 4” of clearance if you plan to blast down hillsides,
less if you tour on back country dirt roads.
North Carolina Department of Transportation
Adjusting to fit:
Saddle height: Set the saddle so that
when you put your heel on the pedal in
its lowest position, your leg is just
straight. Then, when you pedal with the
ball of your foot, you'll have a slight bend
at your knee.
Many people ignore this step. They
either have their saddles too high (and
they wobble side-to-side as they pedal)
or they have them too low (and put too
much strain on their knees as they ride).
With a little practice, you'll be able to
spot people with their saddles set at the
wrong height. Why not give them some
friendly advice?
Saddle position and tilt: If you dropped a
string from the front of your saddle, it
should fall about 1-1/2” behind the center
of the bottom bracket.
Division of Bicycle and Pedestrian Transportation
Streetwise Cycling-UnLinked-Web
11/27/06
5:50 PM
Page 10
11
10
Parts of the Bicycle
(The bottom bracket is where the crank
arm's axle goes into the frame.) If the saddle is too far forward, your pedal motion
is thrown off; if the saddle is too far back,
you'll stretch out too far.
And, for most people, the top of the
saddle should be roughly level. Some tilt
it slightly forward or back but too much
tilt isn't good.
Handlebar height and stem length:
Generally, the top of your handlebars
should be about level with the top of your
saddle. To adjust the lean of your upper
body, next look at the length of the
handlebar stem.
A good test for bikes with dropped
handlebars is to put your elbow at the front
of the saddle and reach for the handlebar.
You should just be able to lay the tips of
your fingers across the top of the bars.
Important: Make sure you have at least
two inches of handlebar stem and
seatpost inside the frame. Look for a
mark on the side that says something like
“MAX EXT” or “HIDE THIS LINE.”
These show you how much you need
inside the frame for safety.
13 Point Quick Check
1.
2.
Basic maintenance
With a few tools and some basic skills, you
can do most of the routine maintenance for
your bike. It's pretty easy to keep your
brakes in shape, to adjust your derailleurs
(gear shifters), fix a flat tire and keep the
chain clean and lubricated.
And, by taking care of these simple tasks,
you can extend the usable life of your
bicycle and cut down on major repair
costs. Try it!
To learn more, get a good bike maintenance
book with clear illustrations and step-bystep instructions or check out online
resources. Also contact the local recreation
department or community college. They
may offer bike maintenance classes.
North Carolina Department of Transportation
3.
4.
5.
6.
7.
Push the tires against a curb. If you
can flatten them, you need more air.
Inflate to the pressure shown on the
tire's sidewall.
Make sure the tire valve stems point
straight to the hubs to avoid rim
cuts. Such cuts can't be patched.
Twist and rock the saddle. It
shouldn't move in any direction.
Twist and rock the handlebars. They
shouldn't be loose.
Squeeze the brakes. The levers
should work smoothly and not hit
the handlebars; the brake pads
should hit the rims squarely.
Run through the gears while riding.
They should shift smoothly onto all
sprockets and not throw the chain.
Rock the fork and handlebars
forward and back and turn from
side to side to check for a loose or
tight headset (the bearings where
handlebars and fork enter the frame).
They shouldn't rock or bind.
8.
9.
10.
11.
12.
13.
Squeeze pairs of spokes together.
They should be tight and the wheels
should be straight. Also took for
broken spokes.
Rock the wheels from side to side. If
they move, the hub bearings are
loose. Next, spin the wheels. They
should roll smoothly. Also keep
each wheel's axle nut or quick
release lever tight.
Rock the pedals front to back. They
shouldn't move and should spin
freely.
Rock the crank arms from side to
side. There should be NO play at all.
Look closely at the chain. It
shouldn't be either caked with
grease and dirt or dry and rusty.
Look for any loose nuts, bolts and
screws and tighten them up.
This chart reprinted with permission of
Bikecentennial, the Bicycle Travel Association. ©
1988 Bikecentennial (now Adventure Cycling). All
rights reserved. Reproduction in any form without
written permission of Bikecentennial is forbidden.
Division of Bicycle and Pedestrian Transportation
Streetwise Cycling-UnLinked-Web
11/27/06
5:50 PM
Page 12
12
13
Protecting your bike from theft
Bicycles are stolen every day in North Carolina.
Here are ten tips to help keep yours from being
one of them…
1.
2.
3.
Lock your bike whenever you
leave it. …Even if you're just going
into a store for a few minutes. A pro
can steal your bike in seconds.
Lock your bike where it can be
seen. If you lock it behind the
bushes, you give the thief a chance
to work in private.
Most locks, chains, or cables can
be broken in a few seconds. For
best protection, get a high security
lock like a U-bolt shaped lock and
use it. These won't stop every thief
but they will stop most.
Don't leave fancy accessories on
your bike when you park it.
Expensive bags, tool kits, and
clip-on lights are easy to steal. Take
them with you.
5. Don't leave your bike outside at
odd hours. Take it inside if you can.
The best lock won't keep someone
from taking your brakes, saddle, or
seatpost.
6. Lock AT LEAST your front wheel
and frame to something solid. It's
better to lock both wheels if you
can—especially if you have quick
release hubs. Think about taking
your front wheel when you lock up.
7. If you have a quick-release seatpost bolt, take your saddle with
you when you park. That'll make
the bike less attractive AND a lot
harder to ride! And it'll keep your
saddle from being stolen.
8. Engrave an ID number on
expensive parts. Otherwise, if
they're recovered, you'll have a hard
time identifying them. The most
important parts are those easiest to
remove: seat post, handlebars &
stem, derailleur, brakes, crank arms
and wheels.
9. Register your bike with the police.
If your police department has such a
program, take advantage of it. It can
help them return your bike if it's
recovered. Be careful though, not to
let them stamp a number into your
frame. Some agencies do this and it
can ruin a really good frame.
10. Make your bike look really ugly.
If it's dirty and plain looking or has a
gross paint job, it may not attract
some thieves. Ugly and unique bikes
are also less tempting because they
are easier to identify by their owners.
Protecting your brain in a crash
4.
North Carolina Department of Transportation
In North Carolina, children under 16 are
required to wear a bicycle helmet. It's a
good idea for adults, too. A bicycle
helmet may be the single most important
piece of equipment you can buy. Studies
show that about 75% of all cycling
deaths are caused by head injuries. And,
each year, many more cyclists suffer
permanent brain damage as a result of a
crash. Don't risk it… wear a helmet every
time you ride!
Helmets come in many styles and colors
and there is one that is just right for you.
Proper sizing is critical for your helmet to
protect your head in case of a crash. Here
are some important points on helmet fit.
• Make sure your helmet is the right size
and doesn't rock from side to side; use
the interchangeable interior pads to
create a snug fit.
• The helmet should sit level on your
head; you should be able to see the
front edge when you look up.
• The neck strap should be snug, but not
too tight; the rule of thumb is that there
should be enough slack for you to
easily fit your fingers between your
chin and the strap.
Be sure to replace your helmet after a
crash—they are designed to withstand
one crash only.
Helmet buying tips:
• Get a helmet that meets the Consumer Product Safety Commission standard. Look for a
CPSC sticker inside the helmet or on the box.
• Don't buy unless you can try it on first. It shouldn't feel tight or uncomfortable. The salesperson can fit your helmet with different sized foam pads to match the shape of your head.
• If you plan to tour, race, trail ride or commute long distances in hot weather, cooling is
very important. Look for a light-colored helmet with plenty of ventilation.
• Be careful with your helmet. Toxic solvents, grease, paints or stickers may ruin the shell
without your seeing the damage.
For more information on bicycle helmets visit the
Bicycle Helmet Safety Institute at www.helmets.org
Division of Bicycle and Pedestrian Transportation
Streetwise Cycling-UnLinked-Web
11/27/06
5:50 PM
Page 14
14
15
Riding in traffic
Above: If you're going very slowly compared to everyone else, ride well over towards the right side
of the roadway.
The following tips are for adults riding on medium speed roads. They are not intended for young
children or for cyclists riding on high speed highways or expressways.
Riding safely in traffic takes practice
and the proper attitude. Remember
that you're the driver of a vehicle.
Once you've got that attitude, the rest is relatively easy. But it still takes work. Start
practicing your skills on quiet streets and
gradually move up to the busy ones. Once
you've mastered these cycling skills, you'll
be able to ride safely on just about any road.
One of the most common mistakes that
cyclists make is to take the wrong road
position for conditions. Just where you
should ride on the road depends on three
main factors…
The closer you're going to the speed of
traffic, the closer you should ride to
that traffic.
1. Your speed:
NEVER ride fast near the curb—that's a
great way to get hit by a car coming out
of a side street. No one looks for fastmoving vehicles coming down the gutter!
Just how fast are you going? You don't have
to look at a speedometer for this test. The
basic rule to follow is this:
Above: If you're going almost as fast as everyone else, rides near the traffic stream. This helps make
you visible to others and it discourages motorists from turning in front of you.
• If you're going much slower than
traffic, ride well over to the right.
• If you're going almost as fast as
everyone else, ride near the traffic
stream.
• If you're going as fast as everyone
else, ride right in the traffic stream.
North Carolina Department of Transportation
Above: If you're going as fast as other traffic, ride right in traffic. This often happens during rush
hour on busy roads. No one moves fast in a traffic jam.
Division of Bicycle and Pedestrian Transportation
Streetwise Cycling-UnLinked-Web
11/27/06
5:50 PM
Page 16
17
16
2. Your destination:
Where are you going? Turning right?
Left? Going straight? The basic rule to
follow is:
Near intersections, use your road
position to tell others where
you're going.
Turning Right: If you're going to turn
right, move towards the right edge of the
roadway. This will tell others what to
expect.
Going Straight: If you're going
keep away from the curb. Just
depends on your speed and the
the road but you should
closer than three or four feet.
straight,
how far
width of
be no
This approach helps solve three common
conflicts:
1. First, it discourages right turning
motorists from pulling up next to you
and then turning right around you. By
riding a bit further into the roadway,
you make them hesitate. As a result,
most will slow down and let you go
through before turning.
2. Next, it makes you more noticeable
to drivers who are waiting at stop
signs on side streets. These drivers are
deadly for bicyclists and must be
watched closely. They cause many
car-bike crashes.
3. Finally, it makes you more visible to
drivers coming towards you. This is
important because one of the most
common threats you face is being cut
off by left-turning cars.
These three threats are very common
complaints among adult bicyclists and
with good reason. Since they tend to ride
too far to the right in urban traffic, they
put themselves out of the line-of-sight for
most drivers.
This one simple trick—not pulling to the
curb when going straight—can help you
avoid between 20 and 40% of all car-bike
crashes and many confrontations.
Here's a rule of thumb: if you often get cut
off, you're probably riding too close to the
curb for your speed; if you often get
honked at, you may be riding too far from
the curb for your speed.
Above: If you plan to turn right, move towards the right edge of the roadway, signal your turn, look
for cross traffic, obey any traffic controls and make your turn.
Above: To go straight, do NOT move towards the right curb; that fools motorists into thinking you
will turn right. Instead, line up with where you want to be beyond the intersection.
Note: If you're going straight, stay out of
right-turn lanes. Otherwise, you'll often
find yourself in trouble when you get to
the intersection. As you approach, look
back for a gap in traffic and merge into
the through lane when it's safe. On faster
roads, rides near the right edge of the
through lane.
Turning Left: If you're turning left, the
correct position is either about four feet
right of the center line or in the left turn
lane (if there is one), just like for cars.
North Carolina Department of Transportation
Above: If you plan to turn left, the proper position is in either the left turn lane or within four feet
or so of the centerline. Proper left turns require practice, skill and confidence.
Division of Bicycle and Pedestrian Transportation
Streetwise Cycling-UnLinked-Web
11/27/06
5:50 PM
Page 18
18
19
Above: Step One: Checking for a gap in traffic. Looking back lets you see what's coming AND it lets
others know you plan to do something. Eye contact with the drivers is important here.
Above: Before moving left to make a left
turn, look back for a good gap in traffic. If
you see one coming, adjust your speed to
“catch” the gap as you approach the intersection. If there isn't a gap, you can either
negotiate with drivers to let you over in front
of them, go a block further in hopes of getting a gap, or pull to the curb and walk across
when safe. Which approach you take
depends on your skill and the traffic.
Left turns on two-lane roads: To get to
your left turn position, look back at
traffic before you get to the intersection.
Just how much before depends on traffic
volume and speed. If it's very busy, look
a block or more in advance. A good rear
view mirror helps for this step. The
mirror allows you to keep an eye out for
any approaching gaps in traffic.
Left turns on multi-lane roads: Making
left turns on busy multi-lane roads can be
much more challenging. It's best to work up
to these turns since they often involve
negotiating with other drivers and precise
riding between lines of traffic.
When it's clear, look over your shoulder
(just to be sure), signal, and merge left to
the proper left turn position. Next, pay
attention to the traffic ahead of you and
traffic on the cross street. Obey any
traffic controls (lights or signs), yield to
oncoming traffic and turn when safe.
If traffic is too fast for you, the best way
is to go straight across the intersection,
stop at the curb and then walk across
when safe. You can't negotiate and merge
with high speed traffic.
Plan your turn very early. First, negotiate and merge to the left side of the right
lane. Next, negotiate and merge to the left
side of the second lane. Negotiate again and
merge to the left side of the second lane. As
you merge over, you will have cars passing
on both sides, riding straight is very important (practice this skill in a parking lot.)
Keep up this process until you get to the
turn lane or proper turn position and make
your turn as described in the previous
section. For more details, see John Forester's
classic bicycling book, Effective Cycling
(MIT Press).
North Carolina Department of Transportation
Above: Step Two: Once you've found a gap, move left IF the driver behind lets you go first or you
have enough time before he/she arrives. Signal and merge to your left turn position.
Above: Step Three: Now concentrate on traffic coming towards you and cars on the side street. Obey
any traffic controls, signal and make your turn.
Division of Bicycle and Pedestrian Transportation
Streetwise Cycling-UnLinked-Web
11/27/06
5:50 PM
Page 20
21
20
Where do you ride?
Different types of roads present different
problems for bicyclists. Each one has its
dangers. Many car/bike crashes happen on
quiet neighborhood streets, for example.
Don't let your guard down wherever you ride!
Here are some things to look out for.
Busy City Streets
Neighborhood Streets
Watch for turning or crossing cars,
especially at intersections. Know
where the turn lanes, busy driveways
and tough spots are ahead of time.
Above: Ride far enough to the left to avoid curb-side hazards like opening car doors, debris,
pot holes and drain grates.
3. The Road Condition:
Where you ride also depends on what the
road itself is like. The main factors to
think about are surface condition and
available width.
Generally, the farther to the right you
ride, the more hazards you'll face. You'll
often find bad drain grates, gravel, glass,
or parked cars, the doors of which could
open in your face.
The best approach is to ride a straight line
to the left of the hazards. Ride at least
three feet away from parked cars to avoid
opening doors.
Next, think about the width of the road.
On a very narrow road (10-foot-wide
lanes, for example), riding near the edge
can encourage motorists to pass unsafely.
While it won't be fun, the best approach is
to ride a straight line far enough from the
curb to discourage unsafe passing. The
idea isn't to “hog the road” but to make
sure everyone gets home safely.
On a wider road, where there is plenty of
room for passing, ride just to the right of
the traffic stream. This will keep right-turning motorists from cutting you off and will
make you more visible to cross traffic.
Practice these techniques on quiet streets
and work up to busy arterials as you gain
confidence and skill.
Rural Highways
These streets may seem “safe” but
watch for things that block your view of
traffic, like bushes at intersections and
parked cars at driveways.
Greenway Trails
Use a mirror to keep an eye on cars
coming from the rear. And watch
cars coming towards you: they may
pull into your lane to pass.
Interstate Highways
Ride slowly on trails and yield to
pedestrians. Watch out at curves or
intersections. Warn people when you
pass: say “passing on your left.”
Above: In very narrow lanes, you may have to
ride far enough from the edge to discourage
unsafe passing.
North Carolina Department of Transportation
For more information on places you can
ride and local conditions, contact your
City or County Planning, Recreation, or
Transportation Department or the
Division of Bicycle and Pedestrian
Transportation.
North Carolina State policy prohibits all bicyclists from riding on
interstate highways and limited
access expressways.
Division of Bicycle and Pedestrian Transportation
Streetwise Cycling-UnLinked-Web
11/27/06
5:50 PM
Page 22
22
23
Night-time riding
Reflective Vest
Taillight
2” Hot Dots on Gloves
3” Red Rear Reflector
Headlight
Reflective Pant Straps
Reflective Tape
Pedal Reflectors
Riding at night isn't for the very young
or infirm. To do it right is an art.
know where the pot holes and gravel
patches are, and be able to plan for
them. Riding slower is a good idea too.
First a sobering fact:
Almost 45% of all cycling deaths happen after dark. It's a risky time to
ride…Especially if you don't really
know what you're doing.
Non-rechargeable battery powered
headlights are the least expensive,
initially, but if you ride at night a lot,
replacement battery costs can mount
up. And, they typically don't light up
the road very well. Rechargeable battery headlights are a little more expensive, but save money in the long run.
Another option would be a generator
light with a halogen bulb. These are
less expensive than the rechargeable
systems and light up the road well.
Even without the halogen bulb, some
generator sets are pretty bright.
If you plan to ride in winter on ice or
through snow and slush, get one of the
battery lights. Generators tend to slide
on wet, slick tires.
Taillights: The best taillights come
with the rechargeable battery/halogen
headlamp sets. Less expensive battery
powered lights work ok if supplemented with good rear reflectors. Generator
taillights go out when the wheel stops
so be careful when stopping in traffic.
Reflectors: For the bike itself, you need
at least a good 3” red rear reflector and
pedal reflectors (amber, usually).
Mount the red reflector low on the
frame (like on the left side where the
rear wheel attaches to the frame). The
lower the reflector is, the sooner it'll
light up in a motorist's headlights.
Remember: Reflectors only work if
they are pointed in the right direction
AND if they are clean! Clean and
check your reflectors occasionally and
replace broken ones.
Nice extras: Add reflective tape to the
frame and moving parts of your bike.
The tape is cheap and durable. Use
white or yellow facing the front and
yellow or red facing the rear. That color
scheme makes sense to other road
users.
Also, reflective pant straps help. All the
bike shops sell them. You might also
add reflective circles to the backs of
your riding gloves. These make great
“blinkers” for signaling!
Some shops sell reflective vests and
such. These can make a big difference,
particularly if you tend to wear dark
colors. Light colored clothing may help
too, although reflective material is far
better than white or yellow clothes.
Remember: night time seems to bring
out the worst in drivers. Don't trust any
of them to know what they are doing.
Keep your hands on the brake levers,
your eyes on everyone and be ready to
take evasive action!
Some basic tips:
You must take special precautions
before riding off into the moonlight.
Use good lights and reflectors. After
all, it's illegal to ride without them.
There's no excuse for riding
without proper equipment—at least
none that's worth your life. You may
never plan to ride after dark but it'll
happen some day. Get the best lights
you can afford.
It's a good idea to stick to streets you
know from riding during the day. You'll
Equipment tips:
Headlights: A good one will let you see
the road well. A mediocre one will let
others see you. A poor one will do
neither but comply with the law.
Headlights vary greatly in the quality
of their construction, their mounting
design, and the amount of light they
supply. There are three basic types of
headlights and most bike shops have a
wide selection from which to choose.
North Carolina Department of Transportation
Division of Bicycle and Pedestrian Transportation
Streetwise Cycling-UnLinked-Web
11/27/06
5:50 PM
Page 24
24
25
Basic riding skills
Starting off:
To start off on your bike, first stand next
to it and swing your leg over the frame.
Then, while standing over your bicycle,
bring one pedal up to a 2 o'clock position, check traffic, step onto the pedal
and ride away.
Some people mount up like a cowboy.
They put one foot on the pedal, push off
and swing their legs over the saddle as
they roll along. While this isn't a big
mistake, it isn't a polished way to ride
either. And, if you take off this way in
traffic, you'll find yourself off balance
and unprepared for emergencies while
swinging yourself into the saddle.
car. It can also tell those behind that you
want to do something. It certainly gets
other drivers' attention.
In fact, many times, the simple act of
looking back will slow traffic down so
that you can signal and merge over. And a
motorist who was about to pass you and
immediately turn right may think twice
about such a dangerous and inconsiderate
move.
Even if you have a mirror, you should
learn to look back over your shoulder in
important situations. Simply looking in
the mirror tells others nothing about your
intentions. And you might miss something important if you rely exclusively on
a small mirror. Use the mirror, instead, for
simply keeping an eye on traffic behind.
If you have trouble looking over your
shoulder and riding straight, practice in a
quiet parking lot. Pick out one of the
stripes and ride along it while occasionally glancing back. Try to see things - don't
just turn your head.
Hold your left shoulder steady as you look
back. You may want to try pushing forward
just a bit with it. Also, keep a light hold on
the handlebars.
Another approach is to drop your left
hand from the bars to your thigh. Then,
when you look over that shoulder you
won't pull back on the handlebars.
Scanning behind:
Looking back over your shoulder is one
of the most valuable basic skills you can
learn. It can tell you what's behind, in
case you're thinking about making a left
turn or want to move left around a parked
North Carolina Department of Transportation
Using the brakes:
Use your brakes smoothly and evenly.
Some people are afraid of their front
brakes, probably because they used it too
hard once and crashed. They make the
mistake of using just the rear brake, which
doesn't have nearly the stopping power the
front brake has. Good cycling technique
means using both brakes with just the right
amount of pressure.
Another use for your brakes is speed control
on downhills. Don't make the mistake of hitting the brakes hard after you've gained too
much speed. Instead, use the brakes lightly
ones go in the bicycle's direction of
travel. These can grab or turn your front
wheel and cause a fall.
As you ride, keep your eyes constantly
moving over the road surface and the
traffic scene. And, when you see a hazard, look back and move around it
when safe. If it's a diagonal railroad
track or pavement crack, cross it as
near to a right angle as you can.
Riding in the rain:
Rain riding can be tricky. Your brakes
won't work as well in the rain as on dry
pavement. For this reason, allow more
distance for stopping and slowing.
and often as you descend. Brake before you
enter curves and let off as you go around.
Remember: As you ride, keep your hands on
the brake levers. In case of emergency, you'll
be ready to use them. Finally, never buy a
bike with the extra brake levers (often called
“suicide levers”). These are never as powerful or positive as the real levers and they put
you in a bad position for a quick stop (see
next page for more detail).
Watch for slippery surfaces like painted
crosswalks. If you have to cross them,
make sure you aren't leaning at the same
time or you could loose control.
Straighten up until you're past the slick
spot and then make your turn.
Watching the roadway:
Far too many bicyclists crash when their
wheels hit cracks, bumps, railroad tracks
and drainage grates in the road. The worst
Division of Bicycle and Pedestrian Transportation
Streetwise Cycling-UnLinked-Web
11/27/06
5:50 PM
Page 26
27
26
Advanced riding skills
The Quick Stop
1. Above: Always ride with
your hands near the brake
levers. You'll be ready for any
emergency.
The basic emergency maneuvers are the Quick
Stop, the Rock Dodge and the Instant Turn.
Knowing how to do these can save your life.
Practice them carefully with long pants and a
helmet. It's possible to fall while you're learning.
The Quick Stop:
There will be times when you have to lose
a lot of speed fast. Some people learn the
hard way that you can't just slam on the
brakes. That's a great way to go over the
handlebars!
What happens when you brake hard?
First, keep in mind that as you ride, more
than half of your weight is on the rear
wheel. This weight distribution changes
when you use the brakes.
As you brake harder and lose speed, your
body's weight moves from the rear wheel
to the front wheel. The rear end of the
bike becomes lighter and lighter until the
back tire starts to skid. Then it lifts off the
ground. All this takes place in just a few
seconds.
An expert cyclist can handle this by very
quickly easing off on the front brake. But
most people don't have the training. As
the rear end lifts, they get scared and
squeeze the brake even harder, which
sends them flying.
To do a Quick Stop, move back to keep
more weight on the rear wheel. You'll find
this easier if you rise up off the saddle and
move your whole body back, using the
pedals as a platform and straightening
your arms, rather than trying to scoot
back on the saddle. As you move back,
lower your head to lower your body.
In this position, you can squeeze the
front brake two or three times as hard
as the rear without flying over the
handlebars. And, since your front brake
is the one with the most stopping
power, that's good!
North Carolina Department of Transportation
2. Above: In a Quick Stop,
move back on the bike and
get low as you put more 3. Above: If your rear wheel
pressure on the brakes.
starts to skid, ease up on the
front brake.
The idea of the Quick Stop is to put more weight on your rear wheel and to lower your center of
gravity, so that you won't flip over the handlebars when you hit the brakes hard.
Three things to keep
in mind:
Equipment for safe
braking:
1. Try Quick Stops slowly and gradually
build up speed as you get the idea and
gain confidence.
2. Pay attention to your rear wheel. If it
starts to skid, you're putting too much
pressure on the front brake and the
rear end is lifting. Immediately ease
off a little on the front brake and the
rear tire will stop skidding.
3. Coming to a complete stop may not be
the best idea. Often, it's better to use
the Quick Stop to lose most of your
speed and then to maneuver out of the
way of danger. At slower speeds, you
can do it more easily. Remember: don't
turn while you're in the middle of braking. That could throw you into a slide.
Fast stops depend on your skills as a
cyclist but they also depend on your
brakes. Keep them in good shape.
The levers should work smoothly, the cables
shouldn't be rusty inside (and should be
coated with lubricant), the brakes themselves should be centered around the rims
and should come away cleanly from the
rims when you release the levers. Brake
shoes should have plenty of pad; and if a
shoe has an open end, it should point toward
the back of the bike.
Aluminum alloy rims and special
compound brake pads are a very good
combination, particularly for stopping in
the rain. If you believe that “bikes don't
stop in the rain,” you're wrong. Good
brakes stop in the rain.
Division of Bicycle and Pedestrian Transportation
Streetwise Cycling-UnLinked-Web
11/27/06
5:50 PM
Page 28
28
29
The Instant Turn
The Rock Dodge
1. Left: First, turn briefly away from the
direction you want to go. This sets up your
lean in the right direction.
1. Above: First turn your
handlebars sharply to avoid
the object with your front 2. Above: Next turn your
wheel.
handlebars sharply the other
way, once your front wheel is
past the object.
The Rock Dodge:
Imagine you're riding down the road and
something in a store window catches
your eye. You look and when you look
back at the road, there's a rock three
feet in front of you. Do you have to hit
it and fall? Maybe not…if you know the
Rock Dodge.
First, your front wheel is the important
one to get around the rock. As the
wheel that steers, it can be turned aside
by all sorts of road hazards: rocks,
cracks, curbs, and so on. The rock in
our example can shove your front
wheel hard to one side and down you'll
go. If your back wheel hits it, you may
get a flat or a bent rim but you probably won't crash.
The key to the Rock Dodge is to use the
handlebars to steer the front wheel
where you want it to go: around the
hazard. Normally, you don't steer this
way—you usually lean into turns. The
first time you turn the bars, you won't
like the feeling. That's why it's good to
2. Right: Then, turn hard in the direction you
want to go. Practice this maneuver slowly in
an empty parking lot first to get the idea.
3. Above: Finally,
straighten out.
try it slowly and gradually build up
speed as you learn the maneuver.
Practice the Rock Dodge is a quiet and
clean parking lot. Take something soft
like a wet sponge, to be the “rock.”
Ride straight towards it at a slow speed.
At the last moment, turn your front
wheel to one side to avoid hitting the
“rock,” then back again once you've
passed it, and finally straighten out.
Try to get as close as you can before
turning and try to miss it by less than a
foot as you go by. Once you get the
hang of the Rock Dodge, you'll simply
be able to twitch the bars around obstacles. A skilled cyclist can ride through
what looks to other like a mine field
without hitting anything. With practice,
you learn just where your wheels are.
As with the Quick Stop, you should
practice this maneuver carefully. It's
possible to get too wild with the
handlebars and put yourself on the
pavement.
North Carolina Department of Transportation
The Instant Turn:
Occasionally, you may find yourself right
next to a car that is about to turn right.
While it's best to stay out of these situations (by riding defensively), here's what
to do…
First, think about how a bike turns.
Unlike a car, a bike doesn't go around corners when you turn the front wheel. It
falls over if you do that. You turn by leaning in the direction you want to go.
But you don't just all of the sudden
lean over. Instead, you gradually “fall”
into your turn and then follow by steering
your front wheel that way. It feels natural
and it works most of the time. But it won't
work when a car is coming your way. To
turn fast, you need a way to lean the right
way very quickly.
If you turn the front wheel the way
you want to go, you'll quickly find out
that won't work. It makes you lean the
wrong way, setting you up to turn right
into the side of that car! But what happens
if you turn your front wheel towards the
car? Your bike will lean away from the
car, setting up the correct turn. The trick is
to turn towards the car for just a moment.
Then turn hard the other way. This way,
you can turn a very sharp corner with
little warning.
Practice this slowly in a parking lot.
Build speed as you build confidence.
A couple of cautions:
1. As you make your turn, bring your
inside pedal UP. You'll be leaned over so
far that it could catch on the pavement.
This, by the way, is good practice for
normal turns as well. Get in the habit of
raising your pedal.
2. Don't use your brakes while turning. Use
them before or after but, as in a car, if you
turn and brake at the same time, you may
slide out. If that starts to happen, put your
inside foot down like a BMX racer.
Division of Bicycle and Pedestrian Transportation
Streetwise Cycling-UnLinked-Web
11/27/06
5:50 PM
Page 30
30
31
5 mistakes to avoid
The following common mistakes lead to
almost all car/bike accidents. It's easy to
avoid these problems if you simply follow
some basic rules: obey traffic laws and ride
defensively.
Car pulls out in front of bike:
Often caused by a driver who isn't paying attention or misjudges the bike's speed. This mistake
leads to about 10% of all car/bike crashes.
Cyclist rides against traffic:
As you ride, keep your eyes moving.
Watch the traffic scene a block or more
ahead: look at what's going on behind you;
keep an eye on cars on side streets.
Cyclist with no lights at night:
Caused by riders who wrongly think it's safer
because they “can see the cars coming.” Too bad
this mistake causes about 25% of car/bike crashes!
Car turns in front of bicycle:
Nationwide, many cyclists die because they
don't use lights and reflectors at night. Almost
45% of all cycling deaths happen after dark.
If you keep your eyes moving, you're
unlikely to be surprised by someone's
dumb move. Finally, look for “escape
routes.” Think about where you would go
if someone did something wrong.
If you have a crash:
It's no fun being involved in a crash. Most
of this booklet is directed at keeping you
out of trouble. But it may happen. If you
do have a crash, you will probably be in
pain and may be groggy. But try to keep
these tips in mind.
Cyclist ignores stop sign:
Causes about 10% of all serious car/bike
crashes. Results from many cyclists' attitude
problem: “Stop signs are only for cars, they
aren't for me!”
In case of trouble…
In some cases, the car turns left in front of an
on-coming bike; in others, the car passes a bike and
turns right. It causes 20% of all car/bike crashes.
North Carolina Department of Transportation
They are based on information originally
published by the Bicycling Association of
British Columbia in Canada.
1. Identify the car: Write down the
license number as soon as you can and
save your note. Also get a good
description of the car and the driver if
you can. The more information you
can get, the better in case you have to
go to court. For this reason (among
others), it's handy to ride with a small
notebook and pencil. Don't forget to
note the date and time.
2. Report the accident immediately:
Don't wait until you “have time.” If,
because of injuries, you're unable to
make the call yourself, ask a witness to do it.
3. Don't get mad at the scene: It can
keep you from taking care of important business like making notes.
Also, if you are injured, don't get up
(unless you need to get out of the
road). Witnesses are more likely to
come forward and help you if you're
lying down.
4. Get copies of any reports: Ask for
photocopies of the police report and
your statement. These will help you
recall details later if necessary.
5. Prepare for your day in court: If
you end up in court, suing the
motorist, read your reports again carefully. Being prepared will impress the
judge and jury. Before the trial, coach
your attorney on cycling subjects. The
more he or she knows, the more help
you will get. Also, dress conservatively but well. Wear a nice suit or dress.
6. Be careful what you say: In court,
the attorney for the other side may
try to paint you as a careless
speed-crazed biker with a hot racing
bike. Carefully answer questions
about how fast you were going and
the kind of equipment you have.
Emphasize that you ride a safe bike
and follow the rules of the road. If you
don't know the answer to a question,
say so. Making up an answer is one of
the biggest mistakes you can make.
If you are harassed:
Some motorists think it's fun to scare
and endanger the lives of bicyclists. If a
driver harasses you while you're riding
legally, there are things you can do.
Division of Bicycle and Pedestrian Transportation
Streetwise Cycling-UnLinked-Web
11/27/06
5:50 PM
Page 32
32
33
Share the road
1. Make notes: Get the license number, a description of the car and, if
possible, a good look at the people
involved.
2. Don't provoke the motorist:
Drivers who harass bicyclists could be
unpredictable. If you start something,
you may find yourself in more trouble
than you want. It's best to keep your
temper, concentrate on observing, and
live to ride another day.
3. Call the police: As soon as possible,
report the incident to the Highway
Patrol, sheriff or local police. But
don't stop there. Also file a
complaint with the city or county
attorney's office. Your efforts may
save another cyclist a lot of grief.
What about dogs?
No cycling guide would be complete
without a discussion of dogs. All too
often, “Man's Best Friend” becomes a
cyclist's worst enemy. Typically, the
dog sees you as a threat to his/her
territory and gives chase. Often,
however, the chase ends when you get
to what the dog sees as the property
line. Here are some tips for dealing
with a dog that comes after you:
• If the dog has bothered you in the
past and continues to be a problem,
let the authorities know. Call
Animal Control. They should cite
the owner for letting the dog run
loose.
quietly; some dismount and walk,
holding their bikes as shields;
some squirt water or a spray
solution; some throw rocks; some
even try to outrun the dog—not
usually the best idea since it helps
teach the dog to chase bikes.
The approach you use depends on the
situation, the dog (Pit Bull vs. friendly
mutt, for example) and how comfortable you are with strange dogs.
Whatever you do, don't show fear.
• In a surprise encounter, there are
many different approaches: some
people yell “NO;” some speak
North Carolina Department of Transportation
Our streets and highways are becoming more
crowded every day. Therefore, it is necessary
that motorists and bicyclists know and practice
the rules of the road. You should always be
aware of the traffic around you and be prepared
for emergency situations.
Bicycle ridership is increasing in North
Carolina. More and more people are biking for transportation, recreation and
health. At the same time, urban traffic has
become more congested and once-quiet
country roads now carry high volumes of
commuter traffic generated by rapid
development in rural areas. As a result,
conflicts between bicyclists and motorists
have increased. That's why it's important
for both bicyclists and motorists to learn
how to “Share the Road”.
which is online at www.ncdot.org/transit/
bicycle/laws/resources/BikePedLaws
Guidebook-Part-1.pdf.
North Carolina law defines a bicycle as a
vehicle, thus granting bicycle riders the
same rights and duties as the drivers of
other vehicles. These rights and duties are
addressed in more detail earlier in this
publication and also in A Guide to North
Carolina Bicycle and Pedestrian Laws,
In general, for bicyclists, sharing the road
means:
• Riding on the right-hand side of the road,
in the same direction as other traffic
• Obeying all traffic signs and signals
• Properly signaling all movements,
while making sure that such movements can be made safely
• Yielding to other drivers and pedestrians, as appropriate, at intersections,
alleys and traffic circles
• Moving to the right to allow lawfully
operated overtaking vehicles to safely
pass, and not increasing your speed
until completely passed
Division of Bicycle and Pedestrian Transportation
Streetwise Cycling-UnLinked-Web
11/27/06
5:50 PM
Page 34
34
35
It is important to obey all traffic laws and
ride in a predictable manner to increase
motorists' cooperation and create a positive perception of bicyclists as road users.
Too often, bicyclists do not behave as
prudent vehicle operators, thus angering
motorists and contributing to the image of
bicyclists as “scoff-laws”.
On the other hand, most motorists are
not aware that bicyclists have a right to
be on the road and that they should
“Share the Road”. In extreme cases,
motorists have been known to intentionally harass bicyclists by trying to run
them off the road, throwing things at
them or committing other unlawful acts.
Since a bicycle is defined as a vehicle,
motorists are required to take the actions
described below when encountering bicyclists on the roadway. The reference numbers for the statutes are noted in brackets
and the full text can be referenced online at
www.ncleg.net/gascripts/statutes/
statutestoc.pl.
Relevant to sharing the road, the North
Carolina motor vehicle laws require
motorists to:
• Signal movements when starting,
stopping or turning, taking care that
such a movement can be made safely;
and, giving a clearly audible signal
whenever the operation of any other
vehicle may be affected [20-154]
• Yield the right-of-way, as required, at
an intersection, alley or traffic circle
[GS 20-155] and [20-156]
• Leave a minimum of two feet of clearance when passing a bicyclist on the
left and not move back to the right
until safely past the overtaken bicycle
[GS 20-149]
• Not pass on the crest of a hill or at a
curve in the road where the driver
cannot see at least 500 feet ahead
[GS 20-150]
3. Be careful in trying to judge the speed
of a bicycle. A bicycle may be traveling faster than you think. Automobile
drivers sometimes cut in front of a
bicyclist too soon because they have
not judged their speed properly.
5. At night, do not assume that
cyclists will always have lights and
reflectors. Be alert for them. When
meeting an oncoming cyclist,
always dim your lights.
4. Be alert for the cyclist who suddenly
swerves or turns in front of you with
little or no warning. Cyclists sometimes wait until the last second to
move to the center of the roadway to
make a left turn.
Drivers are urged to watch for cyclists
on the road and take the following
precautions.
1. Wait until the cyclist has cleared the
intersection before making a turn to
the right or left. The most common
error for an automobile driver is to
make a left turn directly into the
path of an oncoming cyclist without
seeing him until it is too late to stop.
Don't make a right turn in front of a
bicyclist you have just passed. He
or she may be forced to stop quickly and could lose control of the
bicycle, causing a crash.
2. When passing a cyclist, slow down
and make sure the rider is aware of
your presence. Leave plenty of room
between the rider and your vehicle.
If there is no room to pass because
traffic is approaching, wait until it
has gone by, and then pass.
North Carolina Department of Transportation
The “Share the Road” yellow/green warning sign,
has been erected along certain roads to alert
motorists to the possible presence of bicyclists.
Division of Bicycle and Pedestrian Transportation
Streetwise Cycling-UnLinked-Web
11/27/06
5:50 PM
Page 36
36
For more information...
If you'd like to learn more about bicycling in North
Carolina, please contact us:
Division of Bicycle and Pedestrian Transportation
North Carolina Department of Transportation
1552 Mail Service Center
Raleigh, NC 27699
(919) 807-0777
www.ncdot.org/transit/bicycle
• Safety brochures, posters and information: www.ncdot.org/
transit/bicycle/safety/safety_materials.html
• Touring guide and maps of Bicycling Highways routes:
www.ncdot.org/transit/bicycle/maps/maps_intro.html
• Local bicycle touring maps:
www.ncdot.org/transit/bicycle/maps/maps_regional.html
• Calendar of Bicycle Events:
www.ncdot.org/transit/bicycle/events/events_calendar.html
• Listing oft bike clubs and organizations:
www.ncdot.org/transit/bicycle/maps/maps_clubs.html
• Statewide bicycle shop listing:
www.ncdot.org/transit/bicycle/maps/maps_shops.html
• North Carolina bicycle laws:
www.ncdot.org/transit/bicycle/laws/laws_bikelaws.html
North Carolina Department of Transportation


© Copyright 2026