
THE REMINGTON 1100 SHOTGUN Rem 1100 Notes_ Rev with Pix of Disassembly.doc 01/21/06
THE REMINGTON 1100 SHOTGUN
TM
Rem 1100 Notes_ Rev with Pix of Disassembly.doc
01/21/06
Page 1
TABLE OF CONTENTS
REMINGTON 1100™ – AN INTRODUCTION............................................................................3
BARREL INFO............................................................................................................................... 5
WHEN WAS YOUR 1100™ MADE ?...........................................................................................8
THE MAG TUBE............................................................................................................................ 9
MAINTENANCE / TROUBLE-SHOOTING...............................................................................11
STOCK REMOVAL......................................................................................................................15
SPARE PARTS..............................................................................................................................16
SCHEMATIC DRAWING............................................................................................................ 18
MODEL 1100 PARTS LIST ........................................................................................................ 18
DISASSEMBLY REMINGTON 1100/1187.................................................................................20
Rem 1100 Notes_ Rev with Pix of Disassembly.doc
01/21/06
Page 2
REMINGTON 1100™ – AN INTRODUCTION
The Remington 1100™ shotgun was introduced in 1965 as a 12-gauge semi-automatic. Since that
introduction, the 1100™ has been manufactured in many different gauges and configurations. It is used
for trapshooting and skeet as well as relied on by many hunters. Its relatively light weight, feeding
reliability and light recoil make it a very popular shotgun. In fact, more than 6,000,000 have been made.
After a lengthy layoff, I resumed shooting trap about 3 years ago and began doing so with my 1975
1100™. In seeking out some information about the 1100™, I found Trapshooter.Com (TS).
What follows is a compilation of email messages that have been posted on the website TS relating to the
Remington 1100™ shotgun. I saved these messages because I own and shoot an 1100™ and I wanted to
have a record of the information that I was reading on TS.
If you read this and find that your name is nowhere to be found on your email message, do not take
personal offense. In some cases, I saved all the information (names, dates, email addresses etc.) relating
to the original query and the replies. In other cases, I simply did a ‘cut and paste’ and saved the info as it
accumulated. Solid horizontal lines are there to separate messages and pertinent replies from other
messages. Also, where possible, after a message question, I have denoted the answer(s) by inserting
***Reply. Multiple replies are grouped together, but each reply is separated by a series of dashes (-------).
I have also put in some graphics where I thought they might be helpful.
Until recently, I had planned to keep this information only for myself, but recently decided to reformat
and organize the information I have and make it available to anyone who wants it. I did this for a couple
of reasons. First, there have been a lot of questions about the 1100™ recently on TS. Second, due to the
recent interruption at TS we lost our archives. I take full responsibility for the format and content of these
messages. Please note that this is not intended to represent all of the messages regarding the 1100™. It is
merely those that I regarded as important to me at the time. As time permits, the author may add to this.
Input from readers is welcome.
A special tip of our collective trapshooting hats should go to Steve Loban (SteveL in CT) for his
immeasurable assistance in helping to edit and proof this document.
Gene Batchelar, Wheaton, IL
ATA Member
NRA Member
A comment from Steve Loban (SteveL-CT)
Some people have asked me to start my own "unofficial" Remington 1100™ website, but I doubt I will
any time soon, being too busy with my day job and all to maintain it; but it is a good idea. Perhaps
someone else out there can, it would be a great idea to have pictures close up of the parts with arrows
pointing to where they break and how along with tips and instructions of how to repair and clean, etc.
Include a lot of stuff the "New Remington" won't tell you about how to keep the 1100™s in top-flight
order.
Rem 1100 Notes_ Rev with Pix of Disassembly.doc
01/21/06
Page 3
MODEL INFO
“A like-new, shot-very-little 1100™ Tournament with the "good" barrel ". What do you mean 'good
barrel'? I have 2 1100™s and somewhere along the line I must have missed a discussion about barrels.
Please enlighten me.
BTW, what's a Tournament grade 1100™? I have a Classic Trap with chokes (made in 1999) and a plain
old fixed full choke 1100™ I bought in 1975.
***Reply
The Tournament grade was the best production grade in which the 1100™ target guns were made. They
were comparable to the 870TC - cut checkering and very nice Monte-Carlo wood. The next grade up
came from the Custom Shop. I bought mine new in 1979, I believe. They made Tournament Trap and
Tournament Skeet models and the receivers were marked "TRAP-T" and "SKEET-T" on the right side
below the ejection port. I learned from Steve Loban ("SteveL-CT") that the part number 9612-barrel was
the best ever fitted to the 1100™. They are 30-inchers with fixed full chokes and the higher "step" profile
rib.
As Steve will quickly tell you, these old girls are far superior to the 11-87 Trap or the new "1100™
Classic". I've had several people from TS.COM try to buy mine and have turned down as much as $600
for it. I figure if the new gun is $750 and isn't as good, then mine should be worth that same amount.
What is the difference in field, magnum and trap 1100s™? I know the barrel and stock are different on
the trap models. I am sure the difference is in the working mechanism and receivers but I don’t know the
detailed difference.
***Reply
Some differences between models are the following:
Magnum: 1/4" longer receiver, barrel has single, large orifice (gas port) and will only cycle 3" and the
heaviest of the 2-3/4" field loads. The good news is you can put a 2-3/4" barrel on it for trap or skeet.
The bolt body buffer has a black plastic disk, (as do the bonafide trap models) instead of a white disk.
This is not as important as it seems. Changing the spring in the stock is in order to prevent receiver
bashing. Also, some of the gas piston parts on the "Magnum" are heavier - replace these with standard
ones along with a 2-3/4" barrel if you're going to shoot targets.
No difference exists between "Trap" receivers and "field" receivers other than the word "Trap" appearing
between the trigger pins on the lower right hand side of the receiver.
That's why receivers are no big deal at 6,000,000 made. Whereas, trap barrels are!
If a magazine tube separates from a receiver - the receiver is probably really worn down inside anyway rails will be thin, etc. Just get a new receiver or even an old field gun that hasn't been shot very much (the
receiver will be in better shape mechanically than a gleaming well oiled trap receiver that has 150,000200,000 rounds through it!). Put your wood and barrel back on and you're back in business!
Rem 1100 Notes_ Rev with Pix of Disassembly.doc
01/21/06
Page 4
BARREL INFO
I'm trying to determine how to tell if a Remington 1100™ or 870 barrel is one of the 'good' barrels you
talk about. I see reference to barrels made in the '60s to early '80s. I see reference to 'high ribs'. I see
reference to part # 9612 for the 1100™. As I look at 2 barrels I have, I see no part numbers or dates. One
is an 1100™ barrel I bought in 1973-4 with fixed full choke. The other is an 870 barrel on an All
American Trap I just bought - it too is fixed full choke.
A fellow at our club is cleaning out his basement and has a couple of 1100™ barrels - fixed choke - one
skeet, one full. They may be the good barrels, but I can't tell. I guess my question is this: How the heck
can I tell if these are the good barrels you and others rave about ? Are there markings I'm not picking up
somewhere? If I'm treading on trade secret info here, tell me and I'll keep quiet, but I really would like to
know what to look for. Also, what's a fair price for one of these 'good' barrels?
***Reply
There aren't any specific markings per se. All the fixed choked barrels were good.
9612 refers to an obsolete part number from the Remington catalogs of the early 1980s for the Remington
1100™ 30" fixed, full trap. It has the "step" rib and target beads.
9614 was the same barrel in modified choke and is less frequently found.
9526 was the older 1100™ 30" fixed full trap from the late 1960s. It has a field styled vent rib with target
beads. Shoots just as well in my opinion. The 9526s had a rather pronounced stress relief cut where the
top of the barrel extension adjoins the rear of the chamber. The 9612s have a less prominent stress relief
cut, obviously a slight cost cutting measure for ease of production.
4462 is the 30" 1100™ backbored barrel with a .740" bore using the "trap full, super full and extra full"
tubes. These were made from the late 80s/early 90s until very recently.
They have since returned to a standard bore dimension (.727" nominal) on the "Classic" 1100™s (and
870s) using corresponding tubes. These newest barrels are actually light contour field barrels with target
beads and are the junkiest barrels I've ever seen Remington produce. When using such a barrel on an
1100™, you will need a corresponding forend and an 11-87 bolt (since these barrels have the wider 11-87
extractor recess).
I saw a Remington 1100™ barrel this week that doesn't fit the descriptions of 1100™ barrels I've seen.
It's a 30" fixed full choke barrel that, at first, looks like a trap barrel. However on closer examination, the
rib is a little lower than the trap barrel I have and it has no middle bead (and no evidence there ever was
one). Also, the front bead is metal, not white plastic. Any ideas the vintage of this? Do you think it's a
trap barrel, even though it has no middle bead?
***Replies
Sounds like a field barrel. If it hasn’t got any step about 3" down the rib, it isn't a trap barrel. There were
some trap barrels WITHOUT a "step" rib, however. These were the 9526 barrels of the 1960s. I shoot
one. They were 30" fixed full, with a rib profile identical to the field guns but with the target beads. A
Rem 1100 Notes_ Rev with Pix of Disassembly.doc
01/21/06
Page 5
good field barrel can be just as good as the trap barrels. Mine shoots just a tad higher than most, which
makes up for the low rib.
A friend just bought an 1100™ trap and it shoots 15" low and slightly left at 40 yards. What do you
suggest he do to get it to shoot at least 50/50?
***Reply
If you're referring to a recent 1100™ - the "Classic Trap" many of them have this problem. Mine did.
Most Remington’s do shoot somewhat low but not that much. Former Remington people have told me
since they've gone to choke tubes many of the barrels don't shoot straight anymore. I agree! I had one,
too. I couldn't hit a barn with it.
That's why I am so diligent about care for the older barrels. If you have a newer barrel that shoots
straight- fine but if not, it's a real hassle.
------Your friend really needs to send the barrel in. It'll be a hassle but that's ridiculous. My negative regards
to tubed barrels started with an 11-87 the year they came out. I haven't had much use for them since - in
any brand.
------Your friend should try the Remington website/Customer service section. I bought a trap barrel from
Gander Mountain back when they were a mail order company, maybe two years ago. The choke tube was
off center. I notified Remington via e-mail and they exchanged it for a new one that shot well. They said
if I was not happy with that barrel, send it back.
------I must be lucky I've got a 30" full choke fixed with two target beads and vent rib low profile, I also have a
fixed mod stepped rib with target beads. Funny, the full barrel shoots higher than the stepped rib barrel.
In 1974, I bought an 1100™ - field grade, although happily it has a fixed choke, low ribbed barrel that is
choked full. I've shot game with it and also have used it for trap a few times. About 8 months ago, I
bought a new 1100™ Classic Trap with a choke tubed barrel from a fellow at our club who won it at a
shoot. In order to use it as a backup gun, I decided to have Wenig make a semi-custom stock for me at
the Grand. I just received the gun back from them and am pleased with their work. I shot the gun today
and planned to try both barrels just to see if there was a difference.
Here's the hitch you may be able to explain to me. The fixed choke barrel slips onto the gun just fine,
BUT the forend from the Classic Trap model does not slide down all the way. I think it is hanging up on
the large ring that slides over the magazine tube. I thought all 1100™ barrels would be interchangeable Any ideas what's going on here?
***Reply
You need to replace the Classic Trap forend with a forend from an older, standard 1100™ to work with
the old barrel. The Classic Trap uses what's called a "Target Contour" barrel. This is really a light
Rem 1100 Notes_ Rev with Pix of Disassembly.doc
01/21/06
Page 6
contour field barrel with target beads on it. Because it is skinnier, the section of the forend where it beds
is contoured to fit only a light contour profile.
Also, the Classic Trap is actually an 1100™/11-87 "hybrid" using an 11-87 bolt with the thicker, 11-87
extractor. It's possible the extractor notch on your particular barrel was widened to accommodate an 1187 extractor, or some were just made a bit more generous to allow it to slip into place just right. When I
owned a Classic Trap - I found it necessary to not only change the forend to work with an older barrel, but
also had to replace the bolt with a true, 1100™ bolt with the slimmer (870) extractor for it to work.
That reminds me. When ordering extractors for the 1100™, order the "870" extractor. Remington service
reps on the phone might tell you that 11-87 & 1100™ extractors are the same - they are NOT. The reason
they say this is because the new 1100™s are using 11-87 bolts (and hence extractors). There isn’t any
way an 1100™ bolt will accept an 11-87 extractor. I'd also recommend buying a bunch, because who
knows when they will give the 870 the 11-87 extractor treatment in order to save the fuss of inventorying
two parts! (Of course the 11-87 extractors can be turned down 30/1000ths, but this is a pain!)
On the bolt handle side there is some scroll engraving above the slit. On the other side of the receiver the
serial # is between the two trigger assembly pins. It has a 28" barrel with no serial # on it to match with
the receiver. It's modified choke. The guy wants 450$ for it. Is it worth it? Wood and blueing are 9598%.
If the 28” barrel is not the original, how would I tell if it is a field-grade barrel? This barrel has a center
white plastic bead (very small) and the front post bead is silver steel and a high rib. I don't want to buy it
if the barrel is not the original.
***Reply
Barrels never were serial numbered. All that matters is condition and straightness. From what you have
described, and assuming the gun is otherwise in good mechanical shape - meaning no excessive receiver
rail and barrel extension wear - I'd say $450 is a decent price for a gun of this type and configuration. It's
hard to call without seeing it, from what you say it sounds pretty darn good. Don't sweat any small
broken parts-they don't really matter and are all replaceable in a minute or two. Sounds like a solid, early
70s type 1100™.
If it is a step rib, then it is a trap barrel. HOWEVER- the beads do not sound correct. This may not mean
anything, but it is cause to check the barrel carefully to see if it's been tinkered with amateurishly. The
correct beads should be a small, steel MID RIB bead and a target white front bead (the type you will find
on ANY Remington 870, 1100™ or 11-87 trap or skeet gun). It's unlikely that it's a plain field barrel that
someone had ribbed afterward. It's hard to do and not worth the cost for an 1100™ barrel. I can't
remember exactly how this was done in the manufacturing process, but it was pretty permanent and
Remington ribs hold really, really well.
Rem 1100 Notes_ Rev with Pix of Disassembly.doc
01/21/06
Page 7
WHEN WAS YOUR 1100™ MADE ?
All this talk of the older guns being better has me wondering. Does anyone know how to date your
1100™?
***Reply
Yes. Roughly the oldest ones from the early to mid 60s (c.1965) will have no prefix letter in front of the
serial number, as they were all 12-gauge receivers. The serial numbers will be fairly low. The 1960s and
early 1970s guns will have the receiver roll mark cleaner, deeper and thinner than the 1980s guns. Part of
the roll mark on the earlier guns will extend to a very small part of the receiver above the "slot" cut into
the receiver for the bolt handle to ride in. The earliest guns also have wooden magazine plugs, steel, cup
shaped magazine followers (also on the 870) and the triggers were more nicely made and many have
"ALCOA" embossed on them. Lastly, the forend support on the older 1100s™ was a flat piece of milled
steel that never breaks. The common ones encountered today are a cheap piece of stamped springy metal
that will break after about 2,000 - 3,000 rounds (but is replaceable in fifteen seconds.)
As the decade turns into the 1970s, they started putting letter prefixes in front of the serial numbers. The
most common are "L", "M" and "N" (current 1100s™ are using "R" prefixes). L is early to mid 70s. M is
later 70s, maybe very early 80s and N early to mid 80s. Production ceased around 1986 because of the
advent of the 11-87 and was resumed recently (albeit as an 1100™/11-87 hybrid).
The suffix "V" at the end of the serial number means 12-gauge.
Also, the earlier 1100s™ will have the bolt handle secured by engaging a ball bearing into a dimple
visible on the flat, underside of the bolt handle stem. 90% of the 1100s™ (and all 11-87s) you will see
will have the ball bearing in back of and on the edge of that bolt handle stem (there will be an obvious cut
into the bolt handle stem for this. These bolt handles will also have the "dimple" on the flat underside, too
so that they may be used with an old 1100™ that has the old style action bar.
TIP: If someone has a problem with a bolt handle flying out of an 1100™, check the handle carefully (if
you can find it after it flies out). Chances are it's an old fashioned one meant for the earlier guns that will
insert, but not engage the ball bearing into its slot inside the action bar and will fall out under
recoil/vibrations.
The "new" style bolt handles will work with either style action bar.
My 1100™ Trap Serial # is 360181V. What do you make of this?
***Reply
Sounds like 60s or early 70s to me. V means 12 gauge. How is the receiver marked? Is there a roll mark
above the bolt handle slot?
Rem 1100 Notes_ Rev with Pix of Disassembly.doc
01/21/06
Page 8
THE MAG TUBE
This is an older model 1100™ with a 30" step rib fixed full choke barrel. Would it be reasonable to bend
the magazine in 1/16th-inch increments up and to the right until it shoots where he is looking? This has
been recommended by several "expert" skeet and trap shooters at the club. I'm afraid he will separate the
mag tube from the receiver.
***Replies
My mag tube fell off last night during cleaning. I cannot think of a worse thing to do than try to bend that
tube.
------Your suspicions are correct! Don't listen to club "experts". The mag tube is fragile and bending it will
stress it. People tend to lean with their weight on the mag tubes when removing the stock. Lock the
receiver down in a padded vice if you are at home. If you are at the club and you must pull a stock off,
have someone hold it while applying resistance upwards (using the forend) while you push downward on
the screwdriver. That way, the mag tube doesn't get stressed.
If the mag tube falls off, scrap the receiver! The older guns tend to go about 15-20 years of continual
shooting before this happens. Most I see, including my first 1100™, went about that long. I have heard
that NEWER 1100s™ and 870s are suffering mag tube separations much earlier in their service lives and
this is probably attributable to poor quality manufacturing. People are telling me 5 years now - but I have
personally only seen it on 20+ year old receivers with perhaps hundreds of thousands of rounds through
them.
Remember that the receiver on an 1100™ is actually easier to replace than a good trap barrel! There are
six million 1100s™ out there and they're still in production.
Sometimes the flatter rib older barrels will shoot a tad higher than the "step ribbed" barrels. I notice this
phenomenon too and personally I have preferred to shoot a 1960s vintage 9526 barrel for handicap for
this reason (it has a "field rib" with target beads) over the past 2 years. And my lousy handicap average
has gone up almost two birds as a result.
I have to admit, when my very first 1100™ had its mag tube break off the gun had been shot continuously
for 17+ years. The last few years I had an 11-87 forend cap on it; I don't know why, but I did and because
Rem 1100 Notes_ Rev with Pix of Disassembly.doc
01/21/06
Page 9
it would only hold from manual tightening, it would tend to loosen after 5-10 shots. I can't help but think
the vibration from recoil contributed to the breakage. My "second" 1100™ I have used almost
exclusively for doubles for 15 years and it's still going strong. Shot it for singles for a few years, too.
Make sure the forend cap is on tight. Remember, the newer 1100s™ have the 11-87 style caps that lock
into plastic "ratchets" on the magazine cap; the older ones lock by a tiny ball bearing in the forend collar.
Remington will probably tell you keeping the cap on tight will contribute to breaking forend supports. I
disagree.
Keeping the cap on tight protects the barrel extension from cracking by not allowing vibration contact
between the barrel extension and receiver. Also, smear some grease on the outside top surface of the
barrel extension and also a little on the flat underside of the barrel where the forend support pushes up
against the barrel.
You will find as I have the past ten years that breakage will be less frequent for forend supports. And all
the bluing will still be on the top of your barrel extension (which means it is NOT contacting the receiver
metal above it and getting slowly peened to the point where it will develop a hairline crack).
Remember, the folks at Remington who answer the telephones these days are not out at the clubs
pounding tens of thousands of rounds through these puppies, like we are!
And, I learned these tips over the years from various retired Remington people (who are not there
anymore) who DID put these guns through tens of thousands of rounds year after year. So what I'm
sharing here is the REAL advice I've picked up from old, retired Remington folks who knew what they
were doing.
Rem 1100 Notes_ Rev with Pix of Disassembly.doc
01/21/06
Page 10
MAINTENANCE / TROUBLE-SHOOTING
I'm going to start shooting an 11-87 Premier Trap shotgun and seem to remember reading on a previous
thread that it was recommended to put a little grease on the top of the barrel extension before sliding it
into the receiver. It was claimed by this person that by doing this it would extend the life of the
receiver/barrel. Am I making this up? I plan on shooting this 11-87 a lot this summer and want to do all
things possible to make it last.
***Reply
No, you're not making that up. I've been suggesting this and do it myself.
What happens when you apply a good layer of grease to the outside, top, external surface of the barrel
extension is you form a "gel cushion" between the top of the barrel extension and the inside top of the
receiver where the barrel extension would hit and rub during the normal vibrations in the course of firing.
Eventually, the hitting and banging (accelerated by allowing the forend cap to loosen) will contribute to
the cracking of the barrel extension near the chamber and usually just in front of the locking lug recess in
the extension. Barrels are stress-relieved in those "corners" but the grease does help.
I happen to shoot a Remington part # 9526 barrel (30" fixed full FLAT trap rib) from the mid-1960s that
came in a white box with red, Remington lettering.
A retired Remington employee taught me this trick and it does help and makes perfect sense when you
think of the physics involved. My 35-40 year old barrel has nearly NO bluing wear across the top of the
extension - proof there is no metal-to-metal contact and thus, no stressing or work hardening of the
extension.
I also put a dab of grease where the top of the forend support sits wedged against the flat, bottom part of
the barrel, beneath the chamber area. In doing so, I've found the forend supports last twice as long as
usual.
You really should consider a book. Not only on 1100/1187 tips but about Remington in the "good old
days". That stuff is going to be lost forever if someone doesn't write it down.
What is your thinking on the gas rings. I have a set of the original and a set of the "snap together" rings.
Now I hear that Remington is coming out with the two piece set again. I have had problems shooting
doubles. I think it could be the snap together set of rings I was advised to use by Remington.
***Reply
Remington sent me a letter last year after I took this issue (piston/piston seals) all the way up the food
chain to Mr. Milner's office, that they would put the old style rings back into production.
Rem 1100 Notes_ Rev with Pix of Disassembly.doc
01/21/06
Page 11
The problems with the new, "one-piece" style are:
1. Some fit too tight on certain magazine tubes to operate at all.
2. Some shooters have reported failure to cycle in doubles with target loads. (I have personally witnessed
this on more than one occasion-where swapping rings with the old, two piece style immediately cured
the problem)
Whether the second problem is related to the first, I can't say for sure. What I do know is this: Remington
designs all shotguns with hunting in mind, NOT target shooting. When their engineers change a part, it is
to benefit the hunting side of the business (which is 90%) of Remington's gun business.
I was able to make my one-piece "snap ring" set work by polishing up the ID a tad with 15-20 minutes
work with a crocus cloth and fine sandpaper. Mine was just a tiny bit too tight to slide on the magazine
tube.
Admittedly one thing I should have done and haven't yet is measure the O.D. of my 1100 magazine tube
with a set of dial calipers and then measure some 11-87 and/or new 1100 magazine tubes to see if there is
a difference.
The problem could just be in different subcontractors supplying parts, too. Someone at Remington told
me they did have some problems with the earlier, one-piece snap rings but supposedly that has been
corrected.
I know this type of thing happens now and then. I have a brand new Trap Super Full choke tube rolling
around somewhere in my parts box (for a .740" barrel) that cannot be inserted, because it's OD is too large
to be seated about half way to the threads. I've been meaning to send that back now for two years, but
haven't shot much in the past two years to warrant replacing enough parts to dig deep enough into my
parts box.
My opinion about the one-piece snap rings also, is that if you look at it, it's twice as heavy as the original
design. I'm no physicist, but it doesn't take a Ph.D. in physics to figure out that much more inertia will be
needed to start that big, heavy unit rolling than would be required to start the first ring (the piston) of the
old fashioned two piece piston and piston seal arrangement.
The folks who designed the 1100 in the early 1960s included shooters who actually shot trap and skeet
and cared enough to refine the design so that the 1100 would (and it certainly has) become the premier,
hallmark, all-around self-loading shotgun in the world by which all other self-loading shotguns are
judged.
I've thought about compiling my notes and experiences; but I'm one of many folks shooting in CT who
can tell you somewhat of how it was, especially the club in Lordship. Heck; I've known Dick Baldwin
since I was 13. I did get to meet some of the older folks there and some of the older era "brass" as well,
like Mr. Barrett, years ago - my dad was co-pilot on the company plane, a Beechcraft King Air 200,
during the early to mid-1980s when I was learning to shoot. So I guess I was fortunate for a while to have
met some knowledgeable people connected with them and learned as much as I could. Keep the faith!
Rem 1100 Notes_ Rev with Pix of Disassembly.doc
01/21/06
Page 12
A friend I shoot with shoots a Remington 1100 for doubles and can't seem to keep the gun functioning.
Are there any tricks that anyone can tell me of to help out?
***Replies
Has he disassembled and completely cleaned the action, and looked for worn parts such as the barrel seal?
------I'd check the gas ports in the barrel to make sure they are clear of build-up or blockage. I occasionally go
into mine with a very small drill bit that fits snug enough to clear them of carbon. Also, be sure the action
parts are dry and free of oil, grease, and solvents etc. Use 0000 steel wool on the magazine tube and
interior surfaces of the rings, then leave them DRY.
------There are some tricks you need to know. I'll fill you in later on....
But first, a detailed description of what is happening helps tremendously. It could be something as simple
as having the rings on backwards, for instance. Or it could be more subtle such as making sure the round
in the mag seats correctly and the spring doesn't bind inside the tube.
Again, try to get some details; that way we can narrow it down from 101 different things down to just a
few or couple of likely possibilities.
Don't start drilling holes to expand gas ports until we figure out the problem. 99% of the time it is one
factor or a combination of easily correctable factors contributing.
For what it's worth, I shoot 1100s exclusively now for doubles and have not had a firearm related
malfunction on the line in over three years with the same gun. I can't say the same for my fellow shooters
with Perazzis, Krieghoffs and Brownings! This is the truth, not an exaggeration!
------Try the two piece rings. Keep gun clean and dry. Rag residue is enough, except for a couple of spots.
------Just talked to him about what the gun is doing. He says that it seems like it is not getting the fired shell
out before the new shell trys to get in. I know that doesn't sound very technical, but he was having trouble
with it shooting singles yesterday. He took the shell catcher off after the first 25 and the gun jammed up a
couple times shooting one at the time. He was shooting new shells that should have had plenty of poop to
cycle the gun. He shoots it really good (100 straight yesterday, in a strong wind) and would like to shoot
doubles with it, but just can't get it to cycle reliably.
------Does the barrel extension have a deflector stud? Is it a newer vintage barrel?
If so, one cause might be (and I've seen this on a number of newer 1100 and 11-87 barrels) the deflector
studs come from the factory TOO long. They end up interfering with the extraction/ejection and feeding
cycle.
Rem 1100 Notes_ Rev with Pix of Disassembly.doc
01/21/06
Page 13
The cure for this is to carefully file a small amount of material off the tip of the stud on an angle so that
the filed away portion is facing the inside of the receiver and the "longer" part faces the outside of the
ejector port. It's hard to describe in type, but I hope I'm coming across understandably.
I should mention not to file too much. An authorized Remington warranty 'smith’ should be able to do
this for you in about 5 minutes for ten bucks or even just a nod of reciprocal gratitude with the
understanding you will bring him another harder job, soon.
Doing this creates a more "hood" like quality to the deflector stud allowing downward clearance for the
shell to clear most of the stud and be successfully ejected downward and out of the port WITHOUT
bumping into the new shell coming out onto the carrier latch.
Earlier 1100 trap barrels had a smaller "bump" that allowed optimal functioning but in today's
environment, perhaps does not deflect the shells enough to prevent them from hitting the ankles and feet
of your adjacent squadmate. The earliest of all 1100 trap barrels had a coin shaped flat deflector, that is
basically useless but generally prevents hulls from hitting the face, neck and shoulders of your
squadmates - but anything from the elbows to the waist will get hit.
No deflector stud on an 1100 will literally bean your neighbor two or three posts down and will affect
your social popularity immensely on a trap field!
Rem 1100 Notes_ Rev with Pix of Disassembly.doc
01/21/06
Page 14
STOCK REMOVAL
I've taken the stock off my K80 a few times and just assumed that removing the stock from my
Remington 1100™ would be a similar chore. I take off the recoil pad and peer into the dark hole.
Surprise! I've never seen a flat blade screwdriver wide enough to fit the slot in the stock bolt. Tell me
there's an easier way than ordering a special tool for this and spending beaucoup bucks at Brownell's. If
not, I may just forget it.
***Replies
If you were a little further west I could loan you my removal tool. Seeing that’s not possible I have seen a
good idea for this in other webs. Someone recommended using the flat end of an auto lug wrench if you
have that type. The end for popping hub caps. Lets hope any previous owner did not use such a tool to
tighten it down.
------Go to the hardware store and get a 9/16 wood spade bit. Grind off the tip on it. The thickness is just
right. Chuck it into a cordless drill or a variable speed drill and you are set to go. You can also use a
socket that fits on the end of the bit.
------Brownell's sells a 1/4-inch socket that works great.
------You can use a large, flat bladed screwdriver - I'm fortunate enough that a Remington gunsmith made me
my own stock removal tool when I was fifteen, and it's been in my tool kit ever since.
The wood spade mentioned above sounds good, too!
------The 90-degree metal brackets used to reinforce cabinets will work. They sell in hardware stores for
around a $1.
------I found that, using a 5/8” spade bit and a 7/32” nut driver and ratchet wrench works just fine. Just be
careful of the point on the spade bit. You can leave the point there because the stock bolt has a hole in it
that will accommodate the point. However grinding it off would probably be safer.
Rem 1100 Notes_ Rev with Pix of Disassembly.doc
01/21/06
Page 15
SPARE PARTS
A listing of parts that are most commonly needed (break) for the Remington 1100™.
These 5 are easy to find:
Part Name
Action spring
Barrel seal
Piston seal assembly
Link
Forend support
Rem #
Price
15252
15899
200295
26075
91658
$ 3.60
$ 4.00
$14.20
$11.80
$ 5.85
These are the ones I can't find...
Firing pin retractor spring
Extractor
?
?
"fire control" did you mean...
Trigger assembly
20610
***Replies
If you shoot the 1100™ frequently, you will need spare parts, especially during the peak of the season
when the weather is hot and you're subjecting the gun to a lot of firing. Heat plays a significant role in
parts failure for many of the parts. Mechanical stress accounts for a large degree as well.
The action spring on the average should be replaced every 10,000 rounds (or less if you shoot hunting
loads through the gun frequently).
The "Fire Control" is Remington's technical term for the "trigger group". They may not sell this item
directly to individuals, although their corporate policy may have changed.
The only parts that are currently incompatible between "new" 1100™s and "old" 1100™s are the
extractors, which are now all made to fit 11-87 style bolts and barrels.
If you have a traditional 1100™, order the 870 extractors. I have posted this time and again; hopefully
the archives are still retrievable.
I did lobby successfully last year for Remington to reintroduce the traditional two-piece piston and piston
seal arrangement most of us are familiar with.
Sometimes, the new styled "one-piece" unit will have an ID (inside diameter) slightly too tight to function
on some (not all) but some magazine tubes. I had such a problem. They can be dressed a bit with about
20-30 minutes worth of crocus cloth polishing, but they should have the better two piece rings available
which require much less inertia to move the first ring into the second. (The old ones work better with
lighter loads)
------Some magazine related parts have changed in recent years too, I should have noted above. The follower,
retainer and forend grip cap are all 11-87 pattern as well.
Rem 1100 Notes_ Rev with Pix of Disassembly.doc
01/21/06
Page 16
I always take two 1100™s to a trapshoot along with my spare parts kit.
If you shoot the guns frequently, and in hotter weather, you will break parts. There really is no need for
"cannibalization".
I am successfully using the new style links in the old "cup" (the front end of the action spring plunger).
Replacing that "cup" is no big deal, either. When replacing the action spring, it slides effortlessly out of
the steel tube.
In the 20+ years and 250,000+ rounds I have fired through my 1100™s, the only part I personally have
never experienced a failure in is the firing pin itself.
The newer action links are a different shape to fit the newly designed cup on the end of the action spring.
A serious 1100™ shooter should have an extra bolt assembly, trigger group, slide bar (I'm not
remembering all the correct terminology) feed latch, etc. There is no point in buying a bunch of
disassembled parts at exorbitant prices. I stick by my original advice. Have a backup which you can use
in a pinch, or which you can cannibalize for parts.
------Is the action spring the forked looking spring inside the receiver that closes the bolt when you load a shell
in the chamber? My 1100™ has a hard time sometimes closing the bolt fully, just bought it used a few
weeks ago, took it apart and cleaned it, looks hardly fired but the gun is a older 1100™ trap. The spring
goes inside the stock when you pull it back.
------No. The action spring is the coil spring inside the stock. It is inside a metal tube that runs from the back
of the receiver through a channel inside the wood. It is held in by a retainer and pin at the butt pad end
and a "goblet" shaped cup (with a stem and plunger) at the back end of the receiver.
The "fork" or "tuning forked" shaped piece you are referring to is the link.
------Brownell's catalog has the extractor listed as part #767-161-760 and the retractor spring as part # 767935-050. They have the 100 parts broken down by all models, 12 mag and then sub gauges. I'd call them
at 641-623-4000 or visit their site at www brownells.com.
Rem 1100 Notes_ Rev with Pix of Disassembly.doc
01/21/06
Page 17
SCHEMATIC DRAWING
MODEL 1100 PARTS LIST
Rem 1100 Notes_ Rev with Pix of Disassembly.doc
01/21/06
Page 18
(Reference is to the Schematic on prior page)
#
Part Name
#
1
2
3
4
5
6
7
8
9
10
11
12
13
14
15
16
18
19
20
21
22
23
24
25
Action Bar Assembly
Action Bar Sleeve
Action Spring
Action Spring Follower
Action Spring Plug
Action Spring Plug Pin
Action Spring Tube
Action Spring Tube Nut
Action Spring Tube Nut Washer
Action Spring Tube Nut Lock Washer
Barrel Assembly
Barrel Seal
Breech Bolt and Breech Bolt Assembly
Breech Bolt Buffer
Breech Bolt Return Plunger
Breech Bolt Return Plunger Retaining Ring
Butt Plate Frame
Butt Plate Insert
Butt Plate Screw (Recoil Pad Not Shown)
Carrier
Carrier Assembly
Carrier Dog
Carrier Dog Pin
Carrier Dog Washer
47
48
49
52
53
54
55
56
58
59
60
61
62
64
66
67
68
68a
69
70
71
73
74
74a
26
27
28
29
30
31
32
33
35
36
37
38
39
Carrier Dog Follower
Carrier Dog Follower Spring
Carrier Latch
Carrier Latch Follower
Carrier Latch Pin
Carrier Latch Spring
Carrier Pivot Tube
Carrier Release
Carrier Release Pin
Carrier Release Spring
Connector, Left Restricted
Connector, Right Restricted
Disconnector
75
75a
76
77
78
79
80
81
82
83
84
85
86
40
41
42
43
44
45
46
Extractor
Extractor Plunger
Extractor Spring
Feed Latch
Firing Pin
Firing Pin Retaining Pin
Firing Pin Retractor Spring
87
88
89
90
91
92
93
Rem 1100 Notes_ Rev with Pix of Disassembly.doc
Part Name
Fore-End Assembly
Fore-End Support Assembly
Front Sight
Hammer
Hammer Pin
Hammer Pin Washer
Hammer Plunger
Hammer Spring
Interceptor Latch Retainer
Interceptor Latch Spring
Interceptor Latch
Link
Locking Block Assembly
Magazine Cap
Magazine Follower
Magazine Spring
Magazine Spring Retainer
Middle Sight Bead
Operating Handle
Operating Handle Detent Ball
Operating Handle Detent Spring
Piston (20, 28, and .410)
Piston Seal (20, 28, and .410)
Piston /Piston Seal Assembly (12 Ga Not
Shown)
Receiver Assembly Restricted
Return Plunger Retaining Pin
Safety Mechanism
Safety Mechanism Detent Plunger
Safety Mechanism Spring
Safety Mechanism Spring Mechanism Pin
Sear
Sear Pin
Sear Spring
Slide Block Buffer
Stock Assembly
Stock Bearing Plate
Trigger
Restricted
(Trigger
Assembly
Restricted)
Trigger Pin
Trigger Plate Assembly (RH/LH)
Trigger Plate Pin Bushing, Rear
Trigger Plate Pin Detent Spring, Front (Need 2)
Trigger Plate Detent Spring, Rear
Trigger Plate Pin, Front
Trigger Plate Pin, Rear
01/21/06
Page 19
DISASSEMBLY REMINGTON 1100/1187
The Remington 1100 replaced the Model 58 and Model 878 in 1963 and the 1100 rapidly became one of
the most popular gas operated autoloaders. It was offered in larger gauges only, but became available in
28 and 410 chambers in 1970. Later the 1187 was developed as a utility version of the 1100. All
variations are mechanically the same, and this lesson's instruction applies to both the 1100 and the 1187.
1.Pull back the operating handle to lock the bolt in the open position, and unscrew and remove the
magazine cap. Take off the fore end and barrel, in that order, toward the front.
Rem 1100 Notes_ Rev with Pix of Disassembly.doc
01/21/06
Page 20
Rem 1100 Notes_ Rev with Pix of Disassembly.doc
01/21/06
Page 21
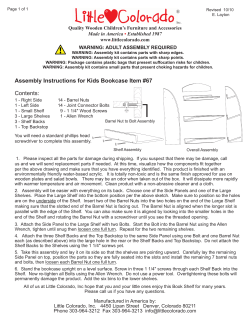
Note that the barrel of the 11-87 special purpose guns have this ring around the barrel lug and have 4 gas
ports instead of two as the Remington 1100 standard 2 ¾ shells or the 1 gas port found on the 1100
Magnums.
Rem 1100 Notes_ Rev with Pix of Disassembly.doc
01/21/06
Page 22
2. Move the rubber gas ring out of its shallow recess on the magazine tube, and slide it off toward the
front.
3. Remove the gas piston and the piston seal ring toward the front.
Rem 1100 Notes_ Rev with Pix of Disassembly.doc
01/21/06
Page 23
4. Restrain the bolt, depress the carrier latch, and ease the bolt forward to the closed position. Push out
the large and small cross pins at the lower rear of the receiver toward either side.
5. Remove the trigger group downward, turning it slightly as it is moved out to clear the disconnector on
the left side.
Rem 1100 Notes_ Rev with Pix of Disassembly.doc
01/21/06
Page 24
6. If both retaining clips are present on the cross pin sleeve, remove one of them.
7. Restrain the carrier, and push out the pivot/sleeve and remove it.
Rem 1100 Notes_ Rev with Pix of Disassembly.doc
01/21/06
Page 25
8. Ease off the carrier spring tension, removing the carrier upward and toward the front. (Note: As the
carrier is removed, restrain the carrier latch, as its spring will force it over toward the front.)
Rem 1100 Notes_ Rev with Pix of Disassembly.doc
01/21/06
Page 26
9. Slowly release the tension of the carrier latch spring, allowing the latch to pivot over forward while
restraining the spring plunger. Remove the plunger and spring toward the front.
Rem 1100 Notes_ Rev with Pix of Disassembly.doc
01/21/06
Page 27
10. Remove the carrier spring and plunger from their hole on the right side of the housing. The carrier
dog and its washer/plate are retained on the right rear wing of the carrier by a cross pin that is riveted in
place. This is not removed except for repair or replacement. If removal is necessary for repair, be sure
the wing is well supported , and drive out the pin toward the left. The pin that retains the carrier release
button is also riveted, and the same advice for removal applies to this part as well.
Rem 1100 Notes_ Rev with Pix of Disassembly.doc
01/21/06
Page 28
Rem 1100 Notes_ Rev with Pix of Disassembly.doc
01/21/06
Page 29
11. The carrier latch is cross pinned at the front of the trigger group. The pin is of very small diameter,
and is very near the edge of the alloy trigger housing. Take care when punching it out so you avoid
damage to the housing and the loops on the latch.
Rem 1100 Notes_ Rev with Pix of Disassembly.doc
01/21/06
Page 30
12. Removal of the rear cross pin sleeve will allow the top of the trigger to move to the rear beyond its
normal position, relieving the tension of the combination sear and trigger spring. The spring can now be
detached from its studs on the sear and the trigger and is removed upward.
Rem 1100 Notes_ Rev with Pix of Disassembly.doc
01/21/06
Page 31
13. Punch out the trigger pin toward the left, and remove the trigger upward, turning it slightly to clear its
left connector arm past the shelf on the housing. The connectors are cross pinned to the top of the trigger,
and the pin is riveted in place. (Remove only for repair). If removal is necessary for repair, be sure the
top of the trigger is well supported, and drive the pin out toward the right.
Rem 1100 Notes_ Rev with Pix of Disassembly.doc
01/21/06
Page 32
Rem 1100 Notes_ Rev with Pix of Disassembly.doc
01/21/06
Page 33
14. The sear cross pin is accessible by angling a punch into the top of the carrier spring hole on the right
side. Nudge the pin toward the left, and remove it with smooth jawed pliers. Remove sear upward.
Rem 1100 Notes_ Rev with Pix of Disassembly.doc
01/21/06
Page 34
15. The hammer and disconnector are retained by a cross pin that is riveted over a recessed washer and
the right side of the housing. This should be removed only for repair or replacement. If removal is
necessary for repair, be sure the disconnector is supported firmly on the left side. Use a punch small
enough to enter the depression on the right tip of the pin, and restrain the hammer spring plunger, as it
will be released as the pin clears the disconnector.
Rem 1100 Notes_ Rev with Pix of Disassembly.doc
01/21/06
Page 35
16. Push out the small cross pin at the upper rear of the housing, and remove the safety spring upward,
along with the detent ball, if possible. Push out the safety button toward either side. If the ball can’t be
removed upward, wait until the button is taken out, and insert a punch to push the ball downward into the
button tunnel for removal.
Rem 1100 Notes_ Rev with Pix of Disassembly.doc
01/21/06
Page 36
17. Grip the operating handle firmly, and pull it straight out toward the right.
Rem 1100 Notes_ Rev with Pix of Disassembly.doc
01/21/06
Page 37
18.Use a fingertip inside the receiver to depress the right shell stop. And remove the bolt and slide
assembly toward the front.
Rem 1100 Notes_ Rev with Pix of Disassembly.doc
01/21/06
Page 38
19. After the assembly is taken out, the bolt can be lifted off the rear of the action bar assembly.
END
Rem 1100 Notes_ Rev with Pix of Disassembly.doc
01/21/06
Page 39


© Copyright 2026