
Documentation - Microsoft Band
Microsoft Band SDK
SDK Documentation
1
Overview...................................................................................................................................... 3
1.1
Introduction ...................................................................................................................................... 3
1.2
Features ............................................................................................................................................ 3
1.2.1 Multi-Platform Support ............................................................................................................................................ 3
1.2.2 Getting Sensor Data ................................................................................................................................................. 3
1.2.3 Creating Tiles and Sending Notifications .................................................................................................................. 4
1.2.3.1
App Tiles .......................................................................................................................................................... 4
1.2.3.2
App Notifications ............................................................................................................................................. 5
1.2.4 Haptic Notifications .................................................................................................................................................. 5
1.2.5 Band Personalization ................................................................................................................................................ 6
1.2.5.1
Me Tile ............................................................................................................................................................. 6
1.2.5.2
Color Themes ................................................................................................................................................... 6
2
Using the SDK ............................................................................................................................... 7
2.1
Getting Started.................................................................................................................................. 7
2.1.1 Android Requirements ............................................................................................................................................. 7
2.1.2 iOS Requirements ..................................................................................................................................................... 8
2.1.3 Windows Requirements ........................................................................................................................................... 8
2.1.3.1
Windows Store Applications Capabilities ........................................................................................................ 8
2.1.3.2
Bluetooth Power Management Settings for Windows .................................................................................... 8
2.2
2.2.1
2.2.2
2.2.3
2.3
2.3.1
2.3.2
2.3.3
2.4
Connecting to a Band......................................................................................................................... 9
Android ..................................................................................................................................................................... 9
iOS .......................................................................................................................................................................... 10
Windows ................................................................................................................................................................. 11
Retrieving the Band Version Information ......................................................................................... 11
Android ................................................................................................................................................................... 11
iOS .......................................................................................................................................................................... 12
Windows ................................................................................................................................................................. 12
Subscribing to Band Sensors ............................................................................................................ 12
2.4.1 Subscribe to Heart Rate Sensor Stream ................................................................................................................. 13
2.4.1.1
Android .......................................................................................................................................................... 13
2.4.1.2
iOS.................................................................................................................................................................. 14
2.4.1.3
Windows ........................................................................................................................................................ 15
2.5
Creating and Managing Tiles ............................................................................................................ 17
2.5.1 Retrieving, Creating, and Removing Tiles ............................................................................................................... 17
2.5.1.1
Android .......................................................................................................................................................... 17
Microsoft
2
2.5.1.2
2.5.1.3
2.6
iOS.................................................................................................................................................................. 19
Windows ........................................................................................................................................................ 20
Sending Notifications....................................................................................................................... 22
2.6.1 Sending Dialogs ...................................................................................................................................................... 22
2.6.1.1
Android .......................................................................................................................................................... 22
2.6.1.2
iOS.................................................................................................................................................................. 22
2.6.1.3
Windows ........................................................................................................................................................ 23
2.6.2 Sending Messages .................................................................................................................................................. 23
2.6.2.1
Android .......................................................................................................................................................... 23
2.6.2.2
iOS.................................................................................................................................................................. 23
2.6.2.3
Windows ........................................................................................................................................................ 24
2.6.3 Allowing Tiles to Receive Local and Remote Notifications (iOS Apps Only) ........................................................... 24
2.6.3.1
iOS.................................................................................................................................................................. 24
2.7
Customizing Tile Layouts.................................................................................................................. 25
2.7.1 Creating a Layout for a Page................................................................................................................................... 25
2.7.1.1
Primitive Element Types ................................................................................................................................ 25
2.7.1.2
Container Element Types ............................................................................................................................... 26
2.7.1.3
Example Layout Element Tree ....................................................................................................................... 26
2.7.1.4
Element Attributes ........................................................................................................................................ 27
2.7.2 Element Rectangle and Margins............................................................................................................................. 29
2.7.2.1
Negative Margins ........................................................................................................................................... 29
2.7.3 Colors...................................................................................................................................................................... 29
2.7.4 Icons ....................................................................................................................................................................... 30
2.7.4.1
Icons Used as FilledButton Masks ................................................................................................................. 30
2.7.5 Barcodes ................................................................................................................................................................. 30
2.7.6 Setting the Contents of a Page ............................................................................................................................... 31
2.7.7 Simple Custom Tile Example .................................................................................................................................. 31
2.7.7.1
Android .......................................................................................................................................................... 31
2.7.7.2
iOS.................................................................................................................................................................. 34
2.7.7.3
Windows ........................................................................................................................................................ 36
2.8
2.8.1
2.8.2
2.8.3
2.9
2.9.1
2.9.2
2.9.3
2.10
Handling Custom Tile Events ............................................................................................................ 39
Android ................................................................................................................................................................... 40
iOS .......................................................................................................................................................................... 41
Windows ................................................................................................................................................................. 43
Sending Haptics to the Band ............................................................................................................ 46
Android ................................................................................................................................................................... 46
iOS .......................................................................................................................................................................... 47
Windows ................................................................................................................................................................. 47
Band Personalization ....................................................................................................................... 47
2.10.1
Managing the Me Tile Image ............................................................................................................................. 47
2.10.1.1 Android .......................................................................................................................................................... 47
2.10.1.2 iOS.................................................................................................................................................................. 48
2.10.1.3 Windows ........................................................................................................................................................ 48
2.10.2
Changing Theme ................................................................................................................................................ 49
2.10.2.1 Android .......................................................................................................................................................... 49
2.10.2.2 iOS.................................................................................................................................................................. 50
2.10.2.3 Windows ........................................................................................................................................................ 51
Microsoft
3
1 OVERVIEW
1.1 INTRODUCTION
The Microsoft Band SDK is designed to allow 3rd party application developers to harness the power of Microsoft
Band. The SDK gives developers access to the sensors available on the Band, as well as the ability to create Tiles
on the Band and to send notifications to these Tiles from their applications. Through the SDK, you, as an
application developer, will be able to enhance and extend the experience of your application to your customers’
wrists. This opens up a whole new dimension of interaction and enables new, richer scenarios for your
applications that make use of the capabilities of Microsoft Band.
Applications that work with Microsoft Band make use of the Microsoft Band SDK to communicate with the Band.
The application logic runs on the host OS (iPhone, Android, Windows Phone) and it remotely controls the UI of the
Microsoft Band as well as receives contextual information and sensor data from the Band.
1.2 FEATURES
The features offered by the SDK are as follows:
Multi-platform support
Sensor data subscriptions
Tile creation and management
Tile notifications
Custom layouts
Haptic notifications
Band theme personalization
The following subsections describe these features in more detail.
1.2.1 Multi-Platform Support
Microsoft Band SDK is also supported on a wide range of platforms. This includes:
Windows Phone 8.1 and later
Windows 8.1 and later (Store Apps)
iOS 7 and later
Android 4.2 (API 17) and later
1.2.2 Getting Sensor Data
Microsoft Band features many hardware sensors that application developers can get data from. The SDK exposes
data from these sensors as streams, and applications can subscribe to these sensor streams. Here is a list of all
the sensor streams that are available:
Sensor
Details
Accelerometer
Provides X, Y, and Z acceleration in g units. 1 g = 9.81 meters per second squared (m/s2).
Gyroscope
Provides X, Y, and Z angular velocity in degrees per second (°/sec) units.
Distance
Provides the total distance in centimeters, current speed in centimeters per second (cm/s),
current pace in milliseconds per meter (ms/m), and the current pedometer mode (such as
Microsoft
4
walking or running).
Heart Rate
Provides the number of beats per minute, also indicates if the heart rate sensor is fully
locked onto the wearer’s heart rate.
The data returned should be used only in resting mode. The Band SDK does not provide
access to the heart rate values optimized for any other activity.
Pedometer
Provides the total number of steps the wearer has taken.
Skin Temperature
Provides the current skin temperature of the wearer in degrees Celsius.
UV
Provides the current ultra violet radiation exposure intensity.
Band Contact
Provides the current state of band as being worn/not worn.
Calories
Provides the total number of calories the wearer has burned.
The following images show the axes for accelerometer and gyroscope sensor relative to the Band:
Refer to detailed section on subscribing to band sensors to learn how to create and manage heart rate
subscription on Microsoft Band.
1.2.3 Creating Tiles and Sending Notifications
The SDK offers developers the option to create tiles on the Band specific to their application. A developer can
create one or more tiles to send notifications to the Band to let the user know something interesting has
occurred. Tiles support custom icons and color themes.
1.2.3.1
App Tiles
Microsoft
5
Each app tile is visually represented on the Start
Strip by an icon that fits within a 46px x 46px box.
Applications can create two type of tiles on the
Band; messaging tiles, and custom tiles.
Messaging tiles contain simple messages with a title
and a body as their content. These tiles will also
show a badge count when new content arrives.
When badged, the tile icon scales down to 24px x
24px to accommodate the badging system. If your
app requires both sizes, you may need to redraw
your icon to make sure it is visually optimized for the smaller size. Refer to the detailed section on creating and
managing tiles to learn how to create your own tiles on Microsoft Band.
Custom tiles have application defined layouts and custom content, which includes multiple icons, buttons, text
blocks, and barcodes. With custom tiles, developers can define unique experiences for their applications. The
developers control exactly how many pages to show inside of a tile as well as the content of individual pages.
They can update the contents of a page that has been created using custom layout at any point, unlike messaging
tiles where every new message results in the creation of a new page inside the tile. In addition, a developer can
choose to add additional pages inside the tile. If the total number of pages goes past the maximum pages allowed
inside the tile, the right most page is dropped out when a new page is added.
It is also possible to register for tile events using the SDK. This allows a developer to know when the user has
entered and exited their tile. In addition, they can receive events when a user taps on a button in one of their
custom tiles. Refer to the detailed section on custom layouts to learn how to create and use custom layouts and
how to handle event callbacks from Microsoft Band tiles.
1.2.3.2 App Notifications
App notifications come in two flavors:
Dialogs – Dialog notifications are popups that are meant to quickly display information to the user. Once
the user dismisses the dialog, the information contained therein does not persist on the Band.
Messages – Message notifications are sent and stored in a specific tile, and a tile can keep up to 8
messages at a time. Messages may display a dialog as well.
Messages queue up inside the tile in a first in first out fashion. Every new message is placed at the head of
the queue (left most position inside the tile). After the number of messages exceeds the maximum
allowed for a tile, the right most message is dropped out of the queue and replaced with the new
incoming message.
Both notification types contain a title text and a body text. Refer to the detailed section on app notifications for
more information on how to create and send these notifications.
1.2.4 Haptic Notifications
App notification dialogs are accompanied with a stock vibration tone on the band. However, it is also possible to
send haptic notifications to the Band without any accompanying UI notification. These haptic notifications can be
used to inform the user of checkpoints or simply provide feedback for actions taken by the user. There are 9
predefined vibration tones that you can send to the Band.
Vibration Tone
Description
Microsoft
6
Notification one tone
One gentle notification tone
Notification two tone
Two gentle notification tones
Notification alarm
Three long high intensity tones
Notification timer
One long high intensity tone
One tone high
One high intensity tone
Two tone high
Two high intensity tones
Three tone high
Three high intensity tones
Ramp up
One tone with ascending intensity
Ramp down
One tone with descending intensity
Note that through device settings on the Band, users have control over intensity of haptic levels and they can also
choose to turn the haptic motor completely off. In those cases, the Band will respect the device setting and not
vibrate. Refer to the detailed section on haptic notifications to see how to create and send haptic notifications to
the Band
1.2.5 Band Personalization
In addition to creating tiles for their own applications, developers can use the SDK to further customize a user’s
Band by setting the background image for the Me Tile, as well as setting the default color theme for all tiles on the
Band.
1.2.5.1 Me Tile
The Me Tile is the default view of the Start Strip and is the tile that contains the user’s Steps, Calories, and Heart
Rate.
1.2.5.2 Color Themes
For each color theme, there are six color classes that are used to represent various states of activity on the Band.
The following graphic shows the various places where different colors show up on the Band. Band color theme
applies to all tiles as long as a tile doesn’t override these colors individually.
Microsoft
7
Refer to the detailed section on Band personalization to find out how to create custom wallpapers and color
themes for Microsoft Band.
2 USING THE SDK
2.1 GETTING STARTED
For each platform there are a few requirements to start using the Microsoft Band SDK.
2.1.1 Android Requirements
The minimum supported Android API version is 17. The following uses-permission tags should be added to the
AndroidManifest.xml:
<uses-permission android:name="android.permission.BLUETOOTH"/>
<uses-permission android:name="com.microsoft.band.service.access.BIND_BAND_SERVICE" />
The Android SDK relies on capabilities provided by the Microsoft Health App. To be able to use the SDK on
Android, having the Microsoft Health App installed on the phone is a requirement. Without the Microsoft Health
App installed on the phone, any attempts to create a Microsoft Band client will fail with error.
Microsoft
8
2.1.2 iOS Requirements
The minimum supported iOS version is 7.0. The recommended development environment is Xcode 6.0+. The SDK
does not support iOS simulator. If you wish to develop an application to communicate with the Band in the
background, you must enable "Use Bluetooth LE accessories" in Background Modes.
2.1.3 Windows Requirements
All versions of the SDK for Windows platforms require Visual Studio 2013 or later. If you wish to use the SDK with
Windows Phone you will also need to install the Windows Phone SDK add-on for VS.
2.1.3.1 Windows Store Applications Capabilities
If you’re writing a WinRT application for Windows or Windows Phone, it will need to declare the appropriate
privileges needed to access Bluetooth hardware resources. To do this, manually update the Capabilities section of
the application’s Package.appxmanifest file to include the following:
<m2:DeviceCapability Name="bluetooth.rfcomm">
<m2:Device Id="any">
<!-- Used by the Microsoft Band SDK -->
<m2:Function Type="serviceId:A502CA9A-2BA5-413C-A4E0-13804E47B38F" />
<!-- Used by the Microsoft Band SDK -->
<m2:Function Type="serviceId:C742E1A2-6320-5ABC-9643-D206C677E580" />
</m2:Device>
</m2:DeviceCapability>
You will also need to add the Proximity capability, but you can do that from the manifest editor UI:
2.1.3.2 Bluetooth Power Management Settings for Windows
One of the limitations of using the SDK on Windows PC is that the default Power Management setting for
Bluetooth devices allows Windows to turn the device off to save power. This can cause problems if the power
saving is turned on in the middle of Bluetooth communication between Band and PC. To work around this
situation, users can turn Power Management setting of “Allow the computer to turn off this device to save
power” inside the Properties dialog to “OFF” for the Bluetooth device they are using with their PC.
Microsoft
9
2.2 CONNECTING TO A BAND
The first step in using the SDK is to make a connection to a Band. To make a connection, the Band and the device
your application is running on must be paired with each other. You can use the Band Client Manager to get a list
of paired Bands and establish a connection to one or more paired Bands. Operations to the Band are
encapsulated in a Band Client.
2.2.1 Android
1. Import the appropriate packages
import
import
import
import
import
import
com.microsoft.band.BandClient;
com.microsoft.band.BandClientManager;
com.microsoft.band.BandException;
com.microsoft.band.BandInfo;
com.microsoft.band.BandIOException;
com.microsoft.band.ConnectionState;
2. Get a list of paired Bands
BandInfo[] pairedBands =
BandClientManager.getInstance().getPairedBands();
3. Create a BandClient object
BandClient bandClient =
BandClientManager.getInstance().create(getActivity(), pairedBands[0]);
4. Connect to the Band
// Note: the BandPendingResult.await() method must be called from a
background thread. An exception will be thrown if called from the UI
thread.
BandPendingResult<ConnectionState> pendingResult =
bandClient.connect();
try {
Microsoft
10
ConnectionState state = pendingResult.await();
if(state == ConnectionState.CONNECTED) {
// do work on success
} else {
// do work on failure
}
} catch(InterruptedException ex) {
// handle InterruptedException
} catch(BandException ex) {
// handle BandException
}
2.2.2 iOS
1. Import the appropriate packages
#import <MicrosoftBandKit_iOS/MicrosoftBandKit_iOS.h>
2. Set up ClientManager and its delegate
[[MSBClientManager sharedManager] setDelegate:self];
3. Get a list of attached Clients
NSArray *attachedClients = [[MSBClientManager sharedManager]
attachedClients];
4. Connect to the Band Client
MSBClient *client = [attachedClients firstObject];
if (client)
{
[[MSBClientManager sharedManager] connectClient:client];
}
5. Implement appropriate delegate methods
// Note: The delegate methods of MSBClientManagerDelegate protocol are
called in the main thread.
-(void)clientManager:(MSBClientManager *)cm
clientDidConnect:(MSBClient *)client
{
// handle connected event.
}
-(void)clientManager:(MSBClientManager *)cm
clientDidDisconnect:(MSBClient *)client
{
// handle disconnected event.
}
-(void)clientManager:(MSBClientManager *)cm client:(MSBClient *)client
didFailToConnectWithError:(NSError *)error
{
Microsoft
11
// handle failure event.
}
2.2.3 Windows
1. Setup using directives
using Microsoft.Band;
2. Get a list of paired Bands
IBandInfo[] pairedBands = await
BandClientManager.Instance.GetBandsAsync();
3. Connect to the Band to get a new BandClient object
try
{
using(IBandClient bandClient = await
BandClientManager.Instance.ConnectAsync(pairedBands[0]))
{
// do work after successful connect
}
}
catch(BandException ex)
{
// handle a Band connection exception
}
2.3 RETRIEVING THE BAND VERSION INFORMATION
Sometimes it is necessary to know what version of the Band you are communicating with. The Band Client allows
you to query the Band for its current firmware and hardware version. With this information developers can
create an application that offers different features based on the version of the connected Band.
2.3.1
Android
String fwVersion = null;
String hwVersion = null;
try {
BandPendingResult<String> pendingResult =
bandClient.getFirmwareVersion();
fwVersion = pendingResult.await();
pendingResult = bandClient.getHardwareVersion();
hwVersion = pendingResult.await();
// do work related to Band firmware & hardware versions
} catch (InterruptedException ex) {
// handle InterruptedException
} catch(BandIOException ex) {
// handle BandIOException
Microsoft
12
} catch(BandException ex) {
// handle BandException
}
2.3.2
iOS
[self.client firmwareVersionWithCompletionHandler:^(NSString *version,
NSError *error){
if (error)
// handle error
else
// handle success
}];
[self.client hardwareVersionWithCompletionHandler:^(NSString *version,
NSError *error){
if (error)
// handle error
else
// handle success
}];
2.3.3
Windows
string fwVersion;
string hwVersion;
try
{
fwVersion = await bandClient.GetFirmwareVersionAsync();
hwVersion = await bandClient.GetHardwareVersionAsync();
// do work with firmware & hardware versions
}
catch(BandException ex)
{
// handle any BandExceptions
}
2.4 SUBSCRIBING TO BAND SENSORS
The SDK provides support for Band sensors as subscriptions. The subscriptions are managed by the Band Sensor
Manager on the Band Client. For each hardware sensor, the Sensor Manager allows the application developer to
create a subscription. A subscription is essentially a platform specific callback mechanism, which will deliver data
at intervals specific to the sensor. Some sensors have dynamic intervals, such as the Accelerometer, that allow
the developer to specify at what rate it wants data to be delivered, whereas other sensors only deliver data as
their values change.
It is important to understand that subscribing to sensor data has an impact on the Band’s battery life. The use of
each sensor requires power draw (some more than others), so developers should only subscribe to sensor data
when the data is absolutely needed for their applications.
Microsoft
13
On Windows and iOS, constant connectivity is required in order to maintain a subscription. If the band loses
connectivity with the phone, the subscription is stopped and it is not automatically enabled upon reconnection.
Some sensor subscriptions require user consent. The subscription permission model is as follows:
1. Permission is granted on a per sensor basis.
2. Applications can request the permission status of a particular sensor. The status can be “Granted”,
“Declined” or “Not Specified”. If permission is “Granted”, applications can simply start the subscription.
3. Applications can request to show the permission dialog to ask the user for permission if the permission is
“Not Specified” or “Declined”.
4. If the permission is “Not Specified” or “Declined” and the application requests to enable the subscription,
the request to enable the subscription will fail.
The SDK shows the consent dialog in the context of the running application to acquire permission for the sensor
subscription. The answer is remembered, so if the user has given permission once, the application would not need
to request it again.
Note: At this time, only heart rate sensor subscription requires an explicit user consent before it can be started.
2.4.1
Subscribe to Heart Rate Sensor Stream
2.4.1.1 Android
1. Update imports
import com.microsoft.band.sensors.BandHeartRateEvent;
import com.microsoft.band.sensors.BandHeartRateEventListener;
import com.microsoft.band.sensors.HeartRateConsentListener;
2. Implement HeartRateConsentListener interface
@Override
public void userAccepted(boolean consentGiven) {
// handle user's heart rate consent decision
};
3. Ensure user has consented for heart rate sensor streaming
// check current user heart rate consent
if(client.getSensorManager().getCurrentHeartRateConsent() !=
UserConsent.GRANTED) {
// user has not consented, request it
// the calling class is both an Activity and implements
// HeartRateConsentListener
bandClient.getSensorManager().requestHeartRateConsent(this,
this);
}
4. Create an event listener
// create a heart rate event listener
BandHeartRateEventListener heartRateListener = new
BandHeartRateEventListener() {
Microsoft
14
@Override
public void onBandHeartRateChanged(BandHeartRateEvent event) {
// do work on heart rate changed (i.e. update UI)
}
};
5. Register the event listener
try {
// register the listener
bandClient.getBandSensorManager().registerHeartRateEventListener(
heartRateListener);
} catch(BandIOException ex) {
// handle BandException
}
6. Unregister the event listener
try {
// unregister the listener
bandClient.getBandSensorManager().unregisterHeartRateEventListene
r(heartRateListener);
} catch(BandIOException ex) {
// handle BandException
}
2.4.1.2 iOS
1. Verify user consent
MSBUserConsent consent = [self.client.sensorManager
heartRateUserConsent];
switch (consent)
{
case MSBUserConsentGranted:
//User has granted access
[self startHeartRateUpdates];
break;
case MSBUserConsentNotSpecified:
//Request user consent
[self.client.sensorManager
requestHRUserConsentWithCompletion:^(BOOL userConsent, NSError *error)
{
if (userConsent)
{
//User granted access
}
else
{
//User declined access
Microsoft
15
}
}];
break;
case MSBUserConsentDeclined:
//User has declined access
break;
default:
break;
}
2. Start sensor updates
- (void)startHeartRateUpdates
{
// if Queue is nil, it uses default mainQueue
NSError *subscriptionError;
[self.client.sensorManager
startHeartRateUpdatesToQueue:nil
errorRef:&subscriptionError
withHandler:^(MSBSensorHeartRateData
*heartRateData, NSError *error)
{
if (error){
// handle error
}
}];
if (subscriptionError){
// failed to subscribe.
}
}
3. Stop sensor updates
[self.client.sensorManager
stopHeartRateUpdatesErrorRef:&subscriptionError];
if (subscriptionError){
// failed to unsubscribe.
}
2.4.1.3 Windows
1. Update using directives
using Microsoft.Band.Sensors;
2. Ensure user has consented for heart rate sensor streaming
// check current user heart rate consent
if (bandClient.SensorManager.HeartRate.GetCurrentUserConsent() !=
UserConsent.Granted)
Microsoft
16
{
// user has not consented, request it
await
bandClient.SensorManager.HeartRate.RequestUserConsentAsync();
}
3. Get a list of supported intervals
// get a list of available reporting intervals
IEnumerable<TimeSpan> supportedHeartBeatReportingIntervals =
bandClient.SensorManager.HeartRate.SupportedReportingIntervals;
foreach (var ri in supportedHeartBeatReportingIntervals)
{
// do work with each reporting interval (i.e. add them to a list
in the UI)
}
4. Set the reporting interval (optional)
// set the reporting interval
bandClient.SensorManager.HeartRate.ReportingInterval =
supportedHeartBeatReportingIntervals.GetEnumerator().Current;
5. Subscribe to the reading changed event for the sensor
// hook up to the Heartrate sensor ReadingChanged event
bandClient.SensorManager.HeartRate.ReadingChanged += (sender, args) =>
{
// do work when the reading changes (i.e. update a UI element)
};
6. Start the sensor
// start the Heartrate sensor
try
{
await bandClient.SensorManager.HeartRate.StartReadingsAsync();
}
catch (BandException ex)
{
// handle a Band connection exception
throw ex;
}
7. Stop the sensor
// stop the Heartrate sensor
try
{
await bandClient.SensorManager.HeartRate.StopReadingsAsync();
}
Microsoft
17
catch (BandException ex)
{
// handle a Band connection exception
throw ex;
}
2.5
CREATING AND MANAGING TILES
Tiles offer the developer the ability to create application specific experiences on the Microsoft Band. The Band
supports up to 13 separate tiles, and the SDK will allow the application to create as many tiles as there is space
for. To work with tiles developers use the Band Tile Manager on the Band Client. The Tile Manager allows you to:
Get a list of the application’s tiles currently on the Band
Get the number of available tile slots on the Band
Create a tile
Remove a tile
The tile can include an icon (46x46 pixels), a small icon (24x24 pixels), a title or name for the tile, and the theme
colors of the tile. By default, all tiles will use the theme colors of the Band, but the developer can override that.
The Band does not support color icons, only white alpha blended icons. Each platform has a helper method to
convert a native bitmap object into the appropriate supported icon format. This helper method uses the alpha
component of the native bitmap object pixels to construct a Band icon object. The red, green, and blue values of
the native bitmap pixels are not used.
After creating a tile, the developer can send dialogs and messages to them using the Band Notification Manager
on the Band Client. Both contain title and body strings, and the message includes a timestamp for display
ordering. Dialogs are quick popups the user can dismiss. The information in the dialogs does not persist once the
user has dismissed them. Messages can be displayed in a dialog or not. Regardless the information of the last 8
messages persists and can be viewed by opening the tile the message was sent to. Tiles also support badging, or
showing the count of unseen messages, on the face of the tile.
2.5.1
Retrieving, Creating, and Removing Tiles
2.5.1.1 Android
1. Update imports
import
import
import
import
java.util.List;
java.util.UUID;
com.microsoft.band.tiles.BandIcon;
com.microsoft.band.tiles.BandTile;
2. Retrieve the list of your application’s tiles already on the Band
try {
// get the current set of tiles
Collection<BandTile> tiles =
bandClient.getBandTileManager().getTiles().await();
} catch (BandException e) {
// handle BandException
} catch (InterruptedException e) {
Microsoft
18
// handle InterruptedException
}
3. Determine if there is space for more tiles on the Band
try {
// determine the number of available tile slots on the Band
int tileCapacity =
bandClient.getBandTileManager().getRemainingTileCapacity().await();
} catch (BandException e) {
// handle BandException
} catch (InterruptedException e) {
// handle InterruptedException
}
4. Create a new tile
// create the small and tile icons from writable bitmaps
// small icons are 24x24 pixels
Bitmap smallIconBitmap = Bitmap.createBitmap(24, 24, null);
BandIcon smallIcon = BandIcon.toBandIcon(smallIconBitmap);
// tile icons are 46x46 pixels
Bitmap tileIconBitmap = Bitmap.createBitmap(46, 46, null);
BandIcon tileIcon = BandIcon.toBandIcon(tileIconBitmap);
// create a new UUID for the tile
UUID tileUuid = UUID.randomUUID();
// create a new BandTile using the builder
BandTile tile = new BandTile.Builder(tileUuid, "TileName", tileIcon)
.setTileSmallIcon(smallIcon).build();
try {
if(bandClient.getBandTileManager().addTile(getActivity(),
tile).await()) {
// do work if the tile was successfully created
}
} catch (BandException e) {
// handle BandException
} catch (InterruptedException e) {
// handle InterruptedException
}
5. Remove all of the application’s tiles
try {
// get the current set of tiles
Collection<BandTile> tiles =
bandClient.getBandTileManager().getTiles().await();
Microsoft
19
for(BandTile t : tiles) {
if(bandClient.getBandTileManager().removeTile(t).await()){
// do work if the tile was successfully removed
}
}
} catch (BandException e) {
// handle BandException
} catch (InterruptedException e) {
// handle InterruptedException
}
2.5.1.2 iOS
1. Retrieve the list of your application’s tiles already on the Band
[self.client.tileManager tilesWithCompletionHandler:^(NSArray *tiles,
NSError *error) {
if (error){
// handle error
}
}];
2. Determine if there is space for more tiles on the Band
[self.client.tileManager
remainingTileCapacityWithCompletionHandler:^(NSUInteger
remainingCapacity, NSError *error){
if (error){
// handle error
}
}];
3. Create a new tile
// create the small and tile icons from UIImage
// small icons are 24x24 pixels
NSError *error;
MSBIcon smallIcon = [MSBIcon iconWithUIImage:[UIImage
imageWithContentsOfFile:@"small.png"] error:&error];
if (error){
// handle error
}
// tile icons are 46x46 pixels
MSBIcon *tileIcon = [MSBIcon iconWithUIImage:[UIImage
imageWithContentsOfFile:@"tile.png"] error:&error];
if (error){
// handle error
}
// sample code uses random tileId, but you should persist the value
for your application's tileId.
Microsoft
20
NSUUID *tileId = [NSUUID uuid];
// create a new MSBTile
MSBTile *tile = [MSBTile tileWithId:tileId name:@"sample"
tileIcon:tileIcon smallIcon:smallIcon error:&error];
if (error){
// handle error
}
// add created tile to the Band.
[self.client.tileManager addTile:tile completionHandler:^(NSError
*error){
if (error){
// add tile failed, handle error.
}
}];
4. Remove all of the application’s tiles
// get the current set of tiles
__weak typeof(self) weakSelf = self;
[self.client.tileManager tilesWithCompletionHandler:^(NSArray *tiles,
NSError *error){
for (MSBTile *aTile in tiles)
{
// remove this tile. can be async.
[weakSelf.client.tileManager removeTile:aTile
completionHandler:^(NSError *error){
if (error) {
// failed to remove this tile.
}
}];
}
}];
2.5.1.3 Windows
1. Update using directives
using Microsoft.Band.Tiles;
2. Retrieve the list of your application’s tiles already on the Band
try
{
// get the current set of tiles
IEnumerable<BandTile> tiles = await
bandClient.TileManager.GetTilesAsync();
}
catch (BandException ex)
Microsoft
21
{
// handle a Band connection exception
}
3. Determine if there is space for more tiles on the Band
try
{
// determine the number of available tile slots on the Band
int tileCapacity = await
bandClient.TileManager.GetRemainingTileCapacityAsync();
}
catch (BandException ex)
{
// handle a Band connection exception
}
4. Create a new tile
// create the small and tile icons from writable bitmaps
// small icons are 24x24 pixels
WriteableBitmap smallIconBitmap = new WriteableBitmap(24, 24);
BandIcon smallIcon = smallIconBitmap.ToBandIcon();
// tile icons are 46x46 pixels
WriteableBitmap tileIconBitmap = new WriteableBitmap(46, 46);
BandIcon tileIcon = tileIconBitmap.ToBandIcon();
// create a new Guid for the tile
Guid tileGuid = Guid.NewGuid();
// create a new tile with a new Guid
BandTile tile = new BandTile(tileGuid)
{
// enable badging (the count of unread messages)
IsBadgingEnabled = true,
// set the name
Name = "TileName",
// set the icons
SmallIcon = smallIcon,
TileIcon = tileIcon
};
try
{
// add the tile to the Band
if (await bandClient.TileManager.AddTileAsync(tile))
{
// do work if the tile was successfully created
Microsoft
22
}
}
catch(BandException ex)
{
// handle a Band connection exception
}
5. Remove all of the application’s tiles
try
{
// get the current set of tiles
IEnumerable<BandTile> tiles = await
bandClient.TileManager.GetTilesAsync();
foreach (var t in tiles)
{
// remove the tile from the Band
if (await bandClient.TileManager.RemoveTileAsync(t))
{
// do work if the tile was successfully removed
}
}
}
catch (BandException ex)
{
// handle a Band connection exception
}
2.6 SENDING NOTIFICATIONS
2.6.1
2.6.1.1
Sending Dialogs
Android
try {
// send a dialog to the Band for one of our tiles
bandClient.getBandNotificationManager().showDialog(tileUuid,
"Dialog title", "Dialog body").await();
} catch (BandException e) {
// handle BandException
} catch (InterruptedException e) {
// handle InterruptedException
}
2.6.1.2
iOS
[self.client.notificationManager
showDialogWithTile:tileId
Microsoft
23
title:@"Dialog title"
body:@"Dialog body"
completionHandler:^(NSError *error)
{
if (error){
// handle error.
}
}];
2.6.1.3
Windows
try
{
// send a dialog to the Band for one of our tiles
await bandClient.NotificationManager.ShowDialogAsync(tileGuid,
"Dialog title", "Dialog body");
}
catch (BandException ex)
{
// handle a Band connection exception
}
2.6.2
Sending Messages
2.6.2.1 Android
1. Update imports
import java.util.Date;
import com.microsoft.band.notification.MessageFlags;
2. Send a message showing it as a dialog
try {
// send a message to the Band for one of our tiles, and show it
as a dialog as well
bandClient.getBandNotificationManager().sendMessage(tileUuid,
"Message title", "Message body", new Date(),
MessageFlags.SHOW_DIALOG).await();
} catch (BandException e) {
// handle BandException
} catch (InterruptedException e) {
// handle InterruptedException
}
2.6.2.2 iOS
1. Send a message showing it as a dialog
[self.client.notificationManager
sendMessageWithTileId:tileId
title:@"Message title"
Microsoft
24
body:@"Message body"
timeStamp:[NSDate date]
flags:MSBNotificationMessageFlagShowDialog
completionHandler:^(NSError *error)
{
if (error){
// handle error
}
}];
2.6.2.3 Windows
1. Update using directives
using Microsoft.Band.Notifications;
2. Send a message showing it as a dialog
try
{
// send a message to the Band for one of our tiles, and show it as
a dialog as well
await bandClient.NotificationManager.SendMessageAsync(tileGuid,
"Message title", "Message body", DateTimeOffset.Now,
MessageFlags.ShowDialog);
}
catch (BandException ex)
{
// handle a Band connection exception
}
2.6.3
Allowing Tiles to Receive Local and Remote Notifications (iOS Apps Only)
2.6.3.1 iOS
1. Register local and remote notifications to a specific Tile on the Band. This is useful if your app owns
multiple Tiles.
[self.client.notificationManager
registerNotificationWithTileID:[tile tileId]
completionHandler:^(NSError *error) {
if (error){
// handle error.
}
}];
2. Register local and remote notifications to the default Tile you own.
[self.client.notificationManager
registerNotificationWithCompletionHandler:^(NSError *error) {
if (error){
// handle error.
Microsoft
25
}
}];
3. Unregister local and remote notifications from the Band.
[self.client.notificationManager
unregisterNotificationWithCompletionHandler:^(NSError *error) {
if (error){
// handle error.
}
}];
2.7 CUSTOMIZING TILE LAYOUTS
The tiles that you add to the Band can each contain up to 8 “pages” of content. When the user taps on the tile,
the first page is shown and the user can swipe horizontally to navigate to other pages in the tile.
Here is the general format of the Band screen shown after the user has tapped a tile:
Left edge (section 1 below, 40 pixels wide) always shows the “Back Bar” allowing the user to exit the app
tile and return to the Start Strip
Middle (section 2 below, 245 pixels wide) shows the current page of the tile
Right edge (section 3 below, 35 pixels wide) shows a peek at the leftmost portion of the next page to the
right of the current page
The remainder of the next page (section 4) and subsequent pages are not visible, but the user can swipe
to navigate to the next page to make it visible
2.7.1 Creating a Layout for a Page
The visual format of the content contained within each page can be customized by creating a “layout” for it. A tile
can have up to 5 layouts and each of the (up to) 8 pages of the tile can be configured to use any of the 5 layouts.
2.7.1.1 Primitive Element Types
The primitive visual element types that contain content and can be formatted with layouts are:
Name
Description
Content Type
TextBlock
Text that is clipped if too wide to fit within its
bounds
string
Microsoft
26
WrappedTextBlock
Text that wraps if too wide to fit within its bounds
string
Icon
Single color bitmap consisting of alpha values
controlling the opacity of each pixel
Icon index (0-9)
Barcode
Text encoded as a Code39 or PDF417 barcode
string
TextButton
White text label on black background button
string
FilledButton
Rectangular button filled with background color
color
TextButton and FilledButton elements generate events to your app when they are pressed by the user. Those
events are described below in the section Handling Custom Tile Events. The other element types do not generate
events.
Note: A layout may contain a maximum of 10 primitive elements.
2.7.1.2 Container Element Types
Primitive elements are the “leaf nodes” of a layout. The “tree” of elements begins with a PageLayout which serves
as the “root” element of the layout. This root will have exactly one child element which will be one of the
following container elements:
Name
Description
FlowPanel
Arranges its child elements sequentially on the page, either
horizontally or vertically
ScrollFlowPanel
Similar to FlowPanel with the ability to scroll between children
that are not currently within the visible area
FilledPanel
Rectangle filled with a background color
Container elements can have 0 or more child elements. These children can be FlowPanel, ScrollFlowPanel, or
primitive elements. A FilledPanel can only be used as the root element of a layout, it cannot be used as a child
of a FlowPanel or ScrollFlowPanel.
Note: The total number of elements (primitive and container) that a layout may contain is limited to about 20. The
exact number will vary depending on the type of elements in the layout.
2.7.1.3 Example Layout Element Tree
To display a day’s weather for each of the daytime and night, you could:
1. Have a PageLayout which has a vertical ScrollFlowPanel as its child.
2. The vertical ScrollFlowPanel has 2 horizontal FlowPanels as children
3. Each horizontal FlowPanel has 2 children:
a. An Icon that will show a sun/moon, cloud, or rain image
b. A WrappedTextBlock with several lines of text showing info such as the temperature and chance
of precipitation.
That will create a Page layout with elements structured like this:
Microsoft
27
ScrollFlowPanel (vertical)
1. FlowPanel (horiz)
1.2 WrappedTextBlock
1.1 Icon
2. FlowPanel (horiz)
2.2 WrappedTextBlock
2.1 Icon
2.7.1.4 Element Attributes
Elements have attributes to control their appearance, including:
Name
Type
Required
Description
Applicable Element
Types
Yes
Define the X,Y location of the
element’s upper left corner
relative to its parent, and its
width and height (in pixels)
All
No
Define the margin sizes (in
pixels)
All
No
Specifies the color of the
FilledPanel. If set to “Custom”
then the color will be that of the
“BackgroundColor” attribute.
FilledPanel
No
The RGB color of the
FilledPanel)
FilledPanel
No
Specifies the color of the core
feature of the element. If set to
“Custom” then the color will be
that of the “Color” attribute.
TextBlock,
WrappedTextBlock,
Icon, ScrollFlowPanel
No
The RGB color of the core
feature of the element (e.g. text
color)
TextBlock,
WrappedTextBlock,
Icon, TextButton,
FilledButton,
ScrollFlowPanel
No
How content should be aligned
horizontally within the element
All
No
How content should be aligned
vertically within the element
All
(default in bold)
Rect
PageRect
4 UInt16 (X, Y, Width,
Height)
Margins
Margins
4 Int16 (Left, Top, Right,
Bottom)
(0,0,0,0)
Background
ColorSource
ElementColorSource
Background
Color
BandColor
ColorSource
ElementColorSource
(Custom)
(Black)
(Custom)
Color
BandColor
(default varies
depending on element
type, see Colors)
Horizontal
Alignment
HorizontalAlignment
Vertical
Alignment
VerticalAlignment
Left, Right, Centered
Microsoft
28
Top, Bottom, Centered
Font
TextBlockFont
Yes
WrappedTextBlockFont
TextBlock Only:
Large,
ExtraLargeNumbers,
ExtraLargeNumbersB
old
TextBlockBaselineAlign
ment
TextBlock,
WrappedTextBlock
Note: Not all character codes
have glyphs in each font.
Characters with no
corresponding glyph in the font
will be rendered with a default
placeholder glyph.
Small, Medium
Baseline
Alignment
Specifies the set of glyphs to
render a string
No
Automatic, Relative
“Automatic”: use the
TextBlock’s Vertical Alignment
attribute to position the text
TextBlock
“Relative”: The “Baseline”
attribute will position the text
baseline
Baseline
Int16
No
If Baseline Alignment is
“Relative”, then Baseline
specifies the vertical offset (in
pixels) from the top of the
TextBlock at which to draw the
string
TextBlock
No
“true” causes the TextBlock to
expand horizontally to fit the
text content.
TextBlock
(0)
AutoWidth
bool
(true)
“false” means the width of the
TextBlock is fixed by the Rect
attribute.
AutoHeight
bool
No
(true)
“true” causes the
WrappedTextBlock to expand
vertically to fit the text content.
WrappedTextBlock
“false” means the height of the
WrappedTextBlock is fixed by
the Rect attribute.
Orientation
Horizontal, Vertical
No
Defines whether child elements
of the list are arranged
horizontally or vertically
FlowPanel,
ScrollFlowPanel
ElementId
Int16
No
Defines a unique (within the
layout) identifier, used when
setting the element content and
determining which button was
pressed in a button event
All
You should read the Band Visual Guidelines documentation to help design page layouts for your app. That
document includes details about font character sets and theme colors.
Microsoft
29
2.7.2
Element Rectangle and Margins
X
Width
Height
Element
Top
Y
Parent
Margin
Bot
Content
Left
Right
Each element must define its Rect attribute which specifies the “X,Y” offset (in pixels) of the upper left corner of
the element relative to its parent, and the width and height (in pixels) of the element.
The “X” and “Y” coordinates of children of a FlowPanel or ScrollFlowPanel should both be set to 0. The parent
will automatically position the element next to the element’s preceding sibling.
Margins can be used to create blank space along the inside edges of an element. Each of the left, top, right, and
bottom margin sizes (in pixels) can be set. The content of the element will not be drawn in the margins.
2.7.2.1 Negative Margins
When an element’s parent is a FlowPanel or ScrollFlowPanel, a negative margin value can be set to reposition the
content of the element on top of the preceding child of the FlowPanel.
For example, suppose you want to have a button with an icon superimposed on it. One way to do that would be
to construct a horizontal FlowPanel with 2 children:
1. FilledButton with a width=100, height=50
2. Icon with a width of 80, height=50, left_margin=-90, right_margin=-90
The -90 value of the left_margin of the Icon shifts it such that the Icon left edge is 90 pixels to the left of the right
edge of its predecessor in its parent FlowPanel (the 100 pixel wide FilledButton), so the Icon is superimposed over
the FilledButton indented 10 pixels from the left edge of the FilledButton.
2.7.3 Colors
Most elements have the ColorSource and Color attributes that are used to control the element’s core feature
color. If the ColorSource is set to “Custom” then the RGB value specified in the Color attribute will be used.
Otherwise, the ColorSource specifies that one of the 6 Band Theme colors or 6 Tile Theme colors should be used.
In that case the color value will be determined dynamically and will reflect the current state of those Theme
colors.
The “core feature color” that is controlled by the color attribute of each type of element is defined by the
following table:
Element Type
Default Color
Feature Controlled
Microsoft
30
TextBlock
White
Font color
WrappedTextBlock
White
Font color
Icon
White
Render color
TextButton
Gray
Button background color when pressed
FilledButton
White
Button background color when not pressed
FilledPanel
Black
Color for the rectangle background
ScrollFlowPanel
White
Scroll bar color
Note that TextButton and FilledButton do not support the ColorSource attribute. Their color can only be set to a
specific RGB color value using the Color attribute.
2.7.4 Icons
When you create a Tile, you provide the normal (unbadged) and small (badged) icons that will be shown on the
Start Strip. When you create a custom layout for a tile, you can provide up to 8 additional icons that can be used
within the layout.
You can create Icons from native bitmaps using the helper method provided in the Band SDK. This helper method
will use the alpha component of each pixel in the native bitmap to construct the Band Icon object. The red, green,
and blue components of each pixel in the native bitmap are ignored. The alpha value of each pixel in the Icon is
used to determine the transparency of the color rendered on the screen. Each pixel of an Icon element will use
the same color as set in the Icon element’s Color attribute in the layout.
The page content specifies which particular icon is displayed within an Icon element. The content of an Icon
element is the index value of the Icon to be displayed. The normal and small tile Icons are at index values 0 and 1,
respectively, and additional icons that were provided start at index value 2. The layout can make use of any of
these Icons.
2.7.4.1 Icons Used as FilledButton Masks
By defining an Icon bitmap that acts as a mask, and superimposing that Icon over a FilledButton (see Negative
Margins), you can create the effect of the Icon image becoming visible when the button is pressed. That is, the
Icon bitmap is defined to have transparent pixels for the desired image, and opaque pixels elswhere. When the
user presses the FilledButton, the FilledButton color changes but only shows through the transparent portions of
the Icon bitmap.
2.7.5 Barcodes
The content of a Barcode element is specified as a string and BarcodeType. The supported BarcodeTypes are
PDF417 and CODE39. The Band will convert the string into its graphical barcode representation based on the type.
For PDF417 each character must be a digit (0-9). The maximum length of the string is 39 characters, but because
of the Band screen width and resolution the effective upper limit that can be rendered is 20 characters.
For CODE39, each character must be a valid Code 39 character: 0-9, A-Z, <space>, ‘$’, ‘%’, ‘+’, ‘-‘, ‘.’, or ‘/’. The
Band will allow a string of up to 39 characters to be assigned, but because of the Band screen width and
resolution the effective upper limit that can be rendered is 12 characters.
Microsoft
31
If the Band is unable to render the entire Barcode content within the space available to the element in the layout,
then the available space will be blank. That is, if the complete Barcode cannot be displayed then no portion of the
Barcode will be displayed.
2.7.6 Setting the Contents of a Page
Layouts only describe the visual formatting of the content. The content is set separately as needed to update the
Band. That is, the layout is set once when the tile is created, and then content is pushed to the Band afterward as
necessary.
When setting the content of a tile page, you specify the tile’s Guid and the page’s Guid. If the page Guid matches
one of the 8 current pages of the tile, then the content will update that existing page. If the page Guid does not
match any of those current pages, then a new page will be created to hold the content. New pages are added on
the left, pushing any existing pages to the right and if the tile already has 8 pages then the oldest (rightmost) page
will be discarded.
Note that the content of the currently displayed page of a tile will not be redrawn on the Band screen even if your
app sets new content to that page. The page is redrawn with the new content if it scrolls off the Band screen and
then back on, or if the tile is exited and reopened by the user.
The content that can be assigned to elements is:
Element Type
Content Data Type
Content Description
TextBlock
TextBlockData
String to display
WrappedTextBlock
WrappedTextBlockData
String to display
Icon
IconData
Icon index (0-9) to render
Barcode
BarcodeData
String and BarcodeType to render
TextButton
TextButtonData
String to display
FilledButton
FilledButtonData
Color to display when the button is being pressed
2.7.7 Simple Custom Tile Example
The following code samples demonstrate how to add a tile to the Band with a single page of content. The layout
of the page is formatted as a vertical ScrollFlowPanel with 2 child WrappedTextBlock elements, each of which will
be used to display a text message to the user. Briefly, the steps shown in the example are:
1. Create a tile
2. Create a layout that consists of a vertical ScrollFlowPanel with children that are wrapped text blocks to
display the text messages.
3. Add the layout to the tile
4. Add the tile to the Band
5. Set the message content of the text blocks
2.7.7.1 Android
1. Update imports
import com.microsoft.band.tiles.pages.ScrollFlowPanel;
Microsoft
32
import
import
import
import
import
import
import
com.microsoft.band.tiles.pages.FlowPanelOrientation;
com.microsoft.band.tiles.pages.PageData;
com.microsoft.band.tiles.pages.PageLayout;
com.microsoft.band.tiles.pages.PageTextBlockData;
com.microsoft.band.tiles.pages.TextBlock;
com.microsoft.band.tiles.pages.TextBlockFont;
com.microsoft.band.tiles.pages.ElementColorSource;
2. Create the layout
// Define symbolic constants for indices to each layout that
// the tile has. The index of the first layout is 0. Since at
// most 5 layouts are allowed, the max index value is 4.
enum TileLayoutIndex {
MessagesLayout
}
// Define symbolic constants to uniquely (within the
// messages page) identify each of the elements of our layout
// that contain content that the app will set
// (that is, these Ids will be used when calling APIs
// to set the page content)
enum TileMessagesPageElementId {
Message1,
Message2
}
// create a scrollable vertical panel that will hold 2 text messages
ScrollFlowPanel panel = new ScrollFlowPanel(new PageRect(0, 0, 245,
102));
panel.setFlowPanelOrientation(FlowPanelOrientation.VERTICAL);
panel.setHorizontalAlignment(PageHorizontalAlignment.LEFT);
panel.setVerticalAlignment(PageVerticalAlignment.TOP);
// create the first text block
WrappedTextBlock textBlock1 = new WrappedTextBlock(new PageRect(0, 0,
245, 102), WrappedTextBlockFont.MEDIUM);
textBlock1.setId(TileMessagesPageElementId.Message1.ordinal());
textBlock1.setMargins(new PageMargin(15, 0, 15, 0));
textBlock1.setColor(Color.WHITE);
textBlock1.setAutoHeightEnabled(true);
textBlock1.setHorizontalAlignment(PageHorizontalAlignment.LEFT);
textBlock1.setVerticalAlignment(PageVerticalAlignment.TOP);
// create the second text block
WrappedTextBlock textBlock2 = new WrappedTextBlock(new PageRect(0, 0,
245, 102), WrappedTextBlockFont.MEDIUM);
Microsoft
33
textBlock2.setId(TileMessagesPageElementId.Message2.ordinal());
textBlock2.setMargins(new PageMargin(15, 0, 15, 0));
textBlock2.setColorSource(ElementColorSource.BAND_BASE);
textBlock2.setAutoHeightEnabled(true);
textBlock2.setHorizontalAlignment(PageHorizontalAlignment.LEFT);
textBlock2.setVerticalAlignment(PageVerticalAlignment.TOP);
// add the text blocks to the panel
panel.addElements(textBlock1, textBlock2);
// create the page layout
PageLayout layout = new PageLayout(panel);
3. Create the tile and add the layout
// create the tile and add the layout
BandTile tile = new BandTile.Builder(tileId, "MyTile", tileIcon)
.setPageLayouts(layout)
.build();
4. Add the tile to the Band
// add the tile to the Band
try {
if(!client.getTileManager().addTile(this, tile).await()) {
// handle add tile failure
}
} catch(BandException ex) {
// handle exception
}
5. Set the content for the page on the Band
try {
if(client.getTileManager().setPages(tileId,
new PageData(TilePageId.PAGE1.Uuid,
TileLayoutIndex.MESSAGES_LAYOUT.ordinal())
.update(new
PageWrappedTextBlockData(TileMessagesPageElementId.MESSAGE1.ordinal(),
"This is the text of the first
message"))
.update(new
PageWrappedTextBlockData(TileMessagesPageElementId.MESSAGE1.ordinal(),
"This is the text of the second
message"))).await()) {
// handle set pages failure
}
} catch(BandException ex) {
// handle exception
Microsoft
34
}
2.7.7.2
iOS
1. Update imports
#import <MicrosoftBandKit_iOS/MicrosoftBandKit_iOS.h>
2. Create the tile
NSUUID *tileId = [NSUUID UUID];
// create a new MSBTile
MSBTile *tile = [MSBTile tileWithId:tileId name:@"sample"
tileIcon:tileIcon smallIcon:smallIcon error:&error];
if (error){
// handle error
}
3. Create a layout
// create a scrollable vertical panel that will hold 2 text messages
MSBPageScrollFlowPanel *panel = [MSBPageScrollFlowPanel alloc]
initWithRect:[MSBPageRect rectWithX:0 y:0 width:245 height:102]];
panel.horizontalAlignment = MSBPageHorizontalAlignmentLeft;
panel.verticalAlignment = MSBPageVerticalAlignmentTop;
// Define symbolic constants for indices to each layout that
// the tile has. The index of the first layout is 0. Since at
// most 5 layouts are allowed, the max index value is 4.
typedef enum LayoutIndex
{
LayoutIndexMessages = 0,
} LayoutIndex;
// Define symbolic constants to uniquely (within the
// messages page) identify each of the elements of our layout
// that contain content that the app will set
// (that is, these Ids will be used when calling APIs
// to set the page content)
typedef enum MessagesPageElementId : uint16_t
{
MessagesPageElementId1 = 1, // Id for the 1st message text block
MessagesPageElementId2 = 2, // Id for the 2nd message text block
} MessagesPageElementId;
// add the text block to contain the first message
MSBPageWrappedTextBlock *textBlock1 = [[MSBPageWrappedTextBlock alloc]
initWithRect:[MSBPageRect rectWithX:0 y:0 width:245 height:102]
font:MSBPageWrappedTextBlockFontMedium];
textBlock1.elementId = MessagesPageElementId1;
Microsoft
35
textBlock1.margins = [MSBPageMargins marginsWithLeft:15 top:0 right:15
bottom:0];
textBlock1.color = [MSBColor colorWithRed:0xFF green:0xFF blue:0xFF];
textBlock1.autoHeight = YES;
textBlock1.horizontalAlignment = MSBPageHorizontalAlignmentLeft;
textBlock1.verticalAlignment = MSBPageVerticalAlignmentTop;
[panel addElement:textBlock1];
// add the text block to contain the second message
MSBPageWrappedTextBlock *textBlock2 = [[MSBPageWrappedTextBlock alloc]
initWithRect:[MSBPageRect rectWithX:0 y:0 width:245 height:102]
font:MSBPageWrappedTextBlockFontMedium];
textBlock2.elementId = MessagesPageElementId2;
textBlock2.margins = [MSBPageMargins marginsWithLeft:15 top:0 right:15
bottom:0];
textBlock2.color = [MSBColor colorWithRed:0xFF green:0xFF blue:0xFF];
textBlock2.autoHeight = YES;
textBlock2.horizontalAlignment = MSBPageHorizontalAlignmentLeft;
textBlock2.verticalAlignment = MSBPageVerticalAlignmentTop;
[panel addElement:textBlock2];
// create the page layout
MSBPageLayout *layout = [[MSBPageLayout alloc] init];
layout.root = panel;
4. Add the layout to the tile
[tile.pageLayouts addObject:layout];
5. Add the tile to the Band
// Prerequisite: bandClient has successfully connected to a Band
[self.client.tileManager addTile:tile completionHandler:^(NSError
*error){
if (error){
// add tile failed, handle error.
}
}];
6. Set the content of the page on the Band
// create a new Guid for the messages page
NSUUID *messagesPageId = [NSUUID UUID];
// create the object containing the page content to be set
Microsoft
36
MSBPageWrappedTextBlockData *textData1 = [MSBPageWrappedTextBlockData
pageWrappedTextBlockDataWithElementId:MessagesPageElementId1
text:@"This is the text of the first message" error:&error];
if (error)
{
// handle error
}
MSBPageWrappedTextBlockData *textData2 = [MSBPageWrappedTextBlockData
pageWrappedTextBlockDataWithElementId:MessagesPageElementId2
text:@"This is the text of the second message" error:&error];
if (error)
{
// handle error
}
MSBPageData *pageData = [MSBPageData pageDataWithId:messagesPageId
templateIndex:LayoutIndexMessages value:@[textData1, textData2]];
[self.client.tileManager setPages:@[pageData] tileId:tileId
completionHandler: ^(NSError *error){
if (error)
{
// unable to set data to the Band
}
}];
2.7.7.3 Windows
1. Update using directives
using Microsoft.Band.Tiles.Pages
2. Create the tile
// create a new Guid for the tile
Guid tileGuid = Guid.NewGuid();
// create a new tile
BandTile tile = new BandTile(tileGuid)
{
// set the name
Name = "MyTile",
// set the icons
SmallIcon = smallIcon,
TileIcon = tileIcon
};
Microsoft
37
// Our layout does not use Icons, but if it did we would
// add our Icons to the tile by calling tile.AdditionalIcons.Add
// to add our (up to 8) additional BandIcons.
3. Create a layout
// create a scrollable vertical panel that will hold 2 text messages
ScrollFlowPanel panel = new ScrollFlowPanel
{
Rect = new PageRect(0, 0, 245, 102),
Orientation = FlowListOrientation.Vertical,
ColorSource = ElementColorSource.BandBase
};
// Define symbolic constants for indices to each layout that
// the tile has. The index of the first layout is 0. Since at
// most 5 layouts are allowed, the max index value is 4.
internal enum TileLayoutIndex
{
MessagesLayout = 0,
};
// Define symbolic constants to uniquely (in MessagesLayout)
// identify each of the elements of our layout
// that contain content that the app will set
// (that is, these Ids will be used when calling APIs
// to set the page content)
internal enum TileMessagesLayoutElementId : short
{
Message1 = 1, // Id for the 1st message text block
Message2 = 2, // Id for the 2nd message text block
};
// add the text block to contain the first message
panel.Elements.Add(
new WrappedTextBlock
{
ElementId = (short)TileMessagesLayoutElementId.Message1,
Rect = new PageRect(0, 0, 245, 102),
// left, top, right, bottom margins
Margins = new Margins(15, 0, 15, 0),
Color = new BandColor(0xFF, 0xFF, 0xFF),
Font = WrappedTextBlockFont.Small
}
// add the text block to contain the second message
Microsoft
38
panel.Elements.Add(
new WrappedTextBlock
{
ElementId = (short)TileMessagesLayoutElementId.Message2,
Rect = new PageRect(0, 0, 245, 102),
// left, top, right, bottom margins
Margins = new Margins (15, 0, 15, 0),
Color = new BandColor(0xFF, 0xFF, 0xFF),
Font = WrappedTextBlockFont.Small
}
);
// create the page layout
PageLayout layout = new PageLayout(panel);
4. Add the layout to the tile
try
{
// add the layout to the tile
tile.PageLayouts.Add(layout);
}
catch(BandException ex)
{
// handle an error adding the layout
}
5. Add the tile to the Band
// Prerequisite: bandClient has successfully connected to a Band
try
{
// add the tile to the Band
if (await bandClient.TileManager.AddTileAsync(tile))
{
// tile was successfully added,
// can proceed to set tile content with SetPagesAsync
}
else
{
// tile failed to be added, handle error
}
}
catch(BandException ex)
{
Microsoft
39
// handle a Band connection exception
}
6. Set the content of the page on the Band
// create a new Guid for the messages page
Guid messagesPageGuid = Guid.NewGuid();
// create the object containing the page content to be set
PageData pageContent = new PageData(
messagesPageGuid,
// Specify which layout to use for this page
TileLayoutIndex.MessagesLayout,
new WrappedTextBlockData(
(Int16)TileMessagesLayoutElementId.Message1,
“This is the text of the first message”),
new WrappedTextBlockData(
(Int16)TileMessagesLayoutElementId.Message2,
“This is the text of the second message”)
);
try
{
// set the page content on the Band
if (await bandClient.TileManager.SetPagesAsync(tileGuid,
pageContent))
{
// page content successfully set on Band
}
else
{
// unable to set content to the Band
}
}
catch(BandException ex)
{
// handle a Band connection exception
}
2.8 HANDLING CUSTOM TILE EVENTS
When the user taps a tile you have added to the Band, an event is generated to notify your application of that
action. Similarly, when the user taps one of the button elements on a tile’s pages, an event is sent to your app.
There are 3 types of events that can be generated for your tiles:
Tile entered (user has tapped a tile)
Microsoft
40
Tile exited (user has pressed the back button to exit a tile)
Button pushed (user has pushed a button element on a tile’s page)
To receive these events for a custom tile you must:
1. Create the custom tile
2. Implement handlers that will be called when one of these events occurs
3. Subscribe to the event types (open, close, button push) that you are interested in
Your handlers will be provided with the event object which will provide the GUID of the tile that triggered the
event and the time at which the event was triggered. If the event is for a button push then the event object will
also provide the GUID of the page containing the button, and the button element ID that you assigned in the
layout.
The following example shows how to create a tile with a single page containing a button, and how to define and
register a handler for the events generated by the Band for the tile.
2.8.1 Android
For Android, tile events are broadcast using intents. To receive tile events, an application needs to implement a
broadcast receiver to handle intents with the following actions:
com.microsoft.band.action.ACTION_TILE_OPENED
com.microsoft.band.action.ACTION_TILE_BUTTON_PRESSED
com.microsoft.band.action.ACTION_TILE_CLOSED
Here is an example implementation of a broadcast receiver that handles tile events:
public class TileEventReceiver extends BroadcastReceiver {
@Override
public void onReceive(Context context, Intent intent) {
if (intent.getAction() ==
“com.microsoft.band.action.ACTION_TILE_OPENED”) {
// handle tile opened event
}
else if (intent.getAction() ==
“com.microsoft.band.action.ACTION_TILE_BUTTON_PRESSED”) {
// handle button pressed event
}
else if (intent.getAction() ==
“com.microsoft.band.action.ACTION_TILE_CLOSED”) {
// handle tile closed event
}
}
}
It is important to note these intents will only be broadcast by the Microsoft Band SDK to the application package
that created the tile. This is especially important because if you plan on handling broadcasts in an application
service you must make sure the service is either running in the same package as the application’s UI activity (if
created in the UI activity) or the service is creating the tile.
Microsoft
41
A nice benefit of using intents for tile events is the application does not need to be running in the foreground to
receive them. You can accomplish this by adding a receiver definition in the application’s manifest and adding an
intent filter for the receiver. For example:
<application
...
<receiver
android:name=".TileEventReceiver"
android:label="@string/app_name"
android:enabled="true"
android:exported="true">
<intent-filter>
<action
android:name="com.microsoft.band.action.ACTION_TILE_OPENED" />
<action
android:name="com.microsoft.band.action.ACTION_TILE_BUTTON_PRESSED" />
<action
android:name="com.microsoft.band.action.ACTION_TILE_CLOSED" />
</intent-filter>
</receiver>
...
</application>
2.8.2 iOS
For iOS, Tile events are pushed to the application as long as the application has a connected MSBClient. The
prerequisite is that the application needs to have at least a Tile added to the Band. This sample code shows you
how to create a Tile with a Text Button element and observe button event if an user presses the button.
1. Update using directives
#import <MicrosoftBandKit_iOS/MicrosoftBandKit_iOS.h>
2. Implemented required delegate methods
// set delegate object in desired class
self.client = [[MSBClientManager sharedManager]
clientWithConnectionIdentifier:persistedConnectionId];
self.client.tileDelegate = self;
-(void)client:(MSBClient *)client tileDidOpen:(MSBTileEvent *)event
{
NSLog(@"%@", event);
}
-(void)client:(MSBClient *)client buttonDidPress:(MSBTileButtonEvent
*)event
{
NSLog(@"%@", event);
}
Microsoft
42
-(void)client:(MSBClient *)client tileDidClose:(MSBTileEvent *)event
{
NSLog(@"%@", event);
}
3. Create the tile
NSUUID *tileId = [NSUUID UUID];
// create a new MSBTile
MSBTile *tile = [MSBTile tileWithId:tileId name:@"sample"
tileIcon:tileIcon smallIcon:smallIcon error:&error];
if (error){
// handle error
}
4. Create a layout
// create a scrollable vertical panel that will hold 2 text messages
MSBPageFlowPanel *panel = [MSBPageFlowPanel alloc]
initWithRect:[MSBPageRect rectWithX:0 y:0 width:245 height:102]];
panel.horizontalAlignment = MSBPageHorizontalAlignmentLeft;
panel.verticalAlignment = MSBPageVerticalAlignmentTop;
// add the text button
MSBPageTextButton *textButton = [[MSBPageTextButton alloc]
initWithRect:[MSBPageRect rectWithX:0 y:0 width:245 height:102]];
textButton.elementId = 1;
textButton.margins = [MSBPageMargins marginsWithLeft:15 top:0 right:15
bottom:0];
textButton.color = [MSBColor colorWithRed:0xFF green:0xFF blue:0xFF];
[panel addElement:textButton];
// create the page layout
MSBPageLayout *layout = [[MSBPageLayout alloc] init];
layout.root = panel;
5. Add the layout to the tile
[tile.pageLayouts addObject:layout];
6. Add the tile to the Band
// Prerequisite: bandClient has successfully connected to a Band
[self.client.tileManager addTile:tile completionHandler:^(NSError
*error){
if (error){
// add tile failed, handle error.
}
Microsoft
43
}];
7. Set the content of the page on the Band
// create a new Guid for the messages page
NSUUID *buttonPageId = [NSUUID UUID];
// create the object containing the page content to be set
MSBPageTextButtonData *textButtonData = [MSBPageTextButtonData
pageTextButtonDataWithElementId:1 text:@"Sample Button" error:&error];
if (error)
{
// handle error
}
MSBPageData *pageData = [MSBPageData pageDataWithId:buttonPageId
templateIndex:0 value:@[textButtonData]];
[self.client.tileManager setPages:@[pageData] tileId:tileId
completionHandler: ^(NSError *error){
if (error)
{
// unable to set data to the Band
}
}];
2.8.3 Windows
On Windows, the application will only receive events while it has a connected BandClient.
1. Update using directives
using Microsoft.Band.Tiles
2. Create the tile with a single page with a layout containing a button
// create a new Guid for the tile
Guid tileGuid = Guid.NewGuid();
// create a new tile with a new Guid
BandTile tile = new BandTile(tileGuid)
{
// set the name
Name = "MyTile",
// set the icons
SmallIcon = smallIcon,
TileIcon = tileIcon
};
// create a filled rectangle to provide the background for a button
Microsoft
44
FilledPanel panel = new FilledPanel
{
Rect = new PageRect(0, 0, 245, 102),
Color = ThemeColor.BandBase
};
// define the element Ids for our tile’s page
Enum TilePageElementId : short
{
Button_PushMe = 1,
}
// add a button to our layout
panel.Elements.Add(
new TextButton
{
ElementId = (short)TilePageElementId.Button_PushMe,
Rect = new PageRect(60, 25, 100, 50),
PressedColor = new BandColor(0xFF, 0x00, 0x00),
}
);
// create the page layout
PageLayout layout = new PageLayout(panel);
// add the layout to the tile, and add the tile to the Band
try
{
tile.PageLayouts.Add(layout);
if (await bandClient.TileManager.AddTileAsync(tile))
{
// layout and tile added successfully
}
else
{
// tile failed to be added, handle error
}
}
catch(BandException ex)
{
// handle an error adding the layout
}
Guid pageGuid = Guid.NewGuid();
// create the content to assign to the page
Microsoft
45
PageData pageContent = new PageData(
pageGuid,
0, // index of our (only) layout
new Button(
TilePageElementId.Button_PushMe,
“Push Me!”)
);
// set the page content to the Band
try
{
if (await bandClient.TileManager.SetPagesAsync(tileGuid,
pageContent))
{
// page content successfully set on Band
}
else
{
// unable to set content to the Band
}
}
catch(BandException ex)
{
// handle a Band connection exception
}
3. Define handlers for tile open, tile close, and button push events
void EventHandler_TileOpened(object sender,
BandTileEventArgs<IBandTileOpenedEvent> e)
{
// This method is called when the user taps on our Band tile
//
// e.TileEvent.TileId is the tile’s Guid
// e.TileEvent.Timestamp is the DateTimeOffset of the event
//
// handle the event
}
void EventHandler_TileClosed(object sender,
BandTileEventArgs<IBandTileClosedEvent> e)
{
// This method is called when the user exits our Band tile
//
// e.TileEvent.TileId is the tile’s Guid
// e.TileEvent.Timestamp is the DateTimeOffset of the event
Microsoft
46
//
// handle the event
}
void EventHandler_TileButtonPressed(object sender,
BandTileEventArgs<IBandTileButtonPressedEvent> e)
{
// This method is called when the user presses the
// button in our tile’s layout
//
// e.TileEvent.TileId is the tile’s Guid
// e.TileEvent.Timestamp is the DateTimeOffset of the event
// e.TileEvent.PageId is the Guid of our page with the button
// e.TileEvent.ElementId is the value assigned to the button
//
in our layout, i.e.
//
TilePageElementId.Button_PushMe
//
// handle the event
}
4. Register the handlers and start listening for incoming events from the Band
// Subscribe to events
bandClient.TileManager.TileOpened += EventHandler_TileOpened;
bandClient.TileManager.TileClosed += EventHandler_TileClosed;
bandClient.TileManager.TileButtonPushed +=
EventHandler_TileButtonPushed;
// Start listening for events
bandClient.TileManager.StartReadingsAsync();
2.9 SENDING HAPTICS TO THE BAND
Haptics, or vibrations, allows the developer to send tactile responses using the Band Notification Manager on the
Band Client. This provides a power feedback tool to enhance the notification experience for an application.
Currently the SDK provides a list of predefined vibration types the application developer can choose from.
2.9.1
Android
try {
// send a vibration request of type alert alarm to the Band
bandClient.getBandNotificationManager().vibrate(VibrationType.NOT
IFICATION_ALARM).await();
} catch (InterruptedException e) {
// handle InterruptedException
} catch (BandException e) {
// handle BandException
Microsoft
47
}
2.9.2
iOS
// send a vibration request of type alert alarm to the Band
[self.client.notificationManager
vibrateWithType:MSBNotificationVibrationTypeAlarm
completionHandler:^(NSError *error)
{
if (error){
// handle error
}
}];
2.9.3
Windows
try
{
// send a vibration request of type alert alarm to the Band
await
bandClient.NotificationManager.VibrateAsync(VibrationType.Notification
Alarm);
}
catch (BandException ex)
{
// handle a Band connection exception
}
2.10 BAND PERSONALIZATION
The Band Personalization Manager on the Band Client allows the developer to personalize the Me Tile, or default
UI, on the Band as well as setting the default theme colors for all tiles.
For Me Tile personalization, the SDK allows setting the background color or image. The Band uses RGB565 image
format, so all bitmaps will be converted to that (either implicitly or explicitly, depending on the platform) before
being sent to the Band.
2.10.1 Managing the Me Tile Image
2.10.1.1 Android
1. Retrieve the current Me Tile image as a bitmap
try {
Bitmap meTileBitmap =
bandClient.getPersonalizationManager().getMeTileImage().await();
} catch (InterruptedException e) {
// handle InterruptedException
} catch (BandException e) {
// handle BandException
}
Microsoft
48
2. Set the current Me Tile image from a bitmap
try {
// Create a bitmap for the Me Tile image
// the image must be 310x102 pixels
Bitmap meTileBitmap = Bitmap.createBitmap(310, 102, null);
bandClient.getPersonalizationManager().setMeTileImage(meTileBitma
p).await();
} catch (InterruptedException e) {
// handle InterruptedException
} catch (BandException e) {
// handle BandException
}
2.10.1.2 iOS
1. Retrieve the current Me Tile image as an UIImage
[self.client.personalizationManager
meTileImageWithCompletionHandler:^(MSBImage *image, NSError *error){
if (error){
// handle error
}
else if (!image){
// no me tile image on the Band
}
else {
self.meTileImage = [image UIImage];
}
}];
2. Set the current Me Tile image from an UIImage
MSBImage *image = [[MSBImage alloc] initWithUIImage:[UIImage
imageWithContentsOfFile:@"sampleMeTile.png"]];
[self.client.personalizationManager updateMeTileImage:image
completionHandler:^(NSError
*error)
{
if (error){
// handle error.
}
}];
2.10.1.3 Windows
1. Update using directives
using Microsoft.Band.Personalization;
2. Retrieve the current Me Tile image as a writeable bitmap
Microsoft
49
try
{
// grab the Me Tile image from the Band
BandImage bandImage = await
bandClient.PersonalizationManager.GetMeTileImageAsync();
// convert to a writeable bitmap
WriteableBitmap bandImageBitmap = bandImage.ToWriteableBitmap();
// do work with the image
}
catch (BandException ex)
{
// handle a Band connection exception
}
3. Set the current Me Tile image from a writeable bitmap
// Create a BandImage for the Me Tile image
// the image must be 310x102 pixels
WriteableBitmap meTileBitmap = new WriteableBitmap(310, 102);
BandImage meTileImage = meTileBitmap.ToBandImage();
try
{
await
bandClient.PersonalizationManager.SetMeTileImageAsync(meTileImage);
}
catch (BandException ex)
{
// handle a Band connection exception
}
2.10.2 Changing Theme
2.10.2.1 Android
1. Get the current theme from the Band
try {
// get the current theme from the Band
BandTheme theme =
bandClient.getPersonalizationManager().getTheme().await();
} catch (InterruptedException e) {
// handle InterruptedException
} catch (BandException e) {
// handle BandException
}
2. Set the current theme on the Band
Microsoft
50
try {
// set the current theme on the Band
bandClient.getPersonalizationManager().setTheme(new
BandTheme(0x39BF6F, 0x41CE7A, 0x35AA65, 0x989996, 0x37E27C,
0x31774F)).await();
} catch (InterruptedException e) {
// handle InterruptedException
} catch (BandException e) {
// handle BandException
}
2.10.2.2 iOS
1. Get the current theme from the Band
[self.client.personalizationManager
themeWithCompletionHandler:^(MSBTheme *theme, NSError *error){
if (error){
// handle error
}
}];
2. set the current theme on the Band
MSBColor *base = [MSBColor colorWithUIColor:[UIColor whiteColor]
error:nil];
MSBColor *highContrast = [MSBColor colorWithUIColor:[UIColor
yellowColor] error:nil];
MSBColor *highlight = [MSBColor colorWithUIColor:[UIColor blueColor]
error:nil];
MSBColor *lowlight = [MSBColor colorWithUIColor:[UIColor
lightGrayColor] error:nil];
MSBColor *muted = [MSBColor colorWithUIColor:[UIColor grayColor]
error:nil];
MSBColor *secondary = [MSBColor colorWithUIColor:[UIColor blackColor]
error:nil];
MSBTheme *theme = [MSBTheme themeWithBaseColor:base
highlightColor:highlight
lowlightColor:lowlight
secondaryTextColor:secondary
highContrastColor:highContrast
mutedColor:muted];
[self.client.personalizationManager updateTheme:theme
completionHandler:^(NSError *error)
{
if (error){
// handle error
}
}];
Microsoft
51
2.10.2.3 Windows
1. Get the current theme from the Band
try
{
// get the current theme from the Band
BandTheme theme = await
bandClient.PersonalizationManager.GetThemeAsync();
}
catch (BandException ex)
{
// handle a Band connection exception
}
2. Set the current theme on the Band
try
{
// create a new Band theme
BandTheme theme = new BandTheme()
{
Base = Colors.White.ToBandColor(),
HighContrast = Colors.Yellow.ToBandColor(),
Highlight = Colors.Blue.ToBandColor(),
Lowlight = Colors.LightBlue.ToBandColor(),
Muted = Colors.Gray.ToBandColor(),
SecondaryText = Colors.Black.ToBandColor()
};
// set the new theme on the Band
await bandClient.PersonalizationManager.SetThemeAsync(theme);
}
catch (BandException ex)
{
// handle a Band connection exception
}
Microsoft


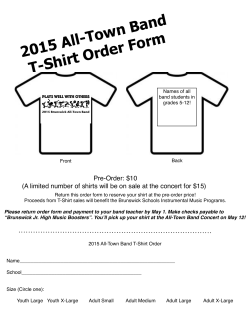


© Copyright 2026