
GLASS DOOR ICE MERCHANDISERS
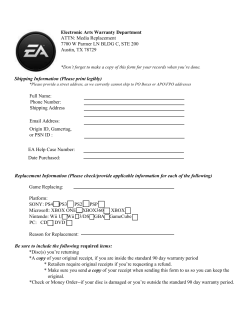
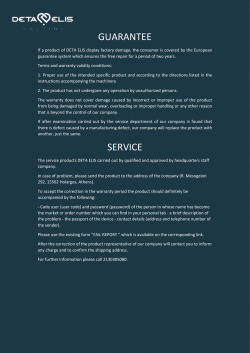
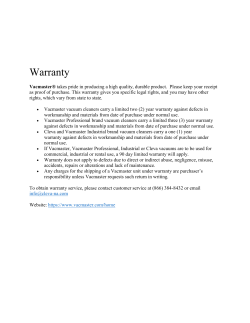
GLASS DOOR ICE MERCHANDISERS
Please read this manual completely before attempting to install or operate this equipment!
An asterisk(*) in a model number means the external finish of cabinet, black & white color,
and each model is identical except the aesthetic difference which doesn't affect the performance.
Model No. :
TGIM-23*
TGIM-49*
SIGN PANEL
SIGN PANEL
DOOR ASSEMBLY
EVAPORATOR FAN
MOTOR BLADE
EVAPORATOR EVAPORATOR
FAN MOTOR COIL
DOOR ASSEMBLY
BACK SPACER
DOOR
HANDLE
SHELF(F)
SHELF(U)
COMPRESSOR
BOTTOM GRILLE
CONDENSER COIL
CONDENSER
FAN MOTOR
FRONT VIEW
FRONT VIEW
SIDE VIEW
CONTENTS
PAGE
1. SPECIFICATIONS ........................................................................................ 2
2. SERIAL NUMBER ........................................................................................ 2
3. NOTICE TO CUSTOMER / INSTALLATION ............................................... 3
4. CLEANING ................................................................................................... 4
5. BASIC OPERATION ................................................................................. 5~9
6. BEFORE REQUESTING SERVICE ........................................................... 10
7. WARRANTY ......................................................................................... 11~12
SPECIFICATIONS
GLASS DOOR ICE MERCHANDISERS
MODEL
COMP H.P.
Amp / watt
V/Hz
REFRIGERANT
CRATED
WEIGHT
TGIM-23*
1/3
6.5A / 820W(defrosting input)
(110-120)V~ / 60Hz
R-134a
376lbs
TGIM-49*
2/3
11.8A / 1160W(defrosting input) (110-120)V~ / 60Hz
R-404A
587lbs
SERIAL NUMBER
The serial number can be found on the data label located inside the unit.
Please retain this serial number for service purposes.
2
Turbo air
NOTICE TO CUSTOMER
Loss or spoilage of products in your refrigerator/freezer is not covered by warranty.
In addition to following recommended installation procedures, you must run the
refrigerator/ freezer 24 hours prior to usage.
INSTALLATION
1. GOOD AIR CIRCULATION
- Please make sure to avoid any partition and object which may stop the air flow.
- Please make sure there is enough space for air circulation to the rear of the unit.
Recommended space between the rear of the unit to the wall is at least 5 inches.
2. PLACE ABOVE STRONG FOUNDATION
- Please make sure that the floor where the unit will be placed can support the total
weight plus any other contents that it may hold.
3. DO NOT PLACE NEAR HEAT
- Please make sure to avoid hot corners and locations near stoves.
- High ambient temperature will significantly reduce cooling efficiency.
4. INDOOR USAGE ONLY
- This unit is designed and tested for indoor use only.
- Outdoor usage will void its warranty.
5. STABILIZATION
- Turn leg levelers counter clockwise as necessary in order to properly level cooler.
6. LEVELING
- Please make sure that the unit levels from the front to the back and side to side.
7. Unit should be on dedicated outlet.
3
Turbo air
CLEANING
1. CLEANING STAINLESS STEEL INTERIOR AND EXTERIOR
: Damage to stainless steel finish due to improper use of cleaning products or
non- recommended products is NOT covered under this product's warranty.
• Do
- Use warm, soapy water and a soft, clean cloth or sponge.
- Rinse surfaces with clean, warm water and dry immediately to avoid water spots.
• DO NOT USE
- Abrasive or harsh cleaners
- Ammonia
- Chlorine bleach
- Concentrated detergents or solvents
- Metal or plastic-textured scouring pads
- Vinegar-based products
- Citrus-based cleaners
2. CLEANING THE CONDENSER FINS
- To maintain proper refrigeration performance, the condenser coil must be free of
dust, dirt, and grease.
This will require periodic cleaning. condenser fins should be cleaned at least every
three months (90 days) or as needed.
3. CLEAN THE GASKET
- The door gasket should be cleaned frequently to maintain proper sealing.
4. CHECK AFTER CLEANING
- Check the unit again for safety.
- Check that the unit is operating properly.
CAUTION
1. POWER CORD
- Please make sure that the power cord is connected to the proper voltage.
- A protected circuit of the correct voltage and amperage must be run for connection
of the line cord.
- Turn ‘off’ the power switch before disconnecting the power cord, whenever
performing maintenance functions or cleaning the refrigerated cabinet.
- Compressor warranties are void if compressor burns out due to low voltage.
2. RE-STARTING
- If disconnected, wait for 5 minutes before re-starting.
4
Turbo air
BASIC OPERATION
1. Plug in and turn on the power and lamp switch located on the top of the bottom grille
right side.
The display panel will light up and make a beeping noise.The compressor will begin
to run.
2. The default temperature setting is No. “16˚F” for the TGIM-23*.
The default temperature setting is No. “16˚F” for the TGIM-49*.
3. The compressor is automatically cycled by the electronic controller (PCB, F-Sensor).
4. The defrost cycle is automatically controlled by the D-sensor, and the PCB.
5. Push the temperature up(+) button for higher temperatures and the temperature
down(-) button for lower temperatures.
6. Evaporator fan motor will run after all doors are completely closed.
7. Good air flow in freezer is critical.
Be careful when stationing the product so that it does not press against the back
wall,and is at least 4 inches away from the evaporator compartment.
5
Turbo air
DISPLAY PANEL OF FREEZER (TGIM-23*)
TEMP CONTROL BUTTON
(SEE PAGE 8)
LAMP SWITCH
INTERIOR TEMP INDICATOR
(SEE PAGE 9)
POWER SWITCH
TEMPERATURE
Turbo air
LAMP
T.F.
FAN
POWER
DOOR
TURBO FREEZE
TURBO FREEZE
DOOR OPENING
FAN RUNNING
TURBO FREEZE BUTTON
(SEE PAGE 8)
6
Turbo air
DISPLAY PANEL OF FREEZER (TGIM-49*)
TEMP CONTROL BUTTON
(SEE PAGE 8)
LAMP SWITCH
INTERIOR TEMP INDICATOR
(SEE PAGE 9)
POWER SWITCH
LAMP
POWER
TEMPERATURE
T.F.
FAN
ON
ON
OFF
OFF
DOOR
TURBO FREEZE
TURBO FREEZE
DOOR OPENING
FAN RUNNING
TURBO FREEZE BUTTON
(SEE PAGE 8)
7
Turbo air
TURBO FREEZE
1. If you push the T.F. (Turbo Freeze) button, the compressor will run for 120 minutes to
bring down the temperature more quickly.
2. If you push the T.F. button again during Turbo Freeze mode, the compressor will
return to the normal operation.
3. During the Turbo Freeze mode, the temperature Up(+)/Down(-) button will not affect
the compressor’s operation.
UP(+)/DOWN(-) BUTTON (Temperature control button)
1. By pushing the Up(+)/Down(-) button, you can set the inside temperature from ‘27˚F’
to ‘5˚F’.
2. If you want lower temperatures, push the Down(-) button.
DEFROST
1. The electronic controller (PCB) features an intellectual algorithm which can recognize
the defrost period that eliminates any icing on the evaporator, which automatically
adjusts to optimal energy saving temperatures. For additional options, this feature
can be monitored and adjusted remotely by a wireless connection.
2. If it is necessary to change the intervals of defrost due to unusual operating
conditions, it can be accomplished by adjusting the switch which is located on the
inside the bottom grille.
3. Once all frost is eliminated, the temperature will continue to rise until it reaches 42.8˚F
(6˚C). When this temperature is detected by the defrost limit control, the defrost
control changes to refrigeration mode.
4. The panel displays “
” during the defrost cycle.
8
Turbo air
INNER TEMPERATURE DISPLAY
1. It displays inside temperature.
2. Display range is -40˚F to 99˚F (-40˚C ~ +40˚C).
3. When inside temperature is lower than -40˚F, the panel will display ‘
and, higher than +99˚F, the panel will show ‘
’.
’.
FAN RUNNING INDICATOR
1. If the fan motor is running, fan running indicator will be turned on.
2. Evaporator fan motor will stop when the door is opened.
DOOR OPENING INDICATOR
1. If the door is opened, an indicator will be turned on.
2. 30 seconds after the door opened, it will sound beep three (3) times.
3. 1 minute after it is opened, it will sound beep again five (5) times.
4. After 5 minutes of staying open, the beeping sound will ring continuously.
5. Once the door is closed, the beeping noise will stop.
9
Turbo air
BEFORE REQUESTING SERVICE
SYMPTOMS
CAUSES
SOLUTIONS
The unit is freezing or • The temperature is set too high • Push the temperature button to
the suitable position.
or low to contain food fresh.
melting food.
The unit does not
refrigerate at all.
• There is a power connection
failure problem.
• Check the power cord and plug
in it correctly.
The unit does not
refrigerate well.
• The unit is in sunlight or near a
heating device.
• The unit contains hot food or
too much food.
• The unit door is opened too
frequently or left open long.
• The condenser is clogged.
• Check the installation place.
• Check the condition of stored
food.
• The floor is too weak or the
leveling feet is set incorrectly.
•
There is a loud noise. The back-side of the unit is too
close to the wall.
• The tray is not in the correct
position.
• Check the installation and
adjust the tray position.
There are dew-drops
on the unit exterior.
• High-moisture air can produce
dewdrops during rainy season.
• Wipe with a dry cloth.
There are dew-drops
on the unit interior.
• The door is opened too
frequently or left open long.
• Damp food is stored.
• Keep the door closed to
remove dewdrops.
The door does not
close tightly.
• Level the unit again.
• The door is bent.
• Reposition the gasket.
• The unit is a levelling failure.
• The door gasket has come out.
The following are not malfunctions:
• A water-flowing sound can be heard when the compressor stops.
This is the sound of REFRIGERANT flowing.
• The compressor does not run against defrosting function.
10
Turbo air
Warranty Claims...
All claims for parts or labor must be made directly thorough Turbo Air.
All claims should include: model number of the unit, the serial number of the cabinet, proof of purchase, date of installation, and all
pertinent information supporting the alleged defect.
In case of compressor replacement under warranty, either compressor or compressor tag must be returned to Turbo Air along with
above listed information.
Failure to comply with warranty policies will result in voiding claims.
Two Year Parts & Labor Warranty...
Turbo Air warrants all new refrigerated components, the cabinet and all parts, to be free from defects in materials or workmanship,
under normal and proper use and maintenance service as specified by Turbo Air and upon proper installation(indoor building only) and
start-up in accordance with the instruction packet supplied with each Turbo air unit. Turbo Air’s obligation under this warranty is
limited to a period of two (2) year from the date of original installation or 27 months after shipment date from Turbo Air,
whichever occurs first.
Any part, covered under this warranty, that are by Turbo Air to have been defective within two (2) year of original installation
or twenty nine (27) months after shipment date from manufacturer, whichever occurs first, is limited to the repair or
replacement, including labor charges, of defective parts or assemblies. The labor warranty shall include standard straight
time labor charges only and reasonable travel time, as determined by Turbo Air.
Additional Three Year Compressor Warranty...
In addition to the two (2) year warranty stated adove, Turbo Air warrants its hermetically sealed compressor to be free from de fects in
both material and workmanship under normal and proper use and maintenance service for a period of three (3) additional years from
the date of original installation, but not to exceed five (5) years and three(3) months after shipment from the manufacturer.
Compressor determined by Turbo Air to have been defective within this extended period will, at Turbo Air’s discretion, be either
repaired or replaced with a compressor or compressor parts of similar design and capacity.
The three (3) year extended compressor warranty applies only to hermetically sealed parts of the compressor and does not apply to
any other parts or components, including, but not limited to, cabinet, paint finish, temperature control, refrigerant, metering device,
driers, motor starting equipment, fan assembly or and other electrical components, etcetera.
404A / 134a Compressor Warranty...
The three-year compressor warranty detailed above will be void if the following procedure is not carefully adhered to:
1. This system contains R404A or R134a refrigerant and polyol ester lubricant. The polyol ester lubricant has rapid moisture absorbing
qualities.
2. Drier replacement is very important and must be changed when a system is opened for servicing. A620 copper drier or better is
highly recommended.
3. Micron level vacuums must be achieved to insure low moisture levels in the system. 500 microns or lower must be obtained.
4. When compressor is grounded, suction drier and 620 drier or better must be replaced.
5. Compressor must be obtained through Turbo Air, unless otherwise specified in writing, through Turbo Air’s warranty department.
What is Not Covered by this Warranty...
Turbo Air’s sole obligation under this warranty is limited to either repair or replacement of parts, subject to the additional limitations
below. This warranty neither assumes nor authorizes any person to assume obligations other than those expressly covered by this
warranty.
NO CONSEQUENTIAL DAMAGES. TURBO AIR IS NOT RESPONSIBLE FOR ECONOMIC LOSS; PROFIT LOSS; OR SPECIAL,
INDIRECT, OR CONSEQUENTIAL DAMAGES, INCLUDING WITHOUT LIMITATION, LOSSES, OR DAMAGES ARISING FROM
FOOD OR PRODUCT SPOILAGE REGARDLESS OF WHETHER OR NOT THEY RESULT FROM REFRIGERATION FAILURE.
WARRANTY IS NOT TRANSFERABLE, This warranty is not assignable and applies only in favor of the original purchaser/user to
whom delivered. ANY SUCH ASSIGNMENT OR TRANSFER SHALL VOID THE WARRANNTIES HEREIN AND SHALL VOID ALL
WARRANTIES, EXPRESS OR IMPLIED, INCLUDING ANY WARRANTY OF MERCHANTABILITY OR LABOR COVERAGE FOR
COMPONENT FAILURE OR OTHER THE WARRANTY PACKET PROVIDED WITH THE UNIT.
ALTERATION, NEGLECT, ABUSE, MISUSE, ACCIDENT, DAMAGE DURING TRANSIT OR INSTALLATION, FIRE, FOOD, ACTS
OF GOD. Turbo Air is not responsible for the repair or replacement of any parts that Turbo Air determines have been subjected after
the date of manufacture to alteration, neglect, abuse, misuse, accident, damage during transit or installation, fire, flood, or act of GOD.
IMPROPER ELECTRICAL CONNECTIONS. TURBO AIR IS NOT RESPONSIBLE FOR THE REPAIR OR REPLACEMENT OF
FAILED OR DAMAGED COMPONENTS RESULTING FROM ELECTRICAL POWER FAILURE, THE USE OF EXTENSION CORDS,
LOW VOLTAGE, OR VOLTAGE DROPS TO THE UNIT. NO IMPLIED WARRANTY OF MERCHANTABILITY OR FITNESS FOR A
PARTICULAR PURPOSE; THERE ARE NO OTHER WARRANTIES, EXPRESSED, IMPLIED OR STATUTORY, EXCEPT THE TWO
(2) YEAR PARTS & LABOR WARRANTY AND THE ADDITIONAL THREE (3) YEAR COMPRESSOR WARRANTY AS DESCRIBED
ABOVE. THESE WARRANTIES ARE EXCLUSIVE AND IN LIEU OF ALL OTHER WARRANTIES, INCLUDING IMPLIED WARRANTY
AND MERCHANTABILITY OR FITNESS FOR A PARTICULAR PURPOSE. THERE ARE NO WARRANTIES, WHICH EXTEND
BEYOND THE DESCRIPTION ON THE FACE HEREOF.
Outside U.S.and Canada; This warranty does not apply to, and Turbo Air is not responsible for, any warranty claims made on products
sold or used outside the continent of the United States and Canada.
11
Turbo air
WARRANTY
REGISTRATION
CARD
TURBO AIR MANUFACTURING COMPANY 4184 Conant St Long Beach, CA 90808, U.S.A.
(Name of your business)
MANUFACTURING COMPANY
MAIL CARD
IMMEDIATELY
(Address)
(Model No. of Unit)
(City and State of Purchaser)
(Unit Serial Number)
(Compressor Serial Number)
This is to inform TURBO AIR MANUFACTURING COMMPANY that I,
This card must be
mailed immediately
after installation
date for warranty to
be in effect.
(Signature of business owner)
have had the above TURBO AIR UNIT installed in my place of business
(Installation date)
The above warranties are in effect from this installation date, or 90 days after shipment from TURBO AIR, whichever comes first.
MANUFACTURING COMPANY
4184 CONANT ST
LONG BEACH, CA 90808
U.S.A & Canada Toll Free 800-627-0032
For Service 800-381-7770
TEL: 310-900-1000
FAX: 310-900-1077
http://www.turboairinc.com


© Copyright 2026