
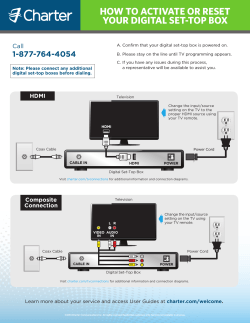
HD | Video Converter
USER GUIDE
HD | Video Converter
The easy way to convert and restore
your Video Tapes in HD
Community
/kaiserbaas
Register this product for 12 month warranty:
www.kaiserbaas.com/register
Get product updates:
www.kaiserbaas.com/updates
Tech support:
e: [email protected]
w: www.kaiserbaas.com/support
p: Australia 1300 302 306
p: New Zealand 0800 302 306
(business hours, AEST)
English
Contents
Community2
Safety Precautions
4
What’s In The Box
5
Product Diagram
6
Connection Guides
8
Vhs Player/Other Analogue Video Output Devices
PlayStation 3
8
10
Xbox 360
12
Nintendo Wii
14
Hdd Formats & Recording
Capacities16
Recording/Capture 16
Saving Files
18
Supported Resolutions
Audio/Commentary Recording
19
20
Product Specifications
21
Frequently Asked Questions
22
Contact Us
24
3
English
Safety Precautions
Before using the HD Video Converter, please ensure that you read and
understand the safety precautions below.
Do not attempt to open the case of the HD Video Converter or modify
it in any way, as this will void the warranty. Maintenance and repairs
should be carried out by Kaiser Baas.
Keep the HD Video Converter away from water and other liquids, as
this may
cause the unit to malfunction.
The HD Video Converter may become warm during use. This does not
indicate malfunction.
Do not place heavy objects on the HD Video Converter, as this may
cause the unit to overheat and malfunction.
If the exterior of the HD Video Converter requires cleaning, wipe it with
a soft
dry cloth.
Do not dispose of the unit via conventional domestic waste.
4
English
What’s In The Box
Please make sure the product package has the following contents:
1 HD Video Converter
6 Warranty Card
2 AC power supply
7 3.5mm Male to
3 Breakout cable
(Mini 8)
Female Audio Cable
8 PS3 Component
Cable
4 User guide
2
3
8
HD G
4
720p
1080p
ame R
e co rd
e r U se
r G u id
e
1
7
5
English
Product Diagram
1 Power
2 DC input
3 Breakout (Mini 8)/Component port (YPbPr –
optional)
– connect to an XBOX360/Playstation3
4 HDMI In*
5 HDMI Out*
6 PC connect
7 Resolution select (720p or 1080p**)
8 720p/1080p status indicator (LED)
9 Analogue/HDMI selector
10 Analogue/HDMI status indicator (LED)
11 Record button
12 Audio / Mic input
13 USB 2.0 port (compatible with USB 3.0)
*HDMI cable not included **not all content is 1080p
6
English
Back
6
5
1
2
4
3
7
9
11
Front
13
12
8
10
7
English
Connection Guides
VHS Player/Other Analogue Video Output
Devices
ANALOGUE
SOURCE
TV
RCA
HDMI
BREAKOUT
GAME RECORDER HD
8
English
Your HD Video Converter can capture any video from any
video source/device
All you need is the right ports/connections!
1. Connect HD Video Converter to TV via HDMI* cable.
2. Connect VHS, or any other device with composite/audio
L&R output, to HD Video Converter.
3. Connect HDD or USB stick to USB port on the HD Video
Converter.
*HDMI cable not included
***maximum recording quality with composite/RCA is 576p.
9
English
HDMI Output
DIGITAL
SOURCE
TV
HDMI
HDMI
HD VIDEO CONVERTER
10
English
1. Connect HD Video Converter, from HDMI out, to TV via an HDMI*
cable.
2. Connect HDMI device, to HDMI in, on the HD Video Converter via an
HDMI*
3. Make sure content is visible on TV screen.
4. Connect HDD or USB stick to USB port on the HD Video Converter.
5. Press Record.
*HDMI cable not included
***maximum recording quality with composite/RCA is 576p.
11
English
Component Output
COMPONENT
SOURCE
TV
COMPONENT
HDMI
HDMI
BREAKOUT
HD VIDEO CONVERTER
12
English
1. Connect HD Video Converter, from HDMI out, to TV via an HDMI*
cable.
2. Make sure the Devices video/audio output settings are setup correctly
before you begin:
It may be necessary to change the Video Output Settings
manually to Component/D-Terminal. Navigate to Settings> Display
Settings>Video Output Settings> Select Component/D-Terminal as
the connector type on your display.
3. Connect the Component Video cable (cable not included) into the
Componenet out of your device
4. Connect the other end of the component cable into the HD Video
Converter via Breakout (Mini 8) cable.
5. Make sure content is visible on TV screen.
6. Connect HDD or USB stick to USB port on the HD Video Converter.
7. Press Record.
*HDMI cable not included
***maximum recording quality with composite/RCA is 576p.
13
English
PlayStation 3
TV
PS3
COMPONENT
HDMI
BREAKOUT
GAME RECORDER HD
14
It may be necessary to change the Video Output Settings
manually to Component/D-Terminal. Navigate to Settings> Display
Settings>Video Output Settings> Select Component/D-Terminal as
the connector type on your display.
At this point the PS3 will ask whether you wish to Set Audio
Output Settings; Make sure you select the Audio Input Connector/
SCART/AV MULTI.
English
1. Make sure the PS3 video/audio output settings are setup correctly
before you begin:
2. Connect the PS3 Component Video cable into the AV Multi Out of
your PS3.
3. Connect the other end of the component cable into the HD Video
Converter via Breakout (Mini 8) cable.
4. Connect HD Video Converter to TV via HDMI* cable.
5. Make sure gameplay is visible on TV screen.
6. Connect HDD or USB stick to USB port on the HD Video Converter.
- Note: Due to High-bandwidth Digital Content Protection (HDCP),
copying of digital audio and video content from HDMI to the HD
Video Converter is not possible. Please use component cable for highdefinition recording.
For more information, go to www.digital-cp.com
*HDMI cable not included
15
English
Hdd Formats & Recording
Capacities
HDD formats
Windows 95Windows 8
Mac OS
HD Video
Converter
FAT
Yes
Yes
Yes
FAT32
Yes
Yes
Yes
NTFS
Yes
No
Yes
Mac Ext
No
Yes
No
Recording/Capture
How to:
1. Switch On (1) Power. The green LED will illuminate.
2. Connect a USB storage device to the HD Video Converter USB port
(12).
3. Prior to content, press Record (10) button. Commence content –
it is now recording. The record button will illuminate to Red.
4. When content is completed, press Record (10) button to stop
recording.
5. The record button will flash several times. DO NOT remove USB
device as the file is being saved. The record button will illuminate
Green when the file is saved.
16
English
The HD Video Converter LED lights will illuminate different colours/ways to indicate
functions.
LED Status Chart
GREEN: flashing
No USB storage device connected
or:
Booting still in progress
or:
HDD not supported - if flashing for extended amount of time
or:
Cable not connected properly
or:
USB storage device is full
GREEN: constant
Ready for plugging in USB storage device
or:
HD Video Converter and setup is ready for recording
RED: constant
HD Video Converter is recording
RED: flashing
New recorded file is saving - wait until the LED turns GREEN before
proceeding to next function
Note:
DO NOT remove storage device while HD Video Converter is saving
RED and GREEN: flashing
Content is HDCP-protected (refer to pg 7) and cannot be recorded
720p/1080p status indicator
Indicates which resolution has been selected
HDMI/analogue indicator
Indicates which input signal has been selected
HDMI LED: on
An HDMI cable has been plugged in and the input video signal source
is HDMI
HDMI LED: flashing
Indicates a possible unstable/loose connection of HDMI cable or cable
needs a few seconds to be stable
Analogue LED: on
Indicates that the input video signal may be YPbPr or composite
Analogue LED: flashing
Indicates a possible unstable/loose connection of YPbPr/composite
cable or cable needs a few seconds to connect
17
English
Saving Files
File saving
-
HD Video Converter will record a new file when the previous file reaches a
capacity of 2GB.
- When HDD or USB storage is full, HD Video Converter stops recording and
record light will change from RED to solid GREEN.
-
HD Video Converter saves files in MPEG4 format.
Resolution
The resolution can be set at either 720p or 1080p for capture. Please note that
not all games are produced at 1080p.
Recording time
The HD Video Converter will record approximately 1GB per 10mins at either 720p
and 1080p.
Auto file naming and using PC Connect Port
The HD Video Converter will create a series of files (2Gb each), each file will have
a unique name based on the time and date the file was created. The file will not
have the current date and time unless you use the PC Connect port to update it.
Please visit www.kaiserbaas.com/HD-Game-Recorder and follow the instructions
on how to update the HD Game Recorder’s internal clock.
An example of file name is: 201307151741_45.mp4
YYYYMMDDHHMM_SS.mp4
18
Input/output
English
Supported Resolutions
1920 x 1080 (50p), 1920 x 1080 (60p)
1920 x 1080 (24p), 1920 x 1080 (25p), 1920 x 1080 (30p)
1920 x 1080 (50i), 1920 x 1080 (60i), 1280 x 1024 (60p)
1280 x 720p (60p), 1280 x 768 (60p), 1280 x 800 (60p)
720 x 480 (60i), 720 x 480 (50i)
640 x 480 (60p), 720 x 480 (60p), 720 x 576 (50p)
Recording
1920 x 1080 (24p), 1920 x 1080 (25p), 1920 x 1080 (30p)
1280 x 720p (50p), 1280 x 720p (60p)
640 x 480 (60p), 720 x 480 (60p), 720 x 576 (50p)
19
English
Audio/Commentary Recording
You can add audio commentary to your captured gameplay by connecting a
microphone* to the HD Video Converter, via the Audio input (11).
With your microphone connected, simply press Record on the HD Video
Converter and talk during gameplay.
*Microphone not included
20
Capture format
mp4 (h.264)
Video format (input)
NTSC, PAL, PAL-60
Audio format
AAC
File recording format
support
FAT, FAT32, NTFS
Interface
USB 2.0 (compatible with USB 3.0)
Input signals
HDMI (for unencrypted HDMI)
English
Product Specifications
Mini 8 (composite & component interface)
MIC (Audio in)
Outpus signals
HDMI (pass-through)
USB 2.0
Bit rate
Max: 16Mbps
Recording capacity
2GB maximum per file
Note:
HD Video Converter will record several 2GB files
to capture greater capacity in one session
Maximum storage capacity
2TB
Power supply
DC 5V, 2A
Weight
150g
Dimensions
132 x 102 x 35mm
21
English
Frequently Asked Questions
Q: Will the HD Video Converter work with my console?
A: Please go to www.kaiserbaas.com/gamerecorderhd for an updated list of
compatible consoles, or email [email protected]
Q: Can I record HD TV from a Cable TV or Satellite box?
A: Refer to connection guide on page 12
Q: What file format does my hard drive or USB thumb drive need to be set to?
A: NTFS or FAT/FAT32
Q: What file type does the HD Video Converter save?
A: MPEG4
Q: The recording light does not turn on. Why?
A: Make sure the power supply is connected and the unit is turned on.
22
English
Q: Will the HD Video Converter continue to record over the recorded files once
my storage device is full?
A: No, the HD Video Converter will stop once all free space is used up on the
storage device.
Q: The Storage Device I use with my Mac won’t work with the Game Recorder
HD.
A: Use the Disk Utility on your Mac to re-format your Storage Device to a
compatible format. (FAT or FAT32)
23
English
Contact Us
Having trouble setting your HD Video Converter up?
Please contact us. No question too big or small and we are
more than happy to help.
Please visit:
www.kaiserbaas.com/support
Or email:
[email protected]
Tech support:
e: [email protected]
w: www.kaiserbaas.com/support
p: Australia 1300 302 306
p: New Zealand 0800 302 306
(business hours, AEST)
24


© Copyright 2026