
CA ERwin Data Modeler Installation Guide
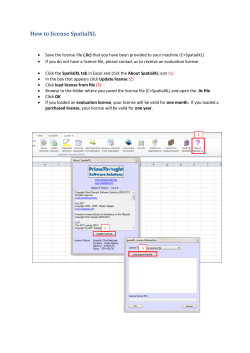
CA ERwin® Data Modeler
Installation Guide
Release 9.6.0
This Documentation, which includes embedded help systems and electronically distributed materials (hereinafter referred to as
the “Documentation”), is for your informational purposes only and is subject to change or withdrawal by CA at any time. This
Documentation is proprietary information of CA and may not be copied, transferred, reproduced, disclosed, modified or
duplicated, in whole or in part, without the prior written consent of CA.
If you are a licensed user of the software product(s) addressed in the Documentation, you may print or otherwise make
available a reasonable number of copies of the Documentation for internal use by you and your employees in connection with
that software, provided that all CA copyright notices and legends are affixed to each reproduced copy.
The right to print or otherwise make available copies of the Documentation is limited to the period during which the applicable
license for such software remains in full force and effect. Should the license terminate for any reason, it is your responsibility to
certify in writing to CA that all copies and partial copies of the Documentation have been returned to CA or destroyed.
TO THE EXTENT PERMITTED BY APPLICABLE LAW, CA PROVIDES THIS DOCUMENTATION “AS IS” WITHOUT WARRANTY OF ANY
KIND, INCLUDING WITHOUT LIMITATION, ANY IMPLIED WARRANTIES OF MERCHANTABILITY, FITNESS FOR A PARTICULAR
PURPOSE, OR NONINFRINGEMENT. IN NO EVENT WILL CA BE LIABLE TO YOU OR ANY THIRD PARTY FOR ANY LOSS OR DAMAGE,
DIRECT OR INDIRECT, FROM THE USE OF THIS DOCUMENTATION, INCLUDING WITHOUT LIMITATION, LOST PROFITS, LOST
INVESTMENT, BUSINESS INTERRUPTION, GOODWILL, OR LOST DATA, EVEN IF CA IS EXPRESSLY ADVISED IN ADVANCE OF THE
POSSIBILITY OF SUCH LOSS OR DAMAGE.
The use of any software product referenced in the Documentation is governed by the applicable license agreement and such
license agreement is not modified in any way by the terms of this notice.
The manufacturer of this Documentation is CA.
Provided with “Restricted Rights.” Use, duplication or disclosure by the United States Government is subject to the restrictions
set forth in FAR Sections 12.212, 52.227-14, and 52.227-19(c)(1) - (2) and DFARS Section 252.227-7014(b)(3), as applicable, or
their successors.
Copyright © 2015 CA. All rights reserved. All trademarks, trade names, service marks, and logos referenced herein belong to
their respective companies.
CA Technologies Product References
This document references the following CA Technologies products:
■
CA ERwin® Data Modeler Standard Edition
■
CA ERwin® Data Modeler Workgroup Edition
■
CA ERwin® Data Modeler Navigator Edition
Documentation Changes
The following updates have been made since the last release (r9.5) of this
documentation:
Review the Prerequisites (see page 20)—Added Microsoft Windows 8.1 as one of the
supported operating systems.
The following updates have been made since the last release (r8.2) of this
documentation:
■
Edit the Options File (see page 15)—Added the new topic that provides information
on editing the license options that help users borrow a license.
■
Borrow a License (see page 22)—Added the new topic that describes how you can
borrow a license from a pool of concurrent licenses.
Contact CA Technologies
Understanding your Support
Review support maintenance programs and offerings.
Registering for Support
Access the CA Support online registration site to register for product support.
Accessing Technical Support
For your convenience, CA Technologies provides easy access to "One Stop" support for
all editions of CA ERwin Data Modeler, and includes the following:
■
Online and telephone contact information for technical assistance and customer
services
■
Information about user communities and forums
■
Product and documentation downloads
■
CA Support policies and guidelines
■
Other helpful resources appropriate for your product
For information about other Home Office, Small Business, and Enterprise CA
Technologies products, visit http://ca.com/support.
Provide Feedback
If you have comments or questions about CA Technologies product documentation, you
can send a message to [email protected].
If you would like to provide feedback about CA Technologies product documentation,
complete our short customer survey, which is also available on the CA Support website,
found at http://ca.com/docs.
CA ERwin Data Modeler News and Events
Visit www.erwin.com to get up-to-date news, announcements, and events. View video
demos and read up on customer success stories and articles by industry experts.
Contents
Chapter 1: Installing CA ERwin Data Modeler
9
Upgrading the License Server....................................................................................................................................... 9
Setting Up a Concurrent License ................................................................................................................................ 10
Review Prerequisites ........................................................................................................................................... 11
Contact CA Customer Care and Get the License ................................................................................................. 11
Edit the License File............................................................................................................................................. 11
Install the License Server .................................................................................................................................... 12
Create the License Server Service ....................................................................................................................... 12
Start the License Server Service .......................................................................................................................... 12
Optional--Change the Port Number .................................................................................................................... 13
Import the License .............................................................................................................................................. 14
Edit the Options File ............................................................................................................................................ 15
Troubleshoot Borrowed Licenses........................................................................................................................ 17
Using a Concurrent License ........................................................................................................................................ 18
Review the System Requirements ...................................................................................................................... 20
Install CA ERwin DM ............................................................................................................................................ 21
Select a License for the Current Session ............................................................................................................. 21
Borrow a License ................................................................................................................................................. 22
Using a Local License .................................................................................................................................................. 24
Contact CA Customer Care and Get the License ................................................................................................. 25
Review the System Requirements ...................................................................................................................... 26
Install CA ERwin DM ............................................................................................................................................ 27
Configure CA ERwin DM to Use a Local License .................................................................................................. 28
Select a License for the Current Session (Local License) ..................................................................................... 29
Contents 7
Chapter 1: Installing CA ERwin Data
Modeler
This section contains the following topics:
Upgrading the License Server (see page 9)
Setting Up a Concurrent License (see page 10)
Using a Concurrent License (see page 18)
Using a Local License (see page 24)
Upgrading the License Server
If you are using an older version of the license server, upgrade the license server to use
the new concurrent licensing feature.
Follow these steps:
1.
Back up CA ERwin DM r8 licenses in the Install folder of the license server. The
licenses are stored in the following path of the Install folder:
\ CA ERwin DM License Administrator\licenses\erwinmod
2.
Upgrade to the CA ERwin DM r9 license server.
3.
Click CA, ERwin, ERwin License Administrator, Create License Server to create the
license server.
The license server is created.
4.
Click CA, ERwin, ERwin License Administrator, Start License Server to start the
license server.
The license server is started.
5.
Import the backed up CA ERwin DM r8 licenses to the license server.
The license server is successfully upgraded.
Chapter 1: Installing CA ERwin Data Modeler 9
Setting Up a Concurrent License
Setting Up a Concurrent License
Your organization plans to use CA ERwin DM with the concurrent licensing model. In this
model, licenses are stored in a server (License Server). When you set up licenses on the
License Server, you create a web service to communicate with the CA ERwin DM
instances that users open.
The following diagram illustrates how to set up concurrent licenses:
Perform the following tasks to set up a concurrent license:
10 Installation Guide
1.
Review the prerequisites (see page 11).
2.
Contact CA Customer Care and get the license (see page 11).
3.
Edit the license file (see page 11).
4.
Install the License Server (see page 12).
5.
Create the License Server service (see page 12).
6.
Start the License Server service (see page 12).
7.
(Optional) Change the Port Number (see page 13).
8.
Import the license (see page 14).
9.
(Optional) Edit the Options File (see page 15).
Setting Up a Concurrent License
Review Prerequisites
To use the concurrent licensing model, install the License Server.
Review the following prerequisites:
■
Select a computer in your local network or in a remote location.
■
Verify that the computer meets the system requirements.
■
Verify that the computer has enough disk space to archive log files.
Contact CA Customer Care and Get the License
Contact CA Customer Care by telephone or the web licensing form with the following
items to receive your license files:
■
License Server MAC address
■
Name of the License Server
After you receive license files, copy them to a folder on the License Server.
Note: To get the MAC address, log on to CA ERwin License Administrator and click the
System Information tab. You can also open the Windows command prompt on the
License Server and type IPCONFIG /ALL.
Edit the License File
If you change the License Server name, edit the license file and include the new name.
Note: CA ERwin Data Modeler opens only after you include the new name in the license
file.
Follow these steps:
1.
Locate and edit the license file.
Typically, the name of the license file is in the (license number) (Edition name)
(“server” MAC address).lic format. For example, 111111-2222 Workgroup (server
xxxxxxxxxxx).lic.
2.
Go to the line that starts with SERVER and change the name.
Note: The SERVER line displays the computer name with a MAC address or any
other node-locking identifier that you use. If you use only the computer name as
the identifier, you cannot edit the file; contact CA Customer Care to get a new
license.
3.
Save the changes.
Chapter 1: Installing CA ERwin Data Modeler 11
Setting Up a Concurrent License
Install the License Server
The License Server stores the concurrent license and helps you use CA ERwin DM.
Follow these steps:
1.
Double-click the CA ERwin DM License Administrator.exe file. You downloaded this
file when you downloaded the CA ERwin Data Modeler.exe file.
The Install License Server wizard opens.
2.
Follow the instructions on the wizard pages.
The program files are copied and the License Server is installed.
Create the License Server Service
You must create the License Server service after installing the License Server. This
service enables the License Server to process requests to check in or check-out licenses.
To create the License Server service, click Start, All Programs, CA, ERwin, ERwin License
Administrator, Create License Server.
Start the License Server Service
Start the License Server service, before you use the License Server. You can start or stop
the License Server service using the Windows Start menu.
Click Start, All Programs, CA, ERwin, ERwin License Administrator, Start License Server.
The services of the License Server service starts.
12 Installation Guide
Setting Up a Concurrent License
Optional--Change the Port Number
The default port number that is used for the License Server is 27000. You can change it if
required.
Follow these steps:
1.
Click Start, All Programs, CA, ERwin, ERwin License Administrator, License Server
Administrator.
The CA ERwin License Administrator window opens.
2.
Click Administration.
The Sign In dialog appears.
3.
Enter admin in the User Name and Password fields. Click Submit.
The Administration tab appears. You are prompted to change the password when
you log in for the first time.
4.
Click Server Configuration, License Server Configuration.
5.
Click Use this Port and enter the port number. Click Save.
You can enter any number that is valid for that computer.
6.
Click Start, All Programs, CA, ERwin, ERwin License Administrator, Stop License
Server.
The services of the License Server service stops.
7.
Click Start, All Programs, CA, ERwin, ERwin License Administrator, Start License
Server.
The services of the License Server service starts.
Chapter 1: Installing CA ERwin Data Modeler 13
Setting Up a Concurrent License
Import the License
After you have installed the License Server, import the license into it. Importing the
license lets users use CA ERwin Data Modeler.
Follow these steps:
1.
Click Start, All Programs, CA, ERwin, ERwin License Administrator, License Server
Administrator.
The CA ERwin License Administrator window opens.
2.
Click Administration.
The Sign In dialog appears.
3.
Enter admin in the User Name and Password fields. Click Submit.
The Administration tab appears. You are prompted to change the password when
you log in for the first time.
4.
Click Server Configuration, User Interface.
5.
Select Concurrent and click Save.
Concurrent is set as the default view for the CA ERwin License Administrator
Dashboard.
6.
Click Vendor Daemon Configuration, Import License, Browse, and select the license
file that you have received from CA Customer Care.
7.
Click Import License.
The license is imported and any errors appear in the Alerts section.
8.
Click Dashboard.
The list of imported licenses appears.
Your concurrent license is ready for use.
14 Installation Guide
Setting Up a Concurrent License
Remove a License from the License Server
After you import licenses to a License Server, many times you have to remove a specific
license. Use this procedure to remove a license that is imported to the License Server.
Follow these steps:
1.
Log in to License Server Administrator.
2.
Click Administration, Vendor Daemon Configuration, Administer.
3.
Click License File or Directory and locate the license that you want to remove.
4.
Select the line for the license that you want to remove and delete the line.
5.
Click Reread License Files.
The deleted license does not appear.
6.
Click Stop to stop the Vendor Daemon.
7.
After the vendor daemon stops, click Administer and then click Start.
8.
Check the Dashboard to help ensure that the license does not appear.
Edit the Options File
Use the concurrent licensing model and borrow licenses to use CA ERwin DM on mobile
devices that support CA ERwin DM. When you borrow a license, the license rights are
available on your local computer. You can open CA ERwin DM using the borrowed
license, regardless of whether you are connected to the License Server.
When you install the License Server, the erwinmod.opt file is copied to the installation
folder. Edit this file and specify the number of licenses that cannot be borrowed and the
maximum hours for which a license can be borrowed.
Important! If you change the erwinmod.opt file name, the file is ignored and users
cannot borrow licenses.
Follow these steps:
1.
Open the erwinmod.opt file from the following folder:
C:\Program Files\CA\CA ERwin DM License Administrator\licenses\erwinmod
The file opens and displays several lines of text in the following format:
BORROW_LOWWATER license_name number.
For example, BORROW_LOWWATER Standard 1.
Chapter 1: Installing CA ERwin Data Modeler 15
Setting Up a Concurrent License
2.
(Optional) To set the number of licenses that cannot be borrowed, follow these
steps:
a.
Go to the line that has the license name that you want to change.
b.
Change the number.
The new number is the number of licenses that cannot be borrowed.
Note: Do not reserve an uncounted license for borrowing. If you do so, you cannot
borrow licenses.
3.
(Optional) To set the maximum number of hours for which a license can be
borrowed, add the following line:
MAX_BORROW_HOURS license_name num_hours
For example, MAX_BORROW_HOURS Standard 48 specifies that a license for CA
ERwin DM Standard Edition can be borrowed for a maximum period of 48 hours.
Default: 168 hours (This value is specified in the license file.)
Ensure that the new period is less than the period specified in the license. If
multiple MAX_BORROW_HOURS keywords appear for the same license_name, only
the last one is applied.
4.
Save the file.
5.
Open CA ERwin License Administrator and click Administration.
6.
Enter the administrator user name and password and click Submit.
7.
Click Vendor Daemon Configuration, Administer.
The Vendor Daemon Actions web page appears.
8.
Click Stop.
The Vendor Daemon is stopped.
9.
Click Start.
The Vendor Daemon is restarted and the changes you have made to the license
options file come into effect.
16 Installation Guide
Setting Up a Concurrent License
Troubleshoot Borrowed Licenses
Symptom
CA ERwin DM does not open with a borrowed license.
Solution
The reason for CA ERwin DM not opening with a borrowed license is using different
names in the license files.
Follow these steps:
1.
Connect to the License Server and open the license files that you have imported
into your License Server.
2.
Verify if the name in the SERVER line is same in all the license files.
Typically the name is the computer name, localhost, or this_host.
3.
If the names are different, change the names to make them consistent.
4.
Import the licenses again.
Chapter 1: Installing CA ERwin Data Modeler 17
Using a Concurrent License
Using a Concurrent License
This section describes how CA ERwin DM users can use a concurrent license with CA
ERwin DM Standard Edition or Workgroup Edition.
Note: Before you start this procedure, your System Administrator must set up the
License Server and import the license to it. You have the License Server details and know
which edition to use.
In the concurrent licensing model, licenses are stored in a License Server. You check out
a license to use CA ERwin DM; when you close the application, the license is checked in.
The License Server increases or decreases the count of available licenses by one when
you check in or check out a license.
Note: If all the licenses are checked out, you cannot open another instance of CA ERwin
DM.
When using CA ERwin DM, if you lose connection to the License Server, the License
Server recovers the license and CA ERwin DM closes. The recovery happens after four
hours of disconnection and several warning messages.
The following diagram illustrates how to use CA ERwin DM with the concurrent licensing
model:
18 Installation Guide
Using a Concurrent License
Perform the following tasks to use concurrent licenses:
1.
Review the System Requirements (see page 20).
2.
Install CA ERwin DM.
3.
Open CA ERwin DM and Provide the License Server Details.
4.
Select a License for the Current Session (see page 21).
5.
Borrow a License (see page 22).
Chapter 1: Installing CA ERwin Data Modeler 19
Using a Concurrent License
Review the System Requirements
Review the system requirements for the computer on which you want to install CA
ERwin DM.
Verify that you have installed one of the following operating systems:
■
Microsoft Windows 8.1
■
Microsoft Windows Vista
■
Microsoft Windows Server 2008 SP2
■
Microsoft Windows Server 2003 SP2
■
Microsoft Windows 7
■
Microsoft Windows 8
■
Microsoft Windows 2012
■
Microsoft Windows XP SP3: As Microsoft has dropped support for Windows XP, CA
ERwin Data Modeler will no longer be tested for compatibility with that operating
environment. Should you encounter any problem(s) using CA ERwin Data Modeler
you should first verify that the problem(s) encountered are not related to an
unsupported operating environment before reporting the problem(s) to CA.
Note: CA ERwin Data Modeler is a 32-bit application and is fully compatible with
64-bit operating systems, except for the following known issues:
■
64-bit database drivers and clients will not work with the application. The
workaround is to use 32-bit database drivers and clients in the 64-bit operating
system environment.
■
Running the CA ERwin API in a 64-bit environment requires some changes to
the workstation registry. For more information about changing the registry, see
the CA ERwin Data Modeler WE Implementation and Administration Guide.
The following requirements must be met or exceeded for CA ERwin Data Modeler to
install and run correctly:
■
Microsoft-based workstation, Intel Dual Core processor or equivalent
■
2 GB available hard drive space
■
2 GB RAM minimum; more is recommended for large models
■
DVD-readable device (only if installing from DVD media)
Note: The minimum screen resolution supported is 1024 x 768. If your screen resolution
is less than the minimum supported, some portions of the screen will not be visible.
20 Installation Guide
Using a Concurrent License
Install CA ERwin DM
Install CA ERwin DM to create, update, and maintain conceptual, logical, physical, and
dimensional models. For the Workgroup Edition, install CA ERwin DM on each computer
that accesses Mart. Install CA ERwin DM using the same executable file for Standard and
Workgroup Editions.
Follow these steps:
1.
Log in to the computer where you want to install the product as an Administrator
user.
If you run an install without Administrative privileges, all files may not be installed
or upgraded, and users can encounter problems when running the software.
2.
Do one of the following tasks:
■
Insert the installation DVD
■
Download the ERwin.exe file from the online CA Technologies product page
and run it.
The Installation Wizard opens.
3.
Follow the instructions on the wizard pages.
The program files are copied and CA ERwin DM is installed.
Note: You can install CA ERwin DM Navigator from the ERwin.exe file or from a separate
Navigator.exe file.
Select a License for the Current Session
If you are using a concurrent license, when you close CA ERwin DM or disconnect from
your network, your license is checked in to the License Server. When you launch CA
ERwin DM again, select the license you want to use for that session.
Follow these steps:
1.
Click Start, CA, ERwin, ERwin Data Modeler.
The CA ERwin DM Licensing dialog appears.
2.
Select one of the following options and click OK:
Acquire concurrent Workgroup Edition license
Connects to the License Server and acquires a concurrent license for the
Workgroup Edition. Suppose the Workgroup Edition license is not available. If
you have purchased the Standard Edition license, then select If unavailable,
attempt to acquire a concurrent Standard Edition license. A concurrent
Standard Edition license is checked out, if available.
Chapter 1: Installing CA ERwin Data Modeler 21
Using a Concurrent License
Acquire concurrent Standard Edition license
Connects to the License Server and acquires a concurrent license for the
Standard Edition.
Acquire concurrent use SQL Azure license
Connects to the License Server and acquires a concurrent use license for SQL
Azure.
Note: To use a concurrent license for SQL Azure, select one of the concurrent
license options mentioned previously, and then select this option.
3.
Enter the path for your License Server in the Server Path field in the
port@hostname or port@IP address format. Click OK.
Example: 27000@remotecomp1, [email protected]
CA ERwin DM opens.
Note: If no license is available, CA ERwin DM Community Edition opens.
You have selected a concurrent license to use CA ERwin DM.
When you borrow a license, the License Administrator Dashboard the number of
licenses that are borrowed for each edition. The Dashboard also displays displays a
number under ERwin DM. Here, ERwin DM represents a license that is acquired from
the ERwin License Administrator. After a license is successfully acquired, the License
Administrator continues to acquire a Workgroup Edition or Standard Edition license.
ERwin DM represents the sum of all licenses acquired from the ERwin License
Administrator. The ERwin DM count does not include the licenses that have been
borrowed.
Borrow a License
If you use the concurrent licensing model, you can borrow licenses to use CA ERwin DM
on mobile devices that support CA ERwin DM. When you borrow a license, the license
rights are available on your local computer. CA ERwin DM opens using the borrowed
license when you are not connected to the License Server.
You can borrow a license from the Licensing dialog at the time of opening CA ERwin DM.
Note: To borrow a Navigator license, specify the server path that has a valid CA ERwin
DM Navigator license.
Follow these steps to borrow a license at the time of opening CA ERwin DM:
1.
Open CA ERwin DM.
The CA ERwin Data Modeler Licensing dialog appears.
2.
22 Installation Guide
Click Acquire concurrent use Workgroup Edition license or Acquire concurrent use
Standard Edition license.
Using a Concurrent License
3.
In the Server Path field, type the license server details.
This Server Path detail is reflected in the Help, Licensing dialog.
4.
Select the Return Date checkbox and specify the return date and time.
5.
(Optional) Select the Remember the licensing options and do not show this dialog
again checkbox.
6.
Click OK.
A license is checked out from the License Server and the rights are available on your
local computer.
To return a license before it expires, start CA ERwin DM and enter the server path in the
CA ERwin Data Modeler Licensing dialog. After CA ERwin DM opens, click Help,
Licensing, and then click Return Borrowed Licenses Early.
Note: If a license expires or is returned before it expires, you have four hours of buffer
time to save your work. After four hours of the expiry of the license, CA ERwin DM
closes. Similarly, if you lose the connection to the License Server, the License Server
recovers the license and CA ERwin DM closes. The recovery happens after four hours of
disconnection and several warning messages.
When the license expires, one of the following events happen:
■
If the client computer is connected to the License Server and a concurrent license is
available, CA ERwin DM checks out a license. If no concurrent license is available, a
warning dialog appears and CA ERwin DM closes after four hours.
■
If the client computer is not connected to the License Server, CA ERwin DM notifies
users about the loss of connectivity with the License Server.
Chapter 1: Installing CA ERwin Data Modeler 23
Using a Local License
Using a Local License
Use a local license if one of the following requirements applies:
■
You are the only user of CA ERwin Data Modeler.
■
You want to use CA ERwin Data Modeler on a specific computer.
■
You plan to use CA ERwin Data Modeler when you are disconnected from your
corporate network.
In this licensing model, the license is stored on your local computer.
The following diagram illustrates how to use a local license:
Perform the following tasks to use a local license:
24 Installation Guide
1.
Contact CA Customer Care and get the license (see page 11).
2.
Review the system requirements (see page 20).
Using a Local License
3.
Install CA ERwin DM.
4.
Open CA ERwin DM and install the license (see page 28).
5.
Select a license for the current session (see page 29).
Contact CA Customer Care and Get the License
Contact CA Customer Care by telephone or the web licensing form with the following
items to receive your license files:
■
License Server MAC address
■
Name of the License Server
After you receive license files, copy them to a folder on the License Server.
Note: To get the MAC address, log on to CA ERwin License Administrator and click the
System Information tab. You can also open the Windows command prompt on the
License Server and type IPCONFIG /ALL.
Chapter 1: Installing CA ERwin Data Modeler 25
Using a Local License
Review the System Requirements
Review the system requirements for the computer on which you want to install CA
ERwin DM.
Verify that you have installed one of the following operating systems:
■
Microsoft Windows 8.1
■
Microsoft Windows Vista
■
Microsoft Windows Server 2008 SP2
■
Microsoft Windows Server 2003 SP2
■
Microsoft Windows 7
■
Microsoft Windows 8
■
Microsoft Windows 2012
■
Microsoft Windows XP SP3: As Microsoft has dropped support for Windows XP, CA
ERwin Data Modeler will no longer be tested for compatibility with that operating
environment. Should you encounter any problem(s) using CA ERwin Data Modeler
you should first verify that the problem(s) encountered are not related to an
unsupported operating environment before reporting the problem(s) to CA.
Note: CA ERwin Data Modeler is a 32-bit application and is fully compatible with
64-bit operating systems, except for the following known issues:
■
64-bit database drivers and clients will not work with the application. The
workaround is to use 32-bit database drivers and clients in the 64-bit operating
system environment.
■
Running the CA ERwin API in a 64-bit environment requires some changes to
the workstation registry. For more information about changing the registry, see
the CA ERwin Data Modeler WE Implementation and Administration Guide.
The following requirements must be met or exceeded for CA ERwin Data Modeler to
install and run correctly:
■
Microsoft-based workstation, Intel Dual Core processor or equivalent
■
2 GB available hard drive space
■
2 GB RAM minimum; more is recommended for large models
■
DVD-readable device (only if installing from DVD media)
Note: The minimum screen resolution supported is 1024 x 768. If your screen resolution
is less than the minimum supported, some portions of the screen will not be visible.
26 Installation Guide
Using a Local License
Install CA ERwin DM
Install CA ERwin DM to create, update, and maintain conceptual, logical, physical, and
dimensional models. For the Workgroup Edition, install CA ERwin DM on each computer
that accesses Mart. Install CA ERwin DM using the same executable file for Standard and
Workgroup Editions.
Follow these steps:
1.
Log in to the computer where you want to install the product as an Administrator
user.
If you run an install without Administrative privileges, all files may not be installed
or upgraded, and users can encounter problems when running the software.
2.
Do one of the following tasks:
■
Insert the installation DVD
■
Download the ERwin.exe file from the online CA Technologies product page
and run it.
The Installation Wizard opens.
3.
Follow the instructions on the wizard pages.
The program files are copied and CA ERwin DM is installed.
Note: You can install CA ERwin DM Navigator from the ERwin.exe file or from a separate
Navigator.exe file.
Chapter 1: Installing CA ERwin Data Modeler 27
Using a Local License
Configure CA ERwin DM to Use a Local License
When you first open CA ERwin DM, the Community Edition opens. Provide the details of
the license to use the edition that you have purchased.
Follow these steps:
1.
Open CA ERwin DM.
The CA ERwin DM Community Edition opens.
2.
Click Help, Licensing.
The Licensing dialog appears displaying the MAC addresses discovered on your
computer.
3.
Click Install License File.
4.
Browse and select the license file you have received from CA Customer Care. Click
Open.
A message appears indicating that your license file was successfully moved to the
application's data directory.
5.
Click OK. Click Close.
6.
Close CA ERwin DM.
You have configured CA ERwin DM to use a local license.
If you need assistance with licensing, open an issue online at the CA ERwin Data
Modeler support site.
28 Installation Guide
Using a Local License
Select a License for the Current Session (Local License)
Every time you launch CA ERwin DM, select the license you want to use for that session.
Follow these steps:
1.
Click Start, CA, ERwin, ERwin Data Modeler.
The CA ERwin DM Licensing dialog appears.
2.
Select Use Local license and click OK.
CA ERwin DM opens using the license stored on your local computer. If a local
license is not available, an error message appears.
If you want to use SQL Azure, your SQL Azure license must also be available on the
local computer.
You can select the Do not show this dialog again check box, so that you always use
the license available on your computer.
Note: To restore the Licensing dialog, open CA ERwin Data Modeler, click Tools,
Options, Reset all Messages, and close CA ERwin Data Modeler. The next time you
open CA ERwin Data Modeler, the Licensing dialog appears.
You have selected a local license to use CA ERwin DM.
Chapter 1: Installing CA ERwin Data Modeler 29


© Copyright 2026