
& how to fit them professionally
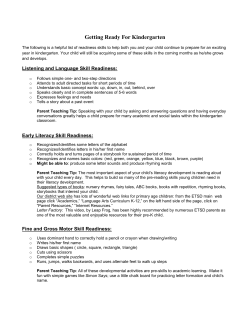
A guide to the various types of cue tips and tools on the market today,
& how to fit them professionally
The basic job of a tip is crucial
- it is the link between your actions and the results -
It’s the cue sports equivalent of car tyres!
You can have a nasty cue with a good tip and play well,
but a fantastic cue with a weak tip will never be any good.
I know of people who have sold £500 handmade
cues thinking that they were no good for them,
when in reality it was probably just a duff tip!
Written by Andrew Ramsay ©
Design by www.digbyfox.com
Types and makes of tips
There are two basic types of tip, pressed and
laminated. A pressed tip is shaped from a
single piece of leather and is the traditional
tip used for
Snooker and
8 ball Pool.
A laminated tip is
made from layers
of leather glued
together.
Here we see a pressed tip on the left and a
layered tip on the right.
Pressed tips
There are many different makes of pressed
tips with varying levels of quality ranging
from the truly nasty Chinese made tips
that come on cheap cues up to the
Mike Wooldridge pressed tips at
£2.50 each!
For the purposes of this exercise I will
stick to the tips you are likely to
come across although there are
many others that could be mentioned,
Blue Velvets and Blue Knights for example,
also please remember that the comments
are only my personal opinion, although I do
have some experience in the matter!
Tweeten’s Elk Master Tips – definitely the
most common and most popular tip and if
you get a good
one they are
capable of
producing the
full range of
shots required
Written by Andrew Ramsay ©
for the British games, however they are
also the softest tips and wear out pretty
fast if you play a lot. Very good tips for
people who use a lot of screw or side in
their game.
You quickly get good at tip fitting if you
use these, both because of the fast wear
times and also 75% of them don't feel
right when you play. Also beware of
fakes, there are plenty out there these days
so check carefully whom you are buying
them from.
Brunswick Blue Diamond Tips – great tips
if you find a good one and nightmarish if
you don't, for
many years
these were the
benchmark tips
for the British
games however
the quality is
not what it once was and I personally don't
think they are worth the extra money over
the Elk Masters.
Mike Wooldridge “Super Tips” – widely
thought to be the best of the pressed tips
and like having a good Elk Master every
time. I have never heard
of anyone with a bad
word to say about these
tips but they are very
expensive for a pressed
tip, as the saying goes:
you get what you
pay for!
Design by www.digbyfox.com
Laminated tips
Laminated tips are tips that are
made from two or more layers of
leather glued together. There are
advantages and disadvantages to
using laminated tips:
On the plus side, they tend to last much
longer than pressed tips and they hold
their shape much better so
once you find one you like they play for
ages. On the negative side they tend to
be less able to hold chalk and much
more expensive.
Most people also feel that laminated tips
are generally harder, so it is the softer
makes that are popular in the UK.
Production costs of laminated tips are
much higher, so as a result so are the
prices, however you do need to buy
carefully because some makes are
seriously expensive! Once again for the
purposes of this exercise I have stuck to
the tips that are popular in the UK, there
are of course many others but most of
them are far too hard.
Talisman Tips – the Talisman Soft Pro is
the best selling laminated tip in the UK
by a nautical mile and like most people
I would agree it is the best one.
Striking a great balance between usability,
reliability and
afford-ability,
this is the tip I
use myself.
Be warned
about buying
imported tips
that are 14mm, they can split when fitted
on our smaller ferrules, elsewhere in the
world the medium tips and water buffalo
tips are very popular but are too hard for
most people here unless you like a very
hard tip. Again beware of fakes, there are
plenty out there these days so check whom
you are buying them from.
Written by Andrew Ramsay ©
Moori Tips - Probable the most expensive
tip of all and one of the most difficult to fit
properly, the trick is to hit thirty or forty
shots in the middle of the fitting before
your final shaping, this will have knocked
out the initial
compression you
get with these
tips, without a
doubt the one to
go for is the
Generation Three
Slow (soft tip) and its hard to argue that they’re not a
very fine product.
Hercules Tips – this is one of the few easy
cross over tips designed for getting more
side in the
American pool
game however
they are soft
enough for use in
snooker, the H2 is
the one to go for
it is very similar to the Moori without the
need to re-mortgage your house. Avoid
the 23-layered version though as it's a bit
like gluing a stone to the end of your cue!
Mike Wooldridge “Layered Super Tips” –
a fine product that I suspect Mike based
on the Talisman Soft, although feels a bit
harder when played in, good value for
money compared with his superb pressed
tips although some people might find the
black layer under the tip a
bit distracting, although it
reminds me of using an
antique cue and I feel
adds a touch of class!
At the moment if you are
thinking of using one of these I suspect the
Talisman is a better bet, although as Mike
gets more feedback on them and perfects
them they might well be the field leaders –
watch this space!
Design by www.digbyfox.com
Tip Care
Its very important that you don't play with
a tip that is damaged or too small; the
reasons for this are that firstly you will
find it more difficult to play,
secondly and more
importantly, you run the
risk of damaging your
cue or even the table that
you are playing on. The
tip should never be smaller
than the ferrule it is attached to
and it should never be allowed to get so
low that is does not cushion the impact of
striking the cue ball.
Always keep your tip well chalked during
play as a lack of chalk can lead to misscues and potential damage of both the
cue and the table.
Tip Tools
These days there are quite a few tools
available on the market designed to help
you maintain your tip to the highest
standard either by shaping it or helping it
to retain chalk by roughing the surface.
These tools are mostly gimmicks because
all you really need to maintain your tip to
the highest standard is a needle file or a
little piece of 250 grit or finer sandpaper,
but we all like a toy so I will try and give
you my opinion of the ones I have used.
The Ultimate Tip Tool - these are very
expensive but also very good, I must
confess I use
one myself,
the problem
is finding
one because
if you import
one from the USA yourself they are too
large to work properly and also designed
to shape tips at 13mm. I also find that with
the American versions the carbide paper is
a little too rough.
Tip Piks - these are
very popular because
they are handy to
carry and effective,
but they are far too effective in my opinion
and tend to destroy the tip pretty fast
although they do work well at first. They
are also pretty expensive for what they are.
Tip Files - these have been around a long
time and work in as much as they do what
they are made
to do, however
I think they are
not a good
tool at all and can damage your cue if you
are not careful, I would most definitely
rather go by eye with a bit of sandpaper!
Tip Tappers - quite a
good tool for people
with harder tips and
very easy to use but
can be a little brutal
if used too often.
...and now for how to fit them!
Written by Andrew Ramsay ©
Design by www.digbyfox.com
Tip Fitting
What you will need:
At some point all tips will wear down and
need replacing, if you let the tip get too
small the impact of each shot will exert too
much force on the cue and you run the
risk of damaging the cue, and also of
course the shots will become harder as
you have less tip to play with, I have seen
many clubs where the house cues tips are
wafer thin and personally I can't see the
logic in that because the cues are both
impossible to play with and will quickly be
destroyed. It is a false economy not to
change a worn tip whatever the quality
of the cue.
1
A flat surface free of clutter and
that you will not cry if you cut
into it with a scalpel – The top of
your new laptop is not the way to
go (and yes I do know someone
who did!).
2
A very sharp knife – I use a
scalpel but a new craft knife
will work just as well, the
important thing is that it is
REALLY sharp and clean.
Some people think tip fitting is a dark art
only to be performed by surgeons and
people who do it for a living; this is of
course absolutely true! Despite that many
people do attempt to fit their own tips,
with mixed results... what I am going to try
and do here is describe in detail one way
to do it that you should hopefully find
simple and effective. As with everything to
do with cues there are many other ways
and the method described here is not how
I do it! (I cut off the excess in one go with
the scalpel but it takes a while to get that
trick right and you will go through a lot
of tips before you do!) Other people use
a grinder or even a lathe although I
suspect if you own a lathe big enough
to do it you are not going to need
advice on how to use it!
3
Very fine sandpaper, 250 grit or
finer and / or a needle file.
4
Some strong but flexible glue i.e.
2 part Epoxy Resin or more
commonly these days Gel Super
glue, it has to be Gel Super glue
other wise the glue will soak into
the tip and make it brittle – I use
Loctite Gel 3 in a nice and easy
to use squeeze-able bottle on my
own tips.
The first thing is to be prepared and have
all the equipment you need to hand; it
really is much easier if you do!
Written by Andrew Ramsay ©
5
0000 wire wool.
6
A cloth to wipe off excess glue.
7
A £20 note – you will see!
8
A tip!
Design by www.digbyfox.com
The Method
1
Cut off the old tip with a scalpel (or if
you are Ronnie O'Sullivan bite it off).
Then I always destroy it to make sure I
know which tip I was unhappy with...
Once you have got it as flush as possible
give it a quick clean and rough up with
wire wool and it should look something
like this:
3
...many people fit used tips that are
already played in, myself included, but
there is not a lot of point in keeping one I
know I don’t like!
Lightly sand the bottom of the tip to
be fitted by placing the sandpaper on
a flat surface and scuffing, this is only to
roughen the surface of the tip so don't
overdo it or the tip will no longer be flat!
2
Remove any left glue or tip until the
ferrule is perfectly flat – this is the
most important stage in fitting a tip
because if you don't get this right it is
impossible to nicely fit a new one.
Always fit a tip that is slightly larger than
the ferrule you are fitting it to for the
obvious reason that it is easy enough to
trim it down to size but impossible to
make it grow!
4
Take your time and strive for as smooth as
glass and 100% flat! You can see in this
photo the wafer this left over that has still
to be removed.
Written by Andrew Ramsay ©
Place tip on ferrule to make sure it
will fit nicely when glued and then
apply super glue gel or other bond to the
tip and place it on the ferrule – these days
Super Glue gel is the most common
method of attaching a tip because it saves
having to use a clamp and saves a lot of
waiting! Note; as I said before it must be
Gel Super Glue otherwise it will absorb
into the tip and make it brittle.
Design by www.digbyfox.com
I use Loctite Gel 3 in the control bottle –
I wonder if they will send me some for
the advert!
The easiest method to do this is to make
lots of little cuts while rotating the cue
because the neater the job the less filing or
sanding you will have to do later! The
more cuts and the smaller they are the
neater the job will be.
Wipe off any excess glue straight away
with paper.
6
After lots of little cuts you should end
up with something like this:
5
Leave the tip for a few minutes to be
sure the glue is totally hard, then
place the tip on a flat surface and trim
away the over hang with a scalpel or craft
knife. Make the first cut flush with the
ferrule and then cut away the bulk of the
overhang before your final trim.
Written by Andrew Ramsay ©
7
Next file or carefully sand the tip to
your approximately desired shape. If
you are using sandpaper it is important
not to touch the shaft of you cue or you
will ruin the finish.
Design by www.digbyfox.com
8
Now burnish the edge of the tip with
a £20 note or a piece of old leather –
this will highlight any errors in the filing.
9
Then re-file or sand off any parts you
are not happy with or that are not
flush with the ferrule and re-burnish.
10
If you are happy with the overall
look and shape of the tip then
use the 0000 grade (ultra fine) wire wool
to clean any scratches and glue marks
from the ferrule.
11
The final tip should look
something like this:
Finally
The business of tips is
really a matter of trial
and error so if you
find either a tip you
get on with or a
method of fitting you
like, stick with it
because changing tips
all the time will just
distract you from the
real reason you are
missing all those
sitters - which is that
you don't practice
enough!
For any snooker cues, tips or equipment
please feel free to e-mail me or take a look
at my eBay shop...
[email protected]
Although the ultimate shape is a matter of
personal taste, I like my tip to be flush with
the ferrule, although some players prefer
an overhang (mushroom shape) - Fergal
O'Brien has a tip a full mm larger then the
ferrule and by the looks of it Peter Ebdon is
another fan of the oversized tip.
Written by Andrew Ramsay ©
Copyright Andrew Ramsay. All Rights Reserved.
Reproduction or translation of any part of this work by any means, electronic or
mechanical, including photocopying, beyond that permitted by the Copyright Law,
without the permission of the publisher is unlawful.
If you choose to ignore this we will send the boys round.
Design by www.digbyfox.com


© Copyright 2026