
Bilateral Human-Robot Control for Semi
Bilateral Human-Robot Control for Semi-Autonomous UAV Navigation H.W. (Han) Wopereis MSc Report Committee: Prof.dr.ir. S. Stramigioli Dr. R. Carloni Dr.ir. M. Fumagalli Dr.ir. R.G.K.M. Aarts March 2015 006RAM2015 Robotics and Mechatronics EE-Math-CS University of Twente P.O. Box 217 7500 AE Enschede The Netherlands Abstract The SHERPA-project (www.sherpa-project.eu) focuses on developing a collaboration between human rescuers and ground/aerial robots for improving rescue activities. In this collaboration, the human should be able to use the robots with ease when necessary, while the robots should be autonomous when the human does not demand control. The MSc research focuses on the control of the slave device using a semi-autonomous controller, where variations in parameters can be made by the operator to support the autonomous controller. The key-aspects of this research are that the operator’s discrete outputs and the robot’s continuous inputs are clearly separated and that the operator can assist the robot without being cognitively overloaded by the robot. The overall goal of the semi-autonomous control architecture is to combine the stability and precision of autonomous control with the cognitive abilities of the operator. The architecture has been validated through simulations and experiments. Contents 1 Introduction 1 1.1 Context . . . . . . . . . . . . . . . . . . . . . . . . . . . . . . . . . . . . . . . . . 1 1.2 Report overview . . . . . . . . . . . . . . . . . . . . . . . . . . . . . . . . . . . . 1 1.3 State of the art . . . . . . . . . . . . . . . . . . . . . . . . . . . . . . . . . . . . . 1 2 Bilateral Human-Robot Control for Semi-Autonomous UAV Navigation 3 Methodology and software implementation 4 12 3.1 Use-case-scenario . . . . . . . . . . . . . . . . . . . . . . . . . . . . . . . . . . . . 12 3.2 Overview . . . . . . . . . . . . . . . . . . . . . . . . . . . . . . . . . . . . . . . . 12 3.3 Algorithms . . . . . . . . . . . . . . . . . . . . . . . . . . . . . . . . . . . . . . . 13 3.4 3.3.1 A*-Path-finding . . . . . . . . . . . . . . . . . . . . . . . . . . . . . . . . 13 3.3.2 Setpoint selection . . . . . . . . . . . . . . . . . . . . . . . . . . . . . . . . 20 3.3.3 Feedback . . . . . . . . . . . . . . . . . . . . . . . . . . . . . . . . . . . . 21 3.3.4 Position controller . . . . . . . . . . . . . . . . . . . . . . . . . . . . . . . 22 3.3.5 Safety-mechanisms . . . . . . . . . . . . . . . . . . . . . . . . . . . . . . . 22 Software implementation . . . . . . . . . . . . . . . . . . . . . . . . . . . . . . . . 24 4 Conclusions and Recommendations 26 A Hardware setup 27 A.1 Using the XSens suit . . . . . . . . . . . . . . . . . . . . . . . . . . . . . . . . . . 27 A.2 Using the Myo-armband . . . . . . . . . . . . . . . . . . . . . . . . . . . . . . . . 28 A.3 Haptic feedback with vibration motors . . . . . . . . . . . . . . . . . . . . . . . . 29 B Installation Manual 32 C User Manual 37 D Myo streamer C++ code 40 1 1.1 Introduction Context This master-thesis has been performed at the RAM department of the University of Twente, under the European project named ”Smart collaboration between Humans and ground-aErial Robots for imProving rescuing activities in Alpine environments” (SHERPA). The goal of SHERPA is to develop a mixed ground and aerial robotic platform to support search and rescue activities in a real-world hostile environment like the alpine scenario [1]. The team consists of a human-rescuer, an intelligent ground-vehicle that carries the load, a fixed-wing UnmannedAerial-Vehicle (UAV) and a big multi-rotor UAV for mapping and several smaller multirotor UAVs for nearby scanning. The robots in this team support the rescuer by improving awareness. Since the human-rescuer is on-site and busy in the rescuing activity, he is often unable to supervise the platform. Therefore the emphasis of the SHERPA project is placed on robust autonomy of the platform, inducing small work-load on the operator. This master-thesis project contributes to this robust autonomy, specifically on the robust autonomy of the smaller multirotor UAVs. In this report, a semi-autonomous control-method is presented for controlling these smaller UAVs in dense terrain. 1.2 Report overview First in the next subsections the state-of-the-art is presented. Then in section 2, the conference paper, submitted to IROS 2015, is given. This paper presents our proposed semi-autonomouscontrol architecture. Furthermore it describes the methodology and implementation details on this and the hardware used for realisation, and it presents experiment results. In section 3, additional information regarding the methodology is presented. Also some specific details on the software-implementation are given and an overview of the implemented software structure is presented. Finally, in section 4 conclusions are presented and recommendations for future-work are made. The appendices describes how the hardware can be used(appendix A), and show the manuals for installing the software (appendix B) and using the software (appendix C). Furthermore some C++ code is documented as this piece of code stands separate from the rest of the software and could potentially get lost for this reason (appendix D). 1.3 State of the art Thanks to their agility, UAVs are exemplary to be used in surveillance, inspection and searchand-rescue missions [1]. In the context of these missions, it is often desirable for these UAVs to operate fully autonomous. In many cases, however, these missions take place in dense terrain, which does not allow fully autonomous operation [2], unless e.g. the UAVs operate at a certain height in which no obstacles are expected [3]. Navigating an UAV close to obstacles, such as buildings or dense trees, is difficult and unreliable, as the UAV requires a certain amount of airflow to stay in the air, and this airflow can cause turbulence. Inside buildings or dense forests the problem becomes even bigger. For this type of missions, current research focuses at the use of semi-autonomous control to overcome the unpredictability of the environment and its impact on the stability of the UAV. 1 Most of these semi-autonomous control methods can be categorized in three different types: Shared-control, Traded-control and Supervisory-control. As the name states, shared-control focuses on sharing the control efforts between the humanoperator and the autonomous-controller. This can be either separate [4], in which the human controls some of the control efforts and the autonomous-controller controls others, or combinatory[5] [6], where both the human and the autonomous-controller contribute to some shared control efforts together, in a specified manner. This can be, for instance, that in normal operation the control is mainly dominated by the autonomous-controller, whereas in more dangerous situations main contribution gradually shifts over to the human operator. Sharedcontrol has shown to increase the overall efficiency and performance [5] [7] and homogenizes the performance of human operators from different backgrounds [6]. The main downfall of this type of semi-autonomous control is that the human has to be present at all times. Also, it was shown that the operator tends to overly trust the system [5], reducing situational awareness and, with this, the operator’s performance at crucial moments. Furthermore, it was observed that the operator started to expect certain behaviour from the autonomous controller and anticipate on this, which can lead to frustration and worse performance when the autonomous controller behaved differently. In the our context, this type of semi-autonomous control is not viable, as the operator cannot be present at all times. In traded-control, control efforts are shifted between the human operator and the autonomous controller, which can be either a part or the total control effort. One of the main types of semi-autonomous traded-control is the mixed-initiative-interaction (MII) method [8]. MII is a flexible interaction strategy, in which the task at hand determines which actor should contribute to which control effort. In certain applications the autonomous controller can lead [9] [10], where the human operator takes over if the situation requires this (e.g. a ground robot that gets stuck in unequal terrain and needs a complex control strategy to get loose). Often in this case, the human overtakes the complete control effort. Other applications can be led by the human, where the autonomous controller takes over in case necessary (e.g. driving a vehicle with safety-systems which are activated if the task diverges from regular driving to avoiding an accident). Results in research show that traded-control, in complex scenarios, can reduce the overall immobility time to a comparable amount of autonomous control, while it can increase the coverage in exploring an area to be comparable to that of pure teleoperation [11]. However, in switching the control effort, there can be some undesired switching behavior temporarily reducing stability. Furthermore, both operators need to be standby. Also, the human requires high environmental awareness to properly take over the control actions. This is undesirable in the SHERPA scenario for two reasons. First, as the operator is busy traversing the difficult terrain, the operator cannot be distracted too much by keeping track of the UAVs. Second, UAVs are intrinsically unstable, which means that small mistakes can have big consequences, and undesired switching behavior can be fatal to the system. Supervisory control [12] [13] allows the human operator to have a reduced workload, as during normal operation the control effort relies completely on the autonomous controller. The supervisor is the human operator who, from time to time or upon request of the autonomous controller, monitors the autonomous controlled system. In case necessary, the operator can intervene to either modify the control algorithm or grant permission for certain operations. In some cases, it is inevitable for the operator to also have the ability to take over control efforts, which basically implies a combination of supervisory- and traded-control. Supervisory control is often applied in situations where there is a big time-delay or the human operator needs to multitask. Research has shown that supervisory control can prevent cognitive overloading, that would occur if the operator had to control both a robot and perform another task. [14] . Next to this it allows for multiple robots to be controlled simultaneously by one operator [15] [16]. 2 However, the more manual operation is demanded, the less complex other tasks can be and the less number of UAVs can be supervised effectively [17]. In this report, a semi-autonomous control architecture is presented, which can be classified as supervisory control. It is implemented for the UAV navigation in dense terrain. It is not desired to allow the human supervisor to directly teleoperate the UAV, as the performance is likely to drop and it can jeopardize the stability. The other extreme, only giving the operator the ability to allow/disallow certain requests from the autonomous controller, e.g. yes you can fly through that narrow opening / yes you can close in to humans, brings along several problems as well, such as what to do after the UAV has flown through the opening or how close can the UAV approach humans. In this case, the supervisor has limited methods for control and cannot supervise the dangerous action as it is being performed. The situation can become worse due to unexpected circumstances. Modifying the control-algorithm itself could cause unexpected behavior and confusion forCite the operator when it is not implemented to be transparent. Therefore, our approach is to merely allow the operator to modify the boundaries/safety-limits of the control algorithm. By this way, the UAV can be allowed to pass a dangerous situation, while the operator supervises the system and can control the process. The effect of the operator’s actions and the expected behavior of the autonomous controller are transparent and predictable, and the operator preserves methods to intervene when the situation becomes worse. In the paper which can be found in the next section, our proposed semi-autonomous control architecture is presented and elaborated. The control method is applied in the field of UAV navigation, but yields the potential to be applied in different fields as well. For example, in Robotic Surgery, the surgeon could supervise the robot by allowing a maximum amount of force to be applied during several aspects of the operation, whereas in Personal Robotics, interaction could be managed by controlling the maximum amount of pressure the robot can apply in interaction or the maximum movement speed the robot can have. 3 2 Bilateral Human-Robot Control for Semi-Autonomous UAV Navigation 4 Bilateral Human-Robot Control for Semi-Autonomous UAV Navigation Han W. Wopereis, Matteo Fumagalli, Stefano Stramigioli, and Raffaella Carloni Abstract— This paper proposes a semi-autonomous bilateral control architecture for unmanned aerial vehicles. During autonomous navigation, a human operator is allowed to assist the autonomous controller of the vehicle by actively changing its navigation parameters to assist it in critical situations, such as navigating through narrow paths. The overall goal of the controller is to combine the stability and precision of autonomous control with the cognitive abilities of a human operator, only when strictly required for the accomplishment of a task. The control architecture has been validated through extensive simulation and in experiments. Master controller Human operator Human machine interface Master device Autonom. controller Communication channel Slave controller Slave robot Environment Slave device Fig. 1. Overview of the semi-autonomous bilateral architecture, in which the human operator can actively change the autonomous controller’s parameters. I. I NTRODUCTION Thanks to their agility, Unmanned Aerial Vehicles (UAVs) are exemplary to be used in surveillance, inspection and search-and-rescue missions [1]. Although fully autonomous operation is often appropriate and desirable, many complex tasks in dense terrains, such as exploration of forests or buildings, can only be accomplished if the UAV is supervised by a human operator [2]. Teleoperation requires full attention of the operator, which is not cost-efficient, and can increase the duration of the operation as the time needed to perform a specific task depends linearly on the delay in the loop [3]. Different types of semi-autonomous controllers have been proposed and investigated. Most of these can be classified under shared-control, traded-control and supervisory-control. In shared-control, the inputs from the human operator and the autonomous controller are combined, e.g., in slidingscale autonomy. Experienced users might expect a certain behavior of the autonomous controller, which leads to worse performance, or overly trust the system, which leads to reduced situational awareness [4]. Shared-control has also been proven to improve efficiency in the human-robot cooperation [5] or in a multi-robot team [6]. In the bilateral shared-control proposed in [7], the human operator can modify the shape of the path of mobile robots while receiving feedback on the actions of the autonomous controller. In traded-control, the control switches between teleoperation and autonomous operation. One of the main types of semi-autonomous tradedcontrol is the mixed-initiative-interaction, a flexible interaction strategy in which the task determines if the human operator or the autonomous controller should contribute to completing it [8]. In certain tasks the autonomous controller can lead [9], [10], while in other cases the human leads This work has been funded by the European Commission’s Seventh Framework Programme as part of the project SHERPA under grant no. 600958. The authors are with the Faculty of Electrical Engineering, Mathematics and Computer Science, CTIT Institute, University of Twente, The Netherlands. Email: [email protected], m.fumagalli, s.stramigioli, [email protected]. [11]. Results show that traded-control can reduce the overall immobility time to a comparable amount of autonomous control while it can increase the coverage in exploring an area to be comparable to that of teleoperation. This paper proposes a semi-autonomous control architecture which can be classified as supervisory-control [12]. The control architecture is depicted in Figure 1 and is based on the classical bilateral teleoperation paradigm in which the human-operator operates a Master device, which consists of the Human machine interface and the Master controller, to interact with the Slave device via a communication channel. The Slave device consists of the Slave controller, which performs low-level control, and the Slave robot which represents the physical robot. The Master device receives a feedback on the state of the slave and/or on the environment. Our approach extends the classical paradigm by inserting an autonomous controller between the Master device and the Slave device. When desired or needed by the mission, the human operator can issue discrete commands to the autonomous controller and overrule the autonomous controller’s parameters. The autonomous controller translates these discrete signals into a continuous stream of setpoints. By this means, the operator can supervise the autonomous controller and assist it to overcome problematic situations, without directly teleoperating the slave robot. The overall control architecture is validated in both a simulation environment and experiments. A quadrotor UAV has to autonomously navigate a cluttered environment, while avoiding obstacles and paths that are narrower than a certain safety distance. The human operator is equipped with a noninvasive human-machine-interface that facilitates inertial and electro-myographic inputs so that the safety level can be overruled by interpreting the gestures of the human operator. Non-invasive haptic and graphical information are fed back during performing the mission. p(xt,xs) rs Parameter handler Setpoint selector xsp Position controller Path executor Path planner Feedback generator Fig. 2. Various data Slave device Path generator Euler angles + elevation xt State Handpose + gesture Armpose + gesture Task manager Haptic + graphic Master device Autonomous controller The autonomous controller with specified signals. II. AUTONOMOUS CONTROLLER This section describes the details of the semi-autonomous controller, as shown in Figure 1, in which a human operator supervises an UAV during the execution of a task. The chosen scenario includes an UAV that navigates in a static map and a human operator that can influence the navigation algorithm by adjusting the safety distance, i.e., the minimum required distance of the UAV to obstacles or the minimum width of a path the UAV can navigate in. The overall architecture of the autonomous controller is detailed in Figure 2. With reference to the figure, the total system consists of three top-level blocks: the master device, the autonomous controller and the slave device. The master device refers to the human operator who, by means of a human-machine interface, assigns targets to be reached in the map and is able to issue commands that modify the safety distance. On the slave side, the robot performs setpoint tracking and shares its state with the autonomous controller, which is then in charge to feed information back to the human operator. Between the master and the slave, the autonomous controller translates the discrete input from the master device to a continuous stream of setpoints for the slave device, and vice versa. The autonomous controller is defined as an interconnection of four main modules that are schematically represented in Figure 2. These modules, which are the task manager, constraint handler, path planner and feedback generator, are described in the next sections, with the exception of the task manager. In general, the goal of the task manager is to interpret signals from the human-machine interface into tasks and to list and determine task execution order. By allowing only a single task to be assigned at a time, the task-manager reduces to a translation from user-input to target-locations. III. PATH G ENERATOR Considering for simplicity a 2D environment, let X ∈ R2 be the set of equidistant points that form a grid into which a 2D map is divided, and let x ∈ X be a grid point. Let xs , xt ∈ X be the grid points that, respectively, represent the start position and the target position of the UAV during a complete task, and let p(xs , xt ) be a path connecting xs to xt . Finally, let xc be the current position of the robot and let us define xs := xc at the moment in which the autonomous controller receives a new target position xt . The path generator block finds a suitable path p(xs , xt ) by using the heuristic best-first-search algorithm A* [13], which finds the lowest cost path by expanding its search at grid points with the lowest value of the function: f (x) = g(x) + h(x) In this function, f (x) is the estimated total cost of a path p(xs , xt ) via x, g(x) the past travel-cost from xs to x, and h(x) is the heuristic function that estimates the minimum future cost-to-go for reaching xt starting from x. By expanding its search at grid points with the lowest value of f (x), the A*-method prioritizes the grid points that have the biggest chance to be a part of the optimal path. In the following subsections, the implementations of g(x) and h(x) are reported. A. Travel-cost g(x) The travel-cost g(x) is defined as the past travel-cost from xs to x. To ensure finding the minimum value for g(x), g(x) is calculated incrementally, by adding the local cost c(xp , x) of traveling from xp to x to the past cost g(xp ) of traveling from xs to xp , where xp is the neighboring parent grid point of x that results in the lowest value for g(x). The value of g(x) is then found as: g(x) = g(xp ) + c(xp , x) In order to generate proper paths, each grid point on the map is assigned a cost for entering, which is defined as the travel-weight w(x). Using this travel-weight, with reference to Figure 3, the local cost c(xp , x) is defined as: if x ∈ [x11 , x22 ] w(x) r 2 c(xp , x) = w(x)2 + w(x11 )+w(x22 ) if x = x12 2 (1) The travel-weight w(x) can be defined arbitrarily in the map. In our specific case, in order to avoid paths that are in the vicinity of obstacles, w(x) depends on dobs (x), which is defined as the smallest Euclidian distance of grid point x to x11 x12 xp x22 Fig. 3. Supporting figure for equation 1, illustrating two different possibilities to travel towards neighboring grid points (green-to-red and green-to-blue). an obstacle, i.e.: 1 r − dobs (x) w(x) = β + α · o ro − ri 100 if dobs (x) > ro if dobs (x) > ri (2) otherwise in which, respectively, ri , ro are the minimum and maximum value assignable to safety distance rs ; α ∈ [0, 99] and β ∈ [1, 99−α] are a scale factor and a weight-offset, respectively. In Figure 4, an example of the travel-weight map, with α = 49 and β = 50, is displayed by the blue color of the map: the darker the blue, the higher the travel-weight for that specific grid point. The offset generated by β = 50 is seen at the border between the white and blue. Note that, by introducing a reasonably high weight-offset β, the algorithm is forced to first search for a lower-cost detour which is not in the proximity of obstacles. This is visible in the left of Figure 4, where the top area is first completely scanned before the algorithm progresses through the opening. This is an important aspect for our approach, as traveling in the proximity of obstacles may require the operator’s attention and, therefore, should be avoided. Section V goes into more detail about this. The weight-scale-factor α ensures that paths traversing in the proximity of multiple obstacles prioritize the center, as can also be seen on the left part of Figure 4. B. Cost-to-go h(x) The A*-method results in the optimal path p(xs , xt ) between the start location xs and the target location xt under the condition that h(x) is admissible, i.e. h(x) does not overestimate the cost-to-go for reaching xt . For calculating the minimum cost-to-go h(x) on a grid with minimum travelweight w(x) = 1, which allows for both diagonal and lateral movement, the sum of the minimum steps between x √and xt can be taken, with the diagonal steps weighted by 2. The value of h(x) is calculated as: dx = x −xt √ = χ · ( 2 − 1) · min(|dx|) + max(|dx|) h(x) in which min(|dx|), max(|dx|) denote the element of dx with the smallest/biggest norm, respectively, and χ ∈ [0, 1) is the admissibility-factor to assure admissibility in the presence of calculation errors. By choosing χ = 0.99, h(x) is underestimating the cost-to-go and therefore is admissible. C. Unreachable target In case a target position is unreachable, the algorithm completely explores the grid-space X and concludes that the target is unreachable. In this scenario there are two options. The path-generator could return a signal telling the target is unreachable and wait for a new target, or it can attempt to go as close as possible. By assuming the operator has a certain awareness of the environment, it can be said that in case of an unreachable target, this was set on purpose. Then, it is desirable that the UAV is guided as close as possible to the target. This closest position is found by searching X for the grid-point x for which h has the lowest value. Then, if the target is unreachable, xt is redefined as: xt := xh,min where h(xh,min ) = min(h(X)). An example of this redefinition is shown on the right part of Figure 4. IV. PATH EXECUTOR The path executor is made of two blocks, namely the setpoint selector and the position controller. The setpoint selector generates a continuous stream of valid setpoints xsp utilizing path p(xs , xt ) received from the path generator and safety-distance rs received from the parameter handler. The position controller translates xsp into Euler-angle-setpoints and an elevation setpoint for the UAV’s low-level controller. The position controller is implemented as a well-known PDcontroller and is not further explained in this paper. The setpoint-selection method is elaborated below. A. Setpoint selection Fig. 4. Left: First the algorithm expands its search for routes with less proximity to obstacles. Then it expands through the opening, finding the target quickly after. Right: This is the worst case situation. The target is unreachable and the algorithm has to search all possible paths. The grid is sized 51 × 51 points; calculation time is 0.53s. Given a path, the setpoint selection block of Figure 2 continuously finds suitable setpoints that drive the UAV towards the target. To do so, with reference to Figure 5, it uses the line-of-sight method to search for the furthest point xp on the path p(xs , xt ), for which the minimum distance dobs (xc xp ) between the line-segment xc xp and the nearest obstacle is greater than safety distance rs . Once xp has been found, the next setpoint xsp is found as the point on the line-segment xc xp that is at the maximum Fig. 5. Graphical representation of the line-of-sight method. xc xc xc,reloc xc,reloc Fig. 6. Figure to illustrate relocating xc in case dobs (xc ) < rs . Left: Single relocation. Right: Double relocation. distance Rmax from xc , with Rmax a manually chosen limit on the distance between xc and xsp . This is calculated as: ( Rmax xp · |x if |xc xp | > Rmax c xp | xsp = xp Otherwise The aforementioned line-of-sight function is implemented as shown in Algorithm 1. Algorithm 1 Line-of-sight setpoint selection 1: xp := xs 2: 3: 4: 5: 6: 7: 8: for i ∈ [size(p(xs , xt ), 1] do if dobs (xc xp,i ) > rs ), then xp = xp,i break end if end for Note that, at any instance, it can occur that dobs (xc ) < rs , e.g., due to the operator increasing the value of rs or due to disturbances. For Algorithm 1 to work properly, it is required that xc is not located within rs , since in that case it will always output xp := xs , which is not valid per definition. In this work, it is essential that by increasing rs , the UAV is forced to move along within the boundaries imposed by rs . Each loop, preliminary checks are performed to see if dobs (xc ) < rs . If this is the case, attempts are made to relocate xc onto the border imposed by rs . Figure 6 shows this relocation in two different cases. Note that this method does not consider any dynamic behavior of the UAV, nor does it include any initial velocities in the process of selecting new setpoints. This implies that the actual trajectory traveled by the UAV may violate the safety-measure imposed by rs . It is assumed that during Fig. 7. Left - Path generation influenced by rs : the path leads to the smallest h(x). As the UAV cannot reach the goal, it stops and asks for help in front of the wall. Middle - Path generation is aware of the limits on rs : the path leads to the goal, the UAV asks for help in front of the door. Right - Path generation ignores rs : the path leads towards the goal, the UAV asks for help in front of the wall. normal operation, the safety-distance is high enough to prevent collision, in combination with the relocation. V. PARAMETER HANDLING In some scenarios, the human operator can influence more parameters. In these cases, the parameter handler’s block has to interpret the operator’s intentions and to convert corresponding inputs to appropriate parameters, which are then forwarded to the autonomous controller. In this work, the parameter handler interprets the inertial and electro-myographic data of the human operator as the safety-distance rs and sends the new value rs to the setpoint selection block. By analyzing how the variations in rs should influence the path generator block led to three different possibilities: the path-generator can be influenced by variations of rs , the path generator can be aware of the limits (ri ,ro ) of rs , or, the path generator can ignore the variation of rs . Figure 7 depicts these three possibilities and shows the local minimum of each. As shown in the left figures, if rs influences the path generator, the path leads to min(h(X)) in front of the wall. Furthermore, upon lowering rs , the UAV will suddenly start to move towards xt , without the operator being able to guide it safely through the opening. In the right figures, it can be seen that ignoring the existence of rs can cause the system to get stuck at a local minimum, even if there is no real reason to ask for operator attendance. The figures in the middle show that it is better to avoid areas with obstacles, unless there is no other viable solution. This feature is implicitly implemented by the weight-offset β (see Equation 2) on the travel-weight w(x) close to obstacles, as described in Section III-A. A time-lapse of the behavior due to the human intervention is shown in Figure 8, where the human sets a reduced safety-distance that allow passing through a narrow path in the map (e.g., a door), computationally impossible otherwise, due to the generation of a local minima that prevent completing the path. x vs time 2 xc xsp 1.5 xp 1 0.5 0 0 2 4 6 8 10 12 14 16 18 y vs time 2 20 yc ysp 1 yp 0 −1 −2 0 2 4 6 8 10 12 14 16 Obstacle distance vs time 18 20 rs 1.5 rquadrotor dobs 1 0.5 0 0 2 4 6 8 10 12 14 16 18 20 14 16 18 20 feedback vs time Feedback signal 2 1.5 1 0.5 0 0 2 4 6 8 10 12 Fig. 12. Result plots for one of the trials in the experiment, in compliance with the the 2D map in Figure 11. A significant amount of overshoot is visible in the plots, which appears to be mainly caused by turbulence due to the small area and the air-flow of the UAV. VIII. C ONCLUSIONS AND FUTURE WORK This paper has presented a novel approach for bilateral control for semi-autonomous UAV navigation, in which the novelty is given by the ability of the human operator to assist the autonomous controller by adapting certain navigation parameters, in this particular case the safety-distance to obstacles. The advantages of this method over other semiautonomous control methods are: the default navigation parameters can be set conservative while the operator preserves flexibility, a clear distinction between discrete user-input and continuous autonomous-control output and a reduced cognitive workload for the human operator. The approach was implemented for our specific scenario and different important aspects of implementing the proposed control architecture were discussed. An A*-path-planning algorithm was used to generate paths and a relocation plus line-of-sight method was used to find suitable setpoints on this path. Advantages of this approach are the flexibility to scale up to 3D and bigger grids and the ability to account for uncertainties such as disturbances and initial velocities. Experiments showed a high performance and reliability in the presence of significant disturbance and the operator was able to assist the UAV to safely travel through the opening in 21 out of 22 trials. The system showed good responsiveness to variations in the safety-distance and showed to successfully counteract overshoot. R EFERENCES [1] L. Marconi, C. Melchiorri, M. Beetz, D. Pangercic, R. Siegwart, S. Leutenegger, R. Carloni, S. Stramigioli, H. Bruyninckx, P. Doherty, A. Kleiner, V. Lippiello, A. Finzi, B. Siciliano, A. Sala, and N. Tomatis, “The SHERPA project: Smart collaboration between humans and ground-aerial robots for improving rescuing activities in alpine environments,” in Proceedings of the IEEE International Symposium on Safety, Security, and Rescue Robotics, 2012. [2] A. Franchi, C. Secchi, M. Ryll, H. H. Bulthoff, and P. Robuffo Giordano, “Shared control: Balancing autonomy and human assistance with a group of quadrotor UAVs,” IEEE Robotics & Automation Magazine, vol. 19, no. 3, pp. 57–68, 2012. [3] T. B. Sheridan and W. R. Ferrell, “Remote manipulative control with transmission delay,” IEEE Transactions on Human Factors in Electronics, no. 1, pp. 25–29, 1963. [4] M. Desai and H. A. Yanco, “Blending human and robot inputs for sliding scale autonomy,” in Proceedings of IEEE International Workshop on Robot and Human Interactive Communication, 2005. [5] C. Urdiales, A. Poncela, I. Sanchez-Tato, F. Galluppi, M. Olivetti, and F. Sandoval, “Efficiency based reactive shared control for collaborative human/robot navigation,” in Proceedings of the IEEE/RSJ International Conference on Intelligent Robots and Systems, 2007. [6] J. D. Brookshire, “Enhancing multi-robot coordinated teams with sliding autonomy,” Ph.D. dissertation, Carnegie Mellon University, 2004. [7] C. Masone, P. Robuffo Giordano, H. H. Bulthoff, and A. Franchi, “Semi-autonomous trajectory generation for mobile robots with integral haptic shared control,” in Proceedings of the IEEE International Conference on Robotics and Automation, 2014. [8] J. Allen, C. I. Guinn, and E. Horvtz, “Mixed-initiative interaction,” IEEE Intelligent Systems and their Applications, vol. 14, no. 5, pp. 14–23, 1999. [9] R. Wegner and J. Anderson, “An agent-based approach to balancing teleoperation and autonomy for robotic search and rescue,” in AI04 workshop on Agents Meet Robots, 2004. [10] R. R. Murphy, J. Casper, M. Micire, and J. Hyams, “Mixed-initiative control of multiple heterogeneous robots for urban search and rescue,” 2000. [11] A. Finzi and A. Orlandini, “Human-robot interaction through mixedinitiative planning for rescue and search rovers,” in Proceedings of the Conference on Advances in Artificial Intelligence. Springer-Verlag, 2005. [12] J. Y. C. Chen, M. J. Barnes, and M. Harper-Sciarini, “Supervisory control of multiple robots: Human-performance issues and user-interface design,” IEEE Transactions on Systems, Man, and Cybernetics - Part C: Applications and Reviews, vol. 41, no. 4, pp. 435–454, 2011. [13] P. Hart, N. Nilsson, and B. Raphael, “A formal basis for the heuristic determination of minimum cost paths,” IEEE Transactions on Systems Science and Cybernetics, vol. 4, no. 2, pp. 100–107, 1968. [14] S. Lenser and C. Jones, “Practical problems in sliding scale autonomy: A case study,” in Proceedings of the SPIE 6962, Unmanned Systems Technology X, 2008. [15] P.-J. Bristeau, F. Callou, D. Vissiere, N. Petit, et al., “The navigation and control technology inside the AR.drone micro uav,” in IFAC World Congress, 2011. [16] ROS: an open-source Robot Operating System, http://www.ros.org. [17] N. Koenig and A. Howard, “Design and use paradigms for gazebo, an open-source multi-robot simulator,” in Proceedings of the IEEE/RSJ International Conference on Intelligent Robots and Systems, 2004. [18] “Xsens motion technologies bv,” https://www.xsense.com. [19] “Myo, Thalamic Labs Inc.” https://www.thalmic.com. [20] “Optitrack, Natural Point,” http://www.optitrack.com. [21] “Arduino,” http://www.arduino.cc. 3 Methodology and software implementation This section elaborates the methodology used for the semi-autonomous controller. Design choices and alternatives are more thoroughly presented and algorithms are explained. Next to this, specific details about the software implementation are presented as well. First, design choices regarding the methodology are presented using the use-case-scenario as a guideline. Then a complete overview of the software-structure is presented. From this overview, each of the algorithms used is explained and finally details on the software implementation are given. 3.1 Use-case-scenario The use-case-scenario for which our semi-autonomous control method is tested is the one of UAV navigation in a cluttered, static map. The human operator, who is on-site, can send target-positions to the autonomous controller and can influence the navigation algorithm by adjusting the safety-distance, i.e. the minimum required distance of the UAV to obstacles. This also induces the minimum width of a path or opening the UAV can navigate through. Obstacles are defined as straight lines, which can stand free or connected. Due to availability, a low-cost Parrot AR.Drone is selected for experiments. This quadrotor takes Euler-angles and an Elevation setpoint as inputs, for an internal controller. As the human-operator is on-site, the master-device has to be wearable and non-invasive. The methodology for the autonomous controller in this use-case-scenario should consist of: • A path-planning algorithm, which translates discrete target-positions to a continuous stream of setpoints, while obeying the safety-distance. • Input handlers, which translate the (possibly continuous) inputs from the master-device to discrete target-positions and variations in the safety-distance. • Operator feedback generation, which generates appropriate feedback for the human-operator. For simplicity, the assumption is made that the map is static and known a-priori. This removes the need of environmental sensors. Feedback on the robot’s state is fed directly into the pathplanning algorithm. 3.2 Overview The overview of the semi-autonomous control architecture, which was previously presented in the paper in section 2, is presented again in figure 1 below. The software architecture is mainly constituted by the autonomous controller. The master-device and the slave-device have some hardware-specific software to communicate with the autonomous controller, but in this report these are considered to be part of the hardware-setup and are elaborated in section A. The autonomous controller consists of four blocks: Path Planner, Feedback generator, Task manager and Parameter handler. The path-planner is the complete navigation algorithm, whereas the Task manager and Parameter handler are the input handlers, and the Feedback Generator generates feedback for the operator. 12 p(xt,xs) rs Parameter handler Setpoint selector Position controller Path executor Path planner Various data Feedback generator xsp Slave device Path generator Euler angles + elevation xt State Handpose + gesture Armpose + gesture Task manager Haptic + graphic Master device Autonomous controller Figure 1: The total system architecture, focused at the Autonomous controller. Signals are indicated, for their specific meaning, see 2 The path-planning algorithm consists of a path-generator, which finds collision-free paths in the environment, and a path-executor, which executes this path. The path-executor consists of a setpoint-selector that selects the next viable setpoint, and a position controller, which transforms these position setpoints into Euler-angles and Elevation setpoints. The feedback to the operator is generated separately in the Feedback-generator. It uses a variety of data from the path-executor to supply the operator situation-awareness and insight in the path-executors behavior. This feedback is both graphic and haptic. The input regarding target-locations is handled by the task-manager, which carries this name so that in later stages it could be possible to have multiple tasks at once. In that case the task-manager decides which task to perform next, which is possibly done in discussion with the Path-generator. The input regarding the safety-distance is handled by the Parameter-handler and directed towards the path-executor which has to obey this safety-distance. 3.3 Algorithms In the next subsections, design choices and explanations of used algorithms are presented. The specific implementation has been presented in the paper, but some design choices or explanations were omitted due to limited space. 3.3.1 A*-Path-finding As introduced in section 2, the path-finding algorithm used in the Path Generator is the A*search-algorithm [18]. This heuristic search algorithm finds the shortest route between two positions on a grid or graph by expanding its search from start-position until the end-position is reached. It is called heuristic, as it prefers to expand at the most promising path-segments first by using a heuristic function. The most promising path-segment is found by calculating the sum of the past path-cost (travel-cost) and the expected future path-cost (cost-to-go) for each evaluated node1 . The algorithm continues at the node with the lowest value for this sum, which therefore, at that iteration, is most likely to be part of the optimal path between the start- and end-position. For this algorithm, to guarantee it finds the optimal path, it is crucial that the 1 In search-algorithms, a grid-point is often referred to as a node. 13 cost-to-go is not over-estimated. Best calculation time can be achieved when the estimation is exact, as in this case the least nodes will be expanded. The algorithm was chosen among others, as it finds an optimal path, is comparably easy to implement and does not unnecessarily over-calculate. Also, the workspace and the obstacles are not bound to specific shapes for the algorithm to work, as long as the grid is dense enough in comparison to the workspace and obstacles’ size. Several variations on the A*-algorithm exist, such as Jump-Point-Search [19] and iterative-deepening-A* [20]. Jump-point-search improves calculation time in uniform grids, whereas iterative-deepening-A* allows lower memory usage. In our case however, memory is not a problem and the grid is not uniform. The algorithm explained First let us make some definitions. Let X ∈ R2 be the grid with equidistant nodes, and x ∈ X denotes one of these nodes. Furthermore, xs , xt denote, respectively, the nodes of the start- and end-position. The optimal path from one node to another is denoted by p(xi , xj ). Let’s assume at first, for simplicity, that the cost for traveling from node to node is uniform in X. We define traversing X to be possible both diagonal and lateral. The local-cost c(xi , xj ) to travel from node xi to node xj is given by: ( 1 if travelling lateral c(xi , xj ) = √ (1) 2 if travelling diagonal in which the cost for travelling diagonal is properly weighted. The travel-cost for x, defined G(x), is the cost travelling from xs to x. G(x) can be calculated incrementally by adding the local-cost c(xp , x) to the travel-cost of the previous ”parent” node G(xp ): G(x) = G(xp ) + c(xp , x) (2) The cost-to-go, defined H(x), can be found as: √ H(x) = 1 · max(|xt − x|) + ( 2 − 1) · min(|xt − x|) (3) with the max, min denoting the maximum and minimum element of these 2D vectors, respectively. The total-cost, F (x), for node x is then found as: F (x) = G(x) + H(x) 14 (4) In our specific implementation n = 8 and the array in the lookup table for a specific node, M(x, 1 : 8), stores the following information: M(x, 1 : 8) = [ px (1) , px (2) , w(x) , Fclosed list , Fopen list , G(x) , xparent (1) , xparent (2)] (7) From left to right, this is: 1. 2. The actual position px , corresponding to the coordinates of x.2 3. The travel-weight w(x) in which also is stored whether x is an obstacle. 4. If x is on the closed-list and the value F it has. 5. If x is on the open-list and the value F it has. 6. The lowest known travel-cost G(x). 7. 8. The parent node’s coordinates xparent . By doing this, most searches are simplified to a simple lookup, which takes O(1) (constant time). The only searches remaining are to find nodes on the open-list if the value of F has to be replaced or to find the position to insert the node if they don’t appear on the list yet. Basically, the closed-list has become obsolete. 3.3.2 Setpoint selection The setpoint-selection method used is Line-of-sight path-following method. In short, this means that, at any time, given a current position xc and a path p(xs , xt ), the next setpoint is the furthest point xp on p(xs , xt ) for which holds that the smallest distance between line-segment xc xp and the obstacles is bigger than the safety-distance. The setpoint-selection algorithm is thoroughly explained in the paper in 2. Therefore it is not further elaborated here. This method was chosen for the following reasons: • It is predictable and intuitive. • It is easy to implement and process, as it only requires some geometric calculations. • It takes shortcuts traversing the path where possible, optimizing the total travel-distance. Downfalls of this method in general are that neither angular rate nor the velocity is limited and that initial conditions are ignored while selecting a setpoint. For a multirotor UAV unlimited angular rate is no problem. The velocity can be limited in the setpoint-selection algorithm by taking a setpoint xsp on the line-segment xc xp , which is at a maximum distance Rmax away from current position xc . A nice positive of this is that in open environments the velocity is likely to be limited by Rmax , whereas in cluttered environments the velocity is likely to be limited by the distance of xp . This 2 The actual position px is necessary as the path has to be translated to real positions for the setpoint-selector. 20 implies that the UAV moves at maximum velocity in open areas and slows down in cluttered areas. Not taking initial-conditions into account can form a problem, as the expected travel-route may differ from the actual travelled route. However, in general the safety-distance will be set high (relative to the maximum velocity). There is a responsive mechanism build in the setpoint-selector (as described in the paper) which reacts when the safety-distance is breached and applies an repulsive force. Therefore the effects of not taking initial conditions into account is not expected to be a problem in our application. 3.3.3 Feedback The feedback to the user consists of two parts: the haptic-feedback and the graphical-userinterface(GUI). The haptic-feedback-device consists of an armband with vibration motors driven by an Arduino prototyping board. It can receive multiple different warning signals, which it translates in different vibration-patterns. These patterns can be, for instance, all vibration motors vibrate together with the intensity (PWM) varying in a sinusoidal manner or that the vibration moves around the arm by actuating each vibration motor one-by-one. The protocol for haptic feedack signals from autonomous controller to human operator is as follows: the autonomous controller periodically sends a single message to the Arduino (e.g. each 3 seconds), that carries the specific warning signal. The Arduino then maps this signal to a specific vibration pattern that lasts for a certain duration (e.g. 1 second). As long as the situation occurs, the autonomous controller keeps sending single messages, and the operator is alerted. The reason to send signals periodically is to prevent disturbing and overloading the operator. The signalling stops when the situation is solved. The specific implementation for the haptic-feedback can be found in appendix A.3. The graphical feedback is provided by the GUI, shown in figure 9. In here, the path p(xs , xt ) is illustrated as the green line, with a green cross at xt . The purple cross is the target-position given by the operator, but due to quantized space, xt diverges a bit. The obstacles are shown as black lines, whereas the travel-weight is represented by the darkness of the blue in the figure. The red cross indicates the furthest valid path-point xp and the orange cross indicates the limited setpoint xsp . The red circle shows the current safety-distance, and is drawn around the current position xc . Last, the yellow line with the red dot gives an indication of the velocity and direction of the UAV. The GUI is interactive and can be clicked on to set new targets (xt ). It provides more information than necessary to function, as this increases trust and understanding with the humanoperator [21]. 21 Figure 9: The graphical-user-interface. 3.3.4 Position controller The position controller for the multirotor UAV was reused from the work of a former bachelor student at the RAM department of the University of Twente, Cees Trouwborst, whom I’d like to thank for this. It was not altered in a significant way, and therefore a link to his bachelor report and the controller-package is considered to be sufficient. The report can be found at: https://www.ce.utwente.nl/aigaion/attachments/single/ 1177 The package can be found at: https://github.com/ceesietopc/ram_ba_package Note that the package found in the GITHUB was slightly altered and is therefore not the one directly usable for our software architecture. The altered package is stored at the RAM department and can be found there. 3.3.5 Safety-mechanisms It can happen that the system overshoots into the area induced by the safety-distance. Three main causes for this can be found: 1. In constrained areas, turbulence, reflecting on walls e.g., can cause the UAV to get an extra positive acceleration. 22 2. The PD-controller is tuned to be under-damping. 3. The inability of the line-of-sight setpoint-selection method to take initial conditions into account, can cause it to select setpoints for which the actual travelled trajectory interferes with the safety-distance. Assuming the safety-distance is relatively big, this will not form a problem for the stability. However, it is undesired behavior and should therefore be prevented where possible. To prevent overshoot into the restricted safety-area, which is induced by the safety-distance, a safety-mechanism can be implemented. Velocity-Obstacles-algorithm A suitable safety-mechanism would be to implement the Velocity-Obstacles-algorithm [22] [23]. This algorithm uses the current position of the UAV in combination with the current position and velocity of the obstacles, to form a set of velocities for the UAV that result in collision within a certain time-frame, assuming constant velocities. This set is called the Velocity Obstacles (VO). By selecting the next setpoint, in combination with the current velocity, in such a way that the net-velocity is not in VO, collision can be prevented. The Velocity-Obstacles-algorithm has not been implemented due to its complexity and the assignment’s limited time. Velocity-Braking-algorithm An attempt has been made to implement a simplified version of the Velocity-Obstacles algorithm, which only looks if the current velocity requires braking. Figure 10 illustrates how this approach was implemented. The blue circle shows the current position of the UAV and the blue line indicates the velocity of the UAV. The braking algorithm detects that, within a certain look-ahead-distance DLA — DLA is chosen to be the brakingdistance when applying half the maximum acceleration of the system —, a collision with the safety-area will occur (this figure is an exaggerated example). Braking is necessary to prevent this. So instead of sending xsp to the position controller, a combination of a braking setpoint and the perpendicular component of xsp is sent, xsp,vo . This induces braking to prevent the collision. 23 xt xp xsp xsp, xsp,vo xbr DLA Figure 10: Velocity-braking illustrated. This braking-algorithm has been tested and removed from the software, as there is a serious problem with this algorithm. Since it only looks for interference straight-ahead, an object could enter the interference region from the side. The algorithm would then apply braking, but since the object has entered somewhere within the braking-distance, this would not be enough. Furthermore, braking is applied step-wise, which causes undesired behavior. These two problems might be fixable, but this would still be fixes and not solutions to our initial problem. Therefore the conclusion is that it is better to not use this method. 3.4 Software implementation The software implementation of figure 1 is shown in figure 11. The Robotic-Operating-System (ROS) framework [24] has been used in creating the software. In this framework, different scripts(threads) run along-side and communicate over internal UDP-connections. There are six main threads that constitute the autonomous-controller, indicated by the grey boxes. These scripts are written in programming language Python and are documented properly. Therefore the implementation is not presented here. For simulation the Gazebo environment [25] is used with the TUM-simulator package. 24 arduino_feedback warningSignal Haptic feedback /arduino_feedback UAV setpoint output Optitrack/Gazebo input setpoint robotState targetDestination xsens_rightHand path myo_selectTarget currentPos myo_setSafetyDistance currentTwist Myo input XSens input Graphical feedback nextPoint processedSafetyDistance graphic_selectTarget Figure 11: The software structure and the interconnections. The grey boxes are the different threads running, the arrows between them are internal UDP message ports. robotState xsens rightHand myo selectTarget myo setSafetyDistance graphic selectTarget warningSignal setpoint targetDestination path currentPos currentTwist nextPoint processedSafetyDistance cmd vel - The state of the robot coming from the Optitrack or Gazebo The right-hand position coming from the XSens, used for target position. The select-target message from the Myo (fingersspread gesture) The message from the Myo to adjust the safety-distance (rotate arm). Select-target message from clicking on the figure in the GUI. Warning signal for the user send to the haptic feedback. The calculated setpoint xsp . The set target-position xt . The found path from start-position to target-position p(xs , xt ). xc , interpreted by the setpoint selector. Velocity information for the graphical feedback. The selected path-point xp in the setpoint-selecting algorithm. The current value of the safety-distance Setpoints in Euler Angles and Elevation, for the UAV. Table 1: Legend to support figure 11 As can be seen in the figure, the setpoint-selector receives all user input and distributes this to the appropriate other threads. It is acknowledged that the user-input regarding target-positions does not enter directly in the Path Generator, the a star generator thread, as was shown earlier in the control architecture in figure 1. This is because the implementation the setpoint selector thread embeds the input collecting tasks of the Task-Manager. Only a single target is allowed at a time, which makes the Task-manager obsolete. The Myo interpreter thread is the Parameter Handler from figure 1. The Feedback Generator can be found in the arduino feedback and graphic feedback threads. The graph is assumed self-explanatory, in combination with the legend in table 1. 25 4 Conclusions and Recommendations The goal of this master thesis research has been to contribute to the robust-autonomy of the smaller multirotor UAVs of the SHERPA project. This report presented a novel bilateral semiautonomous control approach for UAV navigation, which allows the human-operator to assist the autonomous controller by adapting certain navigation parameters in which the autonomous controller has to operate. The approach has been implemented and flight tests have been performed to validate the control algorithm and implementation. Experiments showed a high performance and reliability of the system in the presence of significant disturbance. In the final experiment, the operator was able to assist the UAV to safely travel through a small opening (≈ 10-20 cm bigger than the UAV) in 21 out of 22 trials. In experiments, the system demonstrated good responsiveness to variations in the safety-distance and it was demonstrated the system successfully counteracts overshoot into the safety-area induced by the safety-distance. An attempt was made to prevent overshoot by implementing a braking algorithm, but due to observation of bad behavior in experiments it has been removed after some flight-tests. In future work, one of the first steps would be to remove the assumption of the a-priori known map, so that the experiments are better resembling reality. To do this, instead of letting the autonomous controller know each obstacle in the complete map, implementations can be made such that the autonomous controller only perceives obstacles that are within sight or in the memory. This way the behavior of the total system can be investigated when the autonomous controller cannot predict which path will eventually lead to the target. Also the interaction between the human operator and the autonomous controller can be further investigated. The subsequent step, removing the a-priori known map completely, would be to implement a SLAM3 -algorithm. This would allow the system to operate outside of the optitrack-area or the simulation environment. In this case, it is best to extend the current implementation of the algorithms, which is completely in 2D, to work in 3D. At this moment, the flying height is set to be constant and the UAV is assumed to have clearance, but in real and unknown environments this is not guaranteed. A different contribution to this work could be made by implementing and investigating the Velocity-Obstacles-algorithm. This algorithm could potentially improve the robustness even more, as it can prevent overshoots into the safety-area. Furthermore, it can make the system responsive to non-static obstacles which, if implemented in combination with the above mentioned recommendations, completes the system to be used in truly unknown, dense environments. 3 Simultaneous Localization and Mapping 26 A Hardware setup The hardware architecture is presented in the paper in section 2. This section elaborates details for communicating with the XSens suit [26], Myo-armband [27] and Haptic Feedback [28]. It also provides specific instructions regarding the use of it. The use of Optitrack [29] is not discussed here as its manual can be found on the RAM-wiki. A.1 Using the XSens suit Below a step-wise guide to using the XSens suit is given. Note that second person is needed to help putting on the suit. Needed for the XSens suit to work with the ROS software are:ue to • A windows laptop running the MVN Studio software. • A Ubuntu laptop running the ROS software. • The usb-key for unlocking MVN Studio. • Two wireless receivers to receive data from the XBus-masters (the devices in which the batteries for the suit go). • An externally powered usb-hub. • A network router with two network cables, one for the windows laptop, one for the Ubuntu computer. (Wired communication is preferred as there is a lot of data transferred) To set up the environment: 1. Turn on the windows laptop and connect the usb-hub to it. Put the USB-key in one of the slots. 2. Place the two wireless receivers at a certain distance from each other, preferable on different heights. Make sure they are well above the waist. Connect them to the computer. 3. Turn on the Ubuntu computer and connect the router to both computers. Check the IP-address given to the Ubuntu computer (type: ifconfig in terminal) and write it down. 4. Put on the XSens Motion capture suit. Instructions on how to put on and wear the suit can be found in the user-manual. Ask someone for help putting it on. ! Do not put the batteries in the wrong way around, as it will cause short-circuit in the XBus masters! 5. Start the MVN-Studio software and initialize a work-session. Calibrate the XSens suit. (Instructions in user-manual) 6. In MVN-Studio: Go to Preferences — Miscellaneous — Network Streaming. Enable Network Streaming and add the IP-Address of the Ubuntu computer to the list. Use port 25114 (as this port number is in the code of the Network-receiver script in ROS). 7. Start ROS on the Ubuntu computer, by opening two terminals and entering: $ roscore $ rosrun xsens network receiver xsens receiver.py 27 8. In another terminal, you can check if it works by entering: $ rostopic echo /Xsens network receiver/RightHand A.2 Using the Myo-armband To use the Myo-armband, a windows computer is necessary as well. The stable stock-software for the Myo-armband is, at this moment, only available for windows. The Myo-armband also has an supporting Software-Development-Kit (SDK), available for download on their website. This SDK can be used to develop code for the Myo in C++. For our application, C++ code has been developed that sends the data from the Myo over the network via a TCP-protocol. The TCP-protocol has been chosen as we want to assure that gestures get transmitted correctly. The standard provided data, i.e. gesture and IMU information, is sent 10 times per second after a connection has been established, as this is redeemed to be enough. The implementation allows this data to be send on each IP-address the windows computer has available. The port can be selected as well. The default used port in our application is port 5000. This C++ code can be found in appendix D. Needed to run the Myo-armband in combination with ROS are: • A Windows laptop running the Myo-Connect software. Also the Myo-streamer.exe executable has to be present on the computer. • A Ubuntu laptop running the ROS software. • Usb-receiver for the Myo-armband. • A shared network between the Ubuntu computer and the Windows computer. To set up the environment: 1. First set up both computers. Make sure they have a shared network (make sure firewalls don’t cause problems). 2. Put on the Myo-armband and wait for 2 minutes. It works best when it is warmed up a bit. 3. Calibrate the Myo-armband using the Myo-Connect software. 4. Start the Myo-streamer software on the windows computer. Do this in the following manner: Open a command window and navigate to the folder where Myo-streamer.exe is located. Type: Myo-streamer.exe [IP-ADDRESS] [PORT] ; to run the program. The IP-address should be the address assigned to the windows computer, not the one that is assigned to the Ubuntu computer. 5. Check, on the Ubuntu computer, in the Myo receiver.py script if the value for SERVER-IP is correct. If not, change this. 6. Run the Myo receiver by opening two terminals and typing: $ roscore $ rosrun myo network receiver myo receiver.py 7. Now you can listen to the messages by typing in a new terminal: $ rostopic echo /Myo network receiver/myo msg 28 File: /home/wopereis/arduino.cpp 1 2 3 4 5 6 7 8 9 10 11 12 13 14 15 16 17 18 19 20 21 22 23 24 25 26 27 28 29 30 31 32 33 34 35 36 37 38 39 40 41 42 43 44 45 46 47 48 49 50 51 52 53 54 55 56 57 58 59 60 61 62 63 64 65 66 67 68 69 70 71 72 Page 1 of 2 /* * rosserial PubSub Example and Vibration motor code * Shows how to receive and send messages between ROS and Arduino. * Also realizes the vibration pattern. */ // Necessary includes. #include <ros.h> #include <std_msgs/String.h> #include <std_msgs/Int8.h> // Make a nodehandle and define the looptime for the vibration-pattern calculation ros::NodeHandle nh; int LOOPTIME = 5; // timestep in milliseconds // Callback for the message received from ROS . // If message is 1, vibrate all motors at full strength in an on-off pattern. // If message is 2, vibrate around the arm in sinusoidal strength. void messageCb( const std_msgs::Int8& toggle_msg){ // If message 2 if (toggle_msg.data==2){ // Keep track of start time and total signal length. unsigned long startTime = millis(); // Set first current time. int currentTime = millis()-startTime; while(currentTime<1000){ // See how long this loop takes unsigned long loopTime = millis(); // Calculate values for the PWM's using the sinus waves. int value1 = 0; if (currentTime<334){ value1 = 255*sin(3.14*3*currentTime); } int value2 = 0; if (currentTime>222 && currentTime<556){ value2 = 255*sin(3.14*3*currentTime-222); } int value3 = 0; if (currentTime>444 && currentTime<667){ value3 = 255*sin(3.14*3*currentTime-444); } int value4 = 0; if (currentTime>666 && currentTime<1000){ value4 = 255*sin(3.14*3*currentTime-666); } // Write these values to PWM. analogWrite(9,value1); analogWrite(10,value2); analogWrite(11,value3); analogWrite(12,value4); // Wait till looptime is over. while(millis()-loopTime<LOOPTIME delayMicroseconds(100); } ){ // Set new current time. currentTime = millis()-startTime; } } // Send a signal that is "Beeping" for one second. else if (toggle_msg.data==1){ for(int i = 0; i<5; i++){ analogWrite(9,255); File: /home/wopereis/arduino.cpp 73 74 75 76 77 78 79 80 81 82 83 84 85 86 87 88 89 90 91 92 93 94 95 96 97 98 99 100 101 102 103 104 105 106 107 108 109 110 111 112 113 114 115 116 117 118 119 120 121 122 123 124 125 126 127 128 129 130 131 132 133 134 135 136 137 138 analogWrite(10,255); analogWrite(11,255); analogWrite(12,255); delay(150); analogWrite(9,0); analogWrite(10,0); analogWrite(11,0); analogWrite(12,0); delay(50); } } } // Define subscriber for the signal message channel. ros::Subscriber<std_msgs::Int8> sub("/AStarGenerator/blocked", messageCb ); // Define a publisher for the value of the rotary button (as an example). std_msgs::String str_msg; ros::Publisher chatter("/Arduino/turnButton", &str_msg); char rotaryValue[5] = "asdf"; // Initialize void setup() { // Setup the outputs and inputs. pinMode(13, OUTPUT); pinMode(9,OUTPUT); pinMode(10,OUTPUT); pinMode(11,OUTPUT); pinMode(12,OUTPUT); pinMode(7,OUTPUT); // Power for rotary button. digitalWrite(7,HIGH); // Initialize ros node/serial communication. nh.initNode(); nh.advertise(chatter); nh.subscribe(sub); } void loop() { // Read the value of the rotary button. int value = analogRead(A0); // Translate into characters. rotaryValue[3] = char(value%10+48); value = value-value%10; value = value/10; rotaryValue[2] = char(value%10+48); value = value-value%10; value = value/10; rotaryValue[1] = char(value%10+48); value = value-value%10; value = value/10; rotaryValue[0] = char(value+48); // Publish this string message. str_msg.data = rotaryValue; chatter.publish( &str_msg ); // Check for retrieved signals. nh.spinOnce(); // Wait for 500 milliseconds. delay(500); } Page 2 of 2 B Installation Manual 32 File: /home/wopereis/catkin_ws/src/…NSTRUCTIONS/How-to-install.txt 1 2 3 4 5 6 7 8 9 10 11 12 13 14 15 16 17 18 19 20 21 22 23 24 25 26 27 28 29 30 31 32 33 34 35 36 37 38 39 40 41 42 43 44 45 46 47 48 49 50 51 52 53 54 55 56 57 58 59 60 61 62 63 64 65 66 67 68 69 70 71 72 =============================== How to install the RAM packages =============================== Hi! This file was written to help you install the RAM packages, ram_ba_package, and ram_a_star_generator. The date of writing is 19-03-2015, with the current version of Ubuntu being 14.04 and the current version of ROS being Ros Indigo. -*-*-*-*-*-*-*-*-*-*-*-*-*-*-*-*-*-*-*-*-*-*-*-*-*-*-*-*-*-*-*-*-*-*-*-*-* ================= What is the ram_ba_package package? ==================== -*-*-*-*-*-*-*-*-*-*-*-*-*-*-*-*-*-*-*-*-*-*-*-*-*-*-*-*-*-*-*-*-*-*-*-*-* The ram_ba_package is a package that can connect to several (real-life) Parrot AR.Drones and apply control them either in group or seperately. Stand-alone it supports Position-Control via the interface and Velocity-Control via a Joystick. If a Gazebo-environment (ros-node) is running, the ram_ba_package detects this and a Quadrotor in the simulation environment can be controlled through the interface as well. Note that the Quadrotor needs to be named: "quadrotor" in the actual Gazebo world, as the ram_ba_package searches for this name to receive state-information of the object. -*-*-*-*-*-*-*-*-*-*-*-*-*-*-*-*-*-*-*-*-*-*-*-*-*-*-*-*-*-*-*-*-*-*-*-*-* =============== What is the ram_a_star_generator package? ================ -*-*-*-*-*-*-*-*-*-*-*-*-*-*-*-*-*-*-*-*-*-*-*-*-*-*-*-*-*-*-*-*-*-*-*-*-* The ram_a_star_package is a package that generates shortest-paths in 2D-space between the current location and the selected target location. It then sends Setpoints on this path towards the ram_ba_package's Position-Controller. These setpoints are the package's output, which can be interpreted by other positioncontrollers as well. The package allows the target location to be changed by mouse-click on a interface, or by the use of an XSens IMU suit in combination with a MYO-emg armband. -*-*-*-*-*-*-*-*-*-*-*-*-*-*-*-*-*-*-*-*-*-*-*-*-*-*-*-*-*-*-*-*-*-*-*-*-* ==================== General installation instructions =================== -*-*-*-*-*-*-*-*-*-*-*-*-*-*-*-*-*-*-*-*-*-*-*-*-*-*-*-*-*-*-*-*-*-*-*-*-* In order to complete the installation please follow the three sections, which will help you installing the total package. 1. The first section guides you through installing ROS itself. 2. The second section guides you through installing the necessities for the ram_ba_package and the ram_ba_package itself. 3. The third section helps you installing the ram_a_star_generator package. !NOTE! The ram_ba_package can run without the ram_a_star package, but the ram_a_star_generator package uses the controller in the ram_ba_package for the simulation or experiment environment. -*-*-*-*-*-*-*-*-*-*-*-*-*-*-*-*-*-*-*-*-*-*-*-*-*-*-*-*-*-*-*-*-*-*-*-*-* ========= 1. Installation of ROS itself and setup of workspace =========== -*-*-*-*-*-*-*-*-*-*-*-*-*-*-*-*-*-*-*-*-*-*-*-*-*-*-*-*-*-*-*-*-*-*-*-*-* This was written for ROS Indigo. It might be backwards compatible with future versions, but this is not tested. The installation will assume installation of ROS Indigo. 1. Start by having Ubuntu 14.04 installed (Trusty). If another version is installed, be sure that it is compatible with ROS Indigo. 2. Follow the steps on: http://wiki.ros.org/indigo/Installation/Ubuntu Be sure to install the Desktop-Full version at step 1.4 unless you have specific reasons not to. 3. Set up workspace by following this part of the ROS-tutorial: http://wiki.ros.org/ROS/Tutorials/InstallingandConfiguringROSEnvironment 4. Make life easy: perform the following lines in Terminal to automatically source your workspace: Page 1 of 4 File: /home/wopereis/catkin_ws/src/…NSTRUCTIONS/How-to-install.txt 73 74 75 76 77 78 79 80 81 82 83 84 85 86 87 88 89 90 91 92 93 94 95 96 97 98 99 100 101 102 103 104 105 106 107 108 109 110 111 112 113 114 115 116 117 118 119 120 121 122 123 124 125 126 127 128 129 130 131 132 133 134 135 136 137 138 139 140 141 142 143 144 --> echo "source /[YOUR CATKIN WORKSPACE/devel/setup.bash" >> ~/.bashrc --> source ~/.bashrc Your ros environment should be set up properly at this moment. This can be tested by following the tutorials of ROS. If these work it is fine. -*-*-*-*-*-*-*-*-*-*-*-*-*-*-*-*-*-*-*-*-*-*-*-*-*-*-*-*-*-*-*-*-*-*-*-*-* ================= 2. Installation of the ram_ba_package ================== -*-*-*-*-*-*-*-*-*-*-*-*-*-*-*-*-*-*-*-*-*-*-*-*-*-*-*-*-*-*-*-*-*-*-*-*-* This package was written by Cees Trouwborst and adapted for simulation by Han Wopereis. To set up the environment properly, a couple of extra packages are delivered with this package. These are: - Ardrone_autonomy , a modified version by kbogert of it for multiple quadrotors - Mocap_optitrack, for the optitrack system. - Yosc_cmd_vel_mux, for switching between multiple cmd_vel topics (might be obsolete for the use with single quadrotors, but I'm not sure) - Tum-simulator, for the simulation in gazebo. 1. Place these packages in ~/[YOUR CATKIN WORKSPACE]/src location. 2. Place the ram_ba_package in ~/[YOUR CATKIN WORKSPACE]/src location. 3. In terminal: --> cd ~/[YOUR CATKIN WORKSPACE]/ --> catkin_make 4. You should have Gazebo 2.2.3 installed by default by the ROS-indigo-desktop-full install. Check this by running: --> roscore --> open new terminal by pressing [ctrl]+[shift]+[t] --> rosrun gazebo_ros gazebo If it runs an empty environment you are fine. Otherwise try this: http://gazebosim.org/tutorials?tut=ros_installing And retry. 4. Check if the packages are properly installed for AR.Drone gazebo. --> roslaunch cvg_sim_gazebo ardrone_testworld.launch It should launch an environment with a ARdrone inside. Search for the Ardrone as it is not directly in view. 5. Check if the ram_ba_package is working by: --> --> --> --> roscore open new terminal by pressing [ctrl]+[shift]+[t] rosrun ram interface.py roslaunch cvg_sim_gazebo ardrone_testworld.launch Press scan, it should find a SimulationDrone if Gazebo is open. Press the line of the Simulation Drone twice to open the controller. Toggle the "Interface" button to select position control. Toggle the "Publish Setpoint" button to enable the controller. It should take off. 6. In real experiments instead of running Gazebo, you need to set up the environment according to the documentation in the RAM_BA_PACKAGE. This cannot be tested without an actual AR.Drone !NOTE! Note that this delivered package is not the same as published on GITHUB by Ceesietopc. !NOTE! Page 2 of 4 File: /home/wopereis/catkin_ws/src/…NSTRUCTIONS/How-to-install.txt 145 146 147 148 149 150 151 152 153 154 155 156 157 158 159 160 161 162 163 164 165 166 167 168 169 170 171 172 173 174 175 176 177 178 179 180 181 182 183 184 185 186 187 188 189 190 191 192 193 194 195 196 197 198 199 200 201 202 203 204 205 206 207 208 209 210 211 212 213 214 215 216 -*-*-*-*-*-*-*-*-*-*-*-*-*-*-*-*-*-*-*-*-*-*-*-*-*-*-*-*-*-*-*-*-*-*-*-*-* ============== 3. Installation of the ram_a_star_generator =============== -*-*-*-*-*-*-*-*-*-*-*-*-*-*-*-*-*-*-*-*-*-*-*-*-*-*-*-*-*-*-*-*-*-*-*-*-* To install the full A-star-generator package you need the following packages: - myo_udp_client package, contains the UDP_client to receive the data from MYO, which streams from a windows pc using a streaming script. (Not Mandatory) - Xsens_node package, which interprets XSens data streams from the MVN studio software of XSens which runs on a windows PC (Not mandatory) (Might not be compatible for all XSens suits) (MTx-version Upperbody Xsens suit is supported) - rosserial package, to communicate with an Arduino over USB (Not mandatory) - ram_a_star_generator package, contains the following scripts: * a_star_generator.py * setpoint_selector.py * graphic_feedback.py * myo_interpreter.py - Generates the shortest path in an environment with obstacles. - Selects the furthest line-of-sight point in the path - The GUI. - Interprets incoming Myo data from the myo_udp_client. !NOTE! The ram_a_star_generator package does not support multiple ARDrones at the moment. It also does not support simulationously running simulation and actual Experiments. Installation instructions: 1. Place all packages in ~/[YOUR CATKIN WORKSPACE]/src 2. Compile: --> cd ~/[YOUR CATKIN WORKSPACE]/ --> catkin_make It should work without errors. 3. Check if it works by launching the package. The launch-file contains some parameters that can come along. Default values for the params are: record = 0 simulation = 0 xsens = 1 myo = 1 arduino = 0 The 'record:=1' feature starts a ROSBAG node, which captures the data send over the publishers and the subscribers. Find the location where it is stored afterwards by searching your computer for .bag files. To launch: Open a terminal --> roslaunch ram_a_star_generator ram_a_star_generator.launch record:=0 simulation:=1 xsens:=0 myo:=0 arduino:=0 This should open three separate terminals for: - Graphic-feedback - Setpoint-selector - A-star-generator It should It should It should might not open the ram_ba_package interface.py. open gazebo with a custom RAM environment open a Matplotlib figure, showing the GUI. The environment of the GUI match the environment in Gazebo (this is not interconnected). The figure should show: * A blueish map, with black obstacle lines. The darker the blue, the higher the travel-weight is for the A-star-algorithm. * A magenta X for the current goal location. Page 3 of 4 File: /home/wopereis/catkin_ws/src/…NSTRUCTIONS/How-to-install.txt 217 218 219 220 221 222 223 224 225 226 227 228 229 230 231 232 233 234 235 * A red circle for the current obstacle-avoidance safety-distance around the current position. * A yellow line indicating the velocity and heading. If you click it somewhere, it should reveal a shortest path to the clicked location with a green line. (Travels only diagonal and straight) * A red X for the next setpoint picked. * A orange X for a distance limited setpoint If you press scan in the ram interface.py and connect to the Simulation drone, a controller menu should pop up. Toggle the 'A-star' button and the 'Publish setpoint' button. It should start tracking this line. At this point, everything should work. Page 4 of 4 C User Manual 37 File: /home/wopereis/catkin_ws/src/…_star_generator/How-to-use.txt 1 2 3 4 5 6 7 8 9 10 11 12 13 14 15 16 17 18 19 20 21 22 23 24 25 26 27 28 29 30 31 32 33 34 35 36 37 38 39 40 41 42 43 44 45 46 47 48 49 50 51 52 53 54 55 56 57 58 59 60 61 62 63 64 Page 1 of 2 =============================== How to use the RAM packages =============================== Hi! This file was written on 20-03-2015 to help you use the ram_a_star_generator package. This package extensively uses the ram_ba_package, for which specific documentation is available. This documentation is not repeated here. -*-*-*-*-*-*-*-*-*-*-*-*-*-*-*-*-*-*-*-*-*-*-*-*-*-*-*-*-*-*-*-*-*-*-*-*-* ============ How do I use the ram_a_star_generator package? ============== -*-*-*-*-*-*-*-*-*-*-*-*-*-*-*-*-*-*-*-*-*-*-*-*-*-*-*-*-*-*-*-*-*-*-*-*-* To use the ram_a_star_generator package, one single launch-file has been added. This launch-file can be launched by typing in a terminal: --> roslaunch ram_a_star_generator ram_a_star_launcher.launch which launches the minimum required nodes to do experiments. The launch-file includes some arguments that can be send along while starting. These arguments determine whether it is a simulation or experiment, whether to record data etc. To illustrate this: --> roslaunch ram_a_star_generator ram_a_star_launcher.launch simulation:=1 record:=0 launches everything which is necessary for the simulation environment to run. The possible arguments that can be sent along while launching, with their explanations and defaults, are: =============================================================================== <arg name="record" default="0"/> - Enables rosbag-recording of data. (Be sure to check wheter it actually starts). Is not completely flawless but works most of the time. <arg name="simulation" default="0"/> - Enables simulation mode, and therefore starts Gazebo nodes and doesn't start AR.Drone nodes. Starts special simulation environment. <arg name="environment1" default="0"/> - Sets a set of parameters of the ram_a_star_generator according to predefined environment 1. (Overwrites regular/simulation environment) <arg name="environment2" default="0"/> - Sets a set of parameters of the ram_a_star_generator according to predefined environment 2. (Overwrites regular/simulation/environment1) <arg name="environment3" default="0"/> - Sets a set of parameters of the ram_a_star_generator according to predefined environment 3. (Overwrites regular/simulation/environment1/2) <arg name="xsens" default="1"/> XSENS data. - Starts the nodes for interpreting and receiving the <arg name="myo" default="1"/> data. - Starts the nodes for interpreting and receiving the MYO <arg name="arduino" default="0"/> the haptic-feedback. - Starts the node for communication with the Arduino for =============================================================================== If there is anything unclear about the explanation, a closer look can be taken in the ram_a_star_launcher.launch file, to see how this works. !NOTE! The ram_ba_package is used to run with this package, however it is not the original ram_ba_package, but an adapted one. Therefore, be sure to get this adapted one. -*-*-*-*-*-*-*-*-*-*-*-*-*-*-*-*-*-*-*-*-*-*-*-*-*-*-*-*-*-*-*-*-*-*-*-*-* File: /home/wopereis/catkin_ws/src/…_star_generator/How-to-use.txt 65 66 67 68 69 70 71 72 73 74 75 76 ================== How do I add a custom environment? ==================== -*-*-*-*-*-*-*-*-*-*-*-*-*-*-*-*-*-*-*-*-*-*-*-*-*-*-*-*-*-*-*-*-*-*-*-*-* For an example on how to add custom environments in the package, please look in the launch-file. In here you will find examples on how to change and add environments. -*-*-*-*-*-*-*-*-*-*-*-*-*-*-*-*-*-*-*-*-*-*-*-*-*-*-*-*-*-*-*-*-*-*-*-*-* ======================== Don't forget to have fun! ======================= -*-*-*-*-*-*-*-*-*-*-*-*-*-*-*-*-*-*-*-*-*-*-*-*-*-*-*-*-*-*-*-*-*-*-*-*-* Page 2 of 2 D Myo streamer C++ code 40 File: /home/wopereis/Dropbox/Master…0.8.1/samples/myo_streamer.cpp 1 2 3 4 5 6 7 8 9 10 11 12 13 14 15 16 17 18 19 20 21 22 23 24 25 26 27 28 29 30 31 32 33 34 35 36 37 38 39 40 41 42 43 44 45 46 47 48 49 50 51 52 53 54 55 56 57 58 59 60 61 62 63 64 65 66 67 68 69 70 71 72 Page 1 of 7 // Copyright (C) 2013-2014 Thalmic Labs Inc. // Distributed under the Myo SDK license agreement. See LICENSE.txt for details. #define _USE_MATH_DEFINES #include <cmath> #include <iostream> #include <iomanip> #include <stdexcept> #include <string> #include <algorithm> #include <sstream> // The only file that needs to be included to use the Myo C++ SDK is myo.hpp. #include <myo/myo.hpp> #pragma warning(disable : 4996) #pragma comment(lib, "Ws2_32.lib") #include #include #include #include #include <stdio.h> <stdlib.h> <string.h> <winsock.h> <time.h> #define STREAMING_TEST 1 #define BUFFER_SIZE 4096 using namespace std; void usage(void); // // // // Classes that inherit from myo::DeviceListener can be used to receive events from Myo devices. DeviceListener provides several virtual functions for handling different kinds of events. If you do not override an event, the default behavior is to do nothing. class DataCollector : public myo::DeviceListener { public: DataCollector() : onArm(false), isUnlocked(false), roll_w(0), pitch_w(0), yaw_w(0), currentPose() { } // onUnpair() is called whenever the Myo is disconnected from Myo Connect. void onUnpair(myo::Myo* myo, uint64_t timestamp) { // We've lost a Myo. // Let's clean up some leftover state. roll_w = 0; pitch_w = 0; yaw_w = 0; onArm = false; isUnlocked = false; } // onOrientationData() is called whenever the Myo device provides its // current orientation, which is represented as a unit quaternion. void onOrientationData(myo::Myo* myo, uint64_t timestamp, const myo::Quaternion<float>& quat) { using std::atan2; using std::asin; using std::sqrt; using std::max; using std::min; // Calculate Euler angles (roll, pitch, yaw) from the unit quaternion. float roll = atan2(2.0f * (quat.w() * quat.x() + quat.y() * quat.z()), 1.0f - 2.0f * (quat.x() * quat.x() + quat.y() * quat.y())); float pitch = asin(max(-1.0f, min(1.0f, 2.0f * (quat.w() * quat.y() - quat.z() * quat.x File: /home/wopereis/Dropbox/Master…0.8.1/samples/myo_streamer.cpp Page 2 of 7 ())))); 73 74 75 76 77 78 79 80 81 82 83 84 85 86 87 88 89 90 91 92 93 94 95 96 97 98 99 100 101 102 103 104 105 106 107 108 109 110 111 112 113 114 115 116 117 118 119 120 121 122 123 124 125 126 127 128 129 130 131 132 133 134 135 136 137 138 139 140 141 142 143 float yaw = atan2(2.0f * (quat.w() * quat.z() + quat.x() * quat.y()), 1.0f - 2.0f * (quat.y() * quat.y() + quat.z() * quat.z())); // Convert the floating point angles in radians to a scale from 0 to 18. roll_w = static_cast<int>((roll + (float)M_PI) / (M_PI * 2.0f) * 18); pitch_w = static_cast<int>((pitch + (float)M_PI / 2.0f) / M_PI * 18); yaw_w = static_cast<int>((yaw + (float)M_PI) / (M_PI * 2.0f) * 18); } // onPose() is called whenever the Myo detects that the person wearing it // has changed their pose, for example, making a fist, or not anymore. void onPose(myo::Myo* myo, uint64_t timestamp, myo::Pose pose) { currentPose = pose; if (pose != myo::Pose::unknown && pose != myo::Pose::rest) { // Tell the Myo to stay unlocked until told otherwise. We do that // here so you can hold the poses without the Myo becoming locked. myo->unlock(myo::Myo::unlockHold); // Notify the Myo that the pose has resulted in an action, in this // case changing the text on the screen. The Myo will vibrate. myo->notifyUserAction(); } else { // Tell the Myo to stay unlocked only for a short period. This // allows the Myo to stay unlocked while poses are being performed, // but lock after inactivity. myo->unlock(myo::Myo::unlockTimed); } } // onArmSync() is called whenever Myo has recognized a Sync Gesture after // someone has put it on their arm. This lets Myo know which arm it's on // and which way it's facing. void onArmSync(myo::Myo* myo, uint64_t timestamp, myo::Arm arm, myo::XDirection xDirection) { onArm = true; whichArm = arm; } // onArmUnsync() is called whenever Myo has detected that it was moved from // a stable position on a person's arm afterit recognized the arm. Typically // this happens when someone takes Myo off of their arm, but it can also // happen when Myo is moved around on the arm. void onArmUnsync(myo::Myo* myo, uint64_t timestamp) { onArm = false; } // onUnlock() is called whenever Myo has become unlocked, and will start // delivering pose events. void onUnlock(myo::Myo* myo, uint64_t timestamp) { isUnlocked = true; } // onLock() is called whenever Myo has become locked. No pose events will be // sent until the Myo is unlocked again. void onLock(myo::Myo* myo, uint64_t timestamp) { isUnlocked = false; } // There are other virtual functions in DeviceListener that we could over// ride here, like onAccelerometerData(). For this example, the functions // overridden above are sufficient. // We define this function to print the current values that were updated by // the on...() functions above. void print() File: /home/wopereis/Dropbox/Master…0.8.1/samples/myo_streamer.cpp 144 145 146 147 148 149 150 151 152 153 154 155 156 157 158 159 160 161 162 163 164 165 166 167 168 169 170 171 172 173 174 175 176 177 178 179 180 181 182 183 184 185 186 187 188 189 190 191 192 193 194 195 196 197 198 199 200 201 202 203 204 205 206 207 208 209 210 211 212 213 Page 3 of 7 { // Clear the current line std::cout << '\r'; // Print out the orientation. Orientation data is always available, even if no arm is currently recognized. std::cout << '[' << std::string(roll_w, '*') << std::string(18 - roll_w, ' ') << ']' << '[' << std::string(pitch_w, '*') << std::string(18 - pitch_w, ' ') << ']' << '[' << std::string(yaw_w, '*') << std::string(18 - yaw_w, ' ') << ']'; if (onArm) { // Print out the lock state, the currently recognized pose, and // which arm Myo is being worn on. // Pose::toString() provides the human-readable name of a pose. We // can also output a Pose directly to an output stream // (e.g. std::cout << currentPose;). In this case we want to get the // pose name's length so that we can fill the rest of the field with // spaces below, so we obtain it as a string using toString(). std::string poseString = currentPose.toString(); std::cout << '[' << (isUnlocked ? "unlocked" : "locked ") << ']' << '[' << (whichArm == myo::armLeft ? "L" : "R") << ']' << '[' << poseString << std::string(14 - poseString.size(), ' ') << ']'; } else { // Print out a placeholder for the arm and pose when Myo doesn't // currently know which arm it's on. std::cout << '[' << std::string(8, ' ') << ']' << "[?]" << '[' << std::string(14, ' ') << ']'; } std::cout << std::flush; } // These values are set by onArmSync() and onArmUnsync() above. bool onArm; myo::Arm whichArm; // This is set by onUnlocked() and onLocked() above. bool isUnlocked; // These values are set by onOrientationData() and onPose() above. int roll_w, pitch_w, yaw_w; myo::Pose currentPose; }; int main(int argc, char **argv) { WSADATA w; unsigned short port_number; int a1, a2, a3, a4; int client_length; int bytes_received; SOCKET sd; struct sockaddr_in server; struct sockaddr_in client; char buffer[BUFFER_SIZE]; struct hostent *hp; char host_name[256]; char myo_message[100]; string separator = " ; "; /* /* /* /* /* /* /* /* /* /* /* /* /* Used to open windows connection */ Port number to use */ Components of ip-address */ Length of client struct */ Bytes received from client */ Socket descriptor of server */ Information about the server */ Information about the client */ Where to store received data */ Information about this computer */ Name of the server */ Current message */ Separator in message over UDP*/ cout << endl; cout << "=========== Myo initalization ===========" << endl << endl; // First, we create a Hub with our application identifier. Be sure not to // use the com.example namespace when publishing your application. The Hub // provides access to one or more Myos. File: /home/wopereis/Dropbox/Master…0.8.1/samples/myo_streamer.cpp 214 215 216 217 218 219 220 221 222 223 224 225 226 227 228 229 230 231 232 233 234 235 236 237 238 239 240 241 242 243 244 245 246 247 248 249 250 251 252 253 254 255 256 257 258 259 260 261 262 263 264 265 266 267 268 269 270 271 272 273 274 275 276 277 278 279 280 281 282 283 284 285 myo::Hub hub("com.example.myo_streamer"); cout << "Attempting to find a Myo..." << endl; myo::Myo* myo = hub.waitForMyo(10000); // If waitForMyo() returned a null pointer, we failed to find a Myo, // so exit with an error message. if (!myo && !STREAMING_TEST) throw std::runtime_error("Unable to find a Myo!"); // We've found a Myo. std::cout << "Connected to a Myo armband!" << std::endl << std::endl; // Next we construct an instance of our DeviceListener, so that we can // register it with the Hub. DataCollector collector; // Hub::addListener() takes the address of any object whose class // inherits from DeviceListener, and will cause Hub::run() to send // events to all registered device listeners. hub.addListener(&collector); cout << endl; // Network connection ============================= cout << endl; cout << "=========== Network initalization ==========" << endl << endl; /* Interpret command line */ if (argc == 2) { /* Use local address */ if (sscanf(argv[1], "%u", &port_number) != 1) { usage(); } } else if (argc == 3) { /* Copy address */ if (sscanf(argv[1], "%d.%d.%d.%d", &a1, &a2, &a3, &a4) != 4) { usage(); } if (sscanf(argv[2], "%u", &port_number) != 1) { usage(); } } else { usage(); } /* Open windows connection */ if (WSAStartup(0x0101, &w) != 0) { fprintf(stderr, "Could not open Windows connection.\n"); exit(0); } /* Open a datagram socket */ sd = socket(AF_INET, SOCK_DGRAM, 0); if (sd == INVALID_SOCKET) { fprintf(stderr, "Could not create socket.\n"); WSACleanup(); exit(0); } /* Clear out server struct */ Page 4 of 7 File: /home/wopereis/Dropbox/Master…0.8.1/samples/myo_streamer.cpp 286 287 288 289 290 291 292 293 294 295 296 297 298 299 300 301 302 303 304 305 306 307 308 309 310 311 312 313 314 315 316 317 318 319 320 321 322 323 324 325 326 327 328 329 330 331 332 333 334 335 336 337 338 339 340 341 342 343 344 345 346 347 348 349 350 351 352 353 354 355 356 357 memset((void *)&server, '\0', sizeof(struct sockaddr_in)); /* Set family and port */ server.sin_family = AF_INET; server.sin_port = htons(port_number); /* Set address automatically if desired */ if (argc == 2) { /* Get host name of this computer */ gethostname(host_name, sizeof(host_name)); hp = gethostbyname(host_name); /* Check for NULL pointer */ if (hp == NULL) { fprintf(stderr, "Could not get host name.\n"); closesocket(sd); WSACleanup(); exit(0); } /* Assign the address */ server.sin_addr.S_un.S_un_b.s_b1 server.sin_addr.S_un.S_un_b.s_b2 server.sin_addr.S_un.S_un_b.s_b3 server.sin_addr.S_un.S_un_b.s_b4 } /* Otherwise assign it manually */ else { server.sin_addr.S_un.S_un_b.s_b1 server.sin_addr.S_un.S_un_b.s_b2 server.sin_addr.S_un.S_un_b.s_b3 server.sin_addr.S_un.S_un_b.s_b4 } = = = = hp->h_addr_list[0][0]; hp->h_addr_list[0][1]; hp->h_addr_list[0][2]; hp->h_addr_list[0][3]; = = = = (unsigned (unsigned (unsigned (unsigned char)a1; char)a2; char)a3; char)a4; /* Bind address to socket */ if (bind(sd, (struct sockaddr *)&server, sizeof(struct sockaddr_in)) == -1) { fprintf(stderr, "Could not bind name to socket.\n"); closesocket(sd); WSACleanup(); exit(0); } /* Print out server information */ printf("Server running on %u.%u.%u.%u\n", (unsigned char)server.sin_addr.S_un.S_un_b.s_b1, (unsigned char)server.sin_addr.S_un.S_un_b.s_b2, (unsigned char)server.sin_addr.S_un.S_un_b.s_b3, (unsigned char)server.sin_addr.S_un.S_un_b.s_b4); printf("Press CTRL + C to quit\n"); cout << "Start of main loop:" << endl; cout << "== == == == == == == == == == == == == == == == ==" << endl; cout << endl; while (1) { // #### Myo #### // In each iteration of our main loop, we run the Myo event loop for // a set number of milliseconds. In this case, we wish to update our // display 20 times a second, so we run for 1000/20 milliseconds. // After processing events, we call the print() member function we // defined above to print out the values we've obtained from any // events that have occurred. //collector.print(); Page 5 of 7 File: /home/wopereis/Dropbox/Master…0.8.1/samples/myo_streamer.cpp 358 359 360 361 362 363 364 365 366 367 // #### Streamer #### /* Loop and get data from clients */ client_length = (int)sizeof(struct sockaddr_in); /* Receive bytes from client */ bytes_received = recvfrom(sd, buffer, BUFFER_SIZE, 0, (struct sockaddr *)&client, &client_length); 368 369 370 371 372 373 374 375 376 377 378 379 380 381 382 383 384 385 if (bytes_received < 0) { fprintf(stderr, "Could not receive datagram.\n"); closesocket(sd); WSACleanup(); exit(0); } //cout << "Incoming data = " << buffer << "|| " << endl; // Overwriting the 9th character with a null sign, to overcome // mismatches in python -- c++ strings. It kept sending an extra 0 // at the end, of which errors are prevented by this. buffer[8] = NULL; //cout << "Stripped towards = " << buffer << "||" << endl; //cout << "Data request received. Starting request string compare." << endl; //cout << (strcmp(buffer, "GET DATA")) << " voor " << buffer << " vs " << "GET DATA\r \n" << endl; 386 387 388 389 390 391 392 393 394 395 396 397 398 399 400 401 402 403 404 405 406 407 408 409 410 411 412 413 414 415 416 417 418 419 420 421 422 423 424 425 426 427 Page 6 of 7 /* Check for data request with common message between sender and receiver*/ if (strcmp(buffer, "GET DATA") ==0) { cout << "Composing message: " << endl << endl; string myo_message2; /* Comment out for streaming test!!!*/ // Run 20 times per second, should be enough. hub.run(1000/20); /* Get current pose */ string string string string string string poseString = "Not on arm"; armString = "None"; unlockedString = "Nothing"; rollString = "0"; pitchString = "0"; yawString = "0"; if (collector.onArm) { // Print out the lock state, the currently recognized pose, // and which arm Myo is being worn on. // Pose::toString() provides the human-readable name of a // pose. We can also output a Pose directly to an output // stream (e.g. std::cout << currentPose;). In this case we // want to get the pose name's length so that we can fill // the rest of the field with spaces below, so we obtain it // as a string using toString(). poseString = collector.currentPose.toString(); if (collector.whichArm == myo::armLeft){ armString = "Left Arm"; } else { armString = "Right Arm"; } if (collector.isUnlocked){ unlockedString = "Unlocked"; } File: /home/wopereis/Dropbox/Master…0.8.1/samples/myo_streamer.cpp 428 429 430 431 432 433 434 435 436 437 438 439 440 441 442 443 444 445 446 447 448 449 450 451 452 453 454 455 456 457 458 459 460 461 462 463 464 465 466 467 468 469 470 471 472 473 474 475 476 477 478 479 Page 7 of 7 else { unlockedString = "Locked"; } rollString = to_string(collector.roll_w); pitchString = to_string(collector.pitch_w); yawString = to_string(collector.yaw_w); } myo_message2 = poseString + separator + armString + separator + unlockedString + separator + rollString + separator + pitchString + separator + yawString; strcpy(myo_message, myo_message2.c_str()); //int messageOccupationCount = 0; //myo_message = myo_message2.ToCharArray(1, 1); cout << myo_message << endl; //cout << "Na combinen: " << endl << endl; //cout //cout //cout //cout << << << << myo_message << endl; (char *)&myo_message << endl; (int)sizeof(myo_message) << endl; endl; /* Send data back */ if (sendto(sd, (char *)&myo_message, 100, 0, (struct sockaddr *)&client, client_length) != 100) { fprintf(stderr, "Error sending datagram.\n"); closesocket(sd); WSACleanup(); exit(0); } } } closesocket(sd); WSACleanup(); return 0; } void usage(void) { fprintf(stderr, "timeserv [server_address] port\n"); exit(0); } References [1] L. Marconi, C. Melchiorri, M. Beetz, D. Pangercic, R. Siegwart, S. Leutenegger, R. Carloni, S. Stramigioli, H. Bruyninckx, P. Doherty, A. Kleiner, V. Lippiello, A. Finzi, B. Siciliano, A. Sala, and N. Tomatis, “The SHERPA project: Smart collaboration between humans and ground-aerial robots for improving rescuing activities in alpine environments,” in Proceedings of the IEEE International Symposium on Safety, Security, and Rescue Robotics, 2012. [2] A. Franchi, C. Secchi, M. Ryll, H. H. Bulthoff, and P. Robuffo Giordano, “Shared control: Balancing autonomy and human assistance with a group of quadrotor UAVs,” IEEE Robotics & Automation Magazine, vol. 19, no. 3, pp. 57–68, 2012. [3] M. A. Hsieh, A. Cowley, J. F. Keller, L. Chaimowicz, B. Grocholsky, V. Kumar, C. J. Taylor, Y. Endo, R. C. Arkin, B. Jung, et al., “Adaptive teams of autonomous aerial and ground robots for situational awareness,” Journal of Field Robotics, vol. 24, no. 11-12, pp. 991–1014, 2007. [4] C. Masone, P. Robuffo Giordano, H. H. Bulthoff, and A. Franchi, “Semi-autonomous trajectory generation for mobile robots with integral haptic shared control,” in Proceedings of the IEEE International Conference on Robotics and Automation, 2014. [5] M. Desai and H. A. Yanco, “Blending human and robot inputs for sliding scale autonomy,” in Proceedings of IEEE International Workshop on Robot and Human Interactive Communication, 2005. [6] C. Urdiales, A. Poncela, I. Sanchez-Tato, F. Galluppi, M. Olivetti, and F. Sandoval, “Efficiency based reactive shared control for collaborative human/robot navigation,” in Proceedings of the IEEE/RSJ International Conference on Intelligent Robots and Systems, 2007. [7] J. D. Brookshire, “Enhancing multi-robot coordinated teams with sliding autonomy,” Ph.D. dissertation, Carnegie Mellon University, 2004. [8] J. Allen, C. I. Guinn, and E. Horvtz, “Mixed-initiative interaction,” IEEE Intelligent Systems and their Applications, vol. 14, no. 5, pp. 14–23, 1999. [9] R. Wegner and J. Anderson, “An agent-based approach to balancing teleoperation and autonomy for robotic search and rescue,” in AI04 workshop on Agents Meet Robots, 2004. [10] R. R. Murphy, J. Casper, M. Micire, and J. Hyams, “Mixed-initiative control of multiple heterogeneous robots for urban search and rescue,” 2000. [11] A. Finzi and A. Orlandini, “Human-robot interaction through mixed-initiative planning for rescue and search rovers,” in Proceedings of the Conference on Advances in Artificial Intelligence. Springer-Verlag, 2005. [12] T. B. Sheridan, Telerobotics, automation, and human supervisory control. 1992. MIT press, [13] J. Y. C. Chen, M. J. Barnes, and M. Harper-Sciarini, “Supervisory control of multiple robots: Human-performance issues and user-interface design,” IEEE Transactions on Systems, Man, and Cybernetics - Part C: Applications and Reviews, vol. 41, no. 4, pp. 435–454, 2011. 48 [14] J. Y. Chen and C. Joyner, “Concurrent performance of gunner’s and robotic operator’s tasks in a simulated mounted combat system environment,” DTIC Document, Tech. Rep., 2006. [15] M. L. Cummings and S. Guerlain, “Developing operator capacity estimates for supervisory control of autonomous vehicles,” Human Factors: The Journal of the Human Factors and Ergonomics Society, vol. 49, no. 1, pp. 1–15, 2007. [16] C. Miller, “Modeling human workload limitations on multiple uav control,” in Proceedings of the Human Factors and Ergonomics Society 47th Annual Meeting, 2004, pp. 526–527. [17] H. A. Ruff, S. Narayanan, and M. H. Draper, “Human interaction with levels of automation and decision-aid fidelity in the supervisory control of multiple simulated unmanned air vehicles,” Presence: Teleoperators and virtual environments, vol. 11, no. 4, pp. 335–351, 2002. [18] P. Hart, N. Nilsson, and B. Raphael, “A formal basis for the heuristic determination of minimum cost paths,” IEEE Transactions on Systems Science and Cybernetics, vol. 4, no. 2, pp. 100–107, 1968. [19] D. D. Harabor and A. Grastien, “Online graph pruning for pathfinding on grid maps.” in AAAI, 2011. [20] R. E. Korf, “Depth-first iterative-deepening: An optimal admissible tree search,” Artificial intelligence, vol. 27, no. 1, pp. 97–109, 1985. [21] S. Lenser and C. Jones, “Practical problems in sliding scale autonomy: A case study,” in Proceedings of the SPIE 6962, Unmanned Systems Technology X, 2008. [22] P. Fiorini and Z. Shiller, “Motion planning in dynamic environments using velocity obstacles,” International Journal of Robotics Research, vol. 17, no. 7, pp. 760–772, 1998. [23] J. Van den Berg, M. Lin, and D. Manocha, “Reciprocal velocity obstacles for real-time multi-agent navigation,” in Robotics and Automation, 2008. ICRA 2008. IEEE International Conference on. IEEE, 2008, pp. 1928–1935. [24] ROS: an open-source Robot Operating System, http://www.ros.org. [25] N. Koenig and A. Howard, “Design and use paradigms for gazebo, an open-source multirobot simulator,” in Proceedings of the IEEE/RSJ International Conference on Intelligent Robots and Systems, 2004. [26] “Xsens motion technologies bv,” https://www.xsense.com. [27] “Myo, Thalamic Labs Inc.” https://www.thalmic.com. [28] “Arduino,” http://www.arduino.cc. [29] “Optitrack, Natural Point,” http://www.optitrack.com. 49


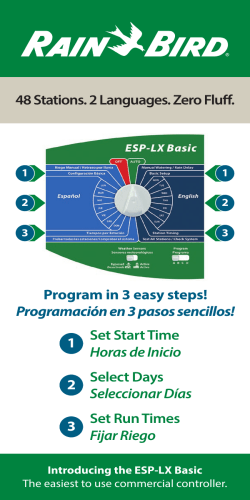


© Copyright 2026