
iPad 2 1 Superguide
Superguides 1 iPad 2 Superguide Everything You Need to Know about the iPad 2 Foreword I used a laptop as my primary Mac for more than a decade, hauling it on my back between work and home every day. But within two months of getting an iPad, I stopped doing that. I bought a new iMac for work and stuck the MacBook in a drawer at home—all because the iPad had replaced my laptop for a huge number of my daily tasks. I didn’t expect the iPad to be so immediately disruptive. But it was. And the success the iPad has had in the market suggests that lots of other people have had that experience too. For ages now, when I’ve been at home, I’ve kept my laptop tucked under the couch. With the arrival of the iPad in our home, however, there’s no need to use either computer. Whether we’re checking in on a game of Words With Friends, browsing Twitter, or quickly answering e-mail, the iPad works better for general-purpose Internet work than either our laptops or the iPhone. The iPad is not perfect, and it’s not a complete replacement for your computer—at least not yet. But it fits into your life in ways you might never before have considered possible. In this book, we’ve collected all our intelligence about the iPad. I hope that when you’re finished reading, you’ll have found plenty of new ways to make it an even bigger part of your life. —Jason Snell Editorial Director, Macworld San Francisco, May 2011 1 Photograph by Peter Belanger This is not to say that the iPad is perfect for every job. I don’t, for instance, use it to reply to e-mails at great length; if a message requires a long answer, I wait until I’m at a Mac. The same goes for any task requiring me to dig around for an old file. And yet, even with its limitations, the iPad can still do wonders. On an overnight business jaunt, I brought my iPad and Apple’s Wireless Keyboard and was able to do some real writing. For a trip on which I would once have lugged a laptop, all I needed was the iPad. Contents Get Started iPad at a Glance . . . . . . . . . . . . . . . . . . . . . . . . . . . 10 Familiarize yourself with every button, switch, port, and plug. Activate the iPad . . . . . . . . . . . . . . . . . . . . . . . . . . 15 Register your iPad and get it set up and synced with your computer. Master Gestures and Navigation. . . . . . . . . . . . . . . 18 Learn simple gestures, manage your apps, create folders, and multitask. Customize Settings . . . . . . . . . . . . . . . . . . . . . . . . 26 Set your wallpaper, alert sounds, third-party app preferences, and more. Find More Apps. . . . . . . . . . . . . . . . . . . . . . . . . . . 35 Browse offerings, sign up for an account, and buy and update apps. Connect and Communicate Get Connected. . . . . . . . . . . . . . . . . . . . . . . . . . . . 41 Learn about Wi-Fi and 3G, set up a data plan, and manage your usage. Browse the Web. . . . . . . . . . . . . . . . . . . . . . . . . . 48 Get familiar with mobile Safari: Navigate the Web and add bookmarks. Check and Send E-Mail. . . . . . . . . . . . . . . . . . . . . . 56 Set up your e-mail accounts, organize messages, and share files. Video Chat with Friends . . . . . . . . . . . . . . . . . . . . .65 Chat with your fellow iPad, iPhone, and iPod touch users over video. Navigate with Maps. . . . . . . . . . . . . . . . . . . . . . . . 69 Search, view traffic, get directions, and add bookmarks. 2 Contents Productivity Get Organized . . . . . . . . . . . . . . . . . . . . . . . . . . . .76 Use Calendar, Notes, and Contacts to file and arrange your digital life. iWork on the iPad. . . . . . . . . . . . . . . . . . . . . . . . . .85 Create stunning work in Pages, Numbers, and Keynote. Microsoft Office and Google Docs. . . . . . . . . . . . . . 96 Work with Office files and edit in the cloud with Google Docs. Sync Files. . . . . . . . . . . . . . . . . . . . . . . . . . . . . . . 99 Learn how to add files to your third-party apps and use services like Dropbox and MobileMe to harmonize documents. Print from the iPad. . . . . . . . . . . . . . . . . . . . . . . . 106 Print wirelessly using AirPrint or one of several third-party apps. Multimedia Sync and Load . . . . . . . . . . . . . . . . . . . . . . . . . . . .111 Master syncing and make your content iPad friendly. Music. . . . . . . . . . . . . . . . . . . . . . . . . . . . . . . . . . 121 Play and stream music using apps, or create tunes in GarageBand. Videos. . . . . . . . . . . . . . . . . . . . . . . . . . . . . . . . . 127 Watch movies and TV, stream online video using third-party apps, and make your own videos with iMovie. Photos. . . . . . . . . . . . . . . . . . . . . . . . . . . . . . . . 132 Browse pictures, display slideshows, and e-mail and share photos. Books and Reference. . . . . . . . . . . . . . . . . . . . . . 139 Read a book on your iPad. Download iBooks and browse the iBookstore, or take advantage of the many third-party e-book apps in the App Store. Games . . . . . . . . . . . . . . . . . . . . . . . . . . . . . . . . 142 Play games, connect with other players, and battle for high scores. Share and Stream. . . . . . . . . . . . . . . . . . . . . . . . . 145 Project your music, video, photos, and games on your television and beyond. 3 Contents Troubleshooting Tips Quick-Fix Tools . . . . . . . . . . . . . . . . . . . . . . . . . . 148 Learn essential tricks for fixing a misbehaving iPad. Common iPad Questions. . . . . . . . . . . . . . . . . . . . 153 Browse this list of the most common iPad problems and questions, and find some handy solutions. Seek Outside Help. . . . . . . . . . . . . . . . . . . . . . . . 159 When your own expertise isn’t enough, find the folks who can help. Security Tips. . . . . . . . . . . . . . . . . . . . . . . . . . . . 161 Secure your device: Utilize passcodes, VPNs, and services like MobileMe to protect your iPad against potential problems. Accessories Cases. . . . . . . . . . . . . . . . . . . . . . . . . . . . . . . . . 164 Protect your device from drops, scrapes, and other mishaps. Headphones. . . . . . . . . . . . . . . . . . . . . . . . . . . . . 168 Get better sound quality, Bluetooth support, and other useful features, such as noise-canceling technology, when you invest in a good pair of third-party headphones. Speakers. . . . . . . . . . . . . . . . . . . . . . . . . . . . . . . 172 Find the right iPad speakers for any setup with our recommendations for every size and budget. Other Accessories. . . . . . . . . . . . . . . . . . . . . . . . 176 Check out an assortment of other important iPad accessories: stands, Bluetooth keyboards, styluses, chargers, and more. 4 Browse by App Included Apple Apps App Store 34 Notes 80 Calendar 76 Photos 133 Camera 132 Photo Booth 137 Contacts 83 Safari 48 FaceTime 65 Settings 25 iPod 121 Videos 127 iTunes 115 YouTube 129 Mail 56 Game Center 142 Maps 69 Other Apple Apps 5 Keynote 92 iMovie 130 GarageBand 124 Numbers 88 iBooks 139 Pages 86 Contributors Senior Associate Editor Dan Moren hasn’t let the iPad out of his hands since its release. This makes sleeping awkward. Senior Editor Jonathan Seff oversees Macworld’s coverage of iTunes, iPods, Apple TV, video and audio playback, and more. Staff Writer Lex Friedman is the writer of The Snuggie Sutra (2010, St. Martin’s Griffin), of which his three young children must never know. Senior Editor Chris Breen offers troubleshooting advice in Macworld.com’s Mac 911 blog and is the author of The iPhone Pocket Guide, sixth edition (Peachpit Press, 2011). Senior Editor Dan Frakes covers iPod, iPhone, iPad, and audio gear for Macworld and runs Macworld.com’s Mac Gems blog. Senior Contributor Glenn Fleishman is the author of Take Control of iPhone and iPod touch Networking and Security, iOS 4 edition (TidBits Publishing, 2011). Rob Griffiths is a former Macworld senior editor and Mac OS X Hints founder, and helps run Many Tricks (manytricks.com). Senior Contributor Joe Kissell is the author of Take Control of Working with Your iPad (TidBits Publishing, 2010). Senior Contributor Ted Landau writes the Bugs & Fixes column for Macworld. Senior Contributor Kirk McElhearn is the author of Take Control of iTunes 10: The FAQ (TidBits Publishing, 2010). David Chartier is a regular contributer to Macworld. He enjoys productivity apps and games for the Mac, iPhone, and iPad. 6 Contributors Jeffery Battersby is a regular contributor to Macworld. He writes about Macs and more on his blog (jeffbattersby.com). iPad 2 Superguide Editor Heather Kelly President & CEO VP & Editorial Director Executive Editor Mike Kisseberth Jason Snell Dan Miller Managing Editor Jennifer Werner Staff Editor Copy Editor Jeff Merron is a freelance writer and editor in North Carolina. John C. Welch is a regular contributor to Macworld. Dr. Franklin N. Tessler is a radiologist from Birmingham, Alabama, who frequently writes about presentations. Serenity Caldwell Gail Nelson-Bonebrake Art DirectorRob Schultz Designers Lori Flynn, Kate VandenBerghe Production DirectorNancy Jonathans Prepress Manager Tamara Gargus Macworld is a publication of Mac Publishing, L.L.C., and International Data Group, Inc. Macworld is an independent journal not affiliated with Apple, Inc. Copyright © 2010, Mac Publishing, L.L.C. All rights reserved. Macworld, the Macworld logo, the Macworld Lab, the mouse-ratings logo, MacCentral.com, PriceGrabber, and Mac Developer Journal are registered trademarks of International Data Group, Inc., and used under license by Mac Publishing, L.L.C. Apple, the Apple logo, Mac, and Macintosh are registered trademarks of Apple, Inc. Printed in the United States of America. Have comments or suggestions? E-mail us at [email protected]. Peter Cohen is the executive editor of The Loop (loopinsight .com) and the cohost of Angry Mac Bastards (angrymacbastards .blogspot.com). Jim Dalrymple is the editor in chief of The Loop (loopinsight .com) and blogs for CNet. 7 Also from the Editors of Macworld iPhone and iPod Touch Superguide 4TH EDITION Mac GeMs 240+ Software Bargains UPDATE iPhoneFOR AND ios Get more insider tips, tricks, and troubleshooting advice from Macworld’s team of experts. Our popular Superguide series offers useful insights and step-by-step instructions for the latest Apple hardware and software. D tricks about your operating system, set up a new Mac, learn about your new iPhone or iPod touch, and download great Mac applications. Each book is available in a variety of formats. Choose from a downWhether you’re new to the world loadable PDF, a hi-res PDF on CD, a printed book, or an e-book. of Apple products or a seasoned Go to macworld.com pro, we’ll show you /superguide to how to master Enter the code order or preview troubleshooting MWREADER6 any of the problems, disto get a discount Superguides. cover tips and on your next order. 8 1 Get Started Before you can unleash your iPad’s power, you’ll need to take a few minutes to get acquainted with its hardware features—every button, switch, slot, port, and plug—and we’ve put together a comprehensive visual guide to help you do just that. Once you know the outside, it’s time for a software tour. Learn how to activate your iPad from iTunes; find out exactly what the difference between a flick and a swipe is; and organize your on-screen apps using folders and the Dock. We’ll also show you how to tweak your settings to your liking, and fill up your iPad with great thirdparty apps from the App Store. Contents iPad at a Glance Page 10 Activate the iPad Page 15 Master Gestures and Navigation Page 18 Customize Settings Page 25 Find More Apps Page 34 9 Chapter 1 Get Started iPad at a Glance It’s always best to start from the beginning. And the beginning, in this case, is the outside of the iPad 2. Here is a quick guide to your iPad’s switches, buttons, and ports. 10 Chapter 1 Get Started A Front Camera The iPad 2 has two cameras: a 0.3-megapixel VGA front-facing camera; and a 0.7-megapixel camera located on the rear of the tablet. The front-facing camera is primarily designed for FaceTime conversation, but can also shoot SD video and 640-by-480-pixel stills. B Touchscreen Display The iPad doesn’t have a tactile keyboard or a bunch of hardware buttons. Instead, you use its 9.7-inch LED-backlit glossy widescreen glass display to surf the Web, compose e-mail messages, navigate apps, and change settings. The screen has a resolution of 1024 by 768 pixels at 132 pixels per inch. It also has an oleophobic coating‚ so it’s easy to wipe off fingerprints and smudges. C Home Button One of only four buttons on the device, and the only one on the front of the iPad, the Home button primarily acts as an escape option, though it can also help you manage your apps. When you’re in an app, pressing the Home button will return you to your Home screen, where all your apps are located (read more about the Home screen in “Master Gestures and Navigation” later in this chapter). If you double-press the Home button, you’ll pull up the multitasking shelf, which allows you to see recently running apps and access device shortcuts. If you’re already on your Home screen, pressing the Home button will send you to the Spotlight search screen; if you have multiple Home screens, pressing it will take you back to the first page. When the device is off, you can wake it up by pressing the Home button once; a double press while the device is awake and locked will bring up your iPod controls. 11 Chapter 1 Get Started m D Sleep/Wake and On/Off Button Located on the top right of the iPad 2 is the Sleep/Wake button. When your iPad is on, you can press this button once to put it to sleep. To wake the iPad up, press the button again, and slide your finger across the lock slider at the bottom of the touchscreen to unlock it. To turn the iPad off completely, hold the Sleep/Wake button down for a few seconds, until the Slide To Power Off slider appears. To turn the iPad back on, press and hold the Sleep/ Wake button until the Apple logo appears. E Back Camera The second of the iPad 2’s cameras is located along the back of the device, in the upper left corner. This 0.7-megapixel 12 Chapter 1 Get Started camera shoots 720p HD video and 720-by-960-pixel stills, and can be used for FaceTime conversation, quick movie-making, or a still shot or two. The software offers a tap-to-focus feature and a 5x digital zoom. Sadly, the quality is largely below that of a point-and-shoot camera or the iPhone 4. F Side Switch The iPad’s Side Switch‚ located on the right side of the tablet, near the top‚ can be set to lock the screen orientation or to act as a mute switch, depending on your preference. In Settings, tap General, and then tap Lock Rotation or Mute in the Use Side Switch To section. If you choose Lock Rotation, toggle the screen-rotation switch on the side of the iPad to expose the orange dot, and your iPad will stay in either landscape or portrait view, regardless of how you’re positioning it. When the rotation lock is engaged, a small icon showing a lock with an arrow around it will appear on the right side of your status bar, near the battery icon. If you select Mute in the settings screen, the switch will control the iPad’s Silent mode, which mutes alert noises. Be advised that you can still hear the audio from music and videos on the device’s speaker when the iPad is in Silent mode. G Volume Up/Down Buttons Directly below the Side Switch are the iPad’s volume buttons. Press the top of the button (Volume Up) to increase the volume and the bottom of it (Volume Down) to lower the volume. You can also quickly mute the iPad by holding down the bottom button for two seconds. These buttons affect app sounds, as well as audio and video playback. You can make these buttons affect your alert and ringer volume as well by enabling Change With Buttons in Settings -> General -> Sounds -> Ringer And Alerts. H Built-in Speaker You’ll find a speaker on the bottom right edge of the iPad 2 (when facing forward). It will play anything that makes noise on your iPad, including music, video, or app sounds. Because the iPad has just one speaker, it only outputs mono (single-channel) sound. You can also connect the iPad to third-party speakers via the headphone jack, Bluetooth, or the dock-connector port. I Dock-Connector Port To charge and sync your iPad, you use the device’s 30-pin dock-connector port, on the bottom center of the device. You can also use this port to hook up your iPad with third-party accessories, such as Apple’s Camera Connection Kit. Keep in mind that only some Macs and AC adapters can charge the iPad; others cause the iPad to declare that it is not charging, although your computer shows that the device is connected and able to sync. When plugged into the 13 Chapter 1 Get Started included 10-watt USB power adapter, the iPad can charge while awake or asleep. On high-powered USB ports—such as the ones on most recent Macs—the iPad charges but it takes longer, according to Apple. On Macs and PCs without high-powered USB ports, the iPad will charge only in Sleep mode; when it’s awake, it will display a “Not charging” message in the status bar at the top of the screen. J Micro-SIM Card Tray Available only on the Wi-Fi + 3G (GSM) iPad model, the micro-SIM card tray along the back left edge of the tablet is where your GSM SIM card is stored. With one of these cards and a cellular data plan, you can get 3G data service on your iPad. In the United States, only AT&T offers an iPad service plan and micro-SIM card, but since the iPad is sold unlocked (not tethered to a specific wireless carrier), you can pop in any international carrier’s applicable micro-SIM card while you’re abroad to receive 3G access. Even if you don’t have an active 3G plan, you can still connect your iPad to the Internet over Wi-Fi. To eject a micro-SIM card, insert the end of a paper clip into the small hole adjacent to the tray and push. K Headphone Jack Located at the top left edge of the iPad is a stan- dard 3.5mm audio jack‚ the same type that’s found in iPods and iPhones. You can use either wired or Bluetooth-enabled wireless headphones with the iPad. If you plug in headphones that have a microphone, the iPad will recognize it and allow you to use it for apps with audio-recording capabilities. Otherwise, the iPad will use its built-in microphone. L Microphone The iPad’s internal microphone is on the top center edge of the device, right above the front-facing camera. You can use it to record audio in any app that supports audio recording. M 3G Antenna (3G iPad only) For optimal reception, the 3G antenna in your iPad is at the top of the device, housed under a black plastic shield. 14 Chapter 1 Get Started Activate the iPad Before you can start surfing the Web, reading novels, or typing e-mails on your iPad, you have to activate it. Fortunately, doing so doesn’t require filling out paperwork or standing in line at the Apple Store. What You Need In order to activate and sync your iPad, you’ll need a Mac or PC with a USB 2.0 port, iTunes 10 or later, the connection cable that came with the iPad, and an iTunes Store account. iTunes is not included in the iPad box, so if you don’t have a copy, go to itunes.com/download and get it. In addition, your Mac should be running OS X 10.5.8 or later; on a PC, you’ll need Windows 7, Windows Vista, or Windows XP Home or Professional (SP3). You’ll also need your Apple ID and password. If you’ve ever bought songs from iTunes, what you use to log in there will be your Apple ID; if you don’t have an Apple ID, you can create one for free by going to appleid.apple.com. Set It Up When you first plug your iPad into your computer, iTunes will launch and walk you through the activation process. The first screen will say “Let’s Get Started” and will lay out the first two steps: registering your iPad and setting up an iTunes Store account. If you don’t want to register your iPad at the moment, you can click the Register Later button on the left. If you’re ready to register, click the Continue button. Next you’ll see the iPad Software License Agreement. Give it a read, check the box confirming that you have read and agree to the license, and click on Continue (if you’d like to look at this document again later, click the Save button before clicking Continue). The iTunes Account screen is up next. This is where you enter your Apple ID and password to register your iPad. If you’ve ever purchased anything from the iTunes Store, you should already have a login. If not, click the radio button labeled I Do Not Have An Apple ID, then select your country, and iTunes will walk you through the sign-up process. 15 Chapter 1 Get Started Once you’re logged in, Apple will offer to sign you up for its MobileMe service if you aren’t already a member. Skip this screen unless you’ve already researched MobileMe and were just waiting for the best time to sign up. (Read more about MobileMe here: macworld.com/6706.) The Setup Your iPad screen is next. You can opt to set up the iPad as a new iPad, or to restore from another backup that you can choose from the drop-down menu. (You’ll also see iPhone and iPod backups listed here.) If this is your first iPad, you can ignore the second option and click Continue to start fresh. The second screen in the Set Up Your iPad section has a few customization options. Here, you can enter a name for your iPad. Below the Name field are three syncing options. Check as many of these boxes as you like, or none at all. The first option is Automatically Sync Songs To My iPad, which will fill your iPad with all the music it can fit from your iTunes library. The second is Automatically Add Photos To My iPad, which fills any space your music doesn’t already occupy with photos it finds in iPhoto. The third option syncs any compatible apps you have in your iTunes library with the iPad. The iPad might seem to have a lot of memory, but it fills up fast. If you have a lot of media already in iTunes, you may want to leave all three of these boxes unchecked. Once you’re out of the setup screens and in the main iTunes interface, you can manually choose exactly what songs, videos, books, and apps you want to keep on your iPad. When you’ve chosen your options, click Done. Navigate the iTunes Interface Congratulations—you’ve activated your iPad! Now, it’s time to add some content. Immediately after you finish setup, you’ll be taken to your iPad’s settings window within iTunes. You can also access this any other time your iPad is connected by clicking the name of your iPad in the iTunes Source list, under Devices. Along the top of the window, you’ll see a row of buttons: Summary, Info, Apps, Music, Movies, TV Shows, Books, and Photos. Each button will take you to an individual screen that contains information and sync settings for each category. Along the bottom of the window, you’ll see a capacity bar (color-sorted by type of content) and a button to sync your iPad (or, if you’ve made changes to any settings, Revert or Apply). 16 Chapter 1 Get Started By default, connecting your iPad will bring you to the Summary screen. Here, you’ll find three sections: iPad, Version, and Options. iPad will display an icon of your iPad as well as its name, storage capacity, software version, and serial number. Under Version, you’ll find two buttons: Check For Updates and Restore. Click the first to perform a quick search and find out whether Apple has posted a new version of iOS‚ the iPad’s operating system. If so, your iPad will ask if you’d like to install it. Click the Restore button to take your iPad back to its factory settings. This is useful if the device is having any sort of major issues. For detailed troubleshooting advice, see the Troubleshooting Tips chapter later in this book. TIP Hidden Info Occasionally, you may need to look up your UDID (your iPad’s unique identifier), or—if you have a 3G iPad—any of its cellular numbers (Cellular Data Number, The Options section gives you a number of controls for fine-tuning how your iPad and iTunes interact. The first, Open iTunes When This iPad Is Connected, does what it says: automatically opens the application whenever you connect your iPad. You can also sync only checked songs and videos from your iTunes library; tell your device to load standard definition video rather than high definition when there is a choice; convert high-bit-rate songs (with a correspondingly large file size) to smaller files; manually manage music and videos, which allows you to drag items one by one to your iPad’s icon (rather than sync prespecified chunks automatically); and encrypt your iPad backup. Additionally, you can configure Universal Access preferences here (you can also do this through Settings -> General -> Accessibility). IMEI, or ICCID). You can access this information by single-clicking on the serial number text (this appears on the Summary screen in We’ll cover each of the other tabs in more detail later in this book. For information about syncing your contacts, calendars, mail accounts, bookmarks, and notes, see the Connect and Communicate chapter; for information about syncing apps, see “Find More Apps” at the end of this chapter; for information about syncing music, movies, television shows, podcasts, books, and photos, see the Multimedia chapter. iTunes’ iPad section). Click to cycle through this information with each click, starting with the UDID. You can’t highlight anything, but if for some reason you need to copy it, just press 1-C on your keyboard. 17 Each time you connect it to a computer, iTunes will attempt to back up all of your data. If you’d like to manage this manually, head to iTunes -> Preferences -> Devices. Chapter 1 Get Started Master Gestures and Navigation Now that you have your iPad activated and running, it’s time to learn how to use it. Your device is running Apple’s mobile operating system, iOS, which uses multitouch gestures. But before you start playing, you’ll want to know the basics of working with iOS and your apps, and what they can (and can’t) do. In this chapter, we’ll walk you through basic gestures, help you take control of navigating and organizing, and throw in some typing tips. Gestures and Techniques If you’ve never before owned a multitouch device from Apple, you may be unfamiliar with crazy phrases like pinch-to-zoom and the difference between the flick and the swipe. Have no fear: While some of these gestures may have odd names, they’re easy enough to pick up. Tap As clicking is to a desktop computer, so is tapping to an iOS device. Tapping is the most common and basic gesture on the iPad. You tap to open apps, bring up controls, make choices from menus, and more. Double-Tap Tap an object twice in succession to effect a double-tap. Double-taps are primarily used for zooming in or out on text, but third-party apps also use the double-tap for various purposes. 18 Chapter 1 Get Started Tap, Hold, and Drag For some functions‚ such as highlighting text, copying and pasting, or deleting and moving apps‚ you’ll need to tap and hold down on the screen. When you do this on a piece of text, it will highlight in blue, and editing handles—vertical lines with blue dots—will appear on either side of the highlighted area. You can tap, hold, and, while holding down, drag your finger to increase or decrease the selection. Dragging also comes into play for moving objects in apps, drawing, and swiping and flicking. TIP Inverse Scroll All flicking and swiping on your iPad is inverse, meaning that when you move your finger down (in other words, swipe down), you’re actually moving whatever is on the screen upward. This makes perfect sense in Flick and Swipe Drag your finger across the screen‚ up, down, left, or right‚ to swipe. Swiping is one of the primary navigational tools on the iPad: You use a left or right swipe to move through app pages on your Home screen or images in the Photos app; you use an up or down swipe to read text in Safari. It’s one of the easiest gestures to learn. A flick is just like a swipe, only faster: The iPad supports inertial scrolling, which means that the faster or slower you move your finger, the faster or slower content will move. If you want to get to the bottom of a page quickly, just flick your finger upward in a fast motion. the real world, but when you’re coming from a computer, where scrolling down on a trackpad or mouse actually scrolls the window down, it can be a bit disorienting at first. Why make this clarification? In this book, we refer Pinch To zoom in or out, you’ll use the pinch gesture (also referred to as pinch-tozoom). To zoom in or to open something, place your thumb and index finger, pinched together, on screen and spread them apart. To zoom out, do the reverse: start with your thumb and index finger outwards, and then pinch them together. several times to “swiping right” to bring up a left-side navigational bar‚ which can be confusing if you don’t know about inverse gestures. 19 Rotate You can even rotate some elements with two or more fingers. Just place two fingers on the screen and make a circular gesture‚ clockwise or counterclockwise. Chapter 1 Get Started Navigation Basics Without apps, your iPad wouldn’t be much fun. Thankfully, your iPad comes with some stock Apple apps, and provides easy access to the App Store. Here’s a quick overview on opening, closing, managing, and deleting apps. At the Start This is the iPad’s Home screen. It’s where you access your apps and the Spotlight functionality. The Home Screen When you first turn on the iPad, you’re brought to the Home screen (see “At the Start”). Here, you’ll see an assortment of icons grouped into rows, and several more icons grouped in the silver Dock along the bottom of the screen. The Home screen is where your apps live, and where you can launch them. Because only 20 apps will fit on one Home screen, you can organize your apps on multiple Home screens, or app pages. Above the Dock, you’ll see a row of dots, with one dot highlighted in white to represent the Home screen you’re currently on; these dots signify the number of app pages you have. Swipe left or right to go from page to page. 20 Chapter 1 Get Started All in a Line Your dock holds your most frequently used apps. The Dock The silver translucent bar along the bottom of your Home screen is called the Dock (see “All in a Line”). If you’ve tried swiping between Home pages, you’ll notice the icons in the Dock don’t change. That’s because the Dock is for apps you use frequently; instead of having to swipe from page to page to find an app, you can drop it directly into the Dock for easy access. You can store up to six apps in the Dock. Search in Spotlight You can search for every e-mail message, Web page, and app on your device, or search through Google or Wikipedia, by swiping right on your Home screen until you reach Spotlight. To search, just type your query in the text box at the top. Open and Close an App Want to launch an app? To open it, all you have to do is tap its icon. Once it’s open, you can return to the Home screen at any time by pressing the Home button. Rearrange and Delete Apps To rearrange the order of your icons, tap and hold any icon on the Home screen. After a few seconds, all your app icons‚ including the one you’re holding‚ will start to wiggle, and a small black X will pop up in each icon’s top left corner (see “Organize Away”). Once they do this, you can rearrange any apps on the Home screen, or even drag them into or out of the Dock. If you’ve installed a third-party app you don’t want anymore, you can tap the X to delete it from your iPad. When you’re finished, press the Home button, and your icons will stop wiggling and stay in their new location. You can also rearrange your icons and Home screen pages through iTunes when you connect your iPad to your computer (see “Find More Apps” later in this chapter). Organize Away You can rearrange apps by dragging them into the space where they should be, or create a folder by dropping one app on top of another. 21 Chapter 1 Get Started Use Folders Having a bunch of apps scattered about your Home screen is OK if you have a small number of them, but when you start amassing a collection, you can use app folders. A folder is a group of apps, represented by a single icon, on the iPad’s Home screen. Each folder sports miniature icons representing the apps inside, along with an overall name. When you tap a folder, the Dock fades and slides down, making room for a view of the folder’s contents. Within, you’ll find the name and icon for each app. Tap any app to launch it, or tap anywhere outside the folder to return to the Home screen. To create a folder, start by tapping and holding any app icon to enter your iPad’s edit mode; after the icons begin to wiggle, drag an app on top of another app. When you release the app, you’ll create a folder, which will open and display both apps. By default the folder is named based on the App Store category for one of the first two apps in the folder. If you want to customize this name, just tap inside the field (while still in edit mode) and enter something new. When you’re done, press the Home button to exit edit mode. To add another app to the folder, reenter edit mode and drag the desired app onto the folder icon. Repeat until you’ve added all the apps you want (up to 20 per folder), and then press the Home button to exit edit mode. To edit the folder itself‚ its name, contents, or the layout of the apps inside‚ you can either enter edit mode and then tap the folder, or, while the folder is open, tap and hold any icon inside (see “Group and Go”). You can then tap the folder’s name to change it, drag apps within the folder to rearrange them, drag an app out of the folder to return it to the Home screen, or tap an app’s Delete button to completely delete it from your iPad. Unlike apps, folders don’t have a Delete button; to delete a folder, you must remove all the apps from it. Group and Go When rearranging apps, you can also edit a folder’s name by tapping it. 22 Chapter 1 Get Started Multitask on Your iPad Opening and closing an app is easy: Tap the app to open it, and then press the Home button to close it. But when you exit, you’re not actually shutting down the app: You’re freezing it in place, or sending it to run in the background. This means you can have multiple active apps running at any one time, and you can even switch between active apps without returning to the Home screen. Frozen Apps versus Background Apps Sometimes you need an app to keep doing something when it’s not in the foreground. For that reason, Apple allows apps to perform tasks in the background using several tools. One of these tools is the push-notification system; another allows apps that provide audio to keep playing while the user switches to another app; and yet another allows tasks‚ such as photo uploads‚ to continue running in the background even if you switch out of the program performing the upload. If your third-party app doesn’t incorporate one of these background features, it will “freeze”‚ which is to say it will remember whatever you were just doing, but not continue to do anything further when you exit it. Switch-a-roo You can scroll between all currently running or frozen apps by flicking left or right along the multitasking shelf. The Multitasking Shelf You can quickly switch between apps by bringing up the multitasking shelf (see “Switch-a-roo”). To do so, quickly double-press the Home button; a shelf below the Dock will rise up from the bottom of the screen, showing off the apps most recently run. To switch to a different app, tap on its icon. Shelf Shortcuts In addition to holding a list of your most recently used apps, the multitasking shelf has a couple of other neat shortcuts for your iPad (see “Extra Controls”). If you swipe right, you’ll bring up a secondary set of controls; here, you can lock your iPad’s orientation (or mute your iPad, depending on how you’ve enabled it in the Settings app), adjust the brightness and volume, and control the music currently playing on your iPad (it defaults to the iPod app’s music library). Extra Controls You can mute your iPad or change brightness, volume, or your music. 23 Chapter 1 Get Started Work with Text Just as your computer has shortcuts and key commands for commonly used tasks, your iPad has a variety of fun techniques you can use for copying and altering your text. Select Text There are two types of text you can select on your iPad: editable and noneditable. To select noneditable text, just tap and hold on the word or phrase you’d like to select; if the text is editable, double-tap on the word. You can adjust this initial selection by moving the blue edit handles that pop up on either side of your selection. While typing, you can also pinpoint your cursor where you need it. Just tap and hold until a magnifying loupe appears, and then drag your finger through your text (see “As You Like It”). Drag the loupe around, and the text insertion point will follow it so you can easily position the cursor exactly where you want. When you release, the cursor will be in the desired spot. Cut, Copy, and Paste Once you tap, hold, and release your text, you’ll see the following options: Select (to select a word) and Select All (to select everything). Pick one, and then choose Cut, Copy, or Paste, or even choose a replacement word, if you’ve highlighted a misspelled word. To paste a word, just position your cursor by tapping, then hold down for several seconds until the Cut, Copy, Paste pop-up appears. Check Your Spelling If you misspell a word, the iPad will underline it with a red squiggly line. Tap and hold on an underlined word, and, to the right of the Copy and Paste options, you’ll see a Replace button that, when tapped, will give you suggestions for alternative words you may have meant to type instead. If you don’t care to see your writing covered in squiggly red lines, you can easily deactivate this spelling checker by making a trip to Settings -> General -> Keyboards. As You Like It Want to highlight starting at a certain letter? Just tap and hold to bring up the loupe, then drag to where you’d like to start highlighting or typing. 24 Chapter 1 Get Started Customize Settings To change and customize your preferences, you need only head over to the Settings app from your Home screen. The app is split into two columns: Along the left, you’ll find a listing for each individual system setting, with entries for any downloaded apps below that; along the right, you’ll see the contents of the currently highlighted setting. We explain each system setting in detail below. Airplane Mode If you travel frequently, Airplane Mode is a necessity: It temporarily switches off the cellular antenna and Wi-Fi, which could interfere with the airplane’s navigational system. This allows you to safely use the iPad in the air once the captain gives the all-clear; for airlines that offer in-flight Wi-Fi service, you can reenable Wi-Fi without turning off Airplane Mode by flipping the Wi-Fi switch in Settings. Wi-Fi The Wi-Fi listing in the left column displays your current connection status (Off, Not Connected, or a network name). On the right, in the main Wi-Fi screen, the first setting is a On/Off toggle switch. If you have Wi-Fi turned on, a list of available networks will appear under the Choose A Network heading. If you’re currently connected to a Wi-Fi network, that network’s name will appear in blue and will have a checkmark by it. The bars by a network indicate its signal strength, and a lock icon means it requires a password. Tapping the blue arrow to the far right of a network’s name brings up its advanced connection information. To join an unlisted network, tap Other and enter an exact network name. The final setting on this screen controls whether the iPad asks if you want to join new networks when you’re out and about. Notifications A notification is a sound, a pop-up alert, or a badge on an application’s icon that appears when an app needs to tell you something—for example, when you have a new instant message or it’s your turn in a game. 25 Chapter 1 Get Started You can turn notifications on or off for all applications that use them, or pick and choose what notifications to activate for each app listed. Location Services The iPad’s Location Services lets apps—both Apple’s built-in ones and any third-party apps from the App Store—figure out where you are using Wi-Fi networks. The iPad Wi-Fi + 3G model also uses cellular networks and GPS to find your location. If you want to globally bar all software from knowing your location, turn off Location Services. (You can turn off access for specific apps by tapping the Location Services option.) Cellular Data These options are only available on the Wi-Fi + 3G iPad. The first option here allows you to turn your data abilities on or off, and the second switch turns Data Roaming on or off. This is very important if you travel abroad‚ as data rates outside your home country will probably be exorbitant, and with Data Roaming turned off, the iPad will simply abstain from using the cellular data network when it’s outside its home territory. You can look over your account and any data plan by tapping View Account; if you’re using a 3G iPad with a GSM radio (in the United States, an AT&T iPad), you can also add a password to your SIM for security reasons by tapping SIM PIN. Brightness & Wallpaper By default, the brightness of the iPad’s screen will adjust automatically as it detects the lighting levels around it. You can turn this feature off and manually adjust the brightness with the on-screen slider in the Brightness & Wallpaper section. (There’s also a Brightness slider next to the iPod controls in the multitasking shelf.) The other setting in this section is for wallpaper. Your wallpaper image appears whenever the iPad is locked or when you are on a Home screen. Tap the preview images once to bring up your image collections. You can assign the same photo for the iPad’s lock screen and Home screen, or you can choose two separate backgrounds. You can choose an image from Apple’s bundled patterns, from pictures you’ve synced with the iPad’s Photo app, or from pictures you’ve taken with or saved to the iPad (under the Saved Photos option). 26 Chapter 1 Get Started Frame When you wake up your iPad, you will see a small framed sunflower icon to the right of your unlock slider. This is the Picture Frame icon, a shortcut that allows your iPad to double as an animated digital picture frame. Under the Picture Frame setting, you can choose between two transitions‚ the classic Dissolve and a nifty folding Origami effect‚ and select which photos you want the slideshow to pull from: all of the photos on your iPad, or certain albums or events. General This section collects any miscellaneous system settings. From here you can set the date, enable Bluetooth, and more (see “General Joy”). About The About screen lists various details about your device, such as legal information, the current Wi-Fi address, available memory, and the serial number. You can also view the number of songs, videos, photos, and applications you have. Usage On the Wi-Fi + 3G iPad only, the Usage section contains the Battery Percentage On/Off switch (the percentage itself is displayed in the menu bar) and a summary of the amount of network data you’ve General Joy In the General section, you can find settings that don’t necessarily warrant their own pane. 27 Chapter 1 Get Started sent and received. The Reset Statistics button makes it easy to zero out all these values, as you might do at the end of a month. Sounds In the Sounds section, you can use the volume slider to adjust the volume, as well as turn sound alerts on or off—these are the alerts that play when you receive or send mail, or get a calendar reminder. When you set an alert, moving the slider next to it from Off to On will preview the sound that plays for that event (unfortunately, you can’t change the sound). You can also mute keyboard clicks and lock sounds from here. Turn on the Change With Buttons setting to control the ringer and alert sounds with the volume buttons on the side of the iPad. Network In the Network menu, you’ll see VPN and Wi-Fi options. Tapping Wi-Fi will bring up the same options you’ll find in the Wi-Fi tab of the Settings menu. VPN (Virtual Private Network) allows outsiders to securely tap into a private network. This comes in useful, for example, when you’re offsite and wish to join your company’s internal network. To set up a VPN, tap Add VPN Configuration. The Add Configuration screen displays the three support options: L2TP, PPTP, and IPsec. Check with your network administrator if you’re not sure which one to use. Bluetooth When this setting is on, the iPad becomes discoverable over Bluetooth and will search for compatible devices, such as headphones and wireless keyboards. Spotlight Search When you swipe left on the first page of your Home screen, you can use Spotlight to search your entire device for apps, messages, calendar events, and more. This preference lets you choose what topics to include in a search and what order they appear in (for example, relevant Mail messages first and applications second). Auto-Lock After periods of inactivity, the iPad locks so that touching its screen does nothing; you must wake it by pressing the Home or Sleep/ Wake button. In the Auto-Lock screen, you set the amount of time that should pass before the iPad locks. Your choices are two, five, ten, or 15 minutes, or never. Passcode Lock You can assign a four-digit passcode to your iPad so that no one can use it without entering the passcode. Tap this entry and select Turn Passcode On to pop up the Set Passcode screen. Use the numeric keyboard to enter and verify a passcode. Once you’ve entered a code twice, you have the option to turn it off, change it, or set whether 28 Chapter 1 Get Started the iPad requires a passcode immediately or after a period of inactivity. If you want more security than just a four-digit passcode, turn off the Simple Passcode setting and enter any password you like, including numbers, letters, or special characters. You can additionally use the passcode lock on the Picture Frame feature, or set the iPad to automatically erase all its data after ten failed attempts to enter the passcode. iPad Cover Lock/Unlock If you are using an iPad 2 Smart Cover, you can turn this setting to On, and the iPad will automatically lock and unlock when you close and open the cover. (For more information about the Smart Cover, see the Accessories chapter.) Restrictions This is the iPad’s parental controls section: Set a passcode, and you can then lock users out of certain features. You can restrict installing and deleting apps from the App Store, as well as access to Safari, YouTube, the camera, FaceTime, the iTunes Store, and Ping. Additional controls prevent changes to location services and accounts. In the Allowed Content section, you can turn off the ability to make in-app purchases, choose a ratings system for your country, and block access to explicit music and podcast content. There are separate ratings entries for movies, TV shows, and apps, which vary depending on your country. The final controls on this page control allowing multiplayer games and adding friends in Game Center. Use Side Switch To You can choose the function of the iPad’s Side Switch, located on the top right side of the device above the volume controls. If Lock Rotation is selected, toggle the Side Switch until the orange dot is exposed, and your iPad will stay in either landscape or portrait view, regardless of how you’re holding it. When Lock Rotation is engaged, a lock with an arrow icon will appear on the right side of your status bar, near the battery symbol. Alternately, if you decide to use the Side Switch for volume, select Mute. When you toggle the switch, this option will silence alerts and ringtones from FaceTime calls. (Note that even when your iPad is in Silent mode for alerts, you’ll still be able to hear audio from music and videos.) Date & Time This screen lets you choose between a 12- and a 24-hour clock. You can also set your date and time manually from here if you’d rather your iPad didn’t set it automatically, and choose your time zone. Keyboard Here you can turn on some useful keyboard shortcuts: Auto-Capitalization will capitalize the beginning of a sentence; AutoCorrection will attempt to correct any misspelled words; Check Spelling underlines words not found in the dictionary; Enable Caps Lock lets you 29 Chapter 1 Get Started double-tap the Shift key to go into Caps Lock mode; and the “.” Shortcut option lets you tap the spacebar twice to insert a period. Beneath those options is the International Keyboards menu. Here, you can choose which language-based keyboards your iPad will support. If you opt for more than one language, a small globe key will appear to the left of your spacebar when typing, allowing you to toggle between the international keyboard options you selected. Under each international keyboard listing, you may also optionally find a setting for changing the keyboard layout. With the English keyboard, you can change the layout from the default QWERTY to AZERTY or QWERTZ; if you’re using a reconfigured hardware keyboard (like one with a DVORAK layout, for example), you can let your iPad know here. International From this menu, choose the language you’d prefer for the iPad’s interface. In addition, you can set your keyboard options (see above) and choose the format the iPad uses to display times, dates, and phone numbers by default. Accessibility Here, you can turn on any number of accessibility options: VoiceOver (to enable spoken text), Zoom, Large Text, White On Black (to invert the iPad interface), Mono Audio, and Speak Auto-text (which will speak auto-corrections and capitalizations aloud). Within VoiceOver, you can also change the Speaking Rate, as well as whether to Speak Hints or use Typing Feedback, Phonetics, or Pitch Change. You can also enable a Bluetooth braille keyboard from this setting, or change Web or Language Rotors. Additionally, you can enable a shortcut for turning on VoiceOver, White On Black, Zoom, or Ask (which allows you to select any of the three) using a triple-press of the Home button. Reset You’ll find the Reset screen useful if your iPad behaves strangely or if you simply want to start from scratch. Reset All Settings will reset the iPad’s settings but won’t delete any media. Erase All Content And Settings will erase settings as well as data and media, essentially wiping your iPad clean. Reset Network Settings will take you back to the device’s original network settings. Reset Keyboard Dictionary will return the iPad’s dictionary to its default settings. Reset Home Screen Layout will move all the icons on your Home screen back to their initial positions. Reset Location Warnings will require all apps to reconfirm that you’d like to give them your location data. 30 Chapter 1 Get Started Mail, Contacts, Calendars The Mail, Contacts, Calendars screen is the hub of all settings pertaining to your mail, contacts, and calendars. Accounts From the Accounts area, you can see your existing accounts, add new ones, and modify the settings for each existing account. For standard POP and IMAP mail accounts, tap on the name of the account to edit the usual litany of mail settings, including server names, usernames, and passwords. (For more about adding accounts, see “Check and Send E-mail” in the Connect and Communicate chapter.) Fetch New Data In the Fetch New Data section, you’ll choose how often your iPad connects to the Internet to gather new mail and contact and calendar data. It lets you choose how often updates are pushed through, from every 15 minutes to hourly. Choose Manually, and it’ll only check when you tell it to. Mail Here you can choose the number of messages that display, how much of each message appears in the preview, and the minimum font size to use. You can also set Mail to show To and Cc labels, to ask before deleting a message, to load remote images, to organize e-mail by thread, and to always Bcc you on sent e-mail messages. You can also change or remove the signature (the default is “Sent from My iPad”). Contacts In the Contacts section, you can control how contacts are sorted and how their names display (either First, Last, or Last, First). Calendars In the Calendars area, you can choose to be alerted to new invitations after syncing calendars, set how far back in time the calendars should sync, and pick the time zone in which you want to display items. Safari Here, you can choose a default search engine: Google, Yahoo, or Bing; decide whether to show the Bookmarks Bar; enable a Fraud Warning alert for fraudulent Websites; enable JavaScript; block pop-ups; and set your Cookies settings. You can also clear the history, cookies, and cache. Clearing the cache, in particular, can help solve issues, like constant crashing, that you may be having with Safari on the iPad. You can also turn on the Debug Console under Developer to help diagnose Web page errors. 31 Chapter 1 Get Started Perhaps the most important item on this screen, however, is AutoFill, which can save you time by automatically filling out Web forms with your contact information or with usernames and passwords you’ve previously entered. When you turn on the Use Contact Info slider, you’ll be able to select your default contact in the My Info field. In this screen, you can also turn the Names And Passwords option on or off, and tap on Clear All to delete saved information. iPod The iPod entry in Settings contains music options such as Sound Check, EQ, and maximum audio volume. You can also turn Lyrics & Podcast Info on, which allows you to get song lyrics and information about podcasts when an audio file is playing. The Home Sharing option allows you to stream music from your local iTunes library on your home computer to any of your iOS devices. To use this feature, you must first log in with the Apple ID you have synced with your computer. Once you’ve connected it with your iPad, if you go into the iPod or Video app, you should be able to see any shared libraries from computers that use your Apple ID on your local network. (For more information on enabling Home Sharing, see “Share and Stream” in the Multimedia chapter.) Video The Video screen lets you control whether you want videos to always start playing from the beginning or pick up where you last left off, and turn closed captioning for videos on or off. If you’re connecting your iPad to a TV, you can toggle widescreen format on or off, and set the iPad to output in either NTSC (standard in North America and parts of Asia) or PAL (the rest of the world). Photos The Photos screen offers settings that control the slideshow feature‚ how long each image appears on screen, whether the slideshow repeats, and whether to shuffle the photos. 32 Chapter 1 Get Started FaceTime You will need an Apple ID to use FaceTime on the iPad. Log in, sign up for a new account, and manage current Apple IDs and e-mail addresses from this screen. Notes The Notes section allows you to switch the default font in the Notes app from Marker Felt to Noteworthy or Helvetica. It’ll even update all your existing notes to use your new font choice. You can also set your default sync account for Notes. Store This screen holds your iTunes account credentials. If you are not logged in with your Apple ID, you’ll be given two options: Sign In or Create New Account. Once you’re signed in, you can select View Account (to see your payment and contact information) or Sign Out. Other Apps Some third-party apps downloaded from the App Store will also store a portion of their individual settings here. These will appear under the Apps heading in the left column of the Settings screen, listed alphabetically by app name. 33 Chapter 1 Get Started Find More Apps While Apple has a number of apps preinstalled to help you manage your calendars, e-mail, Web browsing, photos, and more, you may want to venture outside the sandbox for more varied fare. The App Store, which you can access on your iPad or via iTunes on your Mac, features more than 11,000 made-for-iPad apps and more than 225,000 apps for all iOS devices. If you have something you want to do on your iPad, chances are you can find a way to do it using the App Store. App Basics The iPad can run almost every one of the App Store’s iOS apps, but only certain apps are specifically designed for your device’s larger screen. There are three types of apps in the store: iPhone and iPod touch only, iPad only, and Universal. Apps that are iPhone and iPod touch only will run on your iPad—but not full screen. This means when you first launch the app, it’ll appear about half size (about the size of an iPhone) in the center of the screen (see “Alas, Poor App”). You can make it full screen‚ using a technique called Alas, Poor App An app designed only for the iPhone or iPod touch will run on the iPad, but at half size, or, if you tap the 2x button, full size but pixelated. 34 Chapter 1 Get Started pixel doubling‚ by tapping on the 2X button in the lower left corner of the screen, but that will make the picture slightly fuzzy, and you’ll be stuck using the iPhone-designed keyboard. In contrast, iPad-only apps are designed natively for the iPad’s screen resolution and features, but will not run on an iPhone or an iPod touch. Universal apps are built to work natively for the iPhone, iPod touch, and iPad. In the App Store, a little plus sign (+) next to the price of an app tells you it’s Universal. Navigate the App Store on the iPad On the iPad, you can access the App Store by tapping the blue App Store icon on your Home screen (see “Get Thee to an Appery”). The store is divided into five tabs: Featured (Apple’s special picks), Genius (apps suggested based on your personal taste), Top Charts (showcasing top iPad-friendly apps), Categories (all iPad apps, sorted into primary categories), and Updates (go here to download updates and patches for your currently installed iPad apps). Featured and Top Charts are both great places to start looking for recommended apps, and you can search the entire App Store from either tab using the search bar in the upper right corner of the screen. Get Thee to an Appery You can browse, download, and update your programs from the App Store app. 35 Chapter 1 Get Started The Featured tab includes New And Noteworthy, Staff Favorites, and special banner features on the page, which the team at Apple updates every week or so. For more app options, you can also sort by New, What’s Hot, and Release Date. Scroll to the bottom of the page while in Featured, and you’ll find a Quick Links section, where you can view App Of The Week, Apps From iPad TV Ads, and Game Of The Week, in addition to several other highlighted sections. Below this section, you’ll find a direct link to your account (or an option to sign in or create a new account), a Redeem button for cashing in iTunes gift cards, and a Support button, which launches Apple’s iTunes Support Website in Safari. Below all of this is a link to the iTunes Store’s terms and conditions. The Genius tab displays apps similar to those you’ve already downloaded. For privacy reasons, Genius is turned off by default; to enable it, go to the tab and tap Turn On Genius. Top Charts displays the top ten paid, free, and highest-grossing iPad apps in the App Store; you can view up to 60 by tapping Show More under any of the lists. You can also sort these app charts by category. The Categories tab organizes apps into sections by release date, and allows you to browse through every page of apps within that category. You can also sort by Name or Most Popular. You’ll need an App Store account to download anything‚ even free apps‚ so if you don’t have one, head on over to the Featured tab, scroll down to the bottom of the page, and tap Sign In. If you don’t have an account, tap Create New Account; otherwise, tap Use Existing Account to sign in with your Apple ID and password. You can change and link your credit card information from within the app (though you can also do this from your desktop computer). To download an app, tap its price once to highlight the green Buy App button, then tap once more to confirm the purchase; you’ll be prompted for your password as a security measure. Like the makers of desktop software, iPad app developers regularly upgrade their apps to add new features and fix problems. When your device detects updates for your installed programs, a red badge on the App Store icon will show the number of updates available‚ though sometimes that number won’t update until you relaunch the App Store app. Launch the App Store and tap the Updates section of the App Store window to choose whether to update one or all of your apps to the latest versions. You can also update your apps from the Applications section in iTunes on your Mac; the updates will transfer to your iPad the next time you sync it with iTunes. 36 Chapter 1 Get Started Manage Apps in iTunes Once you amass a collection of apps, downloading, organizing, and deleting them on the iPad can be a bit of a pain. Thankfully, you can save your fingers from tapping and dragging exhaustion and do all of this from iTunes. Download Apps On your computer, you can download any app available in the App Store from iTunes. From the Source list, select the iTunes Store, click the App Store tab at the top, and click the iPad option underneath the tab to weed out all non-iPad apps. You’ll see a rotating banner showcasing Apps Of The Week, New And Noteworthy, What’s Hot, Staff Favorites, and random rotating app collections curated by the App Store team. A column to the right will display Quick Links to common App Store categories as well as charts for the Top Paid, Free, and Grossing apps (see “O True App-othecary”). When you select an app in iTunes, you’ll see a description of what it does, a few screenshots of the app, and customer ratings. (To review or rate an app yourself, you must be logged in and own the app in question.) You’ll also find other useful info on the app’s page. For example, you’ll see the app’s category, age rating, and file size‚ handy to know if you’re short on space. Underneath the app’s description, you’ll find the URL of the developer’s Website. To download an app, click the button below its icon that lists its price. (As on the iPad, you’ll need an Apple ID and password to purchase or O True App-othecary The App Store on iTunes pretty closely resembles its iPad counterpart in looks and functionality. 37 Chapter 1 Get Started download any app.) Once you’ve bought an app, it will download to your Apps section in iTunes, found in the Source list. Within this section, you can see a list of your apps, organized by app type (iPhone and iPod touch, iPad, or all three) or genre, though you can’t actually open any app on your computer. In the lower right corner, you can check whether updates are available for your apps or navigate directly to the App Store to look for more. Sync Apps from Your iPad Every time you connect your iPad to your computer, it automatically backs up any content you’ve purchased while out and about. Apps you’ve downloaded on your iPad will be copied to the Apps section in iTunes. While by default all the apps found in iTunes will be synced to your iPad, this can get unwieldy once you build up a collection (or if you have other iOS devices, like an iPhone or an iPod touch, synced to your computer). So you can also pick and choose the apps you’d like to sync from your iPad’s Apps settings pane within iTunes (see “Bag and Baggage”). Once your iPad is connected to your computer, click on it in the Source list and click the Apps tab at the top of the pane. You’ll see a comprehensive list of all the apps you own in a column on the left side of the pane, including iPhone-only apps as well as iPad-only and Universal apps. On the right side is a preview of your iPad’s Home screens and app icons. Bag and Baggage All your apps—both iPhone and iPod touch only, and iPad—are catalogued here for your selection. 38 Chapter 1 Get Started You can sort these apps by name, kind, category, date, and size. If you’d rather only see iPad-friendly apps, you can select the Show Only iPad Apps option. To load an app onto your device, click the checkbox to the left of the program’s icon; to remove the app, click the checkbox again. Below the column on the left side is a checkbox that allows you to automatically sync any new apps you’ve purchased in iTunes to your iPad. Check this if you’d rather not have to manually check the box of any new app you’ve downloaded every time you sync. Organize Apps Next to the column of installed apps in the Apps tab, you’ll see a preview of your Home screen(s). Click and drag an app icon to move its location; if you see an app you’d like to remove, mouse over it and click the X that appears over the top left corner of the app icon. You can also create folders from iTunes. If you drag an app onto another app, after a slight delay, a folder is created‚ just as if you’d performed the same action on your iPad. You get the same editable folder name, and you can rearrange icons within the folder. Since you’re using a computer, you don’t need to click and hold to enter the jiggling-icon edit mode; you can click and drag anytime. Similarly, to edit an existing folder, just double-click it. Add Files to Your Apps Below app management, you’ll find the File Sharing section. While your apps, on the whole, do not interact, some Apple and third-party apps allow you to add files to them from your computer, by way of iTunes. (If you have no apps that support file sharing, this section won’t appear.) You’ll see a list of apps installed on your iPad that can share files through iTunes. Click on one in the Apps list and you’ll see any files you’ve already added to, or created on, the iPad on the right, along with their creation date and size. (For more information on adding files to your apps, check out “Sync Files” in the Productivity chapter.) 39 2 Connect and Communicate Apple calls the iPad “the best way to experience the Web, e-mail, photos, and video.” Now that you have your iPad set up, it’s time to learn how to best take advantage of these keystone features. In this chapter, we’ll be focusing on how to get online, communicate, and find your way around. We’ll walk you through getting connected (via Wi-Fi or 3G), browsing the Web with ease, setting up and writing e-mail, video chatting over FaceTime, and navigating with Maps. We’ll also suggest some related third-party apps that can fill in the gaps or expand upon the features in the built-in software. Contents Get Connected Page 41 Browse the Web Page 48 Check and Send E-mail Page 56 Video Chat with Friends Page 65 Navigate with Maps Page 69 40 Chapter 2 Connect and Communicate Get Connected The iPad comes in three models: Wi-Fi only, and two versions of Wi-Fi + 3G—a GSM model, which uses AT&T’s 3G network, and CDMA, which uses Verizon’s. All three can connect over wireless home and business networks, but only Wi-Fi + 3G iPad owners can take advantage of the 3G cellular network—assuming they’ve signed up for a data plan. You can check which kind of network your iPad is connected to in the upper left corner of the screen: When on Wi-Fi, you’ll see an upside-down pyramid representing the signal strength (the more bars there are, the stronger the signal); on a cellular network, you’ll see a row of vertical white bars (again, more bars means a stronger signal) with the word 3G next to it. Connect over Wi-Fi Both the Wi-Fi–only iPad and the 3G iPad can connect over wireless networks. These are fairly common in homes and businesses, but they’re not available everywhere, and your network speed depends on your local Internet connection. Pair Up It’s easy to connect your iPad to an available Wi-Fi hotspot using the Settings app. 41 Chapter 2 Connect and Communicate To turn Wi-Fi on, head into Settings, where you’ll see the Wi-Fi option on the left side. (Alternatively, you can find the same preferences within General -> Network.) To the right of the option, you’ll either see Off, if you have the setting turned off; Not Connected, if it’s turned on but not connected; or the name of the network currently in use, if Wi-Fi is turned on and connected. Tap the option to bring up the Wi-Fi preference pane (see “Pair Up”). By default, Wi-Fi is off; to turn the iPad on, simply tap the On/Off switch. This will turn on the Wi-Fi antenna and display a list of networks currently in range, if any. Each one will list—from left to right—its name, whether it requires some sort of password authentication (if it does, you’ll see a small lock symbol), the strength of the signal, and a small blue arrow (for detailed information). Tap a network to connect to it. If the network is protected, you’ll be prompted for a password; otherwise, you should connect automatically. If you don’t see your network listed—if it’s hidden, for instance—tap Other to enter its name and security information, if it has any, so that you can connect to it. Once you’ve connected to a network for the first time, your iPad will add it to a list of friendly hotspots, and in the future will attempt to look for and join it automatically. If you ever want your device to forget a network, simply tap the little blue arrow to the right of its name, then tap Forget This Network. The blue arrow also gives you access to internal information about the hotspot, such as its IP address and DNS. At the bottom of the Wi-Fi settings panel, you’ll see the Ask To Join Networks option. If this is on, while you’re out and about and not connected to a Wi-Fi network, your device will prompt you with a list of available hotspots to connect to. Connect over 3G If you own a 3G-capable iPad, you can also—for a monthly fee—connect over a cellular data network. In the United States, both AT&T and Verizon provide iPad 3G service over their respective networks. Unlike the iPhone 3G and other such services, this is a contract-free plan—you can sign up or discontinue it at any time. In addition, you can manage your 3G service entirely from the iPad—there’s no need to go into a carrier retail location or Apple Store to activate or reconnect your service. 42 Chapter 2 Connect and Communicate Data Breakdown View your account, toggle data on or off, and enable roaming from the Cellular Data settings pane. Know Your 3G Plan Options There are two ways to set up a cellular data plan. If you try to access the Internet on your 3G-capable iPad while you’re out of range of a Wi-Fi network, the device will automatically prompt you with a pop-up window asking if you’d like to sign up for a plan. If you proceed, you’ll be taken to the Cellular Data account window, where you can activate 3G service then and there. Alternatively, you can set up, monitor, and discontinue 3G data service at any time by going to Settings -> Cellular Data (see “Data Breakdown”). There are several options within the Cellular Data settings pane: an On/Off toggle to enable or disable the use of cellular data on your iPad (see “3G Data Usage Tips” later in this chapter for more information); an On/Off toggle for data roaming (to control international use); View Account, which lets you set up and view your cellular data plan; and—if you’re using the GSM version of a Wi-Fi + 3G iPad—SIM Pin, which lets you set a private code for your iPad’s SIM card (to prevent others from activating it for 3G use). To sign up for a plan, tap View Account to bring up the Cellular Data Account window. When creating a new account, your iPad will request your name, telephone number, and e-mail address, and ask you to create a password. After you do that, you’ll be asked to choose a monthly plan (see “The Choice Is Yours”). 43 Chapter 2 Connect and Communicate The Choice Is Yours When signing up for a data plan, you’ll be able to see each option and its pricing. 3G Plans In the United States, you have the option of choosing either AT&T (GSM) and Verizon (CDMA) for your service provider. Because each network relies on a different antenna setup, there are different versions of the iPad for each; as a result, you’ll want to decide which network you want to use before purchase. AT&T offers two options for your iPad: 250MB of data for $15 a month, or 2GB of data for $25 a month. Verizon, on the other hand, provides four different options: 1GB of data for $20 a month, 3GB for data for $35 a month, 5GB of data for $50 a month, or 10GB of data for $80 a month. These 3G plans are prepaid and contract-free—that means you pay at the beginning of the month for your service, and you can disconnect and reconnect it at any time without penalty. In the United States, however, if you already have a wireless account with AT&T (say, if you use an iPhone), you can choose a post-paid plan: Instead of paying at the beginning of the month, you can incorporate your iPad’s 3G service into your monthly cellular bill. Unfortunately, if you wish to activate this option, you’ll have to sign up in an AT&T store or from the company’s Website—you can’t do it directly from your iPad’s Settings screen. It’s important to note that while these plans don’t require a contract, they do rebill automatically every 30 days, so if you only want to sign up for a month’s worth of service, you’ll have to manually cancel by going to 44 Chapter 2 Connect and Communicate View Account -> Add Data Or Change Plan -> Cancel Plan. (We only provide U.S. pricing here—international readers should check Apple’s Website in their country for providers and data rates.) Once you’ve picked your plan, enter your billing information. You’ll have to agree to your cellular provider’s terms and conditions, confirm that your billing information, address, e-mail, and data plan selection are correct, then tap Submit. You’ll be billed immediately for the first month, and then, assuming there were no problems, you’ll receive a message saying your data plan was successfully activated. Monitor Your Usage Once your plan is active, you can change it, add more data, or check your usage by tapping on View Account within the Cellular Data pane in Settings. Log in with your e-mail address and the password you set up to gain access to your account information. Within Account Overview, you can see your current data plan, how much of it you’ve used, the remaining amount of time you have in which to use it (data does not roll over month-to-month), and your monthly billing period (see “Just the Facts”). This screen also gives you the option to add data or change your current plan, add an international data plan, or edit your user and payment information. Just the Facts The Cellular Data Account window displays your current data plan, as well as options to add data or change your plan or user information. 45 Chapter 2 Connect and Communicate Your iPad will automatically send pop-up notifications when you’ve hit the 20 percent, 10 percent, and 0 percent marks for data remaining on your plan each month, and will give you the option of signing up for more data at each of these points. Otherwise, you can simply go into your account and add more data by tapping on the Add Data Or Change Plan button within Account Overview. Add International Data If you’re going on a trip outside the country and want to take advantage of that country’s 3G network to continue your work, you’ll want to sign up for an international data plan. To do this, navigate to Settings -> Cellular Data -> View Account. After signing into your account, tap Add International Plan. Unlike domestic plans, these plans are only valid for one month, to prevent accidental charges—you must re-up at the end of each month spent abroad. Also, you must enroll in a domestic plan before you can buy any international data. In the United States, AT&T offers four data options for international travelers: 20MB for $25, 50MB for $60, 100MB for $120, and 200MB for $200. Choose one of these plans, enter a start date, and agree to AT&T’s terms of use; the company will bill you when the plan starts using your current customer information on file. Unfortunately, Verizon customers have no such international options—but then again, the CDMA wireless standard Verizon employs is not as common outside the United States. 3G Data Usage Tips Since your monthly data is not unlimited, you may find that you go over your allotment or use it too quickly. Here are a few good ways to conserve data and make sure your plan lasts. Tune Out Plan on keeping Cellular Data set to Off unless you specifically need 3G access. By continually leaving it on, you allow any background activities that require Internet access (checking e-mail, for example) to eat up your data. You can, of course, separately disable those actions, but keeping Cellular Data turned off removes any chance of accidental usage. Turn Off Push In Settings -> Mail, Contacts, Calendars, tap Fetch New Data, and set Push to Off and Fetch to Manually or to a less frequent schedule (see “Fetch, Boy”). If either Push or Fetch is enabled, your iPad 46 Chapter 2 Connect and Communicate Fetch, Boy Keep your background data slurping to a minimum by turning off Push, or by reducing how frequently Mail checks for new information. will regularly receive or retrieve mail and other updates. (Note: If you turn off Push and Fetch, Find My iPad will no longer work for tracking a wayward iPad.) Apple automatically prevents the download of large attachments, but if you receive piles of e-mail each day, you could waste megabytes having messages pushed to you immediately instead of waiting to retrieve them at a Wi-Fi watering hole. View Streets, Not Satellites A single page of Google satellite-view data in the Maps app consumes about 1MB. In Classic view, which shows only road outlines, Maps munches data a little less quickly. Tap the page-curl icon in the corner of the Maps app, and tap Classic in the Maps section. Avoid High-Maintenance Apps Streaming video from a third-party app like Netflix (macworld.com/6473) will fast-forward through your allowable data at the rate of hundreds of megabytes per hour. 47 Chapter 2 Connect and Communicate Browse the Web Now that your iPad is connected, you can browse almost everything the Internet has to offer. Apple’s popular desktop browser, Safari, has been adapted for mobile use and comes standard on every iPad. While the mobile version has some limitations (it doesn’t support plug-ins like Flash or Java), Safari can still usually get you anywhere you want to go. Safari Basics A blue compass icon represents mobile Safari. By default, Apple puts the app in the iPad’s Dock, but you can move it elsewhere if you choose. Go ahead and tap the icon to open the browser. With the added screen real estate, the iPad version of Safari looks remarkably similar to its desktop counterpart. Everything you need to navigate Safari is along the app’s top brushed-metal bar. From left to right, here’s a breakdown of the features and options available to you. A Navigation Arrows Tap either the backward (previous) or forward (next) button to travel through your current Safari window’s history. B Multiple Windows The stacked pages icon allows users to open up to nine different Safari windows for an optimal browsing experience. Tap the icon to bring up window view; you can remove or add new pages from this screen by either tapping the New Page option or selecting the black X in the upper left corner of the window. C Bookmarks and History To access your device’s history and book- marks, tap the open-book icon, which will launch a pop-up window showcasing your device’s favorites—including Bookmarks Bar selections, if you have them enabled. D Save and Share The Share icon (represented by an arrow escaping from a rectangle) allows users to add the current page to their bookmarks, create a Web Clip by adding it to their Home screen, mail the page link, and print the contents of the page. A B C D E G 48 F Chapter 2 Connect and Communicate E Enter URLs If you know the Web address of the site you're looking to access, simply enter the URL in the field. On the right side, a small circular arrow allows you to refresh the page. You can look up previously viewed pages and URLs by typing a descriptive word into the toolbar; as you type, mobile Safari will generate a list of matching results from your history and favorites. When Safari is loading a page, the circular refresh arrow will turn into an X. Tap this X (or tap on the URL itself) to stop the loading process. F Search the Web or the Page You can search the Web with Google, Yahoo, or Bing using the text field to the right of the URL field. (To set your preferred search provider, open Settings -> Safari and tap the Search Engine option.) You can additionally use this field to search within the page; underneath the search engine results, you’ll see On This Page with the number of results for your term on the current page. Tap Find "term" to go through and see all highlighted matches for your word(s) within that page. You can also do another in-page search from this view (see “Seeking Words”). G The Bookmarks Bar Though it’s not turned on by default (you can turn it on by going to Settings -> Safari -> Always Show Bookmarks Bar), this bar—which sits directly below the main toolbar—allows you to create a horizontal list of favorite Websites for easy access. Seeking Words To search the contents of a page, you can use the search field on the toolbar and scroll to the On This Page section. 49 Chapter 2 Connect and Communicate Navigate Safari The iPad has a large, crisp screen; however, as most Websites opt to let the device load the full-content versions (as opposed to presenting a mobile version, which you’ll often see on an iPhone or on other small portable devices), default Website text can sometimes be too small to read. You can easily fix this using the iPad’s multitouch gestures. Scroll and Zoom Just like on an iPhone, you can double-tap a paragraph of text, picture, or other nonlinked area on a page to zoom in, and double-tap again to reverse. If you want to magnify the page further, you can use iOS’s pinching gestures and pinch out to expand an area. You can scroll up, down, left, or right by dragging your finger across the page in the desired direction. Flick your finger and the page will scroll on its own with virtual momentum; to stop the motion, tap the screen or let it come to rest on its own. Interact with Links You can navigate almost any page by tapping links. Tapping an e-mail link opens a new message right inside Safari; if you have more than one e-mail account, your device will use your default account as your return address, but you can choose a different account before sending. Tapping a map link opens the Maps app with the destination already specified (see the “Navigate with Maps” section later in this chapter for more about your device’s mapping features). If you tap a link to a supported audio file (AAC or MP3 up to 320 Kbps, Audible, Apple Lossless, WAV, or AIFF format) or video file (H.264 or MPEG-4), mobile Safari will play the media right from the browser. To enter text while on a page, tap a text field; Safari will zoom in on it and bring up the on-screen keyboard. In this text-entry mode, Previous and Next buttons let you quickly jump between text fields without having to zoom back out. If you encounter a scrolling box or list on a Web page, you’ll find that scrolling with one finger won’t do the trick, as that scrolls the entire page. Instead, zoom in on the box and then use two fingers to scroll. Browse Your History If you’re trying to find a Website you’ve visited in the past, tap the Bookmarks icon in the toolbar. Make sure you’re in the topmost menu in the resulting pop-up by tapping the named arrow in the top left corner (tip: if there’s no arrow, you are where you need to be). Then tap History to get an in-depth view by date of your past Website visits. 50 Chapter 2 Connect and Communicate Want to clear your history? You can either clear it from the Bookmarks pop-up window (by navigating into the History folder and tapping Clear History in the upper right corner of the window) or by going to Settings -> Safari -> Clear History. Unfortunately, in either case you have to clear your entire browsing history, as there’s currently no way to remove previously viewed Web pages individually. Add, Manage, and Share Websites If you repeatedly visit a Website, you may want to bookmark it or create a Web Clip for easy access in the future. Add a Bookmark If you’ve found a Web page you can’t live without regularly visiting, tap the Share icon in the toolbar and then tap Add Bookmark (see “My Favorite Sites”). This will summon a pop-up window that asks you to name the page and choose where you’d like to keep it (if you have any bookmarks folders). If you’ve enabled the Bookmarks Bar feature within Settings, you can also place the bookmark there by selecting the Bookmarks Bar folder. Add a Web Clip Sometimes a Website is so important you’d like to have a more permanent link to it outside Safari. Web Clips allow you to turn any page into a faux app on your device’s Home screen—you’ll see an My Favorite Sites To add a bookmark, you simply need to name it, make sure the URL is correct, and choose a place to store it. 51 Chapter 2 Connect and Communicate icon and a name for the page, but it will launch in mobile Safari when you tap it. To add a Web Clip, navigate to the desired Web page and tap the Share icon, then tap Add To Home Screen. The resulting pop-up will show a preview of the Web Clip icon and ask you to come up with a clear, concise name for it. Manage Bookmarks from Your iPad You can keep your bookmarks organized and delete those you’re no longer interested in from the Bookmarks icon in the toolbar or, alternatively, from your computer. From the Bookmarks pop-up, tap the Edit button in the upper right corner in any folder to delete or reorder your bookmarks. From here, you can delete any bookmark or folder—except for the History, Bookmarks Bar, and Bookmarks Menu folders—by tapping the minus sign (–) next to it. If you want to alter a URL (for example, if you bookmarked a specific page on a site, but really wanted to bookmark its home page), tap the bookmark’s title while in Edit mode. The resulting pop-up allows you to change its name, URL, and location within the Bookmarks folder. To move a bookmark to a higher or lower position within its current folder, enter Edit mode and drag the triple gray line icon to the right of the bookmark’s name up or down. Unfortunately, you can only reorder bookmarks within the same folder this way; to move it into a different folder, you must tap the bookmark itself to edit it. You can also create a new folder while in Edit mode by tapping the New Folder button, which appears in the upper left corner of the pop-up window. Manage Bookmarks from Your Computer Although your iPad gives you most of the tools you need to manage your bookmarks, you can also use the Web browser on your Mac or PC to edit and organize them. iTunes will then let you sync bookmarks with the desktop version of Safari (Mac and PC; Windows users can get Safari at apple.com/safari) or Internet Explorer (Windows only). To set up bookmark syncing, plug your device into your computer, then open the device’s preferences in iTunes. Click the Info tab and scroll down to the Web Browser section, where you’ll find an option to sync Safari bookmarks. When this is selected, any changes you make in your desktop Web browser will be reflected in the bookmarks on your device the next time you sync, and vice versa. Incidentally, if you have Apple’s MobileMe service, you can do all of this syncing over the air—no manual sync required. 52 Chapter 2 Connect and Communicate Sharing Safari Using the Share icon, you can mail a link to or print the current Web page. Share a Web Page Found something hilarious or intriguing during your search that you’d like to share with a friend? You can e-mail or print it directly from mobile Safari by tapping the Share icon (see “Sharing Safari”). Select Mail Link To This Page to open up a Mail message with the name of the Website and the link embedded within it. Just type the e-mail address of your recipient and tap Send—or tap Cancel if you’ve decided not to send an e-mail after all—and you’ll be returned to the Web page you were previously viewing. You can also print the current page by tapping Print; in the resulting pop-up window, you’ll be asked to select a compatible printer and the number of copies you want. Safari Tips and Tricks Once you’ve gotten the hang of basic browsing, here are a couple of tips and tricks to really make your browsing experience the best it can be. Do More with Links and Images By tapping and holding any link for a few seconds, you’ll get a pop-up that not only shows the link’s full URL, but gives you the option to open it, open it in a new page, or copy the link to the Clipboard (see “Option Away”). Perform the same gesture on an image, and you’ll see an additional option, Save Image, that will download it to your Camera Roll. 53 Chapter 2 Connect and Communicate Jump to the Top If you’re midway down a long Web page but need access to the beginning, tap the top of the Safari toolbar to jump back to the start. Use Typing Tricks You might notice that when you’re typing URLs or e-mail addresses, the keyboard changes to accommodate useful keys, such as the period (.), slash (/), and .com suffix. In addition, you can tap and hold the .com button to bring up a variety of alternate address endings, such as .net, .org, .edu, and, if you have any international languages installed on your device, those URL country codes. Master AutoFill Save typing time and brain space by taking advantage of Safari’s AutoFill feature. To get started, go to Settings -> Safari -> AutoFill, then turn on the Use Contact Info option and select which contact you’d like to use as your default. Next, turn on the Names & Passwords option. When you enter your login for a Website and tap Submit, Safari will ask whether it should remember that information. If you tap Yes, the next time you visit that site, you can simply tap the AutoFill button to insert your username and password. If you change your login information in the future, AutoFill will detect when you enter a new password or Option Away Tapping and holding on a link or image will open a pop-up menu with additional options. 54 Chapter 2 Connect and Communicate username and ask if you’d prefer it to remember this new combination. Finally, if you want a fresh start, the Clear All button in Settings -> Safari -> AutoFill will delete all saved login information. Troubleshoot Like all programs, especially those that interact with the Web, Safari can occasionally experience slowdowns or display erratic behavior. To fix these problems, you can try clearing Safari’s cookies and cache by heading to Settings -> Safari -> Clear Cookies or Clear Cache. (For more on troubleshooting, see the Troubleshooting Tips chapter.) Third-Party Web Apps Safari may be more than adequate for most of your Web surfing needs, but sometimes you need to call in a specialist. In that case, you’re in luck: The App Store is right at your fingertips, and sports thousands of iPad-optimized applications, including plenty that can give your browsing experience that extra oomph. Mercury Web Browser Pro If Safari isn’t getting it done for you, iLegendSoft’s Mercury Web Browser Pro packs a ton of options and niceties that Apple opted to leave out of its own mobile browser. Unlike the mobile edition of Safari, Mercury offers browser tabs, customizable themes, download and unzipping support, unique multitouch shortcuts, ad blocking, screen dimming, and more. The free light version limits you to two tabs and displays ever-present ads, but the paid pro version eliminates those restrictions ($1; macworld.com/7150). Twitterrific For Twitter aficionados, the Iconfactory’s Twitterrific for iPad puts your timeline front and center, complete with color-coded tweets: green for your own, brown for mentions, blue for direct messages. Every tweet in your timeline has controls that let you reply to it, see other replies to that author, show any conversation, translate the tweet, e-mail it, or mark it as a favorite. The free version is ad-supported and only allows one account—if you want to upgrade to multiple accounts and banish the ad, you can only do so via a $5 in-app purchase (free; macworld.com/5024). 55 Chapter 2 Connect and Communicate Check and Send E-mail With the iPad, Apple claims, you can “see and touch your e-mail like never before.” While that may be technically true—there’s never been a 9.7-inch tablet running Apple’s Mail e-mail client—if you’ve ever used Mail on an iPhone or iPod touch, the experience will seem quite familiar. Connect Your E-mail Accounts In iTunes, you have the option to sync your existing e-mail accounts via iTunes. On a Mac, you can transfer accounts from Apple Mail. On a Windows PC, you can transfer account details from Windows Mail (included with Windows Vista), Microsoft Outlook Express (Windows XP), or Outlook. If you skipped this step, or if you’re using Web-based e-mail, you can also set up these accounts directly on your iPad. Head on down to Settings -> Mail, Contacts, Calendars and tap Add Account (see “Click and Go”). Apple has worked with most major e-mail providers to create automatic Click and Go If you have a Microsoft, MobileMe, Gmail, Yahoo, or AOL account, you can quickly set up your e-mail. 56 Chapter 2 Connect and Communicate setup for these accounts so you don’t have to remember any complicated settings beyond your username and password; if you use a custom provider, you’ll have to set things up manually. Note that you’ll need to have an e-mail account with one of these services or with an ISP before setting it up on your device. Automatic Setup If you have a Microsoft Exchange, MobileMe, Gmail, Yahoo, or AOL account, you can set up your account automatically with nothing more than a username or password. Just tap whichever provider you have an account with and you’ll be asked for your name (what you want to appear on your e-mail messages from this account), e-mail address, password, and a description (usually just your e-mail address, but you can name it something clever like “Personal” or “Spam Account”). Once you’re finished filling out the form, tap Next, and your account should configure automatically. If you’re configuring a MobileMe, Gmail, or Exchange account, you’ll be asked if you want to sync your Calendars and Notes—and in MobileMe’s case, Bookmarks—in addition to your mail. MobileMe Alias Support For a MobileMe account, the service gives you the option to create up to five e-mail aliases—essentially, additional addresses that redirect to your main e-mail address. For example, if your official MobileMe address is [email protected], you could set up an alias of [email protected] to use for mailing lists and another of [email protected] that you provide when you shop online. When you link your MobileMe address and account to your iPad, it will automatically add those aliases as potential From addresses for messages you’re sending. Just tap the From field—your MobileMe aliases will appear alongside your various e-mail accounts. Choose one to use it as the From address for that message. (If you configured your aliases before Mac.com changed to MobileMe, the list shows both the old and new options for each alias: [email protected] and [email protected].) Manual Setup If you’re using a different service provider for your e-mail, or if you want to add an LDAP, CardDAV, or CalDAV account for your contacts and calendars, tap Other when choosing what kind of account to set up (see “Advanced Options”). When setting up a mail account manually, first choose which type your provider supports—IMAP or POP. Then enter the appropriate information in the various fields. This will include your name, e-mail address, and 57 Chapter 2 Connect and Communicate Advanced Options Mail’s Settings allows you to manually set up any special Mail, Contacts, and Calendar accounts you have. account description, just as with the previous option; the incoming and outgoing server addresses; and your username and password. To set up a CalDAV account, you’ll have to know your server, username, and password; adding a subscribed calendar requires that you know the URL for that calendar. Once you’ve entered the appropriate information, the calendar in question will download its events. If you’ve got multiple calendars on a CalDAV account, such as Google Calendar, you’ll have to add a separate account for each of them. To set up an LDAP or CardDAV account, you’ll need to enter the server address, and a username and password. Your iPad will then attempt to connect via SSL; if that fails, it will connect in the clear, or unencrypted. Once your account is set up, you can search the directory from within the Contacts application. If you’re sending an e-mail, Mail will automatically search the directory for you as you enter a name. Mail Preferences Tweak your mail display settings and other important features in Settings -> Mail, Contacts, Calendars. To access specific e-mail settings, tap your account to bring up the Account Info pane. Here, tap Account -> Advanced to access more specific settings, such as enabling SSL security for incoming and outgoing mail, as well as setting an IMAP path prefix (if your e-mail provider requires it). 58 Chapter 2 Connect and Communicate In the Account Info pane, you can also temporarily turn an e-mail account off by moving the Account slider to Off (if it’s a MobileMe, Gmail, or Exchange account, slide the Mail slider to Off). Your device won’t check the disabled account for new mail, and it won’t appear in the Mail app, until you reactivate it. Below the Accounts section, you can change various display settings for the Mail app, including how many messages each inbox displays, how much of each message you see before tapping it, what font size is used, and more. The Signature option allows you to change your e-mail signature from the stock “Sent from my iPad,” or you can omit the signature entirely. (Unfortunately, unlike many desktop e-mail clients, Mail for iOS offers only a single signature.) If you’re using more than one account, you can also choose a default address for sending e-mail when you’re in other programs. Work with Mail Now that you’ve got your Mail accounts set up and working, you can head on to the app itself (see “Unification”). Tap the Mail icon on your Home screen to launch the program. If you have more than one e-mail account, you’ll be able to take advantage of the unified inbox feature, Unification Mail on the iPad allows you to access all your accounts in one inbox. 59 Chapter 2 Connect and Communicate which gives you the option of seeing all your messages in one inbox, rather than having to check each account for new messages. Like most iPad apps, Mail offers portrait and landscape orientation. In landscape, the screen is divided into two columns: The left side contains your mailboxes and message list, while the actual body of the message takes up most of the right side. In portrait, your mailboxes and message lists are accessible only by pop-up menu, with the highlighted message taking up the majority of the screen. (This guide assumes you’re primarily using Mail in landscape orientation, though most of what we describe carries over to portrait mode.) Navigate Your Inbox Tap an account or your inbox along the left side to browse your mail. Flick your finger up and down to scroll, and tap the top of the column at any time to scroll the list back up to the most recent message. You can search within your inbox or whatever mailbox you have selected by tapping the Search bar at the top of the column. At the bottom of the left column, Mail will tell you when it last checked for new e-mails—you can manually refresh this by tapping the Refresh arrow to the left of this time stamp. In the inbox, you’ll see a preview of each message, including the sender, the time it was sent, the subject line, and, if desired, a few lines of text (how many lines appear—none to five—depends on your Mail settings). Unread messages display a blue dot to the left, while mail you’ve replied to or forwarded has small arrow icons to the left. Mail displays only a limited number of messages at once—you can change this by going to Settings -> Mail, Contacts, Calendars. If you have more than that number of messages in your mailbox, scroll to the bottom and tap the Load More Messages option. (The total number of messages still on the server will appear below this.) Tapping the left-arrow button at the top of the screen takes you up a level; repeatedly tapping this button will eventually return you to the main Accounts screen. If you want to move or trash several e-mails, tap the Edit button in the upper right corner of the column. To select messages, you need only tap them once—at the bottom of the column, you’ll see a running tally of how many you’ve selected (see “Natural Selection”). Tap Delete or Move to trash your messages or move them elsewhere, respectively. 60 Chapter 2 Connect and Communicate Natural Selection You can eliminate or move messages in batches using Mail’s Edit feature. Organize Mail by Thread Mail on the iPad offers a way to automatically group messages that are part of the same exchange or discussion. When you receive a message in reply to a previous message that’s still in your inbox, all the messages in the conversation are grouped into a single entry. This message displays a small numeric badge indicating how many messages are in the thread. Tap this discussion item and, instead of viewing the contents of the previewed message, you’ll see a list of all the messages in that conversation, or at least all that remain in your inbox— if you previously filed older messages elsewhere, they won’t appear. The threaded-discussion feature also works with messages filed into other folders; however, a grouped message thread includes only messages residing in the same folder. If you prefer not to see your conversations in threads, you can turn this feature off for all accounts—it’s an all-or-nothing setting—using the new Organize By Thread setting in Settings -> Mail, Contacts, Calendars. Read E-mail To view an e-mail message (and thus mark it as read), tap its title. E-mails appear much like they do in a desktop e-mail program. However, to conserve screen space, Mail limits the number of headers that appear at the top of the message: By default, you’ll see only the From field, subject, and date and time information. To see other header information, such as To and Cc fields, tap the Details button. Tap Hide to make this information disappear again. 61 Chapter 2 Connect and Communicate While viewing a message, you can quickly go to the next or previous message in your inbox by tapping the up and down arrows at the top of the screen, and, although it’s not obvious, you can mark a previously read message as unread by tapping Details. This reveals a Mark As Unread option; tap it, and the next time you view your inbox, the message will display the unread indicator. View Attachments When you receive an e-mail message with an attachment, tapping that attachment’s icon will display a preview of the document, if it’s a file the iPad can display. Alternatively, if you tap and hold, Mail will present additional options. The first is always Quick Look, which gives you the same preview as if you’d simply tapped the attachment’s icon. Next is Open In app name, which lets you open the attachment in the installed iPad app that presents itself as the preferred app for that type of file. The third option is Open In, which presents all the apps on your iPad that the OS believes can open that type of file (see “Alternate Apps”). Of course, which options you get—the preferred app and the apps that appear when you tap Open In—depends on what you have installed on your iPad. If the e-mail includes multiple images, there will be an additional option to save all of the images at once. If you don’t have time to download images, you can disable remote image loading. Go to Settings -> Mail, Contacts, Calendars and move the Load Remote Images slider to Off. (You can still load images manually within a message.) Alternate Apps If Mail can’t figure out the correct app for a document attached to an e-mail, you can easily open it in another installed application. 62 Chapter 2 Connect and Communicate Jot It Down You can create a new message by tapping the New Message button; a blank e-mail will drop down. You can add pictures with copy and paste. Delete Messages There are several ways to delete a message. If you have the e-mail open, simply tap the trash-can icon in the upper right corner of the screen. The message will be sucked into the Trash and the next message will appear. Alternatively, you can batch-delete messages by tapping the Edit button in the upper right corner of the left column, then selecting the messages you wish to trash. And you can delete a message in your inbox, or in any other folder, by swiping your finger across the message and then tapping the red Delete (or Archive) button. Send E-mail The simplest way to send an e-mail is to tap the New Message icon in the upper right corner of the screen. A new message will pop up, ready for you to enter the e-mail address of the person you’d like to send it to, the subject of the message, and the body text. Unfortunately, you cannot attach documents or photos from this New Message screen unless you use copy and paste (see “Jot It Down”). To reply to an existing message, tap the arrow to the left of the New Message icon. This will bring up three or four options: Reply, Reply All (if there was more than one recipient), Forward, or Print. If you forward a message that originally included attachments, you’ll have the option of including those files or just forwarding the body of the message. If you want to send a new message to the sender of an existing message, tap the person’s name in the From field, and then tap his or her 63 Chapter 2 Connect and Communicate e-mail in the resulting pop-up window (if the person isn’t in your contacts, you’ll also have the option of adding him or her as a contact). You can also Cc and Bcc recipients; the latter option will hide those addresses from other recipients. If you want to remove a recipient before sending a message, just tap the To or Cc field, tap the recipient address, and tap the Delete button on the on-screen keyboard. Once you’ve finished your e-mail, tap Send. If you have multiple accounts, your message will by default be sent from the account in which you created it; you can change that by tapping the Cc/Bcc, From field, and then again on the From field. That will bring up a selector that allows you to pick any of your addresses. E-mail Pictures Even though there’s no button to directly add attachments in Mail, you can still add pictures to your e-mails in several ways. From the Photos app, you can e-mail up to five photos (see “Photos and Illustrations” in the Multimedia chapter). While this method imposes a specific photo limit, you can alternatively copy as many as you like and paste them into an e-mail. You can also copy and paste images from other e-mails or applications. Tap and hold an image until the Copy command pops up. Tap it, then return to your e-mail. Tap and hold anywhere inside the body of your e-mail until the Paste button appears, then select it to place your image. Repeat until you’ve added all the images you want, then tap Send. When sending, Mail will offer to resize your photos (to send them faster)—you can choose between Small, Medium, Large, or Original Size. (Third-party apps may have options for you to e-mail other things, such as documents.) 64 Chapter 2 Connect and Communicate Video Chat with Friends For times when hearing a friend’s or relative’s voice just isn’t enough, there’s FaceTime. With FaceTime, not only can you talk to your friends and family, but you can see them too. So if you want to wave good night to your kids while you’re on a business trip, or chat with loved ones across the country, it’s as easy as a few taps. Note that to use FaceTime, you must be on a Wi-Fi network—it won’t work over the iPad’s 3G connection. You’ll also need a friend with a FaceTime device—an iPad 2, an iPhone 4, a fourth-generation iPod touch, or a Mac—who’s also on a Wi-Fi network. It’s additionally worth noting that FaceTime is strictly a one-on-one affair—those looking for a group video calling solution will have to find it elsewhere. Activate FaceTime In order to use FaceTime, you’ll need to log in with your Apple ID. Go to Settings -> FaceTime and enter your Apple ID and password (the same combination you use to buy apps or media). Tap Sign In. (If you don’t already have an Apple ID set up, you have the option to create one here.) Once you’re signed in, you’ll need to associate your account with an e-mail address, if you haven’t already done so. (Note Alternate E-mails You can add more FaceTime addresses from the Settings app. 65 Chapter 2 Connect and Communicate Face Off Once you log in and launch FaceTime, you’ll be greeted with a split-screen view of your iPad’s front-facing camera and a list of your contacts. that if you haven’t used your address with FaceTime before, Apple may first send you an e-mail to verify that you own the account in question.) You can also add multiple e-mail addresses for FaceTime; if you do so, you’ll have the option to choose which address you’d like the call to come from (see “Alternate E-mails”). Launch FaceTime Tap the FaceTime icon on the Home screen of your iPad to get started (see “Face Off”). You’ll be greeted by a two-pane view that shows a video of yourself on the left and a list of your contacts, pulled from the iPad’s address book, on the right. You can also view a list of recent FaceTime calls by tapping the Recents button on the toolbar in the bottom right; you’ll see the name of the contact and when the call took place. For more information, you can tap on the arrow icon next to the entry. If you want quick access to certain contacts, you can tap the Favorites button next to Recents. Make a Call To actually place a FaceTime call, tap on one of your contacts’ names to see his or her information. If you’re calling someone on another iPad 2, a fourth-generation iPod touch, or a Mac, you’ll want to tap that person’s e-mail address. For contacts on an iPhone 4, you can tap either an e-mail address or a phone number. If you already know which e-mail address your contact has associated with FaceTime, you’ll 66 Chapter 2 Connect and Communicate see a blue video camera icon to the right of the address. Otherwise, you’ll have to find out from your friend which address to use, or figure it out with a little trial and error. On the Call Once your friend accepts your call (and we’re sure he or she will), that person’s image should occupy the majority of the iPad’s screen, with your own mug shot relegated to a small picture-in-picture in one corner. You’ll also see three controls at the bottom: Mute, End Call, and the Camera toggle (see “Switcheroo”). Tapping the Mute icon will silence your audio; you’ll still be able to hear and see your conversation partner and he or she will be able to see you, but your screen will dim and you’ll see a big mute icon in the middle. Tapping the icon again at any time will restore your audio, while tapping End Call, as you might expect, will terminate your FaceTime call. The Camera toggle lets you choose whether to show your conversation partner the image from the iPad’s front-facing camera (presumably you) or the rear-facing camera (if you want to show what you’re looking at). If you have a pressing need to return to your Home screen while on a call, you can do so by pressing the Home button once. You’ll still be able to speak with your partner, but he or she will see an overlay on their screen noting that video call is paused, along with a freeze frame, until you resume the call. In order to resume the call, tap the green bar at the Switcheroo While on a call, you can A mute, B switch cameras, and C end the call. 67 A C B Chapter 2 Connect and Communicate top of iPad’s screen or navigate back to your Home screen and tap the FaceTime app again. Add a Favorite If there’s someone you find yourself calling a lot, you probably don’t want to have to burrow down through your contact list every single time you’re going to make a call. Instead, add him or her to your favorites. While viewing your friend’s contact info, tap the Add To Favorites button at the bottom and choose which phone number or e-mail address you’d like to add. (You can add multiple numbers or addresses by repeating this process.) Once you assign a contact to Favorites, you’ll see a blue star next to that entry in your address book. Alternatively, tap Favorites on the toolbar and then tap the plus button (+) in the top right corner. Tap the contact you want to add to Favorites, and then tap the e-mail address or phone number you’re looking for. Receive a FaceTime Call Because FaceTime runs in the background once you’ve set it up, you can get a request for a video chat at any time. A full-screen preview will take over your screen, showing your live video; a title bar at the top that says your contact name would like FaceTime, along with a contact image; and two buttons that allow you to either Decline or Accept the call. Third-Party Communication App If video chat isn’t your thing, you can still talk online using this app. BeejiveIM for iPad Face-to-face chatting is great, but the moment’s not always right. Instead, use BeejiveIM for iPad: This text-based chat app allows you to have multiple conversations with people on AIM, Facebook, Yahoo Messenger, and more. Plus, you can send pictures and voice memos, and view links in an in-app browser ($10; macworld.com/7231). 68 Chapter 2 Connect and Communicate Navigate with Maps Few things are more frustrating than trying to unfurl a full-size map while driving or walking around. With Maps on the iPad, you can view, zoom, and get directions for almost any destination in the world—without the hassle or clutter of toting around paper maps. The 3G iPad even comes with a built-in compass and GPS receiver. Get Oriented Apple’s built-in Maps app uses Google Maps to deliver search results, driving directions, satellite views, street views, and more, so it’s no surprise to see the little Google logo in the lower left corner of the screen when you first open the app (see “Mapped Out”). If you’re using a 3G iPad, you’re lucky enough to have a Global Positioning System (GPS) receiver, which lets your device figure out exactly where it is by triangulating radio signals from satellites in orbit. The iPad uses Assisted GPS, which essentially means that the device’s search for GPS Mapped Out The app uses the entire 9.7-inch screen for displaying routes and roads. 69 Chapter 2 Connect and Communicate information is assisted by computers at cell phone towers, improving speed and reliability. (The Wi-Fi–only iPad, while it lacks GPS, can still use Wi-Fi to get an approximate position if it’s connected to a network.) Maps is quite robust: It allows you to search in street, hybrid, satellite, and terrain views; find directions; check traffic; locate your position; and add bookmarks. You can change the type of map you’re looking at by tapping the page curl in the lower right corner of the screen. You have four options from which to choose (see “Topography Tricks”). Maps allows you to navigate in two modes: Search and Directions. You can change modes by tapping one of the buttons in the top toolbar. Search and Discover By default, Maps starts out in Search mode. In this mode, the toolbar contains—along the right side—the GPS location arrow, the Bookmarks/ Recents/Contacts pop-up, and a text field for conducting searches. Find Your Destination Tap the text field to start your search, and the on-screen keyboard will pop up. (If you’ve used the search bar before, a list of recent searches pops up below the text field.) As you type, Google Topography Tricks You can toggle different views in Maps from the page curl: Classic displays streets and other geographical features in a basic schematic view; Satellite shows overhead satellite imagery; Hybrid is a combination of these two; and Terrain combines street navigation with topographical terrain maps. 70 Chapter 2 Connect and Communicate will offer suggestions as to where you might want to go. You can search for a thing (“beach”), a place (“Zuma Beach”), or a specific address (“Malibu, CA”). Once you tap Search, Google will look in your current area (or the area you specify) for places that match your terms, and will drop a series of pins on items it thinks may be related. If you find the cluster of pins visually confusing, you can opt for a list. Next to the search field, you’ll notice a white-lined gray icon to the right of your search term—tap it to see all of your results in list form. Tap any pin, then the information symbol to the right of its name, to bring up more-detailed information about the location (see “Read All About It”). You can find its full address, get directions either to or from the location, add it to your bookmarks, share the location, or add it to one of your contacts. You can also enter street view (if available) by tapping the photo of the location within the pop-up window. Use Bookmarks, Recents, and Contacts You can access saved addresses, recent searches, and contact addresses through the Bookmarks pop-up in the toolbar. Bookmarks stores any addresses you’ve added as regular locations, while Recents brings up your latest searches and directions. You can use any of these locations—in Bookmarks, Read All About It Tap a pin to get a phone number, address, and more options. 71 Chapter 2 Connect and Communicate Recents, or Contacts—by simply tapping them. If you want to clean up your information, you can clear recent locations by tapping the Clear button in the upper left corner, or edit and delete bookmarks from the Edit button in the same location. To edit the address for a contact, you’ll have to go into Contacts. Use GPS To find your current location, simply tap the location arrow once. It will turn blue, and after a few moments, you’ll see a little blue pulsating dot on the main map. While the Wi-Fi–only iPad doesn’t have a GPS receiver, it will use available Wi-Fi base stations to triangulate its signal. If it’s unable to get a direct lock, you’ll simply see a larger blue circle. This means your device’s GPS or Wi-Fi receiver can’t accurately pinpoint your location, and is locating you in a general area. Tap the dot, and an address for your current location will pop up, along with two symbols. The orange circle on the left brings up Street View, while the information symbol on the right displays your current address, as well as several options: getting directions to and from your location, adding the location to one of your contacts, sharing the location with others, or adding it to your bookmarks. If you have a 3G iPad, you can also use directional GPS, thanks to the device’s built-in compass. Once you’ve found your initial location, tap the blue arrow in the toolbar to activate it. The arrow changes to a smaller arrow with a shining beam of light, indicating that directionality has been activated. On the map, your blue dot also gains a beam of light, indicating your general direction on the map. You’ll also see a compass rose in the top right corner of the map, showing you which direction is north. To exit from this mode, just tap the location arrow in the toolbar once more or drag your finger anywhere on the map. Get Directions Even though Maps doesn’t feature spoken turn-by-turn navigation, you can still use it to get from point A to point B. To enter Directions mode, tap the Directions button in the upper left corner of the toolbar. The search bar will expand into two different fields—Start and End—with an s-shaped arrow in the middle. Tapping the arrow at any point will swap whatever you have in those two fields—useful if you’ve navigated somewhere and now want to know how to return home. Tap either field to bring up the keyboard. Directions mode also gives you access to your most recent searches, but adds a bookmark for your 72 Chapter 2 Connect and Communicate Recalculating You can get step-by-step directions from Maps once you’ve calculated your route. current location to the top of the list, making it easy to find directions from your present position. Once you fill out both fields, you’ll be able to tap the Search button. Although by default Maps searches for driving directions, once you make your initial directions search, you can select either public transportation or walking for alternate routes to your destination. When you search for directions, a small blue bar pops up at the bottom center of the screen. Tap the car icon for driving directions, the bus for public transportation, or the person for walking directions. The middle of the blue bar tells you what kind of directions they are (car, public transit, or walking), where you’re going, how many miles it is, and your approximate travel time. On the right side, the blue Start button provides a step-by-step breakdown of where you need to go. Tap it to get started (see “Recalculating”). When you enter turn-by-turn mode, the left side of the blue bar changes to a single button with white lines on it. Tap it, and the slim blue bar on the bottom is replaced with a pop-up list on the left side of the screen, showing all the steps to get to your destination. Tap any step, and the map zooms in on that point. To exit turn-by-turn mode, simply tap the rectangle in the upper left corner of the pop-up. 73 Chapter 2 Connect and Communicate Third-Party Navigation Apps Google Maps adroitly handles the basics of maps and navigation, but if you’re looking for turn-by-turn spoken directions or deeper information, you might need to look farther afield. Thankfully, there are plenty of map-related apps on the App Store to help fill out your roster. Google Earth You can go beyond maps with Google Earth, which lets you zoom around the world, finding points of interest and viewing close-up satellite pictures. When you’re focused on a specific spot, you can reuse the search field to look for restaurants, parks, or other nearby places, all of which then get highlighted. Tapping on any of those locations exposes a small popover window with the spot’s address and phone number, along with a Web link to Google’s search listing for the spot in question (free; macworld.com/4331). MobileNavigator If it’s directions you’re looking to beef up, Navigon’s MobileNavigator has a set of strong features, including an excellent computer-generated text-to-speech voice, the ability to keep a strong fix on the GPS and refresh streets smoothly, and good 3D animation. It’s also a universal app, so it works on both the iPhone and the iPad without requiring that you buy multiple versions. The software pops up several unobtrusive but useful navigation aids, including lane diagrams on multilane roads, highway signs to make exit choices clearer, and nextnext-turn indicators, showing the direction and nature of the turn after the current turn ($35; macworld.com/7232). 74 3 Productivity Yes, the iPad is fun and entertaining, but it’s also a practical device that serves as a productivity tool. You can use the iPad to stay organized with the included Calendar, Notes, and Address Book apps. Even though it lacks a physical keyboard, the iPad makes a great mobile office. Apple has turned its iWork suite into three iPad apps—Pages, Keynote, and Numbers—that you can use to read and create documents directly on your iPad. Once you have Apple’s iPad software figured out, you can expand your iPad’s abilities with powerful third-party productivity apps. Contents Get Organized Page 76 iWork on the iPad Page 85 Microsoft Office and Google Docs Page 96 Sync Files Page 99 Print from the iPad Page 106 75 Chapter 3 Productivity Get Organized The iPad comes stocked with Apple’s basic apps for organizing your life. Keep on top of your day-to-day activities with the Calendar, use your iPad as a scratchpad for to-do lists and ideas with the Notes app, and keep track of all your acquaintances with Contacts. Calendar Need to know what’s happening next in your life? The iPad’s Calendar app lets you see recent and upcoming events, as well as enter new ones. You can even set alerts in Calendar so you don’t miss a thing. The Calendar app has a nice embossed background reminiscent of a physical day planner, but beyond that, it’s very much like Apple’s iCal application for Mac OS X, except that it’s a little better—it’s more responsive and provides more-flexible views of your schedule. View the Calendar Tap the Calendar app from your Home screen to bring up the main calendar view. Along the top of the calendar screen are four buttons that bring up different view options: Day A, Week B, Month C, and List D. To the right is a Search field E that displays a drop-down menu of possible event matches as you type search terms. At the bottom is a slider that lets you jump ahead or back in time, and a Today button to bring up the current day. Tap the Calendars button in the upper left corner of the screen F to see a list of all calendars currently synced with your iPad. You can select one or multiple calendars, or tap Hide All Calendars. Each calendar is color coded, so you can tell what items belong to which calendar. An Invitations button next to the Calendars button will display any event invitations awaiting response. f a b c d e If you tap Day, you’ll see Calendar’s day view, which displays up to eight hours of events at a time. You can scroll up or down to see events that are happening earlier or later in the day. All-day events appear at the top of the window, even when you scroll. Above the list of events you’ll see the day and date you’re currently viewing (if you’re viewing today’s events, that text will appear in blue), as well as a 30-day calendar for 76 Chapter 3 Productivity Day by Day The Calendar’s Day view lists your events in a datebook-like layout. easy viewing and navigating throughout the month (see “Day by Day”). At the bottom of this view there is a slider with forward and back arrows, which gives you another way to quickly switch between days. The Week mode shows the days of the week across the top, and each day divided by hours below. The current time is indicated by a red dot and a black line that goes across the screen. The current day appears in blue instead of gray. The slide along the bottom switches from days to weeks, again to make it easier to navigate through your schedule. Tap Month to see Calendar’s month view. The bulk of the iPad’s screen in this view displays a complete calendar for the current month, along with a month slider at the bottom and arrows you can tap to move forward or back one month at a time. If a day has any events attached to it, a small dot and a description of the event will appear beneath the day’s number. The dot will be in the color of the event’s calendar. The current day will appear with a blue strip across the top labeled Today. If you tap List, you’ll see a list of all your upcoming calendar events on the left and a schedule of the current day on the right. This view displays the largest number of events at once. To quickly jump back to the current date in any of the Calendar views, simply tap the Today button on the bottom of the screen. 77 Chapter 3 Productivity Add Events To add a new event, tap the plus sign (+) in the lower right corner of the screen. You can assign each event a title, a location (although there’s currently no way to tie that location to a Google Maps address), a date, and a starting and ending time. Tap the Repeat button to set a recurring event. If you don’t want to miss an important meeting or event, you can set up alerts. You can also add miscellaneous information in the Notes field. When creating a new event, you can select which calendar it belongs to. (Pick the default calendar for new events in the Settings app under Mail, Contacts, Calendars.) Invitations received via e-mail from iCal, Exchange, and other services like Google Calendar can be added to the iPad’s Calendar app. iCal and Exchange invitations will automatically appear in Calendar, while Google Calendar e-mail invitations will contain an event attachment that can be tapped and added manually. If you’re a Mac user who uses Apple’s iCal, your calendar should automatically sync to the iPad; however, your to-do lists will remain stuck on your computer, unsynced. Sync Calendars You can sync the iPad with iCal and Entourage calendars on a Mac and with Outlook on a PC. You can also add subscribed calendars and CalDAV accounts. To sync your calendars directly with your computer, attach your iPad to your computer, select it in iTunes’ Source list, and then click on the Info button. You can sync all the calendars in your chosen calendar program, or choose to sync only a select group. To save space on the iPad, you can also limit how many old events to sync (that is, items that have already occurred). To turn on calendar syncing for supported IMAP accounts (such as a Gmail account), go to Settings -> Mail, Contacts, Calendars -> Accounts and add the account. Toggle the switch next to Calendars to On. Adding a CalDAV account or a subscribed calendar is a bit trickier. On your iPad, go to Settings -> Mail, Contacts, Calendars -> Add Account and choose Other. You’ll have the option to add either a CalDAV account or a subscribed calendar. Adding a CalDAV account from your iPad requires that you know your server, username, and password; adding a subscribed calendar requires that you know its URL. Once you’ve entered all the information, the iPad will download the calendar’s events. If you’ve got multiple calendars on a CalDAV account, such as Google Calendar, you’ll have to add a separate account for each calendar. If you’re a Mac user who relies on Microsoft Entourage or Outlook 2011 as your calendar or address book program, don’t despair—there is a way 78 Chapter 3 Productivity to synchronize with the iPad. You’ll need to be using Office 2004 11.3.5 or later, or Outlook 14.1 or later, which may require downloading an update from Microsoft. In Entourage, choose Entourage -> Preferences, then click Sync Services. Check the boxes for Address Book and iCal syncing. You’ll be prompted to choose whether to replace Sync Services items with Entourage or Outlook items, replace Entourage or Outlook items with Sync Services items, or merge all these items together. Your choice will depend on what data you’ve stored in Address Book, iCal, Entourage, or Outlook. Unless you want to wipe out the contents of the Mac’s Address Book and iCal—which might not be wise, especially since Address Book stores items such as iChat Buddy names—it’s safest to choose Merge. Once you’ve set up Entourage to sync with iCal, you should be able to sync those calendars with the iPad through iTunes. MobileMe users can sync calendars wirelessly using push technology. With syncing set up, changes you make to contacts, calendars, mail, or bookmarks on your Mac appear almost instantaneously on your iPad and vice versa—add an event in iCal, and it appears on your iPad. Third-Party Scheduling App The built-in calendar app is a great start, but power planners should take a trip to the App Store for other options. Pocket Informant HD Calendar is a solid, simple way to keep an eye on your schedule, but it lacks a number of features, like geolocation and tasks, and it isn’t very flexible. When it comes to organization, Pocket Informant HD is a big step up, as it lets you plot events on a map, view your schedule in more ways than Apple’s Calendar, and manage tasks in various modes. You can use projects and subtasks, go all out with David Allen’s Getting Things Done system, and even view tasks alongside your day’s events in the app’s calendar views ($15; Web Information Solutions, pocketinformant.com). 79 Chapter 3 Productivity Notes Notes is a straightforward little notepad app, useful for jotting things down. The main Notes screen looks like a piece of yellow-ruled writing paper. You can view and edit notes in portrait and landscape mode. Navigate Notes In portrait mode, there’s a button labeled Notes in the upper left corner. Tap it to get a drop-down list of any notes you’ve saved in the past, sorted from newest to oldest. The list indicates what note you currently have open by circling its name in red. In landscape mode, this list is always open as a column on the left side of the screen. Tap a note to open it. Tap the plus sign (upper right corner) at any time within the Notes program to start a new note. Tap anywhere on the yellow notepaper to bring up the keyboard. To get rid of the keyboard, you can tap the keyboard button in the lower right, select another note (in landscape mode), or tap the Notes button (in portrait mode). When viewing a note without the keyboard open, use the arrows at the bottom of the screen to move to the next or previous note. Tap the envelope icon to insert the note into a new e-mail message. Tapping the trashcan icon gives you the option of deleting the note. (You can also delete a note by swiping across its title in the note Take a Note To create a new note on the iPad, open the Notes app and tap on the plus sign A in the top right corner of the screen. 80 a Chapter 3 Productivity list and tapping the delete button, just as with messages in Mail.) When you’re typing a new note or editing an existing one, the first line of the note becomes the title that appears on the main screen. Notes can tell when text is a phone number or a street or e-mail address. If you click on one of these items when you’re viewing a note, Notes will call the number, map the location, or start an e-mail message addressed to the person shown. Sync Notes There are a number of ways to sync your notes—with Apple Mail, MobileMe, or IMAP-based mail accounts. To turn on Notes syncing, attach your iPad to your computer, select it in iTunes’ Source list, and click on the Info button. Scroll down to the Other section and select Sync Notes. The notes will show up on your computer under Reminders in the Mail application. You can also sync notes back to your iPad from this application. If you are a MobileMe member, you can sync notes wirelessly with Mail on your Mac. Go to Settings -> Mail, Contacts, Calendars and select your MobileMe account. In the pop-up window that appears, make sure Notes is set to On, then tap the Done button. You can also set a default account for creating new notes by going to Settings -> Notes -> Default Account, and selecting your MobileMe account. Notes can also wirelessly sync to IMAP-based mail accounts besides MobileMe. Go to an e-mail account’s settings screen and flip the Notes sharing setting to On. If you have sharing set up with an IMAP account, iTunes will display a warning in the Info screen, informing you that also syncing with Apple Mail could result in duplicates. Back in the Notes app, tap the Notes button (in landscape mode) to bring up a list of accounts set up to share notes, including All Notes and On My iPad. Tap an account to see a list of its current notes. You cannot move notes between accounts. In portrait mode, tap the Notes button to see a new Accounts button above the list of notes. 81 Chapter 3 Productivity Third-Party Notes and To-Do Apps The Notes app is a clean and uncomplicated way to manage your scribbles and to-do list; but for more-complex notes, to-do lists, and task management needs, check out these apps. Simplenote If you’re looking to get a little more out of your note-taking, Simplenote adds a few perks without trying to jam in too much. Simplenote has a simple but functional text-editing window. In addition to offering a text-entry field, this window provides buttons for e-mailing a copy of the note and trashing it. You can sync your notes between multiple devices and your Mac, as well as a slew of other apps and platforms, thanks to Simplenote’s support for third-party apps and services. You can group and filter notes with tags, collaborate on notes with other users, and even publish notes to share with the world (free; premium account, $20 per year; simplenoteapp.com). OmniFocus The OmniGroup’s OmniFocus has long been a taskmanagement powerhouse on the Mac and iPhone, offering a broad, flexible set of tools for organizing your projects and tasks. The iPad app streamlines task creation, organization, and review processes, taking advantage of the device’s portability and multitouch features. The app allows you to catalog and visualize your tasks not only by projects, but by context. These can consist of any resource required to complete them, including the phone, your computer, or a specific location. It’s packed with a powerful set of features for adding due dates and alarms, attaching voice notes, reviewing overdue and upcoming tasks, and syncing wirelessly with the Mac and iPhone editions ($40; macworld.com/6592). Things for iPad Cultured Code’s Things for iPad is a powerful task manager, bundling a strong set of features into a stylish, approachable package. It complements the Mac and iPhone versions by syncing with them over a local Wi-Fi connection, enabling you to manage your tasks and projects on the go. You can organize your tasks into projects, then further categorize them with tags—but only if you want. You can assign due dates, push delayed projects off to the Someday section, and easily view a list of everything that’s immediately due in the Today area. Things eschews some of the complexity of other task managers so that you can get things done right away, instead of spending all your time planning ($20; macworld.com/6140). 82 Chapter 3 Productivity First Contact Contacts is a hub for all the names, phone numbers, addresses, and personal details you can use throughout your iPad apps. Contacts Contacts is the iPad’s address book app. You can populate the Contacts app with contacts from your Mac Address Book as well as Google, Yahoo, MobileMe, or Microsoft Exchange accounts. It’s also possible to set up Contacts to sync with an LDAP or CardDav account. Work with Contacts The Contacts app looks the same in portrait and landscape modes. On the left side of the screen is a list of contact names and a tab for each letter in the alphabet. Tap a letter to go to those contacts. To add a contact, tap the plus-sign (+) button. The resulting screen has fields for all major contact information. You can even choose an image from your photo library for each entry and add custom fields. Tap the Done button after you have entered all the information for a contact. To edit a contact at any time, tap the Edit button. Under each contact are two buttons: FaceTime and Add To Favorites. Tapping FaceTime starts a FaceTime call, while Add To Favorites adds that contact to the Favorites list in the FaceTime app. Various other elements in a contact are also interactive. Tap an e-mail address to start an e-mail to that person in the Mail app; tap an address to bring it up in the Maps app; and tap a URL to go to that page in Safari. 83 Chapter 3 Productivity Sync Contacts There are multiple ways to get existing contacts onto your iPad. You can sync e-mail accounts and contact information over the air through Apple’s MobileMe or Microsoft’s ActiveSync technologies. Go to the Mail, Contacts, Calendars section of your iPad’s Settings app. Tap Add Account and select Microsoft Exchange or MobileMe. Enter your account’s login information. To add an LDAP or CardDav account, select Other and select the type of account you would like to add in the Contacts section. Enter your account information and tap Next. To add your Mac Address Book, or your Google or Yahoo address book accounts, you will have to sync them from your computer using iTunes. In iTunes, go to the Info section and scroll down to Sync Address Book Contacts. You can add all contacts from the Address Book app on your computer, or choose specific groups to sync. You can also opt to sync your Yahoo or Google contacts with the iPad; each service requires your login information. Connect Duplicate Contacts If you have synced your iPad with multiple contacts accounts, you will invariably end up with duplicate entries. To connect the two contacts on your iPad, select Edit, then tap the silhouette icon (looks like a person’s head with a plus sign). Select the duplicate contact, and then select Link. Now your two contacts will appear as one on the iPad, and any changes made on the iPad will also be made to the individual contact files and synced back to both originating accounts. Search Contacts To search for a specific contact, tap the Search bar in the upper left corner of the Contacts app screen or use the iPad’s Spotlight search. 84 Chapter 3 Productivity iWork on the iPad Some of the most powerful business apps on the iPad are slimmeddown versions of Apple’s office desktop programs. Apple has turned its Mac office suite, iWork, into three iPad apps—Keynote, Numbers, and Pages ($10 each). You must purchase these apps individually through the iTunes App Store. Navigate iWork Apps The three iWork apps share a common look and feel. When you first launch each app, you’ll get a Get Started guide for that app. In the upper left corner, a button (called My Documents, My Spreadsheets, and My Presentations in Pages, Numbers, and Keynote, respectively) gives you access to the Document Manager. Here, you can swipe through thumbnails of every document that the app has stored on your iPad. Along the bottom of the screen are four buttons that appear in each app. The first is for send and upload options A, the second brings up download options B, the third starts a new document C, and the fourth is for deleting a document D. a b c d In the Document Manager, you can view your current projects; create new ones; share documents; import them from iTunes, iDisk, or a WebDAV server; and delete them. Tap New Document in the upper left corner to start a new project. You can choose from a variety of templates, depending on the app. Once you’ve created a new document or opened a current project, you’ll enter the app’s main editing interface. While each app has its own toolbar peculiarities, the general orientation remains the same throughout: Tools at the top, with the document laid out below. Some buttons are universal: You’ll find My Documents—which returns you to the Document Man ager—and Undo along the left in every app, while the Info, Tools, Insert, and Full Screen buttons appear on the right side of the toolbar. 85 Chapter 3 Productivity Pages Working in Pages on an iPad isn’t all that different from working in a desktop word processor: You start with a blank sheet, type in some text, and then embellish it with typography and graphics. The difference is that your tools for doing all that on the iPad are somewhat curtailed. Start a Document You begin with the app’s My Documents browser. You can either create a new document based on one of Apple’s 16 templates, or open an existing document you’ve imported or created yourself. Pages offers a variety of beautifully designed templates that are as basic as a blank white page, or that include complex tables, images, shapes, and charts. Unlike Pages for Mac, it doesn’t let you add your own templates to the existing collection. If there’s a document you want to use as a template, you have to import it into Pages and then use My Documents’ Duplicate button to create a new blank document based upon your original. Formatting Pages’ editing screen has a toolbar at the top of the main document and a keyboard below. When it comes to styling what you’ve written, you most likely want to see it in portrait mode, which is the way it will print. Documents will automatically fit to page width in landscape view. At the top right of the screen are four important icons: Information (for text formatting), Insert (for inserting tables, media, and other objects), Tools, and Full Screen. In Pages, tapping the toolbar’s Info button (i) brings up a list of options broken up into three sections: Style, List, and Layout. Here you can apply text styles, format selected text as a list, select text alignment, configure columns, and specify line spacing. To change a font, you have to tap the Info menu. If you scroll down to the bottom of the style list, you can also open a Text Options screen, where you can choose from one of 40-plus fonts and set the size and color of the type. On the Tools menu, in addition to standard options (search, help, word count, and so forth), Pages gives you a Document Setup option; tap it to go to a screen where you can apply document-wide layout settings. Many of these same options are replicated in a formatting toolbar that appears below the standard one in Pages. It has a drop-down style menu and buttons for character styles (bold, italic, underline) and paragraph alignment. The only unique setting here is a button that lets you insert 86 Chapter 3 Pages Pages is an iPad version of Pages for Mac, offering many— but not all—of its bigger sibling’s features. Productivity tabs and line, page, and column breaks. Below all of those options, there’s a ruler you can use to set margins and indentation for your document. Pages also lets you format a document’s background, change the size of its margins, add footer or header text, and add watermarks or other background images. You can easily change paragraph alignment using Pages’ ruler, and it’s easy to create, move, and change tab stops by tapping the ruler, tapping and dragging an existing tab, or double-tapping a tab to change how the stop behaves. Work with Text You get even more editing tools by selecting and tapping words. Pages uses many of the same selection standards as other iPad apps: Tapping a word twice selects it; a pop-up menu enables you to cut or copy a word, replace it with one that’s close in spelling, paste previously copied text, or look up the word’s definition. Tapping three times on a word selects the whole paragraph and brings up other options. No matter how much text you’ve selected by tapping, you can select more or less using the drag handles in the corners of the selection box. A magnifying glass appears above the text as you drag the handles, showing you where the selection point is. Documents in Pages have up to 200 levels of persistent undo. Even after you close a document, when you reopen it, you can still undo the changes you’ve made. Pages also helps you avoid document disasters by saving changes as you work. Work with Objects Pages makes simple work of inserting and manipulating images, tables, charts, text boxes, and other objects. Images come from your iPad’s photo library, while tables, charts, and other objects are part of Pages’ built-in object library. Tap the Insert icon in the top toolbar to get started. 87 Chapter 3 Productivity To delete images, objects, and charts, tap twice on the elements. A table requires you to tap once, and then tap a small circle that appears at the upper left of the table to reveal the delete option. The last version of iWork for the Mac added the option to link Numbers tables to charts and tables in Pages. If you import a Pages document that contains a linked Numbers Chart, Pages will retain the chart and its current underlying data, but the link to Numbers breaks. So when you export the document again, you’ll have to repeat the process of creating links and charts. Navigate the Pages App If you touch and hold on the right side of the Pages screen, the Navigator appears; it lets you move through pages in your document quickly, showing page numbers and previews as you go. What’s Missing While Pages has many of the most essential word processing tools, it doesn’t have them all—for instance, it lacks the extensive proofreading tools found in the desktop version. You can’t add complex document elements, such as tables of contents or footnotes, and it has fewer fonts and styles than Pages for Mac OS X. But it does include a lot of the essential features you’d want for working with basic text documents. Compatibility The Pages iPad app can import the following file formats: Pages ’09 desktop version, Microsoft Word, and plain text files. It can export files in Pages ’09, Microsoft Word, or PDF formats. (Note: If you import Word or Pages documents that contain tracked changes or comments, you’ll lose all comments, and Pages for iPad will automatically accept any tracked changes.) Numbers Given the identical naming of Numbers (for iPad) and Numbers (in iWork ’09), you may be expecting the iPad version of Numbers to be a clone of its desktop counterpart. While it replicates many of the features of the desktop version, Numbers on the iPad is a ground-up rewrite of the application that is focused on creating and working with spreadsheets directly on the iPad. Start a Spreadsheet Numbers automatically opens to its spreadsheet browser, which shows all of the spreadsheets on your iPad. You can create as many as you’d like, until you run out of RAM on your iPad. You 88 Chapter 3 Productivity flip through your sheets with a finger flick, and each screen contains a preview of the sheet, its name, and a time stamp showing when it was last modified. The spreadsheet browser is also where you share your spreadsheets; you can send them via Mail, share them via iWork.com, or export them to Numbers or PDF format. Once you’ve exported a spreadsheet, you can access it from the Apps tab in iTunes (with your iPad connected to your Mac or Windows machine) and transfer it. A prominent New Spreadsheet button brings up Numbers’ template chooser, where you’ll find 15 new templates designed to focus on expected uses of Numbers on the iPad. For example, there’s a simple checklist template, a loan comparison template, an auto log for tracking car mileage and maintenance, a team organization template for coaches, and some templates targeted at educational use—GPA tracking, a stats lab, and an attendance form. Work with Spreadsheets The spreadsheet interface is easy to understand. Tabs along the top of the screen show each sheet; you can flick the tabs to see the sheets that are currently off-screen. Above the tabs, a minimalist toolbar contains buttons that let you return to the spreadsheet browser; undo or redo your last 200 actions, even after you close a spreadsheet; format items; insert new media, tables, charts, or shapes on the current sheet; find text in your spreadsheet; view help; and check spelling (see “Take a Number”). The last button in the toolbar toggles Numbers into full-screen mode, which provides an interface-free view of your worksheet. You can’t do much in full-screen mode, with one exception: You can select a cell or range of cells, and Numbers will display a floating window with some basic stats about your selection, including sum, minimum and maximum, average, and count. Flick this small floating window once to see a graph of the selected cells. Tap a cell in a table once to select it. Tap the vertical or horizontal bar that appears above a table after selecting a cell to select the entire column or row. Once you’ve selected it, you can resize the column or row by dragging a small resize widget in the header of the selected area, move the column or row by dragging anywhere else in the header area, or select more cells by dragging the blue dot on the edge of the selection. The first tap on a cell in Numbers selects that cell; a double-tap brings up the cell editor, where you can enter text, date and time values, 89 Chapter 3 Take a Number Numbers is a ground-up rewrite of its Mac counterpart, focused on creating and working with spreadsheets in a multitouch-based environment. Productivity figures, or functions (over 250 are available). Each of these input modes has its own customized keyboard, greatly easing the data input task. A bigger limitation on text is that you can’t control the font face or size for text in tables on a sheet— you can add bold, italic, underline, or strike-through, and you can change the color, but not the face or size. (You can control fonts in text boxes and charts, just not in tables.) You can format cells in tables in a number of ways, including a star rating format (zero to five stars). though you won’t find steppers, sliders, or pop-up menus in Numbers for iPad. Still, for its intended use, it offers a good amount of control over the appearance and behavior of cells. Work with Objects Like its desktop cousin, Numbers for iPad supports multiple objects per worksheet. You can easily add photos, tables, charts, and objects to a sheet. Numbers offers multiple versions of tables, charts, and objects to choose from, and you can customize your selection. Add a shape, for example, and you can change its fill color and opacity; border color, style, and thickness; and type of shadow (or opt for no shadow). This degree of control makes it possible to create some very nice-looking spreadsheets, as a quick tour of the provided templates will show. You can resize one object to match another by beginning a resize drag, and then tapping the other object with another finger. Work with Forms A new feature in Numbers for iPad, forms are designed to make it easier to enter data in your spreadsheet. To use Forms, you first design your table (or tables) and then tap the plus sign on the tab bar. A pop-up menu lets you choose a new form or new sheet; choose a form, and you’ll see a page that shows all the tables on 90 Chapter 3 Productivity all your sheets. Select one table from that list to instantly create a form from that table. A form is really nothing more than a different view of an existing table on a sheet. For instance, if you create a form from a six-row, sevencolumn table, the resulting form will contain six separate “pages” (table rows) that you can flip through. Each page will take its title from the first column in the selected table, and below that, the remaining six columns in this example will appear as six single-line inputs. At the bottom of the form, arrow buttons let you flip between pages, as well as add or delete them. Delete a page, and you’ll delete the corresponding row from the original table. That’s because the form is directly linked to the table you selected when you created it—the associated table instantly reflects any changes made on the form. The big advantage to this method is that it’s much simpler to enter data using a form than it is to try to tap into each cell and type in the original worksheet. One downside of forms is that they won’t survive a round-trip to and from your Mac—if you export a worksheet to your Mac, edit it there, and reimport it to your iPad, any forms you created will be gone. The good news is that re-creating a form takes only a couple of taps, so it’s not a huge amount of lost time. Compatibility The Numbers iPad app can read the following file formats: Numbers ’09 (desktop application; .numbers), Microsoft Excel (.xls, .xlsx, .xlt, .xltx, .xlsm, and .xla) and comma-separated values (.csv). It can export files from Numbers ’09 into Microsoft Excel (.xls) and PDF file formats. Font support on Numbers for iPad is limited to the 40 or so fonts available on the iPad; you can’t import fonts with your spreadsheet, and Numbers will substitute any missing fonts with the closest available ones. The iPad version is missing a few Numbers for Mac features as well: You can’t use merged cells, pop-ups, steppers, sliders, or conditional formatting (and a number of other minor items). As a result, you may have to rework the formatting of spreadsheets you move onto the iPad. 91 Chapter 3 Productivity Keynote You can use Keynote to create visually stunning presentations on your iPad, complete with drop-shadow text, movies, animations, tables, charts, and graphics. Keynote for the iPad has more quirks than the other two apps, but in many ways, it’s also the iWork app that’s best suited to the tablet. Start a Presentation To create a new Keynote presentation on your iPad, tap the New Presentations button and select from the app’s list of presentation templates. From there you can go through the presentation’s placeholder text and images, and replace them with your own words and illustrations, charts, or photos. You can add slides by tapping the plus sign. Work with Slides The one quirk you’ll notice immediately is that Keynote works in landscape mode only. The assumption (logical enough) is that presentation slides are in landscape mode. The wider aspect ratio also provides room at the side for scrollable thumbnails of the slides in a presentation. Within that sidebar, you can rearrange the order of slides by tapping and holding the one you want to move, and then dragging it wherever you want. Tap the plus sign at the bottom of the sidebar, and a sheet pops up with several sample slide layouts (prepopulated with dummy text and graphics) in your chosen template (see “Unlocking Keynote”). Over in the editing screen on the right, you’ll see three of the usual four buttons (Info, Insert, and Tools), which do pretty much the same things they do in Pages and Numbers. But there are two new ones: Animation and Play. If you select an object and tap Animation, you can select and customize build-in and build-out animations; there are 13 choices, including Appear, Cube, Swoosh, and Twirl. You can specify the timing, direction, and order in which those animations occur. You can also tap any object on a slide to select it, and then move it around with your finger. With two fingers, you can change its orientation or size. Of course, Keynote for iPad doesn’t have all the tools of a full-fledged desktop program. You can’t implement animations based on user input, for example, or print out speaker’s notes. But because presentations are inherently graphical, with relatively simple text input, and because the iPad itself is a useful platform for delivering presentations, as the next section discusses (you can use its video-out port to run presentations on an external display), Keynote is probably the iWork app that works best on the tablet. 92 Chapter 3 Productivity Make a Presentation with Keynote Keynote for iPad lacks a few of the snazzier features found in the desktop version of the product. But it’s still possible to give impressive presentations from your iPad‚ and perhaps even leave your laptop behind‚ if you prepare well and know what to expect. Get Your Presentation Ready Keynote on the iPad can import presentations made in Microsoft PowerPoint or in Keynote for OS X, but in both cases you’re likely to lose a great deal during the import process. Say good-bye to some fonts, transitions, and builds that aren’t available on the iPad, along with audio and more. (Presenter notes are supported, however, whether created on the iPad or imported from a PowerPoint or Keynote for Mac presentation.) Therefore, when it’s feasible, you should create your presentation directly on the iPad. If you intend to use graphics in your presentation, prepare them in advance on your Mac (Apple recommends PNG format), and then sync them to your iPad using iTunes. If you do use Keynote on a Mac, be sure to read up on Apple’s best practices for creating a presentation on a Mac for use on an iPad, which guides you in selecting compatible templates, fonts, and other features (macworld.com/6074). The easiest way to move the presentation onto your iPad is to open iTunes, select your iPad, click on the Apps tab, and Unlocking Keynote One of the best mobile iWork apps with which to show off the iPad’s capabilities, Keynote lets you create, edit, and give presentations with your device. 93 Chapter 3 Productivity select Keynote. Drag your presentation to the Keynote Documents list. Then open Keynote on your iPad, go to the Document Manager (if it’s not already visible), tap the folder icon in the upper right corner, and tap your presentation. (For more transfer tips, see the “Sync Files” section later in this chapter.) Use an External Display If your audience is very small—perhaps you’re showing your portfolio to a potential client or giving your boss a quick demo—you could show your presentation on the iPad itself, albeit without the help of presenter notes. But you’re more likely to hook up your iPad to a projector or some other display. To do so, you’ll need an appropriate adapter. You’ll get the best results and the highest resolution using a display or projector with either the $39 Apple Digital AV Adapter (for displays with HDMI inputs) or the $29 Apple VGA Adapter (for displays with VGA inputs). If you’re connecting to a television with neither HDMI nor VGA inputs, you can instead use the $39 Apple Component AV Cable or the $39 Apple Composite AV Cable, as appropriate, although both offer lower resolution than the Digital AV and VGA adapters (see the Accessories chapter for more information). With an iPad 2, both the Digital AV or the VGA adapter let your iPad mirror everything from its internal screen onto the external display, which may be useful if you want your presentation to include demonstrations of other iPad apps or content that’s not within Keynote itself. However, note that on the original iPad, where mirroring is unavailable, or when using component or composite cables, Keynote itself produces no external video signal until you tap the Play button. Don’t let this confuse you when you’re setting up your presentation and initially see no video on your external display. If possible, when using an iPad with an external display, set your iPad on a lectern or table and keep it stationary during the presentation. It’s cumbersome to hold an iPad that’s tethered to a display, and if you get too animated with your hand gestures, you may pull out the cable or tug at the display accidentally. If that’s not possible, try to use an extra-long VGA cable to maximize your range of movement. Control the Presentation Once you tap Play, you can use your iPad to control the presentation as well as provide extra hints for yourself (a cheat sheet, if you will) that the audience won’t see. 94 Chapter 3 Productivity To change what’s on the iPad’s screen when using an external display, tap the Layouts icon and then one of the following buttons: Current (the current build of the slide as shown on the external display), Next (the next build, which may or may not be the next slide), Current And Next (current and next builds side by side), or Current And Notes (current build and any accompanying presenter notes). This final layout is the only one to display presenter notes, but you can supplement it by tapping the button in the top left corner to display a list of slide thumbnails, which can aid in navigation (tap a thumbnail to jump to that slide). Presenter Notes In the Current And Notes layout, you can see presenter notes underneath your slides (see “Cheat Sheet”). The thumbnails on the left are optional. To advance to the next build or slide, tap once anywhere, or swipe toward the left. To go back, swipe toward the right. One nice extra in Keynote for the iPad is a virtual laser pointer: Touch and hold on the iPad’s screen to show a red dot, which moves with your finger on the main display. Lift your finger and the dot disappears. This is very useful when you want to call attention to a particular area of a slide. To end the presentation (and turn off Keynote’s video output), tap the Close icon. Cheat Sheet In the Current And Notes layout, you can see presenter notes underneath your slides. The thumbnails on the left are optional. 95 Chapter 3 Productivity Microsoft Office and Google Docs If you’re using your iPad for almost any kind of business, there is a good chance that you’ll need to work with Microsoft Office files or Google Docs in some capacity. Fortunately, there are plenty of options for editing and viewing Office files. And thanks to Google’s frequent updates to Google Docs, it’s become a fairly useful Web app on the iPad. Microsoft Office Unlike the iPhone and iPod touch, the iPad was designed with the needs of typists in mind. The screen size, the large virtual keyboard in landscape orientation, and the support for external keyboards make the iPad a natural choice for working with Office documents on the go. For many people, that means reading, editing, and saving Microsoft Word, Excel, or PowerPoint documents. Even though there’s no iPad version of the Microsoft Office suite, you can work with these documents on your iPad if you’re willing to accept a few compromises. Read Only Often you just need to read your important Word, Excel, or PowerPoint documents. This is easy enough to do on the iPad even without a third-party app. All you have to do is get the relevant documents onto your iPad. For example, you can e-mail documents to yourself as attachments, or use an app designed for transferring and viewing documents, such as Avatron Software’s $10 Air Sharing HD (macworld.com/6707), Good.iWare’s $5 GoodReader (macworld .com/6136), or Readdle’s $5 ReaddleDocs for iPad (macworld . com/6654). Editing these documents is a bit trickier. No matter which method you use to import Word documents, some elements of your document (especially formatting) may get lost in translation. Edit Documents with iWork Apps Pages for the iPad can import documents in Word format, Numbers can import Excel spreadsheets, and Keynote can import PowerPoint presentations. The iWork suite 96 Chapter 3 Productivity offers most of Office’s major features. For example, in Pages you’ll find paragraph styles, lists, columns, tables, charts, shapes, imported graphics, headers, and footers. However, some formatting may get lost in the transition to the iPad and Apple apps. For example, Pages on the iPad doesn’t support footnotes or endnotes, hyperlinks, tracked changes, or comments, so it will remove any of those items from a Word document when you import it, and it will alter some other elements (such as fonts, grouped objects, and multipage tables) as necessary. The iWork apps will also replace fonts that aren’t available on the iPad with the closest match from the device’s 40-plus included ones (Helvetica is the default). Google Docs Google Docs, the office component of the Google Docs Web application (docs.google.com), is a natural fit for the iPad. You can view all Google Docs in a browser on your iPad, and edit Google Docs text documents and spreadsheets. When you access the site in Safari on the iPad, Google delivers a mobile version of Google Docs that lists your documents, spreadsheets, presentations, forms, and drawings. You can also switch to desktop view if you prefer the traditional format—editing works in both modes. Currently, only documents and spreadsheets are editable on mobile devices, but you can view all file types as read-only. Google is considering expanding mobile editing abilities to other file types in the future. To edit a document, tap its title, and then tap the Edit button. If you’re working on a shared document, any changes you make to the text will appear in near–real time to collaborators, and any changes they make will show up right away on your iPad’s screen. Spreadsheets are editable in list view. Open the spreadsheet you want to work in and tap a cell or the Edit link to the left of a line. You can add lines, sort by columns, and move from cell to cell using Previous and Next buttons. When you are done working in a cell, tap the Submit button to save your changes, or Cancel to revert the cell to its original text. If you need to make more-advanced edits or work offline, one option is to export your Google Docs files into formats that you can edit with the iWork apps. Then you can add charts to spreadsheets and advanced 97 Chapter 3 Productivity formatting to documents. Third-Party Word Processing Apps Take advantage of the powerful Dropbox cloud-storage system with these compatible word processing apps. Doc2 HD and Office2 HD These third-party app connect directly to your Google Docs account and provide a native iPad editing interface. Doc2 HD offers editing for Google documents, and the company’s slightly pricier $8 Office2 HD (macworld.com/6708), also lets you edit Google Spreadsheets on your iPad. Both apps give you control over font, size, style, color, and alignment. They support bulleted and numbered lists, let you insert and manipulate tables and graphics, and include search, undo, and redo features. They also let you save documents to Google Docs format, as well as share them via Wi-Fi, send them as e-mail attachments, and save them to other cloud-based storage systems such as Apple’s MobileMe ($6; macworld.com/6708). Elements Elements is a basic, no-frills text-editing application designed for your iPad. What’s neat about this app is that it syncs your changes to Dropbox and makes them available on any of your other computers or iOS devices. It doesn’t offer any bold or italic text, images, or paragraph styles—just plain text that you can read and revise in most word processing applications. Elements also offers word, character, and line counts; the option to e-mail your document from within the app; and your choice of any font available on your iPad ($5; secondgearsoftware.com). Documents To Go Premium This ambitious app enables you to create and edit word processing, spreadsheet, and presentation documents in standard Microsoft (.doc, .docx, .ppt, .xls) formats. You can sync them with your computer via Wi-Fi by using a simple program, either for the Mac or Windows, that you can download for free from developer DataViz. You can sync using cloud-based storage services such as Dropbox, iDisk, and Google Docs. You can also easily e-mail any of your documents and also share them with a variety of other iPhone and iPad apps ($17; dataviz.com). 98 Chapter 3 Productivity Sync Files The first step in making your iPad into a real work device is to master file sharing—getting those important work documents on and off the iPad, or setting up a cloud-based system so you can access your documents from anywhere. First, you’ll need to fill your iPad with productivity apps that have sharing capabilities, like Pages, Keynote, GoodReader, or Stanza. The first thing you need to do is learn how to get documents from your Mac onto the iPad. Then, after you’ve edited them or created new ones on the iPad, you need to get them back onto your Mac. There are a few ways to do this: through iTunes, over the Internet, or with a third-party app. Sync with iTunes For apps that use Apple’s File Sharing—such as Apple’s iWork apps, Stanza, or GoodReader—you can use iTunes as a conduit to get files on and off the iPad. When your iPad is connected to your Mac and iTunes is open, select your iPad in iTunes’ Devices section, and then click on the Apps tab. Scroll down to the File Sharing section. (If you have no apps that support file sharing, this section won’t appear.) You’ll see a list of apps installed on your iPad that can share files through iTunes. Click on one in the Apps list and you’ll see any files you’ve already added to, or created on, the iPad on the right, along with their creation date and size. Add and Delete Documents From here, you can add documents to your iPad in two ways. Click the Add button, navigate to a document in the Open dialog box that appears, select the document, and then click Open. When you click Sync, the file will copy to your iPad (see “Secret Sharing”). Alternatively, select the appropriate app in iTunes’ File Sharing Apps list, and drag a file onto the documents list for that app. This copies the files immediately; you don’t need to click Sync. To delete files, select them in the file list and press the Delete key. You can only find files in the app to which you copied them in iTunes. Even if you upload a file that is compatible with other apps, you won’t be able to access it in those apps without adding the file to each app’s File Sharing section in iTunes. If you delete an app on the iPad that has shared files, you will lose those files. 99 Chapter 3 Productivity Secret Sharing iTunes can act as a gateway for transferring files to and from your iPad with familiar drag-and-drop procedures. Import iWork Documents When you’re working with the iWork apps— Pages, Numbers, and Keynote—just getting the document onto your iPad isn’t quite enough. You’ll also need to import the files before you can view and edit them. To do this, open Pages (or any other iWork app) on your iPad and tap the folder icon in the toolbar. You’ll see a list of available documents. Tap a document to import it. It’ll now show up in your My Documents list, where you can work with it. Avoid Import Problems with Files Note that iWork for iPad apps can’t import files with special characters in their titles, such as the forward slash (/). Remove any special characters from your file names before you try to transfer the files. Unfortunately, importing isn’t always a smooth process—not all fonts and document elements will come through. If you’re using Keynote, see Apple’s support document for tips to avoid iPad import problems with Keynote (macworld.com/6074). Pages users should read Apple’s Pages for iPad FAQ (macworld.com/ 6277). Numbers users should see Apple’s Numbers for iPad FAQ (macworld.com/6278). Export iWork Documents Once you’re done editing a document on your iPad, you must export it before you can move it onto your com puter using iTunes. Tap My Documents (or My Presentations or My Spreadsheets). Open the document and tap the Send button. Tap Export, and then choose a file format. If you’ve been working with a Pages document, for example, you’ll want to save it in that format. 100 Chapter 3 Quick Copy Copying a file from your iDisk into an iWork app for editing couldn’t be easier. Productivity If you’ve made changes to a document you imported using iTunes, you’ll see a dialog box asking if you want to replace the original. Tap Replace to do this. When the app exports the file, you can copy it from iTunes back to your Mac. Note that other iPad apps may not require this somewhat complicated import-export procedure. For example, the GoodReader app displays a number of file types, including PDFs, Microsoft Office files, and text files—it just requires that you add files via iTunes. E-mailing yourself attachments is an easy workaround for some files. Copy Documents onto Your Mac To copy documents from the iPad onto your Mac using iTunes’ file-sharing feature, connect your iPad to your computer and open iTunes. Select your iPad from iTunes’ Devices and then click on iTunes’ Apps tab. Scroll down to the File Sharing section and select the appropriate app. Select the file in the list and click Save To. In the Open dialog box that appears, navigate to a folder on your Mac where you’d like to save the file, and then click Open; iTunes copies the file. You can also click on a file in the documents list and drag it to a Finder window to copy it. Sync with MobileMe and WebDAV All three iWork apps also support transferring documents to and from the iDisk feature that’s a part of Apple’s MobileMe service ($99 per year; me.com). Users without MobileMe aren’t completely out of luck, though: the apps can also transfer files to servers running WebDAV. Set Up To set up your iDisk or WebDAV server to work with an iWork app, tap the open file icon (it has a right-pointing arrow) at the bottom of the main documents screen in the app (see “Quick Copy”). Tap the Copy To iDisk option and enter your MobileMe login information. If you tap the Copy To WebDAV option, you’ll need to enter the server address 101 Chapter 3 Productivity and login information. Tap the Sign In button, and you’re ready to start transferring your files. Share Files If you tap Copy To iDisk or Copy To CalDAV again, you’ll be able to choose a file to upload. Select the folder where you’d like to save the document and tap the Copy button. A copy of that document is now stored on your iDisk or CalDAV server. If you tap the download button and then the Copy From iDisk or Copy From WebDAV button, you’ll be presented with a list of available documents that you can import. Tap the document you want to copy to your iPad; it will open in the appropriate iWork app. Use iWork.com iWork.com is not a collaborative online productivity tool like Google Docs. You use it to share documents, spreadsheets, and presentations online from Pages, Numbers, or Keynote, respectively. But the people with whom you share those documents can only view, download, and comment on them; they can’t actually edit them. All that said, iWork.com is a convenient way to share iWork documents, particularly when you’re sharing with people who don’t run iWork themselves. Work with Files on the iPad When looking at a document in any of the three iWork apps—Pages, Numbers, or Keynote—in the main page, tap the Share button. At the bottom of the screen, select the Share Via iWork.com option. You’ll be asked to sign in with your Apple ID if you haven’t done so already. Press on that button from any active document, and you’ll be asked to enter the e-mail addresses of the people with whom you want to share it. You can add an optional message and specify whether the recipients can comment on the document, download it, or both. Tap View to open the document you just uploaded immediately on iWork.com in Safari. The recipients on your To list will get an e-mail. When they follow the link in the message, they’ll see your document in their browser. Work with Files Online When viewing an online document, you see an Add Comment button at the top of the screen; you or your sharers can highlight some text, click that button, and then add a comment about the selected text. Sharers can also leave notes about the document in general, which everyone else can see. There are no Edit buttons or any other tools on iWork.com that let sharers actually change a Pages text, Numbers spreadsheet, or Keynote presentation: It really is just a tool for viewing and sharing. And you can’t sync viewers’ comments or notes back to the 102 Chapter 3 Productivity iWork in the Cloud You can sync iWork documents through iTunes or skip the computer and use iWork.com. original iWork document; they’re stored in the online version only. To see them locally, you have to download a copy of the commented document from iWork.com. Store Files in the Cloud Another option for file synchronization is storing your files in “the cloud.” The Dropbox service (basic version, free; dropbox.com) offers its iPad (and iPhone) app for free, and if you use this file-sharing tool on your desktop, you may find it the ideal way to get files onto your iPad. To use Dropbox, download the software and set up an account. (You’ll need to get a Mac version as well, from the Dropbox Website.) Use the same e-mail address and password on both your Mac and your iPad to link the two versions. Here are two ways to use Dropbox. Move Files or Folders From Your Mac Dropbox’s app makes it a cinch to view any files that are in an iOS-friendly format, including Word and Pages documents, PDFs, text files, and images. Even better, Dropbox offers you the option of opening your synced files in their iPad-compatible apps; you can, for example, use the Dropbox app to send a word processing document to Pages. When you put your files or folders in your Mac’s Dropbox folder, you’ll also see them in the Dropbox app on your iPad. If you have Dropbox installed on multiple Macs (or PCs), the files will get copied automatically, but on the iPad only a list of files you can down- 103 Chapter 3 Productivity load shows up at first. Tap a file to open it in Dropbox. Tap the Send icon in the toolbar to choose an application that can open the file. To view a Word file in Pages, tap the file to view it with Dropbox, tap the Send icon in the toolbar, and then tap Pages. Dropbox will transfer the file to Pages, and Pages will import it. Get Documents Off the iPad Because of limitations on how iOS operates, cloud storage apps are a one-way street on the iPad. It’s simple to get files from Dropbox into an app, but you can’t send them back to Dropbox when you’re done. To get the document off the iPad, you’ll either need to use the method described above for iWork apps, or send the document by e-mail. There is one workaround: In apps that support WebDAV—such as Pages—you can use DropDAV (free for 2GB; dropdav.com) to access your Dropbox folder. DropDAV lets you interact with your Dropbox files via a traditional WebDAV connection. Since Pages lets you open files from a remote WebDAV server, you can get your document and edit it on your tablet. Just remember that you’re working on a local copy. When you’re ready to save, you must manually publish your document back to the DropDAV-created WebDAV server. E-mail Files to Yourself Unless and until Apple allows developers to build full two-way sync into their apps, the next best thing is e-mail. With e-mail you’re just sending copies of your file back and forth, and you have to be careful that you’re always working on the latest version. But e-mailing offers a couple distinct advantages over the iTunes syncing model. First, you don’t have to connect your iPad to your Mac. Second, e-mail messages include date stamps, so you don’t need to guess whether you’re working with the most recent version of a file; you can see precisely when you sent it to yourself. If you plan to rely on e-mail file transfers a lot, it may be worth creating special rules in your mail client of choice to handle these special messages. For example, in Gmail you can create a filter that looks for messages that are both from you and to you, and that contain attachments. Those messages get a Files tag and are archived; this way, the Mail app on the iPad shows them neatly tucked into a folder with the same name. 104 Chapter 3 Productivity Transfer over FTP FTP is another option for transferring files to and from your iPad. The benefit of using FTP from the iPad is that it ensures that you can work on just one copy of a given file at any given time. There are plenty of iPad FTP clients in the App Store, including FTP On The Go Pro ($7; ftponthego.com), FTP Deluxe HD ($1; macworld.com/7270), and FTP Write ($5; macworld.com/7271). These apps let you connect to a remote FTP server, and then edit the files stored there. If you have access to a remote FTP server (through your Web hosting company or other means), both your Mac and iPad can connect to it. But that means you’ll need to download files to your Mac whenever you want to work on them. You might instead choose to configure your Mac itself as an FTP server. To do so, go to the Sharing preference pane and make sure that File Sharing is turned on. Then click the Options button and put a checkmark by Share Files And Folders Using FTP. You will see the FTP address for your Mac in the pane. Note that unless your home has a static IP address and your router is configured properly, it may be difficult to connect to your Mac as an FTP server when your iPad isn’t on the same Wi-Fi network. Third-Party File-Reading App Opening files in iWork apps, viewing them as e-mail attachments, and looking at them online aren’t the only options for viewing files on the iPad. GoodReader Accessing a myriad of file types isn’t as easy on the iPad as many users would like—there’s no single folder where you can just drop them all. Luckily there’s GoodReader, one of the best all-purpose readers for the iPad. It can handle PDFs, most Office documents (.doc, .xls, .ppt, and more), iWork ’08 and ’09 files, HTML and Safari Web archives, and the most popular image, audio, and video formats. GoodReader can also open and cruise through large files, like big PDFs. You can even annotate PDFs with a simple set of drawing tools. In addition to supporting Wi-Fi syncing with your computer, GoodReader also supports syncing over the Internet with convenient cloud-storage services like MobileMe’s iDisk, Google Docs, and Dropbox. The PDF Reflow feature can distill a PDF to just the necessary text for easier reading, and you can easily snap back to your place in a document after following a series of Web links ($5; macworld.com/6136). 105 Chapter 3 Productivity Print from the iPad The process of printing from an iPad has improved since the device was first released with no built-in printing functions. Several printer companies, including Hewlett-Packard, Epson, Kodak, and Brother, took it upon themselves to release apps that allow photo printing from an iOS device to specific printer models when both are connected to the same wireless network. There are also some third-party apps for printing, but they can be expensive, and many require downloading and running software on a host Mac to which a printer must be attached. AirPrint Apple has attempted to solve the printing dilemma by adding a wireless printing feature called AirPrint to the iPad operating system. With this feature, iPad users can print Web pages, e-mail messages, and photos directly to an AirPrint-enabled printer. iPad Printing AirPrint in iOS cuts the cord for printing from an iPad. 106 Chapter 3 Productivity Requirements To use AirPrint, an iPad must be running iOS 4.2 or later and must be connected to a wireless network. The printer must also be AirPrint compatible. At the time of publication, the only printers that work with AirPrint are a handful of HP printers. The app you wish to print from must also have built-in support for AirPrint. For example, Apple’s own Calendar and Contacts apps still do not feature AirPrint in the latest iOS version as of this writing (iOS 4.3.2). However, all the iWork apps have been updated to support AirPrint, as have third-party apps like Calculator HD for iPad and FeedMe News. How to Print Once you have connected your iPad to a wireless network, you should see a new entry titled Print when tapping the Sharing menu icon in Mail, Safari, and Photos. Third-party apps that support printing might place this command elsewhere. Tap the Print button and a Printer Options menu will appear, allowing you to select your printer and choose the number of copies to print. If you’ve already chosen a printer, its name will appear. Otherwise, tap Select Printer, and AirPrint scans your wireless network for a compatible printer. Select the printer you want and the number of copies you need, and tap Print. From there, it just works. You can view or cancel your pending print jobs and even receive a notice when a printer is running low on ink. A Print Center icon will appear in the iPad’s multitasking bar. Tapping the Print Center button brings up a Print Order pop-up window showing the print jobs in your queue. Tap a print job to get a job’s full summary, including the document name, the printer it is going to, the number of copies, whether it’s double-sided, print time, and status. There’s also a large red Cancel Printing button. The Future of AirPrint The smooth yet limited functionality of AirPrint just makes users want more—more compatible printers from different vendors, more apps with printing services, the ability to print from an iPad to a printer shared on the network by a host Mac, and more control over print quality. The ability to print in grayscale to save ink would also be welcome. You won’t necessarily have to purchase a new printer to use the AirPrint feature. HP offers firmware updates for a number of its older models, and other companies may follow its lead, so check with your printer’s manufacturer. All in all, AirPrint is a good start to Apple’s promise of cross-platform wireless printer sharing. 107 Chapter 3 Productivity Get More from AirPrint with Printopia If you can’t wait for the future of AirPrint, you can enhance what your iPad can do with the feature using a third-party utility such as Ecamm Network’s Printopia ($20; ecamm.com). A plug-in for your Mac, Printopia allows you to use AirPrint with any printer connected to your computer. It also introduces features that go beyond paper, such as printing to specific applications (for example, you can send an photo you are printing on your iPad to an image editor like Photoshop). You can even create “virtual printers,” folders on your Mac or in your Dropbox account into which you can send files from your iPad. These virtual printers can also perform automated tasks with those files, such as uploading them to a documentsharing service or importing them into iTunes. First you’ll need to download Printopia from Ecamm’s site (a free trial is available) and install it on the Mac to which your printer is connected. Then open the Printopia preference pane to customize your printer, add printable applications, and specify folders on your Mac or in your Dropbox account as virtual printers. Any printers already connected to your Mac should appear automatically in Printopia’s preference pane, ready to receive AirPrint commands. Click the plus-sign button to begin adding your own applications and services to Printopia. Once you select an application or virtual printer, it gets added to the master list and enabled by default. To toggle a serPrintopia This pane in System Preferences significantly expands on what you can do with AirPrint and your iPad. You can print to virtually any printer brand and model that Mac OS X supports, print to a specific application or file on your Mac (instead of a sheet of paper), and even set a password to prevent other people from using your printers. 108 Chapter 3 Productivity vice’s availability on or off in Printopia, simply click the checkbox next to it. If you want to add a password to Printopia to prevent other people from printing to your Mac’s printers or virtual printers, click the gear icon and choose Setup Password. Finally, to temporarily disable Printopia altogether, click the On/Off slider button on the left side of the pane. All printers, applications, and virtual printers will be unavailable to your iPad (and anyone else’s devices) until you toggle Printopia back on. Google Cloud Print If you’re using Google Docs in a browser on your iPad, you can print to a printer in your house or your business with Google’s recently announced Cloud Print feature. Once you set up your printer by following the instructions at google.com/cloudprint, you can tap the print option at the top of documents in Google Docs (text documents, for example, display it under a menu next to the edit button) to print them wirelessly. Google Cloud Print offers a couple of advantages over Apple’s AirPrint. First, it supports more printers (almost any printer, really) than the handful of HP printers AirPrint supports. Also, Google Cloud Print also does not require that your iPad be on the same wireless network as your printer or the computer that is sharing that printer. Once you set up a printer with Google Cloud Print, you can wirelessly print your document even if you’re halfway around the world from that printer. 109 4 Multimedia The iPad’s 9.7-inch screen is great for viewing photos and video, reading, playing games, and creating finger-painted masterpieces. Add some photos from your computer or the iPad’s built-in camera, and you can instantly create a classy slideshow to show family and friends. With the iPad 2, you can create, share, and interact with the world, as well as stream video and audio on the go. In this chapter, you’ll learn how to best sync, work with, and enjoy your media files. Contents Sync and Load Page 111 Music Page 121 Videos Page 127 Photos Page 132 Books and Reference Page 139 Games Page 142 Share and Stream Page 145 110 Chapter 4 Multimedia Sync and Load Before you can enjoy your music, photos, videos, books, and games, you must first get them onto your device. There are two ways to do this: You can either sync with iTunes, or download media from the iTunes app on your iPad. Sync with iTunes Like most people, if you have any kind of media collection, you probably keep most of it on your computer. To get your music, videos, and books onto your iPad, you’ll have to import it into iTunes. (If you’re trying to import a file that’s not compatible, see “Make Content iPad-Friendly” later in this chapter.) For photos, you can sync with a folder or application: Mac users can use iPhoto 4 or later or Aperture 3 or later; Windows users can use Photoshop Elements 3 or later. Connect your iPad to your computer and open iTunes to adjust your preferences (see “That Syncing Feeling”). From there, it’s just a matter of clicking on the tab for the content you want to sync. That Syncing Feeling When you connect your iPad to your Mac or PC, iTunes lets you choose which types of content to sync, and provides individual categories for customized syncing. 111 Chapter 4 Multimedia After you finish making changes, remember to click the Apply button in the lower right corner of the window before going elsewhere in iTunes; otherwise, you’ll lose all the changes you’ve just made. Sync Music To add music to your iPad, click the Sync Music checkbox under the Music tab. iTunes lets you choose between two options: copying your entire music library; or copying selected playlists, artists, albums, and genres. (You also have the option of including or excluding music videos and voice memos.) If you’re wary of sticking your whole music library on your iPad, you can preemptively see how much space it will take up by looking at the Capacity bar. When you select the Entire Music Library option, iTunes estimates how much space the files will take up and adjusts the bar accordingly. You can also see how many songs you’ll be loading in the upper right corner of the pane. If you decide to pick and choose, iTunes will load a complete list of these subgroups for your perusal (see “Music Sync”). Under the Include Music Videos and Include Voice Memos options, you’ll also be asked if you’d like to fill any remaining free space with randomly selected music. Mix and match your categories by selecting the appropriate checkboxes. Music Sync The Music tab lets you choose what tunes to sync with your iPad, either everything or selected playlists, artists, albums, and genres. 112 Chapter 4 Multimedia Sync Movies When you click on the Movies tab, you’ll see a grayed-out list of all the movies you have loaded into iTunes—represented by their name and a movie poster or selected screenshot. Click the Sync Movies checkbox, and you’ll be able to automatically include all videos, selected ones, playlists, or those most recently uploaded or unwatched (see “Movies Sync”). If you have rented movies from the iTunes Store on your computer, you’ll see them at the very top of the screen; you can transfer a movie to your iPad by clicking on the Move arrow. To transfer it back to your computer, click on the arrow a second time. Sync TV Shows As with the Movies tab, you’ll see a list of your television shows, grouped by series in the TV shows tab. Click on a show, and in the right column, you’ll see a list of the show’s episodes, organized by season. When syncing manually, you can only choose individual episodes or seasons of selected shows. You can also copy over playlists that include TV episodes. If you choose to sync automatically, however, you can copy over an entire series (or your entire television library). You can also filter within that series to sync only unwatched or newly added episodes. If you have rented TV shows on your computer from the iTunes Store, you’ll see them at the very top of the TV Shows tab; transfer one to your iPad by clicking on the Move arrow. You can transfer it back to your computer by clicking on the arrow a second time. Movies Sync The Movies tab gives you the option to sync all movies, specific movies, and playlists with movies in them. 113 Chapter 4 Multimedia Sync Podcasts The Podcasts pane presents you with a list of all your subscribed podcasts, grouped by series. Clicking a podcast will display a list of the show’s episodes, organized by date in ascending order. You can choose to sync your podcasts manually or use iTunes’s automatic options, which offer syncing for the most recently uploaded or unplayed episodes for selected shows or all shows. Sync Books, PDFs, and Audiobooks In the Books pane, you can sync ePubs, PDFs, and audiobooks. The first two are located at the top of the pane, where you can load all or selected e-books and PDFs (see “Books Sync”); the Audiobooks section is below that. Sync Photos and Personal Video Unlike your other content, your photos and personal video files are only linked through iTunes, rather than stored in the program. To sync, go to the Photos pane and choose which application or folder you’d like iTunes to pull these files from. If you have iPhoto or Aperture installed (or, on a PC, Adobe Photoshop Elements), you’ll also see those programs listed. If you choose one of these programs, you can sync images according to how they are organized in that application. Otherwise you’ll only be able to select your Pictures folder or a custom folder of your choice. Unfortunately, you can’t sync your iPad with more than one program or with multiple folders: You have to choose one. As with all the other media panes, you can sync your entire photo library to the iPad, or choose selected albums, projects, and (in iPhoto’s or Aperture’s case) Events, Faces, or images with certain star ratings. Books Sync The Books tab handles syncing of books from the iBookstore, your own ePub files, PDFs, and audiobooks. 114 Chapter 4 Multimedia Purchase Content on the Go Sure, you can sync your media from your computer, but what if you want to download something while you’re out and about? The desktop version of the iTunes Store may be a one-stop shop for your purchased content, but the iPad has three separate apps, each designated for specific types of media. Get More Apps The App Store is designed to let you browse, view screenshots and ratings, download updates, and purchase apps—all on the fly. Due to 3G carrier restrictions, you’ll have to connect your iPad to a Wi-Fi network to download apps bigger than 20MB. (For more on the App Store, see “Find More Apps” in the Get Started chapter.) Find Music, Movies, TV Shows, and More To download new content, you’ll want to head to the iTunes app on your iPad. Tap it, and you’ll see an iPad version of the iTunes Store on your computer. Along the bottom of the screen are buttons for each category in the store: Music, Movies, TV Shows, Ping, Podcasts, Audiobooks, iTunes U, and Downloads. Select Music, Movies, or TV Shows, and three buttons appear at the top of the display: Featured, Top Charts, and Genius (see “What’s in Store”). Genius uses the information you’ve sent to Apple from iTunes to make What’s in Store You can purchase and download music—as well as TV shows and movies—directly on your iPad. 115 Chapter 4 Multimedia Machine That Goes Ping The Ping feature lets you follow people and see the music they’re buying and the bands they like. media recommendations based on the contents of your iTunes library. When you select a specific item‚ a window will pop up, presenting you with information about the item (title, genre, length, summary, and cost). You can also browse user reviews, view previews, and purchase the item. The window also includes a Tell A Friend link that, when tapped, produces an e-mail message promoting the item. Just fill in an address and tap Send. Additionally, on the Music, Movies, and TV Shows pages, you’ll see a Genres button that, when tapped, produces a pop-up menu from which you can choose a genre of your liking. Do so and you’re taken to a page devoted to that genre. The Podcasts and Audiobooks pages have a Categories button that serves a similar purpose. The Downloads tab displays any content currently being downloaded to your device. You can view time remaining, pause or resume the download, and even delete it from the queue if you’ve had second thoughts. At the bottom of each screen is a Quick Links section you can use to move around to different areas of the iTunes Store that Apple has curated—in Movies, for example, you’ll see links to a collection of All HD Movies or Pre-Order Movies. Unlike the iPhone or iPod touch, the iPad can download HD content directly—there’s no need to download the media to your computer first and then sync. Play with Ping If you want to see what your friends are listening to, tap the Ping button, located on the bottom of the page (see “Machine That Goes Ping”). Apple’s venture into social media, Ping lets you browse your 116 Chapter 4 Multimedia friends’ latest likes and downloads using the Activity tab, find new followers by tapping People, or look at your own Ping profile. You can Like or add a comment to a song, album, or user action. If you’re following anyone who has an Artist page, you can use the Concerts feature to view his or her concert itinerary and even get a direct link to buy tickets. Read More Books As the desktop iTunes Store has no section yet for purchasing books from Apple’s iBookstore, you’ll have to do all shopping directly from the iBooks app on your iPad. Although it’s a free app, iBooks does not come preloaded on your device; head to the App Store on your device or on your computer to download it. To browse and purchase new books, open the iBooks app and tap the Store button in the upper left corner. This section is similar to the iTunes app: Banners at the top of the page greet you, along with a New & Notable section and other smaller icons. Tap Categories in the upper left corner to narrow your selection type. You can jump from Arts & Entertainment to Parenting, or over to Sports & Outdoors by way of Fiction & Literature‚ with a detour to the land of Sci-Fi & Fantasy. Along the bottom of the app, five icons sort books into various categories for viewers: Featured showcases content that Apple’s store editors have deemed notable; the NYTimes tab shows best sellers from the newspaper’s list in both fiction and nonfiction; Top Charts displays the top paid and free books that users are currently downloading; Browse allows you to browse by author or category (for either paid or free books); and finally, Purchases shows all the books you’ve downloaded with your currently signed-in Apple ID. (If you ever lose your downloaded books, you can always come back to this tab to download them again.) Search for books using the Search field in the upper right corner. As with the iTunes app, you’ll receive a list of suggestions as you type. Tap Enter to see a paginated list of results. To find out more about a book, tap its icon, and a window will pop up with detailed information. You can download a free sample of any book: Just tap Get Sample to start downloading the first few chapters. This is useful if you want to browse the content, check out the table of contents, or see how it reads on the iPad. If you decide you like the book and want to purchase it, you can do so from within the sample itself via a Buy button in the upper left corner, next to the Library and Table Of Contents buttons. This will take you back into the iBookstore to make your purchase. 117 Chapter 4 Multimedia Make Content iPad-Friendly While the iTunes Store has a decent selection when it comes to new content, maybe you’d like to add something on your iPad that you already own or that you created yourself. In the event that you have a file that’s not iTunes-friendly, there are a couple of ways you can go about converting it. Convert Music If you’ve spent every spare musical minute within the confines of the iTunes window, you might believe there are only five audio formats: MP3, AAC, WAV, AIFF, and Apple Lossless. It turns out, however, that when you waltz around the Internet, you come upon a variety of other audio formats, not all of which play nicely with your iPad. Windows Media files (WMA) are commonly found, but there are others. Many audiophiles favor Ogg Vorbis and FLAC files for their sound quality, although those formats are not as common as WMA, MP3, and AAC. Regrettably, iTunes doesn’t support any of these file types natively. But with a little conversion magic, you’ll have them playing through your iPad’s speakers in no time. The Windows version of iTunes can convert WMA files, but the Mac version can’t. A few free converters are available, such as NCH Software’s Switch (nch.com.au/switch). With it, you can batch-convert a load of WMA files to a host of formats, including MP3, WAV, and AIFF (unfortunately, there are no options for AAC or Apple Lossless). Once you’ve run your WMA files through Switch, toss them into your iTunes library and copy them to your iPad. (Note that this method won’t work with DRM-protected WMA audio files.) To convert Ogg Vorbis and FLAC files directly into an iPad-friendly format, use a program like Stephen Booth’s Max (free; sbooth.org/Max) or tmkk’s X Lossless Decoder (free; http://tmkk.pv.land.to/xld/index_e .html), aka XLD. Convert Video The Web offers many kinds of video, and likely your home collection does as well; unfortunately, iTunes is an incredibly picky eater when it comes to accepting formats. You can solve most of these problems using a program such as HandBrake (free; handbrake.fr), which handles DVD ripping and video encoding. Before you dive in, keep in mind that this is a gray area, legally speaking. Because ripping commercial DVDs circumvents the copy-protection 118 Chapter 4 Multimedia HandBrake Help An app such as HandBrake can help you easily convert video for playback on an iPad. system employed on these discs, the legality of using this type of software is questionable‚ even if you own the DVD and are ripping it only to watch it in another form. You’ll have to assess the risks yourself; if you decide to take the plunge, read on. HandBrake offers a simple preset for iPad owners looking to convert their video (see “HandBrake Help”). In the program, click on Toggle Presets in the toolbar to see the various built-in presets, then click the drop-down triangle next to Apple. Among the other iOS offerings, you should see an iPad preset. You can use it to encode video to your heart’s content. (If you don’t see the iPad preset, you may need to update your list by clicking on the Tool icon at the bottom of the presets pane, then choosing Update Built-in Presets.) Convert e-Books Chances are, you have several documents floating around that you might want for reference on your iPad. iTunes will sync PDFs and ePub e-books; to read anything in iBooks on the iPad, you’ll want to export to one of those formats. PDFs are the easiest to create, though they lack some of the finesse that the ePub format offers iBooks users, such as the ability to increase text size from within the app. But anything you can print, you can make into a PDF. On a Mac, simply click on the program’s Print option from the File menu, and when the dialog box opens, click on the PDF button in the lower left corner. From there, choose Save As PDF from the pop-up 119 Chapter 4 Multimedia Make Me a PDF You can create a PDF from almost any file on your computer, and then sync it to your iPad to bring along. menu, and you can give the file a name and choose where to save it (see “Make Me a PDF”). Once you’re done, just drop the PDF file on the iTunes icon in the Dock, and it will import into iTunes. Unfortunately, ePubs are more difficult to create, even though it’s an open-source format. There are a variety of open-source tools; one such option is Kovid Goyal’s Calibre (free; calibre-ebook.com). However, most suffer from clunky, inscrutable interfaces, often written in cross-platform technologies like Java. Storyist ($59; storyist.com), a writing tool for screenwriters and novelists, offers easy ePub export, but at a price. In the end, unless you specifically want something in ePub format, it may be easier to just export it as a PDF. 120 Chapter 4 Multimedia Music The iPad can serve as your virtual boom box, piano, worldwide karaoke joint, or online radio station. Organize your iTunes content in the iPod app, listen to streaming music using apps from the App Store, or, better yet, create music of your own. The iPod App When you open the iPod app, it’s obvious that it has taken a few visual cues from iTunes. The app sports a Source list (labeled Library), displaying entries for Music, Podcasts, Audiobooks, iTunes U, and Genius Mixes, as well as smart and standard playlists you’ve synced or, in the case of standard playlists, created with your iPad. Section Controls At the top of the screen are play controls, a scrubber bar, volume control, and a Search field. Below that is a two-pane view showing your library. Tap Music, and you’ll see Songs, Artists, Albums, Genres, and Composers buttons along the bottom center of the screen for displaying your tracks in these various views (see “Music Tastes”). Music Tastes You can view your music by songs, artists, albums, genres, or composers. 121 Chapter 4 Multimedia Podcasts are arranged in a list with thumbnail art. Below the show title is the number of episodes on your iPad. Tap a show to see a list of episodes; tap an episode, and it plays. Episodes you haven’t played have a dot next to them. If you’ve listened to part of a podcast, the dot is half-filled. Audiobooks are presented in a list. Tap an audiobook, and a screen appears with chapters listed. Genius mixes display the same four-album-cover collage they do in iTunes. Unlike iTunes, the iPod app doesn’t give you the option to rename Genius mixes or rearrange their position on the iPad’s screen. Playlists In the lower left of the display is an Add button, labeled with a plus sign (+), for creating a new standard playlist on the iPad. You can’t create a smart playlist on your device, though it will play those you’ve created in iTunes. Next to the Add button is a Genius button for creating a Genius playlist based on the currently playing track. If you want to switch on Sound Check (the feature that attempts to balance volume among playing tracks), muck with EQ, configure a volume limit, or turn on lyrics and podcast info, head over to Settings: iPod. To create a new playlist, tap the Add button (see “Playing Around”). This brings up a box‚ similar to the one you get when prompted to enter a Wi-Fi password‚ asking you to name the playlist. Enter a name, then tap Save. The playlist displays briefly in the sidebar, then a list of all your Playing Around The iPad lets you create playlists on the device itself, and later edit or add to them. 122 Chapter 4 Multimedia Just Peachy Tap the iPad’s screen when playing a song, and you get additional controls. songs pops up. Each song has a blue plus-sign icon to the right; to add a song to the playlist, just tap the icon next to its name. To choose from a different source of content, tap the Sources button at the upper left to pick a library (Music, Podcasts, and so on) or another playlist from which to fill your new playlist. You can always add songs to, or delete songs from, your playlist later. Play Music While the browsing experience may be similar to iTunes, playing media on the iPad is akin to doing so on an iPhone or an iPod touch. When you play a track, your device’s screen fills with that song’s album artwork. Artwork you’ve acquired from the iTunes Store scales beautifully, but album art you’ve downloaded yourself can look mighty pixelated if it’s a low-resolution image. Tap the screen to bring up basic playback controls (see “Just Peachy”). Additionally, you’ll see a scrubber bar, along with Repeat and Shuffle buttons. At the lower left of the screen is a back-arrow icon that, when tapped, returns you to the main iPod interface, with the album artwork taking up residence in the lower-left corner. Centered beneath the artwork is a Genius button. Tap it, and the iPad will create a 25-track Genius playlist based on the currently playing song. To the right is a Track List button, a circle with several horizontal lines. Tap it, and all the tracks in the currently playing album or playlist will appear. 123 Chapter 4 Multimedia When playing an audiobook or podcast, tap the screen, and you can e-mail a link to a podcast, scrub through the audio by dragging the playhead in the scrubber bar, and change the speed of the audio (to normal, double, or half speed). At the bottom of these audiobook and podcast screens is a 30-second repeat control. Tap it, and the audio rewinds 30 seconds and plays. To silence the iPad in a hurry, you can either flick its mute switch if you’ve chosen to use it that way, or press and hold on the bottom of the volume rocker switch. The iPod app supports background audio, which means you can listen to your songs while performing other tasks or working in another app on your iPad. To change the song or to pause your music, you don’t have to reenter the app—simply double-click the Home button to bring up the multitasking shelf, then swipe right to access the iPod controls. GarageBand GarageBand ’11 ($5; macworld.com/7054), part of Apple’s iLife suite, is a versatile application. With it, you can play and record virtual instruments, record real instruments plugged into your Mac, create iPhone ringtones, record and assemble podcasts, create movie soundtracks, play and record your guitar through modeled amps and effects, and string together audio loops. Wonderful as the Mac-based GarageBand is, far too many people ignore it completely, or open it once to see what all the fuss is about and never do so again. They do this because they perceive GarageBand as a musician’s tool. Anyone‚ from musicians to tin-eared newbies‚ can use it, no talent required. GarageBand on the iPad eschews the podcast, ringtone, and movie-soundtrack elements and instead focuses on making it easy to create and record music. The app includes a variety of “smart” instruments, enabling you to play pleasing notes, chords, and beats on virtual keyboards, guitars, basses, and drums. In addition to its smart instruments, this eight-track recorder includes a wide variety of virtual instruments (synthesized and sampled) that you can play and record (see “Player Piano”). It lets you record real instruments jacked into a compatible audio interface, as well as sounds recorded with the iPad’s microphone or a compatible external mic. It includes modeled guitar amps and stompboxes for guitar players; offers 124 Chapter 4 Multimedia Player Piano With GarageBand on the iPad, it’s easy to feel like you’re playing an actual instrument. a couple different ways to create drum tracks; and even provides a sampler instrument with an onscreen keyboard for playing back sounds recorded with a microphone. Regardless of your musical skill, GarageBand has something to offer. With very little effort, you can strum the chords to a favorite song on the Smart Guitar instrument. If you need a funky beat to get you out of bed in the morning, you can assemble it with Smart Drums. If you want to do nothing more than piece together a podcast theme with loops and a voiceover, it’s easily done. And if your nine-year-old is getting antsy in the back seat, pass along the iPad and suggest that she play with the Sampler. 125 Chapter 4 Multimedia Third-Party Music Apps With third-party apps, you no longer have to rely solely on your iTunes music library to get through the day. You can do everything from tuning in to online radio, subscribing to a streaming plan, and even creating your own music. Pandora Radio With Pandora, users can pick a song, artist, or genre they’d like to hear, and then create a radio station based on similar content. The app has a simple interface, effortless navigation, and a thumbs-up or thumbs-down button that helps determine how a listener’s station will evolve. Users can bookmark any song or artist, as well as purchase songs from the iTunes Store. Pandora is ad supported, but you can turn the ads off (and gain access to higher audio quality) by subscribing to the $36 per year Pandora One (free; macworld.com/6022). Sonos Controller If it’s streaming music you want, Sonos Controller for iPad can stream from Internet radio stations and subscription services like Rhapsody, Napster, and Sirius FM (free; macworld.com/7233). Magic Piano If you want to use your iPad to create, rather than merely tune in, Smule’s Magic Piano lets both musicians and musician wannabes tickle the virtual ivories in a solo setting, as well as play in concert with others around the world ($1; macworld.com/6711). Looptastic HD More-advanced audiophiles may take interest in an app like Sound Trends’ Looptastic HD, which lets you mix and piece together tracks from a handful of audio loops ($15; macworld.com/6712). 126 Chapter 4 Multimedia Videos Slim and light, the iPad is the perfect device for watching movies or television while you’re sick in bed, or for enjoying a video on the plane. You can watch content from your iTunes library, rent TV shows or movies from the iTunes Store, browse the YouTube app for moments of brilliance, or stream online video from one of many third-party apps. Watch Videos Offline, the best way to watch video is using the built-in Videos app, which pulls from content you’ve synced from your iTunes library. The Videos app is tasked with sorting your videos into rentals, movies, TV shows, video podcasts, music videos, and videos from iTunes U. If you have applicable videos, you’ll see a button for the respective category along the top center bar. Tap one of the category buttons to see an icon-view list of that section. Movies and TV shows you’ve purchased display only the artwork associated with them. There’s no title information, so if you’re unfamiliar with the artwork or have no artwork, you’ll need to tap the artwork or the gray box to learn what the video is. (Homemade videos exported to iTunes from iMovie‚ with no embedded artwork‚ will display the title of the film in place of the icon.) Podcasts, music videos, and iTunes U content provide the title of the item below the artwork. You can’t rearrange the order of items on these screens, but you can delete them by simply tapping and holding the respective clip until you see an X icon in its upper left corner (similar to the one that appears when removing apps). Tap a video’s artwork to see more details about it. For movies or rentals downloaded from the iTunes Store, commonly presented information includes the film’s rating, studio, year made, whether it’s presented in HD (720p) or SD (480p) quality, a summary, actors, directors, producers, and‚ possibly‚ screenwriters. You can switch from the Info pane to the Chapters pane‚ to view the film by chapter‚ by tapping the respective button in the upper right corner of the column. Music videos and home-converted video will show the year of creation or release (often Unknown); the clip’s length, dimensions, and file size; and the codecs 127 Chapter 4 Multimedia Tickle Me iPad Tap a video while it’s playing to bring up extra controls. used for the audio and video in it. TV shows, podcasts, and iTunes U files skip most of these details, offering only the show’s title, rating (if applicable), year of release, and whether it’s in HD or SD. Below these details, you’ll see a list of episodes currently on your device, as well as a link below to Get More Episodes. Once you’re finished reading about the video, you can tap the Play button to start it. Videos on the iPad can play in either landscape or portrait orientation. When in a video, tap the screen, and standard playback controls appear, along with a volume slider (see “Tickle Me iPad”). At the top of the display is a Done button and a scrubber bar. If you want to navigate through a video’s chapters, tap the Back button to return to the previous screen, where you can select a chapter, use the Previous or Next buttons to move back or forward by chapter, use the controller on a compatible set of headphones, or use the scrubber bar to scrub to the scene you want to view. You’ll also find a button for toggling between widescreen and full-screen display. Each is a compromise. When viewing videos formatted for widescreen display, you’ll see large black bars above and below the video. Switch to full-screen mode, and the picture will fill the screen, but you’ll lose some of the left and right sides of the video. (If the video was originally formatted for 4:3 standard definition, the screen toggle button won’t show up.) 128 Chapter 4 Multimedia Watch YouTube Videos Although you can access most content from streaming video sites like YouTube (youtube.com) and Vimeo (vimeo.com) using mobile Safari, your iPad also comes with a built-in YouTube app for quick browsing access. The app is divided up into seven sections: Featured, Top Rated, Most Viewed, Favorites, Subscriptions, My Videos, and History (see “On the Tube”). You can search for a specific video at any point and in any category by tapping the Search bar in the upper right corner. Featured, Top Rated, and Most Viewed all show a page of videos on launch, though you can tap Load More to get more from your category. Featured videos are those YouTube deems interesting, while Top Rated and Most Viewed are, respectively, the highest rated and most viewed videos on the site. You can sort these by time frame: Choose Today, This Week, or All. Favorites, Subscriptions, and My Videos all involve your personal YouTube account (if you have one). Tap any one of these categories, and you’ll be prompted to enter your username and password. You can’t sign up for an account from the app, but you can sign in by tapping the Sign In button in the upper left corner of these categories or by tapping a different, account-required category. Favorites displays those YouTube videos you’ve tagged as interesting or playlists you’ve built, while Subscriptions shows the YouTube channels to which you’re On the Tube A built-in app lets you watch YouTube’s finest right on your iPad. 129 Chapter 4 Multimedia currently subscribed (you can add to or edit any of these by tapping the Edit button in the upper left corner). If you’ve uploaded videos to your account, you can view them by tapping the My Videos category. Finally, History shows what videos you’ve viewed in the past. (To clear them, tap the Clear button in the upper left corner.) To view a video, just tap it. This automatically launches it in full-screen mode, with controls to play, pause, scrub, and exit to the YouTube browser (which you can also do by tapping Done in the upper left corner). If you exit, you’ll be brought to the videos page, which shows a smaller version of the video, followed by some descriptive information about it, related videos, more from the creator or user, and comments people have made about the video. iMovie Apple’s iMovie ($5; macworld.com/6303) allows you to cut surprisingly complicated clips together, providing a legitimately worthy tool for editing on the go. A look at Adobe Premiere or Apple’s Final Cut shows you just how complex video editing can be—this app makes that process not only accessible, but touchable, too. The app’s multitouch gestures provide a variety of new ways to work with clips and the timeline. You can zoom in and out; jump through the timeline; move, split, skim, and rotate clips; and open the Precision Editor for more specific tweaks. That tactile interactivity makes video editing more engaging. You’re assembling the movie directly using your fingers, instead of at a distance via the mouse on a computer. Without a doubt, when it comes to editing, the large iPad screen is a big improvement over the smaller ones on the iPhone and iPod touch. You can export the movie directly to YouTube, Facebook, Vimeo, and CNN iReport, as well as to the iPad’s Camera Roll. iMovie offers HD exports in addition to Web-friendly files. You can layer up to three tracks of simultaneous audio and an optional background track over the clip audio (up from the previous version’s single nonadjustable track). Unfortunately, while you can view audio waveforms on the iPad, there’s no way to individually adjust or split audio clips; you’re stuck with a master volume control for each clip and an on/off button. Nor can you separate audio from a clip‚ though you can switch off audio entirely. 130 Chapter 4 Multimedia On the whole, the iMovie app provides a great user experience. While desktop applications have sought for years to imitate the experience of flatbed editing, the app on the iPad is the first to feel a bit like the real thing. When it comes to video editing, there’s something to be said for working with your hands‚ physically swiping down to cut a clip instead of pressing a key. Third-Party Movie Apps If you want even more video-streaming options, Netflix and Hulu both provide additional content for the iPad‚ for a monthly fee. Netflix Subscribing to DVD rental service Netflix (netflix.com) allows you to receive DVDs of shows and movies in the mail, but the company also has an in-depth online streaming service called Netflix Watch Instantly. For $8, you can subscribe to the company’s Watch Instantly Unlimited service (no DVDs), and every DVD-rental plan starting at $10 a month includes unlimited streaming as well. Either way, you can download the Netflix app and have access to every single one of the company’s streaming titles on the go (free; macworld.com/6473). Hulu Plus Hulu is also a subscription service, but for television. The $8 per month service (hulu.com/plus) gives users access to full episodes of television and older film collections. However, since the Website uses Flash, you can’t access it using mobile Safari—you’ll need to download the Hulu Plus app (free; macworld.com/6471). 131 Chapter 4 Multimedia Photos The iPad makes a fantastic electronic photo album. You can pass it around to friends curious about your latest vacation, hook it up to your television for some large-screen viewing, or turn on Picture Frame mode and create an instant slideshow. But its abilities don’t stop there: The iPad 2 has two cameras for snapping low-resolution images and shooting video. And with Apple’s Camera Connection Kit, you can import photos from your camera and edit them with third-party iPad apps. Use the iPad 2’s Cameras The iPad 2 has not one but two built-in cameras: a 0.3-megapixel VGA front-facing camera, and a 0.7-megapixel camera located on the rear of the tablet. To shoot still images or record videos with these cameras, launch the Camera app by tapping its icon on the Home screen. There are several buttons and toggles on this screen (see “Start Shooting”): The Camera button A snaps a photo or starts and stops a video recording. You’ll hear a shutter-click sound effect when your device captures a still image. Within moments, the camera is ready to take the d E Start Shooting The iPad 2’s built-in Camera app can be used to capture video or still images from the front or back camera. 132 b a c Chapter 4 Multimedia next shot. To quickly see the photo or video you just captured—and other photos you’ve taken with your device—tap on the Camera Roll button B. This will launch the gallery of photos and videos you’ve taken. The Photo/Video toggle C allows you to switch from still images to video; the Swap Camera button D switches views from the back camera to the front (and vice versa). By default, the camera autofocuses on the scene you’re shooting; however, you can tap on the touchscreen to make it focus on a particular object E. If that object is in a darker or lighter area of the frame, the camera will also adjust to make sure that location is properly exposed, even if that means other areas will be blown out or left in darkness. View Photos The iPad is perfect for showing off photos, and Apple’s built-in Photos app is a slick tool for displaying them. Any photos and videos you capture with the iPad 2’s cameras—along with any images you’ve synced to the device—are viewable in Photos. When you open the app, you’ll see some or all of these tabs at the top, offering you up to five different ways to view your synced and saved pictures: Photos, Albums, Events, Faces, and Places (see “Picture the Options”). Photos The Photos tab brings up thumbnails of all the images stored on your iPad. It’s also where you can directly send and share images. Tap the Share arrow in the upper right corner. Here, you can e-mail, copy, print, or delete multiple photos. Tap the photos you wish to send, then tap Email in the upper left corner to create an e-mail message with the images attached. E-mail is unfortunately limited to five images at a time‚ but you can get around this limitation by tapping the Copy button and pasting the images into a message instead. You’ll notice the Delete button is sometimes grayed out or‚ in some instances‚ missing altogether. That’s because the iPad won’t let you delete photos you’ve synced with your computer; you can only delete those images you’ve personally saved to your device or exported from a third-party program. To view an individual photo, tap its thumbnail once. You’ll be greeted by a menu bar and content scroller at the top and bottom of the image, but that will fade away. Tap the screen once to bring it back. 133 Chapter 4 Multimedia Picture the Options The Photos app organizes your images in up to five categories: Photos, Albums, Events, Faces, and Places. If you don’t have any photos with tagged Faces or Places, or images gathered in an album or event, these tabs won’t show up. When you are viewing an image full-screen, the menu bar shows a link back to the album’s thumbnails you were looking at in the upper left corner, a count of how many photos are in the album, a button to cycle through a slideshow of the photos in that album, and a Share button for sharing individual images. Tap the button, and you’re greeted with a pop-up menu, giving you the option to e-mail the photo, send it to your MobileMe gallery (if you have one), assign it to a contact in your Address Book, use it as your wallpaper, print it, or copy it. To view the photo in greater detail, you can either pinch out to zoom in, or double-tap it. Return to thumbnail view by pinching in on the screen. Along the bottom, the content scroller has tiny thumbnails of all the photos in the present album. Tap and drag along it to preview full-screen images of other pictures; release your finger to stop on a specific one. You can also flick your finger to the left or right on the screen to go photo by photo within the album. Albums and Events If you’ve created albums or events within the photo program on your computer, they’ll show up here. In the Albums tab, the first one you’ll see is Saved Photos, which is where any picture you save or export from a third-party program will end up. Pinch to zoom in on an album or event and preview some of the photos contained within, or simply tap to open it in thumbnail view. 134 Chapter 4 Multimedia More to Map If you have synced photos that include geotagging information, the Places tab will appear in the Photos app and show you on a map where the photos were taken. Faces If you use iPhoto or Aperture, you may be familiar with the Faces feature in those programs, which allows you to tag images with the names of the people in them. Sync either application’s pictures with the iPad, and these tags will carry over, creating little miniature albums containing pictures of each respective person. In the Photos app, you can view any of these tagged images under the Faces tab. As with albums and events, you can pinch to zoom for a preview, or tap to open it. Places Most modern cameras (and camera-equipped gadgets) support geotagging. This feature adds location data to your photo, telling you where you were when you snapped it; with the iPad, you can see these photos on a map of the world. If you have any geotagged photos, you’ll see red pushpins on the map representing their locations. Tap a pin to bring up a preview of the photos taken there (see “More to Map”); tap the photos themselves to enter thumbnail view. Slideshows In thumbnail or single-photo view of an album, face, place, or event, you’ll see a Slideshow button in the upper right corner of the screen. Tap it to see several options for creating a slideshow. Choose whether to play music from your iPad’s music library, select one of five transitions, then tap Start Slideshow to begin. You can stop a slideshow at any point by tapping the screen, which freezes on the photo you’re currently viewing and brings you into single-photo view. 135 Chapter 4 Multimedia To control how long each image is displayed in a slideshow, you must leave the Photos app and go to Settings. Choose Photos from the list of apps on the left, and you’ll see the Play Each Slide For option. Make your choice and return to Photos. You can also turn your iPad into a picture-frame slideshow from the Lock screen. Tap the Picture Frame button (to the right of the Unlock slider), and a slideshow of photos from your library will begin to play. You can change options for this slideshow in Settings: Picture Frame. Import and Export Photos There are many ways to get images onto your iPad in addition to capturing them with the built-in cameras. You can save photos from e-mail messages or pages in Safari to your Camera Roll by tapping and holding on each image and selecting Save Image from a pop-up menu. You can also import them onto the iPad from your computer, from a camera, and from a memory card. Import from a Computer To load your iPad with photos from your computer, you will need to sync it with your libraries using iTunes (for more information, see the “Sync and Load” section earlier in this chapter). Export to a Computer Although you can’t download synced photos from your device to a computer, you can download the photos you’ve taken—assuming you have software on your computer that can pull images from a memory card (which is how these programs classify your device). For example, when you plug your iPad into your Mac, and it contains new pictures taken with the camera, you can use iPhoto or Image Capture to import those pictures. On a Windows PC, when you plug in the iPad and it contains new pictures, Autoplay will appear and ask what you’d like to do with your device’s pictures. One of the options is to import them. In Windows Vista Home Premium, the pictures are imported into Windows Photo Gallery. From a Camera or Memory Card What if you want to upload some pictures while you’re on the road, but don’t want to bring your computer and SD card reader? With Apple’s iPad Camera Connection Kit ($29; apple.com), you can move photos and videos from your camera onto the iPad. The kit connects to your iPad’s dock and is made up of two pieces: an SD card reader and a companion USB connector (see “Make the Connection”). If your camera shoots on an SD card (or, with an adapter, a mini-SD card), you can just pop the card out of the camera and put it in 136 Chapter 4 Multimedia Make the Connection Apple sells the $29 iPad Camera Connection kit for photographers who want to upload images directly from a camera or memory card to an iPad. the reader. If you shoot on something else‚ CompactFlash, or even an iPhone or a 4G iPod touch‚ just plug the device’s USB cable (or, alternatively, a USB multiple-card reader) into the USB connector. When you make a connection, the iPad’s Photos app launches immediately and displays thumbnails for every image on the memory card. You’ll notice that a new tab labeled Camera appears along the menu bar. This tab will remain in place as long as there’s a device connected to your iPad through the kit. Once connected, the iPad handles a variety of file formats with equal ease. You can import JPEG, raw, and even movie files. If you’ve already imported some photos from your camera, you’ll see a green checkmark on the thumbnails for those photos. If you shoot Raw+JPEG, a label denoting that pairing will appear across the bottom of the image. (Even though both files end up on the iPad, you will only see one thumbnail.) You can browse all of the thumbnails on the card without importing anything, but to see bigger versions of the images, you have to transfer them. You can tap the Import All button in the upper right corner, or just tap the photos you want, then tap Import Selected. When you transfer images, Photos will create two new albums: Last Import and All Imported. The first will only show the latest media you’ve transferred, while the latter will show everything you’ve imported. Unfortunately, you can’t organize or tag your photos here‚ you’ll have to sync back to iPhoto or Aperture for that. Photo Booth The iPad 2’s cameras aren’t high-resolution enough to snap any fine-art photographs, and the iPad’s form factor makes it a pretty inconvenient point-and-shoot camera. However, one fun use for these cameras, outside of video chatting, is taking pictures with the Photo Booth app. This new app is an iPad version of the classic OS X application that works with iSight cameras. Tap once on the app and you are greeted with nine live previews of the front or back camera’s view with real-time effects including thermal vision, X-ray, twirl, and mirror. Once you 137 Chapter 4 Multimedia Fun with Photo Booth The iPad 2’s Photo Booth app is a fun way to use the built-in cameras on your device. choose an effect, you can move between the front and back cameras by tapping the toggle in the lower right corner. Tap and drag anywhere on the image to alter the effect’s centerpoint (see “Fun with Photo Booth”). To return to Photo Booth’s effects menu, just tap the icon in the screen’s lower left corner. After you take a picture in Photo Booth, it will appear in a tray along the bottom of the screen. Tap once on one of these thumbnails to preview the image. You can also e-mail, copy, and delete the images from within the Photo Booth app. Any photos you take here will also appear in the Photos app and in the Camera Roll. Third-Party Photo App If you want to edit your photos on the iPad, here’s a great option. Photogene for iPad Omer Shoor’s Photogene offers a vast array of editing options, including controls for adjusting levels, and for cropping, rotation, filters, and digital photo frames. Once you’re finished editing, you can e-mail your photos; upload them to Twitter, Facebook, and Flickr; and send them back to the Photos app ($4; macworld.com/6575). 138 Chapter 4 Multimedia Books and Reference Reading, viewing PDFs, and skimming news on the iPad is a snap thanks to a variety of both built-in and third-party programs. Apple’s iBooks (with its attached iBookstore) provides clean, simple e-book and PDF reading, while other apps offer different catalog selections, free books from Project Gutenberg, RSS feeds from news sources, and Wikipedia articles. You’re never too far from some good reading. Read Books The iPad version of iBooks offers a very pleasant reading experience for both ePubs (a popular e-book format) and PDFs, with both portrait and landscape modes. In landscape, the iPad splits the text across two virtual facing pages; in portrait, it limits text to a single page at a time. To keep your iPad’s virtual pages from constantly shifting orientation while you’re reading in bed, double-tap the Home button and swipe right to bring up Orientation Lock, or use the hardware switch, depending upon how you’ve configured that switch in the Settings app. iBooks offers a host of options for navigation and for tweaking your book’s look. Single-tapping anywhere on the text hides most of these interface elements; tapping again brings them back. On the bottom, a small indicator tells you where you are in the current chapter. The app also offers great features for exploring and annotating the books you read. You can search the full text of the book for words or phrases in seconds, and jump straight to those passages. You can add bookmarks, highlight sections, and add notes‚ all of which are then easily discoverable from the book’s table of contents. You can tap and hold a word or phrase to look it up using the built-in dictionary, Google, or Wikipedia. You can choose from six fonts, including Georgia (see “iBooks Display Options”). iBooks also lets you pick one of 11 font sizes; the app also lets you disable full justification, although you must jump over to the Settings app to toggle that preference. iBooks lets you choose a white background with black text, or a sepia background with dark brown text. And you can adjust the brightness‚ a must for nighttime reading. If you want access to books not available in the iBookstore, or you already own a dedicated e-reader, third-party apps may be able to give 139 Chapter 4 Multimedia iBooks Display Options iBooks lets you control the font, its size, and the page color tone as you read. you the reading you seek. For those who want to browse Amazon’s catalog of e-books, there’s the company’s Kindle app (free; macworld .com/6020). It offers numerous text display options, links to Amazon’s massive Kindle bookstore, and syncs with other Kindle apps and the hardware Kindle device. 140 Chapter 4 Multimedia Third-Party Reading Apps On the iPad, you’re not limited to e-book enjoyment—after all, you have access to the entire Internet. A variety of third-party apps outside mobile Safari can supplement and organize your Internet reading. Reeder for iPad If you follow more than a couple blogs or online news sources and use Google Reader to organize them, an app like Silvio Rizzi’s Reeder is essential. Borrowing a few design tricks from Apple’s Photos app, it organizes your Google Reader categories into paper piles, which you can pinch open to reveal the news sources contained within. When articles contain only summaries, you can tap the Readability button (or pinch the summary text) to expand the full article without needing to go directly to its associated Web page ($5; macworld.com/6300). Instapaper At its core, Instapaper is a service for delayed, distractionfree reading of long-form Web content. The idea is that as you surf the Web and encounter lengthier articles that you’d rather read later, or on a better-suited device, you save those articles to Instapaper. The service then grabs the article’s text (and any inline images) and saves them, and you can revisit them at any time via the Web or in the iOS app ($5; instapaper.com/iphone). Flipboard For those readers more interested in a mix of social media news and blogs, Flipboard offers a personalized newspaper-style look for your favorite feeds. You can create up to nine sections that pull from Twitter, Facebook, top blogs, and other sources—Flipboard offers more than 60 different section options (free; macworld.com/6465). 141 Chapter 4 Multimedia Games When talking about entertainment on the iPad, it would be remiss to overlook gaming. The iPad 2’s accelerometer makes driving and action games interactive, while its multitouch screen provides you with several angles to control and engage. You can even connect with others and join a multiplayer campaign, thanks to Apple’s Game Center. Connect with Game Center Game Center allows you to connect with friends and strangers alike, according to your game-playing habits. You can challenge your friends and allow them to challenge you, compare scores, discover new games they’re playing, and get matched with other iPad users. Furthermore, you can stay connected to your gaming circle with notifications, streaming video, leaderboards, and stats. You’ll find Game Center on your Home screen, installed by default. The first time you launch the app, an interface that resembles a green poker table, scattered with clusters of apps, will greet you. Game Center will ask you to enter your Apple ID and password‚ the same one you use to purchase music from the iTunes Store. If you don’t have an Apple ID, you can create one directly within the program. You’ll also get to pick a username, which will identify you on the service. Once you’ve signed in, you’ll be greeted by your profile, which includes your username and friend count, the number of Game Center–enabled games you have on your iPad, and your number of achievements. There’s also space to write a short blurb, and beneath that a button showing your Apple ID account. You can tap this button at any time to view or sign out of your account, if you’re sharing an iPad with siblings or a significant other. Tap View Account to access important Game Center settings. These include allowing invitations from friends and strangers, allowing people to find you by e-mail, and choosing what e-mail addresses you want to associate with your account. You can also edit your nickname, change your account information, and change your region here. Along the bottom of the app are four tabs: Me, Friends, Games, and Requests. When you start the app, you’ll load the Me tab, which show- 142 Chapter 4 Multimedia To the Games You can see a list of all your Game Centercompatible games under the Games tab. cases your aforementioned profile information. Friends lists your current Game Center contacts; to add a contact, tap the plus-sign button in the upper left corner of the screen. You can add a friend by username or e-mail address, and include a short message, if you like. Under the Games tab, you’ll find all your currently installed game titles (see “To the Games”). Each game title shows its icon, the last time you played, and your current Game Center ranking. You can tap a game to access its Leaderboard. In addition to providing a link to play the game 143 Chapter 4 Multimedia directly (in the upper right corner), the Leaderboard shows your rank among your friends and overall, what achievements you’ve managed to get, a list of who among your friends has recently played, and a Tell A Friend button for e-mailing someone about it. Tabs give you access to a full Leaderboard that keeps scores for the day, for the week, and for all time. On the left side, you’ll see your friends’ scores (if they’ve played); on the right, you’ll see the list of players and their respective scores. If you don’t currently have any games compatible with Game Center, tap the Find Game Center Games tab. This will launch a special section of the App Store just for supported games. Third-Party Game Apps Whether you like playing something entertaining or strategic, there are plenty of great iPad games in the App Store. Angry Birds HD In Chillingo’s hugely popular Angry Birds HD, little green pigs have stolen the eggs of some flightless—but skilled—birds, and now the birds want revenge. Clear stages by flinging birds in a slingshot to destroy the pigs ($5; macworld.com/6713). Plants vs Zombies HD In PopCap Games’ Plants vs Zombies, it’s your job to build an army of attacking plants to fend off waves of zombie hordes ($10; macworld.com/6714). Strategery Affogato’s Strategery takes cues from the popular board game Risk, allowing you to play against friends (or the computer) on a massive map filled with colorful dots ($2; macworld.com/6163). Words with Friends HD If you’re more of a Scrabble fan, you may take delight in Zynga’s Words with Friends, a competitive crossword experience similar to the iconic board game. Play against friends in person or online, match up randomly, and even enjoy an in-game chat smackdown with your opponent ($3; macworld.com/6147). 144 Chapter 4 Multimedia Share and Stream In addition to watching local content stored on your iPad, there are also ways to stream content from your computer to your iPad, as well as share the music and video from your iPad on a large HDTV screen (both wired and wirelessly). Here are some of your options. Use Home Sharing Introduced in iTunes 9, Home Sharing was initially designed to allow you to share music and copy files between iTunes on different computers over a local network. But with iTunes 10.2, you can now use Home Sharing to stream content to iOS devices as well. Here’s how it works. iTunes Setup To start with, you need to activate Home Sharing in iTunes on each of the Macs (and Windows PCs) whose libraries you want to share. To do this, go to the Advanced menu in iTunes and choose Turn On Home Sharing (see “Sharing Is Caring”). You’ll be prompted to enter your Apple ID and password. This is where the Home Sharing feature has its limits: Only computers that share the same iTunes account can use Home Sharing. If each of your family members has a different account, you’ll have to choose just one for Home Sharing. Once you’ve activated Home Sharing, any user can listen to or view content in another user’s library. In addition, you can copy items from other libraries: Select any item, then click the Import button to add it to your library. Sharing Is Caring With Home Sharing, you can stream content from iTunes directly to your iPad—no syncing necessary. 145 Chapter 4 Multimedia Set Up Your iPad Head to Settings –> iPod on your iPad, and, under Home Sharing‚ enter the Apple ID and password of the account you used to enable Home Sharing on your computer. Stream Away Once you’ve enabled Home Sharing, you can stream your music and videos over your local Wi-Fi network with ease. Tap Library in the iPod app to access any available Home Sharing library. You’ll find any available videos from Home Sharing in the Videos app: Tap the library in question to view its contents, then tap a movie or TV show to watch it. Stream with AirPlay and More Your iPad can take advantage of AirPlay, Apple’s live streaming technology. With AirPlay, you can send music or video from your device to any AirPlay-compatible output. Whenever you’re listening to music or watching video in an app that supports AirPlay, you’ll see the AirPlay icon (an HDTV-shaped rectangle with a triangle punching its way through the button) on the playhead. Tap it, then tap the name of whatever AirPlay-compatible device you’d like to send your content to. Alternatively, if you have the technical savvy to set up a media server, apps like InMethod’s Air Video ($3; macworld.com/6133) and Zecter’s ZumoCast (free; macworld.com/6710) can stream music and video content directly to your iPad over Wi-Fi or 3G, even if you’re across the country from your media source. Output Your Video You can also send video from your iPad to your television via video out using one of the iPad’s video adapter cables. Apple’s $39 Digital AV Adapter (macworld.com/7234) offers an HDMI port and supports audio and video, so you’ll be able to get 720p HD video and Dolby Digital 5.1-channel surround sound through a single cable to your TV. The $29 VGA Adapter (macworld.com/7235) also supports 720p movie output, but doesn’t carry audio. Both cables can also mirror the contents of your iPad 2’s display on your TV, so you can view apps, slideshows, Keynote presentations, and more. 146 5 Troubleshooting Tips It’s a fact of life: Computers crash. Unlike a desktop or laptop, however, the iPad is fairly easy to triage, even if you’re not tech savvy. This chapter will walk you through some of the basic steps to get your device back up and running again after a slowdown or a crash, attempt to answer some of the most common iPad support questions, advise you on when to seek outside help, and, finally, offer some tips on protecting and securing your data. Contents Quick-Fix Tools Page 148 Common iPad Questions Page 153 Seek Outside Help Page 159 Security Tips Page 161 147 Chapter 5 Troubleshooting Tips Quick-Fix Tools It doesn’t happen often, but on occasion, things get wonky. The app you’re in won’t respond. Or maybe your iPad just shut down, and you can’t get it to turn on again. Whatever the case, you can use any one of these tools to get yourself back to surfing and playing games in no time. To Force-Quit or Not to Force-Quit Uh-oh: You’re surfing the Web, when all of a sudden mobile Safari stops scrolling. You try tapping any of the on-screen buttons, but you can’t get a reaction. The app has become utterly unresponsive. This kind of situation is called an app freeze or crash. For whatever reason, the app has encountered an error it can’t recover from, so rather than get itself further into trouble, it’s stopped doing everything while it tries to figure out what the problem is and solve it (if it even can). If you don’t want to wait for the app to try to fix itself, you can tell it to force-quit. There are two ways to do this. If the app’s not completely frozen, and you can get to the Home screen, you can double-click the Home button to bring up the multitasking shelf. Find your app’s icon and tap and hold it; after a moment, the icons will start to wiggle and a little minus button (–) will appear in the upper left corner of each app (see “Do the Wiggle”). Tap the minus button of the unresponsive app, and it will shut down. You can then safely relaunch it from your Home screen. Do the Wiggle Unlike a computer, the iPad normally automatically manages whatever programs are open, so you don’t have to quit each manually when you’re done with it; however, if your device is feeling sluggish, you can always try forcequitting applications to speed it up. 148 If your app is totally frozen and you can’t get to the Home screen, hold down the Power button on the iPad until the Slide To Power Off slider appears. Then release Power and hold down the Home button until the app exits. Chapter 5 Troubleshooting Tips Move to Restart If your problem is limited to one app, force-quitting will usually do the trick. However, if your entire system is affected, you might want to think about restarting your device. Perform a normal restart by holding down the Power button until you see the Slide To Power Off slider, then shut down your device by sliding the red bar across the screen. Wait a few moments, then restart by holding down the Power button. On rare occasions, your iPad may be so gummed up that it won’t even show you the Slide To Power Off screen, at which point you’ll need to perform a forced restart. Hold down both the Power and Home buttons until you see a blank screen, followed by the silver Apple logo. This signals that the device has properly rebooted. Reset Your Settings and Content If after a restart (regular or forced), your iPad is still acting weird, it might have fallen victim to some corrupted information. Reset your device’s settings, content, and network settings by going to Settings -> General -> Reset (see “A World of Reset”). A World of Reset This preference pane lets you reset settings, content, the network, the keyboard dictionary, the Home screen layout, and location warnings. Apple makes a distinction between settings and data. Data consists mainly of the information that gets synced with your computer, such as music, photos, and contacts, whereas Settings contains the choices you’ve made regarding the iOS interface and its native apps—for example, the cities you choose in the Weather program. In theory, tapping the 149 Chapter 5 Troubleshooting Tips Reset All Settings button reverts your settings to their original values, while leaving your data untouched. In practice, however, some settings— such as wallpaper selection—may not reset. Tap Erase All Content And Settings, however, and you’ll get rid of both your settings and data, returning your device to its stock configuration. Do this, and you’ll need to manually go in and redo each of your settings. (Your content will resync to your device the next time you sync it to your computer. Of course, if you’re nowhere near your computer—you’re on a trip without your Mac or PC, for instance—invoking this option may not be the best idea.) If it’s just an issue with your iPad’s 3G or Wi-Fi, you can tap Reset Network Settings to clear the device’s network information. If you just have specific content that seems corrupt—for instance, there are black spaces in the Photos app where your photos and videos should appear—connect your iPad to your computer and open iTunes, select the iPad in iTunes’ Source list, then choose whatever category is misbehaving (in this case, it might be Photos or TV Shows). Uncheck the sync option for that item and click Apply. When the iPad has finished removing all the data, feel free to re-enable the media options you unchecked. Update Your Software If trying to fix things on the device itself has done you no good, it’s time to turn to iTunes. The first thing to check is whether you’re running the latest version of iOS; often, important bug fixes and security patches will be delivered in the form of an OS update. You can see for yourself what version you’re running by opening iTunes and clicking on Devices in the left sidebar; in the Summary tab, under your iPad’s name and capacity, you’ll see the software version number. (On the iPad you can find the version number by launching the Settings app, tapping General, and then tapping About. Look at the Version entry.) But unless you know what number is current, this won’t help much; you’ll instead want to see if any newer updates have been posted. If iTunes has told you at some Missed Updates If you’ve missed an update, clicking on Check For Update will let you know; otherwise, you’ll see a message telling you that you’re running the current version of iOS. 150 Chapter 5 Troubleshooting Tips time in the past that an update is available, you’ll see an Update button in the Summary tab. If, on the other hand, iTunes believes you have the latest version of the iOS, it still offers you the option to check for the latest version, in the form of a Check For Update button (see “Missed Updates”). Click this button, and iTunes will let you know if your iPad’s version of iOS is current or needs updating. The Dreaded Restore If, for whatever reason, all else fails and you’re completely at odds with your iPad, you’ll want to do a restore from iTunes, which deletes its settings, content, and operating system, wiping the entire device clean before reinstalling its factory settings. You can restore in one of two ways: from a backup or from scratch. If you want to keep your third-party programs and data, make sure to sync your device one more time and let it make a full backup. This will allow you to save any of the data you’ve stored with your third-party programs. (If your device is corrupted and you can’t back it up immediately before restoring it, you’ll still have the option to restore from an earlier backup.) Next, to start the restore process, connect your device to your computer, open iTunes, and select your iPad from the Source list under the Just Being Safe iTunes often doublechecks with you about important decisions regarding your iPad or your media using dialog boxes like this one. 151 Chapter 5 Troubleshooting Tips Devices heading. In the Summary screen that appears, click Restore, and iTunes will ask if you really want to restore the device (see “Just Being Safe”). If you click Restore And Update in that dialog box, your iPad will download the latest software update for your device if you haven’t downloaded it previously. (If you’ve previously downloaded the update, it’s stored on your computer, and iTunes will use it to restore your iPad.) This update contains—among other things—the latest version of iOS. When the initial stage of the restore process is complete, your device has its original factory settings. At this point, a dialog box asks if you want to set up your iPad as new or restore all the data and settings from a backup. Unless you believe your backup contains corrupted data, you should opt to restore from it. When you choose to restore from a backup, the music, videos, photos, calendar items, contacts, and apps you’ve previously synced to your iPad will be copied to the device once again. Once the sync has finished, your iPad should be restored to its full glory (with the exception of e-mail and Wi-Fi–network passwords, and photos taken with your device). Recovery Mode Your device will automatically go into Recovery mode (signified by the Connect To iTunes screen) if it runs into an error so impassable that it can no longer start up and work properly. However, you can also force your device into Recovery mode—useful, for example, when it no longer shows up in iTunes, or when it doesn’t get past the Apple logo during reboot. To force a recovery, hold down the Sleep/Wake and Home buttons—as you would do for a forced restart—but continue holding them down after the restart begins. After about 25 to 30 seconds, the Recovery mode message should appear. You can now connect to iTunes successfully and restore your device to its normal state. If you decide not to do a restore from Recovery mode, you can exit by holding down the Sleep/Wake and Home buttons for 6 to 10 seconds. No data will be erased during a forced recovery. 152 Chapter 5 Troubleshooting Tips Common iPad Questions Even the best-designed device can run into trouble, and the iPad is no exception. Here are answers to some of the most common problems you may encounter. If you’re experiencing one that’s not on this list, Apple’s troubleshooting assistant may be able to help solve your issue (apple .com/support/ipad). Apps, Apps, Everywhere Questions about malfunctioning apps? You’ve come to the right place. My App Has Frozen Check out “Quick-Fix Tools” earlier in this chapter for help with force-quitting an app or restarting your iPad. Why Are My Apps Wiggling? Tapping and holding an app on your Home screen will bring your apps into Edit mode, where you can move them, arrange them into folders, or delete them. Occasionally, you can accidentally press and hold an app, which will bring your icons—seemingly out of the blue—into Edit mode. To fix this, simply click the Home button. This will return your device to its normal state. If you see those shimmying apps in the multitasking shelf, you can stop their motion by simply tapping on the iPad’s display. Wait, Wait, Do Tell Me To prevent accidental deletions, your iPad will always ask you to confirm before it gets rid of an app. I Accidentally Deleted an App When you’re in Edit mode, you can delete programs by tapping the X in the upper left corner of the app’s icon. The iPad tries to prevent accidental deletion with a dialog box asking you to confirm your decision (see “Wait, Wait, Do Tell Me”), but things can still happen. Thankfully, you can recover your lost app in several ways: You can resync with your computer and restore the missing app, or you can redownload your app for free from the App Store. To resync, just connect your iPad to your computer, go to the Apps tab, and select the app in the scrollable 153 Chapter 5 Troubleshooting Tips list. Alternatively, you can go to the App Store on your iPad or on your computer to redownload your lost program for free. Note that if you’ve created new files with the app—a couple of word processing documents with Pages, for example—and haven’t backed up those files by syncing your iPad, when you delete the app, the documents you created with it will be gone for good. My App Won’t Update If you use the App Store on your iPad to download app updates instead of downloading them from iTunes on your computer, there’s a small chance that the app, while downloading, will experience a glitch and refuse to download or display a gray icon with the word Waiting beneath it. First try tapping the downloading app— sometimes all you need to do is pause and restart the download. If that doesn’t work, you can try restarting your iPad, and if that fails, sync your device with iTunes. What Apps Have I Bought? Since you can delete and redownload apps for free at any point, it helps to be able to remember which apps you’ve actually purchased in the past. You can check this list through iTunes on your computer by going to iTunes Store -> Account -> Purchase History. I Don’t Want This App (It Doesn’t Work) While the App Store Terms and Conditions state that “all sales and rentals of products are final,” it’s sometimes still possible to get a refund for an app that simply doesn’t work (or is falsely advertised) by filling out a support ticket on Apple’s Website (expresslane.apple.com). If you’re looking for a price adjustment, however, you’re out of luck: The terms expressly state that neither Apple nor the developer provide “price protection or refunds in the event of a price reduction or promotional offering.” All refunds are given at Apple’s discretion. Rated G You can restrict app purchases to specific age ratings, allow all apps, or not allow users to purchase any. 154 Chapter 5 Troubleshooting Tips Can I Stop My Kids From Buying Apps? Using Restrictions (Settings -> General -> Restrictions), you can remove the ability to purchase apps entirely or limit it to specific rating levels (see “Rated G”). Additionally, you can disable in-app purchases. Note that if purchases are enabled, the App Store does ask repeatedly for your Apple ID password, so other parties are required to know it before they can buy anything. Alternatively, you can set up an allowance account from iTunes on your computer, or give apps as gifts. iTunes Won’t Play (Nice) Sometimes iTunes and your iPad just don’t get along. Here are a couple of common problems you may encounter when trying to connect the two, and their solutions. My iPad Won’t Show Up First check to make sure you have the latest version of iTunes installed (you can do this on a Mac by clicking the iTunes menu while in the program, then selecting Check For Updates from the drop-down menu). If your software is up to date, check your hardware: Is the USB cord plugged in properly to both your computer and your iPad? (To make sure your iPad actually charges, always plug its cord into the computer itself, instead of relying on something like a USB port on an external keyboard.) If the iPad’s still not appearing, try a different port on your computer. At worst, you can try a restart of both your computer and the iPad; if that doesn’t work, try reinstalling iTunes. My iPad and iTunes Disagree There may be times when your iPad and iTunes simply don’t see eye-to-eye—the iPad won’t sync properly or iTunes refuses to update your iPad. If you’ve tried reinstalling iTunes and restoring your iPad and met the same unsatisfying conclusion, try restoring your iPad on a different computer platform—a Windows PC if you have a Mac, for example. Then take it back to your Mac and restore it there. This will sometimes put an iPad back in business. I Get Weird Error Messages during Sync Occasionally, your iPad will disagree with iTunes about something, which may provoke an error. Some error messages explain themselves, while others require some sleuthing. For example, if you get any kind of numerical error code without a detailed explanation, the problem is most likely in one of your sync categories; try unchecking everything, syncing your device, then rechecking all the sync boxes and syncing. At worst, try a backup and restore to get rid of pesky error messages. 155 Chapter 5 Troubleshooting Tips Swap Meet You can add files to and remove them from your iPad inside iTunes. What Does “Connect to iTunes” Mean? If when you turn on your device, it displays the message “Connect to iTunes,” your device has gone into Recovery mode. What this means is that something has gone terribly wrong, and your iPad needs to connect to iTunes for an OS restore. Most times you can get away with doing a backup and restore, but there’s always the possibility that your device will require a clean install of the operating system. How Do I Back Up My iPad? iTunes automatically creates a backup of your device’s settings and details every time you connect it for syncing. (Make sure to keep it plugged in while syncing and properly eject it each time.) However, iTunes does not keep a backup of your purchased apps or music; you can manually back up these by going into Finder -> User Account -> Music -> iTunes, and copying the iTunes folder to an external hard drive, cloud sharing service, or other backup solution. (To learn more about various ways to back up your content, visit macworld.com or hints.macworld.com.) How Do I Share Files? Some third-party apps take advantage of iOS’s File Sharing feature, allowing you to add and remove content from those programs. To see what apps allow File Sharing, in iTunes, go to your device’s Apps tab and scroll down (see “Swap Meet”). To learn more, see “Sync Files” in the Productivity chapter. 156 Chapter 5 Troubleshooting Tips Charging and Screen Woes If you can’t get your iPad to charge, or you’re not seeing anything on the iPad’s screen when looking through sunglasses, this may be the section for you. Why Does My iPad Say “Not Charging”? Your device requires at least 10W of power to charge properly. USB 1.0 and 2.0 ports on older computers may not be able to deliver that amount of power, so when you connect your iPad through one of those ports, it can’t receive the amount it needs to begin a full charge. However, if you put it to sleep, your iPad will begin to charge (albeit slowly). For optimal charging, Apple recommends connecting the iPad to its USB 2.0 wall adapter. Temperature Warning Like animals and small children, your iPad does not relish being placed in direct sunlight. The device’s operating temperature is somewhere between 32 and 95 degrees Fahrenheit (0 and 35 degrees Celsius). If it overheats, it will bring up the Temperature error message (see “Too Darn Hot.”). To speed up your iPad’s recovery time, turn it off and store it somewhere cool for anywhere from 5 to 15 minutes, then attempt to reboot it. The iPad’s Screen and Your Sunglasses If you wear polarized UV sunglasses, you may encounter what looks like a blank screen while looking at the iPad. This is because the device’s LCD screen has a specific kind of polarized filter; when combined with another polarized filter—like, for instance, the one found in your sunglasses—the two cancel each other out, and the iPad’s screen appears to go blank. Take your specs off! Too Darn Hot If you leave your iPad in direct sunlight or in a car on a warm day, it will bring up this warning as a safety precaution while it tries to cool down. 157 Chapter 5 Troubleshooting Tips I Can’t Connect Are you having troubles getting online? Check out these common connection problems to find some relief. My iPad Won’t Connect to Wi-Fi If you can’t see any networks, make sure your iPad is within range. Sometimes you may need to renew your device’s IP address; do this by going to Settings -> Wi-Fi, tapping the blue arrow next to the network you’d like to join, and then tapping Renew Lease (see “Send an SOS”). If that fails, try turning Wi-Fi off, then back on. As a last resort, try rebooting your device. My iPad Won’t Connect over 3G First, make sure you’re currently signed up for a plan with a cellular provider. If you’re somewhere with good coverage but you can’t get a signal, try going to Settings -> Cellular Data and flipping the switch for Cellular Data off, then back on. If that doesn’t work, go to Settings -> General -> Reset -> Reset Network Settings to wipe your device’s 3G settings and fetch them again. My iPad Can’t Connect to My Apple TV 2 using AirPlay For the most part, AirPlay, Apple’s wireless media-streaming technology, is supposed to “just work.” If it doesn’t, make sure that both your iPad and Apple TV are running the latest software, that all devices are logged on to the same local network (and that network doesn’t have a firewall), and that AirPlay is enabled on your Apple TV (check the Apple TV’s Settings -> AirPlay configuration). Turn off Bluetooth if necessary, and check that your iPad is the only device attempting to stream content to your Apple TV. Send an SOS Sometimes your iPad may retain old connection data if you’ve used a Wi-Fi access point in the past. Tap Renew Lease to generate new data for the network. 158 My iPad Can’t Find a Printer The number of printers the iPad works with is limited to a handful of HewlettPackard models. However, with the aid of the $20 Printopia 2 (ecamm.com), Mac users can print to any printer on their local network. In order for this to work, the Mac that hosts the software must be running. Chapter 5 Troubleshooting Tips Seek Outside Help As you’ve seen, you can troubleshoot many basic software issues yourself. However, there are times—especially if the problem involves hardware—when you’ll want to call in the experts. Here are a few ways to identify these issues and figure out whom to call if they happen. iPad Hardware Issues There are some problems that go beyond software. Here’s a rundown of the big ones, and some ideas on where to go. DOA If your iPad won’t turn on, and you’ve tried everything suggested in “Quick-Fix Tools,” take it to an Apple Store or Apple Authorized Service Provider, or call AppleCare. Your iPad is covered under a limited warranty for 90 days of phone support and one year of in-store coverage (or two full years of both if you purchase Apple’s extended coverage option), so if you’re having problems, it’s best to get them checked out immediately. Going to see an Apple Genius or a technician at an Apple Authorized Service Provider in person is recommended, but if you live out of reach of these options, AppleCare’s phone service is available during business hours. I See Dead Pixels Your LCD screen is made up of tiny lit dots called pixels. Occasionally one of those lights will go out, resulting in a small, oddly colored dot on your screen. One or two dead pixels is nothing to worry about, but if you start to see a large concentration of them while your iPad is still under warranty, you’ll want to take your iPad to an Apple Store or Apple Authorized Service Provider, or call AppleCare. This issue isn’t usually covered under warranty unless you have more than four dead pixels in a screen, but it’s always a good idea to check with professionals. Shattered Screen Whether your iPad experienced an untimely drop, or something mistakenly sailed its way, shattering its screen, this is an unfortunate and dangerous situation. The iPad’s warranty does not cover accidental damage, but you may be eligible for a discounted replacement. Liquid Damage Spills are never fun—and especially not when they involve electronics. If you get your iPad wet, the best thing to do is to power it down, dry it off, and lay it flat in a temperate place (out of direct 159 Chapter 5 Troubleshooting Tips sunlight). If you’ve gotten water in a port, prop up the iPad so that any trapped liquid might conceivably escape (if, for instance, you’ve flooded your device’s headphone jack, prop up the iPad with the jack upside down). If either of the device’s liquid sensors—little white tabs on the interior of the headphone jack and the dock connector port—have been triggered, they’ll turn pink, and your iPad’s warranty will become null and void. Liquid damage doesn’t always mean disaster, but when your device isn’t powering on or starts behaving oddly, a trip to the Genius Bar might be in order. While your limited or AppleCare-enhanced warranty doesn’t cover damage from liquids or spills, you may be eligible for a reduced replacement cost. Talk to an Expert Want to get your iPad looked at professionally, or just learn more about it? Here are a couple of places you can go and people you can talk to. Look Online If you have a question to which you haven’t been able to find the answer, there are many helpful places to look on the Web. The Mac OS X Hints community (hints.macworld.com), while it’s primarily Mac oriented, also covers iOS, iPhone, iPod touch, and iPad solutions, and contains a vast network of people willing to pitch in and help. Other sites such as Apple’s own support desk (support.apple.com/ipad) offer hundreds of articles on common problems and fixes. Go to the Apple Store As mentioned above, when your iPad comes down with some hardware trouble, the best people to talk to are the Genius Bar folks at your local Apple Store. You can make an appointment by going to apple.com/retail and typing your zip code; the Website will bring up a map of the nearest stores. Click on an individual store to go to its page, then, in the Make Reservation pane, click on Reserve under the Genius Bar icon. If you’re looking for someone to teach you about your new iPad, the Apple Store also offers group workshops and private One to One sessions ($99; available with the purchase of any new Mac). Find Third-Party Professionals If you live too far away from an Apple Store or prefer to deal with repairs locally, there are Apple Authorized Service Providers scattered all over the globe. You can find the ones nearest to your city, state, province, or country by checking the list Apple maintains on its Website (support.apple.com/kb/ht1434). 160 Chapter 5 Troubleshooting Tips Security Tips Your iPad may be in fine condition when you first remove it from the box, but if you don’t take measures to protect it, you could be in for some trouble down the line. These suggestions can help keep your device secure from would-be intruders, thieves, or Internet snoops. Set a Passcode Password? What Password? Assign a simple (four-digit numeric) or an alphanumeric passcode—one you can remember— and choose security settings. To protect your iPad from prying eyes (or overcurious children), you can set a passcode in Settings -> General -> Passcode Lock. You can choose between a simple passcode (a four-digit number) or one that includes alphanumeric characters. Once you’ve set a passcode, you can change it; tell your device when to require you to enter it (immediately, after 1 minute, after 5 minutes, after 15 minutes, after 1 hour, or after 4 hours); choose whether to show the picture frame on the lock screen; or set your device to erase data after 10 failed login attempts (see “Password? What Password?”). If you forget your passcode, you’ll have to restore from an older backup of your iPad to access your data. Connect your device to your computer, open iTunes, and click Restore to proceed with the reinstall. Find Your Lost iPad Thanks to the iPad’s location services, it knows where it is—to a greater or lesser extent, depending on whether it’s a Wi-Fi + 3G model (which has GPS circuitry built in) or a Wi-Fi–only iPad, which relies on nearby Wi-Fi hotspots to determine its whereabouts. Apple has leveraged this talent so that you can more easily find a misplaced or stolen iOS device. The means for doing this is the iPad’s Find My iPad feature. To set up your iPad to use it, just go to Settings -> Mail, Contacts, Calendars and tap the MobileMe entry. If you have an Apple ID and 161 Chapter 5 Troubleshooting Tips password, enter it in the resulting sheet. If not, tap the Create Free Apple ID entry and you’ll be walked through the process of creating a free MobileMe identity (one that doesn’t require MobileMe’s $99 annual subscription fee). Finally, you’ll be prompted to allow MobileMe to access your location. Agree and you’ll see a Find My iPad entry in a MobileMe sheet. Switch it on and you can trace your iPad using the free Find My iPhone app or Apple’s MobileMe Website (me.com). Use a VPN While the idea of setting up a VPN account on your iPad may seem intimidating, it’s actually pretty simple, if you have the correct information. For example, for a Cisco VPN appliance, you open up Settings -> General -> Network -> VPN. If this is your first time setting up a VPN, you’ll be prompted to create one of three kinds of VPNs. For this example, you’d tap IPSec. From there, you’ll need to enter a description for the VPN account, the TCP/IP address or DNS name for the server, the account name (aka username), and the password (your personal password, and it’s really a good idea to leave this blank—entering the password manually when you connect is a more secure way to set up a VPN). If you’re using a certificate, you’ll have to move the switch to On, then tap the certificate setting to navigate to the one you’ll be using (if you aren’t using a certificate, you’ll need a group name for your VPN account). Finally, type the group password or shared secret, which goes in the Secret field, and choose what kind of proxy setting you’ll need (if you aren’t sure, go with the default). This may seem fairly complicated, but the person or organization controlling the VPN can give you all this information, or send you a configuration file via e-mail or on a Website that will set all this up automatically. Once you’re done entering the required information, tap Save and you’re done. To use the VPN, just open the Settings app. Right below Wi-Fi, you’ll see VPN. Tap the On/Off button to turn it on, and wait a few seconds for the connection to your VPN to initiate. You should be able to work as usual— the only noticeable difference will be a slight slowdown in network speed due to VPN overhead. The status bar at the top of the iPhone screen displays an indicator to remind you that you’re connected to the VPN. When you want to disconnect, go back into Settings and tap the On/Off button again to turn the VPN off. 162 6 Accessories When you purchase an iPad, Apple gives you a few basic accessories to get started, including a power adapter and a USB dock-connector cable. But there are plenty of other useful accessories that Apple doesn’t offer. Whether you’re looking for a Bluetooth keyboard, a protective case, high-quality headphones, or a set of speakers for listening to music out loud, you’ll find scores of add-ons that let you do more with your device. Here are our picks for some of the most useful types of accessories for the iPad. For reviews of the latest gear, go to macworld.com. For details on which types of older accessories will work with the iPad 2, check out macworld.com/7264. 163 Contents Cases Page 164 Headphones Page 168 Speakers Page 172 Other Accessories Page 176 Chapter 6 Accessories Cases The sleek design of the iPad makes you want to show it off, but it’s still vulnerable to scratches and scuffs. To minimize the risk of damage, consider using a protective case. Here’s a rundown of the most common types, along with examples of some of our favorites. Whichever case you choose, make sure it doesn’t block the bottom-mounted speaker and microphone—unless, of course, the case is designed so that you take your iPad out of the case to use it. If Apple’s offerings aren’t to your liking, there are hundreds of third-party iPad cases on the market, and scores specifically for the iPad 2. When shopping for a third-party case, here are a few quick tips: First, keep in mind that the original iPad and the iPad 2 have slightly different shapes, so a case for one may not fit the other. Similarly, when shopping for an iPad 2 case, be sure to check the bag’s specs with Apple’s iPad specifications, or e-mail the vendor, to confirm that the shipping product actually fits the iPad. Some vendors started making their iPad 2 cases and bags before the iPad 2 was even shipping, and not all fit perfectly. Finally, if you see a bag that claims to be perfect for both iPads and netbooks, be doubly careful. Most of the bags that claim to fit both classes of products end up being a poor fit for the iPad—the iPad is much thinner than the typical netbook and will swim around inside. Apple Smart Cover Apple’s in-house protector for the newest iPad can’t really be called a case—as its name implies, the Smart Cover (polyurethane, $39; leather, $69; apple.com) is really just a cover, and one that protects only the iPad Apple Smart Cover 2’s screen at that. But oh, what a clever cover it is, containing a slew of cleverly arranged magnets that let the Smart Cover’s hinge attach, perfectly oriented, to the edge of the iPad; adhere to the iPad’s screen; and automatically sleep and wake the iPad when you close and open the cover, respectively. The Smart Cover also rolls up into a triangular shape to act as both a typing and a viewing stand. (Note that if you want to use the Smart Cover with another case, make sure the latter leaves room for the Smart Cover’s attachment.) 164 Chapter 6 Accessories Shells and Shock-Absorbing Skins Shells and silicone skins generally cover the back and sides of your iPad, but not the screen, offering moderate protection while letting you use the iPad in its case. They range from thin, soft-silicone coverings to polycarbonate-and-rubber protection to chunky, molded-grip gaming jackets. A shell or skin made for the original iPad won’t fit the iPad 2, and vice versa. Examples: Griffin Technology Standle ($35; Standle griffintechnology.com/products/standle; rigid shell with built-in stand), Incase Perforated Snap Case ($40; goincase .com; rigid shell), Marware Microshell iPad 2 case ($40; marware.com). Sleeves Sleeve cases protect your iPad inside another bag, such as a backpack, briefcase, or messenger bag. Some are simple slide-in designs, while others zip closed or sport a flap closure for added security. Most fit both the iPad 2 and the original iPad. Recommendations: Be.ez LA robe iPad Allure ($30; be-ez.com; zippered), Belkin Pleat Sleeve for iPad ($25; belkin.com; zippered), Sena Cases Executive iPad Sleeve ($100; senacases.com; flap), STM Jacket iPad ($25; stmbags.com), Targus Crave Slipcase for iPad ($35; targus.com; zippered), Waterfield Designs Smart Case and iPad Slip Case ($59 and $29, respectively; sfbags.com). 165 LA robe iPad Allure Chapter 6 Accessories Folio Cases Folio-style cases offer allover protection for your iPad, but flip open for easy access to the screen without requiring you to remove the device. If you’re looking for stylish protection, this is where it’s at. A folio case made for the original iPad won’t fit the iPad 2, and vice versa. Notebook Style iPad 2 Case Examples: Portenzo Notebook Style iPad 2 Case ($60; shop.portenzo.com), RadTech STM skinny ($40; radtech.us), Cygnett Lavish ($60; cygnett.com). Bags and Backpacks A bag or backpack lets you carry your iPad along with a bit (or a bunch) of other gear. And you can use it to tote your daily stuff even when you aren’t carrying your iPad with you. Harlem Sling Recommendations: Cocoon Harlem iPad/ Netbook Sling ($55; cocooninnovations.com), Timbuk2 Freestyle Netbook Messenger ($65; timbuk2.com), Tom Bihn Ristretto for iPad ($110; tombihn.com). Carrying Packs Travel Kit Plus Sometimes you want to carry more than just your iPad, but you don’t want a bulky bag or backpack. A carrying pack protects your iPad while also accommodating cables, a charger, and even Apple’s Wireless Keyboard. Recommendations: Incase Travel Kit Plus ($60; goincase.com) WaterField Designs iPad Wallet and iPad Travel Express ($69 to $101, depending on options; sfbags.com). 166 Chapter 6 TIP Find More Goods For more detailed reviews and recommendations, check out our reviews of iPad folios, shells, skins, sleeves, zippered sleeves, and bags and packs at macworld .com/7265. Accessories Body Films Body films protect your iPad’s sides and backside from scratches and scuffs without adding bulk—they’re simply a iPad 2 Clear Skins thin layer of superprotective material that adheres directly to the iPad. Most types can be removed without leaving behind sticky residue. Recommendations: BodyGuardz iPad 2 Clear Skins ($30, bodyguardz .com), BodyGuardz iPad 2 Armor Carbon Fiber ($30; bodyguardz.com), Zagg invisibleShield Apple iPad 2 Skin ($40; zagg.com/invisibleshield), Wrapsol Back Films for the iPad 2 ($30; wrapsol.com). Screen Films Screen films are designed to protect the iPad’s screen from scratches without affecting touchscreen performance; a few also aim to reduce screen glare. Unfortunately, many of these films are difficult to apply, and some actually make glare and fingerprints worse, but if you’re patient and have a steady hand, these are the best options. invisibleShield Recommendations: BodyGuardz ($20, $30 bundled with body film; bodyguardz.com), Zagg invisibleShield ($30, $40 with body film; zagg .com/invisibleshield), Moshi iVisor AG ($30; store.moshimonde.com). 167 Chapter 6 Accessories Headphones Unlike iPods and the iPhone, the iPad doesn’t come with a set of earbuds, so you’ll need to add your own for private listening. Apple’s white earbuds will work, and they’re pretty good as far as earbuds go—the iPhone version even features an inline microphone along with control buttons. But there are better models available that will let you enjoy your iPad’s full sonic potential. Here are the different types of headphones on the market, along with a few of our recommendations. We’ve noted which models include an inline remote/mic module. Earbuds Earbuds sit loosely in your outer ears. Although no earbuds produce outstanding sound, they’re compact and relatively inexpensive. Recommendations: Maximo iM-290 iMetal ($30; maximoproducts.com), Sennheiser MX 580 ($50; sennheiserusa.com). MX 580 In-Ear-Canal Headphones These headphones, also known as canalphones, fit snugly—and fairly deep—in your ear canals. Like earplugs, they block most external noise, so they’re great for travel and noisy environments. They’re also capable of producing stunning audio quality. On the other hand, some people find them uncomfortable, and the best ones come with a stunning price tag. (For more information on in-ear-canal headphones, visit macworld.com/2709.) Recommendations: Etymotic Research hf3 ($179; etymotic.com; inline module), Etymotic Research mc3 ($99; etymotic.com; inline module), Shure SE210m+ ($170; shure .com; inline module), Future Sonics Atrio ($199; futuresonics.com), Ultimate Ears TripleFi 10 ($420; ultimateears.com; inline module). mc3 168 Chapter 6 Accessories Canalbuds Halfway between earbuds and in-ear-canal headphones, canalbuds don’t block out as much external noise as the latter and can’t match the performance of better in-ear-canal headphones. But canalbuds tend to be more comfortable than true in-ear-canal models— because they don’t sit so deep and don’t fit so tightly in your ear canals—and are less expensive. iP-595 iMetal Recommendations: Nuforce NE-7M ($49; nuforce.com; inline module), Maximo iP-595 iMetal ($80; maximoproducts.com; inline module), Ultimate Ears MetroFi 200vi ($40; ultimateears.com; inline module), Sennheiser MM 70i ($139; sennheiserusa.com; inline module). Lightweight Headphones These portable and mostly reasonably priced headphones generally use larger KSC35 drivers (speakers) than earbuds and canalphones, and their earpieces rest against the outside of the ear. Some have a thin headband that goes over or behind the head; others use a small plastic or flexible clip for each ear. For easier traveling, many of these models fold up. Although most lightweight headphones produce mediocre sound, there are some standouts. Recommendations: Koss KSC35 and KSC75 ($45 and $20, respectively; koss.com), Sennheiser HD 238i ($170; inline module), Sennheiser PX 100-IIi ($120; sennheiserusa.com; inline module), Grado iGrado ($50; gradolabs.com). 169 Chapter 6 Accessories Full-Size Headphones If you don’t mind some extra bulk, good full-size headphones, which often fully surround your ears, sound better than good lightweight models. Some are also much more comfortable. These headphones fall into two categories: closed P5 models, which block out some external noise, and open models, which some users prefer sonically, but which also let more noise in and out. One caveat: To reach their potential, many full-size headphones require more juice than an iPad’s headphone jack provides; our recommendations work well with portable devices. Recommendations: Sony MDR-XB300 ($50; sonystyle.com; only for bassheads; closed), Beyerdynamic DT 235 ($58; north-america.beyer dynamic.com; closed), Grado SR60i ($69; gradolabs.com; open), Shure SRH440 ($125; shure.com; closed), Sennheiser HD 448 ($130; sennheiserusa .com; closed), Denon AH-D1001 ($150; usa.denon.com; closed), Bowers & Wilkins P5 ($300; bowers-wilkins.com; closed, inline module). Noise-Canceling Headphones If you’re not a fan of in-ear phones, but you want something that can filter out external noise such as airplane engines, train rumblings, or the hum of a crowd, invest in a good pair of noise-canceling headphones. These headphones—which come in both lightweight and full-size models, with the latter offering better noise isolation—sample outside sound and then pipe in an inverse audio signal to cancel out a good deal of monotonous noise. ATH-ANC7b Although they don’t usually sound as good as comparably priced in-ear phones, they are easier to put on and take off, and they still let you hear what’s going on around you. Recommendations: Audio-Technica ATH-ANC7b ($220; audio-technica .com), Monster Beats Studio by Dr. Dre ($300; beatsbydre.com; inline module), Bose QuietComfort 15 and QuietComfort 3 ($300 and $350, respectively; bose.com). 170 Chapter 6 Accessories Bluetooth Stereo Headphones If you think being tethered to your iPad is a drag, consider going wireless. The iPad can stream BackBeat 903+ stereo audio to Bluetooth (A2DP) headphones, and when you’re running iOS 4.2 or later on your iPad, you can even control music playback using the Play/Pause, Back, and Forward buttons on the Bluetooth headphones themselves. Recommendations: Plantronics BackBeat 903+ ($100; plantronics.com; behind-the-neck), Etymotic Research ety8 ($159; etymotic.com; in-earcanal), Sennheiser MM 100 ($200; sennheiserusa.com; behind-the-neck), AKG by Harman K 830 BT ($250; harmanaudio.com; over-the-head). 171 Chapter 6 Accessories Speakers Your iPad is a great music player, but sometimes you need a break from direct-to-brain listening, or you want to share your music with others. A good set of speakers will help you cut the (headphone) cord with your device. Here are the various types of speakers out there, along with some of our recommendations for each type. For each, we’ve indicated whether it has a true iPad dock cradle, an iPhone-size dock, or a standard audio connection. (Newer speakers with the “Made for iPhone” designation exhibit less interference when used with a 3G iPad that’s not in Airplane Mode.) CableJive dockXtender Cable There aren’t many speaker systems that accommodate the iPad’s large size. But you’re not entirely out of luck—CableJive’s dockXtender dockXtender cable ($26; cablejive.com) lets you use the iPad with any dock-connector speaker system (including that older iPod or iPhone speaker dock you’ve got sitting around). Just plug one end of the cable into the iPad’s dock-connector port, and plug the other end into the dock connector on your speakers. (Keep in mind that iPhone and iPod speaker systems will charge the iPad very slowly, if at all.) Portable Speakers iMainGo 2 If you want to pack your speakers in your luggage, laptop bag, or backpack, you need something small, light, rugged, and battery powered. You sacrifice some sound quality for such convenience. Recommendations: Portable Sound Laboratories iMainGo 2 and iMainGo X ($40 and $70, respectively; imaingo.com; audio jack), Nuforce Podio PS-106 ($59; nuforce.com; audio jack), Altec Lansing inMotion Classic ($130; alteclansing.com; iPhone dock, audio jack), Logitech Rechargeable Speaker S715i ($150; logitech.com; iPhone dock, audio jack). 172 Chapter 6 Accessories Transportable Speakers If you just want to be able to move your music from room to room, or to the backyard, beach, or park, you don’t need ultimate portability. A transportable system will give you better sound and louder volume in a larger, slightly heavier package that can still run off batteries. Fidelio DS8550 Recommendations: Harman Kardon Go + Play Micro ($299; harmankardon.com; iPhone dock, audio jack), Altec Lansing Mix Boombox iMT800 ($230; alteclansing.com; iPhone dock, audio jack), Philips Fidelio DS8550 ($300; philips.com; iPad dock, audio jack). Desktop Speakers PadDock 10 If you’re looking for something compact to put on your desk, kitchen counter, or dresser, but you don’t really need portability, desktop speakers are the way to go. Thanks to their AC power and larger enclosures, these systems offer surprisingly good sound but are compact enough to fit on a bookshelf. Some desktop speakers even offer alarm-clock or radio features. Recommendations: PadDock 10 ($100; pdstand. com; iPad dock), Klipsch iGroove SXT (iPhone dock, audio jack; $150; klipsch.com), iLuv iMM747 (iPad dock; $150; i-luv.com), iHome iA100 ($200; ihomeaudio.com; iPad dock), Boston Acoustics Duo-i Plus ($250; bostonacoustics.com; iPhone dock, audio jack), Bowers & Wilkins Zeppelin Mini ($300; bowers-wilkins.com; iPhone dock, audio jack), Geneva Lab Geneva Sound System Model S ($300; genevalab.com; iPhone dock, audio jack). 173 Chapter 6 Accessories Computer Speakers If you don’t need the integrated dock-connector cradle commonly found on speakers designed specifically for the iPad, iPhone, and iPod, traditional computer speakers will work fine with your iPad. You simply plug an audio cable into the iPad’s headphone jack or into the audio-output jack of Apple’s iPad Dock accessory. Expressionist Bass Recommendations: Altec Lansing Expressionist Bass ($80; alteclansing .com), Creative GigaWorks T40 Series II ($150; us.creative.com), Acoustic Energy Aego-M ($200; acoustic-energy.co.uk), Razer Mako ($300; razerzone.com), Bowers & Wilkins MM-1 ($500; bowers-wilkins.com) Studio Monitors and Powered Bookshelf Speakers If you’re looking for something closer in sound quality to a traditional home Audioengine 2 stereo, a number of vendors make powered bookshelf speakers and studio monitors that you set up across the room. Just connect an iPod dock cradle, such as Apple’s own iPad Dock, and you’re good to go with big, high-quality sound. Recommendations: Audioengine 2 ($199; audioengineusa.com), M-Audio Studiophile AV 40 ($229; m-audio.com), Audioengine 5 ($349 to $449; audioengineusa.com) Bluetooth Speakers Like Bluetooth headphones, Bluetooth speakers let you cut the cord—or dock— between your iPad and your speakers. If your iPad is running iOS 4.2 or later, you can control music playback using Play/Pause, Back, and Forward buttons on the speakers themselves. (Most Bluetooth speakers are portable.) 174 Z515 Chapter 6 Accessories Recommendations: Logitech Wireless Speaker Z515 ($100; logitech .com), Soundmatters FoxL v2 Bluetooth ($199; soundmatters.com), Creative ZiiSound D5 ($300; us.store.creative.com), Philips Fidelio DS8550 ($300; philips.com). AirPlay Audio Systems AirPlay-enabled audio systems take advantage of Apple’s AirPlay (formerly AirTunes) technology to let you stream music from your iOS or Mac OS X devices, over your local wireless network, to the speaker system. Unfortunately, although plenty of AirPlay systems have been announced, few are actually available. Zeppelin Air Recommendations: Bowers & Wilkins Zeppelin Air ($600; bowerswilkins.com; desktop dock speaker with AirPlay). 175 Chapter 6 Accessories Other Accessories Of course, sound and protection are just the beginning when it comes to outfitting your iPad with cool accessories. There are a number of tasks this device can perform with the right equipment. Here are a few of our favorite add-ons. Apple iPad 2 Dock If you want a stable cradle to hold your iPad while it’s charging or syncing, Apple’s simple iPad 2 Dock ($29; apple.com) will do just fine. In addition to keeping your iPad upright—alas, in portrait orientation only—the Dock offers a dock-connector port for charging, syncing, or (with the appropriate cable) outputting video, as well as a stereo-audio output for connecting to powered speakers or a stereo system. Stands and Mounts Many iPad cases include a modest stand that lets you prop up the player for better video viewing or for more comfortable typing. But if you want more stability, more angle options, and perhaps adjustable height, consider a dedicated iPad stand or wall mount. Recommendations: Bweasel iPad Stand ($30; bweasel.com), Griffin Technology Loop ($30; Twelve South Compass griffintechnology.com), Original Kitchen iPad Rack ($30; kitchenipadrack.com), Twelve South Compass ($40; twelvesouth.com), Rain Design iRest Lap Stand for iPad ($50; raindesigninc.com), Luxa2 H4 iPad Stand ($60; usa.luxa2.com). 176 Chapter 6 Accessories Bluetooth Keyboards If you plan to use your iPad for serious data input or extended typing sessions, you’ll want a physical keyboard. The iPad supports any standard Bluetooth keyboard, but finding one that’s travel friendly yet not cramped can be a challenge. (Apple sells a $69 Keyboard Dock, but it’s not a great fit for the iPad 2, and it’s quite limiting: It doesn’t accommodate an iPad in a case, it works only with an iPad in portrait orientation, and it’s too heavy and bulky for travel.) Thankfully, there are a few good options. You’ll just need a compact stand—or an iPad keyboard case with a built-in stand—to keep the iPad propped up. Apple Wireless Keyboard: If you like the iPad Keyboard Dock’s keyboard, but don’t want the bulk of the weighted Dock, Apple’s Bluetooth Wireless Keyboard ($69; apple.com) is exactly what you’re looking for. It’s essentially the same keyboard except that it’s missing a few of the special iPad-speApple Wireless Keyboard cific keys—you get brightness, playback, and volume controls, and the Eject key serves to show and hide the iPad’s onscreen keyboard, but the other Fn-keys are simply, well, Fn-keys. Other Bluetooth Keyboards: Any Bluetooth computer keyboard should work with the iPad, although models designed for use with the Mac—such as Macally’s BTkey ($70; macally.com)—are preferable, because they provide Mac-specific keys (1, Option, Control, brightness and volume BTKey buttons, and so on) that the iPad automatically recognizes. Some vendors have even released Bluetooth keyboards specifically made for the iPad—for example, the Targus Bluetooth Wireless Keyboard for iPad ($60; targus.com) is small and light and includes many of the same iPad-specific buttons as the iPad Keyboard Dock. 177 Chapter 6 Accessories Keyboard Cases Zaggmate The other option is one of the many keyboard cases for the iPad. These accessories combine a Bluetooth keyboard with a protective case, aiming to provide better portability or more convenience than the Apple Keyboard Dock or a separate Bluetooth keyboard. Recommendations: Zagg Zaggmate ($100; zagg.com), ClamCase iPad Keyboard Case ($150; clamcase.com), Adonit Writer (adonit.net), and innumerable folio-style keyboard cases such as the Padacs Rubata ($80; padacs.com). However, since these products include form-fitting cases, be sure to buy a model specifically made for the iPad 2. Touchscreen Styluses Whether you’re looking for a better sketch tool than your finger, a digital pen to sign your name or take handwritten Pogo Sketch notes, or a way to use your iPad’s touchscreen when bundled up in cold weather, a stylus can be a good thing. These simple accessories take the shape of a pen, pencil, or brush handle, and sport a capacitative tip—usually a rubbery nib, but sometimes an actual brush for better artistic control—that works as well as a fingertip for interacting with your tablet. Recommendations: Ten One Design Pogo Sketch ($15; tenonedesign .com; pen/stylus), JustMobile AluPen ($20; xtand.net; pen/stylus), NomadBrush ($24; nomadbrush.com; brush), Wacom Bamboo Stylus ($30; wacom.com; pen/stylus) Camera Connection Kit Apple’s Camera Connection Kit ($29; apple.com) is a must-have accessory for any iPad-toting photographer. Instead of having to connect an iPad to a Mac to load the device with your photos and videos, you can move this content directly 178 Camera Connection Kit Chapter 6 Accessories onto an iPad from a camera using one of the two dock-connector dongles included in the kit: You use the SD-card dongle to transfer media from a camera’s SD card (or mini-SD card with an adapter); if you shoot with a camera that uses a different type of media card, such as CompactFlash, you instead use the USB dongle, connecting your camera’s USB cable, or the cable from a USB card reader, plugged directly to the connection dongle. When you make a connection, the iPad’s Photos app launches and, in a new Camera tab that appears, displays thumbnails for every image on the memory card. You choose which images to import. Once the process is complete, you’ve got a backup of those photos, as well as a better way to preview them than using your camera’s tiny LCD. As a bonus, the Camera Connection Kit also supports—unofficially—lowpower USB microphones for use with many audio-recording apps. (Unfortunately, Apple’s older iPod Camera Connector was made only for particular iPod models, and it doesn’t work with the iPad.) Chargers Just because the iPad uses the same dock-connector port as the iPhone and iPod doesn’t mean you can charge the iPad with any iPhone or PowerBlock Plus iPod charger—or even a standard USB port on your computer. The iPad has heftier charging requirements than iPods and iPhones, which means that some USB ports—especially those on older computers and most USB hubs—don’t provide enough power to charge the iPad during use. That doesn’t mean lower-power USB ports can’t charge the iPad at all. It just means that whether they can charge the iPad’s battery—and how quickly—depends on how you’re using the iPad. For the fastest charging, use the iPad’s included iPad 10W USB Power Adapter (also available separately for $29; apple.com). This will fully charge the iPad in a few hours, even if you’re using the iPad at the same time. Alternatively, you can use any third-party AC adapter or charger that sports the Made For iPad badge, which means it meets Apple’s specifications for iPad charging. 179 Chapter 6 Accessories When connected to a high-power USB port—such as the ones on recent Macs and the one on the iPhone power adapter—the iPad will charge, even during use, but more slowly. Some third-party powered USB hubs also provide higher-power USB ports, but many don’t. Finally, when connected to lower-power USB ports—those on older Macs, most Windows PCs, and most USB hubs (powered or unpowered)—the iPad’s battery does not charge while the iPad is awake, but does charge (albeit very slowly) when the iPad is asleep. Confusingly, the message “Not charging” will appear in the menu bar when the iPad is awake, which might lead you to assume that the offending USB port can never charge your iPad. Rest assured, once you put the iPad to sleep, the battery will indeed charge. Recommendations: Griffin Technology PowerBlock Plus ($35; griffintechnology.com), Incase Combo Charger ($40; goincase.com), Kensington PowerBolt Duo Car Charger ($30; us.kensington.com), Scosche ReVive II Dual USB Home Charger for iPad ($30; scosche.com). Video Cables The iPad’s screen is great, but there may be times when you want to enjoy the advantages of a larger display. With the right cable, you can connect your iPad to a TV or other display, but your connection and output options differ depending on the cable you’re using. Apple Digital AV Adapter ($39; apple.com) lets you output HD video from within supported apps on the original iPad and the iPad 2, as well as mirror the iPad 2’s display, via an HDMI connection. The HDMI connection also provides stereo audio. Apple VGA Adapter ($29), formerly called the iPad Dock Connector to VGA Adapter, lets you output video over a VGA connection—at 1024 by 768 resolution with a 720p scan rate—from compatible apps on both the original iPad and the iPad 2, as well as mirror the iPad 2’s screen. For outputting audio while using the Apple VGA Adapter, you’ll need a separate audio cable that grabs the audio signal from the iPad 2’s headphone jack. 180 Chapter 6 Accessories Apple Component AV Cable ($39) outputs video from compatible apps on either iPad model at 480p or 576p resolution. It also includes left and right analog audio output. Apple Composite AV Cable ($39) outputs video from compatible apps on either iPad model at 480i resolution. It also includes left and right analog audio output. If you plan on watching high-definition video on an external display, you’ll need to use either the Digital AV Adapter or the Component AV Cable. iTunes-purchased HD videos include HDCP (high-bandwidth digital content protection) and require an HDCP-compatible connection, which these two accessories provide. Otherwise, you’ll need to sync the standard-definition (480p) versions of your iTunes-purchased videos, which will play over the VGA adapter or composite cable. You can also use third-party video accessories that include the necessary Apple-approved circuitry, which should include most certified Made for iPad, Made for iPhone, and Made for iPod video accessories produced in the past few years. These accessories should let you output video, along with stereo audio, to a TV via component or composite connections. 181 There are so many things you can experience, watch, and even create using Apple’s iPad that it’s hard to know where to start. Thankfully, nobody spends more time with Apple’s revolutionary products than the editors at Macworld. That’s why there’s no betterqualified team of experts to create this straightforward book on the iPad 2. Inside this book, you’ll find a complete rundown of the best ways you can use your iPad to communicate, be productive, and enjoy multimedia. First activate your iPad and fill it with your favorite music, movies, television shows, podcasts, apps, and files using iTunes. This book will show you how to convert media for easy iPad consumption; master multitouch gestures and tweak system settings; keep your Home screens organized with folders and multitasking; and conquer the secrets of its virtual keyboard. In case you run into any issues while using your device, this book also contains invaluable troubleshooting advice, including how to protect your iPad from would-be intruders. It may not have the power of a full-fledged notebook computer, but the iPad is great at adapting to your needs. Organize your Contacts, Calendar, and Mail with built-in apps, or chat with your friends using FaceTime. Turn your iPad into a work machine by creating documents, spreadsheets, and presentations, or share your files like a pro. Turn your iPad into an e-book reader with Apple’s iBook app, or into a picture frame with the instant slideshow button. Finally, create music, paint masterpieces, edit photos, or perform any number of other tasks with the great third-party apps available in the App Store. Whether you’re brand-new to the iPad or a seasoned expert, this book will show you how to get the most out of your device.


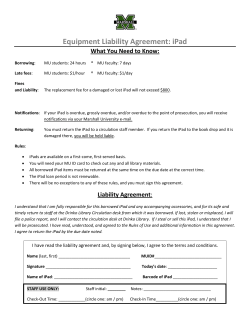


© Copyright 2026