
12X ZOOM & PAN/TILT DOME CAMERA MANUAL
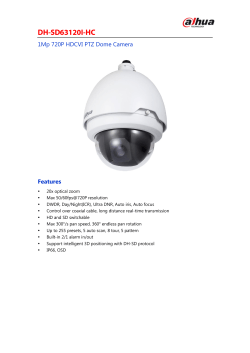
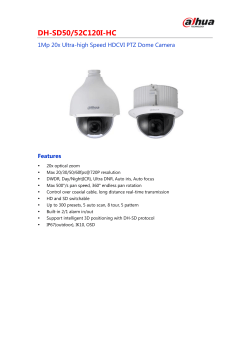
◐ DIMENSION
◐ PRODUCT OUTLINE & FEATURES
1. Product outline
12X ZOOM & PAN/TILT
DOME CAMERA
MANUAL
This camera can be controlled by simple special controller or DVR to up
and down, left and right. In addition, it provides a powerful monitoring of
up to 12X zoom capability.
2. ID setup
- Use it when you use many cameras or if you want to use a special
camera ID.
- You can address up to 255 units.(Please refer to the table for camera
ID setup)
- Optional remote control(model SK-AR11/R1) can control up to 99
cameras.
Ø100
2. Features
1) Modern & contemporary design.
2) Fast speed.(Panning Max. 200 degree per second)
3) 64 presets. Dwell time in each position can be selected.
4) Remote control available(model SK-AR11/R1) via RS-485.
5) Compatible with various DVR's.(PELCO-D Compatible)
6) Simple remote control available.(option)
7) Up to 192X zoom.(Optical 12X, Digital 16X)
8) ICR Day&Night feature.
9) Easy installation with mounting bracket.
10) Omnidirectional surveillance.
Ø120.4
◐ MOUNTING & INSTALLATION
First, you should setup the protocol and camera's ID before installation.
1. Termination switch
( TAPE : 360° Endless)
◐ WARNING & CAUTION
1. Please study the instruction manual before your applications and keep it
for your future reference.
2. Do not install the camera on a unstable surface. It will cause falling or
other hazards.
3. Do not use improper power, it could cause fire or electric shock.
4. Do not disassemble or remodel the camera, it could cause fire, electric
shock or other hazards.
5. This product should be installed by expert installer.
6. Do not install the product at the position exposed to the direct sun light.
7. Do not install the product where lighting is unstable.
8. Do not drop, hit strongly nor vibrate the product.
9. Unplug it when any inflammable or conductive material goes into the
product.
10. This product is produced only for the power 12V DC 1.5A.
Camera ID
1
2
3
4
5
6
7
8
9
10
11
12
13
14
15
16
17
18
19
20
21
22
23
24
25
26
27
28
29
30
31
32
33
34
35
36
37
SW 1
ON
OFF
ON
OFF
ON
OFF
ON
OFF
ON
OFF
ON
OFF
ON
OFF
ON
OFF
ON
OFF
ON
OFF
ON
OFF
ON
OFF
ON
OFF
ON
OFF
ON
OFF
ON
OFF
ON
OFF
ON
OFF
ON
SW 2
OFF
ON
ON
OFF
OFF
ON
ON
OFF
OFF
ON
ON
OFF
OFF
ON
ON
OFF
OFF
ON
ON
OFF
OFF
ON
ON
OFF
OFF
ON
ON
OFF
OFF
ON
ON
OFF
OFF
ON
ON
OFF
OFF
SW 4
OFF
OFF
OFF
OFF
OFF
OFF
OFF
ON
ON
ON
ON
ON
ON
ON
ON
OFF
OFF
OFF
OFF
OFF
OFF
OFF
OFF
ON
ON
ON
ON
ON
ON
ON
ON
OFF
OFF
OFF
OFF
OFF
OFF
SW 3
OFF
OFF
OFF
ON
ON
ON
ON
OFF
OFF
OFF
OFF
ON
ON
ON
ON
OFF
OFF
OFF
OFF
ON
ON
ON
ON
OFF
OFF
OFF
OFF
ON
ON
ON
ON
OFF
OFF
OFF
OFF
ON
ON
SW 5
OFF
OFF
OFF
OFF
OFF
OFF
OFF
OFF
OFF
OFF
OFF
OFF
OFF
OFF
OFF
ON
ON
ON
ON
ON
ON
ON
ON
ON
ON
ON
ON
ON
ON
ON
ON
OFF
OFF
OFF
OFF
OFF
OFF
<Caution> If the termination switch is ON more than 2 units, a trouble on communication may happen.
SW 7
OFF
OFF
OFF
OFF
OFF
OFF
OFF
OFF
OFF
OFF
OFF
OFF
OFF
OFF
OFF
OFF
OFF
OFF
OFF
OFF
OFF
OFF
OFF
OFF
OFF
OFF
OFF
OFF
OFF
OFF
OFF
OFF
OFF
OFF
OFF
OFF
OFF
SW 8
OFF
OFF
OFF
OFF
OFF
OFF
OFF
OFF
OFF
OFF
OFF
OFF
OFF
OFF
OFF
OFF
OFF
OFF
OFF
OFF
OFF
OFF
OFF
OFF
OFF
OFF
OFF
OFF
OFF
OFF
OFF
OFF
OFF
OFF
OFF
OFF
OFF
Setup switch
<Setup switch>
1
ON
OFF
Baud rate
Option
SW 1
SW 2
SW 3
SW 4
2400bps
OFF
OFF
OFF
OFF
Baud rate 4800bps
ON
OFF
OFF
OFF
9600bps
OFF
ON
OFF
OFF
SK-P Protocol
Protocol
SW 5
SW 6
"B"
<Address switch>
6
1
ON
ON
OFF
OFF
8
"A"
Detail "A"
Detail "C"
Protocol/Baud rate setup
3
2) Protocol and Baud rate setting(Detail C : Setup switch)
SW 6
OFF
OFF
OFF
OFF
OFF
OFF
OFF
OFF
OFF
OFF
OFF
OFF
OFF
OFF
OFF
OFF
OFF
OFF
OFF
OFF
OFF
OFF
OFF
OFF
OFF
OFF
OFF
OFF
OFF
OFF
OFF
ON
ON
ON
ON
ON
ON
"C"
Used for RS-485 communication
ㆍ ON : Apply to terminal unit when communicating with PC or remote
control in 1:1 or in multi-communication.
ㆍ OFF : Apply to all the cameras except terminal(final) unit in multicommunication.
2
1) Table for camera ID(Detail B : Address switch)
Ø99
1) Connect the control unit via a twisted pair cable.
2) Connect a regulated 12V DC power unit with a permanent rating of
1.5A.
3) Feed the video signal at video connector via a shielded cable to the
video input of the following unit(e.g. Monitor, camera switcher, video
splitter).
Detail "B"
ID setup
4
<Wall installation>
WALL MOUNT BRACKET
(option, SK-AB11, SK-AB19)
[Warning] In case wrong connected power cable, may result in an electric shock,
fire, and or other hazard.
4. Camera installation
OFF
OFF
Protocol Pelco D Protocol
ON
OFF
Pelco P Protocol
OFF
ON
※After setting above combination, turn off and on.
<Caution> 1. Please make sure the ID and protocol, it may not work in accordance
with environment of setting.
2. Factory default is PELCO D 2400bps.
1) When you install the camera, you should install it after determining its
front direction.
2) Securely attach the bracket on the ceiling.
3) You can install the camera on the wall with optional wall mount bracket.
※You can install the camera
on the wall with optional
wall mount bracket.
<Movable range>
<Ceiling installation>
SK-D108
3. Cable connections
FRONT
Place the camera base
into a hook on a ceiling
base and twist the
camera base clockwise.
RS-485 Communication Cable :
RS-485 A(Orange)
RS-485 B(White)
※Connect with remote control
or DVR
Power Input :
Input only regulated 12V DC, 1.5A
<Caution> Check out the angle of view before installation.
Video Output :
Connect with Monitor
REAR
360°
Endless
255(The rest is omitted)
5. Install complete
After finishing installation, when the power turn on, the camera module
move to initial position.
<Warning> Please do not connect the power during installation.
5
6
7
8
◐OSD MENU CONFIGURATION
Menu
1. Calling out main menu(Control by SK-AR11/R1)
To enter OSD menu, press the button "Save" + "95" + "ENTER"(PELCOD) or press key "ENTER" key(SK-P).
4. Random Pan
Moves the camera to the memorized positions randomly.
Buad rate
1 ~ 32 Preset Save : Pelco-D / Pelco-P
Preset
Buad rate
Set moving speed (1 ~ 10 Speed)
1 ~ 64 Preset Save : SK-P
Dwell Time
Set interval time on preset(2 ~ 60 sec)
Preset Point
Select preset number
Back
Save the setting & move to above menu
Save
Save preset
Exit & Run
Escape this menu & execute "Sequential Pan"
Go
Preset Move
Clear
Delete preset
Zoom Camera
Clear All
Erase all presets
Preset Setup
Auto Pan
Random Pan
Exit
Escape this menu
Setting..
Random Pan Setting..
Speed
Dwell Time
6. Option
Set Miscellaneous
Option Setting..
To make the camera panning automatically at fixed speed.
Auto Pan Setting..
Reset
Menu
1st Position
Exit
2nd Position
2. Preset Save
*◀01▶
*◀02▶
Speed
◀01▶
Dwell Time
◀02▶
Back
Exit & Run
Preset Setting..
* : Indicate Saved
Preset Point
◀01▶
◀02▶
Back
Exit & Run
3. Auto Pan
Sequential Pan
Option
Set moving speed (1 ~ 10 Speed)
Dwell Time
Set interval time on preset(2 ~ 60 sec)
Back
Save the setting & move to above menu
Exit & Run
Escape this menu & execute "Random Pan"
5. Sequential Pan
Moves the camera to the memorized positions one by one.
*◀01▶
Go
Clear
Buad rate
Speed
Sequential Pan Setting..
Save
Preset Point
Menu
Speed
Menu
Buad rate
Speed
◀01▶
Dwell Time
◀02▶
Information
off
Preset Freeze
off
Power On Act
◀None▶
Back
Exit
Menu
Buad rate
Information
Set the display Information(ON/OFF)
Preset Freeze
Set Freeze when Preset Move
OFF : "Live" / ON : "Freeze"
Set the function to operate when the camera turns on.
None
Stand by without movement
1st Position
Set start preset point(1 ~ 64 Point)
Clear All
Back
2nd Position
Set end preset point(1 ~ 64 Point)
Speed
Set moving speed(1 ~ 10 Speed)
Exit
Dwell Time
Set interval time on preset(2 ~ 60 sec)
Back
Save the setting & move to above menu
Back
Save the setting & move to above menu
Exit & Run
Escape this menu & execute "Auto Pan"
Exit
Escape this menu
*◀01 ▶
Back
Exit & Run
10
11
Menu
FOCUS
A/F
SHUTTER
AUTO
AGC
NORMAL
DNR
MIDDLE
SENS-UP
OFF
DAY & NIGHT
AUTO
DZOOM
OFF
MIRROR
NORMAL
OSD
OFF
BRIGHTNESS
50
SHARPNESS
16
ZOOM SPEED
x2
BACKLIGHT
OFF
W/B
ATW
RED
132
BLUE
133
W/B
(White
Balance)
EXIT
Model Number
Set auto focus
Set auto focus then fix on M/F
Set manual focus
Adjust shutter speed
Size
Adjust level of AGC
Adjust level of DNR
Adjust level of Sense up
Set auto switching D ay and Night mode
Set Max. Zoom
Min. Focus Distance
Set Mirror function
Set OSD ON/ OFF
Adjust brightness
Adjust sharpness
Adjust speed of zoom
Set backlig ht comp ensa tion
ATW
Adjust the white balance automatically
by adop ting lights from environment.
AWC
Adjust the white balance automatically
by pressing IRIS OPEN button when camera lens
is facing on white sur face.
MANUAL
INDOOR / OUTDOOR
RESET
Operation
Submenu
A/F
FOCUS
PUSH
MANUAL
SHUT TER AUTO /MANUAL
AGC
NORMAL / HIGH / OFF
DNR
LOW / MIDDLE / HIGH/OFF
SENS-UP OFF x2 ~ x128
DAY & NIGHT COLOR / BW / AUTO
DZOOM
OFF~x16
NORMAL / REVERSE
MIRROR
FLIP / ROTATE
OSD
OFF / ON
BRIGHTNESS 0 ~ 100 Level
SHARPNESS 0 ~ 32 Level
ZOOM SPEED X1 ~ x8
BACKLIGHT OFF / BLC / HLC
Random Pan
Operate by random pan
Auto Pan
Operate by auto pan
Last Action
Operate the last one among above three action
12
Set value of RED/ BLUE manually .
Set indoor/ outdoor
Reset as default
End the menu
TYPE
Max PAN TILT SPEED
MA X 200'/s (pan) 93'/s (tilt)
1/4 inch, Interline Transfer SONY CCD
Current Cons um ption
Operation Temp
-10'c ~ +40'c
Effective Pixels
768(H) x 494(V) (NTSC),
752(H) x 582(v) (PAL)
Optics
12X, f=3.94 to 46.05mm(F1.67~F1.88)
1,000mm
D. ZOOM
Angle Field of view
Dimension
Weight
-20'c ~ +50'c
Φ120.4(W) x 106.3(H)mm
Approx. 450g
OFF/ON (X2 ~ X16)
H : Appr. 51.54°(Wide) to 4.49°(Tele)
D : Appr. 62.4°(Wide) to 5.57°(Tele)
Scanning System
2:1 Interlace
Synchronization
Internal
Frequency
H:15.734 KHz/V:59.94 Hz (NTSC), H:15.734 KHz/V:59.94 Hz (PAL)
Resolution
560 TV Lines(Min.) : Color (WIDE) / 680 TV Lines(Min.) : B/W (WIDE)
Min. Illumination
0.2 Lux/F1.6 (50 IRE) ; Color / 0.004 Lux/F1.6 (50 IRE) ; B/W
S/N (Y signal)
52 dB
Video Output
CVBS : 1.0Vp-p/75Ω
Focus
Zoom Movement Speed
Auto/Manual/One push
1.9 sec (NTSC), 1.84 sec (PAL)
IRIS Control
Auto, Manual
Lens Initialize
Built - In
Camera ID
255 ID Selectable
Day & Night
Auto, COLOR, B/W
Gain Control
OFF, LOW, MIDDLE, High, MANUAL Selectable
White Balance
Back Light Compensation
Electronic shutter speed
ATW/ AWC/ INDOOR/ OUTDOOR/ Manual (1700 ˚K ∼ 11,000˚K)
OFF/BLC/HLC/SSDR Selectable
NTSC (X512 ~ 1/60sec~ 1/120,000 sec ) PAL(~1/50)
OSD
English
SSNR
Low, Middle, High, Off
RESET
EXIT
Protocol
Preset
PELCO - D , SK-P
2400, 4800, 9600 bps
PRESET, SEQ, RANDOM
Function
Power Supply
Please read the instructions carefully for correct use of the product and
preserve it for reference purposes. This specification is subject to change
without any prior notice to improve the quality.
V, H, Mirror, OFF
64 Preset (PELCO-D 32 Preset)
Baudrate
14
Preservation Tem p
Max 1.7 A
V : Appr. 39.28°(Wide) to 3.39°(Tele)
FLIP
13
Sequential Pan Operate by sequential pan
◐ SPECIFICATION
◐ ZOOM CAMERA SETUP CONFIGURATION
CAMERA SETUP
Power On Act
If the product is to be put out of operation definitively, take it to a
local recycling plant for a disposal which is not harmful to the
environment.
Regulated 12v DC+_10%
15
3B25640A


© Copyright 2026