
PDF Document
Symantec NetBackup
OpsCenter Reporting Guide
Release 7.6
Symantec NetBackup OpsCenter Reporting Guide
The software described in this book is furnished under a license agreement and may be used
only in accordance with the terms of the agreement.
Documentation version: 7.6
Legal Notice
Copyright © 2013 Symantec Corporation. All rights reserved.
Symantec, Symantec Logo, and NetBackup are trademarks or registered trademarks of
Symantec Corporation or its affiliates in the U.S. and other countries. Other names may be
trademarks of their respective owners.
This Symantec product may contain third party software for which Symantec is required to
provide attribution to the third party (“Third Party Programs”). Some of the Third Party Programs
are available under open source or free software licenses. The License Agreement
accompanying the Software does not alter any rights or obligations you may have under those
open source or free software licenses. Please see the Third Party Legal Notice Appendix to
this Documentation or TPIP ReadMe File accompanying this Symantec product for more
information on the Third Party Programs.
The product described in this document is distributed under licenses restricting its use, copying,
distribution, and decompilation/reverse engineering. No part of this document may be
reproduced in any form by any means without prior written authorization of Symantec
Corporation and its licensors, if any.
THE DOCUMENTATION IS PROVIDED "AS IS" AND ALL EXPRESS OR IMPLIED
CONDITIONS, REPRESENTATIONS AND WARRANTIES, INCLUDING ANY IMPLIED
WARRANTY OF MERCHANTABILITY, FITNESS FOR A PARTICULAR PURPOSE OR
NON-INFRINGEMENT, ARE DISCLAIMED, EXCEPT TO THE EXTENT THAT SUCH
DISCLAIMERS ARE HELD TO BE LEGALLY INVALID. SYMANTEC CORPORATION SHALL
NOT BE LIABLE FOR INCIDENTAL OR CONSEQUENTIAL DAMAGES IN CONNECTION
WITH THE FURNISHING, PERFORMANCE, OR USE OF THIS DOCUMENTATION. THE
INFORMATION CONTAINED IN THIS DOCUMENTATION IS SUBJECT TO CHANGE
WITHOUT NOTICE.
The Licensed Software and Documentation are deemed to be commercial computer software
as defined in FAR 12.212 and subject to restricted rights as defined in FAR Section 52.227-19
"Commercial Computer Software - Restricted Rights" and DFARS 227.7202, "Rights in
Commercial Computer Software or Commercial Computer Software Documentation", as
applicable, and any successor regulations. Any use, modification, reproduction release,
performance, display or disclosure of the Licensed Software and Documentation by the U.S.
Government shall be solely in accordance with the terms of this Agreement.
Symantec Corporation
350 Ellis Street
Mountain View, CA 94043
http://www.symantec.com
Technical Support
Symantec Technical Support maintains support centers globally. Technical Support’s
primary role is to respond to specific queries about product features and functionality.
The Technical Support group also creates content for our online Knowledge Base.
The Technical Support group works collaboratively with the other functional areas
within Symantec to answer your questions in a timely fashion. For example, the
Technical Support group works with Product Engineering and Symantec Security
Response to provide alerting services and virus definition updates.
Symantec’s support offerings include the following:
■
A range of support options that give you the flexibility to select the right amount
of service for any size organization
■
Telephone and/or Web-based support that provides rapid response and
up-to-the-minute information
■
Upgrade assurance that delivers software upgrades
■
Global support purchased on a regional business hours or 24 hours a day, 7
days a week basis
■
Premium service offerings that include Account Management Services
For information about Symantec’s support offerings, you can visit our Web site at
the following URL:
www.symantec.com/business/support/
All support services will be delivered in accordance with your support agreement
and the then-current enterprise technical support policy.
Contacting Technical Support
Customers with a current support agreement may access Technical Support
information at the following URL:
www.symantec.com/business/support/
Before contacting Technical Support, make sure you have satisfied the system
requirements that are listed in your product documentation. Also, you should be at
the computer on which the problem occurred, in case it is necessary to replicate
the problem.
When you contact Technical Support, please have the following information
available:
■
Product release level
■
Hardware information
■
Available memory, disk space, and NIC information
■
Operating system
■
Version and patch level
■
Network topology
■
Router, gateway, and IP address information
■
Problem description:
■
Error messages and log files
■
Troubleshooting that was performed before contacting Symantec
■
Recent software configuration changes and network changes
Licensing and registration
If your Symantec product requires registration or a license key, access our technical
support Web page at the following URL:
www.symantec.com/business/support/
Customer service
Customer service information is available at the following URL:
www.symantec.com/business/support/
Customer Service is available to assist with non-technical questions, such as the
following types of issues:
■
Questions regarding product licensing or serialization
■
Product registration updates, such as address or name changes
■
General product information (features, language availability, local dealers)
■
Latest information about product updates and upgrades
■
Information about upgrade assurance and support contracts
■
Information about the Symantec Buying Programs
■
Advice about Symantec's technical support options
■
Nontechnical presales questions
■
Issues that are related to CD-ROMs, DVDs, or manuals
Support agreement resources
If you want to contact Symantec regarding an existing support agreement, please
contact the support agreement administration team for your region as follows:
Asia-Pacific and Japan
[email protected]
Europe, Middle-East, and Africa
[email protected]
North America and Latin America
[email protected]
Contents
Technical Support ............................................................................................... 4
Chapter 1
Reporting in OpsCenter ..................................................... 10
About OpsCenter reports ...............................................................
OpsCenter reports UI ..............................................................
Report creation wizards in OpsCenter .........................................
Reports > Report Templates .....................................................
About custom reports in OpsCenter Analytics ...............................
About custom SQL query in OpsCenter Analytics ..........................
About supporting OpsCenter custom reports and custom SQL
queries ...........................................................................
About managing reports in OpsCenter ..............................................
Save report and email report dialog boxes ...................................
Saving an OpsCenter report .....................................................
Exporting an OpsCenter report ..................................................
File formats available in OpsCenter ............................................
Emailing a report in OpsCenter .................................................
Configuring number of rows in a tabular report for email or
export ............................................................................
Adding email recipients to an OpsCenter report mailing ..................
Add email recipients dialog box options .......................................
About managing My Reports ...........................................................
Creating a report using the My Reports tab ..................................
Deleting a saved report using the My Reports tab .........................
Viewing a saved report using the My Reports tab ..........................
Editing a saved report using the My Reports tab ...........................
Exporting a saved report ..........................................................
Emailing a saved report ...........................................................
About managing My Dashboard ......................................................
Reports > My Dashboard options ...............................................
Adding reports to a dashboard ..................................................
Modifying a dashboard section ..................................................
Deleting a dashboard section ....................................................
Emailing dashboard sections ....................................................
Refreshing My Dashboard ........................................................
10
11
12
12
14
14
14
15
15
17
18
18
20
21
23
23
23
24
24
24
24
25
25
26
27
27
27
28
28
29
Contents
About managing reports folders in OpsCenter ....................................
Reports > Manage Folders options ............................................
Adding a reports folder in OpsCenter ..........................................
Editing a reports folder in OpsCenter ..........................................
Deleting reports folders in OpsCenter .........................................
Deleting reports from a folder in OpsCenter .................................
About managing report schedules in OpsCenter .................................
Reports > Schedules options ....................................................
Viewing report schedule details in OpsCenter ...............................
Using report schedules in OpsCenter .........................................
Report Schedule Wizard ..........................................................
Creating a report schedule in OpsCenter .....................................
Editing a report schedule in OpsCenter .......................................
Deleting a report schedule in OpsCenter .....................................
Enabling or disabling a report schedule .......................................
About managing time schedules in OpsCenter ...................................
Reports > Schedules > Create or Edit Time Schedule
options ...........................................................................
Viewing time schedule details ...................................................
Creating a time schedule .........................................................
Editing a time schedule ............................................................
Deleting a time schedule ..........................................................
Chapter 2
29
29
29
30
30
30
31
31
32
33
34
36
37
37
38
38
38
39
39
39
40
OpsCenter reports ............................................................... 41
Report Templates in OpsCenter ....................................................... 41
About report filters in OpsCenter ................................................ 43
Creating an OpsCenter report using a Report Template .................. 44
Using report formats ............................................................... 44
About Report Templates descriptions ................................................ 45
About Audit reports ................................................................. 46
About Backup reports in OpsCenter ........................................... 47
About Catalog reports in OpsCenter ......................................... 197
About Chargeback reports in OpsCenter ................................... 197
About Client reports in OpsCenter ............................................ 206
About Cloud reports .............................................................. 236
About Disk and Tape Device Activity reports in OpsCenter ............ 250
About Hold reports in Symantec NetBackup OpsCenter ................ 262
About Media reports in OpsCenter ........................................... 263
About Performance reports in OpsCenter .................................. 273
About Policy reports in OpsCenter ............................................ 279
About Restore reports in OpsCenter ......................................... 295
About Storage Lifecycle Policy reports ...................................... 304
8
Contents
About Workload Analyzer reports in OpsCenter .......................... 340
Chapter 3
Custom reports in OpsCenter Analytics ....................... 349
Creating a custom report in OpsCenter ........................................... 349
About Custom Report Wizard parameters .................................. 356
Creating an OpsCenter report using SQL query ................................ 363
Index ................................................................................................................... 366
9
Chapter
1
Reporting in OpsCenter
This chapter includes the following topics:
■
About OpsCenter reports
■
About managing reports in OpsCenter
■
About managing My Reports
■
About managing My Dashboard
■
About managing reports folders in OpsCenter
■
About managing report schedules in OpsCenter
■
About managing time schedules in OpsCenter
About OpsCenter reports
Symantec NetBackup OpsCenter is a Web-based software application that helps
organizations by providing visibility into their data protection environment. By using
OpsCenter, you can track the effectiveness of data backup and archive operations
by generating comprehensive business-level reports.
OpsCenter displays customizable, multi-level views of backup and archive resources
and customizable reports for tracking service usage and expenditures. It also
contains tools for defining cost metrics and chargeback formulas or handling alerts.
A wide range of audiences benefit from the reporting and the management
capabilities of OpsCenter. The audiences include IT (Information Technology)
managers, application owners, IT finance teams, external compliance auditors,
legal teams, line-of-business managers, external customers, IT architects, and
capacity planning teams.
Reporting in OpsCenter
About OpsCenter reports
Note: Starting from OpsCenter 7.6, the following products are not supported:
Enterprise Vault (EV), IBM Tivoli Storage Manager (TSM), EMC Networker (EMC).
You will not be able to view any archiving or Enterprise Vault-specific reports.
For more details, refer to the About dropping the support for EV, TM, and EMC in
OpsCenter 7.6 section from the OpsCenter Administrator's Guide.
OpsCenter reports UI
The OpsCenter reports UI consists of the following components:
Report Templates tab
This tab lists all Report Templates (or standard or canned
reports) that are available in OpsCenter. You can modify the
default parameter values of a Report Template as required
and generate a new report of that kind.
For example, use the existing Backup > Job Activity >
Client Count Report Template, change the relative
timeframe to four weeks (default timeframe is two weeks)
and generate a new Client Count report. You can see all
clients that are backed up over the last four weeks.
For report template descriptions, refer to the OpsCenter
Reporting Guide at the following location:
http://www.symantec.com/docs/DOC5808
My Reports tab
You can save generated reports for your future use. These
saved reports are stored in the My Reports tab. Use this
section to view the saved reports or modify the parameters
of the saved reports and generate new reports out of them.
You can also delete the saved reports using the My Reports
tab.
See “About managing My Reports” on page 23.
See “Saving an OpsCenter report” on page 17.
My Dashboard tab
Your saved reports are preserved in My Reports tab, which
you can select and publish on My Dashboard tab. You can
select multiple reports and add them in the same dashboard
section. Thus, you can create multiple dashboard section
containing a number of reports.
See “About managing My Dashboard” on page 26.
Schedules tab
This tab contains all report schedules.
You can create, edit, or delete schedules using this tab.
See “Using report schedules in OpsCenter” on page 33.
11
Reporting in OpsCenter
About OpsCenter reports
Manage Folders tab
Use this tab to manage folders where you have saved your
reports.
See “About managing reports folders in OpsCenter”
on page 29.
Report creation wizards in OpsCenter
OpsCenter provides wizards, which guide you through the entire report creation
procedure.
To create a report, in the OpsCenter console on the Reports tab, click Create New
Report. The following report creation options are available on the Select Report
Creation Option panel:
■
Create a report using an existing Report Template .
See “Creating an OpsCenter report using a Report Template” on page 44.
■
Create a custom report.
See “Creating a custom report in OpsCenter” on page 349.
■
Create a report using SQL Query.
See “Creating an OpsCenter report using SQL query” on page 363.
Reports > Report Templates
This section provides details of the Report Templates that are available in
OpsCenter.
OpsCenter provides a number of Report Templates (or standard or canned reports)
that you can modify and generate a new report of that kind.
In the OpsCenter console, when you click the Reports tab, the Report Templates
home page is displayed.
From the Reports > Report Templates page, you can click any of the Report
Templates to view the respective report with default parameter values.
For description about each report template, refer to the OpsCenter Reporting Guide.
http://www.symantec.com/docs/DOC5808
You can also click the following options on the Reports > Report Templates page:
Create New Report
Click Create New Report to create a standard report, custom report,
or run an SQL query.
12
Reporting in OpsCenter
About OpsCenter reports
Edit Report
If you do not want to run a report template with default parameter
values, you can directly edit it from Reports > Report Templates
page. To edit a report template, first select the report template by
selecting the checkbox on the extreme left of the report template.
Click Edit Report to edit and save the report without executing it.
Figure 1-1 shows various components of a report that is generated using a template.
Figure 1-1
Report Template
Report Templates tree
This tree lists all Report Templates that are
available in OpsCenter.
For report template descriptions, refer to the
OpsCenter Reporting Guide at the following
location:
http://www.symantec.com/docs/DOC5808
Manage report toolbar
Use this toolbar to save, export, or email the
generated report.
Time filters
Use these time filters to view the data for a
specific period of time.
13
Reporting in OpsCenter
About OpsCenter reports
Report area
OpsCenter reports are displayed here.
Report views
Reports can be viewed in different forms or
views, Distribution, Historical, or Ranking.
Use these options to change the current
report view. These options are available only
for chart-based reports.
About custom reports in OpsCenter Analytics
Apart from generating reports using the existing templates, you can also create
custom reports in OpsCenter by changing the report parameters as required.
See “Creating a custom report in OpsCenter” on page 349.
About custom SQL query in OpsCenter Analytics
In OpsCenter, you can create reports by directly running SQL queries. Using this
report creation option, you do not need to go through multiple parameter selections.
OpsCenter 7.6 provides detailed information about the OpsCenter database schema
that you may want to know before running any SQL query to generate reports. On
the Report Wizard > SQL Query page, click the OpsCenter Schema Document link
to open the PDF that contains all relevant information.
Note: You can create only tabular reports by running SQL queries. You can also
run stored procedures using this feature.
See “About supporting OpsCenter custom reports and custom SQL queries”
on page 14.
See “Creating an OpsCenter report using SQL query” on page 363.
About supporting OpsCenter custom reports and custom SQL queries
Symantec is committed to product quality and will support the accuracy and validity
of the data collected and stored in the OpsCenter database and the documentation
of the OpsCenter database schema. However, no Technical Support will be provided
on the actual creation of custom reports, custom SQL queries for specific reports,
or for 3rd party reporting applications (for example, Microsoft Excel, Access, or
Crystal Reports).
See “About custom reports in OpsCenter Analytics” on page 14.
See “About custom SQL query in OpsCenter Analytics” on page 14.
14
Reporting in OpsCenter
About managing reports in OpsCenter
About managing reports in OpsCenter
This section provides information on the operations that you can carry out on the
standard reports that you generate in OpsCenter.
You can carry out the following operations:
■
Saving a report
See “Saving an OpsCenter report” on page 17.
■
Exporting a report
See “Exporting an OpsCenter report” on page 18.
■
Emailing a report
See “Emailing a report in OpsCenter” on page 20.
Save report and email report dialog boxes
A description of the Save report and Email report dialog box options follows in
the table.
Table 1-1
Save report dialog box options
Option
Description
Report name
Enter the report name. For example, if you generated the
Job Count standard report with the group by option that is
selected as Policy Type and report view as Historical, you
can name this report NumberofJobsbyPolicies.
When you select this report on the Saved Reports tab, the
report is displayed with the saved filters and in the report
view that were selected when the reports were saved, with
respect to the current time.
Review the following points about report names:
■
■
■
Description
The report name must be unique in the folder where you
create it. For example, if you create a report in the Private
Reports folder under My Reports, the report name that
you specify must be unique in the Private Reports folder.
The same user can have two reports with the same name
- like one in Public Reports and one in Private Reports
folder.
The report name must not contain any special characters
like (/ \ * ? | ")
The report name must not be more than 220 characters.
Enter the short description for the report.
15
Reporting in OpsCenter
About managing reports in OpsCenter
Table 1-1
Save report dialog box options (continued)
Option
Description
Folder
Select Public or Private folder. If you save the report in a
public folder, all other OpsCenter users can view it. If you
save the report in a private folder, only you can view it.
Expand the Public or Private folder and select a folder where
you want to save the report. Depending on the folder type
that you have selected - public or private - the folders
displayed for selection vary.
Create New
Click this option to create a new public or private folder.
Clicking this option changes the view of Folder. Enter the
folder name and click OK.
This folder is made available in the Folder tree for selection.
Select this newly created folder where you want to save the
report.
Overwrite if report already Select this check box if you want to overwrite the existing
exists in the selected folder report with the same name in the same folder. If you do not
select this check box and save a report with a name identical
to any of the existing reports in the selected folder, a
confirmation message is displayed before you overwrite the
existing report.
Table 1-2
Email report dialog box options
Option
Description
Select Format
Select one of the following formats:
■
PDF
■
HTML
■
CSV
■
TSV
■
XML
Note: Some of these formats may not be available for specific
reports. For example, the Drive Throughput and Drive
Utilization reports can be exported and emailed only in the
HTML format.
16
Reporting in OpsCenter
About managing reports in OpsCenter
Table 1-2
Email report dialog box options (continued)
Option
Description
Select Content
Select one of the following report formats:
■
Distribution
■
Historical
■
Ranking
■
Tabular
Distribution, Historical, and Ranking formats are available
only for chart-based reports.
Email
Enter appropriate email details like address, subject, and
message.
Saving an OpsCenter report
You can save a standard report. This action saves the filters that you have selected
while generating a report. You can use this set of filters to regenerate the reports
with the current time selections.
These reports are saved in the OpsCenter database, which you can view using the
My Reports tab.
You cannot save a report whose name contains any special characters like (/ \ * ?
| ").
See “About managing My Reports” on page 23.
To save a report
1
In the OpsCenter console, click Reports > Report Templates.
2
From the Reports tree, select the report template that you want to save.
3
In the right-hand report view area, click the Save As Report icon. The Save
Report pop-up screen opens.
4
On the Save Report screen, enter the required details.
See “Save report and email report dialog boxes” on page 15.
5
Click OK.
After a successful save, My Reports tab is displayed with this report selected.
Note: You cannot save a report name that contains special characters like (/ \
* ? | ")
17
Reporting in OpsCenter
About managing reports in OpsCenter
Exporting an OpsCenter report
Using OpsCenter, you can preserve report data in files or print the data.
See “ File formats available in OpsCenter” on page 18.
You can open the exported file using other applications, such as a spreadsheet
program or a text editor.
To export a report
1
In the OpsCenter console, click Reports > Report Templates.
You can also export reports that you may have created from Reports > My
Reports.
2
From the Reports tree, select the report template or report that you want to
export.
3
In the report view area at the right-hand side, click the Export Report icon.
The Export Report pop-up screen opens.
4
On the Export Report pop-up screen, select the export options that you want
to export the report with: File format, such as PDF, HTML, CSV, TSV, or XML
and content or report view, such as Tabular, Distribution, Historical, or
Ranking.
Note that only the applicable formats and report views appear for specific
reports.
See “Save report and email report dialog boxes” on page 15.
5
Click OK. The system displays the export options pertaining to the file format
you have selected. Select those options and export the report.
File formats available in OpsCenter
You can export or email OpsCenter reports in the following file formats:
PDF (Portable
Document Format)
Can be viewed using a PDF reader, such as Adobe Reader
CSV
(comma-separated
values)
Use with spreadsheet programs, such as Microsoft Excel.
TSV (tab-separated
values)
Compatible with word-processing applications and text editors
HTML (hypertext
markup language )
Can be opened using with Web browsers
18
Reporting in OpsCenter
About managing reports in OpsCenter
XML (Extensible
Markup Language)
Can be imported (using user-written scripts) by other programs like
databases or billing applications.
The XML format has been enhanced in OpsCenter 7.5. Some of the fields that were
present in other formats like PDF, CSV, TSV, and HTML are now also shown in
the XML format.
The following was the older XML format:
<Report>
{Report Name}
<Disclaimer> {customer message} </Disclaimer>
<Table>
<Header>
<Row>…</Row>
</Header>
<Rows>
<Row>…</Row> …
</Rows>
</Table>
<Table>
<Header>
<Row>…</Row>
</Header>
<Rows>
<Row>…</Row> …
</Rows>
</Table>
{footer}
</Report>
In the old XML format, for each view (like distribution, timeline, etc) there is one
<Table> tag that contains information for that view.
The following is the new XML format:
<Report>
<ReportView>
<Name> {nameValue} </Name>
<Description> {descriptionForReportView} </Description>
<TimeDuration> {timeValue} </TimeDuration>
<ViewName> {viewNameValue} </ViewName>
19
Reporting in OpsCenter
About managing reports in OpsCenter
<ViewSelections>
<SelectedItem value="{selectedNodeNameValue1}">
<ExcludedItem> {excludedNodeName1} </ExcludedItem>
<ExcludedItem> {excludedNodeName2} </ExcludedItem>
...
</SelectedItem>
<SelectedItem value="{selectedNodeNameValue2}">
<ExcludedItem> {excludedNodeName3} </ExcludedItem>
<ExcludedItem> {excludedNodeName4} </ExcludedItem>
...
</SelectedItem>
</ViewSelections>
<Table>
<Header>
<Row>…</Row>
</Header>
<Rows>
<Row>…</Row> …
</Rows>
</Table>
</ReportView>
<ReportView>
</Report>
In the new format <Table> has been moved under a new tag called <ReportView>.
If multiple views (distribution, historical, ranking) are selected for export or email,
each of the views will have one <ReportView> tag corresponding to it. Name,
Description and TimeDuration tags inside ReportView tag will always be present
for each view. However, ViewName, GroupBy, and ViewSelections tags will be
present only if applicable. If report is edited and view selections are changed, these
tags will be added in export.
Emailing a report in OpsCenter
Using OpsCenter, you can email report data to the selected recipients. You can
email a report in a number of different file formats.
See “ File formats available in OpsCenter” on page 18.
20
Reporting in OpsCenter
About managing reports in OpsCenter
To email a report
1
In the OpsCenter console, click Reports > Report Templates.
You can also export reports that you may have created from Reports > My
Reports.
2
From the Reports tree, select the report template or the report that you want
to email.
3
In the report view area at the right-hand side, click the Email Report icon. The
Email Report pop-up screen opens.
See “Save report and email report dialog boxes” on page 15.
4
On the Email Report pop-up screen, select the email options: File format, such
as PDF, HTML, CSV, TSV, or XML and content or report view, such as Tabular,
Distribution, Historical, or Ranking
Note that only the applicable formats and report views appear for specific
reports.
5
Enter email IDs in To, Cc, and Bcc text boxes, to which you want to send
emails.
If these email IDs do not already exist, they are automatically added to the
database.
Alternatively, you can add existing email recipients.
See “Adding email recipients to an OpsCenter report mailing” on page 23.
6
Enter the subject of the email.
7
Enter the message that may be a short description regarding the report data
that you want to email.
8
Click OK.
Configuring number of rows in a tabular report for email or export
When you export, email, or schedule a tabular report, 4000 rows are exported by
default.
You can configure the maximum number of rows in a tabular report that you can
export or email.
21
Reporting in OpsCenter
About managing reports in OpsCenter
To configure the maximum number of rows for export
1
Log on to the OpsCenter Server.
2
Stop all the OpsCenter Server services or processes by using the following
commands on Windows and UNIX:
3
Windows
INSTALL_PATH\OpsCenter\server\bin\opsadmin.bat stop
UNIX
<INSTALL_PATH>/SYMCOpsCenterServer/bin/opsadmin.sh stop
Navigate to the following location:
Windows
C:\Program Files\Symantec\OpsCenter\server\config
UNIX
<INSTALL_PATH>/SYMCOpsCenterServer/config
4
Open the report.conf file.
5
You may want to export all the rows or you may want to increase or decrease
the maximum value. Note that if you export all rows or increase the number of
rows, exporting a report may take time when there are a large number of rows.
■
To export all the rows, you can either comment out
report.schedule.max.tabular.rows parameter or specify any value less
than or equal to -1 for report.schedule.max.tabular.rows parameter.
To comment out report.schedule.max.tabular.rows parameter, add
two forward slashes before the parameter in this manner:
//report.schedule.max.tabular.rows=4000
or
Edit the value 4000 in report.schedule.max.tabular.rows=4000 to -1.
report.schedule.max.tabular.rows=-1
■
To change the maximum number of rows to say 5000, you can set the value
of report.schedule.max.tabular.rows as 5000.
Configure report.schedule.max.tabular.rows=5000
6
Start all Symantec OpsCenter Server services or processes by using the
following command for Windows and UNIX:
Windows
INSTALL_PATH\OpsCenter\server\bin\opsadmin.bat start
UNIX
<INSTALL_PATH>/SYMCOpsCenterServer/bin/opsadmin.sh start
22
Reporting in OpsCenter
About managing My Reports
Adding email recipients to an OpsCenter report mailing
This section provides information on how to add email recipients to whom you want
to send emails. This procedure assumes you've already started the email report
procedure. More information is available about this procedure.
See “Emailing a report in OpsCenter” on page 20.
To add email recipients
1
On the Add Email Recipients screen, select the check boxes in front of the
email recipients to whom you want to send emails.
See “Add email recipients dialog box options” on page 23.
Click To.., Cc.., or Bcc.. depending on where you want to add the selected
recipients.
2
Click OK.
Add email recipients dialog box options
Table 1-3
Add email recipients dialog box options
Option
Description
Recipient Name/Email
Address
Select the check boxes in front of the email recipients to
whom you want to send emails.
To.../Cc.../Bcc...
Click To.., Cc.., or Bcc.. depending on where you want to
add the selected recipients.
About managing My Reports
You can save generated reports for your future use. These saved reports are stored
in the My Reports tab. Use this section to view the saved reports or modify the
parameters of the saved reports and generate new reports out of them. You can
also delete the saved reports using the My Reports tab.
The following topics provide more information about managing reports.
See “ Creating a report using the My Reports tab” on page 24.
See “Deleting a saved report using the My Reports tab” on page 24.
See “Viewing a saved report using the My Reports tab” on page 24.
See “Editing a saved report using the My Reports tab” on page 24.
See “Exporting a saved report” on page 25.
23
Reporting in OpsCenter
About managing My Reports
See “Emailing a saved report” on page 25.
Creating a report using the My Reports tab
This section provides the procedure to create a report using My Reports tab.
To create a report using the My Reports tab
1
In the OpsCenter console, click Reports > My Reports.
2
On the My Reports tab, click Create New Report.
You can create a report in any of the following ways:
See “Creating an OpsCenter report using a Report Template” on page 44.
See “Creating a custom report in OpsCenter” on page 349.
See “Creating an OpsCenter report using SQL query” on page 363.
Deleting a saved report using the My Reports tab
This section provides the procedure to delete a saved report.
To delete a saved report
1
In the OpsCenter console, click Reports > My Reports.
2
On the My Reports tab, in the Reports list, expand a report folder to view the
reports that are saved within it.
3
Select the check box in front of the report name.
4
Click Delete.
Viewing a saved report using the My Reports tab
You can view the saved reports using the My Reports tab.
To view a saved report
1
In the OpsCenter console, click Reports > My Reports.
2
On the My Reports tab, in the Reports list, expand a report folder to view the
reports that are saved within it. Select the saved report that you want to view.
Editing a saved report using the My Reports tab
You can edit a saved report. You can edit the report details, such as the report
name or the folder where you want to save the edited report.
24
Reporting in OpsCenter
About managing My Reports
To edit a saved report
1
In the OpsCenter console, click Reports > My Reports.
2
On the My Reports tab, in the Reports list, expand a report folder to view the
reports that are saved within it. Select the saved report that you want to edit.
3
In the report view area at the right-hand side, click the Save As Report icon.
The Save Report pop-up screen opens.
4
On the Save Report screen, enter the required information.
See “Save report and email report dialog boxes” on page 15.
5
Click OK.
Exporting a saved report
Using OpsCenter, you can preserve saved report data in files or print the data. You
can email a report in a number of different file formats.
See “ File formats available in OpsCenter” on page 18.
You can open the exported file using other applications, such as a spreadsheet
program or a text editor.
To export a saved report
1
In the OpsCenter console, click Reports > My Reports.
2
On the My Reports tab, in the Reports list, expand a report folder to view the
reports that are saved within it. Select the saved report that you want to export.
3
In the report view area at the right-hand side, click the Export Report icon.
The Export Report pop-up screen opens.
4
On the Export Report pop-up screen, select the export options that you want
to export the report with. Select file format, such as PDF, CSV, or XML and
content or report view, such as Distribution, Historical, or Ranking.
5
Click OK. The system displays the export options pertaining to the file format
you have selected. Select those options and export the saved report.
Emailing a saved report
Using OpsCenter, you can email the saved report data to the selected recipients.
You can email the report in the following file formats:
PDF (Portable
Document Format)
Can be viewed using a PDF reader, such as Adobe Reader
25
Reporting in OpsCenter
About managing My Dashboard
CSV
(comma-separated
values)
Use with spreadsheet programs, such as Microsoft Excel.
TSV (tab-separated
values)
Compatible with word-processing applications and text editors
HTML (hypertext
markup language )
Can be opened using with Web browsers
XML (Extensible
Markup Language)
Can be imported (using user-written scripts) by other programs like
databases or billing applications
To email a report
1
In the OpsCenter console, click Reports > Saved Reports.
2
On the My Reports tab, in the Reports list, expand a report folder to view the
reports that are saved within it. Select the saved report that you want to email.
3
In the report view area at the right-hand side, click the Email Report icon. The
Email Report pop-up screen opens.
4
On the Email Report pop-up screen, select the email options: File format, such
as PDF, CSV, or XML and content or report view, such as Distribution,
Historical, or Ranking.
5
Enter email IDs in To, Cc, and Bcc text boxes, to which you want to send
emails.
6
Enter the subject of the email.
7
Enter the message that may be a short description regarding the report data
that you want to email.
8
Click OK.
About managing My Dashboard
Your saved reports are preserved in My Reports tab, which you can select and
publish on My Dashboard tab. You can select multiple reports and add them in
the same dashboard section. Thus, you can create multiple dashboard sections
containing a number of reports.
You can add only 10 reports in a dashboard.
See “Adding reports to a dashboard” on page 27.
See “Modifying a dashboard section” on page 27.
See “Deleting a dashboard section” on page 28.
26
Reporting in OpsCenter
About managing My Dashboard
See “Emailing dashboard sections” on page 28.
See “Refreshing My Dashboard” on page 29.
Reports > My Dashboard options
Select and publish reports on My Dashboard tab. You can select multiple reports
and add them in the same dashboard section. Thus, you can create multiple
dashboard sections containing a number of reports.
You can add only 10 reports in a dashboard.
Table 1-4
Reports > My Dashboard options
Option
Description
Add/Edit/Delete
You can add multiple Dashboards on this page and one or
more reports from My Reports to each of the dashboards.
Use Add, Edit, Delete tasks to add, edit, or remove dashboard
Email Dashboard
Select this option if you want to email all the dashboard
reports.
In the Email Dashboard dialog box that opens, you can
specify the format in which you want to email the dashboard
reports.along with the other email details. Click OK.
Refresh Dashboard
Select this option to update the reports in the dashboard.
Adding reports to a dashboard
This section provides the procedure to add reports to a dashboard.
To add reports to a dashboard
1
In the OpsCenter console, click Reports > My Dashboard.
2
Click Add.
3
On the Add Dashboard Section pop-up screen, enter the section name.
4
Expand the Private or Public Reports folder to view existing reports.
5
Select the check boxes in front of the report names, which you want to publish
on the dashboard.
6
Click OK.
Modifying a dashboard section
This section provides the procedure to modify dashboard section.
27
Reporting in OpsCenter
About managing My Dashboard
To modify a dashboard
1
In the OpsCenter console, click Reports > My Dashboard.
2
Click Edit.
3
On the Edit Dashboard Section pop-up screen, select the dashboard section
from the drop-down list, that you want to modify.
4
Modify the section name.
5
Expand the Private or Public Reports folder to view existing reports.
6
Select or clear the check boxes in front of the report names, which you want
to publish on or remove from this dashboard section.
7
Click OK.
Deleting a dashboard section
This section provides the procedure to delete a dashboard section.
To delete a dashboard section
1
In the OpsCenter console, click Reports > My Dashboard.
2
Click Delete.
3
On the Delete Dashboard Section pop-up screen, select the dashboard
section from the drop-down list, that you want to delete.
4
Click OK.
Emailing dashboard sections
You can email your dashboards.
To email a dashboard
1
In the OpsCenter console, click Reports > My Dashboard.
2
Click the Email Dashboard icon.
3
On the Email Dashboard pop-up screen, select the format in which you want
to send the email.
4
Select email recipients from the To.., Cc.., and Bcc.. as appropriate.
Alternatively, enter new email recipients, which are added into the database.
5
Enter the email subject and message.
6
Click OK.
28
Reporting in OpsCenter
About managing reports folders in OpsCenter
Refreshing My Dashboard
This section provides the procedure to refresh My Dashboard.
To refresh My Dashboard
1
In the OpsCenter console, click Reports > My Dashboard.
2
Click the Refresh icon.
About managing reports folders in OpsCenter
OpsCenter provides a way to manage folders where you have saved your reports.
They can be both private reports and public reports.
Using the Manage Folders tab in the Reports section, you can add new report
folders, edit names of the existing folders, or delete them.
You can also select reports in a particular folder and delete them using this tab.
See “Adding a reports folder in OpsCenter” on page 29.
See “Editing a reports folder in OpsCenter” on page 30.
See “Deleting reports folders in OpsCenter” on page 30.
See “Deleting reports from a folder in OpsCenter” on page 30.
Reports > Manage Folders options
Using the Manage Folders tab in the Reports section, you can add new report
folders, edit names of the existing folders, or delete them.
Adding a reports folder in OpsCenter
This section provides a procedure to add a report folder.
To add a folder
1
In the OpsCenter console, click Reports > Manage Folders.
2
On the Reports tree, select a check box in front of a private folder node or
public folder node in which you want to create a new folder.
3
Click Add.
4
In the Create new folder pop-up window, make sure that you have selected
only one folder. If multiple folders are selected, the Add option is disabled.
29
Reporting in OpsCenter
About managing reports folders in OpsCenter
5
Enter the folder name.
6
Click OK.
This folder is added in the selected node.
Editing a reports folder in OpsCenter
This section provides a procedure to edit a report folder.
To edit a folder
1
In the OpsCenter console, click Reports > Manage Folders.
2
On the Reports tree, select a check box in front of a private folder or public
folder that you want to edit.
3
Click Edit.
4
In the Edit folder name pop-up window, make sure that you have selected
only one folder. If multiple folders are selected, the Edit option is disabled.
5
Edit the folder name.
6
Click OK.
Deleting reports folders in OpsCenter
This section provides a procedure to delete a report folder. If you delete a report
folder, all reports that are saved in that folder are deleted.
To delete folders
1
In the OpsCenter console, click Reports > Manage Folders.
2
On the Reports tree, select a check boxes in front of the private folders or
public folders that you want to delete.
3
Click Delete.
Deleting reports from a folder in OpsCenter
This section provides a procedure for deleting the reports that are saved in a public
folder or private folder.
To delete reports from a folder
1
In the OpsCenter console, click Reports > Manage Folders.
2
On the Reports tree, select a private folder or public folder from which you
want to delete the reports. A list of reports that are saved in the selected folder
displays at the right-hand side of the page.
30
Reporting in OpsCenter
About managing report schedules in OpsCenter
3
From the list of reports, select the check boxes in front of the reports that you
want to delete.
4
Click Delete.
About managing report schedules in OpsCenter
NetBackup OpsCenter provides a way to export or email a report on a specific
schedule. For this task you need to create a report schedule that is associated with
a time schedule on which the specified reports are exported or emailed.
Each report schedule can be associated with a single time schedule. A single time
schedule can be associated with multiple report schedules.
See “About managing time schedules in OpsCenter” on page 38.
The following topics describe how to create and manage report schedules.
See “Viewing report schedule details in OpsCenter” on page 32.
See “Creating a report schedule in OpsCenter” on page 36.
See “Editing a report schedule in OpsCenter” on page 37.
See “ Deleting a report schedule in OpsCenter” on page 37.
See “Enabling or disabling a report schedule” on page 38.
Reports > Schedules options
Using report schedules, you can email or export reports at a scheduled time. Each
report schedule is associated with a time schedule at which it emails or sends the
specified reports.
Table 1-5
Report Schedules tab options
Option
Description
Add/Edit
Select Add or Edit to start the Report Schedule Wizard.
Delete
Select Delete to remove the selected report schedules.
Enable/Disable
Select Enable or Disable to enable or disable the selected
report schedules.
Name
Name of a report schedule.
Time Schedule Name
Name of a time schedule that is associated with this report
schedule.
Enabled
Specifies whether the report schedule is enabled or not.
31
Reporting in OpsCenter
About managing report schedules in OpsCenter
Table 1-5
Report Schedules tab options (continued)
Option
Description
Start Date
Date on which this schedule runs.
End Date
Date on which this schedule stops.
Export
Specifies whether you have exported the associated reports.
Email
Specifies whether you have emailed the associated reports.
Reports
Number of the reports that are exported or emailed when this
schedule runs.
Table 1-6
Time Schedules tab options
Option
Description
Add/Edit
Select Add or Edit to go to the Time Schedule page.
Delete
Select Delete to delete the selected time schedules.
Name
Name of the time schedule.
Schedule Time
Time when the associated reports are exported or emailed.
Recurrence Pattern
A pattern with which this schedule runs.
Start Date
Date when the schedule starts.
End Date
Date when the schedule stops.
Viewing report schedule details in OpsCenter
This section provides information on viewing the list of report schedules.
If you have applied conditions for the selected report, the list of applicable conditions
is shown on the last page of the wizard. You can select the appropriate conditions.
An email notification is sent to the relevant recipients if the selected condition is
satisfied.
To view report schedule details
1
In the OpsCenter console, click Reports > Schedules.
By default, the Report Schedules tab is selected.
2
On the Report Schedules tab, view the report schedule details.
See “Reports > Schedules options” on page 31.
32
Reporting in OpsCenter
About managing report schedules in OpsCenter
Using report schedules in OpsCenter
Using report schedules, you can email or export reports at a scheduled time. Each
report schedule is associated with a time schedule at which it emails or sends the
specified reports.
OpsCenter provides a wizard to create a report schedule.
See “Creating a report schedule in OpsCenter” on page 36.
The following table describes the steps that you need to carry out to email or export
a report on a specific schedule.
See “About managing time schedules in OpsCenter” on page 38.
Creating a report schedule
Table 1-7
Step
Step and reference topic
Number
1
Create a time schedule.
See “Creating a time schedule” on page 39.
2
Create a report schedule.
OpsCenter provides a wizard to create a report schedule. This wizard lets you
specify the following details:
■
Report schedule name
■
File format in which you want to email or export reports
■
■
Select a time schedule.
You can either select an existing time schedule that you have created in the
first step or create a new schedule from here to associate it with this report
schedule.
Specify details of export or email options.
■
Select the reports that you want to export or email on a specific schedule.
Note: You can select only saved reports in a schedule.
See “Creating a report schedule in OpsCenter” on page 36.
Table 1-8
Steps
Reference topic
◆
See “Creating a time schedule” on page 39.
Create a time schedule.
Create a time schedule.
33
Reporting in OpsCenter
About managing report schedules in OpsCenter
Table 1-8
(continued)
Steps
Reference topic
◆
See “Creating a report schedule in
OpsCenter” on page 36.
Create a report schedule.
Create a report schedule.
OpsCenter provides a wizard to create a
report schedule. This wizard lets you specify
the following details:
■
Report schedule name
■
File format in which you want to email or
export reports
Select a time schedule.
You can either select an existing time
schedule that you have created in the first
step or create a new schedule from here
to associate it with this report schedule.
Specify details of export or email options.
■
■
■
Select the reports that you want to export
or email on a specific schedule.
Note: You can select only saved reports
in a schedule.
Report Schedule Wizard
The Report Schedule Wizards contains five panels to help you create a schedule.
Table 1-9
Enter Report Schedule Details panel options
Option
Description
Report Schedule Name
Enter a report schedule name. This field must be filled.
Select Format
Select a file format in which you want to export or email report
the associated reports.
See “ File formats available in OpsCenter” on page 18.
Table 1-10
Option
Select Time Schedule panel options
Description
Create new Time Schedule Select this option if you want a new time schedule to be
associated with the report schedule.
34
Reporting in OpsCenter
About managing report schedules in OpsCenter
Table 1-10
Select Time Schedule panel options (continued)
Option
Description
Use existing Schedule
Select this option if you want the report schedule to be
associated with an existing time schedule
Table 1-11
Select Export/Email Report Options panel options
Option
Description
Export
Select this check box if you want to export the reports that
are associated with this schedule.
See “ File formats available in OpsCenter” on page 18.
Location
Enter a directory path where you want to save the exported
report or click Browse to select the desired location.
Overwrite if file exists
Select this check box if you want to overwrite a file that
already exists at the specified location.
Email
Select this check box if you want to email the reports that are
associated with this schedule.
To
Select email IDs to which you want to email reports.
Cc
Select email IDs to add in the Cc list of email.
Bcc
Select email IDs to add in the Bcc list email.
Subject
Type the email subject. For example: Daily Job Count Report
Message
Type any other related information.
Table 1-12
Select Reports panel options
Option
Description
Private Reports
Select private reports from the list that you want to schedule.
You can select both public reports and private reports.
Public Reports
Select public reports from the list that you want to schedule.
You can select both public reports and private reports.
35
Reporting in OpsCenter
About managing report schedules in OpsCenter
Table 1-13
Select a report condition to be applied panel options
Option
Description
Send email only if the
report meets one or more
selected conditions
Check this option if you want the report to be emailed only if
it meets one or more of the selected conditions. You can
create conditions for custom reports while editing the report.
Report Name
The custom reports that have conditions and are selected to
be scheduled are displayed.
Condition
The condition that is associated with the custom report is
displayed. You can create a condition only for custom reports.
Creating a report schedule in OpsCenter
To create a report schedule
1
In the OpsCenter console, click Reports > Schedules.
2
On the Report Schedules tab, click Add. OpsCenter provides a Report
Schedule Wizard that guides you through the procedure of creating a report
schedule.
The Enter Report Schedule Details panel appears.
Enter the report schedule details.
See “Report Schedule Wizard” on page 34.
3
Click Next.
The Select Time Schedule panel appears:
Select the Use existing schedule option if you want to run this schedule on
any existing time schedule. If you want to create a new time schedule for this
report schedule, select Create new time schedule.
See “Creating a time schedule” on page 39.
If you have selected Create new time schedule, the system takes you to the
Time Schedule Wizard. After creating a time schedule you can select the export
and the email report options.
4
Click Next.
5
If you have selected the Use existing schedule option in the previous step,
in the Configure Export/Email Report Settings panel, specify the following
details:
You can select either Export, Email, or both options.
See “Report Schedule Wizard” on page 34.
36
Reporting in OpsCenter
About managing report schedules in OpsCenter
6
Click Next.
7
In the Select Reports panel, select the public reports or private reports that
you want to export or email on this schedule.
These reports should be saved.
Click Back if you want to change the previous selections.
8
In the Select a report condition to be applied panel, select a report and
report condition to be applied. You can apply report conditions to custom
reports.
You can also select the option Send email only if the report meets one or
more of the selected conditions if you want the report to be emailed only
when the report meets one or more of the selected conditions.
9
Click Save.
Editing a report schedule in OpsCenter
This section describes how to edit report schedule details.
To edit a report schedule
1
In the OpsCenter console, click Reports > Schedules.
By default, the Report Schedules tab is selected.
2
On the Report Schedules tab, select a report schedule from the list that you
want to edit.
3
Click Edit.
4
Edit the report schedule details using the wizard.
5
Click Save.
Deleting a report schedule in OpsCenter
This section describes how to delete a report schedule.
To delete a report schedule
1
In the OpsCenter console, click Reports > Schedules.
By default, the Report Schedules tab is selected.
2
On the Report Schedules tab, select one or more report schedules from the
list that you want to delete.
3
Click Delete.
37
Reporting in OpsCenter
About managing time schedules in OpsCenter
Enabling or disabling a report schedule
This section describes how to enable or disable a report schedule.
To enable or disable a report schedule
1
In the OpsCenter console, click Reports > Schedules.
By default, the Report Schedules tab is selected.
2
On the Report Schedules tab, select one or more report schedules from the
list that you want to enable or disable.
3
Click Enable or Disable.
About managing time schedules in OpsCenter
This section provides procedures to create and manage a report schedule.
Each report schedule can be associated with only a single time schedule. A single
time schedule can be associated with multiple report schedules.
See “About managing report schedules in OpsCenter” on page 31.
The following topics provide more information about managing time schedules.
See “Viewing time schedule details” on page 39.
See “Creating a time schedule” on page 39.
See “Editing a time schedule” on page 39.
See “Deleting a time schedule” on page 40.
Reports > Schedules > Create or Edit Time Schedule options
Use the page to create or edit a time schedule.
Table 1-14
Create or Edit Time Schedule options
Option
Description
Schedule Name
Enter name of the time schedule.
Schedule Time
Enter the time when the schedule runs and the associated
reports are exported or emailed.
38
Reporting in OpsCenter
About managing time schedules in OpsCenter
Table 1-14
Create or Edit Time Schedule options (continued)
Option
Description
Schedule Pattern
Select a pattern with which you want this schedule to be run.
The following schedule patterns are available:
■
One Time
■
Daily
■
Weekly
■
Monthly
■
Quarterly
■
Yearly
Depending on the pattern-selected , options change.
Viewing time schedule details
This section provides a procedure to view the details of time schedules.
To view a time schedule
1
In the OpsCenter console, click Reports > Schedules.
2
Click Time Schedules.
The time schedule details appear:
See “Reports > Schedules options” on page 31.
Creating a time schedule
Use the following procedure to create a time schedule.
To create a time schedule
1
In the OpsCenter console, click Reports > Schedules.
2
Click Time Schedules.
3
On the Time Schedules tab, click Create.
4
On the Create Time Schedule page, specify the necessary details.
See “Reports > Schedules > Create or Edit Time Schedule options” on page 38.
5
Click OK.
Editing a time schedule
Use the following procedure to edit a time schedule.
39
Reporting in OpsCenter
About managing time schedules in OpsCenter
To edit a time schedule
1
In the OpsCenter console, click Reports > Schedules.
2
Click Time Schedules.
3
On the Time Schedules tab, in the table, select the time schedule that you
want to edit.
4
Click Edit.
5
Edit the time schedule details.
6
Click OK.
Deleting a time schedule
Use the following procedure to delete a time schedule.
To delete a time schedule
1
In the OpsCenter console, click Reports > Schedules.
2
Click Time Schedules.
3
On the Time Schedules tab, in the table, select the time schedules that you
want to delete.
4
Click Delete.
40
Chapter
2
OpsCenter reports
This chapter includes the following topics:
■
Report Templates in OpsCenter
■
About Report Templates descriptions
Report Templates in OpsCenter
Symantec NetBackup OpsCenter provides a set of Report Templates or standard
or canned reports that have parameters set to default values. You can modify the
default parameters and generate reports to view the required data. OpsCenter
reports help you to have a good visibility into your data protection environment.
See “Reports > Report Templates” on page 12.
Report Templates are categorized as follows:
Backup Reports
The backup reports show the information that
is related to backups, such as success rate,
job status, and protected bytes.
This category also includes recovery reports.
Note: If you select Reports > Activity
Planning > Job Size in the OpsCenter user
interface, the report that appears displays the
wrong client name. Instead of showing the
client names, a list of backed up VM images
is displayed in this report. In addition, the list
of VM images may not be accurate.
Catalog Reports
These reports provide details about the
catalogs.
OpsCenter reports
Report Templates in OpsCenter
Chargeback Reports
The chargeback reports provide details of the
backup services expenditures.
Using these reports you can track the backup
and the recovery usage and the associated
cost. You can calculate the cost of data
protection management and chargeback to
customers and business units.
Client Reports
These reports provide details about clients
such as backup status, restore job details, or
summary dashboard.
Cloud Reports
These reports provide details about cloud.
Disk & Tape Device Activity Reports
Disk-based data protection (DBDP) reports
show disk pool capacity and its usage,
performance of clients on LAN or SAN,
NetBackup storage lifecycle Map
Hold Reports
Hold reports are a part of NetBackup Search.
The Hold report category is visible only if you
have added a valid NetBackup Search license
key in OpsCenter and when you log on as a
Security Administrator.
Media Reports
These reports provide media data, such as
tape count or usage.
Performance Reports
These reports provide details of throughput.
Policy Reports
These reports show all details about the
backup job policies in NetBackup.
Restore Reports
These reports provide details about restore
operation.
Storage Lifecycle Policy
The SLP reports in OpsCenter show an
end-to-end view of the SLP process that
includes backup to import of duplicated image
into different NetBackup domains. The SLP
reports help you to verify if each step in the
SLP is executed and identify the possible
bottlenecks.
42
OpsCenter reports
Report Templates in OpsCenter
Workload Analyzer
The Workload Analyzer report gives
information about the activities that are done
across a period of seven days. The activities
are number of jobs running at a given period
of time and the amount of data that is
transferred during this period. The report
contains 168 data points of analysis in terms
of the activities that are done for each hour
for a period of seven days.
About report filters in OpsCenter
There can be hundreds of records or thousands of MB of the data that you may not
be concerned about. For example, you want to view only those jobs that were
successful. To view this specific data, you need to use the ‘status’ filter. By setting
this filter to Successful while generating the Job Count report, you can view all
jobs that were successful.
OpsCenter provides a number of filters that you can use to view the required data.
For each report category there is a different set of filters.
Note the following considerations with respect to using the report filters:
■
■
If you edit certain standard reports and select Backup from Snapshot Job type
from the Filters section, incorrect data is shown if data for Backup from Snapshot
jobs exists. This also happens when you create image-related reports via custom
reporting and apply Backup from Snapshot job type filter.
The following standard reports display incorrect data when you select Backup
from Snapshot job type from the Filters section:
■
Hold Reports > Image Retention Summary
■
Backup > Planning Activity > Stored Backup Images > Duplicate copies
■
Backup > Planning Activity > Stored Backup Images > Stored Backup Images
on Media
■
Backup > Planning Activity > Stored Backup Images > Valid Backup Images
■
Backup > Planning Activity > Capacity Planning > Forecasted Size
■
Backup > Planning Activity > Capacity Planning > Historical Size
The Backup Media Role filter when applied to the Tapes Expiring In Future and
Tapes Expiring Now reports does not return any data as data is miscalculated
in OpsCenter.
43
OpsCenter reports
Report Templates in OpsCenter
Creating an OpsCenter report using a Report Template
This section provides the procedure to create a report using an existing Report
Template .
To create a report using an existing Report Template
1
In the OpsCenter console, click Reports.
2
On the Report Template tab, click Create New Report.
To view a report output of a template, select a template in the reports tree. The
report output is as per the default parameter values. You cannot modify any
of the report parameters.
By clicking the Create New Report option, you can launch the report creation
wizard that guides you through the entire report creation procedure. Here you
can modify the report parameters and view the required data.
3
In the Report Wizard, retain the default selection Create a report using an
existing Report Template and click Next.
4
On the Report Templates list, expand a report category to see the Report
Templates within it. Select the Report Template that you want to create a report
from.
Click Next.
5
Select time frame and other filters as required and click Next.
6
Modify display options and click Next.
Using report formats
The following formats are available for standard reports in OpsCenter.
About report formats
Report formats are described as follows:
Rankings reports
Display a horizontal bar graph showing all the data for each view
level object, from greatest to least, within the selected time frame.
Distribution reports
Display a pie chart showing all the data for each view level object
within the selected time frame.
44
OpsCenter reports
About Report Templates descriptions
Historical reports
Display a stacked (segmented) bar graph with a trend line
superimposed over it, showing the average upward and downward
trends of the data over time.
For example the total size of each day’s backup jobs broken out
by geography. Some backup reports use a different bar chart format,
displaying clustered columns for easy comparison between two
classes of objects or events
Tabular reports
Display backup data in a table
About viewing data in a graphical report
Graphical reports present data in a convenient, ‘at a glance’ fashion. However,
some precision may be lost when you use this format. When you are viewing a
graphical report, tool tips are available to provide the precise numerical data. To
view the numerical data on which a graphical report is based, move your mouse
pointer over an area of the graph.
You can also click Show Chart as Table at the bottom of the report to view the
data in a tabular format.
When you are viewing a backup report, you can easily view lower-level reports. On
a graphical report, when you click an area within a graph, the report refreshes to
display data for the next lowest object level.
For example, in a Geography view, you can click a bar labeled Canada to display
a bar chart showing data for Toronto and Vancouver. You can select the bar for a
host to display data for the host’s file systems.
About Report Templates descriptions
This section provides descriptions of all Report Templates available in OpsCenter.
A few important notes on the OpsCenter Report Templates :
■
The Drive Throughput, and Drive Utilization reports can be exported and emailed
only in the HTML format.
The Drive Throughput and Drive Utilization reports display data only till 1 A.M.
and not till the time when you run the report. This is because OpsCenter collects
data for Drive Throughput and Drive Utilization report once per day at 1 A.M.
everyday after midnight.
Therefore the Drive Throughput or Drive Utilization reports are only able to report
on data up until 1 AM on that day, even when run with a relative timeframe of
Previous 24 hours. Similarly if you run Drive Throughput and Drive Utilization
reports at 2 P.M. in the afternoon, the reports display data collected till 1 A.M.
only.
45
OpsCenter reports
About Report Templates descriptions
■
Symantec recommends that you configure the retention period of error logs in
NetBackup as more than 1 day. If the retention period of error logs is less than
24 hours, it may result in data loss for some reports like Drive Throughput.
■
A tabular report that is scheduled for emailing has up to 4000 rows by default.
Similarly, exporting a tabular report in the available formats displays data for a
maximum of 4000 rows by default. The maximum number of rows can be
configured.
See “Configuring number of rows in a tabular report for email or export”
on page 21.
■
Reports in the PDF, TSV, XML, or CSV formats are sent as email attachments.
■
A report in the HTML format is sent as an inline message in email.
■
Sorting for HTML-based reports (for example, Drive Utilization) is not supported.
■
The default view that is selected is All My Views. All standard reports by default
show the data based on what you select for Report Template Default View.
The Report Template Default View can be specified in Settings > User
Preferences. The default value of Report Template Default View is All My
Views.
See “About Audit reports” on page 46.
See “About Backup reports in OpsCenter” on page 47.
See “About Catalog reports in OpsCenter” on page 197.
See “About Chargeback reports in OpsCenter” on page 197.
See “About Client reports in OpsCenter” on page 206.
See “ About Disk and Tape Device Activity reports in OpsCenter” on page 250.
See “ About Media reports in OpsCenter” on page 263.
See “About Performance reports in OpsCenter” on page 273.
See “About Policy reports in OpsCenter” on page 279.
See “ About Restore reports in OpsCenter” on page 295.
See “About Storage Lifecycle Policy reports” on page 304.
See “Workload Analyzer report” on page 340.
About Audit reports
This section provides the reports for the NetBackup Audit Trails feature which
provide a record of all user-initiated actions for auditing NetBackup operational
changes.
46
OpsCenter reports
About Report Templates descriptions
Audit Reports > Audit Trails Report
This section provides descriptions on the Audit Report Template available in
OpsCenter.
Audit trails is a record of all the user initiated activities. An audit trail consists of the
changes that are made in the NetBackup environment. For example, changes such
as creating a policy, deactivating a policy, or modifying a policy.
You can generate the Audit trails report through the reports tab. You can also create
a custom SQL. For example, enter a query: SELECT * FROM audit_record on SQL
query page.
See “Creating an OpsCenter report using a Report Template” on page 44.
See “Creating an OpsCenter report using SQL query” on page 363.
About Backup reports in OpsCenter
This section provides descriptions on all backup Report Templates available in
OpsCenter.
You can view the reports for all NetBackup backup operations including job activity,
deduplication rates, and overall backup status and success rates.
Deduplication > Deduplication Rates by
Master Server
See “Deduplication > Deduplication Rates by
Master Server” on page 50.
Deduplication > Deduplication Rates by Policy See “Deduplication > Deduplication Rates by
Type
Policy Type” on page 52.
Deduplication > Deduplication Size Factor
See “Deduplication > Deduplication Size
Factor” on page 54.
Deduplication > Pre vs. Post Deduplication
Size
See “Deduplication > Pre vs. Post
Deduplication Size report” on page 60.
Deduplication > Deduplication Size Savings See “Deduplication > Deduplication Size
Savings” on page 64.
Job Activity > Variance > About Throughput
Variance report
See “Variance > Throughput Variance”
on page 70.
Job Activity > Variance > About File Count
Variance report
See “Job Activity > Variance > File Count
Variance report” on page 72.
Job Activity > Variance > About Backup
Duration Variance report
See “Job Activity > Variance > Backup
Duration Variance report” on page 72.
47
OpsCenter reports
About Report Templates descriptions
Job Activity > Variance > About Backup Job See “Job Activity > Variance > Backup Job
Size Variance report
Size Variance report” on page 72.
Job Activity > Backup Window > Job Count
See “Job Activity > Backup Window > Job
Count report” on page 77.
Job Activity > Backup Window > Job Size
See “Job Activity > Backup Window > Job
Size report” on page 80.
Job Activity > Backup Window > File Count
See “Job Activity > Backup Window > File
Count report” on page 80.
Job Activity > Job Count
See “Job Activity > Backup Window > Job
Count report” on page 77.
Job Activity > Job Size
See “Job Activity > Job Size” on page 86.
Job Activity > Client Count > Historical
See “Job Activity > Client Count” on page 92.
Job Activity > Job Duration > Ranking
See “Job Activity > Job Duration” on page 98.
Job Activity > File Count
See “Job Activity > File Count” on page 102.
Job Browser > Tabular Backup Report
See “Job Browser > Tabular Backup Report”
on page 108.
Planning Activity > Capacity Planning >
Forecasted Size
See “Planning Activity > Capacity Planning >
Forecasted Size report ” on page 114.
Planning Activity > Capacity Planning >
Historical Size
See “ Planning Activity > Capacity Planning
> Historical Size report ” on page 114.
Planning Activity > Forecast > Job Count
See “Planning Activity > Forecast > Job Count
report ” on page 115.
Planning Activity > Forecast > Job Size
See “Planning Activity > Forecast > Job Size”
on page 115.
Planning Activity > Scheduled Job >
Scheduled Job
See “Planning Activity > Scheduled Job >
Scheduled Job report” on page 120.
Planning Activity > Scheduled Job > Job
Count Scheduled Vs Actual
See “Planning Activity > Scheduled Job > Job
Count Scheduled Vs Actual report”
on page 121.
Planning Activity > Scheduled Job > Job
Count within Backup Window
See “Planning Activity > Scheduled Job > Job
Count within Backup Window report”
on page 125.
48
OpsCenter reports
About Report Templates descriptions
Planning Activity > Scheduled Jobs > Job
Details Scheduled Vs Actual
See “Planning Activity > Scheduled Jobs >
Job Details Scheduled Vs Actual report”
on page 127.
Planning Activity > Scheduled Job > All Jobs See “ Planning Activity > Scheduled Job > All
Jobs report” on page 131.
Planning Activity > Stored Backup Images > See “Planning Activity > Stored Backup
Valid Backup Images
Images > Valid Backup Images report ”
on page 131.
Planning Activity > Stored Backup Images > See “Planning Activity > Stored Backup
Duplicate Copies
Images > Duplicate Copies report”
on page 133.
Planning Activity > Stored Backup Images > See “Planning Activity > Stored Backup
Stored Backup Images > Historical
Images > Stored Backup Images > Stored
Backup Images on Media” on page 134.
Status & Success Rate > Status > Failed Job See “Status & Success Rate > Status > Failed
Count
Job Count report ” on page 141.
Status & Success Rate > Status > Partially
Successful Job Count
See “Status & Success Rate > Status >
Partially Successful Job Count report ”
on page 145.
Status & Success Rate > Status > Successful See “Status & Success Rate > Status >
Job Count
Successful Job Count report ” on page 149.
Status & Success Rate > Status > All Failed See “Status & Success Rate > Status > All
Backups
Failed Backups report ” on page 153.
Status & Success Rate > Status >
Consecutive Failures
See “Status > Consecutive Failures”
on page 153.
Status & Success Rate > Status > Week At
A Glance
See “Status & Success Rate > Status > Week
At A Glance report ” on page 158.
Status & Success Rate > Status > Backup
Window Failures
See “Status & Success Rate > Status >
Backup Window Failures report” on page 166.
Status & Success Rate > Status > Partially
Successful Job Details
See “Status & Success Rate > Status >
Partially Successful Job Details report”
on page 166.
Status & Success Rate > Status > Skipped
Files Summary
See “Status & Success Rate > Status >
Skipped Files Summary report” on page 166.
Status & Success Rate > Status > Job Exit
Status Detail
See “Status & Success Rate > Status > Job
Attempt Status Detail report” on page 167.
49
OpsCenter reports
About Report Templates descriptions
Status & Success Rate > Status > Job Details See “Status & Success Rate > Status > Job
Details report” on page 171.
Status & Success Rate > Status > Job
Summary by Status
See “Status & Success Rate > Status > Job
Summary by Status report” on page 171.
Status & Success Rate > Status > Job Status See “Status & Success Rate > Status > Job
> Historical
Status > Historical report” on page 171.
Status & Success Rate > Status > Job Status See “Status & Success Rate > Status > Job
> Distribution
Status > Distribution report” on page 175.
Status & Success Rate > Success Rate >
Success Rate – All Jobs
See “Status & Success Rate > Success Rate
> Success Rate – All Jobs report ”
on page 178.
Status & Success Rate > Success Rate >
Advanced Success Rate
See “Status & Success Rate > Success Rate
> Advanced Success Rate report”
on page 182.
Status & Success Rate > Success Rate >
Success Rate All Attempts
See “Status & Success Rate > Success Rate
> Success Rate - All Attempts report”
on page 185.
Status & Success Rate > Success Rate >
Success Rate - First Attempt
See “Status & Success Rate > Success Rate
> Success Rate - First Attempt report”
on page 189.
Status & Success Rate > Success Rate >
Success Rate - Line
See “Status & Success Rate > Success Rate
> Success Rate - Line report” on page 193.
Deduplication > Deduplication Rates by Master Server
This report provides the deduplication rates for each NetBackup master server.
You can view the reports for NetBackup deduplication storage including deduplication
rates and storage space saved.
The following are the details that are associated with the Deduplication Rates
by Master Server report:
Report Name
Deduplication Rates by Master Server
Report Category
Deduplication
Where to Locate
Report > Report Templates > Backup > Deduplication >
Deduplication Rates by Master Server.
50
OpsCenter reports
About Report Templates descriptions
Report Purpose
Tabular report that shows deduplication rates for each
NetBackup master server.
Supported products
Symantec NetBackup, Symantec PureDisk, and their
Appliances
Applicable View
Master Server, Media Server
Report Display
Tabular
Drill down report
Yes.
Can be scheduled
Yes.
Supported formats
PDF, CSV, HTML, XML, TSV
Mapping with VBR report
All Reports > Standard Report > Backup > Deduplication >
Deduplication Rates by Master Server
You can edit the Deduplication Rates by Master Server report to show or hide
the columns that you are interested in. All the columns are shown by default. You
can also filter the report to view reports of specific master servers. The following
table shows the filters for Deduplication Rates by Master Server report and
how you can use these filters to view specific data in the report.
Filter
Column
View
Description
Select a view to show data for the selected view in the report. By
default All My Views is selected.
Master
Server
Master
Server
Media
Server
Media Server Select one or more media servers to view data for the selected
media servers in the report. All media servers that are added to
the OpsCenter console are shown in the Value dropdown list.
Client
Client Name
Client OS
Select one or more master servers to view data for the clients
that are backed up by the selected master servers in the report.
All master servers that are added to the OpsCenter console are
shown in the Value drop-down list .
Select one or more clients to view data for the selected clients in
the report. All clients that are protected by the master servers in
the OpsCenter console are listed.
Select one or more client OS to view data for the selected client
OS in the report.
51
OpsCenter reports
About Report Templates descriptions
Filter
Column
Description
Policy
Policy Name
Select one or more policy names to view data for the selected
policies.
Policy Type
Policy
Keyword
Select one or more policy types to view data for the selected
policy types.
Select one or more policy keyword to view data for the policies
Policy Data
having the selected keyword.
Classification
Name
Select one or more policy data classification names like Gold,
Silver, Bronze etc. to view data for the policies having the selected
data classiciation names.
Schedule Schedule/Level Select one or more schedule or level types to view the data for
Type
the configured schedules.
Job
Schedule
Name
Select one or more schedule names to view data for the selected
schedule names.
Job Type
Select one or more job types as Archive, Backup, or Restore to
view data for the selected job types.
Product Type
Select one or more backup products to view data for the selected
Job Transport
products.
Type
Select one or more transport types like FT, LAN, or Unknown to
Job Status
view data for the jobs that have the selected transport type.
Select one or more job status like Failed, Successful etc. to view
data for the selected job status.
Deduplication > Deduplication Rates by Policy Type
This report provides the deduplication rates by NetBackup policy type.
The following are the details that are associated with the Deduplication Rates
by Policy Type report:
Report Name
Deduplication Rates by Policy Type
Report Category
Deduplication
Where to Locate
Report > Report Templates > Backup > Deduplication >
Deduplication Rates by Policy Type.
Report Purpose
Tabular report that shows deduplication rates for each
NetBackup master server.
Supported products
Symantec NetBackup, Symantec PureDisk, and their
Appliances
52
OpsCenter reports
About Report Templates descriptions
Applicable View
Master Server, Media Server
Report Display
Tabular
Drill down report
Yes.
Can be scheduled
Yes.
Supported formats
PDF, CSV, HTML, XML, TSV
Mapping with VBR report
All Reports > Standard Report > Backup > Deduplication >
Deduplication Rates by Policy Type
You can edit the Deduplication Rates by Policy Type report to show or hide
the columns that you are interested in. All the columns are shown by default. You
can also filter the report to view reports of specific master servers. The following
table shows the filters for Deduplication Rates by Policy Type report and how
you can use these filters to view specific data in the report.
Filter
Column
View
Description
Select a view to show data for the selected view in the report. By
default All My Views is selected.
Master
Server
Master
Server
Media
Server
Media Server Select one or more media servers to view data for the selected
media servers in the report. All media servers that are added to
the OpsCenter console are shown in the Value dropdown list.
Client
Client Name
Client OS
Select one or more master servers to view data for the clients
that are backed up by the selected master servers in the report.
All master servers that are added to the OpsCenter console are
shown in the Value drop-down list .
Select one or more clients to view data for the selected clients in
the report. All clients that are protected by the master servers in
the OpsCenter console are listed.
Select one or more client OS to view data for the selected client
OS in the report.
53
OpsCenter reports
About Report Templates descriptions
Filter
Column
Description
Policy
Policy Name
Select one or more policy names to view data for the selected
policies.
Policy Type
Policy
Keyword
Select one or more policy types to view data for the selected
policy types.
Select one or more policy keyword to view data for the policies
Policy Data
having the selected keyword.
Classification
Name
Select one or more policy data classification names like Gold,
Silver, Bronze etc. to view data for the policies having the selected
data classiciation names.
Schedule Schedule/Level Select one or more schedule or level types to view the data for
Type
the configured schedules.
Job
Schedule
Name
Select one or more schedule names to view data for the selected
schedule names.
Job Type
Select one or more job types as Archive, Backup, or Restore to
view data for the selected job types.
Product Type
Select one or more backup products to view data for the selected
Job Transport
products.
Type
Select one or more transport types like FT, LAN, or Unknown to
Job Status
view data for the jobs that have the selected transport type.
Select one or more job status like Failed, Successful etc. to view
data for the selected job status.
Deduplication > Deduplication Size Factor
This report is usually the most talked about when it comes to deduplication since
it shows what the deduplication ratio is for each day over the last two weeks (the
time frame is modifiable). The deduplication ratio is calculated by taking the total
number of bytes that would normally be backed up and dividing it by the number
of bytes that have changed and were backed up. So if 100TB exists on all the
backups taking place but only 10TB were changed and therefore transferred, you
have a rate of 10. This report shows only deduplication jobs. The default Report
On parameter for this report is Master Server. This report is available in a line-chart
format.
This report is available in historical and ranking views. The ranking report ranks the
top hosts in terms of which ones have the best deduplication ratio in bytes. These
hosts have the least amount of change and therefore you get the best benefit from
deduplication.
Figure 2-1 shows a sample view of Deduplication Size Factor Report.
54
OpsCenter reports
About Report Templates descriptions
Figure 2-1
Deduplication Size Factor Report (Historical)
This deduplication report ranks the top hosts in terms of which ones have the best
deduplication ratio in bytes. These hosts have the least amount of change and
therefore you get the best benefit from deduplication.
Figure 2-2 shows a sample view of Deduplication Size Factor Report.
55
OpsCenter reports
About Report Templates descriptions
Figure 2-2
Deduplication Size Factor Report (Ranking)
The following are the details that are associated with the Deduplication Size
Factor report:
Report Name
Deduplication Size Factor
Report Category
Deduplication
Where to Locate
Report > Report Templates > Backup > Deduplication >
Deduplication Size Factor.
Report Purpose
Historical trending report showing savings deduplication
factors.
Supported products
Symantec NetBackup, Symantec PureDisk, and their
Appliances
Applicable View
Master Server, Client
Report Display
Historical, Ranking
56
OpsCenter reports
About Report Templates descriptions
Drill down report
Yes. Drill down reports can be viewed at following four levels
depending on the selected parameter value. Level 1: Client
Name, Level 2: Job Type, Level 3: Schedule/Level Type, Level
4: Policy Name
Can be scheduled
Yes.
Supported formats
PDF, CSV, HTML, XML, TSV
Mapping with VBR report
All Reports > Standard Report > Backup > Deduplication >
Size Factor
You can edit the Deduplication Size Factor report to show or hide the columns
that you are interested in. All the columns are shown by default. You can also filter
the report to view reports of specific master servers. The following table shows the
filters for Deduplication Size Factor report and how you can use these filters
to view specific data in the report.
Filter
Column
View
Description
Select a view to show data for the selected view in the report. By
default All My Views is selected.
Master
Server
Master
Server
Media
Server
Media Server Select one or more media servers to view data for the selected
media servers in the report. All media servers that are added to
the OpsCenter console are shown in the Value dropdown list.
Client
Client Name
Client OS
Select one or more master servers to view data for the clients
that are backed up by the selected master servers in the report.
All master servers that are added to the OpsCenter console are
shown in the Value drop-down list .
Select one or more clients to view data for the selected clients in
the report. All clients that are protected by the master servers in
the OpsCenter console are listed.
Select one or more client OS to view data for the selected client
OS in the report.
57
OpsCenter reports
About Report Templates descriptions
Filter
Column
Description
Policy
Policy Name
Select one or more policy names to view data for the selected
policies.
Policy Type
Policy
Keyword
Select one or more policy types to view data for the selected
policy types.
Select one or more policy keyword to view data for the policies
Policy Data
having the selected keyword.
Classification
Name
Select one or more policy data classification names like Gold,
Silver, Bronze etc. to view data for the policies having the selected
data classiciation names.
Schedule Schedule/Level Select one or more schedule or level types to view the data for
Type
the configured schedules.
Job
Schedule
Name
Select one or more schedule names to view data for the selected
schedule names.
Job Type
Select one or more job types as Archive, Backup, or Restore to
view data for the selected job types.
Product Type
Select one or more backup products to view data for the selected
Job Transport
products.
Type
Select one or more transport types like FT, LAN, or Unknown to
Job Status
view data for the jobs that have the selected transport type.
Select one or more job status like Failed, Successful etc. to view
data for the selected job status.
Example of filter usage: You may run the Duplication Size Factor report for a
specific client to view details for the specific clients.
Report Enhancements:
The following report enhancements have been made for the Duplication Size Factor
report:
■
■
Drill down reports for following four levels have been added.
■
Level 1: Client Name
■
Level 2: Job Type
■
Level 3: Schedule/Level Type
■
Level 4: Policy Name
The report now shows trendlines with customized average periods with option:
Show trendline with moving average period of 3. The value can be 1, 2, 3, 7,
14, or 30. The default value is 3. Example: 3 displays a trendline that, at each
58
OpsCenter reports
About Report Templates descriptions
interval, shows the average of the current data point and the two previous data
points.
■
The unit Years has been added for Relative Timeframe selection. You can now
view data for the last x years.
■
The option Next has been removed from the drop-down menu for Relative
Timeframe. You now cannot enter a relative timeframe like Next 2 weeks. This
is because the report does not support any futuristic data.
■
The following options have been removed from TimeFrameGroupBy selection:
■
Days of week Average
■
Days of week total
■
Hours of day Average
■
Hours of day Total
■
Minutes
■
Month of year Average
■
Month of year total
■
Quarter of year Average
■
Quarter of year total
The following filter enhancements have been made for the Duplication Size Factor
report:
■
New columns Job Status (Complete Only) and Job Status(Complete and Partial
Only) are added to the Report On parameter.
■
UNKNOWN has been added as a value for Policy Type column in the Policy
filter. You can now filter report data for policy types that are UNKNOWN.
■
Job types which are not applicable for this report are removed from the filter.
The supported job types are Backup, Archive, Restore, Catalog Backup, Backup
from Snapshot, Snapshot, Duplicate, and Replication.
■
The default selected value for Job Type column is changed to Backup.
■
The default unit for Y1 axis is now GB.
■
Value SAN is removed from the Job Transport Type filter.
Known Issues:
■
Selecting Reporton Storage Unit name in OpsCenter does not result in any
data for Symantec PureDisk because Storage Unit is not present in PureDisk
.In VBR, jobs data collected from PureDisk puts the storage unit name incorrectly
as “SPA”.
59
OpsCenter reports
About Report Templates descriptions
■
As compared to VBR, the unit of data for Y axis/Y1 axis is one unit lower. For
example: Unit GB in VBR matches up with unit MB in OpsCenter. OpsCenter
shows the correct data.
Deduplication > Pre vs. Post Deduplication Size report
The Pre vs. Post Deduplication Size report gives the comparison between the total
number of bytes that exist on all the backups as if they were normal full backups
and the number of bytes that have changed and therefore needed to be transferred.
This report shows only deduplication jobs. The default Report On parameter for
this report is All Master Servers. This report is available in a line-chart format.
Figure 2-3 shows a sample view of Pre vs. Post Deduplication Size Report.
Figure 2-3
Pre vs. Post Deduplication Size Report
The following are the details that are associated with the Deduplication Size
Factor report:
Report Name
Pre vs. Post Deduplication Size report
Report Category
Deduplication
Where to Locate
Report > Report Templates > Backup > Deduplication > Pre
vs. Post Deduplication Size report.
Report Purpose
Historical trending report of pre vs. post deduplication size.
60
OpsCenter reports
About Report Templates descriptions
Supported products
Symantec NetBackup, Symantec PureDisk, and their
Appliances
Applicable View
Master Server, Client
Report Display
Historical
Drill down report
None
Can be scheduled
Yes
Supported formats
PDF, CSV, HTML, XML, TSV
Mapping with VBR report
All Reports > Standard Report > Backup > Deduplication >
Protected size vs. Backed up size
You can edit the Pre vs. Post Deduplication Size report to show or hide the
columns that you are interested in. All the columns are shown by default. You can
also filter the report to view reports of specific master servers. The following table
shows the filters for Pre vs. Post Deduplication Size report and how you can
use these filters to view specific data in the report.
Filter
Column
View
Description
Select a view to show data for the selected view in the report. By
default All My Views is selected.
Master
Server
Master
Server
Media
Server
Media Server Select one or more media servers to view data for the selected
media servers in the report. All media servers that are added to
the OpsCenter console are shown in the Value dropdown list.
Client
Client Name
Client OS
Select one or more master servers to view data for the clients
that are backed up by the selected master servers in the report.
All master servers that are added to the OpsCenter console are
shown in the Value drop-down list .
Select one or more clients to view data for the selected clients in
the report. All clients that are protected by the master servers in
the OpsCenter console are listed.
Select one or more client OS to view data for the selected client
OS in the report.
61
OpsCenter reports
About Report Templates descriptions
Filter
Column
Description
Policy
Policy Name
Select one or more policy names to view data for the selected
policies.
Policy Type
Policy
Keyword
Select one or more policy types to view data for the selected
policy types.
Select one or more policy keyword to view data for the policies
Policy Data
having the selected keyword.
Classification
Name
Select one or more policy data classification names like Gold,
Silver, Bronze etc. to view data for the policies having the selected
data classiciation names.
Schedule Schedule/Level Select one or more schedule or level types to view the data for
Type
the configured schedules.
Job
Schedule
Name
Select one or more schedule names to view data for the selected
schedule names.
Job Type
Select one or more job types as Archive, Backup, or Restore to
view data for the selected job types.
Product Type
Select one or more backup products to view data for the selected
Job Transport
products.
Type
Select one or more transport types like FT, LAN, or Unknown to
Job Status
view data for the jobs that have the selected transport type.
Select one or more job status like Failed, Successful etc. to view
data for the selected job status.
Example of filter usage: You may run the Pre vs. Post Deduplication Size report
for a specific client to view details for the specific clients.
The following report enhancements have been made for the Pre vs. Post
Deduplication Size report:
■
The option Next has been removed from the drop-down menu for Relative
Timeframe. You now cannot enter a relative timeframe like Next 2 weeks. This
is because the report does not support any futuristic data.
■
The unit Years has been added for Relative Timeframe selection. You can now
view data for the last X years. You can also select Year from the top-right corner
of the report
■
Drill down reports for following four levels have been added in OpsCenter.
■
Level 1: Client Name
■
Level 2: Job Type
62
OpsCenter reports
About Report Templates descriptions
■
■
Level 3: Schedule/Level Type
■
Level 4: Policy Name
The following options have been removed from TimeFrameGroupBy selection:
■
Days of week Average
■
Days of week total
■
Hours of day Average
■
Hours of day Total
■
Minutes
■
Month of year Average
■
Month of year total
■
Quarter of year Average
■
Quarter of year total
The following filter enhancements have been made for the Pre vs. Post Duplication
Size report:
■
New columns Job Status (Complete Only) and Job Status(Complete and Partial
Only) are added to the Report On parameter.
■
UNKNOWN has been added as a value for Policy Type column in the Policy
filter. You can now filter report data for policy types that are UNKNOWN.
■
Job types which are not applicable for this report are removed from the filter.
The supported job types are Backup, Archive, Restore, Catalog Backup, Backup
from Snapshot, Snapshot, Duplicate, and Replication.
■
The default selected value for Job Type column is changed to Backup.
■
The default value of Report On is None.
■
Value SAN is removed from the Job Transport Type filter.
Known Issues:
■
Selecting Report on Storage Unit name in OpsCenter does not result in any
data for Symantec PureDisk because Storage Unit is not present in PureDisk
.In VBR, jobs data collected from PureDisk puts the storage unit name incorrectly
as “SPA”.
■
As compared to VBR, the unit of data for Y axis/Y1 axis is one unit lower. For
example: Unit GB in VBR matches up with unit MB in OpsCenter. OpsCenter
shows the correct data.
63
OpsCenter reports
About Report Templates descriptions
Deduplication > Deduplication Size Savings
Most NetBackup customers have either implemented some sort of deduplication
or plan to in the near future. This is the current trend as customers try to get control
of infrastructure and the amount of time backups take. Add to this the need for many
customers to protect remote offices across smaller WAN links and deduplication
becomes critical since only so much data can be pushed through a small pipe and
many times there is no one at the remote site who is capable of managing hardware.
In the data center, deduplication reporting helps to determine what the actual
deduplication rate is occurring at each PureDisk storage unit. Reporting can be
abstracted to view the protected size or stored size across all PureDisk environments
or drilled down in to one specific area. Common file or data types can then be
identified and matched with their ability to be deduplicated. The report below is a
simple dedupe report created using a Media Server Deduplication Pool. It is a very
basic report and shows how much data would have been backed up without
deduplication enabled. In large environments this would show the number of GB
or TB that is NOT being used due to deduplication. The other reports can contrast
the dedupe data savings vs. the actual deduped information however in this very
small test environment this report shows better information. OpsCenter and
OpsCenter Analytics provide the ability to report on the various forms of deduplication
available with NetBackup. It can provide reports that show things such as how much
deduplication is being done at a remote site before the data hits the WAN pipe.
Using the trending feature of Opscenter Analytics can also help to understand if
the data is growing faster than the hardware or when the WAN bandwidth can be
expected to max out. This allows the company to make educated decisions on
when to add infrastructure proactively instead of waiting for things to fail. This report
shows the total number of bytes that do not need to be backed up because of
deduplication. There is no calculation or ratio in this number. It is the number of
bytes (MB, GB, TB etc.) that have not changed since the last backup and therefore
do not need to be backed up. This report shows only deduplication jobs. The default
Report On parameter for this report is Master Server. This report is available in
Historical, and Ranking views. The ranking report groups the total number of bytes
saved per host being backed up to show the top five hosts in terms of deduplication
savings.
The historical report shows the total number of bytes that do not need to be backed
up because of deduplication. There is no calculation or ratio in this number. It is
the number of bytes (MB, GB, TB etc.) that have not changed since the last backup
and therefore do not need to be backed up. This report shows only deduplication
jobs. The default Report On parameter for this report is Master Server
Figure 2-4 shows a sample view of Deduplication Size Savings Report.
64
OpsCenter reports
About Report Templates descriptions
Figure 2-4
Deduplication Size Savings Report (Historical)
The ranking report shows the number of bytes that have not changed within the
time frame and therefore do not have to be backed up due to deduplication. The
report groups the total number of bytes saved per host being backed up to show
the top five hosts in terms of deduplication savings. This report shows only
deduplication jobs. The default Report On parameter for this report is Master Server.
Figure 2-5 shows a sample view of Deduplication Size Savings Report.
65
OpsCenter reports
About Report Templates descriptions
Figure 2-5
Deduplication Size Savings Report (Ranking)
The following are the details that are associated with the Deduplication Size
Savings report:
Report Name
Deduplication Size Savings
Report Category
Deduplication
Where to Locate
Report > Report Templates > Backup > Deduplication >
Deduplication Size Savings.
Report Purpose
Historical trending report showing savings in storage due to
deduplication.
Supported products
Symantec NetBackup, Symantec PureDisk, and their
Appliances
Applicable View
Master Server, Client
Report Display
Historical, Ranking
66
OpsCenter reports
About Report Templates descriptions
Drill down report
Yes. Drill down reports can be viewed at following four levels
depending on the selected parameter value. Level 1: Client
Name, Level 2: Job Type, Level 3: Schedule/Level Type, Level
4: Policy Name
Can be scheduled
Yes
Supported formats
PDF, CSV, HTML, XML, TSV
Mapping with VBR report
All Reports > Standard Report > Backups > Deduplication >
Size Savings
You can edit the Deduplication Size Savings report to show or hide the columns
that you are interested in. All the columns are shown by default. You can also filter
the report to view reports of specific master servers. The following table shows the
filters for Deduplication Size Savings report and how you can use these filters
to view specific data in the report.
Filter
Column
View
Description
Select a view to show data for the selected view in the report. By
default All My Views is selected.
Master
Server
Master
Server
Media
Server
Media Server Select one or more media servers to view data for the selected
media servers in the report. All media servers that are added to
the OpsCenter console are shown in the Value dropdown list.
Client
Client Name
Client OS
Select one or more master servers to view data for the clients
that are backed up by the selected master servers in the report.
All master servers that are added to the OpsCenter console are
shown in the Value drop-down list .
Select one or more clients to view data for the selected clients in
the report. All clients that are protected by the master servers in
the OpsCenter console are listed.
Select one or more client OS to view data for the selected client
OS in the report.
67
OpsCenter reports
About Report Templates descriptions
Filter
Column
Description
Policy
Policy Name
Select one or more policy names to view data for the selected
policies.
Policy Type
Policy
Keyword
Select one or more policy types to view data for the selected
policy types.
Select one or more policy keyword to view data for the policies
Policy Data
having the selected keyword.
Classification
Name
Select one or more policy data classification names like Gold,
Silver, Bronze etc. to view data for the policies having the selected
data classiciation names.
Schedule Schedule/Level Select one or more schedule or level types to view the data for
Type
the configured schedules.
Job
Schedule
Name
Select one or more schedule names to view data for the selected
schedule names.
Job Type
Select one or more job types as Archive, Backup, or Restore to
view data for the selected job types.
Product Type
Select one or more backup products to view data for the selected
Job Transport
products.
Type
Select one or more transport types like FT, LAN, or Unknown to
Job Status
view data for the jobs that have the selected transport type.
Select one or more job status like Failed, Successful etc. to view
data for the selected job status.
Example of filter usage: You may run the Duplication Size Savings report for a
specific client to view details for the specific clients
The following report enhancements have been made for the Duplication Size Savings
report:
■
■
Drill down reports for following four levels have been added.
■
Level 1: Client Name
■
Level 2: Job Type
■
Level 3: Schedule/Level Type
■
Level 4: Policy Name
The report now shows trendlines with customized average periods with option:
Show trendline with moving average period of 3. The value can be 1, 2, 3, 7,
14, or 30. The default value is 3. Example: 3 displays a trendline that, at each
68
OpsCenter reports
About Report Templates descriptions
interval, shows the average of the current data point and the two previous data
points.
■
The unit Years has been added for Relative Timeframe selection. You can now
view data for the last x years.
■
The option Next has been removed from the drop-down menu for Relative
Timeframe. You now cannot enter a relative timeframe like Next 2 weeks. This
is because the report does not support any futuristic data.
■
The following options have been removed from TimeFrameGroupBy selection:
■
Days of week Average
■
Days of week total
■
Hours of day Average
■
Hours of day Total
■
Minutes
■
Month of year Average
■
Month of year total
■
Quarter of year Average
■
Quarter of year total
The following filter enhancements have been made for the Duplication Size Savings
report:
■
New columns Job Status (Complete Only) and Job Status(Complete and Partial
Only) are added to the Report On parameter.
■
UNKNOWN has been added as a value for Policy Type column in the Policy
filter. You can now filter report data for policy types that are UNKNOWN.
■
Job types which are not applicable for this report are removed from the filter.
The supported job types are Backup, Archive, Restore, Catalog Backup, Backup
from Snapshot, Snapshot, Duplicate, and Replication.
■
The default selected value for Job Type column is changed to Backup.
■
The default unit for Y1 axis is now GB.
■
Value SAN is removed from the Job Transport Type filter.
Known Issues:
■
Selecting Reporton Storage Unit name in OpsCenter does not result in any
data for Symantec PureDisk because Storage Unit is not present in PureDisk
.In VBR, jobs data collected from PureDisk puts the storage unit name incorrectly
as “SPA”.
69
OpsCenter reports
About Report Templates descriptions
■
As compared to VBR, the unit of data for Y axis/Y1 axis is one unit lower. For
example: Unit GB in VBR matches up with unit MB in OpsCenter. OpsCenter
shows the correct data.
Variance > Throughput Variance
This report shows client or policy level details on backup job throughput variations
between last full backup and recent averages.
Figure 2-6 shows a sample view of Throughput Variance Report.
Figure 2-6
Throughput Variance Report
The following are the details that are associated with the Throughput Variance
report:
Report Name
Throughput Variance
Report Category
Backup
Where to Locate
All Reports > Report Templates > Backup > Job Activity >
Variance > Throughput Variance report.
Report Purpose
Client/Policy level detail on backup job throughput variations
between last full backup and recent averages.
70
OpsCenter reports
About Report Templates descriptions
Supported products
Symantec NetBackup, Symantec NetBackup Master
Appliance, Symantec Backup Exec, Symantec NetBackup
PureDisk
Applicable View
Master Server, Client
Report Display
Tabular
Drill down report
Yes. See Client Backup Details.
Can be scheduled
Yes
Supported formats
PDF, CSV, TSV, XML, HTML
Mapping with NOM report
All Reports > Standard Reports > Jobs > Throughput
Variance
You can edit the Throughput Variance report to show or hide the columns that
you are interested in. All the columns are shown by default. You can also filter the
report to view reports of specific master servers. The following table shows the
filters for Throughput Variance report and how you can use these filters to view
specific data in the report.
Filter
Column
View
Master
Server
Description
Select a view to show data for the selected view in the report. By
default All My Views is selected.
Master
Server
Percentage Percentage
Select one or more master servers to view data for the clients
that are backed up by the selected master servers in the report.
All master servers that are added to the OpsCenter console are
shown in the Value drop-down list .
Select an appropriate value of variance percentage. By default,
all the variance percentages that are greater than 1 are displayed
in the Variance (%) column in the report.
Example of filter usage: You may run the Throughput Variance report for a specific
master server to view details only for the specific master server.
The following report enhancements have been made for the Job Duration report:
■
The unit Years has been added for Relative Timeframe selection.
You can now view data for the last x years.
■
The default Relative Timeframe for this report was 28 days now it is changes
to Previous 14 days.
71
OpsCenter reports
About Report Templates descriptions
Job Activity > Variance > File Count Variance report
You can view the detailed reports for NetBackup job activity statistics including file,
job, size, Clients, and job duration.
From Job Activity > Varience you can view the reports on NetBackup operational
ranges to identify statistical variances in backup sizes, throughputs, duration, and
file counts.
The Job Activity > Variance > File Count Variance report lets you investigate why
a particular full backup is different than usual. For example, a file server backup is
successful, but contains fewer files than usual for a full backup.
The report shows NetBackup jobs with significant differences in file counts from
the average count for a master server, policy, and schedule.
If any variation calculation is greater than the selected value of variance when the
report is run, the server, client, policy, and schedule type combination is shown with
the actual file count variation. The table provides the percent variance (in file counts)
for each good job from the average for that server, policy, and schedule.
The Client Name column of the report provides a drilldown link to back up job
details for the specified time frame.
Job Activity > Variance > Backup Duration Variance report
This report provides an indication of how backup time varies from the average
backup time. You can detect any anomalies if the variation is too high.
This report calculates the backup time variation of the last good backup with the
average backup time per client, policy, and schedule type. If any variation calculation
is greater than the selected value of variance when the report is run, the client,
policy, and schedule type combination is shown with the actual variation.
About client jobs for selected time frame report
This drilldown report from the Client Name column provides detailed job information
for the client for the selected time frame.
This drilldown report uses the run time parameters that are passed from the main
report.
Job Activity > Variance > Backup Job Size Variance report
This report provides an indication of how a backup size varies from the average
size. You can detect any anomalies if the variation is too high.
This report calculates the backup size variation of the last good backup with the
average backup size per a client, policy, and schedule type. If any variation
72
OpsCenter reports
About Report Templates descriptions
calculation is greater than the selected value of variance when the report is run,
the client, policy and schedule type combination is shown with the actual variation.
Size variance is calculated using the following formula: (the last backup size - the
average backup size) / the average backup size x 100.
Consider the following points before running a Backup Job Size Variance report:
■
This report considers only full schedules.
■
This report does not consider deduplication jobs.
■
This report does not consider failed jobs. The report considers jobs with status
code like 0, 1 etc.
■
If you ran multiple jobs for the same client in the given time frame like 10 jobs
per the master server, client, policy, and schedule combination then the report
calculates the difference between the last job and the average of the remaining
9 jobs.
■
In case of multi-stream jobs, the report considers each stream as a different
job.
The Client Name column of the report provides a drilldown link to back up job
details for the specified time frame.
Figure 2-7 shows a sample view of the Backup Job Size Variance report.
Figure 2-7
Backup Job Size Variance report
The following are the details that are associated with the Backup Job Size
Variance report:
Report Name
Backup Job Size Variance
Report Category
Backup
73
OpsCenter reports
About Report Templates descriptions
Where to Locate
Report > Report Templates > Backup > Job Activity > Variance
> Backup Job Size Variance
Report Purpose
This report shows job size variance.
Supported products
Symantec Backup Exec, Symantec NetBackup, Symantec
NetBackup Master Appliance, Symantec NetBackup PureDisk
Applicable View
Master Server
Report Display
Tabular
Drill down report
Yes
See “Client backup jobs” on page 75.
Can be scheduled
Yes
Supported formats
PDF, CSV, TSV, XML, HTML
Mapping with NOM report
Reporting > All Reports > Standard Reports > Jobs > Backup
Job Size Variance
The following table lists the filters for Backup Job Size Variance report and how
you can use these filters to view specific data in the report.
Filter
Column
View
Master
Server
Description
Select a view to show data for the selected view in the report.
By default All My Views is selected.
Master Server Select one or more master servers to view data for the selected
master servers in the report. All master servers that are added
to the OpsCenter console are shown in the Value drop-down
list .
Percentage Percentage
Select an appropriate value of variance percentage. By default,
all the variance percentages that are greater than 1 are displayed
in the Variance (%) column in the report.
Example of filter usage: You may run the Backup Job Size Variance report for
a specific master server to view details only for the specific master server.
The following report enhancements have been made for the Backup Job Size
Variance report:
■
The unit Years has been added for Relative Timeframe selection.
You can now view data for the last x years.
74
OpsCenter reports
About Report Templates descriptions
■
The option Next has been removed from the drop-down menu for Relative
Timeframe. You now cannot enter a relative timeframe like Next 2 weeks. This
is because the report does not support any futuristic data.
Client backup jobs
The Client Backup Jobs report shows details of the jobs run for a selected client.
This tabular report shows information like Job ID, Policy Name, Schedule Name,
Status Code, Number of files, Throughput (KB/Sec) etc.
Figure 2-8 shows a sample view of the Client Backup Jobs report.
Figure 2-8
Client backup jobs report
The following are the details that are associated with the Client Backup Jobs
report:
Report Name
Client backup jobs
Report Category
Backup
Where to Locate
Report > Report Templates > Backup > Job Activity > Variance
> Backup Job Size Variance (drill down on Client Name)
> Client backup jobs
Report Purpose
This report shows details of the jobs run for a selected client.
75
OpsCenter reports
About Report Templates descriptions
Supported products
Symantec NetBackup, Symantec NetBackup Master Appliance
Applicable View
Master Server
Report Display
Tabular
Drill down report
No
Can be scheduled
Yes
Supported formats
PDF, CSV, TSV, XML, HTML
Mapping with NOM report
Reporting > All Reports > Standard Reports > Jobs > Backup
Job Size Variance > Client Backup Job
The following table shows the filters for Client Backup Jobs report and how you
can use these filters to view specific data in the report.
Filter
Column
View
Description
Select a view to show data for the selected view in the report. By
default All My Views is selected.
Master
Server
Master
Server
Select one or more master servers to view data for the virtual
clients that are backed up by the selected master servers in the
report. All master servers that are added to the OpsCenter console
are shown in the Value drop-down list .
Client
Client is
Active
Select Yes to view only Active Clients or No to view all the clients
in the report. By default, only Active Clients are shown in the
report.
Client Name
Select one or more clients to view data for the selected clients in
the report. All clients that are protected by the master servers in
the OpsCenter console are listed.
Example of filter usage: You may run the Client Backup Jobs report for more
than one master server. Select Master Server and then select specific master
servers to view details for all the clients.
The following report enhancements have been made for the Backup Job Size
Variance report:
■
The unit Years has been added for Relative Timeframe selection.
You can now view data for the last x years.
■
The option Next has been removed from the drop-down menu for Relative
Timeframe. You now cannot enter a relative timeframe like Next 2 weeks. This
is because the report does not support any futuristic data.
76
OpsCenter reports
About Report Templates descriptions
Job Activity > Backup Window > Job Count report
The Job Activity > Backup Window provides the reports on NetBackup backup
window statistics including the number of jobs, job size, and file counts.
The Job Activity > Backup Window > Job Count report shows the total number
backup jobs in the last two weeks shown by the hour of the day in which each job
ends. It also renders a configurable backup window to help quickly identify if a lot
of jobs end in or outside of what your backup window is or should be. The report
can help you see if there are any hours within the backup window that are under
used and whether any load balancing is appropriate.
Figure 2-9 shows a sample view of the Job Count report.
Figure 2-9
Job Count report
The following are the details that are associated with the Job Count report:
Report Name
Job Count
Report Category
Backup
Where to Locate
Report > Report Templates > Backup > Job Activity > Backup
Window > Job Count
Report Purpose
This report shows job count by hour of day in which job ends.
Supported products
Symantec Backup Exec, Symantec NetBackup, Symantec
NetBackup Master Appliance, Symantec NetBackup PureDisk
Applicable View
Master Server, Client
77
OpsCenter reports
About Report Templates descriptions
Report Display
Historical (Chart)
Drill down report
No
Can be scheduled
Yes
Supported formats
PDF, CSV, TSV, XML, HTML
Mapping with VBR report
Backups->Activity Planning->Backup Window->Job Count
Deviation from VBR
In OpsCenter, the Job Count report does not include the jobs
that were collected during the image data collection. These
jobs are called Sparse Jobs. This is unlike the Job Count
report in VBR, which also included Sparse Jobs. Because of
this change, you may notice a mismatch between the job count
on the OpsCenter report and the corresponding VBR report.
The following table shows the filters for Job Count report and how you can use
these filters to view specific data in the report.
Filter
Column
View
Description
Select a view to show data for the selected view in the report. By
default All My Views is selected.
Master
Server
Master
Server
Media
server
Media server Select one or more media servers to view data for the specific
media servers in the report. All media servers that are attached
to the master servers in the OpsCenter console are shown in the
Value drop-down list ..
Client
Client Name
Client OS
Select one or more master servers to view data for the selected
master servers in the report. All master servers that are added
to the OpsCenter console are shown in the Value drop-down list
.
Select one or more clients to view data for the selected clients in
the report. All clients that are protected by the master servers in
the OpsCenter console are listed.
Select one or more client OS to view data for the selected client
OS in the report.
78
OpsCenter reports
About Report Templates descriptions
Filter
Column
Policy
Policy Data
Select one or more policy data classification names to view data
Classification for the selected policy data classification names.
Name
Select one or more policy keyword to view data for the policies
Policy
having the selected keyword.
Keyword
Select one or more policy names to view data for the selected
Policy Name policies.
Policy Type
Description
Select one or more policy types to view data for the selected
policy types.
Schedule Schedule/Level Select one or more schedule types like CINC, Copy, Daily etc. to
Type
view data for the selected schedule types.
Job
Schedule
Name
Select one or more schedule names to view data for the selected
schedule names.
Job Status
Select one or more job status like Failed, Successful etc. to view
data for the selected job status.
Job Transport
Type
Select one or more transport types like FT, LAN, or Unknown to
view data for the jobs that have the selected transport type.
Job Type
Select one or more job types like Archive, Backup, Restore etc.
Product Type
to view data for the selected job types.
Select one or more backup products to view data for the selected
products.
Attempt
Attempt
Status
The Attempt Status column can have two values i.e. Attempt or
Job. When Job Count is calculated, the report considers all
attempts if Attempt is selected.
By default, Job is selected. Number of attempts are not
considered when Job is selected.
Example of filter usage: You may run the Job Count report for a specific policy
to view job counts for the specific policy. Further if you are interested in knowing
about the job counts for specific products, you can use the Job filter and under
Product Type column, select Backup Exec.
The following report enhancements have been made for the Job Count report:
■
The unit Years has been added for Relative Timeframe selection.
You can now view data for the last x years.
■
The option Next has been removed from the drop-down menu for Relative
Timeframe. You now cannot enter a relative timeframe like Next 2 weeks. This
is because the report does not support any futuristic data.
79
OpsCenter reports
About Report Templates descriptions
■
The following Report On options have been added under Backup Job
Attributes:
■
Job Status (Complete and Partial only)
■
Job Status (Complete only)
■
The Schedule Name column is added under the Schedule filter to filter data
by schedule name.
■
UNKNOWN has been added as a value for Policy Type column in the Policy
filter. You can now filter report data for policy types that are unknown. In earlier
versions of OpsCenter the unknown policy types were shown as blank. Now all
static columns like job type, schedule type, policy type, etc. are shown as
UNKNOWN like in VBR
Job Activity > Backup Window > Job Size report
This report shows the total gigabytes backed up in the last two weeks shown by
the hour of the day in which each job ends. It also renders a configurable backup
window to help quickly identify if a lot of jobs end in or outside of what your backup
window is or should be. The report can help you see if there are any hours within
the backup window that are under used and whether any load balancing is
appropriate.
Job Activity > Backup Window > File Count report
This report shows the number of files that were backed up for each hour of the day.
The height of each bar on the graph represents the total number of files that are
backed up for that hour across the entire date range selected. A user defined backup
window is drawn in yellow for example to compare with what hours the files should
have been backed up in. Bars outside of the yellow window represent the activity
that occurred outside of the backup window. The report can also be used to see
what hours may have capacity to add more backups while still remaining in the
backup window.
Job Activity > Job Count
This report provides as a summary of backup job counts across products, domains,
clients, policies and business level views. There are three display options to see
this report. Historical report view shows the total amount of time spent while doing
backups each day for the past two weeks.
Figure 2-10 shows a sample view of Job Count Report.
80
OpsCenter reports
About Report Templates descriptions
Figure 2-10
Job Count Report (Historical)
Ranking view shows the top ten environments by ranking total number of jobs
performed by each media server during the last two weeks.
Figure 2-11 shows a sample view of Job Count Report.
81
OpsCenter reports
About Report Templates descriptions
Figure 2-11
Job Count Report (Ranking)
Distribution view gives a breakdown of number of jobs performed by each media
server and provides information if any type of load balancing is beneficial.
Figure 2-12 shows a sample view of Job Count Report.
82
OpsCenter reports
About Report Templates descriptions
Figure 2-12
Job Count Report (Distribution)
You can view historical, ranking and distribution report types in tabular format.
Figure 2-13 shows a sample view of Job Count Report.
Figure 2-13
Job Count Report (Tabular)
83
OpsCenter reports
About Report Templates descriptions
The following are the details that are associated with the Job Count report:
Report Name
Job Count
Report Category
Backup
Where to Locate
All Reports > Report Templates > Backup > Job Activity > Job
Count report.
Report Purpose
Customizable report that shows total number of unique clients
backed up per day for the last two weeks, by each master
server.
Supported products
Symantec NetBackup, Symantec NetBackup Master
Appliance, Symantec Backup Exec, Symantec NetBackup
PureDisk
Applicable View
Master Server, Client
Report Display
Historical, Ranking, Distribution
Drill down report
Yes
You can view drill down reports for the selected parameter
value. These reports are available for NetBackup and
NetBackup appliance.
Example: For ranking type of report, you can view four levels
of drill down reports: Level 1: Client Name, Level 2: Job Type,
Level 3: Schedule/Level Type, Level 4: Policy Name
Can be scheduled
Yes
Supported formats
PDF, CSV, TSV, XML, HTML
Mapping with VBR report
All Reports > Standard Reports > Backup > Activity Planning
> Job Count
You can edit the Job Count report to show or hide the columns that you are
interested in. All the columns are shown by default. You can also filter the report
to view reports of specific master servers. The following table shows the filters for
Job Count report and how you can use these filters to view specific data in the
report.
Filter
View
Column
Description
Select a view to show data for the selected view in the report. By
default All My Views is selected.
84
OpsCenter reports
About Report Templates descriptions
Filter
Column
Description
Master
Server
Master
Server
Select one or more master servers to view data for the selected
master servers in the report. All master servers that are added
to the OpsCenter console are shown in the Value drop-down list
.
Media
Server
Media Server Select one or more media servers to view data for the selected
media servers in the report. All media servers that are added to
the OpsCenter console are shown in the Value dropdown list.
Client
Client Name
Client OS
Select one or more clients to view data for the selected clients in
the report. All clients that are protected by the master servers in
the OpsCenter console are listed.
Select one or more client OS to view data for the selected client
OS in the report.
Policy
Policy Name
Policy Type
Policy
Keyword
Select one or more policy names to view data for the selected
policies.
Select one or more policy types to view data for the selected
policy types.
Select one or more policy keyword to view data for the policies
Policy Data
having the selected keyword.
Classification
Name
Select one or more policy data classification names like Gold,
Silver, Bronze etc. to view data for the policies having the selected
data classiciation names.
Schedule/Level Select one or more schedule or level types to view the data for
Type
the configured schedules.
Job
Schedule
Name
Select one or more schedule names to view data for the selected
schedule names.
Job Type
Select one or more job types as Archive, Backup, or Restore to
view data for the selected job types.
Product Type
Select one or more backup products to view data for the selected
Job Transport
products.
Type
Select one or more transport types like FT, LAN, or Unknown to
Job Status
view data for the jobs that have the selected transport type.
Select one or more job status like Failed, Successful etc. to view
data for the selected job status.
Attempt
Attempt
Status
The Attempt Status filter can have two values i.e. Attempt or Job.
When Job Count is calculated, the report considers all attempts
if Attempt is selected.
85
OpsCenter reports
About Report Templates descriptions
Example of filter usage: To view a count of all job attempts in the Job Count report,
select Attempt Status as Attempt.
The following report enhancements have been made for the Job Count report:
■
The unit Years has been added for Relative Timeframe selection.
You can now view data for the last x years.
■
The option Next has been removed from the drop-down menu for Relative
Timeframe. You now cannot enter a relative timeframe like Next 2 weeks. This
is because the report does not support any futuristic data.
The following filter enhancements have been made for the Job Count report:
■
UNKNOWN has been added as a value for Policy Typecolumn in the Policy
filter. You can now filter report data for policy types that are UNKNOWN. In
earlier versions of OpsCenter the unknown policy types were shown as blank.
Now all static columns like job type, schedule type, policy type, etc. are shown
as UNKNOWN as in VBR.
■
Job Transport Type column has been added to the Job filter. For example,
you can view report data for jobs for which the Job transport type is FT or LAN.
Job Activity > Job Size
This report provides as a summary of backup job sizes across products, domains,
clients, policies and business level views. There are three display options to see
this report. Historical report view shows the total megabytes backed up each day
during the last two weeks.
Figure 2-14 shows a sample view of Job Size Report.
86
OpsCenter reports
About Report Templates descriptions
Figure 2-14
Job Size Report (Historical)
Ranking view shows the top 10 backup client ranking them on total megabytes
backed up for that client for last two weeks. The report provides an overview of top
consumers and whether those consumers are the expected ones.
Figure 2-15 shows a sample view of Job Size Report.
87
OpsCenter reports
About Report Templates descriptions
Figure 2-15
Job Size Report (Ranking)
Distribution view gives a breakdown view about total megabytes they have been
backed up in the last two week, for each media server. It shows a clear distribution
of amount of data going to all the media servers and provides inputs if any type of
load balancing is beneficial.
Figure 2-16 shows a sample view of Job SizeReport.
88
OpsCenter reports
About Report Templates descriptions
Figure 2-16
Job Size Report (Distribution)
You can view historical, ranking and distribution report types in tabular format.
Figure 2-17 shows a sample view of Job Size Report.
Figure 2-17
Job Size Report (Tabular)
89
OpsCenter reports
About Report Templates descriptions
The following are the details that are associated with the Job Size report:
Report Name
Job Size
Report Category
Backup
Where to Locate
All Reports > Report Templates> Backup > Job Activity >Job
Size report
Report Purpose
Customizable report about the total megabytes backed up for
each day during the last two weeks.
Supported products
Symantec NetBackup, Symantec NetBackup Master
Appliance, Symantec Backup Exec, Symantec NetBackup
PureDisk
Applicable View
Master Server, Client
Report Display
Historical, Ranking, Distribution
Drill down report
Yes. You can view drill down report for the selected parameter
value. These drill down reports are available for NetBackup
and NetBackup appliance.
Example: For ranking type of report, you can view three levels
of drill down reports: Level 1: Job Type, Level 2:
Schedule/Level Type, Level 3: Policy Name
Can be scheduled
Yes
Supported formats
PDF, CSV, TSV, XML, HTML
Mapping with VBR report
All Reports > Standard Reports > Backup > Activity Planning
> Job Size
You can edit the Job Size report to show or hide the columns that you are
interested in. All the columns are shown by default. You can also filter the report
to view reports of specific master servers. The following table shows the filters for
Job Size report and how you can use these filters to view specific data in the
report.
Filter
View
Column
Description
Select a view to show data for the selected view in the report. By
default All My Views is selected.
90
OpsCenter reports
About Report Templates descriptions
Filter
Column
Description
Master
Server
Master
Server
Select one or more master servers to view data for the virtual
clients that are backed up by the selected master servers in the
report. All master servers that are added to the OpsCenter console
are shown in the Value drop-down list .
Media
Server
Media Server Select one or more media servers to view data for the selected
media servers in the report. All media servers that are added to
the OpsCenter console are shown in the Value dropdown list.
Client
Client Name
Client OS
Select one or more clients to view data for the selected clients in
the report. All clients that are protected by the master servers in
the OpsCenter console are listed.
Select one or more client OS to view data for the selected client
OS in the report.
Policy
Policy Name
Policy Type
Policy
Keyword
Select one or more policy names to view data for the selected
policies.
Select one or more policy types to view data for the selected
policy types.
Select one or more policy keyword to view data for the policies
Policy Data
having the selected keyword.
Classification
Name
Select one or more policy data classification names like Gold,
Silver, Bronze etc. to view data for the policies having the selected
data classiciation names.
Schedule Schedule/Level Select one or more schedule or level types to view the data for
Type
the configured schedules.
Job
Schedule
Name
Select one or more schedule names to view data for the selected
schedule names.
Job Type
Select one or more job types as Archive, Backup, or Restore to
view data for the selected job types.
Product Type
Select one or more backup products to view data for the selected
Job Transport
products.
Type
Select one or more transport types like FT, LAN, or Unknown to
Job Status
view data for the jobs that have the selected transport type.
Select one or more job status like Failed, Successful etc. to view
data for the selected job status.
Example of filter usage: You may run the Job Size report for specific policy data
classification names to view details only for the specific policy classifications.
The following report enhancements have been made for the Job Size report:
91
OpsCenter reports
About Report Templates descriptions
■
The unit Years has been added for Relative Timeframe selection.
You can now view data for the last x years.
■
The option Next has been removed from the drop-down menu for Relative
Timeframe. You now cannot enter a relative timeframe like Next 2 weeks. This
is because the report does not support any futuristic data.
The following filter enhancements have been made for the Job Size report:
■
UNKNOWN has been added as a value for Policy Typecolumn in the Policy
filter. You can now filter report data for policy types that are UNKNOWN. In
earlier versions of OpsCenter the unknown policy types were shown as blank.
Now all static columns like job type, schedule type, policy type, etc. are shown
as UNKNOWN as in VBR.
■
Job Transport Type column has been added to the Job filter. For example,
you can view report data for jobs for which the Job transport type is FT or LAN.
■
The following options have been removed from TimeFrameGroupBy selection:
■
Days of week Average
■
Days of week Total
■
Hours of day Average
■
Hours of day Total
■
Minutes
■
Month of year Average
■
Month of year Total
■
Quarter of year Average
■
Quarter of year Total
Job Activity > Client Count
This report provides a summary of backup client counts across products, domains,
clients, policies and business level views. There are three display options to see
this report. Historical report view shows the total number of unique clients backed
up per day for the last two weeks, for each master server. It can help in highlighting
potential problems by showing any variations in the number of clients that needs
to be backed up and how many are actually getting backed up.
Figure 2-18 shows a sample view of Client Count Report.
92
OpsCenter reports
About Report Templates descriptions
Figure 2-18
Client Count Report (Historical)
Ranking view shows the top ten environments by listing the number of unique clients
that got backed up per each media server during the last two weeks.
Figure 2-19 shows a sample view of Client Count Report.
93
OpsCenter reports
About Report Templates descriptions
Figure 2-19
Client Count Report (Ranking)
Distribution view gives you breakdown by each master server of the number of
unique clients that got backed up in the last two weeks.
Figure 2-20 shows a sample view of Client Count Report.
Figure 2-20
Client Count Report (Distribution)
94
OpsCenter reports
About Report Templates descriptions
You can view historical, ranking and distribution report types in tabular format.
Figure 2-21 shows a sample view of Client Count Report.
Figure 2-21
Client Count Report (Tabular)
The following are the details that are associated with the Client Count report:
Report Name
Client Count
Report Category
Backup
Where to Locate
All Reports > Report Templates > Backup > Job Activity >
Client Count report.
Report Purpose
Customizable report that shows total number of unique clients
backed up per day during last two weeks, by each master
server.
Supported products
Symantec NetBackup, Symantec NetBackup Master
Appliance, Symantec Backup Exec, Symantec NetBackup
PureDisk
Applicable View
Master Server, Client
Report Display
Historical, Ranking, Distribution
95
OpsCenter reports
About Report Templates descriptions
Drill down report
Yes
You can view drill down reports for the selected parameter
value. These reports are available for NetBackup and
NetBackup appliance.
Example: For ranking type of report, you can view four levels
of drill down reports: Level 1: Client Name, Level 2: Job Type,
Level 3: Schedule/Level Type, Level 4: Policy Name
Can be scheduled
Yes
Supported formats
PDF, CSV, TSV, XML, HTML
Mapping with VBR report
All Reports > Standard Reports > Backup > Activity Planning
> Client Count
You can edit the Client Count report to show or hide the columns that you are
interested in. All the columns are shown by default. You can also filter the report
to view reports of specific master servers. The following table shows the filters for
Client Count report and how you can use these filters to view specific data in the
report.
Filter
Column
View
Description
Select a view to show data for the selected view in the report. By
default All My Views is selected.
Master
Server
Master
Server
Media
Server
Media Server Select one or more media servers to view data for the selected
media servers in the report. All media servers that are added to
the OpsCenter console are shown in the Value dropdown list.
Client
Client Name
Client OS
Select one or more master servers to view data for the virtual
clients that are backed up by the selected master servers in the
report. All master servers that are added to the OpsCenter console
are shown in the Value drop-down list .
Select one or more clients to view data for the selected clients in
the report. All clients that are protected by the master servers in
the OpsCenter console are listed.
Select one or more client OS to view data for the selected client
OS in the report.
96
OpsCenter reports
About Report Templates descriptions
Filter
Column
Description
Policy
Policy Name
Select one or more policy names to view data for the selected
policies.
Policy Type
Policy
Keyword
Select one or more policy types to view data for the selected
policy types.
Select one or more policy keyword to view data for the policies
Policy Data
having the selected keyword.
Classification
Name
Select one or more policy data classification names like Gold,
Silver, Bronze etc. to view data for the policies having the selected
data classiciation names.
Schedule Schedule/Level Select one or more schedule or level types to view the data for
Type
the configured schedules.
Job
Schedule
Name
Select one or more schedule names to view data for the selected
schedule names.
Job Type
Select one or more job types as Archive, Backup, or Restore to
view data for the selected job types.
Product Type
Select one or more backup products to view data for the selected
Job Transport
products.
Type
Select one or more transport types like FT, LAN, or Unknown to
Job Status
view data for the jobs that have the selected transport type.
Select one or more job status like Failed, Successful etc. to view
data for the selected job status.
Example of filter usage: You may run the Client Count report for specific policy
data classification names to view details only for the specific policy classifications.
The following report enhancements have been made for the Client Count report:
■
The unit Years has been added for Relative Timeframe selection.
You can now view data for the last x years.
■
The option Next has been removed from the drop-down menu for Relative
Timeframe. You now cannot enter a relative timeframe like Next 2 weeks. This
is because the report does not support any futuristic data.
The following filter enhancements have been made for the Client Count report:
■
UNKNOWN has been added as a value for Policy Typecolumn in the Policy
filter. You can now filter report data for policy types that are UNKNOWN. In
earlier versions of OpsCenter the unknown policy types were shown as blank.
Now all static columns like job type, schedule type, policy type, etc. are shown
as UNKNOWN as in VBR.
97
OpsCenter reports
About Report Templates descriptions
■
The following options have been removed from TimeFrameGroupBy selection:
■
Days of week Average
■
Days of week Total
■
Hours of day Average
■
Hours of day Total
■
Minutes
■
Month of year Average
■
Month of year Total
■
Quarter of year Average
■
Quarter of year Total
Job Activity > Job Duration
This report provides a summary of backup job durations across products, domains,
clients, policies and business level views. It shows you the top ten clients ranked
by the total amount of time consumed for the backup during last two weeks.
Figure 2-22 shows a sample view of Job Duration Report.
98
OpsCenter reports
About Report Templates descriptions
Figure 2-22
Job Duration Report
In addition, you can view the report in tabular format.
Figure 2-23 shows a sample view of Job Duration Report.
99
OpsCenter reports
About Report Templates descriptions
Figure 2-23
Job Duration Report (Tabular)
The following are the details that are associated with the Job Duration report:
Report Name
Job Duration
Report Category
Backup
Where to Locate
All Reports > Report Templates > Backup > Job Activity > Job
Duration report.
Report Purpose
Customizable report that shows top ten clients ranked by the
total amount of time for the backup during the last two weeks.
Supported products
Symantec NetBackup, Symantec NetBackup Master
Appliance, Symantec Backup Exec, Symantec NetBackup
PureDisk
Applicable View
Master Server, Client
Report Display
Ranking
Drill down report
Yes. You can view drill down reports for the selected
parameter value. These reports are available for NetBackup
and NetBackup appliance.
Example: For ranking type of report, you can view four levels
of drill down reports: Level 1: Job Type, Level 2:
Schedule/Level Type, Level 3: Policy Name
Can be scheduled
Yes
100
OpsCenter reports
About Report Templates descriptions
Supported formats
PDF, CSV, TSV, XML, HTML
Mapping with VBR report
All Reports > Standard Reports > Backup > Activity Planning
> Job Duration
You can edit the Job Duration report to show or hide the columns that you are
interested in. All the columns are shown by default. You can also filter the report
to view reports of specific master servers. The following table shows the filters for
Job Duration report and how you can use these filters to view specific data in the
report.
Filter
Column
View
Description
Select a view to show data for the selected view in the report. By
default All My Views is selected.
Master
Server
Master
Server
Media
Server
Media Server Select one or more media servers to view data for the selected
media servers in the report. All media servers that are added to
the OpsCenter console are shown in the Value dropdown list.
Client
Client Name
Client OS
Select one or more master servers to view data for the virtual
clients that are backed up by the selected master servers in the
report. All master servers that are added to the OpsCenter console
are shown in the Value drop-down list .
Select one or more clients to view data for the selected clients in
the report. All clients that are protected by the master servers in
the OpsCenter console are listed.
Select one or more client OS to view data for the selected client
OS in the report.
Policy
Policy Name
Policy Type
Policy
Keyword
Select one or more policy names to view data for the selected
policies.
Select one or more policy types to view data for the selected
policy types.
Select one or more policy keyword to view data for the policies
Policy Data
having the selected keyword.
Classification
Name
Select one or more policy data classification names like Gold,
Silver, Bronze etc. to view data for the policies having the selected
data classiciation names.
Schedule/Level Select one or more schedule or level types to view the data for
Type
the configured schedules.
Schedule
Name
Select one or more schedule names to view data for the selected
schedule names.
101
OpsCenter reports
About Report Templates descriptions
Filter
Column
Description
Job
Job Type
Select one or more job types as Archive, Backup, or Restore to
view data for the selected job types.
Product Type
Select one or more backup products to view data for the selected
Job Transport
products.
Type
Select one or more transport types like FT, LAN, or Unknown to
Job Status
view data for the jobs that have the selected transport type.
Select one or more job status like Failed, Successful etc. to view
data for the selected job status.
Example of filter usage: You may run the Job Duration report for specific policy
data classification names to view details only for the specific policy classifications.
The following report enhancements have been made for the Job Duration report:
■
The unit Years has been added for Relative Timeframe selection.
You can now view data for the last x years.
■
The option Next has been removed from the drop-down menu for Relative
Timeframe. You now cannot enter a relative timeframe like Next 2 weeks. This
is because the report does not support any futuristic data.
The following filter enhancements have been made for the Job Duration report:
■
UNKNOWN has been added as a value for Policy Typecolumn in the Policy
filter. You can now filter report data for policy types that are UNKNOWN. In
earlier versions of OpsCenter the unknown policy types were shown as blank.
Now all static columns like job type, schedule type, policy type, etc. are shown
as UNKNOWN as in VBR.
■
Job Transport Type column has been added to the Job filter. For example,
you can view report data for jobs for which the Job transport type is FT or LAN.
Job Activity > File Count
This report provides the summary of backed up file counts across products, domains,
clients, policies and business level views. There are three display options to see
this report. Historical report view shows the total number of files that got backed up
for each day during the last two weeks for each master server.
Figure 2-24 shows a sample view of File Count Report.
102
OpsCenter reports
About Report Templates descriptions
Figure 2-24
File Count Report (Historical)
Ranking view shows the top ten backup clients ranking them on total numbers of
files that were backed up for them during the last two weeks.
Figure 2-25 shows a sample view of File Count Report.
103
OpsCenter reports
About Report Templates descriptions
Figure 2-25
File Count Report (Ranking)
Distribution view gives a breakdown for the number of files that got backed up in
the last two weeks, for each master server.
Figure 2-26 shows a sample view of File Count Report.
Figure 2-26
File Count Report (Distribution)
104
OpsCenter reports
About Report Templates descriptions
You can view historical, ranking and distribution report types in tabular format.
Figure 2-27 shows a sample view of File Count Report.
Figure 2-27
File Count Report (Tabular)
The following are the details that are associated with the File Count report:
Report Name
File Count
Report Category
Backup
Where to Locate
Report > Report Templates > Backup > Job Activity > File
Count
Report Purpose
Customizable report showing the total number of files that are
backed up each day during the last two weeks.
Supported products
Symantec NetBackup, Symantec NetBackup Master
Appliance, Symantec Backup Exec, Symantec NetBackup
PureDisk
Applicable View
Master Server, Client
Report Display
Historical, Ranking, Distribution
105
OpsCenter reports
About Report Templates descriptions
Drill down report
Yes
You can view drill down reports for the selected parameter
value. These reports are available for NetBackup and
NetBackup appliance.
Example: For ranking type of report, you can view three levels
of drill down reports: Level 1: Job Type, Level 2:
Schedule/Level Type, Level 3: Policy Name
Can be scheduled
Yes
Supported formats
PDF, CSV, TSV, XML, HTML
Mapping with VBR report
All Reports > Standard Reports> Backup >Activity Planning
> File Count
You can edit the File Count report to show or hide the columns that you are
interested in. All the columns are shown by default. You can also filter the report
to view reports of specific master servers. The following table shows the filters for
File Count report and how you can use these filters to view specific data in the
report.
Filter
Column
View
Description
Select a view to show data for the selected view in the report. By
default All My Views is selected.
Master
Server
Master
Server
Media
Server
Media Server Select one or more media servers to view data for the selected
media servers in the report. All media servers that are added to
the OpsCenter console are shown in the Value dropdown list.
Client
Client Name
Client OS
Select one or more master servers to view data for the virtual
clients that are backed up by the selected master servers in the
report. All master servers that are added to the OpsCenter console
are shown in the Value drop-down list .
Select one or more clients to view data for the selected clients in
the report. All clients that are protected by the master servers in
the OpsCenter console are listed.
Select one or more client OS to view data for the selected client
OS in the report.
106
OpsCenter reports
About Report Templates descriptions
Filter
Column
Description
Policy
Policy Name
Select one or more policy names to view data for the selected
policies.
Policy Type
Policy
Keyword
Select one or more policy types to view data for the selected
policy types.
Select one or more policy keyword to view data for the policies
Policy Data
having the selected keyword.
Classification
Name
Select one or more policy data classification names like Gold,
Silver, Bronze etc. to view data for the policies having the selected
data classiciation names.
Schedule Schedule/Level Select one or more schedule or level types to view the data for
Type
the configured schedules.
Job
Schedule
Name
Select one or more schedule names to view data for the selected
schedule names.
Job Type
Select one or more job types as Archive, Backup, or Restore to
view data for the selected job types.
Product Type
Select one or more backup products to view data for the selected
Job Transport
products.
Type
Select one or more transport types like FT, LAN, or Unknown to
Job Status
view data for the jobs that have the selected transport type.
Select one or more job status like Failed, Successful etc. to view
data for the selected job status.
Example of filter usage: You may run the File Count report for specific policy
data classification names to view details only for the specific policy classifications.
The following report enhancements have been made for the File Count report:
■
The unit Years has been added for Relative Timeframe selection.
You can now view data for the last x years.
■
The option Next has been removed from the drop-down menu for Relative
Timeframe. You now cannot enter a relative timeframe like Next 2 weeks. This
is because the report does not support any futuristic data.
The following filter enhancements have been made for the File Count report:
■
UNKNOWN has been added as a value for Policy Typecolumn in the Policy
filter. You can now filter report data for policy types that are UNKNOWN. In
earlier versions of OpsCenter the unknown policy types were shown as blank.
Now all static columns like job type, schedule type, policy type, etc. are shown
as UNKNOWN as in VBR.
107
OpsCenter reports
About Report Templates descriptions
■
Job Transport Type column has been added to the Job filter. For example,
you can view report data for jobs for which the Job transport type is FT or LAN.
■
The following options have been removed from TimeFrameGroupBy selection:
■
Days of week Average
■
Days of week Total
■
Hours of day Average
■
Hours of day Total
■
Minutes
■
Month of year Average
■
Month of year Total
■
Quarter of year Average
■
Quarter of year Total
Job Browser > Tabular Backup Report
This section provides the reports on NetBackup job activity similar to the NetBackup
Activity Monitor.
You can view a detailed listing of all the backup activity performed for the specified
timeframe. The default timeframe is last two weeks. This report lets you view the
status for multiple job attempts (from Job Attempt Count and Status Code
columns). This report also lets you know the time it takes for backup or restore
operations to complete (from the Job Duration column). It thus helps you to quickly
identify details about the backup or restore jobs that take the maximum time.
You can also drill down from the Job Primary ID column in the report to know the
skip file details that are associated with the job. Only some jobs may have skipped
files associated with them. For jobs that do not have any skipped files, the drill-down
report is either blank or shows hyphens.
Figure 2-28 shows a sample view of the Tabular Backup Report.
108
OpsCenter reports
About Report Templates descriptions
Figure 2-28
Tabular Backup Report
The following are details associated with the Tabular Backup Report:
Report Name
Tabular Backup Report
Report Category
Backup
Where to Locate
Report > Report Templates > Backup > Job Browser > Tabular
Backup Report
Report Purpose
Customizable tabular report of all backup data (size, start time,
status code etc.) by client.
Supported products
NetBackup, NetBackup Appliance, Backup Exec, NetBackup
PureDisk
Applicable View
Master Server, Client
Report Display
Tabular
Drill down report
Skip File Details
See “Skip File Details” on page 113.
Can be scheduled
Yes
Supported export formats
CSV, HTML, PDF, XML, TSV
Mapping with VBR report
Backups > Job Browser > Scheduled Jobs > Tabular Backup
Report
109
OpsCenter reports
About Report Templates descriptions
You can edit the Tabular Backup Report to show or hide the columns that you are
interested in. All the columns are shown by default. You can also filter the report
to show activity for a limited sample set, such as one or more policies, master
servers, clients, views, product types, job status etc.
The following table shows the filters for Tabular Backup report and how you can
use these filters to view specific data in the report.
Filter
Column
View
Description
Select a view to show data for the selected view in the report.
By default All My Views is selected.
Master
Server
Master Server Select one or more master servers to view data for the selected
master servers in the report. All master servers that are added
to the OpsCenter console are shown in the Value drop-down
list .
Media
server
Media server
Select one or more media servers to view data for the specific
media servers in the report. All media servers that are attached
to the master servers in the OpsCenter console are shown in
the Value drop-down list ..
Client
Client Name
Select one or more clients to view data for the selected clients
in the report. All clients that are protected by the master servers
in the OpsCenter console are listed.
Client OS
Select one or more client OS to view data for the selected client
OS in the report.
Policy
Policy Data
Classification
Name
Select one or more policy data classification names like Gold,
Silver, Bronze etc. to view data for the policies having the
selected data classification names.
Policy
Keyword
Select one or more policy keyword to view data for the policies
having the selected keyword.
Policy Name
Select one or more policy names to view data for the selected
policies.
Policy Type
Select one or more policy types to view data for the selected
policy types.
Schedule Schedule/Level Select one or more schedule types like CINC, Copy, Daily etc.
Type
to view data for the selected schedule types.
Schedule
Name
Select one or more schedule names to view data for the selected
schedule names.
110
OpsCenter reports
About Report Templates descriptions
Filter
Column
Job
Job Status
Description
Select one or more Job Status like Failed, Missed, Partially
Successful etc. to view data for the selected job status in the
Job Transport
report.
Type
Select one or more transport types like FT, LAN, or Unknown to
Product Type
view data for the jobs that have the selected transport type.
Select one or more products like Backup Exec to view data for
the selected products.
Example of filter usage: You may run the Tabular Backup report for a specific
master server to view backup details only for the selected master server. The sample
report view that is shown above shows data for a specific master server.
Report
Enhancements
The following report enhancements have been made:
■
■
■
■
Each Job primary ID is now a link. You can drill down from the Job
Primary ID column to know the skipped file details for a job.
The report now displays the seconds in Job End Time, Job Start
Time, and Expiration Time columns like 9:40:37 A.M. Earlier the
report used to display the time in hours and minutes only like 9:40
A.M.
The report now shows data for all your views by default. All My Views
is the default view when you edit the report.
Fixed issues of data correctness and parity with VBR.
111
OpsCenter reports
About Report Templates descriptions
Additional
Columns
The following additional columns are shown in the report. These columns
are not displayed by default on the report. You need to edit the report to
manually add these columns and rerun the report.
■
■
■
■
■
■
Filter
Enhancements
Attempt Status
This column is added in OpsCenter 7.6. This column lets you know
the status of the attempt; whether it was successful or failed.
Product
This column shows the product that is associated with the job like
Symantec NetBackup, Symantec NetBackup Master Appliance.
Job Directory
Path that is backed up by a job.
Policy Keyword
Policy keyword that is associated with the job
Storage Unit Name
Name of the storage unit that is associated with the job
Attempt Start Time
Shows the start date and time for the specific job attempt. A job may
require multiple attempts or retries due to resources not being
available etc. Ensure that the report always shows the Attempt Start
Time column. In case you remove Attempt Start Time column, the
report may show duplicate records.
The following filter enhancements are listed:
■
■
■
The unit Years has been added for Relative Timeframe selection.
You can now view data for the last x years. You can also see the
Years tab on top-right corner of the Tabular Backup Report.
The option Next has been removed from the drop-down menu for
Relative Timeframe. You now cannot enter a relative timeframe like
Next 2 weeks.
The following columns have been removed for the Job filter:
■ Agent Server
■
■
■
Job State
UNKNOWN has been added as a value for Policy Type column in
the Policy filter. You can now filter report data for policy types that
are unknown. In earlier versions of OpsCenter the unknown policy
types were shown as blank. Now all static columns like job type,
schedule type, policy type, etc. are shown as unknown like in VBR.
Job Transport Type column has been added to the Job filter. For
example, you can view report data for jobs for which the Job transport
type is FT or LAN.
112
OpsCenter reports
About Report Templates descriptions
Skip File Details
In the Tabular Backup report, you can drill down from the Job Primary ID column
to know the skip file details that are associated with the job. Only some jobs may
have the skipped files that are associated with them. For the jobs that do not have
any skipped files, the drill-down report is either blank or shows hyphens.
Note: The Skip File Details report is also available when you click a Job Primary
ID in the Week at a Glance Details report .
Figure 2-29 shows a sample view of the skip file details report that is obtained by
clicking the Job Primary ID column in Tabular Backup Report.
Figure 2-29
Skip file details
The following are details associated with the Skip File Details report:
Report Name
Skip File Details
Report Category
Backup
Where to Locate
Report > Report Templates > Backup > Job Browser > Tabular
Backup Report (click the Job Primary ID link)
Report Purpose
Lists the skip file details for the selected job.
Supported products
NetBackup, NetBackup Appliance, Backup Exec, NetBackup
PureDisk
Applicable View
Master Server, Client
Report Display
Tabular
Drill down report
None
Can be scheduled
Yes
Supported formats
CSV, HTML, PDF, XML, TSV
113
OpsCenter reports
About Report Templates descriptions
Mapping with VBR report
Backups > Job Browser > Scheduled Jobs > Tabular Backup
Report > Skip File Details
You can edit the report to show or hide the columns that you are interested in. All
the columns are shown by default. You can also filter the report to show skipped
files for a specific job primary ID.
The following table shows the filter for Skip File Details report and how you can use
the filter to view specific data in the report.
Filter
Column
Description
Primary Job
Job Primary ID Select a job primary ID to view skipped file details for the
selected job primary ID.
Planning Activity > Capacity Planning > Forecasted Size report
Planning Activity provides reports on future NetBackup projected trends for storage
capacity needs, media consumption, job sizes, schedules, and counts.
Capacity Planning provides reports on historical NetBackup storage consumption
and projected future NetBackup storage needs.
The Planning Activity > Capacity Planning > Forecasted Size report shows the
supply vs. demand historically but also adds a forecast line for both supply and
demand that can show when in the future they may meet. The point that these two
lines intersect would be the date that new capacity (more disk or more backup
tapes) needs to be added. In the above example the supply is by far outgrowing
the demand, which would suggest that more capacity does not need to be
purchased.
The default first view of this report shows the entire backup environment but for
actual use it should be filtered to a specific tape library or disk pool since some
libraries or pools may be closer to full capacity than others.
The EMM Server column has been removed from the Media filter. The Master
Server filter can be used to view data for specific servers instead of the EMM Server
column.
Planning Activity > Capacity Planning > Historical Size report
This report shows the historical supply vs. demand. Supply is defined as all available
free space on all the tape media in the backup application. This number is calculated
by taking the average size of all full media of the same tape type. That average is
then used for the predicted size of all other tapes that are not full of the same type.
Use of the average is necessary since tapes do not have an exact capacity and
114
OpsCenter reports
About Report Templates descriptions
are written to until the end of tape mark. On the demand side this is a calculation
of all backup jobs for the time period. The idea for this report is that the difference
between the two lines is the extra capacity that was not needed. In an ideal
environment these lines match the blue line, for example, being slightly under the
line showing that all the space for backups is used. This report can sometimes be
referred to as the “just in time inventory” report after the business theory by the
same name.
The default is to show the total environment but for operational use it would need
to be filtered down to individual storage locations since some can be closer to 100%
capacity than others. This change is easily made by clicking Edit Report at the top
of the report.
The EMM Server column has been removed from the Media filter. The Master
Server filter can be used to view data for specific servers instead of the EMM Server
column.
Planning Activity > Forecast > Job Count report
The Forecast reports provide information on the future projected NetBackup job
sizes and job counts.
The Planning Activity > Forecast > Job Count report displays the total number of
backup jobs for each day in specified time frame. A linear regression forecast is
also performed to show you how many backups you can expect for the next three
days based on the current data.
Planning Activity > Forecast > Job Size
This report shows you the total number of backup jobs for each day in specified
time frame. A linear regression forecast is also performed to show you how many
backups you can expect for the next three days based on the current data.
Figure 2-30 shows a sample view of Job Size – Forecast Report.
115
OpsCenter reports
About Report Templates descriptions
Figure 2-30
Job Size – Forecast Report (Historical)
This report is also available in tabular format.
Figure 2-31 shows a sample view of Job Size – Forecast Report.
116
OpsCenter reports
About Report Templates descriptions
Figure 2-31
Job Size – Forecast Report (Tabular)
The following are the details that are associated with the Job Size – Forecast
report:
Report Name
Job Size – Forecast report
Report Category
Planning Activity
Where to Locate
Report > Report Templates > Backup > Planning Activity >
Forecast > Job Size – Forecast report.
Report Purpose
Provides forecast of future backup job sizes across products,
domains, clients, policies and business level views.
Supported products
Symantec NetBackup, Symantec NetBackup Master Appliance
Applicable View
Master Server, Client
Report Display
Historical
Drill down report
Yes. Drill down reports can be viewed at following five levels
for the selected parameter value. Level 1: Master Server,
Level 2: Client Name, Level 3: Job Type, Level 4:
Schedule/Level Type, Level 5: Policy Name
Can be scheduled
Yes
Supported formats
PDF, CSV, HTML, XML, TSV
117
OpsCenter reports
About Report Templates descriptions
Mapping with VBR report
All Reports > Standard Report > Backup > Activity Planning
> Forecast > Job Size – Forecast
You can edit the Job Size – Forecast report to show or hide the columns that
you are interested in. All the columns are shown by default. You can also filter the
report to view reports of specific master servers. The following table shows the
filters for Job Size – Forecast report and how you can use these filters to view
specific data in the report.
Filter
Column
View
Description
Select a view to show data for the selected view in the report. By
default All My Views is selected.
Master
Server
Master
Server
Media
Server
Media Server Select one or more media servers to view data for the selected
media servers in the report. All media servers that are added to
the OpsCenter console are shown in the Value dropdown list.
Client
Client Name
Client OS
Select one or more master servers to view data for the virtual
clients that are backed up by the selected master servers in the
report. All master servers that are added to the OpsCenter console
are shown in the Value drop-down list .
Select one or more clients to view data for the selected clients in
the report. All clients that are protected by the master servers in
the OpsCenter console are listed.
Select one or more client OS to view data for the selected client
OS in the report.
Policy
Policy Name
Policy Type
Policy
Keyword
Select one or more policy names to view data for the selected
policies.
Select one or more policy types to view data for the selected
policy types.
Select one or more policy keyword to view data for the policies
Policy Data
having the selected keyword.
Classification
Name
Select one or more policy data classification names like Gold,
Silver, Bronze etc. to view data for the policies having the selected
data classiciation names.
Schedule Schedule/Level Select one or more schedule or level types to view the data for
Type
the configured schedules.
Schedule
Name
Select one or more schedule names to view data for the selected
schedule names.
118
OpsCenter reports
About Report Templates descriptions
Filter
Column
Description
Job
Job Type
Select one or more job types as Archive, Backup, or Restore to
view data for the selected job types.
Product Type
Select one or more backup products to view data for the selected
Job Transport
products.
Type
Select one or more transport types like FT, LAN, or Unknown to
Job Status
view data for the jobs that have the selected transport type.
Select one or more job status like Failed, Successful etc. to view
data for the selected job status.
Example of filter usage: You may run the Job Size – Forecast report for a specific
client to view details for the specific clients.
The following report enhancements have been made for the Job Size – Forecast
report:
■
The option Next has been removed from the drop-down menu for Relative
Timeframe. You now cannot enter a relative timeframe like Next 2 weeks. This
is because the report does not support any futuristic data.
■
The unit Years has been added for Relative Timeframe selection. You can now
view data for the last X years. You can also select Year from the top-right corner
of the report.
■
Drill down reports for following five levels have been added in OpsCenter.
■
■
Level 1: Master Server
■
Level 2: Client Name
■
Level 3: Job Type
■
Level 4: Schedule/Level Type
■
Level 5: Policy Name
The following options have been removed from TimeFrameGroupBy selection:
■
Days of week Average
■
Days of week total
■
Hours of day Average
■
Hours of day Total
■
Minutes
■
Month of year Average
■
Month of year total
119
OpsCenter reports
About Report Templates descriptions
■
Quarter of year Average
■
Quarter of year total
The following filter enhancements have been made for the Job Size – Forecast
report:
■
New columns Job Status (Complete Only) and Job Status(Complete and Partial
Only) are added to the Report On parameter.
■
UNKNOWN has been added as a value for Policy Type column in the Policy
filter. You can now filter report data for policy types that are UNKNOWN.
■
The default unit for Y1 axis is now GB.
■
Value SAN is removed from the Job Transport Type filter.
Planning Activity > Scheduled Job > Scheduled Job report
Scheduled job provides reports on all future NetBackup scheduled operations to
plan workload capacity, backup windows, and compare against completed
operations.
The Planning Activity > Scheduled Job > Scheduled Job report is available in
Ranking Report view, which depicts how many jobs have been scheduled to run
in future. You can view the Scheduled Jobs per schedule, policy, master server, or
client.
Note: By default, the Scheduled Jobs report shows job count per policy. If you want
to view the job count for clients, schedules, or master servers, change the report
parameters.
There is more information available about how to change this report's parameters.
See “Changing the Planning Activity > Scheduled Job > Scheduled Job report
parameters” on page 120.
Changing the Planning Activity > Scheduled Job > Scheduled
Job report parameters
To change the report parameters
1
On the Scheduled Jobs report, click the Edit link.
2
On the Report Wizard, from the Report On drop-down list, select a Scheduled
Job attribute. For example: Client, Master Server, Policy, or Schedule Name.
3
Click Run.
120
OpsCenter reports
About Report Templates descriptions
Note: To view job count for a specific client, policy, master server, or schedule, click
Show Advanced Filters and select name of the client, policy, master server, or
schedule, for which you want to view job count.
There is more information about the Planning Activity > Scheduled Job > Scheduled
Job report.
See “Planning Activity > Scheduled Job > Scheduled Job report” on page 120.
Planning Activity > Scheduled Job > Job Count Scheduled Vs
Actual report
This historical report depicts how many jobs were scheduled to run in future and
how many jobs are run. The report essentially shows the comparison between
Scheduled (Future) Job Count and Actual Job Count.
Using this report you can determine whether the jobs that were scheduled to run
in future have been run on schedule.
Figure 2-32 shows a sample view of the Job Count Scheduled Vs Actual report.
121
OpsCenter reports
About Report Templates descriptions
Figure 2-32
Job Count Scheduled Vs Actual report
The following are details associated with the Job Count Scheduled Vs Actual report:
Report Name
Job Count Scheduled Vs Actual report
Report Category
Backup
Where to Locate
Report > Report Templates > Backup > Planning Activity >
Scheduled Job > Job Count Scheduled Vs Actual
Report Purpose
This historical report compares actual and scheduled job
counts. This report is valid for NetBackup and NetBackup
Appliance.
122
OpsCenter reports
About Report Templates descriptions
Supported products
NetBackup, NetBackup Appliance
Applicable View
Master Server
Report Display
Historical
Drill down report
None
Can be scheduled
Yes
Supported formats
PDF, CSV, TSV, XML, HTML
Mapping with VBR report
Backups > Activity Planning > Scheduled Jobs > Job Count
- Scheduled Vs Actual
You can view comparison between actual and scheduled job count for a specific
client, policy, master server, or schedule by using filters. The following table shows
the filters for Job Count Scheduled Vs Actual report and how you can use these
filters to view specific data in the report.
Filter
Column
View
Description
Select a view to show data for the selected view in the report.
By default All My Views is selected.
Master
Server
Master Server Select one or more master servers to view data for the selected
master servers in the report. All master servers that are added
to the OpsCenter console are shown in the Value drop-down
list .
Client
Client Name
Select one or more clients to view data for the selected clients
in the report. All clients that are protected by the master servers
in the OpsCenter console are listed.
Policy
Policy Name
Select one or more policy names to view data for the selected
policies.
Schedule Schedule
Name
Select one or more schedule names to view data for the selected
schedule names.
Scheduled Exclude
Job
Manual Jobs
By default the Actual Job Count includes manual jobs, which
were initiated manually. You can exclude manual jobs from the
actual job count, and view only the jobs that are of execution
type Scheduled. To exclude manual jobs in the report, select
Yes.
Example of filter usage: By default the Actual Job Count includes manual jobs,
which were initiated manually by the NetBackup admin. There is more information
available about how to exclude manual jobs from the actual job count.
123
OpsCenter reports
About Report Templates descriptions
See “Excluding manual jobs from the actual jobs in the Job Count Scheduled Vs
Actual report” on page 124.
The following enhancements have been made for this report:
■
The unit Years has been added for Relative Timeframe selection. You can now
view data for the last x years. You can also see the Year tab on top-right corner
of the report.
■
The following units for Time Frame Grouping have been removed:
■
■
Day of week Average
■
Day of Week total
■
Hour of day Average
■
Hour of day total
■
Minutes
■
Month of year Average
■
Month of year Total
■
Quarter
■
Quarter of year Average
■
Quarter of year total
The default value for Exclude Manual Jobs column in Scheduled Job filter is
now changed to No. Earlier the default value for Exclude Manual Jobs was
Yes.
Excluding manual jobs from the actual jobs in the Job Count
Scheduled Vs Actual report
By default the Actual Job Count includes manual jobs, which were initiated manually
by NetBackup admin. To exclude manual jobs from the Actual Job count, and view
only those jobs that have execution type as Scheduled, do the following:
To exclude manual jobs from the actual jobs
1
On the Job Count-Scheduled Vs Actual report, click the Edit link.
2
On the Report Wizard, in the Filter Options section, select Yes from the
Exclude Manual Jobs drop-down list.
3
Click Run.
More information is available about the Planning Activity > Scheduled Job > Job
Count Scheduled Vs Actual report.
124
OpsCenter reports
About Report Templates descriptions
See “Planning Activity > Scheduled Job > Job Count Scheduled Vs Actual report”
on page 121.
Planning Activity > Scheduled Job > Job Count within Backup
Window report
This historical report depicts how many jobs were scheduled and how many jobs
have been run within the specified backup window. The report essentially shows
the comparison between Scheduled (Future) Job Count and Actual Job Count,
during the backup window.
Use this report to determine whether your backup windows are appropriate and are
properly used. Click Show Chart as Table link below the report to display report
details in a tabular format.
The Job Count within Backup Window report can show if jobs are finishing within
a specified backup window. This report is complemented with a graphical drawing
of the backup window for a quick analysis. You can quickly determine if all backup
activity is occurring within the defined window.
Furthermore, looking at window performance across broad timelines using intelligent
averaging is also necessary. Missing a window once or twice doesn’t necessarily
point to broader systematic problems and thus the averaging context needs to be
examined alongside the actual daily context.
The following are details associated with the Job Count within Backup Window
report:
Report Name
Job Count within Backup Window
Report Category
Backup
Where to Locate
Report > Report Templates > Backup > Planning Activity >
Scheduled Job > Job Count within Backup Window
Report Purpose
Comparison of actual vs scheduled NetBackup jobs across a
user-defined backup window against a 24-hour timeline.
Supported products
NetBackup, NetBackup Appliance
Applicable View
Master Server
Report Display
Historical
Drill down report
None
Can be scheduled
Yes
Supported formats
PDF, CSV, TSV, XML, HTML
125
OpsCenter reports
About Report Templates descriptions
Mapping with VBR report
Backups > Activity Planning > Scheduled Jobs > Job Count
within Backup Window
Figure 2-33 shows a sample view of Job Count within Backup Window report.
Figure 2-33
Job Count within Backup Window report
This report shows that backups occurred outside of the window shown in green
(18:00 - 09:00).
The following table shows the filters for Job Count within Backup Window report
and how you can use these filters to view specific data in the report.
Filter
View
Column
Description
Select a view to show data for the selected view in the report.
By default All My Views is selected.
126
OpsCenter reports
About Report Templates descriptions
Filter
Column
Description
Master
Server
Master Server Select one or more master servers to view data for the selected
master servers in the report. All master servers that are added
to the OpsCenter console are shown in the Value drop-down
list .
Client
Client Name
Select one or more clients to view data for the selected clients
in the report. All clients that are protected by the master servers
in the OpsCenter console are listed.
Policy
Policy Name
Select one or more policy names to view data for the selected
policies.
Schedule Schedule
Name
Select one or more schedule names to view data for the selected
schedule names.
Scheduled Exclude
Job
Manual Jobs
Select if you want to exclude manual jobs in the report. You can
select Yes or No.
Example of filter usage: You may run the Job Count Window report for a specific
master server to view job count details only for the selected master server.
The following enhancements have been made for this report:
■
The unit Years has been added for Relative Timeframe selection. You can now
view data for the last x years. You can also see the Years tab on top-right corner
of the report.
■
The default value for Exclude Manual Jobs column in Scheduled Job filter is
now changed to No. Earlier the default value for Exclude Manual Jobs was
Yes.
Planning Activity > Scheduled Jobs > Job Details Scheduled
Vs Actual report
This tabular report shows the comparison between Scheduled Job count and Actual
Job count for each of the combinations of clients, policies, and schedules, for each
day.
Note: By default, the Job Count Details-Scheduled Vs Actual report shows job count
per policy. If you want to view the job count per client or master server, change the
filter parameters.
Figure 2-34 shows a sample view of the Job Details Scheduled vs Actual report.
127
OpsCenter reports
About Report Templates descriptions
Figure 2-34
Job Details Scheduled Vs Actual report
The following are details associated with the Job Details Scheduled Vs Actual report:
Report Name
Job Details Scheduled Vs Actual report
Report Category
Backup
Where to Locate
Report > Report Templates > Backup > Planning Activity >
Scheduled Job > Job Details Scheduled Vs Actual
Report Purpose
This is a tabular report comparing scheduled to actual job
counts grouped by date, master server, client and policy. This
report is valid for NetBackup and NetBackup Appliance.
Supported products
NetBackup, NetBackup Appliance
Applicable View
Master Server
Report Display
Tabular
Drill down report
None
Can be scheduled
Yes
Supported export formats
PDF, CSV, TSV, XML, HTML
128
OpsCenter reports
About Report Templates descriptions
Mapping with VBR report
Backups > Activity Planning > Scheduled Jobs > Job Details
- Scheduled Vs Actual
The following table lists the filters for Job Details Scheduled Vs Actual report and
how you can use these filters to view specific data in the report.
Filter
Column
View
Description
Select a view to show data for the selected view in the report.
By default All My Views is selected.
Master
Server
Master Server Select one or more master servers to view data for the selected
master servers in the report. All master servers that are added
to the OpsCenter console are shown in the Value drop-down
list .
Client
Client Name
Select one or more clients to view data for the selected clients
in the report. All clients that are protected by the master servers
in the OpsCenter console are listed.
Policy
Policy Name
Select one or more policy names to view data for the selected
policies.
Schedule Schedule
Name
Select one or more schedule names to view data for the selected
schedule names.
Scheduled Exclude
Job
Manual Jobs
By default, the Actual Job Count includes manual jobs, which
were initiated manually. You can exclude manual jobs from the
actual job count, and view only the jobs that are of execution
type Scheduled. To exclude manual jobs in the report, select
Yes.
There is more information available about modifying the Planning Activity >
Scheduled Jobs > Job Details Scheduled Vs Actual report.
See “Modifying the Planning Activity > Scheduled Jobs > Job Details Scheduled
Vs Actual report” on page 130.
The unit Years has been added for Relative Timeframe selection. You can now
view data for the last x years. You can also see the Years tab on top-right corner
of the report.
129
OpsCenter reports
About Report Templates descriptions
Modifying the Planning Activity > Scheduled Jobs > Job Details
Scheduled Vs Actual report
Note: By default, the Job Count Details-Scheduled Vs Actual report shows job count
per policy. If you want to view the job count per client or master server, change the
filter parameters.
To change the report parameters
1
On the Job Count Details-Scheduled Vs Actual report, click the Edit link.
2
On the Report Wizard, in the Define Viewable Columns section, select a
column name (Client or Master Server) from the Available Columns list.
3
Click >> option.
4
Click Run.
Note: To view job count for a specific client, policy, master server, or schedule, go
to the Filters section and select the name of the policy, master server, or schedule
for which you want to view job count.
By default the jobs that were run (Actual Job Count) include manual jobs, which do
not have any schedule time associated with them as they are initiated manually.
You can exclude manual jobs from the actual job count, and view only the jobs that
are of execution type Scheduled.
To exclude manual jobs from the actual jobs
1
On the Job Count Details-Scheduled Vs Actual report, click the Edit link.
2
On the Report Wizard, in the Filter Options section, select Yes from the
Exclude Manual Jobs drop-down list.
3
Click Run.
The Job Count Details-Scheduled Vs Actual report shows comparison between
Scheduled Job count and Actual Job count. The Actual Job count includes Manual
Jobs.
There is more information available about the Planning Activity > Scheduled Jobs
> Job Details Scheduled Vs Actual report.
See “Planning Activity > Scheduled Jobs > Job Details Scheduled Vs Actual report”
on page 127.
130
OpsCenter reports
About Report Templates descriptions
Planning Activity > Scheduled Job > All Jobs report
This canned report shows jobs in a tabular form, which include the following:
Manual Jobs
These jobs are initiated manually, by NetBackup admin at his or
her discretion. Therefore, these jobs do not have schedule time
associated with them.
Note: While generating the Job Count-Scheduled Vs Actual report,
you have an option to exclude the manual jobs from the actual job
count and show only those jobs that are of execution type
Scheduled.
See “Planning Activity > Scheduled Job > Job Count Scheduled
Vs Actual report” on page 121.
Scheduled Jobs
These jobs are scheduled to run in future. Each Scheduled Job
information comprises a client, policy, schedule, and schedule time.
OpsCenter stores this information historically. Each Scheduled Job
when run on the specified schedule time becomes an actual job of
execution type Scheduled. Thus, a Scheduled Job has a
corresponding actual job entry in OpsCenter database. This
particular Scheduled Job can be identified by the unique
combination of client, policy, schedule, and schedule time. You can
compare the schedule time of this Scheduled Job with the
corresponding Job Start Time to determine whether that job was
run on scheduled time or not.
Planning Activity > Stored Backup Images > Valid Backup
Images report
Stored Backup Images provide reports on NetBackup backup, duplicate, expired,
unexpired images and their sizes.
The Valid Backup Images report shows unexpired backup images across products,
domains, clients, policies, and business level views. This report is valid only for
NetBackup. This report is available in Ranking and Distribution views.
The unit Years has been added for Relative Timeframe selection. You can now
view data for the last x years. You can also see the Years tab on top-right corner
of the Tabular Backup report.
The option Next has been removed from the drop-down menu for Relative
Timeframe. You now cannot enter a relative timeframe like Next 2 weeks.
The following units for Time Frame Grouping have been removed:
■
Day of week Average
■
Day of Week total
131
OpsCenter reports
About Report Templates descriptions
■
Hour of day Average
■
Hour of day total
■
Minutes
■
Month of year Average
■
Month of year Total
■
Quarter
■
Quarter of year Average
■
Quarter of year total
The default Report On parameter is None. Earlier it was Master Server.
UNKNOWN has been added as a value for Policy Type column in the Policy filter.
You can now filter report data for policy types that are UNKNOWN. In earlier versions
of OpsCenter the unknown policy types were shown as blank. Now all static columns
like job type, schedule type, policy type, etc. are shown as UNKNOWN like in VBR.
The following values for Job Type have been removed:
■
Automatic Discovery and Protection
■
Cleaning
■
DB Recover
■
DQTS
■
Erase
■
Generic
■
Image Cleanup
■
Import
■
Inventory
■
Label
■
LiveUpdate
■
Media Contents
■
Migration
■
None
■
Reclamation
■
Replication
■
Report
132
OpsCenter reports
About Report Templates descriptions
■
Restore
■
Retention
■
Retrieve
■
Storage Pool Management
■
Tape Eject
■
Tape Formatting
■
Tape Request
■
Task Last
■
Test Run
■
Undefined
■
Utility
■
Vault
■
Verify
The default value "All" for Job Type is not there now. The default-selected value is
Backup.
Add Scheduled Job filter. You can filter on the basis of Schedule Name or
Schedule/Level Type.
The default unit for Y axis is now GB. Earlier it was MB.
The following option has been added:
Show trendline with moving average period of 3. The value can be 1, 2, 3, 7, 14,
or 30.
The Distrbution and ranking view is part of another report in OpsCenter "Valid
Backup Images"
ImageExpirationTime with value NULL should also be considered as in VBR.
Planning Activity > Stored Backup Images > Duplicate Copies
report
The axis on the left is for the height of the blue bars for example that tells the number
of duplicate backup copies that exist overall. The yellow line for example is the axis
on the right and it shows the percentage of backup images that are copies. This is
a particularly useful report for situations where you want to make certain there is
always more than 1 backup copy. If two copies of a backup exist, the blue bar would
be a height of 1 (since there is 1 extra copy) and the line would show .5 for 50%
since half of the backup images are copies. The same situation for 3 copies would
133
OpsCenter reports
About Report Templates descriptions
be a blue bar height of 2 and a yellow line percentage of .66 or 66%. In operational
use you can filter this report down to specific policies or the clients that you want
to ensure always have a 50% or greater yellow line so that more than 1 backup
copy exists.
Planning Activity > Stored Backup Images > Stored Backup
Images > Stored Backup Images on Media
This report shows you the total amount of data in gigabytes that was backed up
but has not expired yet for each of the days in the past two weeks. This report
shows results only for NetBackup and NetBackup Appliances. The report can now
also show trendlines with customized average periods.
Click Show Chart as Table link below the report to view tabular details.
You can also filter the report to show unexpired backed up data for a limited sample
set, such as one or more policies, clients, views, or job status. You can use
timeframe grouping filter. For example: If you want to view unexpired backup images
for the period between 1st Jan 2010 to 1st Feb 2010, in groups each of one week,
select 1 Week from the Group by drop-down list. On the report, you can see data
in four stacked bars, one per week. Using the Report On parameter, you can select
report grouping attribute from the drop-down list, which you want to view the report
for. For example: Backup Job Attributes, Backup Image Attributes etc.
The following are details associated with the Stored Backup Images on Media
report:
Report Name
Stored Backup Images on Media
Report Category
Backup
Where to Locate
Report > Report Templates > Backup > Planning Activity >
Stored Backup Images on Media
Report Purpose
Historical report of unexpired image sizes across products,
domains, clients, policies, and business level views.
Supported products
Symantec Backup Exec, NetBackup, NetBackup Master
Appliance, NetBackup PureDisk
Applicable View
Master Server
Report Display
Historical
Drill down report
None
Can be scheduled
Yes
Supported formats
PDF, CSV, TSV, XML, HTML
134
OpsCenter reports
About Report Templates descriptions
Mapping with VBR report
Backups > Activity Planning > Scheduled Jobs > Stored
Backup Images
Deviation from VBR
The data for this report from VBR and OpsCenter does not
match as OpsCenter points to expiration time from
Image_Copy table while VBR used expiration time from
Image_fragment table. This change was introduced in
OpsCenter 7.1 to correct the behavior of the report and also
improve the performance.
Figure 2-35 shows a sample view of the Stored Backup Images on Media report.
135
OpsCenter reports
About Report Templates descriptions
Figure 2-35
Stored Backup Images on Media report
The following table shows the filters for Stored Backup Image on Media report and
how you can use these filters to view specific data in the report.
Filter
View
Column
Description
Select a view to show data for the selected view in the report.
By default All My Views is selected.
136
OpsCenter reports
About Report Templates descriptions
Filter
Column
Master
Server
Master Server Select one or more master servers to view data for the selected
master servers in the report. All master servers that are added
to the OpsCenter console are shown in the Value drop-down
list .
Media
server
Media server
Select one or more media servers to view data for the specific
media servers in the report. All media servers that are attached
to the master servers in the OpsCenter console are shown in
the Value drop-down list ..
Client
Client Name
Select one or more clients to view data for the selected clients
in the report. All clients that are protected by the master servers
in the OpsCenter console are listed.
Client OS
Description
Select one or more client OS to view data for the selected client
OS in the report.
Policy
Policy Data
Classification
Name
Select one or more policy data classification names like Gold,
Silver, Bronze etc. to view data for the policies having the
selected data classification names.
Policy
Keyword
Select one or more policy keywords to view data for the policies
having the selected keyword.
Policy Name
Select one or more policy names to view data for the selected
policies.
Policy Type
Select one or more policy types to view data for the selected
policy types.
Schedule Schedule/Level Select one or more schedule types like Full, Incremental etc. to
Type
view data for the selected schedule types.
Schedule
Name
Job
Select one or more schedule names to view data for the selected
schedule names.
Job Status
Select one or more Job Status like Failed, Missed, Partially
Successful etc. to view data for the selected job status in the
Job Transport
report.
Type
Select one or more transport types like FT, LAN, or Unknown to
Job Type
view data for the jobs that have the selected transport type.
Product Type
Select one or more job types like Archive, Backup, Restore etc.
to view data for the selected job types.
Select one or more products like Backup Exec to view data for
the selected products.
137
OpsCenter reports
About Report Templates descriptions
Example of filter usage: You may run the Stored Backup Images on Media report
for a specific policy to view unexpired image sizes for the specific policy. Further if
you are interested in knowing about the unexpired image sizes for specific products,
you can use the Job filter and under Product Type column, select Backup Exec.
The following enhancements have been made in the Stored Backup Images on
Media report:
Report
Enhancements
The following report enhancements have been made:
■
■
The report now also shows trendlines with customized average
periods.
The following option has been added:
Show trendline with moving average period of 3. The value can
be 1, 2, 3, 7, 14, or 30. The default value is 3.
Select Show trendline with moving average checkbox and use the
drop-down list to specify the number of data points to factor into the
average. At each interval on the graph, the trendline shows a moving
average of the most recent data points. Example: 3 displays a
trendline that, at each interval, shows the average of the current data
point and the two previous data points.
Fixed issues of data correctness and parity with VBR.
Image Expiration time with value NULL is now considered in the
report.
138
OpsCenter reports
About Report Templates descriptions
Filter
Enhancements
139
OpsCenter reports
About Report Templates descriptions
The following filter enhancements are listed:
■
■
■
■
■
■
The unit Years has been added for Relative Timeframe selection.
You can now view data for the last x years. You can also select Year
from the top-right corner of the report.
The option Next has been removed from the drop-down menu for
Relative Timeframe. You now cannot enter a relative timeframe like
Next two weeks.
The following units for Time Frame Grouping have been removed:
■ Day of week Average
■
Day of Week total
■
Hour of day Average
■
Hour of day total
■
Minutes
■
Month of year Average
■
Month of year Total
■
Quarter
■
Quarter of year Average
■
Quarter of year total
The default Report On parameter is now None. Earlier it was Master
Server.
UNKNOWN has been added as a value for Policy Type column in
the Policy filter. You can now filter report data for the policy types
that are unknown. In earlier versions of OpsCenter the unknown
policy types were shown as blank. Now all static columns like job
type, schedule type, policy type, etc. are shown as UNKNOWN like
in VBR.
The following values for Job Type column have been removed for
the Jobs filter:
■ Automatic Discovery and Protection
■
Cleaning
■
DB Recover
■
DQTS
■
Erase
■
Generic
■
Image Cleanup
■
Import
■
Inventory
■
Label
■
LiveUpdate
■
Media Contents
■
Migration
■
None
140
OpsCenter reports
About Report Templates descriptions
■
■
■
■
Reclamation
■
Replication
■
Report
■
Restore
■
Retention
■
Retrieve
■
Storage Pool Management
■
Tape Eject
■
Tape Formatting
■
Tape Request
■
Task Last
■
Test Run
■
Undefined
■
Utility
■
Vault
■
Verify
The Job Type column is mandatory and the default-selected value
for Job Type column is Backup. Earlier the Job Type column was
not applied by default.
A new filter called Scheduled Jobs has been added. You can now
filter on the basis of Schedule Name or Schedule/Level Type.
The default unit for Y1 axis is now GB. Earlier it was MB.
The Distribution view and Ranking view for this report is part of Valid Backup Images.
Status & Success Rate > Status > Failed Job Count report
Status & Success Rate provides reports of both basic and advanced success and
failure rates across NetBackup operations in both per backup window and
week-at-a-glance views.
The Success Rate provides advanced reporting on the NetBackup job success
rates including the ability to filter out retry attempts and partially successful jobs for
both Full and Incremental job schedules.
The Failed Job Count report aggregates failed jobs and shows these across a
timeline. In reality, this report is the same as “all jobs” as no distinction on whether
the failed job was first or last one is made. It provides visualization of whether a
problematic trend exists. It can be reported on against any view or level within a
view along with any of the key backup infrastructure components (backup server,
media server) and attributes (policy, policy type, schedule, OS, product, transport
type). Filtering is available on all components and attributes. The primary use case
of the report is verification of whether actions taken to correct persistent failures
141
OpsCenter reports
About Report Templates descriptions
produce results and reversing trends. The report can now also show trendlines with
customized average periods.
Figure 2-36 shows a sample view of the Failed Job Count report.
Figure 2-36
Failed Job Count report
The following are details associated with the Failed Job Count report:
Report Name
Failed Job Count
Report Category
Backup
Where to Locate
Report > Report Templates > Backup > Status & Success
Rate > Status > Failed Job Count
Report Purpose
This report shows the failed job density over time.
Supported products
NetBackup, NetBackup Appliance, Backup Exec, NetBackup
PureDisk
Applicable View
Master Server, Client
Report Display
Historical
142
OpsCenter reports
About Report Templates descriptions
Drill down report
No
Can be scheduled
Yes
Supported export formats
CSV, HTML, PDF, XML, TSV
Mapping with VBR report
Backups > Status > Failed Job Count
The following table shows the filters for Failed Job Count report and how you can
use these filters to view specific data in the report.
Filter
Column
View
Description
Select a view to show data for the selected view in the report. By
default All My Views is selected.
Master
Server
Master
Server
Media
server
Media server Select one or more media servers to view data for the specific
media servers in the report. All media servers that are attached
to the master servers in the OpsCenter console are shown in the
Value drop-down list ..
Client
Client Name
Client OS
Select one or more master servers to view data for the selected
master servers in the report. All master servers that are added
to the OpsCenter console are shown in the Value drop-down list
.
Select one or more clients to view data for the selected clients in
the report. All clients that are protected by the master servers in
the OpsCenter console are listed.
Select one or more client OS to view data for the selected client
OS in the report.
Policy
Policy Data
Select one or more policy data classification names to view data
Classification for the selected policy data classification names.
Name
Select one or more policy keyword to view data for the policies
Policy
having the selected keyword.
Keyword
Select one or more policy names to view data for the selected
Policy Name policies.
Policy Type
Select one or more policy types to view data for the selected
policy types.
Schedule Schedule/Level Select one or more schedule types like CINC, Copy, Daily etc. to
Type
view data for the selected schedule types.
Schedule
Name
Select one or more schedule names to view data for the selected
schedule names.
143
OpsCenter reports
About Report Templates descriptions
Filter
Column
Description
Job
Job Transport Select one or more transport types like FT, LAN, or Unknown to
Type
view data for the jobs that have the selected transport type.
Job Type
By default, Backup jobs are shown in the report. You can select
one or more job types like Archive, Backup, Restore etc. to view
Product Type
data for the selected job types.
Select one or more backup products to view data for the selected
products.
Attempt
Attempt
Status
The Attempt Status filter can have two values i.e. Attempt or Job.
When Job Count is calculated, the report considers all attempts
if Attempt is selected.
By default, Job is selected. Number of attempts are not
considered when Job is selected.
Example of filter usage: To view a count of all job attempts in the Failed Job Count
report, select Attempt Status as Attempt.
The following report enhancements have been made for Failed Job Count report:
■
The unit Years has been added for Relative Timeframe selection.
You can now view data for the last x years.
■
The option Next has been removed from the drop-down menu for Relative
Timeframe. You now cannot enter a relative timeframe like Next 2 weeks. This
is because the report does not support any futuristic data.
■
The following options have been removed from Time Frame Group By selection:
■
■
Days of week Average
■
Days of week total
■
Hours of day Average
■
Hours of day Total
■
Minutes
■
Month of year Average
■
Month of year total
■
Quarter
■
Quarter of year Average
■
Quarter of year total
The following Report On options have been added under Backup Job Attributes:
144
OpsCenter reports
About Report Templates descriptions
■
Job Status (Complete and Partial only)
■
Job Status (Complete only)
■
The Schedule Name column is added under the Schedule filter to filter data by
schedule name.
■
The report now also shows trendlines with customized average periods.
The following option has been added:
Show trendline with moving average period of 3. The value can be 1, 2, 3,
7, 14, or 30. The default value is 3.
Select Show trendline with moving average checkbox and use the drop-down
list to specify the number of data points to factor into the average. At each interval
on the graph, the trendline shows a moving average of the most recent data
points. Example: 3 displays a trendline that, at each interval, shows the average
of the current data point and the two previous data points.
■
UNKNOWN has been added as a value for Policy Type column in the Policy
filter. You can now filter report data for policy types that are unknown. In earlier
versions of OpsCenter the unknown policy types were shown as blank. Now all
static columns like job type, schedule type, policy type, etc. are shown as
UNKNOWN like in VBR
Status & Success Rate > Status > Partially Successful Job Count
report
This report aggregates partially successful jobs and shows these across a timeline.
It provides a visualization of job volume trends that skip the files that are open during
the backup job. It can be reported on against any view or level within a view along
with any of the key backup infrastructure components (backup server, media server)
and attributes (policy, policy type, schedule, OS, product, transport type). Filtering
is available on all components and attributes. The primary use case of the report
is verification of whether actions taken to correct the open file situation by moving
the scheduling of the client or policies produce results and reversing trends.
Figure 2-37 shows a sample view of the Partially Successful Job Count report.
145
OpsCenter reports
About Report Templates descriptions
Figure 2-37
Partially Successful Job Count report
The following are details associated with the Partially Successful Job Count report:
Report Name
Partially Successful Job Count
Report Category
Backup
Where to Locate
Report > Report Templates > Backup > Status & Success
Rate > Status > Partially Successful Job Count
Report Purpose
This report shows the partially successful jobs density over
time.
Supported products
NetBackup, NetBackup Appliance, Backup Exec, NetBackup
PureDisk
Applicable View
Master Server, Client
Report Display
Historical
Drill down report
No
Can be scheduled
Yes
146
OpsCenter reports
About Report Templates descriptions
Supported export formats
CSV, HTML, PDF, XML, TSV
Mapping with VBR report
Backups > Status > Partially Successful Job Count
The following table shows the filters for Partially Successful Job Count report and
how you can use these filters to view specific data in the report.
Filter
Column
View
Description
Select a view to show data for the selected view in the report. By
default All My Views is selected.
Master
Server
Master
Server
Media
server
Media server Select one or more media servers to view data for the specific
media servers in the report. All media servers that are attached
to the master servers in the OpsCenter console are shown in the
Value drop-down list ..
Client
Client Name
Client OS
Select one or more master servers to view data for the selected
master servers in the report. All master servers that are added
to the OpsCenter console are shown in the Value drop-down list
.
Select one or more clients to view data for the selected clients in
the report. All clients that are protected by the master servers in
the OpsCenter console are listed.
Select one or more client OS to view data for the selected client
OS in the report.
Policy
Policy Data
Select one or more policy data classification names to view data
Classification for the selected policy data classification names.
Name
Select one or more policy keyword to view data for the policies
Policy
having the selected keyword.
Keyword
Select one or more policy names to view data for the selected
Policy Name policies.
Policy Type
Select one or more policy types to view data for the selected
policy types.
Schedule Schedule/Level Select one or more schedule types like CINC, Copy, Daily etc. to
Type
view data for the selected schedule types.
Schedule
Name
Select one or more schedule names to view data for the selected
schedule names.
147
OpsCenter reports
About Report Templates descriptions
Filter
Column
Description
Job
Job Transport Select one or more transport types like FT, LAN, or Unknown to
Type
view data for the jobs that have the selected transport type.
Job Type
By default, Backup jobs are shown in the report. You can select
one or more job types like Archive, Backup, Restore etc. to view
Product Type
data for the selected job types.
Select one or more backup products to view data for the selected
products.
Attempt
Attempt
Status
The Attempt Status column can have two values i.e. Attempt or
Job. When Job Count is calculated, the report considers all
attempts if Attempt is selected.
By default, Job is selected. Number of attempts are not
considered when Job is selected.
Example of filter usage: You may run the Partially Successful Job Count report
for a specific policy to view partially successful jobs for the specific policy. Further
if you are interested in knowing about the partially successful job count for specific
products, you can use the Job filter and under Product Type column, select Backup
Exec.
The following report enhancements have been made for Partially Successful Job
Count report:
■
The unit Years has been added for Relative Timeframe selection.
You can now view data for the last x years.
■
The option Next has been removed from the drop-down menu for Relative
Timeframe. You now cannot enter a relative timeframe like Next 2 weeks. This
is because the report does not support any futuristic data.
■
The following options have been removed from Time Frame Group By selection:
■
Days of week Average
■
Days of week total
■
Hours of day Average
■
Hours of day Total
■
Minutes
■
Month of year Average
■
Month of year total
■
Quarter
148
OpsCenter reports
About Report Templates descriptions
■
■
Quarter of year Average
■
Quarter of year total
The following Report On options have been added under Backup Job Attributes:
■
Job Status (Complete and Partial only)
■
Job Status (Complete only)
■
The Schedule Name column is added under the Schedule filter to filter data
by schedule name.
■
The report now also shows trendlines with customized average periods.
The following option has been added:
Show trendline with moving average period of 3. The value can be 1, 2, 3,
7, 14, or 30. The default value is 3.
Select Show trendline with moving average checkbox and use the drop-down
list to specify the number of data points to factor into the average. At each interval
on the graph, the trendline shows a moving average of the most recent data
points. Example: 3 displays a trendline that, at each interval, shows the average
of the current data point and the two previous data points.
■
UNKNOWN has been added as a value for Policy Type column in the Policy
filter. You can now filter report data for policy types that are unknown. In earlier
versions of OpsCenter the unknown policy types were shown as blank. Now all
static columns like job type, schedule type, policy type, etc. are shown as
UNKNOWN like in VBR
Status & Success Rate > Status > Successful Job Count report
This report aggregates successful jobs and shows these across a timeline. It
provides a visualization of job volume trends. It can be reported on against any
view or level within a view along with any of the key backup infrastructure
components (backup server, media server) and attributes (policy, policy type,
schedule, OS, product, transport type). By default backup jobs are shown in the
report. Filtering is available on all components and attributes. The primary use case
of the report is verification of trends and the days that are exception to the norm.
The report is highly effective for presenting long-term historical data on one of the
most fundamental metrics of managing a backup operation.
Figure 2-38 shows a sample view of the Successful Job Count report.
149
OpsCenter reports
About Report Templates descriptions
Figure 2-38
Successful Job Count report
The following are details associated with the Successful Job Count report:
Report Name
Successful Job Count
Report Category
Backup
Where to Locate
Report > Report Templates > Backup > Status & Success
Rate > Status > Successful Job Count
Report Purpose
This report shows the successful jobs density over time.
Supported products
NetBackup, NetBackup Appliance, Backup Exec, NetBackup
PureDisk
Applicable View
Master Server, Client
Report Display
Historical (Chart)
Drill down report
No
Can be scheduled
Yes
Supported export formats
CSV, HTML, PDF, XML, TSV
Mapping with VBR report
Backups > Status > Successful Job Count
The following table shows the filters for Successful Job Count report and how you
can use these filters to view specific data in the report.
150
OpsCenter reports
About Report Templates descriptions
Filter
Column
View
Description
Select a view to show data for the selected view in the report. By
default All My Views is selected.
Master
Server
Master
Server
Media
server
Media server Select one or more media servers to view data for the specific
media servers in the report. All media servers that are attached
to the master servers in the OpsCenter console are shown in the
Value drop-down list ..
Client
Client Name
Client OS
Select one or more master servers to view data for the selected
master servers in the report. All master servers that are added
to the OpsCenter console are shown in the Value drop-down list
.
Select one or more clients to view data for the selected clients in
the report. All clients that are protected by the master servers in
the OpsCenter console are listed.
Select one or more client OS to view data for the selected client
OS in the report.
Policy
Policy Data
Select one or more policy data classification names to view data
Classification for the selected policy data classification names.
Name
Select one or more policy keyword to view data for the policies
Policy
having the selected keyword.
Keyword
Select one or more policy names to view data for the selected
Policy Name policies.
Policy Type
Select one or more policy types to view data for the selected
policy types.
Schedule Schedule/Level Select one or more schedule types like CINC, Copy, Daily etc. to
Type
view data for the selected schedule types.
Schedule
Name
Job
Select one or more schedule names to view data for the selected
schedule names.
Job Transport Select one or more transport types like FT, LAN, or Unknown to
Type
view data for the jobs that have the selected transport type.
Job Type
By default, Backup jobs are shown in the report. You can select
one or more job types like Archive, Backup, Restore etc. to view
Product Type
data for the selected job types.
Select one or more backup products to view data for the selected
products.
151
OpsCenter reports
About Report Templates descriptions
Filter
Column
Description
Attempt
Attempt
Status
The Attempt Status column can have two values i.e. Attempt or
Job. When Job Count is calculated, the report considers all
attempts if Attempt is selected.
By default, Job is selected. Number of attempts are not
considered when Job is selected.
Example of filter usage: You may run the Successful Job Count report for a specific
policy to view successful job counts for the specific policy. Further if you are
interested in knowing about the successful job counts for specific products, you
can use the Job filter and under Product Type column, select Backup Exec.
The following report enhancements have been made for the Successful Job Count
report:
■
The unit Years has been added for Relative Timeframe selection.
You can now view data for the last x years.
■
The option Next has been removed from the drop-down menu for Relative
Timeframe. You now cannot enter a relative timeframe like Next 2 weeks. This
is because the report does not support any futuristic data.
■
The following options have been removed from Time Frame Group By selection:
■
■
■
Days of week Average
■
Days of week total
■
Hours of day Average
■
Hours of day Total
■
Minutes
■
Month of year Average
■
Month of year total
■
Quarter
■
Quarter of year Average
■
Quarter of year total
The following Report On options have been added under Backup Job Attributes:
■
Job Status (Complete and Partial only)
■
Job Status (Complete only)
The Schedule Name column is added under the Schedule filter to filter data
by schedule name.
152
OpsCenter reports
About Report Templates descriptions
■
The report now also shows trendlines with customized average periods.
The following option has been added:
Show trendline with moving average period of 3. The value can be 1, 2, 3,
7, 14, or 30. The default value is 3.
Select Show trendline with moving average checkbox and use the drop-down
list to specify the number of data points to factor into the average. At each interval
on the graph, the trendline shows a moving average of the most recent data
points. Example: 3 displays a trendline that, at each interval, shows the average
of the current data point and the two previous data points.
■
UNKNOWN has been added as a value for Policy Type column in the Policy
filter. You can now filter report data for policy types that are unknown. In earlier
versions of OpsCenter the unknown policy types were shown as blank. Now all
static columns like job type, schedule type, policy type, etc. are shown as
UNKNOWN like in VBR
Status & Success Rate > Status > All Failed Backups report
This report is one of three using the advanced success or failure calculation logic
around the notion of first, all and last job. They require schedule and window
parameters enabling a precise definition of timeframes. Additionally, these reports
have aggregation levels of job and client. The first job success or failure is the first
job for a client/policy/schedule combination in its defined backup window and last
job is the opposite. As failed jobs are rerun one or more times, the “last job”
represents the last of the reruns within the window. This report produces the details
of the failed jobs based on which one of the three (first or all or last) methods is
chosen. The main use case for this report is based on last job where failure
notification to users is based around last job and failures leading up to the last one
is ignored.
Status > Consecutive Failures
This report is the second of three using the advanced success or failure calculation
logic around the notion of first, all and last job. The main use case is the calculation
of two or more consecutive failures based around Last Job Success/Failure. It
applies intricate logic to pick off the last failed job and in turn to determine that the
last job failures are indeed consecutive. This report can be best verified through
the Client Risk Analysis report. In this report, if three consecutive failures with 24
hour windows were chosen, the client or the policy combination should also appear
on the risk report as not having a successful backup in 72 or more hours.
Jobs that fail consecutively appear in the Consecutive Failures report. The period
for which they fail consecutively is configurable.
Figure 2-39 shows a sample view of Consecutive Failures Report.
153
OpsCenter reports
About Report Templates descriptions
Figure 2-39
Consecutive Failures Report
The following columns are displayed in the report:
154
OpsCenter reports
About Report Templates descriptions
Node Name
Value in the Node Name column depends on the Report On parameter
that you select. The default value of Report On parameter is Master
Server. So the value in Node Name column by default shows the master
server name.
When you select a view from the Filters section while editing the report,
the Report On parameter drop-down list also shows the view levels.
Based on the levels that you select from the Report On drop-down list,
value in the Node Name column changes.
For example, if there is a view like Location with two levels:
Location (View name)
- US
-- Client1
-- Client2
-- Client3
- India
-- Client4
-- Client5
-- Client6
The following selections are possible:
■
■
■
Select this view called Location from the Filters section and select
the Report On parameter as Master Server (default selection). The
Node Name column displays the master server.
Select this view called Location from the Filters section and select
the Report On parameter as Level 1. The Node Name column
displays US and India
Select this view called Location from the Filters section and select
the Report On parameter as Level 2. The Node Name column
displays the clients (clients 1-6).
Client Name
Name of the client
Policy Name
Policies associated with the client and node name
Schedule Name
Schedules associated with the client
Job ID
Job IDs associated with the policy and schedule that fail consecutively.
Start Time
Date and Time when the job started
End Time
Date and time when the job ended.
155
OpsCenter reports
About Report Templates descriptions
Status Code
Status code for the job ID. You can also filter the report to see details
of only a particular status code by using the Job > Status Code filter and
selecting the specific status codes.
Note that jobs with status code 0 (successful) may also appear in the
report. This usually happens in case of multi-streaming jobs. Job IDs
with status code 0 appear because if any of the sub-jobs of a
multi-streaming job fail, it is considered a complete failure. Generally
the Start Time for the multistreaming jobs would be very close.
The following are the details that are associated with the Consecutive Failures
report:
Report Name
Consecutive Failures
Report Category
Status and Success Rate
Where to Locate
Report > Report Templates > Backup > Status and Success
Rate > Status > Consecutive Failures report.
Report Purpose
Provides tabular view showing clients that had consecutive
job failures.
Supported products
Symantec NetBackup, Symantec NetBackup Master Appliance
Applicable View
Master Server, Client
Report Display
Tabular
Drill down report
None
Can be scheduled
Yes
Supported formats
PDF, CSV, HTML, XML, TSV
Mapping with VBR report
All Reports > Standard Report > Backup > Status >
Consecutive Failures
You can edit the Consecutive Failures report to show or hide the columns that
you are interested in. All the columns are shown by default. You can also filter the
report to view reports of specific master servers. The following table shows the
filters for Consecutive Failures report and how you can use these filters to view
specific data in the report.
Filter
View
Column
Description
Select a view to show data for the selected view in the report. By
default All My Views is selected.
156
OpsCenter reports
About Report Templates descriptions
Filter
Column
Description
Master
Server
Master
Server
Select one or more master servers to view data for the selected
master servers in the report. All master servers that are added
to the OpsCenter console are shown in the Value drop-down list
.
Policy
Policy Name
Select one or more policy names to view data for the selected
policies.
Job
Job Types
Select one or more job types as Archive, Backup, or Restore to
view data for the selected job types.
Status Code
Select one or more status codes to view data for the selected
status codes.
Aggregation
Level
Select different parameters for criteria definition about success
rate of the jobs. Select All Jobs Success Rate, First job Success
Rate, Last Job Success Rate. Select Aggregation Level to
consider the kind of jobs for the specified time frame. For example,
if you select First Job Success Rate then the report shows only
the first job for the combination of master server, client, policy,
and schedule.
Metric Type
Select Metric Type to calculate the success rate based as jobs.
Full Days
Select Full Days to specify the list of days to be considered for
Full backups.
Full Window
Parameter
Select Full Window Parameter to specify the start time for the
full backup window.
Success
Rate
Count Partial Select Count Partially Successful Job as Successful to count
Successful
partially successful jobs as successful.
job as
Successful
Full for
Duration of
(In Hours)
Select Full for Duration of (In Hours) to calculate the end time
for the incremental backup window. Backup window end time is
equal to the duration from the start time of the backup window.
Consecutive
Failures
Select how many consecutive failures should be included in the
report.
Increment
Window
Parameter
Select Increment Window Parameter to specify the start time
for the incremental backup window.
Schedule/Level Select the schedule of jobs is Full or Increment or All.
Type
157
OpsCenter reports
About Report Templates descriptions
Filter
Column
Description
Increment for Select Increment for Duration of (In Hours) to calculate the end
Duration of
time for the incremental backup window. Backup window end
(In Hours)
time is equal to the duration from the start time of the backup
window.
Increment
Days
Select Increment Days to specify the list of days to be considered
for Incremental backups.
Example of filter usage: You may run the report for specific policy names to view
details only for that specific policy.
Status & Success Rate > Status > Week At A Glance report
This report summarizes activity for a week by symbolically displaying the result of
each job for each client under the day of the week. The symbols are the blue
(Success) and yellow (Partial Success) men and failures that are denoted by a red
“X”. This report provides quick and comprehensive verification that all is well in the
data protection solution using symbols. A drill-down capability to the job level details
(i.e Job ID, Start/End Time, Size etc.) is provided. You can drill down to any server
on any day and get the job level detail.
It can be reported on against any view or level within a view along with any of the
key backup infrastructure components (backup server, media server) and attributes
(policy, policy type, schedule, OS, product, transport type). Filtering is available on
all components and attributes. The report provides a visualization of job status for
the most current data and how that compares to the previous six days.
This report can be used for automated report generation and email features where
different report filters can be used to show specific systems and then that data
emailed to the relevant parties once a week. Symantec recommends that you use
filters in large environments. This is because the report shows every master server
and client by default.
Week at a Glance Report’s performance declines as the data to be displayed in
the report increases. For example, running a two-month report is slower than running
a two-week report.
Note: The Week at a Glance report displays icons when it is exported or emailed
in an HTML format. Earlier in OpsCenter 7.0.x, the Week at a Glance report could
not display icons when exported or emailed in an HTML format. This issue has
been fixed in OpsCenter 7.1 and later versions.
Figure 2-40 shows a sample view of the Week at a Glance report.
158
OpsCenter reports
About Report Templates descriptions
Figure 2-40
Week at a Glance report
This report shows that there were a number of failures and also quickly shows that
most of the backups completed successfully. Using this report you can see if backups
ran each day of the week and the status of that backup. This report can be scheduled
to be emailed or exported weekly which saves a great deal of time.
The following are details associated with the Week at a Glance report:
Report Name
Week at a Glance
Report Category
Backup
Where to Locate
Report > Report Templates > Backup > Status & Success
Rate > Week At a Glance
Report Purpose
This is a graphical report of the backup status for each
protected client. A blue icon represents a successful backup,
a yellow icon represents a partially successful backup, and a
red icon represents a failed backup. A green background
indicates a full backup. A light blue background represents an
incremental backup.
159
OpsCenter reports
About Report Templates descriptions
Supported products
Symantec Backup Exec, NetBackup, NetBackup Master
Appliance, NetBackup PureDisk
Applicable View
Master Server, Client
Report Display
Tabular
Drill down report
Week at a Glance Detail
See “Week at a Glance Detail report” on page 162.
The Week at a Glance Details report further drills down to Skip
File Details.
Can be scheduled
Yes
Supported export formats
CSV, TSV, XML, HTML
Mapping with VBR report
Backups > Status > Week At a Glance
Deviations from VBR
If one client is backed up by two master servers, two rows are
shown in OpsCenter while one row is displayed in VBR.
The following table shows the filters for Week at a Glance report and how you can
use these filters to view specific data in the report.
Filter
Column
View
Description
Select a view to show data for the selected view in the report. By
default All My Views is selected.
Master
Server
Master
Server
Media
Server
Media Server Select one or more media servers to view data for the specific
media servers in the report. All media servers that are attached
to the master servers in the OpsCenter console are shown in the
Value dropdown list..
Client
Client Name
Client OS
Select one or more master servers to view data for the selected
master servers in the report. All master servers that are added
to the OpsCenter console are shown in the Value dropdown list.
Select one or more clients to view data for the selected clients in
the report. All clients that are protected by the master servers in
the OpsCenter console are listed.
Select one or more client OS to view data for the selected client
OS in the report.
160
OpsCenter reports
About Report Templates descriptions
Filter
Column
Description
Policy
Policy Data
Select one or more policy data classification names like Gold,
Classification Silver, Bronze etc. to view data for the policies having the selected
Name
data classiciation names.
Policy
Keyword
Select one or more policy keyword to view data for the policies
having the selected keyword.
Policy Name
Select one or more policy names to view data for the selected
policies.
Policy Type
Select one or more policy types to view data for the selected
policy types.
Schedule Schedule
Name
Job
Select one or more schedule names to view data for the selected
schedule names.
Job Status
Select one or more Job Status like Failed, Missed, Partially
Successful etc. to view data for the selected job status in the
Job Transport
report.
Type
Select one or more transport types like FT, LAN, or Unknown to
Job Type
view data for the jobs that have the selected transport type.
Product Type
Select one or more job types like Archive, Backup, Restore etc.
to view data for the selected job types.
Select one or more products like Backup Exec to view data for
the selected products.
Example of filter usage: You may run the Week at a Glance report for a specific
master server to view backup status for the clients protected by the specific master
server. Further if you are interested in knowing about the status of say only Backup
jobs (and no other jobs like Restore or archive jobs), you can use the Job Type
filter and select Backup.
The following enhancements have been made in the Week at a Glance report:
161
OpsCenter reports
About Report Templates descriptions
Report
Enhancements
The following report enhancements have been made:
■
■
■
■
Filter
Enhancements
The Week at a Glance report can now show the files and directories
that are backed up for each client. The following checkbox has been
added on the Modify Display Options pane when you edit the report:
Show the files and directories backed up for each client
If you check this option and click Run Report, you can view the client
name and the backed up directory in the Client Name column of
Week at a Glance report.
You can drill down from the Client Name column in the Week at a
Glance report to view Week at a Glance Details report. This was also
available earlier.
Now an additional level of drill down is available from the Week at a
Glance Details report. You can now further drill down from the Job
Primary ID column in Week at a Glance Details report to view Skip
File Details report.
The Client Name column in the Week at a Glance report is now
sorted by default.
Earlier if you selected Rolling 8 days column in the Week
Information filter, the Week at a Glance report displayed one day
less than VBR. This issue has now been fixed.
The following filter enhancements are listed:
■
■
■
For Week Information filter, the value list for Week of the year column
has been updated. The values staring from 17 Weeks Ago to 30
Weeks Ago have been added. Earlier the value selections were
limited from current week to 16 Weeks Ago.
By selecting these additional values, you can view older data in the
report.
UNKNOWN has been added as a value for Policy Type column in
the Policy filter. You can now filter report data for policy types that
are UNKNOWN. In earlier versions of OpsCenter the unknown policy
types were shown as blank. Now all static columns like job type,
schedule type, policy type, etc. are shown as UNKNOWN like in VBR.
Schedule filter has been added to the list of filters for this report. You
can now view report data for jobs that have a specific schedule name.
Week at a Glance Detail report
In the Week at a Glance report, you can drill down from the Client Name column
to know the job details that are associated with the client in the selected week. You
can also click on a job icon to see job details for the selected day for the specific
client.
Figure 2-41 shows a sample view of the Week at a Glance Details report that is
obtained by clicking the Client Name column in Week at a Glance report.
162
OpsCenter reports
About Report Templates descriptions
Figure 2-41
Week at a Glance Detail report
You can click a Job Primary ID to view skipped file details for the job. A new drilldown
report named Skip File Details has been added.
The following are details associated with the Week At A Glance Details report:
Report Name
Week at a Glance Details
Report Category
Backup
Where to Locate
Report > Report Templates > Backup > Status & Success
Rate > Week At a Glance (click the Client Name link or any
icon)
Report Purpose
Backup status for the selected client.
Supported products
Symantec Backup Exec, NetBackup, NetBackup Master
Appliance, NetBackup PureDisk
Applicable View
Master Server, Client
163
OpsCenter reports
About Report Templates descriptions
Report Display
Tabular
Drill down report
Skip File Detail
See “Skip File Details” on page 113.
Can be scheduled
Yes
Supported export formats
PDF, CSV, TSV, XML, HTML
Mapping with VBR report
Backups > Status > Week At a Glance > Week at a Glance
Details
You can edit the report to show or hide the columns that you are interested in. All
the columns are shown by default. You can also filter the report to show jobs for a
specific product or master server.
The following table shows the filters for Week at a Glance Details report and how
you can use these filters to view specific data in the report.
Filter
Column
View
Description
Select a view to show data for the selected view in the report.
By default All My Views is selected.
Master
Server
Master Server Select one or more master servers to view data for the selected
master servers in the report. All master servers that are added
to the OpsCenter console are shown in the Value dropdown list.
Media
Server
Media Server
Select one or more media servers to view data for the specific
media servers in the report. All media servers that are attached
to the master servers in the OpsCenter console are shown in
the Value dropdown list..
Client
Client Name
Select one or more clients to view data for the selected clients
in the report. All clients that are protected by the master servers
in the OpsCenter console are listed.
Client OS
Select one or more client OS to view data for the selected client
OS in the report.
164
OpsCenter reports
About Report Templates descriptions
Filter
Column
Description
Policy
Policy Data
Classification
Name
Select one or more policy data classification names like Gold,
Silver, Bronze etc. to view data for the policies having the
selected data classiciation names.
Policy
Keyword
Select one or more policy keywords to view data for the policies
having the selected keyword.
Policy Name
Select one or more policy names to view data for the selected
policies.
Policy Type
Select one or more policy types to view data for the selected
policy types.
Schedule Schedule/Level Select one or more schedule types like Full, Incremental etc. to
Type
view data for the selected schedule types.
Job
Job Status
Select one or more Job Status like Failed, Missed, Partially
Successful etc. to view data for the selected job status in the
Job Transport
report.
Type
Select one or more transport types like FT, LAN, or Unknown to
Job Type
view data for the jobs that have the selected transport type.
Product Type
Select one or more job types like Archive, Backup, Restore etc.
to view data for the selected job types.
Select one or more products like Backup Exec to view data for
the selected products.
Example of filter usage: You may run the Week at a Glance Details report for a
specific policy to view backup details for the specific policy. Further if you are
interested in knowing about the status of say only Full schedule types, you can use
the Schedule filter and select Full.
The following enhancements have been made in the Week at a Glance Details
report:
■
The Job Primary ID column in the Week at a Glance Details report is now a
link and you can drill down to Skip File Details report. Use the Skip File Details
report to view the skipped files that are associated with a job.
■
The Master Server OS column has been removed from the Master Server
filter.
■
The Media Server OS column has been removed from the Media Server filter.
■
The Client Architecture column has been removed from the Client filter.
■
The Policy Domain column has been removed from the Policy filter.
165
OpsCenter reports
About Report Templates descriptions
■
The Job Type, Job Transport Type, and Product Type columns have been
added to the Job filter. You can now filter this report on the basis of job type,
job transport type or product type.
■
The Agent Server and Job State columns have been removed from the Job
filter.
Status & Success Rate > Status > Backup Window Failures
report
This report lists the jobs which were scheduled to run but failed because the
scheduled backup window was no longer open (the NetBackup status code is 196).
Status & Success Rate > Status > Partially Successful Job
Details report
This report provides details for all NetBackup partially successful jobs. Partially
successful jobs have an exit status of 1. The table in the report is organized by job
ID, server name, and client name.
Status & Success Rate > Status > Skipped Files Summary report
The information in this report is presented using a set of linked reports. The main
report that is organized by master server, displays clients and policies, and the
corresponding number of files that were skipped.
Skipped file details for client report
This drilldown report from the Client Name column
identifies risks to the client because of any skipped
files.
This drilldown report uses the run time parameters
that are passed from the main report.
Skipped file details for policy report
This drilldown report from the Policy Name column
identifies risks to the client due to any skipped files.
This drilldown report uses the run time parameters
that are passed from the main report.
Skipped file details for policy and client This drilldown report from the No. of Skipped Files
report
column provides the names of all skipped files.
This drilldown report uses the run time parameters
that are passed from the main report.
166
OpsCenter reports
About Report Templates descriptions
Status & Success Rate > Status > Job Attempt Status Detail
report
This report provides information about the completion status for a NetBackup job.
The report table provides a count of jobs having a particular status code on a specific
day. The table is organized by server name and date. This report was earlier named
as Job Exit Status Detail report.
A drilldown report is available from the Number of Occurrences column of the
table of the main report. This drilldown report shows job details, such as job type
and policy name. The table includes all jobs having a particular status code on a
given day.
Note: This report may provide inaccurate output when a Job ID is reset in NetBackup
like for catalog recovery or via manual resetting of the Job ID. In case the Job ID
is reset, you must delete the NetBackup master server from the OpsCenter console
and add it again.
Figure 2-42 shows a sample view of the Job Attempt Status Detail report.
Figure 2-42
Job Attempt Status Detail report
The following are details associated with the Job Attempt Status Detail report:
167
OpsCenter reports
About Report Templates descriptions
Report Name
Job Attempt Status Detail
Report Category
Backup
Where to Locate
Report > Report Templates > Backup > Status & Success
Rate > Status > Job Attempt Status Detail
Report Purpose
This report shows the successful jobs density over time.
Supported products
NetBackup, NetBackup Appliance
Applicable View
Master Server, Client
Report Display
Tabular
Drill down report
Yes
See “Job details by attempt status” on page 169.
Can be scheduled
Yes
Supported export formats
CSV, HTML, PDF, XML, TSV
Mapping with NOM report
Standard Reports > Job > Job Attempt Status Detail
The following table shows the filters for Job Attempt Status Detail report and how
you can use these filters to view specific data in the report.
Filter
Column
View
Description
Select a view to show data for the selected view in the report. By
default All My Views is selected.
Master
Server
Master
Server
Select one or more master servers to view data for the selected
master servers in the report. All master servers that are added
to the OpsCenter console are shown in the Value dropdown list.
Job
Job Type
Select one or more job types like Archive, Backup, Restore etc.
to view data for the selected job types.
Example of filter usage: You may run the Job Attempt Status Detail report for a
specific job type like Backup to view status code details for the backup jobs.
The following report enhancements have been made for the Job Attempt Status
Detail report:
■
The unit Years has been added for Relative Timeframe selection.
You can now view data for the last x years.
168
OpsCenter reports
About Report Templates descriptions
■
The option Next has been removed from the drop-down menu for Relative
Timeframe. You now cannot enter a relative timeframe like Next 2 weeks. This
is because the report does not support any futuristic data.
■
This report was earlier named Job Exit Status Detail. This has been renamed
to Job Attempt Status Detail report.
Job details by attempt status
A drilldown report named Job details by attempt status is available when you click
the Number of Occurrences column in Job Attempt Status Detail report. This
drilldown report shows job details, such as job type and policy name. The table
includes all jobs that have a particular status code on a given day.
This tabular reports shows job information i.e. Job Type, Job End time etc by its
attempt numbers.
Figure 2-43 shows a sample view of the Job details by attempt status report.
Figure 2-43
Job details by attempt status report
The following are details associated with the Job details by attempt status report:
Report Name
Job details by attempt status
Report Category
Backup
169
OpsCenter reports
About Report Templates descriptions
Where to Locate
Report > Report Templates > Backup > Status & Success
Rate > Status > Job Attempt Status Detail (drill down from
Number of Occurrences column) > Job details by attempt
status
Report Purpose
This report shows job information by job attempt.
Supported products
NetBackup, NetBackup Appliance
Applicable View
Master Server
Report Display
Tabular
Drill down report
No
Can be scheduled
Yes
Supported export formats
CSV, HTML, PDF, XML, TSV
Mapping with NOM report
Standard Reports > Job > Job Attempt Status Detail (drill down
from Number of Occurrences column) > Job Details By
Status for
The following table shows the filters for Job details by attempt status report and
how you can use these filters to view specific data in the report.
Filter
Column
View
Description
Select a view to show data for the selected view in the report. By
default All My Views is selected.
Master
Server
Master
Server
Select one or more master servers to view data for the selected
master servers in the report. All master servers that are added
to the OpsCenter console are shown in the Value dropdown list.
Job
Job Type
Select one or more job types like Archive, Backup, Restore etc.
to view data for the selected job types.
Status Code
Select one or more status codes to view data for the selected
status codes.
Example of filter usage: You may run the Job details by attempt status report for
a specific job type like Backup to view job attempt details for the backup jobs.
The following report enhancements have been made for the Job details by attempt
status report:
■
The unit Years has been added for Relative Timeframe selection.
You can now view data for the last x years.
170
OpsCenter reports
About Report Templates descriptions
■
The option Next has been removed from the drop-down menu for Relative
Timeframe. You now cannot enter a relative timeframe like Next 2 weeks. This
is because the report does not support any futuristic data.
Status & Success Rate > Status > Job Details report
This report provides detailed information about NetBackup jobs.
Status & Success Rate > Status > Job Summary by Status report
Status Report provides information on basic NetBackup job status including
successful, partially successful, skipped files, and failed backup attempts.
The Job Summary by Status report summarizes NetBackup jobs based on the job
exit status for a specified time interval. You can use this report to provide trend
information.
The bar chart shows a count of successful, partially successful, and failed jobs per
a given date.
Status & Success Rate > Status > Job Status > Historical report
A Job Status report in red (failure), yellow (partial success) and green (success)
displayed in stacked bar format that is grouped by hour, day, week, month, or year
across any timeframe. The report is a count of jobs for each of the three outcomes.
The simplicity of the presentation helps easily identify both positive and negative
trends as well as one-off deviations. For NetBackup environments, the report can
also be generated where attempts rather than jobs are counted. In NetBackup, jobs
can be configured for x many attempts before a job exits with a status. The report
can be filtered across a selection that includes views, backup and media servers,
backup level, policies, schedules, transport types, Operating Systems, and business
classifications.
Figure 2-44 shows a sample view of the Job Status (Historical) report.
171
OpsCenter reports
About Report Templates descriptions
Figure 2-44
Job Status (Historical) report
The following are details associated with the Job Status (Historical) report:
Report Name
Job Status
Report Category
Backup
Where to Locate
Report > Report Templates > Backup > Status & Success
Rate > Status > Job Status
Report Purpose
This report shows job density over time.
Supported products
NetBackup, NetBackup Master Appliance, Symantec Backup
Exec, Symantec NetBackup PureDisk
Applicable View
Master Server, Client, Policy
Report Display
Historical
Drill down report
No
Can be scheduled
Yes
Supported export formats
CSV, HTML, PDF, XML, TSV
Mapping with VBR report
Backup > Status and Success Rate > Status > Job Status
The following table shows the filters for Job Status report and how you can use
these filters to view specific data in the report.
172
OpsCenter reports
About Report Templates descriptions
Filter
Column
View
Description
Select a view to show data for the selected view in the report. By
default All My Views is selected.
Master
Server
Master
Server
Media
Server
Media Server Select one or more media servers to view data for the specific
media servers in the report. All media servers that are attached
to the master servers in the OpsCenter console are shown in the
Value dropdown list..
Client
Client Name
Client OS
Select one or more master servers to view data for the selected
master servers in the report. All master servers that are added
to the OpsCenter console are shown in the Value dropdown list.
Select one or more clients to view data for the selected clients in
the report. All clients that are protected by the master servers in
the OpsCenter console are listed.
Select one or more client OS to view data for the selected client
OS in the report.
Policy
Policy Data
Select one or more policy data classification names to view data
Classification for the selected policy data classification names.
Name
Select one or more policy keyword to view data for the policies
Policy
having the selected keyword.
Keyword
Select one or more policy names to view data for the selected
Policy Name policies.
Policy Type
Select one or more policy types to view data for the selected
policy types.
Schedule Schedule/Level Select one or more schedule types like CINC, Copy, Daily etc. to
Type
view data for the selected schedule types.
Job
Schedule
Name
Select one or more schedule names to view data for the selected
schedule names.
Job Status
Select one or more job status like Failed, Successful etc. to view
data for the selected job status.
Job Transport
Type
Select one or more transport types like FT, LAN, or Unknown to
view data for the jobs that have the selected transport type.
Job Type
By default, Backup jobs are shown in the report. Select one or
Product Type
more job types like Archive, Backup, Restore etc. to view data
for the selected job types.
Select one or more backup products to view data for the selected
products.
173
OpsCenter reports
About Report Templates descriptions
Example of filter usage: You may run the Job Status report for a specific policy
to view job counts for the specific policy. Further if you are interested in knowing
about the job counts for specific products, you can use the Job filter and under
Product Type column, select Backup Exec.
The following report enhancements have been made for the Successful Job Count
report:
■
The unit Years has been added for Relative Timeframe selection.
You can now view data for the last x years.
■
The option Next has been removed from the drop-down menu for Relative
Timeframe. You now cannot enter a relative timeframe like Next 2 weeks. This
is because the report does not support any futuristic data.
■
The following options have been removed from Time Frame Group By selection:
■
■
Days of week Average
■
Days of week total
■
Hours of day Average
■
Hours of day Total
■
Minutes
■
Month of year Average
■
Month of year total
■
Quarter
■
Quarter of year Average
■
Quarter of year total
The following Report On options have been added under Backup Job Attributes:
■
Job Status (Complete and Partial only)
■
Job Status (Complete only)
■
The Schedule Name column is added under the Schedule filter to filter data
by schedule name.
■
The report now also shows trendlines with customized average periods.
The following option has been added:
Show trendline with moving average period of 3. The value can be 1, 2, 3,
7, 14, or 30. The default value is 3.
Select Show trendline with moving average checkbox and use the drop-down
list to specify the number of data points to factor into the average. At each interval
on the graph, the trendline shows a moving average of the most recent data
174
OpsCenter reports
About Report Templates descriptions
points. Example: 3 displays a trendline that, at each interval, shows the average
of the current data point and the two previous data points.
■
UNKNOWN has been added as a value for Policy Type column in the Policy
filter. You can now filter report data for policy types that are UNKNOWN. In
earlier versions of OpsCenter the unknown policy types were shown as blank.
Now all static columns like job type, schedule type, policy type, etc. are shown
as UNKNOWN like in VBR
Status & Success Rate > Status > Job Status > Distribution
report
A job status report in red (failure), yellow (partial success) and green (success)
displayed in pie chart format. The report is a count of jobs for each of the three
outcomes. The main use cases of the report are typically short-term verification
(i.e. last 24 – 48 hours) of backup job status and long term (i.e. 1+ months)
management level reporting requiring high-level status summaries. The report can
be filtered across a selection that includes views, backup and media servers, backup
level, policies, schedules, transport types, Operating Systems, and business
classifications.
Figure 2-45 shows a sample view of the Job Status (Distribution) report.
Figure 2-45
Job Status (Distribution) report
The following are details associated with the Job Status (Distribution) report:
Report Name
Job Status
175
OpsCenter reports
About Report Templates descriptions
Report Category
Backup
Where to Locate
Report > Report Templates > Backup > Status & Success
Rate > Status > Job Status
Report Purpose
This report shows job density over time.
Supported products
NetBackup, NetBackup Master Appliance, Symantec Backup
Exec, Symantec NetBackup PureDisk
Applicable View
Master Server, Client, Policy
Report Display
Distribution
Drill down report
No
Can be scheduled
Yes
Supported export formats
CSV, HTML, PDF, XML, TSV
Mapping with VBR report
Backup > Status and Success Rate > Status > Job Status
The following table shows the filters for Job Status report and how you can use
these filters to view specific data in the report.
Filter
Column
View
Description
Select a view to show data for the selected view in the report. By
default All My Views is selected.
Master
Server
Master
Server
Media
Server
Media Server Select one or more media servers to view data for the specific
media servers in the report. All media servers that are attached
to the master servers in the OpsCenter console are shown in the
Value dropdown list..
Client
Client Name
Client OS
Select one or more master servers to view data for the selected
master servers in the report. All master servers that are added
to the OpsCenter console are shown in the Value dropdown list.
Select one or more clients to view data for the selected clients in
the report. All clients that are protected by the master servers in
the OpsCenter console are listed.
Select one or more client OS to view data for the selected client
OS in the report.
176
OpsCenter reports
About Report Templates descriptions
Filter
Column
Policy
Policy Data
Select one or more policy data classification names to view data
Classification for the selected policy data classification names.
Name
Select one or more policy keyword to view data for the policies
Policy
having the selected keyword.
Keyword
Select one or more policy names to view data for the selected
Policy Name policies.
Policy Type
Description
Select one or more policy types to view data for the selected
policy types.
Schedule Schedule/Level Select one or more schedule types like CINC, Copy, Daily etc. to
Type
view data for the selected schedule types.
Job
Schedule
Name
Select one or more schedule names to view data for the selected
schedule names.
Job Status
Select one or more job status like Failed, Successful etc. to view
data for the selected job status.
Job Transport
Type
Select one or more transport types like FT, LAN, or Unknown to
view data for the jobs that have the selected transport type.
Job Type
Select one or more job types like Archive, Backup, Restore etc.
Product Type
to view data for the selected job types. By default, only Backup
is selected.
Select one or more backup products to view data for the selected
products.
Example of filter usage: You may run the Job Status report for a specific policy
to view job counts for the specific policy. Further if you are interested in knowing
about the job counts per job status for specific products, you can use the Job filter
and under Product Type column, select Backup Exec.
The following report enhancements have been made for the Successful Job Count
report:
■
The unit Years has been added for Relative Timeframe selection.
You can now view data for the last x years.
■
The option Next has been removed from the drop-down menu for Relative
Timeframe. You now cannot enter a relative timeframe like Next 2 weeks. This
is because the report does not support any futuristic data.
■
The following options have been removed from Time Frame Group By selection:
■
Days of week Average
■
Days of week total
177
OpsCenter reports
About Report Templates descriptions
■
■
Hours of day Average
■
Hours of day Total
■
Minutes
■
Month of year Average
■
Month of year total
■
Quarter
■
Quarter of year Average
■
Quarter of year total
The following Report On options have been added under Backup Job Attributes:
■
Job Status (Complete and Partial only)
■
Job Status (Complete only)
■
The Schedule Name column is added under the Schedule filter to filter data
by schedule name.
■
UNKNOWN has been added as a value for Policy Type column in the Policy
filter. You can now filter report data for policy types that are UNKNOWN. In
earlier versions of OpsCenter the unknown policy types were shown as blank.
Now all static columns like job type, schedule type, policy type, etc. are shown
as UNKNOWN like in VBR
Status & Success Rate > Success Rate > Success Rate – All
Jobs report
This last of the single-line success rate reports give the highest number since it
shows at least one success per client stream. Meaning as long as one job is
successful despite any number of retries, it is a 100% success. This report typically
shows overall exposure to someone outside the backup team. A 100% on this report
indicates that everything was backed up even though it may have taken a number
of retries.
Figure 2-46 shows a sample view of the Success Rate-All Jobs report.
178
OpsCenter reports
About Report Templates descriptions
Figure 2-46
Success Rate – All Jobs report
The following are details associated with the Success Rate – All Jobs report:
Report Name
Success Rate - All Jobs
Report Category
Backup
Where to Locate
Report > Report Templates > Backup > Status & Success
Rate > Success Rate > Success Rate - All Jobs
Report Purpose
This report shows the Success rate by job level across
products, domains, clients, policies and business level views.
Supported products
NetBackup, NetBackup Appliance, Backup Exec, NetBackup
PureDisk
Applicable View
Master Server, Client
Report Display
Historical (Chart)
Drill down report
No
Can be scheduled
Yes
179
OpsCenter reports
About Report Templates descriptions
Supported export formats
CSV, HTML, PDF, XML, TSV
Mapping with VBR report
Backups > Success Rate > Success Rate - At Least 1 Success
Per Client
The following table shows the filters for Success Rate – All Jobs report and how
you can use these filters to view specific data in the report.
Filter
Column
View
Description
Select a view to show data for the selected view in the report. By
default All My Views is selected.
Master
Server
Master
Server
Media
Server
Media Server Select one or more media servers to view data for the specific
media servers in the report. All media servers that are attached
to the master servers in the OpsCenter console are shown in the
Value dropdown list..
Client
Client Name
Client OS
Select one or more master servers to view data for the selected
master servers in the report. All master servers that are added
to the OpsCenter console are shown in the Value dropdown list.
Select one or more clients to view data for the selected clients in
the report. All clients that are protected by the master servers in
the OpsCenter console are listed.
Select one or more client OS to view data for the selected client
OS in the report.
Policy
Policy Data
Select one or more policy data classification names to view data
Classification for the selected policy data classification names.
Name
Select one or more policy keyword to view data for the policies
Policy
having the selected keyword.
Keyword
Select one or more policy names to view data for the selected
Policy Name policies.
Policy Type
Select one or more policy types to view data for the selected
policy types.
Schedule Schedule/Level Select one or more schedule types like CINC, Copy, Daily etc. to
Type
view data for the selected schedule types.
Schedule
Name
Select one or more schedule names to view data for the selected
schedule names.
180
OpsCenter reports
About Report Templates descriptions
Filter
Column
Job
Job Status
Description
Select one or more Job Status like Failed, Missed, Partially
Successful etc. to view data for the selected job status in the
Job Transport
report.
Type
Select one or more transport types like FT, LAN, or Unknown to
Job Type
view data for the jobs that have the selected transport type.
Product Type
The value selection for Job Type is mandatory. By default, Backup
jobs are shown in the report. You can select one or more job
types like Archive, Backup, Restore etc. to view data for the
selected job types.
Select one or more backup products to view data for the selected
products.
Success
Rate
Consider
Partially
Successful
Job as
Successful
The default selection is Yes.
Select No if you do not want to consider partially successful jobs
as successful.
Selecting Yes or No may impact the Success Rate percentage
that is shown in the report. Consider a policy that has 5 successful
jobs, 3 partially successful jobs, and 2 failed jobs. If you select
the value as Yes, the Success Rate is 80%. However if you
select the value as No, the Success Rate is 50%.
Example of filter usage: Run the Success Rate - All Jobs report for a specific product
like Backup Exec to get an idea of the success rate for Backup Exec jobs.
The following report enhancements have been made for Success Rate – All Jobs
report:
■
The option Next has been removed from the drop-down menu for Relative
Timeframe. You now cannot enter a relative timeframe like Next 2 weeks. This
is because the report does not support any futuristic data.
■
The following options have been removed from Time Frame Group By selection:
■
Days of week Average
■
Days of week total
■
Hours of day Average
■
Hours of day Total
■
Minutes
■
Month of year Average
■
Month of year total
181
OpsCenter reports
About Report Templates descriptions
■
■
Quarter
■
Quarter of year Average
■
Quarter of year total
The following Report On options have been added under Backup Job Attributes:
■
Job Status (Complete and Partial only)
■
Job Status (Complete only)
■
Two new filters called Schedule and Success Rate have been added.
■
A new checkbox named Target Performance has been added in the Modify
Display Options page under Timeline Chart Properties. You can use the
Target Performance option to specify where a report draws the target line, with
which you can compare the actual performance shown. The Target Performance
option allows you to specify the target for Y1 axis. In case you set a value of
say 100 for Y1 axis and run the report, you will see a straight line parallel to
X-axis and the value as 100 on Y1 axis. Using this option, you can easily
compare the actual performance with the target performance.
Status & Success Rate > Success Rate > Advanced Success
Rate report
This report uses the advanced success or the failure calculation logic around the
notion of first, all and last job. It collects all information around both successes and
failures and presents the results that are grouped by (day or month) timeframe for
either client or the job success rate. Client success rate is a count of successful
clients where all policies that are defined to the client must be successful to declare
the client successful. Thus a client is either 0% or 100% and no intermediate state.
Job success rate is derived from all jobs and separated out by first, all and last and
a specific client can have a job success rate that can range between 0% and 100%.
End-user and customer typically get Last Job Success for job and client whereas
backup architects and administrators examine all three. These reports work well
with views and can be reported on at any level with robust filtering capabilities.
This report simply aggregates jobs according to success rate and shows these
across a timeline. It can be reported on against views and view levels, along with
any of the key backup infrastructure components (master server etc) and attributes
(policy, policy, job etc). Filtering is available on all components and attributes. The
primary use case of the report is verification of trends and the days that are exception
to the norm. The report is highly effective for presenting long-term tabular data on
one of the most fundamental metrics of managing a backup operation.
Figure 2-47 shows a sample view of the Advanced Success Rate report.
182
OpsCenter reports
About Report Templates descriptions
Figure 2-47
Advanced Success Rate report
The following are details associated with the Advanced Success Rate report:
Report Name
Advanced Success Rate
Report Category
Backup
Where to Locate
Report > Report Templates > Backup > Status & Success
Rate > Success Rate > Advanced Success Rate
Report Purpose
This report shows the master server, number of backups that
were successful and failed, the success rate and total amount
processed for each day.
Supported products
NetBackup, NetBackup Appliance, Backup Exec, NetBackup
PureDisk
Applicable View
Master Server, Client
Report Display
Tabular
Drill down report
No
Can be scheduled
Yes
Supported export formats
CSV, HTML, PDF, XML, TSV
Mapping with VBR report
Backups > Status > Daily Summary of Backup Activity
183
OpsCenter reports
About Report Templates descriptions
The following table shows the filters for Advanced Success Rate report and how
you can use these filters to view specific data in the report.
Filter
Column
View
Description
Select a view to show data for the selected view in the report. By
default All My Views is selected.
Master
Server
Master
Server
Select one or more master servers to view data for the selected
master servers in the report. All master servers that are added
to the OpsCenter console are shown in the Value dropdown list.
Policy
Policy Name
Select one or more policy names to view data for the selected
policies.
Job
Job Type
You can select one or more job types like Archive, Backup,
Restore etc. to view data for the selected job types. By default,
Backup jobs are shown in the report.
Status Code
Select one or more status codes to view data for the selected
status codes.
184
OpsCenter reports
About Report Templates descriptions
Filter
Column
Description
Success
Rate
Aggregation
Level
Select Aggregation Level to consider the kind of jobs for the
specified time frame. For example, if you select First Job
Success Rate then the report shows only the first job for the
combination of master, client, policy, and schedule.
Full Days
Full Window
Parameter
Metric Type
Full for
Duration of
(In Hours)
Increment
Days
Increment
Window
Parameter
Select Full Days to specify the list of days to be considered for
Full backups.
Select Full Window Parameter to specify the start time for the
full backup window.
Select Metric Type to calculate the success rate based on clients
or jobs.
Select Full for Duration of (In Hours) to calculate the end time
for the incremental backup window. Backup window end time is
equal to the duration from the start time of the backup window.
Select Increment Days to specify the list of days to be considered
for Incremental backups.
Increment for
Select Increment Window Parameter to specify the start time
Duration of
for the incremental backup window.
(In Hours)
Select Increment for Duration of (In Hours) to calculate the end
Consider
time for the incremental backup window. Backup window end
Partially
time is equal to the duration from the start time of the backup
Successful
window.
Job as
Successful
Select Count Partially Successful Job as Successful to count
partially successful jobs as successful while calculating the
Success Rate.
Example of filter usage: Run the Advanced Success Rate report for a one week
timeframe and for a single master server.
The default Relative Timeframe is now changed to Previous 15 days. Earlier the
report showed data for the Previous 14 days by default.
Status & Success Rate > Success Rate > Success Rate - All
Attempts report
This report shows success rate as it is aggregated at the attempt ( “try”) level. Jobs
can be configured for x many attempts before exiting with a status. If for example
the attempt setting is two and success is attained on the second attempt, this
translates into a 50% attempt rate and 100% job success rate. This metric is only
supported for backup applications in which attempt level data is available. A target
line is also supported providing for an effective visual presentation on when the
185
OpsCenter reports
About Report Templates descriptions
target is exceeded. It can be reported on against any view or level within a view
along with any of the key backup infrastructure components (backup server, media
server) and attributes (policy, policy type, schedule, OS, product, transport type).
Filtering is available on all components and attributes. Main use case is long-term
historical data on one of the key performance indicators.
Figure 2-48 shows a sample view of the Success Rate All Attempts report.
Figure 2-48
Success Rate – All Attempts report
The following are details associated with the Success Rate – All Attempts report:
Report Name
Success Rate - All Attempts
Report Category
Backup
Where to Locate
Report > Report Templates > Backup > Status & Success
Rate > Success Rate > Success Rate - All Attempts
186
OpsCenter reports
About Report Templates descriptions
Report Purpose
This report shows the success rate by all job attempt level
across products, domains, clients, policies and business level
views.
Supported products
NetBackup, NetBackup Appliance, Backup Exec, NetBackup
PureDisk
Applicable View
Master Server, Client
Report Display
Historical (Chart)
Drill down report
No
Can be scheduled
Yes
Supported export formats
CSV, HTML, PDF, XML, TSV
Mapping with VBR report
Backups > Success Rate > Success Rate - All Attempts
The following table shows the filters for Success Rate – All Attempts report and
how you can use these filters to view specific data in the report.
Filter
Column
View
Description
Select a view to show data for the selected view in the report. By
default All My Views is selected.
Master
Server
Master
Server
Media
Server
Media Server Select one or more media servers to view data for the specific
media servers in the report. All media servers that are attached
to the master servers in the OpsCenter console are shown in the
Value dropdown list..
Client
Client Name
Client OS
Select one or more master servers to view data for the selected
master servers in the report. All master servers that are added
to the OpsCenter console are shown in the Value dropdown list.
Select one or more clients to view data for the selected clients in
the report. All clients that are protected by the master servers in
the OpsCenter console are listed.
Select one or more client OS to view data for the selected client
OS in the report.
187
OpsCenter reports
About Report Templates descriptions
Filter
Column
Policy
Policy Data
Select one or more policy data classification names to view data
Classification for the selected policy data classification names.
Name
Select one or more policy keyword to view data for the policies
Policy
having the selected keyword.
Keyword
Select one or more policy names to view data for the selected
Policy Name policies.
Policy Type
Description
Select one or more policy types to view data for the selected
policy types.
Schedule Schedule/Level Select one or more schedule types like CINC, Copy, Daily etc. to
Type
view data for the selected schedule types.
Schedule
Name
Job
Select one or more schedule names to view data for the selected
schedule names.
Job Status
Select one or more Job Status like Failed, Missed, Partially
Successful etc. to view data for the selected job status in the
Job Transport
report.
Type
Select one or more transport types like FT, LAN, or Unknown to
Job Type
view data for the jobs that have the selected transport type.
Product Type
The value selection for Job Type is mandatory. By default, Backup
jobs are shown in the report. You can select one or more job
types like Archive, Backup, Restore etc. to view data for the
selected job types.
Select one or more backup products to view data for the selected
products.
Success
Rate
Consider
Partially
Successful
Job as
Successful
The default selection is Yes.
Select No if you do not want to consider partially successful jobs
as successful.
Selecting Yes or No may impact the Success Rate percentage
that is shown in the report. Consider a policy that has 5 successful
jobs, 3 partially successful jobs, and 2 failed jobs for all job
attempts. If you select the value as Yes, the Success Rate is
80%. However if you select the value as No, the Success Rate
is 50%.
Examples of filter usage: You can run this report for a few master servers for
which you want to view the success rate for all attempts.
The following report enhancements have been made for Success Rate - All Attempts
report:
188
OpsCenter reports
About Report Templates descriptions
■
The unit Years has been added for Relative Timeframe selection.
You can now view data for the last x years.
■
The option Next has been removed from the drop-down menu for Relative
Timeframe. You now cannot enter a relative timeframe like Next 2 weeks. This
is because the report does not support any futuristic data.
■
The following options have been removed from Time Frame Group By selection:
■
■
Days of week Average
■
Days of week total
■
Hours of day Average
■
Hours of day Total
■
Minutes
■
Month of year Average
■
Month of year total
■
Quarter
■
Quarter of year Average
■
Quarter of year total
The following Report On options have been added under Backup Job Attributes:
■
Job Status (Complete and Partial only)
■
Job Status (Complete only)
■
Two new filters called Schedule and Success Rate have been added.
■
A new checkbox named Target Performance has been added in the Modify
Display Options page under Timeline Chart Properties. You can use the
Target Performance option to specify where a report draws the target line, with
which you can compare the actual performance shown. The Target Performance
option allows you to specify the target for Y1 axis. In case you set a value of
say 100 for Y1 axis and run the report, you will see a straight line parallel to
X-axis and the value as 100 on Y1 axis. Using this option, you can easily
compare the actual performance with the target performance.
Status & Success Rate > Success Rate > Success Rate - First
Attempt report
This report shows success rate as it is aggregated at the attempt (known as “try”)
level. Specifically, it zooms in on the measurement of the first attempt for each job.
Jobs can be configured for x many attempts before you exit with a status. If for
189
OpsCenter reports
About Report Templates descriptions
example the attempt setting is two and success is attained on the second attempt,
this data translates into a 50% All Attempt rate and 0% First Attempt rate and 100%
job success rate. This metric is only supported for backup applications in which
attempt level data is available. A target line is also supported providing for an
effective visual presentation on when the target is exceeded. Filtering is available
on all components and attributes. Main use case is to use this report and the All
Attempts report together to see how often success is attained on the first attempt
as opposed to second, third etc. attempts.
Figure 2-49 shows a sample view of Success Rate - First Attempt report.
Figure 2-49
Success Rate - First Attempt report
The following are details associated with the Success Rate – First Attempt report:
Report Name
Success Rate - First Attempt
Report Category
Backup
190
OpsCenter reports
About Report Templates descriptions
Where to Locate
Report > Report Templates > Backup > Status & Success
Rate > Success Rate > Success Rate - First Attempt
Report Purpose
This report shows the success rate by first job attempt level
across products, domains, clients, policies and business level
views.
Supported products
NetBackup, NetBackup Master Appliance, Backup Exec,
NetBackup PureDisk
Applicable View
Master Server, Client
Report Display
Historical (Chart)
Drill down report
No
Can be scheduled
Yes
Supported export formats
CSV, HTML, PDF, XML, TSV
Mapping with VBR report
Backups > Success Rate > Success Rate - First Attempt
The following table shows the filters for Success Rate – First Attempt report and
how you can use these filters to view specific data in the report.
Filter
Column
View
Description
Select a view to show data for the selected view in the report. By
default All My Views is selected.
Master
Server
Master
Server
Media
Server
Media Server Select one or more media servers to view data for the specific
media servers in the report. All media servers that are attached
to the master servers in the OpsCenter console are shown in the
Value dropdown list..
Client
Client Name
Client OS
Select one or more master servers to view data for the selected
master servers in the report. All master servers that are added
to the OpsCenter console are shown in the Value dropdown list.
Select one or more clients to view data for the selected clients in
the report. All clients that are protected by the master servers in
the OpsCenter console are listed.
Select one or more client OS to view data for the selected client
OS in the report.
191
OpsCenter reports
About Report Templates descriptions
Filter
Column
Policy
Policy Data
Select one or more policy data classification names to view data
Classification for the selected policy data classification names.
Name
Select one or more policy keyword to view data for the policies
Policy
having the selected keyword.
Keyword
Select one or more policy names to view data for the selected
Policy Name policies.
Policy Type
Description
Select one or more policy types to view data for the selected
policy types.
Schedule Schedule/Level Select one or more schedule types like CINC, Copy, Daily etc. to
Type
view data for the selected schedule types.
Schedule
Name
Job
Select one or more schedule names to view data for the selected
schedule names.
Job Status
Select one or more Job Status like Failed, Missed, Partially
Successful etc. to view data for the selected job status in the
Job Transport
report.
Type
Select one or more transport types like FT, LAN, or Unknown to
Job Type
view data for the jobs that have the selected transport type.
Product Type
The value selection for Job Type is mandatory. By default, Backup
jobs are shown in the report. You can select one or more job
types like Archive, Backup, Restore etc. to view data for the
selected job types.
Select one or more backup products to view data for the selected
products.
Success
Rate
Consider
Partially
Successful
Job as
Successful
The default selection is Yes.
Select No if you do not want to consider partially successful jobs
as successful.
Selecting Yes or No may impact the Success Rate percentage
that is shown in the report. Consider a policy that has 5 successful
jobs, 3 partially successful jobs, and 2 failed jobs for the first job
attempt. If you select the value as Yes, the Success Rate is 80%.
However if you select the value as No, the Success Rate is
50%.
Examples of filter usage: You can run this report for a few master servers for
which you want to view the success rate for the first attempt.
The following report enhancements have been made for Success Rate - First
Attempt report:
192
OpsCenter reports
About Report Templates descriptions
■
The unit Years has been added for Relative Timeframe selection.
You can now view data for the last x years.
■
The option Next has been removed from the drop-down menu for Relative
Timeframe. You now cannot enter a relative timeframe like Next 2 weeks. This
is because the report does not support any futuristic data.
■
The following options have been removed from Time Frame Group By selection:
■
■
Days of week Average
■
Days of week total
■
Hours of day Average
■
Hours of day Total
■
Minutes
■
Month of year Average
■
Month of year total
■
Quarter
■
Quarter of year Average
■
Quarter of year total
The following Report On options have been added under Backup Job Attributes:
■
Job Status (Complete and Partial only)
■
Job Status (Complete only)
■
Two new filters called Schedule and Success Rate have been added.
■
A new checkbox named Target Performance has been added in the Modify
Display Options page under Timeline Chart Properties. You can use the
Target Performance option to specify where a report draws the target line, with
which you can compare the actual performance shown. The Target Performance
option allows you to specify the target for Y1 axis. In case you set a value of
say 100 for Y1 axis and run the report, you will see a straight line parallel to
X-axis and the value as 100 on Y1 axis. Using this option, you can easily
compare the actual performance with the target performance.
Status & Success Rate > Success Rate > Success Rate - Line
report
This report is a historical report that shows success rate across products, domains,
clients, policies, and business level views. This report simply aggregates jobs
according to success rate and shows these across a timeline. Filtering is available
193
OpsCenter reports
About Report Templates descriptions
on all components and attributes. The primary use case of the report is verification
of trends and the days that are exception to the norm. The report is highly effective
for presenting long-term historical data on one of the most fundamental metrics of
managing a backup operation.
Figure 2-50 shows a sample view of the Success Rate Line report.
Figure 2-50
Success Rate - Line report
The following are details associated with the Success Rate Line report:
Report Name
Success Rate Line report
Report Category
Backup
Where to Locate
Report > Report Templates > Backup > Status & Success
Rate > Status > Success Rate Line
Report Purpose
This report shows job success rate density over time.
Supported products
NetBackup, NetBackup Appliance, Backup Exec, NetBackup
PureDisk
Applicable View
Master Server, Client
Report Display
Historical (Chart)
Drill down report
No
194
OpsCenter reports
About Report Templates descriptions
Can be scheduled
Yes
Supported formats
PDF, CSV, TSV, XML, HTML
Mapping with VBR report
Backups > Success Rate > Success Rate Line
The following table shows the filters for Success Rate Line report and how you can
use these filters to view specific data in the report.
Filter
Column
View
Description
Select a view to show data for the selected view in the report. By
default All My Views is selected.
Master
Server
Master
Server
Select one or more master servers to view data for the selected
master servers in the report. All master servers that are added
to the OpsCenter console are shown in the Value drop-down list
.
Policy
Policy Name
Select one or more policy names to view data for the selected
policies.
Job
Job Type
Select one or more job types like Archive, Backup, Restore etc.
to view data for the selected job types.
Status Code
Select one or more status codes to view data for the selected
status codes.
195
OpsCenter reports
About Report Templates descriptions
Filter
Column
Description
Success
Rate
Aggregation
Level
Select Aggregation Level to consider the kind of jobs for the
specified time frame. For example, if you select First Job
Success Rate then the report shows only the first job for the
combination of master server, client, policy, and schedule.
Full Days
Full Window
Parameter
Metric Type
Full for
Duration of
(In Hours)
Increment
Days
Increment
Window
Parameter
Select Full Days to specify the list of days to be considered for
Full backups.
Select Full Window Parameter to specify the start time for the
full backup window.
Select Metric Type to calculate the success rate based on clients
or jobs.
Select Full for Duration of (In Hours) to calculate the end time
for the incremental backup window. Backup window end time is
equal to the duration from the start time of the backup window.
Select Increment Days to specify the list of days to be considered
for Incremental backups.
Increment for
Select Increment Window Parameter to specify the start time
Duration of
for the incremental backup window.
(In Hours)
Select Increment for Duration of (In Hours) to calculate the end
Consider
time for the incremental backup window. Backup window end
Partially
time is equal to the duration from the start time of the backup
Successful
window.
Job as
Successful
Select Count Partially Successful Job as Successful to count
partially successful jobs as successful while calculating the
Success Rate.
Example of filter usage: Run the Success Rate Line report for a specific job type
like Restore to get an idea of the success rate for restore operations.
The following report enhancements have been made for the Success Rate Line
report:
■
The unit Years has been added for Relative Timeframe selection.
You can now view data for the last x years.
■
The option Next has been removed from the drop-down menu for Relative
Timeframe. You now cannot enter a relative timeframe like Next 2 weeks. This
is because the report does not support any futuristic data.
196
OpsCenter reports
About Report Templates descriptions
About Catalog reports in OpsCenter
This section describes catalog reports for all NetBackup Catalog backup operations
for both NetBackup and NetBackup Appliances..
Cold catalog backup report
This report shows the count of cold NetBackup catalog backups and information
about the media that NetBackup uses for offline backups.
Tool tips in the bar chart show the report name and backup count. The table in the
report also lists the media that NetBackup uses for the backups for each master
server.
About Chargeback reports in OpsCenter
This section provides descriptions of chargeback reports for estimating the specific
costs of providing backup services and storage consumed (with and without
deduplication) to provide chargeback billing of these costs.
Deduplication Chargeback report
See “Deduplication Chargeback report”
on page 197.
Cost Tabular report
See “Cost Tabular report” on page 202.
Chargeback report
See “Backup Chargeback report” on page 202.
Deduplication Chargeback report
This report shows the savings that is achieved because of the deduplication
technology.
To generate this report, you first need to have a cost variable of Protected Job Size.
The deduplication technology can identify files and the data segments that contain
identical data and treats them as a single instance of the file, which it backs up only
once. For example, PureDisk has backed up 100 MB data , in which 20 MB of data
is duplicate or identical. PureDisk protects the same data but eliminates the duplicity
using deduplication. Therefore, the data that is protected is 100 MB, but the actual
data that is backed up by PureDisk is 80 MB, as 20 MB of data is duplicate data.
This results in saving 20 MB of data. You can generate the Deduplication
Chargeback report that shows the amount you have saved using deduplication.
The Deduplication Chargeback report is available in Distribution, Historical, and
Ranking views.
197
OpsCenter reports
About Report Templates descriptions
Figure 2-51 shows a sample distribution view of the Deduplication Chargeback
report.
Figure 2-51
Deduplication Chargeback - Distribution view
Figure 2-52 shows a sample historical view of the Deduplication chargeback report.
198
OpsCenter reports
About Report Templates descriptions
Figure 2-52
Deduplication Chargeback - Historical View
Figure 2-53 shows a sample ranking view of the Deduplication chargeback report.
199
OpsCenter reports
About Report Templates descriptions
Figure 2-53
Deduplication Chargeback - Ranking View
The following are details associated with the Deduplication Chargeback Report:
Report Name
Deduplication Chargeback Report
Report Category
Chargeback Reports
Where to Locate
Report > Report Templates > Chargeback > Deduplication
Chargeback Report
Report Purpose
This report shows the savings that is achieved because of the
deduplication technology.
Supported products
NetBackup, NetBackup Appliance, Backup Exec, NetBackup
PureDisk
Applicable View
Master Server, Client
Report Display
Distribution, Historical, and Ranking
Drill down report
No
Can be scheduled
Yes
Supported export formats
CSV, HTML, PDF, XML, TSV
Mapping with VBR report
Costs > Saving Reports
200
OpsCenter reports
About Report Templates descriptions
The following table shows the filters for Deduplication Chargeback report and how
you can use these filters to view specific data in the report.
Filter
Column
View
Master
Server
Description
Select a view to show data for the selected view in the report. By
default All My Views is selected.
Master
Server
Select one or more master servers to view data for the selected
master servers in the report. All master servers that are added
to the OpsCenter console are shown in the Value dropdown list.
Example of filter usage: Run the Deduplication chargeback report for a specific
master server to view the cost savings for the specific master server.
The following report enhancements have been made for Deduplication Chargeback
report:
■
The unit Years has been added for Relative Timeframe selection.
You can now view data for the last x years.
■
The option Next has been removed from the drop-down menu for Relative
Timeframe. You now cannot enter a relative timeframe like Next 2 weeks. This
is because the report does not support any futuristic data.
■
The following options have been removed from Time Frame Group By selection:
■
■
■
Days of week Average
■
Days of week total
■
Hours of day Average
■
Hours of day Total
■
Minutes
■
Month of year Average
■
Month of year total
■
Quarter
■
Quarter of year Average
■
Quarter of year total
The following Report On options have been added under Backup Job Attributes:
■
Job Status (Complete and Partial only)
■
Job Status (Complete only)
The Master Server Operating system filter has been removed.
201
OpsCenter reports
About Report Templates descriptions
■
The following Report On options have been removed:
■
Backup Image Copy Is Currently Expired
■
Backup Image Copy Media Server
■
Backup Image Encryption State
■
Backup Image Fragment Is Currently Expired
■
Backup Image Is Currently Expired
■
Backup Image Type
■
Data Classification Master Server
■
Data Classification Name
Cost Tabular report
This report shows the chargeback of your backup services in a tabular form.
OpsCenter provides organizations with a tool to evaluate the cost of the IT services
they consume, which is called Chargeback. You can create cost variables and the
formulas that enable you to run the reports that show costs of backup services.
To generate the Cost report you need to have a cost formula created.
Backup Chargeback report
This report shows the chargeback of your backup services in Historical and Ranking
views. You need to have a cost formula created to generate this report.
Figure 2-54 shows a sample Historical view of the Backup Chargeback report:
202
OpsCenter reports
About Report Templates descriptions
Figure 2-54
Backup Chargeback report - Historical View
Figure 2-55 shows a sample Rankings view of the Backup Chargeback report.
203
OpsCenter reports
About Report Templates descriptions
Figure 2-55
Backup Chargeback report - Rankings view
The following are details associated with the Backup Chargeback Report:
Report Name
Backup Chargeback Report
Report Category
Chargeback Reports
Where to Locate
Report > Report Templates > Chargeback > Backup
Chargeback Report
Report Purpose
This report shows the chargeback of your backup services.
Supported products
NetBackup, NetBackup Appliance, Backup Exec, NetBackup
PureDisk
Applicable View
Master Server, Client
Report Display
Historical, Ranking
204
OpsCenter reports
About Report Templates descriptions
Drill down report
No
Can be scheduled
Yes
Supported export formats
CSV, HTML, PDF, XML, TSV
Mapping with VBR report
Costs > Cost Reports
The following table shows the filters for Backup Chargeback report and how you
can use these filters to view specific data in the report.
Filter
Column
View
Master
Server
Description
Select a view to show data for the selected view in the report. By
default All My Views is selected.
Master
Server
Select one or more master servers to view data for the selected
master servers in the report. All master servers that are added
to the OpsCenter console are shown in the Value dropdown list.
Example of filter usage: Run the Backup Chargeback report for a specific master
server to view the cost savings for the specific master server
The following report enhancements have been made for Backup Chargeback report:
■
The option Next has been removed from the drop-down menu for Relative
Timeframe. You now cannot enter a relative timeframe like Next 2 weeks.
■
The following options have been removed from Time Frame Group By selection:
■
■
Days of week Average
■
Days of week total
■
Hours of day Average
■
Hours of day Total
■
Minutes
■
Month of year Average
■
Month of year total
■
Quarter
■
Quarter of year Average
■
Quarter of year total
The unit Years has been added for Relative Timeframe selection. You can now
view data for the last x years.
205
OpsCenter reports
About Report Templates descriptions
■
The following Report On options have been added under Backup Job Attributes:
■
Job Status (Complete and Partial only)
■
Job Status (Complete only)
The following Report On options have been removed:
■
■
Backup Image Copy Is Currently Expired
■
Backup Image Copy Media Server
■
Backup Image Encryption State
■
Backup Image Fragment Is Currently Expired
■
Backup Image Is Currently Expired
■
Backup Image Type
■
Data Classification Master Server
■
Data Classification Name
The Master Server Operating System filter has been removed.
About Client reports in OpsCenter
This section provides and describes the status reports of all NetBackup Clients
(physical and virtual) including at risk vs unprotected vs protected Clients and Bare
Metal Recovery (BMR) status.
Risk Analysis > Client Risk Analysis
See “Risk Analysis > Client Risk Analysis
report” on page 207.
Risk Analysis > Client Coverage
See “Risk Analysis > Client Coverage report”
on page 210.
Risk Analysis > Recovery Point Objective
See “Risk Analysis > Recovery Point
Objective report” on page 218.
About clients not backed up report
See “Clients Not Backed up report”
on page 222.
Virtual Client Summary
See “Virtual Client Summary report”
on page 224.
About job success by client report
See “Job Success by Client report”
on page 228.
About client summary dashboard report
See “Client summary dashboard report”
on page 234.
206
OpsCenter reports
About Report Templates descriptions
About BMR client configuration backup
failures report
See “BMR client configuration backup failures
report” on page 235.
About jobs by application report
See “Jobs by application report” on page 236.
SAN client jobs report
See “ SAN client jobs report” on page 236.
Risk Analysis > Client Risk Analysis report
Risk Analysis provides reports on the NetBackup Clients at risk for being
un-protected or under-protected based on their Recovery Point Objectives (RPO’s).
The Client Risk Analysis report identifies the backup clients that have gone without
a successful backup for a specified period of time and hence are at risk from a
restore standpoint or recoverability standpoint. The “specified period of time” is
user- defined along with several other variables for filtering purposes. The report
is interpreted as all client or policy combinations that have gone x hours, days,
weeks, or months without a successful backup.
The level of granularity is at a client level or policy level and exposes the clients
that have multiple backup policies where one of them may repeatedly fail. The
primary use case is to show that all clients have been backed up as of the last x
hours and all clients have a full backup not more than x days ago. The report also
has an “Is Active” filter to include only those that are currently active as well as the
capability to count partial successes as success and vice versa.
Figure 2-56 shows a sample view of the Client Risk Analysis report.
207
OpsCenter reports
About Report Templates descriptions
Figure 2-56
Client Risk Analysis report
The following table provides details on each column that is displayed in the report:
Client Name
Name of the client that is at risk because of unsuccessful
backup.
Server Name
Name of the server associated with this client.
Policy Name
Name of the associated policy.
Last Successful Job Ended
Date and time when this client was successfully backed up.
Last Full Job Ended
Date and time when the last full backup job ended.
208
OpsCenter reports
About Report Templates descriptions
Last Incremental Job Ended Date and time when the last incremental backup job ended.
Schedule Name
Name of the schedule for the last successful backup of this
client. This column is blank if the client was not successfully
backed up anytime.
Status
Status of the client; whether it is online or offline.
Online At
If the client is offline, this column displays when the client will
be online again. This column is blank if the client is already
online.
The following are details associated with the Client Risk Analysis Report:
Report Name
Client Risk Analysis Report
Report Category
Client Reports
Where to Locate
Report > Report Templates > Client Reports > Client Risk
Analysis Report
Report Purpose
The report takes a look at all of the clients configured and
determines if the client has had a full successful backup in
the time frame specified. If not, it will be called out as a Risk
so that action can be taken to get a successful full backup.
Supported products
NetBackup, NetBackup Appliance, Backup Exec, NetBackup
PureDisk
Applicable View
Master Server, Client
Report Display
Tabular
Drill down report
No
Can be scheduled
Yes
Supported export formats
CSV, HTML, PDF, XML, TSV
Mapping with VBR report
Backups > Risk Analysis > Client Risk Analysis
The following table shows the filters for Client Risk Analysis report and how you
can use these filters to view specific data in the report.
Filter
View
Column
Description
Select a view to show data for the selected view in the report. By
default All My Views is selected.
209
OpsCenter reports
About Report Templates descriptions
Filter
Column
Description
Master
Server
Master
Server
Select one or more master servers to view data for the selected
master servers in the report. All master servers that are added
to the OpsCenter console are shown in the Value dropdown list.
Client
Client is
Active
The default selection is Yes. By default, active clients are
displayed in the report. Hence the clients that are not actively
backed up are omitted by default. Select No if you want to view
the report for all the clients.
Schedule Schedule
/Level Type
Select one or more schedule types like Full, Incremental etc. to
view data for the selected schedule types.
Job
Select a Job Status like Successful or Partially Successful or both
to view data for the selected job status in the report.
Job Status
Example of filter usage: Run the Client Risk Analysis report to include all clients
(both active and non-active) by selecting Client is Active as No.
The following enhancements have been made in the Client Risk Analysis report:
■
The unit Years has been added for Relative Timeframe selection. You can now
view data for the last x years.
■
The option Next has been removed from the drop-down menu for Relative
Timeframe. You now cannot enter a relative timeframe like Next 2 weeks.
■
Earlier there was a Host filter with Host is Active column. The Host filter has
been removed. The Host is Active column is now renamed as Client is Active
column and exists under the Client filter. The default value of Client is Active
column is Yes.
■
The default value of Job Status column under Job filter has been changed to
Successful.
Risk Analysis > Client Coverage report
This is a report where a .CSV file can be imported and compared to the existing
backup solution to determine if there are systems that are not being protected
correctly. The purpose of this report is to show what hosts are not backed up
because the backup application is not even aware of them. The report compares
what OpsCenter hosts are known to be backed up with an external list that is fed
in by .csv file. The list can come from a content management database (CMDB),
DNS listings or any other authoritative source of what hosts should be backed up.
The report works across all backup applications and shows you what backup
application and policy executed the backup and the time of the last full or incremental
backup.
210
OpsCenter reports
About Report Templates descriptions
The Client Coverage report tells you whether all clients in your environment are
being backed up or not. OpsCenter can only report on clients that have already
been defined and configured for backups. This report helps you to identify the clients
that are a part of your environment but are not known to OpsCenter. These clients
may not be getting backed up because of backup software not being installed or
the clients not being configured for backups.
To run this report, you must specify a CSV file (comma-separated value) that
contains a complete and authoritative inventory of all servers across the enterprise.
Some of the independent sources of server inventory across the enterprise which
can be used to generate a CSV file are the following:
■
Configuration Management Database (CMDB)
■
Asset Management System
■
Domain Name System (DNS)
■
Homegrown databases
■
Spreadsheet
OpsCenter imports data from the CSV file and compares the list of clients (available
in CSV) with the clients known to OpsCenter. The clients which are present in CSV
but not in OpsCenter can be easily identified from this report.
Figure 2-57 shows a sample view of the Client Coverage report.
Figure 2-57
Client Coverage report
Note: The CSV file must be located on the machine from where you are running
the Client Coverage report. See “About comparison of clients listed in CSV and
OpsCenter” on page 217. for more information on how the comparison takes place.
211
OpsCenter reports
About Report Templates descriptions
The following table provides details on each column that is displayed in the report:
External Client
Name of the client that appears in the CSV file.
Note: A client may be known by multiple names and all the names
may be documented in the CSV file. The name that appears in the
External Client column is the first name that is documented in the CSV
file. For example, if a CSV file lists multiple names for a client such as,
myhost, myhost.symantec.com, myhost.veritas.com, then myhost
appears in the External Client column.
Backed Up Client
Name of the backed up client in OpsCenter
Message
The result of comparison. The following are the possible messages:
■
Match - Direct
■
Match - FQDN vs. Short name
■
In External List And Not In Backup
The Client Coverage report helps you to identify these clients which
are present in your environment but are not known to OpsCenter. You
must verify if these clients are being backed up.
See “About comparison of clients listed in CSV and OpsCenter”
on page 217.
Product
A list of backup products used for backing up the client, such as,
NetBackup or Backup Exec.
Policy Full Name
The backup policy associated with the client when the last full backup
was successful
Last Full Job Time This is the time when the last full backup was successful for the specific
client.
Policy Name
Incremental
The backup policy associated with the client when the last incremental
backup was successful.
Last Incremental
Job Time
This is the time when the last incremental backup was successful for
the specific client.
The following are details associated with the Client Coverage report:
Report Name
Client Coverage
Report Category
Client
Where to Locate
Report > Report Templates > Client Reports > Risk Analysis
> Client Coverage
212
OpsCenter reports
About Report Templates descriptions
Report Purpose
This report shows a comparison of the list of clients being
backed up against an independently-sourced list (like CMDB,
third party and homegrown asset management systems) of
clients.
Supported products
Symantec NetBackup, Symantec NetBackup Master
Appliance, Backup Exec, NetBackup PureDisk
Applicable View
Client
Report Display
Tabular
Drill down report
No
Can be scheduled
No
Supported export formats
PDF, CSV, TSV, HTML, XML
Mapping with VBR report
Backups > Risk Analysis > Client Risk Analysis > Client
Coverage
The following table shows the filters for Client Coverage report and how you can
use these filters to view specific data in the report.
View Selection
Additional Parameters
Select a view from the Select View Name
drop-down list. This can be done to view the
report for a specific location, department etc.
In case you select a specific view, you must
create the CSV file that contains the clients
in the particular view only. For example, if you
want to see the Client Coverage report for
HR department in Canada, then the CSV file
must contain the client list specific to the HR
department in Canada.
213
OpsCenter reports
About Report Templates descriptions
Client Selection Criteria
214
OpsCenter reports
About Report Templates descriptions
All
■
■
■
■
■
■
■
All: This is selected by default.
Comparison results for all the clients are
displayed.
In external list but was never backed
up: Select this option if you want to view
the clients that are present in your
environment but are not known to
OpsCenter. You must verify if these clients
are being backed up.
Getting backed up but not in external
list: Select this option if you want to view
the clients that are known to OpsCenter
but not present in the CSV file. This may
be due to several reasons like machine
not being available in the network or
machine not registered in the DNS, and
so on.
Is matching (Direct): Select this option
if you want to view the clients for which
host name in CSV is exactly the same as
the host name in OpsCenter. For example,
myhost.symantec.com in CSV and
myhost.symantec.com in OpsCenter.
Is matching (FQDN vs Short Name) :
Select this option if you want to view the
clients for which the host name is an
FQDN in CSV and a short name in
OpsCenter or a short name in CSV and
an FQDN in OpsCenter. For example, if
the CSV file contains myhost.veritas.com
and OpsCenter contains myhost, then the
comparison result is Match - FQDN vs.
Short Name. Similarly, if the CSV file
contains myhost and OpsCenter contains
myhost.veritas.com, then the client is
displayed in the report.
Was getting backed up but not in
external list: Select this option if you want
to view the clients that were being backed
up earlier but not present in the CSV file.
Was matching (Direct): Select this option
if you want to view the clients for which
host name in CSV was exactly the same
as the host name in OpsCenter. For
215
OpsCenter reports
About Report Templates descriptions
■
Wild Card
example, myhost.symantec.com in CSV
and myhost.symantec.com in OpsCenter.
Was matching (FQDN vs Short Name)
: Select this option if you want to view the
clients for which the host name was an
FQDN in CSV and a short name in
OpsCenter or a short name in CSV and
an FQDN in OpsCenter.
You can specify a part of the backed up client
name so that the report shows data only for
the specific backed up clients that are of your
interest. For example, to see details of all
backed up servers running Oracle which are
known to have a string "ora" somewhere in
the host name, you can type the following:
■
■
■
■
■
%ora% - Include or exclude all backed up
clients with ‘ora' anywhere in the host
name
ora - Include or exclude all backed up
clients named ora.
ora% - Include or exclude all backed up
clients whose names start with ora.
%ora - Include or exclude all backed up
clients whose names end with ora.
Similarly, you can specify multiple search
strings as follows:
■ %ora%, %syb% - Include or exclude
all OpsCenter hosts with Ora or Syb
anywhere in the backed up client
name.
Note: This search is applicable only for
Backed up clients and not the External
Clients.
Note: The search is not case-sensitive. For
example, if you search for Ora, you may find
results like ora, Ora, oRa, and so on.
Display Options
Type a report description.
Select the number of rows you want displayed
on a single page.
216
OpsCenter reports
About Report Templates descriptions
Example of filter usage: To view details of all backed up servers running VMWare
that are known to have 'vm' somewhere in the host name, type %vm% in the Wild
Card text box.
About CSV formats
The CSV file required as an input to the Client Coverage report can be created
using a text editor or Microsoft Excel application.
A typical CSV file format is as follows:
Host1_name1,Host1_name2,Host1_name3,Host1_name4
Host2
Host3
Note: Host1_name1,Host1_name2,Host1_name3,Host1_name4 are multiple names
of the same machine. Multiple names for the same machine may exist due to many
reasons like because of a machine having multiple Network Interface Cards etc.
Note: Each host machine exists in a new line. For example, Host1, Host2, and
Host3 all exist in three separate lines.
Here is a sample CSV format:
css-bin3,css-bin3.symantec.com
macy.symantec.com,macy,macy.veritas.com
css-bin10.symantec.com
Note: There is no space after the comma in the CSV file.
About comparison of clients listed in CSV and OpsCenter
OpsCenter imports data from the CSV file and compares the list of clients (available
in CSV) with the clients known to OpsCenter.
The Client Coverage report shows any or all of the following outcomes after
comparison:
217
OpsCenter reports
About Report Templates descriptions
Client is in External This means that a client exists in both the CSV file and OpsCenter
Client and Backed database.
Up Client list
Note: In case multiple names for a system are present in CSV and
OpsCenter, then all the names present in CSV are compared with each
name in OpsCenter till a match is obtained.
The comparison results in this case may be one of the following:
■
■
Match - Direct: This happens when the host name in CSV is exactly
the same as the host name in OpsCenter. For example,
myhost.symantec.com in CSV and myhost.symantec.com in
OpsCenter.
Match - FQDN vs. Short Name: This happens when the host name
is an FQDN in CSV and a short name in OpsCenter or a short name
in CSV and an FQDN in OpsCenter. For example, if the CSV file
contains myhost.veritas.com and OpsCenter contains myhost, then
the comparison result is Match - FQDN vs. Short Name. Similarly,
if the CSV file contains myhost and OpsCenter contains
myhost.veritas.com, then the comparison result is Match - FQDN
vs. Short Name.
In External List
The Client Coverage report helps you to identify these clients which
And Not In Backup are present in your environment but are not known to OpsCenter. You
must verify if these clients are being backed up.
In Backup And Not This happens when the host name is known to OpsCenter but not
In External List
present in the CSV file. This may be due to several reasons like
computer not being available in the network or computer not registered
in the DNS, and so on.
Risk Analysis > Recovery Point Objective report
Recovery Point Objective (RPO) and Recovery Time Objective (RTO) have emerged
as generally accepted metrics for client recoverability. This report ranks all clients
by the amount of time that is elapsed since their last successful backup. The report
shows how long it has been since each system has had a successful backup and
therefore would have difficulty meeting a Recovery Point. In larger environments
being able to run this report on a weekly basis will quickly show where there is risk
due to systems that have not been backed up in a pre-determined amount of time.
In contrast to the Client Risk Analysis report, the level of granularity is the client
level and thus clients with multiple backup policies are represented by the policy
with most recent success. It is recommended that this report not be used for
multi-policy clients. The client “IsActive” filter allows for those hosts that are not
actively being backed up to be omitted. The elapsed time in the report is always
218
OpsCenter reports
About Report Templates descriptions
between now and the last successful backup. The report is effective in its graphical
rankings format placing the clients with longest elapsed time at the top.
Figure 2-58 shows a sample view of the Recovery Point Objective report.
Figure 2-58
Recovery Point Objective report
In the example, no backups have been run for nearly 10 hours for all the clients.
This means that for the five systems on the report, the best RPO possible would
be nearly 10 hours. If you have committed to an 8 hour RPO, then these systems
need to be backed up quickly to be able to meet that SLA.
The following are details associated with the Recovery Point Objective report:
Report Name
Recovery Point Objective
Report Category
Client Reports
Where to Locate
Report > Report Templates > Client Reports > Risk Analysis
> Recovery Point Objective
Report Purpose
User-configurable threshold-based rankings report of clients
exceeding their recovery point objectives.
219
OpsCenter reports
About Report Templates descriptions
Supported products
Symantec NetBackup, Symantec NetBackup Master
Appliance, Symantec Backup Exec, NetBackup PureDisk
Applicable View
Master Server, Client
Report Display
Rankings (Chart)
Drill down report
No
Can be scheduled
Yes
Supported export formats
PDF, CSV, TSV, HTML, XML
Mapping with VBR report
Backups > Risk Analysis > Recovery Point Objective - RPO
The following table shows the filters for Recovery Point Objective report and how
you can use these filters to view specific data in the report.
Filter
Column
View
Description
Select a view to show data for the selected view in the report. By
default All My Views is selected.
Master
Server
Master
Server
Media
Server
Media Server Select one or more media servers to view data for the specific
media servers in the report. All media servers that are attached
to the master servers in the OpsCenter console are shown in the
Value drop-down list.
Client
Client is
Active
Client Name
Client OS
Select one or more master servers to view data for the selected
master servers in the report. All master servers that are added
to the OpsCenter console are shown in the Value drop-down list
.
The default selection is Yes. By default, Active Clients are
displayed in the report. Hence the clients that are not actively
backed up are omitted by default. Select No if you want to view
the report for all the clients.
Select one or more clients to view data for the selected clients in
the report. All clients that are protected by the master servers in
the OpsCenter console are listed.
Select one or more client OS to view data for the selected client
OS in the report.
220
OpsCenter reports
About Report Templates descriptions
Filter
Column
Description
Policy
Policy
Keyword
Select one or more policy keyword to view data for the policies
having the selected keyword.
Policy Name
Select one or more policy names to view data for the selected
policies.
Policy Type
Select one or more policy types to view data for the selected
policy types.
Schedule Schedule/Level Select one or more schedule types like CINC, Copy, Daily etc. to
Type
view data for the selected schedule types.
Schedule
Name
Job
Select one or more schedule names to view data for the selected
schedule names.
Job Status
Select one or more Job Status like Failed, Missed, Partially
Successful etc. to view data for the selected job status in the
Job Transport
report.
Type
Select one or more transport types like FT, LAN, or Unknown to
Job Type
view data for the jobs that have the selected transport type.
The value selection for Job Type is mandatory. By default, Backup
jobs are shown in the report. You can select one or more job
types like Archive, Backup, Restore etc. to view data for the
selected job types.
Example of filter usage: You may run the report for specific master servers to
view details for the clients backed up by specific master servers.
The following enhancements have been made in the Stored Backup Images on
Media report:
■
You can now click (drill down) the bar for each client and view Recovery Point
Objective report for job type, schedule/level type and policy name.
■
The Job Type column has been added under the Job filter.
■
For the Policy filter, the following columns have been added:
■
Policy Keyword
■
Policy Type
■
The Schedule filter has been added.
■
The following Report On parameters have been added:
■
Job Type
■
Policy Name
221
OpsCenter reports
About Report Templates descriptions
■
■
Schedule/Level Type
Earlier there was a Host filter with Host is Active column. The Host filter has
been removed. The Host is Active column is now renamed as Client is Active
column and exists under the Client filter. The default value of Client is Active
column is Yes.
Clients Not Backed up report
This report provides a list of NetBackup clients that have not been backed up or
clients for which all backups failed during the reporting period.
You can determine if all jobs of a policy and client combination have failed or have
not been initiated during the reporting period. You can filter by type of policy like
SharePoint, Oracle, Windows NT and so on.
The client name is displayed multiple times in the report if the client has multiple
NetBackup policies that are associated with it and none of the policies are run during
the reporting period. The report shows details like policy name, schedule name,
and date of the last successful backup.
You can now view data in this report for a specific client view by selecting a client
view from the View filter. Earlier you could only filter the report data for a master
server view.
Figure 2-59 shows a sample view of the Clients not backed up report.
Figure 2-59
Clients Not Backed up report
The following are details for the Clients Not Backed up report:
222
OpsCenter reports
About Report Templates descriptions
Report Name
Clients Not Backed up
Report Category
Client Reports
Where to Locate
Report > Report Templates > Client Reports > Clients Not
Backed up
Report Purpose
This report lists all the clients that are not backed up in the
selected timeframe.
Supported products
Symantec Backup Exec, NetBackup, NetBackup Master
Appliance, NetBackup PureDisk
Applicable View
Master Server, Client
Report Display
Tabular
Drill down report
No
Can be scheduled
Yes
Supported export formats
PDF, CSV, TSV, XML, HTML
Mapping with NOM report
All Reports > Standard Reports > Client > Clients Not Backed
up
Deviation from NOM
Last Successful Backup column shows the job end time in
OpsCenter. However, this column shows the job start time in
NOM.
The following table shows the filters for Clients not backed up report and how you
can use these filters to view specific data in the report.
Filter
Column
View
Policy
Description
Select a view to show data for the selected view in the report. By
default All My Views is selected.
Policy Type
Select one or more policy types like NDMP, FlashBackup etc. to
view data for the selected policy types.
Example of filter usage: You may run the Clients not Backed up report for a specific
policy type like FlashBackup to view backup details for the specific policy type.
The following enhancements have been made in the Clients Not Backed up report:
■
The unit Years has been added for Relative Timeframe selection. You can now
view data for the last x years. You can also see the Years tab on top-right corner
of the Tabular Backup Report.
223
OpsCenter reports
About Report Templates descriptions
■
UNKNOWN has been added as a value for Policy Type column in the Policy
filter. You can now filter report data for policy types that are unknown. In earlier
versions of OpsCenter, the unknown policy types were shown as blank.
Virtual Client Summary report
The Virtual Client Summary report shows details of all virtual clients of a NetBackup
master server. Using this report, you can determine whether these virtual clients
were backed up by NetBackup or not. Thus, you can report on the virtual clients
that need to be protected. It also shows at a glance that last time the client was
backed up. .
You can also drill down in this report to see the job details of a specific virtual client.
OpsCenter can poll the vCenter or Hyper-V server to determine what systems have
been configured and compare that with the NetBackup policies that have been
created. This helps to track those virtual machines that are not being protected by
any NetBackup polices.
Note: Cheking that the virtual machine is added in the is possible opnly when the
policy is manually created or when successful backup has happened for the virtual
machine.
Figure 2-60 shows a sample view of the Virtual Client Summary report.
Figure 2-60
Virtual Client Summary report
The sample report shows an example of vCenter server that has a number of VMs
configured. Most of the virtual clients do not exist in any NetBackup policy and need
224
OpsCenter reports
About Report Templates descriptions
to be added or protected. It also shows at a glance the last time the system was
backed up (from the Last Successful Backup Time column).
The Virtual Client Summary report shows the following columns:
Virtual Server Name
Name of the virtual server host such as VMware
or Hyper-V server
Data Store
Data store associated with the virtual client. Data
Store is where virtual machine configuration files
are stored.
Host
Name of the backup host.
Virtual Client Name
Display name of the virtual client running on a
virtual server.
Multiple virtual clients may have the same IP
address. But they can be identified by their UUIDs.
UUID is a unique identifier of a virtual client.
Note: Click the virtual client name link to view its
job details.
UUID
BIOS UUID for the virtual client.
VM Host Name
Instance ID
IP Address
IP address of the virtual client
Type
Type of the virtual server that this client belongs
to, such as VMware or Hyper-V
Server Name
Name of the NetBackup Master Server, which
backs up this virtual client
This field is shown blank if this virtual client is not
backed up by any NetBackup master server
Exists in a Policy
This status field that describes whether backing
up this virtual client is defined in any NetBackup
policy or not
If a NetBackup Master Server backs up this client,
this field displays “Yes”. If it shows “No”, it means
that this client should be backed up and be
protected.
225
OpsCenter reports
About Report Templates descriptions
Last Backup Time
Time when this virtual client was backed up last
This field displays '-' if the client is not defined in
a backup policy or it is yet to be backed up.
The following are details for the Virtual Client Summary report:
Report Name
Virtual Client Summary
Report Category
Client Reports
Where to Locate
Report > Report Templates > Client Reports > Virtual Client
Summary
Report Purpose
This report shows details of the VMware or Hyper-V servers
that you have configured with NetBackup. It also shows
whether these virtual machines are protected by NetBackup
or not.
Supported products
NetBackup, NetBackup Master Appliance
Applicable View
Master Server, Client
Report Display
Tabular
Drill down report
Yes
See “Virtual Client Job Details” on page 227.
Can be scheduled
Yes
Supported export formats
PDF, CSV, TSV, XML, HTML
Mapping with NOM report
All Reports > Standard Reports > Client > Virtual Client
Summary
The following table shows the filters for Virtual Client Summary report and how you
can use these filters to view specific data in the report.
Filter
Column
View
Master
Server
Description
Select a view to show data for the selected view in the report. By
default All My Views is selected.
Master
Server
Select one or more master servers to view data for the virtual
clients backed up by the selected master servers in the report.
All master servers that are added to the OpsCenter console are
shown in the Value dropdown list.
226
OpsCenter reports
About Report Templates descriptions
Example of filter usage: You may run the Virtual Client Summary report for a
specific client view to view details for the specific clients.
Virtual Client Job Details
This drilldown report is obtained when you click a virtual client name (link) from the
Virtual Summary report. This report shows details for a virtual client like policies,
schedules, backup start and end time, data backed up etc.
Figure 2-61 shows a sample view of the Virtual Client Job Details report.
Figure 2-61
Virtual Client Job Details
The following are details associated with the Virtual Client Job Details report:
Report Name
Virtual Client Job Details
Report Category
Client Reports
Where to Locate
Report > Report Templates > Client Reports > Virtual Client
Summary (click the virtual client name) > Virtual Client Job
Details
Report Purpose
This report shows the details of selected virtual machine.
Supported products
NetBackup, NetBackup Appliance
Applicable View
Master Server, Client
Report Display
Tabular
Drill down report
None
Can be scheduled
Yes
227
OpsCenter reports
About Report Templates descriptions
Supported formats
PDF, CSV, TSV, XML, HTML
Mapping with NOM report
All Reports > Standard Reports > Client > Virtual Client
Summary (click the virtual client name)
The following table shows the filters for Virtual Client Job Details report and how
you can use these filters to view specific data in the report.
Filter
Column
View
Description
Select a view to show data for the selected view in the report. By
default All My Views is selected.
Master
Server
Master
Server
Select one or more master servers to view data for the virtual
clients backed up by the selected master servers in the report.
All master servers that are added to the OpsCenter console are
shown in the Value drop-down list .
Client
Client Name
Select one or more clients to view data for the selected clients in
the report. All clients that are protected by the master servers in
the OpsCenter console are listed.
Example of filter usage: You may run the Virtual Client Job Details report for a
specific client to view details for the specific clients.
Job Success by Client report
This report shows the rate of success for client jobs.
The bar chart shows totals for successful, partially successful, and failed jobs for
each client that is backed up by the selected master servers. Tool tips in the bars
show these job counts. The tool tips for each client also include links to a drill-down
report showing details for all job types.
Click Show Chart as Table link to display job counts of successful, partially
successful, or failed jobs for each client in the selected timeframe.
Figure 2-62 shows a sample view of the Job Success by Client report.
228
OpsCenter reports
About Report Templates descriptions
Figure 2-62
Job Success by Client report
The following are details for the Job Success by Client report:
Report Name
Job Success by Client
Report Category
Client Reports
Where to Locate
Report > Report Templates > Client Reports > Job Success
by Client
229
OpsCenter reports
About Report Templates descriptions
Report Purpose
This report shows the job success by client. This report is valid
for NetBackup and NetBackup Appliance.
Supported products
NetBackup, NetBackup Master Appliance
Applicable View
Master Server, Client
Report Display
Historical (Chart)
Drill down report
Job Details by Client
Can be scheduled
Yes
Supported export formats
PDF, CSV, TSV, XML, HTML
Mapping with NOM report
All Reports > Standard Reports > Client > Job Success by
Client
The following table shows the filters for Job Success by Client report and how you
can use these filters to view specific data in the report.
Filter
Column
View
Master
Server
Description
Select a view to show data for the selected view in the report. By
default All My Views is selected.
Master
Server
Select one or more master servers to view data for the clients
backed up by the selected master servers in the report. All master
servers that are added to the OpsCenter console are shown in
the Value drop-down list .
Example of filter usage: You may run the Job Success by Client report for a
specific master server to view job success details for the clients that are protected
by the specific master server.
The following enhancements have been made for the Job Success by Client report:
■
You can now drill down by clicking the bars in the report. A drill-down report
called Job Details by Client is available.
■
The Report On parameter that let you group the report by Exit Status has been
removed from the Modify Display Options page.
Job Details by Client
This report can be drilled down either by clicking the bar charts in Jobs Success
by Client report or from the Client Name column in Jobs Success by Client (Tabular)
report. This drilldown report lists details of all the jobs for the selected client and
time frame.
230
OpsCenter reports
About Report Templates descriptions
The table includes details like Job type, status code, and media server name.
The report now also displays the Media Server column.
Figure 2-63 shows a sample view of the Job Details by Client report.
Figure 2-63
Job Details by Client
The following is more information on the Job Details by Client report:
Report Name
Job Details by Client
Report Category
Client Reports
Where to Locate
Report > Report Templates > Client Reports > Job Success
by Client (click the bar chart) or Job Success by Client
(Tabular) (click the Client Name column)
231
OpsCenter reports
About Report Templates descriptions
Report Purpose
This report lists job details for client. This report is valid for
NetBackup and NetBackup Appliance.
Supported products
NetBackup, NetBackup Master Appliance
Applicable View
Master Server, Client
Report Display
Tabular
Drill down report
No
Can be scheduled
Yes
Supported export formats
PDF, CSV, TSV, XML, HTML
Mapping with NOM report
All Reports > Standard Reports > Client > Job Success by
Client > Job Details by Client
The following table shows the filters for Job Details by Client report and how you
can use these filters to view specific data in the report.
Filter
Column
View
Description
Select a view to show data for the selected view in the report. By
default All My Views is selected.
Master
Server
Master
Server
Select one or more master servers to view data for the clients
backed up by the selected master servers in the report. All master
servers that are added to the OpsCenter console are shown in
the Value drop-down list .
Client
Client Name
Select one or more clients to view data for the selected clients in
the report. All clients that are protected by the master servers in
the OpsCenter console are listed.
Example of filter usage: You may run the Job Details by Client report for specific
clients or master servers.
Job Success by Client (Tabular) report
This report shows the rate of success for client jobs. The tabular report shows totals
for successful, partially successful, and failed jobs for each client that is backed up
by the selected master servers.
You can also drill-down from the following columns in the table:
■
Client Name
■
Number of Successful Jobs
232
OpsCenter reports
About Report Templates descriptions
■
Number of Partially Successful Jobs
■
Number of Failed Jobs
Figure 2-64 shows a sample view of the Job Success by Client (Tabular) report.
Figure 2-64
Job Success by Client (Tabular) report
The following are details for the Job Success by Client (Tabular) report:
Report Name
Job Success by Client
Report Category
Client Reports
Where to Locate
Report > Report Templates > Client Reports > Job Success
by Client (Tabular)
Report Purpose
This report shows the job success by client. This report is valid
for NetBackup and NetBackup Appliance.
Supported products
NetBackup, NetBackup Master Appliance
Applicable View
Master Server, Client
Report Display
Tabular
Drill down report
Job Details for Client
Successful Job Details for Client
Partially Successful Job Details for Client
Failed Job Details for Client
Can be scheduled
Yes
Supported export formats
PDF, CSV, TSV, XML, HTML
233
OpsCenter reports
About Report Templates descriptions
Mapping with NOM report
All Reports > Standard Reports > Client > Job Success by
Client
The following table shows the filters for Job Success by Client report and how you
can use these filters to view specific data in the report.
Filter
Column
View
Description
Select a view to show data for the selected view in the report. By
default All My Views is selected.
Master
Server
Master
Server
Select one or more master servers to view data for the clients
backed up by the selected master servers in the report. All master
servers that are added to the OpsCenter console are shown in
the Value drop-down list .
Client
Client Name
Select one or more clients to view data for the clients.
Example of filter usage: You may run the Job Success by Client (Tabular) report
for specific clients to view job success details for the selected clients.
Client summary dashboard report
This report summarizes several parameters for each client for the selected server
context and acts as a dashboard of NetBackup activities. You can use drilldown
links to view client detail reports for many of the columns in the table.
The drilldown reports provide information about the client and answer the following
questions:
■
What is the server name, IP address, and operating system type?
■
How much volume for a client is backed up?
■
How many successful, partially successful, and failed jobs for the client?
■
What is the number of restore jobs that run for the client?
■
What is the average job throughput?
You can now view data in this report for a specific client view by selecting a client
view from the View filter. Earlier you could only filter the report data for a master
server view.
The report can also be used as a tool to monitor the health of backup activities for
your managed clients.
234
OpsCenter reports
About Report Templates descriptions
Total jobs for client report
This drilldown report from the Number of Total
Jobs column lists all the jobs for the selected client
and time frame. The job details include policy
name, schedule name, and throughput (KB/sec).
This drilldown report uses the run time parameters
that are passed from the main report.
Successful jobs for client report
This drilldown report from the Number of
Successful Jobs column lists the successful jobs
for the selected client and time frame. The report
lists job details, such as, job type, policy name,
start and end times, and job duration.
This drilldown report uses the run time parameters
that are passed from the main report.
Partially successful jobs for client report This drilldown report from the Number of Partial
Successful Jobs column shows the partially
successful jobs for the selected client and time
frame. The report lists job details, such as, job type,
policy name, start and end times, and job duration.
This drilldown report uses the run time parameters
that are passed from the main report.
Failed jobs for client report
This drilldown report from the Number of Failed
Jobs column lists the failed jobs for the selected
client and time frame. Any jobs with an exit status
other than 0 or 1 are considered to be failed jobs.
The report lists job details, such as, job type, policy
name, start and end times, and job duration.
This drilldown report uses the run time parameters
that are passed from the main report.
Restore jobs for client report
This drilldown report from the Number of Restore
Jobs column lists restores job details for the
selected client. It provides details like policy name,
schedule name, and throughput (KB/sec).
This drilldown report uses the run time parameters
that are passed from the main report.
BMR client configuration backup failures report
If a NetBackup policy has the Collect BMR Info flag set, the job backs up BMR
(Bare Metal Restore) client configuration. This job type starts one or more dependant
jobs to back up the client data.
235
OpsCenter reports
About Report Templates descriptions
This report shows all jobs that failed to completely back up a BMR client
configuration, but their related child jobs (client data backup jobs) were partially or
fully successful.
You can now view data in this report for a specific client view by selecting a client
view from the View filter. Earlier you could only filter the report data for a master
server view.
Jobs by application report
This report uses the NetBackup policy type to simulate an application level report.
For example, an Oracle policy type implies an Oracle application. The report then
lets you see all Oracle backups.
The table in this report organizes jobs in the table by server, client, and application
and includes the backup size in MBs and the number of files. The Application (policy
type) column provides a drilldown link to job details for the respective application.
There is a drilldown report available from the Application column of the table of
the main report. This drilldown report lists all the jobs for the selected client and
policy type. The table includes job details such as, job ID, exit status, and job start
and end times, and a count of files.
This drilldown report uses the run time parameters that are passed from the main
report.
SAN client jobs report
This report shows all the jobs for selected Fiber Transport (FT) media servers and
selected SAN clients.
The report answers the following questions and provides the following information:
■
Did the job run on a LAN or an FT pipe?
■
Are two different clients backed up by a single media server, thus reducing the
throughput?
■
A list of all the FT media servers
■
A list of all the SAN clients.
About Cloud reports
Cloud reports provide information for the NetBackup data written to a cloud storage
location including storage forecasting, trending, throughput performance, and
chargeback costs of storing NetBackup data in a specific cloud storage provider.
Cloud reports are only for NetBackup servers that have Cloud configured on them.
236
OpsCenter reports
About Report Templates descriptions
The following Cloud reports are available:
Job Success Rate
See “Job Success Rate report” on page 237.
Data Expiring in Future
See “Data Expiring in Future” on page 240.
Cloud Metering
See “Cloud Metering” on page 243.
Average Data Transfer Rate
See “Average Data Transfer Rate” on page 245.
Cloud Metering Chargeback
See “Cloud Metering Chargeback” on page 248.
Job Success Rate report
This report gives the success rate of backup jobs on the Cloud for each configured
Cloud storage provider. It also helps you to compare job success rates for different
Cloud storage providers.
You can also view the Success Rate (%) for a specific job end date or time in a
tabular format. Click Show Table to view the details in a tabular format.
The X-axis shows the Job end time and date and Y-axis shows the Job Success
Rate in percentage. The Legend defines different colors for specific storage
providers.
Click Show Chart as Table to view details in the tabular format.
Figure 2-65 is a sample view of the Job Success Rate report.
237
OpsCenter reports
About Report Templates descriptions
Figure 2-65
Job Success Rate report
The following are details associated with the Job Success Rate report:
Report Name
Job Success Rate
Report Category
Cloud Reports
Where to Locate
Report > Report Templates > Cloud Reports > Job Success
Rate
Report Purpose
Success rate by job level across products, domains, clients,
policies and business level views.
Supported products
Symantec NetBackup, Symantec NetBackup Master Appliance
238
OpsCenter reports
About Report Templates descriptions
Applicable View
Master Server, Client
Report Display
Historical
Drill down report
None
Can be scheduled
Yes
Supported formats
PDF, CSV, TSV, XML, HTML
You can edit the report and configure the timeframe or run the report for specific
views, clients, or master servers.
The following table shows the filters for Job Success Rate report and how you can
use these filters to view specific data in the report.
Filter
Column
View
Description
Select a view to show data for the selected view in the report.
By default All My Views is selected.
Master
Server
Master Server Select one or more master servers to view data for the selected
master servers in the report. All master servers that are added
to the OpsCenter console are shown in the Value drop-down
list .
Media
Server
Media Server
Client
Client is Active The default selection is Yes. By default, Active Clients are
displayed in the report. Hence the clients that are not actively
Client Name
backed up are omitted by default. Select No if you want to view
Client OS
the report for all the clients.
Select one or more media servers to view data for the specific
media servers in the report. All media servers that are attached
to the master servers in the OpsCenter console are shown in
the Value drop-down list.
Select one or more clients to view data for the selected clients
in the report. All clients that are protected by the master servers
in the OpsCenter console are listed.
Select one or more client OS to view data for the selected client
OS in the report.
239
OpsCenter reports
About Report Templates descriptions
Filter
Column
Description
Policy
Policy Data
Classification
Name
Select one or more policy data classification names to view data
for the selected policy data classification names.
Policy
Keyword
Policy Name
Policy Type
Select one or more policy keyword to view data for the policies
having the selected keyword.
Select one or more policy names to view data for the selected
policies.
Select one or more policy types to view data for the selected
policy types.
Schedule Schedule/Level Select one or more schedule types like CINC, Copy, Daily etc.
Type
to view data for the selected schedule types.
Job
Job Status
Select one or more Job Status like Failed, Missed, Partially
Successful etc. to view data for the selected job status in the
Job Transport
report.
Type
Select one or more transport types like FT, LAN, or Unknown to
Product Type
view data for the jobs that have the selected transport type.
Select one or more backup products to view data for the selected
products.
Success
Rate
Client Name
Select one or more clients to view data for the selected clients
in the report. All clients that are protected by the master servers
in the OpsCenter console are listed.
Example of filter usage: You may run the Job Success Rate report for specific
clients to view details only for the specific clients.
You can also select time interval for which you want to group the records. For
example, if you select 1 month as the Time Frame and 10 days as the Group By
interval, the report shows records in three chunks of data grouped by 10 days.
Data Expiring in Future
The report shows how much data on the Cloud is going to expire for each Cloud
provider. By default, the report shows the data expiring each day for the next seven
days.
The report shows the total expired backup size and also the number of images that
are going to expire in the next seven days for each Cloud provider. The Y1 axis
gives the total expired backup size and the Y2 axis indicates the number of images
that are going to expire. Click Show Chart as Table to view the data in a tabular
format.
Figure 2-66 shows a sample view of the Data Expiring in Future report.
240
OpsCenter reports
About Report Templates descriptions
Figure 2-66
Data Expiring in Future
The following are details associated with the Data Expiring in Future report:
Report Name
Data Expiring in Future
Report Category
Cloud Reports
Where to Locate
Report > Report Templates > Cloud Reports > Data Expiring
in Future
Report Purpose
This report shows the data expiring each day for the next 7
days.
241
OpsCenter reports
About Report Templates descriptions
Supported products
Symantec NetBackup, Symantec NetBackup Master Appliance
Applicable View
Master Server
Report Display
Historical
Drill down report
None
Can be scheduled
Yes
Supported formats
PDF, CSV, TSV, XML, HTML
You can edit the report and configure the timeframe or run the report for specific
views, clients, or master servers.
The following table shows the filters for Data Expiring in Future report and how you
can use these filters to view specific data in the report.
Filter
Column
View
Description
Select a view to show data for the selected view in the report.
By default All My Views is selected.
Master
Server
Master Server Select one or more master servers to view data for the selected
master servers in the report. All master servers that are added
to the OpsCenter console are shown in the Value drop-down
list .
Media
Server
Media Server
Client
Client is Active The default selection is Yes. By default, Active Clients are
displayed in the report. Hence the clients that are not actively
Client Name
backed up are omitted by default. Select No if you want to view
Client OS
the report for all the clients.
Select one or more media servers to view data for the specific
media servers in the report. All media servers that are attached
to the master servers in the OpsCenter console are shown in
the Value drop-down list.
Select one or more clients to view data for the selected clients
in the report. All clients that are protected by the master servers
in the OpsCenter console are listed.
Select one or more client OS to view data for the selected client
OS in the report.
242
OpsCenter reports
About Report Templates descriptions
Filter
Column
Description
Policy
Policy Data
Classification
Name
Select one or more policy data classification names to view data
for the selected policy data classification names.
Policy
Keyword
Policy Name
Policy Type
Select one or more policy keyword to view data for the policies
having the selected keyword.
Select one or more policy names to view data for the selected
policies.
Select one or more policy types to view data for the selected
policy types.
Schedule Schedule/Level Select one or more schedule types like CINC, Copy, Daily etc.
Type
to view data for the selected schedule types.
Job
Job Status
Select one or more Job Status like Failed, Missed, Partially
Successful etc. to view data for the selected job status in the
Job Transport
report.
Type
Select one or more transport types like FT, LAN, or Unknown to
Job Type
view data for the jobs that have the selected transport type.
Product Type
Select one or more job types like Archive, Backup, Restore etc.
to view data for the selected job types.
Select one or more backup products to view data for the selected
products.
Example of filter usage: You may run the Data Expiring in Future report for specific
clients to view details only for the specific clients.
Cloud Metering
This report shows the data written to the cloud. It also shows forecast and trend.
Figure 2-67 shows a sample view of the Cloud Metering report.
243
OpsCenter reports
About Report Templates descriptions
Figure 2-67
Cloud Metering report
The following are details associated with the Cloud Metering report:
Report Name
Cloud Metering
Report Category
Cloud Reports
Where to Locate
Report > Report Templates > Cloud Reports > Cloud Metering
Report Purpose
Historical view of data written to cloud per Cloud Provider.
244
OpsCenter reports
About Report Templates descriptions
Supported products
Symantec NetBackup
Note: Symantec NetBackup Appliance is not supported.
Applicable View
Master Server
Report Display
Historical
Drill down report
None
Can be scheduled
Yes
Supported formats
PDF, CSV, TSV, XML, HTML
You can edit the report and configure the timeframe or run the report for specific
views or media servers.
The following table shows the filters for the Cloud Metering report and how you can
use these filters to view specific data in the report.
Filter
Column
View
Media
Server
Description
Select a view to show data for the selected view in the report.
By default All My Views is selected.
Media Server
Select one or more media servers to view data for the specific
media servers in the report. All media servers that are attached
to the master servers in the OpsCenter console are shown in
the Value drop-down list.
Example of filter usage: You may run the Cloud Metering report for specific media
servers to view details only for the specific media servers.
Average Data Transfer Rate
You can see the Cloud job count and throughput in KB/sec. The bars represent job
count while the lines represent throughput.
This report gives an insight on the throughput for each Cloud Provider. If you are
using services from multiple Cloud providers, you can compare and identify the
Cloud provider that is providing a better throughput.
Figure 2-68 shows a sample view of the Average Data Transfer Rate report.
245
OpsCenter reports
About Report Templates descriptions
Figure 2-68
Average Data Transfer Rate report
The following are details associated with the Average Data Transfer Rate report:
Report Name
Average Data Transfer Rate
Report Category
Cloud Reports
Where to Locate
Report > Report Templates > Cloud Reports > Average Data
Transfer Rate
Report Purpose
Data expiring each day for the next 7 days.
246
OpsCenter reports
About Report Templates descriptions
Supported products
Symantec NetBackup, Symantec NetBackup Master Appliance
Applicable View
Master Server
Report Display
Historical
Drill down report
None
Can be scheduled
Yes
Supported formats
PDF, CSV, TSV, XML, HTML
You can edit the report and configure the timeframe or run the report for specific
views, clients, or master servers.
The following table shows the filters for Average Data Transfer Rate report and
how you can use these filters to view specific data in the report.
Filter
Column
View
Description
Select a view to show data for the selected view in the report.
By default All My Views is selected.
Master
Server
Master Server Select one or more master servers to view data for the selected
master servers in the report. All master servers that are added
to the OpsCenter console are shown in the Value drop-down
list .
Media
Server
Media Server
Client
Client is Active The default selection is Yes. By default, Active Clients are
displayed in the report. Hence the clients that are not actively
Client Name
backed up are omitted by default. Select No if you want to view
Client OS
the report for all the clients.
Select one or more media servers to view data for the specific
media servers in the report. All media servers that are attached
to the master servers in the OpsCenter console are shown in
the Value drop-down list.
Select one or more clients to view data for the selected clients
in the report. All clients that are protected by the master servers
in the OpsCenter console are listed.
Select one or more client OS to view data for the selected client
OS in the report.
247
OpsCenter reports
About Report Templates descriptions
Filter
Column
Description
Policy
Policy Data
Classification
Name
Select one or more policy data classification names to view data
for the selected policy data classification names.
Policy
Keyword
Policy Name
Policy Type
Schedule Schedule
Name
Job
Select one or more policy keyword to view data for the policies
having the selected keyword.
Select one or more policy names to view data for the selected
policies.
Select one or more policy types to view data for the selected
policy types.
Select one or more schedule names to view data for the selected
schedules.
Job Status
Select one or more Job Status like Failed, Missed, Partially
Successful etc. to view data for the selected job status in the
Job Transport
report.
Type
Select one or more transport types like FT, LAN, or Unknown to
Product Type
view data for the jobs that have the selected transport type.
Select one or more backup products to view data for the selected
products.
Example of filter usage: You may run the Average Data Transfer Rate report for
specific master servers to view details only for the specific master servers.
Cloud Metering Chargeback
This report is valid for Symantec NetBackup OpsCenter Analytics (a licensed version
of OpsCenter). To run this report, you need a cost formula based on a cost variable
that uses the Storage Server variable metric. To do this, first create a cost variable
based on a variable metric named Storage Size and then create a cost formula
based on this cost variable. Only the cost formulae that are based on the Storage
Server variable metric appear in the Cost Formula drop-down list.
The Cloud Metering Chargeback report calculates how much you need to pay to
the Cloud provider on a specific date. The forecast and trendlines help you
understand how much you are going to spend on a particular Cloud provider in the
future.
The Ranking view shows the amount you pay to each Cloud-provider. From the
Ranking view, you can compare the price that you pay to each Cloud provider.
Figure 2-69 shows a sample view of the Cloud Metering Chargeback report.
248
OpsCenter reports
About Report Templates descriptions
Figure 2-69
Cloud Metering Chargeback report
The following are details associated with the Cloud Metering Chargeback report:
Report Name
Cloud Metering Chargeback
Report Category
Cloud Reports
Where to Locate
Report > Report Templates > Cloud Reports > Cloud Metering
Chargeback
Report Purpose
Metering Chargeback
249
OpsCenter reports
About Report Templates descriptions
Supported products
Symantec NetBackup
Note: Symantec NetBackup Appliance is not supported.
Applicable View
Master Server
Report Display
Historical, Ranking
Drill down report
None
Can be scheduled
Yes
Supported formats
PDF, CSV, TSV, XML, HTML
You can edit the report and configure the timeframe or run the report for specific
views or media servers.
The following table shows the filters for the Cloud Metering Chargeback report and
how you can use these filters to view specific data in the report.
Filter
Column
View
Media
Server
Description
Select a view to show data for the selected view in the report.
By default All My Views is selected.
Media Server
Select one or more media servers to view data for the specific
media servers in the report. All media servers that are attached
to the master servers in the OpsCenter console are shown in
the Value drop-down list.
Example of filter usage: You may run the Cloud Metering Chargeback report for
specific media servers to view details only for the specific media servers.
About Disk and Tape Device Activity reports in OpsCenter
Disk and tape device activity reports provide information for all the NetBackup disk,
tape, and SAN Client storage units showing utilization and free space available in
each storage device for each master server
Current Disk Pool Usage report
See “Disk and Tape Device Activity > Current
Disk Pool Usage Report” on page 251.
NetBackup Disk Pool Capacity report
See “NetBackup Disk Pool Capacity report”
on page 253.
NetBackup Disk Pool Size vs. Percentage
Full report
See “ NetBackup Disk Pool Size vs.
Percentage Full report” on page 253.
250
OpsCenter reports
About Report Templates descriptions
Library Summary report
See “ Library Summary report” on page 253.
Library Capacity Forecast report
See “ Library Capacity Forecast report”
on page 254.
Drive Throughput report
See “Disk and Tape Device Activity > Tape
Drive Throughput” on page 254.
Drive Utilization report
See “Disk and Tape Device Activity > Tape
Drive Utilization Report” on page 257.
Disk Usage report
See “ Disk Usage report” on page 259.
Storage Unit Usage report
See “ Storage Unit Usage report” on page 262.
Disk and Tape Device Activity > Current Disk Pool Usage Report
This report shows a comprehensive utilization of disk by pool and type for each
master server that has configured disk pools. It provides details about the disk pool
usage and also about the free space available in the disk pool.
Figure 2-70 shows a sample view of Current Disk Pool Usage Report.
Figure 2-70
Current Disk Pool Usage Report
The following are the details that are associated with the Current Disk Pool
Usage report:
Report Name
Current Disk Pool Usage
Report Category
Disk and Tape Device Activity
Where to Locate
Report > Report Templates > Disk and Tape Device Activity
> Current Disk Pool Usage report.
251
OpsCenter reports
About Report Templates descriptions
Report Purpose
Comprehensive utilization report by disk pool and disk type
for each master server for NetBackup and NetBackup
Appliance.
Supported products
Symantec NetBackup, Symantec NetBackup Master Appliance
Applicable View
Master Server
Report Display
Tabular
Drill down report
None
Can be scheduled
Yes
Supported formats
PDF, CSV, TSV, XML, HTML
Mapping with NOM report
All Reports > Standard Reports > Disk Based Data Protection
> Current Disk Pool Usage
You can edit the Current Disk Pool Usage report to show or hide the columns
that you are interested in. All the columns are shown by default. You can also filter
the report to view reports of specific master servers. The following table shows the
filters for Current Disk Pool Usage report and how you can use these filters to
view specific data in the report.
Filter
Column
View
Master
Server
Description
Select a view to show data for the selected view in the report. By
default All My Views is selected.
Master
Server
Select one or more master servers to view data for the virtual
clients that are backed up by the selected master servers in the
report. All master servers that are added to the OpsCenter console
are shown in the Value drop-down list .
Example of filter usage: Run the Current Disk Pool Usage report for a specific
master server to view the used disk space for that master server.
The following report enhancements have been made for the Current Disk Pool
Usage report:
■
Job Transport Type column has been added to the Job filter. For example,
you can view report data for jobs for which the Job transport type is FT or LAN.
■
The column heading Server Type has been modified to Disk Type.
■
New columns Configured for Snapshots and Replication are added in the
report table.
252
OpsCenter reports
About Report Templates descriptions
NetBackup Disk Pool Capacity report
This report is specific to NetBackup 6.5 and above which introduced “Disk Pools”
as a type of Storage Unit. The basic version of this report shows the total amount
of space that is occupied by backups across all NetBackup 6.5 Disk Pools which
would include OpenStorage Devices, PureDisk deduplication option storage,
SharedDisk, or even AdvancedDisk pools. Along with usage the average of the
high and the low water mark is taken for each disk pool and drawn on the graph.
Since this is an average it should not be used for planning purposes but rather
estimation. In actual usage this report should be filtered on a specific Disk Pool to
show the exact high and low water mark. Finally the forecast is shown so that it
can be determined when capacity needs to be added or backups expired to maintain
operations.
NetBackup Disk Pool Size vs. Percentage Full report
This report is specific to NetBackup 6.5 and above which has new devices and
storage units called “Disk Pools”. A Disk Pool may be an OpenStorage device, a
PureDisk Deduplication system, SharedDisk, or a group of local or network disk
volumes that are pooled together. The bars represent the total number of available
bytes across all disk pools with the colors representing the total amount of space
per disk pool. The lines represent the percentage full each disk pool is. So this
report can help identify how much disk space is used for backups, which pools are
the largest, which ones are near capacity and how the backup environment is load
balancing across disk storage.
Library Summary report
This report provides a current point in time inventory of library capacity. The reports
list the libraries name, Volume DB Server, used/available/total slot count, and used
or available or total capacity. Two calculated columns show the % utilization of slots
and library capacity. The report provides a rich selection of filters enabling users
with a diverse tape library environment to zoom in on any segment of their tape
library population.
Note: The Library Summary report might display some negative values. These
negative values are a result of negative slot counts. If the user added -1 NetBackup
is unable to connect to the media. If the slot count is 0 NetBackup only calculates
data for TLD and TLD8 media leading to negative values in the report. The user
must enter the media slot count from Settings > Configuration > Tape Library.
253
OpsCenter reports
About Report Templates descriptions
Library Capacity Forecast report
This report provides a capacity forecast of Tape Libraries. A libraries’ capacity is
calculated by multiplying Slot Count by Slot Capacity. Slot capacity is the capacity
of the tape in the slot. As no standard exists for measuring library capacity, the
report enables several methods by which an individual tapes capacity is determined.
These consist of using the maximum, the minimum and the average size of full
tapes to determine tape capacity. Additionally, user-defined capacity for tape types
is available in the report parameter selection UI. The report extrapolates out the
trend line through the forecast period using classic linear regression and also plots
the libraries capacity. At the date in which the library capacity line intersects the
capacity forecast line is when the libraries capacity is reached.
Disk and Tape Device Activity > Tape Drive Throughput
This report shows the speed (KB/Sec) at which data backups flow through the tape
drives. The report uses the “heat map” concept and depicts ranges of speeds (slow
to fast) through configurable shades of green color. Reports are generated based
on either Hours-of-Day or Days-of-Week. Advanced averaging logic is used to
determine the throughput values for each cell in the report. The averaging is done
at an image fragment level ensuring granularity and precision in calculations. The
reports can be aggregated and filtered at the Tape Library, Media Server, Drive
Type, Logical Drive, and Physical Drive levels. The sort options allow intuitive
presentation of voluminous data. These reports are important sources of information
for performance analysis and capacity planning activities.
As an example on the analysis that can be performed on this report, suppose you
look at an LTO4 drive that can run at 120+MB/sec, having a report that shows only
5 -6 MB/sec would indicate that the drives are not even close to being at the
maximum capacity. Adding drives in an environment such as this would not impact
the backup window. We see a lot of money being spent on new tape drives when
customers have trouble pushing tape drives from years ago. If you cannot push an
LTO2 drive, then upgrading to an LTO4 will not benefit you (unless you wanted the
hardware encryption option of course). These reports are important sources of
information for performance analysis and capacity planning activities.
Note that the Tape Drive Throughput report displays data only till 1 A.M. and not
till the time when you run the report. This is because OpsCenter collects data for
Tape Drive Throughput report once per day at 1 A.M..after midnight. Therefore the
Tape Drive Throughput report is only able to report on data up until 1 AM on that
day, even when run with a relative timeframe of Previous 24 hours. Similarly if you
run Tape Drive Throughput report at 2 P.M. in the afternoon, the reports display
data collected till 1 A.M. only.
254
OpsCenter reports
About Report Templates descriptions
Note: Symantec recommends that you configure the retention period of error logs
in NetBackup as more than 1 day. If the retention period of error logs is less than
24 hours, it may result in data loss for some reports like Drive Throughput.
Figure 2-71 shows a sample view of Drive Throughput Report.
Figure 2-71
Tape Drive Throughput Report
The following are the details that are associated with the Tape Drive Throughput
report:
Report Name
Tape Drive Throughput
Report Category
Disk and Tape Device Activity
Where to Locate
Report > Report Templates > Disk and Tape Device Activity
> Tape Drive Throughput report.
Report Purpose
A heat-map report showing drive throughput by library, media
server, tape drive and drive type. Darker the color, higher is
the throughput for that particular time, for NetBackup servers.
Supported products
Symantec NetBackup, Symantec NetBackup Master Appliance
Applicable View
Master Server
Report Display
Tabular
Drill down report
None
Can be scheduled
Yes
Supported formats
HTML
Mapping with VBR report
All Reports > Standard Reports > Backups > Tape Devices >
Drive Throughput
255
OpsCenter reports
About Report Templates descriptions
You can edit the Drive Throughput report to show or hide the columns that you
are interested in. All the columns are shown by default. You can also filter the report
to view reports of specific master servers. The following table shows the filters for
Drive Throughput report and how you can use these filters to view specific data
in the report.
Filter
Column
View
Description
Select a view to show data for the selected view in the report. By
default All My Views is selected.
Master
Server
Master
Server
Select one or more master servers to view data for the virtual
clients that are backed up by the selected master servers in the
report. All master servers that are added to the OpsCenter console
are shown in the Value drop-down list .
Policy
Policy Name
Select one or more policy names to view data for the selected
policies.
Schedule Schedule/Level Select one or more schedule or level types to view the data for
Type
the configured schedules.
Job
Job Type
Select one or more job types as Archive, Backup, or Restore to
view data for the selected job types.
Drive
Drive
Select one or more drives to view the specific data on those
drives.
Tape
Library
Tape Library
Serial
Number
Select one or more tape library serial numbers to view the data
specific for those tapes.
Example of filter usage: You may run the report for specific policy data
classification names to view details only for the specific policy classifications. You
may run the report for a specific job type like Backup to view drive throughput details
for the backup jobs.
The following report enhancements have been made for the Drive Throughput
report:
■
The option Next has been removed from the drop-down menu for Relative
Timeframe. You now cannot enter a relative timeframe like next 2 weeks. This
is because the report does not support any futuristic data.
The following filter enhancements have been made for the Drive Throughput report:
■
Job types which are not applicable for this report are removed from the filter.
The supported job types are Backup, Archive, Restore, Backup from Snapshot,
Snapshot, Duplicate, and Replication.
256
OpsCenter reports
About Report Templates descriptions
■
UNKNOWN has been added as a value for Schedule Level/Type column in the
Schedule filter. You can now filter report data for Schedule Level/Type that is
UNKNOWN.
Disk and Tape Device Activity > Tape Drive Utilization Report
Tape drives are still very popular as backup destinations and are moderately
expensive especially if new drives are purchased each time a new update is available
such as moving from LTO3 to LTO4. Many times when backup windows are not
being met the first thing suggested is more tape drives. What we have found is that
in most cases customers are under-utilizing the tape drive investment either due
to time of day considerations – i.e. backups cannot run during the day due to
performance issues – or they simply have too few Media Servers. OpsCenter and
OpsCenter Analytics have a number of drive utilization and throughput reports that
can show at a glance when tape drives are being used, and if there are large gaps
in usage that could be filled up with changes to the backup Policies. This can help
not only fully utilize the drives, but defer a hardware purchase since it is easy to
see when the drives have open cycles.
This report shows the utilization (0 – 100%) of tape drives. The report uses the
“heat map” concept and depicts ranges of utilization (low to high) through
configurable shades of blue for example. Reports are based on either Hour-Of-Day
or Day-of- Week. Advanced logic is used to determine the utilization values for each
cell in the report. Utilization is calculated off a per minute basis ensuring precision
in calculations versus traditional methods of periodic polling of the devices. The
reports can be aggregated and filtered at the Tape Library, Media Server, Drive
Type, Logical Drive, and Physical Drive levels. The sort options allow for intuitive
presentation of voluminous data. These reports are important sources of information
for performance analysis and capacity planning activities.
Note that the Tape Drive Utilization report displays data only till 1 A.M. and not till
the time when you run the report. This is because OpsCenter collects data for Tape
Drive Utilization report once per day at 1 A.M..after midnight. Therefore the Tape
Drive Utilization report is only able to report on data up until 1 AM on that day, even
when run with a relative timeframe of Previous 24 hours. Similarly if you run Tape
Drive Utilization report at 2 P.M. in the afternoon, the reports display data collected
till 1 A.M. only.
Figure 2-72 shows a sample view of Tape Drive Utilization Report.
257
OpsCenter reports
About Report Templates descriptions
Figure 2-72
Drive Utilization Report
The following are the details that are associated with the Drive Utilization report:
Report Name
Tape Drive Utilization
Report Category
Disk and Tape Device Activity
Where to Locate
Report > Report Templates > Disk and Tape Device Activity
> Tape Drive Utilization.
Report Purpose
A heat-map report showing drive utilization by library, media
server, tape drive and drive type. Darker colour signifies higher
utilization of drive for a particular time.
Supported products
Symantec NetBackup, Symantec NetBackup Master Appliance
Applicable View
Master Server
Report Display
Tabular
Drill down report
None
Can be scheduled
Yes
Supported formats
HTML
Mapping with VBR report
All Reports > Standard Report > > Backups > Tape Device
Activity > Drive Utilization
You can edit the Drive Utilization report to show or hide the columns that you
are interested in. All the columns are shown by default. You can also filter the report
to view reports of specific master servers. The following table shows the filters for
Drive Utilization report and how you can use these filters to view specific data
in the report.
258
OpsCenter reports
About Report Templates descriptions
Filter
Column
View
Description
Select a view to show data for the selected view in the report. By
default All My Views is selected.
Master
Server
Master
Server
Select one or more master servers to view data for the virtual
clients that are backed up by the selected master servers in the
report. All master servers that are added to the OpsCenter console
are shown in the Value drop-down list .
Policy
Policy Name
Select one or more policy names to view data for the selected
policies.
Job
Job Type
Select one or more job types as Archive, Backup, or Restore to
view data for the selected job types.
Drive
Drive
Select one or more drives to view the specific data on those
drives.
Tape
Library
Tape Library
Serial
Number
Select one or more tape library serial numbers to view the data
specific for those tapes.
Example of filter usage: You may run the report for specific policy names to view
the details only for a specific policy. You may run the report for tape drive utilization
for a specific job type like Backup to view the details.
The following report enhancements have been made for the Drive Utilization report:
■
The option Next has been removed from the drop-down menu for Relative
Timeframe. You now cannot enter a relative timeframe like next 2 weeks. This
is because the report does not support any futuristic data.
The following filter enhancements have been made for the Tape Drive Utilization
report:
■
Job types which are not applicable for this report are removed from the filter.
The supported job types are Backup, Archive, Restore, Backup from Snapshot,
Snapshot, Duplicate, and Replication.
■
UNKNOWN has been added as a value for Schedule Level/Type column in the
Schedule filter. You can now filter report data for Schedule Level/Type that is
UNKNOWN.
Disk Usage report
This report shows disk usage for the selected server and time frame. The table in
the report provides details such as total number of jobs, total volume processed
259
OpsCenter reports
About Report Templates descriptions
(KB), average throughput (KB/sec), duration of activity, and percentage utilization
in terms of duration.
Figure 2-73 shows a sample view of the Disk Usage report.
Figure 2-73
Disk Usage report
The Disk Name and Media Server Name columns of the table contain drilldown
links to detailed throughput and disk usage reports.
Disk Throughput
This drilldown report from the Disk Name column
shows the data transfer rate (throughput) for a disk
storage unit for the selected server or server
groups.
This drilldown report uses the run time parameters
that are passed from the main report.
Disk Usage Details
This drilldown report from the Media Server Name
column shows the usage details for all the disk
storage units for the selected media server.
This drilldown report uses the run time parameters
that are passed from the main report.
The Disk cell in each row of the report table is a
link to a drill-down report. The rest of the cells
indicate whether the disk was in use or not during
the time slot.
The following are the details that are associated with the Disk Usage report:
Report Name
Disk Usage
260
OpsCenter reports
About Report Templates descriptions
Report Category
Performance Reports
Where to Locate
Report > Report Templates > Performance Reports > Disk
Usage
Report Purpose
This report shows the disk usage of a master server.
Supported products
NetBackup, NetBackup Appliance
Applicable View
Master Server
Report Display
Tabular
Drill down report
Yes
Can be scheduled
Yes
Supported formats
PDF, CSV, TSV, XML, HTML
Mapping with NOM report
Reporting > All Reports > Standard Reports > Performance
Report > Disk Usage
The following table shows the filters for Disk Usage report and how you can use
these filters to view specific data in the report.
Filter
Column
View
Master
Server
Description
Select a view to show data for the selected view in the report. By
default All My Views is selected.
Master
Server
Select one or more master servers to view disk usage for the
selected master servers in the report. All master servers that are
added to the OpsCenter console are shown in the Value
dropdown list.
Example of filter usage: You may run the Disk Usage report for specific master
servers to view the disk usage of the specific master servers.
The following report enhancements have been made for the Successful Jobs of a
Server report:
■
The unit Years has been added for Relative Timeframe selection.
You can now view data for the last x years.
■
The option Next has been removed from the drop-down menu for Relative
Timeframe. You now cannot enter a relative timeframe like Next 2 weeks. This
is because the report does not support any futuristic data.
261
OpsCenter reports
About Report Templates descriptions
Storage Unit Usage report
This report shows storage unit usage for a selected master server and time frame.
The first column of each row of the report table lists a storage unit. The storage unit
name is also a drilldown link to a detailed report. The media server name in the
second column is also a drilldown link.
The rest of the row provides details such as total number of jobs, total volume
processed (KB), average throughput (KB/sec), duration of activity and percentage
of utilization in terms of duration.
Storage unit throughput report
This drilldown report from the Storage Unit column
shows the data transfer rate (throughput) of the
selected storage unit.
This drilldown report uses the run time parameters
that are passed from the main report.
Storage unit usage details for media
server report
This drilldown report from the Media Server Name
column shows the usage details for all of the
storage units of the selected media server.
This drilldown report uses the run time parameters
that are passed from the main report.
The Storage unit column of the report table is a
link to a drilldown throughput report. The rest of
the cells indicate whether the storage unit was in
use or not during the time slot.
About Hold reports in Symantec NetBackup OpsCenter
This section describes Hold reports (optional for the NetBackup Search feature).
NetBackup Search provides the ability to perform a legal search and hold data that
is contained in NetBackup backup images.
Note: The Hold reports is visible if you have added a valid NetBackup Search license
key in Symantec NetBackup OpsCenter and when you log on as a Security
Administrator.
Image Retention Summary
See “Hold Reports > Image Retention
Summary” on page 263.
Top Holds by Size
See “Hold Reports > Top Holds by Size”
on page 263.
262
OpsCenter reports
About Report Templates descriptions
Top Holds by Age
See “Hold Reports > Top Holds by Age”
on page 263.
Hold Reports > Image Retention Summary
This report provides information about status of the images that are on hold. You
can select the size unit (B, KB, MB, GB, or TB) to display.
Hold Reports > Top Holds by Size
This report shows holds that are ranked by the total size of their backup images.
You can select the number of holds in the display, the size unit (B, KB, MB, GB, or
TB), and whether the holds should display in ascending or descending order.
Hold Reports > Top Holds by Age
This report shows holds that are ranked by the age of their backup images. You
can select the number of holds in the display, the time duration, and whether the
holds should display in ascending or descending order.
About Media reports in OpsCenter
This section describes media reports that provide information for all the NetBackup
media status, expiration, and availability, including tape, disk, Appliances, and the
optional NetBackup Vault feature for offsite media tracking.
Media State report
See “Media Reports > Media State”
on page 264.
Available Media report
See “ Available Media report” on page 265.
Drives in Use report
See “ Drives in Use report” on page 265.
Full Media Capacity report
See “ Full Media Capacity report” on page 265.
Media Summary by Media Server report
See “ Media Summary by Media Server
report” on page 266.
Media Utilization report
See “Media Reports > Media Utilization”
on page 266.
Tape Count report
See “ Tape Count report” on page 268.
Tapes Expiring in Future report
See “ Tapes Expiring in Future report ”
on page 268.
TapesExpiring Now report
See “ Tapes Expiring Now report” on page 269.
263
OpsCenter reports
About Report Templates descriptions
Vault Media Usage report
See “ Vault Media Usage report” on page 269.
Media Expiration Schedule report
See “Media Reports > Media Expiration
Schedule” on page 269.
Media Reports > Media State
This report displays the media status and count (per media type) for each master
server and media server combination. Media state can be frozen, active, off-site,
and so on.
Figure 2-74 shows a sample view of Media State Report.
Figure 2-74
Media State Report
The following are the details that are associated with the Media State report:
Report Name
Media State
Report Category
Media Reports
Where to Locate
Report > Report Templates > Media Reports > Media State.
Report Purpose
Lists number of media in each media status per media type
and per media server.
Supported products
Symantec NetBackup, Symantec NetBackup Master Appliance
Applicable View
Master Server
Report Display
Tabular
Drill down report
None
Can be scheduled
Yes
264
OpsCenter reports
About Report Templates descriptions
Supported formats
PDF, CSV, TSV, XML, HTML
Mapping with NOM report
All Reports > Standard Report > Media and Devices > Media
State
You can edit the Media State report to show or hide the columns that you are
interested in. All the columns are shown by default. You can also filter the report
to view reports of specific master servers. The following table shows the filters for
Media State report and how you can use these filters to view specific data in the
report.
Filter
Column
View
Master
Server
Description
Select a view to show data for the selected view in the report. By
default All My Views is selected.
Master
Server
Select one or more master servers to view data for the virtual
clients that are backed up by the selected master servers in the
report. All master servers that are added to the OpsCenter console
are shown in the Value drop-down list .
Example of filter usage: Run the Media State report for a specific master server
to view the media state for that master server.
Available Media report
This report lists the media that is available for use by NetBackup for each master
server that is selected.
The report table provides information, such as, media server, media status, robot
type, volume group and pool, and the time assigned.
Drives in Use report
This report shows the drive usage for the selected server. The report table provides
details for the drive, for example, drive name and type, robot number and type, and
assigned host.
Full Media Capacity report
This report shows the average amount of protected data (in kilobytes) on a tape
for each master server and media type. These are the tapes that NetBackup marked
as full.
The bar chart depicts the amount of data (in kilobytes) per media type.
265
OpsCenter reports
About Report Templates descriptions
The report table is organized by server, media type and count, and shows the size
and number of images on the tape.
Media Summary by Media Server report
For each media server, this report provides the number of tapes and images, the
last written date, and amount of data on the tapes. The name of the media server
is also a drilldown link to a detailed report for media.
Media summary by media status for a
media server report
This drilldown report from the Media Server column
provides a media status summary for a selected
media server. This report displays media status,
number of tapes and images, the last written date,
and amount of data on tapes.
This drilldown report uses the run time parameters
that are passed from the main report.
Media details of media status for a
media server report
This drilldown report from the Media Status column
provides media details for the selected media
server and selected media status. Media status
can be Active, Frozen, Full, Invalid, or Suspended.
This drilldown report uses the run time parameters
that are passed from the main report.
The report displays media ID, type, volume pool,
last written date, expiration date, number of
images, and the amount of data on tape.
Media Reports > Media Utilization
This report shows the number of media in use for a server per date. The columns
in the table show assigned, unassigned, frozen, full, off-site, or suspended media
states. The data for this report is only calculated once in a day. So the report shows
the summary till the previous date. The data for today reflects in the report that you
generate tomorrow. The table in the report is organized by date and server, and
shows counts for each media state.
Figure 2-75 shows a sample view of Media Utilization Report.
266
OpsCenter reports
About Report Templates descriptions
Figure 2-75
Media Utilization Report
The following are the details that are associated with the Media Utilization
report:
Report Name
Media Utilization
Report Category
Media Reports
Where to Locate
Report > Report Templates > Media Reports > Media
Utilization.
Report Purpose
Lists tabular details of media count by media status and media
type.
Supported products
Symantec NetBackup, Symantec NetBackup Master Appliance
Applicable View
Master Server
Report Display
Tabular
Drill down report
None
Can be scheduled
Yes
Supported formats
PDF, CSV, TSV, XML, HTML
Mapping with NOM report
All Reports > Standard Report > Media and Devices > Media
Utilization
You can edit the Media Utilization report to show or hide the columns that you
are interested in. All the columns are shown by default. You can also filter the report
to view reports of specific master servers. The following table shows the filters for
267
OpsCenter reports
About Report Templates descriptions
Media Utilization report and how you can use these filters to view specific data
in the report.
Filter
Column
View
Master
Server
Description
Select a view to show data for the selected view in the report. By
default All My Views is selected.
Master
Server
Select one or more master servers to view data for the virtual
clients that are backed up by the selected master servers in the
report. All master servers that are added to the OpsCenter console
are shown in the Value drop-down list .
Example of filter usage: Run the Media Utilization report for a one week timeframe
and for a single master server.
The following report enhancements have been made for the Media State report:
■
The unit Years has been added for Relative Timeframe selection. You can
now view data for the last X years. You can also select Year from the top-right
corner of the report.
■
The option Next has been removed from the drop-down menu for Relative
Timeframe. You now cannot enter a relative timeframe like Next 2 weeks.
Tape Count report
This report shows tape count for the following Report On parameters:
■
Backup Media Retention Level
■
Tape Type
■
Volume Pool Name
In Veritas Backup Reporter (VBR), there was a separate report for each of these
parameters. In OpsCenter, the three reports are merged into one report.
The Tape Count report is available in the Distribution view.
Tapes Expiring in Future report
This report shows the number of media that expire at each day in the upcoming
seven days. This time frame can be changed to show more in to the future. The
report is helpful in determining if a large quantity of media may become free in the
future which could justify delaying the purchase of more media.
268
OpsCenter reports
About Report Templates descriptions
Note: The filter Backup Media Role applied to the Tape Expiring Now report does
not return any data.
Tapes Expiring Now report
This report lists the media that are about to expire. The Volume Pool Name , Media
ID, and Media Barcode that are listed make it easy to locate the media. The default
time frame when the report is clicked will show what is expiring in the next 24 hours.
That time frame can be changed to show media expiring in the next week, month,
or any future time window desirable.
Vault Media Usage report
This report shows off-site media trends for selected vaults and current off-site media
count. The report consists of two component reports, a bar chart and a table.
This report helps understand your off-site media trends.
Questions like the following are answered by this report:
■
How does the off-site media count vary for each vault?
■
What are the details of the current off-site media ?
The bar chart shows the weekly trend of off-site media counts for selected vaults.
While running the report you select the vaults for which you want to run this report.
The report shows a weekly line trend for selected vault. This chart is a good
indication of how the off-site media count varies over the period of time. You can
compare the media counts of different vaults to see which vault is consuming more
media and how it varies.
The report table provides the details of vaulted media for the selected vaults. When
you run the report you specify the vault names. The report provides important media
details like media ID, off-site slot number, container ID, expiration date, barcode ,
and so on.
Media Reports > Media Expiration Schedule
This report gives graphical representation of the expiration schedule for media. The
report predicts the availability of media based on the expiration date of the media.
Using this report you can determine what media will be available for reuse. The
stacked bars represent the number of media of a specific type that are expired or
going to expire on a particular day. Different colors are used in the bars for different
media types. Tool tips for the bar segments provide the media type and count of
the media that is available on that day.
Figure 2-76 shows a sample view of Media Expiration Schedule Report.
269
OpsCenter reports
About Report Templates descriptions
Figure 2-76
Media Expiration Schedule Report
The following are the details that are associated with the Media Expiration
Schedule report:
Report Name
Media Expiration Schedule
Report Category
Media Reports
Where to Locate
Report > Report Templates > Media Reports > Media
Expiration Schedule.
Report Purpose
Stacked bars representing number of media getting expired
on a particular reporting day.
Supported products
Symantec NetBackup, Symantec NetBackup Master Appliance
Applicable View
Master Server
Report Display
Historical
Drill down report
Yes. See Media Expiration Details.
Can be scheduled
Yes
Supported formats
PDF, CSV, TSV, XML, HTML
Mapping with NOM report
All Reports > Standard Report > Media and Devices> Media
Expiration Schedule
You can edit the Media Expiration Schedule report to show or hide the columns
that you are interested in. All the columns are shown by default. You can also filter
270
OpsCenter reports
About Report Templates descriptions
the report to view reports of specific master servers. The following table shows the
filters for Media Expiration Schedule report and how you can use these filters
to view specific data in the report.
Filter
Column
View
Master
Server
Description
Select a view to show data for the selected view in the report. By
default All My Views is selected.
Master
Server
Select one or more master servers to view data for the virtual
clients that are backed up by the selected master servers in the
report. All master servers that are added to the OpsCenter console
are shown in the Value drop-down list .
Example of filter usage: Run the Media Expiration Schedule report for a specific
master server to view the expiration schedule of media for that master server.
The following report enhancements have been made for the Media Expiration
Schedule report:
■
A new drilldown report named Media Expiration Details has been added.
■
The unit Years has been added for Relative Timeframe selection. You can now
view data for the last X years. You can also select Year from the top-right corner
of the report.
■
The following options have been removed from TimeFrameGroupBy selection:
■
Days of week Average
■
Days of week total
■
Hours of day Average
■
Hours of day Total
■
Minutes
■
Month of year Average
■
Month of year total
■
Quarter of year Average
■
Quarter of year total
Figure 2-1 shows a sample view of Media Expiration Schedule Report.
271
OpsCenter reports
About Report Templates descriptions
Figure 2-77
Media Expiration Details Report
The following are the details that are associated with the Media Expiration
Details report:
Report Name
Media Expiration Details
Report Category
Media reports (Drill down)
Where to Locate
Report > Report Templates > Media Reports > Media
Expiration Schedule (click the bar in the historical graph)
Report Purpose
Details regarding number of media getting expired on a
particular reporting day along with media details
Supported products
Symantec NetBackup, Symantec NetBackup Master Appliance
Applicable View
Master Server
Report Display
Tabular
Drill down report
None
Can be scheduled
Yes
Supported formats
PDF, CSV, TSV, XML, HTML
Mapping with NOM report
All Reports > Standard Report > Backup Media Reports >
Media Expiration Schedule (click the bar in the historical graph)
You can edit the Media Expiration Details report to show or hide the columns
that you are interested in. All the columns are shown by default. You can also filter
the report to view reports of specific master servers. The following table shows the
filters for Media Expiration Details report and how you can use these filters to
view specific data in the report.
Filter
View
Column
Description
Select a view to show data for the selected view in the report. By
default All My Views is selected.
272
OpsCenter reports
About Report Templates descriptions
Filter
Column
Description
Master
Server
Master
Server
Select one or more master servers to view data for the virtual
clients that are backed up by the selected master servers in the
report. All master servers that are added to the OpsCenter console
are shown in the Value drop-down list .
Example of filter usage: Run the Media Expiration Details report for a specific
master server to view the media expiration details for that master server.
About Performance reports in OpsCenter
This section describes performance reports that provide information for overall
performance and throughput statistics on NetBackup Master and Media Servers.
Master Server Job Throughput report
See “ Master Server Job Throughput report”
on page 273.
Media Server Job Throughput
See “ Media Server Job Throughput report ”
on page 278.
NetBackup SAN Client Performance report
See “ NetBackup SAN Client Performance
report” on page 279.
Master Server Job Throughput report
This report provides a tool to compare performance of various master servers. The
table of this report displays throughput and job success information for each master
server. It shows job count and job success rate, and enables you to compare
throughputs of different servers to identify any servers that are performing poorly.
Figure 2-78 shows a sample view of the Master Server Job Throughput report.
Figure 2-78
Master Server Job Throughput report
Drilldown links for the server name, number of total and successful jobs columns
are also provided.
273
OpsCenter reports
About Report Templates descriptions
Total jobs of a server report
This drilldown report from the Total Job Count
column lists the details for all jobs for a selected
server. The report details include details like job
type and status, policy and schedule names, and
start time.
This drilldown report uses the run time parameters
that are passed from the main report.
Successful jobs of a server report
This drilldown report from the Number of
Successful Jobs column shows details for
successful jobs for a given server. The report
provides details like job type, policy and schedule
names, volume, and file counts.
This drilldown report uses the run time parameters
that are passed from the main report.
The following are the details that are associated with the Master Server Job
Throughput report:
Report Name
Master Server Job Throughput
Report Category
Performance Reports
Where to Locate
Report > Report Templates > Performance Reports > Master
Server Job Throughput
Report Purpose
This report shows the performance of a master server.
Supported products
NetBackup, NetBackup Appliance
Applicable View
Master Server
Report Display
Tabular
Drill down report
Yes
See “Total Jobs of a Server report” on page 275.
See “Successful Jobs of a Server” on page 277.
Can be scheduled
Yes
Supported formats
PDF, CSV, TSV, XML, HTML
Mapping with NOM report
Reporting > All Reports > Standard Reports > Performance
Report > Master Server Job Throughput
The following table shows the filters for Master Server Job Throughput report and
how you can use these filters to view specific data in the report.
274
OpsCenter reports
About Report Templates descriptions
Filter
Column
View
Master
Server
Description
Select a view to show data for the selected view in the report. By
default All My Views is selected.
Master
Server
Select one or more master servers to view data for the clients
backed up by the selected master servers in the report. All master
servers that are added to the OpsCenter console are shown in
the Value drop-down list .
Example of filter usage: You may run the Master Server Job Throughput report
for a specific master servers to view the performance of the specific master servers.
The following report enhancements have been made for the Master Server Job
Throughput report:
■
The unit Years has been added for Relative Timeframe selection.
You can now view data for the last x years.
■
The option Next has been removed from the drop-down menu for Relative
Timeframe. You now cannot enter a relative timeframe like Next 2 weeks. This
is because the report does not support any futuristic data.
Total Jobs of a Server report
This tabular report shows the job information run for a master server i.e. Client
Name, Job Type, Job Status, Policy Name, Schedule Name etc.
Figure 2-79 shows a sample view of Total Jobs of a Server report.
Figure 2-79
Total Jobs of a Server report
The following are the details that are associated with the Total Jobs of a Server
report:
Report Name
Total Jobs of a Server
275
OpsCenter reports
About Report Templates descriptions
Report Category
Performance Reports
Where to Locate
Report > Report Templates > Performance Reports > Master
Server Job Throughput (drill down from Total Job Count
column) > Total Jobs of a Server
Report Purpose
This report shows the job information for a master server.
Supported products
NetBackup, NetBackup Appliance
Applicable View
Master Server
Report Display
Tabular
Drill down report
No
Can be scheduled
Yes
Supported formats
PDF, CSV, TSV, XML, HTML
Mapping with NOM report
Reporting > All Reports > Standard Reports > Performance
Report > Master Server Job Throughput (drill down on Number
of Successful Jobs column) > Total Jobs of a Server
The following table shows the filters for Total Jobs of a Server report and how you
can use these filters to view specific data in the report.
Filter
Column
View
Master
Server
Description
Select a view to show data for the selected view in the report. By
default All My Views is selected.
Master
Server
Select one or more master servers to view data for the clients
backed up by the selected master servers in the report. All master
servers that are added to the OpsCenter console are shown in
the Value drop-down list .
The following report enhancements have been made for the Backup Job Size
Variance report:
■
The unit Years has been added for Relative Timeframe selection.
You can now view data for the last x years.
■
The option Next has been removed from the drop-down menu for Relative
Timeframe. You now cannot enter a relative timeframe like Next 2 weeks. This
is because the report does not support any futuristic data.
276
OpsCenter reports
About Report Templates descriptions
Successful Jobs of a Server
This drilldown report is obtained when you click number of successful jobs (link)
from the Master Server Job Throughput report. This tabular report shows details
of all successful jobs of a Server. It shows information like Client Name, Policy
Name, Schedule Name, Start Time, Number of Files, Duration, Volume, Throughput
etc.
Figure 2-80 shows a sample view of the Successful Jobs of a Server report.
Figure 2-80
Successful Jobs of a Server report
The following are the details that are associated with the Successful Jobs of a
Server report:
Report Name
Successful Jobs of a Server
Report Category
Performance Reports
Where to Locate
Report > Report Templates > Performance Reports > Master
Server Job Throughput (drill down from Number of
Successful Jobs column) > Successful Jobs of a Server
Report Purpose
This report shows the successful jobs for a master server.
Supported products
NetBackup, NetBackup Appliance
Applicable View
Master Server
Report Display
Tabular
Drill down report
No
Can be scheduled
Yes
277
OpsCenter reports
About Report Templates descriptions
Supported formats
PDF, CSV, TSV, XML, HTML
Mapping with NOM report
Reporting > All Reports > Standard Reports > Performance
Report > Master Server Job Throughput (drill down on Number
of Successful Jobs column) > Total Jobs of a Server
The following table shows the filters for Successful Jobs of a Server report and how
you can use these filters to view specific data in the report.
Filter
Column
View
Master
Server
Description
Select a view to show data for the selected view in the report. By
default All My Views is selected.
Master
Server
Select one or more master servers to view data for the clients
that are backed up by the selected master servers in the report.
All master servers that are added to the OpsCenter console are
shown in the Value drop-down list .
The following report enhancements have been made for the Successful Jobs of a
Server report:
■
The unit Years has been added for Relative Timeframe selection.
You can now view data for the last x years.
■
The option Next has been removed from the drop-down menu for Relative
Timeframe. You now cannot enter a relative timeframe like Next 2 weeks. This
is because the report does not support any futuristic data.
Media Server Job Throughput report
This report provides details of data that is backed up by NetBackup media servers
and shows server throughput. The report is a useful tool to compare performance
of the media servers that are present in your NetBackup environment.
The pie chart provides a breakdown of the volume of data that is processed for
each media server. A drilldown detail link for throughput details is provided from
each volume pie slice.
Job details for client and media server
report
This drilldown report from the client name column
provides details for a given client, job type, job
status, and media server. The report details include
job ID, job type, exit status, start time, and duration
in seconds.
This drilldown report uses the run time parameters
that are passed from the parent report.
278
OpsCenter reports
About Report Templates descriptions
Media server throughput for media
server report
You can use this drill-down report from the
Throughput (KB/sec) column to see the variation
of throughput per day. The throughput is
represented by a bar for each day of the reporting
period.
This drill-down report uses the run time parameters
that are passed from the main report.
NetBackup SAN Client Performance report
This report is specific to NetBackup 6.5 and above which features Fibre Channel
connected clients called “SAN Clients”. The blue and the yellow bars for example
are stacked together to show the total number of jobs per day. The blue bars
represent the jobs that ran over the LAN and the yellow is jobs ran over the SAN.
The purple and the yellow lines show the total job throughput for all those jobs that
ran that day. The purple represents total job throughput by LAN and the yellow
represents total job throughput by SAN. This report helps identify what ratio of LAN
to SAN traffic for backups are run and what performance benefit is gained by doing
so.
About Policy reports in OpsCenter
This section describes policy reports that provide information for the NetBackup
Policy information including Policies consuming the most storage space.
Top 10 Policies Using Most Server Space
report
See “ Top 10 Policies Using Most Server
Space report” on page 279.
Job Success Rate by Policy Type report
See “ Job Success Rate by Policy Type
report” on page 283.
Policy Change report
See “ Policy Change report” on page 284.
Policy Summary Dashboard report
See “ Policy Summary Dashboard report”
on page 285.
Top 10 Policies Using Most Server Space report
This report displays the 10 policies that have backed up the most data in your
NetBackup environment. You can edit the report and run it for one or more master
servers.
Tool tips appear when you point at each colored bar chart. The tool tip shows the
master server, policy, and also shows the volume of data in MB.
279
OpsCenter reports
About Report Templates descriptions
Click Show Chart as Table link at the bottom of the report to view the report details
in a tabular format. The table lists the volume of data in MB for each policy.
A new drilldown report named Job Details for Policy is now available from the main
report. This drilldown report from the colored bars in the chart provides details about
all jobs for a selected policy. The drilldown report includes information, such as, job
type, status code, client name, and volume in KB.
Figure 2-81 shows a sample view of the Top 10 Policies Using Most Server Space
report.
Figure 2-81
Top 10 Policies Using Most Server Space report
The following are details associated with the Top 10 Policies using most server
space report:
Report Name
Top 10 Policies Using Most Server Space
280
OpsCenter reports
About Report Templates descriptions
Report Category
Policy
Where to Locate
Report > Report Templates > Policy Reports > Top 10 Policies
using most Server Space
Report Purpose
This report shows a ranking of backup policies by space
consumption. This report is valid for NetBackup and
NetBackup Appliance.
Supported products
Symantec NetBackup, Symantec NetBackup Master Appliance
Applicable View
Master Server
Report Display
Ranking (Chart)
Drill down report
Job Details for Policy
See “Job Details for Policy” on page 282.
Can be scheduled
Yes
Supported export formats
PDF, CSV, TSV, XML, HTML
Mapping with NOM report
All Reports > Standard Reports > Policy > Top 10 Policies
using most Server Space
The following table lists the filters for Top 10 Policies using most server space report
and how you can use these filters to view specific data in the report.
Filter
Column
View
Description
Select a view to show data for the selected view in the report.
By default All My Views is selected.
Master
Server
Master Server Select one or more master servers to view data for the selected
master servers in the report. All master servers that are added
to the OpsCenter console are shown in the Value drop-down
list .
Job
Job Type
Select one or more job types like Archive, Backup, Restore etc.
to view data for the selected job types.
By default, the report displays information for the following types
of jobs:
■
Backup
■
Catalog Backup
■
Vault
You must select at least one job type from the Value list.
281
OpsCenter reports
About Report Templates descriptions
Example of filter usage: You may run the Top 10 Policies using most server space
report for specific master servers or views to view details only for the specific master
servers or views.
Job Details for Policy
A new drilldown report named Job Details for Policy is available when you click the
colored bars from the Top 10 Policies Using Most Server Space report. This drilldown
report provides details about all jobs for a selected policy.
This drilldown report uses the run time parameters that are passed from the main
report. The drilldown report includes information, such as, job type, status code,
client name, and volume in KB.
Figure 2-82 shows a sample view of the Job Details for Policy report.
Figure 2-82
Job Details for Policy report
The following are details associated with the Job Details for Policy report:
Report Name
Job Details for Policy
Report Category
Drill down report
Where to Locate
Report > Report Templates > Policy Reports > Top 10 Policies
Using most Server Space (click the colored bars)
282
OpsCenter reports
About Report Templates descriptions
Report Purpose
This report lists all jobs for the selected policy. This report is
valid for NetBackup and NetBackup Appliance.
Supported products
Symantec NetBackup, Symantec NetBackup Master Appliance
Applicable View
Master Server
Report Display
Tabular
Drill down report
No
Can be scheduled
Yes
Supported export formats
PDF, CSV, TSV, XML, HTML
Mapping with NOM report
All Reports > Standard Reports > Policy > Top 10 Policies
using most Server Space > Job Details for Policy
The following table lists the filters for Job Details for Policy report and how you can
use these filters to view specific data in the report.
Filter
Column
View
Policy
Description
Select a view to show data for the selected view in the report.
By default All My Views is selected.
Policy Data
Classification
Name
Select one or more policy data classification names like Gold,
Silver, Bronze etc. to view data for the policies having the
selected data classification names.
Policy Name
Select one or more policy names to view data for the selected
policies.
Example of filter usage: You may run the report for specific policy data
classification names to view details only for the specific policy classifications.
Job Success Rate by Policy Type report
This report provides a quick view of the status of jobs by policy type. The report
shows the job success rate for clients, server, and job policy type.
The bar chart shows the count of successful, partially successful, and failed jobs
per policy type. The tool tips in the colored bars provide job counts and also are
drilldown links to view the details for the policy.
The table in the report displays job information, such as, client name, policy type,
and the success rate.
283
OpsCenter reports
About Report Templates descriptions
Note: This report may not show appropriate data for duplication jobs that are
associated with SLP policy.
This issue occurs because the duplication jobs do not have a policy type. The job
batches duplication of images that are created from possibly different policies and
policy types. The duplication job itself has an internal policy that is created but this
internal policy does not have the policy type set because this is not a backup job.
Job details for policy type report
This drilldown report from the Policy Type column
and the colored bars in the chart provides details
about all jobs for a selected policy type.
This drilldown report uses the run time parameters
that are passed from the main report.
The table includes information, such as, exit status,
client name, volume in KB, and count of files.
Successful, partially successful, and
failed job details for policy type report
There are three drilldown reports from the Number
of Successful Jobs, Number of Partially
Successful Jobs, or Number of Failed Jobs
columns. The job exit status is used as a filter for
the reports. These reports are similar and provide
details for all jobs for a selected client and policy
type.
This drilldown report uses the run time parameters
that are passed from the main report.
The table in this report provides details like, policy
and schedule name, start and end times, and
duration for the job. The table for failed jobs also
includes a column for the job exit status.
Policy Change report
This report shows a count of the changes that were made to job policies in a given
time frame for the selected servers.
The pie chart shows the number of policy changes (a policy can change multiple
times) for each master server. (Each different server appears in a different color in
the chart.) Tool tips in the chart provide a count of the changes.
The table in the report displays the count of changes that were made to each policy
for each server.
284
OpsCenter reports
About Report Templates descriptions
Policy Summary Dashboard report
This report acts as a dashboard of activities that are summarized by your policies.
It gives an overview of activities and can be used as a tool to troubleshoot and
manage by exception using the drilldown links to other detail reports.
It provides answers for some of the following questions for each policy:
■
What is the total number of jobs?
■
How many jobs were successful?
■
How many jobs were partially successful?
■
How many jobs failed?
The table in this report shows information per policy like policy name and type, job
volume in MB, job count, and counts for job exit status. You can also drill down
from the job exit status counts in the columns and view individual policy details
based on exit status and job policy and type.
There are drilldown reports available from the Total Jobs, Number of Successful
Jobs, Number of Partially Successful Jobs, or Number of Failed Jobs columns of
the main report. These drilldown reports provide an overview of all jobs for the
selected policy name, server, and time frame based on the job status.
These drilldown reports use the run time parameters that are passed from the main
report.
Figure 2-83 shows a sample view of the Policy Summary Dashboard report.
Figure 2-83
Policy Summary Dashboard report
The following are details associated with the Policy Summary Dashboard report:
285
OpsCenter reports
About Report Templates descriptions
Report Name
Policy Summary Dashboard
Report Category
Policy
Where to Locate
Report > Report Templates > Policy Reports > Policy Summary
Dashboard
Report Purpose
Tabular report summarizing size, throughput, job counts and
success rate by master server, policy and policy type.
Supported products
Symantec NetBackup, Symantec NetBackup Master Appliance
Applicable View
Master Server, Client
Report Display
Tabular
Drill down report
Yes
See “Total Jobs for Policy” on page 287.
See “Successful Jobs for Policy” on page 289.
See “Partial Jobs for Policy report” on page 291.
See “Failed Jobs for Policy” on page 293.
Can be scheduled
Yes
Supported export formats
PDF, CSV, TSV, XML, HTML
Mapping with NOM report
All Reports > Standard Reports > Policy > Policy Summary
Dashboard
The following table lists the filters for Policy Summary Dashboard report and how
you can use these filters to view specific data in the report.
Filter
View
Master
Server
Column
Description
Select a view to show data for the selected view in the report.
By default All My Views is selected.
Master Server Select one or more master servers to view data for the selected
master servers in the report. All master servers that are added
to the OpsCenter console are shown in the Value dropdown list.
286
OpsCenter reports
About Report Templates descriptions
Filter
Column
Description
Success
Rate
Consider
Partially
Successful
Job as
Successful
The default selection is Yes.
Select No if you do not want to consider partially successful jobs
as successful.
Selecting Yes or No may impact the Success Rate percentage
that is shown in the report. Consider a policy that has 5
successful jobs, 3 partially successful jobs and 2 failed jobs. If
you select the value as Yes, the Success Rate column shows
80%. However if you select the value as No, the Success Rate
column shows 50%.
Example of filter usage: You may run the Policy Summary Dashboard report for
specific master servers or views to view details only for the specific master servers
or views.
Total Jobs for Policy
This drilldown report is available when you click a value (link) from the Total Jobs
column of the Policy Summary Dashboard report. This drilldown report provides an
overview of all jobs for the selected policy name, server, and time frame. This
drilldown report uses the run time parameters that are passed from the main report.
The report provides details like schedule name, start times, and duration of the job
etc.
Figure 2-84 shows a sample view of the Total Jobs for Policy report.
287
OpsCenter reports
About Report Templates descriptions
Figure 2-84
Total Jobs for Policy report
The following are details associated with the Total Jobs for Policy report:
Report Name
Total Jobs for Policy
Report Category
Policy (Drill down report)
Where to Locate
Report > Report Templates > Policy Reports > Policy Summary
Dashboard (click total jobs) > Total Jobs for Policy
Report Purpose
This report lists all jobs of the selected policy. This report is
valid for NetBackup and NetBackup Appliance.
Supported products
Symantec NetBackup, Symantec NetBackup Master Appliance
Applicable View
Master Server, Client
Report Display
Tabular
Drill down report
No
Can be scheduled
Yes
288
OpsCenter reports
About Report Templates descriptions
Supported formats
PDF, CSV, TSV, XML, HTML
Mapping with NOM report
All Reports > Standard Reports > Policy > Policy Summary
Dashboard > Total Jobs for Policy
The following table lists the filters for Total Jobs for Policy report and how you can
use these filters to view specific data in the report.
Filter
Column
View
Description
Select a view to show data for the selected view in the report.
By default All My Views is selected.
Master
Server
Master Server Select one or more master servers to view data for the selected
master servers in the report. All master servers that are added
to the OpsCenter console are shown in the Value dropdown list.
Policy
Policy Name
Policy Type
Select one or more policy names to view data for the selected
policies.
Select one or more policy types to view data for the selected
policy types.
Example of filter usage: You may run the Total Jobs for Policy report for specific
policies to view details only for the specific policies.
Successful Jobs for Policy
This drilldown report is available when you click the successful jobs (link) from the
Policy Summary Dashboard report. This drilldown report provides an overview of
all the successful jobs for the selected policy name, server, and time frame. This
drilldown report uses the run time parameters that are passed from the main report.
The report provides details like schedule name, start times, and duration of the job
etc.
Figure 2-85 shows a sample view of the Successful Jobs for Policy report.
289
OpsCenter reports
About Report Templates descriptions
Figure 2-85
Successful Jobs for Policy report
The following are details associated with the Successful Jobs for Policy report:
Report Name
Successful Jobs for Policy
Report Category
Policy (Drill down report)
Where to Locate
Report > Report Templates > Policy Reports > Policy Summary
Dashboard (click Successful jobs)
Report Purpose
This report lists all the successful jobs of the selected policy.
This report is valid for NetBackup and NetBackup Appliance.
Supported products
Symantec NetBackup, Symantec NetBackup Master Appliance
Applicable View
Master Server, Client
Report Display
Tabular
Drill down report
No
Can be scheduled
Yes
290
OpsCenter reports
About Report Templates descriptions
Supported formats
PDF, CSV, TSV, XML, HTML
Mapping with NOM report
All Reports > Standard Reports > Policy > Policy Summary
Dashboard > Successful Jobs for Policy
The following table lists the filters for Successful Jobs for Policy report and how
you can use these filters to view specific data in the report.
Filter
Column
View
Description
Select a view to show data for the selected view in the report.
By default All My Views is selected.
Master
Server
Master Server Select one or more master servers to view data for the selected
master servers in the report. All master servers that are added
to the OpsCenter console are shown in the Value drop-down
list .
Policy
Policy Name
Policy Type
Select one or more policy names to view data for the selected
policies.
Select one or more policy types to view data for the selected
policy types.
Example of filter usage: You may run the Successful Jobs for Policy report for
specific policies to view details only for the specific policies.
Partial Jobs for Policy report
This drilldown report is available when you click a value (link) from the Number of
Partially Successful Jobs from the Policy Summary Dashboard report. This drilldown
report provides an overview of all the partially successful jobs for the selected policy
name, server, and time frame. This drilldown report uses the run time parameters
that are passed from the main report. The report provides details like schedule
name, start times, and duration of the job etc.
Figure 2-86 shows a sample view of the Successful Jobs for Policy report.
291
OpsCenter reports
About Report Templates descriptions
Figure 2-86
Partially Successful Jobs for Policy report
The following are details associated with the Partially Successful Jobs for Policy
report:
Report Name
Partially Successful Jobs for Policy
Report Category
Policy (Drill down report)
Where to Locate
Report > Report Templates > Policy Reports > Policy Summary
Dashboard (click Partially Successful jobs) > Partially
Successful Jobs for Policy
Report Purpose
This report lists all the partially successful jobs of the selected
policy. This report is valid for NetBackup and NetBackup
Appliance.
Supported products
Symantec NetBackup, Symantec NetBackup Master Appliance
Applicable View
Master Server, Client
Report Display
Tabular
Drill down report
No
Can be scheduled
Yes
292
OpsCenter reports
About Report Templates descriptions
Supported formats
PDF, CSV, TSV, XML, HTML
Mapping with NOM report
All Reports > Standard Reports > Policy > Policy Summary
Dashboard > Partially Successful Jobs for Policy
The following table lists the filters for Partial Jobs for Policy report and how you can
use these filters to view specific data in the report.
Filter
Column
View
Description
Select a view to show data for the selected view in the report.
By default All My Views is selected.
Master
Server
Master Server Select one or more master servers to view data for the selected
master servers in the report. All master servers that are added
to the OpsCenter console are shown in the Value drop-down
list .
Policy
Policy Name
Policy Type
Select one or more policy names to view data for the selected
policies.
Select one or more policy types to view data for the selected
policy types.
Example of filter usage: You may run the Partial Jobs for Policy report for specific
policies to view details only for the specific policies.
Failed Jobs for Policy
This drilldown report is available when you click a value (link) from the Number of
Failed Jobs column of the Policy Summary Dashboard report. This drilldown report
provides an overview of all the failed jobs for the selected policy name, server, and
time frame. This drilldown report uses the run time parameters that are passed from
the main report. The report provides details like schedule name, start times, and
duration of the job etc.
Figure 2-87 shows a sample view of the Failed Jobs for Policy report.
293
OpsCenter reports
About Report Templates descriptions
Figure 2-87
Failed Jobs for Policy report
The following are details associated with the Failed Jobs for Policy report:
Report Name
Failed Jobs for Policy
Report Category
Policy (Drill down report)
Where to Locate
Report > Report Templates > Policy Reports > Policy Summary
Dashboard (click Failed jobs) > Failed Jobs for Policy
Report Purpose
This report lists all the failed jobs of the selected policy. This
report is valid for NetBackup and NetBackup Appliance.
Supported products
Symantec NetBackup, Symantec NetBackup Master Appliance
Applicable View
Master Server, Client
Report Display
Tabular
Drill down report
No
Can be scheduled
Yes
294
OpsCenter reports
About Report Templates descriptions
Supported formats
PDF, CSV, TSV, XML, HTML
Mapping with NOM report
All Reports > Standard Reports > Policy > Policy Summary
Dashboard > Failed Jobs for Policy
The following table lists the filters for Failed Jobs for Policy report and how you can
use these filters to view specific data in the report.
Filter
Column
View
Description
Select a view to show data for the selected view in the report.
By default All My Views is selected.
Master
Server
Master Server Select one or more master servers to view data for the selected
master servers in the report. All master servers that are added
to the OpsCenter console are shown in the Value drop-down
list .
Policy
Policy Name
Policy Type
Select one or more policy names to view data for the selected
policies.
Select one or more policy types to view data for the selected
policy types.
Example of filter usage: You may run the Failed Jobs for Policy report for specific
policies to view details only for the specific policies.
About Restore reports in OpsCenter
This section describes restore job reports that provide information for all the
NetBackup restore and recovery operations.These reports are applicable only for
NetBackup.
Restore Job Summary by Job Count report
See “Restore > Restore Job Attempt
Summary by Job Count” on page 295.
Restore Job Summary by Volume Restored
report
See “Restore > Restore Job Attempt
Summary by Volume Restored ” on page 298.
Restore Job Details report
See “Restore > Restore Job Details ”
on page 301.
Client Restore report
See “Client Restore report” on page 303.
Restore > Restore Job Attempt Summary by Job Count
This report shows graphical summary of number of restore jobs per day.
295
OpsCenter reports
About Report Templates descriptions
Figure 2-88 shows a sample view of Restore Job Attempt Summary by Job Count
Report.
Figure 2-88
Restore Job Attempt Summary by Job Count Report
In addition, you can view the report in a tabular format.
Figure 2-89 shows a sample view of Restore Job Attempt Summary by Job Count
Report.
296
OpsCenter reports
About Report Templates descriptions
Figure 2-89
Restore Job Attempt Summary by Job Count Report (Tabular)
The following are the details that are associated with the Restore Job Attempt
Summary by Job Count report:
Report Name
Restore Job Attempt Summary by Job Count
Report Category
Backup
Where to Locate
All Reports > Report Templates > Restore > Restore Job
Summary by Job Count report.
Report Purpose
Graphical summary of number of jobs per day.
Supported products
Symantec NetBackup, Symantec NetBackup Master Appliance
Applicable View
Master Server, Client
Report Display
Historical
Drill down report
Yes. See Restore Job Attempt Details
Can be scheduled
Yes
Supported formats
PDF, CSV, TSV, XML, HTML
Mapping with NOM report
All Reports > Standard Reports > Restore Job Summary
You can edit this report to show or hide the columns that you are interested in. All
the columns are shown by default. You can also filter the report to view reports of
specific master servers. The following table shows the filters for the report and
how you can use these filters to view specific data in the report.
297
OpsCenter reports
About Report Templates descriptions
Filter
Column
View
Master
Server
Description
Select a view to show data for the selected view in the report. By
default All My Views is selected.
Master
Server
Select one or more master servers to view data for the virtual
clients that are backed up by the selected master servers in the
report. All master servers that are added to the OpsCenter console
are shown in the Value drop-down list .
Example of filter usage: Run the report for a specific master server to view the
restore jobs per day for that master server.
Restore > Restore Job Attempt Summary by Volume Restored
This report shows graphical summary of volume of restore jobs per day.
Figure 2-90 shows a sample view of Restore Job Attempt Summary by Volume
Restored Report.
298
OpsCenter reports
About Report Templates descriptions
Figure 2-90
Restore Job Attempt Summary by Volume Restored Report
In addition, you can view the historical report in tabular format.
Figure 2-91 shows a sample view of Restore Job Attempt Summary by Volume
Restored Report.
299
OpsCenter reports
About Report Templates descriptions
Figure 2-91
Restore Job Attempt Summary by Volume Restored Report (Tabular)
The following are the details that are associated with the Restore Job Attempt
Summary by Volume Restored report:
Report Name
Restore Job Attempt Summary by Volume Restored
Report Category
Restore
Where to Locate
All Reports > Report Templates > Restore > Restore Job
Summary by Volume Restored report.
Report Purpose
Graphical summary showing number of restore jobs per day.
Supported products
Symantec NetBackup, Symantec NetBackup Master Appliance
Applicable View
Master Server, Client
Report Display
Historical
Drill down report
Yes. See Restore Job Attempt Details
Can be scheduled
Yes
Supported formats
PDF, CSV, TSV, XML, HTML
Mapping with NOM report
All Reports > Standard Reports > Restore Job Summary
You can edit this report to show or hide the columns that you are interested in. All
the columns are shown by default. You can also filter the report to view reports of
specific master servers. The following table shows the filters for the report and
how you can use these filters to view specific data in the report.
300
OpsCenter reports
About Report Templates descriptions
Filter
Column
View
Master
Server
Description
Select a view to show data for the selected view in the report. By
default All My Views is selected.
Master
Server
Select one or more master servers to view data for the virtual
clients that are backed up by the selected master servers in the
report. All master servers that are added to the OpsCenter console
are shown in the Value drop-down list .
Example of filter usage: Run the report for a specific master server to view the
Restore Job Summary by Volume Restored for that master server.
Following filter enhancements have been done for the report.
■
New supported formats TSV, XML, PDF, and HTML are added.
Restore > Restore Job Details
This report lists all the completed restore jobs for a selected timeframe.
Figure 2-92 shows a sample view of Restore Job Details Report.
Figure 2-92
Restore Job Details Report
The following are the details that are associated with the Restore Job Details
report:
Report Name
Restore Job Details
301
OpsCenter reports
About Report Templates descriptions
Report Category
Restore
Where to Locate
All Reports > Report Templates > Restore > Restore Job
Details report.
Report Purpose
Lists all completed jobs for the selected timeframe.
Supported products
Symantec NetBackup, Symantec NetBackup Master Appliance
Applicable View
Master Server, Client
Report Display
Historical, Ranking, Distribution
Drill down report
None
Can be scheduled
Yes
Supported formats
PDF, CSV, TSV, XML, HTML
Mapping with NOM report
All Reports > Standard Reports > Jobs > Restore Job Details
You can edit the Restore Job Details report to show or hide the columns that
you are interested in. All the columns are shown by default. You can also filter the
report to view reports of specific master servers. The following table shows the
filters for Restore Job Details report and how you can use these filters to view
specific data in the report.
Filter
Column
View
Master
Server
Description
Select a view to show data for the selected view in the report. By
default All My Views is selected.
Master
Server
Select one or more master servers to view data for the virtual
clients that are backed up by the selected master servers in the
report. All master servers that are added to the OpsCenter console
are shown in the Value drop-down list .
Example of filter usage: Run the Restore Job Details report for a specific master
server to view the completed restore jobs for that master server.
The following report enhancements have been made for the Restore Job Details
report:
■
The unit Years has been added for Relative Timeframe selection. You can now
view data for the last x years. You can also see the Years tab on top-right corner
of the Tabular Backup Report.
■
The default Relative Timeframe for this report was 28 days now it is changes
to next 2 weeks.
302
OpsCenter reports
About Report Templates descriptions
The following filter enhancements have been made for the Restore Job Details
report:
■
The units Weeks, Months and Years have been added for Relative Timeframe
selection. You can now view data for the last X years.
■
The default Relative Timeframe for this report is changed to Previous 14 days.
■
The column Elapsed Time has been removed.
■
New supported formats like TSV, XML, PDF & HTML added.
■
Rows per page parameter value were 20 now it is set to 100.
Client Restore report
This report provides restore job details for a specified client. The table in the report
contains information, such as, master and media server names, and start and end
times.
You can edit the report to show or hide the columns that you are interested in. All
the columns are shown by default. You can also filter the report to show activity for
a limited sample set, such as one or more clients or views.
Figure 2-93 shows a sample view of the Client Restore report.
Figure 2-93
Client Restore report
The following are details associated with the Client Restore Report:
Report Name
Client Restore
Report Category
Client Reports
303
OpsCenter reports
About Report Templates descriptions
Where to Locate
Report > Report Templates > Client Reports > Client Restore
Report Purpose
Lists all the restore jobs of the given client.
Supported products
NetBackup, NetBackup Master Appliance, NetBackup
PureDisk
Applicable View
Master Server, Client
Report Display
N.A.
Drill down report
None
Can be scheduled
Yes
Supported formats
PDF, CSV, TSV, XML, HTML
Mapping with NOM report
All Reports > Standard Reports > Client > Client Restore
The following table shows the filters for Client Restore report and how you can use
these filters to view specific data in the report.
Filter
Column
View
Client
Description
Select a view to show data for the selected view in the report.
By default All My Views is selected.
Client Name
Select one or more clients to view data for the selected clients
in the report. All clients that are protected by the master servers
in the OpsCenter console are listed.
Example of filter usage: You may run the Clients Restore report for specific clients
to view details only for the specific clients.
The unit Years has been added for Relative Timeframe selection. You can now
view data for the last x years. You can also select Year from the top-right corner
of the report.
About Storage Lifecycle Policy reports
This section describes the Storage Lifecycle policy reports that provide information
about the NetBackup Storage Lifecycle Policies (SLP’s)and NetBackup Auto Image
Replication (AIR). It also inludes detailed information on SLP sizes, progress, and
backlog per Master.
The Storage Lifecycle Policy reports in OpsCenter help you gain an end-to-end
visibility across destinations in a storage lifecycle policy. With the Auto Image
Replication functionality, you can replicate images from one NetBackup domain to
304
OpsCenter reports
About Report Templates descriptions
another NetBackup domain. You can specify a different master server as a storage
destination in an SLP. The SLP reports in OpsCenter show an end-to-end view of
the SLP process that includes backup to import of duplicated image into different
NetBackup domains. The SLP reports help you to verify if each step in the SLP is
executed and identify the possible bottlenecks.
The Storage Lifecycle Policy reports in OpsCenter help you find answers to
the following questions:
■
Is the SLP performing according to schedule?
■
Have the 2nd, 3rd… Copies been made? Does the original image still exist?
■
Am I at a risk of data loss? A copy at a certain phase is about to expire and the
subsequent phase’s copy has not been made.
■
What is my backlog? Is it getting steadily worse?
Review the following points about SLP reports:
■
The SLP reports are applicable only to NetBackup.
■
The SLP reports can be run only for 7.1 or higher master servers. If you upgrade
from 7.0 (or 7.0.1) to a 7.1 master server, the SLP reports also show the images
for 7.0 or 7.0.1 master servers.
If you upgrade NetBackup from 7.0 or 7.0.1 to 7.1 and the SLP definition contains
multiple backup operations, then the first copy is marked as "Backup" and the
remaining are marked as "Duplication". For example, if you created an SLP that
contains four destinations where two destinations are for backup and two are
for duplication, then image copy data marks the first copy as Backup and
remaining for Duplication.
■
The data that is shown in the SLP reports is collected from the NetBackup
catalog and the SLP worklist by NBSL. Once the initial data collection is
complete, the updated data is collected from the NetBackup catalog in every
15 minutes and from the SLP worklist in every 10 minutes. The SLP worklist is
located in the EMM and contains metadata like how many copies need to be
created, where they need to be created, when they are completed etc.
The data that is displayed in the SLP reports is based on the image data that
exists in the SLP worklist and the NetBackup catalog.
■
The effects of deduplication, compression, or optimized deduplication on image
or copy size are not considered in the SLP reports.
■
By default, data for SLP reports is purged from the OpsCenter database after
90 days. You can also customize the purge interval for SLP images from Settings
> Configuration > Data Purge.
■
In general, the copy data in the SLP reports (like Copies Completed column) is
based on the data that is collected from the SLP worklist. EMM creates the SLP
305
OpsCenter reports
About Report Templates descriptions
worklist once a backup is complete. OpsCenter collects this data in every 10
minutes and shows it in the SLP reports. Depending on when the SLP worklist
is created and also the OpsCenter data collection cycle, the OpsCenter reports
show details for the copy data.
■
The timeframe filter for all SLP reports is based on the time when the primary
backup image (and not an image copy) was created. For example, if you view
the SLP Status by Image Copy report between 7'th May 1:00 P.M. to 8'th May
1:00 P.M., then the copies that got created for an SLP after 8'th May 1:00 P.M.
may be displayed. These copies may be displayed as the timeframe filter is
based on the time when the primary backup image was created and not on the
copy creation time.
■
SLP reports do not consider non-SLP based duplications.
■
Creating custom reports for SLP’s is not supported.
The following are two high-level SLP reports:
SLP Status report
See “SLP Status report” on page 307.
SLP Backlog report
See “SLP Backlog report” on page 311.
Before using the SLP reports, you must understand the SLP and Auto Image
Replication concepts in NetBackup.
See “About SLP and Auto Image Replication” on page 306.
About SLP and Auto Image Replication
This section gives a brief overview about SLP and Auto Image Replication in
NetBackup.
A Storage Lifecycle Policy (SLP) is a storage plan that specifies where data will be
stored and for how long. The SLP determines where the backup image is initially
written and where it is subsequently duplicated. With NetBackup 7.1, you can also
duplicate backup image or duplicate copies from one storage domain to another
for business continuity planning purposes. This means that you can now copy
backup images from one master server to another master server, and also specify
a different master server as a storage destination in an SLP.
The SLP and Auto Image Replication functionality in NetBackup allow you to move
data to tiers of storage on different master servers commensurate with the value
of the data as it ages.
More information about SLP and Auto Image Replication functionality is available
in the Symantec NetBackup Administrator’s Guide.
306
OpsCenter reports
About Report Templates descriptions
SLP Status report
The SLP Status report provides a summary of lifecycle policies that are associated
with a master server. The SLP Status report is a tabular report that lets you know
the current progress of SLPs in the selected timeframe for each master server that
is added to the OpsCenter console.
The SLP status report gives a quick summary of the SLP activity and lets you identify
the SLPs that are incomplete. You can see if all your duplications (copies) are
complete or not.
By clicking the links in the SLP Status report, you can drill down to more detailed
reports. You can use the drill-down reports to focus on SLP’s, images, or the image
copies that are incomplete. You can also view SLP status for each destination and
also for each SLP.
From the SLP Status report, you can drill down to the following reports:
SLP Status by SLP report
See “SLP Status by SLP report” on page 312.
From the SLP Status by SLP report, you can drill down to
the following reports:
■
■
SLP Status by Destinations report
See “SLP Status by Destinations report” on page 331.
SLP Duplication Progress report
See “SLP Duplication Progress report” on page 335.
SLP Status by Client report
See “SLP Status by Client report” on page 317.
SLP Status by Image report
See “SLP Status by Image report” on page 322.
SLP Status by Image Copy
report
See “SLP Status by Image Copy report” on page 327.
The SLP Status report comprises of the following columns:
Master Server (where the
SLP lives)
Name of the master server (link) where the SLP runs. The
SLP may run on the origin master server or any of the
destination master servers (in case of Auto Image
Replication). The NetBackup master server must be of 7.1
or a later version and also added to the OpsCenter console.
This column is mandatory and cannot be removed when you
edit the report.
Click on the master server (link) to see the drilldown report
named SLP Status by SLP.
307
OpsCenter reports
About Report Templates descriptions
Oldest Unfinished Image
This column tells you about the oldest image that is
SLP-incomplete for the selected master server. This column
represents the image end time (and date). The data from this
column helps you to identify the possible bottlenecks in the
SLP process.
This column is mandatory and cannot be removed when you
edit the report.
Total Clients
Number of the unique clients that are backed up by the SLP
for the selected master server. Note that if the same client is
backed up twice or thrice by the SLP, the client is counted
only once. Click the number (link) to view the SLP Status by
Client report.
This column is mandatory and cannot be removed when you
edit the report.
Total Existing Images
Total number of the images that are present in the OpsCenter
database for SLP’s on the selected master server (includes
both SLP-complete images and SLP-incomplete images).
Click the number (link) to view the SLP Status by Image report
for the specific master server. This report displays details of
images in the OpsCenter database that are associated with
the SLP’s on the selected master server.
This column is mandatory and cannot be removed when you
edit the report.
Images % SLP Complete
Percentage of images in the OpsCenter database that are
SLP-complete for the selected master server. This column
is calculated using data from the following columns of the
SLP Status report:
■
Images SLP Complete
■
Total Existing Images
The contents of Images % SLP Complete column is
calculated by using the following formula:
Images SLP Complete / Total Existing Images * 100
This column is mandatory and cannot be removed when you
edit the report.
308
OpsCenter reports
About Report Templates descriptions
Images SLP Complete
Number of images in the OpsCenter database that are
SLP-complete for the specific SLP on the selected master
server. You can remove this column when you edit the report.
Click the number (link) to view the SLP Status by Image
report. A filtered view of the report appears that displays
details of images in the OpsCenter database that are
SLP-complete for the specific SLP.
Images Not SLP Complete
Number of images in the OpsCenter database that are
SLP-incomplete for the specific SLP on the selected master
server. This column is mandatory and cannot be removed
when you edit the report.
Click the number (link) to view the SLP Status by Image
report. A filtered view of the report appears that displays
details of images in the OpsCenter database that are
SLP-incomplete.
Total Expected Copies
Total number of image copies in the OpsCenter database for
the specific SLP on the selected master server (includes both
complete copies and incomplete copies). This column is
mandatory and cannot be removed when you edit the report.
Click the number (link) to view the SLP Status by Image Copy
report.
% Copy Complete
Percentage of completed copies in the OpsCenter database
for the specific SLP on the selected master server. This
column is mandatory and cannot be removed when you edit
the report. The data for this column is calculated by using
data from the following columns of the SLP Status By SLP
report:
■
Copies Completed
■
Total Expected Copies
The contents of % Copy Complete column is calculated by
using the following formula:
Copies Completed / Total Expected Copies * 100
Copies Completed
Number of the completed copies that are present in the
OpsCenter database for SLP’s on the selected master server.
Click the number (link) to view the SLP Status by Image Copy
report. A filtered view of the report appears that displays
details for copies in the OpsCenter database that are
complete for the selected master server.
You can remove this column when you edit the report.
309
OpsCenter reports
About Report Templates descriptions
Copies Not Complete
Number of incomplete copies in the OpsCenter database for
SLP’s on a selected master server. This column is calculated
using the following formula:
Copies Not Complete = Total Expected Copies –Copies
Completed
Click the number (link) to view the SLP Status by Image Copy
report. A filtered view of the report appears that displays
details for image copies in the OpsCenter database that are
incomplete for the selected master server.
This column is mandatory and cannot be removed when you
edit the report.
Total Expected Size - all
copies (MB)
Expected aggregate size of all copies for SLP’s on the
selected master server that are present in the OpsCenter
database. This column is mandatory and cannot be removed
when you edit the report.
The Total Expected Size for all copies is calculated by using
the following formula:
Total Expected Size for all copies = (Number of copies) *
(backup copy size)
Note: The total expected size for all copies is a front-end
size and is derived from the number of copies multiplied by
the size of backup copy. The effects of deduplication,
compression, or optimized deduplication on the Total
Expected Size – all copies are not considered in the SLP
reports.
Completed Copy Size (%)
Percentage of completed copy size for the selected master
server. This column is mandatory and cannot be removed
when you edit the report.
The Completed Copy Size (%) for the specific master server
is calculated using data from the following columns of the
SLP Status report:
■
Completed Copy Size
■
Total Expected Size – all copies
The contents of Completed Copy Size (%) column is
calculated for each master server by using the following
formula:
Completed Copy Size / Total Expected Size – all copies *
100
310
OpsCenter reports
About Report Templates descriptions
Completed Copy Size (MB) Aggregate size of all the completed copies in the OpsCenter
database for the selected master server. You can remove
this column when you edit the report. Note: The Completed
Copy Size is a front-end size. The effects of deduplication,
compression, or optimized deduplication on completed copy
size are not considered in the SLP reports.
Remaining Copy Size (MB) Aggregate size of all remaining copies that are to be created
for the selected master server. This column is mandatory
and cannot be removed when you edit the report.
The Remaining Copy Size (MB) for a specific master server
is calculated in the following manner:
(Remaining Copy Count) x (Size of Backup Copy1)
Note: The remaining copy size is a front-end size and is
derived from the number of remaining copies multiplied by
the size of backup copy 1. The effects of deduplication,
compression, or optimized deduplication on remaining copy
size are not considered in the SLP reports.
You can use filters to view specific data in the SLP Status report. The following
filters are available when you edit the SLP Status report:
Views
Select a particular view to see data for the selected view.
Master Server
Select one or more master servers to see data for the
selected master servers.
SLP Backlog report
The SLP Backlog report lets you monitor the overall SLP backlog in a glance. This
report shows the trend of images created vs. the images which are SLP incomplete
in a line chart format. This report illustrates what the SLP backlog looks like against
the image creation volume for the selected timeframe and the selected SLP’s. By
comparing the line charts in this report, you can understand the rate at which copies
are created vs. the rate at which images requiring copies are created. This report
provides you with empirical evidence on how efficiently the SLP performs and
visibility into its capacity (i.e. at what point does the outflow begin to fall steadily
behind).
Data for the SLP Backlog report is collected from the OpsCenter database at
midnight (12:00 A.M. by the OpsCenter Server clock). The data collection for the
SLP Backlog report occurs after every 24 hours. This report is available in both
graphical (chart) and tabular formats. To view the report details in a tabular format,
click the link Show Chart as Table at the bottom of the report.
311
OpsCenter reports
About Report Templates descriptions
You can edit the report to view specific data in the report. You can also save this
report. Note that when you save the SLP Backlog report and run the saved report
after some time, the report displays current data. You can export or email this report
for reference.
Note that the data that is shown in the SLP Backlog report (images that are created
and unfinished images) is in GB by default. You can edit the report and change the
units to KB, MB, or TB. The default timeframe for the SLP Backlog report is last
two weeks.
While editing the SLP Backlog report, you can group the timeframe for which you
want to see data. However, the time frame grouping for the SLP Backlog report is
supported for the following intervals only:
■
one day
■
one week
■
one month
The SLP Backlog report does not support any other time frame grouping (like two
days, three months, 1 minute, or four weeks).
You can use filters to view specific data in the SLP Backlog report. The following
filters are available when you edit the SLP Backlog report:
Views
Select a particular view to see data for the selected view.
Master Server
Select one or more master servers to see data for the
selected master servers.
Storage Lifecycle Policy
Select one or more SLP’s to see data for the selected SLP’s.
SLP Status by SLP report
You can view the SLP status by SLP report when you click the master server (link)
in the SLP report. It provides detailed information on the status of each SLP that is
configured on the selected master server.
The SLP status by SLP report lets you monitor the progress of each SLP and also
quickly identify the possible bottlenecks.
The SLP Status by SLP report comprises of the following columns:
312
OpsCenter reports
About Report Templates descriptions
Master Server (where the
SLP lives)
Name of the master server where the SLP runs. The SLP
may run on the origin master server or any of the destination
master servers (in case of Auto Image Replication). The
NetBackup master server must be of 7.1 or a later version
and also added to the OpsCenter console.
This column is mandatory and cannot be removed when you
edit the report.
SLP Name
Name of the SLP (link) that is configured on the master
server. This column is mandatory and cannot be removed
when you edit the report.
Click the name (link) to view the SLP Status by Destinations
report.
SLP Version
Version (link) that is associated with the specific SLP on the
selected master server. This column is mandatory and cannot
be removed when you edit the report.
Click the version (link) to view the SLP Duplication Progress
report.
Oldest Unfinished Image
The oldest image that is not SLP-complete for the specific
SLP on the selected master server. This column represents
the image end time (and date). This data helps you to identify
the possible bottlenecks for the specific SLP.
This column is mandatory and cannot be removed when you
edit the report.
TotaI Clients
Number of unique clients (link) that are backed up by the
specific SLP. Note that if the same client is backed up twice
or thrice by the SLP, the client is counted only once. This
column is mandatory and cannot be removed when you edit
the report.
Click the number (link) to view the SLP Status by Client
report.
Total Existing Images
The total number of images that are present in the OpsCenter
database for the specific SLP on the selected master server.
This includes both SLP-complete images and SLP-incomplete
images. This column is mandatory and cannot be removed
when you edit the report.
Click the number (link) to view the SLP Status by Image report
for the specific SLP on the selected master server. This report
displays details of images in the OpsCenter database that
are associated with the SLP’s on the selected master server.
313
OpsCenter reports
About Report Templates descriptions
Images % SLP Complete
Percentage of images in the OpsCenter database that are
SLP-complete for the specific SLP on the selected master
server. This column is mandatory and cannot be removed
when you edit the report.
The data for this column is calculated using data from the
following columns of the SLP Status by SLP report:
■
Images SLP Complete
■
Total Existing Images
The contents of Images % SLP Complete column is
calculated by using the following formula:
Images SLP Complete / Total Existing Images * 100
Images SLP Complete
Number of images in the OpsCenter database that are
SLP-complete for the specific SLP on the selected master
server. You can remove this column when you edit the report.
Click the number (link) to view the SLP Status by Image
report. A filtered view of the report appears that displays
details of images in the OpsCenter database that are
SLP-complete for the specific SLP.
Images Not SLP Complete
Number of images in the OpsCenter database that are
SLP-incomplete for the specific SLP on the selected master
server. This column is mandatory and cannot be removed
when you edit the report.
Click the number (link) to view the SLP Status by Image
report. A filtered view of the report appears that displays
details of images in the OpsCenter database that are
SLP-incomplete.
Total Expected Copies
Total number of image copies in the OpsCenter database for
the specific SLP on the selected master server (includes both
complete copies and incomplete copies). This column is
mandatory and cannot be removed when you edit the report.
Click the number (link) to view the SLP Status by Image Copy
report.
314
OpsCenter reports
About Report Templates descriptions
% Copy Complete
Percentage of completed copies in the OpsCenter database
for the specific SLP on the selected master server. This
column is mandatory and cannot be removed when you edit
the report.
The data for this column is calculated by using data from the
following columns of the SLP Status By SLP report:
■
Copies Completed
■
Total Expected Copies
The contents of % Copy Complete column is calculated by
using the following formula:
Copies Completed / Total Expected Copies * 100
Copies Completed
The number of completed copies that are present in the
OpsCenter database for the specific SLP on the selected
master server. You can remove this column when you edit
the report.
Click the number (link) to view the SLP Status by Image Copy
report. A filtered view of the report appears that displays
details for copies in the OpsCenter database that are
complete for the selected master server.
Copies Not Complete
Shows the number of incomplete copies in the OpsCenter
database for the specific SLP on the selected master server.
This column is mandatory and cannot be removed when you
edit the report.
The data for this column is calculated by using the following
formula:
Copies Not Complete = Total Expected Copies –Copies
Completed
Click the number (link) to view the SLP Status by Image Copy
report. A filtered view of the report appears that displays
details for copies in the OpsCenter database that are
incomplete for the selected SLP.
315
OpsCenter reports
About Report Templates descriptions
Total Expected Size - all
copies (MB)
Expected aggregate size of all copies for the selected SLP
that are present in the OpsCenter database. This column is
mandatory and cannot be removed when you edit the report.
The data for this column is calculated by using the following
formula:
Total Expected Size for all copies = (Number of copies for
the specific SLP) * (backup copy size for the specific SLP)
Note: The total expected size for all copies is a front-end
size and is derived from the number of copies multiplied by
the size of backup copy. The effects of deduplication,
compression, or optimized deduplication on the Total
Expected Size – all copies are not considered in the SLP
reports.
Completed Copy Size (%)
Percentage of completed copy size for the specific SLP on
the selected master server. This column is mandatory and
cannot be removed when you edit the report.
The data for this column is calculated from the following
columns of the SLP Status By SLP report:
■
Completed Copy Size
■
Total Expected Size – all copies
The contents of Completed Copy Size (%) column is
calculated by using the following formula:
Completed Copy Size / Total Expected Size – all copies *
100
Completed Copy Size (MB) Aggregate size of all the completed copies in the OpsCenter
database for the specific SLP on the selected master server.
You can remove this column when you edit the report.
Note: The Completed Copy Size is a front-end size. The
effects of deduplication, compression, or optimized
deduplication on completed copy size are not considered in
the SLP reports.
316
OpsCenter reports
About Report Templates descriptions
Remaining Copy Size (MB) Aggregate size of all remaining copies that are to be created
for the specific SLP on the selected master server. This
column is mandatory and cannot be removed when you edit
the report.
The data for this column is calculated in the following manner:
(Remaining Copy Count for the specific SLP) x (Size of
backup copy for the specific SLP)
Note: The remaining copy size is a front-end size and is
derived from the number of remaining copies multiplied by
the size of backup copy 1. The effects of deduplication,
compression, or optimized deduplication on remaining copy
size are not considered in the SLP reports.
You can use filters to view specific data in the SLP Status by SLP report. The
following filters are available when you edit the SLP Status by SLP report:
Views
Select a particular view to see data for the
selected view.
Master Server
Select one or more master servers to see
data for the selected master servers.
Storage Lifecycle Policy
Select one or more SLP’s to see data for the
selected SLP’s.
The default timeframe for this report is based on what timeframe is selected for the
top-level report.
SLP Status by Client report
The SLP Status by Client report is available as a drill-down report from the SLP
Status and SLP Status by SLP report. You can view the SLP status by Client report
when you click the links in the Total Clients column in the following reports:
■
SLP Status
■
SLP Status by SLP (a filtered view of the SLP status by Client report is shown)
The SLP Status by Client report lets you monitor the SLP progress for each client
that is associated with the SLP. This report helps you to know details about the
SLPs that protect the clients.
This report also provides details about origin master server (master server where
the data is backed up) and the master server where the SLP is running currently.
These two master servers may be different when in case of Auto Image Replication.
317
OpsCenter reports
About Report Templates descriptions
The SLP Status by Client report comprises of the following columns:
Master Server (where the
SLP lives)
Name of the master server where the SLP that is associated
with the client exists. The SLP may run on the origin master
server or any of the destination master servers (in case of
Auto Image Replication). The NetBackup master server must
be of 7.1 or a later version and also added to the OpsCenter
console.
This column is mandatory and cannot be removed when you
edit the report.
SLP Name
Name of the SLP that is associated with the selected master
server and client. This column is mandatory and cannot be
removed when you edit the report.
SLP Version
Version that is associated with the specific SLP. This column
is mandatory and cannot be removed when you edit the
report.
Client Name
Client name (link) that is backed up by the specific SLP on
the selected master server. This column is mandatory and
cannot be removed when you edit the report.
Click the client name (link) to view the SLP Status by Image
report. The SLP Status by Image report is filtered for the
specific client and the specific SLP.
Origin Master Server
(created the image)
Origin Master Server is where the primary backup copy
resides. The SLP may run on the origin master server or any
of the destination master servers (in case of Auto Image
Replication). The Origin Master Server must be a
NetBackup 7.1 or later master server and also added to the
OpsCenter console.
This column is mandatory and cannot be removed when you
edit the report.
Oldest Unfinished Image
This column tells you about the oldest image that is not
SLP-complete for the selected master server, SLP, and client.
This column represents the image end time (and date). This
data helps you to identify the possible bottlenecks for the
specific SLP.
This column is mandatory and cannot be removed when you
edit the report.
318
OpsCenter reports
About Report Templates descriptions
Total Existing Images
The total number of images that are present in the OpsCenter
database for the specific SLP and client on the selected
master server. This includes both SLP-complete images and
SLP-incomplete images. This column is mandatory and
cannot be removed when you edit the report.
Click the number (link) to view the SLP Status by Image report
for the specific SLP on the selected master server. This report
displays details of images in the OpsCenter database that
are associated with the SLP’s and client on the selected
master server.
Images % SLP Complete
Percentage of images in the OpsCenter database that are
SLP-complete for the specific SLP and client on the selected
master server. This column is mandatory and cannot be
removed when you edit the report.
The data for this report is calculated from the following
columns of the SLP Status by Client report:
■
Images SLP Complete
■
Total Existing Images
The data in the Images % SLP Complete column is
calculated by using the following formula:
Images SLP Complete / Total Existing Images * 100
Images SLP Complete
Number of images in the OpsCenter database that are
SLP-complete for the specific SLP and client on the selected
master server. You can remove this column when you edit
the report.
Click the number (link) to view the SLP Status by Image
report. A filtered view of the report appears that displays
details of images in the OpsCenter database that are
SLP-complete for the specific SLP and client.
Images Not SLP Complete
Number of images in the OpsCenter database that are
SLP-incomplete for the specific SLP and client on the selected
master server. This column is mandatory and cannot be
removed when you edit the report.
Click the number (link) to view the SLP Status by Image
report. A filtered view of the report appears that displays
details of images in the OpsCenter database that are
SLP-incomplete.
319
OpsCenter reports
About Report Templates descriptions
Total Expected Copies
Total number of copies expected in the OpsCenter database
for the specific SLP and client on the selected master server
(includes both complete copies and incomplete copies). This
column is mandatory and cannot be removed when you edit
the report.
Click the number (link) to view the SLP Status by Image Copy
report.
% Copy Complete
Percentage of completed copies in the OpsCenter database
for the specific SLP and client on the selected master server.
This column is mandatory and cannot be removed when you
edit the report.
The data for this column is calculated from the following
columns of the SLP Status by Client report:
■
Copies Completed
■
Total Expected Copies
The contents of % Copies Complete column is calculated
by using the following formula:
Copies Completed / Total Expected Copies * 100
Copies Completed
The number of completed copies that are present in the
OpsCenter database for the specific SLP and client on the
selected master server. You can remove this column when
you edit the report.
Click the number (link) to view the SLP Status by Image Copy
report. A filtered view of the report appears that displays
details for copies in the OpsCenter database that are
complete for the selected master server.
Copies Not Complete
Shows the number of incomplete copies in the OpsCenter
database for the specific SLP and client on the selected
master server. This column is mandatory and cannot be
removed when you edit the report.
The data for this column is calculated by the following formula:
Copies not Complete = Total Expected Copies – Copies
Completed
Click the number (link) to view the SLP Status by Image Copy
report. A filtered view of the report appears that displays
details for copies in the OpsCenter database that are
incomplete for the selected SLP.
320
OpsCenter reports
About Report Templates descriptions
Total Expected Size - all
copies (MB)
Expected aggregate size of all copies for the selected SLP
and client that are present in the OpsCenter database. This
column is mandatory and cannot be removed when you edit
the report.
The data for this column is calculated by the following formula:
Total Expected Size for all copies = (Number of copies) *
(backup copy size)
Note: The total expected size for all copies is a front-end
size and is derived from the number of copies multiplied by
the size of backup copy. The effects of deduplication,
compression, or optimized deduplication on the Total
Expected Size – all copies are not considered in the SLP
reports.
Completed Copy Size (%)
Percentage of completed copy size for the specific SLP and
client on the selected master server. This column is
mandatory and cannot be removed when you edit the report.
The data for this column is calculated from the following
columns of the SLP Status by Client report:
■
Completed Copy Size
■
Total Expected Size – all copies
The contents of Completed Copy Size (%) column is
calculated by using the following formula:
Completed Copy Size / Total Expected Size – all copies *
100
Completed Copy Size (MB) Aggregate size of all the completed copies in the OpsCenter
database for the specific SLP and client on the selected
master server. You can remove this column when you edit
the report.
Note: The Completed Copy Size is a front-end size. The
effects of deduplication, compression, or optimized
deduplication on completed copy size are not considered in
the SLP reports.
321
OpsCenter reports
About Report Templates descriptions
Remaining Copy Size (MB) Aggregate size of all remaining copies that are to be created
for the specific SLP and client on the selected master server.
This column is mandatory and cannot be removed when you
edit the report.
The column content is calculated in the following manner:
(Remaining Copy Count) x (Size of Backup Copy1)
Note: The remaining copy size is a front-end size and is
derived from the number of remaining copies multiplied by
the size of backup copy 1. The effects of deduplication,
compression, or optimized deduplication on remaining copy
size are not considered in the SLP reports.
You can use filters to view specific data in the SLP Status by Client report. The
following filters are available when you edit the SLP Status by Client report:
Views
Select a particular view to see data for the selected view.
Master Server
Select one or more master servers to see data for the
selected master servers.
Storage Lifecycle Policy
Select one or more SLP’s to see data for the selected SLP’s.
Client
Select one or more clients to see data for the selected clients.
The default timeframe for this report is based on what timeframe is selected for
top-level report.
SLP Status by Image report
The SLP Status by Image report is available as a drill-down report from the SLP
Status, SLP Status by SLP, and SLP Status by Client report. You can view the SLP
Status by Image report when you click the links in the following columns:
■
Total Existing Images
■
Images SLP Complete (filtered view of the SLP Status by Image report is shown)
■
Images Not SLP Complete (filtered view of the SLP Status by Image report is
shown)
The SLP Status by Image report lets you monitor the lifecycle for the images that
are associated with the SLP. This report helps you to know which images are
complete and incomplete for a specific SLP and identify bottlenecks in the SLP
process. This report gives an idea of how a specific image is duplicated across
master servers and also provides specific details about the image like backup time,
SLP completion time, copies associated with each image and it's status etc. The
322
OpsCenter reports
About Report Templates descriptions
SLP status by Image report can help you to identify the image IDs that are not
SLP-complete.
The SLP Status by Image report comprises of the following columns:
Master Server (where the
SLP lives)
Name of the master server where the SLP runs. The SLP
may run on the origin master server or any of the destination
master servers (in case of Auto Image Replication). The
NetBackup master server must be of 7.1 or a later version
and also added to the OpsCenter console.
This column is mandatory and cannot be removed when you
edit the report.
SLP Name
Name of the SLP that is associated with the selected master
server and image.
This column is mandatory and cannot be removed when you
edit the report.
SLP Version
Version (link) that is associated with the specific SLP. This
column is mandatory and cannot be removed when you edit
the report. Click the version (link) to view the SLP Duplication
Progress report.
Policy Name
Policy that is associated with the SLP. This column is
mandatory and cannot be removed when you edit the report.
Schedule Name
Schedule that is associated with the policy. You can remove
this column when you edit the report.
Client Name
Client name that is backed up by the SLP for the selected
master server.
This column is mandatory and cannot be removed when you
edit the report.
Origin Master Server
(created the image)
Origin Master Server is where the primary backup copy
resides. The SLP may run on the origin master server or any
of the destination master servers (in case of Auto Image
Replication). The origin master server and master server
where the SLP lives (or is running currently) may be different
if you use Auto Image Replication.
The Origin Master Server must be a NetBackup 7.1 or
later master server and also added to the OpsCenter console.
This column is mandatory and cannot be removed when you
edit the report.
323
OpsCenter reports
About Report Templates descriptions
Image ID
Image ID (link) associated with the image. The Image ID is
unique for each image. Click the image ID (link) to view the
SLP Status by Image Copy report.
This column is mandatory and cannot be removed when you
edit the report.
Backup Time
Date and time when the primary backup is completed.
This column is mandatory and cannot be removed when you
edit the report.
SLP Completion Time
Date and time when the image is SLP-complete. This column
is mandatory and cannot be removed when you edit the
report.
Lag Time (SLP Completion The Lag Time gives you an idea of how much time was
Time – Backup Time)
required to complete the SLP and judge how fast or slow
duplications occur. The Lag time is displayed in seconds.
The Lag time for a specific image copy is computed by using
data from the following columns and by using the following
formula:
Lag Time = SLP Completion Time – Backup Time
This column is mandatory and cannot be removed when you
edit the report.
Total Expected Copies
Total number of copies expected in the OpsCenter database
for the specific SLP and image on the selected master server
(includes both complete copies and incomplete copies).
Click the number (link) to view the SLP Status by Image Copy
report. This column is mandatory and cannot be removed
when you edit the report.
Copies Completed
The number of completed copies that are present in the
OpsCenter database for the specific SLP and image on the
selected master server.
Click the number (link) to view the SLP Status by Image Copy
report. A filtered view of the report appears that displays
details for copies in the OpsCenter database that are
complete for the selected master server.
You can remove this column when you edit the report.
324
OpsCenter reports
About Report Templates descriptions
Copies Not Complete
Shows the number of incomplete copies in the OpsCenter
database for the specific SLP and image on the selected
master server. This column is mandatory and cannot be
removed when you edit the report.
The data for this column is calculated by the following formula:
Copies not Complete = Total Expected Copies –Copies
Completed
Click the number (link) to view the SLP Status by Image Copy
report. A filtered view of the report appears that displays
details for copies in the OpsCenter database that are
incomplete for the selected SLP.
% Copy Complete
Percentage of completed copies in the OpsCenter database
for the specific SLP and image on the selected master server.
This column is mandatory and cannot be removed when you
edit the report.
The data for this column is calculated from the following
columns of the SLP Status by Image report:
■
Copies Completed
■
Total Expected Copies
The contents of this column is calculated by using the
following formula:
Copies Completed / Total Expected Copies * 100
Total Expected Size - all
copies (MB)
Expected aggregate size of all copies for the selected SLP
and image that are present in the OpsCenter database. This
column is mandatory and cannot be removed when you edit
the report. The data for this column is calculated by the
following formula:
Total Expected Size for all copies = (Number of copies) *
(backup copy size)
Note: The total expected size for all copies is a front-end
size and is derived from the number of copies multiplied by
the size of backup copy. The effects of deduplication,
compression, or optimized deduplication on the Total
Expected Size – all copies are not considered in the SLP
reports.
325
OpsCenter reports
About Report Templates descriptions
Completed Copy Size (MB) Aggregate size of all the completed copies in the OpsCenter
database for the specific SLP and image on the selected
master server. You can remove this column when you edit
the report.
Note: The Completed Copy Size is a front-end size. The
effects of deduplication, compression, or optimized
deduplication on completed copy size are not considered in
the SLP reports.
Completed Copy Size (%)
Percentage of completed copy size for the specific SLP and
image on the selected master server. This column is
mandatory and cannot be removed when you edit the report.
The data for this column is calculated from the following
columns of the SLP Status By Image report:
■
Completed Copy Size
■
Total Expected Size – all copies
The contents of Completed Copy Size (%) column is
calculated by using the following formula:
Completed Copy Size / Total Expected Size – all copies *
100
Remaining Copy Size (MB) Aggregate size of all remaining copies that are to be created
for the specific SLP and image on the selected master server.
This column is mandatory and cannot be removed when you
edit the report.
The data for this column is calculated in the following manner:
(Remaining Copy Count) x (Size of Backup Copy1)
Note: The remaining copy size is a front-end size and is
derived from the number of remaining copies multiplied by
the size of backup copy 1. The effects of deduplication,
compression, or optimized deduplication on remaining copy
size are not considered in the SLP reports.
You can use filters to view specific data in the SLP Status by Image report. The
following filters are available when you edit the SLP Status by Image report:
Views
Select a particular view to see data for the
selected view.
Master Server
Select one or more master servers to see
data for the selected master servers.
326
OpsCenter reports
About Report Templates descriptions
Storage Lifecycle Policy
You can select the following columns:
■
■
SLP Name: Select one or more SLP’s to
view data for the selected SLP’s.
SLP status: Select SLP status for which
you want to view data.
Policy
Select one or more policies to see data for
the selected policies.
Schedule
Select one or more schedules to see data for
the selected schedules.
Client
Select one or more clients to see data for the
selected clients.
The default timeframe for this report is based on what timeframe is selected for the
top-level report.
SLP Status by Image Copy report
The SLP status by Image Copy report is available as a drill-down report from the
SLP Status, SLP Status by SLP, and SLP Status by Image report. You can view
the SLP Status by Image Copy report when you click the links in the following
columns:
■
Total Expected Copies
■
Copies Completed (filtered view of the SLP Status by Image Copy report is
shown)
■
Copies Not Complete (filtered view of the SLP Status by Image Copy report is
shown)
The SLP Status by Image Copy report shows how the image copies are created
for different SLP destinations across different master servers. This report provides
detailed information about the image copies that the SLP creates. This report
provides details such as which copy is complete, which SLP is not complete and
the specific copy operations that are pending.
The SLP Status by Image Copy report comprises of the following columns:
327
OpsCenter reports
About Report Templates descriptions
Master Server (where the
SLP lives)
Name of the master server where the SLP runs. The SLP
may run on the origin master server or any of the destination
master servers (in case of Auto Image Replication). The
NetBackup master server must be of 7.1 or a later version
and also added to the OpsCenter console.
This column is mandatory and cannot be removed when you
edit the report.
SLP Name
Name of the SLP that is associated with the selected master
server.
This column is mandatory and cannot be removed when you
edit the report.
SLP Version
Version (link) that is associated with the specific SLP. This
column is mandatory and cannot be removed when you edit
the report.
Click the version (link) to view the SLP Duplication Progress
report.
Data Classification
Data classification that is associated with the SLP.
This column is mandatory and cannot be removed when you
edit the report.
Policy Name
Policy that is associated with the SLP. This column is
mandatory and cannot be removed when you edit the report.
Schedule Name
Schedule that is associated with the NetBackup policy. You
can remove this column when you edit the report.
Client Name
Client name that is backed up by the SLP for the selected
master server. This column is mandatory and cannot be
removed when you edit the report.
Image ID
Image ID associated with the image. The image ID is unique
for each image. This column is mandatory and cannot be
removed when you edit the report.
Click the image ID (link) to view the SLP Status by Image
Copy report.
Job ID
Job ID associated with the specific operation. This column
is mandatory and cannot be removed when you edit the
report.
328
OpsCenter reports
About Report Templates descriptions
Origin Master Server
(created the image)
Origin Master Server is where the primary backup copy
resides. The SLP may run on the origin master server or any
of the destination master servers (in case of Auto Image
Replication). The origin master server and master server
where the SLP lives (or is running currently) may be different
if you use Auto Image Replication.
The Origin Master Server must be a NetBackup 7.1 or
later master server and also added to the OpsCenter console.
This column is mandatory and cannot be removed when you
edit the report.
Operation
The operation that is performed on an image copy like
Duplication, Backup, Import etc.
This column is mandatory and cannot be removed when you
edit the report.
State
Current status of the copy like Complete, Not Started, In
Process, Deleted, Paused. You can remove this column when
you edit the report.
Format
The Format column helps to differentiate between the
NetBackup image format and the snapshot copy. This report
shows the details of any snapshot copy that is a part of the
storage lifecycle policy.
Destination
Destination where a copy should reside as per the SLP
definition. This column is mandatory and cannot be removed
when you edit the report.
Expiration Time
Time when the copy expires. You can remove this column
when you edit the report.
Copy/Import Completion
Time
Time when the copy is completed. This column is mandatory
and cannot be removed when you edit the report.
Lag Time (Copy Time –
Backup Time)
The Lag Time gives you an idea of how fast or slow
duplications occur. The Lag time is displayed in seconds.
This column is mandatory and cannot be removed when you
edit the report.
329
OpsCenter reports
About Report Templates descriptions
Completed Copy Size (MB) Aggregate size of all the completed copies in the OpsCenter
database for the specific SLP and image on the selected
master server. This column is mandatory and cannot be
removed when you edit the report.
Note: The Completed Copy Size is a front-end size. The
effects of deduplication, compression, or optimized
deduplication on completed copy size are not considered in
the SLP reports.
You can use filters to view specific data in the SLP Status by Image Copy report.
The following filters are available when you edit the SLP Status by Image Copy
report:
Views
Select a particular view to see data for the
selected view.
Master Server
Select one or more master servers to see
data for the selected master servers.
Storage Lifecycle Policy
You can select the following parameters:
■
■
■
■
Replication to Remote Master: If the value
is Yes, then copy details for replication
jobs are displayed.
Operation: Select one or more operations
that you want to view.
SLP name: Select one or more SLP’s that
you want to view.
State: Select one or more states that you
want to view.
Example: If you want to view all pending
import operations, select the following
parameters:
■
Operation = Import
■
State = Not Started
Example: If you want to view the replication
status for jobs, select the following
parameters:
Policy
■
Replication to Remote Master = Yes
■
Operation = Duplication
Select one or more policies to see data for
the selected policies.
330
OpsCenter reports
About Report Templates descriptions
Schedule
Select one or more schedules to see data for
the selected schedules.
Client
Select one or more clients to see data for the
selected clients.
Images
Enter the image ID for which you want to view
data.
The default timeframe for this report is based on what timeframe is selected for the
top-level report.
SLP Status by Destinations report
The SLP Status by Destinations report is available as a drill-down report from the
SLP Status by SLP report. You can view the SLP Status by Destinations report
when you click the SLP name (link) in the SLP Status by SLP report.
The SLP Status by Destinations report provides a summary of all the destinations
for a specific SLP. You can view the SLP status by Destinations report to monitor
the SLP progress for each SLP destination. For example, you may want to know
the image copies that are not complete for a specific SLP destination.
The SLP Status by Destinations report comprises of the following columns:
Master Server (where the
SLP lives)
Name of the master server where the SLP runs. The SLP
may run on the source master server or any of the destination
master servers (in case of Auto Image Replication). The
NetBackup master server must be of 7.1 or a later version
and also added to the OpsCenter console.
This column is mandatory and cannot be removed when you
edit the report.
SLP Name
Name of the SLP that you selected. This column is mandatory
and cannot be removed when you edit the report.
SLP Version
Version that is associated with the SLP. This column is
mandatory and cannot be removed when you edit the report.
Data Classification
Data classification that is associated with the SLP destination.
This column is mandatory and cannot be removed when you
edit the report.
331
OpsCenter reports
About Report Templates descriptions
Origin Master Server
(created the image)
Origin Master Server is where the primary backup copy
resides. The SLP may run on the origin master server or any
of the destination master servers (in case of Auto Image
Replication). The origin master server and master server
where the SLP lives (or is running currently) may be different
in case of Auto Image Replication.
The Origin Master Server must be a NetBackup 7.1 or
later master server and also added to the OpsCenter console.
This column is mandatory and cannot be removed when you
edit the report.
Operation
The operation that is performed on an image copy like
Duplication, Backup, Import etc. for the specific SLP
destination.
This column is mandatory and cannot be removed when you
edit the report.
Retention
Retention period that is associated with the specific SLP
destination.
This column is mandatory and cannot be removed when you
edit the report.
Destination
Destination where an image should reside as per the SLP
definition.
This column is mandatory and cannot be removed when you
edit the report.
Average Lag Time (Copy
Time – Backup Time)
The Average Lag Time gives you an idea of how much time
is required to duplicate the primary copy to a particular
destination for a specific SLP and judge how fast or slow
duplications occur. The Average Lag Time is displayed in
seconds. This column is mandatory and cannot be removed
when you edit the report.
Total Expected Copies
Total number of copies in the OpsCenter database for the
SLP and the specific SLP destination (includes both complete
copies and incomplete copies).
This column is mandatory and cannot be removed when you
edit the report.
Copies Completed
The number of completed copies that are present in the
OpsCenter database for the SLP and the specific SLP
destination. You can remove this column when you edit the
report.
332
OpsCenter reports
About Report Templates descriptions
% Copy Complete
Percentage of completed copies in the OpsCenter database
for the SLP and the specific SLP destination.
The column contents are calculated using data from the
following columns of the SLP Status by Destinations report:
■
Copies Completed
■
Total Expected Copies
The contents of % Copies Complete column is calculated by
using the following formula:
Copies Completed / Total Expected Copies * 100
This column is mandatory and cannot be removed when you
edit the report.
Total Expected Size - all
copies (MB)
Expected aggregate size of all copies for SLP and the specific
SLP destination that are present in the OpsCenter database.
This column is mandatory and cannot be removed when you
edit the report. The column contents are calculated by using
the following formula:
Total Expected Size for all copies = (Number of copies) *
(backup copy size)
Note: The total expected size for all copies is a front-end
size and is derived from the number of copies multiplied by
the size of backup copy. The effects of deduplication,
compression, or optimized deduplication on the Total
Expected Size – all copies are not considered in the SLP
reports.
Completed Copy Size (MB) Aggregate size of all the completed copies in the OpsCenter
database for the SLP and the specific SLP destination. You
can remove this column when you edit the report.
Note: The Completed Copy Size is a front-end size. The
effects of deduplication, compression, or optimized
deduplication on completed copy size are not considered in
the SLP reports.
333
OpsCenter reports
About Report Templates descriptions
Completed Copy Size (%)
Percentage of completed copy size for the SLP and the
specific SLP destination. This column is mandatory and
cannot be removed when you edit the report.
The data for this column is calculated from the following
columns of the SLP Status by Destinations report:
■
Completed Copy Size
■
Total Expected Size – all copies
The contents of Completed Copy Size (%) column is
calculated by using the following formula:
Completed Copy Size / Total Expected Size – all copies *
100
Remaining Copy Size (MB) Aggregate size of all remaining copies that are to be created
for the SLP and the Size (MB) specific SLP destination. This
column is mandatory and cannot be removed when you edit
the report. The data for this column is calculated in the
following manner:
(Remaining Copy Count) x (Size of Backup Copy1)
Note: The remaining copy size is a front-end size and is
derived from the number of remaining copies multiplied by
the size of backup copy 1. The effects of deduplication,
compression, or optimized deduplication on remaining copy
size are not considered in the SLP reports.
You can use filters to view specific data in the SLP Status by Image Copy report.
The following filters are available when you edit the SLP Status by Image Copy
report:
View
Select a particular view to see data for the
selected view.
Master Server
Select one or more master servers to see
data for the selected master servers.
Storage Lifecycle Policy
You can select the following columns:
■
■
■
Replication to Remote Master: If the
value is Yes, then SLP’s that duplicate
across master servers are displayed.
Operation: Select one or more operations
that you want to view
SLP name: Select one or more SLP’s that
you want to view.
334
OpsCenter reports
About Report Templates descriptions
The default timeframe for this report is based on what timeframe is selected for the
top-level report.
SLP Duplication Progress report
The SLP Duplication Progress report is available as a drill-down report from the
SLP Status by SLP report. You can view the SLP Duplication Progress report when
you click the SLP version (link) in the SLP Status by SLP report.
The SLP Duplication Progress report is a graphical report that shows how the image
copies are created for an SLP on a specific master server. This indicates how
duplications are progressing for an SLP on a specific master server.
The SLP Duplication Progress report is in a bar chart format and shows the following
data for each axis:
■
X axis shows all duplication destinations that are associated with the SLP
■
Y1 axis bar charts show the percentage of images that are completed
■
Y2 axis shows how many images are created.
Note: The SLP Duplication Progress report shows data for only one master server
where that SLP version is running.
You can also view the report data in a tabular format. To view the report details in
a tabular format, click the link Show Chart as Table at the bottom of the report.
You can edit the report to view specific data in the report. You can also save this
report for reference.
You can use filters to view specific data in the SLP Duplication Progress report.
The following filters are available when you edit the SLP Duplication Progress report:
View
Select a particular view to see data for the selected view.
Master Server
Select one or more master servers to see data for the
selected master servers.
Storage Lifecycle Policy
Select an SLP to see data for the selected SLP. You can
select only one SLP.
The default timeframe for this report is based on what timeframe is selected for the
top-level report.
335
OpsCenter reports
About Report Templates descriptions
Limitations of SLP reports
The data that is shown in the SLP reports is collected primarily from the EMM
worklist and also from the NetBackup catalog. Hence it is important to understand
how the EMM worklist functions. The functionality of the EMM worklist affects the
data that is displayed in the SLP reports.
The following sections provide an insight on SLP and EMM functionality and also
list some limitations that are associated with the SLP reports.
About storage lifecycle policy retention
While creating a storage lifecycle policy in NetBackup, you can specify the
destinations where copies should be created. For an SLP, an image can be written
to the initial destination as part of the following operations:
■
Backup
■
Import
You can define the Retention type for each SLP destination. You can select many
retention types like Fixed (1, 2, 3 weeks), Expire after Copy, Staged capacity
managed etc. The following table explains the meaning of Fixed and Expire after
Copy retention types:
Fixed
Fixed retention type means that the backup
data is retained for a specific length of time
before the backups are expired. When the
retention period is reached, NetBackup
deletes information about the expired backup.
Expire after Copy
Expire after Copy retention type means that
the image expires after the dependent
duplication is complete.
When you are creating a NetBackup policy, the SLP that you created (like SLP1)
can be selected as Policy Storage (storage unit). The SLP (SLP1) is executed when
the policy runs.
About data collection from EMM
The SLP1 performs the following operations:
data that is shown in the SLP reports is collected from the EMM worklist and the
NetBackup catalog. The worklist is located in the EMM and contains metadata like
how many copies need to be created, where they need to be created, when they
are completed etc. In general, the copy data that is shown in the SLP reports (like
Copies Completed, Completed Copy Size columns etc.) is based on the EMM
336
OpsCenter reports
About Report Templates descriptions
worklist. EMM creates the worklist after a backup is complete based on lifecycle
configuration parameters.
Consider a case when you configure an SLP named SLP1:
■
Backup (Stu1)
■
Duplication (Stu2)
■
Duplication (Stu3)
After the backup is complete, a worklist that contains an entry for each copy is
created in the EMM database. In this example, the EMM worklist has three copy
entries (corresponding to the number of copies that are defined in the SLP). The
EMM worklist is updated as and when a duplication job is processed (for example,
State for the copy changes from Not Started to In Process to Complete).
SLP reporting limitations
OpsCenter collects data for SLP reports in the following phases:
Table 2-1
SLP data collection
Serial No.
Phase
Description
1.
Initial Data Collection
When a NetBackup 7.1 or
later master server is added
to the OpsCenter console,
OpsCenter Server initially
collects all data from the EMM
worklist.
2.
Periodic Data Collection
After the initial data load,
OpsCenter collects only the
changed data after every 10
minutes.
OpsCenter depends on the EMM worklist for SLP reporting. The following EMM
behavior affects the data that is shown in the SLP reports:
■
If the Retention type of the SLP destination is Expire after Copy, then EMM
deletes the copy entry from the EMM worklist after duplication is complete. This
behavior affects the initial data collection and periodic data collection for SLP
reports.
See “Issues associated with initial data collection” on page 338.
See “Issues associated with periodic data collection” on page 339.
■
If the Retention type of the SLP destination is Fixed, then EMM deletes the copy
entry based on the Retention period that is specified in the policy. This behavior
affects the initial data collection and periodic data collection for SLP reports.
337
OpsCenter reports
About Report Templates descriptions
See “Issues associated with initial data collection” on page 338.
See “Issues associated with periodic data collection” on page 339.
■
If the SLP images reside on a tape drive, then EMM deletes the copy entry when
the particular SLP is complete. This behavior affects the initial data collection
and periodic data collection for SLP reports.
See “Issues associated with initial data collection” on page 338.
See “Issues associated with periodic data collection” on page 339.
■
If you cancel an SLP that is in progress, then all the copy entries that are
associated with this SLP image are deleted from the EMM worklist. This behavior
affects the periodic data collection for SLP reports.
See “Issues associated with periodic data collection” on page 339.
Issues associated with initial data collection
For initial data collection, the following potential issues can be seen in SLP reports
due to the EMM behavior.
Since initial data collection loads all the data from the EMM, it may have an image
entry with missing copy entries. It is possible that the copy entries in the EMM
worklist are deleted due to the following factors:
■
If the Retention type of an SLP destination is Expire after Copy or Fixed.
■
If duplications happen on a tape drive
The deletion of copies has the following affect on the data that is shown in specific
SLP reports:
■
The SLP Duplication Progress report is in a bar chart format. The X axis shows
all duplication destinations associated with the SLP; Y1 axis bar charts show
the percentage of images completed (% Images Count) and Y2 axis shows
how many images are actually created (Completed Images Count).
If a backup copy is deleted from the EMM worklist, then this report may show
that the backup copy count is less than the duplication count. This is misleading.
It is expected that when an SLP is complete, same number of copies should be
created on all the destinations. Similarly the % Size Completed computation is
inaccurate for this report.
■
If a backup copy entry is deleted from the EMM worklist, the SLP Duplication
Progress report will not show the backup bar chart. Similarly, if a duplication
copy entry is deleted, the Duplication Progress report will not show the duplication
bar chart.
■
The SLP Status by Destination report will show incorrect copy sizes across
destinations. The following columns of the SLP Status by Destination report
show incorrect data:
338
OpsCenter reports
About Report Templates descriptions
■
Total Expected Size – all copies (MB)
■
Completed Copy Size (MB)
Issues associated with periodic data collection
When OpsCenter collects data periodically after every 10 minutes, the following
potential problems can be seen in SLP reports.
Consider a scenario when OpsCenter has collected the data for all copies associated
with SLP1 which is in progress. However, before the next data collection happens
one of the copy entries is removed from the EMM worklist (due to the EMM
behavior). In this scenario, OpsCenter marks such copy entries as Complete if the
image is SLP-complete during the next data collection cycle.
In this example scenario, you may see the following issues:
■
For all such copies that OpsCenter marks complete, the SLP Status by Image
Copy report does not show any value for the Lag Time and the Copy End Time.
■
If the last copy entry for an SLP is removed from the EMM worklist (due to EMM
behavior), then the SLP Completion Time that is shown in the SLP Status by
Image report is inaccurate.
Note: The same issues are seen if you cancel an SLP that is in progress (like SLP1).
These issues occur because all the copy entries associated with this SLP image
are deleted from the EMM worklist.
Known Issues with SLP reports
The following known issues are associated with the SLP reports:
■
When there are multiple copies in an SLP and two or more copies share the
same destination, then only one-bar chart is shown for such copies in the SLP
Duplication Progress report.
■
The size of image copies for which Import is in a Not Started state, is not
considered. Because of this behavior, the SLP Status, SLP Status by SLP, SLP
Status by Client reports may display Completed Copy Size % as 100% while
in reality there may be image copies for which the Import operation is in a Not
Started state.
■
If the Import is in a Not Started state for some image copies, the SLP Status by
Destination report may show two rows for the same storage destination. This
data is shown because there is insufficient data for image copies for which
Import is in a Not Started state. The additional row is not shown once the Import
operation is complete for all image copies.
339
OpsCenter reports
About Report Templates descriptions
About Workload Analyzer reports in OpsCenter
This section provides descriptions on the Workload Report Templates available in
OpsCenter. The reports are in a graphical format and provide details on the overall
past, current, and projected workload of your NetBackup environment including job
counts, sizes, throughput, and scheduled job queues.
Workload Analyzer report
The Workload Analyzer is a report that gives information about the activities that
are done across a period of seven days. The activities are number of jobs running
at a given period of time and the amount of data that is transferred during this period.
The report contains 168 data points of analysis in terms of the activities that are
done for each hour for a period of seven days.
The report is comprised of four reports that are based on time, data transfer, job
queue, and job throughput. Time is the point from when the jobs start, the periods
for which the jobs are active, and the point when the jobs end. Job queue is based
on the length of time, a job is in queue before the job is initiated. Job size is the
amount of data that is moved from the target to the destination depending on the
job type. Job size is also based on how much data is broken down and moved in
a given hour. Job throughput is based on the data transmission rate.
The Workload Analyzer reports consider only the jobs done for calculating and
generating the report. The calculation can result in a difference in data for the current
hour and date. For example, a job that started in the past, and is in the queued
state for a long time is not considered in the job queue report. It is considered only
when it is complete.
See “Workload Analyzer subreports: Job Count, Size, Queue, and Throughput”
on page 340.
See “Generating a Workload Analyzer report” on page 347.
Workload Analyzer subreports: Job Count, Size, Queue, and
Throughput
The Workload Analyzer reports are based on time, queue, size, and throughput.
The following reports are a part of the Workload Analyzer report:
■
Job Count Workload Analyzer: This report is based on the number of jobs
running at a given period of time. The purpose of this report is to display the
data that is based on time and load. You can determine the time for the job
count on the basis of the start and end time of the job. Data for load is determined
based on how many jobs are active during a given period of time. Calculations
are done to determine the number of jobs that are active during a given period
of time.
340
OpsCenter reports
About Report Templates descriptions
For example, the following figure displays the job counts for a given period of
time. (A) shows the jobs that start before the time interval and end after the time
interval. (B) shows the jobs that start before the time interval and end during
the time interval. (C) shows the jobs that start and end during the time interval.
(D) shows the jobs that start during the time interval and end after the time
interval.
■
Job Size Workload Analyzer: This report is based on the amount of data that
is transferred during a given period of time. The calculation is based on the total
amount of data that is backed up by the jobs divided by the time period.
For example, in the following figure there are four jobs that have different
durations across a four hour time period. The left-hand side displays the amount
of data that's transferred during the four hour time period. The right-hand side
of the report displays the start time and end time for each job, amount of data
transferred, and duration. Job A is active for a period of four hours, it starts at
1:20 P.M. and ends at 4:20 P.M. During that period the total data that is
transferred is 80,000 MB. You can calculate data transfer rate, multiply data
transfer rate by the number of minutes during each hour when there is job activity.
Job activity in the first hour is 20 minutes, in the second and third hour it is 60
minutes, and fourth hour it is 20 minutes. Jobs B, C, and D follow a similar
pattern. Load is the sum of loads of all jobs during that hour. The yellow slot
shows maximum activity and the data that is transferred is 115960 KB.
341
OpsCenter reports
About Report Templates descriptions
■
Job Queue Workload Analyzer: This report is based on the period for which,
jobs are in a queue state before data back up begins. Queue time is calculated
through the use of timestamps such as time taken to initiate the job, time taken
to start and end the job. Jobs that have a high queue time are identified to reduce
scenarios where many jobs with high queue time are initiated at the same time.
The queuing is calculated at individual job level and then aggregated to the level
where the report is generated.
342
OpsCenter reports
About Report Templates descriptions
■
Job Throughput Workload Analyzer: This report is based on the rate in
Mbytes\Sec at which the data is transferred This calculation provides an important
indicator to understand the performance. The throughput report is based on
cross-hour calculation. The report displays accurate analysis of the data.
Compared to the other workload reports, the totals for the rows of this report
are averaged.
The Start Write time ensures that the speed is only measured against the time
in which, the actual data transfer takes place. This calculation ensures that the
queue time is not considered. The queue report calculates the queue time. In
the following figure, the throughput is calculated across four jobs that span for
a period of three hours. One job belongs to Policy B and three jobs belong to
Policy A. The green boxes indicate the time in which the write job occurs.
Workload Analyzer report template options
The Workload Analyzer report template is a pre-fixed 168 hour reporting template.
The template makes extensive use of color to display the analyzed data through
the heat map technology. You can configure the color range. Report categories
that include attributes such as backup server, media server, client, policy, provide
a good means to understand the basics of workload and performance. All the reports
that comprise the workload analyzer report template are based on time. The following
figure is a sample report template.
343
OpsCenter reports
About Report Templates descriptions
The highlights of the workload analyzer report template are as follows:
■
You can hover the mouse on each cell in the report to get details such as date,
time, hour, and actual value of the hour.
■
You can configure the range for each color. The color depicts the density of the
jobs running at that hour. It also displays the number of minutes of queue time,
the amount of data transferred, and the throughput rate. The deeper the color
of the cell, the higher is the value in the cell.
■
You can use the Report on feature to select entities for which, you require the
data. For example, if you select Report on for a master server, the second
column in the report displays data for the master server only. The entities include
Backup Server, Media Server, Backup Client, Policy, Policy Type, Schedule,
Job Type, Job Level, Job Error Code, Exit Status, Job Exit Code, Job
Transport Type, Schedule\Level Type, and Storage Unit.
■
You can drill down to the next level in the report. The second column is hyper
linked and provides the drill-down option. For example, from the master server
you can drill down to client. A drill-down report is launched. You can drill down
to clients from the media server, policy, policy schedule, schedule, job type, job
error code, job status, job level, transport type. Other drill-down options are
policy type to policy, job status to job error code, view to next level down the
view hierarchy.
■
The last row on the report shows the total values of all the rows for the entire
time span. The first column shows data for the entire week, whereas the hour
column shows data for that particular hour for all entities.
■
You can use various filters in the report. The filters include:
344
OpsCenter reports
About Report Templates descriptions
Filter type
Description
Time Filter
Filter on Absolute or Relative time filter
View
Filter on any view.
Master Server, media server
Filter on available master servers and
media servers.
Client
Filter on available client.
Policy
Filter on name and type of policy.
Schedule
Filter on schedules
Job
Filter on status, status code, transport type,
type, and schedule or level type.
Storage unit
Filter on the name.
Workload
Filter on duration threshold and time basis.
■
You can use the Report on feature for different variables. The variables include
Backup Server, Media Server, Backup Client, Policy, Policy Type, Schedule,
Job Type, Job Level, Job Error Code, and Storage Unit.
■
You can drill down on any cell to know the details about the data.
The following drill-down options are available for all the Workload Analyzer reports.
345
OpsCenter reports
About Report Templates descriptions
■
Master Server to Client
■
Media server to Client
■
Policy Type to Policy
■
Policy to Client
■
Policy ScheduletoClient
■
Schedule to Client
■
Job Type to Client
■
Job Error Code to Client
■
Job Status to Client (when Job Status <> Failure)
■
Job Status to Job Error Code (when Job Status = Failure)
■
Job Level to Client
■
Transport Type to Client
■
View to Next level down the view hierarchy
The colors in the report represent different data values, the information is available
in the following table.
Table 2-2
Color range values
Color range
Value
Idle
Displays the cells that are gray, which means there are no active
jobs assigned.
1 - 10
Displays value for the data that has the color range between 1 10, the light yellow cells represent these values.
11 - 50
Displays value for the data that has the color range between 11
- 50, the dark yellow cells represent these values.
51 - 100
Displays value for the data that has the color range between 51
- 100, the orange cells represent these values.
More than 100
Displays the value for data that has the color range that is greater
than 100, the red cells represent these values.
See “Workload Analyzer subreports: Job Count, Size, Queue, and Throughput”
on page 340.
346
OpsCenter reports
About Report Templates descriptions
Generating a Workload Analyzer report
You can generate the Workload Analyzer report using the Workload Analyzer report
template from the reports tree. The report comprises of four reports that are based
on time, data transfer, queue time, and throughput speed.
To generate the workload analyzer report
1
In the OpsCenter console, click Reports.
2
On the Reports Template tab, click Create New Report. The reports are also
available under the reports tree as shown in the following figure
3
On the Report Wizard, retain the default selection Create a report using an
existng report templateand click Next.
4
From the Select Report Template list, select the Workload Analyzer report
you want to create and click Next.
347
OpsCenter reports
About Report Templates descriptions
5
Select the time frame from the Relative TimeFrame (beginning at) or Absolute
TimeFrame (beginning at) options.
The Timeframe option displays the output for seven days for the previous week
or the next week. The Relative Timeframe option also displays data from the
date you choose, it can also be from the middle of a week. Absolute Timeframe
displays data for a week for the date you select. For example, if you select
today's date, the data that is displayed is for the next week including today's
date. The selection is for a week and there is no end time provided for selection.
6
Select the required filters and click Next.
7
View the report and click Next.
8
Enter a name and description in the Report name and Description text boxes.
Select the location and click Save to save the report.
Note: Open the saved report. Use the options Previous Week and Next Week
to view data for the previous seven days or next seven days.
About exporting and emailing the Workload Analyzer report
The Workload Analyzer report can be exported in the HTML format. You can set
the export location through the Report Export Location tab.
The report can be emailed only in the HTML format.
Note: When the Workload Analyzer report is emailed for Outlook Express, it does
not show the correct alignment of the cells of the report.
348
Chapter
3
Custom reports in
OpsCenter Analytics
This chapter includes the following topics:
■
Creating a custom report in OpsCenter
■
Creating an OpsCenter report using SQL query
Creating a custom report in OpsCenter
In addition to using the reports that come by default with OpsCenter, you can use
the Custom Report Wizard to create custom reports that are unique to your
installation.
After creating a custom report, you can modify the report, print, save, and email it.
As you work with different report categories, the Report Wizard displays different
parameters. Many of the parameters are used for multiple report categories, and
they appear in different combinations for each type.
You can create a custom report by using the parameters that are available in the
Custom Report Wizard.
See “About Custom Report Wizard parameters” on page 356.
To create a custom report
1
In the OpsCenter console, click Reports > Report Templates.
2
Click Create New Report.
3
On the Select Report Creation Option page, click Create a Custom Report
to start the Custom Report Wizard.
Custom reports in OpsCenter Analytics
Creating a custom report in OpsCenter
4
Select a report category from the Category drop-down list:
Agent
Select this category if you want to know about the configured
Agents on the OpsCenter Server.
Backup/Recovery
Select this category to create reports on jobs, disk pool, logs,
image, media, tape drive etc.
350
Custom reports in OpsCenter Analytics
Creating a custom report in OpsCenter
5
The Subcategories appear as per what you select from the Category drop-down
list. From the Subcategory drop-down list, select one of the following report
subcategories:
The following subcategory appears when you select Agent as the main
category:
Agent Status
Select to view information specific to the Agent. For example, you can
create a report that shows the configured Agents on the OpsCenter
Server and the Agent status.
The following subcategories appear when you select Backup/Recovery as the
main category:
Disk Pool
Select to view a consolidated report related to disk pool.
Job/Image/Media/Disk
Select to view job, image, media, or disk data. The
reports based on this subcategory provide a
consolidated view of job, image, media, and disk. For
example, you can create a custom report that tells the
number of images per job type or a tabular report that
tells which image is backed up on which media.
With OpsCenter 7.5, you can also view the backups
that are taken on the disk.
Log
Select to view logs that are generated as a result of
backup and recovery activity in NetBackup and Backup
Exec.
Media
Select to view reports on media like tape media etc.
Tape Drive
Select to view reports on tape drives. This subcategory
does not show reports related to media servers.The
associated filter parameters, such as Tape Drive Device
Host or Tape Drive Type appear.
Scheduled Jobs
Generate reports on Scheduled Jobs using this
category. For example you can create a report that
compares the scheduled time and the actual time for
scheduled jobs.
351
Custom reports in OpsCenter Analytics
Creating a custom report in OpsCenter
6
Select a report format from the following formats in the View Type drop-down
list:
Distribution
Display groupings or objects or resources in a pie chart.
Ranking
Display a horizontal bar graph showing all the data for each view
level object, from greatest to the least, within the selected time
frame.
Historical
Display a stacked (segmented) bar graph with a trendline
superimposed over it showing the average upward and downward
trends of the data over time.
Tabular
Display data in the form of a table.
7
Click Next.
8
In the Select Parameters panel of the Custom Report Wizard, select values
for one or more report parameters. The report parameters that appear depend
on the report category and the view type that you selected.
See “Configuring timeframe parameters” on page 356.
See “About Custom Report Wizard parameters” on page 356.
As you select parameters, the Content pane may refresh to display additional
selections. For example, when you select a view filter, you are then given a
choice of items on which to filter the report display.
9
Click Next.
10 In the Modify Display Options panel, define the measurements to be collected
for historical, ranking, tabular, and distribution reports. Different display options
are displayed for different view types.
See “About display options” on page 359.
Click Next.
11 In the View Report Data panel, you can view the report that is created as per
your selection.
Click Next.
To return to the Custom Report Wizard and make changes to the report, click
Back.
12 Save the report. Enter a report name, a description (optional), and location
where you want to save the report.
Click Save.
352
Custom reports in OpsCenter Analytics
Creating a custom report in OpsCenter
Example 1: You may want to create a custom report based on your specific
requirements. For example, you may want to create a daily status report of the
clients that are backed up everyday.
This report gives the detailed tabular information of the jobs directory being backed
up, its status (if it’s successful, partially successful or failed), Level Type
(Incremental, Full, Differential Incremental), the job file count and job size in the
datacenter . You can enhance this report by adding more available columns based
on the report requirement.
See the procedure to know how you can create a daily status report of the clients
that are backed up everyday.
To create a daily status report of the clients that are backed up everyday
1
In the OpsCenter console, click Reports.
2
On the Report Templates tab, click Create New Report.
3
On the Report Wizard, select the Create a custom report option and click
Next.
4
Select the Report Category as Backup/Recovery and the Subcategory as
Job/Images/Media/Disk.
5
Select the Report View type as Tabular.
Click Next.
6
Select the appropriate timeframe for which you want to view the data.
7
Select the Job filter. Select the Column as Backup Job data type, Operator
as =, and Value as Yes. Click Add.
8
Click Next.
9
Under Tabular Report Properties, select the Time Basis as Job End Time.
Change the Display Unit as per your requirement.
10 Select Available columns from the list that appears:
■
Backup Job File Count
■
Backup Job Size
■
Job Directory
■
Job End Time
■
Job Start Time
■
Job Status
■
Job Status Code
353
Custom reports in OpsCenter Analytics
Creating a custom report in OpsCenter
■
Job Type
■
Master Server
■
Schedule Name
■
Schedule/Level Type
Click Add.
11 Click Next to run the report.
Example 2: You may want to create a report that examines the number of tapes
in each status category and its percentage.
To report on the distribution of tape status in your environment
1
In the OpsCenter console, click Reports.
2
On the Report Templates tab, click Create New Report.
3
On the Report Wizard, select the Create a custom report option and click
Next.
4
Select the Report Category as Backup/Recovery and the Subcategory as
Media.
5
Select the Report View type as Distribution.
Click Next.
6
Select the appropriate timeframe for which you want to view the data. You can
also select No Time Basis.
7
Optionally, select any filters based on your requirement.
Click Next.
8
In the Distribution Chart Properties section, make the following selections:
Chart Type
Pie Chart
Report On
Media History Status
Report Data
Media ID
Count
9
Click Next.
Example 3: You may want to create a custom tabular report that shows the following
information:
■
Know what jobs were successful in the past week for a specific master server
354
Custom reports in OpsCenter Analytics
Creating a custom report in OpsCenter
■
Show the amount of time the backup took
■
Show how large the backup was
To create a report showing successful backup job details for a master server
1
In the OpsCenter console, click Reports.
2
On the Report Templates tab, click Create New Report.
3
On the Report Wizard, select the Create a custom report option and click
Next.
4
Select the Report Category as Backup/Recovery and the Subcategory as
Job/Image/Media/Disk.
5
Select the Report View type as Tabular.
6
Change Relative Time Frame to Previous 1 Week
7
Under Filters, select Job. In the Column area, select Job Type, select the =
Operator and choose a value of Backup.
Click Add.
8
Back under the Column heading, select Job Status leave the Operator at “=”
and choose Successful as the value
Click Add.
9
Click Next.
10 Select the Time Basis as Job Start Time
11 You may change the Display Unit or Time Duration. For example if the master
server takes smaller backups, then you may change the Display Unit to MB.
12 From the Available Columns list, select the following:
■
Backup Job Size
■
Client Name
■
Job Duration
Click Add to move them under the Selected Columns area.
13 In the Selected Column area, perform the following operations for each of the
rows:
■
Click the check box next to Client Name on the right and click Move Up
to make it the first row.
■
On the Job Duration row, change Operation to Total.
355
Custom reports in OpsCenter Analytics
Creating a custom report in OpsCenter
■
On the Job Size row, change Sort Order to Descending and Operation to
Total.
14 Click Next.
About Custom Report Wizard parameters
The Custom Report Wizard displays a set of parameters that varies depending on
the report type. The following topics describe all the available parameters:
■
Define Time frame parameters
See “Configuring timeframe parameters” on page 356.
■
About display options
See “About display options” on page 359.
■
Report conditions
See “Defining report conditions” on page 363.
■
Filter parameters
See “Selecting and using filter parameters” on page 358.
Configuring timeframe parameters
You use the Time Frame parameters to define the report’s overall time frame and
the intervals for which data is reported.
You can specify absolute or relative time frame for a report.
You can select the following timeframe parameters:
Relative Timeframe
Select Previous or Next from the drop-down list (wherever
applicable), and then specify the number of hours, days, weeks,
months, quarters, or years to define the period. The report displays
data collected within the specified time period, for example, data
of the previous 3 months.
The Relative Timeframe is especially useful for reports that you
plan to generate on a regular basis. Such reports always show data
collected over the most recent time interval.
356
Custom reports in OpsCenter Analytics
Creating a custom report in OpsCenter
Start from the
This applies only to Relative time frames. In Start from the beginning
beginning of <selected of <selected unit>, the <selected unit> may stand for Hours, Days,
Weeks, Months, Quarters, or Years depending on what unit you
unit>
select as a Relative Timeframe.
If you specify a relative timeframe and check Start from the
beginning of <selected unit>, the Relative timeframe is calculated
starting from the first day for week, month, quarter, or year selection,
from 12 A.M. for day selection, and from the earliest whole number
(no minutes or seconds) for hour selection. Do not select the Start
from the beginning of <unit> check box if you want to view data
for the entire period specified in Relative Timeframe.
Examples:
■
■
■
The current date is June 13, 2010. If you select the Relative
Timeframe as Previous 1 Month and do not select the Start
from the beginning of Month check box, the report shows
data from May 14, 2010 to June 13, 2010. However if you select
the Start from the beginning of Month check box, the report
shows data from June 1, 2010 to June 13, 2010.
The current date and time is September 13, 10:30 PM. If you
select the Relative Timeframe as Previous 2 Days and do not
select the Start from the beginning of Days check box, the
report shows data from September 11, 10:30 P.M. to September
13, 10:30 P.M. However if you select the Start from the
beginning of Days check box, the report shows data from
September 12, 12 A.M. to September 13, 10:30 P.M.
The current time is 4:25 P.M. If you select the Relative
Timeframe as Previous 2 Hours and do not select the Start
from the beginning of Hour check box, the report shows data
from 2:25 P.M. to 4:25 P.M. However if you select the Start
from the beginning of Hours check box, the report shows data
from 3 P.M. to 4:25 P.M.
Note: If you specify relative time frame and check Start from
the beginning of <selected unit>, the report is configured to
display data collected over the interval ending at the current
date. This is effectively equivalent to specifying an absolute time
frame; the report’s contents remain static whenever you display
it.
Absolute Timeframe
Define the beginning and end of the time interval to be covered by
the report. When you enter absolute dates, the report’s contents
remain static whenever you display it.
357
Custom reports in OpsCenter Analytics
Creating a custom report in OpsCenter
Ignore From Date
This applies only to Absolute timeframes. Check this option to view
all the data on and before the To date that you enter in the Absolute
timeframe.
Example: Suppose you specify an absolute timframe: From March
1, 2004, 12:00 A.M. to April 30, 2004, 12:00 A.M. The report
displays data from the time period between the start and end dates.
Now if you check Ignore From Date, the report ignores the From
Date and displays all data before April 30, 2004, 12:00 A.M.
Ignore To Date
This applies only to Absolute timeframes. Check this option to view
all data on and after the From date that you enter in the Absolute
timeframe.
Example: Suppose you specify an absolute timframe: From March
1, 2004, 12:00 A.M. to April 30, 2004, 12:00 A.M. The report
displays data from the time period between the start and end dates.
Now if you check IgnoreTo Date, the report ignores the To Date
and displays all data on and after March 1, 2004, 12:00 A.M.
No Time Basis
This signifies that the data shown should not be grouped with time.
The report includes all the data in the OpsCenter database
irrespective of time. The timeframe grouping is not applicable.
Day Window
Day Window is applicable when you specify an Absolute or Relative
timeframe. From the Day Window, you can specify the time interval
that constitutes one day. Select values from the From and To
drop-down lists.
Example: 6:00 PM to 6:00 AM
Example: 12:00 AM (midnight) to 12:00 PM (noon)
Report Time Frame
Grouping
This option appears only when you select a Historical view type.
Select the time interval by which you want to group the records.
For example, if you selected 1 month as the Report Time Frame
and 10 days as the Group By interval, the report shows records in
three chunks of data grouped by 10 days.
Selecting and using filter parameters
You can use filter parameters to obtain additional filtering capability for the report
that you want to display. For example depending on the category or subcategory
that you select, you may filter on the following:
■
Client Operating System
■
Client is Active
358
Custom reports in OpsCenter Analytics
Creating a custom report in OpsCenter
■
Policy Active: Select Yes to view policies that are active. Select No to view
policies that are not active.
■
Index Server Name, Metadata Indexing Enabled have been added for the
Policy filter.
■
Indexing enabled for schedule column has been added under the Schedule
filter.
■
Media is On Hold column has been added under the Media filter.
■
Image is on hold and Image Copy is on hold columns have been added under
the Image filter.
To specify additional filtering criteria
1
On the Custom Reports Wizard, select a report category, subcategory and
view type. Click Next.
2
On the Select Parameters panel, the respective filters appear in the Filters
section.
The list of filters that appear depend on the report category and view type that
you select.
3
Click the filter that you want to use, and then specify one or more values using
the fields provided.
About display options
Use the Modify Display Options panel to define the measurements to be collected
for historical, ranking, tabular, and distribution reports. Different display options are
displayed for different view types.
About Historical view display options
The following display options are available for historical reports. The following
parameters are displayed:
Report On
Define the report’s scope using the drop-down list. This field denotes
the entity on which grouping is required. For example, when you
select the Report On parameter as Client, the Y-axis report data is
grouped per client.
Example: Job Status, Image type etc.
Description
X-Axis
Description to display along with the report. If you leave this field
blank, no description is provided by default.
359
Custom reports in OpsCenter Analytics
Creating a custom report in OpsCenter
Display Name
For Historical reports, a label for the horizontal (X) axis. If you leave
this field blank, a default label is provided.
Report Data
The metric used to define the graph’s horizontal (X) axis.
Examples: Attempt End Time, Client Name
If you choose a Report Data parameter like Client Name which is
not time-based, another parameter called Time Basis appears.
Time Basis
This parameter appears if you select a Report Data parameter like
Client Name that is not related to time. Time Basis resembles the
time attribute on which time filter is applied as criteria. This attribute
is not shown if you select No Time Basis while configuring the
timeframe in the Wizard. Time Basis is the metric used for assigning
a time to each item in the report, if not specified by the Report Data
parameter.
Example: The start time or the end time for each backup job.
Y1 or Y2 -Axis
Display Name
For Historical reports, a label for the horizontal (Y1 or Y2) axis. If
you leave this field blank, a default label is provided.
Report Data
For Historical reports, the metric used to define the graph’s vertical
(Y1 or Y2) axis.
Examples: Job Size, Status Code etc.
Display Unit
For numeric data types, such as Job Size, the units in which to
display the data. This is applicable only for size-related attributes
like Job size, image size, fragment size etc.
Examples: MB, GB.
Chart Type
The report format. Additional formats may be available depending
on the values specified in Report Data.
Show Forecast with
forecast periods
Use the Trendline and Forecast parameters to project future trends
by averaging actual data from the recent past. Check Show
forecast with forecast periods, and use the drop-down list to
specify a number of forecast periods (intervals). This displays a
forecast line extending to future dates, using linear regression to
predict values based on the trend of data within the report’s time
frame.
Example: 12 shows forecast data for the next 12 months (if the
Time Frame Group By is 1 month).
The following Web site helps in calculating the forecast:
http://easycalculation.com/statistics/regression.php
360
Custom reports in OpsCenter Analytics
Creating a custom report in OpsCenter
Show trendline with
Use the Trendline parameter to indicate a general pattern or
moving average period direction by averaging actual data from the recent past. Check
of
Show trendline with moving average, and use the drop-down
list to specify the number of data points to factor into the average.
At each interval on the graph, the trendline shows a moving average
of the most recent data points.
Example: 3 displays a trendline that, at each interval, shows the
average of the current data point and the two previous data points.
Target Performance
For Historical reports, select the Target Performance checkbox
and then either Y1 or Y2-Axis radio button. Type a value in the text
box to include a target level or threshold in the report display. The
target value appears as a horizontal line, useful for making quick
visual comparisons between the target value and the actual values
being reported.
About Ranking chart display options
The following display options are available for Ranking reports. The following
parameters are displayed:
Chart Type
Select Bar Chart from the drop-down list.
Report On
Select the entity that you want to see in the report like Image Type.
Display
Select how many rankings you want to see and how you want them arranged
(in Ascending or descending order).
Y-Axis
Display
Name
Enter a label for the Y-Axis.
Report Data
This is the data that should be plotted on the Y-axis.
Time Basis
Metric used for assigning a time to each item in the report, if not specified
by the Report Data parameter.
Example: The start time or the end time for each backup job.
Description
Description to display along with the report. If you leave this field blank, no
description is provided by default.
About Distribution chart display options
The following display options are available for Distribution reports:
Chart Type
Select Pie Chart from the drop-down list.
361
Custom reports in OpsCenter Analytics
Creating a custom report in OpsCenter
Report On
Select the entity that you want to see in the report like Attempt
Status.
Report Data
This is the data that should be plotted on the pie chart.
Time Basis
Metric used for assigning a time to each item in the report, if not
specified by the Report Data parameter.
Example: The start time or the end time for each backup job.
Description
Description to display along with the report. If you leave this field
blank, no description is provided by default.
About Tabular display options
Use the Modify Display Options panel to establish the column titles for a tabular
report.
The following display options appear for a tabular report:
Time Basis
From the Time Basis drop-down list, select a time basis like Job End Time
or Job Start Time.
Time Basis is used to assign a time to each item in the report.
Description
Enter a description for the report. This is optional.
Display Unit
From the Display Unit drop-down list, select one of the following units:
Time
Duration
■
B
■
KB
■
MB
■
GB
■
TB
From the Time Duration drop-down list, select one of the following time
intervals:
■
Seconds
■
Minutes
■
Hours
■
Days
■
Weeks
■
Months
■
Years
362
Custom reports in OpsCenter Analytics
Creating an OpsCenter report using SQL query
Available
Columns
From the Available Columns list, select one or more values for table columns,
for example, Client Name, Status, Job Group ID.
Click Add.
The columns selected from the Available Columns list are added to the
Selected Columns, which you can rearrange as you want them to be
displayed on reports.
Selected
Columns
The columns selected from the Available Columns list are added to the
Selected Columns, which you can rearrange as you want them to be
displayed on reports using the following controls:
■
Sort order
■
Operation
■
Move Up
■
Move Down
■
Remove
All the columns from the Selected Columns list are displayed in the report.
Rows per
page
From the Rows Per Page drop-down list, select number of rows of records
that you want to display on one report page.
Display
unique rows
in the report
When you select this option, all duplicate rows are replaced by a single row
in the report and only distinct records are shown. Duplicate rows generally
appear if the rows do not have a unique ID.
Defining report conditions
In the Conditions section of the Modify Display Options panel, specify exception
conditions for notification. Exception conditions represent potential problems, for
example an unusually high percentage of backup job failures or an unusually low
quantity of data being backed up. Each condition is defined by assigning threshold
values for a particular metric, such as Success Rate or Total Backup Job Size. You
can set a low threshold, a high threshold, or both. The conditions are applicable
only for numeric values like Job Size (and not for values like Job Type, Master
Server). You can apply condition for attributes like Job type or Master server provided
you have applied a function like Count, Distinct Count etc. on it.
After you specify your conditions, you can create a report schedule so that when a
condition is true, an email notification is sent or the report is exported, or both. The
conditions are applied only when a report is scheduled.
Creating an OpsCenter report using SQL query
This section provides the procedure to create a report using SQL query.
363
Custom reports in OpsCenter Analytics
Creating an OpsCenter report using SQL query
Only Symantec NetBackup OpsCenter Analytics users can access the custom SQL
query function.
See “About custom SQL query in OpsCenter Analytics” on page 14.
Note: OpsCenter 7.6 provides detailed information about the OpsCenter database
schema that you may want to know before running any SQL query to generate
reports. On the Report Wizard > SQL Query page, click the following link to open
the PDF that contains all relevant information: Refer to the OpsCenter Database
Schema Document
Note: OpsCenter Reporter and Restore Operator do not have access to the custom
SQL query option.
To create a report using SQL query
1
In the OpsCenter console, click Reports.
2
On the Report Templates tab, click Create New Report.
3
On the Report Wizard, select the Create a report using SQL Query option
and click Next.
4
On the SQL Query page, enter an SQL query to view the required data.
For example, to view all NetBackup master servers that monitored and managed
by OpsCenter, enter the following SQL query: select * from
domain_masterserver
5
Click Next.
You can view all master server details that are stored in the
domain_masterserver database table.
Note: When you run a stored procedure that has multiple result sets, then
output of only the first result set is displayed on the GUI. The output of other
result sets is not shown on the GUI.
Note that Opscenter stores most of the time fields in Gregorian. If you want to see
the value for a given Gregorian date field in a timezone that is configured on the
OpsCenter host, you should use utcbiginttonomtime(gregorianDatefield) function,
where gregorianDatefield is any time value in gregorian. The function
utcbiginttonomtime function cannot consider DST time offset. Hence it ignores
any DST offset while showing the date and time value.
364
Custom reports in OpsCenter Analytics
Creating an OpsCenter report using SQL query
You must not use utcbiginttoutctime() function as it does not show time in a
time zone that is configured on your OpsCenter host.
365
Index
C
H
correlation reports 44
Create Time Schedule options 38
creating
custom report 349
custom reports 356
custom SQL query 363
Custom Report Wizard
columns parameters
populating table columns 362
data parameters 359
filter parameters
selecting 358
using 358
filtering parameters 363
time frame parameters 356
custom reports 14, 356
data 359
table columns 362
time frame 356
custom SQL query 14
hold
reports 262
hold reports 262
M
Manage Folders options 29
managing
folders 29
My Dashboard options 27
My Dashboard tab 26
My Reports tab 24
N
numeric data
viewing 45
O
OpsCenter reports 10
P
D
data
in graphical reports 45
parameters 359
parameters
Custom Report Wizard 356
pie chart reports 44
PureDisk reports
table columns 362
E
Edit Time Schedule options 38
email
report 20
exporting
report 18
F
file formats 18
filtering
parameters 363
forecast
reports 44
R
ranking reports 44
report formats 44
report schedules 31
report template
descriptions 45
report templates 12
reports
conditions 363
custom
creating 356
formats 44
Index
reports (continued)
graphical
formats 44
numeric data 45
notification
condition parameters 363
Scheduled Jobs 120
ToolTips in 45
reports custom
filtering parameters 363
S
saving
report 17
Scheduled Jobs reports 120
All Jobs report 131
scheduled jobs reports
Job Count Details-Scheduled Vs Actual
report 127
Job Count Within Backup Window report 125
Job Count-Scheduled Vs Actual report 121
schedules 33
Schedules options 31
SIS
single instance storage 362
SLP reports
about 304
SLP Backlog report 311
SLP Status by Client report 317
SLP Status by Destinations report 331
SLP Status by Image report 322
SLP Status by SLP report 312
SLP Status report 307
SLp reports
SLP Status by Image Copy report 327
standard reports
descriptions 197
Symantec Technical Support
OpsCenter custom reports 14
OpsCenter custom SQL queries 14
T
thresholds
report 363
time frames
parameters 356
time schedule 38
ToolTips 45
trending reports
format 44
W
wizards
Custom Report Wizard 356
367


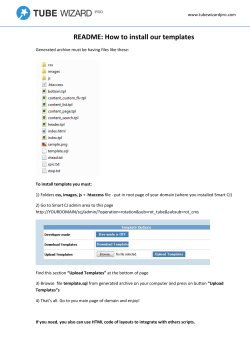


© Copyright 2026