
JADSDS Engine: JavaScript Animation Manual
JADSDS Engine
Thank you!
JADSDS engine is a friendly tag based JavaScript animator created to make easier web projects using the
power of HTML5.
At the moment the engine includes features like color cycling, scale and rotation, gif animated support,
multiple layers for parallax effects, capture events and trigger actions and much more.
All your web projects run in Android as well, an app is included with the engine allowing you run your
project in an Android smartphone.
This is just the first step, we hope include more functions as soon as possible. All will depend if the
people fall in love with the project.
2
Table of contents
How can I open xml files? ............................................................................................................................. 4
How can I create xml files? ........................................................................................................................... 4
Basic section.................................................................................................................................................. 5
Images section ............................................................................................................................................ 10
Audio players section .................................................................................................................................. 29
Text areas section ....................................................................................................................................... 31
Global variables........................................................................................................................................... 34
Timers section ............................................................................................................................................. 36
JavaScript actions ........................................................................................................................................ 38
Image alterations ........................................................................................................................................ 39
Event tags.................................................................................................................................................... 41
Conditionals ................................................................................................................................................ 50
Examples ..................................................................................................................................................... 61
Include the engine in your website............................................................................................................. 66
3
How can I open xml files?
Exist thousands of options for this purpose. The easiest one is your Windows Notepad, otherwise any
other text editor will be ok.
How can I create xml files?
You can use any xml file included in this application for your animations, just save it using “Save As” and
pick a different name.
Is strongly recommended use “Notepad++”, it is free and a very powerful tool.
All your animations need to be saved inside a folder named “animations” in your website. Create a new
folder, pick a name and include all your images and the xml inside the folder. The xml file must have the
same name as the new folder. Please check the examples included.
Xml files are divided in sections: Basic, Audio players, Text, Global variables, Timers and Images.
Remember all the tags are case sensitive.
With “<!--” and “-->” you can comment xml tags and they will be ignored by the app. Example:
<!--<tag>false</tag>-->
4
Basic section
•
screenCanvasResolution: It’s the size of your canvas html object located in your website. Use
“0” for default size or add values for resize it. If you are planning use your animation in your
android phone, it needs to be the screen resolution.
Note: screenPhoneResolution and screenCanvasResolution are the same. The app will read them
in the same way, is just for avoid confusions between Android and HTML 5.
•
canvasResolution: It’s the resolution for your project. The app will stretch your animation until
fit the canvas html object always keeping the aspect ratio.
•
bgColor: Declare the default color for your background. Remember it uses the same logic used
in HTML #ARGB, the values need to be in Hexadecimal.
Example: #ff63aeff
(#Alpha-Red-Green-Blue)
Alpha is used for transparency levels where “ff” means no transparent color. Is strongly
recommended learn more about this on internet.
5
•
grid: If you are creating a pixel art animation this can be handy, it creates that pixel effect that
we all love.
o addGrid: Enable or disable the effect. Possible values: True or False.
o gridColor: Allows set a color for the grid.
o addPixelBetweenGrid: This is a cool effect. Possible values: True or False.
6
•
camera: Allow control the camera, remember the size of the area for the camera in the same
used in “screenCanvasResolution” tag. Please check page 64 for more information.
o
align: Choose Top, Middle, Bottom or Custom. You’ll need these tags:
customAlignLeft: The coordinates for horizontal align.
customAlignTop: The coordinates for vertical align.
<align>Custom</align>
<customAlignLeft>-650</customAlignLeft>
o
autoHorizontalScroll: Allow move the camera automatically. You’ll need these tags:
iniPosition: Decide where the animation will begin. The values are between 0
and 1, where 0 is the beginning and 1 is the end. For example: 0.5 is the half.
Use “;” for join the coordinates x and y.
<iniPosition>0;0</iniPosition>
iniPositionInPixels: We strongly recommend use the previous tag “iniPosition”
instead but, if you are confused, use this tag adding a value in pixels. Remember
use negative values for move the camera to the left.
<iniPositionInPixels>-950;0</iniPositionInPixels>
pixelsMove: The camera moves by default every 2 pixels. You can try another
value.
cameraSpeed: Change the animation speed, a higher number means a slower
speed.
Example:
<camera>
<autoHorizontalScroll>true</autoHorizontalScroll>
<iniPosition>0;0</iniPosition>
<pixelsMove>-2</pixelsMove>
<cameraSpeed>1</cameraSpeed>
</camera>
7
o
forceLandscape: This tag is only for the Android app, it forces the animation to be
always in landscape orientation.
<forceLandscape>true</forceLandscape>
o
forcePortrait: This tag is only for the Android app, it forces the animation to be always
in portrait orientation.
<forcePortrait>true</forcePortrait>
o
addBlackLines: Create a nice cinematic effect. You’ll need these tags:
blackLinesHeight: The height for the black lines in pixels.
blackLinesUpperTop & blackLinesLowerTop: When black lines are used you
have two, at the top of the screen or at the bottom. Here you decide in pixels
the position.
8
o
customScroll: Move the camera using the tags “moveAnimation” or “pathAnimation”.
Remember that you can use the tags “iniPosition” and “iniPositionInPixels” and decide
the start position for the camera.
<camera>
<customScroll>
<moveAnimation>
<iniLeft>0</iniLeft>
<maxLeft>-1920</maxLeft>
<pixelsMoveLeft>2</pixelsMoveLeft>
<pixelsMoveTop>0</pixelsMoveTop>
</moveAnimation>
</customScroll>
</camera>
o
events: Trigger events with the camera. Please see the “Event tags” section for more
information.
<events>
<event>
<eventType>TriggerActionByPosition</eventType>
<eventActions>
<eventAction>StopMove</eventAction>
</eventActions>
<whenGlobalVariableIs>
<variable>
<id>screen</id>
<value>0</value>
</variable>
</whenGlobalVariableIs>
<whenCurrentPositionIs>-960;0</whenCurrentPositionIs>
</event>
</events>
Note: Remember that is possible control the camera using events, just use as id “Camera”. Check the
page 42 for an example.
9
Images section
•
fileName: The file name of your image. Remember use the complete file name, including the
extension. “MyImage.png”, for example.
Optional: You can use the attribute “from” when the image is in another folder or if you just
want borrow images from other animations.
<fileName from="mapzLake">whirlpool1.png</fileName>
•
speed: Change the animation speed, a higher number means a slower speed.
•
id: Sometimes you are going to need add an id. Please check the event “ EditAnimationByID” in
the event tags section.
•
left & top: These are used as coordinates for the images. Remember that these coordinates are
based in the resolution used in the tag “canvasResolution” or “createBackgroundLayer” if you
are using a background layer.
•
flipImage: Flip the image, you have two options: “Horizontal” or “Vertical”.
•
coordinates: Sometimes is necessary place the same image in difference places, using this tag
instead the tags “left & top” is a way to do it easier. Use “;” for left and top and “,” for the next
coordinate. Example: 6;41, 55;3, 108;30.
•
frames: Load a group of images and create an animated object. Change the animation speed
with the tag “framesAnimationSpeed” (see below). Leaving one of the frames empty, the
background will be used as frame allowing you save some memory. Check the example named
“jamr2.xml” for more information.
o
frame: This tag represent one frame and require other tags for configurations.
fileName: The file name of your image. Remember use the complete file name,
including the extension. “MyImage.png”, for example. This tag is necessary and
must be included.
10
Note: A nice trick is leave the tag empty and the background will be used as
frame allowing you save some memory. The first frame never can be empty.
delay: You can control the animation speed in real time using this tag. Like
previous speed tags, a higher number means a slower speed. This tag is
optional.
applyAlterationsToThisFrame: Please check “Image alterations” section for
more information.
o
currentFrame: Declare the default frame index. Default value is 0.
o
loadFramesByImageIndex: Allow you save memory re-using images from another
“image tag”, just use its index number.
Remember these numbers were added as a reference, they are not visible in your xml editor.
11
o
framesAnimationSpeed: Change the animation speed, a higher number means a slower
speed.
o
framesAnimationStop: By default is false, changing its value to “true” the animation will
be frozen. Remember you can toggle its value using events.
o
reUseTagFramesFromPreviousImage: Allow you re-use images from other “image tags”
and save some memory.
o
convertGifAniToFrames: Convert a gif animated to frames.
Optional: Use the attribute “from” when the image is in another folder or if you just
want borrow images from other animations.
<convertGifAniToFrames from="toads">toad.gif</convertGifAniToFrames>
o
convertImageSequenceInFrames: Convert a sequence of images in frames. Please check
the example:
filePreName: The file name before the numbers. Leave it empty if you do not
need it.
startNumber: The lowest number in the sequence.
endNumber: The very last number in the sequence.
formatNumber: The format used for the numbers. Leave it empty if you do not
need it.
fileNameExtension: The file extension of the image.
Image sequence: pic000120.jpg, pic000121.jpg, pic000122.jpg… pic000179.jpg
<images>
<image>
<frames>
<convertImageSequenceInFrames>
<filePreName>pic</filePreName>
<startNumber>120</startNumber>
<endNumber>179</endNumber>
<formatNumber>######</formatNumber>
<fileNameExtension>jpg</fileNameExtension>
</convertImageSequenceInFrames>
</frames>
<left>0</left>
<top>0</top>
<speed>1</speed>
</image>
</images>
12
Optional: Use the attribute “from” when the images are in another folder or if you just
want borrow images from other animations.
<convertImageSequenceInFrames from="re0b2">
o
frameCollection: An animated object is able to have multiple frames. We can have
frames for different kinds of animation. For Example: walking, look around, jump, etc.
Remember you can change them with the action “ChangeFrameCollection”. Please
check “Events tags” for more information.
repeatThisLoopForTimes: Will repeat the animation included inside the tag
“frameCollection” for a number of times and then the event
“FrameAnimationRepeatLoopEnds” will be triggered.
applyAlterationsToAllFrames: Please check “Image alterations” section for
more information.
convertGifAniToFrames: Convert a gif animated to frames.
convertImageSequenceInFrames: Convert a series of images in frames.
o
defaultFrameCollection: The frameCollection tags have an index number like the tag
“loadFramesByImageIndex” explained previously. This tag allows you decide which
collection will be loaded first. Default value is 0.
o
returnBackwardToFirstFrame: An animation is an endless loop of frames that returns to
the first frame after reach the last one. Changing the value to true, the animation after
reach the last frame will return backward instead go to the first one. The default value is
false.
o
colorCycling: This app cannot be completed without this feature. Color Cycling was used
in old video games as an alternative for save memory. The technique consists in use only
one frame and the app literally “moves the colors” creating a feeling of animation.
With imagination you can create really beautiful designs with few lines of code. You will
need these tags:
fileName: The file name of your image.
backwardAnimation: By default the color animation is forward, but changing
this tag to true it moves backward.
13
basicPaletteColor: These are the colors to be animated. The format is simple A,
R, G, B (Alpha, Red, Green, Blue) and for the next color use “-“.
Example:
<image>
<frames>
<colorCycling>
<fileName>colorcycling.png</fileName>
<basicPaletteColor>
255,82,115,247-255,164,247,82-255,82,231,247255,247,82,82-255,82,115,40
</basicPaletteColor>
</colorCycling>
</frames>
<left>317</left>
<top>100</top>
</image>
Here we have an example of color cycling animation. The colors are moved forward.
•
reUseImageFromPreviousImage & loadImageByImageIndex: Like previous tags, allow you save
memory. The big difference here is not to depend of the tag “<frames>”, these ones re-use the
image loaded using the tag <fileName>. Use it when your image is not animated.
•
fillWithPattern: This is great for backgrounds, you can fill areas in your project using an image as
pattern. The tags “repeatTimesHorizontal” or “repeatTimesVertical” allow you repeat the
pattern multiple times.
14
Animated patterns are compactible just use the tag “frames”.
<image>
<frames>
<frame>
<fileName>dcbackft1.png</fileName>
</frame>
<frame>
<fileName>dcbackft2.png</fileName>
</frame>
<frame>
<fileName>dcbackft3.png</fileName>
</frame>
</frames>
<fillWithPattern>
<repeatTimesHorizontal>4</repeatTimesHorizontal>
</fillWithPattern>
<speed>6</speed>
<left>0</left>
<top>164</top>
</image>
•
alpha: Change the level of transparency in an image. The values are between 0 and 255, where 0
is completely transparent and 255 is the opposite.
•
moveAnimation: Move an image from a point to another one. The trajectory is calculated by the
app. Please check “pathAnimation” for another alternative.
Use “pixelsMoveLeft” and “pixelsMoveTop” to indicate how many pixels the engine will move
the image. If pixelsMoveLeft is 0 means vertical movements, both with values mean diagonal
movements or use negative values for move it backward. By default the values are 2 pixels for
both.
15
o
pixelsMoveLeft: Horizontal movements.
o
pixelsMoveTop: Vertical movements.
o
iniLeft & iniTop: The start position for the image.
o
maxLeft & maxTop: The final position for the image.
o
moveAnimationSpeed: Like the tag “speed”, it changes the animation speed.
o
moveAnimationStop: By default is false, but if your design required it, change it to
“true” and the animation will be frozen. Remember you can change it to "false" again
using “actions”.
o
returnToTheBeginning: By default the image after reach the limits of the area return
backward to the beginning. Changing this tag to true the image will be moved instantly
to the beginning.
When we need move our image horizontally or vertically is easy to understand the configuration
but in some cases our design requires diagonal movements and here is where people get
confused. Please check the next images for understand the basics of moveAnimation.
Here “pixelsMoveLeft” and “pixelsMoveTop” are using the same values, causing the image keeps moving in a diagonal direction.
16
In the previous image an area is created with iniLeft, iniTop, maxLeft & maxTop. This means that
the image can only move inside this area, after reach the limits automatically will return.
Playing with “pixelsMoveLeft” and “pixelsMoveTop” values change the direction of the image.
Use negative values for backward movements.
Here we have another example but only for vertical movements, for reach that purpose we
change the value of “pixelsMoveLeft” to 0.
Here “pixelsMoveLeft” was changed to 0 for vertical movements.
17
•
moveEndLessAnimation: Create horizontal or vertical loops following an image pattern. This is
useful for animate roads or backgrounds.
o
direction: The animation can be done in 4 directions: Forward, Backward, Down and Up.
o
pixelsMove: The image pattern is moved following the quantity of pixels declared in this
tag. Higher values create a feeling of speed, an image with a value 1 will move slower
than another one with 4. Use negative values for backward movements.
o
moveEndLessAnimationSpeed: Like in previous speed tags, you can reduce or increase
the speed using this tag.
o
moveEndLessAnimationStop: By default is false, but if your design required it, change it
to “true” and the animation will be frozen. Remember you can change it to "false" again
using “actions”.
moveEndLessAnimation is usually used for animate roads
•
pathEndLessAnimation: Like the previous tag, it creates a loop but here we have more options.
This is useful for create snow effect or clouds in animated skies.
o
iniLeft, iniTop, maxLeft & maxTop: You are not only limited to vertical or horizontal
movements. These tags create a line between two points and will be used as path.
iniLeft & iniTop: The start point.
maxLeft & maxTop: The final point.
o
numberOfLayers: By default is 1, It means the quantity of times that the pattern will be
printed horizontally.
o
distanceBetweenLayers: Change the distant (in pixels) between layers. Use this tag if
you are working with multiples layers. See previous tag.
18
•
o
numberOfImagesPerLayer: You can repeat the image pattern vertically how many times
is required.
o
maxRandomNumberPerLayerInPixels: If you are trying to create snow, rain, etc. this
can be useful. The distance for the image pattern between the layers will be random. If
you are creating an animated background, probably this value would be useful in 0.
o
repeatLoop: By the default is true but if you design require it, change it to false and
after the loop is finished will stop.
o
pixelsMove: The image pattern is moved following the quantity of pixels declared in this
tag. Higher values create a feeling of speed, an image with a value 1 will move slower
than another one with 4. Use negative values for backward movements.
o
pathEndLessAnimationSpeed: Like in previous speed tags, you can reduce or increase
the speed using this tag.
o
pathEndLessAnimationStop: By default is false, but if your design required it, change it
to “true” and the animation will be frozen. Remember you can change it to "false" again
using “actions”.
mode7: This is the first attempt to create a similar mode 7 effect. Mode 7 was popular in the
90’s thanks to the snes. It takes an image and changes its perspective creating a 3d effect. Only
scale is supported by now, but in a future version rotation will be included.
o
cameraY & cameraX: These are the coordinates for the camera, based in the image size
where the mode 7 will be used. You can focus specifics areas of the image with these
values.
o
cameraPixelsMoveX & cameraPixelsMoveY: Like in moveAnimation, the image is
moved base in these values. You can create a feeling of speed adding high values. Use
negative values for backward movements.
o
cameraPixelsMoveIniX & cameraPixelsMoveIniY: These are the coordinates for the
start position of the image. Remember all the values are based in the image size where
mode 7 will be used.
o
cameraPixelsMoveMaxX & cameraPixelsMoveMaxY: These are the coordinates for the
final position of the image. Remember all the values are based in the image size where
mode 7 will be used.
19
o
scaleVertical & scaleHorizontal: You can spread the image for fill a specific area in your
design.
o
useFilters: Turn on or off anti-aliasing. Possible values are true or false.
o
mode7Speed: Change the animation speed, a higher number means a slower speed.
o
mode7Stop: By default is false, but if your design required it, change it to “true” and the
animation will be frozen. Remember you can change it to "false" again using “actions”.
o
cameraControl: You have two different values for this tag:
o
StartAgain: Create an endless loop making the feeling of walking on a road. This
is the default value for this tag.
Return: When the camera reached the cameraPixelsMoveMaxX &
cameraPixelsMoveMaxY values, it returns to the start point.
boxSizeWidth & boxSizeHeight: Declare the size of the area where the mode 7 effect
will be placed.
Is strongly recommended open the file ff6.xml inside the folder “your sd card / PixelsLW / ff6 /” and play with the values. The only one way to
understand is changing the values and see what happened.
20
•
createBackgroundLayer: If you are working with a camera and scrolling you can create multiple
layers with this tag for a nice parallax effect.
This tag creates an alternative “canvasResolution”. If you are planning create a background layer
you must use a resolution smaller than the main “canvasResolution”, thereby the background
layer will move slower when the scrolling happens.
o
maxWidth & maxHeight: Declare the size for the alternative canvas.
The width used in createBackgroundLayer is smaller than the width used in canvasResolution.
21
•
reUseBackgroundLayerFromPreviousImage: You don’t need create a background layer multiple
times, using this tag the previous background layer will be re-used again.
•
pathAnimation: Similar to moveAnimation, it allows move an image from a specific point to
another one creating a path with coordinates. The difference between both is freedom,
moveAnimation is limited to use straight directions and pathAnimation not. The advance of
moveAnimation is CPU – memory friendly and less complicated to configure.
o
o
pathAnimationCoordinates: pathAnimation includes different options for move your
images. Please check the next tags:
iniLeft, iniTop & maxLeft, maxTop: The start point and final point. Use it for
straight movements.
customCoordinates: Create a path with coordinates. The syntax used is “;” for
left and top and “,” for the next coordinate. Example: 1;1, 2;2, 3;3. The image is
moved following these coordinates.
circleRadioWidth, circleRadioHeight, circleCenterPositionLeft &
circleCenterPositionTop: Create a circle path.
pixelsMove: The image pattern is moved following the quantity of pixels declared in this
tag. Higher values create a feeling of speed, an image with a value 1 will move slower
than another one with 4. Use negative values for backward movements.
22
•
o
pathAnimationSpeed: Change the animation speed. A higher number means a slower
speed.
o
startPosition: pathAnimation creates a path of coordinates between “iniLeft & iniTop”
and “maxLeft & maxTop”. This tag allows you decide where will be the start point.
o
pathAnimationStop: By default is false, but if your design required it, change it to “true”
and the animation will be frozen. Remember you can change it to "false" again using
“actions”.
o
returnBackwardToTheBeginning: By default the image after reach the limits of the area
return backward to the beginning. Changing this tag to true the image will be moved
instantly to the beginning.
imageTimer: Is possible create a timer for trigger actions after a specific period of time. Please
see the “Event tags” section for more information.
o
o
o
timerDelay: Decide the time between actions. 1000 means a second.
timerStop: By default is false and the timer starts just after the animation is loaded.
Change it to true, will be in standby until the action “RunTimerOnlyForNumberTimes” is
triggered.
runTimerOnlyTimes: Use it if you need run the timer only for a specific number of
times. Remember the action “RunTimerOnlyForNumberTimes” allows change this value.
•
disableImage: An image can be temporally disabled using this tag. Check the action
“EnableByID” in the “Event tags” section for more information. The default value is false.
•
applyAlterations: Please check “Image alterations” section for more information.
•
visible: Do not confuse this tag with “disableImage”. The “visible” tag hides the image but all its
animations are still running. Check the action “ChangeVisibleValue” ” in the “Event tags” section
for more information. The default value is true.
•
width & height: Allow you change the real size of the image by a new one in pixels.
•
rotate: Rotate the image following the quantity of degrees declared. Something important when
this tag is used is the incompatibility with the tag “flipImage”, you must use “Image alterations”
instead, check its section for more information.
23
•
imagePropertiesAnimation: Allow you animate the properties Alpha, Scale and Rotation in an
image.
o
propetiesToAnimate: Declare what properties will be animated.
property: Allow you configure all the settings for animate an image.
•
propertyName: Name of the property to animate.
o
o
o
Alpha: Like the previous tag alpha, this one allows you animate
the transparency level of an image. The values are between 0
and 255, where 0 is completely transparent and 255 is the
opposite.
Scale: Change the size of the image (width and height).
Rotation: Rotate the image.
Settings for Alpha:
•
minimumAlphaValue: It is the minimum value that alpha property can
reach, after that, the event “MinimumAlphaValueReached” will be
triggered.
•
maximumAlphaValue: It is the maximum value that alpha property can
reach, after that, the event “MaximumAlphaValueReached” will be
triggered.
•
animationAlphaAction: It can be “Increase”, “Decrease” or “Stop” and
allows animate the alpha value of the image.
•
updateAlphaValue: Depending of what option was chosen in the
previous tag, you can set a value for increase or decrease the alpha
property of the image.
•
currentAlphaValue: It is the default value that will be used for the alpha
animation.
•
alphaSpeed: Change the animation speed, a higher number means a
slower speed.
24
Settings for Width & Height:
•
minimumWidthValue: It is the minimum value that width property can
reach, after that, the event “MinimumWidthValueReached” will be
triggered.
•
maximumWidthValue: It is the maximum value that width property can
reach, after that, the event “MaximumWidthValueReached” will be
triggered.
•
animationWidthAction: It can be “Increase”, “Decrease” or “Stop” and
allows animate the width value of the image.
•
updateWidthValue: Depending of what option was chosen in the
previous tag, you can set a value for increase or decrease the alpha
property of the image.
•
currentWidthValue: It is the default value that will be used for the
width animation.
•
widthSpeed: Change the animation speed, a higher number means a
slower speed.
•
minimumHeightValue: It is the minimum value that height property can
reach, after that, the event “MinimumHeightValueReached” will be
triggered.
•
maximumHeightValue: It is the maximum value that height property
can reach, after that, the event “MaximumHeightValueReached” will be
triggered.
•
animationHeightAction: It can be “Increase”, “Decrease” or “Stop” and
allows animate the height value of the image.
•
updateHeightValue: Depending of what option was chosen in the
previous tag, you can set a value for increase or decrease the height
property of the image.
•
currentHeightValue: It is the default value that will be used for the
height animation.
25
•
heightSpeed: Change the animation speed, a higher number means a
slower speed.
•
keepImageInItsPivotWhenScaling: This property is false by default,
change it to true if you want keep the image in its center when its size
changes.
Settings for Rotation:
•
minimumDegreesValue: It is the minimum value in degrees that the
image can reach, after that, the event
“MinimumRotationValueReached” will be triggered.
•
maximumDegreesValue: It is the maximum value in degrees that the
image can reach, after that, the event
“MaximumRotationValueReached” will be triggered.
•
animationRotationAction: It can be “Increase”, “Decrease” or “Stop”
and allows animate the image.
•
updateDegreesValue: Depending of what option was chosen in the
previous tag, you can set a value for increase or decrease the degrees of
the image.
•
currentDegreesValue: It is the default value that will be used for the
animation.
•
rotationSpeed: Change the animation speed, a higher number means a
slower speed.
•
infiniteRotation: The image after reach the maximumDegreesValue will
return to the minimumDegreesValue automatically. The default value is
“false”.
•
pivot: These are coordinates for the point of rotation. By default, will be
the center of the image but you can add a custom coordinate. The
configuration is simple use “;“ for split coordinates. Example: X;Y.
•
rotateImageAroundCoordinate: These are the coordinates for keep the
image orbiting a point. The configuration is simple use “;“ for split
26
coordinates. Example: X;Y.
•
radius: Depending on the previous tag, it declares the distance between
the image and the point.
Note: Like happened with the tag “rotate”, animate an image using the property “Rotation” will
cause incompatibility with the actions flip image vertically or horizontally. For fix this problem
use “Image alterations”, check its section for more information.
Please check the next page, there we are playing with the properties alpha, width and height.
Remember check the Event tags section for learn more about what events and actions are
available for this animation.
27
<image>
<fileName>ng3e.png</fileName>
<left>49</left>
<top>18</top>
<alpha>0</alpha>
<imagePropertiesAnimation>
<propetiesToAnimate>
<property>
<propertyName>Alpha</propertyName>
<minimumAlphaValue>0</minimumAlphaValue>
<maximumAlphaValue>255</maximumAlphaValue>
<updateAlphaValue>40</updateAlphaValue>
<currentAlphaValue>0</currentAlphaValue>
<animationAlphaAction>Increase</animationAlphaAction>
</property>
<property>
<propertyName>Scale</propertyName>
<minimumWidthValue>2</minimumWidthValue>
<maximumWidthValue>68</maximumWidthValue>
<updateWidthValue>2</updateWidthValue>
<currentWidthValue>38</currentWidthValue>
<animationWidthAction>Decrease</animationWidthAction>
<minimumHeightValue>2</minimumHeightValue>
<maximumHeightValue>62</maximumHeightValue>
<updateHeightValue>2</updateHeightValue>
<currentHeightValue>32</currentHeightValue>
<animationHeightAction>Decrease</animationHeightAction>
</property>
<property>
<propertyName>Rotation</propertyName>
<minimumDegreesValue>36</minimumDegreesValue>
<maximumDegreesValue>180</maximumDegreesValue>
<updateDegreesValue>6</updateDegreesValue>
<currentDegreesValue>0</currentDegreesValue>
<rotationSpeed>1</rotationSpeed>
<animationRotationAction>Decrease</animationRotationAction>
</property>
</propetiesToAnimate>
</imagePropertiesAnimation>
</image>
28
Audio players section
•
playerID: All the players created in this section will be used later by the animations. The only
way to do that is assigning an id to the player.
•
audioFile: The audio file name.
Optional: You can use the attribute “from” when the audio file is in another folder or if you just
want borrow files from other animations.
<audioFile from="musicFolder">sound.m4a</audioFile>
•
audioLoop: If this properly is set true, the player will keep playing the same sound infinite times.
•
audioVolume: The values for volume are between 0 and 1. Where 0 is muted and 1 is the
loudest.
•
audioAutoPlay: Set this property to true and the sound will be played just after loaded.
•
events: You can include events here, please check the section “Event tags” for more
information.
Example: Here we added background music to our project.
<audioPlayers>
<audioPlayer>
<playerID>backgroundAudio</playerID>
<audioFile>A-Bit of Daft Punk.m4a</audioFile>
<audioLoop>true</audioLoop>
<audioVolume>0.5</audioVolume>
<audioAutoPlay>true</audioAutoPlay>
</audioPlayer>
</audioPlayers>
29
Another example: Here we used an image as button for play a sound.
<image>
<fileName>icon.png</fileName>
<left>250</left>
<top>20</top>
<events>
<event>
<eventType>OnClickDown</eventType>
<eventActions>
<eventAction>PlayAudio</eventAction>
</eventActions>
<audioPlayerID>sfxAudio</audioPlayerID>
<audioFileToLoad>laser.mp3</audioFileToLoad>
<audioVolumeToUpdate>0.5</audioVolumeToUpdate>
</event>
</events>
</image>
30
Text areas section
•
left & top: They are used as coordinates for the text areas.
•
disableText: Hide the text area. Check the actions “EnableByID” and “DisableByID” in the “Event
tags” section for more information.
•
textAreaID: All the text areas need an id, is the only way to send instructions from any other
animations.
•
stopText: The text declared inside the text areas is printed immediately. You can stop it setting
this tag to false.
•
color: Change the color of your text. Remember, we are using the same logic used in HTML
#ARGB, the values need to be in Hexadecimal.
•
bold: Set it true for make your text bold.
•
font: Change the font in your text, just write a font name.
•
size: Change the size of your text.
•
italic: Set it true for italicize your text.
•
printOneByOne: If your idea is show your text character per character, set this tag to true and
adjust the speed with the next tag.
•
speed: If the tag “printOneByOne” was set true, it changes the animation speed, a higher
number means a slower speed.
•
events: You can include events here, please check the section “Event tags” for more
information.
•
spaceBetweenLines: The space between lines is calculated automatically, but can be done
manually with this tag.
31
•
text: Write your text here, but remember the special codes. Please check next table.
#10;
New line
#38;
&
You must write your text in a single line inside the xml file, thereby the app
will replace the code moving the next text to a new line.
“&” is a reserved character in xml, use this code instead and the app will
replace it for “&”.
Example:
<textAreas>
<textArea>
<left>10</left>
<top>200</top>
<textAreaID>Area1</textAreaID>
<stopText>true</stopText>
<textData>
<color>#ffffffff</color>
<bold>true</bold>
<printOneByOne>true</printOneByOne>
<speed>2</speed>
<font>Latha</font>
<size>12</size>
<italic>true</italic>
<text>One#10;Two#10;Three#10;Four#38;Five</text>
<spaceBetweenLines>20</spaceBetweenLines>
</textData>
<textData>
<text>Six#10;Seven#10;Eight</text>
<font>Roboto</font>
</textData>
</textArea>
</textAreas>
Adding an event to a button:
<image>
<fileName>button.png</fileName>
<left>50</left>
<top>50</top>
<id>button</id>
<events>
<event>
<eventType>OnClickUp</eventType>
<eventActions>
<eventAction>EditAnimationByID</eventAction>
</eventActions>
<editAnimationByIDOptions>
<option>
<editActions>
<editAction>NextText</editAction>
</editActions>
<id>Area1</id>
</option>
</editAnimationByIDOptions>
</event>
</events>
</image>
32
The text printed will look like this:
One
Two
Three
Four & Five
After press the button:
Six
Seven
Eight
33
Global variables
Global variables work in a similar way like “custom conditions”, the big difference is that they can be
used by any other objects (images, text, etc.) in your project and not only the current object.
•
Variable: Create how many variables you need.
o Id: The name for you variable.
o Value: The default value.
Example:
<globalVariables>
<variable>
<id>screen</id>
<value>0</value>
</variable>
</globalVariables>
Here we have a global variable named “screen” and its default value is “0”. In the next example we can
see how it works.
<event>
<eventType>TriggerActionByPosition</eventType>
<eventActions>
<eventAction>StopMove</eventAction>
</eventActions>
<whenGlobalVariableIs>
<variable>
<id>screen</id>
<value>0</value>
</variable>
</whenGlobalVariableIs>
</event>
The previous example has an event “TriggerActionByPosition” and only will be triggered when the global
variable named “screen” have the value “0”.
34
We can update the global variables, please check the next example:
<events>
<event>
<eventType>OnTouchUp</eventType>
<eventActions>
<eventAction>UpdateGlobalVariables</eventAction>
</eventActions>
<globalVariablesToUpdate>
<variable>
<id>screen</id>
<value>0</value>
</variable>
<variable>
<id>screen2</id>
<value>7</value>
</variable>
</globalVariablesToUpdate>
</event>
</events>
35
Timers section
Timers work in the same way as the tag “imageTimer” works, the only ones differences are the tags “id”
and “events”.
•
id: You can use as many timers you need, the only way to change their properties later is giving
them an id.
•
timerDelay: Declare the time between actions. 1000 means a second.
•
timerStop: By default is false and the timer starts just after the animation is loaded. Changing its
value to true, the timer will be in standby until the action “RunTimer” is triggered.
•
runTimerOnlyTimes: Use it if you need run the timer only for a specific number of times.
Remember the action “RunTimerOnlyForNumberTimes” allows change this value.
•
events: After the period time previously declared, the actions included inside this tag “events”
will be triggered. Please check the “Event tags” section for more information.
Note: The next page has an example about how to create a timer. The most important difference is the
“events” tag, they do not use the tag “eventType” because the engine adds automatically the event
“Timer”.
The tag “ids” doesn’t work here because doesn’t make sense, the way how timers change the object
properties is using the action “EditAnimationByID”, this action is added automatically by the engine.
The tag “avoidRunThisEventMultipleTimes” will have “true” as value and cannot be changed.
36
<timers>
<timer>
<timerDelay>2000</timerDelay>
<timerStop>false</timerStop>
<id>timer1</id>
<runTimerOnlyTimes>2</runTimerOnlyTimes>
<events>
<event>
<eventActions>
<eventAction>ChangeCustomCondition</eventAction>
<eventAction>ChangeTimerDelay</eventAction>
</eventActions>
<editAnimationByIDOptions>
<option>
<id>image27</id>
<editActions>
<editAction>ChangeSpeedAnimation</editAction>
</editActions>
<newSpeedAnimation>10</newSpeedAnimation>
</option>
</editAnimationByIDOptions>
<whenCustomConditionIs>fast</whenCustomConditionIs>
<newTimerDelay>5000</newTimerDelay>
<newCustomCondition>slow</newCustomCondition>
</event>
<defaultCustomCondition>fast</defaultCustomCondition>
</events>
</timer>
</timers>
Another example:
<timers>
<timer>
<timerDelay>2000</timerDelay>
<id>timer1</id>
<events>
<event>
<eventActions>
<eventAction>ChangeCustomCondition</eventAction>
<eventAction>ChangeTimerDelay</eventAction>
</eventActions>
<editAnimationByIDOptions>
<option>
<id>ghost1,ghost2,ghost3,ghost4,ghost5</id>
<editActions>
<editAction>StopAnimationAndMove</editAction>
</editActions>
</option>
</editAnimationByIDOptions>
<whenCustomConditionIs>run</whenCustomConditionIs>
<newTimerDelay>2000</newTimerDelay>
<newCustomCondition>stop</newCustomCondition>
</event>
<defaultCustomCondition>stop</defaultCustomCondition>
</events>
</timer>
</timers>
37
JavaScript actions
Trigger actions using events is a way to control objects in your project, but is not the only one. The tag
“javaScriptActions” allow you trigger actions from JavaScript.
These are the necessary tags:
•
javaScriptAction: Use how many actions you need, they are unlimited.
o
o
Id: The id will be used later from your JavaScript code.
events: You can include events here, please check the section “Event tags” for more
information.
Example:
<javaScriptActions>
<javaScriptAction>
<id>Stop</id>
<events>
<event>
<eventActions>
<eventAction>StopAnimationAndMove</eventAction>
</eventActions>
<ids>image1,image2,image3</ids>
</event>
</events>
</javaScriptAction>
<javaScriptAction>
<id>Resume</id>
<events>
<event>
<eventActions>
<eventAction>ResumeAnimationAndMove</eventAction>
</eventActions>
<ids>image4,image5,image6</ids>
</event>
</events>
</javaScriptAction>
</javaScriptActions>
Calling the actions from JavaScript:
function testRunJS() {
jadsdsEngine.runAction("Stop");
jadsdsEngine.runAction("Resume");
}
The method “runAction” runs the actions included inside the tag “javaScriptActions”. Please check the
section “Include the engine in your website” for more information.
38
Image alterations
The app has three tags that allow us make changes and save some memory re-using images. These tags
are: “applyAlterations”, “applyAlterationsToAllFrames” and “applyAlterationsToThisFrame”.
•
•
•
applyAlterations: The alterations will be done to all the frames currently used.
applyAlterationsToAllFrames: Only the frames inside the tag “frameCollection” will be affected.
applyAlterationsToThisFrame: Only the frame inside the tag “frame” will be affected.
You can use all the tags at same time for multiple alterations. The next page includes an example.
Available alterations:
The tag “alterationsToDo” allows you apply the desire effect. Use “,” for multiple effects.
<alterationsToDo>ApplyNewPaletteColor,FlipVertical</alterationsToDo>
These are the available effects:
•
•
FlipVertical, FlipHorizontal: Like the tag “flipImage” flip the images.
ApplyNewPaletteColor: Change the current colors for new ones.
You need the tags “basicPaletteColor” and “newPaletteColor” for change the colors. The format
is simple A, R, G, B (Alpha, Red, Green, Blue) and for the next color use “-“.
<applyAlterations>
<alterationsToDo>ApplyNewPaletteColor</alterationsToDo>
<basicPaletteColor> 255,99,8,255-255,74,0,255-255,49,16,148255,41,0,198-255,57,140,239
</basicPaletteColor>
<newPaletteColor> 255,66,255,8-255,0,255,36-255,148,143,16255,0,198,65-255,57,239,168
</newPaletteColor>
</applyAlterations>
You don’t need include all the colors, just those ones that you are planning to change.
39
Example:
<image>
<frames>
<frameCollection>
<frame>
<fileName>localc1up.png</fileName>
<applyAlterationsToThisFrame>
<alterationsToDo>FlipHorizontal</alterationsToDo>
</applyAlterationsToThisFrame>
</frame>
<frame>
<fileName>localc2down.png</fileName>
</frame>
<frame>
<fileName>localc3up.png</fileName>
</frame>
<applyAlterationsToAllFrames>
<alterationsToDo>ApplyNewPaletteColor</alterationsToDo>
<basicPaletteColor>255,49,16,148-255,99,8,255255,41,0,198-255,74,0,255
</basicPaletteColor>
<newPaletteColor>55,49,16,148-55,99,8,25555,41,0,198-55,74,0,255
</newPaletteColor>
</applyAlterationsToAllFrames>
</frameCollection>
<frameCollection>
<frame>
<fileName>localc1upback.png</fileName>
</frame>
<frame>
<fileName>localc2downback.png</fileName>
</frame>
<frame>
<fileName>localc3upback.png</fileName>
</frame>
</frameCollection>
</frames>
<applyAlterations>
<alterationsToDo>ApplyNewPaletteColor,FlipVertical</alterationsToDo>
<basicPaletteColor>255,49,16,148-255,99,8,255255,41,0,198-255,74,0,255
</basicPaletteColor>
<newPaletteColor>255,99,0,33-255,181,0,99-255,148,0,33-255,181,0,66</newPaletteColor>
</applyAlterations>
<left>317</left>
<top>145</top>
<speed>5</speed>
</image>
40
Event tags
The app can trigger events when a specific situation happens.
<image>
<fileName>ff6citya.png</fileName>
<moveAnimation>
<maxLeft>0</maxLeft>
<maxTop>224</maxTop>
<iniLeft>0</iniLeft>
<iniTop>134</iniTop>
<pixelsMoveLeft>0</pixelsMoveLeft>
<pixelsMoveTop>-1</pixelsMoveTop>
</moveAnimation>
<events>
<event>
<eventType>MoveAnimationMaxTopReached</eventType>
<eventActions>
<eventAction>StopMove</eventAction>
</eventActions>
<disableEventsAfterTriggered>true</disableEventsAfterTriggered>
</event>
</events>
<left>0</left>
<top>224</top>
<speed>5</speed>
</image>
These events allow you trigger “actions”. The example above, show us an event triggered by
moveAnimation when it reached the maximum vertical top value, thereby an action will be triggered to
stop the moveAnimation.
Events tag:
Inside the tag “events” we can declare default values. They will be used later in our projects for trigger
actions. Also, you can use global variables for the same purpose. Please see the “Global variables”
section for more information.
•
defaultCustomCondition: If you are planning to use custom conditions a default value is
required. Please see “Conditionals” section for more information.
<events>
<event>...</event>
<event>...</event>
<event>...</event>
<defaultCustomCondition>running</defaultCustomCondition>
</events>
41
Event Tag:
•
•
•
•
eventType: Check the events table for more information.
eventAction: Check the actions table for more information.
disableEventsAfterTriggered: The event after triggered will be disabled and will not be triggered
again.
avoidRunThisEventMultipleTimes: Do not confuse with the previous tag, this one will prevent
trigger the same event multiple times but will not be disabled.
<events>
<defaultCustomCondition>run</defaultCustomCondition>
<event>
<eventType>OnClickUp</eventType>
<eventActions>
<eventAction>EditAnimationByID</eventAction>
<eventAction>ChangeCustomCondition</eventAction>
</eventActions>
<avoidRunThisEventMultipleTimes>true</avoidRunThisEventMultipleTimes>
<whenCustomConditionIs>run</whenCustomConditionIs>
<newCustomCondition>stop</newCustomCondition>
<editAnimationByIDOptions>
<option>
<id>Camera</id>
<editActions>
<editAction>StopMove</editAction>
</editActions>
</option>
</editAnimationByIDOptions>
</event>
<event>
<eventType>OnClickUp</eventType>
<eventActions>
<eventAction>EditAnimationByID</eventAction>
<eventAction>ChangeCustomCondition</eventAction>
</eventActions>
<avoidRunThisEventMultipleTimes>true</avoidRunThisEventMultipleTimes>
<whenCustomConditionIs>stop</whenCustomConditionIs>
<newCustomCondition>run</newCustomCondition>
<editAnimationByIDOptions>
<option>
<id>Camera</id>
<editActions>
<editAction>ResumeMove</editAction>
</editActions>
</option>
</editAnimationByIDOptions>
</event>
</events>
•
Ids: Usually when an event is triggered the actions affect the current object itself. Using this tag
the actions will affect only the ids included inside the tag. Use “,” for multiple ids.
Note: After use the “ids” tag all the actions will follow it, ignoring the current object. For affect
the current object, you have two options.
o
Include the current object id inside tag with the other ids.
42
o
Create a new “event tag” with the same “eventType”.
<events>
<event>
<eventType>PathAnimationEndPointReached</eventType>
<eventActions>
<eventAction>StopMove</eventAction>
</eventActions>
<ids>image1,image2</ids>
</event>
<event>
<eventType>PathAnimationEndPointReached</eventType>
<eventActions>
<eventAction>ResumeMove</eventAction>
</eventActions>
<ids>image3,image4</ids>
</event>
</events>
In this example we need to create the event “PathAnimationEndPointReached” twice because the actions only
will follow one ids tag.
Note: The actions “EnableByID” and “DisableByID” use the tag “ids” exclusively, it means that
any other actions in the same event tag will affect only the current image. You can use a new
event tag with the same “eventType tag” like we did in the previous example for more actions in
other images.
Remember that the tag “ids” is quick way to run actions in multiple objects, but don’t forget the
tag “editAnimationByIDOptions.
Please check the page 48 for more information.
43
•
assignEvents: This is a nice feature that allows you add or update events to other animations in
real time. It is quite intuitive, just declare the id and assign the event.
Please check the example where we assigned a new event to the audio player “sfxAudio”, it will
play a new sound when the current one is finished.
<image>
<fileName>icon.png</fileName>
<left>250</left>
<top>20</top>
<events>
<event>
<eventType>OnClickDown</eventType>
<eventActions>
<eventAction>AssignEvents</eventAction>
</eventActions>
<assignEvents>
<assignEvent>
<assignID>sfxAudio</assignID>
<events>
<event>
<eventType>PlaybackIsFinished</eventType>
<eventActions>
<eventAction>PlayAudio</eventAction>
</eventActions>
<audioFileToLoad>A-Bit of Daft Punk.m4a</audioFileToLoad>
<audioVolumeToUpdate>0.3</audioVolumeToUpdate>
<audioLoopToUpdate>true</audioLoopToUpdate>
</event>
</events>
</assignEvent>
</assignEvents>
</event>
</events>
</image>
44
•
Audio tags: These are the available audio tags:
o audioPlayerID: You need create a player before play a song. Please check the “Audio
players section” for more information.
o audioFileToLoad: The file name to play.
o audioVolumeToUpdate: Adjust the volume, only values between 0 and 1.
o audioLoopToUpdate: If you want keep the same sound playing infinite times, set it true.
Examples:
<image>
<fileName>icon.png</fileName>
<events>
<event>
<eventType>OnClickDown</eventType>
<eventActions>
<eventAction>PlayAudio</eventAction>
</eventActions>
<audioPlayerID>sfxAudio</audioPlayerID>
<audioFileToLoad>laser.mp3</audioFileToLoad>
<audioVolumeToUpdate>0.5</audioVolumeToUpdate>
</event>
</events>
</image>
<image>
<fileName>icon2.png</fileName>
<events>
<event>
<eventType>OnClickDown</eventType>
<eventActions>
<eventAction>PauseAudio</eventAction>
</eventActions>
<audioPlayerID>backgroundAudio</audioPlayerID>
</event>
</events>
</image>
45
•
editAnimationByIDOptions: These are the necessary tags for the action “EditAnimationByID”.
o
o
o
id: The id of the object to edit. Remember use “,” for multiples ids.
editActions: Here you can use all the available actions. Please check Actions table.
Previous tags: The Actions table not only says what actions are available, it also says
what tags you need. The next example the action “ChangeVisibleValue” needs the tag
“newVisibleValue” for update the property “Visible” of the image.
Please check the next example:
<event>
<eventType>TriggerActionByCurrentFrame</eventType>
<eventActions>
<eventAction>EditAnimationByID</eventAction>
</eventActions>
<whenCurrentFrameIndexIs>12</whenCurrentFrameIndexIs>
<editAnimationByIDOptions>
<option>
<id>Ball7</id>
<editActions>
<editAction>ResumeMove</editAction>
<editAction>ChangeVisibleValue</editAction>
</editActions>
<newVisibleValue>true</newVisibleValue>
</option>
</editAnimationByIDOptions>
</event>
46
Another example:
<events>
<event>
<eventType>OnClickDown</eventType>
<eventActions>
<eventAction>EditAnimationByID</eventAction>
</eventActions>
<editAnimationByIDOptions>
<option>
<id>test</id>
<editActions>
<editAction>UpdateImagePropertiesAnimation</editAction>
</editActions>
<newImagePropertiesAnimation>
<propetiesToAnimate>
<property>
<propertyName>Alpha</propertyName>
<minimumAlphaValue>0</minimumAlphaValue>
<maximumAlphaValue>100</maximumAlphaValue>
<updateAlphaValue>40</updateAlphaValue>
<currentAlphaValue>0</currentAlphaValue>
<animationAlphaAction>Increase</animationAlphaAction>
</property>
</propetiesToAnimate>
</newImagePropertiesAnimation>
</option>
</editAnimationByIDOptions>
</event>
</events>
Use your imagination to guess combinations, in this new example we are using the tag “eventAction”
with “EditAnimationByID” and “editAction” with “UpdateImagePropertiesAnimation” for update
“ImagePropertiesAnimation” of an image.
Remember that “UpdateImagePropertiesAnimation” is not the only one tag available, check page 54 for
more information about how update animations using actions.
Please check the next page for more information about the tag “ids”.
47
ids tag vs EditAnimationByID action
Depending on your project probably you are confused about the tag “ids” and the action
“EditAnimationByID”, the difference between both is that “ids” affect only the object ids inside the tag
ignoring the object that is triggering the action. The best way understand is with examples:
<event>
<eventType>OnClickUp</eventType>
<eventActions>
<eventAction>ChangeVisibleValue</eventAction>
</eventActions>
<ids>ghost1,ghost2</ids>
<newVisibleValue>false</newVisibleValue>
</event>
<event>
<eventType>OnClickUp</eventType>
<eventActions>
<eventAction>EditAnimationByID</eventAction>
</eventActions>
<editAnimationByIDOptions>
<option>
<id>ghost1,ghost2</id>
<editActions>
<editAction>ChangeVisibleValue</editAction>
</editActions>
<newVisibleValue>false</newVisibleValue>
</option>
</editAnimationByIDOptions>
</event>
Using the tag “ids” is faster and intuitive, the previous example we can use both without worry about
conflicts.
<event>
<eventType>OnClickUp</eventType>
<eventActions>
<eventAction>ResumeMove</eventAction>
<eventAction>ChangeCustomCondition</eventAction>
</eventActions>
<ids>ghost1,ghost2</ids>
<newCustomCondition>alpha</newCustomCondition>
</event>
<event>
<eventType>OnClickUp</eventType>
<eventActions>
<eventAction>ChangeCustomCondition</eventAction>
<eventAction>EditAnimationByID</eventAction>
</eventActions>
<editAnimationByIDOptions>
<option>
<id>ghost1,ghost2</id>
<editActions>
<editAction>ResumeMove</editAction>
</editActions>
</option>
</editAnimationByIDOptions>
<newCustomCondition>alpha</newCustomCondition>
</event>
In the previous example we must be careful, using the tag “ids” with the action
“ChangeCustomCondition” will update the custom conditions of all the ids included inside the tag and
probably that is not what we want. In these cases the solution is the action “EditAnimationByID” that
allows update values to other objects without affecting the current one.
Note: Another way to solve the conflict using the tag “ids” is creating a new event with the same
“eventType”, one event will trigger the action “ChangeCustomCondition” and second one will trigger
“ResumeMove” as long as you are not using the tag “avoidRunThisEventMultipleTimes”
48
<event>
<eventType>OnClickUp</eventType>
<eventActions>
<eventAction>ChangeCustomCondition</eventAction>
</eventActions>
<newCustomCondition>alpha</newCustomCondition>
</event>
<event>
<eventType>OnClickUp</eventType>
<eventActions>
<eventAction>ResumeMove</eventAction>
</eventActions>
<ids>ghost1,ghost2</ids>
</event>
49
Conditionals:
You can decide when the action will be triggered.
whenFrameCollectionIndexIs
If the current frame collection index matches with the tag then the action is triggered.
<event>
<eventType>FrameAnimationRepeatLoopEnds</eventType>
<eventActions>
<eventAction>FlipImage</eventAction>
</eventActions>
<whenFrameCollectionIndexIs>0</whenFrameCollectionIndexIs>
</event>
whenCurrentPositionIs
If the current position matches with the tag then the action is triggered. The configuration is simple use
“;“ for split coordinates. Example: X;Y.
<event>
<eventType>FrameAnimationRepeatLoopEnds</eventType>
<eventActions>
<eventAction>ChangeFrameCollection</eventAction>
</eventActions>
<whenCurrentPositionIs>2;368</whenCurrentPositionIs>
<changeFrameCollectionIndexTo>5</changeFrameCollectionIndexTo>
</event>
whenCustomConditionIs
Custom conditions allow trigger actions without depend on animation values.
<event>
<eventType>Timer</eventType>
<eventActions>
<eventAction>StopAnimationAndMove</eventAction>
<eventAction>ChangeCustomCondition</eventAction>
</eventActions>
<whenCustomConditionIs>running</whenCustomConditionIs>
<newCustomCondition>stoppped</newCustomCondition>
</event>
<event>
<eventType>Timer</eventType>
<eventActions>
<eventAction>ResumeAnimationAndMove</eventAction>
<eventAction>ChangeCustomCondition</eventAction>
</eventActions>
<whenCustomConditionIs>stoppped</whenCustomConditionIs>
<newCustomCondition>running</newCustomCondition>
</event>
<defaultCustomCondition>running</defaultCustomCondition>
50
whenCurrentFrameIndexIs
An animation contains a group of frames (images) that are quickly showed one by one creating the
feeling of animation. These frames are repeated in a loop infinite times. We can trigger actions only
when a specific frame is on screen.
<events>
<event>
<eventType>TriggerActionByCurrentFrame</eventType>
<eventActions>
<eventAction>EnableByID</eventAction>
</eventActions>
<whenCurrentFrameIndexIs>3</whenCurrentFrameIndexIs>
<ids>ball</ids>
</event>
</events>
whenRotationDegreesIs
If you are rotating an image you can trigger an event only when the image reaches a specify degree.
<events>
<event>
<eventType>RotationDegreesReached</eventType>
<eventActions>
<eventAction>ChangeAlpha</eventAction>
</eventActions>
<whenRotationDegreesIs>54</whenRotationDegreesIs>
<alpha>255</alpha>
</event>
</events>
whenGlobalVariableIs
Only the event is triggered if the global variable match its value.
<event>
<eventType>TriggerActionByPosition</eventType>
<eventActions>
<eventAction>StopMove</eventAction>
</eventActions>
<whenGlobalVariableIs>
<id>screen</id>
<value>0</value>
</whenGlobalVariableIs>
</event>
51
Events:
MoveAnimationMaxTopReached
moveAnimation when reached the minimum vertical value.
MoveAnimationMaxBottomReached
moveAnimation when reached the max vertical value.
MoveAnimationMaxLeftReached
moveAnimation when reached the minimum horizontal value.
MoveAnimationMaxRightReached
moveAnimation when reached the max horizontal value.
FrameAnimationRepeatLoopEnds
frameCollection when the tag “repeatThisLoopForTimes” is completed.
FrameAnimationLoopEnds
An animation contains a group of frames (images) that are quickly showed one by one creating the
feeling of animation. These frames are repeated in a loop infinite times. When the last frame is showed,
this event is always triggered.
TriggerActionByCurrentFrame
Similar to the previous event, it is triggered when a specific frame is showed.
CirclePathMaxRightReached
pathAnimation when “pathAnimationCoordinates” is used for create a circle and the image reaches the
max right point.
CirclePathMaxLeftReached
pathAnimation when “pathAnimationCoordinates” is used for create a circle and the image reaches the
max left point.
CirclePathMaxTopReached
pathAnimation when “pathAnimationCoordinates” is used for create a circle and the image reaches the
max top point.
CirclePathMaxBottomReached
pathAnimation when “pathAnimationCoordinates” is used for create a circle and the image reaches the
max bottom point.
PathAnimationStartPointReached
pathAnimation when the first coordinate of the path is reached.
PathAnimationEndPointReached
pathAnimation when the last coordinate of the path is reached.
Timer
imageTimer when reach the specified time.
FrameAnimationReturnBackwardToFirstFrameEnds
frameCollection when the tag “returnBackwardToFirstFrame” is completed.
TriggerActionByPosition
It’s triggered when the image reaches a specific coordinate.
OnClickDown or OnTouchDown
Happens when the user touch the image.
OnClickUp or OnTouchUp
Happens when the user touch and release the image.
PlaybackIsFinished
It is trigger when an audio player finishes its sound.
52
StartPrintingText
It happens when a text area starts to print.
PrintingNewLine
It happens when a text area starts to print a new line.
EndPrintingText
It happens when a text area finishes printing its text.
MinimumAlphaValueReached
It happens when the alpha property reach its minimum value.
MaximumAlphaValueReached
It happens when the alpha property reach its maximum value.
MinimumWidthValueReached
It happens when the width property reach its minimum value.
MaximumWidthValueReached
It happens when the width property reach its maximum value.
MinimumHeightValueReached
It happens when the height property reach its minimum value.
MaximumHeightValueReached
It happens when the height property reach its maximum value.
MinimumRotationValueReached
It happens when the image rotate and reach its minimum value.
MaximumRotationValueReached
It happens when the image rotate and reach its maximum value.
RotationDegreesReached
It happens when the image rotate and reach a custom value.
53
Actions:
ChangeFrameCollection
If you animation has multiples frame Collections, you can change the current collection for another one
adding a new index.
Depend on these Tags:
• changeFrameCollectionIndexTo: The index number to update.
FlipImage
Flip the image.
Depend on these Tags:
• flipType: Flip the image, you have two options: “Horizontal” or “Vertical”. Default value
“Horizontal”.
ResumeMove
The image movement is resumed.
StopMove
The image movement is stopped.
StopAnimationAndMove
The image movement and animation is stopped.
ResumeAnimationAndMove
The image movement and animation is resumed.
ResumeAnimation
The image animation is resumed.
StopAnimation
The image animation is stopped.
EditAnimationByID
Allow change the animation properties in other images by id.
Depend on these Tags (and what you want to update):
• editAnimationByIDOptions: Please check the page 46 for more information.
ChangeSpeedAnimation
The image speed is changed, including all the animations (frames and movements).
Depend on these Tags:
• newSpeedAnimation: The new value to update. A higher number means a slower speed.
ChangeTimerDelay
Update the delay for the Timer.
Depend on these Tags:
• newTimerDelay: If a Timer has been included, you can update the delay.
RunTimerOnlyForNumberTimes
Run a Timer only for a specific number of times.
Depend on these Tags:
• runTimerOnlyTimes: The number of times to run.
54
RunTimer
Run a Timer.
StopTimer
Stop a Timer.
EditPosition
Change the current image position.
Depend on these Tags:
• newCoordinates: The configuration is simple use “;“ for split coordinates. Example: X;Y.
UpdateMoveAnimation, UpdatePathAnimation, UpdateMoveEndLessAnimation,
UpdatePathEndLessAnimation, UpdateMode7, UpdateFillWithPattern,
UpdateImagePropertiesAnimation
They allow you update the animation properties. Check page 65 for another example.
Depend on these Tags:
• new + animation name: Please check the next example.
<event>
<eventType>FrameAnimationRepeatLoopEnds</eventType>
<eventActions>
<eventAction>UpdateMoveAnimation</eventAction>
</eventActions>
<newMoveAnimation>
<iniLeft>2</iniLeft>
<maxLeft>100</maxLeft>
<pixelsMoveLeft>-2</pixelsMoveLeft>
<pixelsMoveTop>0</pixelsMoveTop>
</newMoveAnimation>
</event>
Remember you don’t need add all the values, just those ones that you are planning to update.
DisableImage
Disable the current image.
EnableByID
Enable images previously disabled.
Depend on these Tags:
• ids: Use “,” for multiple image ids. Example: image1, image2.
DisableByID
Disable images.
Depend on these Tags:
• ids: Use “,” for multiple image ids. Example: image1, image2.
ChangeSpeedAnimationForFrames
Similar to “ChangeSpeedAnimation” but only affects the frames.
Depend on these Tags:
• newSpeedAnimationForFrames: The new value to update. A higher number means a slower
speed.
55
ChangeSpeedAnimationForMovements
Similar to “ChangeSpeedAnimation” but only affects the movements.
Depend on these Tags:
• newSpeedAnimationForMovements: The new value to update. A higher number means a
slower speed.
ChangeVisibleValue
Hide – unhide an image. Remember, all the animations are still running. Use “Disable image” for hide an
image including its animations.
Depend on these Tags:
• newVisibleValue: New visible value.
CreateRandomCoordinates
Change the current image position to a new one generated by random numbers.
Depend on these Tags:
• parametersForRandomCoordinates: The configuration is “X(ini),X(max),Y(ini),Y(max)”, where
the values are joined by “,”. Example:
<parametersForRandomCoordinates>696,800,246,286</parametersForRandomCoordinates>
ChangeAnimation
Changes the current animation for a new one.
Depend on these Tags:
• changeAnimationTo: Change the current animation. Example:
<events>
<event>
<eventType>OnTouchDown</eventType>
<eventActions>
<eventAction>ChangeAnimation</eventAction>
</eventActions>
<changeAnimationTo>animationname</changeAnimationTo>
</event>
</events>
PlayAudio, StopAudio, PauseAudio, ResumeAudio, ChangeVolumeAudio
Allow you control the music in your animation. Please check the Audio player section for more
information.
Depend on these Tags:
• audioFileToLoad: Load a new sound.
Optional: You can use the attribute “from” when the audio file is in another folder or if you just
want borrow files from other animations.
<audioFileToLoad from="musicFolder">sound.m4a</audioFileToLoad>
•
•
•
audioVolumeToUpdate: Update the current volume.
audioLoopToUpdate: Set a new value for “audio loop”.
audioPlayerID: The player id to update.
56
<event>
<eventType>OnClickDown</eventType>
<eventActions>
<eventAction>PlayAudio</eventAction>
</eventActions>
<audioPlayerID>sfxAudio</audioPlayerID>
<audioFileToLoad>laser.mp3</audioFileToLoad>
<audioVolumeToUpdate>0.5</audioVolumeToUpdate>
<audioLoopToUpdate>true</audioLoopToUpdate>
</event>
ChangeBgColor
Change the background color.
Depend on these Tags:
• newBgColor: Assign a new background color.
ChangeCustomCondition
Change the current custom condition.
Depend on these Tags:
• newCustomCondition: Assign the new value.
NextText
Give instructions to a text area to show the next text.
PreviousText
Give instructions to a text area to show the previous text.
StopText
Give instructions to a text area to stop printing text.
PlayText
Give instructions to a text area to continue printing text.
LoadTextByIndex
Give instructions to a text area to print a text by its index.
Depend on these Tags:
• changeTextAreaIndexTo: Assign the new value for the index.
<events>
<event>
<eventType>OnTouchUp</eventType>
<eventActions>
<eventAction>EditAnimationByID</eventAction>
</eventActions>
<editAnimationByIDOptions>
<option>
<editActions>
<editAction>LoadTextByIndex</editAction>
</editActions>
<id>Area1</id>
<changeTextAreaIndexTo>0</changeTextAreaIndexTo>
</option>
</editAnimationByIDOptions>
</event>
</events>
57
ChangeAnimationAlphaAction
Change the current action used for alpha in imagePropertiesAnimation.
Depend on these Tags:
• animationAlphaAction: You can choose between “Increase” and “Decrease”.
ChangeAnimationWidthAction
Change the current action used for width in imagePropertiesAnimation.
Depend on these Tags:
• animationWidthAction: You can choose between “Increase” and “Decrease”.
ChangeAnimationHeightAction
Change the current action used for height in imagePropertiesAnimation.
Depend on these Tags:
• animationHeightAction: You can choose between “Increase” and “Decrease”.
ChangeAnimationRotationAction
Change the current action used for rotation in imagePropertiesAnimation.
Depend on these Tags:
• animationRotationAction: You can choose between “Increase”, “Decrease” and “Stop”.
ChangeSize
Change the size of an image.
Depend on these Tags:
• height: The new height value in pixels.
• width: The new width value in pixels.
ChangeDegrees
Change the current degree value used for rotate an image.
Depend on these Tags:
• degrees: Set a new value.
ChangePivot
By default an image rotates based in its center, but you can change that adding a new value.
Depend on these Tags:
• pivot: The configuration is simple use “;“ for split coordinates. Example: X;Y.
58
RunJavascriptFunction
Allow you run JavaScript code.
Depend on these Tags:
• runJavascriptFunction: Type you code here. It is highly recommended create a function in
JavaScript with all the code and just call it from here.
<event>
<eventType>MinimumRotationValueReached</eventType>
<eventActions>
<eventAction>RunJavascriptFunction</eventAction>
</eventActions>
<runJavascriptFunction>helloworld("Hello World");</runJavascriptFunction>
</event>
UpdateGlobalVariable
Update a global variable, please check the “Global variables” section for more information.
Please check the example:
<events>
<event>
<eventType>OnTouchUp</eventType>
<eventActions>
<eventAction>UpdateGlobalVariables</eventAction>
</eventActions>
<globalVariablesToUpdate>
<variable>
<id>screen</id>
<value>0</value>
</variable>
</globalVariablesToUpdate>
</event>
</events>
59
Tips
The next image explains how moveAnimation events are triggered.
The next image explains how pathAnimation triggers events when “pathAnimationCoordinates” is used
for create a circle path.
Remember that circle paths have an end and a beginning, it means that the events
“PathAnimationStartPointReached” and “PathAnimationEndPointReached” will be triggered as well.
60
Examples
61
Now is time for advance training, all the examples until now have been as easy as possible for give you a
clear idea about how the engine works.
This time we are going to learn how create an advance animation using almost all the available features.
Images section
The big confusion here is handle events, they are simple and require just a little bit of logic.
<events>
<event>
<eventType>MoveAnimationMaxLeftReached</eventType>
<eventActions>
<eventAction>StopMove</eventAction>
<eventAction>ChangeFrameCollection</eventAction>
</eventActions>
<whenFrameIndexIs>0</whenFrameIndexIs>
<changeFrameCollectionIndexTo>1</changeFrameCollectionIndexTo>
</event>
<event>
<eventType>FrameAnimationRepeatLoopEnds</eventType>
<eventActions>
<eventAction>ChangeFrameCollection</eventAction>
<eventAction>FlipImage</eventAction>
<eventAction>ResumeMove</eventAction>
</eventActions>
<whenFrameIndexIs>1</whenFrameIndexIs>
<changeFrameCollectionIndexTo>0</changeFrameCollectionIndexTo>
</event>
<event>
<eventType>MoveAnimationMaxRightReached</eventType>
<eventActions>
<eventAction>StopMove</eventAction>
<eventAction>ChangeFrameCollection</eventAction>
</eventActions>
<whenFrameIndexIs>0</whenFrameIndexIs>
<changeFrameCollectionIndexTo>1</changeFrameCollectionIndexTo>
</event>
</events>
A good example is moveAnimation tag, when an image reaches the limits will trigger an event and you
can add actions.
62
The most common action for moveAnimation is FlipImage. In the image above we have an animated
image walking, after reach the limits the image returns but we need flip it before otherwise the image
will look like walking backward.
Another common action for moveAnimation is ChangeFrames. Sometimes we need a different
animation when a specific situation happen, something like look around and then returns.
In these cases remember use frameCollection tags for multiples frames.
Use “whenFrameCollectionIndexIs” for trigger the action in a specific moment. Following the previous
example:
<event>
<eventType>MoveAnimationMaxLeftReached</eventType>
<eventActions>
<eventAction>StopMove</eventAction>
<eventAction>ChangeFrameCollection</eventAction>
</eventActions>
<whenFrameCollectionIndexIs>0</whenFrameCollectionIndexIs>
<changeFrameCollectionIndexTo>1</changeFrameCollectionIndexTo>
</event>
Only when “whenFrameCollectionIndexIs” is 0 and “MoveAnimationMaxLeftReached” is reached, the actions
“StopMove” and “ChangeFrameCollection” are triggered, stopping moveAnimation and changing the frame
collection index to 1.
63
Camera
By default the camera is static. In this example we are going to use the tags “autoHorizontalScroll” and
“customScroll”.
<camera>
<autoHorizontalScroll>true</autoHorizontalScroll>
<iniPosition>0;0</iniPosition>
<pixelsMove>-2</pixelsMove>
<cameraSpeed>1</cameraSpeed>
</camera>
Adding the previous camera tag to your project, automatically the camera will move left to right in an
endless loop.
The tag “iniPosition” decide where the camera start point will be. These values are simple to
understand, you can play with values between 0 and 1, where 0 is the beginning of your design, 0.5 is
the half and 1 is the very end.
<iniPosition>X;Y</iniPosition>
They are like coordinates, where the first value is X and the second one is Y.
Example: <iniPosition>0.01223241;0.02037037</iniPosition>
You can be quite precise if you wish, adding an accurate position. For example is your canvas width is
1000 pixels, the half would be 500 what means 0.5.
(500 * 1) / 1000 = 0.5
This will be the value used in “iniPosition”.
64
Another example using “customScroll”
<camera>
<iniPosition>0.01223241;0.02037037</iniPosition>
<cameraSpeed>1</cameraSpeed>
<customScroll>
<moveAnimation>
<iniTop>-11</iniTop>
<maxTop>-381</maxTop>
<pixelsMoveTop>-2</pixelsMoveTop>
</moveAnimation>
</customScroll>
<events>
<event>
<eventType>MoveAnimationMaxTopReached</eventType>
<eventActions>
<eventAction>UpdateMoveAnimation</eventAction>
</eventActions>
<newMoveAnimation>
<iniLeft>-8</iniLeft>
<maxLeft>-620</maxLeft>
<pixelsMoveLeft>-2</pixelsMoveLeft>
</newMoveAnimation>
<disableEventsAfterTriggered>true</disableEventsAfterTriggered>
</event>
</events>
</camera>
Here we are using the tag “moveAnimation” to move the camera to a custom position and using an
event to move the camera again to another position.
65
Include the engine in your website
Before begin is recommended have at least a basic knowledge of JavaScript to make easier understand
the next instructions.
<!DOCTYPE html>
<html xmlns="http://www.w3.org/1999/xhtml">
<head>
<title></title>
<script src="JadsdsEngine_min.js"></script>
<script type="text/javascript">
window.onload = function () {
var jadsdsEngine = new JadsdsEngine('mycanvas');
//jadsdsEngine.fixCanvasSize = false;
//jadsdsEngine.renderMode = RenderMode.Advanced; //RenderMode.Simple;
//jadsdsEngine.antiAlias = true;
//jadsdsEngine.systemFolder = "animations";
//jadsdsEngine.fpsToUse = 20;
//jadsdsEngine.loadingMessage = "Loading...";
jadsdsEngine.loadAnimation("dc");
};
</script>
</head>
<body>
<canvas id="mycanvas" width="320" height="480" style="border-style: solid; borderwidth: 1px"></canvas>
</body>
</html>
Above the method “loadAnimation()” loads the animation “dc” which is located inside the folder
“animations” in your website.
Like you can see some lines of the code are commented, these values are optional. Play with them if you
project requires it.
List of available properties:
•
•
•
•
fixCanvasSize: The engine reads the tag “screenCanvasResolution” and change the size of the
canvas html object following the values submitted by the tag. If you don’t want this change, set
“fixCanvasSize” property to false.
renderMode: If you are planning work with the property “fixCanvasSize” in false, consider use
the “renderMode” in “Advanced”, this feature require more CPU but the image look better after
be stretched. Check the image below for a better review.
antiAlias: If you are planning work with the property “fixCanvasSize” in false and “renderMode”
in “Advanced”, probably you are going to need to set this property to true for Improve the
image quality.
systemFolder: By default the folder where the animations are located is “animations”, but if
your website already has a folder with that name, you can change it by another one.
66
•
•
•
fpsToUse: The frame rate by default used is 20, this is a nice way to keep a low use of CPU.
Change it if you animations need a higher value.
loadingMessage: If you website runs in a different language, with this property you can change
the loading message by another one.
runFunctionAfterLoad: Allows you run code after load the animation. Check the next example:
jadsdsEngine.runFunctionAfterLoad = function () {
alert("ok");
}
•
•
•
runAfterLoadAnimation: All the animations after be loaded run immediately, you can set this
property to false and the engine will be paused. Use the method “resume” for resume the
animation.
stopAnimationWhenIsNotVisible: If you project is bigger than the user visible area and is using
multiples instances of the engine, probably you are going to require an intensive use of the CPU.
You can set this property to true and the animation will pause itself when is not visible.
loadAnimationScreen: If you animation is heavy and take long time to load, maybe would be
recommended use an animation screen while the web browser is downloading the data. Just
include the name of your animation in this tag.
Note: The animation need to be simple with almost no images, the idea is something quick and
easy to download, otherwise the user will see a back screen. frameCollections in these
animations are not allow.
Example:
jadsdsEngine.loadAnimationScreen = “myLoadingScreen”;
List of available methods:
•
•
•
stop: Stop the animation. Example: jadsdsEngine.stop();
resume: Resume the animation. Example: jadsdsEngine.resume();
runAction: Trigger the actions included inside the tag “javaScriptActions”. The parameter is the
javaScriptAction id. Check the “JavaScript actions” section for more information.
function testRunJS() {
jadsdsEngine.runAction("Stop");
}
•
unloadAnimation: If you are planning change the animation, remember always use this method
before call “loadAnimation”.
67
•
loadAnimation: Allow you load an animation. The parameter is the animation name.
Example:
function changeAnimation(animationName) {
jadsdsEngine.unloadAnimation();
jadsdsEngine.loadAnimation(animationName);
}
68
The next image shows us what happened when an image is stretched too much. Black lines will appear
between the images. In these cases set render mode to “Advanced”.
69


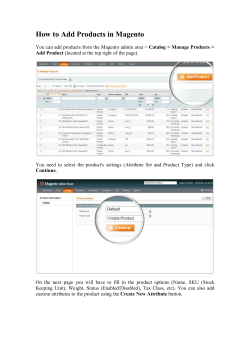


© Copyright 2026