
1
1
The Cottage Mama's DIY Guide
Healthy, Money-Saving Tutorials for the
Slightly Independent Housewife
By Kristy Howard
Subscribe for free money saving ideas, DIY tutorials, and encouraging
articles.
© 2011 | All rights reserved.
The Cottage Mama's DIY Guide | littlenaturalcottage.com
2
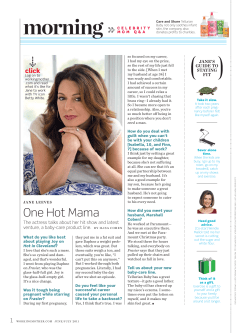
"A wise woman is always learning.
She is open to change.
She is ready to hear.
She pursues knowledge."
Debi Pearl, author of Created to Be His Help Meet
~
You would not be reading this eBook if not for
-my amazing husband, Jeremy, who pretended not to notice that the
lamp was on (again) after midnight. (The Lord knew what He was doing
when He gave me a patient man!)
-my talented and creative sister, Julie, who designed the cover for this
eBook and straightened out the format after I finished making a mess.
-my precious children, who don't seem to mind their mother talking
about them, blogging about them, and taking pictures of everything they
do and everything they put into their mouths.
I love you all so much.
3
Contents
Why do it yourself? {My Story}............................................................................................................5
Part 1: DIY For Your Home................................................................................................6
•
•
•
•
•
Make Your Own Laundry Detergent..........................................................................................9
Make Your Own Liquid Hand Soap.........................................................................................10
Homemade Cleaners That Really Work...................................................................................13
Lovelies for Your Home …......................................................................................................16
Kristy's Tips & Hints …...........................................................................................................18
Part 2: DIY For Your Health....................................................................................................21
•
•
•
•
Make Your Own Herbal Salve..................................................................................................22
How to Make a Herbal Tincture...............................................................................................26
Homemade Cough Syrup..........................................................................................................30
Make Your Own Pedialyte........................................................................................................32
Part 3: DIY For Your Babies......................................................................................................34
•
•
•
•
Homemade Teething Cookies...................................................................................................35
Healthy Baby Food Made Easy................................................................................................38
Fabulous Homemade Baby Wipes............................................................................................42
Simple “Cradle Cap” Rinse......................................................................................................45
Part 4: DIY For Fun!......................................................................................................................46
• Make Your Own Face Scrub.................................................................................................... 47
• Homemade Face Moisturizer....................................................................................................49
• All-Natural Hair Treatments.....................................................................................................51
Kristy's Recommended Resources...........................................................................................................53
About the Author ….................................................................................................................................54
Become an Affiliate ….............................................................................................................................55
4
Why Do-It-Yourself?
{My Story}
My life drastically changed five years ago.
Well, I should say that it began to change five years ago. I have been changing, learning, and
growing ever since.
Five years ago, I sat down at our computer and Googled “homemade cleaning recipes”.
• My husband was suffering miserably with hay fever and skin allergies.
• We were battling eczema with our toddler.
• Our newborn daughter was plagued with allergy symptoms that I felt helpless to relieve or
prevent.
I knew we needed to implement some changes in our lifestyle, but I had no clue where to
even start.
That Google search changed my life.
Much to my delight, I stumbled upon a world of make-it-yourself, pioneering, oldfashioned-living websites. A whole new world suddenly opened before me!
I discovered that there are women who made their own laundry soap, mixed their own
household cleaners, used cloth diapers and made their own baby wipes, ground their own
flour, created their own tinctures and medicines with herbs...
Boy, was I ever surprised and inspired! Needless to say, our lives have never been the same.
This little ebook is a compilation of a few of the recipes and protocols our family has
implemented and grown to love over the past five years.
I use these recipes because they keep our family healthier.
I use these recipes because they save our family money.
I use these recipes just because I can do it myself.
And so can you. I challenge you to give it a try.
Kristy Howard, Little Natural Cottage
5
Part 1:
Do-it-yourself For Your Home
“Household cleaning products are among the most toxic
substances we encounter daily.”
Protect Yourself From Household Toxins, by Debra Lynn Dadd
6
DIY #1:
Make Your Own Laundry Detergent
I remember the first time I stumbled upon a recipe for homemade laundry detergent.
I was dumbfounded.
Make your own laundry detergent? You've got to be kidding. What next? Knit your own
underwear?
As outlandish at the idea seemed to my twenty-first century-woman brain, it was the savings
that convinced me to give it a try.
Pennies a load, you say? Oh yes, I'm listening.
Back then, I didn't care so much about all the chemicals sloshing around in my washing
machine from my store-bough detergents. Now, I do care. And I still love using my own
homemade laundry soap. While I don't rely on it completely (I now use laundry products
from an all-natural company), I still pull out this tried-and-true recipe when I'm in a pinch,
when I feel the need to save a little more money, or when I just want to enjoy the pleasure of
doing it myself.
Let's get started!
7
What you'll need to make your own laundry soap:
•1 heavy-duty bar of soap, such as Fels-Naptha
•½ Borax powder
•½ C washing soda
•10 C plus 1 gallon of water
Where to find the ingredients:
• Large Walmart stores carry Fels-Naptha soap, Borax powder and washing soda. They are
very inexpensive.
• If you cannot find these products locally, you can order them from Amazon.com.
8
How to do it:
1. Set 10 cups of water to boil over high heat in a large pot.
2. Meanwhile, grate your soap. You will need half-a-bar of soap, which will translate
to a scant 2 cups of grated soap.
3. Add the grated soap to the boiling water and stir until it is dissolved.
4. Lower the heat to prevent your pot from over boiling, and add the borax and
washing soda.
5. Continue stirring until all the powdered soaps have dissolved, then remove the
pot from heat.
6. Carefully pour your soapy water mixture into a large bucket (at least a 2-gallon
size) and add the gallon of water. Stir well.
7. Let your soap sit overnight so it can gel. It should thicken quite a bit. Stir before
using.
• Use ½ C per load of laundry, or more for heavily soiled clothing.
9
DIY #2:
Make Your Own Liquid Hand Soap
This recipe is similar to the homemade laundry detergent, omitting the heavier cleaning
agents (Borax and washing soda) and using less water.
I recommend using an all natural bar of soap for this recipe, such as a quality homemade soap
or a brand that is free of harsh chemicals and perfumes.
Do not use a harsh soap, such as Fels Neptha (which is perfect for removing stains in
homemade laundry detergent). You want something gentle and moisturizing for your skin.
Let's get started!
What you will need:
• 1 bar of quality, all natural soap
• ¾ to 1 gallon of water (the more water you use, the less concentrate and less “thick”
your soap will be; ¾ gallon makes a pretty concentrate soap, so use a little more water
if you want your soap a little “thin”)
• 2 to 3 tsp vitamin E oil- as a moisturizer
• 6 to 8 drops tea tree oil- as a disinfectant
10
How to do it:
1. Pour your water into a large pot and heat it over medium/high heat.
2. While the water is heating to a boil, grate your entire bar of soap. Add it to the
boiling water and stir, stir, stir until all the soap has dissolved.
3. Once the soap has dissolved, add the vitamin E oil and tea tree oil; stir again.
4. Remove the soap mixture from heat and let it set out to cool a little.
11
5. Once it has cooled a bit, pour the soap (using a funnel!) into empty hand soap
dispensers (I save my empty ones for this purpose!)
• You will probably have a lot more liquid soap than you have containers, so be sure to keep a
few large jars or containers with lids to store all your extra soap. Refill as needed!
• This recipe yields several 3.5-oz-size hand soaps, as well as two larger bottles for refills.
12
DIY #3:
Homemade Cleaners That Really Work!
I have tried tons of homemade cleaner recipes and can’t say that my “experiments” have all
turned out to my liking.
Take the time I polished our hardwood floors with my homemade “concoction” and had our
feet sticking to the floor every time we walked.
Or the day I cleaned the house from top to bottom (with my homemade solutions, of course)
and had the entire place reeking of vinegar. Oh well, live and learn.
Thankfully, I’ve learned a few things over the years and have found some recipes that are
worth keeping.
In a minute, I'm going to share with you my favorite homemade cleaning recipes.
But first, you may ask why I bother making my own household cleaners when they are readily
available at every supermarket and dollar store on the block?
Two reasons:
First, because I can control what is put into them.
The average bottle of cleaner on the store shelf is full of toxic, harmful and harsh ingredients.
Not only are these products hard on our skin and lungs, many of them are also linked to
illness and allergies. There is very little chance of someone having a reaction to a homemade
cleaning solution since most all ingredients used are natural and biodegradable.
Secondly and obviously, it is more cost efficient to make your own cleaning
solutions than to buy them.
A bottle of homemade glass cleaner, for example, literally cost a few pennies to make- and it
works just as well as store bought brands (no joke). All homemade cleaners use a handful of
inexpensive ingredients (baking soda, Borax, ammonia, vinegar, etc) and you will use the
same basic ingredients over and over. Baking soda, for example, has literally dozens of
household uses.
The truth is, you need very few ingredients to make a cleaner that actually works.
All the impossible-to-pronounce ingredients found in the average commercial cleaners are
cheap fillers, harsh chemicals, and toxic preservatives. You don't need them.
Your skin (and lungs!) will thank you for doing-it-yourself.
13
Kristy's Favorite Recipes for Household Cleaners
Orange Oil Furniture Polish
All you need to have furniture that shines is a bottle of orange oil. This is exactly what it
says, oil from oranges. It is an all natural, Eco-friendly, safe and toxin-free product that has a
myriad of uses around the home. I like to pour a few drops into my mop water, or down the
kitchen sink drain to freshen things up a bit. My favorite use for this fresh-smelling product is
to rub down my wooden furniture with an old sock and few teaspoons of oil. The results are
gleaming!
All Purpose Cleaner
3 TBSP Borax
few drops of liquid dish soap
Orange Oil or essential oils (optional)
To clean floors:
Fill a bucket with warm water and combine liquid dish soap and Borax. Add 2 tsp orange
oil (available at the hardwood store) or 8 drops citrus (orange or lemon) essential oil. Mix
well and use for mopping tile or linoleum floors.
For general cleaning:
Fill an empty spray bottle nearly to top with warm water; add ingredients and shake to mix
well. Use for counter tops, appliances, etc.
Aluminum Pot Cleaner
2 TBSP cream of tartar
1 quart water
Mix; boil in the aluminum pot for 10 minutes. Scour lightly if needed.
Grease & Build-up Remover
Vinegar
Baking Soda
Place 1 cup white vinegar in an empty spray bottle; add 1/2 cup baking soda (the mixture
will "boil" at first). Fill spray bottle up with warm water and shake well. Great for cleaning
stove tops, microwaves, tubs, sinks, etc.
14
For the Bathroom
Wet the surface of your bath tub or sink and sprinkle a liberal dose of baking
powder over entire area.
Let set for 3-5 minutes and scrub down with a slightly scratchy sponge or pad (an old
toothbrush works well for small areas). Rinse with warm water and repeat if necessary. This is
very effective for removing build-up in tubs and sinks.
Follow a similar procedure for cleaning toilets (but don't use your toothbrush! ~grin~).
Keep a large container of baking powder beneath your bathroom sink just for
cleaning purposes!
Mirror & Glass Cleaner
1/8 C vinegar
1/4 C ammonia
1 TBSP Simple Green*
32 oz spray bottle
Place all ingredients in a spray bottle (I reused an empty Windex bottle) and fill with
water. Shake well to combine. This is by far the best glass cleaner recipe I've found - it doesn't
streak! I also use it to clean my bathroom counters - it leaves a nice shine on the faucets.
Shower Cleaner
Simple Green*
Water
Empty spray bottle
Add 1/4 cup Simple Green to a spray bottle; fill bottle with water and shake well to mix. Use
this solution in cleaning your shower; add a few tsp ammonia to solution if you're having
trouble with mold in your shower.
Also works as a floor cleaner - smells great!
*Simple Green is Eco-friendly and biodegradable with no harsh chemicals. You
can purchase Simple Green at many dollar stores. The solution is concentrate
and goes a long way.
For extra savings, look for $1-off coupons on the internet!
15
DIY #4:
Lovelies for Your Home
Nothing is as beautiful as the sights and scents of a well-kept home.
Here are a few of my favorite recipes for adding that extra-special touch to my cottage!
Linen Spray
essential oil of lavender
distilled water
6-oz spray bottle
Fill spray bottle half full of water; add 30-40 drops lavender essential oil.
Fill the rest of the spray bottle with water and gently shake contents.
Pour a little of your homemade linen spray into your iron to give clothing a fresh scent, or mist
it in rooms, closets, or on clean linens.
Try substituting the lavender with essential oil of lemon for a citrus twist!
Carpet Freshener
½ C baking soda
1 tsp ground cinnamon
1 tsp ground cloves
Mix baking soda with ground cinnamon and cloves; store in an air-tight container.
To use: Sprinkle powder on carpet or rugs prior to vacuuming. So simple!
16
Kristy’s Citrus Kitchen Refresher
1 small spray bottle
warm water
essential oils of lemon and sweet orange
Pour enough warm water to fill the spray bottle almost to the top. Add 6 or 8 drops of both the
lemon and sweet orange essential oils. (You can purchase essential oils at a local heath store,
or order them online .)
Shake the bottle gently to mix water and oils. Use this lovely spray as a refreshing spritzer on
your dining table, counter tops, and appliances when you clean your kitchen! Spraying it
around the garbage can area, or under the sink, will help eliminate odors.
The lemon oil works as a sanitizing agent, and the delightful citrus blend leaves a fresh, clean
fragrance in your kitchen!
Scented Drawer Liners
Add a few drops of your favorite essential oil to a piece of clothe and place it at the bottom of
your drawer.
Suggested fragrances are Rose water & Lavender for a sweet, feminine fragrance; or Lemon &
Eucalyptus for a fresh, clean scent.
17
DIY #5:
Kristy's Tips & Hints
To Keep Your Quilts Looking & Smelling Fresh
With four little people - and a hard working man! - in our house, our quilts start looking pretty
dingy from time to time. Here's a simple way to brighten your quilts and keep them looking
fresh:
Soak your quilt overnight in water and 1/2 C Borax, then run it through the rinse cycle in your
wash machine.
Line dry - the sun will whiten your quilt and give it a wonderfully fresh fragrance!
Scuff Remover From Shoes
Like most children, our kids are hard on their shoes. The following is the only scuff remover
that has successfully taken black marks off the Howard kids' shoes! It works great on
both leather and synthetic material (excluding suede or velvet, of course) and leaves the
surface shiny without discoloring:
Blot a rag or cotton ball with nail polish remover. Wipe the surface of the shoe at the scuff
marks. Scuffs usually wipe right off; several applications may be necessary if the mark is large
or has been on a while.
Works great on linoleum floors, too!
18
To Remove Rust from Porcelain Sinks & Tubs
As newly weds, my husband's and my first home was a quaint little “cottage” in east Texas.
We were delighted to discover an antique pedestal sink and claw-foot bath tub in the
bathroom... complete with rust stains that were at least 100 years old!
I never did get those ugly rust spots out of the porcelain. Perhaps if I would have known about
this rust remover back then, I could have enjoyed a soak in a rust-free tub!
Place a teaspoon or two (or more, if the stain is large) of baking soda over the rust spot and
sprinkle just enough water to make a paste. Let it sit for at least an hour, then scrub with a
sponge or rag. If the stains are persistent, repeat on a regular basis... the porcelain should
whiten after several uses.
Odor Remover
To remove garlic or other unpleasant odors from your hands:
Rub the palms of your hands inside a stainless steal sink several times.
Caring for Curtains:
An elderly friend gave me the following tip for keeping curtains in like-new
condition:
Take the curtains down from the windows and wash them once-a-year to keep the fabric
"alive". This prevents dust and debris from collecting and deteriorating the fabric.
This lady had the same lace panel curtains in her home for over thirty years and they
still looked bright and new!
To keep from having to iron freshly washed curtains, try this:
After taking them out of the wash machine, promptly hang them on curtain rods and allow
them to air dry. If a few wrinkles still persist, spritz them with water. The wrinkles will fall out
without you having to spend hours starching and ironing them!
If you're having trouble threading lace curtains on a curtain rod, slip a sandwich "baggie" over
the rod- this will prevent the panels from catching on the edges.
19
Washing Walls
Use a clean paint roller to apply your favorite cleaner when washing your walls... much faster
than the old sponge method!
Cleaning Mini-blinds
Use a clean paint brush when cleaning mini-blinds or shutters... it's lots cheaper than buying
expensive blind-cleaning tools!
20
Part 2:
Do-it-yourself For Your Health
“When we were growing up, herbs were like tomatoes.
We grew them.
We put them up for the winter.
We used them daily,
and gave concoctions away to other people in need of them.
“My mother was always teaching us...
She instilled in us a passion to learn and create.”
Shoshanna Easling, owner of
Bulk Herb Store
21
DIY #6:
Make Your Own Herbal Salve
If you’re a big fan of herbs (like I am!), then you just have to try your hand at
making your own herbal salve. It’s surprisingly simple and so much fun!
This project goes together rather quickly. Just a few minutes of work over a period of a few
days, and you're done.
It’s also a great way to give an inexpensive and creative gift! Here’s a break-down of my costs:
• 4 oz organic plantain leaf- $3
• 3 oz beeswax- $4.50
• 4 (.5 oz) tins and 5 (4 oz) tins- $5
• olive oil- about $5
For about $20, I can make 9 tins of homemade herbal salve for giving and using- not bad!
Check the prices on organic herbal products at your local health store and you’ll definitely
recognize the savings.
Let's get started!
What you'll need:
•
•
•
•
•
herbs (I used plantain for this tutorial)
bees wax
olive oil
small tins with lids
a crock pot and a jar
22
1. The first step is to infuse your olive oil with the herbs. To do this, pack your
herbs into a canning jar (we used quart size) until the jar is three-quarters full.
2. Next, pour olive oil over the herbs until they are completely covered.
Leave about 1 inch of head space at the top, then seal with a lid.
23
3. Place a wash clothe in the bottom of your crock pot, and set the jar of
herbs and oil on top. Fill the crock pot almost completely with water. Turn
on “low” heat and let the herbs sit for three full days. Replace water as needed. By the
end of the three days, you will have an herbal-infused oil…
Like this!
4. Strain off the herbs and pour the oil into a clean container.
You can use cheese cloth or a clean piece of cotton (from an old t-shirt) to strain out the
herbs. (Discard herbs when you’re done.)
24
5. Place the herbal oil into a large sauce pan and add beeswax. I used three 1oz bars of wax for our salve. Turn the burner on low heat and gently stir until the wax
begins to melt. The little things you see floating around in the oil are pieces of beeswax!
• At this point, you can also add 2 or 3 drops of grapefruit seed extract (as a natural
antibiotic) and 2 or 3 drops of vitamin E oil (as a preservative) to your salve oil.
7. Once the wax has completely melted, your “salve” is ready to pour into
tins! The oil should be smooth and completely lump-free before you pour it into your
containers.
25
8. Fill tins almost to the very top, then allow the salve to “set”.
• The tins will be very hot so be extremely careful if you try to move them before
they’re cool! It only took a few minutes for our salve to cool and set.
• This batch yielded five large tins and four small tins of salve.
And here is the final product- plantain herbal salve, ready to use and give!
Plantain has wonderfully healing properties for skin irritations and rashes– it makes a great
gift for a mother with small children or babies! I’ve been using it on my children’s “boo boos”,
dry skin (including diaper rash), and on our daughter's scar from a surgery.
26
DIY #7:
How to Make a Herbal Tincture
I first tried my hand at making my own herbal tinctures a few years ago. It was a surprisingly
simple venture and I was hooked!
Aside from the amazing savings you reap from making your own herbal “medicines” (more on
that in a minute!), the feeling of satisfaction is well worth the minimal effort required. It just
feels good to learn something new about keeping your family healthy and well!
You can use a number of base ingredients for your tinctures; I prefer vegetable glycerin, since
it is naturally sweet-tasting and is easy for children to take. I opt not to include alcohol in my
tinctures, since I feel satisfied with the effectiveness of my homemade glycerites.
Let's get started!
To make your own glycerin tincture, you’ll need:
• herbs (for this tutorial, I used a combination of herbs; you can use a single herb,
however, such as olive leaf for immunity, or whatever you want to try!)
• vegetable glycerin (available online or from health stores)
• canning jar(s) with a lid (I used one jelly-size jar)
• a crock pot
27
How to do it:
1. Fill a clean canning jar (or jars, if you're making more than one tincture)
about two-thirds full of herbs of your choice. You can use a single herb or
combine a mixture of herbs.
2. Add just enough boiling water to wet the herbs, then pour enough
glycerin to fill the jar(s). Leave at least 1-inch of headway at the top.
3. Place lid tightly on the jar(s). I label the jar with the type of herbs I’m using so I
don’t forget what kind of tincture I’m making!
4. Place a wash cloth in the bottom of your crock pot. This will keep your jar(s)
from breaking.
5. Add the jar(s) to the crock pot and pour enough hot water to almost
cover the top.
6. Turn the crock pot on low. You will let the herbs simmer for three days to infuse
the glycerin with the herbs. Add water to the crock pot as needed (usually two or three
times a day at the most).
28
7. After three days, remove jar(s) from the crock pot. Using cheese cloth or a
clean piece of cotton material (such as an old t-shirt), strain the liquid from the herbs
into a clean container. Give the herbs a good squeeze to remove all the liquid, then
discard the herbs.
8. You now have a herbal tincture! Pour it into an amber bottle and be sure to
label and date it. Glycerin tinctures will keep for several years, but we always use our up
before they have a chance to “go bad”.
29
DIY #8:
Homemade Cough Syrup
I’ve been making this simple cough syrup for several years. It’s much better tasting than store
bought kinds, and doesn’t have all the questionable ingredients. If I’m giving it to a little one
under the age of one year old, I substitute agave nectar in place of the honey.
Let's get started!
What you'll need:
• 2 large onions (organic, if possible)
• juice from half a lemon
• 3 to 4 TBSP raw honey (or agave nectar)
30
1. Slice onions and place in a glass dish pan.
2. Drizzle lemon juice and honey over onions.
3. Turn oven to lowest heat and place pan inside; cook 45 minutes to 1 hour.
4. Pour off juice and discard onions. Store “syrup” (juice) in a glass bottle and
label.
•
Yields about 1 cup of cough syrup.
31
DIY #9:
Make Your Own Pedialyte
What you will need:
•
•
•
•
•
2 quarts filtered water
1 tsp baking soda
1 tsp sea salt
7 TBSP honey or agave nectar
2 TBSP powdered electrolyte drink (Melaleuca and
Nature's Sunshine carry these); use flavored Jello if
these are not available
1. Pour 2 quarts filtered drinking water into a large pot. Turn burner on low
heat.
2. With a whisk, stir in baking soda and sea salt.
3. Once those ingredients dissolve, add honey and flavored gelatin or
powder. Stir until well combined.
When “cooking” your solution, be sure to keep the heat on low. You want the water
just warm enough to help the other ingredients dissolve easily.
32
4. Pour into a container or pitcher and chill. Serve cold.
You can make pedialyte “ice cubes” to put in your child’s drink to keep it cold, or freeze
the liquid in molds to make popsicles.
Healthy Mama Tips:
Some pedialyte recipes call for two ingredients I try to avoid: white sugar and Koolaide.
I found that honey worked as a wonderful replacement for the sugar; you can use agave nectar
if your baby is under a year old.
33
Part 3:
Do-it-yourself For Your Babies
“What one learns to know and love as a child is often what is treasured
most as an adult.”
Rosemary Gladstar, author of Herbal Remedies for Children's Health
34
DIY #10: Homemade Teething Cookies
I first made these homemade teething “cookies” for our oldest son when he was miserably
teething as a baby. These aren't as hard as store-bought “Teething Biscuits”, nor as messy.
I am including variations to make this recipe gluten-free, which is how our second son had to
eat them. :)
Let's get started!
All you'll need is:
• 1 C quick oats (if you have old fashioned oats on hand, throw them in the food
processor for a few seconds to grind them up a bit) *gluten-free oats, if necessary
• 1 C whole wheat pastry flour *or 1 C gluten-free flour, such as sorghum or rice
• 1/3 C freshly ground flax seeds
• 1 tsp baking powder
• 1/4 tsp cinnamon
• 1 large banana
• 3 TBSP olive oil or extra virgin coconut oil
• 1 TBSP agave nectar
• 1 tsp vanilla
35
1. Mix the dry ingredients together in a bowl.
2. In a blender, process banana, oil, sweetener, and vanilla until pureed.
3. Add liquid ingredients to dry mixture in bowl and stir until thoroughly
combined (mixture will be lumpy).
4. Work into a ball and flatten or roll out on waxed paper.
36
5. Cut into strips or use a cookie cutter to make shapes. Gluten-free dough
will be too sticky to shape! Spoon it into little balls and flatten them with the palm of
your hand.
6. Place on a cookie sheet and bake in a preheated 350-degree oven for 1012 minutes.
37
DIY #11:
Healthy Baby Food Made Easy
Did you realize that “parents who use processed baby food spend an average of
$300 or more on baby food during their baby’s first year of life??” Whew, that’s a
lot of money!
“Making baby food at home is extremely cost-effective. On average, baby food prepared at
home can cost as little as $55 in the first year!!” (Source, the Pregnancy Store)
In other words, if you are the mother of a small baby, you can’t afford NOT to make baby
food!!
Unfortunately, I didn't learn this until our second child was born. When our oldest child was a
baby, it never entered my brain that babies can eat food other than the tasteless stuff you buy
at the grocery store. I sure never understood why our daughter always spit out that gooey
green stuff. What a picky eater.
Thankfully, I learned a few things about health and common sense between children, and our
second baby feasted on “gourmet” homemade baby food.
Looking back, I guess I went a bit over board to make sure she got the best a baby food a
grinder could offer. Our freezer was always packed with baby food I’d prepared and frozen:
oatmeal and bananas, veggies, casseroles and soups, all frozen in ice cube trays, stored in
freezer bags, and labeled, just waiting to be thawed and served.
And then came baby #3. Along with all the “normal” tasks involved in keeping a home and
family, I had two in cloth diapers, a baby boy who never seemed to nurse enough to be
satisfied, and a two-year-old who still wasn’t sleeping through the night.
38
Gourmet baby food sort of evaporated into a guilty memory. How did I ever have time to do
all that? I wondered as I popped open a jar of chicken and veggies and pretended it smelled
good enough to eat.
Live and learn, as they say. By the time Baby # 4 arrived, I had cultivated the necessary art of
simplifying homemade baby food.
At the time of this writing, our fourth child is fifteen months old and would rather sit still than
eat “baby” food. He graduated from the pureed stuff several months ago, but his mama still
remembers how easy it was to prepare his meals.
Making homemade baby food for our children has been highly rewarding for me. Not only
does it ensure that my babies are getting a healthy diet, but, as I learned along the way, it’s
VERY cost efficient and easy to do.
Let's Get Started!
Here's how to do it:
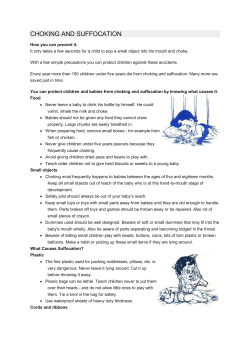
We'll feature sweet potatoes for this tutorial - one of my children's favorite veggies!
1. Wash, peel, and coarsely chop (if necessary) your little one's favorite
vegetable or fruit. Yummy choices include sweet potatoes, carrots, peas, green
beans, beets, apples, bananas, blueberries, etc. The older your baby gets, the more you
can vary his/her diet. I've given my babies quinoa, brown rice, oatmeal, left-over
casseroles, stews, soups, etc. Just stay away from spicy items, of course, or food items
that can be “gassy” (broccoli, beans, etc).
39
2. Cook or steam veggies. (If you're preparing fruit baby food, skip to the
next step). I bought this simple little steam basket from Walmart for less than $10.
Most vegetables will steam tender within 10 to 12 minutes, or less.
Of course, you have to put a lid on the pan in order for the veggies to steam … like this:
3. Puree prepared vegetables or fruit in a food processor; the younger your
baby, the longer you’ll want to process it so there are no lumps. To thin steamed
veggies or fresh fruits, I use unsweetened applesauce, filtered water, breast milk, raw
milk (from cow or goat), homemade whey, or a good, quality yogurt.
40
While you puree your baby's food, you can add extra nutrients to boost the
nutritional value. Here are a few of my favorites:
• Organic, extra virgin coconut oil- a few teaspoons adds considerable amounts of
essential fatty acids to your baby's food, along with a tasty sweetness that your baby will
love!
• Freshly milled flax seeds- provides an extra boost of fiber and essential fatty acids.
• Homemade whey- aids digestion and absorption through the abundance of lactic acid
and probiotics. The addition of homemade whey is especially vital if your baby suffers
with digestive trouble or food allergies.
• To store your homemade baby food: If you’re going to serve it right away, place it in an
air tight bowl and store in the fridge. Otherwise, spoon the food into ice cube trays and freeze
for a few hours. Once your baby food is solid, remove from trays and store in freezer-safe
containers or freezer bags. (Thaw for 30 minutes or so before serving; or, to thaw quickly,
warm frozen baby food “cubes” in a saucepan with a little hot water, just until it is soft.) Baby
food will keep for about 3 months in the freezer, but chances are you’ll use it up long before
then!
• TIP- A single “cube” in an ice cube tray is approx. 1 ounce. I have used both plain,
old ice cube trays and a set of “real” baby food trays, by Fresh Baby. The only perk about the
trays vs. ice cube trays is that Baby Fresh trays have lids. They are convenient and inexpensive
enough to be well worth the purchase.
41
A few Baby Meal Ideas:
• Pureed oatmeal with fruit, such as bananas, fresh peaches, pears, or blueberries. (I
usually stay away from strawberries until my babies are older, since they can pose an
allergy problem for some children.)
• Quinoa is an even better choice for young babies than oatmeal, since it is easy to
digest and is “safe” for babies with gluten intolerance. Quinoa mixes beautifully with
fruit!
• Mashed avocados and bananas make a brain-building meal!
• Steamed veggies: carrots, peas, sweet potatoes, green beans, spinach, etc. Create
veggie blends to expand your babies' palate!
• Mix steamed brown rice with veggie and fruit combinations.
• Consider adding these healthy ingredients to your baby food for extra nutrients:
homemade whey (to aid digestion), organic, extra virgin coconut oil (contains essential
fatty acids), freshly ground flax seeds (fiber and essential fatty acids).
42
DIY # 12:
Fabulous Homemade Baby Wipes
I cloth diapered for five years, most of the time with two babies in diapers at the
same time. I tried cloth wipes for a while, but I had quite enough “extra” washing with cloth
diapers to suit me just fine.
The toxins found in most store-bought wipes concern me enough to keep me from relying on
them… but you gotta have something to keep those hands, faces, and bottoms clean!
I discovered a recipe for making baby wipes at home, then created my own version. I
absolutely loved making and using these! They're so quick and easy.
Best of all, these baby wipes work!
Here’s the nifty little container I keep them in. I have two of these, one for the car or extra
bathroom, etc. I bought these “Sterilite” snap-top lids at Walmart and Hobby Lobby for less
than $2.
Let's get started!
43
This recipe makes two batches of homemade baby wipes. I recommend using all natural
ingredients, since your wipes will only be as good as what they're made of. I use and
recommend Melaleuca's products for gently, toxin-free ingredients.
What you'll need:
• 1 roll Bounty “select a size” paper towels (Don’t use cheaper brands, they turn to
mush! The “select a size” are the ones that let you tear off smaller amounts, perfect for
baby wipes!)
• 4 C warm water
• 2 TBSP Koala Pals soap (or a gentle, natural baby soap)
• 2 tsp Renew Oil (or a natural moisturizing oil to keep skin soft and smooth,
+ a few drops tea tree oil)
How to do it:
• Cut roll of paper towels in half. I use a long, very sharp knife by Rada Cutlery to
do this.
• Gently remove cardboard tube from rolls.
• Mix remaining ingredients in a bowl.
• Pour 2 cups mixture over each of your dry “baby wipes” rolls. (Be sure
mixture is evenly distributed over rolls.) Pull wipes from middle and use!
44
DIY #13: Simple “Cradle Cap” Rinse
This simple rinse is gentle yet effective for treating unsightly “cradle cap” on
newborns. I have used it with our babies with excellent results.
What you'll need:
•
•
•
warm water
apple cider vinegar
witch hazel
How to do it:
1. Pour about 1 cup of warm water into a jar, cup, or small pitcher.
2. Add ¼ C apple cider vinegar and ¼ C witch hazel to the water and stir.
3. Gently pour your homemade rinse over your baby's scalp. While you pour,
gently massage his or her scalp.
4. For best results, gently brush scalp with a soft bristle baby brush to
loosen baby dandruff.
5. Repeat rinse and massaging again, if needed. Follow with a warm water rinse
and gently pat scalp to dry. Use this rinse often (at least daily) to treat cradle cap.
45
Part 4:
Do-it-yourself For Fun!
“The personal care products we put on our skin and hair create possible
toxic exposure through skin absorption.
“These include soaps, lotions, creams, cosmetics, shampoos, deodorants,
and other common products...”
Protect Yourself From Household Toxins, by Debra Lynn Dadd
46
DIY #14:
Oatmeal Face Scrub
What you'll need:
• 1 tsp oats
• 1 ripe banana (the more ripe the better!)
• 2 TBSP plain yogurt
How to do it:
1. Cleanse your face with warm water or your usual astringent.
2. Take about 1 tsp oatmeal and rub it into your skin, concentrating on dry
spots (don’t rub too hard, though, or it will chap!). Rinse with warm water and pat dry.
47
3. Now take about 2 Tbsp mashed bananas (the more ripe the better) and 2
Tbsp plain yogurt. Either blend them by hand in a small bowl with a fork or whisk,
or put them in a food processor for a few minutes. (I prefer to use a blender, since it
produces a creamier mixture!)
4. Apply the mixture liberally to your face
and let it sit for about 15 minutes. Once the
mask has dried (you’ll feel it “tighten” on your skin),
gently bathe your face in warm water with a wash
cloth and pat dry. If you have dry skin, follow up
with a moisturizing lotion. Your skin will feel like
silk!! It’s easy and costs pennies!
48
DIY #15:
Homemade Face Moisturizer
recipe by Julie Smith, Becoming Lydia.com
What you'll need:
•
•
•
•
1 yolk from an organic egg
1 tsp freshly squeezed lemon juice
1 tsp organic extra virgin coconut oil
1 TBSP aloe vera gel
How to do it:
1. Combine egg yolk and lemon juice until smooth
49
3. Add remaining ingredients until stir until completely combined. Mixture
should be smooth and slightly runny.
3. Massage into face after using an Oatmeal Scrub to leave your skin
feeling incredibly soft and clean!
Always keep your homemade face moisturizer in the refrigerator! A small glass jar or
container with a lid is a perfect way to store it.
50
DIY # 16:
All Natural Hair Treatments
Favorite Hot Oil Treatment
What you'll need:
• extra virgin organic coconut oil, or olive oil
How to do it:
1. Gently heat oil in a small saucepan over low heat. Depending on the
thickness and length of your hair, you'll probably need anywhere from 1 to 2 teaspoons
of oil.
2. Work warm oil into the ends of your freshly washed, damp hair. Gently
work oil into your hair with your fingers for about one minute, then fix it into a “bun” at
the back of your head and let the treatment sit for at least 10 to 15 minutes.
3. Rinse thoroughly with warm water, then follow with a cold rinse. For
best results, follow the hot oil treatment with a vinegar hair rinse (recipe following)!
51
Our FAVORITE Hair Rinse
This simple rinse works beautifully for both oily and dry hair types. Just be sure to rinse with
lots of cold water so you won't have any lingering “vinegar” smells. :)
What you'll need:
• ¼ C apple cider vinegar
• 1 quart warm water
How to do it:
1. Mix apple cider vinegar and warm water in a large pitcher or jar.
2. Pour rinse over scalp following a routine wash or a hair treatment.
Work gently into scalp with finger tips.
3. Rinse with cold water for about 1 minute so your hair won't smell like
vinegar!
Check out my favorite herbal hair treatment, Beautiful Hair,
from the Bulk Herb Store!
52
Kristy's Recommended Resources:
Each of the books and DVDs recommended here can be purchased from
Bulk Herb Store.
• Bulk Herb Store and Moutain Rose Herbs are both excellent sources for purchasing
herbs in bulk. They both sell vegetable glycerin, bees wax, tins, amber tincture bottles,
and other tools for making your own herbal concoctions.
• Melaleuca is a health and wellness company that sells excellent quality, eco-friendly
soaps, laundry products, and hundreds of other products for home and body. I used
Melaleuca's all natural products for most of the tutorials included in this eBook.
Books and media:
• The Natural Soap Book (sold by Bulk Herb Store)
• Homestead Blessings DVDs from Bulk Herb Store and Vision Forum.
• Organic Body Care Recipes, by Stephanie Tourles
• The Naturally Healthy Woman, by Shonda Parker
• Herbal Antibiotics, by Stephan Harrod Huhner, and The How to Herb Book, by
Velma J. Keith, are both great resources for natural remedies and info on which herbs
are good for what.
• The Green Pharmacy, by Dr. James A. Duke, is a helpful handbook on natural
remedies and herbal combinations.
• Herbs Made Easy DVDs with Shoshanna Easling, Volumes 1 & 2
53
About the Author
Kristy Howard is a believer in Jesus
Christ, a pastor's wife, and
homeschooling mother of five.
She is passionate about living simply,
naturally, and Biblically for the glory of
God.
Kristy is the owner of
LittleNaturalCottage.com, where she
furiously writes about her loves during
nap time. Her most recent writing
projects include Homeschooling Day
by Day, The Cottage Mama Plans Her
Menu ebook series, and a collaborative
work and best-selling title, Trust Your
Intuition.
54
Earn Money Spreading the Word About
This eBook!
You'd love to make a little extra money from home, and we'd love to help you!
I invite you to become a part of our affiliate program, where you can earn money
by spreading the word about our healthy, natural eBooks for homemakers.
Sign-up is quick, easy, and free!
Become a Cottage Mama eBooks affiliate today and get started!
55


© Copyright 2026