
Mitochondrial Myopathy An Exercise Guide Adult Metabolic Diseases Clinic
Mitochondrial Myopathy
An Exercise Guide
Adult Metabolic Diseases Clinic
Suite 200 - 575 West 8th Avenue, Vancouver, B.C.
604-875-5965
Booklet Adapted by
Margaret O'Riley, RN, BscN, Metabolic Nurse Educator and
Lisa Hainsworth, PT, Neuromuscular Physiotherapist
from the booklet "Multiple Sclerosis - An Exercise Guide" developed by
Carole Shaw, BSR (PT), MCPA, MCSP, Physiotherapist and
Barbara Low, BSR, MCPA, Physiotherapist
Acknowledgements
We gratefully acknowledge Dr. Mark Tarnopolsky,
McMaster University Medical Centre, Hamilton, Ontario
for his valuable input.
Table of Contents
Intent of this Booklet................................................................................................................. 1
What is Mitochondrial Myopathy?............................................................................................ 2
Fatigue........................................................................................................................................ 3
Why Exercise? (Exercise and Health)....................................................................................... 4
How to Exercise (Guidelines for Exercising)............................................................................ 5
Posture........................................................................................................................................ 7
Walking..................................................................................................................................... 10
Exercise Programme............................................................................................................... 11
• Stretching Exercises................................................................................................... 13
• Strengthening Exercises............................................................................................. 24
• Balance Activities........................................................................................................ 36
Endurance Exercise................................................................................................................. 40
Relaxation - Adjunct to Exercise............................................................................................. 41
Your Personalized program..................................................................................................... 43
Intent of this Booklet
The general intent of this booklet is to:
1. Provide information which can help you cope with Mitochondrial Myopathy.
2. Increase your understanding of some of the problems you may experience with Mitochondrial Myopathy.
2. Discuss the role of exercise in the physical management of Mitochondrial Myopathy.
3. Provide guidelines for exercising, walking and maintaining a good posture.
This booklet contains a suggested exercise programme. You are advised to do only those exercises taught to you by a
Physiotherapist.
1
What is Mitochondrial Myopathy?
Mitochondrial myopathy is a group of genetic diseases caused by defects in the way that mitochondria, or powerhouses in
the cells, make energy for the body. The disorders affect the organs and tissues that use the most mitochondrial energy, such
as the muscles, eyes, ears and central nervous system. Symptoms of mitochondrial myopathy correspond to the areas of the
body where the mitochondria are most affected. Some of these symptoms are:
muscle cramping
movement problems
seizures
heart disease
muscle disease
diabetes
fatigue
It is important to note that all of these symptoms do not affect everyone; they vary widely among individuals.
Since the course and manifestations of the disease are so variable, treatment is geared to the individual. Staying active is
important to managing mitochondrial myopathy. Although you can not cure mitochondrial disease by exercising, you can
play an active part in management of your own symptoms.
This booklet provides a guide for maximizing your physical health and well-being.
2
Fatigue
Fatigue is a frequent concern of the person with mitochondrial myopathy. It may restrict your ability to perform your
daily activities, cope with your job, family, etc. It is therefore important to find a balance between exercise, rest and other
commitments.
Normal Muscle Fatigue may be expected when you exercise. It is natural to feel tired afterwards.
Fatigue Related to Psychological Problems such as lack of motivation, feelings of depression and anxiety may occur. It
is a vicious cycle: the less you do, the less you feel like doing, and the more lethargic you become. Regular exercise can have
a very positive effect in helping you overcome this particular form of fatigue.
Muscle fatigue from lack of energy, or "powering out", best describes the type of fatigue many people with mitochondrial
myopathies experience. With this form of fatigue, you may experience cramping, muscle weakness, heaviness of the limb(s),
tremor and lack of coordination. Repeated use of the affected limb may make you feel weak. This form of fatigue should not
be confused with laziness; it cannot be overcome by effort. Do not push yourself.
Try to balance your activities with rest periods and employ energy conservation techniques (under the direction of an
Occupational Therapist).
3
Why Exercise?
Exercise has been shown to improve functional capacity in patients with mitochondrial disease. Although exercise does not
provide a cure for mitochondrial disease, it can greatly improve quality of life and prevent complications from developing.
Exercise can:
improve energy production in the body
improve ability to walk
reduce lactate production
prevent problems arising from inactivity and disuse. Inactivity can lead to a loss of motivation, energy and
mobility, all of which may reduce independence.
Exercise is also important in reducing the risk of developing some complications which occur most frequently in people with
mitochondrial disease such as diabetes and heart problems.
You may ask, "How can I exercise when I feel so lousy?" The key is to do it smartly and to know your limits. People with
mitochondrial myopathies have often had bad experiences with exercise because they have over-exercised and felt worse as
a result. Now, our understanding and experience shows that exercise can and should be part of one's life provided fatigue and the
demands of daily living are taken into account. Research has shown that exercise actually improves energy production in the body.
Exercise plays an important role in maximizing physical health and mitochondrial function and can act as a valuable release
of stress or tension in many people. A carefully tailored exercise programme can provide the same benefits for people with
mitochondrial myopathy.
4
How to Exercise
1. Schedule a time for exercise and do it regularly.
2. Take a dip first if possible. A warm bath or shower relaxes muscles, increase circulation and can make exercise feel
easier.
3. Eat something before you exercise to give your body energy. Do not exercise on an empty stomach. A good choice
is to drink 250-375 mLs of fruit juice or a sport drink (such as Gatorade®) starting the hour before you exercise and
continuing during exercise.
4. Stay hydrated. Drink lots of water during exercise and throughout the day. A good way to determine if you are
getting enough water is if your urine is clear. If it is bright yellow, you need to drink more water.
5. Break it up. For instance, try gentle walking for 5 minutes, three times a day, and build from there.
6. Stretch less. Stretching promotes circulation and maintains your range of motion. However, do shorter stretches,
holding 5 to 10 seconds, so you don't stress your muscles and expend a great deal of energy.
7. Aim low at the beginning and work up to it. Start very low in intensity and gradually increase. For example, if all
you can do is one minute of exercise before you need to stop, start with that one minute and build gradually from there.
Any exercise is better than no exercise.
5
8. Stop if you experience nausea or if you vomit. Decrease the intensity and/or duration for the next time you exercise.
9. Do not perform any exercise which causes you pain. However, it is natural to feel some temporary muscle aches
or discomfort at the start of any form of new exercise.
10. If fatigue is a factor, modifications may need to be made, i.e. rest after the activity so that all of the benefits are
retained without an increase in fatigue.
11. Rest at least 48 hours between exercise for strength (e.g. using weights) and at least 48 hours between endurance
exercise sessions (e.g. stationary bicycle or walking program).
12. Do not hold your breath while exercising. All movements should be performed slowly, smoothly and with control.
13. It is important to be guided by a Physiotherapist.
14. Remember that an increase in exercise tolerance is not achieved quickly. It will take time, consistency, and
motivation on your part.
6
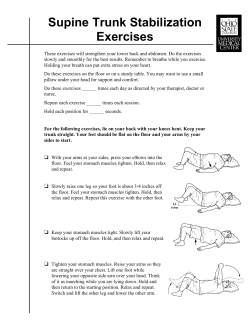
Posture
Figure A
poor
Figure B
poor
Figure C
good
Introduction
Postural problems are common in the general population as well as in patients with mitochondrial myopathy.
A Physiotherapist will assess your posture and make recommendations if correction is required.
Figures A and B are examples of abnormal posture, which, if uncorrected, may lead to other problems such as pain, impaired
balance, and functional difficulties.
Figure C shows the ideal posture.
7
Checklist for Ideal Posture
A
Poor Posture
B
Ideal Posture
Sitting Position
Tuck your chin in comfortably; hold your head up and lengthen your neck.
Pull your shoulders slightly down and back; sit comfortably with your back well supported.
Maintain even weight through your buttocks. Sit with even weight through your thighs - avoid holding your knees together.
Support both of your feet on the floor or on the wheelchair pedals - avoid pointing your foot downwards.
8
A
Poor Posture
B
Ideal Posture
Standing Position
Head and neck - as for sitting.
Spine - as for sitting.
Place equal weight through both feet. (Feet should be six to ten inches apart).
9
Walking
1. Check your posture. Leaning forward causes the centre of gravity to fall in front of your feet and increases the tendency
to fall forward.
2. Try to put equal weight through both feet.
3. Concentrate on bringing your leading foot directly forward by bending the hip and knee; avoid swinging the leg sideways.
4. Strike with the heel as you step onto the leading foot. As you stand on the leg, try to avoid snapping the knee back (into
hyperextension). This can damage the knee joint.
5. It is better to walk well for shorter distances than badly for longer distances. A walking aid may be necessary for some
people (for safety, conserving energy, and improving your walking ability). It is advisable to see a Physiotherapist who
will prescribe the appropriate aid and instruct you in its use.
6. You may be unaware of changes in your walking. Concentrating on the correct technique each and every time you walk
can help you to correct any faults.
10
Exercise Programme
General Guidelines
Your Physiotherapist will guide you in your selection and performance of the exercises.
In preparation for exercising, it is recommended that you wear loose comfortable clothing and supportive, low-heeled footwear.
Categories
Most of the exercises are categorized according to their degree of difficulty. Category A exercises are most suitable for those
people who are relatively mobile and can maintain their balance in sitting and standing. These exercises are also more
difficult than those outlined in Category B and require more energy to perform.
Category B exercises are designed for those people who are less independently mobile and who may require some assistance
to assume and/or maintain the positions outlined.
Exercising in Sitting
Select a comfortable chair that allows adequate back support. It should have a stable base (not on wheels or castors).
The chair height should permit your feet to be fully supported on the floor.
If you have problems with your sitting balance, choose a chair with supportive armrests.
Exercising in Standing
If you have problems with your balance, it is essential that you have some firm support to hold onto while you exercise in
standing. Ideally, this should be approximately waist height (kitchen counter, window sill, firm tabletop, etc.).
11
Mobility
1. To get out of bed - Roll onto your side, lower your legs slowly over the side of the bed, and push up with your arms/hands
to a sitting position.
You may find it beneficial to rest for a short time in this position before trying to stand.
2. To stand up - Place your feet flat on the floor (6 to 10 inches apart), lead forward to stand up slowly, trying not to push
with your hands unless necessary.
Try to take equal weight on both feet.
If spasticity is a problem for you, try to straighten your knees slowly, with control (avoid locking the knees).
12
Stretching Exercises
Stretching exercises are less energy-consuming than strengthening exercises and can be done several times during the
day. It may be beneficial to do them in the morning before getting up and at any other time when you feel stiffness
(spasticity) in the arms, back, or legs.
These exercises should be performed in a slow, smooth, and controlled manner. If the stretches are performed in this
way, you should feel the tight muscles relax. These exercises can be very helpful for those who experience muscle
cramping or stiffness.
Remember:
**Never stretch to the point of pain.
**Do not hold your breath! Try to breathe as normally as possible during the stretching exercises.
13
Neck
Starting Position: Sitting
Sitting in a chair, feet supported, back straight. Try to keep your shoulders level.
1. Look down to the floor, then up
to the ceiling and return to the
starting position.
2. Turn your head to look
over your shoulder; look
left then right.
3. Move your ear down
to one shoulder then
to the opposite side.
Relax the shoulder muscles by shrugging your shoulders up toward your ears, then relax them completely.
Repeat
Purpose: To prevent neck stiffness.
times.
14
Trunk
A
B
Starting Position: Sitting
Starting Position: Sitting
Sitting on a chair or the edge of the bed.
Sitting on a chair, feet supported on the floor.
1. Twist/rotate your trunk to each side (turn to look
behind you).
1. Bend forward to rest your elbows on your knees.
Return to upright position.
2. Twist/rotate your trunk as you bend forward (reach
your right hand to the outside of your left foot).
2. Holding onto your chair with one hand, reach with the
other hand as you turn to look over your opposite shoulder.
3. Stretch/elongate one side of your trunk (lift your
shoulder toward your ear).
3. Twist/rotate as you bend forward, bringing your
shoulder to the opposite knee.
4. Holding onto the chair with one hand, lift the opposite
shoulder towards the ear.
Repeat
times.
Purpose: To improve sitting balance.
To improve trunk flexibility.
Repeat
times.
15
Trunk and Hips
Starting Position: Lying
Lying on your back with your knees bent and your feet flat on the bed.
1. Keeping your knees together, slowly roll to one side, as far as you can, without forcing the
movement. Keep your shoulders on the bed.
Now slowly roll to the other side.
Repeat
Purpose: To reduce muscle spasm in the legs.
To stretch the lower back and hip muscles.
times.
16
Trunk and Hips
A
B
Starting Position: Sitting
Starting Position: Lying
Sitting on a chair.
Lying on your back with knees bent, feet flat on the bed.
1. Bend one knee toward your chest and gently pull
with your arms. You should feel a stretch in the low
back and hips. Hold for 10-30 seconds. Repeat with
the other leg.
1. Bend one knee toward your chest. Gently pull with
your arms. You should feel a stretch in the lower
back and hips. Hold for 10-30 seconds. Repeat with
the other leg.
NOTE: I f you have painful knees, place your hands behind
your thigh as you pull the knee towards you.
Repeat
times.
Purpose: To stretch the muscles of the lower back and hip.
Repeat
times.
17
Hip Stretch
A
B
Starting Position: Sitting
Starting Position: Sitting
Sitting on a chair.
Sit on the floor; with your left leg straight and right leg
crossed over. Place your left arm around the right knee
and gently stretch the buttock muscles by pulling the
bent knee across the body. Hold the stretch for 10-15
seconds and then relax.
Repeat with other leg.
Place your right foot on your left knee.
Stretch the hip by pushing the right knee
towards the floor.
Hold for 10 seconds. Repeat with other leg.
Repeat
times.
Purpose: To stretch the muscles around the hip joint.
Repeat
times.
18
Trunk Stretch
Starting Position: Hands and Knees
On your hands and knees, hands directly below your shoulders, knees directly below your hips.
Try to tighten your stomach muscles, tilting the hips and flattening your lower back.
Keeping your hands in same position; sit back on your heels or as far as is comfortable.
Hold for 10-20 seconds and then return to starting position.
Repeat
Purpose: To stretch the muscles of the trunk and hips.
times.
19
Inner Thigh
A
B
Starting Position: Sitting
Starting Position: Sitting
Sitting on a bed or floor, knees bent. (Cross-legged).
Resting against a wall or the back of a sofa, or
sitting in an armchair. (see diagram).
1. L
et your knees relax slowly toward the floor. You
will feel a stretch in the inner thighs. Hold for 10 to
30 seconds and then relax.
Do not force the movement.
Repeat
times.
Purpose: To stretch the muscles between your legs.
To prevent muscle tightness.
1. L
et your knees relax slowly to the side as far as is
comfortable. Hold for 10 to 30 seconds. Relax.
Do not force the movement.
Repeat
times.
20
Hamstrings
B
A
Sitting on the bed or the floor, straighten
the left leg and bend the right leg so that
the sole of the foot touches the inner thigh.
Sitting on the edge of a couch or bed place one leg
on the bed or couch, if necessary place your hands
just behind your buttocks for support and balance.
1. S
lowly lean forward from the hips until you feel a
stretch behind the knee. If you cannot reach your
toes comfortably use a towel to help you stretch.
Repeat with other leg.
1. L
ean forward from the hips until you feel a stretch
behind the knee. Hold for 10-30 seconds. For an
added stretch to the calf muscles use a towel as
illustrated. Repeat with other leg.
NOTE: Y
ou should not experience any neck or back pain
when doing this stretch. If you do, you may be
performing it incorrectly. Ask your therapist to
check your technique.
Repeat
times.
Purpose: To stretch the muscles behind your knee.
Repeat
times.
21
Quadriceps
A
B
Starting Position: Lying on Side
Lying on Stomach
Lie on your left side. Hold the top of your
right foot between the toes and ankle joint
and pull the right heel toward the buttock to
stretch the front of the thigh. Hold the stretch
for 10-30 seconds then relax.
Rest on your stomach for a short session every day
(10 to 30 minutes).
Place a pillow under your waist if you experience
any back discomfort.
You may require some help to assume this position.
Repeat
times.
Purpose: To stretch the muscle on the front of the thigh.
22
Achilles Tendon/Heelcord
A
B
Starting Position:
Standing (facing the wall)
Standing about 2 to 3 feet away from the wall,
place your hands against the wall.
1. Bend one knee and place the foot in front of you,
keeping the other leg straight behind.
2. Lean forward from the hips, bending your elbows and
keeping your back straight until you feel a stretch in the
calf of the straight leg. Hold for 10-30 seconds. Relax.
Repeat with the other leg. To add a Soleus stretch,
slightly bend the back knee, keeping the foot flat. This
gives you a much lower stretch of the calf muscle.
Repeat
times.
Purpose: To stretch the calf muscle (achilles tendon)
Starting Position: Sitting
Sitting with your feet on the floor, keep your
heels in contact with the floor.
1. Pull your foot up towards you. Hold for 10-30 seconds. Relax. You may use a towel under the ball of the foot to
increase the stretch. Repeat with the other foot.
You should feel a stretch at the back of your ankle and
lower leg (calf).
NOTE: T
his may not be advisable if you have back
problems. Ask your physiotherapist to suggest
an alternative method.
Repeat
times.
23
Strengthening Exercises
Strengthening exercises require more energy than the stretching exercises. Be selective with the number and type
of exercise you decide to do. DO NOT feel that you must do all the exercises at once; instead, select them according
to the demands of your day to day activities. For example, if you have walked or stood for long periods, select an
exercise that works your arms.
For people with mitochondrial myopathy, the problem can be both lack of endurance as well as muscle weakness.
Muscle strength is increased by adding resistance (for example, weights or elastic). It is important to start with low
resistance and slowly increase the difficulty of the exercise.
There is a fine balance between muscle strengthening and fatigue, therefore, do only the number of repetitions
prescribed. Be sure to discuss any problems you may have with the exercises with your Physiotherapist.
24
Arm Exercises
A
B
Starting Position: Sitting
Shoulder Flexion - Active
Lift
arm over head with thumb up and
elbow straight.
Hold
Repeat
counts.
times.
Progress to
lbs. at wrist/hand.
Sitting on a chair or the edge of the bed.
1. Tie elastic around forearms. Keep the elbows close to your
body, palms facing inwards. Separate forearms against the
resistance of the elastic. Hold the position for as long as
you are able, without shaking or discomfort.
2. Tie elastic around forearms. Hold your arms out in front
of you, elbows straight. Separate your arms against the
resistance. Repeat in a variety of arm positions (palms up,
down, in and out).
Repeat
Purpose: To strengthen your shoulder muscles.
To help prevent stiffness of your shoulders.
times.
25
Arm Exercises
A
B
Starting Position: Hands and Knees
Modified Push-up
Elbow Extension - Active
On your hands and knees. Place your hands under
your shoulders. Pelvic tilt (tighten abdominal
muscles to flatten the lower back).
Lie on back, Straighten elbow.
1. Bend your elbows, lower your body keeping your back
straight; knees remain bent.
Straighten your elbows. Raise your body, keeping your
back straight.
Repeat
Hold
Repeat
Progress to
times.
Purpose: To strengthen the pushing muscles of the arms
used in transfers, pushing a wheelchair, etc.
elbow pointing to ceiling.
counts.
times.
lbs. at wrist/hand.
Repeat
times.
26
Abdominals
B
A
Starting Position: Lying
Starting Position: Lying
Lying on your back with both knees bent.
Assume a "pelvic tilt".
Lying on your back with both knees bent and feet
flat, press the lower back down onto the floor or
bed. You should feel your stomach muscles tighten.
Hold this position as you slowly raise one leg three
or four inches off the floor. Do not allow the back to
arch. Hold for seconds and lower slowly.
Repeat with other leg.
Tuck your chin in, lift your head and shoulders off
the floor. Reach your hands towards your knees.
Hold for 5 seconds then lower slowly.
Variations/Progressions:
a) Diagonally up/down
(reach your hands to the opposite knee).
b)Lower more slowly, holding your position
at different points.
Repeat
times.
Purpose: To protect the lower back by strengthening the abdominal muscles.
To improve trunk control.
Repeat
times.
27
Trunk Exercise
A
B
Starting Position: Sitting
Sitting
Sitting upright without support (i.e. chair without arms, or edge of bed).
1. H
olding on to the armrests of the chair, turn your
shoulders to allow you to look to the left and right.
Twist from the waist to look behind you. Let both
your arms swing as far as possible to the left and
then to the right. Bend sideways to touch the floor.
Avoid bending forward. Repeat to the other side.
Repeat
times.
Purpose: To improve trunk strength and control.
To improve sitting balance.
Do not force the movement.
2. Hold the opposite armrest as you bend sideways.
Repeat
times.
28
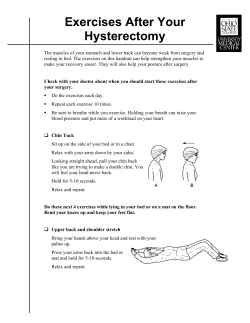
Trunk Bridging
Starting Position: Lying
Lying
Lying on your back, knees bent, feet together flat
on the bed. Keep your knees together if you can.
Lying on your back, knees bent, feet flat on the bed.
You may require some help to assume/maintain
this position.
1. Tighten your abdominal muscles and flatten the
small of your back onto the bed ("pelvic tilt").
2. Lift your hips slowly up from the bed ("bridging"). Do
not arch your back. Hold for 5 to 10 seconds. Lower
slowly.
1. Tighten your abdominal muscles and flatten the
small of your back onto the bed ("pelvic tilt").
2. Lift your hips slowly up from the bed ("bridging").
Hold for 5 to 10 seconds. Lower slowly.
3. Progression Pelvic tilt as before. Lift hips off bed.
Now lift one foot off the bed and hold for 10 seconds
and then lower. Repeat with other leg.
These suggestions may help:
4. Further Progression 1 leg only. Lift hips off the
bed, hold for 10 seconds and then lower. Repeat with
other leg.
b) Have someone hold your feet.
Repeat
times.
Purpose: To improve trunk/hip control.
a) Tie a piece of elastic around your thighs just above
the knees.
c) Rest your feet on a non-skid surface.
Repeat
times.
29
Hip Abductors
A
B
Starting Position: Standing
Hip Abduction - Active
Starting Position: Lying on your side
Standing, hold onto chair. Raise
leg out
to side. Keep toes pointed straight ahead.
Lying on your side with your bottom leg bent.
Hold
Repeat
2. Hold for 5 seconds and lower slowly.
Progress to
counts.
times.
1. Keeping the top leg straight, raise it up about 6 inches.
3. Turn onto your other side and repeat.
lbs. at thigh/ankle.
Repeat
Purpose: To strengthen the hip muscles used in standing and walking.
times.
30
Hip Extensors
A
B
Hip Extension - Active
Hip Extension - Active
Lie on back,
knee bent and foot flat.
Lift bottom and opposite leg up.
Standing, hold onto mat. Lift
backward with knee straight.
Hold
Repeat
Hold
Repeat
counts.
times.
Progress to
Purpose: To strengthen the seat muscles.
leg
counts.
times.
lbs. at thigh/ankle.
31
Hip Flexors
A
B
Starting Position: Standing
Hip Flexion - Active
Hip Flexion - Active
Standing, hold onto mat. Raise
with knee straight.
Hold
Repeat
Progress to
leg forward
March in place.
Repeat
times/minutes.
counts.
times.
lbs. at thigh/ankle.
Purpose: To strengthen the hip muscles used in walking.
32
Hamstrings
B
A
Starting Position: Standing
Starting Position: Sitting on a chair,
feet supported.
Knee Flexion - Active
Standing, hold onto mat. Bend
Hold
Repeat
Progress to
counts.
times.
lbs. at ankle.
knee.
1. Tie a length of elastic to the leg of a stable piece of
furniture.
2. Lift the foot a few inches off the ground and then pull
the heel backwards under the chair. Hold for
5 seconds and relax.
Repeat
Purpose: To strengthen the muscles that bend your knee.
times.
33
Quadriceps
A
B
Starting Position: Standing
Standing
Knee Extension - Active
Knee Extension - Active
Stand with
foot on step.
Raise body up with left on step, straightening knee.
Do not raise other foot onto step.
Standing, hold onto mat. Bend knees halfway.
Hold
Repeat
counts.
times.
Hold
counts.
Lower self down slowly from step.
Repeat
times.
Purpose: A and B - To improve knee muscle strength.
A - To improve control of your hips and knees.
34
Ankle Dorsiflexor
A
B
Starting Position: Sitting
Sitting
1. Sitting with your feet firmly supported on the floor.
Tie a piece of elastic around your feet.
Sitting with your feet firmly supported on the floor.
2. Keeping your heels on the ground, lift your feet up
and out against the resistance of the elastic. Hold for
5-10 seconds.
NOTE: To do this exercise correctly hold your
knees and heels together.
Repeat
1. Lift feet up either one foot at a time or together
(heels stay on floor). Do not allow feet to turn
inward.
2. Hold knees and heels together while trying to
separate feet.
3. Foot circling, first in one direction, then in the
opposite direction.
times.
Purpose: To strengthen the muscles used to control the foot during walking.
To prevent tightening of the heel cords.
Repeat
times.
35
Balance Activities
Impaired balance is a common problem for many people who have mitochondrial myopathy. Good balance and
coordination of movement involves a smooth, well-controlled, automatic response between the muscles moving the
body and limbs. Walking is an example of an activity that requires good balance and coordination. When this is
impaired, safety may also be a problem.
Balance activities are more energy-consuming than stretching exercises and should be performed selectively
according to the demands of your daily activities.
It is most beneficial to perform these exercises slowly, smoothly, and with as much control as possible.
Concentration on performing the exercises correctly is important. Your Physiotherapist will guide you in the correct
technique and appropriate selection.
36
Trunk, Arms and Legs
A
B
Starting Position: Hands and Knees Hands and Knees
On your hands and knees, hands directly below your
shoulders, knees directly below your hips. Try to
maintain the "pelvic tilt".
1. Stretch one arm out in front of you. Lower. Repeat
with the other arm.
Assume and maintain the position described in
exercise A.
1. C
oncentrate on keeping your trunk still. Avoid any
swaying motion.
2. Lift one leg out behind you, then bend your knee
toward your chest. Lower. Repeat with the other leg.
3. Further Progression: Alternate arm and leg extension.
Hold, then lower. Repeat with opposite arm and leg.
Repeat
times.
Purpose: To increase your trunk control.
To improve your balance.
37
On Your Knees
A
B
Starting Position: Kneeling
Kneeling
Position your knees directly under your hips, knees
8 to 10 inches apart. Maintain a "pelvic tilt".
For support, place your hands on a chair in front
of you.
1. Maintain the position.
1. Maintain the kneeling position.
2. a)Move one knee forward 6 to 12 inches.
b)Move the knee backwards to the starting position.
c)Repeat with the other knee.
2. a)Move one knee forward several inches.
b)Move the knee backwards to the starting position.
c)Repeat with the other knee.
3. W
alk sideways on your knees to the right, then to the
left. Focus on keeping your trunk still as you move
sideways.
3. Walk sideways on your knees.
Repeat
times.
Purpose: To strengthen muscles used in walking.
To improve your trunk control.
Hold the chair while performing these exercises.
Repeat
times.
38
Standing
A
B
Starting Position: Standing
Standing
Stand beside a supportive surface such as the
kitchen counter or a table (at least waist height).
Place your feet 8 to 10 inches apart.
Stand beside a supportive surface such as a kitchen
counter or table (at least waist height). Place your
feet 8 to 10 inches apart.
1. K
eeping the knee of the supporting leg slightly bent,
lift the opposite foot off the floor. Hold for 5 seconds
or longer if able. TRY NOT TO WOBBLE.
1. B
end one knee, step backwards and touch the floor
with your toe.
Progression Standing on the supporting
leg, slowly bend the knee and then straighten.
NOTE: E
mphasis is on control of the movement,
not the speed.
Repeat
times.
Purpose: To improve your walking.
2. Step forward and touch the floor with your heel.
3. W
alk sideways slowly, concentrate on lifting and
placing your feet correctly. Use support to help you
maintain your balance.
Repeat
times.
39
Endurance Exercise
The purpose of endurance exercise is to increase your heart rate above its resting rate to challenge your
cardiorespiratory system. This type of exercise should be done regularly to maintain the strength of your heart
and breathing muscles. Because these muscles may be affected by the mitochondrial disease, it is very important
that you consult with your doctor before beginning endurance exercise. You should also work closely with your
physiotherapist to develop an individualized endurance program.
It is generally recommended to do endurance exercise for 20 minutes 3 times per week. However, when you are
just starting an exercise program, you should start very slowly, perhaps exercising continuously for as little as
2 minutes. As your endurance improves, you can slowly build up to exercising continuously for 20 minutes.
Because endurance exercise is aimed at working your heart muscle, it is important to monitor how hard your heart
is working. This can be done by taking your pulse before, during and after your exercise session. You should aim
to exercise at 60% of your maximum heart rate. Your physiotherapist will teach you how to take your pulse and
measure your maximum heart rate.
Bicycling on a stationary bike or doing a walking program are two simple ways to perform endurance exercises.
40
Relaxation — An Adjunct to your Exercise Programme
Everyone, whether experiencing the symptoms of mitochondrial myopathy or not, is subject to variable levels of
daily distress or "stress". The stress response is essentially a complex set of chain reactions that occurs in the body
when a person is subjected to meaningful physical and emotional pressures. This is beneficial to us in short bursts,
heightening our ability to perform properly and to maintain healthy reactivity. Once the conflict or problem has
been dealt with, we should experience a relaxation response or recovery phase, allowing us to regain a healthy state
of physical and emotional balance.
Although the causes of stress are different for each person, over a long period of time, too much stress can be
harmful and has been associated with fatigue and illness. For those who are already dealing with mitochondrial
myopathy, this may further impair their general health and function. Since we cannot always control how much
stress we are faced with, it is important for us to learn to control our reaction to stressful events. The ideal way for
us to counteract many of the harmful effects of stress is to learn how to bring about the relaxation response.
The basic technique for obtaining the relaxation response can be learned quickly and simply. It can become an
enjoyable part of healthy daily life with a little planning and initial effort, especially if practised several minutes daily.
41
Some people obtain the relaxation response when completely absorbed in a personal exercise programme or
when participating in an enjoyable activity in which they are concentrating fully. This is another important
reason to exercise regularly. Others prefer to practise meditation or relaxation exercises in a quiet, comfortable,
uninterrupted setting. A simple example of one of many types of relaxation exercises is:
1. Assume a well-supported position of comfort. Let your eyes close gently. Breathe deeply from the abdomen
(diaphragmatic breathing). Inhale and exhale comfortably to avoid straining or breath holding. Become aware
of the day's events and your thoughts or worries, gradually letting them drift into the background of your
awareness.
2. As your body relaxes, imagine letting any tension you are storing in your muscles "melt away". Begin at your
feet and allow your body to progressively "let go" or relax as you move up to your head. Concentrate on feelings
of comfortable warmth and heaviness, repeating these thoughts mentally to yourself: "My feet and legs are
heavy and warm"; "My back and abdomen are heavy and warm"; "My breathing is deep and regular"; "My hands
and arms are heavy and warm"; "My forehead is smooth and cool"; "I am calm and relaxed". 3. Be aware of how each part of your body feels as you release tension and think of warmth and heaviness. Give
yourself 5 to 30 minutes to achieve a deep sense of relaxation. Try not to force yourself to concentrate or to let
go of tension. Instead, breathe comfortably and deeply, maintaining a reasonably passive attitude — allow any
other thoughts to leave your awareness as you focus on the phrases outlined.
Further instruction in breathing and relaxation techniques can be provided by your Occupational Therapist or
Physiotherapist.
42
Your Personalized Exercise Programme
Strengthening Exercises:
Page
No. of repetitions Any comments
Endurance Exercise:
Time
Type of Activity
Target Heart Rate
43
For more copies, go online at http://vch.eduhealth.ca or
email [email protected] and quote Catalogue No. FA.500.M697
© Vancouver Coastal Health, October 2002
The information in this document is intended solely for the
person to whom it was given by the health care team.
www.vch.ca


© Copyright 2026