
Splendide® Comb Washer/Dryer Installation Guide
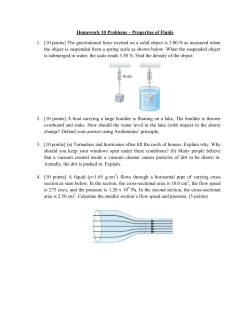
Splendide® Comb Washer/Dryer Installation Guide
This W/D Installation Guide is for a 2010 Heartland Big Horn model 3410RE
Produced by: Jim Hutt ([email protected])
Edited by:
John Borysewicz
1. INSTALLATION OF NEW WASHER/DRYER SUPPORT FLOORING.
(Figure 1)
In preparation for installing a piece of ¾” cabinet grade of plywood over the closet floor area where
the new Splendide washer/dryer will be installed, it was necessary to remove a section of carpet and
install additional support legs (2pcs. of cedar 2x4) and a 2” wide x 24” long x ¾” thick piece of
plywood to support the new plywood support floor at the inside face of the door threshold. The
carpet under the two 2x4 support legs was removed so that the legs would rest on the particle board
subfloor. These pieces of 2x4 were glued and screwed to the particle board flooring. The carpet was
cut at a distance of 24” from the louvered door threshold.
In addition to removing carpet to facilitate installation of the new piece of ¾” plywood flooring, it
was necessary to modify the piping and wiring chase cover piece (RH side of picture in fig. 1) so that
the cover could be lifted straight up for future removal. A small section (3/4”wide x 2 ½”long) was
removed with a jig saw to accommodate this action. The small piece removed was directly under the
RH louvered door facer board. A small wooden ‘drawer pull/knob’ was screwed to the back of the
carpeted chase cover for ease of lifting the chase cover straight up for removal once the poly drain
pan was installed.
1
(Figure 2)
(Figure 2) shows more detail of the supports that were installed to accommodate the new plywood
floor. Prior to installing the new plywood floor, the existing particle board flooring was sealed with
an exterior grade of clear polyurethane sealer. This was done to prevent swelling or possible
deterioration of the particle board in the event of leakage from the water hoses or washer/dryer.
2
(Figure 3)
(Figure 3) shows the new piece of cabinet grade ¾” plywood (five ply) was sealed on both sides with
a coat of clear polyurethane sealer prior to installation. The new plywood flooring piece was
screwed in placed with 1-1/2” drywall screws as noted. The new floor was not glued, only screwed
in place in the event the floor was needed to be removed or replaced. The three screws located about
mid way of the 24”x 26-3/4” piece of new flooring is fastened to the existing particle board floor and
the tubular support beam below the floor. It was necessary to pre-drill these three holes prior to
installing the self tapping flat head screws.
Note: The new piece of 3/4” cabinet grade plywood (24” x 26-¾”) can be purchased from a local
cabinet shop rather than purchase a whole sheet of 4’ x 8’ plywood, which is quite expensive. The
cabinet shop will also be able to cut the new piece of flooring to the desired dimensions.
3
(Figure 4)
Figure 4 shows the installation of the Splendide poly drain pan #PI-22. The pan was secured to the
¾” plywood floor with #10x1” SST flat head screws and SST washers. Back of the pan is located ~
7” from the water piping enclosure paneling and ~ 2” back from the inside edge of the louvered door
threshold frame.
Note: the washer/dryer poly pan is positioned so that the door of the W/D is near the louvered door
and as far right as possible to facilitate opening of the W/D door without having to reach into the
containment closet and to allow sufficient access the back of the unit for water hoses and 4” flexible
vent pipe.
2. INSTALLATION OF ½” DRIP PAN DRAIN HOSE.
As shown in (figures 4a & 4b), a ½” vinyl reinforced hose was routed along side wall in the wiring
and water piping chase to a location under the dresser where a large factory precut hole is located for
exchange of wire and pipes below the main floor to above the floor under the dresser. This hose was
connected to a piece of ½” O.D. poly pipe located through the bulkhead wall between the basement
storage compartment and compartment for the battery and hydraulic slide pump.
Note: Access to this opening is blocked by a section of 1/8” plywood under the bottom dresser
drawers. A Stanley knife and Dremel Tool with a small rotary bit were used to cut this piece of
plywood in halves to provide access to the large diameter hole.
4
(Figure 4a)
(Figure 4b)
2. Continued, External drain line.
(Figure 4c) shows the 1/2” poly pipe drain line that was installed in the battery and slide-out
hydraulic pump compartment. The ½” drain pipe was extended below the trailer side wall for ease of
access and visibility. It is suggested that a piece of plastic mesh be installed over the end of the poly
pipe to prevent plugged from bugs such as ‘mud daubers’ entering and building a nest
5
(Figure 4c)
6
3. DRILLING/SAWING OF 4” HOLE FOR VENT PIPE KIT.
(Figure 5)
(Figure 5) shows location of the 4” drier vent pipe hole location. The vent pipe hole location was
determined by much consternation and suggestions from sources such as Heartland Owners Forum
individuals that regularly participate in the forum and Heartland Customer Service individuals.
Some of the suggestions for locating the 4” vent hole in the side of the 3410RE Big Horn 5th wheel
RV are as follows: (a) In the cool of the morning, observe the condensate buildup on the outer skin
of the RV, the aluminum studs will absorb heat during the day, thus preventing condensate from
forming on the outer skin on the area supported by the aluminum studs. Presto, the stud locations
were easily detectable. See the picture at this end of this installation guide which shows the observed
aluminum stud locations.
(b) Another suggestion was to purchase a stud finder that would locate metallic studs, piping, and
wiring. The Zircon® MultiScanner, i520 OneStep scanner can be purchased from Lowes for
~$50.00. This scanner is a good investment for any RV service shop or Do-It-Yourself RV
mechanic. This tool proved to be very helpful in locating the aluminum studs via the inside and
outside wall. (c) At the suggestion of the Heartland factory service department, small finishing nails
were driven through the 1/8” thick plywood inner wall to verify location of the aluminum stud or any
inner wall obstructions prior to drilling the 4” diameter hole.
The actual location of the 4” diameter hole is 13 ½” above the carpeted wire and water pipe chase
cover and 3” back from the front wall (wood paneling) or 20” above the closet floor as noted in
(Figure 5a). Using the plastic cover vent pipe inside trim piece, draw a 4” diameter circle and then
drive small finishing nails around the circumference to verify that there are no internal wall
obstructions. By doing extensive measurements, both inside and outside, utilizing the outside
clearance lamp location and inside wiring hole for the lamp as reference point, I was able to verify
within 3/16” if the center of the future hole both inside and outside. The hole was initially
drilled/sawed from the inside to verify location, After it was determined that everything was okay to
7
continue the 4 inch diameter hole, the ¼” diameter hole saw pilot hole was drilled completely
through the wall thickness using a regular length bit not attached to the hole saw. The hole was
drilled/sawed to the depth of the hole saw blade and then the process was repeated from the outside
fiberglass skin. The result was a nice clean 4” diameter hole in the correct location to receive the 4”
plastic vent pipe associated with the vent kit as noted (Figure 6).
(Figure 5a)
(Figure 6)
8
4. INSTALLATION OF EXTERNAL VENT CAP
(Figure 7) Shows the external vent cap installed at the door side front of the trailer. Before installing
the external portion of the vent cap, it is recommended that the freshly cut edge of the 3/8” plywood
and fiberglass be sealed with a good grade of silicone or PARR PARBOND by H.B. Fuller Company.
Seal the edges first and let dry so they are no longer sticky and then apply a small bead of sealer to
the underside of the flange adjacent to the 4” pipe that will extend through the trailer wall. The vent
cover is held in place with 6 self tapping screws provided with the vent kit.
(Figure 7)
9
ADDITIONAL INFORMATION ON HOW TO LOCATE THE ALUMINUM STUDS.
As noted in the installation guide under 3a, the aluminum studs can be located externally by
observing the build-up or lack of condensation at the location of the stud. The attached picture of the
24” yellow rule shows the location of studs determined by this method.
Note: Additional installation manuals and data sheet information can be downloaded from the
Splendide website link. www.splendide.com/request_manual.htm
It is recommended that the Splendide data sheet information for Installation Location and Exhaust
Requirement be considered as a supplement to this installation guide.
10


© Copyright 2026