
DMS800 - bestQuestions
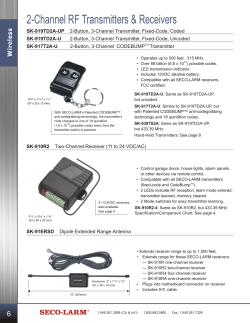
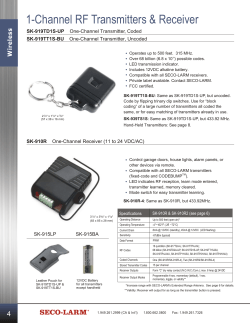
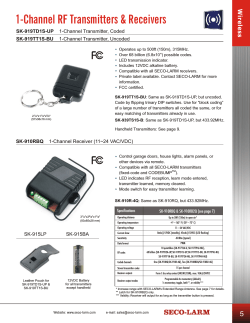
Manual DMS800 DIGITAL WIRELESS MICROPHONE SYSTEM DMS 800 Contents Contents 1General............................................. 5 6Commissioning............................. 19 1.1 Purpose of the manual............................. 5 6.1 Insert batteries into the transmitter........ 19 1.2 Retention of the manual........................... 5 6.2 Connecting the antennae...................... 19 1.3Liability.................................................... 5 6.3 Position the receiver.............................. 20 1.4Warranty.................................................. 5 6.4 Connecting the receiver to the mixing console/amplifier................................... 21 2 Package content.............................. 6 3 Safety and environment................. 8 6.4.1Analogue outputs..................................................................... 21 6.4.2Digital output: Dante™....................................................... 21 3.1Safety...................................................... 8 3.2 Explanation of the symbols used............. 9 3.3 Correct use.............................................. 9 3.4 Incorrect use............................................ 9 3.5Environment.......................................... 10 4 Declaration of Conformity............ 10 5 Equipment description................. 11 5.1 General description............................... 11 6.4.3Digital output: AES-EBU................................................... 22 6.5 Reposition the GROUND LIFT switch (optional)............................................... 22 6.6 Connecting the receiver to the power network.................................................. 22 7 QUICK SETUP................................ 24 8 Operating instructions................. 25 8.1 Setting the carrier frequency.................. 25 8.1.1Setting the transmitter to SILENT mode......... 25 5.2 Functions of the external MUTE switch (optional)............................................... 11 5.3 Technical data....................................... 11 8.2 Switch on MUTE LOCK......................... 26 5.4 DSR800: Description of the controls...... 14 8.3 Programming the transmitter to the receiver settings.................................... 26 5.5 DSR800: Description of the display elements................................................ 16 8.4 Carrying out a sound check................... 27 5.6 DPT800: Description of the controls...... 16 8.5 Selecting the country............................. 28 5.7 DPT800: Description of the display elements................................................ 17 8.6 Listening to the audio signal.................. 28 5.8 DHT800: Description of the controls...... 17 5.9 DHT800: Description of the display elements................................................ 18 2 8.1.2Unlocking the receiver........................................................ 25 9 Controls on the DSR800 receiver.29 9.1 Functions of the SELECT wheel (5)....... 29 9.1.1Functions in LOCK mode................................................ 29 DMS 800 Contents 9.1.2Functions in SETUP mode............................................. 29 12.3AUDIO menu......................................... 39 9.1.3Possible functions in the main window............. 29 12.4ENVIR. menu SCAN.............................. 40 9.2 Functions of the CH1, CH2 (10, 12) buttons................................................... 30 12.5REHEARSAL menu............................... 40 9.2.1Functions in LOCK mode................................................ 30 9.2.2Functions in SETUP mode............................................. 30 9.3 Functions of the BACK button (4).......... 30 9.4 Functions of the DSP button (2)............. 30 9.5 Functions of the headphones buttons CH1, CH2 (6)......................................... 30 10 Display of the DSR800 receiver... 31 10.1Main window.......................................... 31 10.2Battery indicator.................................... 31 12.6UTILITY menu....................................... 41 13 Menu structure of the transmitter.42 13.1Preset mode.......................................... 42 13.2Frequency mode.................................... 42 13.3Silent mode........................................... 43 14 Functional description.................. 44 14.1CHANNEL menu................................... 44 15 Maintenance and cleaning........... 49 15.1Maintenance.......................................... 49 10.2.1 Audio level indicator (E).......................................... 31 15.2Cleaning................................................ 49 10.2.2 MUTE indicator................................................................ 32 16Troubleshooting............................ 50 10.2.3 Antenna indicator........................................................... 32 16.1DSP profiles: Factory settings................ 52 10.3Status and warning messages............... 32 10.3.1 Status and warning displays by urgency...... 33 10.4Channel window.................................... 34 10.4.1 11 Opening the channel window............................ 34 17 DMS800: Controls......................... 53 17.1DSR800................................................. 53 17.2DPT800................................................. 54 17.3DHT800................................................. 54 Display of the DHT800/DPT800 transmitter..................................... 35 11.1Battery indicator.................................... 35 12 Menu structure of the DSR800 receiver.......................................... 36 12.1QUICK SETUP menu............................ 37 12.2CHANNEL menu................................... 38 3 Publishing information Publisher AKG Acoustics GmbH Laxenburger Straße 254 1230 Wien Austria Tel: +43 (0)1 86654-0 Fax: +43 (0)1 86654-8800 Copyright [email protected] © 2015 AKG Acoustics GmbH. All rights reserved. The information contained in this manual, including any drawings and photos provided, are the intellectual property of AKG Acoustics GmbH. In accordance with copyright law, it is not permitted for this documentation or parts thereof to be reproduced or transmitted for any purpose in any form using any means, whether electronic or mechanical, by photocopying, recording or using information storage and information processing systems without the express, written consent of AKG Acoustics GmbH. Forwarding to third parties is not permitted. This manual should be returned to us on request. Updates Version Publication date This manual may be modified without prior notice and does not represent any obligation on the part of AKG Acoustics GmbH. 1.0 April 2015/DE General 1 DMS 800 General 1.1 Purpose of the manual This manual is intended to enable you to: • operate the equipment safely • use the equipment correctly. 1.2 Retention of the manual Keep this manual carefully and in an easily accessible location. Pass this manual on to subsequent owners. This manual is an important part of the equipment. 1.3 Liability AKG Acoustics GmbH accepts no liability if: • The equipment is used for purposes other than those described under correct usage. • Damage is incurred due to incorrect operation • Unauthorised or non-permitted modifications having been carried out. • Damage due to out of date documentation. Liability 1.4 Warranty AKG Acoustics GmbH accepts no liability for damage arising from • incorrect operation. • Unauthorised or non-permitted modifications having been carried out. • Damage due to out of date documentation. Warranty 5 DMS 800 Package content 2 Package content Check that the package contains all the parts given below. If anything is missing, please contact your AKG dealer. DSR800 DSR800 • • • • • 1 x DSR800 receiver 2 x BNC UHF antennae 2 x antenna cables for front mounting 0110E01890 1 x mains cable conforming to EU standard 1 x mains cable conforming to US standard DPT800 DPT800 • 1 x DPT800 bodypack transmitter • 2 x LR6 batteries (size AA) • 1 x MKG L instrument cable DHT800 DHT800 • • • • • • 1 x DHT800 handheld transmitter 2 x LR6 batteries (size AA) 1 x stand connector 1 x W3004 – wind screen for D5 WL1, D7 WL1 and C5 WL1 1 x charging adapter for CU700 and CU800 Colour marking tapes OPTIONAL ACCESSORIES Optional accessories • CU800 — changing unit for DPT800 and DHT800 • RMS4000 — external MUTE switch • Microphone heads D5 WL1, D7 WL1 and C5 WL1 ANTENNAE ACCESSORIES Antenna 6 • • • • • • • • • • SRA2 W or SRA2 EW — passive directional antenna SRA2 B/W or SRA2 B/EW — active directional antenna RA4000 W or RA4000 EW — passive allround antenna RA4000 B/W or RA4000 B/EW — active allround antenna PS4000 W or APS4 — active antenna splitter AB4000 or AB4000 EW — antenna booster MK PS — antenna cable, 60 cm MKA5 — antenna cable, 5 m MKA20 — antenna cable, 20 m 0110E01890 — antenna cable for front mounting Package content DMS 800 Other options and antenna accessories are available in the current AKG catalogue as a download from www.akg.com. Your dealer will be happy to advise. 7 DMS 800 Safety and environment 3 Safety and environment 3.1 Safety • Protect the equipment against Safety ----- direct sunlight the impact of significant dust and humidity rain vibrations or knocks. • Do not spill any liquids on the equipment and do not allow any other objects to drop through the ventilation slits into the equipment. • Do not place any containers filled with liquid on the equipment. • The equipment must only be used in dry rooms. • The equipment must only be opened, serviced and repaired by authorised personnel. The equipment contains no user-serviceable parts. • Before connecting the equipment to power, check that the AC mains voltage stated on the integrated power adapter (DSR800) is identical to the AC mains voltage available where the equipment will be used. • Only operate the equipment on a mains voltage between the 90 and 240 V AC. Using adapters with different output voltage or current types may cause serious damage to the equipment. • If any solid or liquid should get into the equipment, shut down the system immediately. Disconnect the power cable (DSR800) from the power outlet at once and have the equipment checked by our customer service department. • If the equipment is not going to be used for a longer time, disconnect the mains cable (DSR800) from the power outlet. Please note that if you switch the equipment off while leaving the mains cable (DSR800) plugged in, it is not fully isolated from the power network. • Do not place the equipment near heat sources such as radiators, heating ducts, amplifiers, etc. and do not expose it to direct sunlight, excessive dust, moisture, rain, mechanical vibrations, or shock. 8 Safety and environment DMS 800 • To avoid hum or interference, route all audio lines, particularly those connected to the microphone inputs, away from power lines of any type. If you use cable ducts, be sure to use separate ducts for the audio lines. • Clean the equipment with a moistened (not wet) cloth only. Be sure to disconnect the power adapter (DSR800) from the power outlet before cleaning the equipment. Never use caustic or scouring cleaners or cleaning products containing alcohol or solvents since these may damage the enamel and plastic parts. • Only use the equipment for the applications described in this manual. AKG cannot accept any liability for damages resulting from improper handling or misuse. 3.2 Explanation of the symbols used Describes useful information and application notes for efficient operation of the equipment. Provides reference to more in-depth information and downloads online. Describes information on the correct disposal of the components described. 3.3 Correct use The digital wireless system DMS800 has been designed exclusively for the wireless transmission of audio signals from the handheld transmitter DHT800 and from the bodypack transmitter DPT800 to the receiver DSR800. 3.4 Incorrect use Any use not given under correct use is regarded as incorrect. 9 DMS 800 Disposal Declaration of Conformity 3.5 Environment • Always dispose of empty batteries in accordance with the relevant disposal regulations. Never throw batteries into naked flame (risk of explosion) or into the household waste under any circumstances. • The packaging is recyclable. Dispose of the packaging in an appropriate recycling collection system. • In case of scrapping the equipment, separate the housing, electronics and cables and dispose of all the components in accordance with the appropriate waste disposal regulations. 4 Declaration of Conformity This product conforms to the standards listed in the Declaration of Conformity. You can download the Declaration of Conformity at http://www.akg.com or request it by email from [email protected]. 10 DMS 800 Equipment description 5 Equipment description 5.1 General description The DMS800 consists of the following parts: • DSR800 digital stationary true diversity transmitter • DHT800 handheld transmitter and/or DPT800 bodypack transmitter Description There is the choice of AKG microphone heads with the handheld transmitter: • D5 WL1 • D7 WL1 • C5 WL1 Both the receiver and the transmitter operate in a switching bandwidth of up to 150 MHz in the corresponding frequency set within a UHF band of 548 to 832 MHz. This means you can select the receiver frequency from the preprogrammed frequency groups and subchannels of your receiver or set them directly in 25Hz increments. Both the handheld and the bodypack transmitters are programmed to the parameters set on the receiver via infrared transmission. 5.2 Functions of the external MUTE switch (optional) The optional, external MUTE switch RMS4000 allows the bodypack transmitter to be switched to mute even if the transmitter is fitted in a way that makes the integrated MUTE switch hard to access MUTE switch 5.3 Technical data System data Carrier frequency range Band 1: 548.1 - 697.9 MHz (country-dependent) Switching bandwidth ≤ 150 MHz (country-dependent) Audio bandwidth 25 Hz - 20 kHz (±3 dB) Band 2: 710.1 – 831.9 MHz (country-dependent) 11 DMS 800 Equipment description System data THD ≤ 0.02 % Signal-to-noise ratio (A‑evaluated) analogue: XLR symmetrical, typ. 115 dB(A) digital: AES-EBU, typ. 120 dB(A) digital: DANTE Net. Interface, typ. 120 dB (A) Audio sampling rate 24 Bit / 44.1 kHz Modulation digital Bit rate < 200 kbps Compressor AKG Premium Audio Compressor/dbx® technology Latency time 3.5 ms Encryption 32-Bit, 512-Bit, switchable (no additional latency time) Digital True Diversity receiver DSR800 Carrier frequency range Band 1: 548.1 - 697.9 MHz Switching bandwidth ≤ 150 MHz (country-dependent) Channels 2 (dual receiver) Sensitivity 10 dBµV / -97 dBm Image frequency and spurious attenuation ≥ 95 dB Receiver design Super-Heterodyne Diversity system Digital True Diversity Antenna inputs 2 x 50-ohm BNC sockets Audio outputs 2 x analogue: XLR symmetrical Band 2: 710.1 – 831.9 MHz 2 x analogue: 6.3 mm jack, unbalanced 1 x digital: AES-EBU XLR (48 kHz) with BNC Wordclock input 1 x digital: DANTE (Ethernet) (48 kHz) Audio output level 12 XLR bal.: +15 dBu (max.); 6.3 mm jack, unbalanced: +9 dBu DMS 800 Equipment description Digital True Diversity receiver DSR800 Bass roll off 10 – 300 Hz Equalizer 3-Band (parameters: low, mid and high enhancement Compressor dbx® (parameters: amplification, response threshold, ratio, attack, release) Limiter dbx® (parameter: usage threshold) Transmitter battery indicator 7-part PC interface Ethernet via HUB 4000 Q Ethernet via DANTE (100 Mbit/s) Software HiQnet Audio Architect Power supply 90 - 240 VAC, 50 - 60 Hz, 0.4 A Dimensions Standard housing for rack mounting, 1 HU Net weight 2.38 kg 480(W) x 45(H) x 230(D) mm Digital bodypack transmitter DPT800 Carrier frequency range Band 1: 548.1 - 697.9 MHz (country-dependent) Switching bandwidth ≤ 150 MHz (country-dependent) Transmission power 10, 20, 30, 50 mW (ERP max.), can be set via menu (country-dependent) Scatter ≤ -70 dBc Antenna λ/4 antenna Audio input TB3M / 3-pol. Mini-XLR jack (2.5 Vrms max.) Audio input level 0 dB, +10 dB, +20 dB switchable Operating time ≥ 8 hours (2 x 1.5-V LR6 AA batteries) Dimensions 65(W) x 28(H) x 82(D) mm Net weight 88 g without batteries Band 2: 710.1 – 831.9 MHz (country-dependent) ≥ 8 hours (2 x 1.2-V AA NiMH rechargeable batteries >2100 mAh) 13 DMS 800 Equipment description Digital handheld transmitter DHT800 Carrier frequency range Band 1: 548.1 - 697.9 MHz (country-dependent) Switching bandwidth ≤ 150 MHz (country-dependent) Transmission power 10, 20, 30, 50 mW (ERP max.), can be set via menu (country-dependent) Scatter ≤ -70 dBc Antenna Integrated helix antenna Optional microphone heads D5 WL1: dynamic (supercardoid) Band 2: 710.1 – 831.9 MHz (country-dependent) D7 WL1: dynamisch (supercardoid) C5 WL1: Capacitor (cardoid) Max. sound pressure level DHT800 with D5 WL1 (0 dB gain): ≤ 144 dB SPL DHT800 with D7 WL1 (0 dB gain): ≤ 140 dB SPL DHT800 with C5 WL1 (0 db gain): ≤ 144 dB SPL Audio input level 0 dB, +10 dB switchable Operating time ≥ 8 hours (2 x 1.5-V LR6 AA batteries) Dimensions 37(ø) x 170(L) mm (without WL1 head) Net weight 129 g (without WL1 head, no batteries) ≥ 8 hours (2 x 1.2-V AA NiMH rechargeable batteries >2100 mAh) 5.4 DSR800: Description of the controls DSR800 controls 14 The following table describes the controls of the DSR800 (figure from page 53): No. Description 1 POWER: On/off switch 2 DSP button 3 Display 4 BACK button 5 SELECT wheel (turn left/right, press) Equipment description DMS 800 No. Description 6 Headphone buttons (CH1, CH2) 7 Headphone output: 6.3 mm jack socket 8 Infrared receiver window for data synchronisation 9 HF level indicator 10 Channel selector button for channel CH1 11 Light ring for status display for channel CH1 and CH2 (red = warning, green = OK) 12 Channel selector button for channel CH2 13 Opening for antenna front mounting 14 Antenna input A: BNC socket 15 Antenna input B: BNC socket 16 GROUND LIFT switch for XLR output from channel CH1 17 Balanced analogue audio output, channel CH1, on XLR jack (male) 18 Unbalanced analogue audio output, channel CH1, on 6.3 mm jack socket 19 GROUND LIFT switch for XLR output from channel CH2 20 Balanced analogue audio output, channel CH2, on XLR socket (male) 21 Unbalanced analogue audio output, channel CH2, on 6.3 mm jack socket 22 Data interface: RJ10 socket for connecting the receiver to a computer via HUB 4000 Q 23 DANTE output: Ethernet socket 24 AES‑EBU WORDCLOCK IN (48 kHz): BNC socket 25 Digital AES-EBU audio output, CH 1 and CH 2 (48 kHz), to XLR socket (male) 26 Mains power connection (90 - 240 V AC) 15 DMS 800 Equipment description 5.5 DSR800: Description of the display elements DSR800 display The following table describes the display elements of the DSR800 (figure on page 53): Letter Description A Alphanumeric name display B Current group and channel number C 7-part status display of the transmitter battery D Symbol for LOCK mode (button lock) E Audio level indicator F MUTE symbol G Current frequency H Antenna currently active 5.6 DPT800: Description of the controls DPT800 controls 16 The following table describes the controls of the DPT800 (figure on page 54): No. Description 1 Display 2 MUTE switch 3 λ/4 antenna 4 Infrared receiver diode for transmitter synchronisation 5 Status LED (red = warning, green = OK) 6 On/off switch 7 Battery compartment cover 8 Audio input for microphone or instrument: 3-pole Equipment description DMS 800 No. Description 9 Battery compartment for 2 LR6 (AA) 1.5 V batteries or 1.2 V NiMH rechargeable batteries, size AA (>2100 mAh) 10 2.5 mm jack socket for external MUTE switch 11 Charging contacts 12 Locking button for battery compartment cover 5.7 DPT800: Description of the display elements The following table describes the display elements of the DPT800 (figure on page 54): DPT800 display Letter Description A Alphanumeric name display B Current group and channel number C 7-part status display of the transmitter battery D Country code or HF level E Symbol for active encryption F Symbol for activated muting 5.8 DHT800: Description of the controls The following table describes the controls of the DHT800 (figure on page 54): No. Description 1 Display 2 MUTE switch 3 Charging contacts, helical antenna 4 Infrared receiver diode for transmitter synchronisation 5 Status LED (red = warning, green = OK) DHT800 controls 17 DMS 800 Equipment description No. Description 6 On/off switch 7 Battery compartment cover 8 Microphone heads D5 WL1, D7 WL1 or C5 WL1 9 Battery compartment for 2 LR6 (AA) 1.5 V batteries or 1.2 V NiMH rechargeable batteries, size AA (>2100 mAh) 5.9 DHT800: Description of the display elements DHT800 display The following table describes the display elements of the DHT800 (figure on page 54): Letter Description 18 A Alphanumeric name display B Current group and channel number C 7-part status display of the transmitter battery D Country code or HF level E Symbol for active encryption F Symbol for activated muting Commissioning 6 DMS 800 Commissioning Before commissioning your DMS800, check that the transmitter and receiver are set to the same frequency. To commission the DMS800, proceed as follows: 1. Insert batteries into the transmitter 2. Connect the antenna 3. Position the receiver 4. Connect the receiver to the mixing console/amplifier 5. Reposition the GROUND LIFT switch (optional) 6. Connect the receiver to the power network 6.1 Insert batteries into the transmitter Step Description 1 Open the battery compartment cover (9) 2 Insert batteries into the battery compartment. 3 Close the battery compartment cover (9) When inserting the batteries, note the symbols in the battery compartment to ensure the power supply. 6.2 Connecting the antennae The following antennae can be mounted on the receiver: • λ/4 antennae (included as standard) For all applications where there is a line of sight between the transmitter and receiver antennae. • Remote antennae For applications where the reception conditions are not optimal at the receiver position. 19 DMS 800 Commissioning To mount the λ/4 antennae , proceed as follows: Step Description 1 Mount λ/4 antennae onto the front panel (13); use BNC front mounting cable (AKG part no. 0110E01890) to do this. To mount the remote antennae, proceed as follows: Step Description 1 Connect remote antennae with BNC sockets (14) and (15) to the rear of the receiver; use a RG58 cable to do this More information on antennae, accessories and help on frequency planning can be found on our website at www.akg.com. 6.3 Position the receiver Reflections of the transmitter signal on metal parts, walls, ceilings, etc. or shadows from human bodies can weaken or wipe out the direct transmitter signal. For this reason, observe the following points when setting up the receiver or the remote antennae: • Always position the receiver/antennae close to the action area (stage), ensuring a minimum distance between the transmitter and receiver/antennae of 3 m to an optimal 5 m • Avoid shadows of the transmitter signal from persons or objects as these can interrupt the radio link. The requirement for optimal reception is the line of sight between the transmitter and receiver/antennae • Position the receiver/antennae at a distance greater than 1.5 m away from large metal objects, walls, platform structures, ceilings, etc. The receiver can be set up either freestanding or in a 19" rack. When installing one or more receivers in a 19" rack, the antennae supplied are mounted onto the receiver front panel or remote antennae are used. This is the only way to guarantee optimal reception quality. 20 Commissioning DMS 800 6.4 Connecting the receiver to the mixing console/ amplifier The DSR800 receiver has the following outputs • Analogue outputs • Digital outputs 6.4.1 Analogue outputs Both analogue XLR outputs (17, 20) and both analogue 6.3 mm jack outputs can be connected at any time. The output level can be set accordingly in the AUDIO menu. To connect the analogue outputs, proceed as follows: Step Description 1 BALANCED socket (XLR) - microphone input: Move the output level switch to the "-30 dB" position 2 BALANCED socket (XLR) - line input: Move the output level switch to the "0 dB" position 3 Connect the UNBALANCED socket (6.3 mm jack) - unbalanced microphone or line input to the 6.3 mm jack socket 6.4.2 Digital output: Dante™ The Dante™ technology represents a digital audio network technology developed by Audinate that can mean up to 256 channels via standard IP-based components, such as Ethernet cables. The Dante™ interface of the DSR800 has a data transfer speed of 100 Mbit/s. The Dante™ Controller Software can be used to configure and manage all devices compatible with the Dante™ network. The Dante™ Controller Software can be downloaded free of charge from www.audinate.com. The DANTE™ Controller Software automatically connects to the DANTE™ network in the default setting. 21 DMS 800 Commissioning CAUTION: If you set the IP address of the DANTE™ network manually via the software, it is essential that you note down the IP address set. Alternatively, before removing the device from the network, set the IP address to "Automatic" using the software so that the device is detected in a new network by the DANTE™ Controller Software. 6.4.3 Digital output: AES-EBU To connect the digital outputs, proceed as follows: Step Description 1 Connect the balanced AES-EBU digital output on the XLR socket (25) to the required AES-EBU digital input The integrated Wordclock Generator supports a sampling rate of 48 kHz. To synchronise all digital signals on the system, an external 48 kHz clock generator can be connected to the BNC socket Wordclock IN (24). The receiver detects the external 48kHz clock signal automatically and uses the external clock signal from this time. The current clock status can be checked in the channel window. 6.5 Reposition the GROUND LIFT switch (optional) The GROUND LIFT switch (16, 19) is used to isolate the housing mass connection: This allows hum caused by earth loops to be removed. To isolate the housing mass connection, proceed as follows: Step Description 1 Move the GROUND LIFT switch (16, 19) in the LIFT position The switch position is displayed in the channel window. 6.6 Connecting the receiver to the power network Check that the mains voltage on the rear of the receiver matches the mains voltage at the place of use to avoid damage to the equipment. 22 Commissioning DMS 800 To connect the receiver to the power network, proceed as follows: Step Description 1 Connect the mains cable to the AC IN socket (26) on the rear of the receiver and plug into a suitable mains socket 23 DMS 800 QUICK SETUP 7 QUICK SETUP The QUICK SETUP function allows intermodulation and interference-free carrier frequencies to be found for all channels quickly and easily. To carry out a QUICK SETUP, proceed as follows: Step Description 1 Switch on the receiver by pressing the ON/OFF switch 2 Select the START SETUP menu by pressing the SELECT wheel three times 3 Confirm the number of channels by pressing the SELECT wheel once 4 Make frequency ranges unlimited by pressing the SELECT wheel once 5 Start the search by pressing the SELECT wheel once The entry SCANNING appears on the display. The search can take up to one minute. After the search is complete, the channel list appears. 6 Assign channel 1 by pressing CH1 On the display, the question is shown as to whether or not to assign the channel. 7 Confirm the channel assignment by pressing the SELECT wheel once 8 Prepare the transmitter by inserting batteries and switching on 9 Synchronise the receiver with the transmitter by pressing the SELECT wheel once 10 Keep the transmitter's infrared sensor at a distance of approx. 10 cm of the receiver's infrared sensor The receiver display shows a message confirming the successful synchronisation. 11 Return to the channel list by pressing the BACK wheel once 12 Select channel 2 by turning the SELECT wheel to the right On the display, the question is shown as to whether or not to assign the channel. 13 Assign channel 2 by pressing CH2 14 Repeat steps 7 to 9 24 Operating instructions 8 DMS 800 Operating instructions 8.1 Setting the carrier frequency The following steps are required to set the carrier frequency: 7. Set the transmitter to SILENT mode (recommendation) Carrier frequency 8. Unlock the receiver 8.1.1 Setting the transmitter to SILENT mode We recommend setting the carrier frequency in SILENT mode (no HF radiation). This is the only way to avoid "going to transmit" on an unauthorised frequency and potentially disrupt other radio services or wireless microphones. To set the transmitter to SILENT mode, proceed as follows: SILENT mode Step Description 1 When switching on the ON/OFF switch (6), press with the MUTE switch (2) held down at the same time The entry RF‑OFF is shown on the display. 8.1.2 Unlocking the receiver The receiver is electronically locked to avoid any settings being changed accidentally. The receiver switches to LOCK mode after approx. 4 minutes with no button being pressed. The "LOCK" symbol (D) lights up on the display. The automatic lock function can be deactivated in the AUTOLOCK submenu. Unlocking the receiver To unlock the receiver, proceed as follows: Step Description 1 Press SELECT wheel (5) for approx. 2 seconds The "LOCK" symbol disappears from the display. The receiver is in SETUP mode. 25 DMS 800 Operating instructions 8.2 Switch on MUTE LOCK To avoid the MUTE switch on the transmitter being switched on accidentally, it can be locked via the receiver. To lock the MUTE switch, proceed as follows: Step Description MUTE LOCK 1 Switch on the receiver 2 Select the CHANNEL menu; to do this, turn the SELECT wheel to the right 3 Press SELECT 4 Select the MUTE LOCK menu; to do this, turn the SELECT wheel to the right 5 Press SELECT The MUTE LOCK menu is opened. MUTE LOCK is on OFF. 6 Press SELECT MUTE LOCK is on ON and is activated. 8.3 Programming the transmitter to the receiver settings Programming the transmitter to the receiver 26 During synchronisation, the receiver monitors all previously selected transmitter settings (group/channel, frequency, name, input level of the bodypack transmitter, transmitter output, encryption and MUTE LOCK). To program the transmitter to the receiver settings, follow the QUICK SETUP steps up to point 10. Operating instructions DMS 800 8.4 Carrying out a sound check To carry out a sound check, proceed as follows: Step Description 1 Switch on the receiver 2 Select the REHEARSAL menu; to do this, turn the SELECT wheel to the right 3 Switch on synchronised transmitter 4 Start REHEARSAL; to do this, press SELECT twice 5 Exit the action area with transmitter Sound check The display shows the receive signal level and the time advance in graphic form. Note that the receive level should never drop below -85 dBm. Reception can be improved by changing the position of the receiver antenna. 6 Mark individual positions; to do this, press the MUTE button on the transmitter The corresponding marks will appear on the receiver display. 7 Move the curve to the left or right by turning the SELECT wheel Enlarge the curve by pressing the SELECT wheel 27 DMS 800 Operating instructions 8.5 Selecting the country Use the frequencies of the sets preprogrammed for your country. However, ensure that you have the licence for the transmission frequencies of the country, if required. To select the country, proceed as follows: Step Description Selecting the country 1 Switch on the receiver 2 Select the UTILITY menu; to do this, press the SELECT wheel and turn to the right 3 Select the COUNTRY menu; to do this, press the SELECT wheel and turn to the right 4 Press the SELECT wheel Select the country-specific frequency set. If your country is not listed, select the SD (standard) setting. 8.6 Listening to the audio signal Listening to the audio signal 28 To listen to the audio signal, proceed as follows: Step Description 1 Plug headphones with 6.3 mm stereo jack plug into the headphones output (7) 2 Activate the audio signal; to do this, tap the Headphones CH1 or CH2 (6) button 3 Deactivate the audio signal; to do this, press the Headphones CH1 or CH2 (6) button for at least one second Controls on the DSR800 receiver 9 DMS 800 Controls on the DSR800 receiver The functions of the individual controls on the receiver vary depending on the receiver mode. The following modes are possible: • LOCK mode: Receiver is locked, no setting options • SETUP mode: Receiver is unlocked, setting options available 9.1 Functions of the SELECT wheel (5) 9.1.1 Functions in LOCK mode Long press Unlock the receiver (switch to SETUP mode) Turn to the left or right No function Tap Confirm status and warning messages SELECT wheel 9.1.2 Functions in SETUP mode Long press Lock the receiver (switch to LOCK mode) Turn to the left or right Select a menu or change the selected setting Tap Open the selected menu or confirm selected setting 9.1.3 Possible functions in the main window QUICK SETUP menu CHANNEL menu AUDIO menu REHEARSAL menu Directly select and synchronise every free channel in the list of channels Open the submenu (Frequency, Group/Channel, Name...) with the required channel Main window Select another channel in the channel submenu Select the receiver channel CH1 or CH2 in the submenus GAIN, DSP and ATTENUATION PAD. Scroll through the HF level 29 DMS 800 Controls on the DSR800 receiver 9.2 Functions of the CH1, CH2 (10, 12) buttons 9.2.1 Functions in LOCK mode In the main window Channel window for parameter overview, no changes possible 9.2.2 Functions in SETUP mode In the main window Channel window for parameter setting, no changes possible 9.3 Functions of the BACK button (4) BACK-Taste Tap Close current menu Long press Close all menus All unconfirmed values are deleted All unconfirmed values are deleted The main window is displayed 9.4 Functions of the DSP button (2) The factory settings of the DSP button can be found in section “16.1 DSP profiles: Factory settings” on page 52. DSP button In the main window In the AUDIO submenu Deactivate the LOW CUT, EQ, COMPRESSOR and LIMITER functions for the corresponding channel Set the parameters of the digital signal processor 9.5 Functions of the headphones buttons CH1, CH2 (6) CH1 CH2 30 Tap Put the audio signal on the headphones output The volume can be set by turning the SELECT wheel. Display of the DSR800 receiver DMS 800 10 Display of the DSR800 receiver 10.1 Main window After the DSR800 receiver is switched on, the main window is displayed. Main window The main window displays all parameters required for operation: • • • • • • • Name Current frequency Current frequency group Current channel Audio level Active antenna Remaining operating time of the transmitter battery With critical operating conditions (low reception level, battery almost empty, audio clipping), a warning message appears. 10.2 Battery indicator The battery indicator on transmitter (C) and receiver (C) allow the remaining capacity of the transmitter battery to be checked. Each segment corresponds to approx. 1 hour remaining playback time. If no battery voltage is measured or the information is invalid, there is no indicator on the display. Around 1 hour before the battery is empty, the warning message "LOW BATT" and the light ring on the SELECT wheel turns red. Battery indicator 10.2.1 Audio level indicator (E) The audio level indicator (E) displays the audio level indicator of the receiver. To modify the output level of the receiver to the connected mixing console, the output level can be adjusted in the GAIN submenu in the AUDIO menu. Audio level 31 DMS 800 Display of the DSR800 receiver 10.2.2 MUTE indicator The audio output is muted. The light ring (11) lights up red. MUTE indicator As the power supply and the HF section remain switched on, no interference is audible. 10.2.3 Antenna indicator Antenna indicator The DSR800 receiver is a specially developed, digital True Diversity receiver with integrated antenna splitter. The antenna field (H) displays the antenna currently active. 10.3 Status and warning messages Messages This function draws attention to critical operating conditions of the system using optical warning messages. Which warning messages are displayed can be set in the UTILITY STATUS menu. If one of the selected operating conditions occurs, the light ring on the receiver changes from green to red and a corresponding status display is shown on the display. The warning messages appear in order of urgency. Depending on the type of warning, the top field of the display continuously displays a large warning for at least 5 seconds. A small warning remains in the bottom display line until the warning is confirmed. The selected warning functions are active in LOCK mode and in SETUP mode. The corresponding warning messages can be cleared by tapping the SELECT wheel. 32 DMS 800 Display of the DSR800 receiver 10.3.1 Status and warning displays by urgency Display LOW BATT AF CLIP Symbol Meaning The capacity of the transmitter battery will soon be depleted. The light ring changes to red and the display shows a large warning continuously. Warning displays The audio signal overrides the A/D converter of the transmitter. The light ring changes to red and the display shows a large warning for the duration of the error status, but for at least 5 seconds. LOW RF A small warning remains in the main window until the warning is confirmed. The field strength of the reception signal is so low that the receiver is automatically muted to avoid interference noise. The light ring changes to red and the display shows a large warning for the duration of the error status, but for at least 5 seconds. ANT ERROR A small warning remains in the main window until the warning is confirmed. The same antenna has already been active for more than two minutes. The light ring changes to red and the display shows a large warning for the duration of the error status, but for at least 5 seconds. INTERFERE A small warning remains in the main window until the warning is confirmed. Interference signals from other radio microphones, TV, broadcasting equipment, radio transceivers or harmful electrical equipment or electrical installations have been received. 33 DMS 800 Display of the DSR800 receiver Display ENCRYPTION Symbol Meaning The encryption is not set correctly. 10.4 Channel window Channel window The channel window offers a rapid overview of the following tuning parameters: • • • • • • • • • Group/channel Frequency Name Country Audio input level of the handheld or bodypack transmitter Padding (PAD) Transmission power Encryption MUTE LOCK All parameters can be changed and sent to the transmitter. A gain of +0 dB or +10 dB can be set on the DHT800 handheld transmitter. The DPT800 bodypack transmitter supports a gain of the audio input signal by +0 dB, +10 dB or +20 dB. The GROUNDLIFT and WORDCLOCK fields display the corresponding current operating condition. 10.4.1 Opening the channel window To open the channel window, proceed as follows: Step Description 1 In the main window, press the CH1 (10) or CH2 (12) buttons for the required channel 34 Display of the DHT800/DPT800 transmitter DMS 800 11 Display of the DHT800/DPT800 transmitter 11.1 Battery indicator The battery indicator on transmitter (C) and receiver (C) allow the remaining capacity of the transmitter battery to be checked at a glance. Each segment corresponds to approx. 1 hour remaining playback time. If no battery voltage is measured or the information is invalid, there is no indicator on the display. Transmitter display Around 1 hour before the battery is empty, the warning message "LOW BATT" appears on the receiver and the light ring on the receiver turns red. 35 DMS 800 Menu structure of the DSR800 receiver 12 Menu structure of the DSR800 receiver MAIN WINDOW CHANNEL WINDOW CH1 CH2 BACK BACK SELECT <> DSP Set audio editing Set frequency manually <> <> START CHECK Program optical warnings for critical operating conditions <> <> LIMIT SCAN COUNTRY Search only one part of the frequency band Program optical warnings for critical operating conditions <> ATTENUATION PAD AUTOLOCK Set audio output level Assign a name to the channel <> Switch automatic lock function on/off <> MIC GAIN <> HP GAIN DISPLAY MODE Set headphones level Set audio input level of the handheld or bodypack transmitter Change display <> <> TRANSM.POWER DISPLAY CONTRAST Change screen contrast Select transmission performance <> <> ENCRYPTION FACTORY RESET Reset all parameters to factory settings Select encryption: OFF/32‑Bit/512‑Bit <> <> MUTE Deactivate audio MUTE switch on the transmitter; activate MUTE=POWER 36 BACK STATUS Check HF reception area <> NAME UTILITY General settings BACK BACK BACK BACK <> FREQUENCY UNLIMITED SCAN Search entire frequency band REHEARSAL Check HF reception area SELECT Search for other free channels GAIN Set input level for DSP chain <> SELECT <> CONTINUE SCAN GROUP/CHANNEL Set group and channel manually ENVIR. SCAN Search frequency band for active radio frequencies SELECT List of last search results <> AUDIO Set audio editing: Gain, Low‑Cut, EQ, Compressor, Limiter SELECT <> CHANNEL LIST <> CHANNEL Set parameters manually Synchronise channel SELECT SELECT START SETUP Search channel groups to find, set and synchronise free frequencies <> BACK QUICK SETUP Search for and set free carrier frequencies SYNCHR.TRANSM. <> Transmit all settings to the transmitter via infrared WARNING LIST The last 25 warning messages INFO <> Call up information on hardware and software DMS 800 Menu structure of the DSR800 receiver 12.1 QUICK SETUP menu QUICK SETUP Search for and set free carrier frequencies BACK SELECT START SETUP Search channel groups to find, set and synchronise free frequencies NO. CHANNELS Number of required < > channels SELECT: Select/save setting < >: Number <> <> CONTINUE SCAN Limit frequency < > range search SELECT: Select/save setting < >: Frequencies START SCAN Start new search < > SELECT: start <> CHANNEL LIST List of last search results LIMIT FREQ. RANGE CHANNEL LIST <> List of free channels SELECT: Display frequencies < >: Channel CH1, CH2: Assign and synchronise channel SELECT Search for other free channels 37 DMS 800 Menu structure of the DSR800 receiver 12.2 CHANNEL menu CHANNEL Assign a name to the channel <> MIC GAIN Set audio input level of the handheld or bodypack transmitter <> TRANSM.POWER Select transmission performance <> ENCRYPTION Select encryption: OFF/32‑Bit/512‑Bit <> MUTE Deactivate audio MUTE switch on the transmitter; activate MUTE=POWER <> SYNCHR.TRANSM. Transmit all settings to the transmitter via infrared 38 SELECT CH1, CH2 SELECT CH1, CH2 BACK SELECT CH1, CH2 <> NAME BACK BACK SELECT CH1, CH2 Set frequency manually BACK SELECT CH1, CH2 <> FREQUENCY BACK BACK SELECT CH1, CH2 BACK SELECT GROUP/CHANNEL Set group and channel manually SELECT CH1, CH2 Set parameters manually Synchronise channel BACK CH1/CH2 <> CH1/CH2 <> CH1/CH2 <> CH1/CH2 <> CH1/CH2 <> CH1/CH2 <> CH1/CH2 <> Select receiver part SELECT: Select/save setting < >: CH1/CH2 Select receiver part SELECT: Select/save setting < >: CH1/CH2 <> MHZ <> NAME <> PT GAIN <> TRANSM.POWER <> ENCRYPTION <> MUTE LOCK <> SYNC SYNC SYNC Synchronise transmitter SELECT: Start synchronisation Select encryption SELECT: select/save < >: OFF/32-Bit/512Bit Deactivate MUTE button on the transmitter SELECT: select/save < >: ON/OFF <> Synchronise transmitter SELECT: Start synchronisation Select transmission power SELECT: select/save < >: Transmission power Select receiver part SELECT: Select/save setting < >: CH1/CH2 KHZ Synchronise transmitter SELECT: Start synchronisation Set audio input level SELECT: select/save < >: 0, +10, +20 dB Select receiver part SELECT: Select/save setting < >: CH1/CH2 <> Select frequency SELECT: select < >: kHz 10 characters SELECT: select/save < >: Characters Select receiver part SELECT: Select/save setting < >: CH1/CH2 CHANNEL Select channel SELECT: select/save < >: Channel Select frequency SELECT: select < >: MHz Select receiver part SELECT: Select/save setting < >: CH1/CH2 Select receiver part SELECT: Select/save setting < >: CH1/CH2 GROUP Select group SELECT: select < >: Group SYNC Synchronise transmitter SELECT: Start synchronisation SYNC Synchronise transmitter SELECT: Start synchronisation SYNC Synchronise transmitter SELECT: Start synchronisation SYNC Synchronise transmitter SELECT: Start synchronisation DMS 800 Menu structure of the DSR800 receiver 12.3 AUDIO menu AUDIO Set audio editing: Gain, bass roll off, EQ, compressor, limiter BACK SELECT GAIN Set input level for DSP chain <> DSP SELECT CH1,CH2 BACK SELECT CH1,CH2 Set audio editing BACK <> HP GAIN Set headphones level SELECT CH1, CH2 ATTENUATION PAD <> PROFILE <> LOW CUT <> CH1/CH2 <> Select profile SELECT: select/save < >: Profile BACK SELECT CH1,CH2 BACK Select receiver part SELECT: Select/save setting < >: CH1/CH2 GAIN Set input level for DSP (audio) chain SELECT: select/save < >: Gain SAVE Save DSP settings in profile with name SELECT: select/save < >: Profile and characters Set usage frequency for bass roll off SELECT: select/save < >: Frequency <> Set audio output level CH1/CH2 Select receiver part SELECT: Select/save setting < >: CH1/CH2 EQ Set 3-band equalizer SELECT: select/save < >: Level and frequency <> COMPRESSOR Set gain, trigger threshold, ratio, attack and release SELECT: select/save < >: Value <> LIMITER Set usage threshold SELECT: select/save < > : Value ATTENUATION PAD Set audio input level SELECT: Select/save setting < >: 0 dB/-30 dB HP LEVEL Set headphones volume SELECT: Select/save setting < >: Level 39 DMS 800 Menu structure of the DSR800 receiver 12.4 ENVIR. menu SCAN ENVIR. SCAN Search frequency band for active radio frequencies BACK SELECT UNLIMITED SCAN Search entire frequency band SELECT CH1,CH2 BACK <> LIMIT SCAN Search only part of frequency band SELECT CH1,CH2 BACK GRAPH Interference frequencies are searched SELECT: Enlarge display < >: move to the left or right LOWER LIMIT Set lower limit in MHz SELECT: Select/save setting < >: Frequencies 12.5 REHEARSAL menu REHEARSAL SELECT BACK Check HF reception area START CHECK Check HF reception area 40 SELECT BACK GRAPH Field strength check for channels 1 and 2 running SELECT: Enlarge display < >: move to the left or right <> UPPER LIMIT Set upper limit in MHz SELECT: Select/save setting < >: Frequencies <> START SCAN Start new search SELECT: start SELECT GRAPH Search interference frequencies SELECT: Enlarge display < >: move to the left or right DMS 800 Menu structure of the DSR800 receiver 12.6 UTILITY menu UTILITY General settings BACK SELECT STATUS Program optical warnings for critical operating conditions <> COUNTRY Set special frequency presets <> AUTOLOCK Switch automatic lock function on/off <> DISPLAY MODE Change display <> DISPLAY CONTRAST Change screen contrast <> FACTORY RESET Reset all parameters to factory settings <> INFO Call up information on hardware and software <> WARNING LIST The last 25 warning messages SELECT BACK SELECT BACK SELECT BACK SELECT BACK SELECT BACK SELECT BACK RF LOW Warning: no transmitter signal received SELECT: select/save < >: ON/OFF SELECT BACK LOW BATT Warning: Transmitter battery will soon be empty SELECT: select/save < >: ON/OFF <> AUDIO CLIP Warning: Audio signal overrides A/D converter input in transmitter SELECT: select/save < >: ON/OFF <> ANT ERR Warning: Error on antenna input SELECT: select/save < >: ON/OFF COUNTRY Select standard or special frequency preset SELECT: select/save < >: Country AUTOLOCK Switch automatic lock function on/off SELECT: select/save < >: ON/OFF DISPLAY MODE Select one of 4 display modes SELECT: select/save < >: Display mode DISPLAY CONTRAST Select displaycontrast SELECT: select/save < > : Value FACTORY RESET Reset all parameters to factory settings YES/NO SELECT BACK <> INFO Software and hardware version MUTE LOCK < >: scroll 41 DMS 800 Menu structure of the transmitter 13 Menu structure of the transmitter To switch on the transmitter, proceed as follows: Step Description 1 Press the ON/OFF button for 2 seconds 13.1 Preset mode SHUT DOWN Keep the ON/OFF button pressed down to switch off the transmitter. ON/OFF MUTE MUTE ERROR MUTE MUTE MUTE button triggers the signal to mute the audio output on the receiver. "GR/CH" and country display alternates with frequency and transmission output display. ON/OFF After synchronisation of a group and a channel, the group (GR), channel (CH) and country appear on the display. WARNING LOW BATT or AUDIO CLIP 13.2 Frequency mode 42 SHUT DOWN Keep the ON/OFF button pressed down to switch off the transmitter. ON/OFF WARNING MUTE MUTE ERROR MUTE MUTE MUTE button triggers the signal to mute the audio output on the receiver. ON/OFF After synchronisation of a manually set frequency, the frequency and transmitter output appear on the display LOW BATT or AUDIO CLIP DMS 800 Menu structure of the transmitter 13.3 Silent mode 1/9 To switch on the transmitter in silent mode, proceed as follows: 3/9 FREQUENCY Display shows the frequency and country (no HF signal) MUTE 4/9 COUNTRY Display shows the country and serial number (no HF signal) MUTE 5/9 SERIAL NUMBER Display shows the serial number and software version (no HF signal) MUTE 6/9 SOFTWARE VERSION Display shows the software version and frequency band (no HF signal) MUTE 7/9 HARDWARE VERSION Display shows hardware version and frequency band (no HF signal) MUTE 8/9 BAND Display shows frequency band and transmitter name (no HF signal) MUTE 9/9 MUTE The entry RF‑OFF is shown on the display. GROUP/CHANNEL Display shows the group, channel and frequency (no HF signal) MUTE 1 When switching on the ON/OFF switch (6), press with the MUTE switch (2) held down at the same time 2/9 MUTE Step Description MIC GAIN Display shows set microphone level (no HF signal) 43 DMS 800 Functional description 14 Functional description The DSR800 has been developed for operation in large multi-channel systems. 14.1 CHANNEL menu This menu can be used to manually set all parameters relevant for a channel such as group/channel, frequency, name, input level of the bodypack transmitter, encryption and MUTE LOCK. The DSR800 receiver provides frequency groups with specially calculated frequencies. The required channel (frequency) can be manually set and synchronised in this menu. Ensure that all channels are selected from the same group within the same presets. To search for free channels, we recommend the QUICK SETUP function The following table describes the functions of the submenus in the CHANNEL menu. Submenu Function NAME Assign any name for each channel (name of a musician, instrument, or similar) MIC GAIN Adjust the audio input level of the DPT800 bodypack transmitter to the connected microphone TRANSM. POWER Set the transmission power of the synchronised transmitter FREQUENCY 44 Set the frequency directly in 25 kHz increments DMS 800 Functional description Submenu ENCRYPTION Function Activate the encryption function When the encryption function is activated, the receiver calculates a one-off key every time a transmitter is synchronised. This key is sent to the transmitter during the synchronisation process. The key is not displayed and it is not possible to send the same key to two transmitters. Note: • For transmitters with firmware versions lower than 2.0, choose the 32-Bit encryption. (These transmitters do not function with 512 Bit encryption.) • For transmitters with firmware version 2.0 or higher you can achieve the highest possible security with 512 Bit encryption. • If you use a replacement transmitter for a channel, the encryption must be deactivated. MUTE The MUTE LOCK function deactivates the MUTE switch on the transmitter The transmitter synchronised with the receiver cannot be muted with the MUTE button. The MUTE=POWER function allows the MUTE button of the transmitter to be used as the on/off switch as well. SYNCHR. TRANSMITTER Programming the transmitter to the receiver settings GAIN Set input level of the DSP chain 45 DMS 800 Functional description Submenu DSP Function Edit audio signal directly on the receiver Settings can be stored in one of the nine DPS profiles in a freely selectable name. The digital signal processor offers the following dynamic editing functions: • Low Cut (frequency: 10 - 300 Hz) • 3-band equalizer (low: ±20 dB, 80 Hz shelving; parametric mid: ±20 dB, 100 Hz to 10 kHz, Q = 2; high: ±20 dB, 8 kHz shelving) • dbx® compressor (threshold: -60 - +9 dBV, ratio: 1:1 - 1:10, gain: 0 - 20 dB, attack: 1 100 ms, release: 1 - 2000 ms) • dbx® limiter (threshold: -20 - +9 dBV) Changes to a profile always affect both channels. All previous settings of a profile are overwritten. ATTENUATION PAD Modify the level of the balanced audio output to the input sensitivity of the connected equipment With microphone inputs, the setting 0 dB can result in overloads. If the receiver is connected to a microphone input, it is recommended to select -30 dB. The unbalanced line output cannot be controlled. ENVIRONMENT SCAN This function works in a similar way to a spectrum analyser. • UNLIMITED SCAN: the entire frequency band of the receiver is searched for active radio frequencies • LIMIT SCAN: only a part of the frequency band is searched for active radio frequencies During the search process, the audio output remains muted and the display shows the result graphically. Turn the SELECT wheel: Move the curve to the left or right Press SELECT: Enlarge curve 46 DMS 800 Functional description Submenu REHEARSAL Function Sound check Check HF level of the transmitter in the action area The maximum recording time is four minutes UTILITY STATUS Activate optical warning function for specific critical operating conditions If one of these operating conditions occurs, the light ring around the SELECT wheel on the receiver changes from green to red and a corresponding status display is shown on the display. The light ring changes to red and the display shows a large warning for 5 seconds. A small warning remains on the display until the warning is cleared by pressing the SELECT wheel. The warning messages appear in order of urgency. The selected warning functions are active in LOCK mode and in ACTIVE mode. COUNTRY Selecting the country DISPLAY MODE Change the appearance of the display A country must be selected when switching on the receiver for the first time. The following display modes are available MAIN FREQUENCY NAME GROUP/CHANNEL DISPLAY CONTRAST Modify the contrast of the display to the current lighting conditions FACTORY RESET Reset parameters to factory settings 47 DMS 800 Functional description Submenu Function WARNING LIST Calling up warning messages INFO 48 Call up information on the receiver software and the transmitters synchronised with it This function saves the last 25 warning messages. Maintenance and cleaning DMS 800 15 Maintenance and cleaning 15.1 Maintenance The equipment must only be opened, serviced and repaired by authorised personnel. The equipment contains no user-serviceable parts. 15.2 Cleaning Caution: Unplug the DSR800 receiver mains cable from the socket! Clean the surface of the equipment with a soft cloth moistened with water. Never use caustic or scouring cleaners or cleaning products containing alcohol or solvents since these may damage the enamel and plastic parts. 49 DMS 800 Troubleshooting 16 Troubleshooting Error No sound Possible cause Correction Transmitter set to a frequency different from the receiver. Set transmitter to the frequency Mains cable is not plugged into the receiver and/or mains socket. Plug mains cable into the receiver and/or mains socket Errors due to other wireless systems, TV, radio, wireless devices or harmful electrical equipment or installations. Transmitter switch or MUTE switch on "MUTE". Switch on transmitter or press the MUTE switch Receiver is switched off. Switch on the receiver Receiver is not connected to the PA system. Connect microphone or instrument to the bodypack transmitter Transmitter batteries or rechargeable batteries empty. Replace transmitter batteries or rechargeable batteries Transmitter is too far away from the receiver. Brief dropouts at some points of the action area. Check the insertion direction of the batteries in the transmitter Move the transmitter to the receiver Barriers between the transmitter and receiver are creating shadows on the transmitter signal. Remove the barriers between the transmitter and receiver Receiver too close to metallic objects. Remove receiver from metallic objects No line of sight between the transmitter and receiver. Ensure a clear line of sight between the transmitter and receiver Software on the transmitter and receiver does not match. Check the software GAIN set too high or too low. Suboptimal DSP settings. Receiver or antennae incorrectly positioned Transmitter is too far away from the receiver. 50 Connect receiver to the PA system Microphone or instrument is not connected to the bodypack transmitter. Batteries incorrectly inserted in the transmitter. Distortions Switch off other wireless systems Check the DSP settings Reposition receiver or remote antennae. If dropouts remain, mark and avoid critical points. Move the transmitter to the receiver DMS 800 Troubleshooting Error Possible cause Correction AF CLIP The audio signal overrides the A/D converter of the transmitter. Reduce audio input level. ANT ERROR The same antenna has already been active for more than two minutes. Check if the antenna cable is faulty or incorrectly connected. LOW BATT The capacity of the transmitter battery will soon be depleted. Insert new batteries. SYSTEM ERROR Internal error. Switch off receiver and switch back on after approx. 10 seconds. If the error occurs again, contact your AKG service centre. RF ERROR, PLL ERROR Receiver cannot be synchronised to the set frequency. Tap the SELECT wheel to confirm errors and set another frequency. If the error occurs again, contact your AKG service centre. UPDATE FIRMWARE System is ready for software updates. Switch off receiver and switch back on after approx. 10 seconds. If the error occurs again, contact your AKG service centre. INTERFERE ERROR Errors due to other wireless systems, TV, radio, wireless devices or harmful electrical equipment or installations. Change frequency or switch off device creating the interference. ENCRYPTION! Encryption not set correctly. Synchronise transmitter. Errors due to other DMS800 transmitters. Change carrier frequency (resynchronise) WRONG DEVICE Transmitter and receiver work in different frequency bands Ensure that the transmitter and receiver are working on the same frequency band ERROR DEVICE Transmitter data contains errors. If the error occurs frequently, contact your AKG service centre. TIMEOUT No infrared data detected. Align the IR window of the transmitter and receiver with one another and resynchronise. RF LOW The field strength of the reception signal is so low that the receiver is automatically muted to avoid interference noise. Reposition receiver or use remote antennae. 51 DMS 800 Troubleshooting 16.1 DSP profiles: Factory settings LOW CUT 1 2 Profile Presenter No. 4 Music 3 7-9 52 - 6 Instrument 5 Name Application Handheld transmitter Present HT Headset Present PT Beginners, MS Powerpoint, churches, presenters Handheld transmitter Music HT Headset Music PT Instrument microphone with bodypack transmitter Instru PT Beginners and experts, trumpet, tuba, drums Guitar with bodypack transmitter Guitar PT Electric guitar, electric bass, active acoustic guitar User User 1-3 - Experienced users, vocalists, rock bands, karaoke, musical EQ COMPRESSOR LIMITER Freq. [Hz] Low [dB] Mid [dB] Mid Freq [kHz] High [dB] Threshold [dB] Ratio Gain [dB] Attack [ms] Release [ms] 77 0 0 1.0 3.0 -30 2.1:1 3 1 71 -25 1.5:1 5 6 207 Threshold [dB] 0 40 OFF 40 OFF OFF 9 OFF OFF OFF 9 DMS 800 DMS800: Controls 17 DMS800: Controls 17.1 DSR800 A F 1 B C G H D E 2 3 4 5 8 9 10 11 6 12 7 13 100-240V~ 0,35-0,2A 50/60Hz 14 15 16 17 18 19 20 21 22 23 24 25 26 53 DMS 800 DMS800: Controls 17.2 DPT800 A B C 3 2 1 D 12 E F 5 8 4 6 9 10 11 7 17.3 DHT800 A B C 1 2 D E F 8 3 5 4 6 9 7 54


© Copyright 2026