
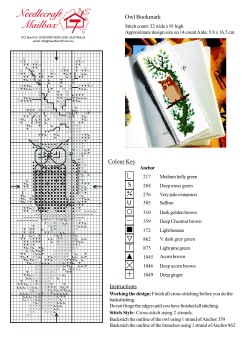
HANG tight The best way to hang even the heaviest objects J
22
21
HANG tight
1
The best way to hang even the heaviest objects
B Y J AY S O M E R S E T
2
19
18
17
16
15
14
3
4
5
6
7
13
8
12
11
10
9
54
C A N A D I A N H O M E W O R K S H O P N OV E M B E R 2 0 0 5
PHOTOGRAPHY: SIMON CHEUNG; MIRROR, PLASMA TV AND BOOKCASE IMAGES: COURTESY OF IKEA CANADA
20
1. Brafasco toggle strap
2. 3M sawtooth picture hanger with
Command Strips
3. Buildex E-Z Toggle
4. Red Head lag shields for concrete
5. 3M removable interlocking fasteners
with Command Strip adhesive
6. Picture-hanging wire
7. PowerHook for drywall
8. Buildex hollow-wall anchors for drywall
9. Ook shield 75-lb. picture hanger
10. Ikea Rugga multi-height hook
11. Ikea Rugga single-height hook
12. Ook no-stud drywall picture hanger
13. 3M bathroom hook with Command
Strip adhesive
14. Buildex large plastic anchors with
screws for drywall
15. Buildex wood screws
16. Buildex small plastic anchors with
screws for drywall
17. E-Z Anchors (metal and plastic)
18. Buildex toggle bolts for drywall
19. Red Head Dynabolt sleeve anchors
for concrete
20. Buildex brass-plated 5-lb. picturehanging hooks
21. Buildex brass-plated 10-lb. picturehanging hooks
22. Buildex brass-plated 20-lb. picturehanging hooks
a solid idea: my friend dry-mounted a poster on wood and hung it over his fireplace.
Five hours later: bam! It came crashing down off the wall. Had my friend known that choosing a
fastener depends on the weight of the object being hung, as well as the type of wall (drywall,
plaster, brick) and studs (wood, metal) you’re putting it on, his picture would still be hanging
and the stereo nearby wouldn’t have been smashed in the process.
Before hanging something, consider the weight and wall type, and then buy fasteners. But don’t just
reach into your toolbox for any old screw and wall plug; E-Z anchors, thin steel screws, plastic
anchors—as with the rest of your tools, each one serves a particular purpose. In every case, we assume
you’re hanging the object on a wall made of drywall with wooden studs (see “Special Circumstances,”
on the next page, for other scenarios).
I
T BEGAN AS
HANGING A FRAMED PICTURE (0 to 20 lbs.)
P ICTURES, OR ITEMS that weigh less than 20 lbs., are the easiest to hang and don’t require plastic wall
plugs, screws or studs. Stick with thin nails (not screws) and picture hooks rated for the weight of the
object being hung. Even art galleries hang their works this way, using the same type of hangers.
The key: go minimal and you won’t ruin your wall. Too often we grab whatever nail or screw is most
convenient, hammer it in and then hook the picture on it. This works, but you’ll leave yourself a huge
hole in the wall when you want to move the picture. Also, the longer you hang your picture, the bigger
the hole will become.
Instead, lightly tap in a thin nail with the hook attached. For large pictures that are still less than
20 lbs., consider installing more than one picture hook.
HANGING A COAT RACK (10 to 20 lbs. with coats)
“A FASTENER IS only as strong as the drywall it’s anchored into,” says Don Millar of Hold-Tite Fasteners in
Concord, Ont., who has been in the fastener business for more than 40 years.“Drywall is pretty flimsy, so
don’t overtighten the anchor or it will simply spin in its hole and you won’t have any holding power.”
The key: drill properly sized pilot holes. The pilot hole should be smaller than the plug, so choose
a drill bit just slightly smaller than the plug.
Measure your coat rack. Assuming it has five hooks and is 1.5 metres long, drill three pilot holes:
one for a screw in the centre of the rack, and the other two on each end (split the difference from the
centre to the edge; for longer or shorter racks, adjust the number of fasteners accordingly).
Insert a hollow plastic wall plug into each hole, tapping the plugs lightly with a hammer so they’re
flush with the wall. Be careful that the entire plug doesn’t tear completely through the drywall’s paper
covering. Next, install the screws through the coat rack and into the plugs with gentle force, so that you
don’t push the screw and plug through the drywall. Lightly tighten the screws so the coat rack sits tight
against the wall.
HANGING A MIRROR (20 to 100 lbs.)
“O NCE YOU GO beyond 20 lbs., it’s a smart idea to drill at least one screw into a stud,” says Millar. Use
a wood screw (it has more bite) and try to drill right into the centre of the stud. Screws going into studs
don’t require wall plugs.
The key: “Coarse-threaded wood screws work best,” says kitchen and bathroom contractor Kevin
Armitage of Armitage Professional Finishes, a renovation company in Courtice, Ont.“Coarse screws bite
into the wood and really hold.” Armitage also suggests using a washer so that the head doesn’t dig into
the wallboard.
Since you’re going right into a stud, you don’t need to drill a pilot hole, but it’s a good idea to use a
template: cut a piece of newspaper or cardboard to the same size and shape as the object, hold it up
on the wall and mark the spots where the fasteners will go.As a general rule, space the fasteners two to
three inches in from the edge of the frame. Use a level to make sure the holes are at the same height.
The second fastener will go right into the drywall and not a stud, but instead of installing a plastic
anchor and a regular screw, use an E-Z drywall anchor. These fasteners, which come in plastic or metal,
allow you to hang heavy objects securely while preserving the integrity of the wallboard, sort of what the
antiquated toggle bolt used to do (don’t bother fussing with toggles or Molly bolts—they’re as useful now
as a computer from 1991). E-Z Anchors are self-tapping, too, so there’s no need to drill a pilot hole. Simply drive the anchor into the wall, and when you’re ready to hang, insert the screw into the anchor.
N OV E M B E R 2 0 0 5 C A N A D I A N H O M E W O R K S H O P
55
HANGING A PLASMA TELEVISION (75 to 150 lbs.)
M OST, IF NOT all, plasma TVs come with brackets specifically designed to hold them on the wall; however, like the weak batteries that come with a toy, the fasteners are not always the best. “The hardware is
often of lower quality and not necessarily the best way to hang the item,” says Mike Dennis, trading manager at Brafasco in Brampton, Ont. “If in doubt, measure your TV, including weight, and consult a professional. Having your TV crash down two weeks after the warranty runs out isn’t your objective.”
Assuming the brackets and fasteners are suitable, your next step is to assess the area. If the brackets span two studs, install them by drilling right into the studs, using a level to make sure they’re straight.
If you don’t have access to two studs, simply cut out a small section of drywall using a utility knife.
Cut a 2x4 (or a piece of plywood) long enough to span two studs. Find the exact height you want to
hang the TV, and then screw or nail the piece of wood horizontally to the two studs. Then place the
bracket over top the area and attach it to the newly installed wood and, if possible, one of the studs.
HANGING A BOOKCASE OR CABINET (200 to 300 lbs.)
T HERE ARE TWO considerations here. If the bookcase sits on the floor, all the weight is sheer (straight
down) and you only need to stabilize the top by installing a few #8 screws into a stud toward the top
of the case. This will prevent it from toppling over.
If you can’t find a stud, use a few E-Z Toggle expansion anchors for added reinforcement. “E-Z Toggles screw into the drywall exactly like an E-Z Anchor,” says Dennis, “but the anchor is longer and you
use a longer screw. As you put the screw through the anchor, a toggle switch moves, so as you tighten,
the switch spreads and holds tight against the drywall.” For even heavier loads, use a toggle anchor,
which can accommodate larger fasteners.
Hanging a bookcase with its weight being carried by the anchors requires reinforced drywall. Reinforce the drywall with 2x4s as you would with a television (see above). For extra protection, install addiitional horizontal pieces (there’s no such thing as overkill here): one near the bottom, one in the middle and one near the top.
Next, screw the bookcase to the wall by drilling directly into the studs and horizontal braces. For
spots without studs, use an expansion anchor.
S PECIAL C IRCUMSTANCES
I NNOVATIVE H ANGING
BESIDES E-Z ANCHORS, here are a few other miracle hangers:
NO STUDS: Studs never seem to be where you need
them. In such cases, it’s especially important to choose
wall fasteners that spread the weight while protecting the wallboard from crumbling. For these cases, the
answer is easy: E-Z Anchors. Use multiple anchors,
depending on the size of the item being hung.
Ook’s shield 75-lb. picture hanger
Hang that priceless Van Gogh using this threeholed hanger. It uses the strength of German-made
blue steel screws to keep it in place.
STEEL STUDS: Metal studs are made of thin sheet metal
that can easily strip fastener holes, so always use finethreaded metal screws and drill slowly.
The PowerHook
Made from yellow zinc-plated steel, these hooks can
hold up to 150 lbs. in 12⁄ " drywall and 121 lbs. in 38⁄ "
drywall. The Z-shaped hook allows for the weight to
be distributed across a larger area.
PLASTER: To keep crumbling to a minimum, drill pilot
holes and use plastic or metal plugs. For heavier applications, a concrete sleeve anchor works best.
MASONRY: You will need to use longer expanding
anchors made of all metal that are designed for
masonry (bricks, stucco, concrete). Hang light objects
from special tempered-steel masonry nails. For heavier objects, fill predrilled holes with anchors that
have a resilient sleeve that expands to hold a screw
or bolt in place.
56
C A N A D I A N H O M E W O R K S H O P N OV E M B E R 2 0 0 5
3M hangers with Command Strips
If you don’t want to make a hole in the wall, consider one of these hangers. They attach to the wall
using an adhesive strip that seals tightly but
doesn’t leave a mark when removed.
LePage poly anchor wraps
If an existing anchor has come loose, give it some
extra bite. Wrap it in one of these little discs of
drywall tape before setting it back in the hole.


© Copyright 2026