
2015 Desk Manual - BuildingPermits.Oregon.gov
2015 Desk Manual Last Updated: 5/29/2015 1 Table of Contents Accela Basics ................................................................................................................................................. 3 An Introduction to ePermitting................................................................................................................. 3 Terminology & Acronym List ..................................................................................................................... 4 Navigation - AA ......................................................................................................................................... 5 Processes – AA ............................................................................................................................................ 13 Accounting & Fees .................................................................................................................................. 13 Addresses ................................................................................................................................................ 28 Applications............................................................................................................................................. 29 Citizen Access (ACA) ................................................................................................................................ 31 Comma Separated Values (CSV’s) Export ............................................................................................... 39 Inspections .............................................................................................................................................. 39 IVR (Interactive Voice Response) Phone System .................................................................................... 41 My QuickQueries..................................................................................................................................... 43 Planning Module ..................................................................................................................................... 44 Professionals and Contacts ..................................................................................................................... 45 Records ................................................................................................................................................... 47 Reports .................................................................................................................................................... 49 Workflow................................................................................................................................................. 50 Reference Materials & Index ..................................................................................................................... 53 ePermitting Terminology ........................................................................................................................ 53 Frequently Asked Questions ................................................................................................................... 63 Inspection Choices .................................................................................................................................. 69 Plan Revisions/Deferred Submittals/Phased Projects ............................................................................ 70 Certificates of Occupancy/Satisfactory Completion ............................................................................... 71 Record Types List .................................................................................................................................... 72 Helpful Links ............................................................................................................................................ 74 2 Accela Basics An Introduction to ePermitting Welcome to Oregon ePermitting! First introduced in 2011, full service ePermitting is a statewide initiative that allows contractors to submit building permits online for multiple jurisdictions through one centralized system. Our goal is to create consistency for the contractors who purchase permits in Oregon and to assist Oregon cities and counties in providing efficient services through ePermitting’s web based system. This manual is for the various jurisdictions that are pioneering the use of full service ePermitting. It contains information about navigating the website, step-by-step processes, and it contains an FAQ section to assist with troubleshooting. It is a living document and will be updated frequently. Please do not print out or save this manual to your hard drive, because it may go out of date quickly. By accessing this manual through the link on the log in page for the back office, you can ensure that you will be using the most recent version. Our office, a section of the Building Codes Division, provides support for the website through a helpdesk ticket system and through our helpdesk phone line. If you have a question about options for changing settings, creating user accounts, or suggestions for improvements, please submit a helpdesk ticket. If you need immediate assistance, please call our helpdesk at 503-373-7396. The Service Provider: Accela Accela, Inc. develops systems and services for government agencies. Accela has provided our office with the platform for ePermitting, saving the State of Oregon the cost of having to develop a system from the ground up. Using Accela’s foundation, our team here at the Building Codes Division creates the walls and roof that complete the structure that is ePermitting, such as the coding that connects a permit item to a fee. You, as the jurisdiction, assist in creating and maintaining everything inside the structure, such as records and addresses. 3 Terminology & Acronym List AA- Accela Automation, also known as the “Back Office,” is the web based portal that jurisdictions use to access Accela. ACA- Accela Citizens Access is the web based portal available to the public. AMO- Accela Mobile Office is software that can be downloaded to a laptop for use in the field to get inspection results and search for permit information. APO- Address, Parcel and Owner. These three items are the key pieces of information tied to the property for which the permit is being purchased. APO is usually obtained on a regular basis from the County Assessors Office. ASI- Application Specific Information. This is the information that will be unique to each permit. For example, APO is a standard part of each permit, but the fees for a mechanical permit would be specific to that type of permit, so fees would be considered ASI. CSV- Comma Separated Values are groups of information that can be transferred to an Excel spreadsheet and used for a variety of report or mailing tasks. EDR- Electronic Document Review is software from Adobe Acrobat Pro and Compara that is integrated into Accela. It allows Building Officials to review and add notes to plans that have been submitted online. Inspector App- This is a mobile application that inspectors can download to their phone or tablet so that they can update inspection statuses or obtain permit information in the field. Portlet- A section of the webpage dedicated to display specific information and perform specific tasks. Portlets make up the console layout seen on the screen. ‘My Navigation’ and ‘Record List’ are examples of portlets. SPEAR form- This is the same thing as an application intake form. The SPEAR form is where the customer will provide information needed for their permit. TSI- Task Specific Information fields comprise of information that is needed before a particular task can be completed. UAT- User Acceptance Testing is the testing done by the jurisdiction’s project team to confirm that the system is working correctly. This is especially important to ensure that fees, converted (historical) permits, and inspections work correctly once the system is in production. Workflow- The workflow is what we call the process that each permit goes through from start to finish as it moves through the system from the permit technician, to plan reviewers, and finally to inspectors. An expanded terminology list is available in Reference Materials & Index, located here. 4 Navigation - AA This section will give you a general sense of how ePermitting’s web-based system is organized and where to locate certain features. The website is organized using portlets. Portlets are like portals to groups of information. For example, the reports portlet (shown to the left) would allow you to access report information. In the upper right hand corner of each portlet is this menu: This allows you to refresh, minimize, or maximize the portlet. When you find that a portlet is not displaying updated information, click refresh on the portlet, rather than refresh on your web browser. The refresh button is on the left hand side of that bar and looks like two arrows in a circle. Portlets sometimes have page numbers that allow you to browse through additional information. You can also see more records in a portlet by selecting Expand List from the portlet menu, though if there is enough information, you may still need to look through pages. The website uses SPEAR forms to collect information. These will often be in pop up windows and will be comprised of the fields that form an application. The first screen you will see after you log in is the Home Screen. In the Home Screen you will see links along the top of the page and two columns of portlets below the links. 5 The User Info portlet, shown in this example to the left, with the jurisdiction’s logo is the top portlet on the left side. Your user information will also be displayed in the top right hand corner of the webpage. Included in this information is your user level, full name, a shortcut to the Alerts portlet, and the link to sign out. If you have multiple user levels, such as when a person works in planning as well as building in a department, the user level information will also be a drop down menu. If you are a user in multiple jurisdictions, you may have a drop down menu to change your jurisdiction as well. This allows you to access records in various agencies without logging out and back in again. The Alerts portlet is located directly to the right of the User Info portlet, and is the first main portlet on the page. The title of each portlet is in the upper left hand corner of the portlet. You will receive an alert message in the Alerts portlet when applications are submitted, payments are made, and when documents are uploaded in ACA. You can delete an alert by clicking the checkbox next to the message and then clicking ‘Delete.’ If an alert is not deleted, it will disappear after 90 days. 6 The next portlet as your scroll down is the Record portlet, which displays the five most recent records. This portlet is where all the information is stored for records that have been created. In the building module, these will likely be building permits, or temporary building records, such as a fee estimate. You can search for records in three ways: 1) By using the ‘Search’ button, which will bring up search option fields. This will allow you to search by a variety of options such as address, project name, or permit type. 2) By using the ‘My QuickQueries’ dropdown menu, which allows you to search for permits using predetermined filters, such as permits with a balance due. You can create your own quick query filters. Click here for directions on creating a QuickQueries list. 3) By using the links to sort the permit list. Text in the Records portlet that is underlined denotes a hyperlink. Click on any hyperlink to sort the permits by that category. In this screenshot, you can see the two hyperlinks that are underlined, and you can see that ‘Description’ is not underlined; therefore you could not sort using the ‘Description’ field. 7 The Record ID portlet is an extension of the Record portlet and will display information for the record that is highlighted in the Record portlet above. To highlight a permit, simply click on the record in the Record portlet, and it will highlight the permit in blue. This will bring up the record summary in the Record ID portlet below. As you can see that the first permit in the list is highlighted in blue. This is the permit for which the Record ID portlet will display information. Once a record is highlighted, you can also use the ‘Go To’ drop down menu to pull up additional information on the selected permit, such as the APO, inspections, or comments. Under Record Detail, you can access the permit expiration information and make changes to the expiration date. You can also access the status of the permit under Record Detail in the Go To menu. It will allow some users to change the permit status, though the status should only be changed under certain circumstances, such as when a permit needs to be manually expired. Since the status of the permit will automatically update as it goes through workflow, changing the status in this section should rarely happen. Changing the status in this section is not the same as changing the workflow status. Directions on changing the workflow status are located here. 8 This is the My Navigation portlet, which allows you to work with the permit that has been highlighted in the Record List portlet. From this menu, you can add fees to a permit, update the workflow of a permit, view parcel information, and more. Try selecting a permit and clicking through a few of the options available in My Navigation to get a sense for how the system allows you to manage a record. You are also able to access the features that are in the My Navigation portlet from the Record ID portlet itself. To the right you can see the ‘Go To’ drop down menu in the Record ID portlet. From this menu, you can access all of the information and features that are listed in the My Navigation portlet, as well as three other less commonly used functions: 1) Expiration allows you to adjust the expiration date of a record. 2) Status allows you to change the status of a permit. This function should only be used in cases where the status cannot be changed using the normal process in workflow. 3) Access Fee History allows you to view the fee details for each payment associated with the record. This is the Reports portlet. The reports available are tools to help you balance your transactions, manage permits, track records, and much more. You can also create permit related documents through reports, such as a certificate of occupancy. The reports are grouped by type and are simple to select and run. More information about reports is available here. 9 This is the Quicklinks portlet. It has links to the customer-facing website for ePermitting, the Building Codes Division website, the Construction Contractor’s Board (CCB) website for license look-ups, and more. This menu displays at the top of your browser. Though this example says ‘Omega’ at the top, your browser will show the name of your city or county. The links in this section will vary depending on your jurisdiction and user level. If you click on Navigation, it will bring up a drop down menu that shows the most recently viewed permits. By clicking on one of these permits, the records portlet will populate with that permit’s information. This is the fastest way to find a permit you have recently worked on. If you click on Create New, you will be able to create a new permit, schedule an inspection, and create a new contact, task, or set. When we say ‘create a permit in the back office,’ it is through this link that you can begin that process. Click on Maps to access the GIS system. The menu underneath the one in the dark blue bar allows you to access different pages of portlets. These links will vary depending on the user level of the person logged in. Clicking Home will take you back to the Alerts and Records portlets. By clicking Property, you can add, update, or correct an address in your jurisdiction. The image to the right is an example of what you would see after clicking Property. APO is a common term you will see in this manual. It is the acronym for address, parcel, and owner. The portlets to edit these key pieces of information can be found on this page. If a customer is trying to purchase a permit from your jurisdiction, but 10 does not see services for a specific address, and you know the address has been added to the system, you may need to add the “address type” to that property. Adding the address type connects your jurisdiction and your services to that address. Another important link on the second menu bar from the top is Inspections. This is where you will manage inspections, print route sheets, schedule inspections, and more. You are also able to use this page to search for inspections themselves. So you could perform a search for all of the temporary electrical service inspections, and the search would bring up all of the permits with that inspection type. This is the Records Sets page. When you are working with a group of permits and you need to take the same action with the entire group, you can make them into a set. An example of when creating a set would be helpful is when you have a group of permits that have reached their expiration date. By making the group into a set, you can expire the group rather than going into each permit and expiring them individually. 11 This is the Point of Sale page. From the Point of Sale portlet page, you are able to take in fees that are not associated to a record, such as the sale of a map or charge for copies. Until certain modules become available in ePermitting, the Point of Sale page is also where you can assess charges for right of way permits, utility permits, and other transactions that your department may handle. You are able to get help directly from our website by clicking the ‘Help’ button in any portlet you have questions about. The information that will pop up in a new window will be specific to the portlet you are in. For example, if you click ‘Help’ in the Professionals portlet, it will bring up information on using that portlet. Similar to this manual, the ‘Help’ section provides screen shots, step-by-step processes, and general navigation information. This is an example of the help window for the Professionals portlet. Hyperlinks are used throughout this manual. They will guide you to additional information and will be text that is colored blue and underlined. 12 Processes – AA This section of the manual will guide you through step by step processes that you will be using on a regular basis, such as the workflow process or the processes for fee related tasks. Accounting & Fees This section includes information on fees, payments, processing refunds, and other tasks that are associated with permit fees and balancing daily receipts. There are three types of fees in the system: new fees, invoiced fees, and credited fees. New fees are fees that have been added to a permit but not invoiced. Invoiced fees are fees that have been added to a payable invoice. Credited fees are fees that have had the payment credited back to the permit. When you invoice fees, you are grouping those fees for payment. When a customer makes a payment, they are paying an invoice. If your jurisdiction takes in a plan review fee at the time of application, you would invoice just the plan review fee which would make that fee payable with its own receipt and invoice number. Then, when the permit is completed, the permit fees, state surcharge, and any other fees would be invoiced into their own invoice group which will also have its own receipt and invoice number. If fees are recalculated due to items being added or voided from the permit, then fees may become “Credited.” For example, when fees are recalculated, the state surcharge will always be credited back to the permit and a new state surcharge applied. New fees: Are not visible to customers on ACA Can be deleted in one step by selecting the fee and clicking delete Allows for recalculation of the state surcharge and fee items Will block the closing of the permit until the new fee has been invoiced or deleted Invoiced Fees: Are visible to customers on ACA Must be voided rather than deleted Will block the closing of a permit if they are not paid or voided Credited Fees: Will show as “Credited” in the Status column 13 This example shows new fees, invoiced fees, and credited fees. By clicking Status, you can group fee items by their status to clearly see which still need to be invoiced. You are also able to sort fee items by the other underlined categories in the portlet, but when you are adding fees it is helpful to see the items sorted by Status to ensure that quantities and items are correct before invoicing. Adding & Invoicing New Fees To add a new fee to a permit, first pull the permit up in the Record portlet and click on Invoice Fees. From the Invoice Fees portlet, click on the ‘Add’ button. Below is an example of what you would see if you selected the ‘Add’ button in the Invoice Fees portlet. 14 In this example, the permit is a mechanical permit, so the line items that are brought up are all mechanical items. These fields will always correlate to the type of permit you have selected in the Record portlet. You are able to change the fee schedule using the drop down menu to add any type of fee. To add a fee here, all you need to do is enter the quantity needed in the blank field under ‘Qty,’ and then click the ‘Submit’ button at the top of the portlet. The unit column will tell you how to enter the quantity of the item. When you are adding fees to a permit, notice the drop down menu for Fee Schedule. This allows you to add a line item from a different fee schedule. This is most often used to add Point of Sale (POS) fees to a permit, such as a fee for making photocopies of plans or printing a map. After clicking on ‘Submit’ to add the fee, the portlet will refresh to the Invoice Fees section. The added fees will show as ‘New’ along with all of the fees previously assessed. After you confirm that the new fees are correct, check the checkbox next to each new fee and click on the ‘Invoice’ button. After clicking on the ‘Invoice’ button, the fees that you have selected will be assigned an invoice number. If you go the Payment portlet, you will see the fees totaled under their invoice number. The example below shows the Payment portlet. The unpaid amount will show in the Balance column. It will also show an ‘N’ under the Paid in Full column. 15 This example shows new fees, invoiced fees, and credited fees. By clicking on Status, you can group fee items by their status to clearly see which still need to be invoiced. You are also able to sort fee items by the other underlined categories in the portlet, but when you are adding fees it is helpful to see the items sorted by Status to ensure that quantities and items are correct before invoicing. Adding Payment Information This is an example of what the payment portlet will look like after you click on the ‘Pay’ button from the Invoice portlet. If you change the payment method to credit card, the payment portlet will bring up the payment fields for a credit card. After entering the payment information, click on ‘Save.’ Here is more information about each of the payment methods in the drop down menu: Cash: Use when the payment is in cash or coins. Check: Paper checks will require you to record the check number. Credit Card: Use for all credit card transactions. Internal Transfer: Use for transfers between departments within your agency. 16 Refund Check: Use only when doing refunds. Write Off: Use when recording bad debts to remove them from active balances. Credit Memo: Use to keep track of pre-payment reduced fees. Fee Waiver: Use to record instances when fees are waived. Journal Entry: Use to adjust excess fees on converted or historic records, for example, a customer needs to add a branch circuit to a permit from an old fee schedule which charged $5 for the circuit, but the new fee schedule has assigned an $8 charge to the permit since that is the new fee for the branch circuit. Use a “Journal Entry” payment of $3 to account for the difference from what the customer was charged. Billed: Use only when the customer will be billed externally through your accounting system. Note: Partial payments are entered the same as regular payments. Though once they are entered, the money needs to be applied to the specific fees they were paid for. Adjusting Fees If a permit has been created and you need to add a new permit item, use the process for adding fees. If, however, a customer is adjusting the items on their permit, such as when there are three dishwashers on a permit but it only needs two, you will need to adjust the fees. To adjust the fees on a permit, go to Invoice Fees. Since permit items are grouped together by type, you will need to select the checkbox next to the item and entire delete the group. So if the fee item says three dishwashers, you will delete all three. Then you will add the necessary number of items back onto the permit, two dishwashers in our example. 17 After you add the correct fees back onto the permit, the state surcharge will be credited back to the permit and then recalculated. If the permit had a minimum permit balance fee applied to it, the minimum permit balance will be credited back to the permit and recalculated also. The new fee items, the minimum permit fee, and the state surcharge will have a new status, and can then be invoiced and paid by going to the Payment portlet. In this example, you can see the credited fees from the original calculation, and the new fees assessed from adding two dishwashers back to the permit. Select the checkboxes for the new fees and click ‘Invoice.’ Then reapply the payment information and follow the steps for a refund, or collect a payment if there were additional fees. Balancing To balance daily transactions, follow these steps: Total the transactions by type: Cash - total the amount and subtract the starting cash amount Checks - confirm receipts show the correct payer and payment amount Credit by signed slips/unsettled transactions - settle only those transactions you posted payments for (note: this is an elective with Virtual Merchant at the time of account setup; can elect to manually settle or auto-settle - if auto-settling, you will have to ‘refund’ any payments that were not posted or accurate) Run the following reports: Payments Received - only includes payment method of Cash, Check, Credit Card, and Credit Card Other (optional) Out of Balance - shows any records that are out of balance 18 Unapplied Funds - only audit this nightly to assure staff are applying payments appropriately as per business rules - or that fees did not become ‘unapplied’ due to fee adjustments on records as these should always be reapplied immediately at the time of adjustment – if this is the case, corrections should be made in the same day if possible. Transactions Applied - this report shows any adjustments that could affect your GL codes Use your jurisdiction’s policies for reporting this information to your treasurer. If the reports do not match the totals you arrived at, check your numbers again. If you still do not balance, use the reports to identify the discrepancy and follow your jurisdiction’s policies on correcting transactions. If the credit card totals are out of balance, you can also run the Credit Card Detail report to help you identify which transaction is not lining up with the credit card totals. Collecting the Plan Review Fee Often, a jurisdiction takes in a plan review fee prior to reviewing plans, collecting the fee at the time the plans are submitted to their department. To charge a customer for only the plan review fee, go to Invoice Fees. Select only the plan review fee checkbox and click on ‘Invoice.’ This will create an invoice that can now be found in the Payment portlet. Go to the Payment portlet now. You will see the invoice for just the plan review fee. Take the customer’s payment for that amount and apply the customer’s payment to the invoice containing the plan review fee. Fee Estimates You are able to create a temporary record through the back office when a customer would like a fee estimate for their permit. The temporary record will be deleted after 90 days. If the customer returns within 90 days of the creation of the fee estimate, you can create their permit application from that temporary record. The first few steps in creating a fee estimate are the same as if you were creating a new permit record. Begin by clicking the ‘New’ button in the Record portlet. Select the record type you need. In our example, we will use the record type for a residential one and two family dwelling. Enter as much of the permit information as you would like to. The information you enter now will stay 19 with the temp record, which could save you from entering information twice if the customer returns for the permit. After you have entered the permit details, click the ‘Estimate Fee’ button, which can be found on both the top and bottom of the SPEAR form. Below is the screen you will see after you click on ‘Estimate Fee.’ In this screen, you will add fees and change the valuation calculator to either the calculated value or the contractor value. The fees you enter here will be the basis for your estimate. For a new one and two family dwelling, first you will add the fees from the residential structural fee schedule, such as the structural plan review fee and the building permit fee. To add these fees, click on the ‘Add’ button. After adding the necessary building permit fees, you will need to click the ‘Submit’ button. 20 Next, change to fee schedule using the fee schedule drop down menu. This is how you will add fee items for the mechanical, electrical, and plumbing components of the new dwelling. Once you have added fee items from a specific fee schedule, be sure to click ‘Submit’ before going to the next fee schedule. Then click ‘Add’ to continue adding fees from different schedules. Often, when permit offices give a customer a fee estimate for a new dwelling, they will include fees for electrical, mechanical, plumbing, site development, driveway, and site utilities. To turn a fee estimate into a permit, click on the existing fee estimate’s temporary record number. The SPEAR form will give you the same button options that you had when you originally opened the record, such as ‘Submit,’ ‘Save Without Submit,’ and ‘Estimate Fee.’ To make a permanent record from the estimate, you will click the ‘Submit’ button instead of ‘Estimate Fee,’ and a permanent record number will be assigned. Fund Transfers Fund Transfers occur when all or part of a payment needs to be applied to a different record than the one it had been previously recorded to. 21 Follow these steps to complete a fund transfer: First, void the paid fees on the permit with the payment to be transferred. This will create an unapplied credit. In this example, a contractor pulls one permit for two services, but the permit was supposed to be for two different locations. Realizing the error, the contractor contacts the agency to set up a new permit and requests that the credited fees be transferred to the new record. So in this scenario, on the original permit, you would first adjust the fees to correct the number of services. This will create a credited fee equal to the cost of one service. Next, go to the permit that the newly credited payment will be transferred to. From that permit, go to Payment in the My Navigation portlet and click on the ‘Fund Transfer’ button. Now you will be able to search for the permit that has the credited payment on it. The search fields available are the same ones that you will find in the Record portlet search, so you are able to search by address, record number, project name, and more. Check the box next to the permit you want to transfer a payment from, and click ‘Select.’ 22 After you select the record, the Payment portlet will take you to the fund transfer fields. In the method drop down menu, select Fund Transfer. In the transfer amount field be sure you input the correct amount to be transferred. As a best practice, we do not recommend that you transfer any excess payments that would need to be refunded to the new record. If a refund is due in addition to the fund transfer, you would want to issue the refund from the permit that the excess fees were paid to. After entering the amount in the transfer amount field, enter your comments, and then click ‘Submit.’ The payment will transfer over, and will be added as unapplied fees. You should get a message that the fund transfer completed successfully. Apply the fees and confirm that the original permit has a zero balance for fees not applied. Non-Sufficient Fund (NSF) Checks When a check is returned to your office for nonsufficient funds, the payment will need to be voided. This situation is an example of when you would void a payment for a transaction that did not occur on the same day. To void the payment, go to the Payment portlet. The payments will be listed under transactions. Check the box for the payment that came back NSF, and click on ‘Void.’ 23 A pop-up window will appear that requests a reason for the voided payment and a comment. Select NSF check from the list, enter your comment, and click ‘Submit.’ You should then receive a message confirming that the payment record was voided successfully. The status for the payment will show voided and the permit will update to reflect the outstanding balance. If your jurisdiction charges a fee for NSF checks, you will need to go to Add New Fees to add that fee to the permit. Then the outstanding balance on the record would include the amount of the NSF check and the NSF check fee. Voiding the payment will affect your end of day balancing. Follow your department’s procedures for the end of day balancing in this scenario. Refunds First, void the fees that need to be refunded. You will be voiding the fee item itself, such as the branch circuit that the customer discovered they did not need, rather than the payment for the fee item. 24 When you void a fee, a window will pop up that will as for a reason. You can select “Refund Requested.” When a fee is voided, the state surcharge will be recalculated. This will credit the previously assessed state surcharge back to the permit and will assess a new state surcharge based on the remaining fees. Unless the entire permit is being withdrawn and you are issuing a full refund, you will need to invoice the recalculated state surcharge fee and apply the necessary amount from the unapplied money to the newly recalculated state surcharge. If your jurisdiction charges a refund fee or a record retention fee, you would then add that fee by clicking on Add New Fees in My Navigation. Change the fee schedule to assign administrative fees to the permit. Invoice the administrative fee as well as the recalculated state surcharge. Apply a payment to the new invoice with money that became unapplied when fees were voided. After the invoice has been paid in full, if there is still unapplied money on the record, click ‘Refund.” First confirm that the amount in the “Total:” box is the correct refund amount. If that figure is correct, then all you need to do is click ‘Submit.’ You do not need to enter the refund amount into the fields. In this example, the amount is 19.62. If there were no total to refund, the ‘Submit’ button would show an error next to the total. After you click ‘Submit,’ the portlet will take you to the fields where you can enter the refund check information. The refund amount will be automatically pulled into the refund amount field. Enter the other required information and click ‘Submit.’ 25 The refund will show in the transactions list with a status of “Refund” and the amount in parenthesis to indicate that the amount is a credit. If you are issuing a refund for a credit card payment back to the credit card, you will need to also issue the refund with the credit card service company. Recording the refund in ePermitting only keeps a record of the transaction; it does not issue a credit card refund. The website for the credit card service company, such as Converge, will have procedures for crediting payments. Voiding Fees You would void a fee from the Invoice Fees portlet when a fee item was mistakenly entered on a permit and invoiced or if the customer realizes that they do not need that item to be on their permit. Check the box next to the item you want to void, and click ‘Void.’ Select a reason from the pop-up window and enter a comment if necessary. Click ‘Submit’ and then the item will then have a status of “Credited,” even if the invoice for it had not been paid. Voiding Payments The system will allow you to void payments from any date, however, as an accounting practice, payments should only be voided on the same day the money was received. One of the few times you would void a payment that was taken in on a prior date is when a check is returned as NSF. Important: Credit card payments need to be voided in the payment portlet AND with the credit card service provider. Voiding a payment in Accela will not return the money to the customer’s card. For example, if you use Converge to process credit card payments, you will need to void the payment in the back office AND you will need to log into Converge to void the payment in their system. 26 To void a payment, select the payment you need to void, and click the ‘Void’ button. This is an example of the pop up box that will appear. Select the reason for from the drop down menu and enter a comment about the voided payment. Click ‘Submit’ after entering your comment. 27 Addresses Each agency maintains the addresses in their jurisdiction. Initially, addresses are loaded into the system based on data received from the County Assessor’s office. If a new address is issued or if an address was missing in the data from the Assessor’s office, a jurisdiction can add or correct addresses through the back office. Addresses can be stored in Accela in two different ways: Reference Data: This is information that has been stored in reference tables. From the reference tables, the data can be searched for and added to records. Transactional Data: This is information that is only added within the data of a record or permit. Adding information to a record itself, such as an address or homeowner information, does not add that information to reference tables, which means it would not be available in other places in ePermitting. For example, an address is changed during the construction of a new house, so the permit technician goes into the SPEAR form for the dwelling permit to correct the address. This updated the address for that record, but if another contractor tries to pull a permit through ACA, that address will not be available in their search. By changing the address in the reference tables, it saves the information for current and future use. When reference data is changed, all of the records that are pulling the information from the reference tables will be updated as well. Adding an Address To add an address, first go to the Property page from the portlet page menu. In the Parcel portlet of the Property page, search for the parcel. If the parcel does not exist in the system, click on ‘New’ to create a new one. You will not be able to see the ‘New’ button until after you have performed a search. This prevents duplicate information from being entered. All addresses must be tied to a parcel. Add the parcel information into the new parcel fields. If your jurisdiction uses districts, add an inspection district under the district tabs. In the Parcels portlet, you can click on the owners tab to look up the owner information. If no information is found in the reference data for the owner, you will need to create a new owner. You are able to add multiple owners to a parcel. From the Parcels portlet, use the address tab to add the address. Again, search for the address before adding the new one, and if it does not exist, create a new one using the ‘New’ button. Click ‘Submit’ after entering the new address information. 28 Then go to the address type tab and add your jurisdiction to add the address type. This step is very important. Adding the address type is what connects that address to your jurisdiction’s services. When a customer cannot see an address in ACA but the address shows in the back office, the address type not being marked is often the issue. The top example to the right shows what the address field would show if no address type were associated with the address searched for. The bottom example shows what it looks like when the address type is assigned. Applications New applications can be created through the back office. When a customer submits a paper application, this process is how the application would be entered into the system. To start a new application, click on Create New in the top menu or click on the ‘New’ button in the Record portlet. Both of these options will bring up a new window that will begin by asking for the record type. The record types available will depend on the services offered by your jurisdiction. The boxes next to the record category containing a plus sign, ‘+’, will bring up the options available in that menu. In this example, when you click on ‘+’ next to Building, the menu drops down with the option for Commercial, Inquiry, Post Disaster, and Residential. By clicking on the ‘+’ next to Residential the menu drops down with the types of residential building permits. 29 Once you have selected your application type, the SPEAR form will populate in the window. This example to the left shows the beginning fields for a residential plumbing permit. The ‘Record Type’ field is read only at this point. To change the record type, click ‘Cancel’ and open a new record. After completing the application, you have the option to submit the permit into the system, save the application without submitting, print an estimate the fee for the permit, or cancel the application. Clicking ‘Submit’ will create the permit record. After you submit it, a window will pop up that will let you pend inspections to the permit. Using the arrows in between the available inspection types field and the selected inspection types field, you can move the appropriate inspections over. Once you click ‘Pending Inspections,’ the inspections you selected will be pended for that permit. Now they will be visible in ACA for customers to schedule online and are recorded in the IVR system for customers who phone in their inspection requests. Once created, you can add documents, payments, new fees, and more. After submitting the permit, it will become available in ACA for the customer to pay online if they are not paying in person. 30 Citizen Access (ACA) The website that customers use to access ePermitting is called Accela Citizen Access, or ACA. Customers are able to contact our helpdesk by email or phone if they have any problems with the website or their ePermitting account. Here is some information on the customer experience in ACA: Registering a New User The image below is what a user would see at the bottom of the ePermitting home page. One way to register a new user is by clicking on the lower rectangle that says ‘I want to register for an ePermitting account.’ Another way to sign up for an account is by using the “New Users” link at the bottom of the gray box in the image below. Either option will direct customers to the terms and conditions, and then to the intake form to gather the new user information. At this time, non-licensed people cannot purchase permits through ePermitting. They are able to register for an account, but will not be able to see any of the permit services offered by jurisdictions. These users are still able to search for permit information, pay fees, and schedule inspections. Not all BCD licenses allow the purchasing of permits through ePermitting. For example, the Limited Electrical License (LEA) holders cannot purchase electrical permits through ePermitting. We hope in the future to expand our services to these groups. 31 This is the new user intake form. It requires the customer to create a unique username, though they will also be able to use their email address to access their account. The security question field allows the customer to type in their own unique security question. The customer is able to add billing information, but the system will never save their credit card information. Associating a License to a User Account If a customer is able to see an address in our system, but does not see any services offered for that address, confirm that the address type has been associated to the address. If the address type has been marked correctly, the customer may not have a professional license associated to their account. If a customer needs assistance associating their license to their account, they can call our helpdesk for assistance. In this screenshot, you can see the second link from the right is Account Management. From this link, the customer can view and edit their account information, add contact information, and add a license to their account. On the right hand side of the License Information bar, there is an ‘Add a License’ button. This will take customers to a screen where there will be a drop down menu that allows them to choose the license type and then a field to enter their license number. This will pull 32 up their license information. After verifying the license information, the customer needs to click on Connect on the right hand side of the information. After clicking on Connect, a pop up will appear that asks if the user wants to associate that license to their account. Now when they search for the address again, the services available for that specific license type will now show under the jurisdiction name. Users are able to add multiple licenses and license types to their account. For example, if an administrator for an electrical contracting company creates a user account, they can associate all of their contractor’s licenses to that one user account. A licensed professional is only able to purchase permits specific to their license type. If they have multiple licenses, they will need to add each license to be able to see the full range of permits available to them through ePermitting. Licensed professional account information is added to our system on a nightly basis for license types other than Architects and Landscape Contractors. If a customer is not seeing current information for their license, they may need to contact the licensing section to have their information updated in their system, since our information is pulled from the licensing sections’ databases. So if a professional with a CCB license renewed his license yesterday but the website tells them that the license is expired, they would contact the CCB to inquire about an update. If a professional with an electrical license does not see updated information, they would need to contact the BCD to inquire about an update. Applying for a Permit Once a licensed professional has registered for an account and has associated their license to the account, they will be able to purchase permits. They will start by clicking on the Apply link on the ePermitting website. From there, the website will ask the customer to agree to our terms and conditions, which they will need to each time they begin a new application. 33 The next screen is to enter the work site location. The more information that a customer enters in these fields, the more addresses that will be filtered out from the search results. Because of this, it is not necessary to put in very much information, because the system is more likely to show the address with fewer filters. So if a customer cannot find an address, they can press the ‘Clear’ button and then re-enter only the street number and the first few letters of the street name. This may bring up a few addresses, but will be less likely to exclude the address they are searching for. If more than one search result comes up, the customer needs to click Select under the action column and the agency name will populate below. If the customer clicks on the agency name, the types of permits will drop down with checkboxes. Once a customer checks a box, the ‘Continue Application’ button will allow the customer to go on to the next step. 34 The next screen will list the licenses that are associated to the customer’s account. The most common issue that customers encounter on this page is that they need to associate a supervising electrician to their electrical license. This can be done by clicking on the license number and then using the supervising electrician drop down menu to choose a supervising license. The next page in the permit process is the work site information page, and it contains read-only information that allows the customer to verify that they are getting the permit for the right property. Owner information is only updated when ePermitting receives an address load from your jurisdiction. The next page is for the applicant and site contact information. Customers can use the ‘Select from Account’ button to populate contact information from the account or license. The next page is additional information, shown in this example to the right. The Project Name and Cross Street Directions are not required. In ACA, the project name is a searchable field, so if the customer uses a distinct project name, they will able to search for their permits with that name. For example, if the contractor for Blue Hill Builders names all of their projects starting with Blue Hill, they will be able to easily search for their projects. 35 This next section is where the customer will select what they are purchasing the permit for. These fields will correspond to the permit type the customer selected at the beginning of the application. The text to the right of the fields indicates the measurement of quantity for that item. For example, the “Enter total sq ft:” field has “Square Ft” as the quantity type, but for a service you would enter the number of services the permit is for. If a customer is concerned that their permit cost is unusually high, sometimes it is because they have entered the quantity wrong, such as entering “200” for one 200 amp service when the field is only asking the number of services as opposed to the number of amps. The next page is the document page. Each customer will see this screen even if the permit items they selected do not indicate the need for a plan review. If a plan review is required, this is where they will upload the electronic documents to be reviewed by an inspector. There are no required fields on this page, so if a customer has no document to upload, they can click ‘Continue Application.’ 36 After the document page, the customer is able to review their permit. Using the ‘Edit’ button on the right hand side of the gray title bar, the customer can change or update information on their permit from the review page. If an application requires a plan review, the application would now be submitted to the jurisdiction without the customer submitting any fees. If the permit is an “over the counter” permit, the customer will need to submit a payment before the permit will be sent to the agency. If it is an “over the counter” permit, then the next page will preview the fees for the permit. This preview will show how the fees were assessed and what the total is after the state surcharge. If everything looks correct, the customer should click ‘Continue to Payment,’ and the customer will be promoted to enter their credit card information. 37 After submitting the payment, the customer will get a confirmation that the transaction is complete and will be able to view their receipt and permit. These documents will also be added to the document history for the permit and will be available to view and download from the record. Navigating the Application While customers go through the application process, there are a few features that are helpful to know about. One is the save button: This button will allow users to return to their application without having to re-enter information. Another helpful feature is the navigation bar, which allows customers to move between permit sections to correct or add to permit information. 38 Comma Separated Values (CSV’s) Export You are able to export data from the back office to use in Excel for tasks like custom reports or mailing lists. First go to the portlet that contains the information you want to export and use search or My QuickQueries if you need specific information. After you have the information sorted out in the portlet, click on the ‘Menu’ button and select CSV Export. You will see a pop up that asks if you want the information opened or saved. For many, the pop up will be at the bottom of the webpage. If you open the information, it will be transferred into a spreadsheet. You can then use the spreadsheet program to sort the data and create your own reports, mailing lists, and more. Inspections In the Inspections portlet page, you can complete any inspection related task from scheduling inspections to creating inspector’s route maps. You can access the Inspections portlet page from the underlined link at the top of the page. You are also able to access inspection information for a specific record from Inspections in My Navigation. This will display the inspection for that record, and will allow you to schedule inspections, result inspections, as well as set a preference to either hide or display inspections for customers in ACA. 39 Adding Inspections Homeowners, contractors, and others are able to schedule inspections on the ePermitting website without logging into the website or having a user account. The website will also give details on the completed inspections to any user. This allows contractors to track their inspections and gives information to real estate professionals and others who may inquire about completed permits. Pended Inspections are inspections that have been listed as required for a permit but have not yet taken place. Adding them to the pending list makes them viewable to customers so they know which inspections to request and in what order to schedule them. Select the permit in the Record portlet and go to Inspections in the My Navigation portlet. Under the ‘Manage Inspections’ menu drop down, select Add/Schedule Inspections. This will bring up a pop up window, shown in this example, which will show the different inspection types. Use the arrows in the center of the window to move the required inspections over. After you have selected the inspections, click on ‘Pending Inspections’ to add the inspection to the pending list. Add/Schedule Inspections if you want to add the inspection to the scheduled list with a day and time. See the Inspection Choices diagram in the appendix for additional information on options available for resulting inspections. 40 IVR (Interactive Voice Response) Phone System The IVR system allows customers to request inspections through a telephone recording system. The IVR system will prompt customers through a phone tree that gathers inspection information. Customers call into the same IVR phone number as the agencies, but go through different menu options to be able to leave their inspection results. Most of the information from the IVR phone requests will be relayed electronically to the back office and is then automatically added to the inspection list. If your jurisdiction allows contractors to leave messages with their inspection requests, then you may need to call into the IVR line to retrieve those messages. When you go to the Inspections portlet, the scheduled inspections will automatically populate. Under the Request Comment column, there will be notes from the customer. If the inspection was scheduled online, this is where the note that the customer typed in will be displayed. If they scheduled their inspection through the IVR system, and left a message, that information will NOT be relayed to the back office. In this example, you can see that three of the listed inspections have “-Msg!” next to a number in Request Comment column. This is the indicator that the requestor has left a voice message with their IVR inspection request. Your office will need to follow the instructions below in order to retrieve those voice messages. If that column only shows the number, and is not followed by “-Msg!” then the requestor did not leave a message and you do not need to call in to the IVR number. It is important to check these messages prior to the inspector going out to the job site because the messages can contain vital information, such as gate code numbers. How to Check Inspection Request Messages First call the State IVR number: 1-888-299-2821 Then press 9# to access the Inspector menu. Enter the Inspector ID and press the pound key (#) 41 Next, enter the Inspector Pin and press the pound key (#) Option 2 will play the contractor messages. The phone system will guide you through the available message options. Posting Inspection Results in IVR You are also able to post inspection results through IVR. First call the State IVR number: 1-888-299-2821 Then press 9# to access the Inspector menu. Enter the Inspector ID and press the pound key (#) Next, enter the Inspector Pin and press the pound key (#) Option 1 will allow you to enter inspection results. The system can look up permits in two ways: 1) The 8 digit confirmation number or 2) The 12 digit IVR reference number 42 My QuickQueries If you want information in a certain portlet to be displayed in a specific way, you can create your own My QuickQueries. By selecting an option from the My QuickQueries drop down menu, the portlet you are in will display information according the parameters set up for the query. For example, if you want the Records portlet to display permits that were submitted in a certain time frame, you can use this tool to sort and display those records. Creating New QuickQueries The portlets that have the My QuickQueries drop down menu will also have a My QuickQueries option in the Menu drop down. This is where you will edit and create QuickQueries. QuickQueries are specific to the portlet and specific to the user who created it. If you create one under your profile, a co-worker would not have the same My QuickQueries in their drop down menu. After going to My QuickQueries in the Menu drop down, click on ‘New.’ In the below example, the query being created is a list of inspections in a certain time period. Therefore, under the “Search By” fields, the option that has been selected is “Scheduled Date” and the dates themselves have been typed into the corresponding blank fields. The operator drop down in the middle will be automatically set to the equal sign (=), but this can be changed to greater than, less than, contains, not equal to (!=), and more. The field after the operator drop down gives you the option of choosing from a menu or typing content. These fields are case sensitive and your QuickQueries will not work if there are 43 minute differences between your search and the reference data. For example, if you select “Inspection Type” is “=” (equal to) and then you enter “electrical,” if the reference data lists inspections under “Electrical,” your QuickQueries will not pull data because of the difference in capitalization. Once you have set the parameters, click the ‘Submit’ button, and after you refresh the portlet, you will be able to select your newly created query from the My QuickQueries drop down menu. Planning Module Not every jurisdiction uses the ePermitting system for planning purposes, so this section may or may not apply to you. If you are a user in multiple modules, such as a person who works in the building and planning department, you can change your user level in the top right hand corner next to where it displays your username. To access planning records in the back office, change the module option in the Record portlet. The module drop down menu is on the right hand side of the portlet next to MyQuickQueries. In this example, you can see that the module has been set to Planning. The next example shows the Record portlet set to the Planning Module. The record types that are displayed in the Record list portlet will only be planning records. 44 Professionals and Contacts ePermitting receives a nightly update of CCB and BCD licenses. This means that the information in our system for these professionals is very up-to-date. We also load Architects, Engineers, and Landscape contractors approximately once monthly. MDI (Manufactured Dwelling Installers) and DEQ (Onsite System Installers) licenses are under review for possible addition to the website. Portlets that manage people reference data include: Professionals; and Contacts Note: Owners live in the Property reference data as part of APO (Address, Parcel, and Owner) Professional Portlet Professional licensing is validated at the time the application is submitted, and again when the permit is issued. As a result of this, you may get an error that the contractor license that is associated to the application is not valid when you go to issue the permit. If you get this error, check the licensing website to determine their current status. If you are able to confirm that their license is active, then you can make an update to their reference record in the Professional portlet. To do this, go to People in the portlet pages links at the top of the website, and then in the Professionals portlet, click ‘Search.’ Input the license number into the appropriate license field and then select ‘Submit.’ From the returned results, select the record. This will populate the Professional Detail tab. In this window you can see the status and the license expiration date fields. 45 Before updating, double check that the license number you are updating corresponds to the license you looked up, not just the contractor name. If you are unsure of a contractor’s license status, do not make an update to their information. Contact the licensing section or call our office if you have any questions. After updating the license status and the license expiration date fields, click ‘Save.’ You can then submit the application or issue the permit as needed. As a result of the nightly licensing load, this updated information may be overwritten with the new information. If the licensing section made the update to that person’s license in their data system, then the license information on the permit will still show as active. If the licensing section did not update the license status and information in their system, then your updates will be overwritten. If this happens, it is recommended that you refer the contractor directly to the licensing section. You are also able to update the address, primary phone, or email for immediate purposes, such as printing the permit, but the information will still be updated nightly with the other system’s data. You can also see the Associated Record List Tab from the Professional Detail window which displays the records that person is associated to. Contacts Portlet Contacts are added manually by the jurisdictions. By adding a contact to the reference data tables in this portlet, you are able to search for and populate the information in records, saving you the time of entering contact information multiple times for an individual. The contact reference data is ideal for adding information for larger contractors, planning consultants, or others you regularly do business with that do not have a professional license. Before adding a new contact, search for the contact to ensure you do not create a duplicate record. If a match is found, select it by highlighting it and under the Contact portlet, a tabbed Contact Detail window will load and you can make updates here as needed. If no match is found, select ‘New’ and add the new contact information, and then ‘Submit.’ 46 Licensing Websites Here are the websites to make ‘favorites’ in your web browser to do license lookups for most of the applicable license types: Construction Contractors Board (CCB): http://search.ccb.state.or.us/search/ Board of Examiners for Engineering: http://www.oregon.gov/Osbeels/Pages/Search_License.aspx Oregon Board of Architect Examiners: http://orbae.com/search-licensees/ Landscapers Contractors Board (LCB): http://www.oregonlcb.com/contractorsearch/ContractorSearch.aspx Building Codes Licensing (BCD) – professional licensing, Plumbing and Electrical (also includes MDI licensing – for reference only, not included in Professionals batch load at this time): http://www4.cbs.state.or.us/ex/all/mylicsearch/index.cfm?fuseaction=main.show_main&gr oup_id=30 DEQ Onsite System Installer (for reference only, not included in Professionals batch load at this time): http://www.deq.state.or.us/wq/onsite/sdssearch.asp Records A record is a set of data. A record can be a permit, a fee estimate, or an inspection record. A property that has been added to the reference tables is a record. Records are created and maintained by jurisdictions. In ePermitting you are able to clone records, run reports from records, create record sets, and relate records. Cloning Records Cloning a record allows you to create a record from information already entered into a permit. To create a cloned record, first pull up the record you want to relate in the Record portlet. From the My Navigation portlet, click on ‘Create Related Recs.’ This is the same place you would create a related record, which is why the portlet is titled ‘Create Related Recs.’ 47 The Record ID portlet will fill with the current related records, and, if there are no current records, will look similar to this example. If there are already related records listed for the permit, be sure to select the correct permit. Check the box next to the permit you want to clone and click on the ‘Clone Record’ button. The screen that populates is in the example to the left. Enter the number of clones you need to make of the record into the first field, and then select the record type to clone. After you have selected the correct record type, you can use the arrows between that field and the one to the right of it to move the record type to the next field. This example shows what it will look like once you have moved a record type over. As you can see, a residential electrical permit has been selected. Then click the ‘Submit’ button. Next, you will select from a checklist which information from the existing record you want to be moved over to the new cloned record. If the information does not apply to the permit you are cloning the information for, then you will manually enter that information after creating the cloned record. 48 After selecting the appropriate boxes, click ‘Submit’ and the record will be created. A pop-up window will tell you if any information failed to transfer over and the portlet will go back to the starting place for cloning records, showing the new record. Reports You are able to run a variety of reports in ePermitting. Reports can be found on the left hand side, in the Reports portlet shown to the right. The reports are categorized by function, so a report for daily balancing would be in the Financial Reports section of the portlet. Select the report you want to run by clicking on the category the report is in, and then click on the report title. This will bring up a window that will ask for information pertinent to the report you are running, such as the date range or which department’s information you need. This information comprises the report parameters and will determine which information will be in your report. How to Generate Reports and Certificates on Converted Records Because a converted record was not created in Accela, certain data may be missing in the record. If the information that is missing in the record is used in a report, the record will not display in the report. As a result, there are some additional steps you need to take on converted records to successfully generate certain reports, particularly the Certificate of Occupancy, Certificate of Satisfactory Completion, and the Building Permit. 49 On a converted record, ensure the following information is complete in the permit record: App Info (ASI) - complete ASI, particularly Category of Construction and Type of Work. Description of Work - review the Description of Work to confirm that this is the statement of work that you want to appear on the printed certificate or that scope of work is reflected here. Inspections - for Certificates, assure that a “final inspection” is indicated and positively resulted. Invoice Fees - confirm that all outstanding fees have been paid in full. Payment - strictly as a check and balance, confirm that there are no unapplied fees indicated on the record. Property Owner - assure that a property owner is associated to the record. Valuation Calculator - for Certificates, even if you are not using the Valuation Calculator to assess fees, you must add a row(s) and input the Occupancy Group and Construction Type. Workflow - For the Permit: assure that the Permit Issuance task shows a status of “issued” For the Certificates: additionally assure that the Inspection Process task shows as “inspection process complete”, and that the Close Out task shows as “finaled.” The workflow status and the record status should both show as finaled. After ensuring these fields are complete in the record, run the report as normal. Then, the converted record should be included in the reported information. Workflow You can access a permit’s workflow through the My Navigation portlet. Workflow describes the various stages that the permit will go through. Just like permits that are submitted to your office in person, permits submitted on through ePermitting go through the process of being received, reviewed, issued, and finaled. As the permit is moved through these stages, the workflow of the permit in the back office will need to be updated. Workflow is divided into “tasks.” In this sample mechanical permit, the workflow stage is inspection process. The name of the task that the permit is currently in is printed in red. The workflow tasks are 50 specific to the type of permit. Depending on the record type, there could be different and additional tasks, such as site review or fire marshall review, or a completely different set of tasks, like you would see in a Planning record. The section to the right of the Workflow Tasks contains more information about the workflow steps. There is additional information on the task status, the date the status was updated, and the user who updated the task. Below is an example of this information. Once a record has moved past a specific task, only users with permission can use the ‘Supervisor’ button to go back and correct or add to an already completed task by changing “Task Active?” to Yes and “Task Completed?” to No. Upon application intake, the possible permit statuses are: Additional Info Needed Additional Info Received Application Accepted (this starts the “clock” on the application, and is used by jurisdictions with Third Party providers to notify them that the application is ready to be assigned for plan review) Application Submitted Ready for Plan Review Ready to Issue (used when no plan review is needed) Void (used only for mistakenly submitted applications) Withdrawn (used when the applicant cancels the project) After an application moves past the intake stage, it will go through the review stages. In the review stage, the possible permit statuses are: Additional Info Needed Additional Info Received Approved (moves application forward) Approved with Conditions (moves application forward but requires entering the conditions in the workflow) Awaiting Review 51 Not Required (this status allows you to move through the review stage if the review task was mistakenly assigned) Revisions Needed Revisions Received (creates child revision record to track revision) Withdrawn (used when the applicant cancels the project) After the review stage, the permit will move into the issuance stage. The possible statuses in this next stage are: Permit Issued (when moved into this stage, the permit is generated and is moved into the Inspection Process stage) Ready to Issue (this is the default status) Withdrawn (used when the applicant cancels the project) Having workflow may feel like an extra step, but it provides valuable information to the customer who can check on the status through ePermitting rather than calling your jurisdiction. It also gives you a quick and easy place to identify the permit’s status if it is inquired about. 52 Reference Materials & Index ePermitting Terminology A•B•C•D•E•F•G•H•I•J•K•L•M•N•O•P•Q•R•S•T•U•V•W •X•Y•Z AA (Accela Automation) — The software application used by Oregon ePermitting to provide a template with a complete set of tools for jurisdictions to manage their building permit process. The software provides the automation of workflows, forms managements, permit activity tracking, cashiering functions, reporting, and other critical tasks. Accela offers supplemental components of the software application for purchase by the jurisdiction to manage additional services outside the scope of the Oregon ePermitting Program. User tip: While AA is the software application itself, you will also hear it referred to as the “back office” system used by jurisdictions. ACA (Accela Citizen Access) — The web-based portal that integrates with Accela Automation to provide online access to permitting services and information utilized by the contractors and the public, alike. It allows customers to apply for, pay, and track permits online 24 hours a day, 7 days a week. Accela Community – A collaboration website provided by Accela where users can browse the knowledge base, submit ideas and questions, view blogs, find documentation downloads, and interact with other users or Accela staff. Registration is required, but is provided free to all Accela product users. ADS (Accela Document Service) — A database for electronic documents (and reports) that are associated with each ePermitting record. See EDMS. Agency – Used to reference a specific jurisdiction’s configuration within the statewide ePermitting system. This is the first required field when logging in to the back office and is the jurisdiction’s Service Provider Code. For example, Lane County is an agency, but their login agency is LANE_CO. AGIS (Accela Geographic Information System) — An interface that integrates with Accela Automation to provide automated maps from a central database. This system provides a geographic representation of all land-use, zoning, and infrastructure information associated with a parcel, permit, inspection, or plan. AMO (Accela Mobile Office) — A mobile application that integrates with Accela Automation to extend inspection resulting capabilities to the field. AMO runs on various operating systems making it compatible with a variety of mobile devices such as Smart Phones, Tablet PCs, and laptops. 53 Anonymous User - An anonymous user is a public user who utilizes the components of ACA that do not require a registered ACA account. They can search for and track permits, make payments, schedule inspections, and upload documents, which allows individuals associated with a building project to participate without having an ePermitting account. See Public User and Registered User. APO (Address, Parcel, Owner)– An acronym for Address, Parcel, and Owner. This combination of information is vital in being able to identify which property the permit has been purchased for. Application - A term identifying the initial application submittal and intake phase of a record prior to the building permit being issued. The application phase can last through plan review. Application Intake Form - An application intake form allows users to provide information and select services related to their building permit project. It is organized into sections that correspond to building department processes. Fees will be automatically assessed depending on the services selected. Application Accepted – A status indicating that an application was received and has been accepted by the local city or county building department. Application Status – The status of the record overall. Though closely related, an application status is different than a task status. For example, the overall application status may be “In Review” while the task status for a particular review stop may actually be “Approved”. See Task Status for more information. Application Submitted – A status indicating that an application has been submitted to the local city or county building department and is awaiting processing. ASI (Application Specific Information) — Consists of fields for collecting information about a project. The ASI fields are often unique to a record type or to a group of similar record types. Depending on the information being collected, ASI can include a text description box, alpha-numeric text fields, numbers, radio (y/n) buttons, checkboxes, or dropdowns. Some ASI fields are only available at application intake, while other can be used throughout the permit process. See Record Type. ATBW (Authorization to Begin Work) — A document that is generated by the system at the end of some ACA application processes. Issuing an ATBW depends on the jurisdiction and not only the building permitting services they offer, but also the ePermitting service level they participate in (Basic or Full Service). A copy of the ATBW is either available for download after payment or is emailed to the applicant. The ATBW serves as a pre-permit document allowing work to begin on the jobsite while the jurisdiction reviews the application and determines the next steps. In Basic Services, the “actual” permit is typically sent to the applicant 1-2 days later. User tip: ATBWs are also referred to as “authorizations.” 54 Attribute - A special characteristic included in reference data, such as a parcel. This can include information such as fire districts, sewer districts, flood plains, etc. that may be informative or dictate the type of activity that can be conducted on that particular site. These attributes are in addition to the “template” information included in the reference data. AV360 (Accela Vantage360) — Provides configuration tools for administrators to use in setting up personalized consoles, form layouts, and more. Additionally, provides access to report settings and manual batch processing. Back Office – Only available to Full Service jurisdictions, this is the record control-center where all applications are processed and managed. All aspects of a permit’s lifecycle are managed from this workspace, including permit application, fee assessment, payment transactions, plan review, permit issuance, inspection details, and reporting. Basic Service – A jurisdiction that participates in ePermitting but offers only limited building permitting services not requiring plan review. A basic service profile has no back office functionality and provides only ACA permit application capability. Both the contractor and jurisdiction are emailed an authorization upon completion of the online ACA application process. Management of the permit process is conducted outside ePermitting and is completed via the jurisdiction’s existing process. CAP – The term “Record” replaces CAP; however, some parts of the system still use this terminology. The term Record now defines a broader range of items or forms that users manage within Accela Automation, such as an application or permit. See also Record or Permit. Cloning - The act of duplicating parts of a record by using an existing record as a template. When you clone a record, a new duplicate record is created. Cloning allows the use of some or all of the template record’s information as a starting point for a new record. This establishes a parent-child relationship between the original record (parent) and the new duplicated record (child). See Related Records. Conditions - An indicator that can be placed on records, licensed professionals, and reference data to help ensure requirements are met before a record can proceed. Conditions are set based on the severity level selected when applying the condition. The severities are Hold, Lock, Notice, and Required; each severity functions differently, allowing or limiting access to pieces of the record as appropriate. A Notice condition, for example, is a visual reminder only and does not stop record progress. Configuration – The technical arrangement of system features to make the model function. A jurisdiction setup typically includes process training and the configuration of jurisdictionspecific fee schedules, logos, contact lists, user profiles, inspection calendars, etc. 55 Contact – A person associated with a permit. A contact can range from the applicant to the owner to a contractor not listed in the state database. Contacts can be saved in reference data or added transactionally. See Reference Data and Transactional Data Console - The layout of the workspace in the back office that include the links and portlets containing all the detailed information the user has access to as established by their user permissions. Consoles can be different from user group to user group. See User Group/User Permissions. Credentials – A unique user ID and password combination assigned to users for each system environment. CSV Export — Allows a user to pull information from a list portlet in the system into an Excel file. This is available in both the back office and for ACA. CVV (Card Verification Value) — A 3 or 4 digit number on credit cards to provide an extra measure of security for online transactions. The CVV can be found on the back of most cards. Delegate User - An ePermitting user with a single login that has permissions to perform operations in multiple agencies. EDMS (Electronic Document Management System) — An automated system supporting the creation, use, and maintenance of electronically-created documents. User Tip: ePermitting uses ADS of our electronic documents, but can interface to some EDMS systems. EDR (Electronic Document Review) — A digital plan review process, made available by Oregon ePermitting, utilizing a locally installed, licensed copy of Adobe Pro X. This tool allows reviewers to open, review, and mark up electronic plans. EMSE (Event Manager and Script Engine) — A tool-set automating and simplifying system processes. Scripts are programmed to run at various points in a permitting process for managing and controlling specific back office & ACA events. User tip: If there errors occur in the system, you may see this term in the pop up window with the details of the error. Environment – ePermitting technicians utilize several different work areas for various pieces of the implementation process. These separate environments are used to conduct training, develop configurations, test new versions of Accela, and more. Production: the “live” system used by jurisdictions and the public for permit management. Staging: closely mirrors production, so that minor changes and updates can be tested to verify system functionality. This is often where jurisdictions test new functionality, scripting changes, or enhancements. 56 Configuration: used for developing system functionality and configuration, specialized testing, and is often used to setup an environment for training and user education. Development: used for specialized system testing. This is where new versions of Accela are first placed to begin the testing process. Training: is usually a copy of the configuration environment where jurisdictional users are required to spend time familiarizing themselves with all phases of the ePermitting model. Training classes for new users take place in this environment. All class members get a student profile and credentials allowing them access the training environment. ePermitting Community – A web-based site, using state software known as GovSpace, allowing multi-agency and multi-jurisdictional collaboration. It provides a document repository for sharing files, blogging tools to provide a one-stop information location, a community board for ongoing discussion threads, and other collaboration efficiency tools. Fee Item – The price that must be paid for a specific service or permit-related item, as specified in an agency’s fee schedule. Each individual fee listed is identified in the system as a fee item. Fee Schedule – The compilation of all building permit fees for services offered by a jurisdiction per requirements of the Consistent Form and Fee Methodology found in rule. FID (Functional Identifier) — A four-digit identification number used to enable specific fields, security permissions, or functionality. These are divided between Admin and Daily permissions; however, a combination of both may be required to establish correct permission settings. Full Service – A service level option that offers a full range of building permit service functionality. It has a functional back office system and provides ACA functionality that includes online permit application and tracking, inspection scheduling, fee payment, and document upload (plans, forms, affidavits, etc.). Helpdesk Ticket – A tool used by live jurisdictions to submit trackable help requests to the Oregon ePermitting helpdesk. Helpdesk requests are assigned a record number and tracked in a state level back office. Hosted – A term used to define a contractual maintenance agreement where use of one or more computer servers is leased, often at an offsite location. For example, the ePermitting system is located on servers owned and managed by Accela in Utah. iLinc –An interactive web-meeting service combining integrating video, PC desktop, application sharing, and other collaborative tools. iLinc is the web-based training tool selected by “ePermitting University” for presenting trainer-guided classes to jurisdictions choosing to participate in upcoming implementations. Inspection Calendar – A setup element that must be created in order to “activate” online inspection scheduling functionality. It controls the days of the week and the hours per day 57 that inspections can be scheduled. Depending upon a jurisdiction’s specific settings, they may have additional flexibility to schedule inspections in the back office when their customers cannot. Multiple calendars may be needed for some jurisdictions. Per statewide standard, same day inspections must be scheduled by 7:00 a.m. Inspection Discipline- Identifies the scope of an individual inspection and creates a relationship to an individual inspector’s profile. Each inspection must have a discipline associated with it. Inspection Districts – Inspection calendars require at least one district to allow autoassigning inspections to system users. District 0 has been adopted as a default to provide that functionality. A jurisdiction can add more than one district as required per their business processes. Inspector Profile – A special profile-setting in addition to a user profile that connects inspectors to inspection disciplines (electrical, mechanical, plumbing, structural, etc.), districts, workload limitations, and the inspection calendar. Inspection Type - A specific kind of inspection categorized by both trade and inspection codes. Naming conventions and code numbering are determined by statewide standards and cannot be altered by jurisdictions. The codes are critical for using the IVR system. Internal CC Process - A payment process where credit card payment information and associated billing information is processed through the ePermitting back office. Jurisdiction staff inputs the credit card number, expiration date, CVV, and billing information, so it can be sent to the Virtual Merchant (VM). VM returns an approval or denial code to the ePermitting back office where only the approval code, payment amount, and payer information is digitally stored. IVR (Interactive Voice Response System) — A statewide voice recognition system provided by Selectron Technologies that allows jurisdiction staff and public users to perform tasks associated with scheduling and resulting inspections over the telephone. A unique 12-digit IVR number is generated for each record in the system to facilitate the use of this thirdparty interface along with the 4-digit inspection code. Jurisdictional ID – Each jurisdiction, whether currently participating in the ePermitting system or not, has a unique code used to identify them in the database. All full service jurisdictions have a 3-digit code used as a functional prefix to identify all their records, permits, ATBWs, IVR, reports, etc. LBDD (Local Building Department Directory) — A web page provided on the Oregon ePermitting website. It allows all jurisdictions with a building program to list current local building department information on the state site, including contact information and services offered. 58 Licensed Professional - A licensed contractor, engineer, architect, etc. who is registered with an enforcement agency that ensures compliance with state and local regulations. User tip: Often referred to as “professionals” or “contractors.” License Types – In the system, license types are used to identify who can purchase specific services. License types are categorized by licensing agency then by a specific license classification. For example, specific electrical licenses issued by BCD are limited to the types of services they are able to purchase; however, this is not confined to BCD licenses and can include CCB, Architects, and Engineers. User tip: Another term for this is “purchasing category.” List Portlet - A back office area that contains a specific list of items. The data in the lists can be sorted by the column headers and information can be exported from these portlets. Lock - A red condition that prevents users from performing nearly all functions on the particular information to which it is applied. This is the highest severity available for a condition. See Conditions. Lookup - Allows a user to search for and view system information. For example, on the intake form lookup is used to locate a reference address, also bringing back the parcel and owner if applicable. See Search and Select. Main Link - A link on that contains a group of portlets relating to one theme. A console may contain multiple main links found at the top of each page. Examples: Home, Addresses, Parcels, My Tasks, etc. Menu Navigation – The “Go-To” menu is found on most form portlets within a record. Like My Navigation, it provides a path to various portlets within a building permit record. Menu Navigation is limited to Out of the Box functionality and cannot be set up as specifically as other navigation options. Module – A separate component of a larger system that can interact with other independent portions of the system. Each module can function independently of the others, but they easily work together to automate systems. While the scope of the ePermitting Program is limited to the scope defined in statute and rule, AA software is not limited to just the management of building permits. Automation offers additional optional components to supplement services provided by a city or county, such as Code Enforcement, Planning, or Licensing modules. These are available for purchase from Accela. Navigation – The process of moving from screen to screen or portlet to portlet using hyperlinks, tabs, function buttons, and browser tools. Navigation within a record is provided in two formats in the back office: My Navigation and Menu Navigation (also known as “Goto Menu”). Additionally, other parts of the system can be accessed using the Main Links, such as the Inspections or My Task pages. 59 Notice - A green condition often indicating special instructions related to that specific item. It could be a parcel condition that serves as a reminder that the property is located in a flood plain or a condition on a record indicating that a revision has been submitted. This is the lightest severity available for a condition and provides the most freedom with regards to changes to that item. See Conditions. Parameter – Fields that may be required for running a report. For example: Start Date, End Time, etc. Parcel Number - A unique designation of a specific parcel also called the map tax lot number, parcel number, tax account number, or some other unique identifier for the plot of land. Permit – A permit is a type of record in ePermitting. Portal – Also called web portal, it is a web site that brings information together from multiple sources for a unified purpose. The ePermitting ACA web portal brings together elements from multiple databases to provide active trade license validation, jurisdiction specific addresses & fee schedules, payment processing, and record specific report creation. Portlet - A section of a page dedicated to display specific information and perform specific tasks. Portlets make up the console layout seen on the screen. Both My Navigation and Record List are both portlets. POS (Point of Sale)- For ePermitting POS means a portlet that allows a jurisdiction to take payment for fees not associated to a record, similar to how a normal cash register functions (i.e. copies, maps). Property owner affidavit – Oregon law requires construction permit applicants, who are not licensed with the Construction Contractors Board, to sign a state form declaring they are the legal property owner who will abide by the responsibilities listed in the form and therefore, can be granted legal rights to apply for a building permit to perform work on their own property. Part 1: Information Notice to Owners about Construction Responsibilities - ORS 701.325(3). Part 2: Property Owner Statement Regarding Construction Responsibilities - ORS 701.325 (2). Online Form: http://ccbed.ccb.state.or.us/WebPDF/CCB/Publications/property_owner%20adopted%209-23-08.pdf Public User - Anyone who uses ACA is a public user. Public users include anonymous users, those without an ACA account, and registered users, those with an ACA account. Quick Query - A pre-defined search that helps users quickly access specific items with particular information in list portlets. Examples: ACA Applications, Permits Issued, Scheduled Inspections, etc. Record - A term that identifies a specific set of data in the system and is tracked by a unique jurisdiction identifier. 60 Record ID - The unique identification number of a record. All records, with the exception of historical data, must start with the 3-digit jurisdictional ID. ePermitting uses a standard format of: 123 – ABC – 13 – NNNN 123(juris id) ABC(record type) YY (record year) NNNN (sequence #). Reference Data - Reference data is data that has been added to the reference tables in ePermitting. Reference data is different from transactional data because you are able to search for and populate reference data into records. An address added to a permit would not be reference data, but if it is added in the Address portlet where the reference data is stored for addresses, then that information becomes searchable and can be pulled into records. Reference Database – An information repository that acts like a library, allowing users to search for stored information. A typical database might include address, parcel, and owner information stored in the a county records database. Users can search the ePermitting reference database from within the back office and from ACA. Access to this search capability is set up by an administrator. Registered User - A public user who has an ACA account is considered a registered user. These individuals are either licensed professionals or property owners that can only purchase permits for those items within their purchasing category. For example, an electrician could pull electrical permits but not plumbing; and a property owner could pull permits for their property only. Report - All documents created by the system are reports. Report Manager – Reports and their accompanying parameters are set up in this area so that users can easily run reports. Determining where reports are located is also established here. Scripted or Scripting – Many of the automatic processes in the system are controlled by strings of computer code, or scripts. Scripts can do any number of things, including reducing the number of steps required to do something, automatically adding fees based on selections in the system, or restrict a permit from being issued if fees are due. See Standard Choice. Set - A function that allows agencies to organize multiple records into a group. Sets can be used to group fees or simultaneously update the workflow for several permit applications at a time. SmartChart - A graphical representation of data bases on a pre-defined query. Examples: Count of new permits this quarter, The number of permits on Hold this month, Closed records by month this year, etc. SPEAR Form (Single Portlet Entry and Review) - See Application Intake Form. 61 Standard Choice - Configurations used by administrators to set up feature functionality. This is where most of the scripting for the model resides. Standard Choices are also used for the content used for reports that result in a letter being generated. Status – Identifies where a record is in the process. This can include both workflow and application statuses, which may indicate whether a plan was approved or that the overall record is “In Review.” Standard Comments – Another piece of reference data, they generally include the commonly used “Write It, Cite It” code citation list used by BCD or a jurisdiction. The comments are divided into 3 major groups (Inspections, Plan Review, and Jurisdiction), followed by the ability to select the applicable code. Comments are essentially templates that can be easily added to a record so that frequently used comments do not have to be typed every time for correction notices or when resulting an inspection. Supervisor button – An override button that gives extra permissions to an individual allowing them to reset a workflow task to a previous state, edit a date field that is normally read-only, etc. Task Status – This is the status of the current step the permit is in. Time Tracking – A record-tracking time counter is controlled by the current task status. If the task is dependent on someone working on the record in the back office (like plan review, fee assessment, etc.), the counter is “running”, but if the task is waiting for the applicant to submit a required document, or pay a fee, etc. the time tracker can be stopped by setting the appropriate task status. TSI: Task Specific Information - Custom fields created for use with workflow tasks. Transactional Data – This is data that is contained within a record, rather than being a record itself. It is not reference data, so it cannot be searched for or reused in records. Any data that has potential for reuse should be added as reference data to make it permanent and searchable for later use. Third-party Software – An add-on or plug-in product not supplied by Accela Automation. UAT (User Acceptance Testing) - The phase of implementation where jurisdictional users process every record type and use all aspects of the system to ensure the program works as expected, fees are calculating correctly, and each function required to complete the day-today work of the building dept. UAT Ticket – A record that details a specific issue encountered during user testing, allowing issues to be tracked and resolved in a timely manner. Upgrade – As with any software solution, Accela Automation is constantly changing and evolving to make the system better and more efficient. As technical changes become available, Oregon ePermitting technicians will compile and eventually apply the changes to the system at one time, creating a system upgrade. 62 User Group – An established set of permissions grouped by specific system tasks so that users can be assigned to a group with the correct permission for their job– i.e. permit technician, supervisor, admin. User Permissions – The controls set by administrators that allow individual users to perform specific tasks in the system. These controls are set up in user groups and, once established, each user is associated to one group. These permissions determine what and who has readonly rights vs. those who have rights as a plan reviewer. User Profile – Individual information for a particular user. The profile determines a user’s login information, their contact information, and indicates the appropriate user group permissions. Valuation Calculator – Calculates the job value for a project based the annual April ICC Building Valuation Table. Virtual Merchant - A hosted, second-party, PCI compliant, payment solution managed by Elavon, that is used for processing all payments for the system. Wildcard – A special character that can be substituted in a search to represent one or more unknown characters that may, or may not be, part of the item being searched for. The ePermitting system uses a percent symbol (%). Workflow - A set of record-related tasks that must be completed in sequential order to move a permit application through the system. Workflow functions, much like a processing checklist, guiding both the jurisdiction and their customers through the required record processing steps from intake to plan review, issuance, inspection, and on. Write it Cite it – A reference list of the most recent and common code citations in five specialty code areas - structural, electrical, mechanical, plumbing, and residential. State rules require the applicable code reference be cited for any violations or necessary corrections. A•B•C•D•E•F•G•H•I•J•K•L•M•N•O•P•Q•R•S•T•U•V•W•X•Y•Z Frequently Asked Questions If there is a general topic for a question, it will be underlined so you can easily scan through to find the question you are looking for. Hyperlinks are sometimes used to guide you to additional information within the manual, and are in bright blue underlined text. Q: One of the addresses in my jurisdiction has been updated. I want to keep the old address in the system so customers can look up past permit records under that address, but I don’t want contractors to be able to pull permits under the old address. How do I accomplish this? 63 A: Follow the normal process for adding an address to the system with the newly assigned address. Remember to assign an address type. Then, search for the old address in the Property portlet, and delete the address type from the old address. This will allow the address to remain in the system as a searchable address record but will prevent permits from being purchased for it. Q: A permit was issued with a different prefix in the permit number. My jurisdiction has a prefix of 687 but the permit number issued was 233-15-0001-STR. A: The jurisdiction indicator needs to be corrected in the Parcel tab in the Property portlet page. To correct this, first void the fees on the permit. Next, delete the parcel from the permit record. Then, in the Property portlet page, search for the parcel and correct the option under Jurisdiction Indicator. Now, you can add the corrected parcel and the fees back onto the permit. Once done, the account code will be correct for that permit. Q: Occasionally a contractor will tell a homeowner that they can purchase permits online, and then the homeowner calls us to ask why they can not purchase permits through ePermitting without a license. What should I tell them? Why is that? A: As our website grows, we hope to make this a feature. Until then, homeowners are still able to utilize parts of our website: they can search for permit records, view their permit details and status, schedule inspections, view inspection results, and more. You as the jurisdiction can create records that list the homeowner under the licensed professional section. One of the licensed professionals 64 in the drop down list is “Owner,” which simply has a description to obtain homeowner information from the APO section. If you create the permit this way, listing the professional as the owner, the permit would be available for the customer to pay online, saving them from the paper application process, but it would be up to your jurisdiction to determine if your policies allow this. Q: A contractor has forgotten his password for ePermitting. How do I change it? A: They will have to be referred to our office. Give the customer our phone number: 503-373-7396. We are able to provide help with confirming usernames, resetting passwords, assistance with connecting license information, and more. Q: I’d like to help the contractor update their license in the system rather than have them make another phone call, how do I do this? A: First, have them go to Account Management in the upper right hand corner, under the green bar. License information will be the fourth section down. Ask the contractor if any licenses are showing in that section. If the license is showing but says that it is ‘Inactive’ or ‘Suspended,’ have them contact the licensing section at 503-373-1268. If no licenses are showing or if a license needs to be added, there is an ‘Add a License’ button on the right hand side in the gray bar. After they look up their license in the next fields, the system will show their license information and then customer needs to click on “Connect” to the right of the license. Now the license will be connected to their account and they will be able to pull permit allowed for that license type. 65 Q: I am trying to run a report for the Planning Department’s financial records. The report asks for the department, and I type in “planning” but no results are returned on the report. A: The fields in the reports section are case sensitive. If the department’s data has been titled as “Planning” with a capital “P,” then the report will only display information if you type it that way in the department field. The default for this field is “All Departments.” Q: A customer has requested to transfer a permit, and our department charges a permit transfer fee. How can I apply this fee to the record? A: Go the record and click on ‘Add Fees’ in the My Navigation portlet. Then, change the fee schedule at the top to B_POS. For this account code there is a Permit Transfer Fee that is three up from the bottom. The unit type for the Permit Transfer Fee is “Ea” so you would enter the quanitity based how many instances of the fee you want to assess to the record, which would likey be just one. Then click ‘Submit’ and the fee will be added to that record. Don’t forget to invoice new fees! Q: A payment type was entered incorrectly as “Cash” instead of “Check” in yesterday’s transactions. How can I change the payment type when it is no longer the same day as the transaction? A: It is up to your jurisdiction to establish a policy for this situation, but our recommendation is to not change the payment type in the system. Instead, we recommend going to ‘Payment History’ in the My Navigation portlet and add a note to the comments about the actual payment type. Rather than simply entering a comment about the correction, you could void the wrong payment and repost it with the correct payment type, but it will show in the current day’s transactions and you will be out of balance for the prior day. We also recommend balancing your transactions at the end of every day in order to avoid situations like this. 66 Q: A customer brought in a check that was already filled out to submit with their plans, but the check was a few dollars off and the customer wants to pay for the difference with cash. How do I enter the one payment with two payment types? A: First, make sure your fees are invoiced. Then, go to the Payments in the My Navigation portlet. Click on the ‘Pay’ button and input the first payment type and payment information but do NOT click ‘Save,’ instead hit ‘Pay More.’ This will bring up the payment window again which will allow you to input your second payment type and payment information. After all of the payment types have been entered, click ‘Save.’ This puts both payment transactions together on one individual receipt with the same payer, and you don’t have to do the process for a ‘partial payment’. Processing the payments as two separate payments would result in two receipts. Note: Do not use the ‘Pay More’ button when using any of the ‘nonpayment’ payment types, particularly Credit Memo. Q: Our office has no way of printing the plans that customers attach to their building permits. Can you turn off this feature for our jurisdiction? A: That feature is integrated into the system and cannot be turned off. You can contact customers once you receive a building application with electronic plans and let the customer know that you require paper plans submitted per your office policy. If you or your jurisdiction has any questions about beginning the process of reviewing plans electronically, please contact our office. Accepting electronic plans is helpful to many contractors and helps to keep the ePermitting process standardized for contractors. Q: We’ve assigned an address to an existing parcel because of the construction of a new home. How do I add an address when the parcel already exists in the ePermitting system? A: You will need to add the address to the parcel itself instead of creating a new address. First go to the Property page, and in the Parcel portlet, search for the parcel. Once the system has brought up the parcel record, you should see an Address tab seven tabs over from the left hand side. 67 Click on the Address tab, and click on the ‘Look Up’ button. Before entering a new address, always search for the address first to ensure that you are not duplicating the address in the system. If no address if found, click on the ‘New’ button. Fill in the address fields with all caps other than the county field. Q: My credit card totals do not balance when I am trying to complete the nightly balancing. My jurisdiction uses Converge (formerly Virtual Merchant) in the back office. A: Run the “Credit Card Detail” report from Financial Reports. Check this report against the Converge daily batch to ensure that no payments were processed twice or that a payment did not process at all. By comparing these, you should be able to identify the discrepancy. Once identified, take the action necessary to correct the issue. If you still do not see a discrepancy but you do not balance for credit cards, consider having another person take a look at the list. Sometimes a fresh pair of eyes can be helpful. Q: My credit card totals do not balance when I am trying to complete the nightly balancing, but my jurisdiction does NOT use Converge (formerly Virtual Merchant) in the back office. 68 A: Run the “Credit Card Detail” report from Financial Reports. Compare this report to your signed credit card slips and to your credit card vendor’s daily batch list. Confirm the payment amounts for each line item in order to locate which item to correct. Usually in this situation, the payment amount was keyed incorrectly in the credit card amount field. If the wrong amount was entered into ePermitting and it is the same day that the payment was entered, you will need to void the payment and re-post the correct amount. Inspection Choices Automation (Back Office) Database Web site accessed by computer Inspector or Permit Tech AMO-software downloaded to a laptop Inspector Inspector App (android or iOS) downloaded to smartphone or tablet Inspector Requires Internet Connection to Result Inspections Requires Internet Connection to Search for Information Toggle directly to related permits and inspections (you can see the inspection history on a permit, but this is if you want to see what inspections have been done on other permits at the site) Integration to jurisdiction’s GIS mapping features Display scheduled inspections on map Save “Favorite” Comments Mobile Printers Y N N Y Y Y Y Y N (you have to search by address or permit number to find the related permits and inspections) Y Y N Y Y Y N N Y Available Available Email Inspection Reports Y Y “Brother” thermal printer can be used Y Who enters results 69 Plan Revisions/Deferred Submittals/Phased Projects Uses: Begin Process From: Process: Tracking Plan Revisions Organizing Plan Amendments Building Review Workflow Status Two Options: -Additional Info Needed -Revisions Needed Additional Info Needed Communicates to customer through ACA, (and internal staff) that the plans need/are being altered. The versions are tracked manually until the plans get finalized Revisions Needed Creates a revision record with: Same permit number as parent record Workflow Documents Comments Create multiple revisions records by moving parent permit into revisions needed status Deferred Submittals Phased Projects Tracking, and charging for, deferred portions of projects (trusses, engineered stairs) Related Records Large projects broken into distinct portions. “Clone Record” Pick Deferred Submittal from application picker Deferred submittal record attaches as child of parent record. Start Phased Permit as Parent Record. Add job valuation through “submitted job value” or the valuation calculator for that portion of job value. Add Fees Process like any other permit New Record Picker Put full project value on the “phased” permit. You must create all the structural phases of the project at this time, by adding them as additional records at the bottom of the SPEAR form- they should be structural PHASED permits Add phase valuation to each of the phases (guesstimate if necessary, you can always correct later) The permit fee will be on the Phased record The plan review and phasing fees will be on the children structural phased records You can create electrical, plumbing, mechanical children permits for each of the structural phased permits. Revision records close when parent record is closed 70 Certificates of Occupancy/Satisfactory Completion Temp Certificate of Occupancy Certificate of Occupancy Uses Structural Permits Structural Permits Begin Process from: Process WorkflowInspection Process Status Temp C of O Requested WorkflowCert. of Occupancy For Occupancy Group and Construction Type to print on C of O, they must be entered in Valuation Calculator To populate Areas of Responsibility, you must 1st add licensees to the “Professionals” on the structural permit. Write down the license numbers! Application Table Select ‘Table Subgroup’ Responsible Party ”Add” responsible parties by picking “Area of Responsibility” and adding license number (you have to know the #, there’s no look up function) Workflow, Change status to “C of O Issued” (all inspections must be completed and fees paid) This creates a TCO child permit with same number as parent TCO permit workflow “Request Accepted” Enter TCO Comments and # days before expiration in workflow comment boxes Move workflow through to “TCO Issued” Certificate of Satisfactory Completion Alterations, Additions, Electrical, Mechanical, Plumbing (provides contractors or homeowners with proof that work was permitted and passed final inspection) Reports“Permit Specific” Report can be run after Final Inspection is Resulted. TCO child permit opens notice condition on parent permit You can do multiple TCOs. Closing parent permit automatically closes TCO permits. 71 Record Types List Building o 1 & 2 Fam Dwelling (New Only)/Comprehensive(R) Combination Permit for a new one and two family dwelling. This type of permit will automaticallyy assess fees based on the valuation and specified ASI. o 1 & 2 Family Dwelling (New Only)/Limited(R) o Agricultural Equine(C) This record type is not a permit. It is a permit exemption which confirms that the proposed structure has been reviewed and it has been determind that there is no permit required. Many agencies charge a fee associated with the site review that confirms compliance of the zoning ordinances. o Alarm or Suppression Systems(C) o Building Appeal o Deferred Submittal(C/R) This record type is not a permit. Deferred Submittals are essentially a plan review of the proposed structure. Because this record type will not be the permit, it will always be a “child record.” You can create a deferred submittal by selecting “Deferred Submital” as your permit type. o Demolition(C/R) Fees are automatically assessed for this record type. o Driveway o Electrical(C/R) o Fence o Inquiry This record type can be used to track inquiry charges from research requests. o Investigation(C/R) This record type is used to track building code violation fees. If the investigation results in a required permit, you can relate the permit record to the investigation record. o Manufactured Dwelling(R) o Mechanical(C/R) o Phased Project(C/R) The permit for this record type will be issued from the Phased Project record. Authorizations will be issued for each for each phase after it’s review has been completed. o Plumbing(C/R) o Post Disaster o Research(C/R) This record type allows you to assess a fee for reviewing already completed work that was done without a permit, but now needs to be permitted. This 72 might happen in a case where someone has built an addition and the bank financing the loan requires that the work now be considered permitted. o Revision(C/R) This record type will always be the child record of another permit because it is for revisions submitted on another record. It is created from the workflow of the parent record. Fees for revisions should be attached to the parent record. o RV Park or Manuf Home Park(C) The fees for this record type are based on the valutaion submitted by the contractor. o Septic – DEQ(C/R/OS) o Site Development(C/R) o Structural(C/R) o Structural Phased(C/R) o Temporary C of O(C/R) o Manufactured Dwelling(R) Licensing o Business License(OS) o Regulatory(OS) Planning o Tracking(OS) o Investigation (OS) o Inquiry o Revision o Project – Inlcuded in full Planning Module only o Pre-Application – Included in full Planning Module only o Type 1 (County/City) – Included in full Planning Module only o Type 2 (County/City) – Included in full Planning Module only o Type 3 (County/City) – Included in full Planning Module only o Type 4 (County/City) – Included in full Planning Module only 73 Helpful Links Accela Community: http://community.accela.com/default.aspx Building Codes Division (BCD): http://www.bcd.oregon.gov/ Minor Label Program: https://minorlabels.dcbs.oregon.gov/ Sample Plans from BCD: http://www.bcd.oregon.gov/accela/documents.html Search Page for Licensing (BCD): http://www4.cbs.state.or.us/ex/all/mylicsearch/index.cfm?fuseaction=main.show_main&group _id=30 Board of Architect Examiners: http://orbae.com/search-licensees/ Board of Examiners for Engineering: http://www.oregon.gov/Osbeels/Pages/Search_License.aspx Construction Contractors Board (CCB): http://search.ccb.state.or.us/search/ Department of Consumer and Business Services (DCBS): http://www.oregon.gov/DCBS DEQ Onsite System Installer: (for reference only, not included in Professionals batch load at this time): http://www.deq.state.or.us/wq/onsite/sdssearch.asp Landscapers Contractors Board (LCB): http://www.oregonlcb.com/contractorsearch/ContractorSearch.aspx Permits Protect: http://www.permitsprotect.info/index.htm PDX Maps: http://www.portlandmaps.com/ 74


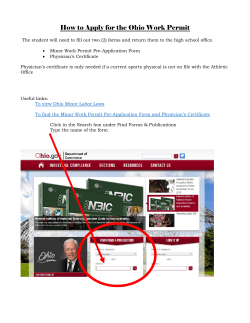


© Copyright 2026