
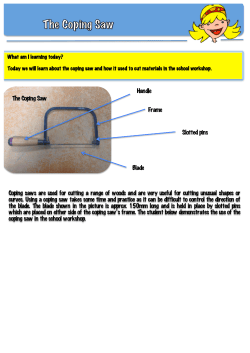
Shaping and bonding wood, bone, horn, steel
Shaping and bonding wood, bone, horn, steel
By
Jim Small
(This is the book that was written by Jim Small, published by the University of Georgia,
and shown on Georgia Public Television in 1982. Jim has total rights to this publications
and has given his permission for reprint here. I hope you guys enjoy this. )
STEP #1
The first step in making any custom knife is, of course, to design a knife that is suitable to
your needs. Put your design on paper, drawing it to the correct dimensions. Show where
the blade grind goes and where the guard or hilt goes, and where the rivet placement will
be.
STEP #2
Once your drawing is done, it is ready to transfer to what will be call a template. The
template is what your design will be permanently cut and designed to. Cut your paper
design out, and place it on any hard material. I use plexiglass, but you can use stiff
cardboard or thin sheet metal. Once your design is transferred, cut it out and profile the
edge. Make your template true to size and dimension
Also show on your template where the grind line will start, where rivet holes will be
placed, and where the guard will go.
STEP #3
Now it is time to transfer your design to your blade steel. You might at this time want to
dye the steel so that your scribe line will show up better. For this purpose we will use a
product called Dye-Kem, a very quick-drying dye that tool –and – dye makers use. It
comes in two colors: red and blue. Either one is acceptable. Once you have painted or
sprayed this dye on the steel, let it dry. Place the template on the steel and with a sharp
pointed object scribe the outline of your design onto the blade material. Go over your
line two or three times so you will be able to see your line clearly. Also scribe where
your rivet holes will be drilled.
STEP #4
Once your design is on the steel, it’s time to cut out the blade. This step can be done in
any one of three ways:
(1) If your design fits closely to the outside proportions of your blade steel, you may
choose to grind away all the excess steel down to the scribe lines of your design; (2)
You can drill a series of hole around and to the outside of your scribe lines. Then
take a hacksaw and cut your design out; (3) Take your blade steel to a machine shop
and for a nominal fee have them cut out the design on a metal cutting band saw.
Always remember to cut just to the outside of the scribe line.
STEP #5
Once your blade is cut out, it is time to profile the contours. You will have to do this
either by filing or by grinding to the scribe lines. As shown, profiling should be done on
the flat platen of the grinder so that the edges are precisely square. When this step is
finished, you’ll begin to see your blade take shape.
STEP #6
At this time you might wish to clean the sides of your blade steel. When you get your
steel from the supplier, it will be a little rough. You may choose to clean the blade steel
before you start Step #3, as the timing really makes no difference. Cleaning can be done
by sanding or once again using the flat platen of the grinder.
Try to keep the steel as smooth as possible. Once the cleaning is done, place the template
back on your blade steel and mark the holes for the rivets. Since we will be using a
screw-type rivet (actually a bolt-on rivet) we will have to use a 3/16” drill bit. Chuck this
in your hand-drill or drill press, and drill the rivet holes. When you use a hand-drill,
place the blade steel upright in a bench vise for easier handling. If you use a drill press,
either clamp the steel to the drill press table or clamp it in a drill press vise. Always
remember to wear protective glasses when using any power tools.
STEP #7
You are now ready to cut out the guard and fit it to the knife steel. There are three basic
materials you can use for the guard: brass, nickel or German silver, or stainless steel.
For our knife we will use brass. We will start with a piece 1/4” thick, 3/4” wide, and
1⅝” long. Place your blade steel across the width of your guard material so that just
about 1/16” stick out above the top of the blade. Then scribe a line at the bottom of the
blade steel. This will give you the depth line to which you will cut. The steel we are
using is about 3/16” thick so center two lines down the guard material 3/16” on center.
This will give you the area you’ll want to cut out. An easy way to cut this center out is to
Scribing the lines
drill the hole at the bottom of the two center lines and use either a hacksaw or a metalcutting band saw to cut the center out. Cut just inside the two centerlines as pictured.
Once this is done, you will have to do some filing to get your guard to fit. You should
take your time so you will have a good snug fit. This is a must!
STEP #8
Slide your guard onto the handle area of your knife. Turn the knife so that you are
looking at the protruding part of the guard or the part of the guard that will eventually
protect your finger. Here we are going to scribe two lines on either side of the guard and
file a notch so that the guard will slide up into the notch. This will help anchor the
bottom the guard and assure that it will be strong. Once the notch is made, slide the
guard onto the knife handle and up into the notch. Be sure that it fits tightly. Now we are
going to drill a hole 3/32” in diameter through the guard material and into the steel part of
the blade. The procedure will stabilize the top part of the guard. Once the hole is drilled,
take the 3/32” pin material and place it into the hole. Now try to move the guard. You
should have a very solid and strong guard fit.
STEP #9
It’s time now to move toward the grinding process. There is one step that we are going to
discuss that will assure that your primary grind lines are even along the edge of the blade.
I am going to show you how to make a tool to scribe two lines just off-centered of the
edge of the blade. I have designed for you a tool that is made of hardened steel (harder
than the knife steel). In the drawing you will see how the cutting tool works in
relationship to the edge of the blade.
You may scribe these lines one of two ways: (1) clamp the tool to a flat surface and work
the blade edge against the tool, or (2) hold the blade on the flat surface and work the
scribing tool against the blade edge. Note: some knifemakers prefer only one centerline;
I prefer two. These are the lines that you will grind to in your primary grinding operation.
Before we start the grinding operation, we need to discuss a few important questions.
One of these is the reason for grinding with abrasive belts instead of grinding stones. A
belt is much faster and cooler. Moreover, grinding with abrasive belts produces less
vibration and does a more accurate job.
Abrasive belts come in different grits or different granular structures. Most knifemakers
use a belt that is 72” long by 2” wide. When we start our grinding process, we will use a
50-grit belt, which is very coarse. The second belt we’ll us is a 120 grit belt, which has a
little finer granular structure. Then we’ll go to a 320-grit belt, with an even finer
structure. We will stop at 320 before we send the knife off to heat-treating. Once the
heat treating process is completed, we’ll use the 320 belt again, then go to a 400 grit belt,
and from there to a 9 mil polishing belt. We will do 99 percent of the blade polishing on
the belt grinder, something you would not be able to do on a stone grinder.
In this drawing you will see an easy and fairly economical way to build a belt grinder. I
have listed in the back of the book suppliers from whom you can along the edge of the
blade. I am going to show you how to make a tool to scribe two lines just off-centered of
the edge of the blade. I have designed for you a tool that is made of hardened steel
(harder than the knife steel). In the drawing you will see how the cutting tool works in
relationship to the edge of the blade.
You may scribe these lines one of two ways: (1) clamp the tool to a flat surface and work
the blade edge against the tool, or (2) hold the blade on the flat surface and work the
scribing tool against the blade edge. Note: some knifemakers prefer only one centerline;
I prefer two. These are the lines that you will grind to in your primary grinding operation.
Before we start the grinding operation, we need to discuss a few important questions.
One of these is the reason for grinding with abrasive belts instead of grinding stones. A
belt is much faster and cooler. Moreover, grinding with abrasive belts produces less
vibration and does a more accurate job.
Abrasive belts come in different grits or different granular structures. Most knifemakers
use a belt that is 72” long by 2” wide. When we start our grinding process, we will use a
50-grit belt, which is very coarse. The second belt we’ll us is a 120 grit belt, which has a
little finer granular structure. Then we’ll go to a 320-grit belt, with an even finer
structure. We will stop at 320 before we send the knife off to heat-treating. Once the
heat treating process is completed, we’ll use the 320 belt again, then go to a 400 grit belt,
and from there to a 9 mil polishing belt. We will do 99 percent of the blade polishing on
the belt grinder, something you would not be able to do on a stone grinder.
In this drawing you will see an easy and fairly economical way to build a belt grinder. I
have listed in the back of the book suppliers from whom you can obtain all of the parts
for making your grinder.
Another question that many people ask concerns the different types of grinds. I have
shown in the sketch the basic types of grinds: The flat or wedge grind you will most
commonly find on French knives or kitchen knives.
The bevel grind is most commonly found on axes and hatchets, and the hollow grind is
seen on most hunting, fishing, and general utility kitchen knives. The hollow-ground
blade is the one we’ll be concerned with.
To obtain a hollow grind, we will press the blade steel onto the surface of a round wheel
over which our grinding belt passes. The wheel is convex, so the resulting operation or
action of the round cutting surface will give us a concave cut or the hollow grind.
Another common question about grinds is why one grind is better than another. The
hollow-ground blade gives the best cutting performance over a longer period of time
because it has a keen, more easily sharpened edge. This is why most excellent hunting
knives have hollow-ground blades.
It is true that a hollow ground blade will not take the abuse of the other two designs, but
remember: we are not going to cut cordwood. We are only going to slice with our
knives. Knives are used for slicing and cutting, not “chopping.”
STEP #10
Before we get into the grinding process, it is necessary to explain one more special tool I
have designed that will he helpful in the grinding process. As shown in the drawing, the
tool is designed to be clamped to the blade where the grinding will start. It will assure
that your grinding lines on either side of the blade will be parallel and straight. The tool
is made of two perfectly flat pieces of steel bolted together. When the bolts (one at each
end of the two pieces of steel) are loosened, the blade steel is inserted between the two
parallel pieces of steel and lined up for the grinding process.
Before grinding
After grinding
STEP #11
The grinding process is probably the most important step in making a custom knife and
the one which will probably take you the longest to master. You should do some practice
before you start. You can pick up some scrap metal from any local welding shop.
Assuming that you have built your belt grinder, we will start with a 50 grit belt. Place it
on the machine and line it up. Now place the tool mentioned in Step #10 on the blade at
the area at which you want your grind to start.
Hold the knife in your right hand so that you are looking at the edge of the blade, and
steadying the point with your left hand, gently press the blade into the grinder against the
wheel. If you practiced on a few pieces of steel beforehand, you’ll know that the grinder
will do most or the work. That is cutting the hollow grind. The more you push into the
wheel, the wider the hollow grind will appear on the side of the blade.
The difficult part comes next. At the same time you push the blade into the wheel, start
moving the blade from right to left in one smooth motion. Let me at this time call your
attention to the two scribe lines that we scribed down the center of the blade. When you
are grinding, do not go beyond these lines. Practice will tell you how you are doing on
your grind and time will be your partner. Go slow. Once you have made two or three
passes, take it away from the grinder. Look at it and study it all the time you are steadily
pushing into the grinding surface and moving along the blade edge. As you continue,
always try to stay in the same grind line. This will be hard at first, but each time you do it,
it will get easier.
Repeat the same process for the other side of the blade. I might remind you that the blade
is going to get warm, even hot, so remember to keep a bucket of water near by to dip the
blade into. I can’ t overemphasize that you are going to need practice. Here the old adage
holds true: practice makes perfect.
STEP #12
After you have ground your blade, send the knife to the heat-treater. I have listed a few
addresses in the back of the book. Any of these companies are very capable of doing a
fine job. When you send your blade, you will need to tell them what kind of steel you are
using simply because different steels heat treat differently. All of the companies listed do
custom heat-treating for custom knife makers so these will do the kind of job your blade
requires.
STEP #13
When your knife is returned to you from the heat- treater, it will be of the correct
hardness or temper. If you will remember, we ground the blade down to the two
centerlines. It will be necessary in the next couple of steps to re-grind it to the finished
thickness.
Before we start work on the hollow grind, we are going to finish the flat area of the blade,
the handle, and the choil area between the guard and blade edge. To do this we once
again use the flat platen of the grinder. We will choose a new 220—grit belt and very
carefully re—do the flat areas. After this is done, use a 400—grit belt to get a fine finish.
This finish will be a flat textured surface.
NOTE: You may choose to leave this finish. It will make a nice contrast to the polished
blade.
If you choose to have a polished finish we will go next to the 3-M 9-mil belt. You need to
apply a little belt grease to the surface of the belt. Then carefully apply the knife to the
flat platen. You will not be removing much metal but mostly polishing the steel. After a
few minutes you will begin to see the polish take effect
STEP #14
After the flat areas are finished, attach the hollow grind. You’ll use the same belts we
used in Step #13: 22O—400—9-mil. You will start grinding with the 220 belt the same
way you did before the knife was sent for heat treating. It might be necessary for you to
practice again on a piece of scrap steel just to get the feel once more.
Getting the final finish on the blade correctly is most important. You will want to
remember not to build up too much heat because it can damage the blade. You will also
want to be careful not to remove too much steel from the blade edge. Using the three
belts mentioned should give you a fine polish. If you stay with the 9-mil belt long enough,
you’ll have a super fine polish.
STEP #15
Now is the time to apply the guard. You’ll remember it has previously been fitted, so all
you have to do is slide it onto the knife to check the fit. Remove the guard and clean all
areas to be soldered, including the area up inside the notch that the guard will fit into.
Clean it so that bright metal shows. This is very important because the solder will not
flow where the metal has not been cleaned. You will not have to worry about the sides
because you have already polished them in Step #13.
Apply the solder to the area to which the guard will be affixed. Also apply it to the notch
along the bottom of the blade and to the guard. Force some solder into the hole where the
pin goes.
Now slide the guard onto the blade. Align the hole in the guard with the hole in the blade
and insert the pin. You will notice that much of the solder has been pushed out along the
sides of the guard. You might want to take a nail or something sharp and pull some of the
excess solder back along the front and back of the guard.
Now it is time to apply a little heat. This will require a shop torch (readily available at
any hardware store). When applying the heat, apply it below the guard and to both sides
of the handle. The best way to do this is to mount the knife upright in your vise and
evenly apply the heat. In just a little time the solder will begin to flow. Remember that
the solder will always flow to the heat source, so if the heat is applied evenly, the solder
will flow evenly.
It is very important that the solder joint be smooth and bright, especially along and in
front of the guard. To help smooth the solder in front of the guard, I usually use a piece of
small—diameter wire (usually stainless steel) with a sharp point and run it along the
solder joint, pushing and smoothing the molten solder. The result is a smooth, bright fit.
NOTE: There are two types of solder to use. One is the paste solder. The other is wire
solder flux. Both are excellent. You want to use a solder that melts at approximately 450
to 500 F. For our purpose we’ll use the paste solder because the flux or de-oxidizing
agent is already mixed with the solder.
STEP #16
After the solder has hardened, it will be necessary to remove the excess. A sharp chisel—
like instrument is good for removing the bulk of this excess. Making sure all the excess
has been removed from the back of the guard will insure a tight fit of your handles. After
the heavy stuff has been removed, a small piece of sandpaper or a file can be used. When
working on the front of the guard, be very careful not to scratch or gouge the guard or the
blade.
STEP #17
The guard is now in place, and it’s time to cut out your handle material. This is easily
done by placing the knife down on the material to be used and drawing the outline with a
pencil or scribing it with a sharp instrument. It is important that your handle material is
flat and that it fits squarely against the guard. Once these steps are taken care of, use a
coping saw or a band saw to cut out your handles.
Always cut on the outside of the drawn or scribed line so that you will give yourself
plenty of room to work in.
NOTE: I’ve found that using a handle material 3/8” thick gives me plenty of room to
work. This thickness provides me with enough stock to add contours and flowing lines to
the knife. So when ordering your handle material, you might ask for 3/8” thick material
in the length and width you’ll need.
Any spacer material you want to add to the handle of the knife you can also cut during
this step. There are some attractive variations that you can use. Let your imagination be
your guide
STEP #18
Once the handles have been cut out, we will need to check once again for fit, making sure
everything is tight and flat. Once you are satisfied everything fits well, drill and
counter—bore the holes in the handle material. There are two ways of doing this. First,
using a 5—minute epoxy glue on one side, glue the handles to the blade handle.
Remember to follow the instructions on the epoxy label. Once the handles are dry and
affixed to the knife, bore your holes through the blade side of the knife handle and on
through the handle material. Then apply the other handle in the same manner and drill
back through the existing holes. This type of handle application insures that everything is
completely aligned.
The second way of applying the handles is to clamp the material to one side of the blade
handle and drill the holes. The same for the other side. Care must be taken to make sure
that the handle does not slip. If it does slip the handle will not align properly and you’ll
get an inaccurate fit. Either way is okay. Just remember to take your time
STEP #19
Once the handles have been fitted and the holes drilled, you’ll need to counter—bore
each hole using a counter—boring tool which can be purchased from one of the suppliers
listed in the back of the book. The counter— bore will cut a hole 5/16 of an inch in
diameter down into the existing holes. At the base or the cutting edge of the counter—
bore is a guide the same diameter as the holes in the handle. This will assure a good
straight cut. You will not want to bore all the way to the blade material: only down far
enough so that the screw—type rivet sits on a shoulder down in the hole. You will have
to gauge this depth according to the thickness of your handle material. A good depth is a
little over half the thickness of the handle material.
When this is done to both sides of the knife handle, you are ready to set your rivets.
Before you permanently affix the rivets try them in the holes. Then unscrew them, apply
your epoxy, tighten them down, and let them dry.
STEP #20
Once the epoxy has hardened, you are almost finished. All that is left to do is to start
shaping the handle. For one reason or another new knife makers have a tendency to make
large, bulky, square handles. These handles are okay for meat cleavers and axes, but on
your knife your handle should be a thing of beauty. Before you start shaping the handle
or even before you start making the knife, study some designs of other knife— makers.
Books are readily available from any of the knife suppliers in the back of the book. Most
of these men mentioned——I include myself—— started out just like you. They’ve spent
years working on their designs. Look, study and then incorporate their ideas into your
own. I am sure on your first knife you might have a tendency to imitate one particular
design, but remember: through creative imitation come new creative designs.
When you start to grind and file away the handle material go slow, a little at a time. Don’t
go too far: trim just enough until you’re satisfied that what you see is what you want.
Step #20 is something I really can’t help you on. It’s a step that sets you and your knife
away from all other knifemakers——and for that matter, from all other artists.
From the very beginning of choosing your design to the very end of shaping your handle,
you’ve become a creator: Starting with raw materials and turning them into something
beautiful, something of lasting quality, a tool you’ve created with your own imagination
that can be handed down from generation to generation. Your friends may be attracted to
your creation and offer to buy one. This is fine. You’ve now developed a new incentive
to progress even further. Make the most of it. You will find that every knife you make
will be an unforgettable experience.
The last step in the knife making process is the sharpening of the knife. The edge of the
knife can be set by using a used 220—grit belt on your grinder or by using a very coarse
sharpening stone. Holding the knife steady with your right hand, place the edge of the
knife on the coarse stone at a 20 to 23 angle. With the help of the left hand against the
back of the blade, push the knife along the Stone, lifting and wiping the blade off the
edge of the Stone. After a couple of these strokes, you will see that you are beginning to
set the edge on the left side of the blade.
Now flip the knife over and do the same thing, drawing the knife toward you. Once you
have a rough edge, you want to go to a harder or finer stone. Remember: on sharpening a
knife always work from the heel or the back cutting edge of the knife to the toe (or the
point), pushing the knife away and pulling the knife toward you. Try to maintain this 20
to 23 degree angle for a good cutting edge.
In closing I would like to remind you that in time you will become proficient. Remember
that time is your friend, not your enemy. Go slow: a thing of beauty is not created in a
day. If you have problems, let common sense be your guide. I have tried to give you the
best and easiest ways to uncomplicated this art of creating a knife. Most knifemakers will
be happy to help you in any way they can, sharing ideas and giving constructive
criticism. But for the most part you’re the guy behind the grinder.
GO TO IT!!
Suppliers:
Mother of Pearl Company
Joe Culpepper & Barbara Chaplin
828-524-6842
www.motherofpearl.net
Universal Agenices
Ric Chopra
678-969-9147
www.knifesupplies.com
Stephen Bader & Co., Inc
Dan Johnson
518-753-4456
www.stephenbader.com
Koval Knives, Inc
Michael & Judy Koval
614-855-0777
1-800-556-4837
www.kovalknives.com
Pop Knife Supplies
James Poplin
706-678-5408
www.popsknifesupplies.com
Green River Leather Works
Sherry & JP Sinclair
270-932-2212
www.knifeshows.com/crafters/leather/lott
R.W. Wilson
304-723-2771
www.rwwilsonknives.com
Jim’s Specialty Woods
Jim Gunderman
802-258-3992
There were many other suppliers listed in Jim’s book, but we have had this book since
1982 I was not sure who was still in business and who was not. I did some internet
searches and could not find many of them so I stuck with the ones I know are still out
there and supplying people every day. If you would like the entire listing, send me an email ([email protected]) and I will scan in the pages and e-mail them right back.
If you would like to “meet” Jim Small, you can check out the Custom Knife Directory
Forum on Fine Embellishments. (www.ckdforums.com)


© Copyright 2026