
Art, Crafts and Calligraphy 3 COURSE GUIDE
semester
Art, Crafts and
Calligraphy
COURSE GUIDE
Associate Degree in Education/
B.Ed. (Hons) Elementary
2012
3
This product has been made possible by the support of the American People through the United States Agency for
International Development (USAID). The contents of this report are the sole responsibility of the authors, and do
not necessarily reflect the views of USAID or the United States Government.
Technical Support: Education Development Centre (EDC); Teacher’s College, Columbia University
Foreword
Teacher education in Pakistan is leaping into the future. This updated Scheme of Studies is the latest
milestone in a journey that began in earnest in 2006 with the development of a National Curriculum,
which was later augmented by the 2008 National Professional Standards for Teachers in Pakistan and
the 2010 Curriculum of Education Scheme of Studies. With these foundations in place, the Higher
Education Commission (HEC) and the USAID Teacher Education Project engaged faculty across the
nation to develop detailed syllabi and course guides for the four-year B.Ed. (Hons) Elementary and
two-year Associate Degree in Education (ADE).
The syllabi and course guides have been reviewed by the National Curriculum Review Committee
(NCRC) and the syllabi are approved as the updated Scheme of Studies for the ADE and B.Ed. (Hons)
Elementary programs.
As an educator, I am especially inspired by the creativity and engagement of this updated Scheme of
Studies. It offers the potential for a seismic change in how we educate our teachers and ultimately our
country’s youngsters. Colleges and universities that use programs like these provide their students
with the universally valuable tools of critical thinking, hands-on learning, and collaborative study.
I am grateful to all who have contributed to this exciting process; in particular the faculty and staff
from universities, colleges, and provincial institutions who gave freely of their time and expertise for
the purpose of preparing teachers with the knowledge, skills, and dispositions required for nurturing
students in elementary grades. Their contributions to improving the quality of basic education in
Pakistan are incalculable. I would also like to thank the distinguished NCRC members, who helped
further enrich the curricula by their recommendations. The generous support received from the
United States Agency for International Development (USAID) enabled HEC to draw on technical
assistance and subject-matter expertise of the scholars at Education Development Center, Inc., and
Teachers College-Columbia University. Together, this partnership has produced a vitally important
resource for Pakistan.
PROF. DR. SOHAIL NAQVI,
Executive Director,
Higher Education Commission,
Islamabad.
ASSOCIATE DEGREE IN EDUCATION/B.ED (HONS) ELEMENTARY
ii
How this course guide was developed
As part of nation-wide reforms to improve the quality of teacher education, the
Higher Education Commission (HEC) with technical assistance from the USAID
Teacher Education Project engaged faculty across the nation to develop detailed
syllabi and course guides for the four-year B.Ed. (Hons) Elementary and two-year
Associate Degree in Education (ADE).
The process of designing the syllabi and course guides began with a curriculum
design workshop (one workshop for each subject) with faculty from universities
and colleges and officials from provincial teacher education apex institutions.
With guidance from national and international subject experts, they reviewed the
HEC scheme of studies, organized course content across the semester, developed
detailed unit descriptions and prepared the course syllabi. Although the course
syllabi are designed primarily for Student Teachers, they are useful resource for
teacher educators too.
In addition, participants in the workshops developed elements of a course guide.
The course guide is designed for faculty teaching the B.Ed. (Hons) Elementary
and the ADE. It provides suggestions for how to teach the content of each
course and identifies potential resource materials. In designing both the syllabi
and the course guides, faculty and subject experts were guided by the National
Professional Standards for Teachers in Pakistan 2009 and the National Curriculum
2006. The subject experts for each course completed the initial drafts of syllabi
and course guides.
Faculty and Student Teachers started using drafts of syllabi and course guides and
they provided their feedback and suggestions for improvement. Final drafts were
reviewed and approved by the National Curriculum Review Committee (NCRC).
iii
HOW THIS COURSE GUIDE WAS DEVELOPED
The following faculty were involved in designing this course guide: Naurin
Kanwal GECE (W) Hyderabad; Shahnaz Begum, RITE (F) Abbottabad;
Neelam Shezadi GCET Faisalabad; Sadaf Raza, Allama Iqbal Open
University, Islamabad; Muhammad Rauf, IER University of Peshawar; Syeda
Nadia Raza, Allama Iqbal Open University, Islamabad; Dr. Sanaullah, Allama
Iqbal Open University, Islamabad; Zahida Mubeen, GCEE (F) Pishin; Tahseen
Zehra, GECE (W) Hussainabad, Karachi; Dr. Mussarat Anwar Sheikh, Fatima
Jinnah Women University, Rawalpindi; Rubina Mushair GECE, Hussainabad,
Karachi; Abida Manzoor, GCET (F) DG Khan; Dr. Abdul Hafeez, GCET (M)
Faisalabad; Mamoona Zahid, Fatima Jinnah Women University, Rawalpindi;
Rukhsana Said, University of AJK; Tehseen Muhammad, IER University of
the Punjab, Lahore; Mahmood Jan, GCEE, Panjgoor; Wasina Talat, Sardar
Bahadur Khan Women University, Quetta; Ayaz Mughal, Sindh University;
Muhmmad Amin, GCE (M) Gilgit; Asia Shah, Hazara University, Mansehra.
Subject expert guiding course design: Ms Afshan Razzaque, Sindh Education
Foundation.
Date of NCRC review: 3 March 2011
NCRC Reviewers: Dr. Uzma Qureshi, Chairperson Lahore College Women
University; Dr. Mumtaz Akhtar Director IER, University of the Punjab,
Lahore; Dr. Mussaret Sheikh, Chairperson Education Department, Fatimah
Jinnah Women University, Rawalpindi.
ASSOCIATE DEGREE IN EDUCATION/B.ED (HONS) ELEMENTARY
iv
Table of Contents
Syllabus
UNIT 1 UNIT 2 UNIT 3
UNIT 4
UNIT 5
08
Course introduction
21
History and culture
31
Elements and principles of design
39
Crafts
44
Assessing art, crafts, and calligraphy in the classroom,
and exhibition 57
Course Resources
61
Syllabus
ART, CRAFTS AND CALLIGRAPHY
ART, CRAFTS AND CALLIGRAPHY
Year/semester
Year 2, Semester 3
Credit value
3 credits
Prerequisites
None
Course description
The Art, Crafts, and Calligraphy course will help prepare Student Teachers to teach
these subjects in the elementary grades. It provides Student Teachers with an opportunity to develop their knowledge and understanding of art, crafts, and calligraphy
(with a focus on Pakistani artists, calligraphers, and craftsmen and women) and to
practice making their own works using a variety of techniques. Given that this is
a teacher education course, Student Teachers also examine the role of art in child
development; the importance of art, craft, and calligraphy in the curriculum; and the
links between art, crafts, and calligraphy and other subjects such as science, math,
and social studies. Student Teachers will have learned about lesson planning, classroom assessment, and classroom management in other courses; in this course they
will focus on these three skills as they apply to teaching and learning art, crafts, and
calligraphy in the elementary grades.
Course goals
By the end of the semester, Student Teachers will be able to:
• explain the importance of art education and its role in child development
• recognize and appreciate artists, art styles, and artwork
• explain the origins and development of a variety of crafts in Pakistan
• use a variety of tools and materials to make art, crafts, and calligraphy
• explain and apply elements and principles of design
• identify links between art and other school subjects
• assess children’s work in art, crafts, and calligraphy
• plan appropriate art, craft, and calligraphy activities for children in
elementary grades
• present a portfolio of their work that conveys their appreciation and interest
in art, crafts, and calligraphy and presents evidence of their knowledge, skills,
and dispositions for teaching these subjects.
09
COURSE SYLLABUS: Art, Crafts And Calligraphy
Learning and teaching approaches
As with other courses in the ADE/B.Ed (Hons) Elementary program, the Art, Crafts,
and Calligraphy course encourages a variety of teaching and learning approaches.
Instruction should aim to provide opportunities for Student Teachers to develop their
own understanding of course content and to experiment with their own ideas and
new techniques. Collaboration and interaction with peers and with the Instructor to
discuss art, crafts, and calligraphy will be encouraged.
Although Student Teachers are encouraged to pursue their own interests in art, crafts,
and calligraphy, the intent of the course is to prepare for teaching, and so the teaching-learning approaches used should model the approach to art, crafts, and calligraphy
in an elementary classroom.
Depending on where your college or university is located, this course may involve
visits to museums and/or art galleries. All Student Teachers, no matter where they are
located, should aim to meet local craftsmen and women.
An important element of the course is the portfolio. All Student Teachers are required
to make a portfolio that will be assessed at the end of the course. The portfolio and
how it will be graded should be discussed in the first unit of the course.
Semester outline
1
UNIT 1:
Introduction to the Art, Crafts, and Calligraphy course
Week #
Topics/themes
Introduction to art education
1
• Overview of the course
• What is art? What is craft?
• The course portfolio
Approaches to art teaching
2
• Art and child development
• Why teach art and craft in elementary grades
• The role of the teacher in teaching art, crafts, and calligraphy
Unit learning goals
At the end of the unit, Student Teachers will be able to:
ll
critically discuss the question ‘what is art’?
ll
explain ways in which art and craft are similar and different from each other
ll
analyse and discuss examples of children’s art with reference to children’s
developmental stages in art
ll
identify the attributes required to teach art in the elementary grades.
ASSOCIATE DEGREE IN EDUCATION/B.ED (HONS) ELEMENTARY
10
Essential questions
• What is art? What is craft?
• What are children’s developmental stages in art?
• Why is art, crafts, and calligraphy education important?
• What attributes do teachers require to teach art, crafts, and calligraphy in
the elementary grades?
• How can teachers interact with children to support their creative development?
2
UNIT 2:
History and culture
Week #
Topics/themes
Art and culture in ancient Indus Valley civilizations
3
• Art and crafts (the development of pottery and metalwork, printing on
cloth, bead making)
• Planning teaching and learning based on the art and culture of ancient
Indus Valley civilizations
Approaches to art teaching
4
• Art and child development
• Why teach art and craft in elementary grades
• The role of the teacher in teaching art, crafts, and calligraphy
Calligraphy
5
• Calligraphy in different cultures and traditions around the world
• Persian artists and their calligraphy
• Pakistani calligraphers (Anwar Jalal Shemza, Syed Sadequain Ahmed Naqvi,
Ismail Gulgee, and Shakir Ali)
• Making calligraphy using different tools and mediums
20th-century art in Pakistan
6
11
• Introduction to Cubism (Pakistani artists Shakir Ali and Mansoor Rahi)
• Introduction to realism (Pakistani artists Ali Imam, Iqbal Hussain, Khalid
Iqbal, and Anna Molka Ahmed)
• Introduction to abstraction (Pakistani artists Ahmed Parvez
COURSE SYLLABUS: Art, Crafts And Calligraphy
Unit learning goals
At the end of the unit, Students Teachers will be able to:
give examples of how art is a product of the particular culture in which
is produced
ll
discuss the key features of Islamic art
ll
explain the significance of calligraphy in Islamic art and culture,
and how it developed
ll
explore how manipulating and embellishing letters, words, and text
can enhance, or change, meaning
ll
recognize and appreciate artists, art styles, and artwork
ll
describe Cubism, realism, and abstraction.
ll
Essential questions
• Does art reflect culture or shape it?
• How is culture and tradition expressed through art?
• What is Islamic art?
• How can I use Islamic art to teach math and other subjects?
• How can writing be manipulated and embellished to convey meaning
through its appearance (beyond its literal meaning)?
• What are Cubism, realism, and abstraction in art?
3
UNIT 3:
Elements and principles of design
Week #
Topics/themes
The elements and principles of design (lines and colour)
7
• Elements of art and their importance: line, shape, form, space, texture,
value, and colour
• Lines and what they do in art
• Types of lines: vertical, horizontal, diagonal, zigzag, and curved
• Line variation, length, width, and texture
• Colour and the colour wheel (primary, secondary, and tertiary colours)
• Characteristics of colour: hue, value, and intensity
The elements and principles of design (size, shape, and texture)
8
• Use of space
• Two dimensions and three dimensions in art
• Geometric shapes and forms
• Organic shapes and forms
• Texture
ASSOCIATE DEGREE IN EDUCATION/B.ED (HONS) ELEMENTARY
12
3
UNIT 3:
Elements and principles of design
Week #
Topics/themes
9
Printing and patterns
• Printing: vegetable printing, leaf printing, and block printing
• Pattern making: geometrical and organic patterns
Drawing and painting
• Pencil drawing, graphite drawing, crayons, pastels, etc.
• Shading techniques
• Painting
• Still life
• Landscape
10 and 11
Unit learning goals
At the end of the unit, Students Teachers will be able to:
analyse how the elements of art and design principles are used to communicate ideas and feelings
ll
create art for specific purposes using the elements of art to communicate ideas
ll
experience using different mediums for expression in art
ll
apply art vocabulary in daily work.
ll
Essential questions
• What are the elements and principles of design?
• How do I use the elements and principles of design to create and critique
artwork?
• How can the elements and principles of design influence the viewer’s
perception of work?
13
COURSE SYLLABUS: Art, Crafts And Calligraphy
4
UNIT 4:
Crafts
Week #
Topics/themes
Crafts in Pakistan
12
• Crafts practiced and made in Pakistan
• Crafts and technology
• Doing craftwork and making handicrafts (for example, puppets and puppetry,
textiles, making beads, making mosaics and mirror work, and pottery). 1
Doing crafts with children in the elementary grades
13
• Doing craftwork and handicrafts
• Crafts across the curriculum
• Doing crafts with children in the elementary grade
Unit learning goals
ll
At the end of the unit, Students Teachers will be able to:
ll
describe the variety of crafts produced in Pakistan
ll
explain links between locations and crafts produced, and broader links to the culture
and communities that produce them
discuss ways in which developments in technology have changed the way crafts
are made
ll
reflect on and critique crafts that they and their peers produce.
ll
design craft activities for children in elementary grades
ll
give examples of links between crafts and other areas of the curriculum.
ll
Essential questions
• How are crafts linked to the places where they are produced?
• Who are the craftsmen and craftswomen of Pakistan?
• What crafts are produced locally and by whom?
• What can children learn from doing and making crafts?
• How are craft activities linked to learning across the curriculum?
These are examples. You should
choose crafts appropriate to your location and resources available.
1
ASSOCIATE DEGREE IN EDUCATION/B.ED (HONS) ELEMENTARY
14
5
UNIT 5:
Assessing art, crafts, and calligraphy in the classroom, and
exhibition
Week #
Topics/themes
Preparing to teach art, crafts, and calligraphy
• Connecting art, crafts, and calligraphy across the curriculum
• Managing art, crafts, and calligraphy in the classroom
• What is assessment in art, crafts, and calligraphy education?
14
Preparing to teach art, crafts, and calligraphy, continued
• Assessing children’s learning during an art activity
• Assessment rubrics
• Planning for art, crafts, and calligraphy
15
16
Exhibition and portfolios
• Arts and crafts exhibition
• Display and assessment of Student Teacher projects and portfolios
Unit learning goals
At the end of the unit, Students Teachers will be able to:
ll
critically discuss the value of assessing learning in art education in
elementary grades
identify opportunities for assessment in an art, crafts, or calligraphy
activity or lesson
ll
plan for assessment in an art, crafts, or calligraphy activity or lesson.
ll
Essential questions
• What planning is required for teaching and learning art, crafts, or
calligraphy?
• How can I integrate art, crafts, and calligraphy with other subjects?
• How is assessment in art, crafts, and calligraphy the same as in other
subjects? How is it different?
• What art, crafts, and calligraphy knowledge, skills, and attitudes or
dispositions should I be assessing?
• How can I establish effective criteria for assessment in arts?
15
COURSE SYLLABUS: Art, Crafts And Calligraphy
Possible references and resources
Web resources
This selection of websites is just a small fraction of what is available on the Internet
about teaching art, crafts, and calligraphy. Websites change and are updated, so go
online to create your own list of useful websites.
General websites
What is an art sparker? It’s a creative prompt that excites your imagination. For a list
of art sparkers:
ØØ http://artjunction.org/resources/sparkers-resource/
Generating art ideas:
ØØ http://www.bartelart.com/arted/ideas.html
Kinder Art has many ideas around which to plan arts and crafts activities
for young children:
ØØ http://www.kinderart.com/
Principles of art and design
‘The Elements and Principles of Art’ is a useful PowerPoint presentation:
ØØ http://mullermaker.weebly.com/uploads/8/4/0/5/8405497/elements_and_principles.ppt
National Curriculum
National Curriculum for Drawing Curriculum, Grades V1–V111.
Search for the title of this document to download a soft copy (or search http://unesdoc.unesco.org)
Child development and art, children’s
artistic development
Caroline Sharp, ‘Developing Young Children’s Creativity: What Can We Learn from
Research?’ National Foundation for Education Research (2004), available at:
ØØ http://www.nfer.ac.uk/nfer/publications/55502/55502.pdf
Grace Hwang Lynch, ‘The Importance of Art in Child Development’:
ØØ http://www.pbs.org/parents/education/music-arts/the-importance-of-art-inchild-development/
ASSOCIATE DEGREE IN EDUCATION/B.ED (HONS) ELEMENTARY
16
Assessment and lesson planning
The following website provides guidance on planning an art lesson:
ØØ http://www.getty.edu/education/teachers/building_lessons/guide.html
Example rubrics for the arts:
ØØ http://www.eed.state.ak.us/tls/frameworks/arts/6assess3.htm#singing
Assessment resources for art teachers:
ØØ http://artjunction.org/ten-assessment-resources-for-art-teachers/
ØØ http://www.incredibleart.org/links/toolbox/assessment.html
Islamic Art and calligraphy
The website of the Jameel Gallery of Islamic Art at the Victoria and Albert Museum
includes images from its extensive collection and ideas for teaching:
ØØ http://www.vam.ac.uk/content/articles/t/
teachers-resource-exploring-calligraphy-through-the-jameel-gallery-of-islamic-art/
ØØ http://www.calligraphyislamic.com/
ØØ http://www.patterninislamicart.com/
Ancient civilizations in the Indus Valley
The following websites provide information and ideas for teaching about art and
crafts created by ancient civilizations of the Indus Valley:
ØØ http://www.harappa.com/har/har0.html
ØØ http://www.bbc.co.uk/schools/primaryhistory/indus_valley/
ØØ http://www.ancientindia.co.uk/indus/home_set.html
ØØ http://archive.cyark.org/moen-jo-daro-new-threats-to-indus-valley-civilizationblog
Art across the curriculum
Crayola Dream-Makers is a series of curriculum resources that contain lesson plans
for educators teaching primary grades. Each guide uses visual art lessons to stimulate critical thinking and problem-solving for individual subject areas such as math,
language arts, science, and social studies.
ØØ http://www.crayola.com/for-educators/ccac-landing/free-professional-resources/dream-makers.aspx
Pakistani artists
ØØ http://pakistanartreview.net/index.html
Puppets
ØØ http://www.schoolofpuppetry.com.au/tutorials.php/what-types-of-puppets-arethere
17
COURSE SYLLABUS: Art, Crafts And Calligraphy
Books
Rob Barnes, Teaching Art to Young Children, 4–9, 2nd ed.
(London: RoutledgeFalmer, 2002).
Gillian Clements, Indus Valley City (Mankato, MN: Sea-to-Sea Publications, 2009).
John Dewey, Art as Experience (New York: Capricorn Books, 1958).
E. Eisner, The Arts and the Creation of Mind, chapter 4, ‘What the Arts Teach and How
It Shows’ (New Haven: Yale University Press, 2002).
Jamal J. Elias, On Wings of Diesel: Trucks, Identity and Culture in Pakistan
(Oxford: Oneworld Publications, 2011).
Robert Fisher, Teaching Juniors (Oxford: Blackwell, 1991).
Keith Gentle, Teaching Painting in the Primary School (London: Cassell, 1993).
Pat Gura, Resources for Early Learning: Children, Adults and Stuff.
London: Hodder & Stoughton, 1996).
Ijaz Hassan, Painting in Pakistan (Lahore: Ferozsons, 1996).
Marjorie Husain, Aspects of Art: An Essential Textbook for Students of Art in Pakistan
(Karachi: Oxford University Press, 1997).
Peggy Davison Jenkins, Art for the Fun of It: A Guide for Teaching Young Children
(Englewood Cliffs, NJ: Prentice-Hall, 1986).
John Lancaster, Art in the Primary School (London: Routledge, 1990).
Viktor Lowenfeld and W. Lambert Brittain, Creative and Mental Growth (New York:
The Macmillan Company, 1947).
John Matthews, Helping Children to Draw and Paint in Early Childhood: Children and
Visual Representation (London: Hodder & Stoughton, 1994).
M. Hanif Raza, Portrait of Pakistan (Lahore: Ferozsons, 1994).
A. Razzak, Children and Art: The Status of Art Education in Pakistan
(VDM Verlag Dr. Müller, 2011).
A. Razzak, Fun with Paper Bag (Lahore: Ferozsons, 2009).
Hazel Richardson, Life in the Ancient Indus River Valley (New York: Crabtree
Publications, 2005).
ASSOCIATE DEGREE IN EDUCATION/B.ED (HONS) ELEMENTARY
18
Marcella Nesom Sirhandi, Contemporary Painting in Pakistan
(Lahore: Ferozsons, 1992).
Rafya Tahir, Calligraphic Art in Pakistan: Some Myths Uncovered, Jamal, vol. 1 2012
(College of Art and Design: University of the Punjab).
Pauline Tambling, Performing Arts in the Primary School
(Oxford: Basil Blackwell, 1990).
S. H. Vandal, Art Education in Pakistan: A Case Study of Bringing Art to School Children
at the Informal Level Pakistan. Paper presented at the UNESCO Regional Expert
Symposium on Arts Education in Asia, Hong Kong, 2004 at: http://portal.unesco.
org/culture/es/files/40487/12668582913pakistan.pdf/pakistan.pdf
Fiona Watt, Art Skills (London: Usborne Publishing, 2008).
Fiona Watt, Complete Book of Art Ideas (London: Usborne Publishing, 2009).
Saima Zaidi, ed., Mazaar, Bazaar: Design and Visual Culture in Pakistan (Karachi:
Oxford University Press, 2010).
Course grading policy
Multiple techniques of assessment will be used in the course. By using multiple
forms of assessment, the Instructor will have an in-depth picture of the knowledge,
skills, and dispositions of Student Teachers. The total grade determined by examinations should not exceed 30 per cent of the course grade. Student Teachers are expected to be present in class, engage with activities and discussion, and complete course
assignments. The course Instructor will tell you how the course will be graded and
which assignments will be graded.
One of the best ways to assess this course is via a portfolio. Your course Instructor
will advise you about making a portfolio if one is required.
19
COURSE SYLLABUS: Art, Crafts And Calligraphy
Planning guide
The planning guide is organized by unit.
Each unit includes an overview of the unit and a selection of ideas for Instructors
teaching the course. Ideas for teaching are organized by week. The ideas are starting
points only, and there are many other ideas that Instructors (and Student Teachers)
may want to pursue.
For units 1 and 5, a complete set of example session plans is provided. Example session plans are also provided for units 2 and 4. Session plans are provided as examples
for Instructors to try or adapt as needed. Example session plans are designed for a
period of 50 to 60 minutes.
ASSOCIATE DEGREE IN EDUCATION/B.ED (HONS) ELEMENTARY
20
UNIT 1
INTRODUCTION TO
THE ART, CRAFTS, AND
CALLIGRAPHY COURSE
UNIT 5
UNIT 4
UNIT 3
UNIT 2
UNIT 1
Unit overview
This unit begins with an overview of the course and the question ‘what is art, what
is craft’, as well as a consideration of the role of calligraphy. The two words (arts
and craft) fit together—like cup and tea—and both require creativity. They might
also use similar materials and the same elements and principles of design. However,
a craft is an activity that uses specific materials with a certain goal in mind. Usually
a craft has a set of directions and skills to make to a finished product, and when a
child makes a craft, he or she learns to follow directions and solve problems while
working toward a goal. Art is generally much less directed and more creative—the
goals of a piece of art are less well defined. The difference may also be in the hands
of the craftsman or woman and the artist: it depends on the purpose of the piece.
There is no correct answer!
In the second week of this unit, Student Teachers learn about child development and
art, and the importance of art education. They will identify the attributes required for
teaching these subjects in elementary grades and consider how teachers promote or
hinder creative and artistic development through their interactions with children.
Week 1: Introduction to art education
• Overview of the course
• What is art? What is craft?
• The course portfolio
Week 2: Approaches to art teaching
• Art and child development
• Why teach art and craft in elementary grades
• The role of the teacher in teaching art, crafts, and calligraphy
Unit learning goals
At the end of the unit, Student Teachers will be able to:
ll
critically discuss the question ‘what is art’?
ll
explain ways in which art and craft are similar and different from each other
ll
analyse and discuss examples of children’s art with reference to children’s
developmental stages in art
ll
identify the attributes required to teach art in the elementary grades.
ASSOCIATE DEGREE IN EDUCATION/B.ED (HONS) ELEMENTARY
22
UNIT 1
UNIT 2
UNIT 3
UNIT 4
UNIT 5
Essential questions
• What is art? What is craft?
• What are children’s developmental stages in art?
• Why is art, crafts, and calligraphy education important?
• What attributes do teachers require to teach art, crafts, and calligraphy in
the elementary grades?
• How can teachers interact with children to support their creative development?
Unit 1: Session plans
Week 1, session 1: Overview and introduction
to the course
Introduction to the course (20 minutes) Provide a brief overview of the art course, its
contents, and learning goals. Respond to any questions that Student Teachers have and
discuss the ways in which the course will be assessed. Note that this course is mostly
focused on the visual arts, and dance, music, and drama are not included.
Brainstorming (10 minutes)
Ask Student Teachers what comes to their mind when they think about art. Ask them to
jot down key words, ideas, and feelings that represent art. Ask them to share their ideas
with a partner.
Visualization (10–15 minutes)
Now ask Student Teachers to close their eyes for a few moments to think of a world
without art. Ask them to draw their mental image in their notebooks. Discuss their ideas
about a world without art (what do they imagine?) and invite Student Teachers to share
the images they made.
Conclusion (10 minutes)
Have Student Teachers consider the following quotes. Based on their discussions, do
they agree with the quotes? Why? Why not?
Art is not what you see, but what you make others see. (Edgar Degas)
Art is literacy of the heart. (Elliot Eisner)
Quotes from the ‘Incredible Art Department’:
ØØ http://www.incredibleart.org
23
COURSE GUIDE: Art, Crafts And Calligraphy
UNIT 5
UNIT 4
UNIT 3
UNIT 2
UNIT 1
Week 1, session 2: What is art? What is craft?
Classification activity (20–30 minutes, depending on the number of items)
Present a variety of images and artefacts of art, crafts, and calligraphy to Student
Teachers. You could put the images on cards or display them on PowerPoint slides.
Examples could include a piece of mirror embroidery from Balochistan; a wooden
spoon from Gilgit; a painting by Abdur Rahman Chughtai; calligraphy by Anwar
Jalal Shemza, Sadequain, Ismail Gulgee, and Shakir Ali; tiles from Masjid Wazir Khan
in Lahore, pottery from Multan; a sculpture by Huma Mulji; a decorated truck; etc.
Present as many images and artefacts as possible.
Ask Student Teachers to work in small groups to categorize the items into art or craft.
They should keep a note about why they put a particular item into the category.
Reporting (30 minutes)
Item by item, ask each group to say which category they put the item in and why.
Note points of disagreement. Make notes on the board or chart about the criteria they
mention; for example, purpose, value, or an item’s rarity.
Use the discussion and criteria listed to develop an understanding of how art, craft, and
calligraphy are the same but different. Defining craft is perhaps easier than defining art:
craft is an activity that uses specific materials with a certain goal in mind. Usually a craft
has a set of directions and skills to get to a finished product. Art is generally much less
directed and more creative; the goals of a piece of art are less well defined. The difference between the two may be in the hands of the craftsman or woman and the artist: it
depends on the purpose of the piece. Calligraphy is difficult to categorize: if the viewer
is looking at the technique that was used, then it might seem like a craft; if they are
moved or affected deeply by the calligraphy, it might seem more like art.
Week 1, session 3: The course portfolio
Introduction (5 minutes)
It is likely that Student Teachers will be familiar with a portfolio as they are mentioned elsewhere in the ADE/B.Ed (Hons) program. Begin by asking Student
Teachers about portfolios. For example, ask is they have they made portfolios before,
and what they were?
If Student Teachers are not familiar with the idea of a portfolio, share examples and
spend some time discussing their purpose and content. Explain that there is no single
standard formula for a course portfolio, but portfolios can spotlight student learning
and record a process of scholarly inquiry of approaches into a particular subject. Course
portfolios serve several functions: they serve as an aid to memory (‘what worked,
what didn’t?’); they help in investigating student learning (‘are they learning what I am
teaching?’); and they are available to others for discussion, feedback, and formal review.
The course portfolio is a collection of work by Student Teachers that ‘tells the story’ and
provides evidence of learning and development during the course.
ASSOCIATE DEGREE IN EDUCATION/B.ED (HONS) ELEMENTARY
24
UNIT 1
UNIT 2
UNIT 3
UNIT 4
UNIT 5
Small group and whole-class discussion (30 minutes)
Ask Student Teachers to discuss the following questions in small groups:
• What is the purpose of a portfolio for this course?
• What might be included in a portfolio for this course?
• How will you organize your portfolio? What items will go in which section?
Ask the groups to report back to the whole class on the first question (remind groups to
avoid repeating what other groups have already reported). Note important points on the
board.
If these have not been covered, explain that the key purposes for having Student
Teachers make a portfolio for this course are as follows:
• To document your progress over time
• To identify patterns of growth in an area or competency
• To develop your skills in reflection, interpretation, and self-assessment
• To present a holistic picture of your skills and abilities to teach art, crafts,
and calligraphy
• To provide evidence that you are prepared to teach art
• To present evidence of professional involvement
Ask the groups to report back to the whole class on the second question (remind groups
to avoid repeating what others group have already reported). Note important points on
the board.
If they are not mentioned, explain that portfolios could include examples of Student
Teacher–made and child-made art, craft, and calligraphy (or photographs of the same);
plans for activities and lessons; reflections on art; diagrams with ideas for cross-curricular links; reflections on teaching art, crafts or calligraphy; and course assignments. The
range of items is not precise. Student Teachers will need to decide what to include to
achieve the purposes of the portfolio (listed above).
Ask the groups to report back to the whole class on the third question (remind groups
to avoid repeating what other groups have already reported). Note important points on
the board.
Explain that portfolios can be organized by course unit, by theme (and there are various
themes), or by type of material. There may be other ways too.
Whole-class discussion: Portfolio assessment (25 minutes)
As with all summative assessments, it is important for Student Teachers to know
how they will be assessed and what will be assessed. Explain that the portfolio will be
assessed and the result of the assessment will count toward their final grade.
As the Instructor for this course, you should have designed a rubric for assessing
portfolios. If you have done this, share and discuss the rubric so that Student Teachers
know how they will be assessed.(Alternatively, you could work with Student Teachers
to design the rubric to assess their portfolios. See Unit 5 for information about how to
design rubrics. This will require more time.)
25
COURSE GUIDE: Art, Crafts And Calligraphy
UNIT 5
UNIT 4
UNIT 3
UNIT 2
UNIT 1
Homework
Ask Student Teachers to identify two or three children at different ages for example,
a 3-year-old, a 5-year-old, and a 12-year-old. Provide a box of pencils, pens, and crayons and ask the children to draw something familiar; for example, a dog or a house.
Encourage them to draw their best picture.
Week 2, session 1: Art and child development
You will need to prepare a handout for this session about children’s developmental
stages in art. The following webpages will help you prepare, although there are many
others, and children’s developmental stages in art are presented in many textbooks.
‘Children’s Developmental Stages in Art’:
ØØ http://portfolio.educ.kent.edu/schneiderj/kids.htm
‘Drawing development in Children’:
ØØ http://www.learningdesign.com/Portfolio/DrawDev/kiddrawing.html
‘Lowenfield’s Stages of Artistic Development’:
ØØ http://www.d.umn.edu/~jbrutger/Lowenf.html
Reading (20 minutes)
Distribute the reading about children’s developmental stages in art. Invite Student
Teachers to read with a partner. Introduce and explain any new vocabulary.
Discussion (20 minutes)
Discuss the reading about children’s developmental stages in art. Ask:
• Do Student Teachers remember passing through these stages?
• Do they recognize some of the stages based on their experience with children
they know now?
Remind Student Teachers that all children are different, the ages attached to each stage
are not fixed, and that children might move forward and backward between stages for a
while.
What questions do Student Teachers still have about child development and art?
Display and review of children’s drawings (20 minutes)
Ask Student Teachers to display the drawings they collected from children (this was the
homework task in the previous session).
Invite them to look at the drawings. What evidence can they see in the drawings of
children’s developmental stages in art?
ASSOCIATE DEGREE IN EDUCATION/B.ED (HONS) ELEMENTARY
26
UNIT 1
UNIT 2
UNIT 3
UNIT 4
UNIT 5
Week 2, session 2: Why teach art and craft
in elementary grades
Introduction (5 minutes)
Start the session by asking Student Teachers if they remember doing arts and crafts at
school. What do they remember?
Explain that in this session they are going to be thinking about why arts, crafts, and
calligraphy are an important part of the school curriculum.
Group work and presentation (30 minutes)
Explain that the school curriculum can be crowded. Some schools and teachers say they
don’t have time for arts and crafts, or that other subjects are much more important. Let’s
imagine that we are going to persuade these people that arts, crafts, and calligraphy do
have an important role in education for all children.
Divide Student Teachers into groups and invite them to brainstorm as many of the
potential benefits of teaching art and craft as possible. Allow approximately 10 minutes
for this task. Now ask them to organize their ideas and to give a heading to each group
of ideas.
Ask each group to present their ideas. Discuss and ask questions about key points or
unusual points in their presentations.
Summary (5 minutes)
Summarize the session by explaining that participating in art, crafts, and calligraphy
activities has a number of developmental benefits for children. It can help develop motor
skills as well as problem-solving and critical-thinking skills. It encourages concentration,
and it supports language and social development. Art, crafts, and calligraphy education
can give children more confidence in their creative skills. It can help children learn to
consider different points of view and promote cultural awareness.
As you provide the summary, invite Student Teachers to give you examples of how
art, crafts, and calligraphy education can have these benefits for children. For example, using scissors helps develop motor skills, and talking about their work develops
language skills.
Setting an assignment (5 minutes)
Conclude the session by setting an assignment. Ask Student Teachers to either:
• Write a letter to a senior education official to make the case for art, crafts,
and calligraphy education in the primary school curriculum.
or
• Design a leaflet for parents explaining why art, crafts, and calligraphy education
is beneficial for their children.
27
COURSE GUIDE: Art, Crafts And Calligraphy
UNIT 5
UNIT 4
UNIT 3
UNIT 2
UNIT 1
Week 2, session 3: The role of the teacher in teaching
art, crafts, and calligraphy
Introduction (20 minutes)
Ask Student Teachers to read the story ‘One Little Boy’. (The story is provided at the
end of this unit.)
Discuss as a whole class:
• Are you familiar with the situation the author describes?
• What messages about art, teaching art, and learning art was the author trying
to convey?
• Do you agree with these messages?
Summarize by noting that in the elementary grades, children are unlikely to have an art
teacher. In early grades, children might have the same teacher for all subjects. They do
not have an art teacher as such, but they should still be doing art, crafts and calligraphy.
In this session they are going to think about the attributes a teacher needs to teach art,
crafts, and calligraphy well.
Talking with children about their art, crafts, and calligraphy (40 minutes)
Explain that one of the most important attributes required for teaching art, crafts, and
calligraphy is to be able to talk with children about their work and how they made it
or are making it. The way teachers talk and interact with children is key to children’s
creative development.
Divide Student Teachers into small groups (three of four members). Share the scenarios
listed below (you can put them on a chart, the board, or in a handout). Ask Student
Teachers to consider and discuss the impact of each scenario on children’s creative
development.
1. A child shows the teacher his painting. The teacher says ‘What is it?’
2. In a calligraphy activity, the teacher asks: ‘Tell me about why you chose these
colours’.
3. The teacher sees the child is having difficulty. He says: ‘Let me do that for you’.
4. The teacher notices that the two parts of a child’s model keep falling apart. She
asks: ‘How could you make this connection stronger?’
5. Children have made pinch pots from clay. She looks at them and says, ‘I wonder
where the best place is to dry these. What do you think? Where shall we put
them to dry?’
6. The teacher comments on a child’s work when it is finished. ‘That’s good’, she
says.
7. At the end of the lesson, the teacher asks, ‘Who would like to tell us about the
patterns they’ve made?’
8. At the end of the lesson, the teacher says, ‘Bilal has made the best puppet. Bilal,
show your puppet to everyone’.
Invite groups to report back in a whole-class discussion. Which scenarios encourage creativity and children’s artistic development? Which ones hinder creativity and children’s
artistic development?
ASSOCIATE DEGREE IN EDUCATION/B.ED (HONS) ELEMENTARY
28
Course resource: Week 2, session 3
One Little Boy
F
by Helen Buckley
One day, a little boy went to school. He was a quiet little boy and it was quite a big
school. But when the little boy found that he could go to his room by walking right in
from the door outside, he was happy: the school did not seem quite so big anymore.
One morning, when the little boy had been in school for a while, the teacher said:
‘Today we are going to make a picture’. ‘Good!’ thought the little boy. He liked to
make all kinds of pictures: lions and tigers, chickens and cows, trains and boats. He
took out his box of crayons and began to draw.
But the teacher said, ‘Wait! It is not time to begin!’ And she waited until everyone
looked ready. ‘Now’, said the teacher, ‘we are going to make flowers’. ‘Good!’ thought
the little boy. He liked to make beautiful ones with his pink and orange and blue
crayons. But the teacher said, ‘Wait! I will show you how’. She drew a red flower with
a green stem. ‘There’, said the teacher, ‘now you may begin’.
The little boy looked at his teacher’s flower. Then he looked at his own flower. He
liked his flower better than the teacher’s. But he did not say this. He just turned his
paper over and made a flower like the teacher’s. It was red, with a green stem.
On another day when the little boy had opened the door from the outside all by
himself, the teacher said, ‘Today we are going to make something with clay’. ‘Good!’
thought the little boy. He liked clay. He could make all kinds of things with clay:
snakes and snowmen, elephants and mice, cars and trucks. He began to pull and pinch
his ball of clay.
But the teacher said, ‘Wait! It is not time to begin!’ And she waited until everyone
looked ready. ‘Now’, said the teacher, ‘we are going to make a dish’. ‘Good!’ thought
the little boy. He liked to make dishes. He began to make some that were all shapes
and sizes.
But the teacher said, ‘Wait! I will show you how’. And she showed everyone how to
make one deep dish. ‘There’, said the teacher, ‘now you may begin’. The little boy
looked at the teacher’s dish. Then he looked at his own. He liked his better than the
teacher’s, but he did not say this. He just rolled his clay into a big ball again and made
a dish like the teacher’s. It was a deep dish.
The little boy learned to wait, and to watch, and to make things just like the teacher.
Soon, he didn’t make things of his own anymore.
29
FACULTY RESOURCES: Art, Crafts And Calligraphy
Then it happened that the little boy and his family moved to another house, in
another city. The little boy had to go to another school. This school was even bigger
than the other one. There was no door from the outside into his room. He had to go
up some big steps and walk down a long hall to get to his room. And the very first day
he was there, the teacher said, ‘Today we are going to make a picture’.
‘Good!’ thought the little boy. And he waited for the teacher to tell what to do. But the
teacher didn’t say anything. She just walked around the room.
When she came to the little boy, she asked, ‘Don’t you want to make a picture?’
‘Yes’, said the little boy. ‘What are we going to make?’
‘I don’t know until you make it’, said the teacher.
‘How shall I make it?’ asked the little boy.
‘Any way you like’, said the teacher.
‘And any colour?’ asked the little boy.
‘Any colour’, said the teacher. ‘If everyone made the same picture and used the same
colours, how would I know who made what, and which was which?’
‘I don’t know’, said the little boy. And he began to make a red flower with a
green stem.
Used with permission but not be reused except for the purpose described in this
course guide.
ASSOCIATE DEGREE IN EDUCATION/B.ED (HONS) ELEMENTARY
30
UNIT 1
UNIT 2
UNIT 3
UNIT 4
UNIT 5
UNIT 2
HISTORY AND
CULTURE
31
COURSE GUIDE: Art, Crafts And Calligraphy
UNIT 5
UNIT 4
UNIT 3
UNIT 2
UNIT 1
Unit 2 overview
In Unit 2, Student Teachers will make links between art and the culture in which it
was created, and explore ways in which art is a reflection of culture and how culture
influences art.
Student Teachers will begin the unit by looking at the art and architecture of the
Indus Valley, one of the world’s earliest urban civilizations and noted for its planned
cities built of brick, roadside drainage system, and multistoried houses. Inhabitants
of the ancient Indus river valley developed new techniques in handicraft and metallurgy. Crafts of the Indus Valley included pottery making, dyeing, metalworking in
bronze, and bead making.
Islamic art, like art everywhere, encompasses many styles. It has been influenced
by the pre-existing cultures of the peoples living in areas where Islam has spread.
Therefore, Islamic art is an expression of people living in lands where Islam has an
influence on daily life. Student Teachers will consider the different styles and development of Islamic art and opportunities to use Islamic art as a way of teaching mathematics. An important element of Islamic art is calligraphy. Student Teachers will learn
about Pakistani calligraphers and their work, and will make their own calligraphy.
Art movements are the collective titles that are given to artworks that share the
same artistic ideals, style, technical approach, or time frame. Grouping artists of
similar interests or styles into art movements is mainly a characteristic of western
art. Art movements are essentially a development of the 20th century, when there
was a greater variety of styles than at any other period in the history of art. As with
all art, these movements are a reflection of a particular period in history. Although
Cubism, realism, and abstraction originated in western art, many Pakistani artists
have painted and continue to paint using these styles and techniques. In Unit 2,
Student Teachers are introduced to Cubism, realism, and abstraction via the works
of Pakistani artists.
Week 3: Art and culture in ancient Indus Valley civilizations
•
•
Art and crafts (the development of pottery and metalwork, printing on
cloth, bead making)
Planning teaching and learning based on the art and culture of ancient
Indus Valley civilizations
Week 4: Islamic art
• Introduction to Islamic art
• History and development of Islamic art
• Islamic art and links across the curriculum
Week 5: Calligraphy
•
•
•
•
Calligraphy in different cultures and traditions around the world
Persian artists and their calligraphy
Pakistani calligraphers (Anwar Jalal Shemza, Syed Sadequain Ahmed Naqvi,
Ismail Gulgee, and Shakir Ali)
Making calligraphy using different tools and mediums
ASSOCIATE DEGREE IN EDUCATION/B.ED (HONS) ELEMENTARY
32
UNIT 1
UNIT 2
UNIT 3
UNIT 4
UNIT 5
Week 6: 20th-century art in Pakistan
•
•
•
Introduction to Cubism (Pakistani artists Shakir Ali and Mansoor Rahi)
Introduction to realism (Pakistani artists Ali Imam, Iqbal Hussain, Khalid Iqbal,
and Anna Molka Ahmed)
Introduction to abstraction (Pakistani artists Ahmed Parvez, Lubna Latif,
Maqsood Ali, Anwar Maqsood, and Hamid Ali)
Unit learning goals
At the end of the unit, Students Teachers will be able to:
give examples of how art is a product of the particular culture in which is
produced
ll
ll
discuss the key features of Islamic art
explain the significance of calligraphy in Islamic art and culture, and how it
developed
ll
explore how manipulating and embellishing letters, words, and text can
enhance, or change, meaning
ll
recognize and appreciate artists, art styles, and artwork
ll
describe Cubism, realism, and abstraction.
ll
Essential questions
•
•
•
•
•
•
Does art reflect culture or shape it?
How is culture and tradition expressed through art?
What is Islamic art?
How can I use Islamic art to teach math and other subjects?
How can writing be manipulated and embellished to convey meaning through
its appearance (beyond its literal meaning)?
What are Cubism, realism, and abstraction in art?
Ideas for teaching Unit 2
The ideas below provide possible starting points for sessions and activities with
Student Teachers.
Week 3
Ideas for teaching about art and crafts of ancient civilizations
in the Indus Valley
Student Teachers could:
• Share what they know already about ancient civilizations in the Indus Valley
(this topic is part of the Semester 2 course Pakistan Studies).
• Imagine a visit to Moen-jo-Daro many thousands of years ago and write a
postcard to their family about the city.
33
COURSE GUIDE: Art, Crafts And Calligraphy
UNIT 5
•
•
•
•
UNIT 4
UNIT 3
UNIT 2
UNIT 1
Make clay seals with markings that signify them as their personal seals. The Indus
Valley civilization is famous for its clay seals. The seals were probably used to
close documents and mark packages of goods, and they often included an image
and script.
Try bead making or block printing.
Invite an expert to present and discuss a selection of artefacts from the
Indus Valley.
Plan a lesson for children in higher elementary grades to learn about town
planning in a city like Harappa.
Week 4
Ideas for teaching about Islamic Art
Student Teachers could:
• Classify a range of Islamic art in various ways (for example, according to four
categories or elements, or according to when or where it was produced).
• Explore geometry and tessellations through Islamic art.
• Design a tile and make it in clay.
• Design a carpet using motifs and patterns from Islamic art.
• Visit a building that incorporates Islamic art or a museum to look at examples of
Islamic art. If possible, they could take photos or make drawings of what they
see and take notes about materials used, origin, and other details.
Week 5
Ideas for teaching about calligraphy
Student Teachers could:
• Compare calligraphy from different cultures in Japan, China, Europe, and the
Islamic world to find out how they are the same and different. They could
consider: Who made the calligraphy? What materials were used, and where does
the calligraphy appear? What size is the calligraphy? Was the calligraphy
designed to be viewed close up or far away? Why might people in any culture
choose to make ‘special’ writing? Can a writing style change how we read a
piece of writing?
• Read about calligraphy in Islamic art. For example: http://www.vam.ac.uk/
content/articles/c/calligraphy-in-islamic-art/ or www.islamicart.com
• Practice making calligraphy using different media (in any language).
Week 6
Ideas for teaching about 20th-century art in Pakistan
(Cubism, abstraction, realism)
Student Teachers could:
• Prepare for and participate in an interactive lecture to introduce Student
Teachers to Cubism, abstraction, and realism, illustrated with examples by
Pakistani artists.
ASSOCIATE DEGREE IN EDUCATION/B.ED (HONS) ELEMENTARY
34
UNIT 1
UNIT 2
UNIT 3
•
•
UNIT 4
UNIT 5
Take part in a jigsaw research activity about Pakistani artists. Divide Student
Teachers into five groups. Assign each group an artist. Ask them to work
individually to find out about the artist and to collect examples of their work
(they can download images into a folder to share). In class, create five new
groups, so that each group has a Student Teacher who researched each of
the artists. Invite group members to share what they learned with each other.
Share images of work by realists using PowerPoint slides. Discuss the paintings
and the characteristics of realism. Have Student Teachers draw their own
‘everyday scene’ with an emphasis on realism and detail.
Example session plans for Unit 2
Week 4, session 1: Introduction to Islamic art
Preparation
Prepare two PowerPoint presentations:
• An introductory PowerPoint presentation with examples of Islamic art from each
of the four categories (10–12 images).
• A PowerPoint presentation for Student Teachers to use in small groups with at
least 30 examples of Islamic art showing the four different categories (include the
date for each piece of art and its origin)
Introduction (15–20 minutes)
Using the introductory PowerPoint presentation, explain to Student Teachers that
despite the variety of Islamic art that exists, most traditional art fits into one of four
general categories.
• Geometric designs, including tiling and tessellating designs
• Organic and figural designs, including plants, animals, and human figures
• Calligraphic designs, which use Arabic script in decorative ways
• Medallion designs, often seen in carpets, which have a central design element
surrounded by borders
Discuss each of the images, noting that some examples include more than one
category.
Sorting activity (20 minutes)
Divide Student Teachers into small groups and have them work at a computer so
that they can view the PowerPoint presentation. (If no computer is available, prepare
handouts of the images.) Ask them to look at each of the images of Islamic art and
classify the works into four categories. If they feel an artwork might have characteristics of two categories, they should place it in the category they feel it matches most
strongly.
Discussion (20 minutes)
When groups have finished, have them compare answers and discuss any differences
of opinion.
35
COURSE GUIDE: Art, Crafts And Calligraphy
UNIT 5
UNIT 4
UNIT 3
UNIT 2
UNIT 1
Additional ideas
Ask Student Teacher to place the artworks in chronological order, creating a timeline
that shows when each piece of art was created. Invite them to make generalizations
about how the art changed over time.
Ask Student Teachers to organize the artwork geographically. Invite them to make
generalizations about art from different places.
Explore styles of Islamic art:
ØØ ‘Styles in Islamic Art’: http://www.vam.ac.uk/vastatic/
microsites/1342_islamic_middle_east/
ØØ ‘Islamic Arts and Architecture’: http://islamic-arts.org/
Week 4, session 3: Islamic art and links across
the curriculum
This session could be used as an example of art across the curriculum as Student
Teachers and children learn about geometry as well as Islamic Art.
Preparation
You will need a compass and ruler to use on a blackboard.
Student Teachers will need the same to use in their notebooks or on A4 sheets of
paper.
Lecture with PowerPoint presentation (15–20 minutes)
Use the following content to prepare a short lecture. Illustrate your lecture with
images.
The use of geometry is important in the development of Islamic ornament, whatever
form it takes. The use of purely geometric elements to create elaborate patterns,
though, has become a sophisticated form of decoration on its own. The appeal of
Islamic geometric decoration lies in its logical interrelation of parts, reflecting in
abstract form the underlying order found in nature.
Among the most important aspects of Islamic geometric design are repetition and
variation. A series of tiles, for example, may consist of only one or two shapes, but
the patterns of the tiles may all be different. In other designs, a few different shapes
may be combined to create a complex interlocking pattern.
Symmetry plays a part in most Islamic patterns. There may be a single line of reflective symmetry, usually from the top to the bottom, or there may be three or four
lines of symmetry. Straight (translation) and turning (rotational) movements are also
used. Sometimes reflective symmetry and the two kinds of movement are found in
the same design. Symmetry and repetition give unity to the more complex designs
ASSOCIATE DEGREE IN EDUCATION/B.ED (HONS) ELEMENTARY
36
UNIT 1
UNIT 2
UNIT 3
UNIT 4
UNIT 5
Triangles and hexagons (30 minutes)
Student Teachers will need a compass, paper, and a ruler.
Give the following instructions to Student Teachers:
1. 1.
Open the compass about two inches and press the point into the
paper. This is the invisible starting point from which the design will unfold.
Draw a circle with the compass.
2. Put the compass point anywhere on the circumference of the circle, and
swing the pencil leg so that a mark is made on the circumference. Move the
point of the compass to the pencil mark. and make another pencil mark on
the circumference. Continue doing this around the circle until there are six
marks.
3. Join up the points in sequence around the circle to make the six-sided polygon, a hexagon. This has three pairs of parallel lines.
Explain to Student Teachers that now they are going to draw stars within the
hexagon:
1. Join up every second point. (Student Teachers should now have an equilateral triangle.)
2. Join up the other three points and you have a second equilateral triangle.
Together these two triangles make up a star. One triangle points up to
heaven, the other points down to Earth. Three pairs of parallel lines make
up the star. In the middle of the star is another hexagon.
3. Joining up every second point of the inner hexagon makes another equilateral triangle in the inner hexagon. Joining up the other points makes a
second equilateral triangle and another six-pointed star with a hexagon in
the middle.
Point out to Student Teachers that this pattern can go on and on.
1
4
2
5
3
This activity is from: http://www.vam.ac.uk/content/articles/t/
teachers-resource-maths-and-islamic-art-and-design/
37
COURSE GUIDE: Art, Crafts And Calligraphy
UNIT 5
UNIT 4
UNIT 3
UNIT 2
UNIT 1
Conclusion (10 minutes)
Conclude the lesson by asking Student Teachers to cut out the hexagonal shape they
first made inside the circle. This is a hexagonal tile. Ask them if they can fit their tiles
together. If not, why not? How could they make tiles that fit together?
Week 5, session 3: Making calligraphy
Preparation
Collect and provide a variety of materials for Student Teachers to make calligraphy,
such as calligraphy pens, paints, different kinds of paper, scissors, crayons, chalks,
and so forth.
Introduction: Experimentation (20 minutes)
Ask each Student Teacher to write their name (in any language). They should write
it carefully and make the font larger than normal.
Ask them to look closely for characteristics they might emphasize, such as the repetition of a letter, a first or last letter, a pattern in their name, or a prominent feature.
Ask Student Teachers to experiment with ways of embellishing and manipulating
these characteristics, using a calligraphy pen or pencil or any other material.
Now ask them to write their name again slowly, but this time emphasising these
characteristics.
Making calligraphy (40 minutes plus out-of-class time)
Explain to Student Teachers that they are going to use the same approach to create a
piece of two dimensional art around a word, letter, phrase, or poem (in the language
of their choice), taking calligraphy as their inspiration.
Ask them to select their word, letter, phrase, or poem and to experiment with embellishment and manipulation. They should also try using different materials. As they
are making choices, remind them to think about what they would like to achieve
with their calligraphy.
Once they have an idea and decided on the materials to use, they can begin. Remind
Student Teachers to keep notes on their choices (such as why this word, letter, phrase
or poem; why these embellishments; and why these materials).
Explain to Student Teachers that they should bring their completed works to the next
session. They should also prepare a short description of their work to explain why
they chose this subject and materials, and what they wanted to achieve.
A variation on this activity is to select one word, letter, phrase, or poem for all
Student Teachers to work with. This will produce a variety of calligraphy in different
media, expressing different feelings and ideas but all with the same subject.
ASSOCIATE DEGREE IN EDUCATION/B.ED (HONS) ELEMENTARY
38
UNIT 3
ELEMENTS AND
PRINCIPLES OF DESIGN
UNIT 5
UNIT 4
UNIT 3
UNIT 2
UNIT 1
Unit 3 overview
The elements and principles of design are the building blocks used to create a work
of art. The elements of design can be thought of as the things that make up a piece of
art. The principles of design can be thought of as what an artist does to the elements
of design. In Unit 3, Student Teachers will explore elements of art and principles of
design. Emphasis is placed on hands-on experience so that Student Teachers practice
using some of the elements and principles of design.
Week 7: The elements and principles of design (lines and colour)
•
•
•
•
•
•
Elements of art and their importance: line, shape, form, space, texture, value,
and colour
Lines and what they do in art
Types of lines: vertical, horizontal, diagonal, zigzag, and curved
Line variation, length, width, and texture
Colour and the colour wheel (primary, secondary, and tertiary colours)
Characteristics of colour: hue, value, and intensity
Week 8: The elements and principles of design (size, shape, and texture)
•
•
•
•
•
Use of space
Two dimensions and three dimensions in art
Geometric shapes and forms
Organic shapes and forms
Texture
Week 9: Printing and patterns
• Printing: vegetable printing, leaf printing, and block printing
• Pattern making: geometrical and organic patterns
Weeks 10 and 11: Drawing and painting
•
•
•
•
•
Pencil drawing, graphite drawing, crayons, pastels, etc.
Shading techniques
Painting
Still life
Landscape
Unit learning goals
At the end of the unit, Students Teachers will be able to:
analyse how the elements of art and design principles are used to communicate
ideas and feelings
ll
create art for specific purposes using the elements of art to communicate ideas
ll
experience using different mediums for expression in art
ll
apply art vocabulary in daily work.
ll
ASSOCIATE DEGREE IN EDUCATION/B.ED (HONS) ELEMENTARY
40
UNIT 1
UNIT 2
UNIT 3
UNIT 4
UNIT 5
Essential questions
• What are the elements and principles of design?
• How do I use the elements and principles of design to create and critique
artwork?
• How can the elements and principles of design influence the viewer’s
perception of work?
Ideas for teaching Unit 3
The ideas below provide possible starting points for sessions and activities with
Student Teachers.
Week 7
Ideas for teaching about the elements and principles of design
Student Teachers could:
• Visit the following website for simple descriptions and examples of the elements
and principles of design: http://www.johnlovett.com/test.htm
• Try the exercise at the end of the description to help consolidate their
understanding of the elements and principles of design, and/or to assess their
understanding:
ØØ http://www.johnlovett.com/exercise.htm
• visit another useful site about the elements and principles of design:
ØØ http://www.goshen.edu/art/ed/Compose.htm
Ideas for teaching about lines
Student Teachers could:
• Draw lines as an expression to music being played. Vary the moods of music.
• Analyse paintings and sculptures of famous artists. Study the way the artist has
used line to emphasize certain aspects and to create unity and perspective in the
composition.
• Use as many different types of lines as possible to cover an entire page.
• Make a storyboard using stick figures to help tell a story.
Ideas for teaching use of colour (colour wheels, tints,
tones, and shade)
Student Teachers could:
• Create a chart showing which colours can be made by mixing primary colours
(blue, red, and yellow). Make notes on the chart to explain how each colour was
made. Then, look at how one colour is affected by the one next to it, e.g. a red
looks redder next to a green than it does next to an orange.
• Drip paints onto a wet sheet of paper and take note of the effects of colours
mixing.
• Observe and experiment with colours as they are placed side by side. Use paints
or paper to experiment by placing different coloured circles onto a standard
background square. Take note of the apparent changes that are brought about
when colours are placed beside each other.
• Make two similar drawings and use warm colours in one drawing or painting and
use cool colours in the second. Take note of the effects on the viewer.
41
COURSE GUIDE: Art, Crafts And Calligraphy
UNIT 5
•
•
•
•
UNIT 4
UNIT 3
UNIT 2
UNIT 1
Use colours next to each other on the colour wheel to create harmony in a
picture.
Find objects or drawings that are one particular colour. Then compare them
with what others have found. Can you order the colours in a sequence to show
value, from the lightest to the darkest?
Paint a number of pictures using only two or three colours to show different
emotions. Paint an ‘angry’ picture. What two colours will you choose to use?
Paint a ‘sad’ picture. Which colours will you use now?
Explore value as an element of art: use one colour and make a colour chart by
starting with the saturated hue at the top of the page, and gradually changing its
value by adding white, a small portion at a time. Paint each new colour under the
previous one. Use these monochromatic colours to make a picture.
Week 8
Ideas for teaching about use of space and value in
two-dimensional and three-dimensional art
Student Teachers could:
• Look at colour to see how it can give a sense of space. For example, often the sky
gets bluer and trees get greener as they recede (colour gradation).
• Create three-dimensional forms with straws or toothpicks and clay
(e.g. coil pots)
• Make sculptures from a variety of different materials, such as cardboard
and wood scraps, connected with string, elastic bands, and glue.
• Make a clay sculpture. Observe light and shade of the structure by using a torch
and shining it on the sculpture from different directions. Draw the sculpture a
number of times, showing how the direction of light affects the light
and shadows.
• Explode a design. Cut a sheet of dark paper into several pieces (of any design).
Place them like a jigsaw (with each part fitting together) on a white background.
Pull the sections apart, leaving small white spaces between the dark forms, then
increase the white spaces. How does the image change?
• Use a light source on this or another set of objects to create shadow and use this
as an arrangement to paint with a monochromatic scale.
• Take a section of a photograph or picture, enlarge it, and use it as a model to
copy. Look especially at the dark and light patterns.
• Analyse the work of several artists and their use of light and shade.
Ideas for teaching about texture
Student Teachers could:
• Collect materials with different textures or collect photos of materials with
different textures. Try classifying them in different ways (such as rough, smooth,
shiny, or soft).
• Use pencil or wax crayons to make pencil or crayon rubbings on trees and
other surfaces.
• Use varied textures to paint on and use as a print. For example, dip sea sponges
in paint and print on material or paper to achieve different effects. Other ideas
include: wrapping rope around wood or a tin, which can be rolled in paint
and then over paper.
ASSOCIATE DEGREE IN EDUCATION/B.ED (HONS) ELEMENTARY
42
UNIT 1
UNIT 2
UNIT 3
UNIT 4
UNIT 5
Week 9
Ideas for teaching about patterns and printmaking
Student Teachers could:
• Create patterns using only geometric shapes, only organic shapes, and then a
mix of both.
• Use halves of potatoes for block printing. Cut shapes into the cut half of the
potato. Dip the end of the potato into a tray of paint or use a paintbrush to apply
paint or ink. Stamp the end of the potato onto paper to create a variety
of patterns.
• Use lids of different sizes to make prints. Apply paint on the edge and
stamp down on paper.
Weeks 10 and 11
Ideas for teaching drawing and painting
Student Teachers could:
• Try blind contour drawing. This is an excellent way to train the eye to draw
what it really sees rather than what it thinks it sees. Ask Student Teachers to
choose an object to draw. Ask them to pick a point on the object where the
eye can begin its slow journey around the contour or edge of the object. Explain
that when the eye begins to move, so should the hand holding the pencil. At no
time should they look at their hand as it draws. They should try drawing the
entire contour of the object without lifting their pencil from the paper. Explain
that the more they practice this method, the more their drawings will resemble
what they are looking at.
• Draw a still life picture. Before starting, use a cut-out frame to find a
composition that is balanced and pleasing to the eye. Make the still life again,
but this time, choose another composition using the cut-out frame.
• Take paints and other media outside and paint a landscape. Plan some
outdoor visits to create some interesting landscape, seascapes, or cityscape.
• Look at the work of an artist and try to paint in their style.
43
COURSE GUIDE: Art, Crafts And Calligraphy
UNIT 4
CRAFTS
UNIT 1
UNIT 2
UNIT 3
UNIT 4
UNIT 5
Unit 4 overview
Crafts are closely related to art. Both require creativity, and in many cases similar
materials are used. They may use the same elements and principles of design.
However, a craft is an activity that uses specific materials with a certain goal in
mind. Usually a craft has a set of directions and skills to result in a finished product,
and when a child makes a craft, he or she learns to follow directions and solve
problems while working toward a goal.
Craft is also linked closely to technology. Crafts make use of technology, and some
technologies used are very old. However, technologies change and develop and so
do crafts. Pottery for example, is an ancient craft that relies on technologies first
developed thousands of years ago. These technologies have developed, and so the
way pottery is made has also changed even though the fundamental process is the
same.
In Unit 4, Student Teachers will consider the vast array of crafts produced in
Pakistan, from pottery to puppets. They will look at selected crafts by location—
what is made and where—and speak with local craftsmen and women. They will
look at how crafts are made and the technology involved. Student Teachers will
make crafts as well as plan and evaluate craft activities for children in the elementary grades. They will consider ways to link craft activities to other areas of the
curriculum.
Week 12: Crafts in Pakistan
•
•
•
Crafts practiced and made in Pakistan
Crafts and technology
Doing craftwork and making handicrafts (for example, puppets and puppetry,
textiles, making beads, making mosaics and mirror work, and pottery).2
Week 13: Doing crafts with children in the elementary grades
• Doing craftwork and handicrafts
• Crafts across the curriculum
• Doing crafts with children in the elementary grades
Unit learning goals
At the end of the unit, Students Teachers will be able to:
ll
describe the variety of crafts produced in Pakistan.
explain links between locations and crafts produced, and broader links to
the culture and communities that produce them.
ll
discuss ways in which developments in technology have changed the way
crafts are made.
ll
reflect on and critique crafts that they and their peers produce.
ll
design craft activities for children in elementary grades.
ll
Give examples of links between crafts and other areas of the curriculum.
ll
These are examples. You should
choose crafts appropriate to your location and resources available.
2
45
COURSE GUIDE: Art, Crafts And Calligraphy
UNIT 5
UNIT 4
UNIT 3
UNIT 2
UNIT 1
Essential questions
•
•
•
•
•
How are crafts linked to the places where they are produced?
Who are the craftsmen and craftswomen of Pakistan?
What crafts are produced locally and by whom?
What can children learn from doing and making crafts?
How are craft activities linked to learning across the curriculum?
Ideas for teaching Unit 4
The ideas below provide possible starting points for sessions and activities with
Student Teachers.
Weeks 12 and 13
Student Teachers could:
• Make a map that shows which crafts are made where in Pakistan. Find out why
this area is known for this particular craft.
• Collect crafts produced locally and set up an exhibition at college, university, or
at a school.
• Select a local craft, develop a set of questions to ask the craftsmen or
craftswomen who make the craft, and interview them. They could write up the
interview as if writing for a magazine or newspaper. Student Teachers could
collect the articles and make them into a booklet about crafts in the area.
• Make a variety of types of puppets: glove or hand puppets, finger puppets,
sock puppets, rod puppets, and shadow puppets.
• Plan and present a puppet show for children. They should think about the age
and interests of the audience.
• Make papier mâché beads and explain how they could use them to teach
about sequences in math, or as the starting point for a creative writing activity.
(For example, children could imagine they found the bead, or a bracelet or
necklace made from the papier mâché beads, and write about where the bead
came from and who owned it.)
• Make and decorate thumb pots (pinch pots). Steps for making a pinch pot:
o Begin with a ball of clay. Push your thumb into the centre. Then pinch up
the walls.
o Turn the piece as you pinch. This will help you to keep an even thickness
in the walls of the piece.
o Gently pat the bottom on a flat surface to create a flat spot on the bottom
of the piece.
o If desired, add a design to the inside and outside of the pot and to the edges.
• Look at a variety of textiles from Pakistan, for example, hand-woven khaadi,
mirror-work, embroidery, and block-printed fabrics. They could consider
questions such as: Who makes these fabrics? What was their original purpose?
• Try weaving strips of paper and fabric. Cut up a large photo or picture into
strips. Find a similar sized photo or picture and cut that into strips. Take the strips
from one photo and lay them out next to each other on a piece of paper. Glue
both end of the strips to the paper. Now take the strips from the second photo
or picture and start to weave them across the strips from the first photo. What
kind of effects can be produced by using different photos or pictures? Try the
same activity with strips of fabric or with natural materials.
ASSOCIATE DEGREE IN EDUCATION/B.ED (HONS) ELEMENTARY
46
UNIT 1
UNIT 2
UNIT 3
•
•
•
UNIT 4
UNIT 5
Create patterns by block printing (potato printing) onto fabric or other surfaces.
Design and try out craft activities with children in elementary grades. Reflect on
the activities and children’s reactions.
Ask Student Teachers to collect materials for a craft box: empty boxes, bits of
fabric and thread, tape, tinfoil, tissue paper, etc. Keep the craft box at college or in
your department so that Student Teachers can use the items when needed.
The content of this unit lends itself to project work. Student Teachers could select a
local craft and develop a project around it to include:
• Selecting a craft to examine
• Interviewing with craftsmen and women
• Collecting artefacts (or taking photographs of them)
• Studying the technique and materials used and the technology behind it
• Practicing the craft and making artefacts
• Planning activities for children related to the craft
• Presenting their work; for example, in a display, spoken presentation, or booklet
Example session plan for Unit 4
Week 13, session 2: Crafts across the curriculum:
Investigating shadows
In advance of the lesson, make or collect a few very simple shadow puppets. You can
do this by cutting out shapes on strong paper or card and attaching them to a stick.
You could also collect a few interesting-shaped objects to cast a shadow. Groups of
Student Teachers will need a screen. They can hang a sheet of fabric or paper and
two people can hold it. If you have a smooth, clean wall, that might work also as a
screen. Finally, groups of Student Teachers will need a source of light. A torch or
lamp will work if the room is not too bright and the light is strong. You might need
to darken the room.
Introduction (5 minutes)
Explain to Student Teachers that you will be taking them through a series of activities that they could do with children in the elementary grades. You are assuming the
role of the schoolteacher and the Student Teachers are the children.
Explain that the sequence of activities begins with making shadow puppets. Shadow
play is an ancient form of entertainment and storytelling. It is still popular today,
and the puppets used range from intricate moving shapes of people and animals to
the simplest shapes cut from a piece of card. (Try to show some pictures of shadow
puppets.)
Investigating shadows (30 minutes)
Demonstrate the use of the puppets you made, then provide Student Teachers with
card, glue, and sticks to make their own simple shadow puppets. They should draw
the puppet they want on a piece of paper or cardboard. For this first puppet, they
should just make the outline shape, cut it out, and attach it to the stick: for example, the shape of a cat, a house, a robot, or an owl. Provide some time for Student
Teachers to practice using their puppets.
47
COURSE GUIDE: Art, Crafts And Calligraphy
UNIT 5
UNIT 4
UNIT 3
UNIT 2
UNIT 1
Now ask Student Teachers to make another shadow puppet. This time, their puppet
should be more complex. Again, they should draw the puppet they want on a piece of
paper or cardboard, but this time, instead of just cutting an outline, they should cut
out shapes from within the outline: for example, windows in a house, the battery in a
robot, or the eyes of an owl.
Ask Student Teachers to try out their second puppet.
Ask Student Teachers to compare the shadows produced by their two puppets.
Ask: ‘What is a shadow?’ Listen to answers and ask if they have additional questions
to help them refine their ideas. Explain that a shadow is an absence of light, caused
by an object blocking light.
Divide Student Teachers into groups and give them several objects and materials to
test. Can they make shadows with the materials? (Materials could include a glass,
sieve, book, piece of fabric, plastic bag, and magnifying glass, for example.)
Discuss: Which materials make the best shadows? Why?
Introduce new words: opaque, transparent, translucent. Explain the words in simple
terms. We can see clearly through transparent materials and light passes through
them. Translucent materials let some light through them, and opaque materials do
not let any light pass through them. The opaque materials make the best shadows.
Reflection and discussion (20 minutes)
Explain that the activity has stopped. You are no longer a schoolteacher and the
Student Teachers have stopped being children in class.
Ask Student Teachers to discuss the following questions with a partner:
• The activity began with shadow puppets, but what subject was being taught?
• What knowledge and skills were children developing via this activity?
Key points to mention if they are not raised:
• Children will be able to explain that a shadow is an absence of light, caused by
an object blocking light.
• Children will be able to explain the difference between opaque, translucent,
and transparent materials and give examples.
• Children will be able to observe, collect, and present evidence.
• Children will be able to use simple equipment and materials.
Ask Student Teachers to discuss the following questions with a partner:
• In what grade would you do this activity? Why?
• How could you develop this lesson?
ASSOCIATE DEGREE IN EDUCATION/B.ED (HONS) ELEMENTARY
48
UNIT 1
UNIT 2
UNIT 3
UNIT 4
UNIT 5
Explain that children in all elementary grades could try this activity or at least parts
of the activity. Cutting out shapes might be difficult for children in grade 1, so the
teacher could help or make puppets for children to experiment with. The words
opaque, translucent, and transparent might be introduced with older children only
(grade 3 and above).
Ideas for developing the activity include investigating ways to make the shadow
bigger and smaller, or investigating shadows made by the Sun and making a sundial.
Or teachers might use the idea of shadows for a language activity. There are many
options.
Conclusion (5 minutes)
Conclude by explaining this session was another example of how to make links
across the curriculum beginning with an art activity.
49
COURSE GUIDE: Art, Crafts And Calligraphy
UNIT 5
UNIT 4
UNIT 3
UNIT 2
UNIT 1
UNIT 5
ASSESSING ART, CRAFTS,
AND CALLIGRAPHY IN
THE CLASSROOM, AND
EXHIBITION
ASSOCIATE DEGREE IN EDUCATION
50
UNIT 1
UNIT 2
UNIT 3
UNIT 4
UNIT 5
Unit 5 overview
In this unit, Student Teachers begin drawing together all that they have learned by
focusing on lesson planning, classroom management, and assessment in teaching
and learning art, crafts, and calligraphy.
In the first week, Student Teachers will revisit the idea of connecting art across the
curriculum and the opportunities that doing art, crafts, and calligraphy provides
for learning other subjects. As many schools in Pakistan do not include teaching
art, crafts, and calligraphy in the timetable, it is especially important for Student
Teachers to be able to identify opportunities to integrate art, crafts, and calligraphy
with other subjects so that children in elementary grades have opportunities for
creative development. In the first week of this unit, Student Teachers will also briefly
consider the specific classroom management skills required for teaching art, crafts,
and calligraphy, before moving on to the topic of assessment.
In the second week of this unit, Student Teachers will focus on assessment of art,
crafts, and calligraphy in elementary grades. The most important aim of assessment
in these subjects in elementary grades is to enhance children’s learning. Assessment
is, therefore, at the heart of teaching and learning arts, crafts, and calligraphy.
The end-of-semester display of artwork and exhibition are important aspects of art
teaching and learning. Student Teachers will plan and organize an art exhibition to
exhibit their work prepared during the course.
Week 14: Preparing to teach art, crafts, and calligraphy
• Connecting art, crafts, and calligraphy across the curriculum
• Managing art, crafts, and calligraphy in the classroom
• What is assessment in art, crafts, and calligraphy education?
Week 15: Preparing to teach art, crafts, and calligraphy, continued
• Assessing children’s learning during an art activity
• Assessment rubrics
• Planning for art, crafts, and calligraphy
Week 16: Exhibition and portfolios
• Arts and crafts exhibition
• Display and assessment of Student Teacher projects and portfolios
Unit learning goals
At the end of the unit, Students Teachers will be able to:
ll
identify opportunities for assessment in an art, crafts, or calligraphy
activity or lesson
ll
plan for assessment in an art, crafts, or calligraphy activity or lesson.
ll
51
critically discuss the value of assessing learning in art education in
elementary grades
COURSE GUIDE: Art, Crafts And Calligraphy
UNIT 5
UNIT 4
UNIT 3
UNIT 2
UNIT 1
Essential questions
•
•
•
•
•
What planning is required for teaching and learning art, crafts, or calligraphy?
How can I integrate art, crafts, and calligraphy with other subjects?
How is assessment in art, crafts, and calligraphy the same as in other subjects?
How is it different?
What art, crafts, and calligraphy knowledge, skills, and attitudes or dispositions
should I be assessing?
How can I establish effective criteria for assessment in arts?
Ideas for teaching Unit 5
Week 14
Student Teachers could:
• Practice connecting learning outcomes or learning objectives to activities
and assessment.
• Make spider diagrams or mind maps to show curriculum links between topics
from art, crafts, and calligraphy to other subjects, and from other subjects to art,
crafts, and calligraphy.
• Listen to a presentation from an experienced elementary school teacher (or
teachers) about classroom management in art, crafts, and calligraphy lessons and
activities, and take part in a question-and-answer session with the teacher(s).
• Take photographs and draw diagrams of how to set up a classroom for art, crafts,
and calligraphy.
• Identify classroom routines and rules for art, crafts, and calligraphy with children
in the elementary grades.
• Make lists of materials to collect for teaching and learning art, crafts, and
calligraphy.
• Identify what to assess in the elementary grades when teaching art, crafts, and
calligraphy.
• Discuss how art, crafts, and calligraphy are assessed and why and how assessment
is the same or different from other subjects.
Week 15
Student Teachers could:
• Examine specific lesson plans to identify what to assess, when, and how.
• Create simple assessment rubrics.
• Visit a class when children are doing art and find out what the teacher is assessing
Write about what you observed and learned about assessing art.
• Read the article ‘Writing Learning Outcomes and Assessment Criteria in Art
and Design’ by Allan Davies:
ØØ http://www.heacademy.ac.uk/assets/documents/subjects/adm/writing-learning-outcomes-final26_6.pdf
• Practice linking learning outcomes, activities, and assessment.
ASSOCIATE DEGREE IN EDUCATION/B.ED (HONS) ELEMENTARY
52
UNIT 1
UNIT 2
UNIT 3
UNIT 4
UNIT 5
Week 16
Student Teachers could:
• Prepare for and curate an exhibition of work produced by them during the
course, including portfolios.
• Finalize their course portfolios.
• Review and assess each other’s portfolios (peer assessment).
• Prepare a presentation about their experiences and learning about art, crafts,
and calligraphy.
Example session plans for Unit 5
Week 14, session 1: Connecting art, crafts, and
calligraphy across the curriculum
Introduction (5 minutes)
Divide the class into half. Explain that one-half of the class will do one activity. The
other half will do a different activity. (If time allows, both groups should try both
activities.) Explain that both activities are about making connections between art,
crafts, and calligraphy and other subjects, which has been discussed throughout the
course. Explain the activities.
Making a diagram of cross-curricular links (40 minutes)
Activity 1
In the National Curriculum for Social Studies in grade 4, one of the themes is
‘Culture: The way we live together’. More details are provided in the handout at the
end of the unit.
In the National Curriculum for Mathematics in grade 1, it is stated that children
should be able to identify basic shapes. More details are provided in the handout at the
end of the unit.
Ask Student Teachers to work with a partner. Have them select one of the themes
and identify art and craft activities that would help children achieve the listed learning
objectives. Ask them to prepare a spider diagram or mind map to present their ideas.
Explain how to make a spider diagram or chart. Ask Student Teachers to write the
starting theme (‘culture: the way we live together’ or ‘recognizing basic shapes’) in the
centre of a piece of chart paper. Brainstorm ideas and link those ideas to the central
idea. Continue adding ideas and links and try grouping similar ideas together. If
Student Teachers are not sure what to do, try making a spider diagram or mind map
together.
53
COURSE GUIDE: Art, Crafts And Calligraphy
UNIT 5
UNIT 4
UNIT 3
UNIT 2
UNIT 1
Activity 2
Ask Student Teachers to work with a partner. They should select one of the following
topics or techniques from this course:
• Block printing
• Islamic art
• Colour
Ask them to think of links between their topic and other curriculum areas (math, science, social studies, language arts, and general studies). Ask them to prepare a spider
diagram or a mind map to present their ideas.
Explain how to make a spider diagram or chart. This time, Student Teachers will
write their topic or technique (block printing, Islamic art, colour) in the centre of a
piece of chart paper. As they did with the first diagram, they should brainstorm ideas
and link those ideas to the central idea. They should continue adding ideas and links
and try grouping similar ideas together.
Gallery walk (15 minutes)
Ask Student Teachers to display their spider diagrams and mind maps for a
gallery walk.
Conclude the session by asking for comments on the diagrams and maps. They
should show that making links between teaching art and teaching other subjects is
easy and that there are many links to be made.
Week 14, session 2: Managing art, crafts, and
calligraphy in the classroom
Whole-class discussion (10 minutes)
Classroom routines are especially helpful when teaching and learning art, crafts, and
calligraphy. Ask Student Teachers:
• What is meant by ‘classroom routines’?
• What are some examples of classroom routines?
• Why are classroom routines helpful for children and teachers?
• Are classroom routines the same as classroom rules?
Explain that classroom routines are particularly helpful for managing materials for
art, crafts, and calligraphy activities. Children should know routines for getting their
materials, distributing materials, tidying up, hanging up or storing their artwork, and
moving around the classroom. If there are no routines or children don’t know them,
children cannot take responsibility for helping in the classroom, and the previously
mentioned tasks have to be managed and carried out by the teacher.
Group discussion (30 minutes)
Ask Student Teachers to work in small groups to list the routines they would like to
establish with children for art, crafts, and calligraphy activities, and how they would
establish them.
Invite groups to report to the class (taking care not to repeat what other groups have
already reported).
ASSOCIATE DEGREE IN EDUCATION/B.ED (HONS) ELEMENTARY
54
UNIT 1
UNIT 2
UNIT 3
UNIT 4
UNIT 5
Design a poster
Invite Student Teachers to design a poster for the classroom to remind children about
the rules and routines for an art activity. What would they write? How would they
make it interesting and encouraging for children?
Student Teachers should begin the activity and complete it out of class, ready to share
in the next session.
Week 14, session 3: What is assessment in art,
crafts, and calligraphy education?
Begin the session by displaying the posters Student Teachers have made to help
classroom management.
Small group discussion (15 minutes)
Divide Student Teachers into small groups (three or four members) to discuss the
following:
• Should children’s learning in art, crafts, and calligraphy be assessed? Why?
• What are some of the challenges in assessing art, crafts, and calligraphy?
Invite groups to report back, and ask one Student Teacher to note key ideas on the
board.
Art, crafts, and calligraphy can and should be assessed, as the information collected
informs teaching and is the basis for feedback to help children improve and develop
their work. Formative assessment of art, crafts, and calligraphy in the primary grades
is especially important because the knowledge, skills, and attitudes children are developing often cut across the curriculum. Assessment during an art activity can reveal
something about children’s development (such as the development of fine motor
skills) and specifically about particular subjects (such as language development).
When we assess children’s work, we have to take care not to simply determine whether or not their work is ‘good’, as in lifelike or neat and tidy. A young child’s collage of
the city might not be as lifelike or sophisticated as a collage by an 11-year-old, but the
young child may have worked well with others to produce the collage, demonstrated
creativity, selected a variety of appropriate materials, used materials such as scissors
and glue effectively, and been able to talk about the work to the teacher and other
children. Assessment is about the process and the product.
What should be assessed in arts, crafts, and calligraphy in elementary
grades? (40 minutes)
In elementary grades, teachers will be assessing children’s knowledge, skills, and
attitudes in art, crafts, and calligraphy. Ask Student Teachers, again working in small
groups, to develop a list of knowledge, skills, and attitudes they would assess in the
elementary grades. For example, they might think that children should know the
names of shapes, be able to use scissors to cut out small shapes, and demonstrate
interest in work done by their peers.
55
COURSE GUIDE: Art, Crafts And Calligraphy
UNIT 5
UNIT 4
UNIT 3
UNIT 2
UNIT 1
Encourage them to be specific. For example, rather than saying ‘children will know
about colours’, they will write ‘children will be able to list primary colours’ or ‘children will be able to create secondary colours by mixing primary colours’. They should
record their ideas on three flip charts. Each group should then post their flip charts in
three locations around the room.
Divide Student Teachers into three groups to review the charts and to develop three
‘master lists’. One group reviews charts prepared about knowledge, another looks at
the charts about skills, and the other looks at attitudes. They should only add an item
to the master list if they all agree that it is clear what is meant and that the item is
applicable to children in the elementary grades. They should avoid repeats.
Display the master lists in the classroom.
Week 15, session 1: Assessing children’s
learning during an art activity
Assessing children’s learning during an art activity (30 minutes)
Explain to Student Teachers that they are going to read a lesson plan and identify what
the teacher will assess, when and how to determine what children already know, and
what they are learning or have learned during the lesson.
Distribute an example lesson plan (there is one at the end of the unit).
Allow Student Teachers time to read the lesson plan with a partner. As they read,
remind them to think about the following questions:
• What will the teacher assess? (Refer to the charts made in the previous session
about knowledge, skills, and attitudes.)
• When will the teacher assess it?
• How will the teacher assess it?
Whole-class discussion (20 minutes)
Discuss the three questions from the previous activity with the whole class.
Explain that the teacher will be specifically assessing learning described in the lesson
learning outcomes. The teacher will be collecting evidence to decide if children
demonstrated the knowledge, skills, and attitudes listed. The teacher will probably
be open to other information too: children might learn something the teacher hadn’t
planned for or there might be something unexpected that provides useful information
about the child and their learning.
Explain that there are several key points for assessment in the lesson. The first is in the
discussion: the teacher finds out what children know already. All the way through the
lesson as the teacher gives instructions, he or she can see who is following and who
is having difficulty. The teacher can find out why they are having difficulty following
instructions (for example, perhaps they don’t understand the instructions). The
teacher can see which choices children make when they draw organic and geometric
shapes or choose warm and cold colours. She or he can ask about their selection of
ASSOCIATE DEGREE IN EDUCATION/B.ED (HONS) ELEMENTARY
56
UNIT 1
UNIT 2
UNIT 3
UNIT 4
UNIT 5
shapes and colours. At the end of the lesson, the teacher can find out if children can
respond to questions about the work they have done. Note the importance of talking
with children throughout the lesson about their work to find out what they know and
can do.
Homework (5 minutes)
Distribute the four assessment tools (these are provided in this course guide). Ask
Student Teachers to read them and to be ready to discuss the following questions in
the next session:
• In what ways are they different from each other? In what ways are they
the same?
• When would they be used? Over how long a period of time?
• Who uses each tool?
• What do they think the purpose is of each tool?
Week 15, session 2: Assessment rubrics
Feedback on the four assessment tools (15 minutes)
Ask Student Teachers to refer to the four assessment tools they looked at for
homework.
Divide Student Teachers into small groups (of three or four students) and ask them to
discuss the following questions:
• In what ways are the assessment tools different from each other? In what ways
are they the same?
• Over how long a period of time is the tool used?
• Who uses the tool?
• What do they think the purpose is of each tool?
Conclude the activity with a brief whole-class discussion about each question.
Summarize by explaining that all the tools are for assessing art. Tool 1 is likely to be
used by a teacher over a term to help assess children’s general level/performance in
art. Tool 2 is also likely to be used by a teacher, but it breaks up performance into
a different set of categories than Tool 1 does, and they are more specific. Tool 3 is
more likely to be used by a child or student, and it is a self-assessment tool to be used
over a short period of time. Tool 4 is a rubric for a performance-based assessment
(or authentic assessment). A performance-based assessment is a form of assessment
that requires students to perform and demonstrate a task rather than write or select
an answer. The rubric helps the teacher to make a less subjective judgement of the
performance of the task.
Making a simple rubric (30 minutes plus out-of-class time if needed)
Ask Student Teachers to continue working in small groups (of three or four members). Explain that they are going to make a simple rubric to assess learning based on
the lesson plan in the previous session.
Ask them to make the following chart with the learning outcomes in the lesson plan
down the left-hand side:
57
COURSE GUIDE: Art, Crafts And Calligraphy
UNIT 5
1
UNIT 4
2
UNIT 3
UNIT 2
UNIT 1
3
Name geometric shapes
Differentiate between
organic and geometric
shapes
Give examples of and
differentiate between
warm and cold colours
Follow instructions to
complete the task
Use the materials
provided
Discuss the work they
produced
Ask Student Teachers to think about each of the intended learning outcomes for the
lesson and what a child will do or say that will inform them that they have successfully
achieved the learning outcome. Ask them to add their ideas to the chart in column 1.
Now ask Student Teachers to think about each of the intended learning outcomes
for the lesson and what a child will do or say that will inform them that they have not
achieved the learning outcome. Ask them to add their ideas to the chart in column 3.
Now ask them to think about each of the intended learning outcomes for the lesson
and what a child will do or say that will inform them that they have partially achieved
the learning outcome. Ask them to add their ideas to the chart in column 2.
Ask groups to display and compare their charts.
Concluding discussion (10 minutes)
Has every group made the same rubric? If there is variation, what accounts for the
variation?
In what ways would this rubric be helpful to the teacher teaching the lesson?
ASSOCIATE DEGREE IN EDUCATION/B.ED (HONS) ELEMENTARY
58
UNIT 1
UNIT 2
UNIT 3
UNIT 4
UNIT 5
Week 15, session 3: Planning for art, crafts,
and calligraphy
Discussion and brainstorm (10 minutes)
Discuss: Is planning a lesson in arts, crafts, and calligraphy the same or different from
other subjects?
Ask Student Teacher to brainstorm the questions to ask when planning a lesson or
activity in art, crafts, and calligraphy. Note down ideas on a chart or board. Possible
responses include:
• What theme or topic is the lesson based on?
• What knowledge, skills, and attitudes do I want to develop?
• What do children already know? What can they already do?
• How does the lesson build on what’s been done before?
• What stimulus am I going to provide?
• What do I need children to think about?
• What problems do I want them to solve?
• How can I encourage children to explore materials and try out ideas?
• What resources will they need?
• How will I assess learning?
• What will children do next?
Note that the questions are the same questions teachers ask themselves when making
a plan for any subject. However, there are some slight differences: teachers planning
art, crafts, and calligraphy lessons might spend more time thinking about materials
and resources and how to manage them.
Thinking about learning outcomes, activities, and assessment
Remind Student Teachers about the links between learning outcomes, learning
activities, and assessment. Discuss the following example as a whole class as a way to
link the three elements of a lesson.
A lesson has the following outcome: ‘Children can make a tonal strip by mixing
increasing amounts of white paint into a given colour’.
Ask:
• What activities would they plan?
• How would they assess learning?
• What learning would they assess?
Now share the following learning outcomes on the board or chart
• Children can describe what they think or feel about their own and others’ work
• Children can predict new colours from different mixes of primary colours
• Children can use simple tools and materials correctly to make a
three-dimensional model
• Children can observe closely to create a still life drawing of two objects
59
COURSE GUIDE: Art, Crafts And Calligraphy
UNIT 5
UNIT 4
UNIT 3
UNIT 2
UNIT 1
Divide Student Teachers into eight groups. Assign one learning outcome to two
groups. Assign another learning outcome to two more groups and so on. Ask each
group: What activities would help children achieve the learning outcome? What
would they assess and how? Explain that after 15 minutes, they will share their ideas
with the other group working on the same outcome.
After 15 minutes, invite groups to share ideas and provide feedback to each other. If
time allows, repeat the process and provide groups with another learning outcome to
work on.
Make sure that you are moving between groups, guiding the task and commenting on
ideas.
ASSOCIATE DEGREE IN EDUCATION/B.ED (HONS) ELEMENTARY
60
Faculty Resources
61
FACULTY RESOURCES: Art, Crafts And Calligraphy
Course resource: Week 14, session 1
Excerpt from National Curriculum for
Social Studies (Grade 4)
S
Theme
Students’ learning outcomes
Culture: The ways
we live together
• Explain the term culture, with examples.
• Describe their family culture (language,
food, dress, how the festival is celebrated, etc.).
• Compare their own family culture with that of a family in
another country.
• Compare the culture of different provinces of Pakistan.
• Identify the ways in which the people of their province are
similar and different with each other.
• Recognize that culture is dynamic and keeps changing over
time.
• Define the terms conflict and peace.
• Identify the possible consequences of peace and conflict.
• Understand that their attitude may result in peace or conflict.
• Identify ways to create peace.
• Recognize that conflicts are inevitable and can be managed
(dealt with positivity).
Getting along with
others
Ways of resolving
conflict
• Identify ways of resolving conflicts.
• Explain that communication is a way to resolve conflict.
• Use problem-solving methods to suggest a solution to a personal (home, school) problem.
Communication
• Identify the forms of communications.
• Trace the history of any modern form of communication.
• Identify the advantages and disadvantages of any one modern
form of communication.
• Explain the ways in which computers have made communication easier.
• Design a postcard and write a message and post it to a friend.
• Use a telephone directory to identify the telephone numbers
of emergency services in their area (police, fire brigade,
ambulance).
ASSOCIATE DEGREE IN EDUCATION/B.ED (HONS) ELEMENTARY
62
Excerpt from National Curriculum for
Mathematics (Grade 1)
S
Contents and scope
Identification of
basic shapes
Learning outcomes and skills
i) Recognize and match objects from daily life of similar shape.
ii) Identify the following basic shapes:
• Rectangle
• Square
• Circle
• Oval
• Triangle
iii) Identify the basic shapes from real-life objects.
Patterns
iv) Match similar basic shapes.
i) Identify and describe patterns with two or three elements.
ii) Extend a given pattern of two or three elements.
Position
Identify whether an object is placed
• inside or outside
• above or below
• over or under
• far or near
• before or after
• right or left, of a given picture.
63
FACULTY RESOURCES: Art, Crafts And Calligraphy
Course resource: Unit 5, week 15, sessions 1 and 2
Examples of assessment tools
S
Assessment tool example 1
Level
Aspects for assessment
1
Exploring and
developing ideas
Children respond to ideas
2
Children explore ideas
3
Children explore ideas and
collect visual and other
information for their work
Investigating and making
images and artefacts
Children use a variety of
materials and processes to
design and make images
and artefacts
Children investigate and
use a variety of materials
and processes to design and
make images and artefacts
Children investigate the
qualities in materials and
processes, communicate
their ideas, and design and
make images and artefacts
for different purposes
Evaluating and
developing work
Children describe what they
think or feel about their
own and others’ work
Children discuss differences
in others’ work, and suggest
ways to develop their own
work
Children discuss similarities
and differences between
their own and others’ work,
and adapt and develop their
own work
ASSOCIATE DEGREE IN EDUCATION/B.ED (HONS) ELEMENTARY
64
Assessment tool example 2
Assessment tool
Student ____________________________________ Grade_______________________
Ratings: excellent, good, fair, poor
Knowledge of basic art concepts
Colour
Perspective: Depth perception
Proportion
Composition
Balance
Contrast
Harmony
Skill level: Application
Use of tools
Gluing/pasting
Neatness
Dexterity
Attitude: Interest ability
Cooperation
Participation
Care and use of materials
Promptness
Respect for students and other art work
Use of class time
Adapted from a rubric developed by the Alaska Department of Education & Early Development at:
ØØ http://www.eed.state.ak.us/tls/frameworks/arts/6assess3.htm#visual
65
FACULTY RESOURCES: Art, Crafts And Calligraphy
Assessment tool example 2
Assessment tool
What I was good at: ...
What I need help with ...
What I enjoyed ...
What I’d like to do next ...
ASSOCIATE DEGREE IN EDUCATION/B.ED (HONS) ELEMENTARY
66
Assessment tool example 4
Pastel drawing rubric
Advanced
Technical
Proficient
Basic
• Realism
• Colours
• Objects are
• All fits
blended from
complete
together
dark to light
• Colour has
• All is
• Not smeared
been added
consistent
but one colour • Some
• Background
is layered
layering of
is considered
next to other
colours
as well as
colours so the • Drawing
objects drawn
eye blends the
surface is
• Pastels are
colours
technically
handled
• Shapes are
different
the same
developed and
from object
throughout
not contained
to object
the drawing
within outline • Some
shading but
not complete •
•
•
•
•
It looks good • Focal point
Focal point
• Variety
Repetition
• Repetition Variety
All shapes fit
the design
• Background
is considered
• Whole class
time and
Work habits
beyond
• Whole class
time
In progress
• Idea is
started but
not complete
• Only two
colours used
for shading
• Smearing
• Finger prints
still on
surface
• Background
and objects
separate
• Starts at the • Shapes float
base of the
• Are
paper
unrelated
• Inside of
page is
ignored
• Objects
border the
page
• Only centre
is considered
• Majority of
• Day working
class time
out of four
days
Adapted from a rubric developed by the Alaska Department of Education & Early Development at:
ØØ http://www.eed.state.ak.us/tls/frameworks/arts/6assess3.htm#visual
67
FACULTY RESOURCES: Art, Crafts And Calligraphy
Course resource: Unit 5, week 15, session 1
Lesson plan
This lesson links to measurement and geometry (competency 3) in the National
Curriculum in grade 2.
F
Lesson outcomes
Children will be able to:
• name geometric shapes
• differentiate between organic and geometric shapes
• give examples and differentiate between warm and cold colours
• follow instructions to complete the task
• use the materials provided
• discuss the work they produced.
Materials
• Pencils
• A4 paper, two sheets per child
• Wax crayons or coloured pencils
Steps in the lesson
1. Introduce the activity by discussing geometric shapes and organic shapes.
(Children will be familiar with geometric shapes from previous math lessons).
Ask children to give examples from the classroom and local environment.
2. Talk about the concept of warm and cool colours. Do some colours make
them feel warm? Do some colours make them feel cold? Why? (Children might
say things like, ‘fire is yellow and orange’, ‘water is sometimes blue’.)
3. Give every child an A4-sized piece of paper. Ask them to divide the paper into
six squares, using their pencils. Show an example:
4. Ask children to fill each of their squares with geometric shapes, with only one
shape in each box. Ask them to colour their shapes and the background using
either warm colours or cold colours. (For example, they might have a green
shape with a blue background, or a purple shape with a green background.)
ASSOCIATE DEGREE IN EDUCATION/B.ED (HONS) ELEMENTARY
68
5. Distribute more paper. Again, ask children to divide the paper into six squares.
Now ask them to fill each box with a geometric shape. They can then colour in
their shapes using only warm colours or cool colours (whichever they did not
use to colour the organic shape pattern).
6. Display children’s work when it is finished and discuss them with the
whole class.
• How do the different combinations of colour make them feel?
• What’s their favourite colour combination?
• How are the organic shapes different from the geometric shapes?
• Which patterns do they like?
69
FACULTY RESOURCES: Art, Crafts And Calligraphy
ASSOCIATE DEGREE IN EDUCATION/B.ED (HONS) ELEMENTARY
70

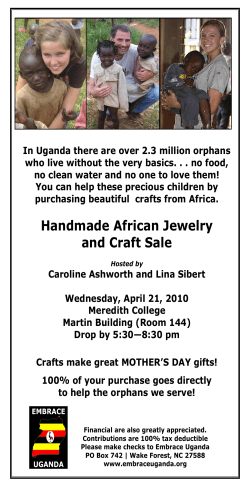


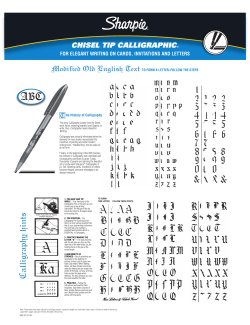


© Copyright 2026