
Document 161282
DISCLAIMER
the road and safe driving practices. In-
Learning to drive is an important milestone
in a person’s life. This Manual was designed
to assist you in learning the skills necessary to become a safe licenced driver. It con-
To the
Road User
tains information on how to obtain your
system, rules of the road, signs and road
markings, and what to do in emergency
tion necessary to pass a driving examination including facts which you will need to
know to successfully complete the rules of
The assistance of the Avalon Community
Office, is acknowledged in preparing this
THIS BOOKLET HAS BEEN
PREPARED AS A GUIDE FOR
DRIVERS.
situations.
This Manual contains most of the informa-
change without notice.
College, through the staff of the Literacy
licence, the Newfoundland and Labrador
driver licencing and vehicle registration
formation in this guide is subject to
FOR OFFICIAL PURPOSES,
PLEASE REFER TO THE
HIGHWAY TRAFFIC ACT.
AVAILABLE AT
WWW.GOV.NL.CA
booklet in an easily readable format.
Specifics on commercial classes of
licences may be found in the Highway
Traffic Act.
Motor Registration Division
Department of Government Services
Newfoundland and Labrador
Revision Date:
2008
Revision
Date:February
April 2009
1
Driver Examination Offices are located on a regional basis and serve various
towns within the region. The following is a list of Regional Offices and travel
points. Visits are scheduled on a regular basis and schedules can be obtained
from Regional Offices.
CORNER BROOK REGION
OFFICE
TRAVEL POINTS
Corner Brook (637-2213) .................................................. Deer Lake (635-2901)
Stephenville (643-8635) .......................................... Port Aux Basques (695-7283)
ST. JOHN’S REGION
OFFICE
TRAVEL POINTS
St. John’s (729-2519)
Mount Pearl (729-2442)
Harbour Grace (945-3014)
2
For general inquiries, please call
toll free 1-877-636-6867
Clarenville (466-2063) ........................................................ Bonavista (468-7747)
Marystown (279-8030)
(279-2810)
Labrador City (944-5859)
Happy Valley - Goose Bay (896-3881)
(896-5437)
GRAND FALLS-WINDSOR REGION
OFFICE
TRAVEL POINTS
Grand Falls-Windsor (292-4353) ......................................... Milltown (882-2029)
Springdale (673-4273)
Gander (256-1014)
Lewisporte (535-6909)
Flower’s Cove (456-2820) ................................................ St. Anthony (454-8580)
Forteau (931-2014)
Cartwright
Port Hope Simpson
TABLE OF CONTENTS
INTRODUCTION ........................................................................................................................................ 1
ADDRESSES & PHONE NUMBERS OF MOTOR REGISTRATION OFFICES ................................................. 2
LICENCING REQUIREMENTS .................................................................................................................... 4
Who Can Drive in Newfoundland & Labrador ....................................................................................................... 4
How to Obtain a Newfoundland Driver’s Licence .................................................................................................. 4
The Graduated Driver’s Licencing Levels .............................................................................................................. 4
The Road Test ........................................................................................................................................................ 5
Driver’s Licence Classifications .......................................................................................................................... 6-9
Driver’s Licence Classifications Diagram .............................................................................................................. 9
VEHICLE EQUIPMENT AND STANDARDS ................................................................................................ 10
Lights .................................................................................................................................................................. 10
Brakes ................................................................................................................................................................. 10
Muffler ................................................................................................................................................................ 11
Horn .................................................................................................................................................................... 11
Tires .................................................................................................................................................................... 11
Windshields and Other Windows ......................................................................................................................... 11
Windshield Wipers and Washers .......................................................................................................................... 11
Defrosters ............................................................................................................................................................ 11
Mirrors ................................................................................................................................................................ 11
Speedometer ....................................................................................................................................................... 11
Odometer ............................................................................................................................................................ 11
Flares .................................................................................................................................................................. 12
Seat Belts and Child Restraints ............................................................................................................................ 12
Restraints Diagram ............................................................................................................................................. 13
TRAFFIC SIGNS ....................................................................................................................................... 13
Cell Phones ......................................................................................................................................................... 13
COMMON REGULATORY SIGNS ......................................................................................................... 17-18
WARNING SIGNS ..................................................................................................................................... 19
Common Warning Signs ................................................................................................................................. 19-21
Construction Signs .............................................................................................................................................. 22
TRAFFIC AND PEDESTRIAN LIGHT SIGNALS .................................................................................... 23-24
PAVEMENT MARKINGS ...................................................................................................................... 25-27
RULES OF THE ROAD ............................................................................................................................. 28
Right of Way ......................................................................................................................................................... 28
Who Goes First .................................................................................................................................................... 28
4-Way Stop ........................................................................................................................................................... 29
Turns .............................................................................................................................................................. 30-33
Safe Passing .................................................................................................................................................... 34-35
Signals and Lane Changing ............................................................................................................................ 36-37
Entering and Driving on Divided Highways ......................................................................................................... 38
Leaving a Divided Highway .................................................................................................................................. 39
Cloverleaf ............................................................................................................................................................ 39
Backing ............................................................................................................................................................... 40
Parking ........................................................................................................................................................... 41-44
School Buses ....................................................................................................................................................... 45
Emergency Vehicles ............................................................................................................................................. 46
Following Distances ............................................................................................................................................. 47
Avoid Hitting Car in Front of You ......................................................................................................................... 48
Avoid Being Struck From Behind ........................................................................................................................ 48
Speed .................................................................................................................................................................. 49
Sudden Stopping and Reaction Time .................................................................................................................. 49
Manual Transmission .......................................................................................................................................... 50
When Lights are Required ................................................................................................................................... 51
RESPONSIBLE DRIVING ......................................................................................................................... 52
Maintaining Your Vehicle ..................................................................................................................................... 52
Night Driving ....................................................................................................................................................... 53
Driving in Bad Weather ....................................................................................................................................... 53
Winter Driving ..................................................................................................................................................... 54
Steering and Skidding ......................................................................................................................................... 55
Fuel Efficient Driving ........................................................................................................................................... 55
EMERGENCIES ................................................................................................................................... 56-60
Collisions ............................................................................................................................................................ 61
IMPAIRED DRIVING ........................................................................................................................... 62-66
NOW YOU ARE LICENCED ....................................................................................................................... 67
Renewing Your Licence ....................................................................................................................................... 68
Donor Consent Form .......................................................................................................................................... 68
Vehicle Registration ............................................................................................................................................. 68
Application for Registration ................................................................................................................................. 68
Renewing Your Registration ................................................................................................................................. 68
Registration for Out-of-Province Passenger Vehicles ........................................................................................... 69
Registration for Out-of-Province Commercial Vehicles ........................................................................................ 69
Renewal Processing ............................................................................................................................................. 69
Licence Plates ..................................................................................................................................................... 70
Insurance ............................................................................................................................................................ 70
Transfer of Ownership ......................................................................................................................................... 71
Bill of Sale ........................................................................................................................................................... 72
COURSES TO IMPROVE DRIVING SKILLS ............................................................................................... 73
DEMERIT POINT SYSTEM ...................................................................................................................... 74
Table of Point Values for Convictions ................................................................................................................... 75
MOTORCYCLE SAFETY ............................................................................................................................. 75
Check Your Equipment ....................................................................................................................................... 77
Check Your Motorcycle ........................................................................................................................................ 78
Safe Driving Practices ..................................................................................................................................... 79-84
Riding at Night ..................................................................................................................................................... 85
Emergencies .................................................................................................................................................. 85-87
Passengers .......................................................................................................................................................... 88
Blow Outs ............................................................................................................................................................ 89
OBTAINING A NEWFOUNDLAND AND LABRADOR MOTORCYCLE LICENCE ........................................... 90
MOTORCYCLE BALANCE TEST MANEUVER ............................................................................................ 90
LEARNING TO DRIVE A MOTORCYCLE ................................................................................................... 90
ROAD TEST ............................................................................................................................................. 91
INFORMATION FOR THE COMMERCIAL DRIVER .............................................................................. 92-96
3
Licencing Requirements
Who Can Drive in Newfoundland and
Labrador?
In order to drive a motor vehicle in Newfoundland
and Labrador, a person must hold a valid licence for
the type of vehicle being driven. A valid Newfoundland driver’s licence is required by all Newfoundland
residents who want to drive on the province’s streets
and highways.
4
A valid Newfoundland licence is not required by people from outside Newfoundland who hold a valid licence from their own province, state, territory or
country, provided that they are seventeen years of age
or older. Such people may operate a vehicle for a period of three (3) months before being required to
apply for a Newfoundland licence. The same applies
to licenced motorcycle operators who are seventeen
years of age or older.
How to Obtain a Newfoundland Driver’s
Licence
Who can get a driver’s licence?
Newfoundland has a Graduated licencing system in
place. Graduated licencing is a gradual step-by-step
licencing process that is designed to help novice
drivers, regardless of age, acquire the knowledge and
skill needed to operate a motor vehicle.
Anyone 16 years of age or older, and who has not been
refused for medical reasons, may apply for a Newfoundland Driver’s Licence.
New applicants must:
• be sixteen (16) years of age or older
• present (at the time of application) proof of age
in the form of an official government birth
certificate; or a passport; plus one other source
of identification showing name and date of birth
such as a SIN card or MCP. All documents must
be originals. Photocopies will not be accepted unless properly certified.
The Graduated Drivers Licence Levels
Newfoundland and Labrador has a Graduated Driver
Licencing program for classes 5 and 6. For information on these classes please refer to p.6.
Before you can be issued a Level I licence, you will be
required to pass a written test and a standard vision
test (if you wear corrective lenses bring them with
you for the test). The written test consists of questions about the rules of the road, safe driving practices and road sign recognition. A mark of 85% is a
passing grade for the written test. Class 6 applicants
will be required to do a balance test prior to the written and vision testing.
Fees
charged
forthewritten
tests
which
must
Whenare
you have
passed
vision and
written
tests,
you
be
to for
writing.
are also
can paid
apply for
and prior
pay a fee
your LevelFees
I licence.
With
charged
the Road
Used
Guide
Air Brake
your Levelfor
I licence
you may
begin
yourand
practice
driving
Booklet.
following the rules under the requirements of the class.
When you have passed the vision and written tests, you
can apply and pay a fee for your Level I licence. With
your Level I licence you may begin your practice driving
following the rules under the requirements of the class.
The Road Test
After 12 months in Level I or 8 months in Level I, with the completion of an
approved driver training or motorcycle program for class 5 or 6, you may take
your road test. We recommend you contact the nearest office prior to your graduation date to schedule a road test date and time.
NOTE: Please check with the Motor Registration Office for requirements
for classes 1, 2, 3, or 4.
On the day of your road test, your vehicle will be checked for mechanical fitness
and you must present the following:
1. Your receipt for the payment of your road test fee.
2. Your valid Level I driver’s licence.
3. Your valid insurance and registration papers for the vehicle in which you are
to be road tested in.
5
Driver’s Licence Classification
6
Each driver’s licence issued in Newfoundland and Labrador since November 1977
is a classified licence. This means that it belongs to a group or category and allows
the driver to operate the types of vehicles listed in that category. Your licence will
be classified in its main category and endorsed for other classes of vehicles you
may be entitled to drive. For example, you may have a “Class 5” driver’s licence
which is also endorsed for “Class 6” because you also have a valid motorcycle
licence.
CLASS 3 -
• All classes are valid for five (5) years and expire on the driver’s birth date.
“Class 4 Driver’s Licence” permits the holder to drive only those vehicles listed
next to it in the diagram, unless it is endorsed for others. The driver must have
held a valid licence of at least “Class 5” for a minimum of one (1) year. A medical
examination is required as well as vision, written and road test. (Road test not
required for taxi. Restricted Class 4 licence will be issued.)
CLASS 1 “Class 1 Driver’s Licence” is a licence that permits the holder to drive only those
vehicles listed in the Class 1 “permitted to operate” section of the diagram, unless
it is endorsed for other types of vehicles as well. The driver must have held a valid
licence of at least “Class 5” for a minimum of one (1) year. A medical examination
is required as well as vision, written and road test.
CLASS 2 “Class 2 Driver’s Licence” permits the holder to drive only those vehicles listed
next to it in the diagram, unless it is endorsed for others. The driver must have
held a valid licence of a least “Class 5” for a minimum of one (1) year. A medical
examination is required as well as vision, written and road test.
“Class 3 Driver’s Licence” permits the holder to drive only those vehicles listed
next to it in the diagram, unless it is endorsed for others. The driver must have
held a valid licence of at least “Class 5” for a minimum of one (1) year. A medical
examination is required as well as vision, written and road test.
CLASS 4 -
CLASS 5 Level I Please note a Class 5 licence refers to a full Class 5 not a 5I or 5II.
“Class 5 Level I” permits the holder to drive only those vehicles listed next to it in the
diagram. Level I is 12 months in duration (8 months with the completion of an
approved Driver Education Program), and drivers must comply with all the
requirements for Level I:
• 16 years of age
• 12 months reduced to 8 months with an approved driver education program
• Accompanied by a licenced driver with 4 years driving experience in Class 5 or higher.
• Novice driver must have a Blood Alcohol Content (BAC) of 0 mg% and the accompanying driver cannot exceed 50mg or more of alcohol in 100mL of blood.
• No passengers, except accompanying driver. Parent or guardians may be present if
novice is in a driver education program accompanied by a licenced instructor.
• No upgrade to a commercial class driver’s licence
• Not permitted to drive between midnight and 5:00 A.M.
• “Novice Driver” sign required on rear of vehicle ONLY when being operated by a
novice driver (5cm (2 in) lettering black on white background)
• Pass road test to exit Level I
Vision, written and road tests are required . Medical examinations are necessary at
age 75 years or older.
CLASS 5 Level II
Class 5 Level II permits the holder to drive only those vehicles listed next to it in the
diagram. Level II is 12 months in duration and the requirements for this class are
as follows:
• If driving between midnight and 5:00 a.m. must be accompanied by a licenced
driver with 4 years driving experience in Class 5 or higher (exempt for travel to
and from work. Novice driver must provide proof of working hours from employer for police.)
• Novice driver must have a BAC of 0 mg % and accompanying driver cannot
exceed 50mg or more of alcohol in 100mL of blood.
• Passengers restricted to the number of seat belts
• No upgrade to commercial class driver’s licence
Class 5 Level II drivers will automatically exit level II after 12 months from entry,
unless suspended. A full Class 5 driver’s licence will be issued and sent to you after
your 12th month.
Class 6 Level I
Class 6 Level I permits the holder to drive only those vehicles listed next to it in the
diagram. Level I is 12 months in duration and drivers must comply with all the
requirements for Level I
• 16 years of age
• 12 months reduced to 8 months with an approved motorcycle driver education
program
7
• Accompanied by a licenced motorcycle driver with 4 years driving experience, on another motorcycle or in a motor vehicle.
• Not permitted to drive between midnight and 5:00 A.M.
• Novice driver must have a BAC of 0 mg % and accompanying driver cannot
exceed 50mg or more of alcohol in 100mL of blood
NOTE:
• Passenger NOT permitted
• No upgrade to commercial class driver’s licence
• Not permitted to drive after darkness (one half hour before sunset to one
half hour after sunrise
• Not permitted on highways where posted speed limit exceeds 80 KM/H
8
• Pass road test to exit this level
Parental or guardian approval is required for any driver under 19 years of age to
obtain a novice driver’s licence (for first time applicants). This requires a parent’s
or legal guardian’s signature on the initial application.
Class 8
Class 8 permits the holder to drive traction engines only - as shown in the diagram. The minimum age is 17 years. A written test is required and a letter from
the employer (stating that the driver operates traction engines) is necessary. Medical examinations are required at age 75 or older.
Vision, balance, written, and road tests are required. Medical examinations are
necessary at age 75 years or older.
Class 9
Class 6 Level II
Class 6 Level II permits the holder to drive only those vehicles listed next to it in the
diagram. Level II is 12 months in duration and the requirements for this class are
as follows:
• BAC of 0 mg %
• No upgrade to commercial class driver’s licence
Air Brake endorsement, without brake adjustment certification. A written test is
required.
Class 9A
Air Brake endorsement, with brake adjustment certification. Both a written and a
practical test are required.
9
Glass:
clean front and back?
Vehicle Equipment and Standards
The motor vehicle in which you take a driving test will be checked before your test
for the following: licence plate, lights, horn, rear-view mirror, windshield wipers,
muffler, brakes, tires, windshield, window glass and steering. A driving test will not
be given in a vehicle which is unsafe or does not meet equipment requirements. It
is wise to check your vehicle regularly to ensure that the following standards are
met.
1. LIGHTS
10
Seat:
placed in the most comfortable position?
Wipers:
do they wipe clean?
Tail lights:
clean and
working?
Tires:
in good condition
with plenty of tread?
Headlights and
turn signals:
clean and
working?
Side reflectors
and turn signals:
clean?
Rearview and sideview mirrors:
adjusted to reduce blind spots?
Brakes:
working well?
(a) Headlights - The headlights of a motor vehicle (other than a motorcycle) must
give off an upper beam of white light that will reveal a person or another
vehicle at a distance of 100 m. A dash beam indicator light (showing high
beam) must be part of the lighting system. A motorcycle must have at least
one headlamp.
*See Rules of the Road Section for use of high and low beam.
(e) Signal Lights - All vehicles must have a set of signal lights that emit a white or
amber light at the front and a red or amber light at the rear to indicate turning
direction. These must be visible for a distance of 90 m to the front and 250 m
to the rear.
(b) Parking Lights - These lights are used to make your vehicle visible when parking only. If you drive when lights are needed, turn your headlights on.
All vehicles must have brakes that can be applied by two separate and independent
means (front and rear). These brakes must be kept in good working order.
A motorcycle must have a brake on each wheel of the cycle.
(c) Tail Lights - These red lights at the rear of a vehicle or trailer must be visible
from a distance of 150 m. A white light must shine on the licence plate so that
it is visible from a distance of 15 m.
(d) Fog Lights - These may be used in addition to low beam headlights when the
fog is so thick that regular headlights have no advantage.
2. BRAKES
3. MUFFLER
All vehicles must be equipped with a working muffler that prevents excessive
or unusual noise. Tampering with a muffler (muffler cut-out) to increase
noise is strictly forbidden.
4. HORN
All vehicles must have a working horn to be sounded whenever it is reasonably necessary. Bells, gongs, or sirens are for use on emergency vehicles only.
8. DEFROSTERS
All vehicles (except motorcycles) must have a defrosting device that will keep
both front and rear windows free of moisture and ice to ensure that the
driver has a clear view of the road.
5. TIRES
All vehicles must be fitted with tires of the standard prescribed by the Highway
Traffic Act. At least 1.5 mm of tread depth must remain. No tires with metal
studs may be used between May 1st and October 31st.
6. WINDSHIELDS AND OTHER WINDOWS
It is an offence to have a sign or other object in the window that might block or
impair the driver’s vision. However, certificates and stickers required or allowed by the Highway Traffic Act or Regulations may be put in the proper
positions (inspection certificates, parking permits, etc.). Window tinting is not
permitted on the windshield and the front windows.
9. MIRRORS
All vehicles must have at least one mirror to give the driver a clearly reflected
view to the rear. These must not be cracked or discoloured. The inside rearview mirror and outside side mirrors must be adjusted to the driver’s view.
For all types of mirrors there still exists a “blind spot” where other vehicles
may be driving and not be reflected in either mirror (see page 38). You must
look over your shoulder, as well as using your mirror, before changing your
position on the road. If your view to the rear is obstructed, you must have two
outside mirrors.
10. SPEEDOMETER
7. WINDSHIELD WIPERS AND WASHERS
All vehicles (except motorcycles) must be equipped with a wiper device for
cleaning rain, snow and moisture from the windshield. Since 1971, motor
vehicles have also been equipped with a windshield washer that must be kept
filled with washer fluid. For safety, it is important that you be able to wash away
sudden splashes from other vehicles that could obscure your vision.
All vehicles must have a working speedometer that accurately shows the speed
at which the vehicle is travelling.
11. ODOMETER
The odometer indicates the total distance that the vehicle has travelled. It is
illegal to tamper with or change the mileage shown on the odometer.
11
12. FLARES
A commercial vehicle exceeding 2500 kg must be equipped with flares which
must be placed 30 m in front of and to the rear of a disabled vehicle.
13. VEHICLE MODIFICATIONS WITH AFTERMARKET PARTS
Window tinting; adjusting the height of vehicle; modifying wheels, tires, exhaust etc. will void warranty and legally may not be permitted. You should
consult the HTA and accompanying regulations and acts for clarification.
14. SEAT BELTS
12
Seat belt use is mandatory in Newfoundland and Labrador. The lap belt is to be
worn low down on the hips (not across the stomach) ensuring that the belt is
tight. The shoulder belt must be worn across the shoulder and never under the
arm. An improperly worn seat belt could cause additional injury rather than
protect you during a collision. All passengers 16 years of age and over are responsible for wearing their seat belts properly. The driver’s responsibility is to
ensure that passengers under 16 years of age are properly restrained.
Pregnant women should wear the lap and shoulder belt when riding in a vehicle. The belt must be worn properly, low down under the bulge of the tummy
and across the shoulder. The best way to protect the unborn child is to ensure
the safety of the mother.
15. CHILD RESTRAINTS
Infants up
uptoto9 9Kgkilograms
(20be
pounds)
be properly
restrained
in a
(20 lbs.) must
properlymust
restrained
in a correctly
installed
correctly
installed
infant
carrier
that
faces
the
rear
of
the
vehicle.
infant carrier that faces the rear of the vehicle.
NEVER PLACE A REAR-FACING CHILD RESTRAINT IN A SEAT EQUIPPED
NEVERAN
PLACE
REAR-FACING CHILD RESTRAINT IN A SEAT EQUIPPED WITH
WITH
AIR ABAG.
AN AIR BAG.
Children between 9 and 18 kilograms (20-40 pounds) must be properly restrained in a forward-facing car seat that has been correctly installed acChildren between 9 and 18 Kg (20-40 lbs) must be properly restrained in a
cording to manufacturer’s instructions with tether strap properly installed.
forward-facing car seat that has been correctly installed according to manu-
Try
the seat
in your vehicle
to bestrap
sure properly
that it can
be installed properly and
facturer’s
instructions
with tether
installed.
can be tightened so there is little movement.
a child
that has
A booster
booster seat
seatmay
mustbebeused
usedforwhen
a child
has outgrown
outgrownaacar
carseat.
seat.These
These
seats raise
raisethe
thechild
childtotowindow
windowlevel
level
position
of vehicle
the vehicle
andand
positions
thethe
lapseat
beltbelt
of the
in
in
proper
position
to restrain
theThey
passenger.
you don’t
secure a child
thethe
proper
place
to restrain
the child.
are not,Ifhowever,
a substitute
for
in
a proper
seat you may receive a fine and the loss of two demerit points.
car-safety
seats.
More importantly, by securing them properly, it may prevent the injury or
even
of arestraint
child. system has CMVSS (Canadian Motor Vehicle Safety
Makedeath
sure the
Booster
seats
be used if your child is:
Standards)
on must
the label.
• Four to eight years old (inclusive)
•Check
Between
18 andand
37height
kilograms
pounds)
the weight
limits(40-80
of the seat
to be sure that it is correct for
•your
Under
145
cm
(4’9”)
tall
or
under
child.
For further information on booster seat safety please contact the Department
TryHealth
the seatand
in your
vehicle toServices
be sure at
that709-729-5021
it can be installed
properly
of
Community
or visit
theirand
webcan
site
be
tightened
so
there
is
little
movement.
at www.health.gov.nl.ca/health/booster/default.htm
Always
followthethe
instructions
according
theseat
child
seat manufacturer’s
Always follow
instructions
according
to theto
child
manufacture’s
manual
manual and the vehicle owner’s guide.
and the vehicle owner’s guide.
Transport Canada
that children
(Fig. 2)
Transport
Canada recommends
recommends that
children 12
12 and
andunder
undershould
shouldbebeproperly
properly Wear the lap belt low over your hips
– pull it until it fits snugly. Leave an
restrained
especially
if there
is a ispassenger
side air
restrainedininthe
theback
backseat
seat
especially
if there
a passenger
sidebag.
air bag.
Wear the lap belt low over your hips – pull it until it fits
inch or so of play between the shoulWeights for child seats are just a guide, please check manufacturer specifications.
snugly. Leave an inch or so of play between the shoulder
Weights for child seats are just a guide, please check manufacturer specificader belt and your chest (Fig. 1).
belt and your chest.
New
tions.law effective July 1, 2008 regarding booster seats.
(Fig. 1)
16. CELL PHONES
16.ItItCELL
PHONES
isis illegal
toto use
illegal
use aahand-held
hand-held cellular
cellular telephone
telephone while
while driving in Newfoundland
It isLabrador,
illegal to use
a hand-held
cellular of
telephone
whileTraffic
driving
in Newfoundand
Labrador,
Act.
and
as per
Section 176.1(1)
176.1(1)
of the
the Highway
Highway
Traffic
Act.
land and Labrador,
perand
Section
176.1(1)
of the Highway Traffic Act.
Violations
will face aasfine
4 demerit
points.
Violators will face a fine and 4 demerit points.
Violators will face a fine and 4 demerit points.
(Fig. 3)
CELLULAR SAFETY TIPS
•
•
•
•
•
•
•
•
•
•
•
•
Safe driving is your first priority
Buckle up
Keep your hands on the wheel
Keep your eyes on the road
Position your phone where it is easy to see
Familiarize yourself with the phone’s operation while the car is parked
Use a hands-free microphone while driving
Use the speed dial feature for frequently called numbers
Safely pull over and dial manually
Never take notes while driving. Pull off the road if you must read or write
Use voice mail to pick up your calls if it is inconvenient
Driving and traffic conditions demand your full attention.
Children under 18 kilograms must be
held in an approved restraint(Fig. 2).
Children weighing more than 18 kilograms must wear seat belts (Fig. 3).
*NOTE: The fine for NOT wearing a seat belt properly could be up to
$500.00 and two (2) demerit points on your driving record.
13
Traffic Signs
All traffic signs are designed to help the motorist follow safe driving practices. Although the meanings of
the signs do not change, watch for them in several
different places. They may be overhead, mounted on
signs above the highway, on poles next to the roadway, or painted on the pavement itself.
The Horizontal Rectangle states
directions and distances.
The Octagon always
means Stop.
The Inverted Triangle always means yield the right
of way.
14
Memorize These
Simple Shapes
The Vertical Rectangle or
Square states
regulations.
The Crossbuck marks the
railway crossing.
Blue or
Flourescent
Yellow
The Pentagon warns that school children may be
present.
The Diamond warns
of a hazard ahead.
• Means “stop” or that something is not allowed.
• indicates a school zone or informs the motorist of services
ahead.
The stop sign, a red octagon with white lettering, means come to
a full stop and be sure the way is clear before you drive on.
• you must stop at the stop line or crosswalk, if present
• no other sign has this shape
The school ahead sign is a blue pentagon with a white figure of
a schoolboy and schoolgirl. It means you are entering a school
zone. Slow down and drive with extra caution. Watch out for children.
The yield sign, a white triangle with a wide red border, means
slow down and be ready to stop if necessary.
Yield right of way to oncoming traffic.
• no other sign has this shape
• may also be yellow/black lettering
• no other sign has this shape. Some signs may also indicate
the maximum speed which is safe.
• may be flourescent yellow in colour.
This sign indicates where children cross the street regularly to go
to school.
The crossbuck sign warns of a railway crossing ahead. It has a
white background with a reflective red border. Be ready to stop, if
necessary.
• no other sign has this shape. Stop if there is a mechanical
signal device or flagperson warning of the approach of a train
• not less than 5 m from the nearest rail.
This sign informs the motorist that there is a police station ahead.
15
• indicates that movement is permitted and gives information
regarding distance and direction
• indicates traffic regulations and gives directions that must be
obeyed
Information Signs are rectangular green signs with white lettering. They indicate distances and directions of other cities, towns
or communities and highway routes.
Regulatory signs are rectangular or square signs that have a
white background with black or other colour lettering. They state
the laws regarding speed limits, parking regulations, turning and
passing.
Some regulatory signs may have a symbol indicating that whatever is shown on the sign is or is not permitted.
16
A green circle on a regulatory sign means that whatever is shown
on the sign is permitted or mandatory (required by law).
• indicates tourist information
Tourist information signs are rectangular signs with a brown
background and white lettering. They inform motorists where rest
areas, historical sites, parks and tourists chalets are located.
A red circle with a diagonal red stroke means that whatever is
shown on the regulatory sign is NOT permitted.
Common Regulatory Signs
• you must not make a U-turn
• indicates the legal speed limit
• pedestrians are not permitted on this highway
• trucks may use this highway
• parking is not permitted in the direction indicated by the
arrows
• you must keep to the right of the island
• indicates where you may park during certain time periods
• advises of a change in speed ahead
• warns motorists not to enter this street
• bicycles are not permitted on this highway
17
• this sign is placed on multi-lane highways to advise motorists to keep to the right lane except to pass
• one-way street
• identifies a pedestrian crosswalk where drivers must yield
right-of-way
• indicates that there is a passing lane 2 km ahead, where it is
safe to pass
• two-way left turns (both lanes turn left)
18
• you must not make a left turn at this intersection
• this sign indicates this parking space is reserved for impaired
mobility drivers with a special permit
• this sign reminds drivers not to pass if they must use the
passing lane, unless they can do so safely. Any vehicles coming toward you have the right to use that passing lane first. If
there are several vehicles coming toward you, there is a good
chance that one of them may want to use the passing lane. In
that case, you must yield right-of-way to them.
• indicates a general warning to be cautious
WARNING SIGNS – are diamond shaped, and have a yellow background with
black letters or symbols. They warn of dangerous or unusual conditions ahead
such as slippery roads, a sharp turn, trucks turning, or a dip in the road.
• warns that the right lane is ending
• steep hill ahead – It may be necessary to shift to a lower gear
and use motor to assist in braking
• no other sign has this shape
COMMON WARNING SIGNS
• traffic lights ahead – Be prepared to stop
• pedestrians may be crossing the highway
• amount of space under a bridge or overpass
• winding road ahead
• warns of a right turn followed by a left turn
• bump or rough road ahead
19
• two lanes of traffic merge ahead – Traffic is entering from the
right.
• warns of falling rocks
• pavement ends – There is a gravel road ahead.
• warns of a sudden turn in the road ahead in the direction
shown by the arrow – Slow down and proceed with care.
• warns of an intersection ahead crossing the road at right
angles.
20
• moose cross this section of the roadway regularly – Slow down
and drive with extra care.
• warns of a playground area – Be alert for children.
• warns of a narrow bridge or underpass ahead
• warns of a railway crossing ahead
• dead end – exit right or left
• two-way traffic ahead – Drivers travelling in opposite directions must share the highway.
• warns that you are approaching a T-intersection – You must
proceed either right or left.
• sharp curve to the right ahead
• the road ahead is not as wide as the road on which you are
driving
• road surface is slippery when wet
• warns of a slight bend or curve in the road ahead
• stop sign ahead – Be prepared to stop.
• highway ahead becomes single roadway with two-way traffic
(traffic travelling in both directions) – Keep to the right.
• highway ahead is divided by a median (island) – Keep to the
right. Driver should signal intention and move to another
lane only when safe to do so.
21
• the chevron sign warns of a very sharp turn in the road
• the chevron sign warns of a very sharp turn in the road
ahead in the direction of the symbol
ahead in the direction of the symbol
• this red and orange sign warns of a slow moving vehicle
ahead – The sign is required to be mounted on the rear of
such a vehicle when it is being driven on the highway.
• this red and orange sign warns of a slow moving vehicle
ahead construction
– The sign is required to be mounted on the rear of
• means
such a vehicle when it is being driven on the highway.
• survey crew ahead – Drive with extra care.
• warns of trucks entering the highway from the right hand
side of the road
CONSTRUCTION SIGNS a
ROAD CONSTRUCTION ZONES: Road construction zones are the areas of
22
a street or highway located between orange “construction signs”.
MAXIMUM FINE $1500
Speeds in road construction zones are generally reduced to protect workers in those•areasmeans
and toconstruction
allow them to work safely around heavy equipment. These
zones also have reduced speeds to allow drivers enough time to react to any obstacles and to reduce potential damage caused by loose gravel and uneven pavement.
Fines for not obeying posted speed limits in road construction zones are doubled.
The fines range from a minimum of $100 to a maximum of $1,500. Remember to
always obey directions by flag people. Be aware that vehicles ahead of you may stop
CONSTRUCTION
SIGNS
are diamond
shaped toa indicate
warning.
unexpectedly. Be
cautious
when approaching
construction
zone.
Carelessness can be deadly. SLOW DOWN TO KEEP US SAFE. Remember “YOU” are
in Control.
FINES DOUBLED IN
CONSTRUCTION ZONES
• crew working on road maintenance ahead
• crew working on road maintenance ahead
• flagperson ahead – Be prepared to stop for instructions.
• This orange and black hazard sign warns of danger. It is usually placed on objects in or near the highway in order to guide
motorists away from them. Hazard signs can be found at each
end of a concrete bridge or near a washed-out section of the
roadway.
• “D” sign used on commercial vehicles to warn of overdimensional load.
TRAFFIC LIGHT SIGNALS
A solid green light at an intersection means you may go straight
ahead or turn right. If you want to make a left turn, you can proceed only after yielding right-of-way to pedestrians and oncoming
traffic (motorists coming toward you through the intersection).
A red signal with a green arrow means you may proceed only
in the direction of the arrow, after yielding right-of-way to pedestrians and other traffic.
&
A solid amber light means that the red signal is about to appear. You must stop your vehicle if you can do so safely; otherwise proceed through the intersection with caution.
When the arrow signal goes off, you must wait for the solid green
light to appear before proceeding.
A flashing amber signal means to slow down and proceed with
caution.
23
A solid red light means you must stop at the intersection and
wait for the signal to turn green before proceeding. You may make
a right turn providing you come to a complete stop and yield
right-of-way to pedestrians and other traffic before proceeding
(unless a sign prohibits you from doing so).
A flashing red signal means come to a complete stop and
proceed only when it is safe.
At some intersections, signs may prohibit a RIGHT turn.
&
A green signal with a green arrow means you may proceed in
the direction of the arrow, straight ahead, or turn right unless a
sign prohibits you from making such a turn. When the arrow
signal goes off, follow the rule for a solid green light.
There may be occasions when, because of a collision or traffic congestion, a police officer may motion you to go through a red light. In
such cases always obey the directions of the police officer.
PEDESTRIAN LIGHT SIGNALS
Figure 1
A pedestrian facing a green “walk” signal or a “pedestrian” signal may proceed across
24 the
A pedestrian
a green of
“walk”
signal or a “pedestrian” signal may proceed
roadway infacing
the direction
the signal.
the roadway
in have
the direction
of theatsignal.
Ifacross
no pedestrian
signals
been installed
an intersection with traffic lights, pedestrians may proceed across the street if they face a solid green TRAFFIC light.
If no pedestrian signals have been installed at an intersection with traffic lights,
Drivers should be extra careful when encountering and observing Pedestrians. Some
pedestrians
across
the street
if they
a solid
TRAFFIC
are
young andmay
are proceed
not aware
of moving
traffic,
someface
suffer
from green
mobility,
visual, or
light. impairment.
hearing
Blind and partially sighted pedestrians identify themselves by carrying a white cane.
The canes are held diagonally in front of the pedestrian. Some people use guide dogs
with distinctive rigid harnesses to assist them in walking safely.
Use extra caution when you notice a visually impaired person at a corner. They will
usually extend their canes when intending to cross. Take this as your signal to give
the right of way to the pedestrian.
Drivers operating hybrid vehicles need to be extra vigilant as these vehicles are almost
silent, especially when slowing down or coming to a stop.
Figure 2
Figure 2
A pedestrian facing a red “don’t walk” signal or an orange “hand” signal should
ANOT
pedestrian
a red
walk”
or an
orange
“hand”
signal should
proceedfacing
across
the“don’t
roadway.
To signal
cross the
road
safely,
the pedestrian
must
NOT
proceed
across
the
roadway.
To
cross
the
road
safely,
the
pedestrian
must
wait until the signal changes to Figure 1.
wait until the signal changes to Figure 1.
However, if a pedestrian is already in the intersection before the “don’t walk” or
However,
if a pedestrian
is or
already
in the
intersection
before
the “don’t
walk”
or
“hand” signal
appears, he
she must
proceed
as quickly
as possible.
While
doing
“hand”
signal appears,
he the
or she
must proceed
quickly as possible. While doing
so, pedestrians
still have
right-of-way
over as
vehicles.
so, pedestrians still have the right-of-way over vehicles.
Pedestrians should always walk on the left side of the road facing traffic. It is a
Pedestrians
alwaysorwalk
on theclothing
left sideatofnight,
the road
facing
is a
good idea toshould
wear white
reflective
so that
youtraffic.
can beIteasily
good
idea
to
wear
white
or
reflective
clothing
at
night,
so
that
you
can
be
easily
seen by motorists.
seen by motorists.
For your own safety, go directly across when you wish to cross the street. Use an
For
your ownor
safety,
go directly
across when you wish to cross the street. Use an
intersection
crosswalk,
if possible.
intersection or crosswalk, if possible.
PAVEMENT MARKINGS
1. Road Markings at Intersections
STOP LINE
CROSSWALK
• Motorists must come to a complete stop at this line and proceed only after
yielding to pedestrians and other traffic.
• Road markings indicating a place where people can safely cross the street
• Motorists must stop before entering a crosswalk at an intersection and yield to
pedestrians before proceeding.
25
NOTE:
If there is no stop line or crosswalk at an intersection, the motorist must stop at a
point as close to the corner of the intersection as safety allows and proceed only
after yielding right-of-way to pedestrians and other traffic.
2.
Lane Markings
26
• yellow lines separate lanes of traffic travelling in
opposite directions
• a solid line on your left means it is unsafe to
pass
• a broken yellow line on your left means you may
pass if the way is clear
• white lines separate lanes of traffic travelling in
the same direction
• “A” should not pass
• “A” may pass
3.
Arrows
Arrows painted on lanes close to an intersection indicate which direction the
traffic in that lane must follow. When the roadway beyond the intersection is
blocked with traffic you should stop before entering the intersection and wait
until the traffic ahead moves on.
4.
Painted Islands
Two solid yellow lines enclosing diagonal yellow lines, as shown, are painted on
the roadway to guide traffic away from fixed objects, such as a bridge or an island
(median), which are in or near the roadway. You should not travel over them or
use them to pass.
• traffic must turn left
• traffic must turn left or proceed straight ahead
27
• traffic must proceed straight ahead
• traffic must turn right
Rules of the Road – Right of Way – Who can go first?
28
When approaching an intersection that is not controlled by traffic lights, stop or yield signs, or a police
officer, you must yield right of way to traffic on your
right-hand side.
When turning left at an intersection, you must yield
right of way to any vehicles coming toward you before you proceed.
When entering a main highway from any side road or
driveway, you must always yield right of way to traffic
on the main highway, as well as to pedestrians about
to cross. On a highway where there is a passing lane,
the traffic in the through lane has the right of way
when both lanes merge.
Four Way Stop
At an intersection where stop signs are located on all four corners, the first vehicle
to come to a full stop should be allowed to proceed first.
When two vehicles arrive at such an intersection at the same time, the vehicle on
the right-hand side has the right of way and should proceed through the intersection first.
If you are behind a vehicle that has stopped at the stop sign, you must also come to
a complete stop at the stop sign when that vehicle has moved on.
*Remember, if you are not sure who has the right of way, it is safer to yield the
right of way to the other driver. It is better to avoid a collision than to insist on
having the right of way. Never pass a vehicle which has stopped at a stop sign,
traffic light or crosswalk.
Always yield right of way to emergency vehicles when they have their lights flashing and the siren on. Pull to the right as far as possible and stop. Remain stopped
until the emergency vehicle has passed.
When Traffic Light is not working treat as a 4-way stop.
29
Turns
Right Turns
Left Turns
To make a right turn, you must signal your intention to do so before approaching
the intersection and move into the lane closest to the right side of the road. Come
to a complete stop. Proceed into the right lane of the highway on which you wish
to travel, after yielding right of way to pedestrians and other traffic. (Be careful to
check for pedestrians and bicyclists in YOUR blind spot before turning).
From a one-way street to another one-way street
30
When approaching an intersection, you must signal your intention to make a left
turn and move into the left lane of the one-way street. Stop and move into the left
lane of the one-way street on which you wish to travel, providing the way is clear.
31
From a one-way street to a two-way street
From a two-way street to a one-way street
When approaching an intersection, you must signal your intention to turn left and
move into the left lane of the one-way street. You must enter the two-way street to
the right of the centre line, in the lane closest to the center line, when the way is
clear.
When approaching an intersection, you must signal your intention to turn left and
move into the left lane of the two-way street (the lane closest to the centre line).
You may proceed into the left lane of the one-way street when the way is clear.
32
From a two-way street to another two-way street
When approaching an intersection, you must signal your intention to turn left and
move into the lane immediately to the right of the centre line. You may proceed
through the intersection and must enter the lane immediately to the right of the
centre line on that two-way street, when the way is clear.
From a two-way street to another two-way street
(double left turn lanes)
Where signs or lights indicate that two lanes of traffic may turn left, you must
move into one of the lanes, proceed through the intersection and complete the
turn in the corresponding lane.
2-Point Turns
U-Turns
When you need to turn around on
a narrow road, it is best to wait
until you can make the turn using
a side road. Drive past the side
road, turn on your right signal and
stop your vehicle to the extreme
right side of the road. When the way is clear, back up slowly into the side road.
Check again for traffic. Turn on your left signal and proceed as usual to make a left
turn onto the same highway you just left.
A U-turn should be made only under certain conditions. First, the road must be
wide enough to allow a turn in just one swing. Secondly, you must be able to see
far enough to the front and rear of your vehicle to make sure that no other traffic
is near.
3-Point Turns
To turn your vehicle around on the highway, you must first turn on your right
signal and pull off to the extreme right side of the road. When the way is clear, turn
your wheel sharply to the left, cross to the other side of the road and stop your
vehicle at the edge. Put your car in Reverse, turn the wheel sharply to the right
and back up to the other side of the road. Complete the turn moving forward in
the opposite direction from which
you came.
If you want to make a U-turn and you are in an area where U-turns are permitted,
you must first stop the car on the extreme right side of the road. Signal a left turn,
check front and rear for traffic (including your LEFT blind spot) and turn your
wheel sharply to the left. Move the car carefully across the road and complete the
turn.
A U-turn is NOT permitted:
• at an intersection
• near the top of a hill
• on a curve or bend in the road
• where you would interfere with other traffic
• where a sign prohibits such a turn.
33
Safe Passing
You always take a risk when you pass another vehicle. Even if the vehicles are
parked, you must be alert for doors opening, cars pulling out, and pedestrians
walking between the parked cars.
When you pass a moving vehicle, the risk is even greater. You must rely on good
judgment to pass another vehicle safely. You not only have to judge the time and
distance needed to pass but also take into account the condition of your own
vehicle.
Here are the steps to follow when you want to pass:
34
1. You may pass only when the centre line markings permit. Remember, there
must be a broken yellow centre line on your left-hand side before you may
attempt to pass.
2. You must make sure that the way ahead and to the rear is clear of traffic
(check your left blind spot).
3. Signal your intention to pass (use your left signal) well behind the vehicle in
front of you and move carefully into the passing lane (Figure 1). Give an audible signal before pulling into passing lane.
4. Speed up to complete the pass, but be careful NOT to go over the posted speed
limit (Figure 2).
5. After you have passed the vehicle, signal your intention to move back into the
right lane (use right signal), but wait until you can see both headlights of the
vehicle you just passed in your rear-view mirror before doing so (Figure 3).
You are permitted to pass other vehicles on the right side when the driver in front
is making a left turn, where there are two or more lanes in each direction and on
one-way streets. You are not permitted to make this maneuver by driving off the
roadway.
On some of the main highways, a special passing lane is provided for motorists.
This makes it safer to pass other slower vehicles. You may use such a passing lane
if you have enough time to complete the pass safely before the passing zone ends.
The driver in the vehicle being passed also has a responsibility to cooperate. Never
speed up when another vehicle is attempting to pass you. To avoid a collision, you
may sometimes have to slow down to allow the passing vehicle the opportunity to
move back safely into your lane of traffic.
*If you are being passed, give way to the overtaking vehicle.
You are NOT permitted to pass under these conditions.
• whenever weather conditions hinder your view
• when you are on a curve in the road
• when you are at an intersection or railway crossing
• when you are within 30 m of a crosswalk
• when you are on a blind hill or near the top of a
hill
• when you are on a narrow bridge
• where a solid line marking is to your left
• where a sign prohibits passing
35
Signals and Lane Changing
The law requires that you signal when you intend to:
• stop or suddenly decrease the speed of your vehicle
• turn left or right
• change from one lane to another
• pass another vehicle on the highway
• leave the roadway
• set your vehicle in motion from a parked position
36
These signals must be in the form of directional signals (left and right indicators),
or brake. If vehicle signal lights are not working, give hand and arm signals as
shown in the diagram.
Even though you must use your car’s turn signals, in some cases hand signals are
also desirable. For example, when you are pulling out of a line of parked cars and
your signal lights are hard to see.
Giving signals properly and in sufficient time lets other motorists know what your
intentions are. It also allows them time to react and may reduce the chance of a
collision occurring.
When turning left or right always check over your shoulder in the direction you
are turning to ensure there is no vehicle in your blindspot.
Lane Changing
When you must change lanes, always practice these steps:
• Check traffic ahead.
• Look in your rear-view mirror for traffic approaching from the rear.
• Signal your intention to change to the right or left.
• Before turning, turn your head in the direction of your turn, and check over
your shoulder for cars that are too close to be visible in your rear-view mirror
(blind spot).
Do not leave lane changing to
the last minute. Plan your
route and prepare for turns
accordingly. Do not change
lanes at an intersection, as
other drivers will not know
whether you are signalling to
change lanes or to make the
turn at the intersection.
37
• Maintain or increase speed during the lane change.
• When doing this, be careful that you are not following other traffic too closely.
“Blind Spot”
Even if your mirrors are correctly positioned, there is still a “blind spot” to the
right and left rear corners of your vehicle. Your rear-view mirror will not show a
car in the lane next to yours, when the front bumper of the other driver’s vehicle
is about even with, or past your rear bumper.
If you rely on your inside mirror only, and turn into another lane without looking
over your shoulder, a collision is almost sure to occur.
“Blind Spot”
Entering and Driving on a Divided
Highway
Before you enter a divided highway, it is a good idea
to know where you are going as there is no opportunity to stop and check a map.
To enter a divided highway, you must first move onto
an access ramp and then into an acceleration lane.
When you enter the acceleration lane, you must signal your intention to move left, and speed up to be
able to merge smoothly with through traffic.
38
Drivers already on the divided highway should move
into the left lane if it is safe to do so. This leaves the
right lane open for motorists entering the divided
highway, and allows them to merge safely. This is only
a courtesy by the other driver and it is your responsibility to only merge when it is safe to do so.
Remember, always maintain a safe following distance
after entering traffic. When driving around a curve
enter the curve slowly and increase speed as you get
the “feel” of the curve.
Leaving a Divided Highway
When leaving a divided highway, signal your intention to move right and proceed into the deceleration
lane. Slow down and adjust your speed to the limit
posted on the exit ramp.
Signs are posted far enough in advance to warn motorists that an exit is coming up. If you miss an exit
DO NOT STOP or BACK UP on the divided highway.
Instead, proceed as usual and turn off at the next
exit.
Cloverleaf
Most modern highways have roads that intersect each
other on different levels (an overpass). The cloverleaf is a common example of such an intersection.
The advantage of this type of intersection is that vehicles do not have to cross the path of other traffic in
order to make a turn. At a cloverleaf intersection, all
turns are right turns.
To make a right turn onto the intersecting highway,
you must turn right AFTER you pass the bridge (overpass).
39
Backing
Many traffic collisions are caused when motorists are
backing up. Therefore, although you may think that
backing up is a relatively minor part of learning to
drive, it is actually very important that you learn the
proper procedure. Backing is permitted only when
the move can be made safely.
40
1. You must NEVER back a vehicle until you have
checked behind it from the outside first. Remember, children, bicycles, and other small objects
are not always visible from inside the car.
5. Start to back slowly and safely.
6. If you must cross a pedestrian crosswalk or
sidewalk before you enter the street, stop and
check both sides of the roadway once again.
7. Proceed when the way is clear.
Always back into the nearest lane of traffic that is facing in the direction you want to go.
2. Once you are seated in the vehicle, check both
sides of the road to make sure that the way is
clear.
3. From the normal seating position, shift your
weight onto the right hip and turn your body to
look out the rear window, bracing yourself by placing your right arm along the top of the front passenger seat.
1. Check around you to
be sure the way is
clear before you back
up.
4. Place your left hand at the top centre position on
the steering wheel (12 o’clock).
2. Always turn and look
behind you as you
back up.
Parking
You may park your vehicle only where it is safe and legal to do so. Signs and
pavement markings usually indicate where you are allowed to park.
Common sense will tell you where you are NOT allowed to park. You must not
park if you are blocking a sidewalk, intersection, traffic lane, driveway, or emergency exit. In addition, you must not park if you are in front of an authorized
loading door, on a bridge or in a tunnel.
You must NOT double park (parking on the left side of a vehicle already stopped
on the side of the road).
You must NOT park where you are obstructing the free flow of traffic.
Do NOT park when you are within:
• 10 m of a stop sign or other traffic control signals
• 6 m of a crosswalk
• 1 m from the point on the curb or edge of the road way immediately opposite
a fire hydrant
• 20 m of a bus stop
• 15 m of a railway crossing
• 7 m of the entrance to a fire station
• 6 m of the entrance to a public building (school, church, etc.)
If you must park a vehicle on the highway, pull over onto the right shoulder, parallel to the roadway, and make sure your vehicle can be seen from a distance of 60
m in either direction. Before leaving your vehicle ensure the ignition is locked, the
key removed and the vehicle properly braked.
In case of an emergency, pull over to the right side of the roadway and use emergency indicators or flares to warn other motorists of your presence. Many people
raise the hood of their vehicles to indicate that they need help. Most motorists
recognize and respond to this distress signal.
Never move your vehicle from a parked position unless you check traffic, signal
and pull from the curb when it is safe to do so.
41
Parking on a Hill
When you are parking on a hill remember to turn your
wheels so that if your vehicle rolls away, it will NOT roll
into the path of other traffic but away from it.
If you park facing uphill, the direction you turn your
wheels will depend on whether the street has a paved curb.
If there is a curb, turn your wheels toward the centre of
the street (Figure 1).
42
If there is no curb, turn your wheels towards the edge of
the street (Figure 2).
If you park facing downhill, always turn your wheels toward the edge of the street (Figure 3).
Parallel Parking
When you want to park between two other parked vehicles,
you must follow the correct procedure for parallel parking.
1. Make sure there is enough space between the two parked
cars for your vehicle to fit (One and a half times the
length of your own vehicle should be enough).
2. Drive parallel to the front car and stop when your back
bumper is lined up with the back bumper of the parked
car.
3. Shift to REVERSE and back up slowly, turning the steering wheel sharply to the right until your car is at approximately a 45° angle to the curb.
4. When your front bumper can clear the rear bumper of
the car ahead, turn the steering wheel sharply to the left
and continue to back slowly into the parking space.
5. If necessary, straighten the wheels and move the car
forward in order to have an equal distance front and
rear for clearance.
*When you are parked properly, your wheels should be
within 30 cm of the curb.
43
Angle Parking
When your parking space is at 90° (a right angle) to
the road, as it is in most parking lots, you should
BACK into the space and then drive out (Figure 1).
You should be familiar with backing into the space
from the left and the right.
44
When your parking space is slanted at a 60° angle to
the road you should DRIVE into it and back out
(Figure 2).
(Figure 1).
NOTE: For driver testing purposes examiners use a
parallel parking style measuring 1.98 m by 7.3 m
(6½ ft. by 24 ft.) and a 90º angle back in of 2.74 m
by 4.5 m (9 ft. by 15 ft.). For 90º angle back in parking you may be required to complete this from the
left or right.
(Figure 2).
Meeting or Overtaking a School Bus
Whenever you approach a school bus that has stopped
to pick up or drop off school children and is displaying a visual signal such as flashing lights and a stop
sign, you must stop before reaching the bus. This is
true whether you are approaching the bus from the
front or the rear. You must remain stopped until the
bus has started up again, or the driver signals you to
go, or until the flashing lights and stop sign are deactivated.
On multi-lane undivided highways, all traffic must
stop in all directions and in all lanes for a stopped
school bus with its lights activated.
The words “School Bus” in black lettering, shall appear on
both the front and back of the vehicle.
45
Right of Way of Emergency Vehicles
Priority is given to all vehicles equipped with emergency equipment displaying red
lights flashing or a combination of red and blue lights flashing and signalling with
a bell or siren.
Upon the approach of a vehicle equipped with emergency equipment activated,
you must:
• yield the right of way immediately,
• put on your signal and pull over to the right hand curb or edge of the roadway
clear of an intersection. On a 2 lane highway, pull to which ever side is clear to
allow the vehicle to pass,
46
• stop and remain stopped until the emergency vehicle has passed, and
• it is common courtesy to turn off your headlights if driving at night — but leave
on your parking lights to remain visible.
If you approach a vehicle with the emergency equipment operating, reduce your
speed and be prepared to stop. Give them sufficient space and if directed pass with
caution.
Following Distances
It has been shown that nearly two-thirds of rear-end
collisions occur under ideal driving and road conditions. In most cases the responsibility for this type of
collision must be placed on the driver following other
traffic. There are instances, also, where the driver in
front may sometimes contribute to such accidents
by inconsiderate stopping, so it is important to drive
at safe following distances.
You have to estimate a reasonable distance between
your car and the vehicles you are following to be sure
of having enough space to stop. You will have to constantly adjust your following distance depending upon
how much traffic there is, the speed of the vehicles
and the road conditions.
For ordinary passenger vehicles, the minimum safe
following distance is at least one car length for every
15 km/h. When roads are slippery, this distance
should be doubled. Commercial vehicles driving outside the city should allow at least 150 metres between
them since large vehicles reduce visibility and require
greater distance to stop.
“Two Second Rule” or “Time Interval Driving
Method” is a way of calculating a safe following distance. Since it is often difficult to judge the number
of car lengths of space you need for your speed, this
is a good way to test your distance from the car ahead.
47
THE TIME INTERVAL DRIVING METHOD
1. The car ahead is about to pass a checkpoint
(sign, driveway, pole or other marker).
2. Begin counting seconds (one thousand and
one, one thousand and two) as the rear of the
car you are following passes your selected
checkpoint.
3. If it takes fewer than two seconds for your car
to pass the same checkpoint, you are following
too close to allow a safe stop.
4. If it takes two seconds or more for your car to
pass the same checkpoint you have developed a
REASONABLE following distance for ideal
weather conditions between your car and the
vehicle ahead.
5. In less than ideal driving conditions your following distance will have to increase. Two seconds at highway speeds will allow you to react
to an obstacle ahead. It will not give you sufficient time to stop your vehicle.
To Avoid Hitting a Car in Front of You:
To Avoid Being Struck from Behind:
• Don’t be impatient. Keep calm in slow moving traffic. Watch for the brake
lights of the car ahead, but don’t depend on them – they may not be working.
• Keep your brake lights clean and in working order. Flash them when slowing
down or preparing to stop.
• Look for problems that might come up for the driver ahead of you.
• Know what’s happening behind, use your mirrors frequently and keep your
rear window clean and clear of frost or snow.
• Watch for a decrease in distance between your car and the one ahead.
• Never assume what the actions of the driver ahead will be. For example, don’t
take it for granted that the car ahead will go through an amber light – most
drivers will stop, as they should.
48
• If the car ahead has stopped, allow enough time and distance for it to start
moving again.
• Pay strict attention to your driving. Never let personal problems or daydreams
take your attention from the road.
• Signal well in advance for turns, stops and lane changes to alert the driver
behind you.
• Slow down gradually (over a long distance) to give the driver behind more
time and space in which to react.
• Keep pace with traffic within the limitations of weather conditions and speed
limits. Never impede or block the normal and reasonable movement of
traffic.
Speed
Braking
It is important to always drive at a speed which will allow you to stop within the
assured safe distance you can see ahead. The posted speed limit is the legal limit
under ideal conditions. In the event the legal sign is missing the speed limit is 100
km/h on paved portions of the Trans Canada Highway, 80 km/h on other paved
highways, 60 km/h on gravel roads, and 50 km/h through settlements or school
zones.
The brakes must bring the vehicle to a stop. How far the vehicle will travel before
the brakes will do this, depends upon:
• the speed of the vehicle
• the condition of the brakes
• the condition of the tires
Sudden Stopping and Reaction Time
Before you can realize that you must stop your vehicle to avoid an object ahead,
you must see it. Because of inattention, poor visibility or low visibility conditions,
you may travel some distance towards a dangerous situation before you see it.
Even after you see an object in your path, you may go an additional distance before
recognizing it as a hazard which would require a stop.
Reaction Time and Distance
Realizing you must stop, you move your foot from the accelerator (gas pedal) to
the brake. The distance which your vehicle travelled during this time is called
“reaction distance”.
Tests have shown that the average alert driver requires about ¾ of a second to step
on the brake pedal, after seeing danger. This is know as “reaction time”. In ¾ of a
second your vehicle, travelling at about 50 km/h will go 10 metres (about 2 car
lengths) before you can even start to apply the brakes.
• the nature and condition of the road surface
• whether the vehicle is on a level road or travelling up or down a hill
49
Braking Distance
At a speed of about 30 km/h the average braking distance is about 10 metres with
all conditions being favourable. The total stopping distance for a car, travelling at
30 km/h, after the driver has seen a reason for stopping, is the sum of the reaction
distance and the braking distance – a total of about 20 metres or five car lengths.
NOTE: Do not use your left foot on the brake unless it is absolutely necessary.
50
Manual Transmission
When Lights are Required
When starting off press the accelerator to speed up
the engine a little and let the clutch out slowly, until
the point of contact or friction point is felt. Slowly let
the clutch pedal out and accelerate lightly at the same
time.
Lights are required from one-half hour before sunset to one-half hour after sunrise and at any time
when visibility prevents you from seeing clearly persons and vehicles at a distance of 150 m or less.
You should use your headlights at all times. Reports
have shown that there are fewer collisions when low
beam lights are used during daylight hours.
When the vehicle has reached about 15 kph a shift to
second is needed. Depress the clutch and at the same
time release the accelerator, push the gear shift to
neutral and on into second gear. Release the clutch
slowly, especially through the friction point and at
the same time gently press the accelerator. Repeat
this procedure for changing to higher gears.
USE HIGH AND LOW HEADLIGHT BEAMS PROPERLY
When slowing, repeat this procedure from higher to
lower gears. This allows the engine to assist in braking.
Use high beam only when driving in open country without other cars near.
High and Low Beam Lights
Next to speed, inadequate or improper use of lights
is the most common cause of collisions at night.
Too many drivers try to drive the same speed at night
as they would in the daytime. You should slow down.
Never drive so fast that you can’t stop within the distance you can see with your lights, otherwise you are
“overdriving your headlights”. This means that you
would not see an obstacle in time to avoid hitting it.
You should keep your headlights clean at all times to
get the maximum range of the beam.
Glare
At night, the glaring headlights of oncoming cars or
the reflection of lights (from behind) in your rear
view mirror can seriously reduce your vision. The
glare causes the pupil of the eye to contract and it
takes about seven seconds for the pupil to recover
and readjust to the less intense light. During this time
you may be temporarily blinded. If you were travelling at 90 km/h for those seven seconds, your car
would have gone 125 m while you had no vision.
To avoid the effects of glare, direct your vision away
from headlights by looking to the right edge of the
roadway. To cut glare from the rear, adjust your mirror or use a day-night mirror.
Maintaining Your Lights
Do not wait for the other driver to dim lights first.
When following other cars, you must use your low
beam when you are within 150 m of the rear of the
car ahead. Your lights could blind the driver ahead if
they reflect in his mirror.
Check your lights regularly, to ensure they are properly aimed, free from cracks and clean.
On a level road the low beam should reveal objects at
least 30 m (about 100 ft.) away, but be aimed below
the level of the oncoming driver’s eyes.
Dimming Your Headlights
You should use your high beams only when driving
in open country without other cars near. Always use
low beams when approaching other cars, when you
are driving in areas with street lights, in fog and when
you are following another vehicle.
When meeting an oncoming vehicle, you must dim
your lights when you are within 150 m of that vehicle.
51
Responsible Driving
MAINTAINING YOUR VEHICLE
It is the duty of the driver to see that his/her vehicle is up to safety standards
before it is driven on our roadways. A responsible driver makes sure that regular
maintenance is carried out. Vehicle maintenance can be divided into three categories.
1. Daily or weekly check by the driver
52
• Keep your vehicle clean inside and outside. Seat belts in particular should be
cleaned to prevent dirt and moisture from getting into the retracting mechanism and preventing them from working properly.
• Check your tire pressure. Tires that are under-inflated by more than 27.5
kPa (about four pounds) can be a serious safety hazard. Also, check tires for
damage or wear.
• Check that all lights are operational and clean.
• Check that the windshield wipers are properly attached to the wiper blades. If
the wipers do not clean the window streak-free, replace them.
2. Regular servicing by the driver and/or service garage
This should include:
• oil and filter changes
• transmission fluid changes
• axle differential oil changes
The following should be inspected:
•
•
•
•
•
drive and axle shafts
steering, brake and clutch reservoirs
cooling system levels
brake system
front suspension, including alignment and condition of ball joints, steering
rods, shock absorbers and springs.
• headlight aim
• engine adjustments – valve clearances, ignition timing, distributor and spark
plugs
• carburettor or fuel injection system and air filter element
3. Special Servicing
• When the engine is cold, check under the hood for correct level of oil, antifreeze in the radiator, windshield washer fluid, and brake fluid. Check hoses
for cracks and leaks and fan belts for wear or looseness of fit.
• Anything beyond simple maintenance, including vehicle recalls and safety
standard certification, should be carried out by a dealer or licenced mechanic.
Night Driving
In proportion to mileage driven, there are three times more fatal collisions at
night as there are during daylight hours. Night driving is more dangerous because
the distance you can see ahead is greatly decreased. It is important not to “overdrive your headlights” (see Rules of the Road section of this book) and to reduce
your speed until your eyes have recovered from the glare of another vehicle’s
lights. The main rule for night driving is “slow down so that you can stop in time
to avoid hitting anything shown by your headlights”.
Make smooth steering, braking and speed changes and allow extra space between
you and the car ahead. This will reduce the chance that spray will obscure your
vision and will provide you with stopping distance on slippery roads.
Driving in Bad Weather
FOG
RAIN
Rain acts as a lubricant and the road is likely to be most slippery a few minutes
after it starts to rain or following a light drizzle. As rainfall increases, tires have a
difficult job trying to cut through the water to maintain contact with the road. If
there is too much water, or if the vehicle is going too fast, the tires may skid on top
of the water (hydroplaning). When this happens, the steering will pull to one
side or the other and control becomes difficult. To avoid these situations, it is
better to slow down when it begins to rain.
Since visibility is reduced in rain, slow down. Use your wipers at the various speeds
to keep the windshield clear.
Avoid puddles! What appears to be a shallow puddle may actually be a deep pothole which could damage your vehicle, break a wheel or cause a flat tire. The
spray of water might “drown” your engine, or decrease the efficiency of your brakes.
When you must drive in the fog, reduce your speed, use your low beam lights,
increase your following distance and use the lane markings as a guide.
53
In very dense fog (zero visibility);
• safely move as far as possible off the road and stop,
• activate the hazard lights and dome light, turn off the headlights, and
• do not return to the roadway until the conditions have improved.
Winter Driving
Newfoundland and Labrador winters are often harsh, requiring that a vehicle be
prepared for winter driving and special care must be taken when on the road.
Winterize your car and your driving habits.
• Icy roads – As the temperature goes below freezing, wet roads become icy
and slippery. Certain sections such as shaded areas, bridges and overpasses
freeze first. Look ahead and slow down. Ease off the accelerator gradually. A
sudden release may cause an un-balancing effect. Should the vehicle skid,
shift to neutral (automatic) or depress the clutch pedal (standard) and steer
where you wish to go.
54
Apply the brakes. If one or more wheels lockup (conventional brakes),
release the brakes and reapply more gently.
If your vehicle has ABS brakes don’t pump the brakes. Apply full, firm steady
pressure to the brake pedal, the ABS computer will do the rest.
On slippery roads, slow down, keep farther back from the vehicle ahead and
avoid sudden turns, braking, accelerating, etc.
• Black ice – These are patches of ice that you may not even see because the
pavement shows through. Be aware that these may exist and reduce your
speed. That will allow you to have maximum control.
• Starting on ice – Tires can grip a slippery surface better if you accelerate
gently. You may even want to start in low gear to prevent skids and spinning of
wheels.
• Snow – Snow may be hard packed and as slippery as ice. It can also be rutted,
smooth or soft. In all cases it may present a hazard to your driving.
Vehicle handling will be improved under severe winter conditions by ensuring
that identical winter tires are installed on all four wheels.
As a tire wears, snow traction is reduced. Tires that are worn close to the tread
wear indicators have reduced traction on snow covered roads and should not
be used.
• Steering and Skidding – Never make any sudden or sharp turns on slippery roads. Try to anticipate your turns and start to slow down well before you
reach an intersection or curve on the highway. If the rear of your vehicle starts
to skid, on a rear wheel drive vehicle, remove your foot from the accelerator
and brake peddle and steer in the direction of the skid. On a front wheel drive
vehicle accelerate slightly to pull your vehicle out of the skid. Once the vehicle starts to straighten up prepare for another skid in the opposite direction.
You should always focus your attention on the roadway in the direction which
you wish to travel.
STEER INTO THE SKID
emissions that contribute to climate change and urban smog. Depending on your
driving habits and how often you drive, these basic techniques and useful tips
could save you hundreds of dollars a year in fuel and maintenance costs:
• It is both safer and more fuel-efficient to maintain a steady speed on the road,
accelerate smoothly when passing or merging with faster traffic and avoid hard
braking. European tests have shown that aggressive driving - frequent rapid
acceleration and hard braking -can increase fuel consumption by
approximately 40 percent.
• Drive at the posted speed limit. Lowering your highway cruising speed from
120 km/h to 100 km/h will reduce fuel consumption by up to 20 percent.
• Plan your trips to combine errands and to avoid traffic jams, steep hills, road
construction, etc. Combining a number of short trips into one longer one
allows your engine and drivetrain to reach peak operating temperature, which
is not possible on trips of less than 5 km. Avoiding trouble spots shortens your
travel time and reduces unnecessary idling.
•
If you are driving a vehicle with a manual transmission, learn how to use it
properly for maximum fuel savings. A tachometer can help you shift the
transmission at the most fuel-efficient engine speeds (the owners’s manual
will indicate these speeds).
•
If you have cruise control, use it for highway driving to maintain a constant
FUEL EFFICIENT DRIVING TECHNIQUES
Safety should be your number one concern every time you get behind the wheel of
a vehicle. The good news is that practising fuel efficient driving techniques not
only improves road safety, it also reduces fuel consumption and cuts exhaust
55
speed, avoid inadvertent speeding and save fuel. The exception is on hilly terrain,
where it’s a good idea to allow the vehicle’s speed to drop slightly going uphill
and then let gravity help you build up speed again (to a safe level) going down
the other side.
56
• In summer, minimize your use of air conditioning. Operating an air conditioner
in hot weather can increase fuel consumption by more than 20 percent in city
driving. A more fuel-efficient option for staying cool is to open a window.
However, at highway speeds, use your car’s flow-through ventilation - open
windows and sunroofs increase aerodynamic drag, which makes the engine
work harder and consume more fuel. If you must use your vehicle’s air
conditioning, avoid running it continuously; shut it off after the interior is
cool or set the controls to a comfort level that allows the system to cycle.
• Check tire pressure at least once a month when the tires are cold (i.e. the
vehicle has been stationary for at least three hours or has not been driven
more than 2 km). If you have to drive more than 2 km to add air, check the
tires before you leave and then add the amount of air that is missing from this
reading. Inflate the tires to the recommended pressure, usually indicated on
the car door, glove compartment or in the owner’s manual. With proper tire
inflation, your car will burn less fuel and be safer to drive. A vehicle with tires
that are under inflated by a total of 10 psi (69 kPa) increases fuel consumption
by 5 percent.
• Use a block heater in the winter to warm the engine oil and make cold starts
easier on your engine components. Your vehicle’s oil does not freeze when the
temperature dips below 0° C, but it does get much thicker. This means your
engine has to work harder and use more fuel. Use a timer to switch the block
heater on two hours before you plan to drive. Proper use of a block heater can
improve your vehicle’s overall fuel economy by as much as 10 percent. But
don’t leave your block heater on overnight or your energy savings will disappear
in a higher electricity bill.
• Follow the vehicle manufacturer’s recommended operating procedures and
maintenance schedule in your owner’s manual. Regular maintenance such
as oil and filter changes will not only prevent early degeneration of your vehicle’s
components, it will also keep them operating at their most fuel-efficient level.
A clogged air filter can increase fuel consumption by up to 10 percent. Regular
maintenance will keep your vehicle operating safely, save you money and, at
the same time, help the environment.
• Remote car starters are handy on cold winter mornings, but don’t start your
car too soon - in most driving conditions, today’s modern engines need to
warm-up for only 30 seconds, even on cold mornings. Also, allowing your car
to idle too long wastes gas and produces unnecessary exhaust emissions.
• Idling for more than 10 seconds, except in traffic, . wastes more fuel than
stopping your engine and restarting it again. At the end of the day, stopping
unnecessary idling will benefit the environment and save you money.
You
Youwill
willfind
findother
otheruseful
usefultips
tipsand
andtools
toolson
onthe
theWeb
Webatat
www.oee.nrcan.gc.ca/transportation
www.oee.mcan.gc.ca/vehicles.
Driving Emergencies
The types of emergency situations you may find yourself in can vary from something minor to the possibility of being involved in a collision. These situations can
be minimized if you know what to do. The following pages tell you how to prevent
these occurrences, what they involve, and how to deal with them when they occur.
Most collisions occur because of human failure in that drivers are not prepared to
respond to these emergencies.
because this may cause your car to roll over or go into a dangerous skid.
What you would do instead is:
• steer in a straight line; stay on the shoulder
• take your foot off the accelerator pedal
• apply the brakes very gently to reduce speed
DROWSINESS OR FATIGUE
Although being tired while driving may not seem like an emergency situation, it
may lure you into a fatal crash if you close your eyes for “just a second.” At the first
sign of blurred vision, heavy eyelids, or fatigue, stop your vehicle and rest. If
you are on a long trip make regular stops as often as you need. Getting out of the
car and walking around can also help. Encourage your passengers to chat with
you or listen to your radio. Move your eyes around and occasionally change the
speed of your car slightly. Changing your body’s position at regular intervals may
help to keep you alert. Open the window to let in fresh air. If possible, switch
drivers to rest. Being drowsy or “half asleep” can be compared to a drugged condition and is often referred to as “highway hypnosis”. It is far safer to be well
rested before you begin your trip.
• after you have slowed down, you can consider steering back onto the highway.
Before doing this, you must check for traffic ahead and behind; then turn
your front wheels gradually left to get back on the pavement. Be sure that your
speed is reduced enough so that you don’t shoot across the centre line
RUNNING OFF PAVEMENT EDGE
• Hold the steering wheel firmly and take your foot off the accelerator to let your
car slow down gradually.
A serious collision may be caused if your car drifts or is forced onto the shoulder
of the road. Whatever you do, don’t try to swerve back sharply onto the pavement
TIRE BLOWOUT
A tire blowout can cause you to suddenly lose control of your vehicle. When a
blowout occurs the behaviour of the car depends entirely upon which tire fails. If
one of the front tires blows out, the car swerves to the side with the flat tire,
making steering difficult. In the case of a rear tire blowout, the rear end of the car
“fishtails” or sways from side to side. If a blowout occurs, your steering is the
important thing:
57
• Brake only when the speed is reduced enough to give you control.
• Do not turn off onto the shoulder of the road until you have complete control.
If the blowout causes your car to go off onto the shoulder, don’t try to get back
on the pavement. Let the car slow to a stop.
• Drive your car off the roadway to a safe spot to change your tire.
• Set out flares or other warning devices if available.
Note: Underinflation (not enough air) is a common cause of blowouts. Check tire
pressure at least once a month.
58
BRAKES FAIL
Modern vehicles have a two-circuit hydraulic brake system, so total brake failure
is extremely rare. If your brakes do fail, try pumping the brake pedal to temporarily restore hydraulic pressure. If this fails, down shift and apply the parking brake
(handbrake)in a pumping fashion with the release mechanism depressed until
the vehicle stops. Your brakes may temporarly fail when you go through a large
puddle of water. Always test your brakes by applying light pressure to the pedal
after driving through deep water. The brakes may pull to one side or may not work
at all. You can “dry” them by driving slowly and applying them lightly.
If total brake failure occurs and you manage to stop your vehicle, do not go on –
call for assistance.
HEADLIGHTS FAIL
If your headlights go out , check the light switch immediately. Often a light switch
will be bumped by an arm or knee. If the lights remain out, bring your vehicle to
a safe stop, and call for assistance. Check to see if the radio, interior lights, fan,
etc., are all without power. If this is the case, the problem probably involves the
battery cables. If only the headlights are without power, it may be a fuse or circuit
breaker. Remember, it is not only dangerous, but also illegal to drive your vehicle
at night without lights.
ACCELERATOR PEDAL STICKS
If your accelerator pedal sticks, shift to neutral in automatic transmission vehicles and de-clutch in standard transmission vehicles. Bring your vehicle to a stop
as soon as it is safe and practical to do so. Turn off the ignition. Do not proceed,
call for assistance.
HOOD FLIES UP
If your hood suddenly opens and blocks your vision while you are driving, you
must brake smoothly, signal your turn, and pull safely off onto the shoulder. You
can judge where you are on the road by looking out the left window or, in some
cars, through the gap under the hinge of the hood. Once you have stopped, make
sure the hood is secured before proceeding.
DIRECT COLLISION COURSE
If a vehicle suddenly approaches from the opposite direction in your lane, a collision may seem likely. The defense in this situation involves four (4) steps:
• Brake hard! The more your speed is reduced, the less the impact will be.
• Head for the shoulder on the right hand side of the road and blow your horn.
The other driver might realize their error and steer back into their own lane.
Never swerve to the left to avoid a collision, you may be in the path of oncoming
traffic or the driver may pull back into his own lane and hit you head-on.
• If necessary, take to the ditch or any open ground that is free of obstructions.
Any alternative is better than a head-on collision.
• To reduce the force of impact, head for something which is capable of absorbing energy. For example, a bush, shrub, or snowbank. A general rule of thumb
is to hit an object with a glancing blow rather than head-on. Sideswiping an
object has at times avoided more serious collisions.
Each situation presents different possibilities. By being alert at all times when you
are behind the wheel, a fraction of a second may be all you would have to escape
the collision.
VEHICLE ON FIRE
Usually fire is due to an electrical short circuit. If possible, disconnect the battery
cables immediately to remove the power source. Don’t use a metal object or your
bare hands to remove wires; instead, use insulated tools or a jack handle wrapped
with a piece of cloth or other material that doesn’t conduct electricity. Smother
any flames with dirt, sand or a large article of clothing. It’s a good idea to keep an
ABC fire extinguisher in the passenger compartment of your vehicle for easy access. Ensure all passengers get out of, and away from, the vehicle.
VEHICLE PLUNGES INTO WATER
Your vehicle will float for two to five minutes if the windows and doors are closed.
This is where the advantage of wearing your seat belt comes in. It can prevent you
from being knocked out during those few moments needed to escape.
Doors will initially be difficult to open due to water pressure as the vehicle begins
to sink, or because of vehicle damage. As the vehicle fills with water, pressure
outside and inside equalizes. The best escape route is through the windows. If you
have power windows roll them down immediately because water will cause a short
circuit in the electrical system. If you can’t open the windows, don’t panic. Vehicles with a front engine will sink front first so that the air trapped inside will be
pushed to the rear near the roof. It may be necessary for you to breath this air
while waiting for the pressure inside and outside to become equal; then it will be
easier to open the door.
As you surface, be sure to release air gradually so that your body will not be damaged by the change in pressure.
59
SLOW DRIVING
It is an offence to drive so slowly as to impede or block the normal flow of traffic.
If for some reason you must drive slowly, because of mechanical or other
problems:
• Move over to the right lane and permit other traffic to pass.
• Pull off the roadway and stop to allow traffic to pass.
• Use your emergency flashers.
MOOSE ON THE HIGHWAY
60
Numerous moose-vehicle collisions occur on Newfoundland and Labrador highways. Moose are attracted to roadways because:
• they like to eat the road salt that collects on the vegetation or in roadside
pools,
• the first green growth usually grows at the road edge, and
• the windswept roadways also provides relief from the flies that inhabit the
woods during the summer.
The best way to avoid an accident with a moose is to be aware of when and where
you are most likely to meet one on the highway:
• During the summer and fall over 50 percent of accidents with moose occur.
During this time you must be extra cautious on our highways.
• The vast majority of accidents occur between dusk and dawn. This is the
time when moose are most active. Over 90 percent of moose-vehicle accidents occur between 11 p.m. and 4 a.m. A wise driver will not schedule driving for late night or early morning. If you must drive after dark, be on a constant guard for moose by scanning both sides of the road. Use high beam
headlights unless you are approaching or overtaking other traffic and pay close
attention to warning signs that mark high risk areas.
• It has been established that more accidents occur on certain sections of the
road than elsewhere. Some sections of the highway are noted as high risk
areas. These areas are posted with moose-crossing warning signs like this
one.
Be aware of these areas, but always assume that
you may see a moose at anytime and anywhere.
Use extreme caution whenever you see an animal. No matter what it appears to be doing or
how far it is from the road, slow down and get
ready to stop. Moose can move very rapidly and
can suddenly bolt in front of your vehicle at the
last moment. Always think moose – especially
when you drive at night.
COLLISIONS
Sometimes, in spite of all your efforts to avoid a collision, you may find yourself
involved in one. The law requires that every driver involved in a collision must stop at
the scene of the collision and offer assistance.
In the case of a collision with personal injuries, possible motor fuel leaks or serious
vehicle damage, stay calm and follow these steps:
6. If someone is pinned in the car, but not hurt, crawl into the car and try to release
them. A driver may often be trapped by the steering wheel. The pressure can be
eased by releasing the seat catch and pulling the seat back.
7. In case of fire, try to put it out with a fire extinguisher, dirt or a blanket. Most fires
start when the electrical wiring is short-circuited. Try to disconnect the battery,
but be careful not to touch metal parts with the “positive wire” because this
could cause a spark.
1. Turn off all vehicle engines and turn on emergency flashers.
2. If the occupants of either vehicle are hurt, do not move them until trained help
arrives. Moving an injured person may cause additional damage or even death.
If, however, the vehicle is on fire, all occupants must be moved clear in case of
an explosion. In this situation, make sure the head and spine are firmly supported.
8. Give first aid if you are trained to do so. In any case, you should cover the injured
with a coat or blanket to keep them warm. You might also loosen collars, ties
and belts to make breathing easier. If there is bleeding, you can apply direct
pressure to the wound to slow it down. Do not apply pressure to a head injury.
The most important thing you can do is to stay calm and reassure the injured by
speaking in a low, controlled voice and telling them that help is on the way.
3. Report the collision or make sure that someone else does if you are unable. The
police will need to know immediately the exact location of the accident, the
nature of damage and injuries, and your name. Other information will be gathered at the scene.
9. You are required to immediately report all collisions to the police where someone has been injured – no matter how slightly – or where the damage to all
property apparently exceeds $1000.00.
4. Remember that disabled vehicles on the roadway present a hazard to you and
other motorists. Take steps to position your vehicle off the road and provide for
the personal safety of those involved in collisions.
10. If no one is injured, but damage to any vehicle resulted, you must give your
name, address and licence and registration numbers to the other driver. You
must also give details about your insurance and any other necessary information.
5. Set up warning signals within a distance sufficient to give other traffic enough
warning to slow down or stop.
11. If only your vehicle is involved in a collision, such as running off the road, and
if damage exceeds $1000.00 or someone is injured, you must still report the
61
collision to the police. Many drivers have been convicted for failing to report a
collision, believing that since no other vehicle or property was involved, they
were not required to make a report.
12. If you collide with, and do damage to, an unattended vehicle, or other property, you must leave your name and address with the vehicle or property you
have damaged. You must then report the collision to the nearest police
station.
13. It is often wise to get the names, addresses and phone numbers of any witnesses to any collision.
62
IMPAIRED DRIVING
Alcohol
Before the automobile was invented, the excessive use of alcohol caused more
harm to the individual than to anyone else. Now they have at their disposal a twoton weapon – the motor vehicle! Special studies show that in 50% of fatal accidents at least one driver had been drinking – often excessively. Even small amounts
of alcohol can have a dangerous effect on your behaviour. One drink alone can
reduce a driver’s ability to concentrate, to correctly assess unexpected situations,
and to react quickly enough. As the level of alcohol in your blood increases, you
will have trouble judging distances and your vision will become blurred.
Impaired driving is a criminal offence. If your ability to drive is impaired by alcohol or drugs, you can be convicted of a number of offences under the Highway
Traffic Act and/or the Criminal Code of Canada. The vehicle doesn’t even have to
be moving: you can be charged even if you haven’t started to drive (have care or
control of a motor vehicle).
The law is tough on impaired drivers. If you are found guilty of impaired driving,
you will get a criminal record. Think about it.
It doesn’t take a lot of alcohol in your system to be impaired. The law sets the legal
limit at 50mg or more of alcohol in 100mL of blood. You can reach that limit by
having only a drink or two, depending on body weight, the amount of alcohol in
the drinks, time and other factors. The best rule to follow is “if you drink, don’t
drive”. The law applies to all types of motorized vehicles – cars, motorcycles,
trucks, snowmobiles, all-terrain vehicles, heavy equipment, boats and the like.
If the police suspect that you are impaired when they stop you, they may ask you at
the road side, for a breath sample to test the amount of alcohol in your blood, or
you may be taken to the police station to be tested.
If your blood alcohol concentration is 50mg or more of alcohol in 100mL of blood,
your driver’s licence will be suspended for 24 hours.
If you can’t physically give a breath sample, the police officer can ask you to let a
doctor take blood samples to see if you’re over the legal limit. These samples may
also be taken by a nurse or hospital technician under a doctor’s authority. If you
are injured and cannot be asked, the police, with the permission of a judge, can
ask a doctor to take blood samples. If you submit to a blood test, you have the right
to have one of the samples tested independently.
If you refuse to give a breath or blood sample, you will be charged with refusal.
The penalties are the same as for impaired driving.
90 Day Suspensions under the Highway Traffic Act:
Penalties
If your blood alcohol concentration is 80 mg% or more, your driver’s licence will
be suspended for 90 days in addition to the 24 hour suspension. The 90 day
suspension will take effect 14 days after expiry of the 24 hour suspension.
Under the provincial regulations for impaired driving, new suspension periods
have been established. A driver charged under the Highway Traffic Act can be
suspended from 24 hours up to 90 days. As well, a driver convicted of impaired
driving can be suspended from driving for periods of 12 months for a first offence
and up to 60 months for a subsequent offence. For Novice Drivers there are also
specific penalties for periods of suspension if the driver exceeds the zero tolerance
regulations.
24 Hour Suspensions under the Highway Traffic Act:
63
Suspension Periods for convictions under the Highway Traffic Act:
1st offence
suspended from driving for 12 months
2nd offence
suspended from driving for 36 months
3rd and subsequent
suspended from driving for 60 months
Suspension Periods for Convictions under the Criminal Code of Canada
If you are charged under the Criminal Code of Canada (CCC) for driving or having care
or control of a motor vehicle (snowmobile, ATV, motorcycle, etc.), the penalties are:
1st offence
nd
2 offence
fine of $600 or more, prohibited from driving for a minimum of 12
months, to a maximum of 3 years.
14 days in jail and prohibited from driving for a minimum of 24
months, to a maximum of 5 years.
90 days in jail and prohibited from driving for a minimum of 36
3rd and
subsequent months.
64
Reinstatement Requirements
Alcohol Education Courses are available from approved driving schools province
wide. You may complete your course anytime during your suspension so contact
them as soon as possible to arrange for an appointment. There is a fee charged for
this service that is the individual’s responsibility.
Novice drivers who exceed the zero tolerance blood acohol concentration will have
their driving privileges suspended.
Novice Driver Suspension Periods under the Highway Traffic Act:
Alcohol Assessment/Rehabilitation
This program is provided by Addiction Services, Department of Health. As part of
your reinstatement requirements you are required to undergo an assessment.
You should contact Addiction Services as soon as you receive your notification as
you may be placed on a waiting list for an appointment.
• Criminal negligence causing bodily harm
– up to 10 years in prison and up to a 10-year prohibition from driving
• Manslaughter and criminal negligence causing death
– up to life in prison and up to a lifetime prohibition from driving
All of these penalties apply also to impaired boating and flying.
The initial interview and assessment process will normally take between 2-4 sessions. This process will take anywhere from 6 months plus.
In addition to your reinstatement fees, you will have to pay an administrative fee
for the assessment.
These are minimum penalties and can be increased in some cases. It is illegal to
drive when you have been ordered not to by a judge or when your licence has been
suspended for an impaired driving conviction. If you do drive, you could face up to
two years in prison and a further prohibition from driving up to life. The Criminal
Code also enables the ordering of treatment in some cases.
Remember, also, that it’s illegal to leave the scene of an accident. Penalties for this
include up to two years in prison and a prohibition from driving of up to three years.
If your impaired driving results in injury or death to others, the penalties are tough.
The maximum penalties are:
• Impaired driving causing bodily harm
– up to 10 years in prison and up to a 10-year prohibition from driving
• Impaired driving causing death
– up to 14 years in prison and up to a 10-year prohibition from driving
65
Drugs & Alcohol
Most drivers who are charged with impaired driving under the Criminal Code of
Canada get into trouble because of alcohol, but any drug that changes your mood
or the way you see the world around you will also affect the way you drive. The
same penalties apply to drivers convicted of impaired driving whether the
impairment is caused by drugs or by alcohol.
Illegal drugs such as marijuana and cocaine are not the only problem. Some drugs
that your doctor may give you or prescribe for you, and some non-prescription
over-the-counter drugs can also impair your driving ability.
Here are some points to remember:
66
• When using prescription medicines or receiving allergy shots, ask your doctor
about possible side effects such as dizziness, nausea or drowsiness that could
affect your driving.
• Read the label of any over-the-counter remedy you take. Any stimulant, diet
pill, tranquillizer or sedative may have a dangerous effect on your driving.
Even allergy and cold remedies contain ingredients which could cause drowsiness or otherwise impair your driving ability.
• The combination of some drugs with any amount of alcohol can have dangerous effects, even several days after you’ve taken the drug. Don’t take chances
– ask your doctor or pharmacist.
Using drugs or drinking before driving is NOT a good idea. The consequences of a
collision are the obvious result we can imagine, but if you are involved in a colli-
sion while impaired, your insurance company doesn’t have to pay for collision
damage to your car. Even worse, if you are hurt, your medical and rehabilitation
costs may not be covered. If you drive for a living, the loss of your licence could
mean the loss of your job, and a conviction will increase the insurance premiums
you have to pay. Drinking is a personal choice; drinking and driving affects everyone on the roadway. It is safer and more responsible to appoint a non-drinking
designated driver or to take a cab.” If you drink, don’t drive.”
Now You are Licenced
If you change your name, or address, you must inform the Motor Registration
Division of those changes within 10 days. You must also submit documented proof
of such a change. For example, a copy of your marriage certificate would be acceptable as proof that your name has been changed.
Here’s what your new driver’s licence will look like:
(front)
(back)
67
Renewing Your Licence
All driver’s licences issued in Newfoundland and Labrador are valid for a five year
period.
required to be registered, insured for public liability and have a licence plate attached to the rear of the vehicle for identification. (Commercial vehicles require 2
licence plates.) The registration permit and insurance forms must be kept in the
vehicle at all times and produced whenever a police officer requests it.
Your licence expires on your birthday during the fifth year. You must renew your
licence before that date; otherwise, it will no longer be valid.
Applying for Registration
Before your licence expires, Motor Registration Division will send you a written
reminder that you will soon need to renew your licence. You must complete a
form, have your photo taken at an MRD office and pay the appropriate fees.
68
If you lose or damage your licence, you must apply to the Motor Registration Division for a replacement. It is important to know your driver’s licence number and
the date the licence was issued because these will remain the same on your replacement licence. A replacement fee is charged for this service.
In order to register your vehicle, a registration form must be completed and signed.
If you purchase a vehicle from any of the dealerships in the province, they will
complete these registration forms for you. You must give the name of your insurance company and the insurance policy number. Once you have produced the
necessary documents, you will receive a registration form (vehicle permit) and a
licence plate.
Renewing Your Registration
Donor Consent Form
If you would like to become an organ donor in the event of your death, you can
indicate your intention right on your driver’s licence original application or application for renewal.
Vehicle Registration
Vehicles which are driven on the highways of Newfoundland and Labrador are
Vehicles in Newfoundland and Labrador are registered for a 12 month period.
Each year you will be notified by the Motor Registration Division that your vehicle
registration will soon expire. You must complete a form and forward it to the
Division, with payment for your renewal, or you may follow the instructions on the
form and renew over the internet. Once processed, your new registration slip (vehicle permit) and licence plate sticker valid for 12 months will be issued to you.
The licence plate sticker must be attached to your licence plate located on the rear
of your vehicle.
Registration for Out-of-Province Private Passenger Vehicles
If you are not a resident of Newfoundland and Labrador but wish to drive your own
vehicle in this province, you may do so for a period of three (3) months, providing
that your vehicle has already been registered in your home province, state or
country and hold a valid driver’s licence. During that time, you must not allow a
Newfoundland and Labrador resident to drive your vehicle for more than 30 days
unless employed by you as a chauffeur. After the three (3) month period, you
must register your vehicle in Newfoundland and Labrador.
If you are in Newfoundland and Labrador on business, you must register your
vehicle here after just 30 days (a non-commercial vehicle may Not be used to
deliver goods in the province unless it is registered).
If you are taking up residence in Newfoundland and Labrador, you have 30 days to
register your vehicle.
Registration for Out-of-Province Commercial Vehicles
All commercial vehicles operated in Newfoundland and Labrador must be registered in this province, unless there is a reciprocal agreement in place.
Commercial vehicles registered under the Canadian Agreement on Vehicle Registration (CAVR) or vehicles from the New England States may be driven in Newfoundland and Labrador without being registered here. Likewise, commercial vehicles
from Newfoundland and Labrador may also be driven in Canada when licenced under CAVR or the New England States without having to be registered there.
* A special permit (for one round trip to our province) is available to operators
of commercial vehicles not registered under CAVR or from states which do
not have a reciprocal agreement with Newfoundland and Labrador.
When any commercial vehicle from out-of-province is driven in Newfoundland
and Labrador, it is subject to the same regulations as to size, equipment, and
traffic control as commercial vehicles registered in Newfoundland.
Renewal Processing
Before your driver’s licence or vehicle registration expires, you will receive a renewal notice. Your licence can be renewed at any Regional Office of the Motor
Registration Division, by mail or through banks and credit unions. If you use the
banking system, read the renewal form for instructions to ensure you meet all
requirements. Your sticker and permanent documents will be mailed to you within
30 days.
Prior to transfers being processed all outstanding fines must be paid.
69
Licence Plates
When a new vehicle is registered in Newfoundland and Labrador, the owner receives a licence plate for that vehicle. If the first letter of the plate begins with; A, D,
H, M, T, V, or W, the plate will be displayed on the rear of the vehicle. Only one
validation sticker will be issued for these plates and it shall be displayed on the
rear plate.
For all vehicles with the first letter of the plate not listed above, two plates and one
sticker, which must be placed on the rear plate, are still required.
Each time the registration of a vehicle is renewed, the sticker issued by the Motor
Registration Division must be attached to the licence plate already on the vehicle.
70
Insurance
Every vehicle driven on the highways of Newfoundland and Labrador must have
public liability insurance; $200,000.00 is the minimum requirement. Drivers
should check with their insurance companies to get the best possible coverage.
The pink insurance slip must be kept in the vehicle at all times. Failure to carry
this insurance coverage may result in vehicle seizure.
Transfer of Ownership
If you purchase a vehicle through a private sale rather than a dealership, the buyer
and seller must both complete the section on the back of the vehicle registration
permit for the vehicle in question and forward it to the nearest Motor Registration
Division. The Division must be informed of such a transfer of ownership within
ten (10) days.
The vehicle seller is responsible for completing the left portion on the reverse side
of the vehicle permit. The individual should also complete the bill of sale giving
the following information:
* An in-transit permit may be issued to unregistered vehicles for the purpose of
transporting these vehicles to a place where they will become registered or
will be inspected prior to registration. You must pay a fee and provide proof of
insurance before such a permit will be issued.
The registered owner is responsible at all times for their motor vehicle. Any
penalties or fines incurred by a person driving your vehicle could become
your responsibility if the vehicle is being operated with your consent.
1. date of sale
2. purchaser’s name and address
3. make, model and year of vehicle
4. serial number
5. licence plate number
6. purchase price
The purchaser is required to complete the declaration on the right portion of the
reverse side of the permit by providing the insurance company, policy number,
date of birth, and signature. A motor vehicle inspection certificate is also required.
71
Back
of Notification
NotificationofofSale
Sale—
– Transfer
Ownership
Back View
View of
Transfer of Ownership
72
Courses to Improve Driving Skills
Various courses are offered in Newfoundland and Labrador to promote safe driving. These courses are as follows:
1. Defensive Driving Course
A six (6) hour program which teaches Defensive Driving Techniques.
2. Professional Driver Improvement Course
A six (6) hour course for large vehicle operators which focuses on Defensive
Driving Techniques.
3. Point Reduction Course
A six (6) hour program that can remove up to four (4) points from your
driving record (Certain conditions apply).
4. Graduated DL Programs
Eligible to those 16 years of age and older (some may qualify for an insurance
discount). It includes in-class & in-car instruction and program content is
endorsed by the department.
5. Motorcycle Training Program
25 hour course designed to provide you with the skills and knowledge for safe
and enjoyable motorcycle riding.
6. School Bus Driver’s Course
A six (6) hour program designed specifically for school bus drivers to increase
their awareness of hazards encountered in the daily operations of school buses.
7. Responsible Driver Workshop (Suspended Drivers Course)
An eight (8) hour program mandatory for drivers who have had their driver’s
licence suspended under the demerit points system.
8. 55 Alive/Mature Driving
A refresher course designed specifically to meet the needs of mature drivers
operating in today’s congested and changing driving environment.
9.
Think First
Course)
9. Think
First(Alcohol
(AlcoholEducation
Education
Course)
four (4)
(4)hour
hourprogram
programmandatory
mandatoryfor
fordrivers
driverswho
whohave
havehad
had3two
AA four
or 4,(2)
24twenhour
ty-four (24) or
hour
or one ninety
day suspension
1 Criminal Code convicsuspensions
1 Criminal
Code impaired
drivingor
conviction.
tion within a two year period.
10. Alcohol
Alcohol Assessment/Rehabilitation
Assessment/Rehabilitation
10.
For
For drivers
driverswith
with53or
ormore
more24
24hour
hoursuspensions
suspensions within
within 22 years
years or
or 22 Criminal
Criminal
Code
Code Impaired
Impaired Driving
Drivingconvictions
convictionswithin
within510years.
years. Two or more ninety day
suspensions within two years or a combination of two 24 hour or one ninety day suspension and one Criminal Code conviction within 2 years.
73
Demerit Point System
Newfoundland and Labrador is using the Demerit Point System. The System will
not affect safe drivers who follow the rules of the road – but will serve to remind
those who break the law that they must be more careful when driving; otherwise,
they run the risk of having their driver’s licence suspended.
The Demerit Point System deals primarily with moving violations – not those
regarding faulty equipment, illegal parking, or the more serious offences, like
impaired driving covered under the Criminal Code of Canada.
74
If you are convicted of an offence while driving on the highways of Newfoundland
and Labrador, or any other Canadian jurisdiction, the appropriate number of points
will automatically be added to your record. If you accumulate 12 points within a
two-year period, your driver’s licence will be suspended.
If you are a “novice” driver, you can only accumulate six (6) points within a oneyear period before your licence is suspended.
You are considered a novice driver if:
1. you are in Level I or Level II
2. you have not completed Level I or Level II without a suspension due to an
accumulation of points
3. you have not completed one whole year without any suspension
It is possible to get a ticket, and consequently accumulate points, without being
stopped by a police officer. However, you will be notified in writing when you have
accumulated six (6) points, and given another written warning when you have
accumulated nine (9) points. If you are a probationary driver, you will be notified
after accumulating only three (3) points.
The first time that you accumulate enough points, your driver’s licence will be
suspended for two (2) months.
If you accumulate enough points within a two-year period after the first suspension to have your licence suspended a second or third time, you will lose your
licence for four (4) months.
* If you are caught driving while your licence is suspended, you will face an
additional suspension of four (4) months the first time, and nine (9) months
for subsequent offences in that 5 year period.
Your driver’s licence is reinstated only after the entire suspension period has
expired. Motor Registration Division cannot, under any circumstances, return your
licence before the suspension is over. You must pay a fee to have your driver’s
licence reinstated and you must participate in a mandatory responsible driver
workshop (suspended drivers course) either during your suspension or prior to
reinstatement.
It is possible to have points removed from your record. Points accumulated for
any offence are automatically removed two (2) years after the date of conviction.
Some drivers may be eligible for a Point Reduction Course. If a driver successfully
completes such a course, up to four (4) points can be deducted from his/her
record. However, this course can only be completed once every 5 years. For further information on this matter, contact the Motor Registration Division office
nearest you.
The fee for any driving course is your responsibility.
TABLE OF POINT VALUES FOR CONVICTIONS
Conviction
Points
Imprudent driving ............................................................................................. 4
Failing to remain at the scene of an accident .................................................. 12
Passing a school bus while loading or unloading children ................................ 6
Operating or allowing to be operated an uninsured vehicle .............................. 6
Improper passing ............................................................................................. 3
Speeding 1 - 10 km/h in excess of posted limit .............................................. 0
11 -20 km/h in excess of posted limit ............................................. 2
21 - 30 km/h in excess of posted limit ............................................ 3
31 km/h and over in excess of posted limit ..................................... 4
Selected Examples of Other Convictions
Driving to the left of the centre line ................................................................... 2
Failure to obey traffic signs or lights .................................................................. 2
Failure to stop before turning right on red light ................................................ 2
Failure to stop at a stop sign .............................................................................. 2
Failure to signal change of direction .................................................................. 2
Failure to yield for a pedestrian ......................................................................... 2
Motorcycles riding two abreast .......................................................................... 2
Following another vehicle too closely ................................................................ 2
Driving too slowly as to impede traffic ............................................................... 2
Making improper turns at intersection ............................................................. 2
Driving with view obstructed ............................................................................. 2
Failure to obey police officer’s signal ................................................................. 2
Operating a motor vehicle without a driver’s licence ........................................ 2
Operating a motor vehicle with improper class of driver’s licence .................... 2
75
76
Motorcycle
Safety
This section of our manual is not intended to be an
in-depth study of motorcycle handling. Motorcyclists
must know the rules of the road contained in the
earlier sections of this book and be skilled in handling and controlling the cycle before attempting to
pass the motorcycle balance test maneuver and road
test.
77
Check Your Equipment
Using the proper equipment will make cycling safer
and more comfortable. Road and weather conditions
affect motorcycle drivers more than four wheel vehicles.
78
Protect your eyes. Wind and rain can tire your eyes
and blur your vision. Dust, bugs and debris can
hurt your eyes and make you lose control. Eye or
sunglasses provide little protection. You can use a
helmet with a clear shield but the best eye protectors are goggles. Goggles are less likely to steam up.
Windshields and fairings help deflect wind, rain
and flying objects but they do not protect eyes.
Wear gloves – You’ll have better control. They protect your hands and give you a better grip on the
bars and controls. Numb fingers cause control problems.
Cold or hot weather clothing. You’ll need ventilated
clothing in cold or hot weather. Rubber clothing
should be avoided – it makes you perspire and offers little protection in a fall.
Always wear a helmet. Similar helmet laws are in
effect in all provinces. Governments looked at the
facts and passed the law. Don’t ignore it. When
wearing the helmet, see there is no slack in the chin
strap. Ask your dealer about helmet standards before you buy.
Wear proper clothing. Protect yourself from sun,
wind, bugs and stones. Leather is best. Heavy nylon and denim are acceptable. Cover up from head
to foot. Your jacket should be belted at the waist.
Don’t let flaps, laces or anything else dangle from
your clothing. Don’t wear things that flap or balloon in the wind, they may distract you. Don’t carry
things in your pockets that could hurt you if you
fall.
Choose bright colours, they will make you more noticeable. Yellows, reds and oranges, especially
fluorescents are best. Reflective tape can be applied
to your helmet and motorcycle.
Always wear boots. Make sure they cover your ankles. You want protection and good handling of the
foot controls.
Check Your Motorcycle
Horn. Test it – it may save your life.
Check it for Safety.
Don’t just jump on your bike and ride off. Take a few
minutes to check the important things on a regular
basis. Get to know your owner’s manual inside out.
If you buy a used bike, try to obtain the owner’s
manual from the manufacturer.
Brakes. Check that brake controls are
adjusted correctly and work properly.
Throttle. The throttle should not stay
open when released.
Clutch. Check clutch “drag” or “slip”.
There should be neither.
Cables. Replace if worn, damaged or
frayed, don’t risk an accident. Make
sure all cables are well lubricated.
Drive Chain. When you’re sitting
on the bike, there should be at
least two centimetres of play at the
centre of the chain. Make sure the
chain is wet, but not dripping,
with oil. Use chain lubrication oil.
Tire Pressure. With correct
pressure bikes handle better.
Pressure changes according to
load. Inspect tires for cuts,
damage to sidewalls and
things stuck between treads.
Nuts, Bolts and Cotter Pins can
be loosened by vibration and
should be checked often.
Mirrors. Clean and adjust before you
start. Convex mirrors make it hard to
judge distance.
Gas and Oil. Check levels. If the engine lacks oil,
it can “seize” and may cause your rear wheel to
lock.
Lights: Are they working? Check
turn signals, high beam indicators
and brake lights.
NOTE: Never take a motorcycle on the street until
you have checked it and are familiar with its
controls and operating devices.
79
To control a motorcycle your body must be in the proper position.
Hold the handgrips firmly so that you will not lose your
grip if the motorcycle bounces. The wrist of your throttle hand should be flat so that you don’t accidentally
use too much throttle and you can reach for the brake
easily with your fingers. Grasp the throttle with palm
and thumb.
Sit in an upright position close enough
to the handlebars to reach them with
your arms slightly bent. You shouldn’t
have to stretch to reach the controls.
80
You should keep your feet firmly on the footpegs.
This will help you maintain balance and ready
you to use the brake and gearshift if necessary.
Never drag your foot along the ground; it may
catch on something and cause you to lose your
balance.
Hold your knees firmly against the gas tank when
riding. This keeps you secure on the seat, and gives
you the best balance as the motorcycle turns.
Turning
Turning
Braking
Stopping
Braking
andand
Stopping
New
trouble
turning
thanthan
experienced
riders.
Beginners
usuNewriders
riderstend
tendtotohave
havemore
more
trouble
turning
experienced
riders.
Beginners
ally
take
turns
too
fast.
When
they
can't
hold
a
turn,
they
end
up
crossing
into
anothusually take turns too fast. When they can’t hold a turn, they end up crossing into
eranother
lane of lane
trafficofor
goingoroff
the off
road.
brake
hardtooand
skidand
outskid
of contraffic
going
theoften
road.they
Often
theytoo
brake
hard
out
trol.
of control.
To turn a motorcycle safely, you must lean the bike in the direction of the turn. As
To makeas ait turn
safely the
youmost
haveeffective
to leanway
the tobike
the turn. and
Somemake
riders
are
illogical
may seem,
leaninto
a motorcycle
a turn,
when
at speeds
of greater but
thanyou
approximately
push of
onless
the
afraidtravelling
to lean with
the motorcycle,
have to lean25to kph,
turn.isAttospeeds
handgrip
in theyou
direction
you the
wishbike
to turn
– push
turn right;
push lefttheto turn
turn
than 40 Kph,
must lean
further
thanright
yourtobody.
The sharper
left. This is called “push” steering. At slower speeds, you must lean the bike further
and the faster your ride, the more you must lean. You and your motorcycle work
than your body. The sharper the turn and the faster your ride, the more you must lean
together
as oneYou
unit,
youmotorcycle
both must work
lean together.
the
motorcycle.
andsoyour
together as one unit, so you both must
lean together. One other very important point: Before you change your lane position,
or position within a lane, or before you turn off the roadway you are on, ALWAYS do
a quick shoulder check. It may save your life!
Always
be ready
to Your
stop.motorcycle
Your cyclehas
hastwotwobrakes
brakes
stop
Always
be ready
to stop.
andand
you you
needneed
them them
both toboth
stop to
effectively. The
front
brake
is
the
more
important
of
the
two
as
it
provides
about
three-quarters
of
your
stopeffectively. The front brake is the more important of the two as it provides about
pingthree-quarters
power. Squeezingofthe
front
brake
lever
too
hard
or
applying
the
rear
brake
too
hard
may
cause
your stopping power. If you squeeze the front brake lever too
the affected wheel to skid – resulting in longer stopping distances or even causing a fall. Remember
hard,
however,
you
maybraking:
lock the front wheel. This is most likely to happen on wet
these important points about
pavement.
If
your
front
wheel
locks,
theormotorcycle
almost
certain
to fall.“normal”
If you
• Use both brakes EVERY time you slow
down
stop. If youisuse
only the
rear brake
stops,
will the
not front
developbrake
the skill
to use there
the front
brake
properly
when youthese
reallypoints
need it.
learnyou
to use
properly,
is no
danger.
Remember
ALWAYS
using
both
brakes
will
decrease
your
stopping
distance
–
every
time.
about braking:
• Apply both brakes at the same time, using progressive pressure on the front brake, while slightly•decreasing
pressure
the reartime
brakeyou
as slow
you slow.
But,oragain,
mostuse
important
thatrear
both
Use both
brakesonevery
down
stop.itIfisyou
only the
brakes be applied simultaneously.
forstop,
“normal”
stops,
not check
develop
the skill
use directions
the front to
brake
• Every brake
time you
do a quick
headyou
andmay
mirror
behind
you intoboth
make
properly
when
you
really
need
it.
you aware of traffic coming up behind. You may have to get out of there in a hurry, if something
is coming up fast behind you.
81
• Apply
both
at the
samea turn,
time.since
Some
that you
• Braking
should
be brakes
done before
entering
heavypeople
brakingbelieve
while turning
mayshould
require
more apply
tractionthe
thanrear
is available
in a turn
on contaminated
Since
canbrake first;
this– isespecially
not true.
The sooner surfaces.
you apply
theyou
front
not always
seethe
around
a turn,
it makes
to beyou
moving
slow enough when entering a turn to
brake,
sooner
it will
start sense
slowing
down.
be able to stop quickly should the need arise. While light braking may not be problematic, should
it•become
or stop
around
a turn
there will be
You necessary
can use to
thebrake
fronthard
brake
in aquickly
turn. while
Somegoing
people
think
this– isanddangerous,
occasions when this is necessary – the same principles apply as when braking in a straight line.
and it can
be if the
road isthatvery
slippery
andprinciples
the brake
not S's)
usedbeproperly.
It is extremely
important,
however,
these
additional
(theisthree
used when
Otherwise,
it
is
no
more
dangerous
to
use
the
front
brake
in
a
turn than it is
braking hard in a turn:
• straighten
reduce
lean angle
the bikeline.
to be as straight up (upright) as possible
when -you
are and
stopping
in aofstraight
• square - make sure the handlebars are aligned as they would be in a straight line stop.
••squeeze
thestopping
front brakeonlever
the rear brake
It is -asimultaneously
good idea tosqueeze
practice
“offwhile
the applying
road” surfaces
suchand
as while
wet
squeezing
the roads,
clutch lever
roads, dry
gravel, etc., before using the public roads.
• It is a good idea to practice stopping on various surface conditions in a location away from public roads. Practice in safety will better prepare you for different road conditions while in traffic.
This
Not This
Shifting
ShiftingGears
Gears
There isis more
more to shifting
There
shifting gears than simply getting the motorcycle
motorcycle to
to accelerate
accelerate
smoothly.Accidents
Accidentscan
canoccur
occurififthe
thegears
gearsare
areused
usedincorrectly
incorrectlywhen
whendown
downshifting,
shiftsmoothly.
turning,
or starting
on hills.
ing, turning,
or starting
on hills.
Starting on a Hill
It is more difficult to get the motorcycle moving on an upgrade than it is on flat
ground. There is always a danger of rolling backward into someone behind you.
This is what you must do:
Downshifting
Downshifting
• Use the front brake to hold the motorcycle while you start the engine and shift
into first gear.
It is important to shift down through the gears one at a time as you slow down or stop,
It is important to shift down through all gears as you slow down or stop. This way
and always to be in the gear appropriate to your speed. You should always be in first
you will have enough power to accelerate quickly if necessary.
gear when you stop so that you will have enough power to accelerate away from trouble quickly if necessary.
Make certain you are going slowly enough when you shift into a lower gear. If you
Make
certain
slowly enough
when
youtheshift
a lower
youThis
are
are going
tooyou
fast,arethegoing
motorcycle
will lurch
and
rearinto
wheel
maygear.
lockIfup.
going too fast, the rear wheel may skid – particularly where the pavement may be conis more likely to happen going down hill, where the motorcycle tends to pick up
82 taminated by water, oil residue, debris, etc. This is always more likely to happen going
speedhill,
or when
into firsttends
gear ifto the
range or
forwhen
first gear
is very
down
whereshifting
the motorcycle
pickspeed
up speed,
shifting
into low.
first
Under
these
conditions,
you
may
need
to
use
the
brakes
in
order
to
slow
gear if the speed range for the first gear is very low. Under these conditions, youdown
may
enough
to shift
safely. in order too slow down enough to shift safely. Use the clutch
need
to use
the brakes
slowly and very smoothly when down-shifting - always remember your limitations
with respect to available traction.
Shifting in a Turn
Do not upshift or downshift in a turn unless you can do it very smoothly. A sudShifting in a Turn
den change in power to the rear wheel can cause it to lock or spin. The result can
Do not upshift or downshift in a turn unless you can do it very smoothly. A sudden
be a skid. It is best to slow down and change gears before entering a turn.
change in power to the rear wheel can cause it to lock or spin. The result can be a
skid.
It is best
to slow
down
change
gears
before entering
a turn.
Matching
engine
power
andand
vehicle
speed
is generally
referred
to as “slipping the
Matching
clutch”. engine power and vehicle speed is generally referred to as “slipping the
clutch”.
• Change to the foot brake to hold the cycle while you operate the throttle with
your right hand.
• Open the throttle a little bit for more power.
• Release the clutch gradually. If you release it too quickly, the front wheel may
come off the ground or the engine may stop – or both.
• Release the foot brake when the engine begins to slow down. This means the
engine is taking hold.
Riding on Dangerous Surfaces
These may include wet pavement (especially just after it starts to rain); gravel
roads or places where sand and gravel have collected on paved roads; mud, snow,
and ice; wet painted line markings and steel surfaces such as manhole covers.
To Operate on Slippery Surfaces
• Reduce speed – It takes longer to stop on slippery surfaces and reduced
speed makes up for this. It is especially important to reduce speed on curves.
Remember, speed limits posted on curves apply to good surface conditions.
WHEN FOLLOWING A FOUR-WHEELED VEHICLE ON A HIGHWAY YOU SHOULD
RIDE SLIGHTLY TO THE LEFT OR RIGHT OF THE CENTRE OF THE LANE.
• Use both brakes – The front brake is still more effective than the rear brake
even on a slippery surface. The only time you shouldn’t use the front brake is
if the surface is extremely slippery, like ice. Then you shouldn’t brake at all.
• Avoid sudden moves – Sudden changes in speed or direction can cause a
skid on slippery surfaces. Therefore, you should turn, brake, accelerate, and
change gears as little as possible. On a very slippery spot, you should make no
changes at all until you are across.
• Avoid slippery areas – Try to find the best pavement that you can. It is better
to operate in the track created by the wheels of cars on wet pavement because
oil from cars tend to build up in the centre of the lane. Stay away from the
edge of the road when you make sharp turns at intersections or enter and
leave freeways at high speed; dirt or gravel tends to collect there. Certain sections of the road dry out faster after a rain or melt faster after a snow. Try, at all
times, to stay in the best part of the lane. Avoid completely, if possible, very
slippery areas such as ice, hard packed snow, or wet wooden surfaces. If you
can’t avoid these areas, proceed as slowly as you can and use your feet as
“outriggers” for balance.
83
Uneven surfaces.
These may include bumps, broken pavement, “pot holes” or railroad tracks across
the road. Such surfaces can affect your control of the motorcycle.
To operate on uneven surfaces:
• Slow down to reduce the impact.
• Straighten out your course so that the motorcycle is upright.
• Rise slightly on the footpegs so that you can absorb the shock with your knees
and elbows.
84
• If you have to cross the tracks, slow down and cross as close to a 90 degree
angle as possible.
• When you want to cross tracks, ruts, or pavement seams running parallel (in
the same direction) to the course you are driving, move far enough away to be
able to cross it at an angle. Then, just make a quick sharp turn. Do not try to
edge across. It could catch your tires and upset your balance.
• When you ride over rain grooves or a metal bridge grating, the motorcycle will
tend to wander back and forth. While this may give you an uneasy feeling, it is
not usually dangerous. The best thing to do is stay on course and “ride it out”.
Ride straight across.
When approaching two lanes of vehicles stopped at a traffic light, you should stop
behind the last vehicle in either lane. Never ride between two lanes of vehicles.
FOLLOWING OTHER TRAFFIC – MAINTAIN A SAFE FOLLOWING DISTANCE AT
ALL TIMES. REMEMBER! AVOID DRIVING IN THE BLIND SPOTS OF VEHICLES
YOU ARE FOLLOWING.
Riding at Night
At night you can’t see or be seen clearly – even with the best headlights. To drive
safely you must do these things:
• Use your high beam whenever you are not following or meeting a vehicle to
get all the light you can.
• Reduce your speed and don’t overdrive your headlights. Be sure you are going
slowly enough to stop before reaching something your headlight shows on the
road ahead.
• Use the vehicle ahead. Its headlights can give you a better view of the road and
its bouncing tail lights can alert you to bumps or rough pavement.
• Allow more distance between yourself and the vehicle ahead. This will give
you more time to react.
• Don’t pass unless it is necessary. If you must pass, give yourself more distance to do so.
• Stay alert. If you are sleepy – stop and rest.
• Keep your goggles, face shield and windshield clean. If they are badly scratched,
replace them.
• Make sure you are visible. Clean your lights and reflectors, wear bright colours and add reflective tape where it will do the most good. A reflective vest
is a good idea.
• Signal earlier, brake sooner, and flash your brake lights.
EMERGENCIES
No matter how careful you are, there will be times when you find yourself in a tight
spot. Your chances of getting out safely depend upon your ability to react quickly.
Here are some emergencies and ways to handle them.
85
QUICK STOPS
Since
the your
frontmotorcycle
brake supplies
about
three-quarters
of your
braking
power, you
Stopping
quickly
requires
that you use
the same
principles
you
woulduse
use itwhen
making
a “normal
stop”
exceptlever
that your
actions
accelerated.
must
to stop
quickly.
Squeeze
the– brake
steadily
butare
firmly.
Do not
Both theat front
anditrear
brakes
should
used locking
simultaneously.
to
“grab”
it. Apply
as fully
as you
can be
without
the frontBrace
wheel.yourself
The rear
avoid falling
maybeTrylosing
the front
brakerear
leverwheel
steadibrake
shouldforward
also beand
applied.
not tocontrol.
lock theSqueeze
rear wheel.
A locked
is
ly but firmly – do NOT “grab” it. At the same time, roll your right foot forward on the
not as likely to cause a fall as a locked front wheel; however, it makes the cycle
rear brake lever, firmly, but with less pressure than is being applied to the front
hard to control.
brake. When both brakes are applied simultaneously using this procedure, you will
greatly lessen the possibility of wheel skids – skids increase stopping distance and
may cause a spill.
AVOIDING
OBSTACLES
AVOIDING OBSTACLES
A piece
piece ofof debris
debris ororaapothole
potholemight
mightappear
appearsuddenly
suddenly inin your
your path
path as
as the
the vehicle
vehicle
ahead passes
passes over
overit,it,ororthe
thevehicle
vehicleahead
aheadmay
may
suddenly
stop.
a quick
suddenly
stop.
EvenEven
a quick
stopstop
may
quickbe
turn
not work
in these
instances.
The only
to avoid
collision
may be awould
may
not work
in these
instances.
Theway
only
way toa avoid
a collision
a
or
swerve.
quick turn.
86
The trick to making a quick turn is to get the motorcycle to lean quickly in the direcThe trick to making a quick turn is to get the motorcycle to lean quickly in the
tion you wish to turn. The sharper the turn, the more you must lean. To get the
direction
to turn. push
The sharper
the turn, inthethemore
must lean.
To get
motorcycleyou
to wish
lean quickly,
on the handgrip
sameyou
direction
you want
to
the
cycle
to
lean
quickly,
press
on
the
inside
of
the
handgrip
in
the
same
direction
turn or serve. If you wish to turn right, push on the right handgrip. If you wish to turn
you
want on
to turn.
you wish This
to turn
to thethe
right,
press
on the
inside
of the away
right
left, push
the leftIfhandgrip.
causes
front
wheel
to turn
slightly
handgrip.
This causesinthe
frontyou
wheel
to to
move
slightly
the left
you and the
from the direction
which
wish
serve,
but to
leans
the as
motorcycle
in
the desiredcontinue
direction
to avoid
theThe
obstacle.
motorcycle
straight
ahead.
result is a lean to the right. As the motorcycle
lean, youiswill
the handlebars
directiontoit be
is leaning.
It
NOTE:begins
Pushtosteering
notturn
intuitive
– it must inbethe
practiced
effective.
will
happen
automatically
as
you
try
to
keep
the
motorcycle
from
falling
over.
You
you MUST deliberately think “turn left – push left” and “turn right – push
should
practicetime
making
so you’ll be able
to are
make
in an
right” EVERY
youquick
steer turns
your motorcycle
if you
to them
develop
theemernecgency.
essary skill and ability to take quick avoidance action – without having to
think about how to turn the machine.
To avoid some problems, it may be necessary to brake and turn at the same time.
After you
have
your
turntime
around
the obstacle,
andUse
to
Slowing
down
as completed
you turn gives
youserve
a littleormore
to complete
the turn.
avoid any further problems, it may be necessary to slow down or stop. It
very little of your rear brake. The rear wheel tends to skid in a sharp turn.
is very important that you avoid braking and swerving at the same time!
Such an action may compound the problem by causing a skid. Always
ensure the
motorcycle is upright with the handlebars straight before brakSPEED
WOBBLES
ing aggressively. Remember: you should always be aware that breaking
If you develop a speed wobble, don’t brake. Hang on to the handlebars firmly but
and turning actions have an effect on traction – the amount of grip your
don’t try to stop the wobble. Gradually release the throttle and pull off the road as
tires have with the road surface.
soon as you can. Check for unequal tire inflation, bent or misaligned wheels,
SPEED WOBBLES
If you spokes,
develop loose
a speed
wobble,ordon’t
brake. Hang
on to the
handlebars
firmly but
loose
bearings,
an improperly
mounted
windshield
or fairing.
All
don’t
trythings
to stopare
thetypical
wobble.
Gradually
release the throttle and pull off the road as
of
these
causes
of unsteadiness.
soon as you can. Check for unequal tire inflation, bent or misaligned wheels,
loose spokes, loose bearings, or an improperly mounted windshield or fairing. All
THROTTLE
of
these thingsSTICKS
are typical causes of unsteadiness.
If your throttle sticks, immediately squeeze the clutch lever. If you can’t correct
the problem, turn off the engine with the emergency “Killswitch”, and steer off the
THROTTLE
STICKS
road and brake
to a stop.
If your throttle sticks, immediately squeeze the clutch lever. If you can’t correct
the problem, turn off the engine with the emergency “Killswitch”, and steer off the
STAYand
IN brake
YOURtoOWN
LANE IN AN EMERGENCY
road
a stop.
The moment you change lanes, you risk being hit by a vehicle. You should be able
to squeeze by most obstacles without leaving your lane. This is one time when the
STAY
OWN LANE
IN ANfavour.
EMERGENCY
size ofINtheYOUR
motorcycle
is in your
Even if the obstacle is a car, there is
The
moment
youtochange
lanes, youit.risk
beinglanes
hit by
a vehicle.
You enough
should be
able
generally
room
move alongside
Change
only
if you have
time
to
to
squeeze
by
most
obstacles
without
leaving
your
lane.
This
is
one
time
when
the
make sure there are no vehicles in the other lane. Above all, during any emersize
the motorcycle
in your
favour.what
Evenyouif have
the obstacle
is a car,
there
is
gencyofsituation
stay calmisand
remember
learned during
your
traingenerally
room tosessions.
move alongside it. Change lanes only if you have enough time to
ing and practice
make sure there are no vehicles in the other lane. Above all, during any emerMost accidents
involving
dueyou
to carelessness
otheryour
drivers,
so
gency
situation stay
calm motorcyclists
and rememberarewhat
have learnedofduring
trainbe extremely
careful
and keep visible at all times.
ing
and practice
sessions.
Most accidents involving motorcyclists are due to carelessness of other drivers, so
be extremely careful and keep visible at all times.
If a car is coming at you in your lane,
Brake! Ride toward the right shoulder of the road – never to the left.
If there is time, flash your light, use
your horn.
Ride off the road if necessary.
87
Passengers
Once you are licenced, you may wish to carry a passenger on your motorcycle. You
should not consider carrying passengers until you have become comfortable driving your motorcycle. Carrying a passenger changes everything: steering, acceleration, braking, and balance. Generally, when carrying a passenger you’ll need to
ride more slowly, and slow down sooner for stops and curves. Allow more room in
traffic. Remember, you are legally responsible for your passenger’s welfare.
Adjust the angle of the headlight.
88
Make sure your bike is ready
and built for carrying another
person. You’ll need to check the
owner’s manual. Add the
specified amount of air
pressure to the tires.
You must have a proper seat and foot pegs that allow the passenger to sit
behind you without moving you from your normal position.
Only you, and not your passenger, should make hand signals.
Sudden movement can cause a change of direction.
The passenger should always move when you do:
Leaning forward when you accelerate, back when
you slow down, and with you, when you are taking a
corner.
Make sure your passenger wears
protection gear similar to your own.
The person behind you should sit
as far forward as possible
without crowding you, and hang
on securely to your waist or hips.
Make sure your passenger
understands that they must sit
still.
Adjust the shock absorbers, check
the slack in the drive chain.
Both of the passenger’s feet should always be on the pegs, even when
you’re stopped. Hot pipes and mufflers are a major hazard.
Blow Outs
If the rear tire blows, maintain your position on the machine. Don’t brake – ease
off the throttle instead.
89
If a front tire blows, hang on firmly and
try to steer straight and shift your weight
to the rear.
When you’ve slowed enough, move to the right side of the road.
OBTAINING A NEWFOUNDLAND AND LABRADOR
MOTORCYCLE LICENCE
To get a motorcycle licence in our province you must be a minimum of 16 years of
age (with parental approval). You are required to pass a motorcycle balance test
maneuver, written test, a sign test, a vision test and a road test in traffic.
• weaving (riding in a weaving pattern through a pylon course)
• straight line balance (riding as slowly as you can through a pylon course)
• stopping quickly (stopping the motorcycle as quickly as possible without skidding the wheels)
The skills for motorcycling require a lot of practice. Before you go out on the street
with other traffic, there are certain basic skills needed for your safety.
LEARNING TO DRIVE A MOTORCYCLE
MOTORCYCLE BALANCE TEST MANEUVER
After you successfully complete the balance, written and vision test you will be
issued a Class 6 Level I licence. You will have to pay for your Level I and road test
fee.
When you report for this test you should have:
90
•
•
•
•
•
clothing that covers your entire body – reflectionized if possible
an approved helmet and eye protection
your motorcycle – with no defects
proof of insurance (pink liability card)
motorcycle registration permit
The test will consist of these maneuvers:
As a Level I motorcycle operater , you will be restricted to these conditions while
learning:
• Accompanied by a licenced motorcycle driver with 4 years driving experience, on
another motorcycle or in a motor vehicle.
• Novice driver must have a BAC of 0 mg % and accompanying driver cannot exceed
50 mg % BAC
• Passenger NOT permitted
• operating the controls (being able to designate any of the major-minor operating controls)
• No upgrade to commercial class
• controlling the engine (starting and shutting down the engine during the test)
• Not permitted to drive after darkness (one half hour before sunset to one half hour
after sunrise
• upshifting/downshifting (changing gears while riding)
• Not permitted on highways where posted speed limit exceeds 80 KM/H
ROAD TEST
After you successfully complete the motorcycle balance test maneuver, you will be
required to undergo a written and vision test followed by a road test in traffic,
accompanied by a driver examiner. This test will demonstrate your knowledge of
the rules of the road, traffic, signals and your driving ability. Once you have passed
this final test you will be licenced as a Class 6 Level II driver.
GENERAL COMMENTS
• All motorcycle riders must be aware that riding a motorcycle carries with it a
greater risk than driving in your four-wheeled vehicle due to a number of factors,
including your visibility to other drivers, the size and weight of your motorcycle,
road conditions, weather conditions, your skill level, etc. You MUST be fully aware
of your surroundings and practice good proactive riding principles to stay safe.
• ALWAYS do a complete “head check” (i.e. look carefully ahead and to both sides)
of your surroundings before you move off from a stop.
• ALWAYS do a “shoulder check” (i.e. look carefully over your shoulder in the
direction of your intended turn) on every occasion immediately before you
change a lane or lane position, or before you turn off the road you are travelling
on.
• ALWAYS do a quick mirror and head check every time you stop. Check your mirrors every 5 seconds.
• You MUST actually turn your head and look carefully for this proactive and defensive technique to be effective. Head checks, shoulder checks and mirror checks
can save your life.
• Be aware that the contact patch of your two tires with the road surface is approximately equal to the size of your two fists. This relationship with the road surface
may be affected by a variety of factors, including weather conditions, road surface
conditions, your skill level, the condition of your motorcycle tires, tire pressures,
etc.
• The amount of grip that your tires have with the road surface is called “traction”
and is variable, depending on the factors listed above, and is further affected by
the ABC's of riding: accelerating, braking and cornering (or turning). There is
only so much traction available – use it wisely.
• In order to ensure that the risks of riding a motorcycle are minimized to the
extend possible (they can never be eliminated), you should always wear the proper protective riding gear and practice good, safe riding principles.
• Be familiar with every aspect of your machine and check it over carefully before
riding. Know what is in your motorcycle owner's manual, and follow the recommendations it contains.
• Participate in motorcycle training courses whenever you get an opportunity. You
are never too old to learn!
• Ride smart! Ride safe!
91
With the escalating costs of maintenance to vehicles today, it is little wonder that the owners in
the trucking industry wish to attain the best in low
cost efficiency from their vehicles. This goal can be
achieved through the driver. Drivers of commercial vehicles should have an extensive knowledge of
the operations of these expensive vehicles.
92
The Highway Traffic (Trip Inspection Report)
Regulations requires, as a part of the driver’s responsibilities, that the driver complete a pre-trip
inspection of his or her vehicle at the beginning of
each day.
The purpose of a “Pre-Trip Inspection” is to
eliminate costly repairs to the vehicle by conducting a visual inspection to detect minor defects and
ensure they are corrected before they develop into
major problems. This can save the owner hundreds
of dollars in maintenance.
Information
for the
Commercial
Driver
To keep in line with the trucking industry to produce
more conscientious drivers, the Department of Government Services has implemented a comprehensive test for
commercial drivers wishing to obtain a Class 01, 02 or 03
driver’s licence.
Before applying for a commercial driver’s licence the
applicant must submit a medical form to the department
stating that he or she has passed a physical examination
by a physician. Upon submitting the medical form the applicant must then undergo a written commercial and sign
test along with a vision test. An air brake endorsement is
required for vehicles equipped with air brakes (Class 09).
Upon successfully completing the written and vision
tests the applicant is issued a permit authorizing him or
her to receive instruction from a licenced commercial
driver for the class of licence desired.
When the driver has received sufficient instruction he
or she must make arrangements, by appointment, for a
road test. It is important that every applicant wishing to obtain a commercial
driver’s license for Class 01 or 03 have the skills and knowledge to pass the following aspects of this road test:
c.
iii. Power steering
iv. Windshield wash
Check front suspension for excessive wear (i.e. springs, u-bolts, tie rods).
1. Pre-trip Inspection
2. Reverse 90 degree angle parking
3. Uncoupling and coupling (Class 01)
4. Road test in traffic
The following information is a summary of a road test which the applicant must
successfully complete.
PRE-TRIP INSPECTION
Before starting a trip the driver should always conduct a visual inspection of
his or her vehicle. By following three basic steps the driver checks under the
hood, around the vehicle, and checks in the cab.
1. Under the hood:
a. Check hoses and belts for cracks and excessive wear.
b. Check fluid levels:
i. Coolant
ii. Oil
2. Walk around vehicle:
a.
b.
c.
d.
e.
f.
g.
h.
Check left body, tires and wheels;
Check left body, marker lights;
Check tail, brake, and signal lights at rear; check doors or tail gate;
Check right body, tires and wheels;
Check right body, marker lights;
Check headlights, park and signal lights at front;
Check air valves and glad hands: and
Check 5th wheel to ensure jaws are closed around the trailer pin.
3. In the cab:
a.
b.
c.
d.
Check seat and mirror adjustments;
Check gauges in instrument panel;
Check horn;
Check tell tale lamps (indicators).
93
BACKING
The driver is always responsible when backing. All drivers can reduce backing accidents if they use a guide whenever possible. The guide should stand
where there is a clear, continuous view of the backing path the vehicle will follow. The guide must be visible to the driver throughout the maneuver.
The reverse 90 degree angle parking requires the driver to safely back up to
a loading dock. Two attempts are allowed in this portion of the test.
7. Dismount tractor in safe manner and pull the 5th wheel lock handle into
“open” position.
8. Release park brake, pull ahead until the trailer apron slips to the lower part of
the 5th wheel. Stop and apply tractor parking brake.
9. Check landing gear to make sure the ground is firm enough to support the
weight.
10. Pull tractor ahead one tractor length and apply parking brake.
UNCOUPLING AND COUPLING
Coupling
Uncoupling
94
1. Apply tractor parking brake and pull out tractor protection valve.
2. Place chock blocks under trailer wheels.
3. Check ground surface (level and solid).
4. Crank trailer landing gear down until it contacts the ground. Shift handle to
“low” gear and crank until the landing gear takes part of the trailer weight.
(Leave handle in “low” gear).
5. Climb up on rear of tractor in safe manner.
6. Disconnect air lines and light cord in logical order and secure them on
dummy couplers. Emergency line first.
1. Release tractor parking brake and back the tractor slowly so the 5th wheel
throat is in direct line with the kingpin under the front of the trailer. This is best
done by aligning the tractor drive wheels with the side of the trailer while looking
in the side mirrors.
2. Stop, just before the 5th wheel makes contact with the front of the trailer.
Apply tractor parking brake.
3. While standing alongside the tractor drive wheels, check the height of the
trailer and raise or lower it as necessary. Check to see if jaws are open and that the
pin is lined up with the 5th wheel. Do this from underneath and behind the tractor.
4. Proceed to rear of trailer and check that chock blocks are in place. Check
behind the trailer to make sure there is nothing in the way, should the trailer
accidentally roll back during coupling.
11. Remove wheel chocks, return to driver’s seat and advise your examiner that
coupling procedure is complete.
5. Connect air lines and light cord in logical order (usually emergency line first).
Align hose couplers with trailer glad hands so that they look straight. Align light
cord with the trailer socket so that the raised area fits into the socket, without
forcing.
ROAD TEST IN TRAFFIC
6. Re-enter tractor cab, activate hand control valve, depress tractor protection
valve and, with your head out the window or door, listen for air exhausting at the
rear of the trailer. (This is to determine if the air lines are hooked up in the right
order.) Pull hand control level down and hold it there to secure trailer brakes.
i.
Call out air pressure (minimum 100 P.S.I. for coupling).
ii. Release tractor park brake.
7. Back under trailer so that 5th wheel jaw locks firmly around kingpin. Test the
coupling by gently pulling the tractor forward.
8. Apply tractor parking brake. Release hand control valve.
9. Check and double check front and rear of 5th wheel to determine that the
jaws are properly closed around the kingpin and that the safety lock or latch is in
place.
10. Crank up trailer landing gear, reverse handle one full turn, and secure handle
on hanger strap in position.
The road test will consist of a number of traffic situations, traffic lights, left
and right turns, and lane changes. Class 02 and 04 drivers are required to stop at
all Railway Crossings a distance of 5 meters from the nearest rail. The examiner
will keep a watchful eye on ability to negotiate this large vehicle through traffic, on
transmission shifting and on general knowledge of the rules of the road.
The examiner will record your faults during the test and inform you of any
mistakes at end of the test. The examiner will not discuss your test while the test
is in progress.
The safety with which you operate as a commercial driver depends entirely
on you. Remember that the driver is solely responsible for his or her actions.
With this in mind you can make our highways a safer place upon which to drive.
VEHICLE DIMENSIONS
Commercial vehicles are limited to height, width, length and weight in accordance with the Newfoundland and Labrador Highway Traffic Act. Special Permits
may be issued for vehicles carrying oversize or overwidth loads. Regardless of
licencing or permits issued, you must obey all posted signs which restrict the
dimensions or weight of loads on any portion of the highway.
95
The maximum legal height of a vehicle on highways is 4.15 meters.
used on most manual shift truck transmissions. Shifting is faster and smoother
when you use this double-clutch procedure.
The maximum legal width of a vehicle and its load is 2.6 meters.
The legal lengths of vehicles vary according to the type of vehicle. In Newfoundland and Labrador the maximum vehicle lengths are:
•
•
•
•
96
single unit vehicle…12.5 meters
semi-trailer including load, tractor…23 meters
combination including truck or car pulling trailer…23 meters
intercity bus…14.0 meters
Commercial vehicles are licenced in Newfoundland and Labrador in accordance
with their gross vehicle weight (G.V.W.). This weight is the combined weight of the
vehicle and its load. The maximum allowable G.V.W is determined by such factors
as the number of axles, the spacing of the axles, size of tires, etc.
SHIFTING GEARS
It is important for drivers to be alert to changing conditions that may require you
to reduce speed and shift to lower gear.
For dangerous downgrades, gears should be down-shifted at the top of the hill
before entering the grade to make use of engine braking.
Double-clutching (depressing the clutch twice with each change of gears) must be
KNOWLEDGE OF AIR BRAKES
Air Brake manuals are available from all Driver Examination Offices.
TRANSPORTATION OF DANGEROUS GOODS
Drivers of vehicles transporting any class of Dangerous Goods (i.e.: explosives,
compressed gases, flammable and combustible liquids, flammable solids, oxidizing substances, poisonous and infectious substances, radioactive materials,
corrosives and hazardous waste materials) must be in possession of proper documentation and a Certificate of Training issued by the employer.
The Certificate of Training is valid for a period of 36 months.
Drivers must be aware of the necessary safety requirements regarding the packaging, loading, unloading and transporting of dangerous goods, as well as the
displaying of proper safety makers. (For instance, a tractor trailer carrying a load
of propane is required to have dangerous goods placards on the front, rear and
both sides of the trailer.)
RIGHT TURNS
All right turns must be started from the right lane as close to the right side of the
street or road as possible.


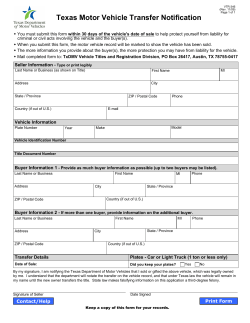

© Copyright 2026