
ALLEN EDMONDS SHOE FIT GUIDE
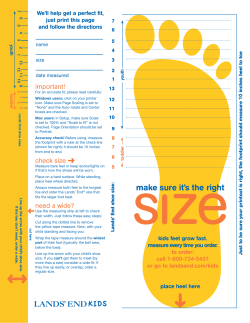
ALLEN EDMONDS SHOE FIT GUIDE
HOW TO GET THE PROPER FITTING SHOES
To get a truly professional fitting, we recommend visiting an Allen Edmonds Master Fitter at any one of our retail stores. However, if an Allen Edmonds store is not located
near you, this Shoe Fit Guide is designed to help ensure your Allen Edmonds shoes are the best possible fit. Follow each of these step-by-step instructions to get an accurate
measurement for your feet and a comfortable experience with your new shoes. You may use this in conjunction with the Interactive Fit Guide.
TIP #1: MEASURE AT A TIME THAT FITS
TIP #4: GET SOMEONE TO HELP YOU
Feet tend to swell in different circumstances and at different times of the day. We
suggest you measure your feet during the midday or late afternoon after you have
been on your feet for some time.
TIP #2: WEAR SOCKS WHEN MEASURING
You need to have a friend help you take the measurements because if you were to
try to take your measurements yourself, when bending down to mark your length
and width, your sizing would be affected. Make sure your friend takes your
measurements looking straight down at the Shoe Fit Guide. Even viewing it at a
slight angle may affect the outcome.
Wear the type of socks that you’ll likely be wearing with your new shoes, as the
thickness of the socks may affect your measurements.
TIP #5: GIVE YOURSELF A BIT OF ROOM
TIP #3: STAND STRAIGHT AND BALANCED
If your measurement is on a length line, we recommend you go to the next halfsize longer in order to give your toes a bit of room.
When you do the measuring, be sure both feet are on the ground and you’re
balanced and straight to get the proper foot placement.
TIP #6: ONE FOOT LARGER IS COMMON
Almost everyone has one foot larger than the other. The key is to determine your
size from the measurement of the larger of your two feet. And obviously, be sure
to measure both feet.
LEFT FOOT W-ZONES
RIGHT FOOT W-ZONES
16
HEEL-TO-TOE
MEASUREMENT
W1 W2 W3 W4 W5 W6 W7 W8 W9 WA WB WC WD
16
15
15
14
14
13
13
12
12
11
11
10
10
9
9
8
8
7
7
6
6
5
5
4
4
A
FOR EASY ALIGNMENT FOLD ALONG DOTTED LINE AND ALIGN A WITH A TO FORM A CIRCLE
INSIDE EDGE OF LEFT FOOT
INSIDE EDGE OF RIGHT FOOT
WD WC WB WA W9 W8 W7 W6 W5 W4 W3 W2 W1
B
FOR EASY ALIGNMENT FOLD ALONG DOTTED LINE AND ALIGN B WITH B TO FORM A CIRCLE
PAGE 1
A
2
B
W1 W2 W3 W4 W5 W6 W7 W8 W9 WA WB WC WD
WD WC WB WA W9 W8 W7 W6 W5 W4 W3 W2 W1
ALIGN
Align the semi-circle A’s and B’s from Page 1 and Page 2
to form a complete circle, and the two parts of the
Shoe Fit Guide align properly. When the circles
are complete, all of the vertical lines should
also align. Tape the sheets together.
1
A
A
CONFIRM
To ensure that this Shoe Fit Guide is accurate,
this area should be the same size as a credit card.
If not, please be sure that any PAGE SCALING
is turned off in your Page Setup or Printer
Settings. This output must be at 100% in order
to achieve an accurate measurement of your foot.
TIP
FOLD PAGE 1 BACK
ALONG DOTTED
LINE TO MAKE
ALIGNMENT EASIER
16
16
15
15
14
13
12
14
13
12
11
11
10
10
9
9
8
8
7
7
6
6
5
5
4
4
LENGTH
Stand with your back against the door
and have someone measure your feet
and mark where your toes end. Be sure
they view straight down from above
the foot.
LEFT FOOT INSTEP LINE
RIGHT FOOT INSTEP LINE
2-1/8” x 3-3/8”
5
A
FOLD
Fold up along the line to form the vertical
panel and place flat against a closed door.
3
FOLD ALONG DOTTED LINE TO FORM VERTICAL PANEL
B
W-ZONES
4
PLACE
With your socks on, step onto
measuring guide and make sure
your heel is against the door.
PLACE HEEL AGAINST DOOR
6
INSIDE
FOOT LINE
WIDTH
Align the inside edge of your foot
with the appropriate line. Find
the area where the outside of your
foot falls. Follow this area to the
W-Zones (W1, W2, W3, etc.) at
the top. On the Conversion Chart
page, find the row with your
length and the column with your
corresponding W-Zone. The
intersection of the row and
column is your recommended
shoe width.
FOLD ALONG DOTTED LINE TO FORM VERTICAL PANEL
PAGE 2
ALLEN EDMONDS SHOE FIT GUIDE
CONVERSION CHARTS
Use the Length Chart if you need to convert your shoe size to an international size, or vice versa. To determine your shoe width, use the Width Chart to find the W-Zone
that corresponds to the area where the outside of your foot falls, then find your shoe length. Follow the respective row and column to find your shoe width. Should your
foot fall on the line between two areas, use the lower W-Zone if you have a thinner foot, or the higher W-Zone if you have a wider foot.
LENGTH CHART
U.S .
E.U.
U.K.
6
39
5.5
6 .5
39.5
6
7
40
6 .5
7 .5
41
7
8
41.5
7 .5
8.5
42
8
9
43
8 .5
9 .5
43.5
9
10
44
9 .5
10 .5
44.5
10
11
45
1 0.5
11.5
4 5. 5
11
12
46
11.5
12.5
46.5
12
13
47
1 2 .5
14
48
13
15
49
16
16
50
17
WIDTH CHART
SHOE LENGTH
6
W-ZONES
W1
W2
W3
W4
W5
W6
W7
W8
W9
2A
A
B
C
D
E
E
2E
3E
WA
6.5
2A
A
B
C
D
D
E
E
2E
3E
7
2A
A
B
B
C
D
E
E
2E
3E
WB
7.5
2A
A
B
B
C
D
D
E
E
2E
3E
8
2A
A
B
B
C
D
D
E
E
2E
3E
8.5
3A
2A
A
B
B
C
D
E
E
2E
3E
9
3A
2A
A
B
B
C
D
E
E
2E
3E
9.5
3A
2A
A
B
B
C
D
E
E
2E
3E
WC
WD
10
3A
2A
A
B
B
C
D
E
E
2E
3E
10.5
3A
2A
A
B
B
C
D
D
E
E
3E
3E
11
3A
2A
A
B
B
C
C
D
E
E
3E
3E
11.5
3A
2A
A
B
B
C
D
E
E
3E
3E
12
3A
2A
A
B
B
C
D
E
E
3E
3E
12.5
3A
2A
A
B
B
C
D
D
E
E
3E
13
3A
2A
A
B
B
C
D
E
3E
3E
14
3A
2A
A
B
B
C
D
D
E
3E
15
3A
3A
2A
A
B
B
C
D
E
3E
16
3A
3A
2A
A
B
B
C
D
E
3E
Note: The gray area (width D)
indicates a medium or standard
shoe width. 3A - C is considered
narrow width, while E - 3E is
considered wide width.
PAGE 3


© Copyright 2026