
– STEP BY STEP WRITING A Research PAPER 1.
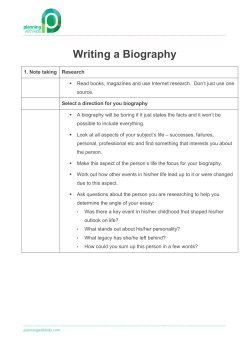
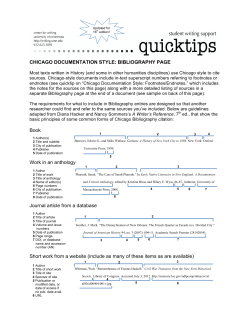
WRITING A Research PAPER – STEP BY STEP
There are two kinds of papers you may be asked to write:
1. A SURVEY or REPORT– a review of what others have written about a topic. You are not
2.
asked to present your arguments, but to summarize the arguments of others.
An ARGUMENT or RESEARCH paper– you are to review the material written about a
topic, draw your own conclusions and argue your point.
Many papers required in introductory courses are surveys or reports. Argument papers may be
required in upper-level courses.
STEP ONE – ORGANIZE TO BEGIN YOUR PROJECT – Begin as soon as the paper is
assigned!
Get a large manila envelope to keep your materials together. Label the envelope with your name,
the name of the course and the due date of your research paper. In this envelope, you will place
everything you create for your paper and other reference tools (copy of the exact assignment,
your style manual, lists of sources you find, 3 x 5 cards, rough draft, etc.).
Make a list of every step you will need to do to complete the paper. Beside each step, write the
target date for completion of that step. Start with the due date of your paper and move backward
on your calendar to set dates for completion of the steps. Allow more time than you think you will
need for each step, and plan to complete the paper a few days before the due date.
For example:
Task Target Completion Date
Hand in paper May 1
Final proofreading April 25
Complete final draft April 20
Edit rough draft April 15
Write rough draft April 10
Outline of paper April 5
Library research Month of March
Choose topic March 1
Organize materials February 27
Keep this list in your envelope or tape it to the outside. Check off each step as it is completed.
Notice that writing a paper takes time (this plan calls for approximately two months – not a few
days!), so start thinking about a research assignment as soon as it is assigned. Remember, this
process will have to be completed in addition to work in all your other classes.
STEP TWO – FAMILIARIZE YOURSELF WITH GOOD MODELS AND MAKE SURE YOU
UNDERSTAND THE ASSIGNMENT.
NOW is the time to ask questions if you don’t understand what you are being asked to do.
There’s nothing worse than working hard on a project and then finding out you’re on the wrong
track. Is your paper supposed to be a survey or report, or an argument? How long does the paper
need to be? Are a minimum number of sources required? What style manual is to be used? If this
information is not spelled out in the assignment, ASK ! If you don’t know what a good research
paper should look like, ask your professor where you can go to read examples of good papers.
STEP THREE - CHOOSE YOUR TOPIC (if you have a choice) AND WRITE YOUR PURPOSE
OR THESIS STATEMENT.
A mistake student researchers sometimes make is choosing a topic that is too broad. Choose a
general area that interests you, for example, Natural Disasters. Now, narrow the topic several
times:
Natural Disasters
Earthquakes
Predicting Earthquakes
Scientific Advances in Earthquake Prediction
*Use of Computer Simulations in Predicting Earthquakes
Another example of narrowing your topic:
Vitamins
Vitamin C
Value of Vitamin C to the body
*Effectiveness of Vitamin C in fighting colds
Keep your list – if you’ve chosen a topic that’s TOO narrow or obscure, you may want to back up
a step to find more information. If you’re not sure you’ve chosen a good topic, ask your
professor’s opinion.
Next, write your PURPOSE STATEMENT or THESIS STATEMENT.
If you are writing a survey or report, you will need a purpose statement – a statement that says
what the paper will explore or report on. (Ex: "The purpose of this report is to identify and explain
the four methods of AIDS testing which are most commonly used.")
If you are doing a research/argument paper, you will need a thesis statement – a statement which
makes a debatable claim which your research will either prove or disprove. (Ex: "Taking Vitamin
B6 in controlled amounts can significantly increase the overall performance of marathon
runners.")
Use your purpose statement or thesis statement as a "bull’s eye" – make sure every paragraph
you write relates to your thesis. This will help you avoid wandering off topic and including
irrelevant information.
STEP FOUR – EXPLORE YOUR TOPIC: PLAN YOUR SEARCH FOR INFORMATION.
Make a list of topics/keywords you will use in your search for information. They can be used in an
internet search, or in a computerized card catalog in the library.
Ex: earthquake (keyword search)
earthquake + prediction (Boolean search – some Boolean searches use
earthquake + technology AND, OR or NOT instead of + .)
earthquake + computer
earthquake + simulation
A keyword search is very broad. The keyword "earthquake" may lead you to some good
information, but you may also have to sift through hundreds of useless sites. A Boolean search
will produce fewer sites, but they’ll be more relevant to your topic.
Don’t forget that you can also conduct your own research on certain topics. For instance, you
might interview people knowledgeable in your field, or design and administer a survey.
STEP FIVE – PREPARE FOR DOCUMENTATION: START YOUR SEARCH
Where can you look for information?
Books - do a search in the library’s on-line catalog
Periodicals - the Reader’s Guide to Periodical Literature lists by author and subject all the articles
that appeared in several dozen journals and magazines during a given year. Magazines are
bound by year and located in the library stacks.
General Encyclopedias - (Britannica, Americana, World Book, etc.) will probably not be detailed
enough to use as main sources, but if you need general background information on your topic,
they could be helpful.
Specialized Encyclopedias - (Dictionary of American History, Encyclopedia of Psychology,
Encyclopedia of World Cultures, etc.) dozens of these encyclopedias cover their fields in much
greater depth than a general encyclopedia. If you don’t know if there’s one for your particular
field, ask a reference librarian, or do an internet search, using keywords encyclopedia or
dictionary.
Biographical Dictionaries – (Current Biography, Dictionary of American Biography, Who’s Who in
Economics, etc.) – contain brief accounts of lives and accomplishments of well-known people.
Almanacs - (World Almanac and Book of Facts, Statistical Abstract of the United States, etc.) give
facts and statistics that will help you substantiate your claims. Can be very valuable sources.
Internet- use a search engine like Yahoo or Excite.
*A word about Internet sources: Be selective about internet sources you use. Anyone can post
anything on a website – the information may or may not be accurate. In general, go with sites of
established agencies or groups. For instance, in looking for information on earthquakes, assume
the US Geological Survey’s site would have more reliable information than "Joe’s Earthquake
Page."
Here are some questions to ask yourself when evaluating the reliability of internet sites:
Is the information primary or secondary? Is it a researcher’s report of his/her findings, or
is it a newsgroup discussion of the information?
Who is the author of the page? Is contact information provided? If not, be suspicious.
How well written is the page? Does it look and sound professional?
When the page was last updated? If it doesn’t say, you don’t know how recent the
information is.
Can you verify the information in other sources?
Is there reason to believe the information may be biased? Is the page giving information
on the effectiveness or safety of a drug sponsored by the company that manufactures
that drug?
Keep a list of books and periodicals that look promising and where you found them in the library
(name, author, call number, etc.) Also keep a list of good web sites you find. You may stumble
upon a great site by following links from other pages, and then forget how you got to it. Having
the web address written down saves you a LOT of time and frustration.
THIS LIST IS YOUR WORKING BIBLIOGRAPHY, the sources you intend to consult, and it can
easily be done on computer. List these sources in the proper bibliography style suggested by
your style manual. The list can then easily be edited to become your final bibliography.
Look for the most recent sources you can find. Most research uses a combination of primary and
secondary sources.
Primary research – the researcher gathers facts by going directly to the source itself.
A science researcher might set up her own experiment.
A history researcher might go directly to courthouse documents, or letters.
An archaeology researcher might go directly to a dig site.
Secondary research – the researcher reads about the work that has been done by others in the
field.
Combination – a psychology researcher might read about experiments done by others, then set
up his own experiment.
Don’t hesitate to ask a reference librarian for help if:
You’ve looked but you can’t find enough information about your topic;
You have sources, but you don’t know how to locate them in the library (bound periodicals,
microfilm, etc.)
STEP SIX – COLLECT YOUR INFORMATION: TAKE NOTES FROM YOUR SOURCES.
Use index cards. On the top of each card you make for each source, put the bibliography entry
information in the correct form OR put a number that will link it to the correct source in your
working bibliography. Consult your style manual to see how to do entries for books, periodicals,
websites, etc. Put only one piece of information on each card, and include the page number from
the source. Keep cards from the same source together (for now).
Notetaking does not involve copying! It involves reading, selecting, interpreting, summarizing,
paraphrasing. Paraphrasing means summarizing information you’ve read, not just changing a few
words.
Caution: Any direct quote MUST be put in quotation marks and cited in your paper, in an end
note or footnote. Paraphrased information must also be cited. If you don’t give proper credit for
the thoughts or direct words of others, it’s PLAGARISM.
STEP SEVEN – OUTLINE YOUR INFORMATION. DON’T SKIP THIS STEP!
An outline is a PLAN, and having a plan before you begin will make writing much easier and keep
you focused. A skeleton outline might look like this:
Introduction
Background Information
Purpose or Thesis Statement
Body
Point 1 (beginning the proof of the thesis)
Supporting evidence
Point 2 (building on the first point and continuing the proof)
Supporting evidence
Point 3 (building on first two points and continuing the proof)
Supporting evidence
Conclusion
Restatement of the Purpose or Thesis
Statement of Implications or Call to Action
Lay out your 3 x 5 cards and group them into piles according to the sections of your outline.
STEP EIGHT – COLLECT MORE INFORMATION OR BEGIN WRITING
Do you have enough information to begin writing, or do you need another trip to the library?
STEP NINE – WRITE FROM YOUR NOTECARDS.
Don’t wait for inspiration - just start writing (typing). Once your fingers are engaged in the
process, your brain will follow. Take each group of cards in order and write. Include the citations
of your sources as you go, whether at the end of sentences (parenthetical citations) or as
footnotes at the bottom of the page (which will depend on your professor and your style manual.)
Word 97 has a feature which allows you to insert these very easily (Insert. . . Footnote). Double
space your rough draft. When you’ve gotten through all your cards and added a conclusion, print
out a hard copy and save your work on your computer.
Can’t get past that big, blank screen? Some students find that they can talk about their topic more
easily than they can write. Try dictating into a tape recorder, then play the tape and transcribe it
into your computer. Now you have something on paper to work with.
STEP TEN – EDIT YOUR ROUGH DRAFT.
Wait 24 hours. Then read through the hard copy of your rough draft ALOUD. Reading aloud helps
you catch grammatical errors and identify incomplete or awkward sentences. Ask yourself:
Does my introduction grab the reader’s attention?
Is my thesis clear?
Does every point relate to my purpose or thesis statement?
Are my points arranged in a logical order?
Do I have enough supporting evidence for each point?
Have I given credit for the direct words or ideas of others?
Does my conclusion tie everything together?
As you go through your rough draft, make corrections, reword, and identify points that are weak.
If there are weak points, a trip back to the library for more supporting information may be
necessary.
Watch for things such as good transition sentences when going from one thought to another,
consistency in verb tenses, etc. Don’t use slang expressions and, unless the assignment
specifically asks for your opinion, don’t use "I think" or "in my opinion."
STEP ELEVEN – COMPLETE YOUR FINAL DRAFT AND BIBLIOGRAPHY.
Make sure you’ve made the corrections you caught as you read your rough draft, added new
information, reworded sentences, etc. Use Spell check and Grammar check tools on your
computer.
All the sources you used should already have entries in correct bibliography form on your 3 x 5
cards – just alphabetize them on a separate page for your final bibliography. If you kept your
working bibliography on computer it will be easy to delete sources you didn’t use and alphabetize
the rest. Also do a cover page, and anything else required for your paper at this point.
STEP TWELVE – PROOFREAD YOUR FINAL COPY.
Do a final proofread to make sure your paper is perfect. Caution: Spell check and Grammar
check tools on your computer should be used, but do not rely on them to catch every error – they
won’t! There is no substitute for proofreading. Consider having a friend read your paper –
someone else may be able to catch mistakes you didn’t.
STEP THIRTEEN – DUPLICATE A COPY FOR YOUR FILES.
Print two perfect copies of your paper – one to hand in and one to keep. Keep the paper saved on
your computer until the course is finished.
WHEN YOU GET YOUR PAPER BACK. . .
If you received a good grade, celebrate!
If your grade is not what you’d hoped for, make an appointment to see your professor. Ask for
suggestions as to what you could have done to make it a better paper. Remember that learning to
write takes practice. The more you write, the better you’ll get!


© Copyright 2026