
CARE & MAINTENANCE Aluminum Windows & Patio Doors (JCM001)
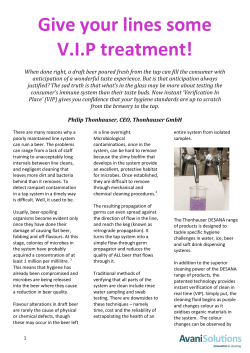
CARE & MAINTENANCE Aluminum Windows & Patio Doors (JCM001) Caring for your aluminum windows and patio doors will save time and money. Proper maintenance requires periodic tasks to maintain long life, smooth operation, and warranty coverage. Regular inspections and minor maintenance are the best ways to keep these products in good condition. Do-It-Yourself Technician INTRODUCTION This guide provides important information that will help to keep aluminum windows and patio doors looking beautiful and operating smoothly for many years. It is necessary to take some time every year to clean and inspect your aluminum windows and patio doors for damage. TABLE OF CONTENTS CONTACT US Precautions and Safety. . . . . . . . . . . . . . . . . . . . . . . . . . . . . . . 2 Needed Materials & Tools . . . . . . . . . . . . . . . . . . . . . . . . . . . . 2 Basic Inspections & Maintenance. . . . . . . . . . . . . . . . . . . . . . . 2 Cleaning Glass & Aluminum Surfaces . . . . . . . . . . . . . . . . . . . 4 Hardware Cleaning & Lubrication. . . . . . . . . . . . . . . . . . . . . . 5 Glossary. . . . . . . . . . . . . . . . . . . . . . . . . . . . . . . . . . . . . . . . . . . 7 Inspection Checklist . . . . . . . . . . . . . . . . . . . . . . . . . . . . . . . . . 8 For questions, feel free to contact us by phone or email: • Email: [email protected] • Phone: 1-(800)-JELD-WEN/1-(800)-535-3936 WINDOW & PATIO DOOR PARTS Top Rail Top Rail Head Jamb Grille Frame Head Jamb Lite Upper Sash Side Jamb Operating Panel Check/Meeting Stile Sash Lock Check/ Meeting Rail Side Jamb Stationary Panel Lower Sash Stile Glazing/Glass Bottom Rail Sill Sill Bottom Rail The advice offered herein can be done by a homeowner with some mechanical aptitude. If you are unsure, it is recommended that you hire a trained service provider such as a competent and licensed construction contractor or building professional. JELD-WEN disclaims any and all liability associated with the use and/or provision of these instructions. Any reliance upon the information or advice is at the risk of the party so relying. The information contained herein may be changed from time to time without notification. © 2009, JELD-WEN, inc. | JELD-WEN, the JW icon and Reliability for real life are registered trademarks of JELD-WEN, inc., Oregon USA. All other trademarks are the property of their respective owners. 1 (10/09) PRECAUTIONS, SAFETY & CLEANING RECOMMENDATIONS PRECAUTIONS & SAFETY • Window insect screens are not security devices and will not prevent a child or anyone from falling through. • Never mix cleaners or solvents. This may be dangerous as well as ineffective. • Use help when working with a large window sash or patio door panel to avoid injury. • Use proper/safe equipment and precautions when cleaning and servicing the exterior side of windows above ground level. • If using commercial cleaning or finishing products or solvents, carefully read and follow safety instructions, warnings, cautions and disposal instructions on manufacturer’s labels. Wear appropriate safety gear (e.g. clothing, goggles, gloves) and provide plenty of ventilation. RECOMMENDATIONS • Do not power-wash windows or use a garden hose; this can cause seal failure and allow water to enter the structure. • When cleaning exterior, multi-story windows, begin with the upper story and work down. • Avoid using metal tools, razor blades, or other sharp objects and abrasive cleaners. They can damage window surfaces, scratch glass and remove exterior glass coatings. • Do not allow aggressive cleaners to come into contact with Aluminum surfaces. Immediately rinse and dry. • Do not allow cleaners to puddle or collect at glass edges near glazing materials. • Avoid cleaning in direct sunlight or in temperatures too hot or too cold. • Immediately clean spills. • Avoid excessive rubbing and over-cleaning. • Most solvents are flammable and/or toxic and must be handled with extreme care. Do not use near open flame, sparks, or electrical motors. • Do not scour. • Clean and rinse one area at a time. • Clean twice a year (monthly in coastal areas) or when dirty. • After-market tints and films are not recommended, as they may cause damage to the glass and/or sealant. NEEDED MATERIALS & TOOLS • Baby shampoo or mild soap and water or vinegar and water • Several clean, soft, non-abrasive, absorbent Chamois or lint-free dry cloths • Soft bristle brush • Spray bottle • Vacuum cleaner • Sponge • Appropriate solvent • Commercial glass cleaning products or solvents (for stubborn stains) • Plastic putty knife (for paint or label removal) • Plastic wrap (for label removal) • Spray silicone BASIC INSPECTIONS & MAINTENANCE INSECT SCREENS 1.Inspect screens for: • Cuts, scratches, or holes • Looseness 2.Replace or repair damaged screens. Contact a local supplier for repair or replacement information. Note! Screens may not be covered under manufacturer’s warranty. To be sure, ask your supplier or distributor. Cleaning 1.Remove screen and place screen into tub or shower if indoors; on lawn or hard surface if outdoors (avoid exposure to dirt). 2.Gently spray with water and brush lightly with soft bristle brush until clean (use gentle spray nozzle setting). For stubborn dirt, 1.Gently scrub with soft bristle brush with mild soap and water. 2.Rinse clean. 3.Reinstall screen when dry. 2 BASIC INSPECTIONS & MAINTENANCE – CONTINUED SASH/PANEL INSPECTION GUTTERS & OVERHANGS Inspect sash or patio door panel annually (monthly for coastal areas). If the window has a removable sash, it may be helpful to remove it before inspection. Gutters and overhangs protect windows and patio doors from excess water exposure. Clear at least once per year. • Inspect stiles and rails for damage. • Check glass for cracks. If cracked, call your local glass supplier for replacement. • For insulating glass units, look for moisture or fogging between glass panes (most likely to occur on cold mornings). This may be an indication of seal failure. Call us for recommendations. • Verify the sealant at the lower corners of the frame is intact. Repair as necessary with 100% silicone sealant. WEATHERSTRIP Inspecting and maintaining weatherstrip can help avoid costly structural damage from water leakage and energy loss due to air and/or water infiltration. Replace weatherstrip that is missing, torn, cracked, brittle, discolored, gummy, or that has no “bounce back” when pressed down. Call us for replacement instructions. Precautions • We recommend denatured alcohol for non water-soluble cleaning (for stubborn stains, lacquer thinner may be used in small amounts and only as directed). Other solvents such as mineral spirits or petroleum-based products may damage or dissolve weatherstrip. • When using alcohol, always test small area first to avoid product damage. WEEP SYSTEM Aluminum windows and patio doors are not subject to moisture damage; however, damage could develop in the structure around the unit if water does not drain properly from the sill area. Weep systems are designed to drain water to the exterior. If water does not drain quickly from the sill through the weep system, check the weep holes for blockage as follows: 1.Regularly clean sill track with vacuum or wipe thoroughly with damp cloth. 2.Pour small amount of water (1 cup) into interior sill track. If water drains through exterior weep holes or crevice, system is clear. If not, continue to Step 3 to clean. 3.Insert thin wire into the exterior weep hole in the frame. Do not insert the wire farther than necessary to clear the blockage because the insulating glass unit may become damaged. Call us if unsure. 4.Repeat step one until water runs clear to the exterior. If not successful, call a service technician. EXTERIOR SIDING JOINT 1.Clean with damp cloth or mild soap and water. A proper seal of the joint between the window and the exterior surface of the structure will provide a proper shield from the elements and will keep water and/or air from leaking into the home. 2.Rinse and dry thoroughly. Inspect sealant in the joint for: • Do not use anything sharp near weatherstrip. Light Cleaning 3.Repeat if necessary. • Cracks Non Water-Soluble Cleaning • Voids Clean with denatured alcohol on soft cloth. If denatured alcohol doesn’t work: • Deteriorating areas (e.g. loss of adhesion) 1.Clean with small amount lacquer thinner on soft cloth. Repair damaged sealant with a best quality sealant. 2.Repeat if necessary. Note! Do not apply sealant to areas where installer or contractor did not originally seal. Seek professional advice from an installer or contractor if unsure. 3.Clean with mild soap and water, then rinse. If unsuccessful, consider replacing weatherstrip. Repair If weatherstrip is loose or falling out of the kerf: 1.Carefully remove weatherstrip. 2.Apply thin bead of silicone sealant into kerf. 3.Reinstall weatherstrip. 4.Hold in place with tape for 24 hours. 5.Carefully remove tape. 3 When repairing a sealant joint, 100% silicone sealant is the most durable, but it cannot be painted. Use 100% polyurethane sealant if painted. Follow sealant manufacturer’s instructions for proper application. CLEANING GLASS SURFACES Some window sashes may be removed (horizontal slider), tilted in (tilt & side-load single-hung), or opened (casements without egress hinges) for easier access to the exterior surface. For specific details on sash removal, please refer to the appropriate product guide for your window at www.jeld-wen.com/resources. GENERAL CLEANING Prepare cleaning solution (1 tsp baby shampoo to one gallon of water or 1-1/2 cups vinegar to one gallon of water). PAINT REMOVAL 1.Soak dried latex paint drips with warm water and baby shampoo solution. 1.Rinse surface with clean water from top to bottom. 2.Wipe with damp cloth or sponge. 2.Clean with mild soap and water and sponge or soft brush with uniform pressure horizontally, then vertically. If needed, Note! Quickly rinse and dry any run-down. Don’t allow cleaning solutions to collect or puddle on surfaces, crevices, etc. 3.Promptly rinse thoroughly with clean water (sponging while rinsing may be helpful; do not allow cleaning solution to dry on the surface). 4.Wipe dry with lint-free, dry cloth. 5.If necessary, repeat steps above until clean. 6.Dry window frame and sill with separate cloth. STUBBORN STAIN REMOVAL For stubborn stains, commercial glass cleaning products may be necessary. • Apply small amount directly to the stain. Avoid spilling or dripping down the glass. • Some persistent stains may need higher strength cleaning solutions that contain active ingredient chemicals such as toluene, xylene, mineral spirits or naphtha. Special care must be taken when using these types of cleaners. 3.Scrape gently with plastic putty knife. Repeat soak and scrape. 4.Repeat if necessary. Note! For oil-based paint drips, consult local paint professional. LABEL REMOVAL Slowly peel from one corner. If label tears or sticks, moisten with soapy water and gently scrape with plastic putty knife. Stubborn labels can be soaked with soapy water and covered overnight with plastic wrap. Gently remove with plastic putty knife. MORE INFORMATION ON GLASS CLEANING • The Glass Association of North America (GANA): www.glasswebsite.com • Cardinal Glass Industries: www.cardinalcorp.com Note on Websites! Website content is subject to change and should be used for informational purposes only. JELD-WEN is not responsible for third-party information. • For oil and grease: try baking soda and water or washing soda and water. • Rinse thoroughly with clean water and dry. CLEANING ALUMINUM SURFACES Aluminum windows usually have either a “baked-on” enamel finish or an anodized protective finish. Inspect aluminum surfaces for scratches or cracks in the finish. Pay close attention to bare aluminum (edges and weep holes) and areas of no finish. Bare aluminum will oxidize over time. Oxidation is a natural occurrence that produces a coating that wipes off as a dark, metallic-looking residue. To remove oxidation: 1.Gently remove with fine scratch pad or steel wool; do not scratch finished surfaces. 2.Dust or vacuum residue and wipe clean with damp cloth. For optimum protection against oxidation, apply a coat of high quality car wax over the enamel or anodized finish. To clean finished or coated (e.g. anodized) aluminum surfaces: 1.Wipe with sponge and water. 2.Dry with soft cloth. If soil adheres: 1.Sponge or lightly brush with mild soapy water. 2.Rinse and wipe dry with soft cloth. For very stubborn soil: 1.Wipe with mild solvent (mineral spirits) and a clean soft cloth or non-abrasive nylon cleaning pad to remove grease, sealant or caulking compounds. 2.Dry with separate clean cloth. 3.Clean residue with sponge, mild soap and water, rinse and let dry. 4 HARDWARE CLEANING & LUBRICATION Cleaning and lubrication help to maintain and restore smooth operation to movable parts of windows and patio doors and, in most cases, offer corrosion protection. Always thoroughly clean hardware before lubricating. Maintain hardware any time windows are not opening or closing properly or at least bi-annually (monthly for coastal areas) for the following: • Clean dirt/debris • Tighten loose screws • Replace damaged hardware Use caution with silicone-based sprays. Apply only in small amounts and do not overspray. Wipe off excess lubricant to avoid staining and/or damage to other window or patio door parts. Silicone may cause some hard plastic parts to become brittle. HARDWARE TYPES PRECAUTIONS The following substances may damage protective hardware finishes. Do not use: • Vinegar-based cleaners • Citrus-based cleaners (lemon, etc.) Metal hardware offers functionality, aesthetic appeal and resistance to corrosion, but is not totally corrosion proof. Replace corroded hardware. Plastic hardware offers high resistance to the elements; however, over time, can deteriorate from ultraviolet light, heat, cold, and chemical exposure. • Paint removers • Window cleaners • Brick/siding washes • Any other industrial or abrasive cleaners HARDWARE CLEANING General Cleaning Heavy Cleaning 1.Remove hardware for easier cleaning. 2.Use mild soap and water on a soft cloth or sponge; rinse and wipe dry. For stubborn dirt, use a soft bristle brush to gently scrub. Solvents, abrasives, and other cleaners could cause damage to protective coatings on hardware. If the general cleaning procedure is not sufficient, call us for recommendations. 3.Apply several coats of high quality, non-abrasive car wax. 4.Reinstall hardware. HARDWARE LUBRICATION Different hardware parts need different types of lubricants. Suggested Lubricant Types White or Lithium Grease: Protects metal surfaces against corrosion, reduces friction and wear on moving parts, and is an excellent multi-purpose lubricant. ® Graphite (spray black carbon powder): Use for door lock key ways and hinges. Note! Use care when applying graphite to prevent possible staining of parts. Spray Silicone: Use for slider tracks, jamb liners, and weatherstrip. Note! Do not spray directly onto hardware surfaces. Spray onto clean cloth to apply. ® There are two different single-hung windows. One offers a side-load sash identified by a metal clip and the other utilizes a fixed, screwed in balance rod. 1.Vacuum track or side jambs thoroughly (check for obstructions such as rocks, pet hair, etc.). 2.Wipe with sponge, mild soap and water. 3.Rinse and let dry. 4.Apply silicone spray to dry, soft cloth; wipe on track or side jambs; do not apply silicone to weatherstrip. 5.Install sash (if previously removed). Plastic Hardware 5 Note! Butt hinges are located on swinging patio doors and some window styles. Lubricate hinges with light oil (3-In-One oil or equivalent) annually or when noisy. Horizontal Sliders & Single-Hung Windows Light Oil (such as 3-in-One ): Use for sliding or rotating joints. Most hard plastic hardware parts (e.g. sash retainer latches) require periodic cleaning for smooth operation and do not require lubrication. Butt Hinges 6.Slide sash back and forth (up and down on single-hung) to check operation. Retainer Latch HARDWARE LUBRICATION – CONTINUED Casement/Awning Hardware Casement/Awning Rotating Joints Note! New operators and hinges are already greased and oiled and should not need lubrication. Periodically lubricate operator gear mechanisms with white or lithium grease. Light oil provides lubrication for rotating joints such as hinge pivots. Spray lubricants or graphite are acceptable, but need frequent application. Grease Here Oil Here 1.Open window for access to joints. 2.Oil as shown. Slider Tracks & Jamb Liners Slider tracks or jamb liners can become dirty and difficult to operate. Keep clean and lubricate as follows: Operator with removable cover Grease Here Oil Here 2.Vacuum track or wipe with a soft cloth. 3.Apply spray silicone to dry, soft cloth. Wipe onto track, jamb liner and/or weatherstrip. Do not apply silicone to pile (fuzzy) weatherstrip. Clean Slide Do not lubricate Hinge Single-arm operator 4.Reinstall sash(es) and check operation. Dual-arm operator Oil each pivot point There are two types of operators with gear mechanisms: • Removable cover • Non-removable cover with the gears reachable through the back For operators with removable covers: Note! Some handle styles don’t have screws and will just pull off. 1.Remove set screw on crank handle with small screwdriver or Allen wrench; remove handle. 2.Gently remove plastic cover (lift from the base). 3.Apply grease to gears and oil to joints. Patio Door Rollers & Multi-Point Locks Removing patio door panels can be dangerous and should be performed by service personnel or at least with additional help. Latch point 1.Remove door panel. 2.Tip door panel for access to rollers on the bottom. 3.Lubricate rollers where the shaft goes through the middle of the wheels with light oil. Rollers 1.Use a small mirror for a better view of the gears. 4.Lightly oil multipoint lock at each latch point. 2.Apply grease/oil through back side of operator. 5.Spray keyway lock with graphite lubricant. For operators with non-removable covers: 6 1.Remove sash(es). Key way GLOSSARY Casement A window with a sash that opens from the side like a door. Double-Hung A window with an upper and lower sash that slide vertically past each other. Egress Hinge A hinge used in conjunction with certain casement windows to allow a wider opening to meet emergency exit requirements. Frame The assembly of structural members (head, sill and jambs) used to fasten the window/patio door to the structure. Insulated Glass Unit A sealed assembly of two or more panes of glass separated by a spacer. Jamb Liner A removable balance system that fits into the side jamb. Kerf A groove that often holds weatherstrip. Keyway The slot in the lock where the key is inserted. Patio Door Panel An assembly comprised of stiles (vertical pieces), rails (horizontal pieces) and the patio door’s glass. Rail The horizontal piece of a sash or panel. Retainer Latch Secures sash into jamb to guide during operation. Releases to tilt for easy cleaning or removal. Sash An assembly comprised of stiles (vertical pieces), rails (horizontal pieces) and the window’s glass. Seal Failure The airtight seal between two panes of an insulating glass unit has broken and is usually discovered when excess moisture fogs the inside of the glass panes. Side Jamb The vertical frame member on either side of the window or patio door. Sill The bottom horizontal frame member of a window. Sill Track The track on the sill of a sliding/gliding window or patio door that guides the sash as it opens and closes. Slider A window with one or more sashes that slide horizontally. Stile The vertical piece of a sash or panel. Weatherstrip A strip of material that covers the joint between two separate parts of a window or patio door and is used to prevent rain, snow and cold air from entering. Weep Hole The visible exit or entry part of a water drainage system used to drain water out of a window unit. 7 INSPECTION CHECKLIST EXTERIOR INSPECTION DATE _____/_____/_____ NOTES • Aluminum Surface Dirty Cracks, scratches, blisters, other damage • Sealant Joint Cracks, voids, other damage Deterioration, loss of adhesion • Glass Dirty Scratched, cracked, other damage • Weatherstrip Missing or loose Tears, cracks, other damage Brittle, gummy, discolored No “bounce back” • Insect Screen Dirty Missing or loose Mesh damaged or loose • Gutters Dirty Damaged Missing INTERIOR • Aluminum Surface Dirty Scratched, cracked, other damage • Glass Dirty Moisture between Panes (insulating glass only) • All Product Hardware Dirty or damaged Discolored or tarnished Problems with sash locks Casement/Awning Windows Operators working properly Operators need lubrication Double/Single-Hung Windows Jamb liners damaged Sash balances fail to hold properly Problems with sash tilt latches Problems with cam pivots Sliding Windows Track dirty Patio doors Track dirty Problems with rollers Problems with locks Locks or hinges need lubrication 8 11-664 01/08 (SB 2M)


© Copyright 2026