
Adobe CS4 Printing Guide
Adobe® Creative Suite 4 Printing Guide Introduction. . . . . . . . . . . . . . . . . . . . . . . . . . . . . . . . . . . . . . . . . . . . . . . . . . . . . . . . . . . . . . . . . . . . . . . . . . . . . . . . . . . . . 1 What This Guide Is Intended to Do. . . . . . . . . . . . . . . . . . . . . . . . . . . . . . . . . . . . . . . . . . . . . . . . . . . . . . . . . . . . . . . . 1 How This Guide Is Structured. . . . . . . . . . . . . . . . . . . . . . . . . . . . . . . . . . . . . . . . . . . . . . . . . . . . . . . . . . . . . . . . . . . . . 1 Partner Program for Print Professionals . . . . . . . . . . . . . . . . . . . . . . . . . . . . . . . . . . . . . . . . . . . . . . . . . . . . . . . . . . . 2 Chapter 1: Common Resources . . . . . . . . . . . . . . . . . . . . . . . . . . . . . . . . . . . . . . . . . . . . . . . . . . . . . . . . . . 3 The Adobe PDF Print Engine. . . . . . . . . . . . . . . . . . . . . . . . . . . . . . . . . . . . . . . . . . . . . . . . . . . . . . . . . . . . . . . . . . . . . . 3 Adobe Graphics Model. . . . . . . . . . . . . . . . . . . . . . . . . . . . . . . . . . . . . . . . . . . . . . . . . . . . . . . . . . . . . . . . . . . . . . . . . . . 3 Color Blindness Preview. . . . . . . . . . . . . . . . . . . . . . . . . . . . . . . . . . . . . . . . . . . . . . . . . . . . . . . . . . . . . . . . . . . . . . . . . . 3 PDF Creation. . . . . . . . . . . . . . . . . . . . . . . . . . . . . . . . . . . . . . . . . . . . . . . . . . . . . . . . . . . . . . . . . . . . . . . . . . . . . . . . . . . . . 3 Helping Customers Prepare Files for Submission. . . . . . . . . . . . . . . . . . . . . . . . . . . . . . . . . . . . . . . . . . . . . . . . . . 9 Transparency. . . . . . . . . . . . . . . . . . . . . . . . . . . . . . . . . . . . . . . . . . . . . . . . . . . . . . . . . . . . . . . . . . . . . . . . . . . . . . . . . . 10 Chapter 2: Adobe InDesign CS4 . . . . . . . . . . . . . . . . . . . . . . . . . . . . . . . . . . . . . . . . . . . . . . . . . . . . . . . . 16 Preparing InDesign Documents for Output . . . . . . . . . . . . . . . . . . . . . . . . . . . . . . . . . . . . . . . . . . . . . . . . . . . . . About InDesign Program Versions. . . . . . . . . . . . . . . . . . . . . . . . . . . . . . . . . . . . . . . . . . . . . . . . . . . . . . . . . . . . . . Text Features . . . . . . . . . . . . . . . . . . . . . . . . . . . . . . . . . . . . . . . . . . . . . . . . . . . . . . . . . . . . . . . . . . . . . . . . . . . . . . . . . . Rotated Spread Viewing. . . . . . . . . . . . . . . . . . . . . . . . . . . . . . . . . . . . . . . . . . . . . . . . . . . . . . . . . . . . . . . . . . . . . . . . Using the InDesign forensic tools. . . . . . . . . . . . . . . . . . . . . . . . . . . . . . . . . . . . . . . . . . . . . . . . . . . . . . . . . . . . . . . Finding Problems: Additional Forensic Tools . . . . . . . . . . . . . . . . . . . . . . . . . . . . . . . . . . . . . . . . . . . . . . . . . . . . Color Management Issues. . . . . . . . . . . . . . . . . . . . . . . . . . . . . . . . . . . . . . . . . . . . . . . . . . . . . . . . . . . . . . . . . . . . . . Working with a book file . . . . . . . . . . . . . . . . . . . . . . . . . . . . . . . . . . . . . . . . . . . . . . . . . . . . . . . . . . . . . . . . . . . . . . . Creating PDF Files from InDesign. . . . . . . . . . . . . . . . . . . . . . . . . . . . . . . . . . . . . . . . . . . . . . . . . . . . . . . . . . . . . . . Printing from InDesign. . . . . . . . . . . . . . . . . . . . . . . . . . . . . . . . . . . . . . . . . . . . . . . . . . . . . . . . . . . . . . . . . . . . . . . . . Helping Customers Prepare InDesign Files. . . . . . . . . . . . . . . . . . . . . . . . . . . . . . . . . . . . . . . . . . . . . . . . . . . . . . 17 20 30 32 33 35 39 41 42 43 50 Chapter 3: Adobe Photoshop CS4 and Photoshop CS4 Extended . . . . . . . . . . . . . . . . . . . . . . . . . . . . 55 General Guidelines. . . . . . . . . . . . . . . . . . . . . . . . . . . . . . . . . . . . . . . . . . . . . . . . . . . . . . . . . . . . . . . . . . . . . . . . . . . . . 56 Appropriate Formats . . . . . . . . . . . . . . . . . . . . . . . . . . . . . . . . . . . . . . . . . . . . . . . . . . . . . . . . . . . . . . . . . . . . . . . . . . 61 Printing from Photoshop. . . . . . . . . . . . . . . . . . . . . . . . . . . . . . . . . . . . . . . . . . . . . . . . . . . . . . . . . . . . . . . . . . . . . . . 69 Adobe Creative Suite 4 Printing Guide i Chapter 4: Adobe Illustrator CS4 . . . . . . . . . . . . . . . . . . . . . . . . . . . . . . . . . . . . . . . . . . . . . . . . . . . . . . . 73 Bleed. . . . . . . . . . . . . . . . . . . . . . . . . . . . . . . . . . . . . . . . . . . . . . . . . . . . . . . . . . . . . . . . . . . . . . . . . . . . . . . . . . . . . . . . . . Working with multiple Artboards. . . . . . . . . . . . . . . . . . . . . . . . . . . . . . . . . . . . . . . . . . . . . . . . . . . . . . . . . . . . . . . Working with Text from Different Versions of Illustrator. . . . . . . . . . . . . . . . . . . . . . . . . . . . . . . . . . . . . . . . . . Document Color Modes. . . . . . . . . . . . . . . . . . . . . . . . . . . . . . . . . . . . . . . . . . . . . . . . . . . . . . . . . . . . . . . . . . . . . . . . Live Effects . . . . . . . . . . . . . . . . . . . . . . . . . . . . . . . . . . . . . . . . . . . . . . . . . . . . . . . . . . . . . . . . . . . . . . . . . . . . . . . . . . . . Examining Customer Files. . . . . . . . . . . . . . . . . . . . . . . . . . . . . . . . . . . . . . . . . . . . . . . . . . . . . . . . . . . . . . . . . . . . . . Forensic tools. . . . . . . . . . . . . . . . . . . . . . . . . . . . . . . . . . . . . . . . . . . . . . . . . . . . . . . . . . . . . . . . . . . . . . . . . . . . . . . . . . Printing from Illustrator . . . . . . . . . . . . . . . . . . . . . . . . . . . . . . . . . . . . . . . . . . . . . . . . . . . . . . . . . . . . . . . . . . . . . . . . Creating PDF Files. . . . . . . . . . . . . . . . . . . . . . . . . . . . . . . . . . . . . . . . . . . . . . . . . . . . . . . . . . . . . . . . . . . . . . . . . . . . . . Opening Illustrator PDF Files in Illustrator. . . . . . . . . . . . . . . . . . . . . . . . . . . . . . . . . . . . . . . . . . . . . . . . . . . . . . . 74 74 76 78 80 86 88 89 92 93 Chapter 5: Adobe Acrobat 9 Pro . . . . . . . . . . . . . . . . . . . . . . . . . . . . . . . . . . . . . . . . . . . . . . . . . . . . . . . . 95 Changes, Enhancements, and New Features in Acrobat 9 Pro. . . . . . . . . . . . . . . . . . . . . . . . . . . . . . . . . . . . 95 Examining PDFs . . . . . . . . . . . . . . . . . . . . . . . . . . . . . . . . . . . . . . . . . . . . . . . . . . . . . . . . . . . . . . . . . . . . . . . . . . . . . . . 96 Overprint Preview in Acrobat 9 Pro . . . . . . . . . . . . . . . . . . . . . . . . . . . . . . . . . . . . . . . . . . . . . . . . . . . . . . . . . . . . . 97 Acrobat 9 Pro Print Production Tools. . . . . . . . . . . . . . . . . . . . . . . . . . . . . . . . . . . . . . . . . . . . . . . . . . . . . . . . . . . . 98 Comparing Documents . . . . . . . . . . . . . . . . . . . . . . . . . . . . . . . . . . . . . . . . . . . . . . . . . . . . . . . . . . . . . . . . . . . . . . . 109 Editing PDF files . . . . . . . . . . . . . . . . . . . . . . . . . . . . . . . . . . . . . . . . . . . . . . . . . . . . . . . . . . . . . . . . . . . . . . . . . . . . . . 110 Previewing and Flattening transparency. . . . . . . . . . . . . . . . . . . . . . . . . . . . . . . . . . . . . . . . . . . . . . . . . . . . . . . 120 Using the Job Definition Format (JDF) . . . . . . . . . . . . . . . . . . . . . . . . . . . . . . . . . . . . . . . . . . . . . . . . . . . . . . . . . 125 Using Comment and Review features in Acrobat 9 Pro. . . . . . . . . . . . . . . . . . . . . . . . . . . . . . . . . . . . . . . . . . 128 Printing PDF Files. . . . . . . . . . . . . . . . . . . . . . . . . . . . . . . . . . . . . . . . . . . . . . . . . . . . . . . . . . . . . . . . . . . . . . . . . . . . . 132 Links to known issues and resources. . . . . . . . . . . . . . . . . . . . . . . . . . . . . . . . . . . . . . . . . . . . . . . . . . . . . . . . . . . 137 Adobe Creative Suite 4 Printing Guide ii Adobe Creative Suite 4 Printing Guide Introduction TABLE OF CONTENTS 1 Introduction 3 Chapter 1: Common Resources 16 Chapter 2: Adobe InDesign CS4 55 Chapter 3: Adobe Photoshop CS4 and Photoshop CS4 Extended 73 Chapter 4: Adobe Illustrator CS4 95 Chapter 5: Adobe Acrobat 9 Pro Welcome to the Adobe® Creative Suite® 4 Printing Guide. Adobe is dedicated to providing software that allows designers to express their visual ideas, while providing tools and resources to printers to ensure that those ideas print as intended. While designers explore the creative features of Adobe Photoshop® CS4, Adobe InDesign® CS4, and Adobe Illustrator® CS4, as well as the capabilities of Acrobat® 9 Pro, printers need to take a rather different approach. You might call it “reverse engineering”: inspecting, analyzing, and, if necessary, modifying customer files to facilitate printing. While this document is focused on the needs and requirements of printers, it is also useful for production artists who are preparing files for print. Some modifications (for example, replacing solid black areas with a rich black build, or converting RGB text to black-only) are dictated by the physical requirements of printing. Some tweaks may be necessary to accommodate a particular raster image processor (RIP) or imaging device. Not all workflows are the same, and solutions vary accordingly. Regardless of your particular workflow, the more you know about the tools used by designers to create files, the better equipped you are to anticipate, prevent, find, and fix problems. In addition, you’ll be better able to advise your customers as they prepare files for submission. What This Guide Is Intended to Do This guide serves as both a detailed technical reference for handling Creative Suite 4 files from your customers, and as a training tool for your staff. For example, this guide will introduce you to forensic tools, such as the Overprint Preview option in Illustrator, InDesign, and Acrobat 9 Pro, as well as the Output Preview function in Acrobat, all of which are invaluable in highlighting potential problems. The earlier you can pinpoint problems in a job, the less expensive and complicated they are to rectify. As RIPs have matured and transparency flattening has become more sophisticated, there are fewer issues with jobs containing transparency. The advent of pure PDF workflows based on the Adobe PDF Print Engine will result in more reliable reproduction of PDF content—that is, greater consistency and fidelity to the designer’s intent. For example, transparency effects in InDesign CS4, such as gradient feather, glow, and inner shadow effects, image without the need for flattening when output through a PDF Print Engine-based RIP. You’ll find guidance in this document for identifying such effects and for preparing jobs to correctly render them during output. Additionally, you’ll find links to other available reference materials that cover such topics in depth. How This Guide Is Structured Some technologies and concepts—such as PDF creation, transparency, and the Adobe Graphics Model—are common across the Adobe products used for print design and production in Creative Suite 4 Design Premium, Design Standard or Master Collection. You’ll find information about such topics in the “Common Resources” chapter. This document is organized so that you can quickly find information about specific software. As a job enters production in a printing plant, its path varies according to the conventions of the particular plant, as well as the requirements of the job. But because many jobs involve the aggregation of artwork and text in an InDesign layout, it makes sense to treat InDesign as a “hub,” and Photoshop, Illustrator, and Acrobat as related spokes. As the applications themselves are deeply integrated, you’ll find cross references that mirror the interdependent ecosystem of the Creative Suite. For example, it’s not enough to know how to place an image in InDesign: you also need to know how certain aspects of a Photoshop image (such as opacity, blending modes, or vector content) will print from InDesign. Because an Adobe PDF is often the final product of the job, Acrobat wraps up this guide. You’ll find advice for generating PDFs in the “Common Resources” chapter, with additional application-specific information in sections on individual applications. The Acrobat section will familiarize you with the preview, preflight, and editing tools available in Acrobat 9 Pro. Additional resources are included throughout and at the end of this guide, to help you locate specific information online. Partner Program for Print Professionals As a Member of the Adobe Partner Connection Print Service Provider Program, your company will enjoy the support of our industry’s benchmark service and support program. Don’t miss the opportunity to put Adobe’s technical, product and promotional resources to work for your business’ success. Join this winning team today. For complete information about membership and benefits, please visit http://www.adobe.com/ go/printserviceprovider. Adobe Creative Suite 4 Printing Guide 2 Chapter 1: Common Resources The integration between components in the Creative Suite 4 family allows for such productivity enhancing features as shared color management settings, common PDF presets files, shared color swatches, and the ability to use native files—such as Photoshop .psd, Illustrator .ai, Acrobat .pdf, and even InDesign .indd formats—as artwork. Since there is so much “common ground,” this section addresses features and issues that are the same across many of the Creative Suite 4 components. The Adobe PDF Print Engine The Adobe PDF Print Engine is not a shrink-wrapped product. It is a printing platform based on PDF and other Adobe core technologies. OEM RIPs and workflow systems incorporating the PDF Print Engine can process PDF files natively (without converting data to PostScript® or a proprietary intermediate format), thus maintaining live transparency. Being able to use native, unconverted (and unflattened) PDF files throughout a workflow provides a complete, end-to-end PDF environment that uses common technology to generate, preview, and print PDF files. The Adobe PDF Print Engine combines the strengths of Adobe PDF for content definition and the Job Description Format (JDF) standard for job ticketing and process control in powering RIP and workflow systems. Available in printing systems from Adobe print solution partners, the Adobe PDF Print Engine enhances output consistency throughout the workflow, improving overall print productivity and profitability. Adobe PDF Print Engine 2 will extends these benefits to production workflows for Variable Data Printing (VDP) used in personalized publishing (e.g. direct marketing), and output to a digital color press. For more information on the Adobe PDF Print Engine and the partners who market RIPs and workflow systems incorporating it, see http://www.adobe.com/products/pdfprintengine. Adobe Graphics Model The Adobe Graphics Model ensures consistent rendering and display of color and transparency effects in Illustrator, Photoshop, InDesign and Acrobat. It is essentially a software RIP that processes graphics instructions and displays the results on screen. The Adobe Graphics Model allows InDesign to consistently display placed raster and vector art at full resolution, as if you were viewing the original art in Photoshop or Illustrator. It also enables you to view realistic rendering of overprinting and special effects such as opacity settings and blending modes. Color Blindness Preview Photoshop and Illustrator now offer the option to view content as it would be seen by people with two forms of color blindness, Protanopia, and Deuteranopia. PDF Creation The Adobe PDF Library is used consistently by Creative Suite 4 components which generate PDFs natively (that is, without needing to generate PostScript and Distill). Consequently, Illustrator, InDesign, and Photoshop can directly generate PDF files without the need for Acrobat Distiller®. Of course, Distiller is still available to convert PostScript files into PDFs if necessary, but directly exporting PDF files is the recommended method of creating PDF files. It’s faster and easier to generate PDF files through direct export and, in addition, if you wish to maintain live transparency (if your RIP supports it), directly exporting PDFs is the only way to do so. Note: Prior to Creative Suite 2, exported PDFs contained font information encoded in CID (character identifier) form. Some non-Adobe RIPs could not correctly process such PDFs, even though CID encoding had been part of the PDF specification for some time. To work around the problem and eliminate most instances of CID encoding, many printers created PDFs by generating PostScript and distilling. Today, most RIP vendors support CID encoding; issues with PDFs containing CID encoding should be moot. Occasionally, CID encoding is needed to support some glyphs, whether the PDF is exported or created by Distiller. Also note that you may find that Creative Suite 4 produces PDFs that are smaller in file size than PDFs exported from previous versions. Adobe Creative Suite 4 Printing Guide 3 While it may be more familiar to create PostScript and use Distiller to generate PDFs rather than exporting PDFs, that’s unnecessary in current workflows. Even if your imposition software or RIP dictates that you submit Acrobat 4.0-compatible files, there should be no issues in using exported PDFs created using the PDF/X-1a preset, which meets the PDF 1.3 specification. Contact your RIP and imposition vendors to obtain updated versions that support more modern PDF formats. For more information on PDF specifications, see the “Acrobat 9 Pro” section in this document. If your workflow includes a RIP that utilizes the Adobe PDF Print Engine (APPE), take advantage of the support for unflattened transparency by exporting to the latest level of PDF supported by your RIP, or to standards-based PDF such as PDF/X-4, rather than generating PostScript and Distilling to create a PDF (which would flatten transparency). PDF settings: An overview Whether you are generating PDFs from Illustrator, Photoshop, InDesign, or through Distiller, the categories of PDF settings are the same. These settings are found in the Export Adobe PDF dialog (InDesign), the Save As dialog (Illustrator and Photoshop), and under Edit PDF Settings (Distiller). PDF Export Options: InDesign PDF Save As Options: Illustrator PDF Save As Options: Photoshop • Adobe PDF Preset indicates whether a default preset or a user-created preset is being used. If you’ve started with an existing preset and modified some of its settings, the preset name is followed by “(modified).” Adobe Creative Suite 4 Printing Guide 4 • Standard specifies whether the setting achieves a defined PDF/X format for the file (such as PDF/X-1a, PDF/X-3, or PDF/X-4), or meets the definitions for one of the PDF/A (archival) standards. • Compatibility indicates the minimum version of Acrobat required to read the file. The label in parentheses shows the PDF file specification that applies; for example, “Acrobat 5 (PDF 1.4)” indicates that the resulting PDF will be compatible with Acrobat 5.0 and later, and that the file meets the PDF 1.4 specification. Proper compatibility also affects other applications that must process the PDF, such as imposition software. While an Acrobat 9-compatible file may seem more “modern,” your imposition software may not allow you to use it. Consult the documentation for such software, as well as the requirements for your RIP, to determine the appropriate compatibility setting. • General includes basic file options, such as page range. The choices in the “Options” and “Include” sections of the General pane (such as Bookmarks, Hyperlinks, and Tagged PDF) affect only web-appropriate PDFs and do not pertain to print-ready PDFs. However, if you are producing a document that may be used in various media or that could be archived, it is recommended that you configure these options appropriately as well. • Compression allows you to specify settings for compression and downsampling of images. Additional options let you compress text and line art, and crop images to frame limits. • Marks and Bleeds options let you include crop and bleed marks, as well as page information, bleed, and slug area. • Output controls how colors are converted (or preserved), based on your choices and the color management settings in effect. • Advanced controls font embedding and subsetting, OPI comments, transparency flattening (if necessitated by the PDF compatibility setting), and the inclusion of JDF information. Embedding includes the entire character set of a font in the resulting PDF; subsetting is a form of embedding that includes only characters used in the document, and results in a smaller file size. Although Illustrator, InDesign, Photoshop and Distiller correctly embed fonts in PDF files, some non-Adobe applications may not. Additionally, some fonts cannot be embedded in PDFs because of vendor licensing restrictions. It is advised that you never create a PDF without embedding or subsetting fonts. • Security allows you to add password-based security to the PDF file. (Security options are not available during creation or editing of a PDF preset. Security options are available only at the time of PDF creation or later within Acrobat). Note that imposition software may reject a PDF with security settings, even if the file does not require a password. It’s best to avoid any security restrictions on PDFs intended for print. If a customer supplies a PDF with security settings applied, request that they submit a replacement PDF without security settings. Note that security is not supported in PDF/X compliant files for this reason. • Summary displays an overview of the PDF settings. To expand the description for each category, click the arrow to the left of the topic. If any conflicts occur (such as a source color profile that doesn’t match the color settings file in effect), a warning will appear in the Warnings area. Default PDF settings Several of the default PDF presets (also referred to as joboptions files) are specifically intended for commercial printing, with some important differences noted. Typically, it’s most appropriate to start with one of the default settings, modify it to suit your needs, and save that setting as a custom job option. Since PDF settings are stored in a common repository and shared by InDesign, Illustrator, Photoshop, and Distiller, you can create custom presets in one of the applications, and the settings will automatically be available to the other applications. (However, some installed presets are available only within Distiller or Illustrator). Adobe applications install a default set of PDF creation presets, which cannot be edited; however, you can start with Adobe Creative Suite 4 Printing Guide 5 a default preset, duplicate it, and edit the duplicate preset for your workflow. While the interfaces for creating PDF options differ slightly between the applications, the concepts are the same. An introduction to the features of the common default presets follows. Smallest File Size Appropriate for online distribution or e-mail attachments (but not for commercial printing), the Smallest File Size option aggressively compresses and resamples image content, and converts all RGB, CMYK, and grayscale content to the sRGB color space (spot colors are retained, however). This may result in noticeable color shifts from the original artwork. Note that the compatibility setting for Smallest File Size is now Acrobat 6.0, to reflect latest best practices and requirements. Settings include: • Compatibility: Acrobat 6.0 (PDF 1.5), which maintains live transparency and layers. • Color Images: Bicubic downsampling to 100ppi; Compression = Automatic (JPEG); Image Quality = Low. • Grayscale Images: Bicubic downsampling to 150ppi; Compression = Automatic (JPEG); Image Quality = Low. • Output: Destination = sRGB IEC61966-2.1. High Quality Print Intended for imaging on in-house proofers and desktop printers. Any RGB, Lab or spot-color content will remain in the original color space and won’t be converted to CMYK. While this might be appropriate for desktop printers or other digital imaging devices, color appearance may be compromised if the PDF is processed in a workflow that does not honor color profiles. High Quality Print settings include: • Compatibility: Acrobat 5.0 (PDF 1.4), which maintains live transparency. • Color Images: Bicubic downsampling to 300ppi; Compression = Automatic (JPEG); Image Quality = Maximum. • Grayscale Images: Bicubic downsampling to 300ppi; Compression = Automatic (JPEG); Image Quality = Maximum. • Output: No color conversion; include tagged source profiles. Press Quality The settings of the Press Quality preset create a PDF that is appropriate for commercial offset printing. Note that PDF Compatibility is Acrobat 5.0, which maintains live transparency. Press Quality settings include: • Compatibility: Acrobat 5.0 (PDF 1.4). • Color Images: Bicubic downsampling to 300ppi; Compression = Automatic (JPEG); Image Quality = Maximum. • Grayscale Images: Bicubic downsampling to 300ppi; Compression = Automatic (JPEG); Image Quality = Maximum. • Output: Convert content with profiles to destination; preserve color numbers for untagged content; maintain spot colors. Settings available from within individual applications Standard [available in Distiller only] Intended for viewing and printing business documents (but not for commercial print). Most spot color content is usually maintained, but areas interacting with transparency may be converted to RGB. Standard settings include: • Compatibility: Acrobat 6.0 (PDF 1.5). • Color Images: Bicubic downsampling to 150ppi; Compression = Automatic (JPEG); Image Quality = Medium. • Grayscale Images: Bicubic downsampling to 150ppi; Compression = Automatic (JPEG); Image Quality = Medium. • Output: Destination = sRGB IEC61966-2.1. Adobe Creative Suite 4 Printing Guide 6 Oversized Pages [available in Distiller only] Intended for use in architectural and engineering environments, this option allows pages in excess of 200 x 200 inches (such as CAD files) to be saved as PDFs. Most spot color content is maintained, but areas interacting with transparency may be converted to RGB. Settings include: • Compatibility: Acrobat 7.0 (PDF 1.6). • Color Images: Bicubic downsampling to 150ppi; Compression = Automatic (JPEG); Image Quality = Medium. • Grayscale Images: Bicubic downsampling to 150ppi; Compression = Automatic (JPEG); Image Quality = Medium. • Output: Destination = sRGB IEC61966-2.1. PDF/A-1b:2005 (CMYK) and PDF/A-1b:2005 (RGB) [available in Distiller only] PDF/A is an ISO standard for long-term storage of electronic documents (the A stands for “archival”). Audio and video content are not allowed, and the PDF may not invoke external information sources (such as attachments, fonts, or hyperlinks). No encryption is permitted, and JavaScript is not allowed. Settings include: • Compatibility: Acrobat 5.0 (PDF 1.4). • Color Images: Bicubic downsampling to 300ppi; Compression = Automatic (JPEG); Image Quality = Maximum. • Grayscale Images: Bicubic downsampling to 300ppi; Compression = Automatic (JPEG); Image Quality = Maximum. • Output: Color mode depends on the choice of the PDF/A-1b:2005 (CMYK) or PDF/A-1b:2005 (RGB) standard. Illustrator Default [available in Illustrator only] A PDF created with Illustrator’s Default setting is essentially an Illustrator file in a PDF wrapper: to Illustrator, it’s just a normal Illustrator file, with all layers, objects, and effects intact. To other applications, it’s a PDF with Acrobat 6.0 compatibility. Unlike other PDF files, these files can be opened safely in Illustrator and edited, provided that the necessary fonts are active, if the option to “Preserve Illustrator Editing Capabilities” is selected. Settings include: • Compatibility: Acrobat 6.0 (PDF 1.5). • Color and Grayscale Images: No downsampling; Compression = ZIP 8-bit. • Output: No color conversion. PDF/X: Industry standards Tailored specifically for the printing industry, PDF/X specifications are intended to provide a framework for creating print-ready PDFs. PDF/X is a subset of the full PDF specification, refined to prevent the inclusion of non print-appropriate content such as movies and hyperlinks, and to ensure that important needs—such as correct font embedding—are honored. As RIPs and other workflow components become more sophisticated, the PDF/X standards evolve to meet the needs and capabilities of the changing environment, hence the multiple specifications. How do you determine which of the PDF/X standards is appropriate for your workflow? The compatibility level (Acrobat 4 or 5) may be dictated by the capability of your RIP or other components (such as imposition software); the output settings will be determined by whether or not you’re using a color-managed workflow. Given the proven reliability of PDF/X formats in print workflows, it is highly recommended that you start with the most appropriate PDF/X specification for your workflow, and make whatever modifications you need (such as invoking bleed or adding marks). PDF/X-1a:2001 PDF/X-1a files can contain CMYK, grayscale, and spot-color content, but no RGB content. The ArtBox or TrimBox must be internally defined in the file; fonts must be embedded and/or subset. Acrobat 4.0 compatibility dictates that transparency is flattened (ideally, at the high-quality resolution Settings include: • Compatibility: Acrobat 4.0 (PDF 1.3). Transparency will be flattened. Adobe Creative Suite 4 Printing Guide 7 • Color Images: Bicubic downsampling to 300ppi; Compression = Automatic (JPEG); Image Quality = Maximum. • Grayscale Images: Bicubic downsampling to 300ppi; Compression = Automatic (JPEG); Image Quality = Maximum. • Output: Convert to destination color space; no embedded profiles. PDF/X-3:2002 The specification for PDF/X-3 builds on PDF/X-1a, adding support for embedded color profiles and thus allowing RGB and Lab content in addition to the color spaces supported by PDF/X-1a. Use this format in a color-managed workflow Setting include: • Compatibility: Acrobat 4.0 (PDF 1.3). Transparency will be flattened. • Color Images: Bicubic downsampling to 300ppi; Compression = Automatic (JPEG); Image Quality = Maximum. • Grayscale Images: Bicubic downsampling to 300ppi; Compression = Automatic (JPEG); Image Quality = Maximum. • Output: No color conversion; embedded profiles. PDF/X-4:2008 PDF/X-4 extends the PDF/X-3 specification, adding support for live, unflattened transparency, as well as layers. The inclusion of layers and live transparency may make PDF/X-4 files inappropriate in workflows using older devices and processes. Consult the documentation for your RIP and any other steps in your workflow, such as imposition, to determine if PDF/X-4 files can be processed correctly. Part of the PDF/X-4 standard is the requirement that a “conforming reader” application shall be used to properly process it, which may mean that you need to obtain a patch or upgrade for your RIP or other processes (such as trapping and imposition) that will handle PDFs (RIPs using the Adobe PDF Print Engine can correctly process PDF/X-4 files). Settings include: • Compatibility: Acrobat 5.0 (PDF 1.4). Live transparency is maintained. (Note that, while the official PDF/X-4 specification allows Acrobat 7.0 [PDF 1.6] compatibility, CS4 applications use Acrobat 5.0 compatibility.) • Color Images: Bicubic downsampling to 300ppi; Compression = Automatic (JPEG); Image Quality = Maximum. • Grayscale Images: Bicubic downsampling to 300ppi; Compression = Automatic (JPEG); Image Quality = Maximum. • Output: No color conversion; embedded profiles. Managing custom PDF presets Supplied PDF presets are stored in one common location for access by Illustrator, InDesign, Photoshop and Distiller (with the exceptions of application-specific presets noted previously). Because the presets are stored in a common repository, if you attempt to delete a preset, you’ll receive an alert that deletion will affect more than the application you’re using at the moment. User-created custom presets are also available to Illustrator, InDesign, Photoshop and Distiller, but are stored in a separate location from the factory presets. On the Mac, you’ll find custom settings in [user]/Library/Application Support/Adobe/Adobe PDF/Settings. On a PC, they’re stored in C:\Documents and Settings\[user]\Application Data\Adobe\Shared Documents\Adobe PDF\ Settings. As you establish methods for the creation of PDFs for your particular workflow, standardize all of your prepress workstations, and share those methods and the correct presets with your customers to ensure submission of appropriate PDF files as final job files. You can provide the correct PDF presets to your customers as *.joboptions files; they simply double-click the file and it’s automatically installed in the correct location. The methods for exporting and importing saved PDF presets varies slightly by Creative Suite 4 component; see this document’s section on the individual component (or consult the Help menu for the application) for specifics. Adobe Creative Suite 4 Printing Guide 8 “Save as PDF” feature [Mac OS® only] Clicking the Printer button (not the Print button) in print dialog boxes on the Apple® Macintosh® takes you to the operating system’s printer dialog. The PDF button at the bottom of the dialog box opens a pull-down menu with PDF options. These options are a function of the operating system, and do not invoke Distiller or any other Adobe process. The Save as PDF function is an Apple operating system capability, and does not provide flexible control over color handling, nor have any options for font embedding (although embeddable fonts are embedded and subset by this process). Consequently, a PDF created with the Save as PDF function may not be appropriate for CMYK-based commercial print workflow. Some Adobe applications do not allow you to use this system function, but non-Adobe applications allow you to use it. Macintosh PDFs The Save as PDF option available in print dialog boxes does not use Distiller to create PDF files. You have no control over color handling. If your workflow requires that you submit PostScript files for RIP processing, consult the vendor documentation for your system before creating PostScript. Some vendors require that you use a proprietary, vendor-specific PostScript Printer Description (PPD) as the target when you create the PostScript file. Such workflows may limit editability and repurposing PDFs. If you are not required to use a vendor-specific PPD, generate device-independent PostScript. Generally speaking, you should keep the following guidelines in mind when creating PostScript files: • Use PostScript Language Level 3 whenever possible, if your RIP is compatible with Level 3. • Include fonts in the PostScript. • Add the file extension .ps to the PostScript file. If the file is processed through Distiller, the PDF will be given the same name, but with the extension .pdf. Some Windows applications, such as Microsoft® Word, may automatically add a .prn extension; Distiller recognizes both .prn and .ps extensions. If you are submitting PostScript to an imposition process, consult the documentation for that process to determine the correct naming convention. • Choose an appropriate PPD file for your output device. If there is no vendor-specific PPD, use Adobe PDF as your target printer. Even if you do not plan to process the PostScript file through Distiller, using the Adobe PDF PPD provides maximum flexibility in print options and media sizes. Helping Customers Prepare Files for Submission Educating your customers makes your life—and theirs—easier on many levels, and as a result also builds customer loyalty. It’s very helpful if you provide reference materials outlining correct procedures for job submission. Do you prefer native application files (for example, an InDesign file plus support art)? Advise your customers on proper usage of InDesign’s Preflight (greatly enhanced and customizable in CS4) and Package features, and point out the forensic tools built into InDesign and Illustrator that can help them find errors before sending their files to you. For example, Illustrator CS4 now includes a Separation Preview function, and you can create and share custom InDesign Preflight profiles with your customers. See the “InDesign CS4” and “Illustrator CS4” sections of this document for more information. Adobe Creative Suite 4 Printing Guide 9 If you prefer that customers submit print-ready PDF files, the preceding advice is still beneficial, because using the tools correctly and understanding your needs helps them build better files, which become better PDFs. No doubt you know all too well that a poorly constructed document becomes an unusable PDF. With that in mind, show customers how to use the forensic tools in Acrobat 9 Pro to highlight potential problems before they send a PDF that won’t print as expected. Encourage your customers to perform preflight inspections on PDF files they are preparing for print, to ensure a smoother flow in your processes and reduce the amount of time you spend fixing PDF files to meet your production needs. Consider providing custom presets to your customers, to enable them to create PDFs to your specifications. It is also helpful to provide customized preflight profiles for Acrobat and the new InDesign Live Preflight to customers to ensure that they perform all the proper preflight checks according to your settings. For more information on the Print Production tools in Acrobat 9 Pro, see that section of this document. Communicating with ConnectNow (free for up to three participants per meeting) All Creative Suite 4 applications provide a portal to Adobe ConnectNow (part of Acrobat.com), a personal online web-conference tool, so you can conduct real-time meetings from your desktop. All you need is a web browser and the free Flash player plug-in — no additional software is required. Attendees join the meeting by logging into a web-based meeting space from their own computers. In a ConnectNow online meeting, you can share your desktop, use live chat, share online whiteboards, and use many other collaboration features. In addition, participants can give each other permission to control their computers: imagine how helpful it would be for a client to hand over control of their desktop so you can show them step-by-step how to fix a problem file. In Acrobat 9, choose Share My Screen from the Collaborate menu. In Photoshop, Photoshop Extended, Illustrator, InDesign, Flash, Dreamweaver, Fireworks and InCopy, choose File > Share My Screen. You will find that ConnectNow can be a powerful tool in customer communications. USING CONNECTNOW TO HELP CUSTOMERS In addition to providing your custom PDF presets to customers, consider using the Share My Screen function in Creative Suite 4 to demonstrate how to load and use custom presets. You can even take over control of their computer if necessary to show them how to use the correct preset to create PDFs in Creative Suite 4 applications. This basic access to ConnectNow , which allows you to share your screen with two other participants at once, is free. If you need to regularly collaborate with a larger audience of attendees, consider purchasing one of the commercial versions of Connect. For more information, see http://www.adobe.com/products/acrobatconnectpro/ Transparency As Adobe applications have developed more sophisticated methods of flattening transparency to meet the limitations of PostScript-based workflows, and as RIP manufacturers have enhanced the capabilities of their devices, imaging transparency is no longer the challenge it was in earlier versions of the software. Transparency is completely and natively supported by the PDF imaging model. Because transparency rendering is dependent upon the color profile and resolution of the final output device, it is desirable to maintain transparency effects in a live, unflattened state right through to final output. PDF jobs which are rendered by a PostScript RIP must be flattened to opaque objects prior to rendering. If the job is properly constructed, this can happen very late in the workflow, and the desired results can be achieved. Print workflows which utilize the Adobe PDF Print Engine can maintain live transparency effects all the way through to final rendering. This provides a high degree of confidence that the printed jobs will reproduce with a high degree of fidelity to the designer’s intent. InDesign, Illustrator, and Photoshop create and support opacity and blending mode attributes for content, and PDF files compatible with Acrobat 5.0 and later can contain live, unflattened transparency. PDF files compatible with Acrobat 4.0 and earlier cannot have live transparency; such content is flattened into opaque objects in the PDF. Adobe Creative Suite 4 Printing Guide 10 While the requirements of your own workflow dictate some parts of your approach to imaging transparency, here are some general, beneficial guidelines for you and your customers: • If possible, place text and vector content higher in stacking order than objects using transparency. For example, move a text frame in InDesign so that it is positioned above a placed Photoshop file that is silhouetted with soft-edged transparency. This can be accomplished by changing the stacking order of objects, or by moving the text frame to a higher layer. Of course, if this would alter the design, it may not be an option. Flattened and Unflattened Transparency The original InDesign file (far left) contains a transparent native Photoshop file—the dandelion— and a drop shadow. Objects in an unflattened PDF (center; pulled apart to show intact live transparency) remain intact, and transparency is still live. But a PDF/X-1a file requires flattened transparency, which results in many opaque, separate “atomic regions” (right; pulled apart to show how atomic regions divide content during flattening). • Keep transparency live as long as possible. Rather than flattening a layered Photoshop file to a single layer, keep the layers intact and save the file as a native Photoshop file (.psd). Use Illustrator native (.ai) files rather than saving artwork in the EPS format, which flattens transparency. When creating PDFs from documents containing live transparency, use a PDF format (compatible with Acrobat 5.0 or later, such as PDF/X-4 that supports live transparency, if your workflow supports such PDF files. • Use the Overprint Preview in Illustrator, InDesign, Acrobat 9 Pro, and Adobe Reader to check the interactions of objects using blending modes. Activating Overprint Preview in these components generates a more realistic display of artwork, providing the opportunity to catch objects that may image differently from the way they appear when viewed in the normal, composite view. Note that Acrobat 9 Pro and Adobe Reader 9 now automatically activate Overprint Preview when opening PDF/X files. Overprint Preview can also be controlled in Preferences in both applications. • If your workflow system requires that transparency be flattened, you may want to create a customized transparency flattener preset and share it with your customers. The High Resolution flattener preset is satisfactory for most circumstances, but you may wish to create a custom flattener preset that uses a Line Art and Text Resolution setting in keeping with the resolution of your RIP. For example, if your platesetter uses a 2400dpi resolution, create a custom preset using that resolution. You also have the option to convert all text and strokes to outlines in the interest of consistency across flattened and unflattened areas, but this option may result in larger file sizes in the PDF or EPS files produced, and renders text uneditable. Transparency Flattener Presets While the High Resolution flattener preset (left) is usually sufficient, you may wish to create a custom preset that incorporates a Line Art and Text Resolution that matches the resolution of your RIP (right). You also have options to convert text or strokes to outlines. Adobe Creative Suite 4 Printing Guide 11 Invoking a Flattener Preset You can choose a flattener preset during PDF or EPS export, and in the Print dialog box. • Use the Flattener Preview feature, available in Illustrator, InDesign, and Acrobat, to highlight areas in artwork that will be affected by flattening. In InDesign and Illustrator, use the preview as a guide to help you decide how you should stack page objects to avoid flattening text and vector segments. Flattener Preview Red highlight indicates vector areas that will be affected by transparency. For more information about transparency, see “Transparency in Adobe Applications: a Print Production Guide” (http://www.adobe.com/go/learn_transparency_print_en ) and “Designer’s Guide to Transparency for Print Output” (http://www.adobe.com/go/ learn_transparency_designer_en). Color Management in Creative Suite 4 Components The goals of color management are to reduce the amount of proofing needed to accurately assess color, and to ensure predictable output and print. When used properly, color management speeds the process and reduces the costs associated with achieving the color your customer expects. Keep in mind that, even if you choose to turn off color management in Adobe applications (note that you cannot turn off color management in Acrobat 9 Pro), color management is still being performed by your operating system to govern monitor display and printing. It’s best to leave color management on in Adobe applications, and to ensure that the same settings are used across all the applications for consistency. Use Adobe Bridge to easily synchronize color settings for Illustrator, Photoshop, InDesign and Acrobat simultaneously. Illustrator, Photoshop, InDesign and Acrobat use the same underlying code to render color— whether displaying an image on a monitor, printing to a desktop printer, or sending data to a RIP. If color management is carefully implemented and maintained, you should be able to better communicate color expectations with your customers. In addition to providing an environment for consistent color viewing and rendering, color-managed workflows allow—and encourage—the use of RGB images. With a larger color gamut than CMYK, RGB offers the potential for more flexibility in a print workflow, especially if the content might be repurposed for the web, video, or mobile phones. Some color corrections are much more easily performed in the RGB color mode, and many digital devices (such as inkjet print- Adobe Creative Suite 4 Printing Guide 12 ers and toner-based digital presses) are capable of rendering a wider gamut than is possible with offset inks. Consequently, in such an environment, it is beneficial to maintain maximum color possibilities by not converting to CMYK prematurely. Using RGB also makes it easier for you to move the project from one press to another while keeping the color looking consistent among your own equipment, deferring the conversion to CMYK until the latest point possible. Managing color needs for a customer is a comprehensive job. Start by encouraging customers to at least calibrate their monitors using Adobe Gamma (Windows) or the Color System Preference under Displays (Mac OS). This provides them with a very basic system profile to be used in color management. For more reliable profiling, encourage them to obtain a monitor profiling device and use it at recommended intervals to maintain reliable on screen display. Don’t share customized monitor profiles; each monitor needs a profile specifically generated for that particular monitor In many cases, choosing North America Prepress 2 as your color setting will be a sufficient start, but you can customize settings as you develop more specific RGB-to-CMYK conversions. For example, North America Prepress 2 uses a CMYK conversion that is based on Specification for Web Offset Publications (SWOP), and although it does work for sheetfed printing, it’s not always the best choice. A more appropriate conversion for a sheetfed operation might be to choose the U.S. Sheetfed CMYK working space by selecting U.S. Sheetfed Coated (or Uncoated) v2 from the CMYK menu in the Color Settings dialog box. If you want to take more control, you can create a custom CMYK conversion. From the same CMYK working space menu, choose Custom CMYK. In the Custom CMYK color settings dialog box, enter the values that will result in a CMYK conversion that best meets your needs. You may find it easiest to establish your settings in the Photoshop Color Settings dialog box (Edit > Color Settings). Keep in mind that, for optimum results, you should fingerprint your presses and proofing systems, and use custom profiles. Once you have established a color setting in Photoshop, save and name it by clicking the Save button in the Color Settings dialog box. The settings will be placed in the correct folder so that the entire Creative Suite can access them. However, you can save them to another location as a way to distribute them to others. The file you create, with the extension .csf, contains the settings you share with other users in your shop or with customers. To import color settings, click the Load button in the Edit > Color Settings dialog box in Illustrator, InDesign, or Photoshop. Navigate to the .csf file you want to load and select it. Once the color setting is imported into one of the applications, you will need to synchronize settings so that the other components can access them. The easiest way to do that is to use Adobe Bridge CS4. Here’s how: 1.Launch Bridge. 2.Choose Edit > Creative Suite Color Settings. 3.From the list, choose your color settings by name. If you have not already loaded a supplied color setting, you can browse for it by clicking the Show Saved Color Settings Files and then navigating to the desired settings file. 4.Click Apply. Using Bridge to Synchronize Color Settings Adobe Bridge displays a red “pie” section to indicate that color settings are not synchronized across components that use color management (left). To synchronize settings in all applications, select the proper color setting from the list of Suite Color Settings, or browse to import a supplied setting by clicking the Show Saved Color Settings Files button. Click Apply. Bridge then displays an intact color “pie” to indicate that color settings are synchronized (right). Adobe Creative Suite 4 Printing Guide 13 Photoshop, Illustrator, InDesign, and Acrobat 9 Pro will now be able to use the same color settings. Each application will render color the same way, so color across the applications will look consistent on screen and will print consistently. If you do not wish to implement color management, you may elect to use what is termed a safe CMYK workflow. A safe CMYK workflow ensures that CMYK color numbers are preserved all the way to the final output device, as opposed to being converted by the color management system. This workflow is beneficial if you want to incrementally adopt color management practices. For example, you can use CMYK profiles to soft-proof without risking unintended color conversions before final output. Illustrator and InDesign support a safe CMYK workflow by default; when you open or import a CMYK image with an embedded profile, the software ignores the profile and preserves the raw color numbers. If you want your Creative Suite application to adjust color numbers based on an embedded profile, change the CMYK color policy to Preserve Embedded Profiles in the Color Settings dialog box. You can easily restore the safe CMYK workflow by changing the CMYK color policy back to Preserve Numbers (Ignore Linked Profiles). You can override safe CMYK settings when you print a document or save it to PDF. However, doing so may cause colors to be rendered in different color values. For example, pure CMYK black objects may be re-separated as rich black. For more information on color management options for printing and saving PDFs, consult the Help files for each Creative Suite 4 component. For more information on color management in Adobe products, see the self-help guide, available here: http://www.adobe.com/studio/print/pdfs/CS3_color_workflows.pdf Color swatches Creative Suite 4 components can easily share color swatches by using the Adobe Swatch Exchange (ASE) format. This makes it easy to establish standard swatches for a project, regardless of the originating application. For example, to save swatches from an InDesign document, select a range of swatches in the Swatches panel, and then choose Save Swatches from the Swatches panel menu. You are prompted to name and save the swatch file, and InDesign creates a file with the file extension .ase, containing all the selected swatches. To import swatches from an Adobe Swatch Exchange file, choose Load Swatches from the Swatches panel in Photoshop, Illustrator, or InDesign, and navigate to the saved .ase file. All swatches—regardless of color mode—are imported. OpenType font format Photoshop, Illustrator, InDesign fully support the extended features of OpenType® fonts. The OpenType format offers exciting features for designers, while being compatible with a wide range of imaging devices and workflow systems. Among the features of OpenType fonts are: • Cross-platform compatibility. A file created on a PC using OpenType fonts can be opened on a Macintosh computer using the same OpenType fonts, without any text alteration or reflow. • Extended character sets, including ligatures for letter combinations other than fi, fl, ffl, and so on. These discretionary ligatures are correctly interpreted during spellcheck. (Not all OpenType fonts include discretionary ligatures.) • Special characters such as diacriticals for non-English text, swashes, and arbitrary fractions (again, not available in all OpenType fonts). In PostScript fonts, such features have traditionally required the use of separate fonts (called Expert Sets) containing the special characters. Since an OpenType font can have in excess of 65,000 characters, all of these special features can be incorporated within one font. • Unicode number identification of characters. Unicode numbering means that, if a character exists in more than one OpenType font, it exists at the same position in the font. Thus, changing the font used by text would not result in missing or incorrect characters. (Again, not all special characters exist in all OpenType fonts, and switching to an OpenType font that did not have the desired special character would result in something called a “notdef” (not defined) character, usually indicated by a rectangle, where the character should be.) Adobe Creative Suite 4 Printing Guide 14 OpenType fonts coexist peacefully with PostScript Type 1 and TrueType fonts without conflict. Adobe OpenType fonts have distinct names (such as Helvetica LT Std or Adobe Garamond Pro) that prevent font conflicts and allow easy identification in font listings. You should have no imaging issues whatsoever with OpenType fonts, regardless of the font vendor. For more information on OpenType font technology, see http://www.adobe.com/go/opentype. Adobe Creative Suite 4 Printing Guide 15 Chapter 2: Adobe InDesign CS4 For most designers and service providers, InDesign is the cornerstone of Adobe Creative Suite 4 Design Premium and Standard. The advanced layout and output capabilities in InDesign expand creative freedom and streamline production workflows. InDesign CS4 includes many new features to enhance productivity, both for designers and print service providers. Such new features include: • Live Preflight: Preflight while you design. Continuous preflighting alerts you to potential production problems in real time so you can quickly navigate to a problem, fix it directly in layout, and keep working. InDesign’s Live Preflight function is configurable to check for conditions specific to your workflow. Define and share custom profiles to pinpoint problems early in the life of a job. A Preflight indicator in the status bar at the lower left of the document window dynamically displays the current Preflight state of the document. A green light in the status bar indicates that the document currently meets the preflight profile in effect. A red light indicates preflight problems; open the Preflight panel for detailed information. The dynamic preflight behavior enables designers to monitor the content of their documents throughout the design process, rather than discovering problems by preflighting just before they send their job for print. • Customizable Links panel: Find, sort, and manage all of your document’s placed files in the customizable Links panel. View attributes that are most critical to your workflow such as scale, rotation, and resolution. Links Panel options allow you to choose whether to display columns that display Effective PPI, color space, rotation, and much more. The new Relink to Folder speeds the updating of links by allowing you to target a folder. • Smart Guides: Quickly align, space, rotate, and resize single or multiple objects with the help of dynamic guides. The guides, object dimensions, rotation angles, and x and y coordinates appear dynamically so you can quickly snap an object’s edge or its vertical or horizontal center to another nearby object or page edge in the layout. • Spread rotation: Temporarily rotate the spread view without physically turning your monitor. Enjoy full editing capability at 90-, 180- and 270-degree angles so that you can easily include non-horizontal elements in your designs. Note that the rotation is just a display effect that makes it easier to work on rotated content; rotated spreads print in their original, unrotated orientation. • Place multiple graphics as a contact sheet: Interactively create grids of multiple images as they are placed. While placing multiple graphics, hold down Ctrl+Shift (Mac: Command+Shift) to drag a grid of images. Use keyboard arrows to control the number of rows (up/down arrows) and columns (left/right arrows). • Smart Text Reflow: Automatically add pages at the end of a story, selection, or document when text is overset using this new preference. Smart Text Reflow works hand-in-hand with conditional text as pages are automatically deleted or added when conditional text is hidden or shown in the document. • Text Stroke Enhancements: Miter limit and Join options allow you to control the appearance of strokes applied to text. InDesign CS4 also includes new features dedicated to long-document creation. While you may not be creating such content, it is useful to be familiar with the features if you are required to edit content. These features include: • Conditional text: Deliver multiple versions of a document for different users, all from a single InDesign source file. Hide text at paragraph, word, and even character level without relying on layers. The remaining text and anchored objects automatically reflow in the layout. Adobe Creative Suite 4 Printing Guide 16 • Cross-references: Simplify the writing, production, and management of long documents with flexible and powerful cross-references that dynamically update as content is changed or moved within a document. As cross-media publishing grows, your customers may wish to repurpose their print content for online use. InDesign CS4 builds on the HTML export features of CS3 and adds new features to enable designers and print production operators to create interactive online content without learning an extensive new set of skills: • Interactive document design with SWF file export: Transform page layouts into dynamic SWF files without working in the Adobe Flash® authoring environment. Create digital documents with interactive buttons, hyperlinks, and unique page transitions for playback in the Adobe Flash Player runtime. • Page transitions in SWF and PDF files: Apply page transitions such as wipe, dissolve, fade, and more to individual pages or all spreads, and output to SWF or PDF. Preview a page transition before it is applied, and experiment with speed and direction for greater design control. You can even add a page curl effect during SWF export. • Export to Adobe Flash CS4 Professional (XFL): Export InDesign documents to the XFL format and open them in Adobe Flash CS4 Professional with the visual fidelity of your original InDesign layout maintained. Use Flash to add sophisticated interactivity, animation, and navigation to complex layouts for an engaging reading experience. • Kuler panel: Easy access to the Adobe Kuler online community, so you can experiment with color harmony rules, and create, save, and download color themes, automatically adding them to the Swatches panel. Note that Kuler-generated swatches are RGB. • Collaboration tools: Use the Share My Screen function via ConnectNow (File > Share My Screen) to collaborate and communicate with customer. Corrections and revisions are much easier when you and your customer are looking at the same file simultaneously. Preparing InDesign Documents for Output Your particular workflow will dictate some of the operations you perform on incoming InDesign files; for example, you may wish to substitute a four-color rich black formula in large areas of black that the customer built as 100%-process black. You may need to re-separate customer images to accommodate the total ink limit of the press running the job, and so on. But there are some general operations that you should consider performing on every job, as part of preparing it for imaging. Cleaning up extraneous content in files While extra content such as non-printing objects, hidden objects, and objects outside the page limits won’t actually image, such content can add to file size and file complexity, or even produce unnecessary alerts. Cleaning up the Pasteboard Objects in the pasteboard area do not image, nor do they appear in exported PDF files, unless they fall within the designated bleed or slug area. But the proxy representations of graphics used in those objects are still present in the file, and they contribute to file size. When a file is packaged, InDesign does not include the links for objects in the pasteboard that are fully outside the printable area of the document. However, when the file is opened on another computer, it produces a Missing Link alert triggered by that absent content, that at first appears to be a problem. However, links in the pasteboard area are marked by the page designation “PB” in the Links panel, which will help you narrow down the issue. To prevent future confusion, delete unused content in the pasteboard area. Unused layers Empty layers don’t cause any problems in imaging, but deleting them from a complex document may facilitate troubleshooting or other file operations. In the Layers panel menu, choose Delete Unused Layers. There’s no confirmation or intermediate alert; the layers are instantly deleted. Adobe Creative Suite 4 Printing Guide 17 Managing swatches Like empty layers, unused swatches have no impact on output, but you may find that simplifying an overly long list of swatches makes it easier to see what inks are actually used in the document. To eliminate unused swatches, choose Select All Unused from the Swatches panel menu, and then click the Trash Can icon at the bottom of the Swatches panel to delete the selected swatches. If you are unable to delete a swatch you believe to be unused, it’s possible that it’s used by imported artwork. If so, you will be unable to delete the swatch. To determine if a spot-color swatch is used by imported artwork, you can use Separations Preview (Window > Output > Separations Preview) to search for objects using the swatch. In a long document, this may be tedious, but it’s effective. Process swatches, of course, will not generate unnecessary plates. To find InDesign objects such as text, lines, or frames that use unwanted swatches, use the enhanced Find/Change function. Choose Edit > Find/Change, select the Object tab at the top of the dialog box, and then click the small magnifying glass icon to the right of the Find Object Format area of the dialog box. The Find Object Format Options dialog box opens; select Fill in the left column, and select the name of the swatch in the swatch list at the right. Click OK, return to the Find/Change dialog box, and click the Find button. The first object filled with the swatch should be highlighted. If nothing is highlighted, or if the alert “Cannot Find Match” appears, click the small trash can to the right of the Find Object Format field to clear the attributes, and click the magnifying glass to return to the Find Object Format Options dialog box. Change the Attribute from Fill to Stroke, click OK, and run Find again. If you still can’t find an object, you can continue eliminating attributes such as shadows, and so on. And note that if the swatch name does not appear in this list, this indicates that there is no InDesign-created object using the swatch; that alone eliminates one of the possible causes of the mystery swatch. Find/Change to Locate Objects by Attributes Click the Object tab at the top of the dialog box (above); then click the magnifying glass to open the Find Object Format Options dialog box (right). If you cannot locate any page elements using the unwanted spot color, but are still concerned that an unwanted plate may be output as a result of artwork you’ve overlooked, try this: Print the file as separated output to a laser printer, selecting only the problem plate for output. If no objects or artwork are using the problem swatch, when you start to print, an alert will appear that the selected pages do not use the ink. If you determine that the swatch is truly not used in the document, you should feel confident that no unnecessary plates will be generated by the file. However, you may want to delete the swatch to avoid confusing anyone who handles the file later in the prepress process. If you still can’t delete the swatch, try exporting the file to InDesign Interchange to clean it up. Choose File > Export, and choose InDesign Interchange as the format. A file with the extension .inx is created. Close the problem file, and open the InDesign Interchange file. You should now be able to delete the problem swatch, and save the file under a new name. Editing swatches It’s better to manage, examine, and edit colors when they are saved as swatches. To find colors used in the document that are not designated as named swatches, choose Add Unnamed Colors from the Swatches panel menu. InDesign then finds all colors and adds them to the Swatches Adobe Creative Suite 4 Printing Guide 18 panel list. It’s now much easier to check for spot colors or process colors specified as RGB or Lab colors that may not output as expected, because they will be converted to CMYK during most print or output operations. To edit a swatch, double-click the swatch name in the Swatches panel; the Swatch Options dialog appears. Use the Color Type pop-up menu to choose between Spot and Process. Choose from the Color Mode pop-up menu to assign a color mode—you can choose from Lab, CMYK, and RGB, or select from the long list of color swatchbooks, such as Pantone Coated, TRUMATCH, Toyo, and more. Note that just setting the Color Mode to CMYK (without changing the Color Type) is not sufficient to designate a swatch as a process color. You must also change the Color Type to Process to designate the swatch as process. Changing the Color Definition of a Swatch Double-click the swatch name in the Swatches panel; you can then change the name, color type, and recipe in the Swatch Options dialog box. Here, an RGB swatch (left) is converted to CMYK for more predictable output (right). Using the Ink Manager You may receive a job that uses multiple spot inks, which are actually intended to print as a single color. For example, the InDesign file may include artwork and page objects that use Pantone 130 C, Pantone 130 U, and PMS 130. Clearly, these names are intended to represent a single ink, and the multiple ink definitions must be resolved before printing. Most RIP software allows the remapping of spot colors, to resolve extra inks to the correct plates. But you can also use the InDesign Ink Manager to rectify the superfluous colors and accomplish the same goal—correct output. The Ink Manager is available via several routes: • Through the Swatches panel menu. • Through the Separations Preview panel menu. • In the Print dialog box. • In Export dialog boxes for EPS and PDF. Using the Ink Manager Select a spot color you want to remap to another ink, and use the Ink Alias pop-up menu to select the target ink. To remap one spot color to another spot color (or to a process plate), select the spot color in the Ink Manager dialog, and choose the appropriate plate from the Ink Alias pop-up menu. You can also use a process plate as the target ink, but you cannot map a process plate to a spot ink. Adobe Creative Suite 4 Printing Guide 19 You can also check “All Spots to Process” to output all spot inks as process. This is a nondestructive option: the spot inks are not actually redefined as process colors, but print and export as process builds (all conversions and ink alias operations performed in the Ink Manager are nondestructive). Caution: if there are several different definitions of what should be one spot color, outputting the colors as CMYK may result in inconsistent color, even if you’ve mapped all the extra spot colors to one ink. If this is the situation, the best way to achieve color consistency is to edit all objects and placed artwork to use one spot color or one consistent CMYK recipe. This may require that you edit placed artwork in the original applications, such as Photoshop and Illustrator, to achieve consistent color. About InDesign Program Versions InDesign CS4 can open a file created in any previous version of the program, with certain considerations. For example, in some environments, customers may request that the printer return final versions of files, reflecting any corrections requested by the customer or performed by the printer to facilitate imaging. If you haven’t updated all of your workstations to CS4, beware of attempting to work on customer files with an older version of InDesign. While it’s possible to export a file from InDesign CS4 as an InDesign Interchange file, opening that file in InDesign CS3 may result in some content being modified—or lost. Some content, such as Conditional Text, doesn’t exist in CS3; hidden conditional content will be deleted when an Interchange file from CS4 is opened in InDesign CS3. All of the conditional attributes will be lost if the file is opened in InDesign CS3, resaved, then reopened in InDesign CS4. Thus, file fidelity will be lost in attempting to “round-trip” such files. Consequently, it’s best to keep InDesign files in their original version throughout the life of the job. Cross-platform issues While InDesign files and popular graphics formats originating on a PC can be opened on a Mac (and vice versa), fonts can still be an issue. Windows-format TrueType fonts can be used under Macintosh OS X, and OpenType fonts are fully cross-platform. PostScript Type 1 fonts, however, are platform-specific. Attempting to replace a font with what seems to be the cross-platform equivalent can easily result in a changed appearance, or worse, text reflow. Using a font-conversion utility to convert a PC font to a Mac font (or vice versa) may result in a font with changed font metrics, which may result in text reflow. Additionally, you may find that the End User License Agreement (EULA) for the font forbids such conversions. It is strongly recommended that you keep files on their original platform unless you’ve determined that OpenType fonts are used throughout the job. Managing missing fonts When you open an InDesign file that’s missing fonts, the Missing Fonts alert lists those fonts needed by InDesign that are not available. Note, however, that this initial list does not reference any fonts needed by placed graphics. Clicking the Find Font button takes you to the Find Font dialog box, in which all fonts required by the document itself are listed, as well as fonts needed by placed art (indicated by an icon). Click the Find First button to navigate to the first use of the font in the document. (The Find Font dialog box is available at any time by choosing Type > Find Font.) Adobe Creative Suite 4 Printing Guide 20 Missing Fonts Alert When you open an InDesign file that uses fonts currently unavailable on the system, you’re presented with an alert listing the missing fonts. However, only fonts used by InDesign are listed: fonts used in support artwork are not listed here. Using the Find Font feature InDesign’s Find Font feature lists fonts used by InDesign, as well as any fonts used by placed graphics. Here, the font Balloon is used by a placed Illustrator file, but is not available on the system. (Illustrator embeds fonts with suitable permissions, but won’t embed fonts whose vendors disallow embedding.) To replace a needed font in the Find Font dialog box, select the font name in the top window of the dialog box, and then choose a replacement font family and style in the Replace With fields. Replacing fonts does not, by default, change style definitions. To do that, check the Redefine Style option. Keep in mind that replacing fonts will change the appearance of text and possibly cause reflow. It’s preferable to use the correct fonts originally specified by the designer, unless you have been given permission to replace fonts. While you can designate replacement fonts for text created in InDesign, you cannot replace fonts in placed graphics; for that, you’ll have to open the artwork in the originating application and make the change, resave, and update in InDesign. Again, consult the file’s creator to obtain the correct font, or permission to substitute an available font. When you preflight a file in InDesign, the application checks for fonts needed by placed artwork and reports any missing fonts. When you package a file, InDesign gathers up all necessary fonts—including those required by (but not embedded in) placed artwork, provided that all required fonts are active on the system. “Missing Font” messages A common cause of missing font messages is moving a file from one platform to another. Even if you’ve deemed this safe because only OpenType fonts are used in the file, you may be surprised by InDesign’s insistence that it’s missing the font Times. This is because the InDesign default paragraph style, Basic Paragraph, uses a platform-specific version of Times. It’s likely that the “missing” font is used in a miscellaneous space or paragraph return. You can either manually change each instance (being careful to determine that this won’t alter the appearance of text), or you can change the definition of the Basic Paragraph style. Double-click the style named [Basic Paragraph] and change its Basic Character Formats to use a font that is available on your system. Note, however, that if you perform this change and return the file to your customers, they’ll face the same issue when they reopen the file on their own platform. Cross-Platform—Missing Times message Because the Basic Paragraph style on a PC uses Times Roman,and the Basic Paragraph style on Mac OS uses Times Regular, this message may appear when you open a InDesign Mac document on a PC (left), or a PC InDesign document on the Mac (right). Adobe Creative Suite 4 Printing Guide 21 Fixing the Missing Times Problem Double-click the [Basic Paragraph] style in the Paragraph Styles panel, select Basic Character Formats in the left column, and change the font family to a version of Times active on your system (usually the TrueType version on a Mac). If there’s no result when you click the “Find First” button—that is, if InDesign doesn’t take you to a spot in the document and highlight the text that uses the missing font—check paragraph styles and character styles. If there’s no visible evidence of text needing the font, there will probably be no problems with output. However, if you suspect that the phantom font is a symptom of a corrupt file, try exporting the file to InDesign Interchange to clean it up: 1.Choose File > Export, and choose InDesign CS3 Interchange (INX) as the format. A file with the extension .inx is created. 2.Close the current document. 3.Go to File > Open and navigate to the InDesign Interchange (.inx) file. 4.Examine the file to ensure that no unwanted alterations have taken place; then choose Type > Find Font to see if the phantom font is gone. 5.If all is well, choose File > Save As and save the file with a new name, indicating that it’s derived from your customer’s original file but is a revised version. Note: Exporting to InDesign Interchange is primarily intended for sharing files with users of InDesign CS3, but it is also a valuable method for dealing with a file that has developed internal corruption. The process of exporting to InDesign Interchange can often solve problems with files, such as spurious missing font messages and unnecessary swatches that cannot be removed. Improvements and Enhancements to the Links Panel In addition to providing new methods for locating, updating, and relinking graphics used in an InDesign file, the Links panel has been greatly enhanced in CS4 to provide detailed information about linked and embedded graphics. Common functions, such as relinking graphics, are also easier to perform with the new interface. Adobe Creative Suite 4 Printing Guide 22 Category columns A B Links Panel main window C D E Link Info window Links Panel Enhancements Sort the Links panel by file name, status, page, and more, by clicking the sorting icons at the top. Display the Link Info window section of the Links panel by clicking the disclosure triangle (circled). Customize display options by choosing Panel Options from the Links panel menu. A. “One or more instances modified” icon B. Modified icon C. Missing-link icon D. Embedded-link icon E. Show/Hide Link Information Enhancements to the Links Panel include: • Links Panel main window: Thumbnails are displayed for each link, making it easy to quickly identify graphics in the Links list. The links list can be sorted by file name, page, status, and more, by clicking on the column header icons at the top of the Links panel. Graphics placed multiple times in a document are now displayed as single entries, with a disclosure triangle by the file name to allow you to view all instances of the graphic. The Modified icon for multiple instances of a graphic is different from the Modified icon for a single placed file, making it obvious that some — but not all — instances have been modified. For graphics not placed on a document page, the Links panel also displays PB for items on the pasteboard, a Master page identifier (such as A for a graphic on the A Master spread), OV for a graphic anchored in overset text, and HT for a graphic anchored in hidden Conditional text. • Link Info window (an expansion to the Links panel): Click the disclosure triangle at the bottom of the Links panel to display extensive information about a selected link, including scale factor, dimensions, effective ppi, and much more. This feature replaces the Link Information option formerly available through the Links panel menu, and provides much more information than the previous feature. • Panel Options: Available through the Links panel menu, Panel Options include row size, thumbnails, and controls for displaying an extensive list of information for each link. The options allow you to customize the information displayed in the Links panel. You can choose whether to have the selected information displayed in a column in the main Links panel window, or as a listed item in the Link Info window below. These options govern what is displayed in the Links Panel, as well as the Link info window that is part of the Links panel. If you add multiple new options under Show Column, you will have to widen the display of the Links panel to view all the columns. By default, the most commonly needed options are displayed in columns in the main window of the Links panel, and the remainder are displayed in a list in the Info panel. Adobe Creative Suite 4 Printing Guide 23 Links Panel Options Choose which information is displayed in the Links panel, as well as the Link Info window (part of the Links panel). Note that the more options you select in Show Column, the wider the Links panel can become. You can sort the Links list by the icon at the top of any column. Readilyavailable information on color space, ICC profiles, effective resolution, scaling, rotation, and transparency can speed your evaluation and troubleshooting for customer files. • Utilities: Available through the Links panel menu, Utilities include Copy Links To (which copies selected links to a designated folder) and options for copying the full directory path of a selected link. • Other features: The Links panel menu offers options to Edit Original, Reveal in Finder or Reveal in Bridge, and to embed or unembed graphics. Managing links and relinking imported files If your client has used the InDesign Package feature to organize and submit files, and you haven’t altered the directory structure of the submitted folders or renamed any of the support files, all graphic links should be current. If, however, you have moved the support files, renamed the Links folder created during the Package process, or renamed the files themselves, you will have to refresh the links to support files. To update modified links, select one of the links in the Links panel which displays a yellow triangle alert (indicating it has been modified). Then, from the Links panel menu, choose Update All Links. All modified links will then be updated. Missing Graphics Missing and Modified Graphics The red stop signs indicate links that are missing—they’ve been moved or renamed. The yellow triangle indicates a file that has been modifed since the InDesign file was last opened. Modified Graphic To link to missing files, select the name of one missing graphic in the Links panel (Window > Links), click the Relink button on the bottom of the panel ( ), and navigate to the first of the missing files, and relink. If all missing files are stored in the same directory (and have not been renamed), all of them will be updated automatically. If the files are distributed over several directories, you’ll have to relink to one file in each directory; the remaining files in the directories will be updated automatically. If all links are current, but you wish to relink to different graphics with the same file names (for example, high-resolution versions of the currently linked low-resolution files), you can quickly relink to a folder containing the replacement graphics. Select the names of all the missing links in the Links panel, and then choose Relink to Folder from the Links panel menu. Navigate to the folder containing the correct files , and click the Choose button. Adobe Creative Suite 4 Printing Guide 24 Relink to Folder To quickly relink graphics to graphics with the same name, but in a different folder (for example, to substitute high-resolution images for low-resolution images), select the link names and choose Relink to Folder from the Links panel menu. If you need to link to a different file format with essentially the same name but a different extension (for example, Image.eps rather than Image.tif ), Relink to Folder contains an additional, helpful option. Relinking to Other File Types The Relink to Folder dialog includes an option to retain the original filename, but change the extension. By the way, you can use this option to relink to files whose names you’ve modified with added text: for example, if your original graphics were named with the convention Image.eps, but the revised graphics are named with an added “.r1” to indication a first-round revision (e.g., Image.r1.eps), you can set the Relink to Folder operation to link to graphics with an “r1.eps” extension. Note that you must use a dot separator in the name as in this example; other separators, such as an underscore or dash, will not be recognized by the Relink to Folder option for matching extensions (don’t enter the first dot in the Match same filename field; InDesign assumes that there is an initial dot). If files have been completely renamed, you’ll have to manually relink to those files one by one, since InDesign cannot automatically recognize them as replacements. Replacing FPO (For Position Only) images If you’re using an OPI (Open Prepress Interface) workflow that swaps low-resolution images for high-resolution images, and the high-resolution images have the same names as the lowresolution images used by the designer, you can use the Relink to Folder method to link to the replacement files. Your OPI system vendor may also offer a plug-in for InDesign that facilitates this for you. But if you are replacing low-resolution FPO images scanned by the customer with high-resolution scans created in your shop, relinking won’t achieve the desired result, because the low-resolution images are not derived from your high-resolution scans. InDesign retains any transformations (such as cropping, rotation, and scaling) when relinking, but if your scans are not identical in origin or dimensions to the designer’s desktop scans, the position and scale of the images will likely be incorrect. Adobe Creative Suite 4 Printing Guide 25 Updating customer's low-resolution FPO image Using the customer’s placed low-resolution image as a guide (left), size and scan the artwork (center). But if you simply relink to your high-resolution image, any transforms are also applied to the new image when it is imported (far right). Position, scale, and rotation are incorrect as a result. Here, the customer enlarged the image and rotated it slightly clockwise, and the transparency has been scanned to match. Placing the high-resolution scan in the same frame maintains those transformations, resulting in an oversized, rotated image. It will be necessary to manually remove the rotation and scaling, and reposition the image to match the customer’s art. Consequently, you must manually position your scan to match the scale, crop, and position of the customer’s FPO scan. Here’s an easy method for accomplishing this: 1.Create a new frame containing your high-resolution scan (or place the image in the page and allow it to create its own frame). 2.Set the frame’s opacity to 50%. 3.Position the frame over the one containing the customer’s FPO image. 4.Rotate, reposition, and scale the frame until its content lines up with the customer’s image. The Free Transform tool ( ) makes this easy. 5.Once the high-resolution image matches the FPO image, select the high-resolution image with the Direct Selection tool, and copy the image to the clipboard. 6.Switch to the Selection tool and delete the frame, leaving the original customer frame in position. 7. Select the customer frame (you don’t have to delete the image) and choose Edit > Paste Into. InDesign replaces the customer’s FPO image with your high-resolution scan. Embedded artwork Support artwork is usually linked in InDesign files. However, you may find that a customer has embedded artwork in the file rather than linking to it, and has not supplied a copy of the original graphic. (To embed an image, select it, and then choose Embed File from the Links panel menu.) When you preflight a file that contains embedded graphics, the original graphic name is represented by “(Embedded)”, but the graphic’s page and type are still listed. The Links panel, however, lists the graphic’s original name. While embedding usually doesn’t cause problems in imaging, it increases the file size of the InDesign document, and it makes it more challenging to edit the artwork. The artwork must be unembedded in order to be edited in an external application such as Photoshop or Illustrator. Select the name of the link in the Links panel, and choose Unembed File from the panel menu. You’ll be asked if you want to link to the original file; click No (because you don’t have the original file) and navigate to the folder where you’d like to save the unembedded file. InDesign extracts the embedded art, saves an external file with the correct name, and updates the link to the newly created file. You can now edit the graphic as necessary. Note that the result is identical to the original placed graphic before embedding—there is no change in resolution or color space. It’s simply been extracted from the InDesign file and saved to disk. Embedded Images An icon indicates that a graphic is embedded in the InDesign file (left). To edit the graphic, you must first unembed it and save it as an external file. Select the link in the panel, and choose Unembed File from the panel menu. Click No in the dialog box that appears (right). Adobe Creative Suite 4 Printing Guide 26 Copied and pasted artwork Vector artwork that shows no entry in the Links panel has likely been copied and pasted from Illustrator. This should present no problem during imaging. Pasting content from Illustrator offers the advantage of being completely editable within InDesign, but it has no relationship with the original Illustrator file. The artwork is now part of the InDesign file, independent of the Illustrator file from which it was copied, as if it had been drawn in InDesign. Thus, editing the original file in Illustrator does not change the InDesign file. Image content copied and pasted from Photoshop, however, presents some problems. Even if the original image was CMYK, the copied content is RGB. There is no link to the original file, and thus no editability and no way of determining the file name of the original file. Essentially, it’s a screen shot. If possible, obtain the original Photoshop image from the file creator and place, rather than copy and paste, it in the InDesign file. If you cannot obtain the original image, select the image (or frame) in InDesign, and copy to the clipboard. Launch Photoshop and create a new, empty file (File > New). Accept the size Photoshop indicates—it’s based on the dimensions of the image content you copied to the clipboard. Paste the image; in Photoshop CS4, it becomes a Vector Smart Object. Press Return or Enter after pasting. Then, choose Layer > Smart Objects > Rasterize. Perform the desired edits, change color space if necessary, and save the file. To update the InDesign file with the new file, select the frame containing the pasted image, choose File > Place, and navigate to the saved image you created. Above all, advise your customer not to copy and paste from Photoshop in the future. While Photoshop and InDesign allow it, it’s not a good production practice. Determining image resolution and color space To check the resolution and color space of an individual image, select it and consult the Info panel (Window > Info). However, not all formats can be determined in this manner: while the Info panel displays information for TIFF, JPEG, PSD, and Photoshop EPS files, it cannot display information about PDFs or Illustrator AI or EPS files containing images. Pay special attention to the Actual ppi (pixels per inch) and Effective ppi values: Actual ppi describes the original resolution of the image as it was saved from Photoshop; Effective ppi describes the resolution of the image as it is used in InDesign. For example, a 300 ppi image that has been scaled at 200% in InDesign would have an Actual ppi of 300 x 300, and an Effective ppi of 150 x 150. This information is useful in determining if an image has been scaled beyond a desired resolution. Using the Info Panel Selected images (PSD, TIFF, EPS, and JPEG) display their resolution and color space in the Info panel. Layer overrides to placed files The Layer Overrides (Object > Object Layer Options) in InDesign allow a designer to control the display of layers in Photoshop, Illustrator, or PDF files from within InDesign CS4. A designer can even apply different layer visibility overrides to different instances of the same source file. Wise use of this technique can reduce the number of images that need to be tracked, transported, and managed, while also giving designers new flexibility and simplified file management. Applying layer overrides does not alter the original layered file; it only affects how the file displays in InDesign; files with layer overrides output as they appear on screen. Graphics governed by Object Layer are indicated in the Links panel with a “Yes” in the Layer Overrides column, followed by a number indicating how many layers are affected. Adobe Creative Suite 4 Printing Guide 27 Object Layer Options Layered graphics whose appearance is affected by Object Layer Options are indicated by a “Yes” in the Layer Overrides column. A number in parentheses indicates how many layers are affected. When performing any edits in Photoshop to a file using Layer Overrides, be mindful that your actions may affect multiple instances of the image. Don’t delete any layers during edits—they may be needed in some instances of the image. Don’t flatten the original source files for images affected by layer overrides. If your shop has historically advised flattening Photoshop layered files placed in InDesign, be sure to advise customers and staff not to flatten when layer overrides are used. Maintain the layer names, stacking order, and layer comp definitions in each layered source file unless you need to alter the file. When these layering attributes are altered in the original file after layer overrides are applied in InDesign, the link becomes invalid in InDesign and the appearance of the file may change when the link is updated. This does not create an output issue if the resulting changes in appearance are intentional. The Layer Options dialog box offers the choice of honoring InDesign’s overrides when updating a graphic or “starting over” with the saved file’s layer visibility settings. Even if you choose to honor InDesign’s overrides when updating, any new layers you’ve added will automatically be visible. Raster-based Photoshop DCS and EPS files Desktop Color Separation (DCS) files may still be used by some customers who need to include spot color plates in their color images. Because DCS files are pre-separated, it can be a challenge to integrate them into some prepress workflows. InDesign CS4 automatically merges DCS 2.0 files created from Adobe Photoshop during printing or export, so it’s easier to reuse legacy files. These enhancements are made possible because InDesign reads Photoshop DCS and EPS files as images. Reading these file types as images yields another benefit: Photoshop EPS files can be color-managed if an ICC profile was embedded. For an EPS or DCS file to benefit from these enhancements in Adobe InDesign CS4, the file must meet the following requirements: • The file must be created by Photoshop. • The file must be an 8-bit file. The CMYK, RGB, and gray color models are supported. It can include spot colors, and it can be a multitone file (such as a duotone). • A DCS file must not be saved with the Include Vector Data option selected. (Clipping paths are supported without this option selected.) • DCS files must conform to the DCS 1.0 or 2.0 specification. EPS and DCS files (such as copy-dot scans) not meeting these requirements can still be placed, but they won’t benefit from the enhanced workflow in InDesign. You can also elect to open DCS files in Photoshop and resave them as native Photoshop (.psd) files, and then replace the DCS files in InDesign. Unlinking and relinking placed text files Unlike placed graphics files, placed text files are always completely included in the document so that the text can be edited freely in InDesign. By default, text files are not linked to a source file, although that preference can be changed. If text files are placed as linked files, and are marked as missing in the Links panel or Preflight dialog box, it poses no problems for high-resolution printing because the text is completely included in the document. Placed text stories can be unlinked from their source files using the Links panel. Unlinking causes InDesign to stop tracking the source text files. If a customer uses a workflow where text is only edited and formatted within Adobe InDesign after it’s placed, unlinking text files prevents Adobe Creative Suite 4 Printing Guide 28 unnecessary alerts caused by modified or missing external text files that are no longer needed. Depending on your customers’ editing workflow, you might consider adding an unlinking step to the customer checklists you provide for handing off jobs. To unlink text files: 1.Select all text files in the Links panel. You can use the standard methods for multiple selection (Shift-clicking or Ctrl- clicking (Windows) or Command-clicking (Mac OS) items in the panel). 2.Choose Unlink from the Links panel menu. The unlinked items are removed from the Links panel, but the actual text content remains in the document. While retaining links to external text files might sound attractive when text alterations are sent by a customer, note that updating a link to a supplied text file will eliminate any formatting performed in InDesign. This could wreak havoc if changed formatting is subsequently overlooked. Customers who are prone to frequent or late-stage text editing should consider using an InCopy workflow instead. For more information on InCopy, see the InCopy product page on the Adobe website: http://www.adobe.com/products/incopy. InDesign Files as artwork InDesign files—even multipage documents—can now be used as artwork; that is, you can place an InDesign file into another InDesign file, in the same manner as you would place a Photoshop or Illustrator file. This can facilitate ad placement, collaboration, even manual imposition. Files are displayed in the Links panel in the same way as placed Photoshop or Illustrator files, with one difference: support art required by the placed InDesign file is listed below the placed file, indented to highlight its relationship to the placed InDesign file. The InDesign Preflight function checks placed InDesign files and reports on the status of artwork and fonts needed by those placed files. In addition, placed InDesign files as well as their support art and fonts are gathered if the file is packaged. Placed InDesign File A placed InDesign file is listed in the Links panel as any other art file. File names indented below the InDesign file indicate artwork linked to that file. Placed InDesign file Support files for placed InDesign file While Type > Find Font will allow you to substitute fonts in the main “parent” InDesign file, you’ll have to open any placed InDesign files to perform font substitution in those files, and then update. To open a placed InDesign file, select the name of the file in the Links panel and click the Edit Original icon (small pencil) at the bottom of the panel. If you edit graphics contained in the placed InDesign files, you’ll need to update their links in the placed files, and then update the placed files themselves in the parent file. PDFs as artwork In much the same way as you’ve traditionally used EPS files as artwork, you can use PDFs (including multi-page files) as artwork. If the PDFs were correctly created, there are no worries about missing support files or font embedding (provided that all fonts used to create the PDF will allow embedding). Any change to the original PDF file (such as regenerating the file, deleting or rearranging pages) will impact the appearance of the InDesign file. For best results, PDF files intended for placement as art in an InDesign file should be saved as Acrobat 5.0-compatible or later to avoid premature flattening of transparency. If the originating application has used fonts that forbid embedding, the PDFs will yield a “missing fonts” alert during Preflight, as well as marking those fonts as missing if you use Find Font. A file using such PDFs as artwork won’t image correctly unless the necessary fonts are supplied, active, and avail- PDFs as Placed Art The Links panel shows which pages of a multipage placed PDF are used, indicated by the number after the colon. Adobe Creative Suite 4 Printing Guide 29 able to the imaging device. Note that PDFs with security settings cannot be placed in InDesign, even if you know the necessary passwords. Text Features InDesign contains some advanced features for generating text components. Text components such as Cross-References, Conditional Text, paragraph-based numbering, and Variables are generated as the result of special functions in InDesign and, as such, require some special handling when editing. Cross-References Helpful in long documents such as user manuals or technical publications, cross-references refers readers from one part of the document to another. If a document is extensively edited, causing text reflow, cross-reference text may change as page numbers are updated. To change the specifications for a cross-reference, use the options in the Cross-Reference panel (Window > Type & Tables > Cross-References). You can customize your Preflight profile to warn you if Cross-references are out of date and require updating. Conditional Text Conditional text is text whose display is governed by conditions — hence the name. For example, a textbook might contain quiz questions along with answers to the questions. The instructor’s copy would display the quiz answers; the students’ copies would not. Using conditional text, both versions of the textbook can be sourced from the same document. While multiple layers are one solution to this requirement, conditional text offers the advantage that the optional text can be inline with other text; this can make it easier to align common and conditional text. Note that if conditional text is turned off within a story, text reflow may occur. Advise your customers to notify you if they have used the Conditional text feature, and suggest that they provide you with hard copy or PDFs for each case of Conditional text so you can check for correct output. Showing and Hiding Conditional Text Conditional text can be visible for one version of output (left) and hidden for another version (right). Note that when inline conditional text is hidden, remaining text may reflow. Any text — a paragraph, a word, even a single letter — can be tagged with one or more conditions. You must be careful to set the visibility of the conditional text itself correctly; if the conditional text is visible, it will print. To control the visibility of conditional text, use the “eye” icon in the Conditional Text panel (Window > Type & Tables > Conditional Text). To easily identify text belonging to each condition, color indicators such as highlights and several types of underscores can be selected. You can choose whether to show or hide conditional text indicators, and you have options to show but not print the indicators, or to show and print the indicators. In most circumstances, you would wish to avoid printing conditional text indicators, except possibly for proofreading and identification purposes on proof output. To control the visibility and printability of conditional text indicators, use the options in the Indicators pop-up menu in the Conditional Text panel. Assigning Conditional Text Selected text can be assigned to one or more conditions. A check by the condition name means that currently selected text is tagged with that condition. The eye icon controls the visibility of the conditional text. If conditional text is visible, it will print. The Indicators pull-down menu controls the visibility and printing state of conditional text indicators, not the conditional text itself. Adobe Creative Suite 4 Printing Guide 30 Conditional Text Indicators Indicators such as colored wavy underlines or highlights identify conditional text. You can choose whether these indicators are visible or hidden, and whether they print. Don’t confuse the visibility and print options for the conditional text indicators with the visibility (and thus the printability) of the conditional text itself. Paragraph-based Numbering Enhanced numbering and bulleted lists are paragraph attributes, and can be controlled by paragraph styles. If you need to change the formatting for a numbered list (for example, to change all numbers to another color), you will find that you cannot select the numbers themselves as you would select other text. Because the numbers are generated by the paragraph style, you must change them by using the Paragraph Styles Option dialog box. To control the formatting and color of numbers and bullets in such situations, you will need to invoke a character style that applies the desired formatting. For details on formatting numbered text, see InDesign Help. Numbering Styles If you can’t select a number or letter in a list, it’s being generated by a paragraph style that uses InDesign’s auto-numbering feature. To change the attributes of the numbers (or letters), open the Paragraph Style Options for the style (double-click the style name in the Paragraph Styles panel). Change the options to alter the appearance of the numbers or letters. Here, the multiple-choice letters to the answers in the quiz have been changed from lower-case to upper-case letters. Variables A Text Variable generates text based on rules: In a Running Header, text is generated based on rules set up in the Variable definition. To edit the text generated by the variable, either edit the definition (Type > Text Variable > Define, and select the variable), or convert the variable text to plain text (Type > Text Variables > Convert Variable to Text) and edit the converted text. Note that plain text will no longer be changed if the variable definition is edited. There are nine types of variables: Adobe Creative Suite 4 Printing Guide 31 • Chapter Number: Usually inserted into individual documents that are part of a Book file. When the Book file is synchronized, each chapter is given the correct number, based on its position in the book. • Creation Date: Based on the original creation date of the file. • File Name: Inserts the document’s file name. • Last Page Number: Inserts the total number of pages, and updates if pages are added to or deleted from the file. • Modification Date: Inserts the most recent modification date of the document, including the date and time of day. The date is updated each time the document is saved. • Output Date: Inserts the most recent print or export date of the document. • Running Header (Character Style): Inserts text derived from the first or last instance of text using a specified character style on the page. Think of telephone books which show the first and last names at the top of each page. • Running Header (Paragraph Style): Inserts text derived from the first or last instance of text using a specified paragraph style on the page. • Custom Text: Available only when you select New in the Text Variables dialog, the Custom variable lets you assign any text to a “placeholder” variable. This can be useful for text or terminology that may change (such as a new product name). Note that text generated by a variable will not break or hyphenate. If you are required to make text edits in which variable text forces unwanted line breaks or text reflow, you may have to convert the variable text to plain text to accomplish desired text flow. Rotated Spread Viewing InDesign CS4 introduces the ability to rotate the working view of a spread by 90 degree increments The pages of the spread are viewed at the rotated angle, and can be worked on at that angle; text frames created while the spread is viewed in rotation take on the rotation of the spread. This can make it much easier to work on projects such as greeting cards and calendars. Note that spread rotation is only an altered view for convenience in working on rotated content; the pages do not actually change the document’s setup. Pages print and export in their original orientation. Note that a single page within a spread cannot be rotated separately from the other pages in the spread. Rotate Spread View To facilitate working on layouts such as calendars, you can rotate the on screen view by 90 degree increments. Tools work in rotated fashion, as well. The file prints and exports in its original orientation, however. The rotation icon next to a spread in the Pages panel indicates that it has been rotated on screen To rotate a spread, choose a page or spread, select Rotate Spread View from the Pages panel menu, and choose a rotation value (90 degrees clockwise, 90 degrees counter-clockwise, or 180 degrees). To clear the rotation, choose Rotate Spread View from the Pages panel menu, and select the Clear Rotation option. Adobe Creative Suite 4 Printing Guide 32 Using the InDesign forensic tools In addition to its new Live Preflight function, InDesign offers a number of methods for examining documents and content for problems. Use these methods to catch extraneous spot colors, non-printing objects, and transparency issues. Preflighting the document The Preflight function has been greatly expanded in InDesign CS4. You can create and share customized preflight profiles, and even embed a profile in a document. Preflight is now also a dynamic process, providing constant feedback in the status bar concerning the document’s current state according to the preflight profile in use — hence, the term Live Preflight. Consequently, problems can be spotted immediately, rather than waiting for preflight to be performed just before a job is submitted. Preflight Status Report The document status bar at the lower left of the InDesign document window displays a constantly-updated indicator of current Preflight status. A green light indicates that document content meets the current preflight profile’s specifications. A red light and number of errors indicates that the current preflight profile has found problems in the document. Click the triangle to the right of the status report (or double-click the status report text in the status bar) to open the Preflight panel for more information. To view preflight results, click on the triangle at the right side of the preflight module in the status bar (at the lower left corner of the document window), and choose Preflight Panel from the pop-up menu that appears, double-click the error status text in the status bar, or choose Window > Output > Preflight Panel. Any errors are displayed; click on each entry to see a description of the flagged problem, as well as a proposed fix for the problem. You can also double-click on the item in the Preflight panel list to go to the problem object in the document. Preflight Reporting Based on your custom preflight profile, InDesign displays an error message for each violation of the profile. The problem is described, and a possible fix is proposed. You can save the preflight error report as a text file or PDF. By default, live preflighting is turned on, and uses a basic working preflight profile (note checkbox); this option gives you an alert in the status bar showing the number of current preflight problems (or a green light if there are no problems). To create a custom preflight profile, choose Window > Output > Preflight Panel. The Preflight panel is displayed; choose Define Profiles from the panel menu. Preflight Profiles Live Preflight is much more extensive in InDesign CS4. Define profiles that fit your workflow and print conditions by setting options for each aspect of the document. Note that you can export and import custom preflight profiles, and can even embed a profile in a document. Consider creating multiple Preflight profiles for your most common printing conditions so you can easily load the appropriate profile and check documents for different output workflows. Preflight Profile Options You can set up very granular controls as part of a custom preflight profile. To activate a control, click the checkbox by the control (such as Links or Color), then click the disclosure triangle next to the control name to change settings. The controls include: Adobe Creative Suite 4 Printing Guide 33 General • Enter a description of the profile’s settings or purpose. Links • Links Missing or Modified • OPI Links: check this option to be warned of graphics that contain OPI instructions. Color • Transparency Blending Space Required: Choose RGB or CMYK. • Cyan, Magenta, Yellow plates not allowed: check this for a job that should have only black and/or spot plates. • Color Spaces and Modes Not Allowed: choose from RGB, CMYK, Spot Color, Gray, and Lab • Spot Color Setup: Choose a maximum number of allowable spot colors, and whether to use Lab values or CMYK equivalent values to represent the spot colors on screen. • Overprinting Applied in InDesign: Check for any content set to Overprint by InDesign. • Overprint Applied to White or [Paper} color: Check for overprinting white objects, which will not image (also checks for overprinting white in placed art). • Registration Applied: Check for any text or objects using Registration color. Images and Objects • Image Resolution: Check for minimum/maximum resolution for color, grayscale and 1-bit images. • Non-proportional scaling: Check for distorted graphics. • Uses transparency: Check for graphics and other objects using transparency (opacity or blending mode). • Image ICC profile: Check for embedded profiles that may cause CMYK conversion; exclude any images with no embedded profiles. • Layer Visibility Overrides: Check for any layer visibility overrides to placed Photoshop, Illustrator or PDF files. • Minimum Stroke Weight: Set a minimum stroke weight value. You can also limit the check to reverse strokes or strokes printing in multiple colors. • Interactive elements: Check for buttons, sounds, and movies. However, hyperlinks are not reported. • Bleed/Trim hazards: Check for objects too close to the designated live area. You can specify separate insets for top, bottom, left/inside, and right/outside. Also check for objects too close to the spine. Text • Overset: Display number of frames with overset text. Select each entry in the preflight panel to see how many characters are overset in each instance. • Paragraph Style and Character Style Overrides: You can choose to ignore font style, kerning/tracking, language, and color overrides. • Font Missing: Identify if a needed font is not available on the system. • Glyph Missing: Identify if a glyph is not available in the font used by the text (this could occur if a glyph was used, but then the font applied to the text was changed to another font which does not contain the glyph). • Dynamic Spelling Detects Errors: Checks for occurrences of words flagged by Dynamic Spelling. However, you must search for the telltale red zig-zag underline indicating misspelled words (Dynamic Spelling must be enabled). Adobe Creative Suite 4 Printing Guide 34 • Font Types Not Allowed: Check for protected fonts (fonts which cannot be embedded in PDFs), bitmap, TrueType, ATC (Adobe Type Composer) fonts, and several different Type 1 and OpenType formats. • Non-proportional Type Scaling • Minimum Type Size: Set a minimum type size. You can also limit the error reporting to white or multicolor text. • Cross-References: Check for out-of-date or unresolved cross-references. • Conditional Text Indicators Will Print: Check for Conditional Text whose indicators are set to print. Document • Page Size and Orientation: Check for document page dimensions (ignoring orientation prevents flagging of document based on portrait/landscape orientation). • Number of Pages Required: Set options for minimum/maximum number of pages, as well as exact number of pages, and multiples of a specified number. • Blank Pages: Specify whether pages are considered blank if they contain only master items (and no other document page content), or if they contain only non-printing items. • Bleed and Slug Setup: Set a minimum/maximum or exact value for bleed amount and slug area size. To modify an existing preflight profile, select it in the Profile pop-up menu in the Preflight panel, and then choose Define Profiles from the panel menu. Click OK when you’re finished. Choose Preflight Options from the Preflight panel menu to choose whether to embed the working profile into new files, whether to use the embedded profile or your working profile when opening new documents, whether to include hidden and non-printing layers, and whether to check objects in the pasteboard and objects set to be non-printing. There are some font issues that Preflight does not catch: Fonts required by any PSD files with text layers are not indicated in the list. These fonts will not be checked for by preflight, nor will they be included when the file is packaged, so the customer will have to manually collect them for job submission. Suggest that Photoshop files containing text be saved as Photoshop PDF, which embeds fonts and makes packaging fonts unnecessary. In addition, text in a Photoshop PDF will print as sharp, vector edges, whereas text in a Photoshop PSD will be rasterized during print. Finding Problems: Additional Forensic Tools Whether you use InDesign’s Live Preflight function or dedicated preflight software, or rely on experienced prepress operators to carefully examine incoming files, it’s important to recognize problem files early in the production process, in the interest of saving time, money, and sanity. For a thorough analysis, use all the forensic tools available to you—Separations Preview, Overprint Preview, Flattener Preview, and the Info panel—in addition to the Preflight function. Separations Preview Use the Separations Preview panel (Window > Output > Separations Preview) to evaluate on screen how a document will color-separate on printed output. You can view individual spot and process color plates or any combination of plates. Choose an option from the Separations panel menu to view plates in their actual ink color, or as black. You can also highlight overprinting objects and areas that exceed a specified total ink limit, by choosing Ink Limit from the Separations Preview panel’s View pop-up menu. If you need to make adjustments, for immediate feedback you can edit while Separations Preview is in effect. Adobe InDesign can preview separations by displaying any combination of the inks defined in the document, such as the cyan plate and the magenta plate. The results display using highresolution screen display engine in InDesign to more realistically represent conditions such as overprinting, RGB-to-CMYK conversion, and spot color interactions with transparency. Trapping, however, is not simulated. The ability to display overprints and ink limits for any combination of plates can make the Separations Preview capability more useful for evaluation than a laser-printed separations proof. Separations Preview is calculated using the ink characteristics for process and spot inks. Adobe Creative Suite 4 Printing Guide 35 On an offset press, black ink is not 100% opaque. For a more accurate simulation of black opacity, enable and properly configure color management and choose to display blacks accurately (choose Preferences > Appearance of Black, and choose Display All Blacks Accurately for on screen display), or, if you have disabled color management (not recommended), you can choose the Desaturate Black command from the Separations Preview panel menu. Desaturate Black reduces the visual opacity of the black plate only (this does not affect output). Desaturate Black is redundant (and will provide an anemic display of black objects) when color management is on and accurate blacks are displayed. Keep the following tips in mind as you use the Separations Preview panel: • CMYK plates are always listed, even if, for example, the job uses only two spot colors. However, CMYK plates are not output if no colors need to be printed on them. • The Separations Preview panel lists all inks defined in a document, whether or not they are actually used in the document. Consequently, it is recommended that you delete unused spot-color swatches before viewing separations. • You can view the effect of converting spot colors to process and the effect of aliasing a spot ink (see the previous “Using the Ink Manager” in this section). Both of these options are available in the Ink Manager on the Separations Preview panel menu. • You can’t preview the overprinting effects of built-in trapping or Adobe In-RIP Trapping. Separations Preview displays only the effects of overprints applied manually through the Attributes panel. You can use the Ink Limit feature in the Separations Preview panel to see if any areas of the document exceed a specified limit—for example, 320% for sheetfed printing. The total ink limit depends on the press being used to run the job, the type of stock, and other factors. If only a few small areas are highlighted in this preview, it should be no cause for alarm. But if large areas exceed the desired total ink limit, you may have to edit graphics and other content to ensure that their total ink value falls within the limit to prevent printing problems. In the Separations Preview panel, choose Ink Limit from the View pop-up menu, and enter an ink limit value. Areas in gray are within the total ink limit. Areas shown in red are over your ink limit; more intense reds indicate greater degrees of ink-limit excess. The percentages along the right side of the panel indicate the ink amounts at the location of the pointer. To view the ink percentage at any point on the layout: 1.Position the mouse where you want to evaluate the ink percentages. 2.Refer to the percentages along the right side of the Separations Preview panel. Ink values for each plate are displayed, along with the total for CMYK plates. Note: When viewing separations, the total CMYK ink value is displayed, but not the total combined ink value for overlapping process and spot colors. Position the cursor over areas of overlapping process and spot colors, and add the CMYK total value to the values displayed for spot colors. To highlight areas exceeding a total ink coverage limit, choose Ink Limit from the Separations Preview panel pull-down menu. Set the Ink Limit value for your press condition; areas exceeding the limit are highlighted in red. Overprint Preview Overprint Preview is a View mode (View > Overprint Preview) that simulates how objects set to overprint will appear in color-separated output (or composite output when the Simulate Overprint option is enabled). When Overprint Preview is on, you can see underlying objects through overprinted objects as they would appear on press. Because Overprint Preview models ink behavior, overprinted objects that use lighter or screened inks reveal more underlying inks during overprint preview because they actually are less opaque when printed. Overprint Preview also gives a more realistic view of spot colors involved with certain blending modes. In the normal, composite view, interactions between spot color objects may be misleading, so make it a habit to check files by turning on Overprint Preview. Because turning on Overprint Preview also turns on High Quality Display, you may experience a slight slowing of performance in InDesign as a result. Consequently, you may wish to turn on Overprint Preview to check content, and then turn it off once you have finished. Adobe Creative Suite 4 Printing Guide 36 Using Overprint Preview The text and oval both have a fill of solid PMS 399, and the text is set to Multiply. The composite view (left) is misleading: after all, you can't have 200% of a single ink. Turn on Overprint Preview, however (right) and you'll see how this effect will actually print. Flattener Preview To display the Flattener Preview panel choose Window > Output > Flattener Preview. To evaluate the effects of flattening, select an option from the Highlight pop-up menu in the Flattener Preview panel: • Rasterized Complex Regions: Highlights areas that are rasterized based on the settings in the transparency flattener preset. When the Raster/Vector Balance slider is set to 100, no areas are highlighted because rasterization only occurs within the outlines of each text or line-art object that’s affected. • Transparent Objects: Highlights objects that use transparency. It doesn’t indicate any of the possible results of flattening. • All Affected Objects: Highlights both objects that use transparency and objects that must be flattened because they interact with the objects that use transparency. This setting does not indicate flattening results, but it’s useful because it indicates all objects that could potentially be flattened. • Affected Graphics: Highlights images that will be flattened, but not effects or nonimage objects (such as vector drawings). This setting is especially useful for OPI workflows, because the highlighted images are the ones that must be swapped with high-resolution versions at output time in order to flatten properly. If an image isn’t highlighted, you don’t need to be concerned about flattening it in an OPI workflow. You can use this setting together with the Info panel to verify the resolution of any highlighted images. • Outlined Strokes: Highlights which strokes will be slightly thicker when flattened. Sometimes strokes are converted into filled areas of the same width to recreate a transparent effect when flattened. These areas may appear thicker because some RIPs process strokes differently than filled shapes, but the effect is usually not visible on device resolutions above 1200 dpi. If you are printing on a device below 1200 dpi and this feature highlights many objects on a page, you can make all strokes appear consistent by applying a preset where Convert All Strokes To Outlines is turned on. • Outlined Text: Highlights which type characters will be converted to outlines under the currently applied transparency flattener preset. Characters become slightly thicker when converted to outlines, but the effect may not be visible on device resolutions above 1200 dpi. If you are printing on a device below 1200 dpi and this feature highlights many characters on a page, you can make all text appear consistent by applying a preset where Convert All Text To Outlines is turned on. • Raster-fill Text and Strokes: Highlights text or strokes that may be affected by RIPs that record continuous-tone (CT) objects at a different resolution than linework (LW) objects. Affected objects are likely to use transparency effects that create images, such as drop shadows or feathered edges. You don’t need to use this option if you don’t have this type of RIP, or if you have this type of RIP and its version has no issues producing output of text or strokes with drop shadows and feathers. • All Rasterized Regions: Highlights all areas that will be rasterized because of the current flattener preset—not just complex regions. This option involves rasterization of fills, not outlines, and the rasterized fills are clipped to the original smooth outlines. Again, this view is useful if you output to a RIP that processes CT and LW objects differently because it indicates which parts will appear on the CT page as a result of flattening. It also highlights objects that will be rasterized when the Raster/Vector Balance uses a value less than 100. If many areas are highlighted, you Adobe Creative Suite 4 Printing Guide 37 may want to consider using transparency flattener settings with the Raster/Vector Balance set to 100, or increase the Line Art and Text Resolution if you set Raster/ Vector Balance to less than 100. Note that it is extremely rare for text or vector content to be rasterized in InDesign CS4, unless you have chosen a very low value for the Raster/Vector Balance control. Note: If you want to minimize the chance that text will be outlined, stack the text above all other objects; for example, move it in front of other objects using Object > Arrange > Bring to Front. If this can be done without changing the look of the design, it will prevent the text characters from being flattened by getting them out from under the transparency objects. Select a flattener preset from the Preset pop-up menu. If Auto Refresh Highlight is off, click Refresh to see the effect of the preset you selected. To control preview refresh, do one of the following: • Click the Refresh button after changing the Highlight or Preset settings. • Select Auto Refresh Highlight to let InDesign refresh the display after you change Highlight or Preset settings. Flattener Preview The text on the left is affected by the drop shadow because it is below the drop shadow. The text on the right isn’t affected by transparency because it is now above the drop shadow in stacking order. Photoshop blending mode issue Within Photoshop, a shadow set to Multiply blend mode will darken what’s underneath it. But when you place a Photoshop file into InDesign, the shadow knocks out what’s underneath, lightening the area rather than darkening it. To see the effect, place a Photoshop image containing a shadow into InDesign, and then use Separations Preview (Window > Output > Separations Preview). Turn off the black separation, and you’ll see that the shadow knocks out anything behind it. While this wouldn’t matter if the shadow fell on an empty area of the page, the knockout effect will be obvious when it falls over other page content. Photoshop Blending Modes in InDesign A Photoshop shadow looks satisfactory in composite view, but turning off the black plate in the Separations Preview panel reveals a problem: rather than darkening everything, the shadow knocks out everything underneath. While InDesign honors opacity attributes of native, layered Photoshop files, it does not handle all Photoshop blending modes. InDesign handles its own shadows correctly, darkening content underneath. Blending modes from Illustrator (including Illustrator-created shadows and other effects) image correctly as well. If the image is silhouetted and just requires a drop shadow (a concentric shadow, offset from the image), eliminate the drop shadow in Photoshop, and replicate it in InDesign. If, however, the designer has created a cast shadow (for example, a shadow that would be cast by a vase on the table under it), you must take special measures to ensure that the shadow will image correctly. If the shadow has been created on a separate layer from the object, the Photoshop file can be correctly imaged from InDesign, after a minor change (described in the following steps). If the shadow is on the same layer as the object, it must be copied onto another layer, and deleted from the object’s layer. The object and its shadow must be on separate layers in Photoshop to be able to use this workaround: Adobe Creative Suite 4 Printing Guide 38 1.Place the image in InDesign; then copy its frame to the clipboard. Choose Object > Object Layer Options, and turn off the top layer, leaving only the shadow layer visible. Select the shadow frame, and set it to Multiply blend mode in the Transparency panel. You’ll see immediately that the shadow looks more natural, darkening underlying objects. 2.Choose Edit > Paste in Place to paste the copied image. Use Object Layer Options again, this time to turn off the shadow layer and leave only the top layer. Check the results with Separations Preview: you’ll see that the shadow no longer knocks out. Solving the Shadow Problem Place the image twice, for separate handling of the shadow and the object. Use Object Layer Options (left) to control the visibility of layers, and set the shadow’s frame to Multiply. The result: a shadow that images correctly (right). Keep in mind that the limitations (and solution) apply to anything in a Photoshop file that uses any blending mode (not just shadows, and not just the Multiply blend mode). Screen Mode To see different representations of a document, choose View > Screen Mode and select from the Screen Mode menu to toggle among four Screen options (you can also use the last tool at the bottom of the toolbox to select these modes): • Normal: Page and pasteboard are visible, and guides, margin indicators and hidden characters (such as paragraph markers) may also be shown, depending on the user’s preferences. • Preview: Guides, margin indicators, and hidden characters are not displayed. The pasteboard area changes to gray (unless the user has selected another color in preferences), and only the trim area of the page is shown. Any non-printing objects are also invisible. Preview is also useful for quickly noticing any artwork too close to trim. Quickly toggle between Normal and Preview modes by pressing the W key on the keyboard (provided you are not currently in a text frame). • Bleed: Appearance is the same as for basic Preview mode, except that the bleed area is also displayed, if a bleed zone has been set up. This can make it easier to visually determine if the document has adequate bleed. To set up a bleed zone if the document does not have one, choose File > Document Setup, and enter the appropriate value in the Bleed amount fields. Click the More Options button in the Document Setup dialog if necessary to display the Bleed amount fields. • Slug: The trim area of the page is displayed, along with the designated slug area. Color Management Issues Handling alerts about missing or mismatched color profiles Color management is enabled by default throughout Adobe Creative Suite 4. Under most circumstances, the most flexible prepress workflow is to have color management on, because the color settings are designed for a safe CMYK workflow. Turning color management off also disables profile and policy warnings, which increases the chance of misinterpreted colors as graphics are moved among applications, particularly for RGB objects from color-managed applications. If you frequently encounter alerts indicating missing or mismatched profiles, provide customers with the color settings in use at your shop and have them use Adobe Bridge to synchronize them across their workgroup. Some color settings files, such as the North American General Purpose 2, are configured to preserve CMYK numbers and convert RGB without displaying mismatch warnings. If you use such a color settings file you will rarely encounter the warnings described below. Other color settings, such as North American Prepress 2, are set to display warnings so that you can monitor workflow status more closely. If you do see the following alerts, it is safer from a prepress point of view to make choices that preserve RGB profiles and preserve color numbers of CMYK objects. When you open a file that displays a mismatch alert, you may Adobe Creative Suite 4 Printing Guide 39 encounter it twice: once for the InDesign RGB working space and once for the InDesign CMYK working space. The Profile or Policy Mismatch dialog box appears when a document opens on a computer that uses different color settings than those used to create the document. There are two possible types of mismatches: profile mismatches and policy mismatches. A profile mismatch simply means that the RGB or CMYK working space of the user who saved the document is different than the working space of the user who is opening the document. A policy mismatch is a difference in how each user resolves a profile mismatch. For example, one user might preserve color numbers (by ignoring embedded profiles), while another user might preserve color appearance (by applying embedded profiles). Preserving color numbers is typically correct for CMYK, but preserving profiles is typically correct for RGB graphics with embedded profiles. When you see a mismatch alert message, you can take one of these actions: • Reconcile the root cause of the alert message: Click Cancel and determine why the customer is using color settings that don’t match yours. Then you can open the document and make one of the choices in the alert message. If practical, have the customer and your shop use the same color settings so that mismatches don’t happen in the future. • Assume the document’s colors were correct in the customer’s environment: For an RGB mismatch, if the document’s policy was Preserve and the customer’s placed RGB graphics include embedded profiles, you can select Leave the Document As Is. There is usually no need to change the RGB (working space) Profile. For a CMYK mismatch, you may need to change the CMYK (working space) profile to your shop’s standard. If the document’s policy was Preserve Numbers and the customer’s placed CMYK images do not include embedded profiles, you can select Leave the Document As Is. If the document’s CMYK policy was Preserve, you may want to consult with the customer to confirm that they intended to use the Preserve policy, because it is not CMYK-safe. If the document contains CMYK objects with embedded profiles, the Preserve policy keeps them, which may result in CMYK color conversions at output time. If that was not what the customer intended, simply choose Ignore Embedded Profiles to open the document in a safe CMYK mode. • Defer the decision until later: Select Leave The Document As Is, but at a later time be sure to choose Edit > Assign Profiles to verify that the profile assignments for both RGB and CMYK are appropriate, and then, if necessary, change the profiles. Caution: If there was a policy mismatch, be aware that saving the document on your computer applies your current color settings policy to the document. You can change the profile assignment of an individual image. For example, if you know that a placed image was saved with the wrong profile, you can either assign the correct profile or simply ignore it if the correct profile would match the document’s working space. Note: You can change the profile assignment of bitmap images only, such as Photoshop or TIFF files. You can’t change the profile assignments of EPS or PDF files. To change the profile assignment of an individual image: 1.With the Direct Selection tool (white arrow), select an image. 2.Choose Object > Image Color Settings. 3.Assign the correct profile, and click OK. Assigning a profile to one graphic doesn’t affect any other graphics and doesn’t change the working space of the InDesign CS4 document. At any time you can use the Info panel to identify the color profile of a selected image. See the “Common Resources” chapter for more information about color management in Creative Suite 4. Adobe Creative Suite 4 Printing Guide 40 Working with a book file Adobe InDesign CS4 can organize and manage sets of InDesign files in a book file—a binder that governs a collection of documents—to dynamically share attributes and formats. For example, a reference book with 10 chapters can be created as 10 InDesign files that exist separately, but are managed by the book file for pagination, indexing, and other operations. If a customer has used a book file, it’s best to manage prepress operations such as preflighting across all documents in a book. This requires using the Book panel, which displays a book’s individual InDesign documents as a list. To open a book, choose File > Open and select the book file. Book files use the .indb file extension. (If you don’t see any file extensions, you may need to turn on a setting in your operating system that makes file extensions visible). A book file appears as a panel. The Book panel command doesn’t appear in the Window menu until a book file has been opened. If more than one book is open, you’ll see multiple Book panels. A Book panel’s name is the name of its book file. To find commands that affect files in a book, look on the Book panel menu. For example, to preflight a book, you choose Preflight Book from the Book panel menu. If you choose File > Preflight, you’ll preflight the active open document only, regardless of the documents selected in the Book panel. Similarly, the File menu commands to print or export a PDF file affect the active open document only, not books; to print or export books you must choose Print or Export commands from the Book panel menu. The exact name of the commands can change according to whether or not documents are selected in the Book panel. Always preflight a book before creating output from it. Alert messages, such as those about missing fonts and graphics, don’t appear when you open a book file—only when you open an individual document that is governed by a book file. Note which documents are selected in the book file. Some commands in the Book panel menu, such as the Preflight Book, Export Book To PDF, and Print Book commands, operate on the selected documents only. To preflight, export, or print the entire book, make sure that either no documents are selected or all documents are selected in the Book panel. When documents are selected in the Book panel, the Preflight Book, Export Book To PDF, and Print Book commands appear as the Preflight Selected Documents, Export Selected Documents to PDF, and Print Selected Documents commands, respectively. It’s possible to create a book where the page size and orientation varies with each document in the book. You may want to verify the page orientations of your book files before setting up output media by double-clicking each file in the Book panel to open and check them. Synchronizing, paginating, and preflighting a book file A modified icon ( ) appears when an individual document in a book has changed since the last time the book was saved. When a document in a book has been modified, it’s no longer certain that the book’s pagination is correct because pages may have been added to or deleted from the modified document. For this reason, the only way to resolve a modified icon is to repaginate the book, so that InDesign can determine whether pages were added or deleted from the modified document and update the book accordingly. Before you repaginate a particular book for the first time, preflight all the constituent documents in the book first to ensure that all necessary fonts are present. Select all the document names in the Book panel, and choose Preflight Book from the panel menu. If fonts are missing, text may recompose during repagination, causing line breaks to change. Repaginate only after consulting with the customer, because it may alter the content (such as page numbering) of documents in the book. To repaginate a book, choose Repaginate from the Book panel menu. A book’s formatting is controlled by a style source document that controls all other documents in the book. Any document in a book can be a style source document which is indicated by a small icon ( ) to the left of its name in the Book panel. Any InDesign document can belong to multiple book files. For this reason, when customers use a book file, they should identify the style source document; before you synchronize the book, confirm that the correct document is earmarked as the source document in the Book panel. Because a book can contain complex links, cross references, and other dependencies, it is best to have customers synchronize, preflight, package, and proof book files to resolve outstanding book-level issues before the files are handed off. Adobe Creative Suite 4 Printing Guide 41 When you synchronize a book file, the following attributes are governed (and may be changed as a result): table of contents styles, character styles, paragraph styles, object styles, table and cell styles, trap styles, swatches, numbered lists, variables, page numbering, and chapter numbering. Synchronizing a book file won’t resolve color management profile inconsistencies among book documents. To anticipate color management error messages before high-resolution output, export to PDF as a test; profile conflict alert messages appear when the book is printed or exported. If you encounter a color profile conflict error message, determine the correct settings (which may require a discussion with the customer) and change the color settings in documents as needed. Remember that you can quickly do this by saving the correct settings to a transportable .csf file (in the Edit > Color Settings dialog box) and then loading them into other documents. To synchronize an entire book file: 1.Open the book file. While it’s not required that you open all of the files in the book, note that the Edit > Undo command can undo synchronization changes only to files that are open. 2.Make sure the correct style source document is specified. 3.Shift-click to select all the files in the book, or click in an empty area below the list of documents to deselect all documents. 4.From the Book panel menu, choose Synchronize Options. Make sure all of the options you want to synchronize are on, and then click OK. 5.From the Book panel menu, choose Synchronize Book. 6.When an alert appears indicating that the synchronization is successful, click OK. Creating PDF Files from InDesign If you accept PDF files from customers, it’s likely that you have specific PDF presets that are appropriate for your workflow. Be sure to share those presets with customers; remember that PDF creation presets (also called joboptions in Distiller) are shared across Creative Suite 4. See the “Common Resources” chapter for more detailed information on PDF creation. This topic concerns InDesign-specific settings. Generally speaking, your first decision is between creating a PDF with live transparency (compatible with Acrobat 5.0 and above) or a PDF with flattened transparency (compatible with Acrobat 4.0 and earlier). If your workflow supports live transparency (for example, if your RIP implements the Adobe PDF Print Engine), it’s preferable to keep transparency live throughout the job’s life cycle. Keeping transparency live means using native files as support art when creating PDFs containing live transparency and not prematurely flattening transparency. If your workflow handles PDF files, but contains any processes (including imposition, trapping, and RIPping) that do not support live transparency, you may achieve more predictable results by generating Acrobat 4.0-compatible PDFs. Contact the vendors of RIPs, imposition software, and other workflow components to discover if newer versions are available that will allow you to process PDFs containing unflattened transparency. Depending on your workflow, start with one of the presets and modify as necessary: • PDF/X-1a:2001—Based on PDF 1.3 (Acrobat 4.0), and intended for use in workflows that do not employ color management or support live transparency. All transparency is flattened; spot colors are maintained; any RGB content is converted to CMYK during PDF generation. • PDF/X-3:2002—Based on PDF 1.3 (Acrobat 4.0), and intended for use in workflows that require flattened transparency, but have support for color management. Transparency is flattened; no color conversion takes place. • PDF/X-4:2008—Based on PDF 1.4 (Acrobat 5.0). Supports color management and maintains live transparency; no flattening or color conversion takes place. This is ideal for RIPs based on the Adobe PDF Print Engine technology. There’s at least one important modification you should make to the PDF preset you use as a starting point in InDesign: by default, InDesign does not include bleed or marks in its default presets. Consider creating a custom PDF preset that includes bleed, and share it with your customers: Adobe Creative Suite 4 Printing Guide 42 1.Choose File > Adobe PDF Presets > Define. 2.Choose the appropriate preset for a starting point. 3.Click the New button, and name the preset. 4.To modify the bleed settings, choose Marks and Bleeds, and set the appropriate bleed amount for your workflow. It is not sufficient to check the option to Use Document Bleed Settings. If a document has been set up with zero bleed, the resulting PDF will be without bleed. Rather, set the bleed amount to an appropriate number (usually 0.125 in). 5.Choose any printer’s marks you wish to add. 6.Click OK to save the PDF preset 7. To save the PDF preset as a file for another workstation or a customer, choose File > Adobe PDF Presets > Define, select the preset in the list, and click the Save As button. Give the preset a brief name (InDesign adds the extension .joboptions to the name), and save the preset. 8.To load a PDF preset, choose File > Adobe PDF Presets > Define and click the Load button. Navigate to the supplied file and click Open. The preset is added to the list of available presets in InDesign, and is then also available to other Creative Suite 4 applications. In addition to the PDF/X presets, InDesign also includes the following default PDF creation presets: Smallest File Size, High Quality Print, and Press Quality. For details of specific features of the default PDF presets in Creative Suite 4 applications, see the “Common Resources” chapter. Exporting PDFs versus Distilling Despite some urban myths to the contrary, exported PDFs and distilled PDFs are equally compliant. You may find that distilling creates a slightly smaller file size in some cases, but you will also find that InDesign CS4 creates much smaller exported PDFs than previous versions of InDesign did. Exporting PDFs offers the advantage of speed and maintains live transparency, as well as features such as hyperlinks, bookmarks, and multimedia. Using Adobe Distiller requires two steps: first, generating PostScript, and then processing that PostScript through Distiller. But keep in mind that generating PostScript will flatten transparency, possibly limiting later editing. Printing from InDesign The comprehensive range of InDesign options lets you precisely customize print settings for your shop’s workflow. Once you’ve determined the best combinations of settings for the devices in your shop, save those combinations as print presets. You may then be able to run many of your jobs simply by choosing a preset from the Printer Preset menu at the top of the Print dialog box. Your shop’s goal should be to prepare print presets for the most common types of output so that InDesign files print easily and consistently. You can change all printer options—such as page size and color profiles—from the Print dialog box. Print settings are independently maintained for each document, so that each document can preserve its own settings. The print dialog box: Common areas In the Print dialog box, the only area that changes is that containing options specific to each panel. All other areas of the Print dialog box are common areas that remain visible regardless of the panel you are viewing. In the interest of consistency, options that don’t apply in a certain workflow are dimmed, not removed. If an option is dimmed, but its label is not, the option does apply but it can’t be changed. Print Preset: If you have created or imported any custom print presets, choose from this pop-up menu. Printer: Choose the appropriate target printer from this menu, which is populated with currently installed printer drivers. You can also opt to create a PostScript file. PPD: (PostScript Printer Description) The choices are determined by the current Printer menu setting. When you select a PostScript printer in the Printer menu, the PPD menu will display the name of PPD that was set up with that printer by the printer driver. Note that you cannot select another PPD; this guards against assigning a PPD other than the one properly set up with a particular device. If you want to create a PostScript file targeted to a PPD for a printer not connected Adobe Creative Suite 4 Printing Guide 43 to the computer, choose PostScript File from the Printer menu, and then select the desired target PPD from the PPD pop-up menu. (Usually it’s best to use Adobe PDF as the target when generating PostScript you intend to process through Adobe Distiller.) The Print Dialog Box The common areas (circled in red) and the Preview pane are available regardless of what options are selected in the print options list at left. The remaining areas of the Print dialog box change according to the option selected from the list. Print Options Select an option to display its option panel Common Areas (available at all times) Document Preview Pane Click to display additional information Document Preview Pane The preview proxy in the lower left of the Print dialog box gives graphic feedback on how well the current job settings fit the selected media. It updates dynamically any time you change a setting that affects the print area required for the job. Preview Pane The initial view (left) shows the placement of the file on the chosen media, as well as selected marks and bleed. Click once to display the text-only view (center), which provides information on the dimensions of the page and media, as well as scale factor, and whether thumbnails or tiling have been chosen. Click once more to see the Custom view (right), which shows the relationship of page to media for a cut-sheet device (such as a roll-fed printer), as well as the color mode. The document preview proxy has three views; to cycle through the views, click the proxy. The views are as follows: Standard view: Displays the relationship of a document page to the media. It shows the effects of various options such as paper size to imageable area, bleed and slug areas, and page marks, as well as the effects of tiling and thumbnails. The bleed area is shown in red and the slug area is shown in blue; purple is where they overlap. Text view: Lists media dimensions, document page dimensions, scale factor, and whether thumbnails have been requested, as well as number of tiles that will be generated (if tiling has been selected). Adobe Creative Suite 4 Printing Guide 44 Custom page/Cut sheet views: Displays the results of different print settings, depending on page size. For custom page sizes, the preview shows how the media fits on the output device, the maximum supported media dimensions for the device; and the settings for offset, gap, and transverse. For cut sheets (such as Letter or A4), the preview shows the relationship of the media to printable area. The preview also shows the output mode with the appearance of the small icon at the lower left, indicating Separations, Composite Grayscale, Composite CMYK, or Composite RGB. Control buttons These buttons appear across the bottom of the Print dialog box: Setup Button (“Page Setup” on Mac OS): Accesses the printer driver for the chosen printer to allow you to pick media size and some other options. Note that choices in the InDesign Print dialog box may override some choices made in the Setup/Page Setup options. Printer Button (Mac OS only): Accesses the printer driver for the chosen printer to allow you to pick page range, etc. However, note that choices in the InDesign Print dialog box may override some choices made in the Printer options. Save Preset: Allows naming and saving customized print settings for one device in your environment for future use. To share saved print presets with your customers or workgroup: 1.Choose File > Print Presets > Define. 2.Select the preset or presets you wish to share. Shift-click to select a range of presets, or Ctrlclick (Windows) or Command-click (Mac OS) to select multiple individual presets. 3.Click Save, and name the preset collection. InDesign saves a file with a .prst file extension. If you selected multiple presets, the .prst file will contain all selected presets. To load saved print presets within your workgroup (or for your customers to do so): 1.Choose File > Print Presets > Define. 2.Click Load, and navigate to the supplied .prst file. All print presets in the .prst file will be added. Cancel: Discards changes you made in the Print dialog box, with the exception of any settings saved in a print driver-specific dialog box. If you want to save changes to the Print dialog box but don’t want to print, you can click the Save Preset button to save the settings as a print preset. The Print Dialog box: Panels The particular options available in the Print dialog panels depend on the chosen printer and its PPD. Consult the documentation for your device for instructions on printer-specific options. General: Choose number of copies and page range; whether to print spreads or master pages; whether to print non-printing layers and objects, blank pages, or guides and grids. You can choose to print even pages only, or odd pages only. Choosing Spreads will print intact spreads, regardless of the total number of pages in a spread (InDesign allows up to 10 pages in a single spread). Selecting Print Master Pages will print only the master pages, and will not print any document pages. You can also choose to print all layers, only the visible layers, or only the layers which are both visible and printable. General Options Control number of copies and page range, as well as printable/non-printable elements such as layers, non-printing objects, blank pages, and guides. Adobe Creative Suite 4 Printing Guide 45 Setup: Choose media size (including custom sizes), orientation, scale, and page position, as well as thumbnail and tiling options. Setup Options Select from media sizes available for the device (based on the PPD) and set orientation. Offset and Gap are available only for cut-sheet devices (such as rollfed printers or imagesetters). Choose the appropriate scaling factor and page position on the media. Thumbnails are small versions of the pages, printed with up to 7 x 7 (for a total of 49) per sheet. Tile options allow you to print a large document, such as a poster, on smaller media and then tape the tiles together manually. Marks and Bleed: Choose options for crop, bleed, and registration marks. Caution: Choosing the option to Use Document Bleed Settings won’t include bleed if the Document Bleed Setting is set to zero, so check the value in the Bleed fields to confirm that they contain the appropriate value. Marks and Bleed Options Choose the marks to be imaged on output, the weight for crop and bleed marks (.125 pt, .25 pt, or .5 pt), and the marks offset (between 0 and 1 inch) to avoid impinging on artwork. Check the option to Use Document Bleed Settings only if the document has been set up with a defined bleed area (File > Document Setup). Include Slug Area allows a designated Slug area to print on output. Output: The availability of color options such as Composite CMYK, Composite Gray, Separations, In-RIP Separations, and so on, will depend on the printer chosen. While you can specify angle and frequency for each ink, your output device will probably ignore these choices. Output Options The Color options available will depend on the PPD for the target device. For example, a desktop inkjet printer will allow only RGB and Composite Gray, while a four-color laser printer will often allow Composite CMYK, Composite Gray, and separations. The Flip option allows mirrored printing (horizontal, vertical, or both). Trapping and screening are available only if separated output is chosen (or in-RIP separations). Choose Simulate Overprint to simulate the appearance of overprinted objects. The Ink Manager button launches the Ink Manager for remapping spot colors as necessary. Adobe Creative Suite 4 Printing Guide 46 Graphics: Under Images, choose from All (complete image information), Optimized Subsampling (reduced data to speed printing), Proxy (low-resolution representations of images for quick comp printing), or None (print gray boxes to represent graphic frames). Under Fonts, choose None (if fonts are resident on the RIP), Complete (to include the complete set for each font), or Subset (download only the necessary glyphs). The option to Download PPD fonts is intended to prevent font substitution for common fonts such as Times, Helvetica, and so on. Graphics Options The Send Data option allows you to choose from All (full-resolution image), Optimized Subsampling (reduced resolution, suited for the printer), Proxy (low resolution), or None (images are represented by gray boxes). Use the Optimized, Proxy, or None options only when printing comps (for example, for proofreading). Usually, you should choose All. Fonts Font download options are available for PostScript printers. Choose from Complete, Subset, or None. Use the option to Download PPD Fonts to ensure that fonts used in creating the document are used for imaging, rather than fonts resident on the imaging device. This can resolve font version conflicts for common fonts, such as Helvetica and Times. Color Management: If you are working in a color-managed environment, and are using the correct profiles for your target device, follow these steps: 1.Under Print, select Document. 2.For Color Handling, choose Let InDesign Determine Colors. 3.For Printer Profile, select the profile for the output device. 4.Under Output Color, for an RGB device (such as an inkjet printer), select Preserve RGB Numbers; for a CMYK device (such as a laser printer), select Preserve CMYK Numbers if it is not selected by default. This option determines how InDesign handles colors without a color profile, such as images without embedded profiles. In this case, InDesign sends the color numbers directly to the output device. When this option is deselected, InDesign first converts the color numbers to the color space of the output device. Preserving numbers is recommended when you are following a safe CMYK workflow (see “Using a Safe CMYK Workflow” in this section). Preserving numbers is not recommended for printing RGB documents. 5.At the bottom of the Print dialog box, click either Setup button (Windows) or Printer button (Mac OS) to access the printer driver dialog box. Turn off color management for the printer, and click Print to return to the InDesign Print dialog box. Every printer driver has different color management options. If it’s not clear how to turn off color management, consult your printer documentation. Color Management Your choices in this panel will depend on the setup of your particular workflow. Here, a printer profile has been selected; consequently, color management must be turned off in the Printer settings (accessed using the Printer button at the bottom of the Print dialog box) to avoid conflicting settings. The option to Preserve CMYK Numbers ensures that untagged content is not changed. Any content tagged with a profile that differs from the target device will be converted, however. Hover over each option to read helpful information in the Description area at the bottom of the dialog box. Adobe Creative Suite 4 Printing Guide 47 Advanced: If you are using an OPI workflow, choose options for OPI image replacement. Also, select the appropriate Transparency Flattener preset. If you have not created a custom flattener preset, choose the High Resolution preset. Advanced Options The Print As Bitmap option is only available for non-PostScript printers; it may be useful if complex content (such as shaded vector objects) cause an error. Choose a resolution from the pop-up menu to the right of the Print as Bitmap option. If you use an OPI workflow (low-resolution/highresolution image swapping), choose the options recommended by your vendor’s documentation. Choose the appropriate Transparency Flattener preset for your workflow. For most situations, High Resolution is appropriate, but if you have created a custom flattener preset, choose it. Summary: Here you’ll see an overview of all the settings selected; a text log of the summary can be saved by clicking the Save Summary button at the bottom of this panel. You may find it useful to save the summary log and archive it with the final files, to assist with future handling of the file. Summary This provides an overview of all the print settings currently in effect. Scroll through the log window to see all settings without having to click on individual options in the left pane. To save as a text file, click the Save Summary button at the bottom. Printing booklets Although you probably use a dedicated imposition solution for complex imposed pagination, it can sometimes be helpful to print simple paginated comp versions of a multipage document to visualize the final form. The Print Booklet feature in InDesign (File > Print Booklet) allows you to do this, without tying up a workstation devoted to imposition. There are three types available in Print Booklet: 2-up Saddle Stitch, 2-up Perfect Bound, and Consecutive (which includes 2-up, 3-up and 4-up Consecutive). You can also pick a page range for the imposition. The modes of imposition are: 2-up Saddle Stitch: Creates two-page printer spreads, which can be duplexed, collated, folded and stapled. If necessary to complete the pagination, blank pages are added to the end of the document. The options for Space Between Pages, Bleed Between Pages, and Signature Size are not available in Saddle Stitch mode. 2-up Perfect Bound: Creates two-page printer spreads for duplexing and trimming on all four sides of the pages, to be bound into to a cover with a spine. If the number of pages can’t be evenly divided by the number of pages in a signature, InDesign adds blank pages to the end of the document. Adobe Creative Suite 4 Printing Guide 48 Consecutive: Creates a two-, three-, or four-page panel appropriate to a foldout booklet or brochure. In Consecutive mode, Bleed Between Pages, Creep, and Signature Size are not available. This mode does not provide any option for short-trimming a panel that folds in first. Print Booklet is, as the name implies, a method of printing. It does not create a new InDesign document with imposed pages, but produces a print stream with the pages in position. To use the Print Booklet function: 1.Choose File > Print Booklet, and if appropriate, pick a preset from the Print Preset menu. Or choose Current Document Settings to use the print settings in effect for the document. 2.Pick a page range, using hyphens to separate the ends of a range (for example, “1–16” to include all the pages between 1 and 16, inclusive). To choose individual pages, use commas—for example, to select pages 2, 4, 12 and 16, type “2,4,12,16” (without the quotation marks). If the document uses section starts, in the Range field you will have to enter any section numbers (such as “Sec3:16” for page 16 of Section 3). Or you may find it easier to specify the page numbers by using absolute numbering convention—just type a plus sign (“+”) to indicate absolute page position. For example, to select the first eight pages of the document, type “+1 – +8” (without the quotation marks). To change settings such as printer’s marks and media size, click the Print Settings button at the bottom of the Print Booklet dialog box. This takes you to the standard print dialog panels; when you’ve modified the settings as needed, click OK, and you’ll be returned to the Print Booklet dialog box to proceed. The Setup options These options in the Print Booklet dialog box include: Space Between Pages: The gap between pages; available for all the booklet types except Saddle Stitch. In Perfect Bound booklets, the Space Between Pages value must be at least the width of the Creep value. Bleed Between Pages: Available only when 2-up Perfect Bound is selected, a value must be between zero and half the Space Between Pages value. Creep: Specifies the amount of space necessary to compensate for paper thickness and folding on each signature. Enter a positive value to push outside pages out from the spine (leaving the center spread unchanged); enter a negative value to push interior pages in, toward the spine (leaving the outside spread unchanged). Creep is available for 2-up Saddle Stitch and 2-up Perfect Bound booklets. Signature Size: The number of pages in each signature (available only for 2-up Perfect Bound). If the number of pages to be imposed is not evenly divisible by the Signature Size value, blank pages are added to the end of the document as necessary. Automatically Adjust To Fit Marks And Bleeds: Margins calculated to accommodate bleeds and printer marks. Deselect this option to set the margin values manually. Margins: Amount of space that surrounds the printer spread. Deselect Automatically Adjust To Fit Marks And Bleeds to manually set the values. Higher values increase the space beyond the marks and bleeds. Too low a value may clip the marks and bleeds. Available for all booklet types. Print Blank Printer Spreads: Determines whether blank spreads are printed. InDesign adds blank pages or spreads to the end of the document if the number of pages to be imposed is not evenly divisible by the number of pages in a signature. Preview The Preview panel allows you to view the arrangement of imposed pages, for checking crossover art, page order, creep settings, marks, and bleed. The Messages and Warning areas inform you of any problems, or whether blank pages had to be added to complete signatures. Adobe Creative Suite 4 Printing Guide 49 Print Booklet Preview Page through the display to see pages included, as well as the results of any creep values. The Messages area displays whether blank pages had to be added to fulfill the signature; the Warning area informs you if media size is too small for the imposed spreads. Helping Customers Prepare InDesign Files When it’s time for final printed output, it is easier than ever for a customer to locate an Adobe InDesign prepress service provider. The widespread acceptance of Adobe InDesign by prepress service providers results from a long and proven record of reliable, consistent output and a deep set of tools specifically geared to identify and resolve prepress issues before printing. As with every previous version of the software, Adobe InDesign CS4 incorporates requests from print professionals worldwide as solicited by Adobe. This close and continuing collaboration with the print publishing community makes possible great advances in output efficiency and quality. As a page layout application, InDesign is the “aggregator” of text, artwork from Illustrator, and images from Photoshop. Consequently, in preparing to output InDesign files, you (and customers) have to consider issues relating to objects and effects created within InDesign as well as attributes of placed artwork and fonts used. Common-sense tips for customers Customer education is an important part of a print service provider’s relationship with clients. In addition to providing basic specifications for providing files for print, it’s helpful if you make sure that clients are well-versed in the details of building and submitting files for successful print. You can also help by supplying custom InDesign and Acrobat preflight profiles and encouraging your customers to examine their own files before submitting them. In light of complex features such as transparency, it’s easy to lose sight of the basics: • Monitor the Live Preflight module in the status bar of InDesign documents to catch problems early. • Build to correct trim size, keeping in mind any specifications for image area (necessary distance from trim and fold), and the need to accommodate any short-trim panels. • Ensure that adequate bleed is created, and that bleed is included in PDFs submitted as job files. • Avoid radical scaling of images. • Use Separations Preview to check for correct plates. • Reconcile extraneous spot colors, by editing content or by using Ink Manager. • Convert any spot colors to process if they are intended to print CMYK. • Include 100% printed comps (or comps marked for size). Adobe Creative Suite 4 Printing Guide 50 • Do some housecleaning before submitting the job: prune extraneous elements, empty frames, and unused styles and swatches • Communicate any special circumstances, including custom-finishing such as embossing, foil-stamping, spot varnishes, complicated folding, or custom binding. Preparing files containing transparency For a detailed resource on imaging files containing transparency, see “Transparency in Adobe Applications: A Print Production Guide” (http://www.adobe.com/go/learn_transparency_print_en). The transparency guide is useful for you as a print service provider, and can also serve as a very helpful reference for your customers as they prepare their files. Here are some general guidelines: • Don’t flatten transparency unnecessarily or prematurely. Keeping transparency live means that you can take advantage of more modern workflows such as those using the Adobe PDF Print Engine. Thus, don’t flatten Photoshop files—keep layers intact. Save Illustrator files as native Illustrator (.ai) rather than as EPS files. • Don’t use transparency unnecessarily: for example, to create a 20% black tint, don’t apply 20% opacity to a solid black frame; instead, create and apply a swatch that’s a 20% tint of black. • If possible, place text at the top of stacking order, or on a top layer, to eliminate any possibility that type will be converted to outlines during transparency flattening. For more on handling transparency in customer files, see “Common Resources” chapter in this document. Packaging a Job In previous versions of InDesign, activating the Package function would automatically perform a preflight. Now that Preflight is dynamic, the Package function does not perform preflight as a separate operation; it just displays the current results of preflighting in the Package dialog. This series of screens will look familiar to users of earlier versions: they are the same screens as seen in Preflight in previous versions of InDesign. To use the Package function, choose File > Package. InDesign displays a summary overview describing the state of the document, incorporating any problems that have been found by Preflight. Any problems are highlighted with yellow alert triangles. To see more detail for each topic, select from the list in the left column of the Package dialog box. The Summary screen provides a quick overview of potential issues you might wish to resolve before packaging the job. Summary Screen The Summary screen displays an overview of the file’s attributes, highlighting problem areas with yellow alert triangles. Click a topic name to see more detail on that topic. The Fonts screen lists fonts used in the document (including fonts needed by placed artwork), and identifies font formats used (such as OpenType, TrueType, or Type 1) and their status (OK, Missing, or Protected). Select a font name from the list, and the Current Font area displays the directory path to the font file itself, and indicates the page on which the font is first used. Adobe Creative Suite 4 Printing Guide 51 Fonts Screen The Fonts screen identifies font formats, and highlights missing fonts, including fonts missing in placed artwork. Protected fonts are fonts which cannot be embedded in PDFs. The Links and Images screen lists the status, type, and color space of images used in the document. (However, it will not list the color space of placed Illustrator files, EPSs, or PDFs.) Click an item in the list, and the Current Link/Image area also displays the Actual and Effective ppi of the file. Actual ppi is the resolution of the saved image; Effective ppi is the net resolution as a result of any scaling within InDesign. InDesign cannot report the resolution of image content within a placed PDF or Illustrator AI or EPS file. To simplify the display, check the Show Problems Only option. Links and Images Screen The Links and Images screen highlights missing images and RGB images. Select an image from the list and additional info is displayed below, including the actual ppi and effective ppi, as well as any layer overrides. You can simplify the list by checking the option to Show Problems only. The Package report does not list any linked images missing from placed Illustrator (.ai) files, nor are such images gathered when packaging a job. Advise your customer to either embed the image, supply it separately, or save the file as an Illustrator PDF or an Illustrator EPS (which includes the image information by default). Supplying the image separately offers the most flexibility, if you should need to edit or color-correct the image. The Colors and Inks screen lists inks used in the document. If there are extraneous inks, use Ink Manager to resolve duplicates. The angle and lines per inch information has no impact on the ultimate imaging of the job; those attributes are assigned at the RIP based on your particular setup. The Print Settings screen displays the settings in effect when the file was last printed from InDesign. These settings have no effect on your RIP’s processing of the job, but may be helpful in troubleshooting future output. The External Plug-ins screen lists any plug-ins used in the creation of the document. Generally, plug-ins used by document creators are not necessary for successful output by other users, so entries in this list don’t usually constitute a problem. Resolve any remaining issues (such as missing fonts or graphics), and click the Package button. Adobe Creative Suite 4 Printing Guide 52 The next step is to fill out the Printing Instructions form, with fields for contact information and special instructions concerning the job. Whether or not you fill out the form, the Package process generates a text file containing information about the package, including plug-ins used, fonts packaged, inks used in the document, print settings, and a complete list of the files packaged. Note: The “Filename” field in the Printing Instructions form governs the filename of the instructions text file that is generated during the Package procedure, not the filename of the InDesign file being packaged. You can accept the default name, “Instructions.txt,” or enter a new name, but don’t leave the field blank. The Printing Instructions Form Customers can use this form to supply contact information, as well as special instructions and useful information about the job. The text in the Filename field becomes the name of a text file containing all the information entered into this form. You can change the name, but don’t delete the contents of this field. If you do, InDesign will display an error during the Package process, because it cannot create a text file with no name. In the Create Package Folder dialog box that follows, you’re presented with the following options: • Copy Fonts (Except CJK): All fonts used by InDesign are packaged. If any Illustrator art requires fonts that haven’t been (or can’t be) embedded, those fonts will be packaged. In the Roman (Western English) version of InDesign, Chinese, Japanese, and Korean (CJK) fonts are not packaged. If such fonts are required in the job, they must be gathered manually. Fonts required by a Photoshop native file (.psd) won’t be packaged. Advise customers to save such files as Photoshop PDF files instead, so that fonts will be embedded and not require packaging. This option is selected by default; leave it checked. • Copy Linked Graphics: All graphics linked to the InDesign file are copied into the folder created in the Package process. However, any images linked to placed Illustrator files are not packaged. Advise customers to use the Illustrator option to Include Linked Files (available in the Save dialog box), or to manually copy the needed images into the Links folder inside the Package folder. This option is selected by default; leave it checked. • Update Graphic Links in Package: This option helps to ensure that all graphic and image links are up-to-date. When you package a document, the linked files are collected and copied to one folder named Links. The packaged InDesign file looks in that Links folder to find all placed graphics, rather than in the original location, such as a server volume. This option is selected by default; leave it checked. • Use Document Hyphenation Exceptions Only: This option embeds the customer’s user dictionary in the InDesign document, and helps to ensure that other user dictionaries are ignored. This can help prevent unwanted line break changes. This option is not selected by default. • Include Fonts and Links From Hidden Document Layers: This option includes all fonts and linked files on InDesign document layers that are hidden. This option is turned off by default, meaning that Adobe InDesign CS4 only includes content on layers that are visible at the time the document is packaged. This option is not selected by default; to ensure that all needed artwork and fonts are packaged, be sure to select this option if needed layers are hidden at the time of packaging. • View Report: This option automatically displays the Printing Instructions report after the package is created. The report is always saved to the package folder whether or not this option is selected. This option is not selected by default. Adobe Creative Suite 4 Printing Guide 53 Additional sources of information: There are many sources of information about InDesign. The following is not an exhaustive list but rather a selection of websites that may be of use to you and your customers: InDesign Secrets: http://www.indesignsecrets.com InDesign User Groups: http://www.indesignusergroup.com Knowledgebase: http://www.adobe.com/support/indesign Adobe Creative Suite 4 Printing Guide 54 Chapter 3: Adobe Photoshop CS4 and Photoshop CS4 Extended It is rare that a final job comes to you as a Photoshop file; images are usually placed into page layouts or illustration files for design and output. So, in addition to being mindful of basic image attributes within Photoshop, you must also keep in mind how those images are handled and output by those other applications. As in Creative Suite 3, there are two versions of Photoshop in Creative Suite 4: Photoshop CS4 and Photoshop CS4 Extended. Photoshop CS4 is part of Design Standard; Photoshop CS4 Extended is part of Design Premium, Web Premium, Production Premium, and Master Collection. Both versions of Photoshop include these new features: • Adjustments panel: Simplify image adjustment by easily accessing every tool you need to nondestructively adjust and enhance the color and tone of your images; on-image controls and a wide variety of presets are also included in the new live and dynamic Adjustments panel. • Masks panel: Quickly create and edit masks from the new Masks panel. This panel offers all the tools you need to create editable pixel- and vector-based masks, adjust mask density and feathering, easily select noncontiguous objects, and more. • Content-Aware Scaling: Use the new and revolutionary Content-Aware Scaling feature to automatically recompose an image as you resize it, smartly preserving vital areas as the image adapts to the new dimensions. Get the perfect image in one step without time-intensive cropping and retouching. • Better raw image processing: Camera RAW now offers localized corrections, postcrop vignetting, TIFF and JPEG processing, and support for more than 190 camera models. • Canvas rotation: Work on an image at any angle, without interpolation • Pixel Grid: Perform precision editing at high magnifications, even in rotated views • Improved retouching tools: Re-engineered Dodge, Burn, and Sponge tools lighten, darken, and modify saturation with more predictable results • Better print experience: Get outstanding prints with superior color management, tighter integration with leading printer models, and the ability to preview out-ofgamut image areas. Support for 16-bit printing on Mac OS offers increased color depth and clarity. • Superior performance on very large images: Take advantage of 64-bit support on certain Windows computers • Multi-Touch support: Take advantage of Multi-Touch trackpad features on newer Apple MacBook Pro and MacBook Air computers running Mac OS X Leopard Photoshop CS4 Extended includes the above new and enhanced features, plus these new features: • New 3D features: Now paint directly on 3D models, wrap 2D images around 3D shapes, convert gradient maps to 3D objects, add depth to layers and text, get printquality output with the new ray-tracing rendering engine, and enjoy exporting to supported common 3D formats. • Edit motion graphics more efficiently with new single-key shortcuts, sync visual effects with specific points in an audio track using new audio syncing controls, and turn any 3D object into a video display zone. The integration between Photoshop and the other Creative Suite 4 components enables you and your customers to take advantage of the flexibility afforded by the native Photoshop format. Adobe Creative Suite 4 Printing Guide 55 Multiple layers can be used for complex compositing and color correction; type and other vector components can add to visual interest, and consistent color management across Creative Suite 4 ensures predictable output. General Guidelines While your workflow has its own particular requirements, some general rules about resolution and color space still apply. When you supply specifications to your customers, to help them prepare jobs for submission, it’s important to make sure that they’re educated about issues you encounter with image content. The increasing use of digital cameras means that many designers are submitting their own images, rather than relying on professional scanner operators to handle the scaling, color, retouching, and resolution control that previously was the province of print service providers or color trade shops. This section will help you educate customers, as well as provide guidance for handling customer images that need modification to solve printing problems. Resolution Whether its origin is a digital camera or scanner, an image is composed of pixels (short for “picture element”). The number of these little colored squares per linear inch (or per centimeter, depending on your system of measurement) is described as the resolution of the image, expressed in pixels per inch (ppi). The higher the resolution of an image that’s a given size, the more detail that can be displayed. 72 ppi: 236 KB 36 ppi: 128 KB 300 ppi: 2.2 MB Image Resolution The higher the number of the pixels per inch (ppi), the more detail an image can display. More pixels per inch also means larger image size. Increasing the resolution, or upsampling, from 72 ppi to 300 ppi in Photoshop does not recreate missing information. Note the softening of detail in the image that has been upsampled in Photoshop, compared to an image scanned to the correct size at the 300-ppi resolution. Upsampling: Resolution increased to 300 ppi from 72 ppi. The appropriate resolution for an image to be printed, based on the final line screen, is 1.5 to 2 times the line screen, at or above its final size. For example, an image to be printed at 150 lines per inch (lpi) should be scanned to final size with a resolution of 225 ppi to 300 ppi. There is no advantage to exceeding 300 ppi for an image to be printed at 150 lpi; the excess information incurs unnecessary processing with no visual improvement. Rather than do the math, most users elect to use 300 ppi as a general target resolution. It’s important to emphasize that, whatever the target resolution, the image must be scanned (or photographed digitally) at or above its final printing size. That is, an image intended to print at a size of 5 x 7 inches and a line screen of 150 lpi should be scanned to 5 x 7 inches at 300 ppi. Scanning an image at 300 ppi, but at a size of 2 x 3 inches, with the intention of scaling up the image to the correct final size of 5 x 7 inches (either in Photoshop or in a page layout program), will compromise detail after resizing. Photoshop can interpolate information, but this results in Adobe Creative Suite 4 Printing Guide 56 the program’s “best guess” approximation of the missing pixels. There is no substitute for a correctly sized original image of the proper resolution. Compared to scaling up, scaling down an image is less likely to produce obvious loss of detail, whether the scaling is done in Photoshop, Illustrator, or InDesign. Even though image data will be discarded, the smaller size camouflages the loss. Plus, if you use the Bicubic Sharper method in Photoshop when scaling down the size of an image (which is recommended; this is discussed in the following topic), slight edge sharpening is applied to compensate visually for the discarded data. Actual versus Effective resolution The best approach to image creation (whether scanning or shooting a digital photograph) is to have the image at the proper size and resolution before using it in other applications (or printing directly from Photoshop). Generally, if you start with an image that is 300 ppi at a given size, you have some leeway; scaling up to 125% in a page layout probably won’t degrade detail in an obvious way. An image without much detail (such as a background shot of a soft, gauzy sky) could still be acceptable if scaled up to 150% in a page layout. An image with a resolution of 300 ppi that is scaled up to 200% in an InDesign or Illustrator document has an effective resolution of 150 ppi. In other words, scaling an image up in InDesign decreases the resolution, and scaling an image down in InDesign increases the resolution. Conversely, a 300-ppi image that is scaled down to 50% has an effective resolution of 600 ppi. Scaling down images in InDesign or Illustrator does not reduce the amount of information included in an exported PDF, or an outgoing print stream, as no pixels are actually discarded. Processing time may increase slightly in the RIP. If just a few images are scaled down in a page layout, it’s probably not worthwhile to use Photoshop to scale down the images and update them. But if most of your images are scaled down—or if images are scaled down drastically—it may be worthwhile to take the time to reduce their size in Photoshop and update them in the page layout program. Weigh the time required to scale the images against the increase in processing time—and increased storage required for oversized images—to decide whether it is necessary to create downsized images. Resampling images It’s best to scan or photograph an image at the correct final size and resolution, rather than scaling it and subjecting it to interpolation. However, when scaling becomes necessary, Photoshop offers some refinements to optimize the results. Choose Image > Image Size to see the Image Size dialog box. You can resize an image by pixel dimensions or document size. Under both the pixel count and document size options, you can also specify a percentage size. If Resample Image is not selected, the Pixel Dimensions part of the dialog box is dimmed, because the pixel count won’t change if the image is not resampled. Pixel Count/ Percentage (toggle) Image Size Choose options according to how you intend to resize an image— by dimensions or by pixel count. (Scaling a placed image in InDesign or Illustrator does not let you interpolate image data. ) Document Dimensions Scaling Options If the Resample Image option is selected, Photoshop must interpolate information. That is, it must manufacture image data to “fill in the blanks” if the image is scaled up. If the image is scaled down with Resample Image selected, interpolation governs what information is discarded. The scaling options include six methods for resampling, and even offers parenthetical hints about suitable uses for the methods: • Nearest Neighbor (Preserve Hard Edges): Appropriate when resizing screen shots (to avoid anti-aliasing small text), but inappropriate for photographic images. Adobe Creative Suite 4 Printing Guide 57 • Bilinear: Averages the color of surrounding pixels; fast, but produces mediumquality results. • Bicubic (Best For Smooth Gradients): Slower, but produces smoother results than Bilinear. • Bicubic Smoother (Best for Enlargement): As the hint implies, smooths the results to minimize obvious pixels or jagged artifacts. • Bicubic Sharper (Best for Reduction): Accentuates edge sharpening to camouflage the loss of data when scaling down images. Note: To specify a default scaling method, choose Edit > Preferences > General (Windows) or Photoshop > Preferences > General (Mac OS), and then choose a method from the Image Interpolation Methods menu. Changing resolution without resampling During interpolation, pixels are created or averaged from existing information in the image. But if you resize an image without resampling, no information is created or lost. The most common example of this approach involves digital camera images, which are frequently very large, but with low resolution. The solution for this sort of image is to change the resolution without altering pixels. Choose Image > Image Size, and deselect the Resample Image option. You’ll then see that dimensions and resolution are linked together: increase the resolution and the dimensions are reduced. Decrease the dimensions and the resolution is increased. Set the resolution to an appropriate value, such as 300 ppi, and the width and height fall into place accordingly. With this approach, no pixels are lost or created, so the file size is not changed. In essence, only the number of pixels per inch (or centimeter) is changed, not the actual pixels themselves. Color mode If you are using a color-managed workflow, you may be accustomed to receiving RGB or Lab images from your customers, tagged with the correct color profiles. All Creative Suite 4 products fully support a color-managed workflow, and Adobe Bridge can synchronize color settings across all the programs in Creative Suite 4 for consistency. (For more on color management, see the “Common Resources” chapter in this document.) Resizing Without Resampling Digital camera shots often open in Photoshop with low resolution but oversized dimensions. Turn off the Resample Image option and set the resolution or dimensions. The dimensions and resolution are interrelated, so the file size of the image does not change because no pixels are lost (or manufactured). If you are not using color management, you probably expect your customers to supply CMYK or grayscale images in submitted jobs. There are also other color modes to consider, such as grayscale, multitone, and bitmap. Adobe Creative Suite 4 Printing Guide 58 Color Gamuts A comparison of AdobeRGB (red line), ProPhotoRGB (blue line) and CMYK (dotted line) gamuts to the range of visible light (color shape). RGB The native color mode of images from scanners and digital cameras is RGB (red-green-blue). As humans, we also “think” in RGB, because the color receptors in our eyes process red, green, and blue light to create our view of the world. The gamut of RGB light is somewhat larger than the range of colors that can be printed with CMYK process inks, which is why some vibrant colors in RGB images displayed on a monitor lose richness when printed. This may require some explanation to customers who are disappointed when comparing a printed piece to what they see on their monitor. There are advantages to the large color gamut available in the RGB color mode; if your workflow supports it, keep images in the RGB color mode as long as possible to avoid premature loss of color data. Some color corrections are easier in RGB (such as setting neutral points) and many Photoshop filters do not work in CMYK. CMYK If you prefer to receive CMYK images, but your customer has supplied images in another color space, such as RGB or Lab, you must decide whether to convert the images to CMYK yourself, or rely on the color-conversion function of your RIP. In-RIP color conversions from many vendors are more predictable than in the past, but if you prefer to make your own conversions, it’s important to know how to control the conversion to CMYK in Photoshop. When converting between color modes, Photoshop uses the color settings currently in effect. If you have a custom profile for the intended target (such as your press), you should choose that in your color settings. If you prefer to receive CMYK images from your customers, supply them with your preferred settings to ensure that they send images that are appropriate for your workflow. Special case: Screen captures Screen captures benefit from special handling when converting from RGB to CMYK. Create a special Gray Component Replacement (GCR) separation setup that generates a maximum black, replacing all four-color grays and blacks with shades of process black. This prevents small black text (and the gray backgrounds commonly found in software screens) from becoming a fourcolor black, thus minimizing blurring or color casts on press. To create the custom separation setup: 1.Choose Edit > Color Settings. 2.In the Working Spaces area of the dialog box, choose Custom CMYK from the CMYK pop-up menu. 3.In the Custom CMYK dialog box, choose GCR for the Separation Type. 4.For Black Generation, choose Maximum from the pop-up menu. Look closely at the Gray Ramp diagram; wherever the image contains equal levels of red, green and blue (which constitutes a neutral gray in RGB images), those areas will be replaced with shades of black, with no cyan, magenta, or yellow ink in those areas. 5.Type a name for the custom CMYK separation recipe (or accept the name that Photoshop generates for you), and click OK. This returns you to the Color Settings dialog box. Adobe Creative Suite 4 Printing Guide 59 Screen Captures Create a custom CMYK working space that uses GCR and a Maximum Black Generation to replace all four-color gray and black content with shades of process black. Use this custom separation setup when converting screen captures from RGB to CMYK. 6.In the Color Settings dialog box, click Save and name the new color setting. Photoshop will save the color setting in the default location. If you want to save the settings file somewhere else, navigate to that location. You’re also given the opportunity to provide a helpful description in the Color Settings Comment dialog box that appears when you save the setting. Type remarks in this field to guide subsequent users of the setting. Click OK to close the Color Settings dialog box. Your new separation setup is now in effect. Comments When you create custom separation setups, enter comments in the Color Settings Comment dialog to help other users understand how to use the setup. Note: This special separation setup remains in effect until you choose another setup. It’s appropriate only for converting screen captures and similar images. Be sure to choose a more appropriate separation setup before performing general image conversions. Grayscale Grayscale images are intended to print only in black ink, but beware of images that look grayscale but are actually color images. Photoshop CS3 introduced a special black-and-white color adjustment (Image > Adjustments > Black & White), which provides sophisticated controls for governing the conversion from color to the appearance of a black-and-white image. However, the Black & White adjustment does not actually convert the image to grayscale. Not Truly Grayscale While this image appears to be black-only, the title bar of the document tells the truth; it’s actually RGB. Adobe Creative Suite 4 Printing Guide 60 If such an image is not converted to grayscale, even very slight color shifts on press could produce a color cast in the printed image. An image that’s color—but appears grayscale—still displays its color mode in the document’s title bar. Look for the CMYK or RGB identifier after the image name in the title bar. Just finish the conversion by choosing Image > Mode > Grayscale, and update the image links if the image is used in an InDesign layout or Illustrator file. Multitone images (duotone, tritone) Multitone images such as duotones, tritones, and quadtones are actually grayscale images containing embedded transfer curves. The transfer curves contain information about what colors are generated during output, as well as the relative values of those colors. Most commonly, process black is one component of a duotone or tritone, which can cause a common problem you may encounter with multitone images supplied by customers. The initial dialog box for duotone options (Image > Mode > Duotone) automatically populates the black ink name for you. Unless the image is intended to print with a spot black ink rather than process black, this default black ink should not be changed. Some users think that they should manually pick a black ink. This results in an additional, unintended plate being generated during output. Duotone Settings The default settings for a duotone image use process black for the black plate. Choosing Pantone Black instead, generates an extra, unwanted black plate. To fix this problem, open the image in Photoshop, and choose Image > Mode > Duotone to open the Duotone Options dialog box. Highlight the incorrect black ink name, and change it to Black, with a capital “B,” to indicate standard process black. Update the image link in InDesign or Illustrator as necessary, and delete the extraneous ink from the Swatches palette of the target document. On Windows, the duotone presets are found in: C:\Program Files\Adobe\Adobe Photoshop CS4\ Presets\Duotones. In Mac OS, the Macintosh, the presets are found in: Applications/Adobe Photoshop CS4/Presets: Duotones. To save a custom preset for multitone images, click Save in the Duotone Options dialog box. Save to the default location, or choose an alternative location. Photoshop creates a file with the .ado extension. To load a duotone preset, click Load in the Duotone Options dialog box and navigate to the desired preset. Bitmap images Bitmap images (also called bilevel or line art scans) consist of only black and white (or black and transparent) pixels, with no intermediate shades of gray. Such images can be colorized when placed into Illustrator or InDesign, taking on whatever color is applied. The black areas of the bitmap image become the color of the applied swatch, while the white areas remain unaffected. Appropriate Formats Some of the old restrictions on image formats no longer apply in Creative Suite. In modern workflows, you are not limited to using TIFF and EPS files; more modern formats such as native Photoshop and Acrobat PDF provide more flexibility and function. While you may feel more comfortable with the time-tested formats, the newer formats offer significant benefits. In other words, do not fear the new approaches, and do not assume that you have to convert Photoshop files to something more familiar in order to image a job successfully. In a full Adobe Creative Adobe Creative Suite 4 Printing Guide 61 Suite workflow, the integration between Photoshop, InDesign, Illustrator, and Acrobat means that you can take advantage of the native Photoshop image format for successful output. By the same token, converting layered Photoshop files or native Illustrator files to EPS will flatten transparency, limit functionality, and may radically change the appearance and output of such files. Let’s look at some of the advantages—and shortcomings—of popular image formats. Photoshop native Photoshop’s native format (PSD) offers a number of significant advantages for designers: • An unlimited number of layers. • Layer masks for nondestructive masking. • Adjustment layers for nondestructive color correction and special effects. • Opacity controls. • Blending modes that allow color interaction between layers. • Special effects such as drop shadows and embossing. • Spot-color support. • Vector-drawing capabilities. • Clipping paths and vector masks for silhouetting objects. • Importing 3D content from CAD programs. • Editing and painting directly on 3D layers. Photoshop PSD files support CMYK, RGB, and Lab color spaces, as well as grayscale, multichannel, and multitone (duotone, tritone, and so on). All of these aspects of PSD files remain intact when Photoshop files are placed into Illustrator or InDesign documents, with the exception of blending modes. While opacity attributes of a Photoshop file are honored by Illustrator and InDesign, blending modes are not. See the “Photoshop Blending Mode Issue” topic in the InDesign chapter of this document for more information on the issue and how to work around it in InDesign. Current versions of InDesign and Illustrator support layered PSD files, so there is no need to flatten layers for output. Because InDesign allows overrides to Photoshop layer visibility with Object Layer Overrides, flattening an image whose appearance is managed by InDesign would result in incorrect output. If you are concerned about storing large Photoshop files, note that, pixel-for-pixel, a Photoshop file usually takes up less space on disk than an equivalent TIFF or EPS file. Certainly, a large, complex file with many layers will result in a larger file size, but consider it a fair trade-off for the flexibility such a file provides. If a customer’s file contains unused, hidden layers, consult with the customer before deleting such layers to reduce file size. If the file is used in an InDesign document, determine whether those layers are rendered visible by Object Layer Options or required for alternate versions of the image on another part of the job. In some OPI (Open Prepress Interface) workflows, native Photoshop files may require special handling. In a traditional OPI environment, special low-resolution EPS files are used as placeholders; within those EPS files are OPI comments that refer to the name and location of highresolution files to be used for imaging. A server-based function performs the image swap before the RIP. Photoshop native files are not used in this type of workflow. But some modified OPI workflows don’t use formal EPS-based image swaps; instead, these workflows allow all image formats and defer including high-resolution image data until the RIP. You may find that, in such a workflow, you will need to embed Photoshop files in the Illustrator or InDesign documents before generating PostScript, or you may have to include the Photoshop files in the print stream (as opposed to omitting them during print). Consult your RIP’s documentation for instructions on correctly handling native Photoshop images if you use such a workflow. Now, let’s look at some of the unique capabilities of native Photoshop files. Vector content in Photoshop images While most Photoshop images are composed solely of pixels, Photoshop also supports the inclusion of vector information. Vector text, vector-based Shape layers, vector masks, and Smart Objects can coexist with pixels in a Photoshop file. Such content remains editable throughout Adobe Creative Suite 4 Printing Guide 62 the life of the image; text can be edited with the Type tool, and vector shapes can be edited with the Pen and selection tools. Since such content has no inherent resolution, it can be scaled and rotated within Photoshop without losing fidelity. However, some special handling is required to ensure that such content prints as intended. Vector Text: The Horizontal and Vertical Type tools are used to create vector text in Photoshop. Like text in Illustrator or InDesign, such text is fully editable—content, color, size, and spacing can be changed at any time, provided that the text remains true text. If the text is rasterized (Layer > Rasterize > Type), the text becomes pixels and such editability is lost. Note that the Type Mask tools do not create vector text; they let you type pixel-based characters that instantly become active selections. The appearance of vector text in Photoshop is a bit misleading; even though the text is clearly not pixels—it’s fully editable—it appears rasterized. If the image is printed directly from Photoshop, the edges of text will be defined at the resolution of the underlying image, unless the image is printed to a PostScript printer and Include Vector Data is checked in the print dialog. (Text will be rasterized if the image is printed to a non-PostScript device, such as an inkjet printer, even if Include Vector Data is checked.) If a Photoshop .psd file containing text is placed into Illustrator or InDesign, the text will image at the resolution of the placed image. However, if the file is saved as a Photoshop PDF, the text in the image will print as crisp, vector text if the Photoshop PDF is placed in Illustrator or InDesign. Vector Text in Photoshop Viewed in Photoshop (left), the text appears rasterized. It will image as pixels if printed directly from Photoshop, unless Include Vector Data is checked in the print dialog (and the printer is a PostScript device). But if the file is saved as a Photoshop PDF (right), text is crisp when viewed in Acrobat, and prints as vectors if placed into an InDesign or Illustrator document, or if printed directly from Acrobat. Shape Layers: To create a Shape Layer, choose a vector drawing tool, such as the Pen tool, set the paths behavior in the Options bar to Shape Layer ( ), and select a foreground color. Use the Pen tools and the geometric tools (Rectangle, Ellipse, Custom Shape tool, and so on) to create what are essentially vector masks for a layer filled with color. The vector shapes can be edited with the selection tools and modified with the Add/Delete Anchor Point tools. The rules for imaging Shape Layers are the same as for vector text: to ensure crisp, vector edges, save the file as a Photoshop PDF. Shape Layer Pixel Fill Paths Shape Layers Created with vector drawing tools such as the Pen tool and Custom Shape tool, Shape Layers are essentially sheets of color with vector masks. This image has three shape layers; note that each Shape Layer consists of a color component and a vector mask component, which can be edited independently. Vector Masks: Very similar to Layer Masks, Vector Masks are created with vector tools such as the Pen tool. After a vector shape is created, the user chooses Layer > Vector Mask > Current Adobe Creative Suite 4 Printing Guide 63 Path. The selected path is then used as a vector silhouette for the layer, much like a clipping path. As with vector text and Shape Layers, images with Vector Masks should be saved as Photoshop PDFs to retain a crisp, vector edge when placed in other applications, such as InDesign or Illustrator. Smart Objects: Vector art placed as a Smart Object in a Photoshop image receives special handling. While it displays as pixels, the source vector art is embedded within the Photoshop file as vector. If a Smart Object is scaled in Photoshop, the content is re-rendered from the embedded vector information. Thus, no fidelity is lost from interpolation during cumulative transformations. Raster art can also be designated as a Smart Object, with the same benefits. But vector Smart Objects differ in an important way from the vector components discussed earlier: Smart Objects display and image as pixels, regardless of how the file is saved. That is, saving as a Photoshop PDF does not result in sharp vector edges; Smart Objects are rendered at the resolution of the image. Smart Objects do not retain any link to the original file; any edits performed to the original file won’t be reflected in the Smart Object embedded in the Photoshop image. The Smart Object data is part of the Photoshop file with no external links. To edit a Smart Object, double-click its thumbnail in the Layers palette. If the Smart Object is vector, Illustrator CS4 will launch, and the vector art will open as an Illustrator file. Edit as necessary, then choose File > Save; the edited data will be written back into the Photoshop file, and the Smart Object will be updated accordingly. If the Smart Object is a pixel image, double-clicking will open the image data in Photoshop for editing and will write the corrected image data back into the parent image when saved. Note that Camera Raw images can be placed as Smart Objects, and double-clicking to edit will call up the Camera Raw interface. Vector Smart Objects can be endlessly transformed without losing data (because each transform is re-rendered from the embedded vector data), but raster Smart Objects are subject to some of the same restrictions as any raster image: • Rotating the Smart Object will cause some loss of detail, although subsequent rotations are each re-rendered from the original pixel data; thus, the transformations are not cumulative. • Scaling down does not destroy data, although the reduced image will display less detail because of reduced size; scale the Smart Object back up to its original size, and the original data is re-rendered without additional interpolation. • Scaling up a raster Smart Object past its original size requires interpolation, with a resulting loss of detail. However, Smart Objects offer the advantage of re-rendering the image data fresh with each transformation, rather than causing cumulative data loss with multiple transformations. Clipping paths One common method for silhouetting an object in Photoshop is to draw a vector path with the Pen tool. Traditionally, it was necessary to designate the path as an official clipping path (by choosing Clipping Path from the Paths palette menu), and then save the file as a Photoshop EPS. This is still viable, although it’s no longer necessary to designate a path as a clipping path; InDesign provides options for using any saved path within a Photoshop PSD or TIFF file. Saved “regular” paths offer more flexibility than clipping paths; the user can choose from multiple saved paths for multiple uses of a single image—with different appearance—by changing the use of clipping paths within a page layout. Such paths can also be edited in InDesign; the original path is unchanged, but a user-modified instance of the path is used by InDesign to customize the silhouette. Such flexibility is limited for clipping paths; InDesign can modify the path to trim out visible parts of the image, but cannot reveal anything that falls outside the clipping path. A regular Photoshop path (not designated as a clipping path) doesn’t have such a limitation; it can be freely edited, to hide or reveal any part of the image. Flatness, expressed in device resolution pixels, governs how a device interprets curved vector paths, using tiny, straight segments. The lower the flatness value, the more straight segments are used to draw the curved path, and thus render it more faithfully. The higher the number of straight segments that must be generated when imaging the curve, the more processing power is required. But it’s not necessary (or advisable) for you to make a decision about appropriate flatness settings for clipping paths. When designating a path as a clipping path, leave the field Adobe Creative Suite 4 Printing Guide 64 blank: the output device will use it own optimum flatness setting to image curved paths without unnecessary processing. Path Flatness Leave the Flatness field blank, to allow the final output device to determine optimum flatness for curved paths. 3D content Photoshop CS4 Extended offers features targeted to engineering, architectural, scientific, and medical users. While these users may not seem to be your primary customers, Photoshop images containing three-dimensional (3D) and video content may be part of many types of work. The ability to interpret CAD data and produce a 3D rendering in Photoshop allows product designers to generate photographic product renderings before products are manufactured. Photoshop CS4 Extended CAD data can be interpreted and rendered to generate an image with special properties. A 3D object can be rotated and scaled in space, textures can be modified within Photoshop, and users can paint directly on 3D objects. The expanded 3D features in Photoshop CS4 Extended allow merging 2D art into 3D models, and include the ability to map art onto built-in 3D shapes such as cone, cube, pyramid, sphere, and more. Photoshop images containing 3D content should not present any problems in imaging and print; when placed into Illustrator or InDesign files, they are interpreted as any other Photoshop file. Although not vector objects, 3D objects share one advantage with Smart Objects: scaling the object within the image, or enlarging the image in Photoshop, reinterprets the 3D data and generates a new rendering of the object, so detail is not lost. Consequently, if a Photoshop file containing a 3D object is too small (or of insufficient resolution), scaling the object in Photoshop will produce better results than you’d achieve with a normal photograph. If you need to scale up an image containing 3D content, you’ll achieve better results by scaling the image in Photoshop, rather than enlarging it in Illustrator or InDesign. Note that patterns or textures applied to the surface of 3D objects are pixel-based and will lose detail accordingly. To clarify, the edges and details of a 3D object don’t lose detail when scaled, but any textures applied to the object will be scaled as any “regular” photographic data would be. To edit 3D objects, choose options from the new 3D menu. To add new light sources, doubleclick the 3D object’s thumbnail (indicated by a three-dimensional cube icon) in the Layers palette to activate the 3D Lights panel. Use the 3D Rotate tool and 3D Orbit tool to manipulate 3D objects in space. To edit a texture, double-click the name of the texture in the Layers palette. The texture opens as a separate image in Photoshop. You can perform any edits, including color correction, distortion, painting, and adding new layers—even text layers. Choose File > Save to write the edited image is written back into the 3D file, updating its appearance, or just click back in the parent file. You can also paint directly on a 3D object. 3D Content The 3D cube icon identifies Layer 1 as special 3D content translated from CAD data. The texture sublayers SKY and WETSUIT can be edited, but new texture layers cannot be added. Adobe Creative Suite 4 Printing Guide 65 Converting images containing 3D content to CMYK will flatten all 3D content; editability will be lost as a result. Smart filters In previous versions of Photoshop, filter effects, such as artistic watercolor and stained glass effects, caused permanent changes. But the Smart Filter option in Photoshop CS4 allows such effects to be applied nondestructively. Select a layer in the Layers palette, then choose Filters > Convert for Smart Filters. Then apply any number of filters to the Smart Filter layer. Such filters can be reworked or deactivated without any interpolation of the image. Multiple filters can be applied to a layer designated as a Smart Filter layer. Each Smart Filter will have its own visibility control in the Layers palette. Smart Filters Add nondestructive filter effects to a layer by using Smart Filters. Control the visibility of Smart Filter effects with the eyeball icons. To hide the effects of a single Smart Filter, click the eyeball icon next to the filter’s name. If you need to edit a customer’s Smart Filter effects, double-click the name of the applied filter in the Layers palette. The filter’s dialog box will be displayed; change the parameters as desired. To hide the effects of all Smart Filters, click the eyeball icon next to the Smart Filters sublayer. If a customer supplies an image containing Smart Filters layers, keep in mind that flattening the image will remove all editability and permanently change pixels affected by Smart Filters. Tagged Image File Format (TIFF) TIFF (file extension .tif) maintains many of the same features supported by the native Photoshop format—including layers, clipping paths, spot color channels, ICC profiles, Smart Objects, and Smart Filters. TIFF files are often larger than native Photoshop files with the same layer content, but because more applications support the format, they are also more usable outside an all-Adobe workflow. However, some non-Adobe applications may not support layered TIFF files. Encapsulated PostScript (EPS) The EPS (file extension .eps) format does not support many of the features of native Photoshop files—such as layers, Smart Objects, and Smart Filters. Traditionally, the EPS format has been favored for images in which clipping paths are used to silhouette an object, or for images to be printed as multitone (duotone, tritone, and so on). If your customer has supplied EPS files, there is no advantage to re-saving them as native Photoshop files. EPS files offer support for vector content, such as type and vector shapes; the files will print with sharp vector edges when placed in Illustrator or InDesign. However, reopening such images in Photoshop re-rasterizes them, and as a result, loses the crisp fidelity of vector content. While the EPS format is supported by most page layout, word processing, and graphics applications, non-PostScript printers will image only the screen-resolution preview component of EPS files. When saving an EPS file, note the options in the Save dialog box: Preview: Creates a low-resolution image for viewing in other applications or printing to nonPostScript printers. For an EPS file that will be shared between Windows and Mac systems, choose the TIFF preview option. An 8‑bit preview is color, while 1‑bit previews are black and white, resembling a fax image; 8‑bit previews add more to file size than 1‑bit previews. Encoding: Determines the way image data is delivered to a PostScript output device. Encoding options include: • ASCII (or ASCII85): Select this option if you are printing from Windows, or if you experience printing errors with other options. Adobe Creative Suite 4 Printing Guide 66 • Binary: Produces a smaller file, but some page-layout applications as well as some print spooling and network printing applications may not support images saved with this option. • JPEG: Compresses the file by discarding image data. Control the degree of JPEG compression, from JPEG Maximum Quality (slight compression) to JPEG Low Quality (aggressive compression). Files with JPEG encoding can be printed only on Level 2 (or later) PostScript printers. Some devices do not support the printing of separated output for files using JPEG compression. Include Halftone Screen and Include Transfer Function: Maintains any custom screening specification, as well as embedded curves meant to control the output values (for example, to linearize output and compensate for device behavior). Many RIPs ignore these attributes. Transparent Whites: Displays white areas in bitmap EPS files as transparent. PostScript Color Management: Converts file data to the color space of the target device. Do not select this option if you plan to place the image in another color-managed document. Only PostScript Level 3 printers support PostScript Color Management for CMYK images. To print a CMYK image using PostScript Color Management on a Level 2 printer, convert the image to Lab mode before saving in EPS format. Include Vector Data: Preserves vector graphics (including type). However, vector data in EPS and DCS files is available only to other applications, and is rasterized if you reopen the file. Image Interpolation: Applies anti-aliasing to the printed low-resolution image to improve output when printing to devices such as laser printers. Desktop Color Separations (DCS) 1.0/2.0 To facilitate the output of color separations, Quark®, Inc., developed the DCS format as a preseparated format with special features. It’s a subset of the EPS specification. A DCS 1.0 image actually consists of five files: four individual files (one each to represent cyan, magenta, yellow, and black), and a “parent” file that references the individual color components. In the 1990s, DCS files speeded desktop printing: only the parent file was sent to a desktop device. But in separated output to high-end devices such as an imagesetter, the four high-resolution color files were imaged for final output. Corruption or loss of any one of the five files constituting the image would render the image unusable. A later version, DCS 2.0, adds support for spot colors in addition to CMYK plates. The DCS 2.0 format also offers the option to save in a single-file format (Single File with Color Composite), rather than requiring the user to keep track of multiple individual files. When placed into InDesign or Illustrator documents, DCS files of either version are correctly printed and exported, whether you choose separated or composite output; the constituent colors are combined in the outgoing print or export. Non-Adobe applications usually require that you generate separated output to correctly print DCS files. The DCS format is also used for copy-dot images, which are created by scanning final film for ads or articles when digital files of the materials are not available. Photoshop does not generate this proprietary type of DCS file and usually cannot open or edit this file format without a special plug-in. While InDesign can combine DCS files generated by Photoshop into correct composite information during output, you may find that copy-dot DCS files require that you send separated output from InDesign. Joint Photographic Experts Group (JPEG) While you may regard the JPEG format (file extension .jpg) as primarily for web use, a JPEG with slight compression can be appropriate for print (provided the devices and processes in your workflow accept JPEG images). The unattractive rectangular compression artifacts that are frequently associated with JPEG images do not appear in images compressed with Maximum quality settings in Photoshop. That said, it’s generally advisable to avoid editing JPEGs and resaving in the JPEG format because each resave involves re-compression, and data can be lost unless the level of compression is carefully chosen. It’s best to save the file as a PSD or TIFF file, and then update InDesign or Illustrator files to use the new image. Adobe Creative Suite 4 Printing Guide 67 Another issue with the JPEG format is that it does not offer any support for layers, spot colors, or alpha channels. Photoshop PDF Photoshop (file extension .psd) files are usually created with the intention of using them in other applications, such as InDesign and Illustrator. Consequently, the best format for saving images is usually the native Photoshop (PSD) format. However, in some cases, an image is the final job, and won’t be placed into another application. While Photoshop’s native file format is the most flexible option, some customers may wish to submit a PDF for output. Because it shares the same PDF libraries as all the other Creative Suite 4 components, Photoshop can save images in the same PDF formats. However, to maintain fidelity to the artist’s intent and to ensure high-quality output, suggest to your customers who want to submit Photoshop PDF files that they start with one of the print-appropriate options (Press Quality, or one of the PDF/X formats), and then turn off resampling and compression. Ask the customer to avoid placing any security restrictions on the PDF file. To ensure that the image can be edited if necessary, make sure that the Preserve Photoshop Editing Capabilities option is selected. Unless the image contains vector or text content, saving an image as a Photoshop PDF offers no advantage over saving the image as a Photoshop native file. Special Case: Photoshop files with vector content It’s important to maintain the crisp definition of vector content in a Photoshop file, whether that content consists of type, Shape Layers, or vector masks. Three image formats support vector content (PSD, EPS, and PDF), and it’s important to choose the appropriate format for your workflow. A native Photoshop file (PSD) supports the inclusion and editability of such content. A Photoshop file containing vector content can be reopened and edited in Photoshop with no loss of data, and can be placed in other applications. However, vector content in a Photoshop file placed in Illustrator or InDesign will be rendered as pixels during output from those applications, thus losing the crisp appearance. Saving such a file in the Photoshop EPS format preserves vector content for other applications, but at a price: such a file cannot be re-opened in Photoshop without re-rasterizing the vector content. If you try to open such a file, you’ll receive an intermediate dialog box asking for rasterizing parameters; this is a warning that you will re-rasterize vector content if you continue. If a customer has supplied such a file, do not attempt to open and edit the file in Photoshop. Instead, ask that the customer perform the necessary edits and provide a replacement image. As an alternative, request that the customer re-save the file as a Photoshop PDF with no compression or downsampling. Vector Content Avoid re-opening a Photoshop EPS containing vector content. All contents of the file—including text and other vector shapes—will be rasterized, losing editability and file fidelity. Saving as Photoshop PDF avoids this problem. Photoshop PDF is the best format for images containing vector content: the file can be reopened for editing in Photoshop without rasterizing the vector content, and the PDF “wrapper” ensures that page layout programs and other applications will render the vector content as crisp, vector edges without pixelation. Adobe Creative Suite 4 Printing Guide 68 Photoshop PDF To preserve vector content, start with the High Quality Print preset. Turn off Optimize for Fast Web Preview, and turn off compression and downsampling. The goal is to preserve all the original Photoshop data, but encase it in a PDF wrapper for proper rendering by other applications. For these types of files, instruct your customers to start with the High Quality Print PDF preset, and then modify it a bit in the interest of image integrity. • For General options, select Preserve Photoshop Editing Capabilities so the file can be reopened in Photoshop. This option does increase file size, but is required to maintain all layers and to allow future editing of vector and text content. • Deselect Optimize for Fast Web Preview. While this doesn’t impair content fidelity or editability, it’s unnecessary in a print workflow. • For Compression options, choose Do Not Downsample, and set Compression to None, to avoid any loss of data. • Leave the Output and Security options at the default settings. Because the saved file has a .pdf file extension, double-clicking the file to open it launches Adobe Acrobat, not Photoshop. Using the InDesign Edit Original function also opens the file in Acrobat. To edit such files in Photoshop instead, launch Photoshop and then choose File > Open to open the file. After editing the file in Photoshop, you then must manually update links to such files in InDesign or Illustrator. Printing from Photoshop Some of the options available to you when printing from Photoshop depend on the features of the target device. Choose File > Print to open the Print dialog box. The dialog box is divided into two sections; the preview and general options are in the left section, and the Color and Output options (available through a pop-up menu) are in the right section. General options The general options include scaling and position options to determine how the image prints relative to the chosen media. Print Dialog Box— General Options Choose options for position and scale of output. To reposition the image on the media, deselect the Center Image option and either enter coordinates in the Top and Left fields, or drag the image thumbnail in the media window at the left. For scale factor, enter a percentage value or height and width dimensions, or drag on a corner of the thumbnail. Scaling: When you print to a page larger than the document’s size, you can scale the image to fit the media. Photoshop allows you to do so visually, manually by height and width dimensions, or automatically to fit the media (which may be enlargement or reduction, depending on the size of the image and the size of the media). Adobe Creative Suite 4 Printing Guide 69 To change the orientation of the page, click the page orientation icon below the preview area to choose Portrait or Landscape. To scale the image visually, grab one of the handles on the image in the preview area of the Print dialog box to scale the image up or down. You cannot scale the image nonproportionally or rotate it. If you deselect the Center Image option, you can reposition the image by entering values for the Left and Right fields of the Position section or by dragging the thumbnail of the image. To center it, simply select Center Image. Photoshop calculates and displays the values that result in a centered image on the media you have chosen. Output options When you choose the Output option from the pop-up menu on the right side of the Print dialog box, you’re presented with options for additional information to be printed with the image. Print Dialog Box— Output Options Choose options for marks, labels, and captions as well as a background color and border. Halftone options chosen in the Screen topic may be ignored by the output device. Some options are only available for PostScript printers. Your choice of output options depends on your workflow, as well as the capabilities of the target device: • Calibration Bars: Adds an 11‑step grayscale wedge from 0 to 100%, in 10% increments, if the target printer is a PostScript device and if there is room on the media for the calibration bars. • Registration Marks: Prints bull’s-eyes and star target registration marks on the image. • Corner Crop Marks: Prints crop marks at the corners of the image bounds. • Center Crop Marks: Prints crosshairs at the vertical and horizontal centers of the image. • Description: Prints any description text entered in the File Info dialog box, up to about 300 characters. • Labels: Prints the file name above the image. • Emulsion Down: Reverses the orientation of the image and is useful for film output or special effects. • Negative: Inverts the entire output, including all masks and any background color. This option is useful if you are imaging directly to film or other photosensitive media. • Background: Lets you select a background color that will be printed on the page outside the image area. Click the Background button, and then select a color from the color picker. (This option affects only output, and leaves the image unchanged.) • Border: Prints a black border of the specified width at the edge of the image. • Bleed: Prints crop marks inside rather than outside the image. Use this option to trim the image within the graphic rather than at the edge. • Screen: Sets the line screen and dot shape (although most imaging devices ignore these settings and apply halftoning based on settings at the RIP). • Transfer: Applies a compensation curve to the output image. Intended to compensate for dot gain or dot loss in film output, this option is recognized only when you print directly from Photoshop or when you save the file in EPS format and print to a PostScript printer. Generally, it’s best to adjust for dot gain using the settings in the Adobe Creative Suite 4 Printing Guide 70 CMYK Setup dialog box. Transfer functions are useful, however, when compensating for a poorly calibrated output device. • Interpolation: Reduces the jagged appearance of a low-resolution image by automatically upsampling the output stream while printing. However, resampling may reduce the sharpness of the image quality. Some PostScript Level 2 (or higher) printers have interpolation capability. If your printer doesn’t, this option has no effect. • Include Vector Data: Retains vector edges for text and other vector content when printing to a PostScript device. • Send 16-bit Data: Send maximum image information for high quality output if you are using Macintosh System 10.5 and later and your printer supports 16-bit images. Color management When you choose the Color Management option from the pop-up menu on the right side of the Print dialog box, you’re presented with options for color management during output. Print Dialog Box— Color Management Options With the pop-up menu set to Color Management, choose the appropriate settings for your workflow. Hover over any option to view additional information at the bottom of the dialog. Options below the preview thumbnail allow you to match print colors on screen, highlight out-of-gamut warnings, and simulate paper white. Print section In the Print section, choose between the Document and Proof radio buttons. Choose Document to print the image according to the current color settings, taking into consideration the behavior of the target printer. Choose Proof to modify the output to match the proofing environment you specify. Use the Proof option if you wish the output to emulate the appearance of another device, such as using your desktop printer to mimic the final appearance on press. There are substantial enhancements to the print experience in Photoshop CS4 and Photoshop CS4 Extended, including support for printing of large (>30,000 pixels), user interface improvements, rulers in the print preview, gamut warnings, and great support for scripting. Options section The Options section governs color handling. The available choices depend on what you select from the Color Handling pop-up menu: • Printer Manages Colors: Photoshop sends the image data “as is,” and the target device uses its built-in default color rendering. You can choose an option from the Rendering Intent pop-up menu, but most non-PostScript printers use Perceptual intent and ignore any other choice you might make here. If fleshtones have a greenish cast when printed, this may be a sign that color management in the printer is turned off. Note that, on Windows, using Printer Manages Colors will compress the gamut of images to sRGB color space when printing, which may produce less-vivid colors when printing to a wide-gamut device. • Photoshop Manages Colors: When this option is selected, you can choose a target printer profile and a rendering intent. The ideal target profile is a custom profile built for your device, but if you don’t have a custom profile, choose the canned profile that matches your device and media. (These profiles are often installed when the printer driver is installed, but you may have to obtain them from the vendor.) It’s very important to avoid “double color management” when using this option; make sure that you turn off any color compensation at the printer (address this in the print driver dialog Adobe Creative Suite 4 Printing Guide 71 box, which appears when you click the Print button in the Print dialog box). If fleshtones print with a heavy red cast, this is a sign that both Photoshop and the printer are performing color management; disable it at the printer to allow only Photoshop’s color management to affect output. Consult your printer documentation for specifics. With many newer printer drivers, when Photoshop manages colors, the drivers will set the defaults within the driver settings accordingly, for optimum output. • Separations: To print a separate sheet of media for cyan, magenta, yellow, and black plates as well as any spot color component (such as spot colors in duotone images), choose Separations, and turn off color management at the printer. Photoshop displays an alert underneath the Color Handling pop-up menu, asking “Did you disable color management in the printer dialog box?” (Separations are not available for RGB or grayscale images, but are available for CMYK and multi-channel images.) • No Color Management: Select this option when printing color targets used to profile the printer. Again, Photoshop reminds you to also turn off color management in the printer dialog box. When you click the Print button at the bottom of the dialog box, you enter the specific print driver dialog box for the chosen printer. The chosen printer chosen determines the options available in that dialog box. Clicking Print in the print driver dialog box sends image data to the target printer. For more information, see http://www.adobe.com/go/ps_support. To search, type appropriate terms in the Search For field, select other Search options, and then click the Search button. Adobe Creative Suite 4 Printing Guide 72 Chapter 4: Adobe Illustrator CS4 Over its product life, Adobe Illustrator has evolved from a sturdy vector-drawing program for creating logos and illustrations to a full-featured creative environment with painterly brushes, soft-edged effects, and 3-dimensional design tools. Illustrator is used predominantly to create artwork that will be placed into another application, such as InDesign, but many artists work exclusively in Illustrator to create final artwork, especially in packaging environments. Illustrator files can be saved as native Illustrator (AI) files, PDF files, or EPS files—even TIFF and Flash (SWF) formats. Each new version brings enhancements that provide design functionality far beyond the original, basic vector-drawing capabilities of Illustrator. As your customers begin to use the more advanced features of Illustrator, it is helpful for you to know how to ensure that their files will print as expected. Illustrator CS4 offers enhancements and new controls that allow you to more easily and efficiently edit customer files when necessary. There are a number of new features and enhancements to existing tools in Illustrator CS4, including: • Multiple Artboards: Illustrator now offers the ability to create documents that contain multiple artboards within a single file. Artboards can be of different dimensions, and can even overlap each other. For example, the letterhead, envelope and business card for a client can be created within one Illustrator file. This can simplify the creation of common components such as swatches and symbols; rather than needing to duplicate such assets across multiple Illustrator files to create multiple pieces of a job, they can be contained within one Illustrator file and used on multiple artboards. • Separations Preview: View individual inks in color, as well as overprint effects. Selectively show and hide individual spot and process colors to preview color separations on screen, so you can quickly and easily identify potential printing problems early in a job. • Bleed Support: You can now define a bleed zone of any width, as in InDesign. Bleed values can be different on each side, and are applied to all artboards in the document. • New Defined Workspaces: Under Window > Workspace (or from the Workspace pulldown menu in the Application bar), you can choose new options that will configure the workspace to resemble FreeHand, InDesign, or Photoshop environments. You can also choose a workspace that targets a particular task, such as Printing and Proofing, Typography, or Web. • No More Filters: There was considerable duplication between the visual operations available under the Filter menu and those available under the Effects menu. Filters created literal, embedded, pixel-based content, or permanently altered affected objects. Effects remain editable throughout the life of the job, and, as such, are much more flexible. To remove the redundancy, the Filter menu entry is now gone. Most options that were available under the Filter menu can now be found under the Effects menu, or the Edit menu. Third-party filters that used to appear under the Filter menu will now be available under the Object > Filter menu when installed. Enhancements to Existing Features • Isolation mode: Work in Isolation mode with more object types, including compound paths, gradient meshes, clipping paths, opacity masks and images. • Type on a Path: Improved composition of type on paths, requiring less manual kerning for smooth text flow. • Alignment to a key object: While it’s long been possible to designate one of several objects as a key object for alignments, this feature is now more obvious. Select several objects, then click on one of the objects to earmark it as the key object. The selection edge of the key object becomes bold; any transforms will now be based on the position of that key object. Adobe Creative Suite 4 Printing Guide 73 • Enhanced Gradient Tool: Now you can modify gradients with controls that appear directly on the selected object, changing and adding colors on the gradient, and changing the gradient position with intuitive controls. • Transparency in Gradients: You can now specify opacity for color stops on a gradient, in addition to applying color. • Appearance panel: You can now perform many operations directly in the Appearance panel without invoking menus or other panels. Select individual Appearance components in the panel, and alter the options. • Smart Guides: Smart Guides now make it easier to snap objects to the centers and edges of other objects Bleed While it’s always been possible to create artwork that includes adequate material for bleed, there has been no formal bleed “zone” until Illustrator CS4. Now, you can specify a bleed area that is recognized when printing and exporting an Illustrator file, in much the same way as you can in InDesign. You can snap objects to the bleed lines. To turn off the view of bleed guide lines, choose View > Guides > Hide Guides. To create a defined bleed, you can either specify a bleed value when creating a new document, or add it once the document is open. To add a bleed area to an existing document, choose File > Document Setup and enter the appropriate amount in the bleed fields. By default, all bleed values are linked; changing one value changes them all. But you can unlink the bleed fields and specify a different value for each side of the artboard. Note that in files with multiple artboards, all artboards will have the same bleed value. Setting Bleed Value The bleed fields are linked; enter a value in any field, and all fields are automatically updated. To specify different bleed amounts, click the chain icon (circled) to unlink the fields, and then enter the values in individual fields. Specified Bleed The red line indicates the bleed area around an artboard, which can be invoked during print and export to ensure correct bleed amount on output. In print and Save as PDF dialogs, be sure to check the option to Use Document Bleed Settings under the Marks and Bleed topic. Note that if you check this setting, but have not specified a bleed zone for the document, no bleed is generated; only artwork within the artboard trim area is printed or retained in the resulting PDF. If you have not specified a bleed zone, you can manually enter a bleed value when saving as PDF or when printing, and correct bleed will be included, assuming the chosen print media is large enough. Working with multiple Artboards Long requested (especially by FreeHand users switching to Illustrator), multiple Artboards allow the user to create multiple individual drawing areas within a single document. While this does not mean that Illustrator is now a page layout application (for example, there is no provision for master pages or automatic page numbering, as in InDesign), it provides the ability to hold multiAdobe Creative Suite 4 Printing Guide 74 ple assets within one file. Artboards can be of any size, and can even overlap each other, provided they fit within the boundaries of Illustrator’s maximum canvas, which is limited to 227.54 inches on each side. For example, all the collateral artwork for a client — the letterhead, business card, and envelope — can be contained within a single Illustrator file. 1101 Rotor Road Rotorolia, PA 17031 Multiple Artboards Extend the flexibility of Illustrator files with multiple Artboards. Each artboard can be resized, printed separately, and exported to separate pages of a multi-page PDF. Bob Rotorovski General Manager 1101 Rotor Road Rotorolia, PA 17031 717-555-5555 1101 Rotor Road Rotorolia, PA 17031 An artboard is not an object; it is a defined drawing area within the overall Illustrator canvas, which can be addressed directly. Artboards can be created, modified, and repositioned with the Artboard tool ( ). To create a new artboard, select the Artboard tool, and drag a rectangle on the canvas, or click on an object to create a new artboard aligned with the object’s bounding box. Press the Enter key (Mac: Return) to open the Artboard Options dialog, where you can specify exact dimensions for the artboard. You can also select an existing rectangle and choose Object > Convert to Artboard, or duplicate an existing artboard by selecting it with the Artboard tool, and then Option/Alt-dragging to a new area of the canvas. To create an artboard within an existing artboard, hold down the shift key while dragging with the Artboard Tool. To modify the dimensions of an artboard, select it with the Artboard tool and press the Enter/Return key to open the Artboard Options dialog. Artboard Options Specify dimensions , proportions and position for an artboard, as well as the display options for center marks and centerline crosshairs. To delete an artboard, select it with the Artboard tool and press the Delete or Backspace key. Only the artboard itself is deleted; any artwork remains. However, any artwork which falls outside any remaining artboard will not be included when you save as PDF or print the file. Crop Areas to Artboards: Converting older Illustrator files When you open a legacy Illustrator file containing a Crop Area (created by the Crop Area tool) or Page Tiles, you are given the option to create Artboards from crop areas, page tiles, artwork bounding boxes, and the original legacy artboard. If you open a legacy file with no page tiles or crop areas defined, the original legacy artboard becomes a single artboard in the converted Adobe Creative Suite 4 Printing Guide 75 document. While the content of the document is essentially unchanged, you can now select the artboard and move it, change its dimensions, or duplicate it. Converting Crop Areas to Artboards You have the option to create Artboards for aspects of a legacy Illustrator file, including the original single artboard (as it was defined in previous versions), crop areas (created with the Crop Area Tool), bounding boxes, and page tiles. Working with Text from Different Versions of Illustrator Illustrator CS4 can open a file created by any previous version of Illustrator; however, you should be cautious about opening files created by versions prior to Illustrator CS. The text composition engine was revamped for Illustrator CS, and live text from previous versions may rewrap or leading may change when a file is opened in Illustrator CS or later. Opening Illustrator CS, CS2 or CS3 files in Illustrator CS4 does not cause text reflow. If text has been converted to outlines or if the file consists only of vector shapes and placed images (with no live text), opening older files in Illustrator CS4 should present no problems whatsoever; changes in text composition do not affect purely vector content. When you open a legacy file (created by a version of Illustrator prior to CS) containing live text, an alert warns you that the file contains text created in a previous version of Illustrator, and that the text must be updated before you can edit it. Opening Legacy Files Because Illustrator CS revised the text composition engine, this alert appears on opening files created in versions of Illustrator prior to CS. It is recommended that you click OK. You are presented with three choices: Update, Cancel, and OK. Adobe recommends that you don’t click the Update button in this alert; text may reflow, but you won’t have the opportunity to view “before and after” to judge if the reflow has caused problems. Clicking Cancel prevents the file from opening. Clicking OK allows you to open the file, and leaves the text unchanged. You will be able to update text once the file is open, with the added advantage of being able to check the status of the text before and after the update. Once the file is open in Illustrator CS4, another alert appears when you attempt to edit legacy text. You are given three choices: Copy Text Object, Cancel, and Update. If you click Update, the text becomes live text, and is composed according to the rules in Illustrator CS4. This may result in changed line-spacing or text reflow. Although the changes may not be immediately apparent, you risk making changes that your customer does not want. Thus, it is recommended that you do not click the Update button in this alert. Choosing Cancel just stops the editing process without altering the text; nothing happens. The recommended choice is Copy Text Object. Illustrator then creates a ghosted version of the untouched text in a locked sublayer named Legacy Text Copy, along with a live, editable copy of the text updated by the current composition rules. Adobe Creative Suite 4 Printing Guide 76 Updating Legacy Text When you select text created in older versions of Illustrator, you have three courses of action. It is recommended that you choose the Copy Text Object option. Illustrator then creates a ghosted version of the legacy text, showing its appearance in older versions, so you can spot any unwanted changes. Live text is displayed in its correct color, and can be edited as you wish. Use the ghosted legacy text as a guide to modify the live text to match the customer’s supplied file as closely as possible. When you have finished, either hide or delete the Legacy Text Copy to avoid inadvertent output of the guide text. There should be no issues if you open a customer’s files to edit vector content, but do not modify text. In this situation, click OK in the opening alert, and avoid editing the text. Illustrator won’t create the legacy text guide or change the text in any way if you do not attempt to edit it. Type on a Path has been improved in Illustrator CS4, resulting in smoother composition of type along a path. However, this change in composition may affect the appearance of type on a path when you open an older Illustrator file. If you don’t edit the type, it remains unchanged. But when you begin to edit type on a path, you are given an alert that you can update to the newer character positioning of CS4. If you click Don’t Update, you can still edit the type, but it will use the older character positioning rather than the new, smoother CS4 method. If you want to manually update type on a path, choose Type > Type on a Path > Update Legacy Type on a Path. Updating Type on a Path When you edit type on a path that was created in a previous version of Illustrator, the type composition will be updated to the new CS4 method, creating smoother type flow along the path. However, this may result in a noticeable change in type appearance or reflow. If your workflow includes editing customer files and then returning the corrected files to the customer for future use, you face an additional concern. Although Illustrator CS4 offers options for saving back to versions as old as Illustrator 3, it’s important to warn your customer that edited text in such files may be reflowed or converted to point text or outlines, and as a consequence text editability will be impaired or lost. In the case of type on path objects that were created in Illustrator CS4 using the new type on path composer, text composition changes may occur when saving to Illustrator CS-CS3. When saving to Illustrator 10 and older, the type will be converted to point type or outlines. Point text consists of small groups of several letters, rather than a smooth, continuous flow of text. While point text will print as intended, it is difficult to edit point text without impairing spacing and text position. Keep a copy of the file in Illustrator CS4, in case further edits are required before the end of the job. Adobe Creative Suite 4 Printing Guide 77 Saving to Older Formats Because of the text composition engine in Illustrator CS was changed from previous versions, saving documents with text to be opened in older versions of Illustrator can result in text being converted to outlines (left) or point text (right). Always keep a current version of the file with live text so that text can be edited if necessary. Saving Illustrator CS4 files for users of older versions can present some issues in addition to text. Live Effects, such as 3D objects, Live Trace objects, and Live Color objects, are converted to expanded, literal vector objects (rather than editable Live Effects) when saved for versions of Illustrator before CS2, and thus lose much of their editability. Warped shapes (including text), drop shadows, and glows become raster content if saved for versions prior to Illustrator 9. When you save Illustrator files containing such effects, an alert warns you that type may be converted to point text and that the editability of some features may be lost. This applies when the file is opened in an older version of Illustrator or reopened in Illustrator CS4, because the content in the outgoing file has been permanently altered to meet the limitations of the older version. For this reason, you should save a duplicate copy of the file in the CS4 format in case further edits are required. Older Format Alert When you save an Illustrator file containing live effects to an older format, you are warned that such content won’t be editable in the older version of the program. Also, the content won’t be editable if reopened in Illustrator CS4. Note that saving an Illustrator CS4 file containing multiple artboards in an older format will retain all artwork, but will contain only a single artboard, which takes on the dimensions of the largest artboard in the original document. You are given the option to save each Artboard to a separate Illustrator file. Whichever option you choose, the original multiple Artboards are not automatically restored if the backsaved file is reopened in Illustrator CS4. However, the location and dimensions of artboards are retained as guides through a “round trip.” To restore the artboards, select a guide (or multiple guides), and then choose Object > Convert to Artboards. Document Color Modes When creating a new document, an artist can choose from multiple document presets, intended for a variety of output options, including Print, Web, Video, Mobile and Devices, Basic RGB, and Basic CMYK. Encourage your customers to start with the Print document setting, which automatically sets the document color mode to CMYK, and establishes a Raster Effects setting of 300 ppi. This preset creates a letter-sized document by default, but the artist can set the document dimensions to any value, up to 227.4 x 227.4 inches. The document color can be changed at any point, but this may result in some unwanted changes. For example, drop shadows become four-color shadows when a document is started in RGB, but changed to CMYK after the shadows are created. When a user chooses File > New to begin creating an Illustrator file, the option to choose a color mode may not be obvious; you must click the Advanced triangle to reveal options for document Saving Multiple Artboards to Older Formats Note that multiple Artboards will be lost when saving files to older formats; you have the option to save each Artboard to a separate Illustrator file. Adobe Creative Suite 4 Printing Guide 78 color mode and raster effects resolution. New Document Basic mode; click the Advanced triangle to reveal additional options. Advanced Mode Options for Color Mode and Raster Effects resolution are found here. The default settings create a CMYK file, but if the color mode has been set to RGB, the changed settings may be easily overlooked during document creation. In an RGB document, even if the color sliders are set to CMYK when choosing a color, an RGB color is created. The document color mode can be changed from RGB to CMYK, but some issues must be corrected in the converted file. Spot-color swatches retain the correct spot-color definition after conversion, and all other content is converted to CMYK using the current color management settings. Generally speaking, this is satisfactory, with the exception of black content specified as R0–G0–B0 or 100% black, which is converted to a four-color black (rich black) when the file is converted to CMYK. This content should usually be converted to 100% black for correct output. Proof setup You can display an on screen preview of how your document’s colors will look when reproduced on a particular output device. Keep in mind that the reliability of the soft proof depends upon the quality of your monitor, the accuracy of your monitor calibration, the fidelity of your monitor and output devices, and the ambient lighting conditions of your work environment. Soft-proofing mimics the appearance of printing colors on screen, but does not represent the appearance of blending modes or overprint; for that, you must turn on Overprint Preview (View > Overprint Preview). To soft-proof colors on screen: 1.Choose View > Proof Setup, and do one of the following: • Choose a preset that corresponds to the output condition you want to simulate. The default choice depends on the color settings currently in effect. • Choose Customize to choose or create a custom proof setup for a specific output device. If you have a custom profile for the output device (for example, a proofing device or a printing press), this option provides the most accurate preview of output. 2.Choose View > Proof Colors to activate the soft-proof display. You can toggle Proof Colors on and off by re-selecting the option. When soft proofing is on, the Proof Colors command displays a check mark, and the name of the proof preset or profile appears at the top of the document window. 3.To compare the appearance of multiple presets, create a new window (Window > New Window). Using the Screen Mode control at the bottom of the Tools panel, set the application to Standard mode and arrange multiple windows side-by-side. Choose a different preset for each window by choosing View > Proof Setup, selecting a preset, and turning on Proof Colors. Pixel preview If the Illustrator artwork will be exported for web or mobile-device use, you may wish to preview the outcome for optimum results. Artwork exported for these environments is rasterized at 72 Adobe Creative Suite 4 Printing Guide 79 ppi, but you have some control over the pixel grid position. Choose View > Pixel Preview, then observe the results if you move or transform artwork: Objects snap to an invisible 72-ppi pixel grid. While this helps avoid anti-aliasing at the top and left edges of artwork, you may wish to reposition the artwork without snapping to the grid. To do this, choose View > Snap to Pixel to deselect that option. Pixel Preview does not help you judge how Illustrator artwork will look when exported to image formats such as TIFF or PNG, since you control those results with your choices in the export settings. Live Effects Live Effects, such as 3D effects, glows, and distortions such as Scribble and Zig Zag, change the visual appearance of objects, but they do not permanently alter the underlying artwork. Consequently, Live Effects are continuously editable, provided the file is not saved in a format that does not allow editability, such as older Illustrator formats. Some of these effects require special handling to ensure that they print as expected. 3D objects Illustrator creates the visual effect of three-dimensional depth by applying transformations and shading to vector objects. The 3D objects created by the 3D Effects feature can be rotated in the 3D function dialog box, and the depth, lighting, and perspective of objects can be repeatedly edited. To create 3D effects, select an object and choose Effect > 3D and then select one of the options: Extrude & Bevel, Revolve, or Rotate. To edit existing 3D effects, however, do not choose the 3D option again from the Effect menu. Instead, double-click the 3D entry in the Appearance panel (Window > Appearance). The 3D Options dialog box appears. 3D Effects To edit existing 3D effects, doubleclick the 3D entry in the Appearance panel. To see additional controls in the 3D Options dialog, click the More Options button. If the object is intended to print as four-color process, no additional measures are necessary. However, if the object uses a spot color, special handling is required to ensure that the spot color prints as intended. The option to retain spot color is hidden in the initial view of the 3D Options dialog box. To access the spot-color option, click the More Options button in the 3D dialog box. Controls for lighting and spot-color preservation are displayed at the bottom of the dialog box. Adobe Creative Suite 4 Printing Guide 80 Spot-color 3D Objects When performing 3D operations on a spot-color object, display the additional options in the 3D dialog box for more controls. To avoid converting spot-color content to CMYK, check the Preserve Spot Colors option. At first, the object will appear as black only; for correct display, activate Overprint Preview (View > Overprint Preview). To maintain spot-color content in 3D objects, Illustrator uses overprint. Essentially, the object is replicated by two separate objects—a solid object filled with the spot color, plus a grayscale (black only) object carrying the shading and set to overprint. This arrangement will initially appear to be black only, until you turn on Overprint Preview (View > Overprint Preview). Since overprint must be processed for the object to print correctly in the spot color and black, the RIP must allow PostScript overprint to be active. = + Retaining Spot Color For output, Illustrator renders a spot-color 3D object as two elements—a group of black-only objects, set to overprint, and a solid object filled with the spot color. You must turn on Overprint Preview to view this effect correctly, and the output device must honor the overprint instruction to image the objects correctly. We have used an extruded object as the example, but the same rules apply to rotated and revolved 3D objects. Expanding 3D objects A live 3D object in Illustrator is a simple cross section under the hood. While this allows you to edit the basic cross section shape (and thus the shape of the 3D object), you cannot select individual, shaded areas for editing, because they are not literal, individually editable vectors. To convert the live effects to editable vectors, expand the object (Object > Expand Appearance). The result can be a collection of very complex objects, but you gain some editability for individual components, and often a reduction in file size. If you must expand a 3D object, it is recommended that you work on a copy of the file, and keep an unedited original as insurance. Adobe Creative Suite 4 Printing Guide 81 Expanding Live Effects A live 3D object (left) is a simple cross section under the hood (center). While this allows you to edit the basic cross section shape (and thus the revolved object), you cannot select individual, shaded areas for editing, because they are not “real.” To convert the live effects to editable vectors (right) expand the object (Object > Expand Appearance). Ensuring correct imaging of raster-based effects Illustrator CS4 offers stylized soft-edge effects such as Drop Shadow, Feather, and Inner Glow, which are rendered as pixels during output. While these effects are live and editable, their resolution during output is governed by the Document Raster Effects setting (Effects > Document Raster Effects Settings). By default, the Raster Effects setting in Illustrator CS4 is 300 ppi, which should be sufficient for most printing needs. However, files created in earlier versions of Illustrator may be set up with the previous default setting for Raster Effects of 72 ppi. The low resolution may not be obvious on screen, but it will be apparent in most output. Because these effects are live effects, rather than actual content, changing the Raster Effects resolution will correct the resolution of the effects. Bear in mind that, if the artwork will be scaled during placement in another application (for example, when placed into an InDesign layout), the final output size should be taken into consideration. An Illustrator file that will be scaled at 50% can have a Raster Effects setting of 150 ppi—scaling it at 50% will result in an effective resolution of 300 ppi, and so on. When most effects are applied to spot-color objects, the spot-color definition is retained; content is not converted to CMYK or RGB. However, the SVG effects (Effect > SVG Filters) do not support spot color. If SVG filters are used, affected spot-color objects become CMYK or RGB (based on the document color mode). If you need to modify effect-created shadows or glows in an Illustrator file supplied by a customer, open the Appearance panel (Window > Appearance), double-click the shadow entry in the panel and modify the settings as necessary. If you need to change a filter-created shadow or glow created in an earlier version of Illustrator, you must delete the existing content and create a replacement. It may be easier to accomplish this by displaying the file in Outline view (View > Outline). Use the Direct Selection tool ( ) to select the outline of the glow or shadow, and delete or move it as necessary. If your customer cannot provide the settings originally used to create the content, you will have to approximate the results. Consider replacing the filter-generated content with an effect-generated appearance instead, in the interest of future editability. Effects and Spot Color The original spot-color shape (upper left) retains its spot-color definition when the Feather (upper right) and Extrude (lower left) effects are used. However, SVG effects such as the AI_BevelShadow effect (lower right) convert spot-color content to the color mode of the document. In this example, the bright Orange 021 of the beveled heart will print as CMYK, losing its vibrance. Editing warps and envelope distortions Illustrator CS4 offers methods for distorting text and other objects, using a feature called Envelope Distort. Select an object or text with the Selection tool, choose Object > Envelope Distort, and select from the available options: • Make with Warp: Lets you choose from the 15 default Warp shapes, including Arc, Bulge, Flag, Fisheye, and others. Each Warp option offers controls over vertical and horizontal distortions. • Make with Mesh: Sets the number of rows and columns, and Illustrator creates an editable mesh. Select the anchors and control handles to manipulation the distortion manually. • Make with Top Object: Lets you create any shape with the geometric tools (ellipses, stars, and so on) or draw a shape (open or closed) with the Pen tool. Place the shape above the text or other object you wish to distort (higher in stacking order). Select the top object and the object you wish to distort, and Illustrator will distort the object using the top object as a guide. Adobe Creative Suite 4 Printing Guide 82 Envelope Distort Start with text, and apply a Mesh Envelope Distort effect (left). To edit the envelope itself, choose Object > Envelope Distort > Edit Envelope (center) and manipulate the envelope's anchor points and control handles. To edit the artwork, choose Object > Envelope Distort > Edit Contents, and select the contents (right) Using the Appearance Panel To easily determine and edit the fill, stroke, and Effects attributes of a selected object, use the Appearance panel (Window > Appearance). All attributes are listed in the panel. In previous version of Illustrator, it was necessary to open multiple panels to perform such functions as changing fill color or stroke weight, you can now make those changes easily with controls within the Appearance panel. For example, to change the fill color of a selected object, select its Fill attribute in the Appearance, then click the small color block indicating the Fill color. The color block changes to a pull-down panel that allows you to choose from all available Swatches in the file. To change the weight of a stroke, select the Stroke attribute in the Appearance panel. Choose a new weight from the Stroke weight pull-down that appears in the Stroke row in the Appearance panel, or type a value in the field. This approach gives you extensive control over the appearance of an object, all in one panel. You can also add new fills and strokes more easily, by using the Appearance panel menu options Add New Fill and Add New Stroke, or by clicking the New Stroke or New Fill icons at the bottom of the Appearance panel. To modify an Effect, double-click its entry in the Appearance panel to display the dialog box for the effect. To add a new Effect, click the Add New Effect icon at the bottom of the Appearance panel to display a pull-down menu list of Effects. Appearance Panel At a glance, this panel lists effects applied to an object. To modify an Effect, click its entry in the Appearance panel, or click the hyperlink to open the appropriate panel to modify the Effect. You can also add new strokes, fills and Effects in the Appearance panel. Add New Stroke Add New Effect Add New Fill Duplicate Clear Appearance Delete Stroke and effect attributes can also be reordered in the Appearance panel by dragging entries up and down in the list order. For example, the visual order of strokes can be changed so that strokes fall in front of or behind the object’s fill, and the order of strokes can be changed to modify the appearance of the object. Adobe Creative Suite 4 Printing Guide 83 Modifying Objects with the Appearance Panel Fill and Stroke attributes are listed as separate entries and can be manipulated individually. To change the weight of a stroke, select the Stroke hyperlink in the list to open the Stroke panel. You can alter the order of attributes by dragging them up or down in the Appearance panel. Here, the red stroke has been moved above the fill, changing the appearance of the artwork. The Appearance panel has been enhanced in Illustrator CS4 so that it can now display common attributes for a mixed selection. This means only non-matching attributes will display as “Mixed” in the panel. If you have three objects with different fills or strokes and they all have the Drop Shadow effect applied it is now possible to edit the Drop Shadow for them all. To make this more powerful Adobe has added a new option under the Select menu: Select > Same > Appearance Attribute. For example, if you want to edit the settings for all the objects with Gaussian Blur in a file, select an object with Gaussian Blur applied, show the Appearance Panel, highlight the Gaussian Blur attribute, and choose Select > Same > Appearance Attribute. All the objects in the file with that attribute will be selected and you can then edit or delete that effect for all the selected object simultaneously. Why might this be important? You may receive Illustrator files with Document Raster Effects Settings set to 72 ppi. When you change this setting to 300 ppi, the appearance of some Effects may change substantially, so you might wish to edit the Effects for the affected objects. In previous versions of Illustrator, it was necessary to do this for each individual object. Using the Attributes Panel To control the overprinting attributes for the fills and strokes of objects, use the Attributes panel (Window > Attributes). Overprinting objects won’t be obvious in the normal display mode in Illustrator. For this reason, you should check Illustrator files by temporarily displaying them with Overprint Preview turned on (View > Overprint Preview). Because Overprint Preview can slightly slow performance, you may want to turn it off after you have determined if there are any problems with the file. Attributes Panel The white telephone artwork has been set to overprint (left). This results in incorrect output (center). Deselect the Overprint Fill option in the Attributes panel (right) to correct this. The Attributes panel also offers options for displaying and hiding the center point of selected objects, reversing the direction of selected paths (helpful for arrowheads on the wrong end of a path), and the choice of Even/Odd fill and non-zero winding rule behavior. Adobe Creative Suite 4 Printing Guide 84 Handling complex files Today’s RIPs are much more robust than they were just a few years ago, but at times you may still want to simplify a file for processing. An extremely complex vector file can present challenges in trapping or may result in long RIP times. At these times, consider deleting unnecessary content and simplifying unnecessarily complex objects. Path Attributes To govern the behavior in areas where a path overlaps itself, the Attributes panel gives you the choice of Non-Zero Winding Fill rule (left) or EvenOdd Fill rule (right). Stray points and unpainted objects Inadvertent pen clicks can leave unwanted anchor points, which do not add substantially to the complexity of the file, but may change the bounding box of the illustration. Illustrator makes it easy to select single stray points; choose Select > Object > Stray Points. You may have to choose View > Fit in Window to see all the selected points. Press the Delete key to eliminate the stray points once they are selected. An object that has no fill or stroke adds to the complexity of the document and should be deleted if possible. However, it may not be safe to just delete all items on the page with no fill and stroke. For example, a shape used as a mask will have no fill and stroke. However, other objects that use no fill or stroke can be deleted to simplify the document. The easiest way to delete stray single points, empty text paths, and unpainted objects (objects with no fill or stroke) is to choose Object > Path > Clean Up. This method efficiently finds and deletes unnecessary objects in the document and does not affect objects used as masks. Clean Up Delete unnecessary objects to simplify the document Hidden objects, layers, and sublayers Objects that are completely hidden by other objects may not contribute to the final appearance of the artwork, but they still add complexity to the file. Covered objects are also processed during the generation of PostScript, adding data even though they are not visible. To reduce the complexity of the file, you may elect to delete any unnecessary hidden objects. While a few small hidden objects are not problematic, large unnecessary objects can be eliminated. To find such objects, choose Edit > Select All, and note any selected objects that are not visible. Then, switch to Outline view to make it easier to select and delete the hidden objects. Objects that are not hidden behind other objects, but whose paths are set to not be visible, also contribute to file size without contributing to output. This can be a result of selecting the path and choosing Object > Hide Selection, or clicking the eyeball visibility icon next to a sublayer in the Layers panel. Each sublayer represents a single path or object in the document. Adobe Creative Suite 4 Printing Guide 85 Hidden Content Layers and sublayers that are not visible add to file size without contributing to output. If you are certain that they are not needed, delete them to simplify the file. If you want to simplify the artwork and reduce the file size by deleting nonvisible layers and sublayers, work on a copy of the customer’s file for safety. Simplify paths Artwork that has been generated by the Live Trace feature in Illustrator can have tens of thousands of points. If you are having difficulty processing such a complex file, the Simplify feature, if used carefully, can reduce the number of points in a complex path without visibly altering its appearance. Select the complex path, and choose Object > Path > Simplify. Use the options in the Simplify dialog box to balance path fidelity with its appearance. Often, reducing Curve Precision very slightly can markedly reduce the number of points without noticeably affecting the appearance of the artwork. Simplify Paths A slight reduction in curve precision can reduce path complexity without impairing the appearance of artwork. As with other operations that permanently alter the contents of an Illustrator file, work on a copy of the customer’s file, and keep the original for safety. Examining Customer Files In an ideal world, it would be best to leave customer files untouched to ensure maintaining the customer’s intent. However, print requirements often dictate that you open customer files for examination or editing. For example, you may need to convert large black areas to rich black to achieve the desired appearance on press. While modifying some aspects of a file, be careful that you do not disturb other elements. Encourage your customers to supply native Illustrator (AI) files to you, whether their final artwork will be imaged directly from Illustrator, or will be placed in an InDesign layout. While an EPS file saved from Illustrator is still fully editable in Illustrator, it is often a much larger file on disk. Also, the EPS format does not support transparency, so an EPS cannot interact visually with other artwork in InDesign. There is no advantage to saving an Illustrator file in the EPS format, unless the file will be placed into an application that does not correctly process the native Illustrator AI format. Font embedding for display and print By default, Illustrator embeds fonts for display and print in native (AI) and EPS files (if the font license allows embedding). This means that the font information in an Illustrator file is available to ensure correct display and printing of the file when it is placed into other applications. For example, an Illustrator file placed into an InDesign page will print correctly, even though you Adobe Creative Suite 4 Printing Guide 86 may not have the fonts used by the Illustrator file. But it’s important to note that the embedding is for display and print, not for editing. If you open a customer’s Illustrator file that uses fonts that are not active on your system, you will receive a Font Problems alert. Missing Font Font information is embedded for print and display in other applications; this does not make the fonts available for editing in Illustrator if the fonts are not active on your system. If you proceed and open the file, you risk losing the embedded font information, rendering the file unsuitable for output. In this situation, it may be best to ask the customer to perform the necessary edits or, if the required edits do not involve the affected text, ask the customer to convert the text to outlines to avoid future font issues—permissible only if the End User Licensing Agreement (EULA) for the font allows converting to outlines. Linked and Embedded images Raster images can either be embedded in an Illustrator file, or placed in an Illustrator file with an external link (as in InDesign). Each option has advantages and disadvantages: • Linking images requires that the images be supplied in addition to the Illustrator file for proper output. Linked images can be edited in Photoshop and then updated with the Links panel in Illustrator. If you do not move the image to another directory, the link will remain current. However, if you move or rename the image, you will have to update the link in Illustrator. • Embedding images avoids the need to send images separately, but does not provide the recipient access to the original image information for editing. Thus, if a color correction were necessary for an embedded image, the customer would have to supply the image for you to correct. You then update the image in the Illustrator file, replacing the embedded image with the corrected image. At that point, you can choose whether to embed or link the corrected image. Note that embedding an image increases the file size of the Illustrator file by approximately the amount of the image’s size on disk (that is, embedding a 2 MB image increases the file size of the Illustrator file by approximately 2 MB). If you need to edit an embedded image, and the customer cannot supply the image for editing, there is a workaround to enable you to extract the image, using Acrobat 9 Pro as an intermediate step: 1.Save the Illustrator file as an Illustrator PDF, with the following settings: • Adobe PDF Preset: Illustrator Default • Compression: Do Not Downsample; No Compression • Output: No Color Conversion 2.Open the PDF in Acrobat 9 Pro. 3.Using the TouchUp Object tool (Tools > Advanced Editing > TouchUp Object Tool), select the image, right-click (Windows) or Control-click (Mac OS) and choose Edit Image from the context menu that appears. Adobe Photoshop opens the image for editing. 4.In Photoshop, perform the necessary edits on the image. Although the TouchUp method is intended to allow you to write an edited image back into a PDF, you can choose Save As to save the image on disk for use in other applications. For best results, save the image as a Photoshop native (PSD) file or TIFF image. 5.Return to Illustrator. Open the Links panel (Window > Links), select the embedded image in the Links panel, and choose Relink from the panel menu. Navigate to the corrected image, and choose Place in the dialog box. The embedded image is replaced with the corrected version of Adobe Creative Suite 4 Printing Guide 87 the image, and all transformations are retained. The new image will be linked to the Illustrator file, rather than embedded. You can now discard the PDF; its only purpose was to help you capture the image at full resolution for editing. Forensic tools When you examine customer files to pinpoint issues before they can have an impact on your workflow, make it a habit to use the Illustrator tools that can help you easily find common problems. Overprint Preview As mentioned in the earlier section, “Using the Attributes panel,” Overprint Preview (View > Overprint Preview) can help you find overprinting problems in Illustrator files. Because Overprint Preview provides a more realistic display of transparency and blending modes, it can also help you find problems that arise from using transparency with spot-color objects. For example, a spot-color object set to Multiply with another object using the same spot color may appear to darken the underlying artwork. But, since there cannot be 200% of a single ink, the display is misleading. Turning on Overprint Preview allows Illustrator to more realistically represent final output. Overprint Preview Spot-color text set to Multiply appears to darken the area where it overlaps a rectangle using the same spot color (top). But Overprint Preview provides a more realistic display (bottom). Because there cannot be 200% of the same ink, the overlapping area will actually not be darker when printed. Separations Preview Use the new Separations Preview feature to view individual plates, or to see the document in progressive mode. Choose Window > Separations Preview to open the Separations Preview Panel. Check the Overprint Preview option in the panel to activate separations display. Use the “eyeball” visibility controls next to the ink names to selectively display separations in color. (There is no provision to display a separation in black to resemble film or plate output.) Separations Preview Activate Separations Preview by checking the Overprint Preview box, then selectively display the inks. Separations Preview can enable you to easily identify problems such as unintended overprinting content, objects not overprinting that should be, rich black or Registration used inappropriately, and extraneous spot colors. Finding such problems early in the life of a job can save money, aggravation — and deadlines. Flattener Preview Use the Flattener Preview (Window > Flattener Preview) to determine which objects in the document will be affected if the file is flattened. Flattening occurs when PostScript is generated by choosing File > Print, by exporting to the Encapsulated PostScript (EPS) format, or by saving the file as a PDF compatible with Acrobat 4.0 or earlier. The Flattener Preview won’t show overprinting, as Overprint Preview does, nor is it intended to realistically display final color. Its purpose Adobe Creative Suite 4 Printing Guide 88 is to show areas affected by transparency flattening so you can modify the file or choose another flattener preset if necessary to control flattening results before output. To use the Flattener Preview features: 1.Choose Window > Flattener Preview. If you don’t see all options, choose Show Options from the panel menu. 2.Select a flattener preset. The default High Resolution preset is appropriate for most printing conditions, but if you have created a custom preset, choose it from the Preset pop-up menu. 3.To preview the results of using a flattener preset, click the Refresh button and select objects to highlight: • Rasterized Complex Regions • Transparent Objects • All Affected Objects • Affected Linked EPS Files • Expanded Patterns • Outlined Strokes The options available to you depend on the preset selected. For example, if you select the High Resolution flattener preset, Rasterized Complex Regions won’t be available because the High Resolution preset does not result in rasterized regions. 4.If you choose a new preset, click Refresh to renew the display. In a very complex document, this may take a few seconds. 5.To view small details, click in the preview area at the bottom of the panel; the cursor automatically becomes a zoom tool. Hold down the spacebar to pan the image in the preview window. Flattener Preview To see all the available controls in the Flattener Preview dialog box, choose Show Options from the panel menu. Choose an existing transparency flattener preset, or create a custom preset based on your choices in the Flattener Preview dialog box (left). Printing from Illustrator The Print dialog box contains controls for selecting a printer and PostScript Printer Description (PPD), as well as access to page setup, presets, and options. Certain controls are displayed regardless of the option chosen in the left column of the dialog box. The remainder of the dialog box changes according to the selected option. Tiling Artboards To tile artboards, you must print them one at a time. Enter the number of the artboard in the Range field, and choose the Tile option. You can numerically specify position in the Placement X/Y fields, or drag the thumbnail in the preview window to position the artwork relative to tiles. Adobe Creative Suite 4 Printing Guide 89 Tiling an Artboard To tile an artboard, select the artboard’s number in the Range field, then set the Tile options. You can drag the thumbnail in the preview window to reposition the artwork in the tile indicators. Print presets You can create print presets to store specific settings for each printing device in your department, making it faster and easier to print to multiple devices without having to change settings each time you switch devices. Set all the options as you wish for a single device, then click the Save Preset button at the bottom of the Print dialog box to name and save it as a preset. The preset will then be available under the Print Preset pop-up menu any time you open the Print dialog box. You can also export and import saved print presets. To export print presets: 1 Choose Edit > Print Presets. 2 Select one or more presets in the list and click Export. Shift-click to select a range of presets. Control-click (Windows) or Command-click (Mac OS) to select several individual presets. 3 Specify a name and location, and then click Save. If you have chosen multiple print presets, they are all stored in a single, saved Preset file. Saved Illustrator print presets do not have a file extension, so it is a good idea to give the saved presets a recognizable name. To import print presets: 1 Choose Edit > Print Presets. 2 Click Import. Locate and select the file containing the presets you wish to import, and click OK. Print options You can select from the following options: • General: This option lets you choose number of copies, page size and orientation, page range, scaling (including anamorphic factors that do not maintain the original proportions), tiling options, and which layers to print. You can also choose to ignore artboards or skip blank artboards. • Marks and Bleed: Select printer’s marks, page information and color bars, as well as bleed. Now that Illustrator supports a specified bleed “zone,” you can check the Use Document Bleed Settings option if the document was set up with bleed, or you can manually specify bleed values. Bleed begins at the edge of an artboard. If you are printing multiple artboards, the same bleed value is applied to all of them. • Output: Select composite or separated output; also choose in-RIP separations, and specify which colors are output when printing separations. • Graphics: Set path flatness, font downloading, and PostScript level. If necessary, you can choose Compatible Gradient and Gradient Mesh Printing to convert meshes and Adobe Creative Suite 4 Printing Guide 90 gradients to JPEG in the print stream. Use this option only if you cannot get complicated meshes or gradients to print otherwise. The current Raster Effects Resolution is displayed, but you must exit the print dialog box to change the setting. • Color Management: Choose whether to let Illustrator determine correct printing colors or allow the printer to do so. Select a color profile and rendering intent for printing. • Advanced: Choose to preserve, discard, or simulate overprints. Choose from existing flattener presets, or create a custom preset for this document. • Summary: View a list of chosen printing options, and see warnings about issues such as transparency flattening or out-of-gamut objects. Printing Multiple Artboards There are several important controls for printing artboards under the General topic: • Ignore Artboards: This option prints all the artwork on the entire Illustrator canvas and disregards the Artboard boundaries. The content is treated much like artwork in previous versions of Illustrator: the outside boundaries of all the artwork are regarded as a bounding box and the Artboard edges are ignored. • Skip Blank Artboards: This option will prevent outputting blank plates for empty Artboards. Printing Multiple Artboards The Print dialog now contains controls for selecting and previewing artboards before you print. To select a discontiguous range of artboards, separate the artboard numbers with a comma (e.g., ”1,3” to print the first and third artboard). The navigational control beneath the preview thumbnail pane in the print dialog allows you scroll through the Artboards in the Illustrator file so you can confirm that selected Artboards will fit in the specified media. Printing Bleed There are two methods for including bleed in print output: invoking an existing bleed setting, or manually entering bleed values. If a bleed value has been specified during document setup, or added by modifying the document setup at some point (File > Document Setup), it can be invoked by just checking the Use Document Bleed Settings option in the Print dialog. If bleed has not been established formally by specifying bleed settings in Document Setup, you can manually enter the appropriate values in the bleed fields in the Print dialog. Note that, by default, the four bleed fields are linked: change the value in one field, and they all change. You can, however, click the link icon to unlink the fields, and enter different values if necessary. Adobe Creative Suite 4 Printing Guide 91 Printing Bleed If a bleed setting has been established for the file, just check the option to Use Document Bleed Settings to include artwork in the bleed in output. If no bleed setting has been established, you can also manually enter bleed values. Creating PDF Files Illustrator CS4 can create Adobe PDF files directly, without the need to generate PostScript and process it through Distiller. To create a PDF from an Illustrator file, choose File > Save As and choose Adobe PDF for the format. The options you choose depend on the ultimate purpose of the PDF. For example, a PDF to be used for customer reviews can contain lower-resolution image content than a PDF intended to be submitted to a RIP. Illustrator ships with seven PDF presets, but you can create, save, import, and export your own custom PDF presets. Note that, while Illustrator provides options to add security to a PDF as it is created, many workflow components such as RIPs and imposition software will reject a PDF with security. Password protection may be appropriate in PDFs containing sensitive content that you send to customers, but such security settings are usually problematic in a print workflow. For more information on PDF settings, see the “Common Resources” chapter earlier in this document, and the Acrobat 9 Pro chapter later in this document. Illustrator default preset The default PDF preset creates a very flexible PDF. It can be opened by Acrobat and Reader version 6 and above and reopened in Illustrator, but it can result in large files that may not be processed by older devices. Its options include: • Compatible with Acrobat 6: May not be appropriate for some older RIPs and workflows that do not accept later versions of PDF. Transparency is not flattened. • Preserve Illustrator Editing Capabilities: Includes the complete Illustrator file within the PDF, which allows the file to be safely reopened in Illustrator for editing. This option can substantially increase file size, and should be checked only if you intend to allow round-tripping of the file back into Illustrator. • Embed Page Thumbnails: Adds slightly to file size by creating page thumbnails for use in Acrobat 9 Pro. If you uncheck this option, Acrobat automatically creates thumbnails when opening a PDF. • Create Acrobat Layers from Top-Level Layers: Allows you to maintain layers in the PDF, if your workflow supports Acrobat 6-compatible files. • Compression: Compresses image content using ZIP (lossless) compression but does not downsample the image. Other PDF creation presets Illustrator CS4 also includes presets shared with other Creative Suite 4 components, including High Quality Print, Press Quality, PDF/X1a, PDF/X-3, and PDF/X-4 options. For descriptions of the features of these PDF presets, see the “Common Resources” chapter earlier in this document. Adobe Creative Suite 4 Printing Guide 92 Note that, by default, bleed is not included when you choose the PDF/X-1a preset. Consider starting with the PDF/X-1a preset, then setting the bleed value under Marks and Bleeds, and save this custom preset for future use when you want to create a PDF/X-1a-compliant PDF including bleed. Including Bleed in PDFs Bleed is not included by default when saving an Illustrator file as a PDF. Be sure to check the correct options under Marks and Bleed. Creating multi-page PDFs from Multiple Artboards If the Illustrator file contains more than one Artboard, you have the option to save all Artboards in a multi-page PDF, or choose individual Artboards to include in the PDF. Illustrator assigns a number to each artboard; to view Artboard numbers, choose the Artboard tool and the numbers are displayed in the upper left-hand corners of all Artboards. Artboards to PDF Choose All, or select the Range option. To select discontiguous Artboards, separate with a comma. For example, choosing the Range option and entering “1-2,4” would include Artboards 1, 2, and 4 in the PDF. Illustrator files with multiple Artboards can be saved with any type of PDF preset, including PDF/X-1a. Each page in the resulting PDF will be the dimensions of the artboard. For example, an Illustrator file containing a business card, a letterhead, and an envelope will produce a threepage PDF containing three different size pages. Opening Illustrator PDF Files in Illustrator Adobe PDF files created from Illustrator, and saved with the Preserve Illustrator Editing Capabilities option checked, can be safely opened in Illustrator because the Illustrator file itself is embedded in the PDF. However, it is not recommended that you open other PDFs in Illustrator for editing, regardless of the originating application. A very simple PDF, with no live text or transparency, may survive the trip. But with most files, you risk losing font embedding (if the necessary fonts are not active on your system), and you may inadvertently change objects, losing fidelity to the customer’s intent. Adobe Creative Suite 4 Printing Guide 93 Opening a PDF in Illustrator An Illustrator PDF saved with Preserve Editing Capabilities retains fidelity to the original when reopened in Illustrator (left, in outline view). However, a PDF saved without this option loses fidelity to the original when reopened, and results in a file that is much more difficult to edit (right, in outline view). If it is necessary to perform edits to a customer PDF that go beyond the editing capabilities of Acrobat 9 Pro, it is best to ask your customer to make the edits and supply a corrected PDF. For more information, see http://www.adobe.com/go/ai_support. To search, type appropriate terms in the Search For field, select other Search options, and then click the Search button. Adobe Creative Suite 4 Printing Guide 94 Chapter 5: Adobe Acrobat 9 Pro There are many ways to create PDFs, aside from creating them from within Adobe Creative Suite 4 components, as described in the ”Common Resources” chapter of this guide. For example, when Adobe Acrobat is installed on a Windows system, Microsoft Office applications such as Word and PowerPoint® use the PDFMaker macro to generate PDFs; while these are fully compliant Adobe PDF files, they may not be print-ready. You may receive PDFs generated from non-Adobe programs that use Distiller as a PDF creator, and also from applications that use non-Adobe libraries or utilities to create PDFs. It may be difficult to determine the origin of PDFs submitted by customers, because Acrobat 9 Pro can combine existing PDF files into a PDF package (a single container for multiple individual PDF documents) or into single files with multiple pages. In an ideal world, your customers carefully follow your specifications for PDF creation, and provide a perfect PDF for print. However, this is frequently not the case, and you must troubleshoot—and repair—customer files to ensure successful imaging and printing. The edits you can perform on a PDF are limited, but you may be surprised at what you can repair. The best solution is to fix the problem in the originating application and generate a new PDF; but you may not have that option. For example, an ad submitted by a customer may have been created by another designer, who inherited the file from another supplier, and so on. The combination of communication issues and looming deadlines means that you have to perform the repair in Acrobat, with no access to the original files. Thus, it’s important to know what you can—and cannot—fix, and to be aware of the repercussions of some edits. Changes, Enhancements, and New Features in Acrobat 9 Pro Acrobat 9 Pro builds on previous versions by substantially enhancing the capabilities of the Output Preview and Preflight functions, revamping the Document Compare feature, increasing performance, and more. Other new and enhanced features include: • Faster launches: Acrobat 9 Pro usually launches in less than three seconds. • Intelligent Overprint Preview, triggered when a file with overprinting elements is opened. Preferences allow you to control additional conditions for displaying overprint. • The new Object Inspector displays dimensions, resolution, color space, font information, and more when clicking on individual objects or stacks of objects. • The ability to make minor text edits more easily, especially across line endings. • The option to permanently remap colors with Convert Colors. • A revamped Document Compare function, with detailed views of the differences between two files. Quickly detect differences between two versions of a document, including PDF, Microsoft Word, Microsoft PowerPoint, CAD, and even scanned documents. View thumbnails indicating all changes on every page. Select the types of changes you want to display or ignore, including text formatting, images, line weights, and backgrounds. • PDF Portfolios, which can contain files of any format, including PDFs. • Embed content created in Adobe Flash: Enrich your PDF documents with embedded video, audio, and widgets created in Adobe Flash software that are natively viewable with Adobe Acrobat® 9 and Adobe Reader® 9 software. Combine the security and convenience of portable Adobe PDF files with the rich appeal of high-impact media. • Enhancements to Preflight and Fixup capabilities, with a streamlined interface. • The ability to import one PDF into another as a separate layer. • New Fixups that can permanently crop a PDF. • PDFMaker has been discontinued on the Macintosh platform; Macintosh users can still use the Adobe PDF printer to create PDFs from Microsoft Office applications. Adobe Creative Suite 4 Printing Guide 95 • Enhanced collaboration features, including access to free screen sharing and file hosting via Acrobat.com and ConnectNow service. • Support for preparing files for use in workflows using the Adobe PDF Print Engine 2, which adds support for digital printers and variable data printing (VDP). • Enhanced Form Wizard that automatically adds form fields based on intelligent analysis of a PDF. You can also enable PDFs to be filled out and saved by users of Adobe Reader 8 and above. Use Acrobat.com services to distribute and manage forms, and to collect and organize forms data. Examining PDFs Acrobat 9 Pro includes new forensic tools for finding potential problems in PDF files as well as enhanced tools for fixing common problems. Standards Compliance If you open a PDF/X file (or a PDF in compliance with any of the standards, such as PDF/A or PDF/E), a new option automatically appears in the Navigation pane. Click the standards icon in the Navigation pane to display the specifics of the file’s compliance Standards Navigation Pane When you open a PDF that complies with a standard, the Standards category becomes available in the Navigation pane. Click the icon to view information about the PDF’s standards compliance. Determining a File’s Origin: Viewing PDF Document Properties To view helpful information about a document, such as the source file’s original application and fonts used in the document, choose File > Properties. Click the Description tab at the top of the dialog box to view the source of the PDF as well as its version. Not all methods of PDF creation leave information in the PDF about its origin, but you should be able to identify the origin of PDFs created by Adobe applications, Acrobat Distiller, QuarkXPress®, or the PDFMaker macro in Microsoft Office applications. The most important piece of information on this pane may be PDF Version, considering that some older workflows and devices do not support more recent versions of PDF. Check to make sure that the PDF is supported by your RIP, as well as any other process that will handle the file (such as imposition software). Remember that you can use the PDF Optimizer feature in Acrobat to save the file to a lower version, if necessary, without impairing font embedding. Document Properties You can quickly determine the origin of a PDF, as well as security settings and font embedding characteristics in the Document Properties dialog box, by choosing the Description option. This PDF was exported from InDesign CS3 (v. 5.0.1). It uses PDF version 1.6, which means it is compatible with Acrobat 7.0. Thus, it may contain live transparency. Adobe Creative Suite 4 Printing Guide 96 Click the Fonts tab at the top of the Document Properties dialog box to view information about font embedding in the PDF. Check to make sure that all fonts are fully embedded or subset; this information is available in parentheses after the font name. If embedding has no entry, the font is not embedded, which may lead to problems at output time. If you don’t own the necessary font, contact the customer and request that they recreate the PDF with the font properly embedded. If the font forbids embedding, ask that the customer consult the end-user licensing agreement (EULA) for the font to determine if they can legally supply the font separately for you to download to the RIP for correct imaging. Document Properties/Fonts All fonts embedded in the PDF are listed, along with their embedding status. Here, the font Balloon is not embedded. Unless you have access to Balloon, font substitution will occur at print time, and thus output won’t be faithful to the original file. To view information about the security settings in the PDF, click the Security tab at the top of the Document Properties dialog box. If the PDF has any restrictions—even if they don’t include restrictions to printing—to avoid problems, get a new PDF without any security restrictions whatsoever from the customer. This is necessary even if no password is required to open the document and the document has no restrictions. If a Permissions password has been applied, your imposition software may reject the file, and your RIP may be unable to process it. PDFs for print should be completely free of any security settings. Document Properties/Security Any security limitations appear in the Security pane. Even if the security setting allows printing, some processes (such as imposition software) will reject the file unless it is free of all security restrictions (including permission passwords). Overprint Preview in Acrobat 9 Pro Overprint Preview mode displays overprinted objects on screen as they would appear in print, not as an opaque stack of graphics. It also provides a more accurate preview of how spot colors will look. In previous versions, users had to manually invoke Overprint Preview, but Acrobat 9 Pro takes a different approach. There is no longer a menu item to control overprint display; instead, Preferences and the Output Preview panel control when Overprint Preview is activated. Adobe Creative Suite 4 Printing Guide 97 Controlling Overprint Preview Under Page Display, you can choose from Never, Always, Automatic, or Only for PDF/X Files. In Preferences (PC: Edit > Preferences; Mac: Acrobat > Preferences), choose the Page Display topic. Under Page Content and Information, you are given four choices for Overprint Preview: • Only For PDF/X Files: Overprint Preview is automatically activated when you open a PDF/X-compliant file. • Never: Overprint Preview is not activated when you open a file, even if it contains overprinting elements. However, Overprint Preview is automatically activated when you open the Output Preview panel. This is the default setting in both Acrobat 9 Pro and Adobe Reader 9. • Always: Overprint Preview is active at all times. • Automatic: Overprint Preview is activated when you open any PDF containing overprinting elements, and is triggered on a page-by-page basis. Even if you have set the Overprint Preview preference to “Never,” Simulate Overprinting is automatically chosen any time you open the Output Preview panel (Advanced > Print Production > Output Preview). Note that Adobe Reader 9 offers the same choices in Preferences; advise your customers to download the current version of the free Reader so they can view Overprint in their own PDFs to check for problems before they submit a file for printing. Acrobat 9 Pro Print Production Tools The Print Production tools are available individually by choosing Advanced > Print Production, or you can display the Print Production toolbar for easier access (Advanced > Print Production > Show Print Production Toolbar). This topic examines the Print Production tools in order, from left to right in the toolbar. Trap Presets Preflight Ink Manager Crop Pages Transparency Flattener Preview JDF Print Production Tools Many of the Print Production tools are greatly expanded and enhanced from previous versions. Output Preview Convert Colors Add Printer Marks Fix Hairlines PDF Optimizer Trap Presets Use Trap Presets to edit and save trap settings that will be used again. Choose Advanced > Print Production > Trap Presets, or click the Trap Presets button ( )in the Print Production toolbar. If you don’t apply a trap preset, the [Default] trap preset is applied to all pages of the document. Trap settings are processed by a RIP that uses Adobe In-RIP Trapping. Traps and assignments apply only to an open document; they are not stored in the document. You must print from Acrobat for trap settings to be exercised. Adobe Creative Suite 4 Printing Guide 98 Creating a Trap Preset Comprehensive trap controls let you govern trapping between objects or images. Other options let you trap images internally and trap 1-bit images to other objects. Applying these presets establishes trap parameters. Traps are generated only when PostScript from Acrobat is processed by a RIP using Adobe In-RIP trapping. Output Preview Output Preview in Acrobat selectively shows, hides, and highlights objects on screen according to choices made in the Output Preview dialog box. Use Output Preview to visually check for extraneous inks, areas in excess of a total allowable area ink coverage value, RGB content, overprinting objects, rich black areas, and more. Because the feature does not generate a report, you must examine each page individually, and you might overlook very small details in a complex page. (For a rules-based check of the document that generates a report on all pages, see “Preflight,” later in this chapter. Subtle Problems None of these problems are apparent in the initial view of the PDF: extraneous spot colors, RGB image content, and overprinting white artwork. All may cause incorrect output if not fixed. Use the forensic tools in Acrobat 9 Pro to highlight such potential problems. Soft-Proofing Colors In a color-managed workflow, you can soft-proof your document directly on the monitor to see how the document’s colors will look based on a specific output profile. The reliability of the soft proof depends on the quality of your monitor, your monitor profile, the accuracy of your device output profile, and the ambient lighting conditions of your work environment. To display a soft proof: 1.In the Output Preview dialog box, choose a profile from the Simulation Profile pop-up menu. In a PDF/X file, the simulation profile will be dictated by the output profile chosen when the PDF was created. 2.Select the Simulate Ink Black option to preview in the monitor space the actual dynamic range defined by the proof profile. (This option is not available for all profiles.) 3.Select the Simulate Paper White option to preview the specific shade of white for the print medium described by the proof profile. Simulate Ink Black is automatically selected. (This option is not available for all profiles.) Adobe Creative Suite 4 Printing Guide 99 Previewing Separations You can choose to view a single separation or multiple separations in any combination, much like progressive proofs. To preview color separations: 1.Display the page you want to preview. 2.Choose Advanced > Print Production > Output Preview, or click the Output Preview button ( ) in the Print Production toolbar. When you choose Output Preview, Acrobat automatically activates Overprint Preview if your preferences are not set to automatically activate it. The appearance of any overprinting objects changes, but such changes may be hard to see in very small objects. (You can check for overprinting objects more precisely later by using the Color Warnings feature in Output Preview.) 3.In the Output Preview dialog box, choose Separations from the Preview menu. 4.Use the check boxes to the left of the ink list to select the color separations you want to view or hide. When you deselect the box next to an ink, any content using that ink disappears in the document window. This makes it easy to pinpoint areas that are using the wrong spot color ink. 5.Set the Sample Size to Point Sample, 3 by 3 Average, or 5 by 5 Average. Note: At this point, if you discover any extraneous spot colors or find spot color content that should print as four-color process, use the Ink Manager function (see “Using the Ink Manager” later in this chapter) to fix the problem without having to return to the originating application. Viewing Separations Use the check boxes to the left of ink names to selectively view separations. This can help you quickly determine if there are extraneous inks, or if objects may print in the wrong color. 5 Check ink percentage values by hovering the mouse pointer over an area in the document window. The ink percentages appear next to each ink, and your pointer acts as a rolling densitometer. Acrobat 9 now also displays a Total Area Coverage amount at the bottom of the list; this is especially helpful when spot and process colors are combined. Separations See all inks used in the file at a glance. View color values with a “rolling densitometer” as you move the pointer on screen. Note the new Total Area Coverage value displayed. Adobe Creative Suite 4 Printing Guide 100 Show Options To highlight potential problem areas, choose a type of content from the Show menu. This feature isolates the chosen content on screen and temporarily hides all other content. This makes it easy to catch RGB content or to isolate CMYK content from spot content. RGB content is not a problem in a color-managed workflow, but it can be an issue in an all-CMYK workflow if the RIP does not perform satisfactory in-RIP color conversion. Fortunately, this problem can be fixed easily with another Print Production tool, the Convert Colors function. Acrobat 9 Pro adds several new options to the Show menu, including Registration, Text, and Line Art, and Not DeviceCMYK or Spot. Select the Total Area Coverage option to highlight any areas that exceed a total ink limit that you specify. The pop-up menu has predefined entries ranging from 180% to 400% in 20% increments; you can also manually enter any value between 1% and 1000%. You can change the highlight color by clicking the color block to the left of the percentage field and choosing a new color from the swatch menu. If one of the predefined swatches isn’t satisfactory, click the Other Color option at the bottom of the swatches matrix and create a new custom highlight color. If only very small areas are highlighted, you shouldn’t have any problem printing the job. But the larger the areas that exceed the limit, the more likelihood that you’ll experience problems on press from heavy coverage. You may have to edit problem content and then regenerate the PDF. Total Area Coverage Highlight areas that exceed the total ink limit. As with other warnings, you can change the highlight color by clicking the color block. Viewing Color Warnings The Output Preview dialog box also includes color warnings that show where rich black inks and overprinting effects appear in the document. Such attributes don’t always indicate a problem, but highlighting them can help you determine whether they will cause any issues on output. To view color warnings, choose Color Warnings from the Preview list, and select the warnings you want to activate. Select Show Overprinting, Rich Black, or both. To change the highlight color for the warnings, click the swatch next to the warning, and select a new color from the swatch menu that appears. The Overprinting warning highlights areas affected by some blending modes, and areas that have been set to overprint. Overprinting, such as black text overprinting a color area, is not necessarily a problem. But in the example document, the white logo at the lower right will disappear during imaging because it is set to overprint. This will have to be fixed before output. Adobe Creative Suite 4 Printing Guide 101 Color Warnings/Overprinting Unintended overprint attributes can produce unwanted color combinations or cause objects to disappear when output. In this example, the white Aquo logo appears correct in normal view (top, left), but disappears when Simulate Overprinting is turned on in the Output Preview panel (top, center). This represents how the logo will actually output. To find other overprinting elements, select the Color Warnings option (left), and click the color block to choose a highlight color. Overprinting isn’t always a problem, such as black overprinting text and the black rectangle (top, right). But this is a warning that the white Aquo logo will not print correctly; the white areas of the logo will disappear when the file is printed. The Rich Black warning highlights areas that will print as rich black; that is, solid process black mixed with any underlying color inks for increased opacity and richer color. While this doesn’t always indicate a problem (in fact, it’s desirable to use a rich black build in large areas), it’s helpful to identify rich black areas in case you need to modify your trap settings—for example, to perform pullbacks or keepaways (choking back on the cyan, magenta, and yellow to avoid registration problems) on reverse type within the rich black areas. New in Acrobat 9 Pro is the Start Cutoff value, which allows you to set a threshold value of black to be used in determining if an area is defined as Rich Black. Areas containing the threshold percentage of black plus any non-zero value for cyan, magenta or yellow will trigger the Rich Black warning. Warnings—Rich Black To view black areas that also include other colors, select the Rich Black option. Click the small color block to change the highlight color used by Acrobat to indicate rich black areas. Rich blacks aren’t necessarily a problem, but it’s helpful to highlight such areas in case trapping will require special handling, such as creating pullbacks in areas of reverse type or other art. Here, magenta highlights rich black areas. Object Inspector New for Acrobat 9 Pro, the Object Inspector displays extensive information about all content directly underneath where the user has clicked. Choose the Object Inspector option under Preview in the Output Preview panel, and click anywhere in the displayed PDF. The Object Inspector window displays available information for the cursor position. If you click on an image, resolution, color space, dimensions, and rendering intent are listed. If you click on a filled Adobe Creative Suite 4 Printing Guide 102 object, the color and overprint status are displayed. Click on text, and the font name, font type (for example, OpenType), size, color, and overprint status are displayed. Everything under the cursor click is described: click on black text that is overprinting a PMS 183 shape, and you’ll see information about the black text as well as the PMS 183 shape underneath. Object Inspector Click with the crosshair cursor to view information about the selected element. The Object Inspector window displays information about everything directly under the cursor, in stacking order. Here, the black crosshair over the man’s shirt indicates where the user has clicked. If you click in an empty area, the Object Inspector window will be empty. Preflight Some problems are more easily found using the Acrobat Preflight function than Output Preview, which requires you to visually determine problems, depending on what’s being shown, hidden, or highlighted. Preflight tests a PDF against specified rules, and provides pass-or-fail reports that highlight any problems found. An extensive selection of preflight profiles ship with Acrobat 9 Pro, and you can use any of the supplied profiles as a starting point to create your own custom profile. But it’s important to note that some profiles may regard some conditions in a PDF as warranting only a warning or informational notes, even though those conditions are inappropriate for correct output in your workflow. For this reason, it is often necessary for you to create your own custom preflight profiles to ensure that you uncover pertinent issues in PDF files. Preflighting a PDF file is critical to ensure that it meets the requirements of your print output workflow. Preflight tools can save you time and trouble by applying consistent and customized tests to your files, alerting you to make corrections before creating output. The Preflight interface has been streamlined in Acrobat 9 Pro, making it easier to find controls. New Preflight profiles give you a head start finding and fixing many common print production problems. And the new Standards pane makes it easy to create standards-compliant PDFs from existing PDF files. Standards Open Preflight (Advanced > Preflight), and click on the Standards button at the top of the Preflight panel. Choose the appropriate standard (PDF/X, PDF/A, or PDF/E) then click Continue. Select the specific settings for the conversion, and click Continue to finish the conversion. New Standards Options in Preflight You can now choose to convert an existing PDF to a standards-compliant file. Choose from PDF/X, PDF/A, or PDF/E. Adobe Creative Suite 4 Printing Guide 103 Default Preflight Profiles Acrobat 9 Pro includes more than 50 prebuilt preflight profiles, which are designed to identify potential problems in specific workflows and, in some cases, fix problems. Included are profiles that check for font embedding, text using rich black, violations of total area coverage limits, and more. New fixups give you the ability to merge spot colors with different names, convert from and to spot colors, assign objects to layers, embed fonts, and much more. You can also customize a preflight profile to match your specific needs (see “Customizing a Preflight Profile” later in this chapter). Profiles are listed under categories: • Acrobat/PDF version compatibility: Checks for the version of Acrobat required to open the file. • Create PDF layers: Options include creating separate layers for vector, text, and image content, or placing objects on layers based on their transparency or overprint settings. • Digital printing and online publishing: Checks to see that a PDF file meets the requirements for common black-and-white or color digital printing conditions, or examines and optimizes a file for online use. • PDF analysis: Includes multiple profiles to check for common issues, such as fonts that are not embedded, white objects set to overprint, and low-resolution images, and more. • PDF fixups: Repairs common problems. Fixups can be used separately, or attached to a preflight profile, enabling you to automate some common edits, such as converting RGB content to CMYK. • PDF/A compliance: Checks for compliance with PDF/A-1a or PDF/A-1b specifications. Fixups to convert files to compliant files (when possible) are also listed in this category. (The PDF/A specifications are for archival storage of PDF files.) • PDF/E compliance: Includes checks for compliance with the Engineering standard, plus fixups to convert a file to PDF/E if possible, or remove PDF/E information if necessary. • PDF/X compliance: Checks for compliance with PDF/X-1a, PDF/X-3, PDF/X-4, PDF/X-4p, PDF/X-5g, or PDF/X-5pg specifications. Fixups to convert files (when possible) to compliant files are also available in this category. • Prepress: Includes profiles geared toward magazine ads, sheetfed offset, web offset, and newspaper conditions. Using Preflight Profiles To preflight an open PDF document with an existing profile: 1.Choose Advanced > Preflight, or click the Preflight button ( toolbar. ) in the Print Production 2.Choose the category that most matches your needs—Acrobat/PDF version Compatibility, Create PDF layers, Digital printing and online publishing, PDF Analysis, PDF fixups, PDF/A compliance PDF/E compliance, PDF/X compliance, or Prepress—and click the triangle to the left of the category to reveal the profiles within the category. If you have imported profiles, you will have an Imported profiles category as well. And if you have created custom profiles, you will also have a Custom profiles category. 3.Select a preflight profile that matches your output criteria. The profile description appears under the profile name. You can also click the Further Options triangle at the bottom of the panel, to specify whether to run the preflight check just for visible layers, or to limit the preflight to just a range of pages. 4.Click Analyze or Analyze and Fix. Adobe Creative Suite 4 Printing Guide 104 Single Checks Single Checks Results Standards Single Fixups Preflight Profiles To use an existing profile, select it from the list of profiles, and choose Analyze (or, if the profile includes a Fixup, choose Analyze and fix). Note the new options for Standards, Single Checks, and Single Fixups. Select Profiles Single Fixups Search Feature You can more easily find the profile, single check, or single fixup you need with the buttons at the top of the Preflight list. Single Checks and Single Fixups allow you to quickly check for or fix a single issue, without needing to create a custom profile. Profile Description 5 Review the results. To view a problem element, you can use the Show in Snap option, or you can double-click the entry in the results and Acrobat displays a colored rectangle around the element in the page. Viewing Preflight Results A red “X” indicates an aspect of the PDF that did not pass the preflight check. To highlight the offending element, select the item in the Results list and click the Show in Snap button. The element is displayed in the Snap View window. You can modify the highlight display through the Preferences options available in the Preflight panel menu. The Snap View function displays a separate window showing the object itself. You can change the background color used in the Snap View using the Background Color menu at the bottom of the window. You can navigate problem content by clicking the forward arrow at the bottom of the Snap View window. Keep clicking the forward or back navigation arrows in the Snap window to go to all of the PDF’s problem objects listed in the Preflight results. Saving Preflight Results To save the results of the preflight as a report, click the Create Report button at the bottom of the Preflight dialog box. Provide a name and location for the report. A report PDF lists the problems found, as well as highlighting the problems on a thumbnail of the document. You can easily view the highlighted areas in Acrobat by opening the Layers panel (View > Navigation Panels > Layers) and selecting the layers you’d like to display. If you prefer, Acrobat can generate an XMLor text-based report rather than a PDF. Embedding an Audit Trail The ability to embed an audit trail in a PDF is based on the Ghent Working Group Standard for preflight tracking. You must run a full preflight profile (not a single check or fixup) in order to embed an audit trail. To embed a description of the preflight profile used, as well as a digital signature, choose Embed Audit Trail from the Preflight panel. This provides a method for checking the document at later stages of the workflow, to ensure that nothing has been altered since the preflight was performed. Adobe Creative Suite 4 Printing Guide 105 Preflight Audit Trail You may wish to embed an Audit Trail in a preflighted PDF to help keep track of the preflight results and the profile used. The Audit Trail feature will also reflect whether the PDF has been altered since the audit trail was embedded. PDF Fixups When Fixups are included in a Preflight profile, Acrobat will automatically repair some of the problems that the preflight process finds. Keep in mind that not all problems can be fixed in Acrobat. For example, image content of insufficient resolution can be pinpointed with Preflight, but there’s no way to rectify such an issue within Acrobat. As with many problems in a PDF file, the origin of the issue lies much further upstream in the lifecycle of the job. It would be necessary to locate a high-resolution image, replace the low-resolution content in the original application, and generate a new PDF. A profile may contain a preflight check, a fixup, or both. To identify what components a profile contains, examine the icons to the left of the entry in the Preflight profile dialog box: • Preflight profiles which contain only checks will display a highlighted magnifying glass ( ) to the left of the name. • Fixups display a highlighted wrench ( ) to the left of the name. • Profiles that combine checks along with fixups will show both the magnifying glass and wrench highlighted ( ). Single Checks and Fixups Acrobat 9 Pro adds Single Checks and Single Fixups to streamline the finding and fixing of common problems, such as image resolution. Single Checks and Single Fixups can be run independently without needing to be incorporated into a Profile. Acrobat 9 Pro includes an extensive list of Single Checks, including checks for ink coverage, transparency, font embedding, text using rich black, black objects set to knock out, objects using Registration color, images below a threshold resolution, and many more. Single Fixups include convert Registration color to black, merge spot colors with different names, embed fonts, assign object types to layers for troubleshooting, and much more. You can also create your own Single Checks and Single Fixups. To create a single check: 1.In the Profiles panel of the Preflight dialog box, click the Select Single Checks button. 2.Choose Options > Create New Preflight Check. 3.On the right side of the dialog box, select a group, select a property for the group, and then click Add. The new single check appears in the group appropriate to its group and property. To create a single fixup: 1.In the Profiles panel of the Preflight dialog box, click the Select Single Fixups button. 2.Choose Options > Create New Preflight Fixup. 3.Name the fixup and specify the criteria. The new fixup appears in the group appropriate to its category and type. Layer Fixups Acrobat 9 Pro includes a new group of Fixups devoted to creating and manipulating Layers. Select the Single Fixup button for Fixups that create different layers for text, graphics, and images; create layer names for unnamed layers; put overprinting objects on a single layer, or put transparent object on a single layer. Think of these layers as “view groups” rather than layers as they exist in an Illustrator or Photoshop file: they enable you to selectively view components of a PDF, regardless of actually visual stacking order. For more information on creating, viewing, and printing PDF layers, see Acrobat 9 Pro Help, available under the Help menu. Adobe Creative Suite 4 Printing Guide 106 Customizing a Preflight Profile Acrobat 9 Pro ships with an extensive selection of preflight profiles, but you will probably want to create some custom profiles tailored to your needs. For example, there is a profile to check for images below 250 ppi, but there is no prebuilt profile to check for images below 300 ppi, which is the customary desired image resolution for commercial print. So you may want to create a custom preflight profile just to check for images that fall below the desired 300 ppi resolution. You can combine multiple checks within one profile; you’re not limited to checking for just one potential issue. You can create, edit, and delete custom profiles. You can also export profiles to share with your workgroup or send to customers, and import profiles to add to your preflight list by using the buttons at the bottom of the Edit Profile dialog box. To edit a preflight profile and save it as a custom profile for future use: 1.Choose Create New Preflight Profile from the Preflight panel menu. A list of profiles appears in the lefthand pane, with a row of edit buttons below the list. If this is the first new custom profile you have created, the Custom profiles category is created, and your new profile is listed in the category as New Profile 1. You may find it easier to select an existing profile and click the Duplicate Profile button ( ). If you duplicate a profile, the new profile will be stored under the same category as the profile you’ve duplicated. New Profile Delete Profile Duplicate Profile Export Profile Import Profile Preflight Profile Edit Buttons: To create, edit, delete, import, and export profiles, use the buttons at the bottom of the Edit dialog box. 2.Enter a name and update the description to reflect the attributes; this will help you and your customers identify what the profile is used for. 3.In the left column, select the attributes you want to edit, such as Images, Fonts, or Colors. 4.Click the button next to the problem you want to identify and enter a value, if appropriate. For example, if you want to identify any images with a resolution lower than 300 ppi, click the Images option under the profile name, and type 300 in the “pixels per inch” box in the right side of the dialog box. Choose what kind of response the profile will yield by choosing an option from the pop-up menu to the left of the entry: Preflight Alert Options: Choose the type of alert you want a Preflight profile to display. • Error: Lets you know a file has failed preflight. • Info: Reports on conditions found during preflight without implying any error. Consequently, the PDF isn’t regarded as “failing” the preflight test. • Warning: Uses a yellow alert triangle to call your attention to conditions in the PDF that, while not constituting a failure of the preflight test, may be of concern in some workflow situations. • Inactive: Prevents the profile from checking the attribute. Make any other changes to the profile; choose Locked to prevent accidental changes. Click Summary in the left pane to see a summary of the errors that the profile will identify. 7 Click OK. Acrobat adds the new profile to the list. Adobe Creative Suite 4 Printing Guide 107 Sharing Profiles You can share a preflight profile with other users. For example, you can provide your customers with a preflight profile to ensure that their files meet your needs before they hand off jobs to you. You may also choose to share profiles with other workstations in your shop. To export a preflight profile: 1 Choose Advanced > Preflight, or click the Preflight button in the Print Production toolbar. 2 Select the profile you want to export, and then click the Options button at the top of the Preflight dialog, and choose Export Preflight Profile from the pull-down menu. 4 Specify a location for the profile, and then click Save. Acrobat creates a file with the .kfp extension. Note: You can lock the profile before packaging it to ensure that your customers won’t accidentally modify it. To import a preflight profile: 1.Choose Advanced > Preflight, or click the Preflight button in the Print Production toolbar. 2.Click the Options button at the top of the Preflight dialog box. 3.Choose Import Preflight Profile from the pull-down menu. 4.Navigate to the saved profile, and click Open. Acrobat creates the Imported Profiles category, if it doesn’t already exist, and adds the imported profile to that category. You can also double-click a .kfp file in the Macintosh Finder or Windows Explorer, and Acrobat 9 Pro automatically imports the profile. Note: Preflight profiles are very small. You can easily e-mail them to customers. To use preflight profiles, your customers must have Acrobat 9 Pro. Automating the Preflight Process Using Preflight Droplets You can use a droplet to preflight multiple PDF files at once. A preflight droplet is a small application that examines a PDF file when you drag it onto the droplet icon. You can create a preflight droplet that uses a prebuilt profile or custom preflight profile that you’ve created. For example, the Droplet can sort preflighted PDFs into “pass” and “fail” folders. Be sure to create those two folders before making the Droplet, so you can specify those locations as part of the process. The Droplet dialog box refers to “success” and “error” folders, but these are just descriptions. The actual names of the two folders are not important; you can name them whatever you like. To create a droplet: 1.Choose Advanced > Preflight, or click the Preflight button in the Print Production toolbar. 2.Select a profile from the list. 3.Click the Options button at the top of the Preflight dialog box, and choose Create Preflight Droplet from the Options pop-up menu. 4.If you’re using a profile different than what you selected in step 2 , choose a preflight profile in the Preflight: Droplet Setup dialog box. 5.Specify where to move each PDF file that meets the preflight criteria and where to move the file if Acrobat identifies errors during preflight. You have other options: Acrobat can copy the processed PDFs, rather than moving them; or it can save a shortcut (Windows) or an alias (Mac OS), rather than the PDF, into the target folder. You can also create reports for successful and failed files. 6.Click Save to name the droplet and specify a location for it, such as the desktop. Remember where you save it. To use a droplet, just drag a PDF file (or multiple PDF files) onto the Droplet icon ( ). Acrobat preflights the PDF files, generates reports, and moves or copies the processed files you specified. Adobe Creative Suite 4 Printing Guide 108 Comparing Documents The Compare Documents feature is greatly enhanced in Acrobat 9 Pro. To launch the feature, choose Document > Compare Documents (in Acrobat 8, this feature was under the Advanced menu). You can choose from any two currently open files, or browse for two PDFs to compare. Designate the older and newer file, specify the type of documents you are comparing, and Acrobat generates a PDF with the results of the comparison. Whereas previous versions of Acrobat outlined changed areas in pink, Acrobat 9 builds a very detailed report, highlighting every area that differs between the older and newer file. Compare Documents Choose two PDFs for comparison, specify a page range for each, and choose a document description — reports, presentations, or scanned documents — and click OK. It’s important to choose the correct document description for optimum results: • Reports, presentations and magazine layouts: Multiple page documents, with text flow from page to page, and objects crossing the gutter on facing-page spreads. • Presentation decks, drawings, or illustrations: Page-independent files; there is no connection between pages other than page order. No text or graphics spanning connecting pages. • Scanned Documents: This option is a bitmap- only comparison. It converts the pages to bitmap, if they are not already, and compares the bitmaps. Since this comparison does full pixel-based bitmap analysis, it will know if two versions of an image are different. Useful for comparing two images when one has been touched up. Also useful for comparing to files that have gone through different conversions or changes, such as transparency flattening, where only a bitmap compare will work since compare on a flattened PDF will highlight all the atomic regions. Hover over a highlighted area in the resulting report PDF to see a description of the differences. Click on highlighted areas to see before-and-after comparisons of images. If the new image is a corrected version of the older image (rather than a completely different image), changed areas of the image are highlighted. Click on a highlighted area, and Acrobat displays a “difference” image that may make it easier to pinpoint the changes. The Compare Documents result is a PDF, and can be saved and reviewed with the job at any time. Adobe Creative Suite 4 Printing Guide 109 Compare Documents: Results The improved Compare Documents feature creates a PDF with detailed indications of the differences between two PDFs. Hover over a highlighted element to see a comment describing the difference, or click on the element to see a before-and-after comparison. Editing PDF files PDFs are intended to be final files; they’re not “working files.” While it’s best to make necessary changes to the original application file (such as an InDesign or Illustrator document), you don’t always have that luxury. If you must perform edits to a PDF, work on a copy of the file, be mindful of any alerts you receive, and perform a Save As to economize the file when you’re done. Know that there are limits to the kinds of edits you can perform and be especially vigilant when editing text: some fonts do not allow re-embedding, and the file’s integrity is lost as a result. In addition, even minor text edits can result in odd spacing or other problems. To edit text and graphics in a PDF, use the TouchUp Text tool and the TouchUp Object tool. Both tools are in the Advanced Editing toolbar (Tools > Advanced Editing > Show Advanced Editing Toolbar). TouchUp Text Tool The TouchUp Text tool is used for selecting and modifying text. Along with selecting and modifying text the users can add new blocks of text using the TouchUp Text Tool. Also, new to Acrobat 9.0, users can wrap text on a line during editing. It can be done by selecting the “Enable Text Word Wrapping” in the Touchup Preferences. Keep in mind that, to edit text, you must have the correct fonts active on your system. But even if you have the necessary font (depending on the permissions attached to the font used in selected text), you may or may not be able to edit the text and re-embed the font used in the text. What you can do depends on the font licensing permissions, which vary according to vendor. Acrobat respects the flag within the font that governs these permissions, and it cannot override any limitations on text-editing or font-embedding. To edit text, choose Tools > Advanced Editing > TouchUp Text Tool, or click the TouchUp Text tool ( ) in the Advanced Editing toolbar. Before you start editing text, it’s advisable to find out the attributes of the text. Select the text and right-click (Windows) or Control-click (Mac OS), then choose Properties from the context menu that appears. If you do not own the font, ask the customer to make the edits in the original application file (page layout or illustration program), and then send you a new, corrected PDF. Adobe Creative Suite 4 Printing Guide 110 TouchUp Text Tool Before editing text, select the target text with the TouchUp Text tool and right-click (Windows) or Control-click (Mac OS). Choose Properties from the context menu to check the text’s attributes and editing and embedding permissions. If the font cannot be re-embedded, your edits may cause problems with imaging, because the font won’t be embedded after edits. As a result, the edited text may not image correctly. You can perform some other text edits without needing to tackle font embedding. The TouchUp Text tool lets you change the color, size, scaling, strokes, and other attributes without risking font permissions. Choose the options you’d like in the TouchUp Properties dialog box, and click Close when you have finished. You’re limited in your color choice selections, however, and cannot specify CMYK or spot colors. TouchUp Object Tool The TouchUp Object tool lets you make limited edits on images and vector art in a PDF. For example, you can perform color conversions on a selected image without using Photoshop. Choose the TouchUp Object tool by selecting Tools > Advanced Editing > TouchUp Object Tool, or by clicking the TouchUp Object button ( ) in the Advanced Editing toolbar. Select the image with the TouchUp Object tool, right-click (Windows) or Control-click (Mac OS) , and choose Properties from the context menu. Click the Color tab, and select an option from the Convert To pop-up menu. Adobe Creative Suite 4 Printing Guide 111 TouchUp Properties The Color tab includes a wide range of color conversions for the selected content. Here, the image has been easily converted to grayscale without having to open Photoshop. You can also use the TouchUp Object tool to select images and vector art in a PDF for editing in external applications. For example, to remove a blemish on a model’s face, select the image with the TouchUp Object tool, and right-click (Windows) or Control-click (Mac OS) to choose Edit Image from the context menu that appears. If it isn’t already running, Adobe Photoshop CS4 launches; it opens the image for editing. The image that appears is not the original image, per se, but it represents the actual image information as contained within the PDF—not resampled or resized. You can add layers in Photoshop to accomplish the needed edits, but you must flatten the file before saving it (File > Save) to write the corrected image back into the PDF. If you encounter an alert cautioning you that the image uses transparency and that you cannot add layers, just click OK. Some image content is not editable with the TouchUp Object tool. For example, attempting to TouchUp a duotone image will yield an error: “Could not complete your request because a color was specified using an unsupported color space.” As a result you cannot open or edit the image. The TouchUp Object tool also provides a method for extracting graphic information for use in other applications (provided you have the right to do so). Instead of choosing File > Save to return the content to Acrobat, choose File > Save As, and save the image as any format to create a file on disk. In addition, you can use the TouchUp Object tool to place an image, flip images or other objects in different directions, as well as rotate selected objects. You can also use the TouchUp Object tool to reposition objects in a PDF, or to select objects and delete them. To edit vector art in a PDF—for example, to fix a logo that’s incorrectly set to overprint—select the art with the TouchUp Object tool, right-click (Windows) or Control-click (Mac OS) and choose Edit Object from the context menu that appears. (Before right- or Control-clicking, you may first need to Shift-click to select multiple components of a complex object.) If it isn’t already running, Adobe Illustrator CS4 launches; it opens the vector artwork for editing. Perform edits as you would with any other Illustrator file. You can add new objects to the existing Illustrator layer during editing, but you cannot add new layers (or the content won’t be written back into the PDF). When you’ve finished, choose File > Save to write the corrected data back into the PDF. You can also choose File > Save As to save the artwork as an Illustrator file for use in other situations. TouchUp Object The context menu has multiple options for modifying selected content. Adobe Creative Suite 4 Printing Guide 112 Importing a PDF into another PDF as a layer 1.Open the Layers Navigation panel (View > Navigation Panels > Layers). 2.In the Layers panel, click on the Options menu pull-down ( ), and choose Import as Layer. Name the layer, and choose options for position, scale, opacity — even position the layer behind the existing contents. Importing a PDF as a Layer Select another PDF to import as a layer, and choose scaling, stacking order, position, and opacity options. Using Other Applications to Edit PDF files Using the TouchUp tools is the recommended method for editing content in a PDF. Still, be cautious about accidentally modifying content, and carefully examine edited PDFs to ensure that no unintended changes have occurred. Adobe does not recommend that you attempt to edit PDFs outside of Acrobat, however. For example, while Illustrator will open a PDF, it is intended to open only PDFs that were created by Illustrator. PDFs created by other applications—even Adobe InDesign—are not intended to be edited in Illustrator. Font embedding may be damaged, content may become corrupted, and there is no guarantee that such edits won’t greatly impair file integrity. It’s still best to return to the originating application, perform the necessary edits there, and generate a new, corrected PDF. Convert Colors Using the Convert Colors feature, you can convert color objects in a PDF document to CMYK or another color space. Acrobat uses the source color spaces of objects in the document to determine what (if any) color conversion is required. Acrobat manages the colors using embedded profiles (if they exist) or default or user-defined color spaces. You can convert the colors of a single page, a range of pages, or an entire document. Note: To convert only the color of a selected object, use the TouchUp Object tool. The Convert Colors function in Acrobat 9 Pro includes a revamped interface, access to the Ink Manager (and the ability to permanently process Ink Manager changes), as well as several new options: • Preserve Black: If R, G, and B values are the same, this options will convert to an equivalent percentage of process black. This is especially useful for handling PDFs from Office files intended for high-end printing, to avoid multi-color output of text and other elements intended to print as black. • Promote Gray To CMYK Black: Converts device gray to CMYK, not to rich black. Adobe Creative Suite 4 Printing Guide 113 • Preserve CMYK Primaries: When transforming colors to prepare CMYK documents for a different target print profile, preserves primaries. For colors with just one colorant, Acrobat uses that colorant. For colors with more than one colorant, Acrobat finds the color with the smallest color difference. Convert Colors Acrobat 9 Pro adds many new features to the revamped dialog, including access to the Ink Manager. Click the blue arrow under Document Colors to reveal or hide the color spaces and spot colors lists. To convert a document’s colors to a different color space: 1.Choose Advanced > Print Production > Convert Colors, or click the Convert Colors tool ( in the Print Production toolbar. ) 2.In the Convert Colors dialog box, select a color type option from the list of document colors. You can specify different conversion options for different color spaces and colorants. For example, you could embed separate color profiles to calibrate color for grayscale, RGB, and CMYK objects. This strategy could be useful if your RIP color-manages PDF files or if you are sharing PDF files with others. 3.Select an option from the Action menu: • Preserve: Keeps objects in the selected color space when you output the document. • Convert: Uses the destination space profile to convert color objects to the chosen output profile. • Decalibrate: Removes embedded profiles from the color objects in that color space. • Map to: Maps a selected spot color to a specified process plate or another spot color in the document. 4.Choose a destination profile that accurately defines the target output device. 5.Specify which pages to convert. 6.Specify whether to embed the destination profile. If you embed the profile as a source color space, Acrobat tags all images with the destination profile. If you embed it as an output intent, Acrobat uses the destination profile as the output intent, replacing any existing output intent. Depending on the color spaces you select, the Convert Colors command will preserve, convert, or map color values from the source color space to the specified destination space as follows: • Objects with untagged RGB data (DeviceRGB) convert from the working space RGB profile to the CMYK gamut of the destination space. Untagged CMYK (DeviceCMYK) and grayscale (DeviceGray) values are converted in the same way. • Objects in device-independent color spaces (CalGray, CalRGB, or CIE L*a*b) can be preserved or converted. If they are converted, Acrobat uses the device-independent object’s embedded profile information. • Objects set in spot colors (including Separation, DeviceN, and NChannel color spaces) can be preserved, converted, or mapped (aliased) to any other ink present Adobe Creative Suite 4 Printing Guide 114 in the document. Spot colors can also be mapped to a CMYK process color, if the process color model of the destination space is CMYK. Spot colors mapped to other inks can be previewed in the Output Preview dialog box. Using the Ink Manager Acrobat 9 Pro includes Ink Manager functions similar to the Ink Manager in Adobe InDesign CS4, but there are important differences between the two applications. In Acrobat, you have the choice of setting temporary Ink Manager options through the Output Preview panel (which will affect output from Acrobat in the current session, but will not cause a permanent change to the file), or choosing permanent Ink Manager options through the Convert Colors tool (Advanced > Print Production > Convert Colors). It’s very important to recognize the differences between the two Ink Manager approaches, so that you do not inadvertently permanently change a PDF through Convert Colors, unless you truly intend to do so. To display the Ink Manager, click Ink Manager in the Output Preview dialog box, click the Ink Manager tool ( ) in the Print Production toolbar, or choose Advanced > Print Production > Ink Manager. The Ink Manager is also available when you print; to access it, click Ink Manager in the Output panel of the Advanced Print Setup dialog box. You can perform the following tasks in the Ink Manager: • To create an ink alias, select the spot-color ink for which you want an alias, and then choose a color from the Ink Alias menu. The ink type icon and ink description change accordingly. • To convert an individual spot color to process, click the spot icon to the left of the color name ( ). To convert all spot colors to process, click Convert All Spots To Process. The icon next to each color changes to CMYK color mode ( ). Until you print the document, converting spots to process affects only the display. When you convert spot colors to process colors during printing, only the output is affected; the document remains unchanged. • To restore spot colors, deselect Convert All Spots To Process, or click the icon to the left of the spots you wish to restore. Ink Manager Remap one spot color ink to another or to a process ink. Also, convert all spot inks to process with one click. Note: If multiple spot colors with different specifications (such as PMS 185C, PMS 185CV, and PMS 185CVU) are converted to process, color inconsistency may occur in objects using the different spot colors. If the objects are intended to be the same color but you don’t have access to the original application files, you may elect to remap the extraneous spot inks to one spot ink. You can then process the PDF as four-color process, using controls in your RIP’s software, to ensure consistency of color. Output Preview: Using Ink Manager for Temporary Ink Mappings The Ink Manager available in Output Preview temporarily modifies the way inks are treated for output. You can use the Ink Manager to temporarily remap a spot-color ink to its equivalent CMYK process color or to an existing spot or process color, using what’s called Ink Alias. (However, you cannot map a process color to a spot ink.) The effects of ink aliasing appear on screen in Output Preview and in the printed output, but are in effect only while the PDF is open in Acrobat during the current session. A spot color aliased to a process color appears as that Adobe Creative Suite 4 Printing Guide 115 process color in the document during Output Preview. Spot inks mapped to process colors won’t display correctly unless viewed in Output Preview mode, but they will output from Acrobat according to changes made in the Ink Manager. Keep in mind that changes chosen in the Ink Manager affect display and output only until the PDF is saved and closed. When the PDF is closed (even if it is saved), the changes are not saved in the file. This allows you to generate correct output without permanently altering the file. Convert Colors: Using Ink Manager for Permanent Ink Mappings To make Ink Manager choices permanent, you must use the Convert Colors function. You can make the desired choices in Ink Manager before opening the Convert Colors dialog, or launch Ink Manager from within the Convert Colors dialog, with the same outcome. The Ink Manager itself performs the same functions however you launch it, but Convert Colors finalizes the choices made in Ink Manager. Once you’ve made the choices in Ink Manager, you will notice that the Ink Manager choices are reflected in the Document Colors window at the top of the dialog. Double-check the ink mappings, and click the Add button to add the Ink Manager instructions to the list of color conversions to be performed. The Convert Color operations are performed in the order listed, so you may need to use the Move Up or Move Down buttons to ensure that the operations are performed in the correct order. Note that you can save and load color conversion setups for common corrections, which might help your customers correct common problems before they submit PDFs for print. Once you have chosen all the desired options in the Convert Colors dialog, click OK. Acrobat displays an alert cautioning you that this operation cannot be undone. Click the Yes button, and save the file (with a new name, if you wish to keep the original file unchanged). Convert Colors Alert Because the Convert Colors function causes permanent changes to a PDF, you are warned that a Convert Colors operation cannot be undone. However, you can choose File > Revert to return to the original state of the PDF, or close the document without saving it. Adding Printer Marks You can embed printer marks in a PDF document. You may need to expand the page size to accommodate the marks. The Crop Pages function expands page dimensions, as well as crops the page. For information on changing page size, see the next section, “Cropping pages.” To embed printer marks: 1.Choose Advanced > Print Production > Add Printer Marks or click the Printer Marks button in the Print Production toolbar ( ). 2.Specify the pages to mark, and which marks to include; you can choose any combination of trim marks, bleed marks, registration marks, page information, and color bars. 3.Select Embed Printer Marks With Layers if you want to embed the marks in a layer in the PDF file. A layer named Marks & Bleeds is added to the document, and its visibility can be controlled in the Layers panel. If you deselect this option, Acrobat embeds the printer marks in the file itself, without creating a new layer. If there’s not enough room to display marks, a message alerts you that marks overlap the page. Adobe Creative Suite 4 Printing Guide 116 Add Printer Marks Acrobat can add standard trim and bleed marks to the chosen page range as well as color bars and page information. You can also choose to place marks on a separate layer. Note: An InDesign CS4 PDF file can include printer marks either in a separate layer or on the page, but Acrobat detects them only on a separate layer. If they were exported as a layer, they are replaced by any printer marks you create using the Acrobat Add Printer Marks feature. If the InDesign printer marks are on the page, Acrobat printer marks overlay them and might not align with them. Cropping pages Use the Crop Pages dialog box to define boundaries for trim, bleed, and art for your document. The Crop feature provides several functions: • Show All Boxes: Previews properties of CropBox, ArtBox, TrimBox, and BleedBox in a thumbnail; deselect this option and choose a single box to display, using the popup menu below the Show All Boxes option. The dialog box previews each selected property as a differently colored box with its dimensions at the bottom. (To see these indicators all the time, you can turn them on in Preferences > Page Display.) • Units: Lets you set the unit of measurement—points, picas, millimeters, centimeters, and inches—for the page dimensions of each box in the thumbnail preview. • Margin Controls: Lets you crop the page (or range of pages) to specified dimensions by entering desired proportions. Note that this a masking procedure—information outside the new margin dimensions is not discarded. Consequently, the file size is not reduced. In addition, it’s possible for some applications and prepress processes to ignore the margin settings. For example, when placed in InDesign, a PDF that uses margin controls to reduce the dimensions of the visible area can be “de-cropped” through the Show Import Options options (Art, Trim, Bleed, or Media). If you select the Crop option in the Show Import Options dialog box when placing a cropped PDF in InDesign, the margin settings are honored. • Change Page Size: Enables you to extend the dimensions of the pages in the PDF. This is much like the Canvas function in Adobe Photoshop CS4—think of it as the opposite of cropping. You can only increase the page dimensions, however; you can’t reduce the dimensions. Adobe Creative Suite 4 Printing Guide 117 Display Options Margin Controls Change Page Sizes Crop Pages You can do much more than just crop pages in Acrobat. Display Art, Trim, Bleed, and Crop boxes as overlays on the thumbnail preview. Move the boundaries of those boxes with Margin Controls, and extend the page size by using the Change Page Size options. Changing Page Margins Here’s how to change page margins in Acrobat 9 Pro. 1.Choose Advanced > Print Production > Crop Pages, or click the Crop tool ( Production toolbar. ) in the Print 2.In the Crop Pages dialog box, choose a unit of measure. 3.In the Crop Margins area of the Crop Pages dialog box, select the boundary to modify (CropBox, ArtBox, TrimBox, or BleedBox). You can select one of the following boundaries: • Crop defines the boundary for the contents of a page when it’s displayed or printed. If not otherwise specified (for example, in the JDF settings), the crop boundary determines how page contents are positioned on the output medium. • Trim defines the finished dimensions of the page after trimming. • Bleed defines the clipping path when the page is printed professionally to allow for paper trimming and folding. Printer marks may fall outside the bleed area. • Art defines the meaningful content of the page, including white space. 4.In the Margin Controls area, adjust the Top, Bottom, Left, and Right margins by entering values or clicking the increment arrows. Margin values are the amount the boundary is moved inward from its initial position. Lines are displayed on the page thumbnail and in the document window to show the new margin positions. 5.Select other options, as appropriate: • Remove White Margins crops the page to the artwork boundary. • Set To Zero restores the crop margins to zero. • Revert To Selection reverts to the crop margin that you selected with the Crop tool. 6.Specify the desired pages to be affected by your margin choices, and click OK. You can also crop a page by selecting the Crop tool in the Advanced Editing toolbar, or by choosing Tools > Advanced Editing > Crop Tool and dragging a cropping rectangle on the page. Select a handle at a corner of the cropping rectangle, and drag it to the size you want. Double-click within the cropping rectangle (or press the Enter or Return key on the keyboard) to open the Crop Pages dialog box. Cropping is nondestructive: it affects only display and print, but does not eliminate any content. Later, you can change the cropping specifications or return to the boundaries of the original document. Adobe Creative Suite 4 Printing Guide 118 Changing Page Size Here’s how to increase the page size (media box) of a PDF document: 1.Open the Crop Pages dialog box, using one of the methods just described in “Cropping Pages.” 2.Select a fixed page size or specify values for a custom page size. 3.Click OK. You have control over top, bottom, left, and right margins. So, for example, you could add extra “paper” at the left of a document that will be punched for comb binding. Note: If you increase the page size, the content appears smaller in the dialog box preview, but the dimensions of actual page content aren’t reduced. The original content is centered in the enlarged page. Permanently Altering Page Dimensions The cropping function available in the Print Production toolbar enables you to visually crop out unwanted content, but this is a masking effect; the content is still actually there, and may be perceived by imposition and other processes, producing unwanted results. Acrobat 9, however, offers you the ability to permanently change the media size for a PDF, by using a Preflight Fixup. Here are the steps: 1.Choose the Crop tool (Tools > Advanced Editing > Crop Tool). 2.Click and drag to create a rectangle of the size and position you want for a final crop. 3.Once you are satisfied with the cropping rectangle, right-click (Mac: Control-click) and choose Set ArtBox from the contextual menu that appears. You will invoke this newly-defined ArtBox in a Fixup to truly crop the document. Now, to create and apply the Fixup: 1.Open the Preflight dialog (Advanced > Preflight), click the Options button, and choose Create New Preflight Single Fixup. 2.In the left column, choose the appropriate Fixup category. Single Fixup for Page Geometry Choose the Fixup category, then select a prebuilt Fixup as a starting point. Modify the settings, give the Fixup a name, and click OK. 3.Set the Fixup options as necessary: Assign a name, choose the Set Page Geometry Boxes option in the Type of Fixup column, and modify the settings as shown above. Click OK, and then save the fixup. When you run the Fixup by clicking the Fix button in the Preflight dialog, you’ll be prompted for a new file name, because this Fixup will permanently alter the file, deleting all content outside the newly-defined trim and resetting the trim definition as you have specified. Adobe Creative Suite 4 Printing Guide 119 Fixing Hairlines Whether they’re from scaled-down vector artwork, or from thin stroke-weight definitions in placed artwork, fine hairlines can be problematic in commercial printing, and might not image properly in the final printed piece. The Fix Hairlines tool can find most hairlines in the document and replace them with a heavier line. You can also thicken hairlines in Type 3 fonts and PostScript patterns. 1 Choose Advanced > Print Production > Fix Hairlines, or click the Fix Hairlines tool ( the Print Production toolbar. ) in 2 Enter values for the hairline width and replacement width, and select a unit of measurement. 3 Select Include Type 3 Fonts or Include Patterns to replace hairlines in Type 3 characters or patterns with the same replacement width as other hairlines. 4 Specify the page range for hairline changes. You can fix hairlines for the entire document or for specific pages. Note: Because you can use font characters and patterns in a variety of contexts in the same document, changing the line weight may produce unexpected results. Be sure to check the results if you select these options, and adjust your selections as necessary. Fix Hairlines Increase the stroke weight of anemic vector art by setting a threshold value. Acrobat thickens only those strokes meeting or exceeding the threshold. Thickening Type 3 fonts and patterns may take a bit longer. Previewing and Flattening transparency Transparency is the visual interaction between overlapping, non-opaque colors in text and graphics. You can create transparency in Photoshop, Illustrator, and InDesign by using opacity percentages, blending modes, feathers, drop shadows, embossing, and similar effects. When saving or exporting files with transparency, you can choose to save the file in a format that preserves live transparency, or in a format that flattens transparent objects. If your workflow is based on the Adobe PDF Print Engine, you’re well equipped to handle live transparency without having to flatten at any stage. You can maintain live transparency by saving Photoshop files as native PSD; Illustrator files as native AI, and PDFs as files that are compatible with Acrobat 5.0 and above. For more information on the Adobe PDF Print Engine, see http://www.adobe.com/products/pdfprintengine. Flattening converts layered or stacked objects with transparency into a single, flat, opaque layer. Overlapping areas are replaced with objects that replicate the look of transparently interacting objects. Overprint is used if necessary to replicate transparency effects in spot color objects. Flattening is necessary for print output to PostScript or for export to any file format that does not support live transparency (for example, EPS, JPEG, and PDF 1.3). Transparency has already been flattened in any PDF file that was created by converting a PostScript file in Distiller, but Adobe Creative Suite 4 applications can export PDF files with live transparency. As artwork becomes more complex (for example, mixing images, vectors, type, spot colors, and overprinting), so does the flattening process and its results. Because transparency flattening may create overprinting, it is important to ensure that the RIP is set up to handle overprinting properly. Adobe recommends flattening transparency only when you are ready to print a PDF file, unless you need to flatten the PDF file earlier because of the requirements of your RIP or other aspects of your workflow. Flattening transparency makes permanent changes that cannot be undone. So defer flattening until after you perform any necessary color conversions or other edits. Acrobat 9 Pro can save files in different PDF format versions, some of which retain live transparency. The PDF/X-1a format is best for placement into non-Adobe applications that require flattened transparent objects. PDF/X-4 is recommended for workflows, such as those using the Adobe PDF Print Engine, which support live transparency. Refer to the individual product user guides for more information on transparency and printing. For detailed information on transparency flattening, see “Transparency in Adobe Applications: A Print Production Guide” http://www.adobe.com/go/learn_transparency_print_en and “A Designer’s Guide to Transparency for Print Output” http://www.adobe.com/go/ learn_transparency_designer_en. Previewing flattening The Transparency Flattener Preview feature lets you see the effects of flattening settings on a PDF page. You can inspect the objects that have transparency applied, view which objects transparency flattening will affect, and flatten transparency before printing final output. Keep in mind that, once you have flattened the content of a PDF, that change is permanent: saving as an Acrobat 5.0 (or above) format won’t restore live transparency. To see which objects will be affected by flattening: 1.Select the page that you want to examine, and choose Advanced > Print Production > Flattener Preview, or click the Flattener Preview button in the Print Production toolbar ( ). 2.Choose an option from the Highlight menu (options are dimmed if there is no live transparency on the selected page). Affected content appears in red, while the rest of the artwork appears gray. You can choose which objects to preview before flattening: • Rasterized Complex Regions: Shows the areas that will be rasterized, based on the Raster/Vector balance control. Select Clip Complex Regions in the Flattener Settings area to minimize stitching problems. For information on stitching and flattener artifacts, see the printing guides on the Adobe website (www.adobe.com/go/ print_resource). • Transparent Objects: Shows objects that are sources of transparency, such as those with opacity values less than 100%, or objects with blending modes, opacity masks, feathering, embossing, or drop shadows. • All Affected Objects: Shows all objects that are impacted by transparency, including transparent objects and objects that are overlapped by, underneath, or adjacent to transparent objects. • Expanded Patterns: Shows all patterns involved with transparency that will be expanded during the flattening process. • Outlined Strokes: Previews all strokes outlined as a result of transparency. If you select Convert All Strokes To Outlines in Flattener Transparency Preset Options, all strokes will have outlines applied. 3.Move the Raster/Vector slider or enter a value to specify the degree of rasterization applied to complex areas of artwork. For high-end print output, typically the best setting is 100 (the slider is moved to the Vectors end). Depending on the complexity of the file, this setting maintains all objects as vector information whenever possible when Acrobat saves to PostScript or to other formats that require flattening. This setting may create smaller files and retain useful information for post-processing; however, files with numerous small vector-based objects (referred to as “atomic regions”) may take longer to process. Adobe Creative Suite 4 Printing Guide 121 Note: Moving the slider to the left all the way to zero rasterizes all content on the selected page or designated pages, whether it involves transparency or not. Rasterizing every page creates enormous files, the equivalent of creating a TIFF image of the page. Avoid this option unless the file is so complex that you cannot process it otherwise. As an alternative, consider the Print As Raster setting in the Acrobat Print dialog box. 4.Specify resolutions for rasterizing complex line art and text, and gradients and meshes: • Line Art And Text Resolution: Lets you set the resolution applied to areas that need to be rasterized because they are too complex to be retained in vector form based on the current Raster/Vector Balance setting. Typically, you should set this resolution to at least 1200 ppi to attain high-quality text rasterization. Consider setting this value to the resolution of your RIP, or a value that is evenly divisible into that resolution. • Gradient And Mesh Resolution: Specifies the resolution of gradients and meshes, including raster-based effects such as drop shadows, feathers, and glows, that have been rasterized as a result of flattening. The most common resolution is 300 ppi. Higher settings may slow performance without noticeably improving quality. • Convert All Text To Outlines: Keeps the width of all text in the artwork consistent by converting it to outlines. Because this option can slow processing and cause noticeable thickening on very small serif text, deselect this option for most high-end printing workflows. If you experience inconsistent text rendering on output, you may wish to convert text to outlines when it interacts with areas using transparency effects such as drop shadows. However, choosing this option converts all text to outlines on pages that contain transparency, not just text interacting with transparent areas. Text on pages without transparency is not converted to outlines. • Convert All Strokes To Outlines: Keeps the width of all strokes in the artwork consistent by converting them to outlines. As with converting text, deselect this option for most high-end printing workflows because it may result in a thickening of fine strokes. • Clip Complex Regions: Ensures that the boundaries between vector artwork and rasterized artwork fall along object paths. This option reduces stitching artifacts that result when part of an object is rasterized while another part of the object remains in vector form (as determined by the Raster/Vector slider). • Preserve Overprint: Preserves overprint attributes in artwork when possible during the flattening process. When necessary, the flattener may execute some overprint attributes to ensure that artwork retains its original appearance after flattening, especially when spot colors are involved. • Transparency Blending Color Space: If you wish to change the transparency blending color space, click the Change button and choose the appropriate color profile for your conditions. 5.Click the Save button near the top of the dialog box to preserve any setting changes, for access in the Print dialog box or PDF Optimizer options. 6.Choose whether to store or apply the flattener settings: • Customized settings must be saved as a flattener preset (see above), making the preset available in the print dialog. • While it is recommended that you apply flattening at print time, your workflow may require flattened PDFs. If so, make a copy of the file, then click Apply to flatten the PDF using the selected settings. When you save the file, these changes are permanent. Adobe Creative Suite 4 Printing Guide 122 Flattener Preview Test various flattening scenarios and preview the results. The OK and Apply buttons have very different functions: OK exits the Flattener Preview and stores the results for future previews (if the settings have been saved as a named preset). Apply processes the settings in the Flattener Preview dialog box, and flattens the file accordingly. You cannot undo Apply, but the file is not permanently altered until you choose File > Save. Applying Flattener Settings Keep in mind that applying flattener settings is the same as flattening transparency—a permanent change that cannot be undone. Alternatively, you can flatten transparency in a copy of the document—without affecting the original PDF file—using PDF Optimizer; see the next section “Flattening Transparency Using PDF Optimizer.” To apply the flattener settings to the PDF document: 1.In the Flattener Preview dialog box, specify flattener settings. 2.In the Apply To PDF area of the dialog box, select the page or pages to apply the flattener settings to. 3.Click Apply. You cannot undo this operation. Flattening Transparency Using PDF Optimizer To create a copy of the PDF file with flattened transparency, use the Transparency panel in PDF Optimizer. PDF Optimizer applies transparency settings to all pages in the document before applying any other optimization settings you have selected. To flatten transparency using PDF Optimizer: 1.Choose Advanced > PDF Optimizer. 2.Select the Transparency option in the left column. If the document has flattener settings associated with it, Acrobat uses these settings as the initial values in the Transparency panel. Otherwise, it uses the settings last used in the panel. 3.Choose a flattener setting (usually High Resolution). 4.Click OK to permanently flatten transparency in the file. 5.You are asked to provide a name and location for the new file. Note: When you click OK in the PDF Optimizer dialog box, PDF Optimizer applies all the selected settings in all panels, whether you have recently applied them or not. To prevent accidental changes, review the settings in the PDF Optimizer panels before clicking OK. For more information on PDF Optimizer settings, see “Using PDF Optimizer to optimize files for print” in this chapter. Optimizing file size You can optimize files several ways, including by reducing their file size. You may be able to reduce the file size of a PDF file simply by using the Save As command. This command rewrites the file, removes duplicated or unnecessary information, and does not require you to regenerate the PDF file from the source file. Adobe Creative Suite 4 Printing Guide 123 If you wish to further reduce the file size, choose Document > Reduce File Size. This also gives you the option to change the version compatibility of the PDF. Select the version compatibility that you need (or select the default option to Retain Existing format), and click OK. Note that reducing the version may change the content of the file. For example, converting a file from PDF 1.4 (Acrobat 5.0) to PDF 1.3 (Acrobat 4.0) compatibility requires transparency to be flattened. Note: You can also set version compatibility in PDF Optimizer. Using PDF Optimizer to optimize files for print Acrobat PDF Optimizer makes the PDF file more efficient and can be used to prepare it for printing. You can unembed fonts, compress images, correct the file format, remove components you no longer need in the file, and flatten transparency. Keep in mind how you intend to use the file. The options you choose in PDF Optimizer depend on your workflow. For high-resolution printing, use caution when downsampling or compressing images, unembedding fonts, or flattening transparency. Some options are more appropriate for a file that will be printed to a high-end printer, and others are more appropriate for a file that is intended for on screen viewing. In most cases, the default settings are appropriate for a variety of uses. Note: Optimizing a digitally signed document invalidates the signature. Optimizing a PDF/X file can invalidate the file if the resulting document no longer has its fonts embedded, or is compatible with PDF 1.4 (Acrobat 5.0) or later. To optimize a PDF file: 1.Choose Advanced > PDF Optimizer, or click the PDF Optimizer button ( Production toolbar. ) in the Print 2.Click Audit Space Usage to view a report of the total number of bytes used for specific document elements. The results appear in actual bytes and as a percentage of the total file size. Auditing the document can help you decide which options to select. 3. Select Images in the left pane of the dialog box, and choose options according to your output workflow. This option downsamples or compresses color, grayscale, and black-and-white images. Downsampling reduces file size by lowering the resolution of images. This is accomplished by averaging the colors of several pixels and merging them into larger pixels of the average color. Compression reduces file size by eliminating unnecessary pixel data. In general, JPEG gives better results on images such as photographs with gradual color transitions. ZIP is the better choice for illustrations with large areas of solid, flat color or patterns made up of flat colors. For monochrome images, JBIG2 compression, which is available in PDF Optimizer but not in Acrobat Distiller, is superior to CCITT. If you’re using JPEG or JPEG2000 compression, specify maximum quality because JPEG and JPEG2000 compression methods are typically lossy, resulting in some permanent data loss. For JPEG2000 compression, you can also specify lossless so that no pixel data is removed. Compression for monochrome images is lossless, except for JBIG2 compression, which provides both lossy and lossless modes of compression. 4.Select Fonts in the left pane of the dialog box, to choose whether to unembed fonts to reduce file size. However, for high-end printing, Adobe recommends embedding all fonts. Check to make sure the font supplier allows embedding. 5.Select Transparency in the left pane of the dialog box, to flatten transparency in the document, using default options for Low, Medium, and High Resolution. If you saved a custom flattener style in the Flattener Preview, it’s available here. For high-quality printing, it is best to use the High Resolution option or create a custom flattener style appropriate for your particular workflow system. 6.Select Discard Objects in the left pane of the dialog box to remove objects, such as embedded page thumbnails, bookmarks, and document tags from the PDF document. There are also options to convert smooth lines to curves and merge image fragments. Several of the options allow you to delete content that has nothing to do with imaging the document, such as JavaScript actions, search indexes, and form actions. The option to flatten form fields does not delete form field content, but flattens and embeds that content as visible artwork. Adobe Creative Suite 4 Printing Guide 124 7. Select Discard User Data in the left pane of the dialog box to allows deletion of comments, file attachments, private data embedded by other applications, and hidden layer content. 8.Select Clean Up in the left pane of the dialog box to remove unnecessary items from the document. By default, only elements that do not affect functionality are selected. If you are unsure of the implications of removing other options, you should use the default selections. You can choose from these options: • Object Compression Options: Lets you remove all compression or compress document structure. If you’ve chosen compatibility with Acrobat 6.0 or later, you can also compress the entire file or leave the compression unchanged. • Use Flate To Encode Streams That Are Not Encoded: Analyzes if applying compression to a particular stream will reduce file size. Compression is applied only if file size will be reduced. • In Streams That Use LZW Encoding, Use Flate Instead: Replaces LZW encoding with Flate encoding. • Remove Invalid Bookmarks/Remove Invalid Links: Eliminates bookmarks and links that point to deleted pages or to other invalid destinations. • Remove Unreferenced Named Destinations: Deletes named destinations that the PDF document does not reference internally. Because this option does not check for links from other PDF files or websites, it may not fit in some workflows. As with links and bookmarks, deleting these aspects of the PDF may impair navigation when viewed on screen, but has no adverse effect on imaging. • Optimize The PDF For Fast Web View: Restructures a PDF document for page-ata-time downloading (byte-serving) from web servers. This option has no benefit for printing, so it can be set on or off. 9.Click OK, name the new optimized PDF file, and specify a location for it. The original PDF document remains unchanged. For information on specific PDF Optimizer options, see Complete Acrobat 9 Pro Help, available in the Help menu. Using the Job Definition Format (JDF) Keeping track of a job’s specifications, especially on a complex job, can be challenging. Job Definition Format (JDF) provides a streamlined way to create an efficient, automated workflow based on Adobe PDF. The features in Adobe Acrobat 9 Pro enable you and your customers to create JDF files on the desktop to preserve information that can be used later in the workflow. About JDF files JDF is a job-ticketing file format that provides a mechanism to specify and control all of the processes in print production, from job submission through prepress, press, and postpress. As a device-independent standard, JDF can describe every part of a job (cover, inside pages, binding, number of copies, and so on) and link management information systems (MIS) with production workflow systems—no matter what tools are used. JDF places individual actions into a greater context, so that each element is recognized as part of the whole. In the same way that Adobe PostScript describes pages and Adobe PDF describes documents, JDF describes jobs. Acrobat 9 Pro JDF files include product information, such as job ID, number of copies, binding settings, and customer information; section data for each section of the job, such as the section name, number of pages, page size and orientation, scaling percentage, and inks; and file data for each native or PDF file assigned to a section, including the file name, document name, and page range. You can add more job data to JDF files as more information is obtained about the job’s specifications. You can create a high-level JDF file that describes only a rough outline of the job; as you add information, the outline can evolve into a detailed product description. You can embed PDF creation settings (.joboptions files) and preflight profiles in a JDF to ensure the integrity of the files before the job enters print production. Acrobat 9 Pro compares the job description with the properties of the assigned files and reports any discrepancies in page size, inks, or the number of pages available in the associated documents. Adobe Creative Suite 4 Printing Guide 125 After preflighting and verifying the JDF file and the PDF files associated with it, you can package the files into a single MIME (Multipurpose Internet Mail Extensions) file. The MIME specification lets you format non-ASCII messages so they can be sent over the Internet, ensuring the file links are retained during transfer. Your customer can submit the JDF package to your production site as an e-mail attachment, send it to the URL of a CIP4-compliant system, or drop the files on an FTP site. Creating JDF files To create a JDF file in Acrobat 9 Pro: 1.Choose Advanced > Print Production > JDF Job Definitions, or click the JDF tool in the Print Production toolbar ( ). Acrobat displays the JDF Job Definitions dialog box, where you can access all JDF functionality in Acrobat 9 Pro. JDF Job Definitions Use this dialog box to access all JDF functionality in Acrobat 9 Pro. 2.Choose from the following options: • Click New to start creating a new JDF definition. • Click Add to import a JDF definition. • Click Remove to delete a definition. • Use Edit to start editing a definition. Use the Contacts Manager, Media Manager, and Submission Manager buttons to edit an existing JDF file, as described in the corresponding sections that follow. • Click Submit to submit the current PDF. Contacts Manager Use the Contacts Manager to record contact information for everyone involved in the project. Click Contacts Manager in the JDF Job Definitions dialog box, and then click Add to add a new contact. You must have at least one contact person, and that person must be defined as the customer. Media Manager Use the Media Manager to specify media, or paper stock, for print jobs in Acrobat 9 Pro. Click Media Manager in the JDF Job Definitions dialog box. Your customer can specify media with as much information as is known; you can also add relevant information later. Alternatively, your customer can leave the media type unspecified, and then you can create and select the appropriate media settings. You can also embed media settings in a JDF template for your customer to use. You can add or modify media settings at any point during the production cycle. Media Manager You can specify settings for media to be used in the job, and these settings will be incorporated into the JDF definition you create. Adobe Creative Suite 4 Printing Guide 126 Submission Manager Before you prepare a JDF file, use the Submission Manager to configure the submissions workflow. Submissions are a new way to convert, test, and package files for delivery to a service provider. Click Submission Manager in the JDF Job Definitions dialog box. Then click Add in the Submission Manager dialog box to create a new configuration. In the Submission Setup dialog box, name the configuration, choose a default conversion setting, and select a submission method—for best results, always check Submit as MIME package. In Pre-submission Options check the options Verify that PDF files are consistent with the JDF job definition and Preflight PDF files. The first option compares the JDF file with the associated files and verifies that they exist and are linked to the appropriate URL; any inconsistencies in page sizes, inks, and the number of pages available result in an error. The Preflight PDF files option preflights the PDF files using the preflight profile specified in the JDF file (if there isn’t one specified, the option uses the one specified in the Submission Setup dialog box). Configuring JDF files To configure a new JDF file: 1.Create a new JDF file, as described in “Creating JDF files.” 2.Click New in the JDF Job Definitions dialog box. Then select New to create a blank JDF file. 3.Choose an option: • Select Based On The Document: [Filename] to create a JDF files based on the PDF file you have open. Acrobat automatically fills in the Section and File data, but you must manually complete the product data. • Select Based On The Job Definition: [Filename] to create a JDF file using an existing JDF file as a template. Settings for preflighting and PDF conversion are embedded, but you must manually enter Product, Section, and File data. 4.Enter a name for the JDF file and specify a location for it. Then, click Create And Edit to open the Edit JDF Job Definition dialog box. 5.Enter the product information on the General tab. Enter billing information and add contacts on the Customer Info tab. Adding a Section Each JDF file must have one or more sections. Create a section for each file or for each set of files that has a different page size and orientation, media settings, duplex policy, scaling percentage, or set of inks. To add a section, click Add Section at the bottom of the Edit JDF Job Definition dialog box. Name the section and enter its settings. Use the Ink tab to specify the inks used: select a color standard, such as CMYK, and then add any spot colors (including varnishes) used in the section. To add a PDF file or native file to the section, click Add File, and then browse to the file you want to add. Add files in sequential order. To change the order, select a file name and click Move Up or Move Down. Submitting the Job When you’ve added all the sections and the files, arranged the files in sequential order, and included all the information you have, you are ready to submit the job. Select the JDF file in the JDF Job Definition dialog box, and click Submit. Acrobat 9 Pro converts PDFs and native InDesign files listed in the JDF file into PDF files using the PDF conversion settings specified in the JDF file. If the verification option is selected in the submission settings, Acrobat compares the JDF file to the content of the files and reports any inconsistencies. If the Preflight option is selected, Acrobat preflights the file using the Preflight profile specified in the JDF file or the submission settings and displays a detailed preflight report. Then Acrobat packages the file and submits it as a MIME file or uploads it to the location specified in the Submission Setup dialog box. For more information, see the JDF white paper at http://www.adobe.com/products/jdf. Adobe Creative Suite 4 Printing Guide 127 Including InDesign Files in a JDF Job Submission In addition to handling PDFs, a JDF job submission can include native InDesign files. Acrobat earmarks InDesign files with the specified JDF information, which is incorporated when you export PDFs from InDesign. JDF Templates You can create a JDF file for your customer to use as a template. Templates include media specifications, PDF conversion settings (formerly called Acrobat Distiller job settings), and preflight profiles. Configure the JDF file, save it, and send it to your customer. To create a JDF file, your customer should select the option Based on the job definition and navigate to the JDF file you provided. Using Comment and Review features in Acrobat 9 Pro Use the commenting and reviewing features in Acrobat 9 Pro to communicate with your customer about issues identified during preflighting, or to get final approval on changes you’ve made to the document before printing. You can include preflight results as comments in the file (see “Saving preflight results” in this chapter), use the highlighting and drawing tools to illustrate issues, and add any other instructions or information in comments you add manually. Then use PDF Optimizer to create a smaller copy of the file that you can e-mail to your customer (see “Using PDF Optimizer to optimize files for print” in this chapter). Enable the PDF file for review in Adobe Reader 7, 8 or 9, so that your customer will have commenting and drawing tools available. About Comments You can add comments in a PDF file without affecting the output or the content of the file. (Note, however, that placing comments inside the trimbox of a PDF/X file will invalidate its compliance with the PDF/X specification. Consequently, comments should be made on a copy of a PDF/Xcompliant file.) These comments include notes, highlights, text edits, and stamps; you can also attach sound, text, or image files to the document to convey your message. For example, you can indicate an error or misalignment by circling it, add a stamp that says you’ve approved a page, or record a message explaining that a certain element on a particular layer is causing print problems. You can also attach other files within a PDF document, such as preflight settings, preflight reports, or job information. E-mailing or uploading a PDF file with comments is less expensive and more efficient than the hard-copy process of printing a proof, marking it up, shipping or faxing it to the customer, having the customer go through the physical document to find the comments, and then going through the whole process again in reverse. The e-mail- or server-based PDF review process also gives you the ability to request and receive approval from the customer, using the stamp tool or the digital-signature feature, which can identify the person, date, and time for your records. For information on using commenting tools in Acrobat, see Complete Acrobat 9 Pro Help in the Help menu. Allowing multiple reviewers to mark up a PDF If you wish to facilitate PDF markup with your clients, you have the choice of setting up a Shared Review (recommended) or an e-mail-based review. The Shared review approach offers the advantage of storing comments in a central location, and allowing reviewers to view each other’s Adobe Creative Suite 4 Printing Guide 128 comments, which can reduce redundancy in markup. An e-mail review is easier to set up (since it does not rely on a central server for comment storage), but because reviewers cannot see other reviewers’ comments, there is a likelihood of redundant markups. Additionally, the review initiator must collect individual participants’ comments and combine them on a “master” PDF to have a realistic overview of all reviewers’ markups. Shared review Whereas previous versions of Acrobat required you to specify a network folder, a WebDAV server, or a Windows server running Microsoft SharePoint® Services to host a Shared Review, Acrobat 9 Pro offers a much easier alternative: host files (at no charge) on Acrobat.com. When using Acrobat.com for shared reviews, you can also allow reviewers to open and share the PDF in a live chat session. To initiate a Shared Review: 1.Choose Comments > Send for Shared Review. Select the first pull-down option to have Acrobat.com manage the review. Note that you can select the check box to enable the file for page view sharing and chat collaboration 2.The recipient will receive an e-mail with a link to Acrobat.com to download the review PDF. 3.Reviewers will need to create a Acrobat.com login to participate. Acrobat will create a new file titled [Filename]_review.pdf locally and all comments from reviewers will be managed through Acrobat.com and tracked in the Acrobat Tracker under the Comments menu. 4.Participants can add comments with Acrobat (or Reader) Comment and Markup tools. In the review PDF highlight bar area, choose Check for New Comments to see if others have added reviews or add your own comments and click Publish Comments to add to the shared review. E-mail-based review To send a file for E-mail Review to Adobe Reader 7, 8, or 9 users, choose Comments > Attach for E-mail Review in Acrobat 9 Pro. Acrobat opens the Send By E-mail For Review wizard. Follow the directions of the setup wizard, which guides you through selecting a PDF for e-mail review, choosing participants, and even automatically generates an e-mail message that instructs recipients how to participate. You can also customize the e-mail message if you wish. For more detailed information on setting up e-mail-based or shared reviews, see Complete Acrobat 9 Pro Help. Exporting and Importing Comments You can choose to send a file containing only the comments (rather than the commented PDF itself) to a customer when the PDF file is too large to send as an e-mail attachment. After you add your comments to the PDF file, export them in Form Data Format (FDF), or XML-based FDF (XFDF). FDF files contain only comments and entries in form fields, and thus are smaller than PDF files. The customer then imports the comments into their own copy of the PDF for viewing. When an FDF file is opened or imported into a PDF document, the comments appear in the proper places on the pages. This means that FDF files from multiple reviewers can be imported into one central copy of the PDF document, and the comments of all reviewers can be viewed at once. To export comments as an FDF file: 1.Open the PDF document and add your comments. 2.Choose Comments > Export Comments > To File. 3.Choose whether to export an FDF or XFDF file, name the exported comments file, and then click Save. To import comments into a PDF document, double-click the FDF file (indicated by the .fdf file extension) Acrobat automatically opens the original PDF file and imports the comments from the FDF file. If Acrobat is unable to locate the associated PDF, you will be asked to locate it manually. Alternatively, you can open the original PDF document and choose Comments > Import Comments, select the FDF file containing the comments, and click Select. Adobe Creative Suite 4 Printing Guide 129 Summarizing All Comments in a PDF Summarizing comments is a convenient way to get a synopsis of all the comments associated with a PDF document. The summary function creates a new PDF document that is independent of the one that contains the original comments. To summarize comments in a PDF file, choose Comments > Summarize Comments. Select options in the Summarize Options dialog box, and click OK. You can choose to create only a list of comments, or have Acrobat create a summary that contains a thumbnail of each page, with connecting lines identifying the source of each comment. Acrobat generates a new PDF of the summary, which you can save, print, or send to your customer—just like any PDF file. To print a summary of comments in a PDF file, simply print the summary PDF file you’ve already created. Or in the original commented PDF, choose Comments > Print With Comments Summary, select layout options, and click OK. An alternative to printing summary comments is to print the original note pop-ups (as they appear on the page) along with the pages themselves. To print with open pop-ups, do the following: 1.Choose Comments > Comment View > Open All Pop-Ups. 2.Open Preferences, and choose Print notes and pop-ups in the Commenting panel of the Preferences dialog box. 3.Choose File > Print, and choose Document and Markups from the Comments And Forms menu. Collaborate Live Collaborate Live is a free service available in Acrobat 9 Pro, which allows you to invite up to two other participants to review a PDF in an online session. In a Collaborate Live session, the participants view a document with a live chat window. When sharing pages, the document page and magnification is shared with all participants, so that everyone sees the same part of a document. When one participant changes the view magnification, or navigates to another page, all participants are taken to the new magnification or page. To initiate a Collaborate Live session: 1.Choose File > Collaborate > Send & Collaborate Live. The Acrobat.com screen is displayed; click the Next button. 2.Sign in with your Adobe ID and click Sign In. If you don’t yet have an Adobe ID, click the Create Adobe ID hyperlink to create one. 3.A form appears, containing e-mail text and fields for recipients’ e-mail addresses. Enter recipients’ addresses in the To and CC fields, and modify the e-mail text if you wish. 4.By default, the PDF is sent as an attachment to the e-mail. Alternatively, you can check the option to store the file on Acrobat.com and just include a hyperlink to the file. Acrobat adds the suffix “_collab.pdf” to the filename, saves this new PDF in the same directory as the original file, creates the e-mail, and launches your default e-mail program. You can further edit the text of the e-mail before you send it, if you wish. Recipients must have Acrobat 9 Pro or Adobe Reader 9 to participate. The recipient opens the PDF attached to the e-mail (or follows the hyperlink to the file on Acrobat.com). The recipient can sign in as a guest or use their Adobe ID, if they have one (an Adobe ID is not required). Any participant can click Start Page Sharing to begin the collaborative review. The view is synchronized for all participants: any participant can navigate through document pages and change magnification, and the view changes for all participants. All participants can enter text in the Document Chat window, but if a participant adds markups such as sticky notes, other participants cannot see them. Each participant can save the PDF with their own markups, however. The advantage of Collaborate Live is that all participants can see the same content onscreen simultaneously, while chatting (or talking by telephone), without having to subscribe to a dedicated Web conferencing service. Share My Screen with Adobe ConnectNow For more functionality than the Collaborate Live feature, consider using the Share My Screen feature available through ConnectNow. Adobe ConnectNow is a personal web-conference tool Adobe Creative Suite 4 Printing Guide 130 for conducting real-time meetings on your desktop. Attendees join the meeting by logging in to a web-based meeting space from their own computers. In a ConnectNow online meeting, you can share your desktop, use live chat, share online whiteboards, and many other collaboration features. Because you have Acrobat 9 Pro, you are able to initiate a ConnectNow session and invite two other participants to an online session. To start a meeting: 1.Choose File > Collaborate > Share My Screen. Adobe ConnectNow is launched; if you do not have the necessary Flash plug-in, you will be prompted to permit its installation. 2.If prompted, enter your Adobe ID and password, or create an ID if you don’t have one. 3.Once you are in your meeting room, you can invite participants. The URL of the meeting room is displayed for you, and you are provided a link to send e-mail invitations to participants. When other attendees have joined your meeting room, you can share your computer screen, chat with attendees onscreen, take notes, and use other meeting features. ConnectNow also includes a whiteboard feature, allowing you to mark on the screen to call attention to important details. All participants can enter text in the Shared Notes pod on screen, and each participant can save the contents of the Shared Notes pod to a text file on their computer for future reference. For more information, choose Help > Adobe ConnectNow Help while in the meeting room. To attend a meeting: 1.Participants can click the meeting URL in the e-mail invitation, or type the Meeting URL in the address box of a browser. 2.Participants enter their Adobe ID and password, or log in as a guest if they do not have an Adobe ID. Once you are in the meeting room, you can chat with attendees, take notes, and use many other meeting features. In addition, you can pass control to another participant so they have the permissions of a presenter. This can be useful when you want to show a customer how to fix a file, giving you the ability to guide them through necessary steps. Acrobat.com and Related Free Services Acrobat.com is a free set of online services, including file sharing and storage (up to 5GB), PDF conversion from popular file formats, the Buzzword collaborative online word processor, and ConnectNow web conferencing. You can create and share documents, communicate in real time, and simplify working with others. Services include: • Share: By sending URLs instead of e-mailing large attachments, you and your team can access files from any computer in the office or on the road. • Adobe Buzzword: A new online word processor, perfect for writing reports, proposals, and anything else you need to access online or work on with others. It looks and behaves like your normal desktop word processor, but it operates inside a web browser, so there’s no installation required. • My Files: Store any kind of file online (not just PDFs) for access from anywhere. • Create PDF: Upload up to 5 Microsoft Word, Excel, and other file formats to create PDFs online. If you need more conversions, purchase Acrobat 9 Pro or Standard, or sign up for the Create PDF Online service. • ConnectNow: Free online Web conferencing for you and two other participants. Other options are available through Connect Pro, with programs for those wishing to allow up to 15 participants, or commercial versions of Connect that allow up to 1,500 participants and provide call-in and session recording features. For more information on these programs, go to the Connect Pro web page: http://www.adobe.com/products/acrobatconnectpro/ Adobe Creative Suite 4 Printing Guide 131 Printing PDF Files Most of the options in the Adobe Acrobat 9 Pro Advanced Print Setup dialog box are the same as for other Adobe applications. When you’re ready to print the document, the Acrobat 9 Pro Print dialog box contains the settings you need to ensure successful output. However, you should first set up the document’s pages correctly for your requirements and processes. Choose File > Print Setup (Windows) or File > Page Setup (Mac OS) to see these settings. To print an Adobe PDF document: 1.Choose File > Print. Print Dialog Choose page range and scale factor, as well as options for printing the content of comments and forms. Click the Advanced button for more options. 2.Choose your output device from the Name menu (Windows) or the Printer menu (Mac OS). 3.Specify which pages to print, page-scaling options, page rotation, and other basic settings. Acrobat displays a preview of the document that reflects the settings you’ve selected. The Print dialog box displays the standard print settings for the operating system you’re using, based on the PPD of the selected printing device. 4.To view printing tips, click the Printing Tips button to launch a browser and access helpful tech notes on the Adobe website. Click the Summarize Comments button to generate a summary of comments in the PDF. For more output options, click the Advanced button. Advanced Print Setup Choose options for composite or separated output (depending on the capabilities of the output device), as well as marks and bleeds, PostScript options, and Color Management controls. 1.In the Output panel, specify settings for color separations., Transparency Flattener preset, screening, and whether to simulate overprint. You also have access to Ink Manager through this panel. Select the option to Print As Image only if the file is too complex to print normally. Adobe Creative Suite 4 Printing Guide 132 If you are outputting separations, click the printer icon to the left of an ink name to suppress printing for that color. In Composite mode, select the option to Simulate Overprinting to more realistically render overprinting attributes, if you are printing to a device that does not natively support overprint. Choose the appropriate Transparency Flattener preset. Note that frequency and angle options will most likely be overridden by functions in the imaging device. Click the Ink Manager button to remap spot colors or to convert spot colors to process for output. 2.In the Marks and Bleeds panel, select the marks you want to print. Choose from several styles of marks—InDesign, Illustrator, and QuarkXPress. Include registration marks, color bars, and page information. 3.In the PostScript Options panel, select the settings for your workflow. Consult the documentation for the printing device to determine the appropriate PostScript options for correct output. 4.In the Color Management panel, set options for handling color: • Color Handling: Determines if color management is used and whether it happens in the application or at the printing device. • Acrobat color management: Enables you to select an ICC Profile that describes the target output device. • Printer Color Management: Sends the document’s color data along with the document profile directly to the printer and lets the printer convert the document to the printer color space. The exact results of the color conversion can vary among printers. • Same as Source (No Color Management): Discards all color management information and sends device color to the printer. • Color Profile: Determines the profile used for handling colors during printing. • Output Color: Specifies the output color based on the settings in the Output panel of the Advanced Print Setup dialog box. • Apply Output Preview Settings: Simulates the print space defined by the device identified in the Simulation Profile menu of the Output Preview dialog box. (Choose Advanced > Print Production > Output Preview.) This option allows you to simulate the appearance of one device on another. Color Management Choose color handling options, color profiles, and profiles for proofing simulation. 5.If you want to save the settings you’ve selected in the Advanced Print Setup dialog box, click Save As, and then name the settings file. If you do not save the settings, Acrobat retains them only as long as the document is open. Click OK to close the Advanced Print Setup dialog box, and then click OK to print. Setting Up a PPD file A PPD file contains information about the output device, including printer-resident fonts, available media sizes and orientation, optimized screen frequencies, resolution, and color output 133 capabilities. Selecting the PPD that corresponds to your PostScript printer or imagesetter provides Acrobat with the available settings for the output device, and determines which PostScript information is sent to the printer. For example, fonts listed in your PPD file reside in the printer, so they are not downloaded unless you explicitly include them. Because so many advanced printing features depend on the PPD for information, it’s important to set up the correct PPD before you print. For best printing results, Adobe recommends that you obtain the latest version of the PPD file for your output device from the manufacturer. Be sure to store PPDs in the location specified by the operating system. This is usually accomplished by the installer for the printer driver. For details, consult the documentation for your operating system. Note: Certain PPD features commonly found in imagesetter PPD files won’t be accessible from the Advanced Print Setup dialog box. To set these printer-specific features, use the Printer Properties dialog box (Windows) or the Print Center (Mac OS). See “Setting Adobe PDF printer properties” in Complete Acrobat 9 Pro Help. Setting PostScript Options You can set options for a particular PostScript printer, such as how to handle nonresident printer fonts and how to download Asian fonts. In addition, if a PDF file contains device-dependent settings, such as halftones and transfer functions, you can send these settings in the PostScript output to override the default settings in the printer. To use these options, you must be connected to a PostScript printer or have a PostScript printer driver installed with a PPD selected. To set PostScript options in the Advanced section of the Print dialog box: 1.Choose a PostScript printer as your target printer and choose File > Print. In the Print dialog box, click the Advanced button and choose PostScript options in the dialog: 2.For Font And Resource Policy, specify how fonts and resources are downloaded (consult the printer documentation for appropriate font download setting): • Send at Start: Downloads any fonts and resources that are used on more than one page at the beginning of the document. (This is the fastest option, but it uses more printer memory.) • Send by Range: Downloads fonts and resources with the first page that uses them, and removes them when they are no longer needed. (This option uses less memory.) • Send for Each Page: Downloads the fonts and resources with each page on which they are used. (This option uses the least amount of printer memory.) 3.For Print Method, choose the PostScript level of the output device. 4.Select other options in the PostScript panel as desired: • Download Asian Fonts: Prints documents with Asian fonts that are not installed on the printer or embedded in the PDF file (they must be present on the system). • Emit CIDFontType2 as Emit CIDFontType2 (for PostScript v. 2015 and up): Preserves hinting information in the original font. Otherwise, CIDFontType2 fonts are converted to CIDFontType0 fonts, which are compatible with a wider range of printers. • Emit Undercolor Removal/Black Generation: Retains undercover removal (UCR) and black generation settings if they exist in the PostScript file. Black generation calculates the amount of black to be used when trying to reproduce a particular color. UCR reduces the amount of cyan, magenta, and yellow components to compensate for the amount of black added by the black generation. Because it uses less ink, UCR is generally used for newsprint and uncoated stock. • Emit Halftones: Retains any halftone information in the file. Note that your RIP may override this information. • Emit Transfer Functions: Retains the transfer functions traditionally used to compensate for dot gain or dot loss that may occur when an image is transferred to film. With this option, Acrobat keeps the transfer functions as part of the file, and applies them to the file when it is output. Adobe Creative Suite 4 Printing Guide 134 • Emit Flatness: Uses the currently chosen flattener setting. • Emit PS Form Objects: Generates PostScript form objects for Form XObjects within the PDF file. This option may reduce the overall size of the print job, but it will increase the printer memory required. Form XObjects are used to create a single description for complex objects, such as background objects, that can appear many times in a single document. • Discolored Background Correction: Addresses severe discoloration issues that might occur during printing, such as white backgrounds printing as yellow. 5.Click OK to exit the PostScript Options dialog box. Then click Print in the main Print dialog box. Creating a PostScript File Acrobat 9 Pro can convert a document to a PostScript file, which can include full Document Structuring Conventions (DSC) comments or not, depending on how you create the file. To create a PostScript file for imposition or other print processes, you can attain better results by using the Save As command. Choose PostScript from the Save As Type (Windows) or Format (Mac OS) menu. You can include full DSC comments and other advanced information, including device dependency, font inclusion, comments, and language level. For more information, see “Converting to PostScript or Encapsulated PostScript (EPS)” in Complete Acrobat 9 Pro Help. In Windows only, you can print a PostScript file from Acrobat through the Print dialog box by selecting the Print To File option. Acrobat creates a device-dependent PostScript file, which may not fully meet DSC conventions. It is recommended that you use the Save As command to create a PostScript file for compatibility with more devices and workflow systems. Note: To create device-independent PostScript files from Acrobat, you must save as PostScript or EPS format. To create PostScript Level 1, save as EPS. Working with Asian fonts Select Download Asian Fonts in the Advanced Print Setup dialog box if you want to print a PDF document with Asian fonts, but the fonts are not installed on the printer or embedded in the document. (Embedded fonts are downloaded whether or not this option is selected.) You can use this option with a PostScript Level 2 or later printer. To make Asian fonts available for downloading to a printer, make sure that you have downloaded the fonts to your computer using the Custom or Complete option during installation of Acrobat. If Download Asian Fonts is not selected, the PDF document prints correctly only if the referenced fonts are installed on the printer or embedded in the document. If the printer has similar fonts, it substitutes those. If there are no suitable fonts on the printer, it prints text in Courier. If Download Asian Fonts does not produce the results you want, print the PDF document as a bitmap image. Printing a document as an image may take longer than using a substituted printer font. Note: Some fonts cannot be downloaded to a printer, either because the font is a bitmap or because font embedding is restricted in that document. In these cases, the printer substitutes the font, and the printed output may not match the screen display. Printing documents with layers Many documents include layers, which provide flexibility by separating content. For example, graphics may be on one layer and text on another. A multilanguage file may contain separate layers for the text for each language. You can export layers that are created in Illustrator CS4 and InDesign CS4 into a PDF 1.5 and later file. Acrobat 9 Pro can show, hide, and print layers that were created in the original application. You can rename and merge layers in Acrobat, change the properties of layers, and add actions to layers through the Options menu on the Layers tab. Layers are supported in PDF 1.5 and later. Typically, if a layer is visible, it prints. Layers Acrobat 6.0 and later support layers. Both InDesign and Illustrator can create layered PDF files, which can be useful for managing multiple versions of content. Click the eyeball icon to control the visibility of a layer, and check the layer options to control printing of layers. To merge layers, choose Merge Layers from the Options pop-up menu at the top of the Layers pane. To view layers in a PDF document: 1.Click the Layers tab or choose View > Navigation Tabs > Layers. Note that the “eyeball” visibility icon is not the only influence over whether a layer prints. In the Layers panel, select a layer and choose Options > Layer Properties to determine whether a layer is set to print. 2.Click the eye icon to hide a layer’s content, or click the empty box to display a layer’s content. This setting temporarily overrides the settings in the Layer Properties dialog box. 3.From the Options menu on the Layers tab, choose one of the following options: • List Layers For All Pages: Shows every layer across every page of the document. • List Layers For Current Page: Shows layers only on the currently visible page. • Reset To Initial Visibility: Resets layers to their default state (as saved in the original file). • Apply Layer Overrides: Displays all layers, regardless of the settings in the Layer Properties dialog box. You must first turn off this command before you can click the eye icon to hide a layer. You can edit layer properties in the Layer Properties dialog box, but changes (except changes to the layer name) do not take effect until you choose Options > Reset To Initial Visibility. Note: You cannot save the view of a layered PDF file that you create by using the eye icon on the Layers tab to show or hide layers. When you save the file, the visibility of the layers automatically reverts to the initial visibility state. If you want to save a different view of a layered PDF file, you must change the default state of the layers in the Layer Properties dialog box. To edit layer properties, choose Layer Properties from the Options menu in the Layers tab. You can rename layers and set the default initial visibility, print, and export states. You can combine the default state setting, the visibility settings, and the print setting to control when a layer is visible and when it prints. If a layer contains a watermark, for example, you may want the layer to be invisible on screen but always print and export to other applications. The layer does not need to be listed in the Layers tab, because Acrobat handles all the state changes automatically. Note: A locked icon in the Layers tab indicates that a layer is for information only. You can’t change the visibility of a locked layer; the only property you can change is its name. To merge one or more layers in a PDF document, choose Merge Layers from the Option menu in the Layers tab, and then specify the target layer into which they merge. Merged layers acquire the properties of the target layer. Once you have merged layers, you cannot restore the original layers. You can also flatten the layers in a PDF document, consolidating all the visible layers. When you flatten a layered PDF document, Acrobat does not preserve content that is hidden or layers that are not visible. Once you have flattened layers, you cannot restore the original layers. You can edit content in a layered PDF file just as you would in any other PDF document. The selection tools recognize and select any content that is visible, regardless of whether the content is on a selected layer. Normally, when you print a PDF document that contains layers, only the content that is visible on screen prints. However, the creator of a layered PDF document can make exceptions—for example, stipulating that layered watermarks must print or confidential information must not print—regardless of its visibility on screen. If the document is designed to print differently from the way it currently appears on screen, a warning message appears in the Print dialog box. The thumbnail view of the page in the Print dialog box always shows the page as it will print. Note: Not all RIPs support layered PDF files. When you print the PDF file directly to a RIP that doesn’t support layered PDF files, all layers may print, including hidden layers. To change print overrides for a layer: 1.Click the Layers tab. 2.Select a layer and then choose Layer Properties from the Options menu. 3.In the Layer Properties dialog box, choose one of the following from the Print menu: • Always Prints forces the layer to print. • Never Prints forces the layer not to print. • Prints When Visible matches printed output to on screen visibility. Links to known issues and resources KnowledgeBase: http://www.adobe.com/support/acrobat/ Print Resources: http://www.adobe.com/print/ Adobe PDF Print Engine: http://www.adobe.com/products/pdfprintengine/ Partner Program for Print Professionals: http://www.adobe.com/go/printserviceprovider. Find out about the wide range of benefits, including technical support, software, and promotional assistance Adobe has to offer print and pre-press professionals. Adobe Systems Incorporated 345 Park Avenue, San Jose, CA 95110-2704 USA www.adobe.com Adobe, the Adobe logo, Acrobat, Clearly Adobe Imaging, the Clearly Adobe Imaging logo, Illustrator, ImageReady, Photoshop, and PostScript are either registered trademarks or trademarks of Adobe Systems Incorporated in the United States and/or other countries. Mac and Macintosh are trademarks of Apple Computer, Inc., registered in the United States and other countries. PowerPC is a registered trademark of IBM Corporation in the United States. Intel and Pentium are trademarks or registered trademarks of Intel Corporation or its subsidiaries in the United States and other countries. Microsoft, Windows, and Windows NT are either registered trademarks or trademarks of Microsoft Corporation in the United States and/or other countries. All other trademarks are the property of their respective owners. © 2008 Adobe Systems Incorporated. All rights reserved. 11/08


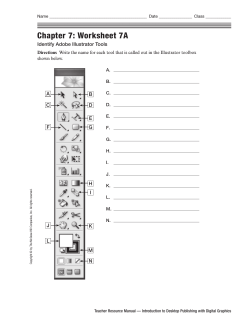


© Copyright 2026