
CHEFS! THEME 1: Becoming a Chef
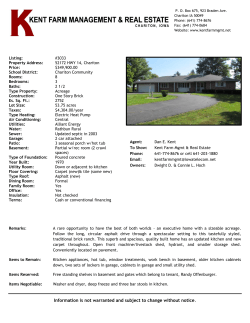
CHEFS!
THEME 1: Becoming a Chef
CHEFS!
THEME 1: Becoming a Chef
p.3 Session 1
Kids in the Kitchen
p.12 Session 2
Half-Way to a Chef
p.20 Session 3
Chefs in the Kitchen
Session 1:
BECOMING A CHEF
Kids in the Kitchen – Lesson Plan
Objectives:
Chefs have an opportunity to meet each other and the facilitator.
•
Chefs create and discuss rules and expectations for behaviour in the kitchen to ensure safety.
•
Chefs become familiar with the kitchen layout and equipment. RESOURCES
About Me
DISCUSSIONS & ACTIVITIES
Introduce yourself, the program, and welcome the children. Give the children
a chance to share information about themselves by completing the About Me
information sheet. essential
TIME
(MINUTES)
15
Ask the children to brainstorm some possible rules for behaviour in the kitchen.
Kitchen Rules & Safety Ask them to tell you why the rules are important. Use flipchart paper and colourful
markers to record their suggestions. Review the Kitchen Rules and discuss rules the
in the Kitchen
20
KIDS IN THE KITCHEN
•
children may not have thought of. Discuss the tips listed on Safety in the Kitchen.
essential
A Kitchen Scavenger Hunt can be a good activity to help children gain confidence
in the kitchen. Assign the children to pairs and assign each pair a couple of common
pieces of kitchen equipment to find. If they need a visual example of the items, hold
up examples or provide them with pictures of the items. essential
10
Mystery Food Can
Introduce the Mystery Food Can and explain that, each day, the children will need
to identify different foods inside the can with only their sense of touch and smell.
optional
5
How to Set a Table
During the recipe preparation, or before the children begin eating, demonstrate how
to properly set a table. optional
5
Kitchen Equipment
Scavenger Hunt
Try these recipes (45 mins):
•
Strawberry Apple Salsa
•
Crunchy Cinnamon Crisps
•
Egg in the Hole
TEACHING MOMENT:
The About Me activity can function as
an icebreaker. Children may find this
activity more fun if you assign them
to pairs and ask them to interview
each other using the About Me
questions.
It’s a Fact! In the Middle Ages, spices like cinnamon, cloves, and nutmeg were worth their weight in gold. Many of the
first European explorers were searching for places where spices grew and many wars were fought to control the trade in
spices.
3
KIDS IN THE KITCHEN
BECOMING A CHEF
Session 1:
Kids in the Kitchen – Resources
About Me
Welcome to CHEFS! Please share a little bit about yourself and
your cooking experience.
Name:_____________________________________________ Age:________ Male___ Female___
How much experience do you have cooking? a. none b. some c. lots
Name something you enjoy cooking:____________________________________________________
Name something you would like to learn to cook: ________________________________________
The breakfast of your dreams is: _______________________________________________________
The dinner of your dreams is: _________________________________________________________
Do you have a favourite fruit or vegetable?______________________________________________
Do you consider yourself a healthy eater?________________________________________________
Do you exercise or play any sports?_____________________________________________________
Have you ever tried a vegetarian meal?__________________________________________________
What would you typically drink with a meal?_____________________________________________
4
Kitchen Rules
•
Please leave all bags and coats outside of the kitchen/work area.
•
If you have a cell phone or iPod, leave it at home or in your bag.
•
Work together as a team, with all members respecting each other.
•
When somebody is speaking to you, stop what you are doing and listen.
•
Keep a positive attitude with no bad moods or bad language; this keeps the kitchen fun for everybody.
•
Always practice safety in the kitchen by following the safety rules.
•
Before you work with food, place your hair net on your head, put your apron on and wash your hands.
WHEN TO WASH YOUR HANDS:
•
Before and after cooking.
•
After handling raw meat.
•
After using the washroom.
•
After sneezing or blowing your nose.
KIDS IN THE KITCHEN
Kids in the Kitchen – Resources
BECOMING A CHEF
Session 1:
5
KIDS IN THE KITCHEN
BECOMING A CHEF
Session 1:
6
Kids in the Kitchen – Resources
Safety in the Kitchen
TO PREVENT ANY ACCIDENTS IN THE KITCHEN, FOLLOW THESE TIPS:
•
Clean up any spills right away.
•
Keep drawers, cupboard doors, and the oven door closed at all times.
•
Baggy clothes or sleeves could catch on fire around the stove or get caught up in kitchen equipment.
•
Turn pot and pan handles towards the back of the stove to avoid bumping into them.
•
Always handle electrical cords with dry hands.
•
Be sure to wash any utensil that falls on the floor before using it again.
•
Use a non-slip mat or wet cloth under a cutting board to stop it from slipping while you are chopping.
•
After you use a knife, lay it along side of the sink, not in the water where you may not see it and cut yourself.
•
When carrying a knife in the kitchen carry it along side your body pointing down.
•
If a knife starts to fall off the counter, step back. Do not try to catch it before it hits the floor.
•
When you lift the cover off a hot pot, lift it so the steam goes to the back of the stove to prevent a steam burn. Use an oven mitt, too.
•
Use pot holders or oven mitts (no dish towels) when
handling hot pots, pans or baking sheets.
•
Use only “microwave safe” cookware in the microwave. Never use tin foil or anything made of metal.
Mystery Food Can
Source: Adapted from Kids in the Kitchen
Objective: The Mystery Food Can is a great way for student’s to learn about foods using various sensory skills.
Materials/Resources:
•
Mystery Can (large coffee tin with plastic lid)
•
Large sock
•
Large elastic band
•
Various foods (eg. pineapple, kiwi, star fruit, cannelloni, couscous, whole coconut, pomegranate, dried beans or
lentils, wild rice, etc.)
* To make the Mystery Food Can, cut off both ends of the coffee can, cover bottom end with plastic lid. Cut toe end off sock
and stretch open end over can, securing with an elastic. Alternately, trace and attach a cardboard circle with a hole big
enough for a child’s hand to fit in the center. Decorate the outside of the can with food pictures.
KIDS IN THE KITCHEN
Kids in the Kitchen – Resources
BECOMING A CHEF
Session 1:
Instructions:
•
Without the children seeing, place a mystery food in the can.
•
Have the children take turns putting their hands into the can and touching the food.
•
Have the children describe the food’s shape and texture.
•
Ask the children to guess what it might be.
•
Remove the food and observe the shape and color.
•
Ask the children if they can identify the food and share anything that they know about the food.
•
After taking the food out of the can, wash and cut the foods that can be cut and observe the inside. Does it
have skin? A core? Seeds or a pit? Is it juicy or dry?
•
Have the children sample the food, if possible.
Note: This is a great ice breaker game
7
KIDS IN THE KITCHEN
BECOMING A CHEF
Session 1:
Kids in the Kitchen – Resources
Kitchen Equipment Scavenger Hunt
Source: Adapted from KICK – Kids in the Community Kitchen Program Toolkit
Objective: To help chefs become familiar with kitchen tools & equipment and where they are kept in the kitchen.
Chefs learn where items are stored so that they can be more self–directed when working in the kitchen.
Materials/Resources: Scavenger Hunt Lists
•
Lists of various kitchen items
•
Collected examples of some items to show participants
Instructions: Arrange the kids into groups of two. Provide each group of two with a Scavenger Hunt List. Show
the groups what some of the the items might look like. Instruct the participants to travel through the kitchen
cupboards, etc. to find all of the items on their list.
Example items for Scavenger Hunt Lists:
8
•
Wooden spoon
•
Spatula
•
Drinking glass
•
Plate
•
Set of cutlery (spoon, fork, knife)
•
Mixing bowl
•
Cutting board
•
Rolling Pins
How to Set a Table
•
Place the dinner plate or bowl on the table in front of the chair.
•
The knife goes to the right of the plate with the sharp side of the blade facing towards the dinner plate.
•
If you need a spoon for the meal, it goes beside the knife.
•
The dinner (big) fork is placed on the left side of the plate.
•
If you are having a salad, the small fork goes to the left of the dinner fork.
•
The glass goes on the right, above the knife and spoon.
•
The side plate for bread or rolls is placed just above the forks.
•
The dinner napkin is folded and lies to the left of the forks.
KIDS IN THE KITCHEN
Kids in the Kitchen – Resources
BECOMING A CHEF
Session 1:
9
RECIPES
BECOMING A CHEF
Session 1:
Kids in the Kitchen – Recipe
Strawberry Apple Salsa
with Crunchy Cinnamon Crisps
Skill Level: Easy
Prep time: 10-15 minutes
Serves: 8
Cook time: 5 minutes
INGREDIENTS
2 cups frozen whole strawberries or
or 1 pound container of fresh berries, sliced
2 medium apples
1 tbsp honey or maple syrup
zest from half an orange (use the fine side of a grater)
juice of ½ an orange
2 tbsp mint, freshly chopped (optional)
4 whole wheat or whole grain tortillas
1 tbsp white sugar
1 tsp cinnamon
Strawberry Apple Salsa Instructions:
1. Spread berries on a large sheet pan to thaw (about 30 minutes).
2. In a large bowl, mash the berries with a potato masher.
3. Wash, core and dice the apples and add to berries.
4. Add the honey or maple syrup, zest and juice.
Crunchy Cinnamon Crisps Instructions:
1. Using a pastry brush, brush tortillas with a little bit of water, then sprinkle with the cinnamon sugar mixture.
2. Cut each tortilla into wedges using a pizza cutter or a chef’s knife and place them on a baking sheet.
3. Bake 400 °F about 5 min or until golden brown.
4. Let tortillas cool then use them to scoop up the salsa.
EQUIPMENT/TOOLS NEEDED:
10
•
Apple corer / slicer
•
Paring knife
•
Zester or grater
•
Chef’s knife
•
Measuring spoons
•
2 mixing bowls
•
Cutting board and
non–slip mat
•
Pastry brush
•
Pizza cutter
•
Potato masher
•
Cooling rack
•
Baking sheet
This ingredient may be available locally in New Brunswick. Find local food at www.buylocalnb.ca
Egg in the Hole
Skill Level: Easy
Prep time:12–25 minutes
Serves: 1
Cook time:5 minutes
INGREDIENTS:
1 slice whole wheat bread
1 egg
1 tsp margarine
1 pinch of salt
1 pinch of pepper
RECIPES
Kids in the Kitchen – Recipe
BECOMING A CHEF
Session 1:
INSTRUCTIONS:
1. Spread 1 tsp margarine over both sides of bread.
2. Make a hole in the middle of the bread (about 2 inches in diameter) using a cookie cutter or by ripping it with
your fingers.
3. Place bread on a hot frying pan.
4. Break an egg into the bread hole.
5. Turn the element down to low and cook until the egg white turns white.
6. Flip bread and continue to cook until the yolk is firm (you may need to puncture the yolk with a knife).
7. Slide onto your plate and enjoy.
Note: For multiple servings, use a griddle or several large frying pans.
EQUIPMENT/TOOLS NEEDED:
•
Frying pan or large griddle
•
Bread knife
•
Spatula
This ingredient may be available locally in New Brunswick. Find local food at www.buylocalnb.ca
11
Half-Way To Chef – Lesson Plan
Objectives:
•
Chefs become familiar with the names and functions of different types of kitchen equipment.
•
Chefs learn the meaning of cooking terms and how to read a recipe.
•
Chefs learn how to properly measure wet and dry ingredients.
HALF-WAY TO CHEF
BECOMING A CHEF
Session 2
TIME
RESOURCES
DISCUSSIONS & ACTIVITIES
A variety of uncommon
kitchen items
Display a variety of kitchen items which the children may not be familiar with. Ask
if they know what they are called, what they do, or how to use them. Allow the
children to demonstrate, with supervision, where appropriate. Ask them to think
of some meals that may involve the items in preparation. essential
10
The Chefs learn cooking terms through friendly competition and a familiar game
format. essential
25–30
(MINUTES)
Cooking Terms Jeopardy
Glossary of Cooking
Terms
Measuring Tips
How
to Measure
Reading a Recipe
Recipe Preparation Steps
Measuring = Math + Food. Gather measuring spoons and cups along with
basic kitchen ingredients, like water and flour. Discuss the different units of
measurement (eg. cup, tablespoon, etc.). Demonstrate the techniques for
measuring wet and dry ingredients. Ask for volunteers to join you and ask them to
measure varying amounts of wet and dry ingredients. essential
15
Use one of the suggested recipes below to illustrate the guidelines for reading a
recipe. You may wish to use the Reading a Recipe Resources to guide your lesson.
Ask the children to brainstorm and think of possible scenarios that might result
if you misread a recipe; for example, you might end up with chunks of carrots in
your carrot muffins, if you don’t read that they need to be grated. essential
10
Try one of these recipes (30 mins):
•
Whole Wheat Blueberry Pancakes
•
Tuna Wrap
TEACHING MOMENT:
Maintain a positive atmosphere
by providing encouragement and
asking questions of the children
that call upon their knowledge and
experiences.
It’s a Fact! Tender tuna belly makes one of the most popular kinds of sushi – raw fish on ice. Huge, top–quality tuna
12
fish are flown to Japan and sold for thousands of dollars to make sushi.
Half–Way To Chef – Resources
Cooking Term Jeopardy!
Objective: The chefs become familiar with cooking terms to help them read and make recipes in upcoming
sessions.
BECOMING A CHEF
Session 2:
•
Flip chart paper/marker board
•
Markers
•
Glossary of Cooking Terms
Instructions:
Provide each participant with a copy of the Glossary of Cooking Terms. Review the terms as a group, allowing the
children to take turns reading out the terms and definitions. Assign the participants to to two or three teams (they
may wish to create team names).
HALF-WAY TO CHEF
Materials/Resources:
Collect the Glossary of Cooking Terms copies from the children and begin the game.
Read the definition of a term and allow the teams to raise their hands when they know the answer. The first to
answer correctly receives points. Just as in Jeopardy, answers are given in question format; for example, ‘What is
bake?’
Keep a tally of points on flip chart paper or a marker board.
Note: It may be helpful to have a complete list of the terms written on a marker board or otherwise visible, depending on
how familiar the children are with the terms.
13
BECOMING A CHEF
Session 2:
Half–Way To Chef – Resources
Glossary of Cooking Terms
Bake: To cook in an oven that is preheated according to the recipe.
Batter: a mostly fluid mixture of liquid, flour & other ingredients.
HALF-WAY TO CHEF
Beat: To mix two or more ingredients together usually in a fast circular motion, until the mixture is smooth.
Boil: To heat a liquid in a pot on the stove until bubbles rise & break the surface and steam rises from the liquid.
Broil: To cook under the top element in an oven.
Chill: To refrigerate until cold.
Chop: To cut food into small pieces.
Combine: To mix two or more ingredients together.
Cream: To make soft, smooth & creamy by beating.
Dice: To cut food into small cube like pieces.
Dough: A fairly solid mixture of liquid, flour, and other ingredients.
Drain: To strain away unwanted liquid.
Drop: To scoop dough with a spoon, making rounding piles.
Fold: To gently mix ingredients using a spatula, moving food from the center & lifting towards the edge of the bowl.
Grease: To rub the inside of baking dish with butter, margarine or baking spray to prevent food from sticking.
Knead: To work dough into a uniform mixture by pressing, folding, and stretching.
Mash: To squash food with a fork or potato masher.
Melt: To heat a solid food until it becomes liquid.
Preheat: To prepare an oven to the correct temperature before baking.
Scrape: To use a rubber spatula to remove as much of the mixture as possible from a bowl or pot.
Shape: To use hands to roll or mould dough into a certain shape.
Simmer: To cook liquids over very low heat.
Slice: To cut food into thin sections using a sharp knife.
Toss: To mix lightly until combined.
14
Measuring Tips
It is important to measure ingredients correctly to get good results. You will need to know:
•
The right tools.
•
How to measure (some ingredients are measured using different methods).
•
Abbreviations for measurements.
Dry Measuring Cups: These are often cups that fit one inside the other.
They are metal or plastic. They are used to measure dry ingredients like
flour or sugar and soft solids like margarine. They come in sizes: ¼ cup (50ml), 1/3 cup (75ml), 1/2 cup (125ml), 2/3 cup (150ml), 3/4 cup (175ml),
and 1 cup (250ml).
HALF-WAY TO CHEF
Half–Way To Chef – Resources
BECOMING A CHEF
Session 2:
Liquid Measuring Cups: These are clear glass or plastic cups with
measurement markings painted on the outside. They have a handle and
spout or lip to make pouring easy. They will hold 1 cup (250ml), 2 cups
(500ml) or 4 cups (1L).
Measuring Spoons: Measuring spoons usually come in a set. They can
be used for dry or liquid measure. They come in sizes that measure: ¼ teaspoon (1ml), 1/2 teaspoon (2ml), 1 teaspoon (5ml), and 1 tablespoon (15ml).
Dry Ingredients:
1. Spoon the ingredients into the measuring cup.
2. Level off any extra with the straight edge of a knife or spatula.
Liquid Ingredients:
1. Place the liquid measuring cup on a level surface.
2. Bend down so your eye is the level with the markings of the cup.
3. Fill the cup to the right level.
Note: When measuring 1 tablespoon (15ml) or less, fill the appropriate measuring
spoon to the top without letting it spill over.
15
HALF-WAY TO CHEF
BECOMING A CHEF
Session 2:
Half–Way To Chef – Resources
Reading a Recipe
A recipe is a set of instructions for preparing a certain food or drink. Although they can be written in different forms,
they usually follow the same guidelines:
Recipe Title or Name: can include a description of the recipe like “healthy tropical smoothie”.
Servings or Portions: How many portions the recipe makes and sometimes the size of the portion.
Time: Tells you how long it takes to prepare the recipe. Sometimes includes cooking time
Ingredients: A list of items you will need to prepare the recipe.
•
A recipe may say “optional” beside an ingredient which means it is not critical but can be added for extra flavour
or to make the recipe a little different.
•
Ingredients can be without a specific measurement as in “salt to taste” or a “pinch” of salt or spice.
•
The ingredient might be listed with certain instructions of what you need to do with it before using it in the
recipe. “one egg, beaten” or “1 cup carrots, grated.”
Directions or Method: The steps for preparing the recipe must be followed in the order they are given. Preheating
the oven is often the first step.
Serving Suggestions: Ways to serve the food you are preparing or other foods to serve with it.
Nutritional Analysis: Number of calories & other nutrients per serving.
Measurement Short Forms:
cup = c = 250 ml pound = lb = 454 g
16
teaspoon = tsp = 5 ml
tablespoon = Tbsp = 15 ml
Recipe Preparation Steps
Before you start a recipe, read the recipe and the directions, to make sure that you have:
•
All the ingredients called for
•
The necessary kitchen tools & equipment
•
Enough time to complete the recipe (preparation time & cooking time)
Be prepared by always following these steps:
•
Remove any jewelry on your hands and wrists
•
Keep your hair tied back or wear a hair net
•
Wear an apron to keep your clothes clean
•
Clean and clear a work area
•
Set out necessary ingredients and equipment
•
If necessary, preheat the oven
•
Wash your hands
HALF-WAY TO CHEF
Half–Way To Chef – Resources
BECOMING A CHEF
Session 2:
Now, you are ready to start cooking. Remember to follow the directions exactly and in the order they are given.
Ingredients need to be measured accurately for best results.
17
RECIPES
BECOMING A CHEF
Session 2:
Half–Way To Chef – Recipe
Whole Wheat Pancakes
Skill level: Easy
Prep time: 15 minutes
Serves: 12 (2 pancakes each)
Cook time: 2–3 minutes/pancake
INGREDIENTS:
1½ cups all purpose flour
1½ cups whole wheat flour
3 tbsp granulated sugar
2 tbsp baking powder
½ tsp cinnamon
1 tsp salt
2 eggs
3 cups 2% milk
3 tbsp vegetable oil
1 ½ tsp vanilla
1 cup blueberries
INSTRUCTIONS:
1. In a medium bowl, stir together flours, sugar, baking powder, salt and cinnamon.
2. In a separate large bowl, whisk together eggs, milk, oil and vanilla.
3. Pour dry ingredients over wet and very gently mix batter until just combined. Do not over–mix. Let mixture sit
for 2 minutes.
4. Heat a large non–stick skillet or griddle over medium to high heat. Spray with non–stick spray then pour ¼ cup
batter for each pancake, scatter blueberries on top.
5. Cook 1½ – 2 minutes or until bubbles on top break, bottom of pancake should be golden when you flip it.
6. Turn and cook for 1 minute longer or until lightly browned.
EQUIPMENT/TOOLS NEEDED:
18
•
Medium mixing bowl
•
Large mixing bowl
•
Dry measuring cups and measuring spoons
•
Liquid measuring cup
•
Whisk
•
Non stick skillet or griddle
•
Non stick spray
•
Spatula
This ingredient may be available locally in New Brunswick. Find local food at www.buylocalnb.ca
Tuna Wrap
Skill level: Easy
Prep time: 10 minutes
Serves: 4 (1/2 wrap per serving)
Cook time: N/A
INGREDIENTS:
2 large whole wheat or whole grain tortillas
1 can tuna in water – drained
1 tbsp olive oil mayonnaise
2 tbsp mild salsa
¼ cup celery – minced
½ cup reduced fat grated cheddar cheese
RECIPES
Half–Way To Chef – Recipe
BECOMING A CHEF
Session 2:
INSTRUCTIONS:
1. Mix tuna with salsa, mayo and celery in a mixing bowl.
2. Lay tortillas flat on the counter and divide the tuna mixture between them, spreading with a spoon or spreader
to almost reach the edges.
3. Sprinkle each tortilla with half of the cheese.
4. Fold opposite ends of tortilla in about 2 inches (this will keep your filling from falling out) then roll up the tortilla
from one non folded side to the other. Cut in half and serve.
EQUIPMENT/TOOLS NEEDED:
•
Cutting board and non slip mat
•
Chefs’ knife
•
Mixing bowl
•
Measuring spoons
•
Dry measuring cups
•
Grater
This ingredient may be available locally in New Brunswick. Find local food at www.buylocalnb.ca
19
Chefs in the Kitchen – Lesson Plan
Objectives:
•
Chefs are able to safely use a chef’s knife and a paring knife.
•
Chefs participate in cleaning up.
CHEFS IN THE KITCHEN
BECOMING A CHEF
Session 3:
TIME
RESOURCES
DISCUSSIONS & ACTIVITIES
Samples of knives (bread,
chef’s, paring, etc.)
Types of Knives
Discuss the differences between kitchen knives (eg. bread knives have serrated
edges to keep bread in place when slicing, chef’s knives have a rounded blade
for rocking back and forth when chopping vegetables, paring knives are used
to peel and slice small foods, etc.) essential
10
How to Use a
Chef’s Knife
How to use a
Paring Knife
Slicing, Dicing, & More
Demonstrate the proper technique for using a chef’s knife and a paring knife.
Involve the children in the demonstration by guiding them through the proper
steps to ensure safety. Demonstrate the difference between chopping, dicing,
slicing, etc. essential
Note: it is best practice to use a cutting board with non–slip mats underneath when cutting.
20
Now that the children have learned all of the important chef skills, they can
celebrate by making their own chef’s hat! optional
10
Lead the kids in a game of Kitchen Charades. Write cooking terms, kitchen
equipment, and even food names on cards, place them in a hat, and have the
children pick one with their eyes closed. The child will then act out the word,
for the opposing team to guess. optional
20
Guide the children in cleaning the kitchen after the food has been served. They
will be responsible for cleaning up in future sessions. optional
15
How to Make a
Chef’s Hat
Kitchen Charades
Dish & Kitchen Clean Up
Try these Recipes (45 mins):
•
Apple & Cheddar Quesadillas
•
Broccoli Salad
(MINUTES)
TEACHING MOMENT:
Allow the children to practise
a skill like peeling or chopping
as soon as they learn it.
It’s a Fact! Ever see cattle chewing and chewing and chewing? They’re chewing cud, partially digested food that they
20
burp up from their stomachs. Cattle burp up a big blob of cud from their stomachs and give it another round of chewing
before swallowing it again to finish digesting it.
Type of Knives
Paring knife
Chef's Knife
Paring Knife
Serrated Bread Knife
Utility Knife
Utility Knife
Carving Knife
CHEFS IN THE KITCHEN
Chefs in the Kitchen – Resources
BECOMING A CHEF
Session 3:
21
CHEFS IN THE KITCHEN
BECOMING A CHEF
Session 3:
Chefs in the Kitchen – Resources
How to Use a Chef's Knife
How to use a Chef’s knife:
Understanding how to hold a chef’s knife properly is 80% of using it safely. The other 20% of safety lies is how you
hold the food being cut.
•
Grip the knife at the base of the blade. Pinch the back of the blade between your thumb & index finger – the
way you might hold a credit card out to someone.
•
Grip the food with the tips of your fingers slightly curled under (like a claw). Your fingers will act as a guide for
the knife.
•
You can either drag the knife towards you with the blade tip and the point touching the board the whole time
when you are slicing through a food.
•
Or you can rock the knife back and forth on the curved surface of the knife’s tip, using the back edge or “heel” of
the blade to do most of the cutting.
•
To dice or mince the food, keep the same grip on the knife and place your other hand flat on top of the knife.
Rock the knife back & forth over the food with the tip staying on the board
How to use a Chef’s knife video.
http://www.stellaculinary.com/knife–skill–video–techniques–hd
22
How to Use a Paring Knife
A paring knife is a much smaller knife with a blade that is between 2½ and 4 inches long. For many, it is the most
used knife in the kitchen.
•
Used for peeling fruit and vegetables
•
Cutting or slicing small foods like garlic, berries etc.
•
Mincing small items like garlic
•
Removing the skin from onions, citrus fruits etc.
•
Detailed or controlled cutting
HOW TO PEEL
•
Open your working hand flat and lay the paring knife diagonally across your fingers with the blade facing in.
Close your hand around the handle with your index finger wrapping around the top edge of the knife’s handle.
•
Hold the apple in your left hand (or right if you are a lefty). Your right thumb also holds the apple as you begin
to push the knife along the inside of the flesh.
•
Now your thumb becomes your knife’s guide. Your thumb moves around the apple as your left hand turns the
apple. Always keep your thumb ahead of the blade to protect yourself from being cut.
CHEFS IN THE KITCHEN
Chefs in the Kitchen – Resources
BECOMING A CHEF
Session 3:
Visit http://queencleopatra.hubpages.com/hub/paring-knife---different-kinds-of-knife for lots more information
on knives and a video on how to use a paring knife.
23
CHEFS IN THE KITCHEN
BECOMING A CHEF
Session 3:
Chefs in the Kitchen – Resources
How to Make a Chef's Hat
Objective: New chefs have fun creating their own chef’s hat to either take home or wear in upcoming sessions.
Materials/Resources: (per hat)
•
2 sheets of legal size (8.5 x 14 inches) sheets paper
•
Scissors & ruler or measuring tape
•
Tape & stapler
•
Crayons, markers, or pencil crayons
•
Stickers (optional)
•
White Bristol board cut to: 23 x 4 inches
Instructions:
1. Have the children decorate their hat bands first, then set aside.
2. Tape the two pieces of paper together on the 8½ inch side, overlapping edges ½ inches. hen fold this long
sheet vertically into an accordion fold all the way along the length. One inch pleats work well but you can
make them smaller if you like.
3. Gently unfold the accordion folded paper and stretch it out to fit 1 inch inside the top edge of the hat band.
Tape the bottom of the paper onto the back side of the band all along the edge allowing for some pleating. If
there is excess paper that doesn’t fit into the band, just cut it off leaving a ½ inch excess.
4. Overlap the back edges of the hat band until it fits the child’s head. Staple the band in place and tape the accordion file together where the edges overlap.
This is a great photo opportunity for your group of chefs!
Adapted from
www.ehow.com
24
Kitchen Charades
Source: Adapted from Kids in the Kitchen
Objective: This activity tests the chefs’ retention and comprehension of cooking terms and names of kitchen tools
and / or equipment.
Materials/Resources:
•
Charades cards (included)
•
Kitchen equipment/tools which will be needed for demonstration
Instructions: Before the session begins, cut out the charades cards and arrange them face down in a pile. Each
child will have a chance to choose a card from the pile and act out the term on the Charades card. You can perform
this activity as one group or divided into teams.
CHEFS IN THE KITCHEN
Chefs in the Kitchen – Resources
BECOMING A CHEF
Session 3:
25
CHEFS IN THE KITCHEN
BECOMING A CHEF
Session 3:
26
Chefs in the Kitchen – Resources
Kitchen Charades Pictures
Whisk
Mix
Mash
Roll
Boil
Bake
Sprinkle
Pour
Blend
Session 3:
Kitchen Charades Pictures
Knead
Chop
Grate
Toast
Fry
Stir Fry
Steam
Barbecue
Beat
CHEFS IN THE KITCHEN
BECOMING A CHEF
Chefs in the Kitchen – Resources
27
CHEFS IN THE KITCHEN
BECOMING A CHEF
Session 3:
Chefs in the Kitchen – Resources
Dish & Kitchen Cleanup
Rule #1: Everyone participates in clean up
This is how we will clean:
•
Separate garbage into their proper bins (wet, dry, compost, refundables, recycling, etc. as appropriate).
•
Collect all dishes and utensils in clean bins.
•
Scrape and rinse any food from dishes.
•
Fill one sink with hot soapy water (one squirt of dish soap). Use the other sink for running hot water
when you need to rinse the dishes.
•
Set up a draining board or rack next to the rinse sink.
•
Use a dish cloth, brush, or scouring pad to wash the dishes.
•
Rinse the dishes in the rinse sink by holding them under hot, running, rinse water and inspecting for any
missed spots. Be sure to rinse away all soap suds.
•
Dry the dishes with a clean dish towel.
•
All dishes, utensils, and equipment need to be put away in the proper cupboards and drawers.
•
Using a fresh sink of hot, soapy water, clean the counters/workspace as well as the stove top. Dry the
surfaces after cleaning.
•
Place all dirty laundry (soiled aprons, wash cloths, drying cloths, etc.) in the appropriate laundry basket.
Before anyone leaves for the day, please be sure that the kitchen is clean.
28
Apple and Cheddar Quesadillas
Skill level: Moderate
Prep time: 10 minutes
Serves: 11
Cook time: 5 - 10 minutes
INGREDIENTS:
1 small whole wheat tortilla
½ apple or pear, washed and sliced
¼ cup reduced fat cheddar cheese, grated
½ tsp white sugar
¼ tsp cinnamon
1 non–stick spray
RECIPES
Chefs in the Kitchen – Recipe
BECOMING A CHEF
Session 3:
INSTRUCTIONS:
1. Combine cinnamon and sugar in a small bowl.
2. Grate cheese and set aside.
3. Thinly slice apple leaving the skin on.
4. Lay the apple or pear slices over half of the tortilla.
5. Sprinkle with cinnamon sugar.
6. Cover the apples with grated cheese and fold the tortilla in half.
7. Heat griddle or frying pan over medium to high heat.
8. Spray griddle lightly with non–stick spray, then place tortilla on top.
9. Cook until the bottom tortilla is slightly browned. Lightly spray top of tortilla with non–stick spray and gently flip
it over. Cook until the other side browns and slide it onto a cutting board.
10. Use a pizza cutter or chef’s knife to cut tortilla into wedges.
EQUIPMENT/TOOLS NEEDED:
•
Skillet or griddle
•
Spatula
•
Grater
•
Paring knife
•
Cutting board and non–slip mat
•
Pizza cutter or Chef’s knife
•
Small bowl
•
Measuring spoons
This ingredient may be available locally in New Brunswick. Find local food at www.buylocalnb.ca
29
RECIPES
BECOMING A CHEF
Session 3:
Chefs in the Kitchen – Recipe
Broccoli Salad
Skill level: Easy
Prep time: 25 minutes
Serves: 6
Cook time: N/A
SALAD INGREDIENTS:
3 cups broccoli stems and florets, diced
½ cup dried cranberries
½ cup sunflower seeds
½ red pepper, diced fine
1 carrot, peeled and grated
1 can mandarin oranges in juice, drained
DRESSING:
½ cup light mayonnaise
2 tbsp reduced–fat sour cream
1 tbsp white vinegar
2 tbsp sugar
INSTRUCTIONS:
1. Whisk dressing ingredients together and let sit for at least 10 minutes for sugar to dissolve, then whisk again.
2. Combine salad ingredients in a bowl, and toss with dressing until well combined.
EQUIPMENT/TOOLS NEEDED:
30
•
Cutting board and non slip mat
•
Vegetable peeler
•
Can opener
•
Strainer
•
Paring knife
•
Chef’s knife
•
Whisk
•
2 mixing bowls
This ingredient may be available locally in New Brunswick. Find local food at www.buylocalnb.ca


© Copyright 2026