
Steps for a successful project:
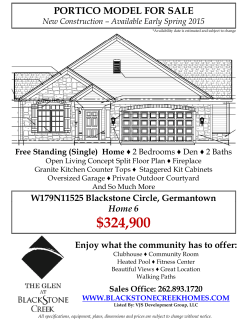
Accesory Buildings - Typical Acceptable Locations
*
DRI VE
GARAGE
NOTE: Property line must be accurately located by
the property owner. I f neccesary, a survey
may be required.
5' Minimum
Without Firewall
Accessory Structures
must not be located over
recorded easments.
SETBACK @ CORNER LOT
VARI ES WI THI N
THE CI TY
ALLEY
GARAGE
5' Minimum or
2' Minimum
With Firewall
Limited Overhang
Before You Build:
Zoning Requirements
Steps for a successful project:
Plan your project with city code requirements in mind.
Property owners and their contractors are legally accountable
for conforming to applicable code requirements, and it is their
responsibility to ensure that the project is planned, designed
and built according to those code requirements. A summary of
common code requirements for a typical garage or shed can be
found on this handout, but it may not address every condition
of every project. Questions regarding specific projects or
requirements should be directed to the Permit and
Development Center. You may visit in person, or by calling
515-283-4200 during business hours.
24' Minimum
**
DRI VE
2' Minimum
Limited Overhang
GARAGE
5' Minimum
Without Firewall
GARAGE
2' Minimum
With Firewall
Limited Overhang
BLDG LI NE
VARI ES
WI THI N
THE CI TY
DRI VE
DRI VE
HOME
HOME
*
HOME
VARI ES
WI THI N THE CI TY
VARI ES
WI THI N
THE CI TY
*
STREET
DRI VE
STREET
GARAGE
HOME
*
**
HOME
Prepare a site plan showing how your project will be
located on the property. You must indicate the location of
your project and other structures on the site by showing
accurate dimensions in all directions. I ndicate the dimensions
of the yard (back yard, side yard, etc.) in which your project
will be located and also indicate all known easements. The
county assessor's web site contains useful information,
including a basic site plan and lot dimensions that can be of
assistance as you develop your new site plan.
(http:/ / www.assess.co.polk.ia.us)
VARI ES
WI THI N THE CI TY
*
approach & sidewalk permit required
no approach premit required
Setback requirements:
For projects located in the rear yard:
Unattached garage or shed accessory buildings in the rear yard must be located at least five (5) feet from the side and rear lot lines, and three
(3) feet from the house. The building may not be located in a required setback adjoining the street or over a recorded easement. I f a properly
constructed firewall is erected, the clearance to lot lines may be reduced to two (2) feet to the property line, and less than three (3) feet from
the house. Four (4) inch maximum overhang or projection from the wall is permitted when the wall is within two (2) feet from the property
line.
For projects located in the side or front yard:
Garage or shed accessory buildings (unattached or attached) which are not entirely in the rear yard must maintain the same setback as required
for the dwelling. This dimension varies between zoning districts. Please consult with the Development Zoning Division of the Permit and
Development Center for specific requirements for your property.
Size restrictions:
Area:
Every lot is entitled to accessory buildings or sheds in the rear yard having a total area of 576 square feet. Larger structures are permitted,
provided that the total areas of accessory garage or shed buildings do not exceed the lesser of 1000 square feet or 20 percent of the rear yard
area. The 20 percent limitation does not apply if the property is more than one acre in size.
Use restrictions:
The use of an accessory garage or shed is limited to the storage of private motor vehicles and incidental personal equipment. Use for other
purposes is not permitted unless the building is demonstrated to conform to all applicable code requirements.
Floor
Sloping Grade
Maximum
17'-0"
Maximum
17'-0"
Maximum
17'-0"
Maximum Building Height
Mansard Roof
Apply for your plan review and Building Permit. Bring
two copies of your site plan and construction documents to
the Permit and Development Center. Provide the PDC staff with
the name address and phone number of the property owner,
contractor, and designer.
Private Garage
Communi ty Development Department
Permi t and Development Center
602 Robert D. Ray Dri ve
Des Moi nes, I A 50309
Obtain your Building Permit. Permit fees will vary
depending on the size of your project. Separate electrical,
mechanical or plumbing permits are necessary if included in
your project. Licensed contractors may be required, unless the
homeowner qualifies for an owner's permit.
Height and Stories:
Accessory garage or shed buildings are limited to a single story, and seventeen (17) feet in height. Building height is calculated as shown
below.
Gable, Hip, or Gambrel Roof Floor
Prepare your construction documents. I ndicate how you
will build your project. Detailed construction documents will
be necessary if your construction differs from the details and
limitations shown on this handout. Non-conventional
construction may require design and certification by an I owalicensed design professional.
Residential Detached
Floor
Schedule your inspections. You must notify your inspector
when the job is ready for inspection, call the inspector
between the hours of 7:30 - 9:00 AM, or 3:30 - 4:00 PM
weekdays. Ensure that your permit card is posted in an
accessible and visible location near the project. The following
inspections are required.
Slab or Footing: You must have the project inspected after
the forms have been erected, but prior to concrete placement.
Ensure that the property lines and lot corners are identified.
Framing: After the framing has been erected, and work
completed, but prior to concealment.
Final: After all work is completed, but before you occupy the
building. On many garages and sheds, the framing and final
inspection can occur at the same time if the interior is
unfinished.
I f you have any questions, need copies of ordinances
or need additional clarification, call 515-283-4200.
January, 2009
* Narrow Wall Bracing Required
See "Narrow Wall Bracing" Handout
can be found @ www.dmgov.org/ forms/ index.htm
2 X 4 pressure treated wood
or foundation redwood
1/ 2" diameter anchor bolts at 6'-0" O.C.
Embed 7" into concrete. Use minimum of
2 bolts per piece and locate one bolt not
more than 12" from each end.
Top of Floor
3.5" (Minimum)
6"
8"
Gr a d e
Concrete slab on grade
Firm undisturbed soil,remove
all debris and organic material.
Footing must extend 42" below grade.
I f garage area excees 720 square feet,
see trench footing detail.
Finish Grade should begin 6" below
siding/ wall finish and fall away @
1/ 4" per foot.
8"
Garage Framing Detail
This detail represents conventional construction. Other details are acceptable if designed by I owa licensed design professionals
Glulam
3 1/8” x 15”
24’ 0”
3 1/8” x 15”
(3) 1 ¾” x 11 ¼”
(2) GBW
3 1/8” x 16 ½ ” (3) 1 ¾” x 11 7/8”
(2) GBW
26’ 0” 28’ 0”
3 1/8” x 15”
(3) 1 ¾” x 11 7/8” 3 1/8” x 16 ½”
(2) GBW
(3) 1 ¾” x 14 7/8”
(2) GBW
Glulam
3 1/8” x 13 ½”
Microlam
(3) 1 ¾” x 11 ¼”
Microlam
(3) 1 ¾ x 11 ¼
Trench Footing Detail
Rafter size
and spacing
6 X 6 - W1.4 X W1.4
Welded wire fabric,
bend into footing
#4 Rebar
@ 18" O.C.
Horizontal
2 x 6
#4 Rebar
@ 2'-0" O.C.
Vertical
2 x 4
Size
Sand Fill
Finish Grade
Firm, undisturbed soil
Trench footing
8"
Build Up Detail
Nailer's for
sheet rock
2'-0" (Minimum)
with Firewall
Either Or
1/ 2" Ext. Grade Drywall
or 5/ 8 type "X" drywall
required from floor to
roof deck when outside
face of exterior wall is
less than 5 feet to property
line or less than 3 feet
to a dwelling'
Overhang
Limitations:
See Notes
Openings
Prohibited
less than
3 feet
Firewall Detail
Glulam
3 1/8” x 15”
Microlam
(3) 1 ¾” x 11 ¼”
(2) GBW
Gable
Wall of
Gable
Roof
Bearing
Wall of
Hip Roof
Rafter Span Table based on the current I RC
2 x 8
Siding:
I nstalled per manufacturer instructions.
Microlam
(3) 1 ¾” x 11 ¼”
(2) GBW
2 x 10
Double 2X4 plate. Overlap at corners
and offset splices 4'0"" or more. Face
nail with 16D nails at 16" O.C. End nail
to studs with (2)-16D nails.
Header
Location
Glulam
3 1/8” x 13 ½”
2 x 12
2 X 4 studs at 16" O.C. or 24" O.C.,
depending on siding support requirements.
See siding manufacturers data for spacing.
18’ -0” Opening
22’ 0”
22’ 0’ 28’ 0”
Property line
Minimum 1 X 4 rafter ties
(non-load bearing) at 48" O.C.
Face nail to rafters with
(3)-8D nails
8"
2-0" to 4'-0" max.
Greater height
with design by
Structural Engineer
Rafters: See tables at right for size,
species, and spacing. Use metal rafter
ties. I f rafters are spaced differently
than studs, and stud spacing is over
16' O.C., solid blocking must be added
below double plate. Trusses: Spacing
and attachment clips per truss design.
Provide truss certification from
manufacturer.
Firm, undisturbed soil
1'-0"
"Approved or Grade Stamped" Roof Sheathing:
I nstalled per manufacturer's instructions.
Roof covering:
I nstalled per manufacturer's instructions.
17' Maximum Height
3'-6"
8" Concrete trench
footing required for
garages exceeding
720 sq. ft. in
floor area
12
3 Minimum
Garage Door Header Table
16’ -0” Opening
Garage
Width
(Minimum)
Ridge board of at least one inch nominal thickness
and not less in depth than the cut end of the rafter
or gusset the rafters. Trusses: Spacing and
attachment per truss design. Provide truss
certification from manufacturer.
Span
Top of Ridge
6"
Finish grade
Before you Build: Notify Iowa One-Call of pending excavation for utility locates
48 hours in advance: 1-800-292-8989
(Minimum)
Garage Building Details
Maximum Clear Span per Lumber Species and Grade
30 psf snow load, no ceiling attached to rafters, 10 psf dead load
Spacing
( inches)
12”
16”
24”
12”
16”
24”
12”
16”
24”
12”
16”
24”
12”
16”
24”
o.c.
o.c.
o.c.
o.c.
o.c.
o.c.
o.c.
o.c.
o.c.
o.c.
o.c.
o.c.
o.c.
o.c.
o.c.
Douglas
Larch
#2
9-5
8-2
6-8
13-9
11-11
9-9
17-5
15-1
12-4
21-4
18-5
15-1
24-8
21-5
17-6
Fir-
Hem-Fir
#1
9-8
8-9
7-1
14-9
12-9
10-5
18-8
16-2
13-2
22-9
19-9
16-1
26+
22-10
18-8
#2
8-10
8-0
6-7
13-7
11-9
9-7
17-2
14-11
12-2
21-0
18-2
14-10
24-9
21-1
17-3
#1
9-3
8-5
6-11
14-4
12-5
10-2
18-2
15-9
12-10
22-2
19-3
15-8
25-9
22-3
18-2
Southern Pine
Spruce-pine-fir
#2
9-6
8-7
7-1
14-5
12-6
10-2
18-8
16-2
13-2
22-3
19-3
15-9
26+
22-7
18-5
#2
9-1
8-2
6-8
13-9
11-11
9-9
17-5
15-1
12-4
21-4
18-5
15-1
24-8
21-5
17-6
#1
9-8
8-9
7-8
15-2
13-9
11-9
20-0
18-1
14-9
24-9
21-5
17-6
26+
25-7
20-11
Notes:
1) This table indicates commonly available lumber species. Other species are permitted,
provided the spans conform to applicable limitations as adopted by code.
2) This table assumes that ceiling joist or rafter ties are located at the bottom of the
attic space, and the attic space is not used for storage.
Notes: Overhang Limitations
12 inch maximum overhang less than 5 feet greater than 2 feet from property line
with 1 hour rating on underside less than 4 feet from property line.
4 inch maximum overhang @ 2 feet from property line.
Notes: Drywall may be used as wind bracing if it is fastened according to the following framing schedule
#1
9-1
8-2
6-8
13-9
11-11
9-9
17-5
15-1
12-4
21-4
15-5
15-1
24-8
21-5
17-6


© Copyright 2026