
Patio Planter box © 2013 August Home Publishing Co.
Patio
Planter box
© 2013 August Home Publishing Co.
Weekend Project
patio Planter Box
A couple of tools and some basic
woodworking skills are all it takes
to build this durable planter.
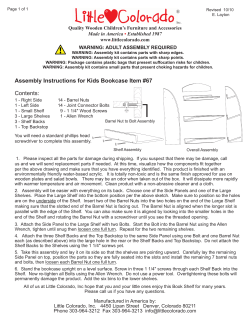
{ Easily expandable, this planter box will showcase lots of potted plants
and is easy to build.
1
WoodsmithPlans.com WS15916
I wanted a planter box to really show off the potted plants on my patio. It not only needed to look
great, but I also wanted it to be sturdy enough to
last a long time. That’s what I found in the patio
planter shown above.
It may look like a lot of other planters you’ve seen,
but it’s certainly not built like the rest. You’ll find you
won’t need to do a lot of tedious hand work or use a
lot of special tools to build this one.
It’s designed to withstand the weather so you can
use it outdoors. And since you can use construction
lumber to build it, it’s also easy on your budget.
©2013 August Home Publishing Co. All Rights Reserved.
B
making the
Legs
One of the interesting features
of this planter box is the construction of the legs. Each of the
legs is made of three separate
parts that go together to create
a solid leg post.
You’ll also notice there are four
mortises in each leg. They accept
the tenons on the side rails of the
box. They’re quite easy to make.
You won’t need to do a lot of
drilling and chopping out waste
to make these mortises. That’s
because they’re made by simply
cutting dadoes in the leg pieces.
Then when you put the three
leg pieces together, these dadoes
automatically form the mortises.
Dadoes & Rabbets. The easiest way
to cut the dadoes and rabbets is on
your table saw. A few simple setups like you see in the box below
are all you’ll need.
To make the fewest passes, set
your dado blade as wide as possible. Next, add an auxiliary fence
to the miter gauge to minimize
chipout. Then by making a series
of dado cuts at the top and bottom
of the leg face (A) and leg side (B),
LEG SIDE
A
1#/8
#/4
FILLER C
BLOCK
LEG FACE
#/4
2!/8
%/8"roundover
on outside
edge of leg face
2!/8
C
C
FILLER BLOCK
B
C
B
LEG SIDE
A
A
LEG
FACE
B
A
LEG
FACE
2#/4
18
2&/8
2#/4
2&/8
2&/8
2!/4
1!/2
1!/2
1!/2
NOTE: Four mortises are formed
when leg pieces are assembled
1!/2
Leg side piece fits into
rabbet cut on leg face
NOTE: Leg pieces are made
from 1!/2"-thick stock
a.
3
C
B
you’ll be able to size the dadoes to
the right width. The second and
third drawings at the bottom of
the page will help you do this.
Edge Rabbet. Next, I attached an
auxiliary fence to the rip fence and
cut a wide rabbet along one edge
of each leg face piece. This rabbet
captures the leg side and forms
the two outside faces of the leg.
After cutting the rabbets, I
added a decorative look by routing a 5⁄8" roundover along the outside edge of the leg face (detail ‘a’).
TOP
VIEW
FILLER
BLOCK
LEG
SIDE
3
!/8
A
!/8
LEG
FACE
%/8"
roundover
A square filler block (C) on the
inside completes the leg. You’ll
want to use waterproof glue to
hold the pieces together before
you move on to building the sides.
How-To: Rabbet & Dado Joinery
A
Aux. fence
2&/8
A
Dado
blade
B
Stop
block
a.
A
Aux.
fence
B
2!/8
2#/4
A
Dado
blade
END VIEW
A
a.
Aux.
fence
END VIEW
A
1#/8
B
B
#/4
#/4
NOTE: Cut identical dadoes
in leg side and leg face
Lower Leg Dado. Using your rip fence as a stop at
one end and adding a stop block at the other end lets
you accurately locate the dadoes on the lower leg face.
2
WoodsmithPlans.com WS15916
Top Leg Rabbet. A wide dado blade
and auxiliary fence on the miter gauge
will help you cut the top leg rabbets.
Rabbet Cut. With an auxiliary fence
attached to your rip fence, a couple of
passes will cut the rabbet along the edge.
©2013 August Home Publishing Co. All Rights Reserved.
TOP
RAIL
NOTE: Tenons on
top rails are flush
with top edge of rail
D
TOP
RAIL
D
a.
PANELS
!/2
#/8
F
F
F
SIDE
PANEL
!/2
D
E
Back
Leg
E
2!/4
2!/2
2!/8
F
#/8
#/4
D
E
!/2
#/8
F
#/8
PANEL
F
BOTTOM
RAIL
b.
10!/4
E
FRONT VIEW
(Front Leg Removed)
!/8" roundover
on front edges
E
3!/2
4!/4
NOTE: Rails are made
from 1!/2"-thick stock
BOTTOM
RAIL
!/8" roundover
E
17
21!/2
2#/4
#/8
45°
NOTE: Panels are cut
from !/2"-thick stock
2!/4
E
F
#/8
making the sides
With the legs assembled, it’s
time to make the sides. To do
this, you’ll start by making
rails and panels and then adding a top frame.
Here, it’s a good idea to make all
the pieces and dry fit them before
you glue them up. That way, there
won’t be any surprises when it’s
time to assemble the planter box.
I used a couple of different
colors of exterior house paint to
protect the wood and add contrast to my project. You can either
paint the pieces before you put it
F
TOP SECTION VIEW
together or after it’s assembled.
If you decide to paint it beforehand, be careful not to paint the
gluing surfaces.
Make The Rails. The first step is to
make the rails that will join the
four legs. After cutting the top and
bottom rails (D, E) to length, you’ll
need to center a groove along
one edge of each of the rails. This
groove will hold the side panels.
It’s easy to do. Just set your
dado blade to make a 3/8"-wide
cut. Then cut the groove like you
see in the first drawing below.
Cut the Tenons. With the grooves
cut, you can now focus your
attention on cutting the tenons
on the ends of the rails. You’ll
want to size them to fit into the
top and bottom mortises you
made in the legs.
You’ll need to use your dado
blade again for these cuts. A wide
blade setup will save you time.
I made the top and bottom
shoulder cuts first and then cut the
cheeks at the sides of each rail. The
second and third drawings below
will help you complete this step.
How-To: Rail Groove & Tenons
Aux. fence
D
D
Aux.
fence
a.
D
END VIEW
a.
Rip fence acts as stop
for shoulder cut
END VIEW
D
!/2
#/8" dado
blade
END VIEW
2!/4
2!/4
#/8
Centered Groove. Set the rip fence 1⁄2"
from the blade. Make a pass along the edge,
flip it end-for-end and make another pass.
3
a.
#/4"dado blade
D
#/8
Cutting the Top Shoulders. Using the rip fence
as a stop, adjust the blade height and cut away
the shoulder waste. Sneak up on the length.
WoodsmithPlans.com WS15916
D
#/8
Cutting Tenon Cheeks. Without
changing any settings, you can
quickly cut away the cheek waste.
©2013 August Home Publishing Co. All Rights Reserved.
!/2"-dia. x !/4"-deep counterbore
with #/16" through hole
After finishing the tenons, I
mitered the ends of each one at 45°
(detail ‘b,’ previous page). This
lets the ends of the tenons butt
against one another for stability.
Side Panels. To enclose the sides
of the box, I cut four panels (F) to
fit between the rails and the legs
(main drawing, previous page).
Then I used my router to make a
1/ " roundover along the front edge
8
of each of the panels. This gives
the sides a nice finished look when
the panels sit next to one another.
Completing the sides of the
planter box is simple. Assemble
the legs and bottom rails. Then slip
the panels into the grooves you cut
in the rails. Finally, add the top rail.
Side Panel Molding. Before moving
on to the top frame, I took a few
minutes to make molding (G) to
cover the panels along the inside
of the legs and rails (see drawing
and detail ‘a’ at right). This adds a
bit of a decorative touch and helps
hold the panels in place. But more
importantly, it keeps rain water
from pooling along the rails.
A trip to the router table is all it
takes to make this molding from a
piece of extra-wide stock. The first
two drawings below will show
you how this is done.
Top Frame. The planter box will be
subjected to all types of weather.
So it’s important to cover the top
edges and top corners of the box.
This is done by adding a flat protective top frame (H) to the box.
3!/2
#8 x 2!/2" Fh
woodscrew
TOP
FRAME
24
a.
!/2"-dia.
wood plug
H
H
5
TOP
FRAME
G
Side
panel
G
#/8
#/8"
roundover
Rail
#/8
SECTION VIEW
H
H
#8 x 1!/4"
Fh
woodscrew
24
b.
H
#/4
H
#/4
#/4
#/4
#/4
G
G
MOLDING
MOLDING
9!/2
Drill and countersink for
#8 x 1!/4" Fh woodscrew
MOLDING
G
c.
G
SECTION VIEW
3!/2
!/2"-dia. plug
1%/8
H
G
17
!/8" roundover
NOTE: Molding is
mitered in corners
!/8" round1!/2
over
Top
rail
&/8
the drawing and detail ‘b’ above.
Then fasten the frame to the top
of the legs and top rails with
long countersunk woodscrews
(detail ‘c’ above).
I used wood plugs to keep
water out of the holes. Just insert
them in place and cut them off
flush with the top frame, like you
see in the last drawing below.
Now all that’s left is to complete
the inside of the box. That means
making a shelf to hold the plants.
Since miters tend to open up
due to changes in temperature
and humidity, I decided to use
half-laps at the corners. They also
keep the sides square and add
strength to the planter box once
it’s assembled.
First, cut the top frame pieces to
length. Then use your dado blade
to cut half-lap joints at the ends.
Finally, complete the top frame
by securing the half-laps with
screws like you see illustrated in
Panel Molding & Plug Trimming
G
#/8" roundover bit
#/8"-thick
extra-wide
blank
a.
G
G
#/8
#/8
END
VIEW
#/8" roundover
Rout Roundover Edges. At the router table,
make the molding by first routing a roundover
along the edges of an extra-wide blank.
4
a.
END VIEW
After trimming
plug, sand flush
G
Cutting Molding From Blank. After routing
the roundover, it’s easy to use your table saw
to cut the molding to the desired width.
WoodsmithPlans.com WS15916
Flush Trimming Wood Plugs.
Applying tape around the plug helps
prevent saw marks on the top frame.
©2013 August Home Publishing Co. All Rights Reserved.
a.
I
SHELF
BRACKETS
(1!/2" x 15!/2")
Shelf
support
K
SHELF SLAT
!/4"-dia. x
!/2"-deep hole
J
NOTE: All parts
are made from
#/4"-thick stock
!/2
I
1!/2
1
1!/2 4!/2
I
Shelf
support
K
K
SHELF
SLAT
1(/16
!/8" roundover
on top edges
of shelf slats
#/8
SHELF
CLEAT
1
TOP
SECTION
VIEW
4#/4
K
18%/8
I
K
SHELF
CLEAT
SHELF
SLAT
#8 x 1!/4"
Fh woodscrew
b.
SHELF SLAT
K
J
2
#/4
4
5&/8
!/2
15
J
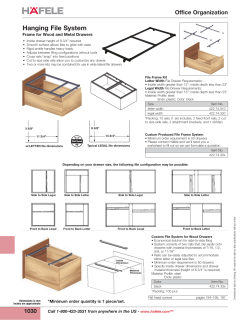
adding the
Adjustable Shelf
#8 x 1!/4"
Fh woodscrew
After the top frame and sides are
completed, there’s only one thing
left to do — add the adjustable
shelf. The shelf consists of three
slats and two cleats (drawing
above). Vertical brackets inside the
planter have holes that accept shelf
supports. These allow the shelf to
be raised and lowered to match the
height of the potted plant.
Shelf
support
!/8" roundover
SHELF CLEAT
2
Adjustable shelf bracket. The shelf
rests on supports set into four
vertical brackets screwed to the
inside of the box. Since the shelf
needs to be adjustable, I drilled
holes 1" apart, starting 41/2" from
the bottom of the bracket to
accept the shelf supports. Then
by simply moving the supports
up or down, it’s easy to quickly
K
K
SHELF SLAT
a.
Tall auxiliary
fence
a.
K
Waste
END VIEW
Waste
Fence acts
as stop
1(/16
1(/16
!/2
Make Vertical Cut First. After adding a tall
auxiliary fence to your miter gauge, stand the
slat on end and butt it against the rip fence.
5
Waste
END VIEW
Horizontal Notch Cut. After adjusting
the blade height and rip fence position,
turn the slat on edge and make the cut.
WoodsmithPlans.com WS15916
SHELF
BRACKET
J
SHELF
CLEAT
FRONT
SECTION
VIEW
Shop Tip: Clean Notches
SHELF SLAT
I
accommodate a variety of different pot sizes. The brackets are
secured to the rails with woodscrews, as in detail ‘b’ above.
Slats. Now you can turn to the
slats. It’s a good idea to measure
between the sides of the box at this
point to make sure that the shelf
is sized to be easily raised and
lowered. I cut the slats to a length
that would leave 1" of clearance
between the end of the slats and
the legs of the box.
To allow for water to drain
between the slats, I left a 3/8"
gap between each of the slats, like
you see in detail ‘a’ above. You’ll
also need to cut a notch at each
of the corners to make room for
the shelf brackets. The box below
shows you how this is done.
shelf Cleats. The cleats complete
the shelf assembly. They are
made from 3/4"-thick stock cut to
a width of 2". I made my cleats 15"
long. This allows plenty of room
between the end of the cleats and
the sides of the box.
Now all that’s left to do is to
paint and assemble the planter
box. Then you can fill it with
plants, and it’s ready for you to
enjoy for years to come.
©2013 August Home Publishing Co. All Rights Reserved.
A Longer Box
To make a longer planter box, all you’ll need
to do is extend the length of the rails and
top frame a bit. Then cut a few extra side
panels. It’s assembled the same way as the
smaller planter box. The drawing below will
help you with the dimensions and assembly
details for building the longer planter box.
Since the planter is twice as long, you’ll
also need to double the adjustable shelf
space. To do this, simply build two shelves
just like the one in the smaller planter box.
LONG FRAME E
TOP RAILS
41
NOTE: Longer planter box
requires construction of
second identical shelf
F
1
2
A
C
12
F
H
A
H
LONG SIDE
TOP RAIL
F
SHELF
BRACKETS
B
H
SHELF
SLAT
Short side
molding
38!/2
G
SHELF
CLEAT
SIDE
PANEL
D
C
Added Materials & Supplies
A Long Side Top Rails (2)1!/2 x 2!/2 - 38!/2
B Long Side Bottom Rails (2)1!/2 x 3!/2 - 38!/2
C Side Panels (8 Additional Panels)
!/2 x 4!/4 - 10!/4
D Long Side Molding (4)
#/8 x #/8 - 34
E Long Top Frame Rails (2) 1!/2 x 3!/2 - 41
F Shelf Brackets (4) # /4 x 1!/2- 15!/2
G Shelf Cleats (4)
# /4 x 2 - 15
H Shelf Slats (3)#/4 x 4#/4 - 18%/8
6
WoodsmithPlans.com WS15916
C
C
C
34
D
LONG SIDE
MOLDING
B
LONG SIDE
BOTTOM RAIL
34
38!/2
©2013 August Home Publishing Co. All Rights Reserved.
Materials, Supplies, & Cutting Diagram
Planter Box
A
B
C
D
E
F
G
H
Leg Face (4)
Leg Side (4)
Filler Block (4)
Top Rails (4)
Bottom Rails (4)
Panels (16)
Panel Molding (1)
Top Frame Rails (4)
1!/2 x 2&/8 - 18
1!/2 x 2!/4 - 18
1!/2 x 1!/2 - 18
1!/2 x 2!/2 - 21!/2
1!/2 x 3!/2 - 21!/2
!/2 x 4!/4 - 10!/4
#/8 x #/8 - 20 ft. (rgh)
1!/2 x 3!/2 - 24
I
J
K
•
•
•
•
Shelf Brackets (4)
Shelf Cleats (2)
Shelf Slats (3)
#/4 x 1!/2 - 15!/2
#/4 x 2 - 15
#/4 x 4#/4 - 18%/8
(8) !/2"-dia. Wood Plugs
(4) Shelf Supports
(8) #8 x 2!/2" Fh Woodscrews
(36) #8 x 1!/4" Fh Woodscrews
1!/2"x 5!/2"- 84" Douglas Fir (6.4 Bd. Ft.)
A
A
A
A
B
B
B
B
1!/2"x 7!/4"- 72" Douglas Fir (7.3 Bd. Ft.)
C
C
C
C
H
H
H
H
1!/2"x 7!/4"- 96" Douglas Fir (9.7 Bd. Ft.)
D
D
D
D
E
E
E
E
!/2"x 11!/4"- 96" Douglas Fir (7.5 Sq. Ft.)
F
F
F
F
F
F
F
F
F
F
F
F
F
F
F
F
G
#/4"x 7!/4"- 96" Douglas Fir (4.8 Bd. Ft.)
K
J
7
K
K
I
I
I
I
I
WoodsmithPlans.com WS15916
©2013 August Home Publishing Co. All Rights Reserved.
Materials, Supplies, & Cutting Diagram
Long Planter Box
A
B
C
D
E
F
G
H
Long Side Top Rails (2)
Long Side Bottom Rails (2)
Side Panels (8 Additional Panels)
Long Side Molding (4)
Long Top Frame Rails (2)
Shelf Brackets (4)
Shelf Cleats (4) Shelf Slats (3)
1!/2 x 2!/2 - 38!/2
1!/2 x 3!/2 - 38!/2
1!/2 x 4!/4 - 10!/4
#/8 x #/8 - 34
1!/2 x 3!/2 - 41
#/4 x 1!/2 - 15!/2
#/4 x 2 - 15
#/4 x 4#/4 - 18%/8
•
•
•
•
(2 Additional) !/2"-dia. Wood Plugs
(4 Additional) Shelf Supports
(2 Additional) #8 x 2!/2" Fh Woodscrews
(12 Additional) #8 x 1!/4" Fh Woodscrews
Note: Legs, Side Top and Bottom Rails, and Side Top Frame
Rails are the same as for the Short Planter Box
1!/2"x 7!/2"- 84" Douglas Fir (8.8 Bd. Ft.)
A
A
B
B
1!/2"x 4"- 84" Douglas Fir (4.7 Bd. Ft.)
E
E
!/2"x 6"- 96" Douglas Fir (4 Sq. Ft.)
C
C
C
C
C
C
C
C
D
#/4"x 4"- 72" Douglas Fir (2 Bd. Ft.)
F
F
G
G
F
G
F
G
#/4"x 5"- 60" Douglas Fir (2.1 Bd. Ft.)
H
8
H
WoodsmithPlans.com WS15916
H
©2013 August Home Publishing Co. All Rights Reserved.
MAIL
ORDER
SOURCES
Woodsmith Store
800-444-7527
Rockler
800-279-4441
rockler.com
Benjamin Moore
855-724-6802
benjaminmoore.com
9
Project Sources
There isn’t much else that you’ll need
to build these patio planter boxes besides the wood. The adjustable shelf
is supported by L-shaped shelf supports (33860) that came from Rockler.
To stand up to the elements, I used
waterproof, polyurethane glue to
assemble the planter boxes. Then I
painted them with an exterior house
paint from Benjamin Moore. The colors I used were “Lightning White”
and “Weston Flax.”
WoodsmithPlans.com WS15916
©2013 August Home Publishing Co. All Rights Reserved.


© Copyright 2026