
ACHIEVING THE SPLITS! By
ACHIEVING THE
SPLITS!
‘Maximum Flexibility in Minimum Time, For Everybody’
By
Robert E. Devane
http://www.martialartsinc.com
ACHIEVING THE SPLITS!
ACKNOWLEDGEMENTS
A Big Thank You to Declan Kidd, Declan Browne and Uyi Ighodaro
for all their help and for their appearances in the photographs. A
Big Thank You also to the photographer, John Casey.
Finally, A Big Thank You to Shane Devane for helping to make this
manual available on the internet.
Copyright © 2000 by Robert E. Devane
All Rights Reserved.
No part of this manual may be reproduced by any means, nor
transmitted, nor translated into a machine language without the
written permission of the author.
Disclaimer:
The author makes no warranty of any kind in regard to the content of this
document, including, but not limited to, any implied warranties of
merchantability, or fitness for any particular purpose. The author of this
document shall not be liable for errors contained in it, or for incidental or
consequential damages in connection with the furnishing of, use of, or
reliance upon information contained in this document.
2 of 70
ACHIEVING THE SPLITS!
TABLE OF CONTENTS
1)
Introduction
2)
Equipment needed
3)
Benefits of Stretching
4)
Physiology of Stretching
5)
Factors Limiting Flexibility
6)
The Warm Up
7)
How to Stretch
8)
Types of Stretching
9)
Stretching Exercises
10)
Partner Stretching
11)
Isometric and P.N.F. Stretching
12)
The Cool Down
13)
The Lower Back
14)
The Abdominals
15)
The Mental Approach
16)
The Routines
17)
Questions & Answers
18)
Conclusion
3 of 70
ACHIEVING THE SPLITS!
INTRODUCTION
When I started Martial Arts I really admired the other Martial Artists
who performed spectacular standing and aerial kicks. All of the top
competitors and performers were able to do the splits. They used
their flexibility in incredible ways. They seemed able to kick
vertically with any type of kick. They also didn’t seem to need to
warm up before performing these superhuman kicks! I also noticed
that the more flexible competitors always won the competitions and
that the least flexible competitors invariably lost. The audiences
were also amazed by spectacular displays of flexibility and this is
still the same today. Being able to do the splits is not just important
for Martial Artists only. In nearly every physical sport, flexibility is of
utmost importance. Just watch any top athlete and you should
notice that flexibility is a major part of their athleticism.
So, with all this in mind I decided that I was going to achieve the
splits. It was not always easy and many people told me that I
would never be able to do the splits. They used to say “If you
weren’t born with ‘em you won’t get ‘em”. I searched high and low
for all the stretching knowledge I could find. I must have tried every
routine and piece of equipment available. I trained very hard but
wasted a lot of time on bad and potentially dangerous information
and stretches. I received a lot of bad advice including; “Force
yourself into the splits until your hips break and when they heal you
will be able to do the splits”. I was also told, “Get your lower ribs
removed” (and these were the serious ones!). But I persevered
and after much research and discussion with top sports people I
came up with my own system. Using it I achieved the splits in a
relatively short period of time. I had done it! Despite the odds!
I continued to research and develop my system of stretching. My
research brought me in contact with many professional athletes
and coaches. We teamed up to work on the best and fastest
methods to achieve maximum flexibility. After much time we came
up with a program that we feel is the best. It gets the best results in
the minimum time. We call it “Achieving The Splits”. The reason
why we called it this is because we believe that you will be
achieving the splits once you follow our system.
4 of 70
ACHIEVING THE SPLITS!
Anyone can achieve the splits as long as they are not physically
prevented from doing so. The only situations that can prevent
someone from
achieving the splits include; injuries, deformities or disease. If you
have any doubt about your health then please consult a doctor.
This programme is not claiming that you will achieve the splits
overnight. It is a gradual process to achieve the splits. The time it
takes each individual to achieve the splits varies.
There are only three requirements to achieve the splits.
1.) A desire to achieve the splits (which you have shown by
purchasing this manual).
2.) The knowledge in this programme.
3.) A dedication to stick to this programme.
If you study the information in this programme and follow the
routine you will definitely be successful.
Robert E. Devane.
World Martial Arts Champion.
[email protected]
5 of 70
ACHIEVING THE SPLITS!
EQUIPMENT NEEDED
WHAT EQUIPMENT DO I NEED?
Do I need the latest super duper XXX5000 gadget device
stretching gizmo to achieve the splits?
The good news in a short word is “NO”. There are a lot of
stretching machines for sale at the moment, and every
advertisement is trying to say that you will get the splits quicker
with their machine and with less effort. This simply is not true. Most
of these devices are useless.
The only piece of equipment you need to achieve the splits is
yourself.
Save your money!
I achieved the splits by using this program (Achieving The Splits!),
and without having to purchase any equipment. Now don’t get me
wrong some of them can be useful. I have tried nearly every
stretching gadget and device on the market today. I found that the
useful machines can be good, but only when added to ‘Achieving
The Splits!’ program. None of them are mandatory and in fact the
only real use I found from stretching equipment is that they help
prevent boredom of routine.
Simply Put: No stretching device, machine or gadget beats
floor or partner stretching.
6 of 70
ACHIEVING THE SPLITS!
BENEFITS OF STRETCHING
WHAT ARE THE BENEFITS OF STRETCHING?
If you stick to this program, what benefits will you get from your
results?
THE BENEFITS OF STRETCHING (not in any particular order):
1) Improved Balance.
It is amazing how important balance is in all sports. By improving
your stretch you will also improve your balance. This may be
noticed when twisting, turning and switching direction.
2) Greater Strength.
Working towards achieving the splits helps to increase the power
and strength in the legs. Isometric stretching is especially good for
increasing strength. Strong legs run and move faster as well as
kicking harder.
3) Increased Range of Motion.
While you are getting lower in your stretches you are improving
your flexibility. Improved flexibility allows for a greater range of
movement. This is especially noticed in sports like Martial Arts,
gymnastics and figure skating where the competitors kick above
their heads with ease.
4) Prevention of Injury.
The more flexible you are, the less likely it is that you will strain or
tear your muscles.
5) Increased Blood Circulation.
Stretching helps the body with the transport of blood to all the
muscles. The blood carries essential oxygen and nutrients around
the whole body. This also helps with the prevention of injury as
well as promoting health.
7 of 70
ACHIEVING THE SPLITS!
6) Speeds Up Healing.
If you have tired, injured or sore muscles stretching can be very
useful to alleviate them. Stretching also helps the body with the
breakdown of lactic acid which builds up in the body during
exercise. Lactic Acid causes the tight and stiff feeling in the
muscles, and stretching helps to eliminate this soreness.
7) Encourages Relaxation.
Stretching is a great way to relax the body and the mind.
Stretching is perfect to help the body cool down after exercising.
Stretching after exercising returns the muscles to their normal state
of elongation.
8) Greater Speed.
By stretching consistently and correctly you should notice an
improvement in speed due to greater flexibility and range of
motion.
9) Improved Agility.
When you improve your flexibility your agility will also improve.
Improved agility allows you to react faster and quicker.
All of these improvements are highly useful to every sports person
and also to anyone who wishes to be in good health.
8 of 70
ACHIEVING THE SPLITS!
PHYSIOLOGY OF STRETCHING
It is not necessary to have a doctorate in anatomy or physiology to
achieve the splits! However, a basic understanding of the muscles
and how they work can help.
Muscles:
There are three types of muscle, Cardiac muscle (the heart),
Smooth muscle (the internal organs) and Skeletal muscle. Skeletal
muscle is attached to and moves our bones. Skeletal muscle is
under our conscious control and is described as voluntary muscle.
The muscle is composed of many strands of tissue called
Fascicles. Each fascicle is composed of Fasciculi (muscle fibers).
Fasciculi are composed of Myofybrils and in turn these are
composed of sacromeres. All of the muscles fibers are surrounded
by a sheath of connective tissue. The connective tissue extends at
each end of the muscle to form tendons. The muscle is attached to
an immovable bone by the tendon. This end is referred to as the
origin. The other end is attached to a bone that moves (also by a
tendon). This end is called the insertion. When you stretch, the
muscle fiber is pulled out to its full length, sacromere by
sacromere. The total length of a stretched muscle is a result of the
number of fibers stretched.
Joints:
The main joints involved to achieve the splits are the ball and
socket joints found where the top of the femur (thigh bone) joins
the hip. The top of the femur has a ball-shaped part which fits into
the socket of the hip bone. The ball and socket joints allow for a
greater range of movements then the hinge joint (knees and
elbows).
Movement:
Limbs are moved by the contraction of muscles across a joint.
Most muscles work in pairs where one muscle of the pair moves a
bone one way and the other muscle moves it back. Muscles which
have opposing effects are called antagonistic muscles.
9 of 70
ACHIEVING THE SPLITS!
FACTORS LIMITING FLEXIBILITY
The following is a list of factors which may be preventing your
flexibility. Read down through them and try to eliminate the ones
that you have control over.
Internal Limiting Factors:
1)
2)
3)
4)
5)
6)
7)
8)
9)
The type of joint (not every joint is meant to be flexible)
The internal resistance within a joint (may be dependent
on genetic factors)
Bony structures which limit movement
The elasticity of the muscle tissue (muscles that were
injured may not be as elastic)
The elasticity of the tendons and ligaments (ligaments
attach muscle to muscle and do not stretch much.
Tendons attach muscle to bone and should not stretch at
all)
The elasticity of the skin (the skin has a small degree of
elasticity)
The ability of a muscle to relax and contract to achieve the
greatest range of movement (achieved through practise)
The temperature of the joint and associated tissues
(muscles and joints are more flexible when body
temperature is 1 to 2 degrees higher than normal)
Muscle mass (heavily developed muscles may hinder
flexibility)
External Limiting Factors:
1)
2)
3)
4)
The temperature of the location (warm locations make
stretching easier)
The time of day (most people find it harder to stretch in
the morning and easier to stretch in the evening)
The condition of the muscle/joint (injured muscles and
joints are generally less flexible)
Age (as a general rule children are more flexible than
Adults)
10 of 70
ACHIEVING THE SPLITS!
5)
6)
7)
8)
Gender (as a general rule females are more flexible than
males)
The person’s ability to perform a particular exercise
(practise helps solve this one)
The person’s commitment to & motivation for achieving
flexibility
The restrictions of any clothing or equipment
11 of 70
ACHIEVING THE SPLITS!
THE WARM UP
Before starting any stretching program it is important to first loosen
up the muscles and joints and then to warm them up using
cardiovascular exercise. This serves many purposes the main
ones being the prevention of injury and also the maximizing of
results.
Before you start the warm up it is important to loosen up first.
Loosening up the muscles and joints:
By loosening up your muscles and joints first, you increase the
blood flow around the body and prepare the body for the oncoming
warm up, thus preventing injury and stiffness.
Start by rotating all your joints and limbs slowly in both directions.
Work from your head to your feet making sure to rotate the
following:
Head, Shoulders, Arms, Wrists and Fingers, Waist, Hips, Knees,
Ankles and Toes.
Next you may perform some light stretches such as the calf
stretch, quad stretch, hamstring stretch and butterfly stretch (see
descriptions and photos).
NOW YOU ARE READY TO WARM UP. What is warming up?
Warming up is any exercise or activity that helps to raise your
heart rate and increase your body temperature. Good examples of
warming up include; running, skipping, cycling, dancing, sparring,
playing soccer, etc.
How long should I warm up for?
Exercise can be performed for upwards of five (5) minutes. The
basic rule is that when you are sweating you are warm enough to
stretch. The warmer you are, the better your stretch will be, and
the lower your risk of injury. However make sure not to overdo the
exercising or you may tighten up your muscles and force them to
shorten thus making it harder to stretch. Many runners and cyclists
have very poor flexibility because they work so much on
12 of 70
ACHIEVING THE SPLITS!
strengthening their muscles, and they do not stretch them back to
their normal length after exercising. If you are a sports person try
to use exercises that are ‘sport specific’. For example if you are a
martial artist then spar, kick or perform a kata to warm yourself up.
If you are a dancer then work on your dance moves and routines.
The same applies to all other sports people – use your sport to
warm yourself up before stretching and therefore you will not only
increase your flexibility but you will also become better at the sport
that you require greater flexibility for!
13 of 70
ACHIEVING THE SPLITS!
HOW TO STRETCH
Before we start talking about types of stretches it is important to
understand how to stretch first. We have broken this section into a
few different headings to help you to further understand how the
stretching process works and to maximise your results.
How often do I need to stretch?
In order to gain maximum results it is important to stretch three (3)
times per week. This can be spaced out throughout your week e.g.
Mondays, Wednesdays, Fridays or Tuesdays, Thursdays and
Saturdays.
You can also stretch everyday. However, if you are stretching
everyday you should take between one (1) to two (2) days off from
stretching per week just to let your muscles rest and recuperate.
How hard should I stretch?
There are two (2) main types of pain that you may feel when you
stretch. The first type is a warning pain. Warning pains tell you that
you may injure your muscle(s) if you continue stretching. You get
this type of pain if your muscles are injured, overworked or if you
are stretching to hard.
The other type of pain is a stretching pain. This is simply the
sensation that you get when you are stretching near to your
maximum. This pain is normal it is more similar to the sensation of
lifting weights to the point of fatigue. You need to feel the stretch in
order to advance.
With time you will be able to tell the difference between pains. ‘If in
doubt get out’ (of the stretch). If you feel a warning pain come out
of the stretch slowly. If you feel a stretching pain then try to relax
the muscle.
If you are stretching three (3) days per week then you can stretch
hard and try to increase your maximum stretch. If you are
stretching more then three (3) days per week make sure that every
session is not a hard session e.g. Monday increase your maximum
stretch, Tuesday maintain your maximum stretch, Wednesday
increase, Thursday maintain etc.
Never force a stretch instead always relax into the stretch. The
more relaxed you are the better the stretch will be.
14 of 70
ACHIEVING THE SPLITS!
How long should I hold a stretch for?
In order to get any results from stretching it is important to hold the
stretch for at least ten (10) seconds. This does not mean that when
you start the stretch you start to count to ten (10). It means that
after you start the stretch and when you are at your maximum
stretch then start to count for ten (10) seconds. Make sure to vary
your routine and experiment by holding your stretch for longer
periods of time e.g. thirty (30) seconds, sixty (60) seconds etc. In
order to increase you stretch always do what feels hardest e.g. if
holding a stretch for ten seconds is easy then increase the stretch
or increase the time that the stretch is held for.
How many sets of each stretch should I perform?
Each stretch should be performed three (3) times each. Take a
quick break in between each stretch not lasting longer then sixty
(60) seconds.
How do I breath when stretching?
I have seen many people hold their breath and turn purple when
stretching and only come out of the stretch in order to catch their
breath! You don’t want to do this. Breathe as normally as possible
in through your nose and out through your mouth. Concentrate on
your breathing more so then on your stretch and this can help you
to relax. The more relaxed you are the better your stretch will be.
Every time you exhale try to relax more and increase you stretch.
How do I increase my splits?
If every time you stretch you try to increase your previous stretch
by only one quarter of an inch, it will be a very short period of time
until you can do the full splits. Take things gradually and relax into
every stretch. Follow the rest of this program and make sure that
you are consistent and you will achieve your goals.
15 of 70
ACHIEVING THE SPLITS!
TYPES OF STRETCHING
1.) Ballistic stretching:
Involves using a limb or body momentum to force a stretch
beyond its normal range. (e.g. Bouncing). This kind of
stretching can cause injury and is not recommended.
2.) Dynamic stretching:
Involves the gradual movement of a limb, increasing the
range of movement. (e.g. swinging). Dynamic stretching can
be used to loosen up the limbs.
3.) Passive (static) stretching:
Involves holding a stretch with the use of some other part of
your body, apparatus or partner.
4.) Active stretching:
Involves holding a stretching with just the use of muscles
involved in the stretch. E.g. raising your leg and holding that
position by using only your leg muscles
5.)Isometric stretching:
Involves the contraction of the muscles while being
stretched.
16 of 70
ACHIEVING THE SPLITS!
STRETCHING EXERCISES
There are literally thousands of types of stretching exercises. A lot
of them are dangerous to your muscles and joints and many are
just plain useless. This section is strictly devoted to the useful and
most effective stretching exercises so you do not have to waste
time on the bad ones. The following stretching exercises are listed
in order, starting with the easiest and ending with the hardest.
Make sure to take your progress gradually as you do not want to
injure yourself through haste.
The Calf Stretch:
See Figure 1.0
The calf is the muscle on the rear of your lower leg. It is used when
you flex or point your foot. In sports it is extensively used when
running, jumping etc.
Figure 1.0
How it’s done:
To stretch your left calf place your right leg in front of your left leg
and face a wall (or another immovable object). Point both feet
towards the wall and bend your right knee. Place your hands on
the wall as if you were trying to push it over. Lock out your back leg
and use it to push against the wall. You should feel a stretch along
your left calf. Repeat on the opposite side to stretch the right calf.
17 of 70
ACHIEVING THE SPLITS!
The Quad Stretch:
See Figure 1.1
The Quad is short for quadriceps and it is the muscle on the front
of your upper leg. It is a very strong muscle and it is used
extensively in sports for running, kicking, jumping etc. The
quadriceps extends the lower leg.
Figure 1.1
How it’s done:
Start with your feet shoulder width apart. To stretch your right leg
shift all of your weight onto your left leg and raise your right leg
behind you. Hold onto your right foot with your right hand and pull
your right foot towards your buttocks. You may hold onto a chair,
wall or partner for balance with your left hand. Push your hips
forward to increase the stretch. Repeat using the opposite leg.
The Seated Buttock Stretch
See figure 1.2
Yes, it is important to stretch your buttock muscles! This stretch
prevents you from walking like an orang-utan after your stretching
routine! The buttocks are heavily used in all sports.
Figure 1.2
18 of 70
ACHIEVING THE SPLITS!
How it’s done:
Sit on the ground with your feet extended forward. Bend your right
leg and place your foot on the ground to the left of your left leg
thigh. Hug your leg with both arms and pull it towards your chest.
Look and twist your body to your right (as if trying to look over your
right shoulder). Then repeat on the opposite side.
The Lying Buttock Stretch
See figure 1.3
Here is another good stretch for the buttocks.
Figure 1.3
How it’s done:
Lie on the ground on your back with your legs extended. Bend
your right leg and bring it to your left side using your left arm. Keep
your back flat on the ground and your right arm flat on the ground.
Then repeat on the opposite side.
The Seated Hamstring Stretch:
See Figure 1.4
Your hamstring muscle is the muscle on the back of your upper leg
and it works in conjunction with your quadriceps muscle. The
hamstring is a very powerful muscle and it is used for squatting,
running, jumping, kicking, etc. The hamstring is used to bend the
lower leg.
Figure 1.4
19 of 70
ACHIEVING THE SPLITS!
How it’s done:
Sit on the ground with your legs only shoulder width apart. To
stretch your right hamstring, hold onto your right leg with both
hands. Try to hold on to your foot but if you can’t reach then hold
on to your ankle, shin or knee. Keep your back straight and try to
bring your chest to your leg. You may use your arms to pull
yourself into the stretch but make sure not to force the stretch.
Repeat with your left leg.
The Seated Double Hamstring stretch:
See Figure 1.5
This time you will be stretching both hamstring muscles at the
same time.
Figure 1.5
How it’s done:
The same as the Hamstring Stretch except both legs are together.
Keep your legs straight (no bent knees!) and your feet pointing
towards the ceiling with the sides touching. Your left hand grabs
your left leg and your right hand grabs your right leg. Hold onto
your knee, ankle or foot depending on your flexibility.
The Standing Double Hamstring Stretch:
See Figure 1.6
This is another stretch that stretches
simultaneously.
20 of 70
both
hamstrings
ACHIEVING THE SPLITS!
Figure 1.6
How it’s done:
Stand up straight with your legs together and your feet together
pointing forward. Keep your knees locked straight. Slowly bend
forward at the hip and try to touch the floor with both hands. If you
can touch the floor then try to place the palms of your hands on the
floor and hold. When this becomes easy try to place the backs of
your hand on the floor. Alternatively you can hold onto your ankles
and pull your chest towards your legs.
The Standing Isolation Hamstring Stretch:
See Figure 1.7
This is a great stretch for isolating the hamstrings. When it is done
right you can really feel it!
Figure 1.7
How it’s done:
Like the standing double hamstring stretch start off with your feet
together. To stretch your right hamstring first place your left foot to
21 of 70
ACHIEVING THE SPLITS!
the right of your right foot. Your left leg should be over and in front
of your right leg. Don’t bend your knees instead keep them locked
straight. Your left leg should be helping to lock your right leg
straight. Then slowly try to touch the ground. Then try to place the
palms of your hands on the ground. When you can do this try to
place the backs of your hands on the ground. Alternatively you can
grab onto your right ankle with both hands and pull your chest to
your legs.
The Butterfly Stretch:
See Figure 1.8
This time you are stretching your inner groin muscles. These
muscles are used a lot in martial arts and dancing. They are used
when you raise and lower your leg to the side.
Figure 1.8
How it’s done:
Sit on the ground, bend your legs and bring your feet in together
towards your groin. Hold onto your feet with your hands and with
your elbows and forearms push your knees towards the ground.
You may place your back against a wall and push down on your
knees using your hands to maximise this stretch.
The Half Side Splits, Front Stretch:
See Figure 1.9
This stretch stretches the hamstring except this time it stretches
the hamstring in the exact position that it will be in when you
perform the side splits.
22 of 70
ACHIEVING THE SPLITS!
Figure 1.9
How it’s done:
To stretch your right leg start off with feet a bit wider then shoulder
width. Bend your left leg to the side and crouch down on it while
keeping your right leg locked straight to your right side. Lean
towards your right leg and support yourself with your hands on the
ground (one to each side of your right leg). Keep your left heel on
the ground. Then repeat on the opposite side and leg.
The Half Side Splits, Side Stretch:
See Figure 2.0
This time you are stretching and isolating the inner groin muscle.
Figure 2.0
How it’s done:
Start off the same as the half side splits, front stretch. Feet a bit
wider then shoulder width apart. To stretch the right leg bend your
left leg and crouch all the way down over it. Keep you right leg in a
sideways position out to the right. Your hands can be placed on
the ground in front of you for support. Keep your left heel on the
ground. Repeat on the opposite side.
23 of 70
ACHIEVING THE SPLITS!
The Sprint Stretch:
See Figure 2.1
This stretch improves hip flexibility, which is needed for any major
movement of the legs.
Figure 2.1
How it’s done:
Assume a position similar to a sprinter on the starting blocks. Place
your right leg forward, and it should be bent at an angle a little
greater then ninety (90) degrees. Your left leg should be placed
behind you with your left knee on the ground. Push downwards
with hips as if trying to bring them to the ground. You should feel
this stretch from one knee to the other. Then repeat on the
opposite side.
The Horse Stance Stretch:
See Figure 2.2
This stretch works on the inner groin and outer hip muscles
simultaneously. It is called the horse stance stretch because it is
supposed to resemble a horse riding position. I’ve never seen
anyone riding a horse in this position, but it is a really good stretch!
Figure 2.2
How it’s done:
Start off with your legs wide to the sides (double shoulder width).
Bend your knees and bring your hips towards the ground as if
trying to sit on it. Place your hands on the ground for support.
24 of 70
ACHIEVING THE SPLITS!
The Seated Box Splits Stretch:
See Figure 2.3a, 2.3b & 2.3c
This stretch works the inner groin muscles, and it is one of the best
stretches for them. It is used greatly by dancers and martial artists
alike.
Figure 2.3a
Figure 2.3b
Figure 2.3c
How it’s done:
Simply sit on the ground with your legs apart as wide as possible.
Don’t bend your knees. To increase the stretch, place your hands
on the ground behind you and push forward to help bring your hips
forward.
Also stretch down to your right leg the same way as in the
hamstring stretch. Then stretch down to your left leg. And Finally
stretch down to the centre and keeping your back straight try to
bring your chest to the floor (ouch!).
25 of 70
ACHIEVING THE SPLITS!
The Side Splits:
See Figure 2.4a
Here is the one that you have been waiting for! This stretch works
your hamstring on one leg and your inner groin muscle on the
other leg, along with your outer hip muscles, all at the same time!
Figure 2.4a
How it’s done:
Start off with both feet together. To perform the right side splits,
slide your left leg back. Your left leg turns to a sideways position
like a side kick with the inside of your left foot on the ground. Your
right foot comes up on the heel in a front position like a front kick.
Place both of your hands palm down on the ground on both sides
of your right leg. Keeping
both legs completely straight bring your hips towards the ground.
Your torso can face your right leg or to the front. Then repeat on
the opposite side.
Don’t even bend the knees a fraction of an inch! Keep your hips in
line and make sure that you are not leaning towards sitting on the
ground. When you are starting out this technique is way more
important then how low you can go with the stretch. If you start to
develop bad habits at the start, then you may jeopardise being
able to do the splits properly in the future. Don’t be like one of
those people who assume a position similar to a road killed frog
and proclaim that you can do the splits! Take it gradually. It takes a
while to become comfortable with the technique before you even
start to get lower.
26 of 70
ACHIEVING THE SPLITS!
The Box Splits:
See Figure 2.5
Okay so you survived the side splits! Now it is time for the box
splits. Most people find this to be the hardest stretch to develop.
The box splits work the inner groin and outer hip muscles of both
legs simultaneously.
Figure 2.5
How it’s done:
Start off with your feet together and start to slide them out to the
sides. Place the palms of your hands on the ground to support
yourself. This also helps you to get out of this stretch when you
need to. Keep your back straight and your knees should be locked
straight. Continue to slide your legs to their respective sides and
bring your groin towards the ground. Try to keep you hips angled
forward so that they are directly over your legs.
The Splits: Tips For Beginners:
* Take it gradually.
* Concentrate on your breathing.
* Technique is more important then how low you can go.
* Don’t bend your knees.
* Keep your back straight.
* Try to relax into the stretch.
* For extra support and piece of mind at the start use a chair to
lean on. This helps you to concentrate more on your technique and
it supplies a bit more balance and safety. It is also easier to get out
of the splits position when using a chair. See Figure 2.6 & 2.7.
27 of 70
ACHIEVING THE SPLITS!
Figure 2.6
Figure 2.7
The Splits: Tips For The Advanced:
I am close to getting the splits but I am having trouble getting
down those last few inches. What do I do?
For those of you who are close to getting either the box splits or
the side splits and are having trouble getting down those last few
inches here is what to do.
There are 4 main options:
1) Breathing:
When you are at the lowest point in your stretch and you feel that
you can not get down those last few inches what you can try to do
is to completely exhale by breathing out and let your body go limp.
This causes your body to be heavier and your stretch should get
lower. Sleeping bodies and dead bodies weigh heavier because
they are totally relaxed. You are also trying to make your body
heavier by exhaling and going limp. It may sound really easy but it
is hard to do properly.
2) Hand Positioning:
Your hand positioning may be preventing you from getting lower in
the splits. Try putting your hands on your upper thighs and this will
increase your weight in the centre line of the stretch, which should
bring you to the ground. To use your maximum body weight for the
splits then place both hands on top of your head.
3) Isometrics:
Isometrics can also help to get down those last few inches in the
splits. Read the next section for details.
28 of 70
ACHIEVING THE SPLITS!
4) Partner stretching:
Partner or two (2) person stretching is very useful for those last few
stretching inches. Read on for details.
The Splits: Tips For The Super Advanced:
I can do the splits easily. What’s next? Bring it on!
Next is to stretch beyond the splits! The splits equal 180 degrees.
So with the following stretches we are going to try to go beyond
180.
Stretching Between Chairs:
See Figure 2.8
In order to stretch beyond 180 degrees you must elevate yourself.
The best way to do this is by stretching between two (2) chairs.
This method can be for the side splits or the box splits.
Figure 2.8
How it’s done:
Place the chairs double shoulder width apart. Place your hands on
the ground or use another chair or partner for support. Place your
feet on the chairs and slowly push out the chairs with your feet until
you are 180 degrees. Then simply place your hands on your thighs
or your head and exhale to sink lower. Take it slow. It will take a
while for you to get used to the technique but once you get it is a
serious party piece!
Three Person Stretching:
See figure 2.9
Make sure that you trust the two partners that you will be using for
this one! I’m sure that this stretch was used as a form of torture in
29 of 70
ACHIEVING THE SPLITS!
bygone eras, but it is an excellent stretch. This stretch also uses
the force of gravity (it may be performed without partners).
Figure 2.9
How it’s done:
Start off lying on the ground on your back with your legs and
buttocks against a wall. Each of your stretching assistants firmly
grasp each of your feet. They then work together to slowly bring
your feet down the wall in a box splits position. Make sure that you
tell them when you are at your maximum. Try to relax as much as
possible and hold for ten (10) seconds at your maximum stretch.
30 of 70
ACHIEVING THE SPLITS!
PARTNER STRETCHING
Partner stretching is stretching with the help of one or more
people. Partner stretching can be very good for results because it
allows the person stretching to solely concentrate on the stretch.
Partner stretching also takes away the worry about being stuck in a
particular stretching position.
It is important to only use someone that you trust when you are
performing partner stretches. The person being stretched should
be in control. Make sure to tell your partner when you want your
stretch increased and more importantly when you want to stop.
Your partner should always follow your instructions to make sure
that injuries do not occur.
Anytime a partner is helping someone stretch they should:
1) Increase the stretch gradually.
2) Listen to your partner & follow his/her instructions.
3) Make sure to support your partners’ joints and keep the
stretching motion smooth. No bouncing, jerking or twisting!
4) When your partner is finished with the stretch help them to
slowly come out of the stretch position.
The following are examples of two (2) person stretches:
The Seated Double Hamstring stretch (with a partner):
See Figure 3.0
Stretching both hamstring muscles at the same time.
Figure 3.0
How it’s done:
The same as the Hamstring Stretch except both legs are together.
Keep your legs straight (no bent knees!) and your feet pointing
towards the ceiling with the sides touching. Your left hand grabs
your left leg and your right hand grabs your right leg. Hold onto
your knee, ankle or foot depending on your flexibility.
31 of 70
ACHIEVING THE SPLITS!
What your partner does:
Your partner stands or kneels behind you and pushes your lower
back with both hands. This should bring your chest towards your
knees.
The Butterfly Stretch (with a partner):
See Figure 3.1
Stretching your inner groin muscles. These muscles are used a lot
in martial arts and dancing. They are used when you raise and
lower your leg to the side.
Figure 3.1
How it’s done:
Sit on the ground, bend your legs and bring your feet in together
towards your groin. Hold onto your feet with your hands and with
your elbows and forearms push your knees towards the ground.
You may place your back against a wall and push down on your
knees using your hands to maximise this stretch.
What your partner does:
Your partner kneels or stands in front of you and places his/her
hands on your knees (left to right & right to left). Your partner then
pushes both of your knees down towards the ground. If your
partner stands or kneels directly in front of your feet or ankles it
can stop your feet sliding out of the stretch.
The Seated Box Splits Stretch (with a partner):
See Figure 3.2
This stretch works the inner groin muscles and it is one of the best
stretches for them. It is used greatly by dancers and martial artists
alike.
32 of 70
ACHIEVING THE SPLITS!
Figure 3.2
How it’s done:
Simply sit on the ground with your legs apart as wide as possible.
Don’t bend your knees. To increase the stretch, place your hands
on the ground behind you and push forward to help bring your hips
forward.
Also stretch down to your right leg the same way as in the
hamstring stretch. Then stretch down to your left leg. And Finally
stretch down to the centre and keeping your back straight try to
bring your chest to the floor (ouch!).
What your partner does:
Your partner stands or kneels behind you and places his/her hands
on your lower back. Then your partner applies pressure and this
should push you further down. Don’t forget to stretch towards your
right leg, then your left leg, and then straight down to the centre.
The Standing Hamstring Stretch (with a partner):
See figure 3.3
This is an isolation stretch for the hamstrings.
Figure 3.3
33 of 70
ACHIEVING THE SPLITS!
How it’s done:
Stand up straight with your back against a wall. Allow your partner
to lift up one of your legs. Keep your standing foot sideways
(parallel to the wall). Concentrate on keeping your knees from
bending. Make sure to tell your partner when to stop increasing the
stretch, and then hold the stretch for ten (10) seconds.
What your partner does:
Your partner slowly and gradually raises one (1) of your legs.
He/she holds onto your heel with both hands. Then when it is time
to finish the stretch, your partner slowly places your foot back on
the ground.
The Standing Front Splits Stretch (with a partner):
See figure 3.4
This stretch works your hamstring on one leg and your inner groin
muscle on the other leg, along with your outer hip muscles all at
the same time!
Figure 3.4
How it’s done:
Start off standing straight up with both of your legs together. When
your partner picks one of your legs up shift your weight onto your
standing leg. Hold onto your partner, a wall or a chair for support
and balance. Slowly sink into the stretch like you are trying to bring
your groin to the floor. Your weight should be evenly distributed
between both legs. Make sure to keep your standing foot firmly on
the ground and try not to let it slide.
What your partner does:
Like the previous stretch your partner slowly and gradually raises
one of your legs to about waist height. He/she should be
supporting your leg at your heel & ankle and/or the back of your
34 of 70
ACHIEVING THE SPLITS!
knee. Once your partner has raised your leg to waist height,
he/she moves slowly backwards so that you are performing the
splits at an elevated angle.
The Standing Inner Groin Stretch (with a partner):
See figure 3.5
This stretch isolates the inner groin muscles on each leg. It is also
called the side kick stretch because it looks like the person being
stretched is doing a side kick.
Figure 3.5
How it’s done:
Start off side ways facing your partner with both your legs together.
Make sure to keep your hips in a side chamber position.
What your partner does:
Similar to the standing hamstring stretch your partner slowly and
gradually raises one of your legs in a side kick position. He/she
supports your foot and ankle. It is up to your partner to make sure
that your hip is not in a front or back chamber, because these
positions stretch different muscles.
The Standing Box Splits Stretch (with a partner):
See figure 3.6
This is an elevated version of the box splits.
35 of 70
ACHIEVING THE SPLITS!
Figure 3.6
How it’s done:
Start off sideways to your partner. Allow your partner to lift your leg
(the one closest to him/her). Keep your weight evenly distributed
between both of your legs. You can hold onto your partner, a wall
or a chair for support. Make sure that both of your legs are in a
side ways position and that you are stretching your inner groin
muscles.
What your partner does:
Your partner slowly and gradually raises your leg to waist height in
a side kick position. Then he/she proceeds to slowly move
backwards so that you are in an elevated box splits position.
The Standing Side Chamber Stretch (with a partner):
See Figure 3.7
This looks like some kind of mutant stretch but it is a great
stretching exercise for Martial Artists who wish to develop their
kicks. It specifically works on your side chamber. A side chamber
is the position that your leg and knee are in prior to performing a
kick such as, side kick, roundhouse kick or hook kick. This stretch
works the inner groin and the outer hip of the stretching leg.
Figure 3.7
36 of 70
ACHIEVING THE SPLITS!
How it’s done:
Like the standing inner groin stretch/ side kick stretch start off
sideways to a wall. Keep your standing foot pointed at a 45-degree
angle towards the wall for balance.
What your partner does:
Your partner picks up your leg by supporting your ankle and foot.
He/she raises your leg in a side kick stretch. The higher the leg,
the harder the stretch. Start off at waist height. Your partner then
helps you to bend your
stretching leg and pushes your leg towards your body. Your knee
should be moving towards your chest. This stretch should look like
a side chamber position, the position your leg is in before a side
kick is thrown.
One or more partners can be used in nearly every stretch. The
ones listed above are the mains ones, but don’t be afraid to
experiment. Using one partner is generally best, but it is also
possible to stretch using 2 partners. Figures 2.9 & 3.8 demonstrate
two examples of three person stretching.
Figure 2.9
Figure 3.8
37 of 70
ACHIEVING THE SPLITS!
ISOMETRIC & P.N.F. STRETCHING
*IMPORTANT NOTE*:
Isometric & P.N.F. exercises are NOT recommended for children
and adolescents whose bones are still growing.
Isometric stretching is the contraction of the muscles that are being
stretched in order to help increase the stretch. P.N.F. is a method
of stretching which incorporates both isometric and passive
stretching (contraction & relaxation) in order to improve flexibility.
P.N.F. stands for proprioceptive neuromuscular facilitation. P.N.F.
stretching was originally designed and developed for the
rehabilitation of patients. Today it is used by many top sporting
people as a more advanced method to develop flexibility. This
method of stretching helps to strengthen the muscles while they
are in an elongated state. After the contractions it is generally
easier to relax the muscles further and to increase your stretch.
Types of Isometric & P.N.F. Solo Stretches
The Butterfly Stretch:
See Figure 1.8
This time you are stretching your inner groin muscles. These
muscles are used a lot in martial arts and dancing. They are used
when you raise and lower your leg to the side.
Figure 1.8
How it’s done:
Sit on the ground, bend your legs and bring your feet in together
towards your groin. Hold onto your feet with your hands, and with
your elbows and forearms push your knees towards the ground.
You may place your back against a wall and push down on your
knees, using your hands to maximise this stretch.
38 of 70
ACHIEVING THE SPLITS!
The Isometric Part:
When you have pushed your knees down as low to the ground as
possible, contract the muscles in your legs and try to bring them
upwards to the start position again. Your arms/hands should
prevent your legs from raising upwards. Hold the tension in your
legs for approx. ten (10) seconds. You may then come up out of
the stretch and take a thirty (30) second rest. Then repeat again.
Do this for three (3) sets.
Alternatively for a harder method you can remain in the stretch
after the ten (10) second contraction. Try to relax your legs and
push your knees down lower to increase your stretch. When you
are at your lowest, contract your leg muscles again and resist with
your arms/hands. Using
this method perform three (3) contractions per stretch. After each
contraction, you should be able to increase your stretch. Perform
one to three (1-3) of these stretches.
The Side Splits:
See Figure 2.4a
This stretch works your hamstring on one leg and your inner groin
muscle on the other leg, along with your outer hip muscles all at
the same time!
Figure 2.4a
How it’s done:
Start off with both feet together. To perform the right side splits
slide your left leg back. Your left leg turns to a sideways position
like a side kick, with the inside of your left foot on the ground. Your
right foot comes up on the heel in a front position like a front kick.
Place both of your hands palm down on the ground, on both sides
of your right leg. Keeping both legs completely straight, bring your
hips towards the ground. Your torso can face your right leg or to
the front. Then repeat on the opposite side.
39 of 70
ACHIEVING THE SPLITS!
Don’t even bend the knees a fraction of an inch! Keep your hips in
line and make sure that you are not leaning towards sitting on the
ground. When you are starting out, technique is way more
important then how low you can go with the stretch. If you start to
develop bad habits at the start then you may jeopardise being able
to do the splits properly in the future. Don’t be like one of those
people who assume a position similar to a road killed frog and
proclaim that you can do the splits! Take it gradually. It takes a
while to become comfortable with the technique before you even
start to get lower.
The Isometric Part:
When you are down as low to the ground as possible contract the
muscles in your legs and try to bring them back to the start position
again. The ground should prevent your legs from moving. Hold the
tension in your legs for approx. ten (10) seconds. You may then
come up out of the stretch and take a thirty (30) second rest. Then
repeat again. Do this for three (3) sets.
Alternatively for a harder method you can remain in the stretch
after the ten (10) second contraction. Try to relax your legs and
increase your stretch. When you are at your lowest contract your
leg muscles again by pushing your feet into the ground. Using this
method perform three (3)
contractions per stretch. After each contraction you should be able
to increase your stretch. Perform one to three (1-3) of these
stretches.
The Box Splits:
See Figure 2.5
Most people find this to be the hardest stretch to develop. The box
splits work the inner groin and outer hip muscles of both legs
simultaneously.
Figure 2.5
40 of 70
ACHIEVING THE SPLITS!
How it’s done:
Start off with your feet together and start to slide them out to the
sides. Place the palms of your hands on the ground to support
yourself. This also helps you to get out of this stretch when you
need to. Keep your back straight and your knees should be locked
straight. Continue to slide your legs to their respective sides and
bring your groin towards the ground. Try to keep you hips angled
forward so that they are directly over your legs.
The Isometric Part:
When you are down as low to the ground as possible, contract the
muscles in your legs and try to bring them back to the start position
again. The ground should prevent your legs from moving. Hold the
tension in your legs for approx. ten (10) seconds. You may then
come up out of the stretch and take a thirty (30) second rest. Then
repeat again. Do this for three (3) sets.
Alternatively, for a harder method you can remain in the stretch
after the ten (10) second contraction. Try to relax your legs and
increase your stretch. When you are at your lowest, contract your
leg muscles again by pushing your feet into the ground. Using this
method perform three (3) contractions per stretch. After each
contraction you should be able to increase your stretch. Perform
one to three (1-3) of these stretches.
Types of Isometric & P.N.F. Partner Stretches
The Butterfly Stretch (with a partner):
See Figure 3.1
Stretching your inner groin muscles. These muscles are used a lot
in martial arts and dancing. They are used when you raise and
lower your leg to the side.
Figure 3.1
41 of 70
ACHIEVING THE SPLITS!
How it’s done:
Sit on the ground, bend your legs and bring your feet in together
towards your groin. Hold onto your feet with your hands, and with
your elbows and forearms push your knees towards the ground.
You may place your back against a wall and push down on your
knees using your hands to maximise this stretch.
What your partner does:
Your partner kneels or stands in front of you and places his/her
hands on your knees (left to right & right to left). Your partner then
pushes both of your knees down towards the ground. If your
partner stands or kneels directly in front of your feet or ankles, it
can stop your feet sliding out of the stretch.
The Isometric Part:
When you are at your maximum stretch you let your partner know.
Then you contract your leg muscles as if you were trying to raise
your legs back to the starting position. Your partner stops your legs
from moving with his/her hands and arms. Hold the contraction for
ten (10) seconds. You may then come up out of the stretch and
take a thirty (30) second rest. Then repeat again. Do this for three
(3) sets.
Alternatively for a harder method you can remain in the stretch
after the ten (10) second contraction. Try to relax your legs and
increase your stretch with your partners help. When you are at
your lowest contract your leg muscles again. Using this method
perform three (3) contractions per stretch. After each contraction
you should be able to increase your stretch. Perform one to three
(1-3) of these stretches.
The Standing Hamstring Stretch (with a partner):
See figure 3.3
This is an isolation stretch for the hamstrings.
42 of 70
ACHIEVING THE SPLITS!
Figure 3.3
How it’s done:
Stand up straight with your back against a wall. Allow your partner
to lift up one of your legs. Keep your standing foot sideways
(parallel to the wall). Concentrate on keeping your knees from
bending. Make sure to tell your partner when to stop increasing the
stretch and then hold the stretch for ten (10) seconds.
What your partner does:
Your partner slowly and gradually raises one (1) of your legs.
He/she holds onto your heel with both hands. Then when it is time
to finish the stretch your partner slowly places your foot back on
the ground.
The Isometric Part:
When you are at your maximum stretch you let your partner know.
Then you contract your leg muscles, as if you were trying to lower
your leg back to the starting position. Your partner stops your legs
from moving with his/her hands and arms. Hold the contraction for
ten (10) seconds. You may then come up out of the stretch and
take a thirty (30) second rest. Then repeat again. Do this for three
(3) sets.
Alternatively for a harder method you can remain in the stretch
after the ten (10) second contraction. Try to relax your legs and
increase your stretch with your partners help. When you are at
your maximum stretch contract your leg muscles again. Using this
method perform three (3) contractions per stretch. After each
contraction you should be able to increase your stretch. Perform
one to three (1-3) of these stretches.
43 of 70
ACHIEVING THE SPLITS!
The Standing Inner Groin Stretch (with a partner):
See figure 3.5
This stretch isolates the inner groin muscles on each leg. It is also
called the side kick stretch, because it looks like the person being
stretched is doing a side kick.
Figure 3.5
How it’s done:
Start off side ways, facing your partner with both your legs
together. Make sure to keep your hips in a side chamber position.
What your partner does:
Similar to the standing hamstring stretch, your partner slowly and
gradually raises one of your legs in a side kick position. He/she
supports your foot and ankle. It is up to your partner to make sure
that your hip is not in a front or back chamber, because these
positions stretch different muscles.
The Isometric Part:
When you are at your maximum stretch, let your partner know.
Then you contract your leg muscles as if you were trying to lower
your leg back to the starting position. Your partner stops your legs
from moving with his/her hands and arms. Hold the contraction for
ten (10) seconds.
You may then come up out of the stretch and take a thirty (30)
second rest. Then repeat again. Do this for three (3) sets.
Alternatively for a harder method you can remain in the stretch
after the ten (10) second contraction. Try to relax your legs and
increase your stretch with your partners help. When you are at
your maximum stretch contract your leg muscles again. Using this
method perform three (3) contractions per stretch. After each
contraction you should be able to increase your stretch. Perform
one to three (1-3) of these stretches.
44 of 70
ACHIEVING THE SPLITS!
With all of these stretches there are two (2) main methods of
execution:
1) After the contraction you come out of the stretch, and then
repeat the stretch again after a short break.
2) After a contraction you remain in the stretch, and try to
increase your stretch by relaxing your legs. Then when you
are at your maximum, you again contract your muscles. And
then again you relax and then contract. You perform three
(3) contractions per stretch.
Try method one (1) first and then progress to method two (2) when
you are ready.
45 of 70
ACHIEVING THE SPLITS!
THE COOL DOWN
What is the cool down?
The cool down is the conclusion to your workout. Cooling down
after training and stretching is of utmost importance and it is often
neglected by many athletes. Proper cooling down has a number of
uses:
1) Prevention of Injury.
The cool down helps to minimise pain, strains, cramping and
stiffness.
2) Increased Blood Circulation.
The cool down helps to increase the blood flow around the body
especially to the muscles that have just been stretched.
3) Speeds Up Healing.
The cool down helps the body with the breakdown of lactic acid,
which builds up in the body during exercise and stretching. Lactic
Acid causes the tight and stiff feeling in the muscles and stretching
helps to eliminate this soreness.
4) Encourages Relaxation
The cool down is a great way to relax the body. The cool down is
perfect to bring the body back to its’ normal active state.
How do I cool down?
The objective of the cool down is to bring your heart rate close to
its’ normal resting rate and to increase the blood flow around the
body. Perhaps the easiest way to cool down is to walk or to lightly
jog. The cool down should last approx. five (5) to ten (10) minutes.
You can use any cardiovascular exercise to cool down if you prefer
– just remember not to get carried away. You don’t want to warm
up again!
46 of 70
ACHIEVING THE SPLITS!
THE LOWER BACK
It is of utmost importance to exercise and stretch your lower back.
A strong and flexible lower back is needed in order to be able to
perform the splits. The following is a very good and easy stretch for
the lower back. If you are a beginner, make sure that you get used
to this stretch before moving on to the next exercises. If you are
advanced at stretching this exercise still has benefits.
The Cobra Stretch:
See figure 4.0
This stretch is called the cobra stretch, because when you perform
it your body should resemble that of a cobra snake. This stretch
stretches the lower back and also the abdominals.
Figure 4.0
How it’s done:
Start off in a press-up position. Lying flat on the ground (stomach
to the floor), keep the palms of your hands flat on the ground close
to the sides of your ribs. Push up with your hands raising and
arching your upper body, making sure to keep your hips on the
ground. It should feel as if you are trying to lie backwards onto the
back of your legs. Hold this position for ten (10) seconds and then
return to the starting position. Repeat this stretch two (2) more
times, for a total of three (3) sets.
The Crab Stretch:
See figure 4.1a & 4.1b
This lower back stretch also strengthens the lower back. It is used
widely in gymnastics and wrestling and it is also called ‘The
Bridge’. This stretch is much harder then the previous stretch and
should only be attempted by advanced stretchers.
47 of 70
ACHIEVING THE SPLITS!
Figure 4.1a
Figure 4.1b
How it’s done:
Start off by lying on the ground on your back. Bend your knees and
keep the soles of your feet on the ground. Place your hands on the
ground behind your ears. This is the part that most people make a
mistake on. Your hands need to be placed on the ground from an
inverted position.
Then push with your hands and your feet simultaneously, and your
body should start to raise at your stomach. Then lock your elbows
and your knees as straight as possible, and you should resemble
an arch. Hold this stretch for approx. ten (10) seconds and slowly
lower yourself back to the ground. Repeat this stretch two (2) more
times for a total of three (3) sets.
I am having difficulty lifting myself up in the crab stretch.
What should I do?
The Crab Stretch (with a partner):
See figure 4.2
If you have difficulty with the crab stretch by yourself you can
always use a partner to help you.
48 of 70
ACHIEVING THE SPLITS!
Figure 4.2
How it’s done:
Follow the same instructions as above.
What your partner does:
Your partner stands to the side of you and places his hands on
your sides at your waist. He/she then helps you to lift up by
supporting by body. Your partner also helps you to return to the
starting position.
The Crab Stretch (using a wall):
See figure 4.3a, 4.3b & 4.3c
Here is another variation of the crab stretch. It is more difficult then
the crab stretch, so make sure that you get plenty of practise with
the other stretches before performing this one.
Figure 4.3a
Figure 4.3b
49 of 70
Figure 4.3c
ACHIEVING THE SPLITS!
How it’s done:
Start of by standing approx. 2.5 – 3 foot away from a wall. Your
back should be facing the wall and your feet should be shoulder
width apart. Lean Backwards and place the palms of your hands
on the wall, with your fingers pointing towards the wall. Slowly walk
your hands all the way down the wall and keep your feet flat on the
ground. You can end up in a crab stretch with your hands on the
ground, or you can keep your hands on the wall. Then slowly walk
your hands back up the wall until you end up back at the starting
position. Repeat another two (2) times for a total of three (3) sets.
The Lower Back Raise Exercise:
See figure 4.4a & 4.4b
This exercise for the lower back is a strengthening exercise. It is
not a stretching exercise.
Figure 4.4a
Figure 4.4b
How it’s done:
Start off by lying face down (on your stomach) on the ground. Keep
your legs together and straight. Your fingers and hands are placed
behind your ears. Balancing on your pelvis, raise your upper body
and your legs off the ground. Hold for approx. two (2) seconds and
then lower to the ground again. Repeat approx. ten (10) – twenty
(20) times. Increase the number of sets to increase the difficulty.
One (1) of these stretches and the lower back raise exercise
should be performed once or twice a week.
50 of 70
ACHIEVING THE SPLITS!
THE ABDOMINALS
In order to be able to achieve the splits, you need to have strong
and conditioned stomach muscles. The abdominals are your
centre of gravity and they play a huge part in the development of
your stretching.
Abdominal training is too large a subject for us to have included in
this stretching manual, so if you wish to know how to best condition
and train your abdominals, then please access ‘Achieving
Washboard
Abs’
by
going
to
our
website:
http://www.martialartsinc.com
Check out the advertisement at the end of this manual for further
details.
To help you with stretching it is important to exercise the
abdominals at least three (3) times per week. Make sure to include
exercises for your lower abs, your lateral obliques (side abs or love
handles) and also for your upper abs.
51 of 70
ACHIEVING THE SPLITS!
THE MENTAL APPROACH
Achieving the Splits is very much a mental task, as a physical one.
Some people believe that it is only your mind preventing you from
being able to do the splits. If you do not have a good mental
approach to achieving the splits it is highly unlikely that you will
ever be able to do them.
Believe in Yourself:
The first thing that you must do is believe that you can attain the
splits. As long as you do not have any major physical defects,
disabilities etc. then you will be able to do the splits. Sometimes
people consciously think that they may be able to do the splits, but
this is not enough. It is imperative that your subconscious mind
believes that you can and will be able to do the splits. You do not
want to start this program with any underlying disbelief in yourself.
Imagine you are given a brand new Mercedes car. It is perfect in
every way except one – the handbrake cannot be released. What
use would this car be too you? Not much, except as something to
look at. This manual is the same. If you do not subconsciously
believe that you will achieve the splits then you are mentally
applying a handbrake to yourself and your success!
In order to help your subconscious believe that you will achieve the
splits, you can say to yourself, “I am going to achieve the splits”.
This may sound corny but your subconscious listens to what you
say aloud.
Be Positive:
Keep yourself positive, especially before you are about to begin a
routine. Be positive that you are going to make advancements
every time you stretch. Sometimes during your training you may be
stiff, and you may not achieve your maximum stretch. If this
happens do not belittle yourself. Never use negative reinforcement.
Simply see the situation for what it is – Your legs are saying they
are tired and need only a light stretch and rest.
When you are trying to achieve the splits, people can try to deter
you for many reasons jealousy, ignorance etc. Do not listen to
negative people – They only wish to drag you down to their level.
You may wish to keep your plan of attaining the splits to yourself to
avoid this negativity. Only discuss your plans with positive people
who will be there for you mentally as well as physically.
52 of 70
ACHIEVING THE SPLITS!
Set Clear Goals:
It is important to know exactly what you want to achieve. If you do
not know exactly what you want, then how will you know when you
get it? It is best to take a piece of paper and a pen and then to
clearly write your goals.
Firstly, is it the right side splits that you wish to attain? Or the left
side splits? Or the box splits? Or all three? Is it those last few
inches that are troubling you? Do you want to be able to do the
splits cold? Do you want to do the splits across chairs? Etc. Clearly
write down what you want the end result to be. This method of
writing down your goal also helps to program your subconscious to
achieve it.
The next thing to do is to set a specific date as to when you wish to
achieve this goal. Be realistic. Remember it can take anywhere
from a few weeks to a few years. If you can increase your stretch
by one-quarter inch every week then you are doing well. Plan to
achieve the splits gradually and set a reasonable time frame for
your goals.
Finally, bridge the gap between now and achieving your goal.
Read through the routines and pick one and establish a few
smaller goals, which when added together will help to attain your
overall goal. As example is, achieving the butterfly stretch, by
being able to touch both knees off the floor. Also, set an achieving
date.
Motivation:
It is important to keep yourself motivated. Motivation helps your
determination and persistence. Determination, persistence and the
knowledge contained within this manual will help you to achieve
the splits. There are a few ways to keep yourself motivated.
1) Keep track of your progress. Get someone to take photos of
your side splits (both sides) and your box splits before you start
this program. These photographs will prove to be a good indicator
of your advancement.
You can also measure how far down you stretch and compare your
results every time you stretch.
53 of 70
ACHIEVING THE SPLITS!
2) Use the photographs in this manual to motivate and inspire you.
You can enlarge and print out these photos to hang on the wall.
They will remind you of your goal.
3) Reward yourself. Every time you increase your stretch and you
improve, you should reward yourself. Give yourself small rewards
like a cookie (don’t overdo it though!), or allow yourself to watch
your favourite T.V. program. You can also buy yourself something
like a magazine or clothes etc.
Never Give Up:
The biggest thing is to never give up. Sure, it will be hard
sometimes and you won’t want to stretch sometimes, but you
must. Anytime you feel like giving up, read over your goals and
reread this manual. Look at the pictures and remind yourself that
you will be performing the splits soon, once you don’t give up.
Persistence and determination are the keys to success. The
reason why most people fail to achieve the splits boils down to one
very harsh truth………..laziness! Don’t be like one of those people.
Never give up. Believe in yourself and be positive. All of your goals
will be achieved once you stick with it. Prove it to yourself. You can
and you will achieve the splits.
54 of 70
ACHIEVING THE SPLITS!
THE ROUTINES
Now that you have gotten this far, you may be wondering how you
can put all of the information in the manual into a routine. We have
done it for you! The following routines have been broken up into
three (3) sections. Beginners routines, intermediate routines and
advanced routines. Start at the level that you feel most
comfortable, and proceed gradually to the next routines.
Beginner Routine 1
• Loosen up your muscles and joints first.
• Warm up: Fast Walk for 15+ minutes until you are lightly
sweating.
• Stretch your lower back using The Cobra Stretch.
• The Stretches:
1) The Calf Stretch (Both legs)
2) The Quad Stretch (Both legs)
3) The Seated Buttocks Stretch (Both legs)
4) The Seated Hamstring Stretch (Both legs)
5) The Seated Double Hamstring Stretch
6) The Butterfly Stretch
7) The Side Splits (Both Sides) - using a chair
8) The Box Splits – using a chair
How many sets of each stretch should I perform?
Perform each stretch three (3) times.
How long should I hold each stretch for?
Hold each stretch for at least ten (10) seconds.
How long should I rest for in between stretches?
Rest time between each stretch should be no longer then thirty
(30) seconds.
How often do I perform this routine?
Perform this routine at least three (3) times per week e.g.
Mondays, Wednesdays & Fridays or Tuesdays, Thursdays &
Saturdays.
NOTE: Make sure also to exercise your abdominals at least three
(3) times per week.
55 of 70
ACHIEVING THE SPLITS!
Beginner Routine 2
• Loosen up your muscles and joints first.
• Warm up: Light jog for 10+ minutes until you are lightly
sweating.
• Stretch your lower back using The Cobra Stretch.
• The Stretches:
1) The Calf Stretch (Both legs)
2) The Quad Stretch (Both legs)
3) The Seated Buttocks Stretch (Both legs)
4) The Standing Isolation Hamstring Stretch (Both legs)
5) The Standing Double Hamstring Stretch
6) The Butterfly Stretch
7) The Half Side Splits, Front Stretch (Right Leg Only)
8) The Half Side Splits, Side Stretch (Left Leg Only)
9) The Side Splits (Right Side Only) - using a chair
10) The Half Side Splits, Front Stretch (Left Leg Only)
11) The Half Side Splits, Side Stretch (Right Leg Only)
12) The Side Splits (Left Side Only) - using a chair
13) The Box Splits – using a chair
How many sets of each stretch should I perform?
Perform each stretch three (3) times.
How long should I hold each stretch for?
Hold each stretch for at least ten (10) seconds.
How long should I rest for in between stretches?
Rest time between each stretch should be no longer then thirty
(30) seconds.
How often do I perform this routine?
Perform this routine at least three (3) times per week e.g.
Mondays, Wednesdays & Fridays or Tuesdays, Thursdays &
Saturdays.
NOTE: Make sure also to exercise your abdominals at least three
(3) times per week.
56 of 70
ACHIEVING THE SPLITS!
Intermediate Routine 1
• Loosen up your muscles and joints first.
• Warm up: Skip for 10+ minutes until you are lightly sweating.
• Stretch your lower back using The Crab Stretch.
• The Stretches:
1) The Calf Stretch (Both legs)
2) The Quad Stretch (Both legs)
3)
4)
5)
6)
7)
8)
9)
8)
The Seated Buttocks Stretch (Both legs)
The Seated Hamstring Stretch (Both legs)
The Seated Double Hamstring Stretch
The Butterfly Stretch
The Seated Box Splits Stretch
The Sprint Stretch (Both Sides)
The Side Splits (Both Sides)
The Box Splits
How many sets of each stretch should I perform?
Perform each stretch three (3) times.
How long should I hold each stretch for?
Hold each stretch for at least ten (10) seconds.
How long should I rest for in between stretches?
Rest time between each stretch should be no longer then thirty
(30) seconds.
How often do I perform this routine?
Perform this routine five (5) days per week.
NOTE: Make sure also to exercise your abdominals at least three
(3) times per week.
57 of 70
ACHIEVING THE SPLITS!
Intermediate Routine 2
• Loosen up your muscles and joints first.
• Warm up: Perform jumping & kicking exercises (or any other
physical activity) for 10+ minutes until you are lightly
sweating.
• Stretch your lower back using The Crab Stretch.
• The Stretches:
1) The Calf Stretch (Both legs)
2) The Quad Stretch (Both legs)
3) The Seated Buttocks Stretch (Both legs)
4) The Standing Isolation Hamstring Stretch (Both legs)
5) The Standing Double Hamstring Stretch
6) The Butterfly Stretch
7) The Horse Stance Stretch
8) The Seated Box Splits Stretch
9) The Sprint Stretch (Both Sides)
10) The Side Splits (Both Sides)
8) The Box Splits
How many sets of each stretch should I perform?
Perform each stretch one (1) times.
How long should I hold each stretch for?
Hold each stretch for thirty to sixty (30 – 60) seconds.
How long should I rest for in between stretches?
Rest time between each stretch should be no longer then thirty
(30) seconds.
How often do I perform this routine?
Perform this routine five (5) days per week.
NOTE: Make sure also to exercise your abdominals at least three
(3) times per week.
58 of 70
ACHIEVING THE SPLITS!
Advanced Routine 1
• Loosen up your muscles and joints first.
• Warm up: Perform any exercises that are specific to your
sport for at least ten (10) minutes until you are sweating.
• Stretch your lower back using The Crab Stretch.
• The Stretches:
1) The Calf Stretch (Both legs)
2) The Quad Stretch (Both legs)
3) The Seated Buttocks Stretch (Both legs)
4) The Seated Double Hamstring Stretch (with a partner)
5) The Butterfly Stretch (with a partner)
6) The Standing Hamstring Stretch (with a partner)
7) The Standing Inner Groin Stretch (with a partner)
8) The Side Splits (Both Sides)
8) The Box Splits
How many sets of each stretch should I perform?
Perform each stretch three (3) times.
How long should I hold each stretch for?
Hold each stretch for at least ten (10) seconds.
How long should I rest for in between stretches?
Rest time between each stretch should be no longer then thirty
(30) seconds.
How often do I perform this routine?
Perform this routine three to five (3-5) days per week.
NOTE: Make sure also to exercise your abdominals at least three
(3) times per week. Perform the Lower Back Raises at least once
per week.
59 of 70
ACHIEVING THE SPLITS!
Advanced Routine 2
• Loosen up your muscles and joints first.
• Warm up: Perform any exercises that are specific to your
sport for at least ten (10) minutes until you are sweating.
• Stretch your lower back using The Crab Stretch.
• The Stretches:
1) The Calf Stretch (Both legs)
2) The Quad Stretch (Both legs)
3) The Seated Buttocks Stretch (Both legs)
4) The Seated Double Hamstring Stretch (with a partner)
5) The Standing Side Splits Stretch (with a partner)(both
sides)
6) The Standing Box Splits Stretch (with a partner)
7) The Seated Box Splits Stretch (with a partner)
8) The Side Splits (Both Sides)
8) The Box Splits
How many sets of each stretch should I perform?
Perform each stretch three (3) times.
How long should I hold each stretch for?
Hold each stretch for at least ten (10) seconds.
How long should I rest for in between stretches?
Rest time between each stretch should be no longer then thirty
(30) seconds.
How often do I perform this routine?
Perform this routine three to five (3-5) days per week.
NOTE: Make sure also to exercise your abdominals at least three
(3) times per week. Perform the Lower Back Raises at least once
per week.
60 of 70
ACHIEVING THE SPLITS!
Super Advanced Routine 1
• Loosen up your muscles and joints first.
• Warm up: Perform any exercises that are specific to your
sport for at least ten (10) minutes until you are sweating.
• Stretch your lower back using The Crab Stretch using a wall.
• The Stretches:
1) The Calf Stretch (Both legs)
2) The Quad Stretch (Both legs)
3) The Seated Buttocks Stretch (Both legs)
4) The Butterfly Stretch (Isometric)
5) The Sprint Stretch
6) The Seated Box Splits Stretch
7) The Side Splits (Both Sides)(Isometric)
8) The Box Splits (Isometric)
How many sets of each stretch should I perform?
Perform each stretch three (3) times.
How long should I hold each stretch for?
Hold each stretch for at least ten (10) seconds.
How long should I rest for in between stretches?
Rest time between each stretch should be no longer then thirty
(30) seconds.
How often do I perform this routine?
Perform this routine three to five (3-5) days per week.
NOTE: Make sure also to exercise your abdominals at least three
(3) times per week. Perform the Lower Back Raises at least once
per week.
61 of 70
ACHIEVING THE SPLITS!
Super Advanced Routine 2
• Loosen up your muscles and joints first.
• Warm up: Perform any exercises that are specific to your
sport for at least ten (10) minutes until you are sweating.
• Stretch your lower back using The Crab Stretch using a wall.
• The Stretches:
1) The Calf Stretch (Both legs)
2) The Quad Stretch (Both legs)
3) The Seated Buttocks Stretch (Both legs)
4) The Butterfly Stretch
5) The Standing Hamstring Stretch (with a
partner)(Isometric)
6) The Standing Inner Groin Stretch (with a
partner)(Isometric)
7) The Side Splits (Both Sides)(P.N.F.)
8) The Box Splits (P.N.F.)
How many sets of each stretch should I perform?
Perform each stretch three (3) times.
How long should I hold each stretch for?
Hold each stretch for at least ten (10) seconds.
How long should I rest for in between stretches?
Rest time between each stretch should be no longer then thirty
(30) seconds.
How often do I perform this routine?
Perform this routine three to five (3-5) days per week.
NOTE: Make sure also to exercise your abdominals at least three
(3) times per week. Perform the Lower Back Raises at least once
per week.
62 of 70
ACHIEVING THE SPLITS!
QUESTIONS & ANSWERS
When is the best time to stretch?
It is fine to stretch any time. It is hardest to get results in the
morning because your muscles (and body) are still asleep. It is
easier to get results from stretching in the evening when you are
completely awake. Some people choose to stretch only in the
evening and others believe that if they manage to get a good
stretch in the morning then their flexibility at night will be much
better (and easier). I recommend that you vary your routine and
stretch in the evening sometimes and in the morning other times.
This way you get the best of both worlds.
The only set times that you must stretch is before and after
exercising.
What surface do I stretch on?
Stretching can be performed anywhere that there is enough space.
Again vary your routine as much as possible. Practise stretching
on hard floors, carpets, sand or grass. It is easier to stretch on
grass, sand or thick carpet as apposed to a hard surface because
your joints are cushioned more and also your feet and legs sink
into these surfaces making your stretch lower.
What should I wear when stretching?
It is important to wear loose clothing that will not restrict your
stretch. Sports shoes may be worn. If you are stretching on a
slippery surface like polished wood, tiles or lino then you can try to
stretch in just your socks because this will make your feet slide
easier.
When I am stretching the sides splits which side should I
stretch first?
It doesn’t really matter which side you stretch first, right or left.
Some people like to stretch the side they are best at first and other
people prefer to stretch their ‘Bad’ side first. Try each method to
see which gives you the most results. The important thing is that
you stretch three (3) times on the one side split before changing to
the opposite side split. It is easier to increase the stretch by
concentrating on one side split at a time.
63 of 70
ACHIEVING THE SPLITS!
Can I change the order of the stretches in the routines?
Feel free to change any part of the routines (not that any change is
required). You can add to them or change the order or just perform
part of them but beware of deviating from the routines too much.
How long will it take me to achieve the splits?
The time it takes each person differs. Take things gradually.
Although it is healthy to put a time frame on your goals don’t
pressurise yourself too much. Persist with the program and strive
for results but avoid being too impatient as injuries may occur.
How should I breathe during stretching?
Breathe normally and avoid holding your breath. Exhale on the
stretch.
Is warming up before stretching necessary and what type of
warm up is best?
Yes warming up is necessary. It is better to use a warm up related
to your practised sport. Skipping, running, jumping, kicking are all
good examples of warm ups.
When is the best time to stretch?
The best time to stretch can depend on your biological clock. Most
people are most flexible in the afternoon but some people prefer to
stretch in the morning, as it is harder.
How do I distinguish between the sensations of stretching
and pain?
When you start stretching it may be hard to distinguish between
the two but with time you will understand the feelings better.
Discomfort is normal but as a general rule stop stretching if you
feel pain.
What should I think about while I stretch?
It is not important to concentrate solely on the stretch. By letting
the mind wonder can take away from the discomfort, and by
concentrating on the stretching can help to stretch that extra inch.
The best method is to concentrate solely on your breathing and
each time you exhale try to relax further and to increase your
stretch.
64 of 70
ACHIEVING THE SPLITS!
Are stretching machines/gadgets useful?
This is a matter of opinion but stretching machines do not give a
better stretch than a solo routine or a partner's assistance. This is
not to say there is no use for stretching machines but they are not
needed to achieve the splits.
Is two person stretching useful?
Yes, two person stretching is mainly useful when you have
reached an intermediate to advanced level of stretching and need
extra force and weight to increase your stretch. Again is not
necessary but useful to achieve the splits.
Where should I perform these stretching routines?
On the uppermost peak of Mount Fuji. Only kidding! Stretching is
best performed in warm surroundings. You don’t have to live in a
warm country. A warm room is perfect. I know a guy who gets
results from stretching in front of a heater while wearing thermal
leggings.
I have a muscle injury. What should I do?
There is an easy acronym to remember if you have a muscular
injury. It is “RICE” which stands for: Rest, Ice, Compression
(bandage), Elevation. This should help to minimise the pain and
swelling. Then it is important to seek professional advice.
My muscles are stiff and sore after stretching. How can I
reduce this?
Even if you are warming up, cooling down, stretching safely and
not over stretching you can still be stiff and sore. This may be
because you have been inactive for a while or because you are
simply increasing your stretching results. Massage can work well
to reduce this stiffness and soreness. Also, a hot bath can help.
65 of 70
ACHIEVING THE SPLITS!
CONCLUSION
After reading this manual, all that is left for you to do now is to get
started! If you follow this manual you will definitely see results. Put
together your routine and make sure that you are consistent. This
manual should be used over and over again as a reference guide.
Anytime you feel bored with your routine or if you ever feel like
your results have reached a plateau, then re-read this manual.
We here at http://MartialArtsInc.com would love to hear about your
achievements. Please send us a picture of you stretching and let
us know how you are getting on.
Please feel free to contact us if you have any further questions or if
you need further assistance: Email: [email protected]
All comments, criticisms and suggestions regarding this manual
are greatly appreciated.
66 of 70
ACHIEVING THE SPLITS!
Robert E. Devane performing a mutant stretch!
The Box Splits.
Robert Devane holds a side kick for the camera
67 of 70
ACHIEVING THE SPLITS!
Declan Kidd tortures Robert Devane!
68 of 70
ACHIEVING THE SPLITS!
OTHER TITLES AVAILABLE
HOW TO SURVIVE All VIOLENT ATTACKS!
This unique book prepares you for the toughest of street attacks. It
is full of tips, tricks and techniques for beating the most hardened
street fighters in seconds. Whether you have Martial Arts skills or
not this book will show you how to inflict maximum damage in
minimum time. This amazing book also reveals the secret tricks
that attackers use. It is a bible for everyone that wishes to be able
to defend themselves and their loved ones from any violent
situation. For further info please visit:
http://www.martialartsinc.com
ACHIEVING WASHBOARD ABS!
If you goal is to have abdominals of steel then this is the manual
for you. This manual covers everything you need to know to
Achieve Washboard Abs. The specifically designed, super charged
routines, just take 10 minutes per day no matter what shape you
are currently in! For further info please visit:
http://www.martialartsinc.com
These amazing manuals are not for sale in the shops. To purchase
your copy please visit http://www.martialartsinc.com
DOUBLE GUARANTEE!
SATISFACTION IS GUARANTEED
RESULTS ARE GUARANTEED
………Or your money back.
69 of 70
ACHIEVING THE SPLITS!
For A Wealth of Martial Arts information visit:
http://www.martialartsinc.com
This super site combines Martial Arts with Health & Fitness, and
also Success Strategies. If you want to learn fast or simply improve
yourself, then you need to visit this site. There is tons of
information and articles on various topics including: ‘Which Martial
Art is the best?’, ‘Personal Safety’, ‘Diet & Nutrition’ etc. etc.
Don’t forget to drop us a line to let us know what you think about
the site. Also, if you have any information that you would like to
see
included
in
this
site
then
please
email
to:
[email protected]
70 of 70


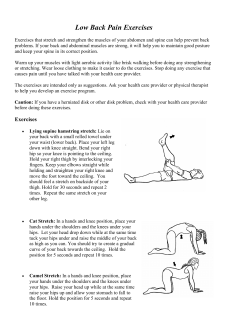


© Copyright 2026