
Follow these seven basic steps and you’ll
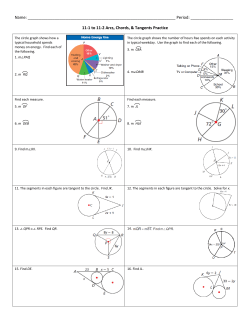
how to draw
timon
Learn to draw one of your favorite characters
from THE LION KING with celebrated Disney
Animator, Michael Surrey.
Follow these seven basic steps and you’ll
be drawing like a true Disney Animator!
1
3
2
4
6
5
7
Step 1:
Step 4:
Step 6:
• Start with a circle – the starting point of his head
• Draw a curved peanut shape underneath the
circle to define his body
• From his back, draw a line down to define
his frame
• To define Timon’s head, squash the shape
of the circle slightly by giving it a gentle
diamond shape.
• Draw a big circle for his nose in the lower
left portion of the gentle diamond shape
• Add the smile lines for Timon’s mouth
• Create Timon’s eyes by drawing two oval
shapes above the nose. Don’t forget to add
his pupils.
• To define Timon’s face, add his eyebrows by
working off of the eye circles
• Soften the shape of Timon’s face by adding a
slight cheek line to the left side of his face.
• Fill in his nose and don’t forget the bit of
glare to his shiny nose.
• Add 3 or 4 hairs along the upper right side
of his head, making the shapes different
lengths.
• Add his ears by following along your
original circle line, dropping down below
his head in half circles on both sides. Don’t
forget to draw the inside part.
• Define his arms by adding hanging hair
lines to the lower portion
• Define Timon’s toes and give a bit more
volume to his back.
Step 2:
• From the front of his body, draw a line
down to define the rest of his frame
Step 3:
• To define Timon’s arms and body, draw a
line straight out from between the circle and
peanut shape.
• Add a line to define the other arm along
side your first arm
• Draw a small box underneath to define the
hair under Timon’s front arm. Do the same
on his back arm, but offset it slightly.
• Move down to create his tail, by drawing a
long arched line out from the lowest corner
of his body frame.
Step 5:
• To add Timon’s hand, create a small angled
box at the end of the lines for his arms.
• Don’t forget to add Timon’s fingers at the
end of the box, but remember he’s got a big
Grub in his hands.
• To add the Grub, draw a big round, squishy
shape with the head above Timon’s hand
and the round body extending below.
• Add Timon’s feet but starting at the lower
corner of his body frame and add a curved
line for his leg and a straight line for the
bottom of his foot. Repeat this on the other
side of his body frame.
• Fill in his legs by drawing a line off of
the tummy area and connect down to the
bottom of his feet.
• Add long triangle shapes to define his feet!
© 2011 Disney
Step 7:
• Add the stripes to his back – just a few
• Define his tail a bit more buy shading-in the
upper tip
• Shade-in Timon’s toes
• Finish off Timon’s tasty Grub by adding in
the eyes & fangs for the mouth then add
a line down the lower portion to define its
body.
My Drawing of
timon
IN THEATERS SEPTEMBER 16 IN
ON
+
+
OCTOBER 4
LIMITED TIME © 2011 Disney


© Copyright 2026