
TROUT IN THE HOW TO RAISE TROUT IN
TROUT
IN THE
HOW TO RAISE TROUT IN
MARYLAND CLASSROOMS
Produced by
Potomac-Patuxent Trout Unlimited
Copyright 2011
Edited by Rosalyn Bass
DEDICATION
This manual is dedicated to the memory of David
Wittman. Dave will be remembered by many Maryland
teachers and students for his enthusiasm and eagerness
in helping them successfully implement their “Trout in
the Classroom” (TIC) programs. His tireless efforts
serve as a model for fulfilling the mission of the TIC
program, which is:
“to motivate our school youth to become the future
protectors of and advocates for establishing and
maintaining healthy conditions for trout in local
streams.”
iii
iv
ACKNOWLEDGEMENTS
This manual benefits greatly from contributions made by Shawn
Ackley of Robert Frost Middle School, Rockville; Chuck Dinkel of
Potomac-Patuxent Trout Unlimited; Sandra Cornell of North
Chevy Chase Elementary School, and Cindy Etgen, Martha
Schaum and other staff of the Aquatic Resources Education
Program (AREP) at Maryland’s Department of Natural Resources
(DNR). We also would like to acknowledge Mr. Les Pearce of the
Isle of Wight, United Kingdom, author of Appendix C, and
Aquarticles, where it was originally published. Thanks go to these
and other thoughtful advisors whose contributions and comments
have helped improve this document for current and future teachers
in the TIC family. Thanks also to Susan Hall for formatting the
manual and making it an easier reference tool.
v
vi
TABLE OF CONTENTS
CHAPTER
PAGE
1. TIC Equipment ........................................................................................................... 1
2. System Set-Up ............................................................................................................ 3
3. Preparing for Your Eggs ............................................................................................. 6
4. Transitioning the Eggs to the Tank: Tempering ......................................................... 7
5. Hatchling Stages ......................................................................................................... 8
6. Caring for the Tank ................................................................................................... 10
7. Water Testing............................................................................................................ 12
8. Feeding the Trout: Routinely and During Vacations ................................................ 16
9. Releasing Your Trout ............................................................................................... 19
10. End of Year Clean-up ............................................................................................... 23
11. What Should I Do If…? ............................................................................................ 25
12. Teaching Aids ........................................................................................................... 35
13. Potential TIC Funding Sources ................................................................................. 36
APPENDIX
PAGE
A. Stages of Trout Growth ............................................................................................ 39
B. Tank Inspection Record ............................................................................................ 43
C. The Nitrogen Cycle .................................................................................................... 47
vii
viii
CHAPTER 1. TIC EQUIPMENT
Table A below contains a list of equipment needed to set up and maintain the TIC
program. Al items below (except the tank, stand, chiller and items from a home
improvement store) are now available online from ThatPetPlace in Lancaster, PA.
Contact for information about ordering is:
Stephanie Welsh
Senior Business Account Representative
ThatFishPlace/ThatPetPlace
237 Centerville Road
Lancaster, PA 17603
Phone:
717-299-5691, x1288
Local Fax: 800-786-3829
Direct Fax: 717-381-2266
e-mail: [email protected]
If you don’t need and wish to omit or substitute for some recommended equipment listed
in Table A, please inform Stephanie Welsh of the changes you wish to make to the
recommended setup or replacement kit.
The home improvement store items are relatively cheap: surge protector, $12.00;
Styrofoam board, $6.00, buckets around $5.00 each; and the other items combined
around $7.00, for a total of $40.00 or less.
1
TABLE A: EQUIPMENT LIST
Item
First Year Set-Up
Items from ThatPetPlace.com
Fluval 305 or 405 Filter
Replacement filter media*
Whisper #40 Air Pump
Battery Operated Digital Thermometer
16-oz. bottle of MicrobeLift
Freshwater Master Testing Kit
20ft. ½” internal diameter (I.D.) tubing
Tap Water Conditioner
¼” check valve
6” Aquarium Net
Foam Pre-filter
12” Air Stone
10ft. ¼” airline tubing
1 Tube of Aquarium Sealant
Large Vacuum to Clean Gravel
2 bags of gravel “river jewels”
3 Piece Brush Set (to clean tank sides)
Breeder Box (Hatching Basket)
Annual
Replacement
X
X
X
X
X
X
X
X
X
X
X
X
X
X
X
X
(Optional)
X
Other Source Items
55-Gallon Tank and stand
TradeWinds DI-25 ¼ HP drop-in chiller**
X
X
Home Improvement Store
Foam Board (Styrofoam) Insulation
5-Outlet Surge Protector
Stainless Steel Hose Clamps for Tubing
2 one- or two-liter bottles
Turkey Baster
3 five-gallon buckets with lids***
X
X
X
X
X
X
X
X
X
X
X
X
(Optional)
* Biomax, Marineland White Diamond Crystals, and ChemiPure Charcoal.
** Order direct from TradeWinds (760-233-8888), [email protected].
Price to Maryland Trout in the Classroom (TIC) schools $530 + ~ $45 shipping.
*** Needed for water changes, storing de-chlorinated water, and for transporting
fingerlings to the release site.
2
CHAPTER 2. SYSTEM SET-UP
A. PREPARING THE TANK
1. Position the tank on Styrofoam board, cut to fit the bottom of the tank with about
½” overhang on all sides. This will help insulate the tank and discourage water
from dripping onto the floor from the outside of the tank.
2. Place the tank on a stable lab-type counter, bench, or stand capable of supporting
a total of 500 pounds (the tank, 55 gallons of water, and gravel). The best location
is close to an electrical outlet and a sink to make filling and draining the tank
easier. Select the location for the tank carefully because once it is filled with
water, it won’t be moveable.
3. Lighting Conditions for the tank. The tank should be away from direct sunlight.
Sunlight will raise the water temperature in the tank and promote the growth of
algae. This will put a greater strain on the chiller and require additional tank
cleaning time. Furthermore, newly hatched trout prefer relative darkness for the
first four weeks or so as they do in nature where they seek to hide in the darkness
provided by stream structures. To provide this dark environment, cover all four
sides of the tank with Styrofoam board cut to fit and attached with duct tape. The
top of the tank also should be covered with Styrofoam with cut-outs for filter
hoses and the chiller line. A removable window can be cut out of the front board
and hinged with duct tape for viewing. The Styrofoam will not only provide the
desired darkness but also insulate the tank, thus requiring less operating time for
the chiller and prolonging its life. Alternatively, a piece of black paper or black
cloth can be used to cover the front glass of the tank. Avoid positioning the tank
under fluorescent light. Do not use aquarium lights.
B. GRAVEL
The items from ThatFishPlace for the first year set-up include 2 bags of pre-cleaned
gravel (“river jewels”) sufficient to cover the bottom of the tank to a depth of ½ to 1 inch.
Gravel makes an excellent “home” for the bacteria which are necessary to convert
ammonia into harmless compounds. The large surface area provided by the gravel allows
ample area for the bacteria to grow.
Gravel other than “river jewels” must be cleaned before being placed in the tank. To
clean, place the gravel in a holding container where it can be hosed down until the water
runs clear of dirt and dust. A bucket or a colander is used for this purpose. After getting
the gravel as clean as possible by hosing, place it evenly across the bottom of the tank.
The gravel will probably still need further cleaning. Gently cover the gravel with several
inches of tap water. If the water still looks stained, and it probably will, siphon out the
water and replace it with fresh water. Do this until you feel you have removed as much
3
residual dirt as you can. It may not be possible to siphon out all the dirt but the main filter
should take care of what’s left when it gets turned on.
C. CHILLER
A chiller is needed to keep the tank’s water temperature at about 52°F (11°C). The TIC
program strongly recommends the TradeWinds DI-25 drop-in chiller. It can be ordered
directly from:
TradeWinds
Phone: 760-233-8888
e-mail: [email protected]
TIC’s preference for the TradeWinds drop-in chiller is based on:
1. satisfactory experience;
2. convenience (less maintenance, no water pump needed);
3. lower price than most other chillers; and
4. a 5-year warranty.
The chiller should be placed where it can be easily accessed for maintenance and
temperature adjustments, i.e., next to, and at the same height as or under the tank.
D. AIR PUMP AND WATER FILTER CONNECTIONS
1. Place the air pump behind the tank.
2. Cut the tubing from the air pump and insert the check valve. Make sure the
check valve faces the proper direction to prevent water from returning to the air
pump in case of a power outage.
3. Place the air stone in the tank. The air stone is very fragile and should be
carefully removed from its package.
4. Run the tubing from check valve to the air stone. Greasing the tubing with
vaseline or saliva will make installation easier.
5. Fill the tank with tap water. (Note: Please remember that the water needs to be
totally chlorine-free by the time eggs are put in the tank.)
6. Wait 10 minutes to saturate the air stone and provide an even air flow.
7. Plug in the air pump and check to see that air is flowing evenly through the
stone.
8. Install the Fluval Water Filter, following installation instructions on the CD.
4
9. Double check the Fluval Water Filter to make sure the housing does not leak.
10. Fix a fine mesh cloth or bag over the intake tube of the water filter. Fasten
tightly to the tube with a plastic or twist tie to keep fry from being sucked into the
filter. A cut-down Bio Max media bag works well.
E. BREEDER BOX/HATCHING BASKET
The breeder box is designed to protect very young fish from harm. The plastic frame
should be secure and free of sharp edges or scrap plastic. The net, which should be free of
holes or damage, is supposed to be placed loosely around the outside of the plastic frame
to protect the fish from damage by the sharp edges of the frame or from getting stuck
between the frame and netting. To avoid this problem entirely, the net can be placed
inside the frame and secured at each corner with needle and thread, aquarium sealant, or
twist ties.
YOUR SYSTEM IS NOW OPERATIONAL!
F. BY THANKSGIVING BREAK
1. Set up tank and breeder box as described above. (Do NOT install Breeder Box
yet.)
2. Fill the tank with tap water.
3. Turn on the filter, chiller and air pump.
4.
Set the chiller to cool the tank water to 52°F (11°C) with a 20F differential.
NOTE: Never run a drop-in chiller unless the chiller coil is completely
Submerged.
5. Test the setup to make sure all the equipment is functioning properly.
4. After a test period of two or three days, disconnect the chiller. Continue
running the filter and air pump. During this time, the filter can be run at a
lower flow rate by adjusting the flow control valve. Be sure to set the filter for
maximum flow when you start feeding the hatchlings.
HAVE A HAPPY THANKSGIVING VACATION!
5
CHAPTER 3. PREPARING FOR YOUR EGGS
Fertilized rainbow trout eggs and food will be delivered to all schools during the
first week in January.
A. IMMEDIATELY AFTER WINTER BREAK
1. Turn on the chiller, setting the temperature to register around 52°F (11°C).
2. Test the water for pH, ammonia, nitrites and nitrates. Adjust pH to close to
neutral,7.0: see Chapter 7: Water Testing Procedures.
3. Add additional MicrobeLift to tank in accordance with directions on its
container.
4. At least two days before the eggs arrive, wash and thoroughly rinse a
container to hold the eggs during the tempering process. Use dechlorinated
water from the tank. The container can be a china or glass bowl, a margarine tub
or any similar chlorine-free container that has been well-cleaned.
5. Let container air dry to make sure all residual chlorine has fully leached out of
container before egg delivery.
6. Using dechlorinated tank water, prepare two or three trays of ice cubes for
possible use in tempering eggs and keep in a freezer. Be sure that the ice trays
have zero trace chlorine. Note on dechlorination: Chlorine should leach out of
the tank and buckets within 72 hours. The use of tap water conditioner can
reduce that time to minutes.
B. ONE DAY BEFORE EGG DELIVERY
1. Using the digital thermometer, check to see that the water temperature
registers 52°F (11°C).
2. Check the breeder box in the tank. Make sure that water flowing from the filter
will not disturb the resting eggs. If necessary, redirect the outflow from the filter.
3. Place the air stone near but not underneath the breeder basket.
6
CHAPTER 4. TRANSITIONING THE EGGS
TO THE TANK: TEMPERING
The eggs will arrive in a jar filled with cold water at a temperature of about 40°F (4.5°C).
The eggs will need to be tempered: that is, the water temperature in the jar has to be
gradually raised to within 2-3°F (1-2°C) of the temperature of the water in the tank.
1. Gently move the eggs with some of their water from the carrying container to the
tempering container.
2. Measure the temperature of the water containing the eggs with a standard
thermometer.
3. Using the prepared ice cubes of de-chlorinated tank water, chill an appropriate
quantity of clean de-chlorinated tank water so that it reaches the temperature
measured in step 2. Add this water to the tempering container to submerge all the eggs.
4. Gradually add tank water to the egg container over a 60 to 90-minute period until
the temperature of the water in the tempering container and in the tank is the same.
5. Using a stirrer which has been cleaned and rinsed in dechlorinated tank water,
NOT TAP WATER, gently stir the eggs from time to time to increase oxygen supply
to tempering water. Do not stir the eggs roughly during tempering. Egg movement at
that time can weaken their outer shells. This can create weak spots or broken areas.
These spots are vulnerable to fungal infection.
6. When the tank and egg container temperatures are the same, place the eggs
carefully in the breeder box.
7. The outer shells of the eggs must remain translucent. Uniform cloudiness can be
okay; it might be just the trout development. Pick out any eggs with white spots. A
turkey baster will work well for this. An egg with any opaque spots (or a fully opaque
egg) will not develop.. The white spots are a fungus that spreads REALLY fast. Pick
out spotted eggs twice a day, if possible. The breeder box should be checked the last
thing on Friday afternoon.
7
CHAPTER 5. HATCHLING STAGES
A. HATCHING
This starts the alevin stage when trout absorb their yolk sacs.
1. The eggs will not all hatch at exactly the same time but over a 2-3 day period
from the first egg hatches. Hatching usually starts within ten days of egg arrival.
2. Some eggs will not hatch properly and should be picked out after a couple of
days.
3. Any leftover eggs must be removed or at least isolated. These eggs are not likely
to hatch.
4. The leftover shells float to the top of the tank or the breeder box. Fish enzymes
will break down these shells and create foam. This is normal. Scrubbing the sides
of the tank will loosen this foam.
5. During this phase, a jelly-like fungal growth may appear. Check for this around
the inside tank surfaces. Also check for this growth on the surfaces of the breeder
box. If you find this, wipe or scrape these surfaces with a sponge or brush.
Loosening this growth will send it through the filtration system.
Note: The longer the hatchlings can stay in the breeder basket, the better
B. REMAINDER OF ALEVIN (SAC-FRY) STAGE (1-3 weeks)
1. The length of time at this stage depends upon the water temperature. If the water
temperature is permitted to rise, fry develop faster.
2. A digital thermometer is the most reliable method of checking the in-tank
temperature since chiller consoles are notoriously inaccurate. Check the water
temperature daily.
3. Look for any odd looking trout (two-headed, three-headed, unusual heart
development, etc.). These odd trout don’t usually survive. They illustrate the
principle of survival of the fittest.
4. Alevins can survive in a Petri dish for short periods and can be observed closely
under a microscope or using a hand lens.
C. SWIM-UP STAGE
1. As yolk sacs disappear, some trout will start swimming to the top of the breeder
box.
2. When the first hatchling is seen to swim up in the breeder box, begin feeding.
Spread a minuscule amount of the tiniest food size near any swimming trout. Turn
off the filter system for a few minutes when you are feeding the trout for the first
8
couple of times. Not having a strong current will make the food more visible and
the trout will more likely begin to feed. MAKE SURE YOU TURN THE
FILTER BACK ON WHEN YOU FINISH FEEDING.
3. Once all hatchlings are swimming up and have been eating, unhook the breeder
box and lower it gently to the bottom of the tank.
4. Strong adventurous fish will swim out. The more timid weaker fish will hide for a
few more days until they are stronger.
5. You should continue to add MicrobeLift to your tank as often as once a week
according to directions on the bottle.
Note: The longer the hatchlings stay in the breeder basket, the better
D. FRY STAGE (4-8 weeks)
1. Some trout never learn to feed and will die. These non-feeding fish are called
“pinheads” (big heads, little bodies). These trout should be removed, as they will
not develop.
2. Most TIC classrooms see a mortality spike with the pinheads. It is very normal.
E. PARR STAGE (the rest of the time until release)
See Appendix A for pictures of the developmental stages of the trout.
1. Look for parr marks (vertical stripes) on the trout.
2.
Cannibalism can and does occur. The big fish do eat the little fish. If
cannibalism becomes an issue, feed more often to assuage hunger. Large
cannibalistic fish can be separated in the breeder basket if necessary.
9
CHAPTER 6. CARING FOR THE TANK
A. INTRODUCTION
The most important job after the hatchlings are in place is to keep the tank system clean
and the bacteria colonies growing and happy. Specifically, keep the tank sides and
bottom clean and the tank water changed regularly using well water, aged tap water or tap
water treated with a dechlorinating conditioner. Also, before working in the tank, hands
must be washed, thoroughly rinsed of contaminants (such as soap and lotion) and
thoroughly dried because trout are extremely sensitive to chlorine. This will ensure a
much higher trout survival rate.
B. TANK CLEANING
This section applies mainly to tank maintenance AFTER the fish leave the breeder
box.
1. Remove any slime and dirt from the sides of the tank WEEKLY with a hand mitt,
long-handled brush, or other suitable implement.
2. Prompt removal of dead fish is also required. Some fish may start to get lethargic,
or have problems swimming. Eventually, they simply float around the tank. These
fish are sick, and they will never get better. One dead fish body, if left too long,
can spread disease to other fish, damaging the whole population.
3. Cleaning also includes examining the filter intake and removing tank debris, as
well as any dead or trapped fingerlings found there.
4.
Gravel in the tank is cleaned by moving the siphon through the gravel, sucking
up water and dirt trapped in and below the gravel. If tank cleaning is scheduled
twice a week (e.g., Tuesday and Friday), the siphon is used to clean half the
gravel in the tank, removing about 5 gallons of tank water at each cleaning. This
water is emptied into a bucket used for that purpose.
5. Occasionally, fingerlings can get sucked up along with dirt from the gravel. Just
net them and return the runaways to the tank. They may look dispirited or even
comatose, but the odds are that they will survive.
6. Check chiller cooling fins for lint and dust. If necessary, clean with a small
vacuum cleaner, dusting cloth, or soft bristle plastic dust brush.
10
C. WATER CHANGING
Particularly during the earliest stages of trout development, daily water testing is your
best guide as to how much water to change and when to do so. High ammonia and nitrite
levels are the best indicators of the need for a water change.
1. Water changing should be done at least twice a week. A total of 10 gallons of water
should be exchanged weekly. As explained above, this can be done most efficiently in
combination with gravel cleaning. An easy alternative method of water removal is to
use a clean gallon jug (milk or other) with the top cut off. Dipping the jug in the tank
(while not scooping up fish) is an easy way to reduce tank water. However, the jug and
the hands of those dipping it in the tank should be chlorine-free.
2. Fill a clean 5-gallon plastic bucket with dechlorinated water chilled to the temperature
of the tank water and equal to the amount of water removed from the tank. Slowly add
this water to the tank, trying not to create a disturbance. This procedure, when done
twice a week, achieves the weekly routine water change that works so well in helping
to keep trout mortality low.
3. Immediately change 10 gallons of water any time the fish appear to behave strangely or
start dying in large numbers. Most likely this is the result of an ammonia spike.
4. Always keep 10 gallons of clean dechlorinated water on hand for regular and
emergency water changes. Tap water can be dechlorinated by “aging”: that is, leaving
it in a bucket for at least two days to allow the chlorine to evaporate out of solution.
Alternatively, a “tap water conditioner” can be used for rapid dechlori-nation. Well or
spring water does not need to be aged.
5. Always keep two or more 1- or 2-liter bottles of dechlorinated water in the freezer to
use for maintaining the tank water at 52°F (11°C) in the event of a power failure or
other temperature spike. The exterior of these bottles must be cleaned and then rinsed
with dechlorinated water before freezing since they will be used to chill dechlorinated
water needed for water exchanges or to float in the tank.
D. FILTER CLEANING
It is normally not necessary to clean the filter or change its media during the school year.
Should the water flow become seriously restricted, open the filter and remove all debris,
mainly from the foam insert. Then refill and seal the filter, reattach the inlet tubing,
prime the pump and reattach the power cord. If you change the filter media, change only
one section at a time, thereby permitting bacteria from the remaining section to colonize
the new media.
Note: Detailed instructions on how to disassemble and reassemble the filter are on both
the illustrated instruction sheet and the CD accompanying the filter. When reassembling
the filter after cleaning apply a thin layer of Vaseline or plumber’s grease to the rubber
gasket on the filter cover.
11
CHAPTER 7. WATER TESTING
A. INTRODUCTION
A water testing kit, included in the first year set-up, has the equipment you need to test
for ammonia, nitrite, nitrate, and pH. The two most essential tests are for pH and
ammonia. However, testing for all four is a good practice since nitrites are toxic to fish
and high nitrate levels can also negatively affect the health of the fish. Testing for
dissolved oxygen is useful but optional. It is advisable to keep a daily log of test results
which can also serve as “real” data for students to graph. See Appendix B for a sample
Tank Inspection Record.
Note on Test Kit Shelf Life: There is a lot number on each of the small bottles of test
solutions in the kits. The last 4 digits of that number indicate the month and year of
manufacture. It is permissible to use the test solutions for three years after the
manufacturing date before opening a new test kit. So be sure to check the lot number on
the bottles in your test kit.
B. TEST FOR pH
1. Put 5ml of the tank water to be tested into a clean test tube. The test tube in your
testing kit has a line at 5ml.
2. Add 3 drops from the pH Solution bottle.
3. Cap the test tube and invert it several times to mix the solution.
4. Holding the test tube against a white background, match the color of the solution
against the pH chart provided. Read and record the test results in your Log.
A pH level of 7.0 to 7.5 is recommended.
If the water becomes too acidic (pH level below 6.5), the following procedure is
recommended:
1. For a 55-gallon tank, divide ½ cup of rinsed coral chips (found in most pet stores)
into 3 equal portions.
2. Spread one portion of the chips in the tank every 4-5 days during the next two
weeks.
3. If at the end of the third week, the pH is still lower than required, repeat this
procedure with another ½ cup of rinsed coral chips.
Following this procedure will usually raise and maintain a pH of about 7.0 in the tank
water. DO NOT TRY TO CHANGE THE pH LEVEL OF THE TANK MORE
THAN 0.1 OR 0.2 IN A DAY. NOTE: Products such as pH Up and pH Down are also
12
available at aquarium stores to maintain constant pH levels and are easier to use but more
expensive than coral chips.
C. TEST FOR AMMONIA
1. Put 5ml of the tank water to be tested into a clean test tube. The test tube in your
testing kit has a line at 5ml.
2. Add 8 drops from the Ammonia Test Solution Bottle #1.
3. Add 8 drops from the Ammonia Test Solution Bottle #2.
4. Cap the test tube and shake it vigorously for 5 seconds.
5. Wait 5 minutes for color to change. Precise timing is important. Variation can
affect the color and accuracy of the results. Holding the test tube against a white
background, match the color of the solution against the chart provided. Read and
record the test results in your Log.
An ammonia level of 0 ppm is recommended.
A major water change will be needed if the ammonia load becomes consistently too high
for the biological filtration to handle (i.e. a level of 0.5 ppm or higher). This usually
occurs when the fish are over-fed or there are too many fish in the tank. If the problem
occurs frequently, some fish may need to be removed to reduce the daily level of
ammonia or the number of water changes may need to be increased to 3 or 4 a week.
D. TEST FOR NITRITE
1. Put 5 ml of the tank water to be tested in a clean test tube. The test tube in your
testing kit has a line at 5ml.
2. Add 5 drops from the Nitrite Test Solution Bottle #1.
3. Cap the test tube and shake it vigorously for 5 seconds. This step is essential. Do
not hold finger over open end of test tube as that can affect accuracy of
results.
4. Wait 5 minutes for the color to change. Precise timing is important. Variation
can affect the color and accuracy of the results. Holding the test tube against a
white background, match the color of the solution against the chart provided.
Read and record the test results in your Log.
A nitrite level of 0 ppm is recommended.
13
E. TEST FOR NITRATES
1. Put 5ml of the tank water to be tested into a clean test tube. The test tube in your
testing kit has a line at 5ml.
2. Add 10 drops of Nitrate Test Solution Bottle #1 to the tube, holding the bottle
upside down to make sure drops are the same size.
3. Cap the test tube and tip it upside down several times to mix the solution.
4. Vigorously shake the Nitrate Test Solution Bottle #2 for at least 30 seconds.
This step is extremely important to ensure accuracy of test results.
5. Add 10 drops of Nitrate Test Solution Bottle #2 to the test tube, holding the
bottle completely upside down to make sure drops are the same size.
6. Cap the test tube and shake it vigorously for 1 minute. This step is extremely
important to ensure accuracy of test results.
7. Wait 5 minutes for the color to develop.
8. Holding the test tube against a white background match the color of the solution
to the color on the Nitrate Color Chart. The closest match indicates the ppm of
nitrate in the water sample. Read and record the test result in your Log.
Beneficial bacteria convert toxic ammonia and nitrite into nitrate. A high nitrate level
indicates a build-up of fish waste and organic compounds, resulting in poor water quality.
A nitrate level of 40 ppm or less is recommended.
F. TEST FOR DISSOLVED OXYGEN (DO)
A test kit for measuring the dissolved oxygen (DO) in the tank water is optional but
recommended. The test kit can be obtained from ThatPetPlace. Following the
instructions in the test kit, it is best to measure the DO at the bottom of the tank where a
low level (less than 5 ppm) is a signal to search for the presence of dirt or a poorly
functioning air stone or pump. A DO level of around 5ppm or less will not sustain trout
life.
14
G. CHECK LIST
For your convenience, the following check list has been prepared to help organize the
tank maintenance chores.
DAILY
1. Check tank temperature. A temperature increase might indicate a chiller problem.
2. Feed the trout (see Chapter 8 for feeding guidelines).
3. Remove dead fish or debris from the tank.
4.
Test water for Ammonia, pH, nitrites and nitrates, and record the readings in a
Log (see Tank Inspection Record, Appendix B). Do a 10-gallon water change
if any reading deviates markedly from the recommended level. As you do this,
don’t let the tank temperature fluctuate more than 50F(30C).
In an emergency, however, clean water is more important than temperature
stability. Some schools have had success with testing twice or three times
weekly instead of daily. However, daily testing encourages participation by more
students and is optimal from the standpoint of trout health.
5. Ensure that water is flowing from the filter and that no fry are caught at the
Intake points and that the air stone is still working properly.
6. Check all hose connections and tighten as necessary.
WEEKLY
1. Clean the gravel 2 or 3 times a week such that there is an exchange of 10 gallons
of water per week (see section on water changing in Chapter 6).
2. Clean the sides of the tank with a mitt, brush or other suitable implement.
3. Examine chiller cooling fins for lint and dust. Clean, if needed, using a small
vacuum cleaner, dusting cloth or soft bristle plastic dust brush.
4. Test for dissolved oxygen and record reading in the log.
15
CHAPTER 8. FEEDING THE TROUT:
ROUTINELY AND DURING VACATIONS
A. INTRODUCTION
The rule of thumb for feeding the trout is to provide only as much food as can be
completely consumed in 5 minutes and certainly within 10 minutes. Give only one pinch
of food at any time, and remove all extra food particles. Overfeeding can pollute the tank
and cause problematic ammonia levels. Continued leftovers mean that you are overfeeding your fish. It is better to have slightly hungry fish than to over-feed and have too
much waste.
While fish are in the breeder box, feed very little food. Feeding guidelines for trout
swimming outside the breeder box and at increasing levels of development until
release are in tables B and C below.
B. MEASURING THE FEED
Table B indicates how much food is recommended daily per tank in measurements by
medicine spoon and measuring spoon. These food amounts are based on an estimate of
135 fish (plus or minus 10 fish) in the tank. A medicine spoon can be purchased at a
pharmacy or the drug section of some stores.
Alternatively, the amount of food recommended for the fish at each developmental stage
can be measured by weight, i.e. ounces or grams, using a digital scale. The calculated
weight of food is then marked off on a medicine spoon for daily use.
1. For fish leaving the breeder box and until 1 inch long (no more than 45 days),
gradually increase the amount of #0 feed to 0.04 oz. per tank per day.
2. For trout 1 inch to 1-½ inches (less than another 60 days) switch to #1 feed and
gradually increase daily feeding from 0.04 oz. to 0.12 oz. per tank.
3. For trout larger than 1-½ inches, switch to #2 feed and continue feeding at 0.12
oz. per tank per day until release.
Table C presents the recommended amount of food in ounces and grams for varying
numbers of trout in the tank. This table is available for teachers who use a digital scale to
weigh the food.
16
TIC FEEDING GUIDELINES
BY VOLUME
Table B (around 125 to 145 fish per tank)
Age and
Size of Fish
Size of
Food
Medicine Spoon
Amount
Measuring Spoon
Amount
First 3 weeks
after hatching
Crumble Mix
1/2 ml. mark
1/3 of 1/4
teaspoon
3 weeks to 1 inch
(2.5 cm.) long
Crumble Mix
and then Size 0
2 ml. mark
3/8 teaspoon
1 to 1.5 inches
(2.5 to 3.8 cm.) long
Size 1 and
then Size 2
4 ml. mark
3/4 teaspoon
1.5 to 2 inches
(3.8 to 5.7 cm.) long
Size 2
8 ml. mark
1-1/2 teaspoons
2 inches (5.7 cm.)
and longer
Size 2
12 ml. mark
2-1/4 teaspoons
A standard medicine spoon can be obtained from a pharmacist who may even give it to
you for nothing if you tell him/her why you want it. The measuring spoons are those used
in cooking. Measurement in cooking spoons is always a level amount, the excess in the
spoon removed by running a straight edge across the top of the spoon.
At each age/size of the trout, the amount of food provided per day should start with the
amount shown in the table and be gradually increased so that the size of the trout and the
amount of food called for in the table should reach the next stage at about the same time.
Since these measurements are not the product of hard science, you always need to factor
in common sense and your best judgment based on the number and needs of the fish in
your tank and any water quality issues you may be experiencing.
17
TIC FEEDING GUIDELINES
BY WEIGHT (grams and ounces)
Table C
50 fish
total
100 fish
total
200 fish
total
300 fish
total
400 fish
total
Out of Hatch Box
0.09 g.
0.003 oz.
0.17 g.
0.006 oz.
0.34 g.
0.012 oz.
0.51 g.
0.018 oz.
0.68 g.
0.024 oz.
Approx. 1 inch
(2.5 cm.) long
0.34 g.
0.012 oz.
0.68 g.
0.024 oz.
1.36 g.
0.048 oz.
2.04 g.
0.072 oz.
2.72 g.
0.096 oz.
Approx. 1.5 inches
(3.8 cm.) long
0.85 g.
0.03 oz.
1.70 g.
0.06 oz.
3.40 g.
0.12 oz.
5.10 g.
0.18 oz.
6.80 g.
0.24 oz.
Approx. 2.25 inches
(5.7 cm.) long
2.73 g.
0.10 oz.
5.45 g.
0.19 oz.
10.9 g.
0.38 oz.
16.3 g.
0.57 oz.
21.8 g.
0.76 oz.
Fish Size
C. FEEDING FREQUENCY
The trout can be fed 2 or 3 times a day, as desired, by dividing the recommended total
daily amount into halves or thirds and feeding the portions as appropriate. The trout will
seem “hungry” all the time. Remember that they are wild animals, and their instinct is to
eat any food presented to them, no matter how often. During the first few weeks, be
vigilant to the possibility of ammonia spikes from over-feeding. Water changes (removal
of ammonia) are the only solution. It is always good to “boost” your tank with
MicrobeLift as often as once a week in amounts suggested by instructions on the
bottle.
If ammonia levels can be kept satisfactorily low, an extra daily feeding can be done in the
last two weeks before release, as long as the fish continue to consume the feed
completely in less than five minutes. However, be particularly vigilant against ammonia
spikes at this time.
D. GUIDELINES FOR FEEDING DURING VACATIONS
Ideally, during vacation periods, someone should check on the tank, conduct water
changes and feed the trout on a regular basis. However, this is not always possible. The
following guidelines have been designed for those times when daily feeding is not
possible. AN AUTOMATIC FEEDER IS NOT RECOMMENDED. If you enlist the
assistance of security and maintenance staff to feed the fish on weekends and holidays, it
is advisable to place a feeding chart near the tank to record when and how much the fish
18
have been fed. The importance of not overfeeding the trout should be made clear to
everyone feeding the fish during vacation periods.
SHORT VACATIONS (3- or 4-day weekends)
On Friday, feed less; do a normal water change. The fish can survive for more than three
days without any additional food.
MID-LENGTH VACATIONS (7 to 10 days)
1. Trout can survive even a 10-day vacation without food or water changes..
2. In the days leading up to the vacation, feed a little less so as to minimize ammonia
buildup during the holiday.
3. Do a 10-gallon water change on the day you are leaving. If possible, do a 5-gallon
change in the morning and another 5-gallon change in the afternoon.
4. Watch the water temperature as you do this. Don’t let the tank water temperature
fluctuate more than about 50F (30C) or so.
LONG VACATIONS (11+ days)
1. Same preparation as for mid-length vacation.
2. Plan to have someone feed the fish halfway through the vacation, if possible, with
the same amount of food provided the day just before the vacation.
3. Don’t worry if no one can come to feed the fish. Trout can survive lean times.
19
CHAPTER 9. RELEASING YOUR TROUT
A. INTRODUCTION
The most rewarding event of the TIC program year is the release of the fingerlings into
local streams. This provides confirmation of success in maintaining a healthy
environment for the trout and nurturing them well. It also can provide a direct connection
between student caregivers, their fingerlings and their local watershed.
It is hard to determine the survival rates for released trout, but full grown fish have been
recovered and genetically linked to trout raised in the classroom. However, in general,
TIC is not a stocking program, but rather an educational program. The true value of
raising and releasing trout lies in the process.
B. PREPARATIONS FOR RELEASING THE TROUT
The fingerlings need to be transferred from the tank (a 4” x 6” dip net is recommended)
with some of the tank water into an aerated hard plastic cooler. Battery-operated aerators
are available from Bass Pro and other large sporting goods stores. The cooler should be
able to hold at least 10 gallons of water. When available, Trout Unlimited volunteers can
help with this process. To keep the water in the cooler from warming during the trip to
the stream, liter bottles of frozen dechlorinated water should be placed into the cooler
with the fingerlings. This should keep the temperature in the cooler comfortable for the
fingerlings for several hours. If time permits before releasing the trout, the fingerlings
could be gradually acclimated by adding stream water to the cooler to reduce differences
in temperature and chemistry between the water in the cooler and the stream water.
C. THE OPTIMAL RELEASE PROGRAM
The optimal release program includes the following broad areas:
1. a stream habitat study
2. a discussion of conservation issues
3. Trout Games
4. Trout Release
5. Trout Fishing Orientation
For convenience of presentation and organization for both teacher and student,
particularly when several schools are participating in the same release date, it is useful to
set up 5 stations, each focusing on a specific set of activities in the Optimum Release
Program. This is conceptualized as follows. (Asterisks [*] denote particularly high
priority activities which should form the core of all release programs.)
20
Station 1 (Home Sweet Home) consists of:
* 1. a blind comparison test of water quality in a sample of water from:
a. the stream receiving the trout;
b. tap water; and
c. water from a nearby stream that does not harbor trout.
The comparison should include tests for ammonia, nitrites, nitrates, pH, and
dissolved oxygen. Teachers should record the number of students choosing each
of the three options as part of a year-end program report to the TIC state
coordinators.
2. measuring turbidity and the speed and volume of stream flow.
Station 2 (What’s for Dinner?) consists of:
* 1. a student survey and identification of macroinvertebrates in the stream
2. an examination of plants, insects and other critters found on or near the stream
bank.
Station 3 consists of teachers’/students’ choices of games relating to conservation such
as Web of Life, Who’s Your Daddy?, Macro Mayhem, Food Web Tag, etc.
Station 4 consists of a specialist-led discussion of conservation issues such as:
1. the factors affecting stream quality, e.g., impervious surfaces, erosion, storm
drains, culverts, trash, and garbage
* 2. the impact of people on trout.
Station 5 consists of:
1. Trout Unlimited volunteers demonstrating fly tying/casting, use of fishing gear
2. student participation in fly tying/casting practice
Although no specific Station has been designated for that activity, no Trout in the
Classroom program can exist without the release of the trout. Please note that keeping
count of the number of fingerlings released is a critical part of this activity, partly because
Maryland’s Department of Natural Resources requires an accurate tally of yearly TIC
releases by stream.
A naturalist-led stream walk could be both an enjoyable and instructive part of a release
program. The appropriate county’s Parks Department or Department of the Environment
may have a naturalist on staff who could both conduct the talk (see Station 4 above) and
lead such a walk if given sufficient advance notice of the opportunity to do so.
It also is recognized that time constraints may not permit the full range of activities listed
in the Optimal Release Program and therefore priority should be given to the activities
asterisked above.
21
D. EQUIPMENT NEEDED
1. For the stream habitat study:
a. a water testing kit
b. kick seine
c. hip boots
d. table and chair
e. white plastic sheet or cutting board for specimens
f. turkey baster to siphon up macroinvertebrates
g. clear bowls and specimen jars for samples
h. magnifying hand-held viewer box (Acorn Naturalists, T-2345 or equivalent),
magnifying glasses, and measuring tape to set up stream flow measurements
2. For the angling demonstration:
a. rods and reels
b. lures, flies, and fly-tying equipment
3. For the trout release and count:
a. 12-oz. cups
b. 2 or 3 aquarium nets (6x4 inches)
E. SAMPLE AGENDA FOR TROUT RELEASE PROGRAM
9:15 AM - 9:45 AM:
Students arrive with fingerlings in coolers which bear school
identification
9:45 AM - 10:00 AM:
Welcome and overview of day’s activities
10:00 AM - 11:00 AM: Two 25-minute sessions with 5 minutes between each
11:00 AM - 12:00 PM: Trout releases, including time for acclimatization.
This early time has been chosen to release the fingerlings into
the stream in order to keep the fingerlings from becoming
overstressed.
12:00 PM - 12:30 PM:
Lunch
12:30 PM - 2:00 PM:
Three 25-minute sessions with five minutes between each
2:00 PM - 2:15 PM:
Closing Ceremony including a report of the number of trout
released by school; students/teachers depart
2:15 PM - 2:45 PM:
Clean up, volunteers depart
22
F. SAMPLE SCHEDULE FOR
MULTIPLE SCHOOL PARTICIPATION
IN A TROUT RELEASE PROGRAM
TIME
Station 1:
Home Sweet
Home
Station 2:
What’s for
Dinner?
Station 3:
Food Web
Activity
Station 4:
Conservation
Discussion
Station 5:
Fly tying/
casting
10:00 AM to
10:25 AM
Group A
Group B
Group C
Group D
Group E
10:30 AM to
10:55 AM
Group B
Group C
Group D
Group E
Group A
11:00 AM to
12:00 PM
RELEASE TROUT
12:00 PM to
12:30 PM
LUNCH
12:30 PM to
12:55 PM
Group C
Group D
Group E
Group A
Group B
1:00 PM to
1:25 PM
Group D
Group E
Group A
Group B
Group C
1:30 PM to
1:55 PM
Group E
Group A
Group B
Group C
Group D
2:00 PM to
2:15 PM
CLOSING CEREMONY
23
CHAPTER 10. END OF YEAR CLEAN-UP
A. INTRODUCTION
At the end of the TIC season, it is important to clean your tank set-up to ensure success in
the following year. Furthermore, if you take time to make sure that everything is clean,
your equipment will last longer.
B. DIRECTIONS FOR FINAL CLEANING OF THE TANK
1. Turn off the electrical pumps, chillers, filters, etc. Empty the tank almost all the
way, by your usual method. Many people like to use the gravel cleaner to do this
work. Remove the gravel and finish emptying the tank.
2. Disconnect the tubing.
3. Using a solution of 1 part unscented Clorox to 10 parts water, wipe down the
interior and exterior of the tank. Alternatively, you can use a solution of 1 part
white vinegar to 5 parts water. A soft sponge (dedicated to this use only) can be
used, scrubbing hard to remove scale and algae growth. Stubborn scale/algae can
be scraped off by careful use of a straight-edged safety razor blade.
4. The same solution used above can now be used for cleaning out the tubing. Use
long brushes which can be bought at any pet shop.
5. Rinse the tank to remove any chlorine/vinegar and wipe dry with clean cloth, or
let air-dry.
6. Wash and dry the gravel by spreading it out on a cloth or towel and placing it in
the sun or in a ventilated area. The gravel can also be sterilized using the Clorox
or vinegar solution, but then it MUST be rinsed with tap water and completely
dried.
7. Put the gravel inside the tank, cover the tank with a dust-proof cover, and store in
a safe place.
24
C. DIRECTIONS FOR FINAL CLEANING OF THE CHILLER
1. Drop-in Chiller (TradeWind, Glacier)
a. Using a bleach or vinegar solution, as described above, and a dedicated
sponge, wipe off the stainless steel Freon tubing.
b. For hard-to-remove plaque, use a small plastic scrub brush. Never use a wire
brush on these tubes.
c. Remove dust and lint from the fins of the coolant tubing (those black thin slats
on the side of the chiller). Use a small vacuum cleaner, dusting cloth, or soft
plastic bristle dust brush to do this. Your chiller will run more efficiently if
you remove the lint and dust.
2. Flow-through style Chiller (Arctica Titanium, AquaChill, Via Aqua, Polar
Bear)
a. Rinse pre-filter sponge on pump thoroughly with water, and let air-dry.
b. Tip chiller and drain. Using pump or faucet hose, flush chiller with clean tap
water in each outlet to ensure that all dirt is washed out of the cooling tank.
Then tip further to ensure it is fully drained.
c. Remove dust and lint from all vents on the chiller, using a small vacuum
cleaner, dusting cloth, or soft plastic bristle dust brush.
D. DIRECTIONS FOR FINAL CLEANING OF THE FILTER
1. Take apart the filter and scrub the plastic parts clean with a 1:10 bleach solution
or 1:5 vinegar solution as described above.
2. Thoroughly rinse all filter media, i.e., filter sponges, charcoal, pre-filter, etc., with
tap water. Spread on a towel and place in the sun or a well-ventilated area to dry.
Scrub the ceramic cylinders free of all debris. This year’s filter cartridge may be
used for the following year if it has been thoroughly cleaned. Alternatively, it can
be replaced by a new filter cartridge.
3. Thoroughly air-dry entire filter apparatus.
4. When all components are dry, re-assemble the filter and store inside the tank.
25
CHAPTER 11. WHAT SHOULD I DO IF…?
EGGS AND HATCHING
How should I assemble the breeder box (hatching basket)?
The breeder box is designed to protect eggs and very young fish from physical harm. The
plastic frame should be secure and free of sharp edges or scrap plastic. The net should be
free of holes or damage. The manufacturer designed the net to be placed around the
outside of the plastic frame. However, a safer environment for the eggs and hatchlings is
achieved by placing the net inside the breeder box and securing it at each corner with
needle and thread, aquarium sealant, or twist ties. The net can be loose, but should not
float up as this could let the eggs fall out of the breeder box.
When should the trout be allowed out of the breeder box?
It is generally agreed that trout should remain in the breeder box as long as possible, even
after some start to jump out on their own. Once all the trout are able to swim freely and
have been feeding actively for a week or two, they are likely to be strong enough to
navigate the currents of the tank and can be released into the tank.
How do I let the trout out of the breeder box when it is time?
The breeder box may be gently removed from the sides of the tank and lowered slowly to
the bottom. The trout can swim out from there. This allows some trout to remain
protected in the breeder box for a few more days. Tip the basket very gently to remove
any lingering fish before removing it from the tank. Placing a Bio-Max media filter bag
on the filter and chiller intakes will ensure that small fish are not suctioned into these
units.
Some of my hatched fish are not eating. Some of my fish are deformed. Is this
normal?
Yes. During the growth process, some fish will die. Some fish may survive initially only
to die later because they never begin to eat. Other fish will be deformed, and very often
will also die. This is a natural part of fish reproduction. It is not normal, however, for
very many or most of the fish to die. If this is the case, there may be a problem with the
tank environment.
What do I do with my eggs or fish in an emergency?
In an emergency, eggs can be preserved by placing the breeder box in a container of dechlorinated water and putting the container holding the eggs into a cooler containing one
or more ice packs. Use a thermometer to carefully manage the amount of ice or ice packs
needed to keep the eggs around 50°F (10°C). Do not add ice directly to the eggs. Place
the ice around the outside of the egg container. Ice water may be dirty and the rapid
melting from immersion would cause sudden temperature changes that might do the eggs
more harm than good.
26
With fish, particularly large fish, the only option in an emergency is to add previously
prepared plastic bottles of frozen water which have been externally washed with dechlorinated tank water. Do not fill these plastic containers to the top with water before
freezing since water expands in the frozen state and will push off the top of the container
as it freezes. Alternative strategies include the use of clean ice packs or sealed plastic
bags of regular ice. It is possible to regulate temperature by adding or taking away ice in
this way. Do not add tap water ice cubes directly to the tank. This ice probably has
chlorine in it, which can harm the fish. Tank-water ice cubes can be prepared and stored
for these emergencies. If the tank itself is not useable, a clean 5-gallon bucket can hold
fish in an emergency.
Can I keep eggs or fish in a household refrigerator?
No. Refrigerators are not an acceptable substitute for the tank environment. Because most
refrigerators operate between 350F and 400F, they are far colder than the tank.
My eggs have hatched. What should I do with the egg shells?
The discarded egg shells will decompose naturally in time. If they appear to be hosting
fungal growth, they should be removed and disposed of. Just as with living eggs, they
might turn opaque white, or may take on a fuzzy appearance. If this is the case, remove
them.
What do I do with dead eggs or dead fish?
Remove dead eggs, dead fish, and decaying waste matter (e.g.discarded food) as soon as
possible with a turkey baster. Do so at least once a day, and even more often during
critical periods or as needed. This process alone is very important in keeping the
remaining fish alive. Poor cleaning is very often the root cause of excessive fish death.
Why are so many of my eggs or fish dying?
Death is a natural part of fish development. Everyone should expect to lose eggs and fish.
The exact survival rate is highly variable and based on many factors. A sudden spike in
mortality can indicate a tank problem. It is also worth noting that there are two naturally
high-mortality periods: first during the egg stage and then again when the trout first learn
to feed. Some fish never learn to feed and simply starve.
What is a normal death rate?
Death rates are different from one stage to the next. With green eggs, a large percentage
is expected to die. With eyed eggs, a higher survival rate is expected. The loss of most of
your eyed eggs does suggest a problem. As the fish hatch, and age further, survival rates
should improve. By the time fish are free swimming and have learned to eat, death should
be an uncommon event. Losing many free swimming fish, above all else, is a sign that
the tank environment is not healthy. As they grow, fish produce more waste, so cleaning
and water changes may be needed more often.
27
FISH
My alevin are very active and are pushing other fish into the corners of the basket.
What does this behavior suggest? Should I be feeding them more?
This is normal activity. In this stage, young trout prefer dark corners. It may help to put
some screen material over the breeder box to reduce the amount of light these fish are
exposed to. UV light can be harmful to eggs and alevin. Fish at this age do not need food
at all. When beginning to feed, at the end of the alevin stage, start with small amounts as
recommended in Chapter 8..
Trout are being sucked into the filter. How can I prevent this?
Use BioMax media bags over filter intake.
How sensitive are the fish to temperature changes?
For best results, the tank water temperature for trout should be maintained as close as
possible to 52°F (11°C). Fish can handle small fluctuations of one or two degrees, but
sudden changes of almost any scale will be stressful. Rapid changes of 50F (30C) or more
are a serious threat to trout survival.
What should I do if all the fish are lethargic, unmoving at the bottom of the tank,
gasping for oxygen at the top of the tank, or don’t respond to food?
Do a 20% (10-gallon) water change.
Why are my fish or eggs dying at an abnormally high rate?
Poor water quality, as a result of insufficient cleaning or water changes, is among the
most serious threats to fish health. It is essential that water changes of 10% per week for
alevin and 20% per week for older and bigger trout be maintained, using de-chlorinated
tap or well water. Other causes of fish death might be sudden pH or temperature
fluctuations, lack of aeration, and chemical exposure. High ammonia concentrations can
result in sudden fish death. Daily water testing will show if the tank water is experiencing
continuing high ammonia concentrations. Dealing with ammonia spikes is covered under
the Water Quality section below.
Most of my fish died in the first month. Is this common?
Massive fish death is commonly found in the first month. Eggs and young fish are easily
stressed, putting them at greater risk of death due to fungus, changes in water quality or
large swings in water temperature. It is useful to practice water changes and tank cleaning
before the fish arrive and to continue this process regularly while caring for the fish.
What if I come in and many of the trout have died?
1. Remove healthy fish first and put them into into a bucket filled with the dechlorinated water and 1 or 2 frozen bottles of ice you have prepared for
emergencies.
28
2. Put a battery-operated aerator or tank’s air stone in the bucket.
3. Add Microbelift to the bucket, following package instructions.
4. Turn off the chiller.
5. Remove as much water from the tank as possible (80%).
6. Leave pump and filter intake covered.
7. Clean tank with clean scrub sponge and gravel cleaner. Remove as much crud as
possible.
8. Refill tank with any water available. If the available water is chlorinated, e.g., tap
water, use a de-chlorinating agent.
9. Turn the chiller back on.
10. Cool the water with prepared de-chlorinated ice or freeze packs externally washed
with de-chlorinated water.
11. Drain the filter, clean the filter media, and replace at least one charcoal filter.
12. Add MicrobeLift as soon as possible.
13. Put fish back in tank.
14. The next day, add more MicrobeLift.
CHILLER
Does it matter where I put the chiller?
Yes. The best place to put a drop-in chiller is next to and level with the tank to ensure
that the chiller coil can be completely submerged. The best place for an in-line chiller is
next to and level with the tank. Placing an in-line chiller above or below the tank can
affect the water pressure and flow rate in the system. It is also essential for in-line chiller
tubing to be free of kinks or excessive bends, possibly by increasing the tubing length.
How can I prevent leaks in an in-line chiller?
Once a chiller system is assembled, a leak is unlikely to develop. However, physical
contact with the system such as tugging on the tubes could damage connections. For this
reason, students should not touch chiller hardware without supervision. A serious leak
will pump the entire contents of the tank onto the floor within a very short time. Drop-in
chillers do not leak as no water flows through them.
29
Can I fix leaks in my in-line chiller on my own?
The assembly of the chiller system is straightforward, so fixing it without assistance is
quite possible. Simply unscrew the connection, and make sure that it is not cracked or
damaged in any way. Next, reassemble the leaking connection carefully. You can use a
tool to tighten any connection, but do not force any plastic parts as they will crack under
excessive strain.
What if the chiller runs continuously?
If the chiller runs continuously, contact your TIC coordinator, as it may need more
refrigerant or, in the case of a drop-in chiller, check whether dust or dirt is restricting
action of the cooling fins.
What do I do if my chiller stops working?
Try to maintain water temperature by putting one or two of the previously prepared jugs
of frozen water in the tank. Replace as necessary until a replacement chiller arrives.
Obtaining an Emergency Replacement Chiller
Potomac-Patuxent Trout Unlimited has a spare chiller for emergency use. Please phone
Jim Greene (301-652-3848) or Chuck Dinkel (301-831-3637) to arrange for its delivery
and installation.
WATER QUALITY
Do I need to age tank water before first filling the system?
No, the break-in period will age the water before fish are introduced.
My tap water is discolored. Is this ok?
All water will have some color, most often a faint green or white. Tap water that is not
acceptable might appear very cloudy or may have a strong chemical smell. If this is the
case, an alternate source of water should be considered.
The water in my tank is cloudy. What should I do?
Cloudy water probably indicates too much decaying matter. This may be from dead fish,
leftover food, or a filtration problem. The best way to handle this problem is to:
1. Conduct regular water changes.
2. Clean the tank of all solid material.
3. Make sure the filter is functioning properly and that water is flowing through it.
4. Clean filter components, if needed, with aged or well water but do not use soap
or any chemical cleaners.
5. Replace carbon filter packs annually.
6. Keep reducing the amount of food until fish consume all they are given within
10 minutes. Excess food should be removed and discarded.
30
How do I know if my water is safe for trout?
Most well water is acceptable for use in the tank. Tap water must be de-chlorinated to
become safe for trout. This can be done by letting the tap water stand in the tank or
bucket for at least 48 hours. This permits the chlorine to vaporize out of solution before
use in the tank. This is called “aging” the water. Alternatively, a “tap water conditioner”
can be used for rapid de-chlorination.
How should I conduct water changes? What is the right amount of water to change?
Water changes are an important part of tank maintenance to provide a healthy
environment for the trout. It is best to change about 10 gallons of tank water every week,
using well water or tap water that has been de-chlorinated by “aging” or by the use of a
tap water conditioner. A gravel vacuum is an efficient way to clean the tank and remove
water at the same time. Twice-a-week cleaning, i.e., removing 5 gallons of tank water
each time, will keep the tank clean as well as generate a weekly 10-gallon water change.
Should students wash hands before touching tank water?
Before working in or around the tank, students’ hands must be washed, thoroughly rinsed
of contaminants such as soap and lotions and thoroughly dried because trout are
extremely sensitive to chlorine.
Should students wash up after contact with tank water?
Yes. While tank water is not particularly hazardous to students, they should clean their
hands with soap and warm water. Please do not use soap until all tank work is done.
What is an ammonia spike? What can I do about it?
An ammonia spike is one example of a chemical imbalance in the tank environment.
These are serious threats to fish health. The tank filter and its bacterial population help
reduce problems like this, but they cannot work alone. The best way to prevent any
chemical imbalances in the tank is to regularly clean the tank and change the water. All
debris such as food, waste, and dead fish should be removed as soon as possible. Water
changes of 10 gallons per week are required and should not be skipped. There is no
replacement for regular cleaning and water changes. See Appendix E for a description of
the nitrogen cycle.
Can I use ammonia removal grains to prevent ammonia spikes?
They may be used only in a dire emergency if a large water change doesn’t reduce the
ammonia. These chemicals tie up the ammonia in the water, rendering it harmless to the
fish. However, by tying up the ammonia, it deprives your biological filter (the “good”
bacteria) of the food it needs to live and grow. So in the long run, while you have reduced
your ammonia, you are killing off your long-term ammonia reducer (your biological
filter).
31
POWER FAILURE
What happens if there is a power failure? How much time do I have?
It is important that the fish have as stable a water temperature as possible. Short
downtimes of an hour or two probably will not harm the fish or change tank temperatures
significantly. However, lost power over a weekend or worse still, a long vacation,will
likely be fatal to the fish.
What should I do if the power must be turned off?
The custodians who are authorized to turn the power on and off should be informed that
the trout system needs constant power. If constant power is not possible, see if you can
cycle the power. This means running the chiller for two hours on, then two hours off.
This is better than simply letting the tank sit all day without power. It is best to prevent
any such problems and carefully maintain the tank environment. The priority in an
emergency is getting the tank environment back to normal. No emergency procedure can
replace the stability of a working tank.
TANK
What tools are needed for tank installation?
The only tools needed for tank installation are a screwdriver, a knife or pair of scissors,
and pliers to tighten any connections if needed. You may also need 3 clean 5-gallon
buckets to assist in filling the tank and for water changes. These can be purchased at any
hardware store. Rinse the buckets first and then do not use these buckets for anything
other than tank water.
How tight should plastic parts be?
Plastic parts need to be tightened by hand. They should be as tight as possible without
risking damage.
The tubing is very hard to fit over the plastic tank parts. What should I do?
A small amount of Vaseline on the fitting may help. If tubing still doesn’t fit over parts, it
might help to dip the end of the tube in very hot water. This will momentarily soften the
plastic, allowing you to slide the tubing over the part. Also, tubing can be carefully
stretched by heating the ends, and then inserting a rigid object like a pair of scissors into
the end. This applies pressure to the end and stretches it a small amount. Excessive force
can break the tube end. Tight tubing generally will fit, but it might require some time and
patience.
Is it safe to use metal tools on plastic parts?
The use of metal tools is OK when great care is taken. It is more important that parts be
screwed in place in the proper position. No amount of force can replace good alignment.
32
What tool should I use to tighten the hose clamps?
Some hose clamps come with thumb screws that allow tightening without tools. Others
only require a screw driver. Hose clamps should be tight, but should not be forced. Plastic
parts could be broken with too much force.
How can I help keep a stable tank temperature?
It is important that the chiller always be on and set to the appropriate temperature of 52°F
(11°C). The use of insulation will help the chiller maintain a stable temperature. When
using unchilled de-chlorinated water in a 55-gallon tank, limit changes to 5 gallons at
any one time, because unchilled water will increase the temperature in the tank.
Why is the air stone needed?
Aeration of the tank is an important part of simulating a stream environment. The stream
environment is not only cold, but also constantly moving and constantly mixed with air.
Because of this, it is important that filters, air stones, and the chiller pump all operate
well. The pre-filters on the chiller pump, the intake on the tank filter, and the surface of
the air stones should all be clean and free of debris.
Where do I position the air stone?
The air stone aeration system produces a large volume of bubbles. These bubbles can
interfere with the filter operation by filling the motor with air and causing it to “air lock”
and fail. For this reason, there should be at least 4 inches between the air stone and the
filter.
My tank is coated with a green slime. What is this? What should I do?
Green films or slime may indicate the presence of algae. This will not necessarily hurt
your trout and some teachers leave it growing. Many, however, choose to remove it,
using an aquarium or other soap-free sponge or similar tool. To prevent further growth of
algae, limit the amount of light entering the tank (See Chapter 2, section A.3 for
instructions on providing a proper lighting environment for the trout).
Should I get a lid for my tank?
Yes, it is better to cover the tank with some material to prevent objects from falling in,
trout jumping out and to provide the reduced light levels that fish prefer. (See Chapter 2,
Section A.3 for instructions on preparing a lid for the tank.) Purchased tank lids can also
work, but it is important not to use the light feature if provided in the purchased lid.
Does my tank need insulation?
Many tank systems have worked without insulation. However, insulation will provide a
darker, more stable environment for the fish. Insulation will reduce the amount of work
needed to maintain the water temperature, save electricity and limit the amount of time
the chiller will be operational (See Chapter 2, Section A.3)
What kind of insulation can I use?
There are many materials which can help insulate the tank. The most popular is
Styrofoam, available at any home repair/industrial hardware store. Two layers of bubble
33
wrap also would make a good insulator. For best results, cover the bottom of the tank as
well. Many other materials can work including plastic, wood, or cardboard (see Chapter
2, Section A.3 for recommended insulation).
I am using the same tank system I had last year. What do I need to do to make it
ready this year?
At the beginning of each year, you should clean all parts of the tank system with warm
water. Do not use soap on any part of the tank. You should also replace any disposable
filter parts. (See Chapter 10, “End of Year Clean-Up”, for more information.)
EMERGENCY INSTRUCTIONS
How can I inform custodians, or other teachers, about what to do if there is an
emergency while I am away?
A written protocol for handling emergencies should be prepared by the teacher and
discussed with the designated emergency back-up person(s) by the time the trout eggs
have hatched. This document should include the following:
1. Basic information about the tank set-up
a. The tank needs a constant flow of electricity.
b. The chiller is a critical component of the tank set-up, because it keeps the
temperature of the tank water at about 52°F (11°C). This is a requirement for
trout survival. The chiller is located _________________________________
2. Instructions for keeping the trout alive under emergency conditions. An
emergency condition is either a chiller failure, i.e., tank temperature has risen to
60°F (15.5°C) or more, or a power outage.
a. The trout in this tank need cold water to survive. If possible, turn the
electricity back on to restart the chiller.
b. To reduce the temperature of the water in the tank, place two or three
previously prepared one-liter plastic bottles containing frozen tank water.
These plastic bottles are located _________________________________
c. With a net, located _________________________________, remove all dead
fish and uneaten food from the tank. If more than six fish are dead, do a 10gallon water exchange.
d. Three 5-gallon buckets and a siphon, located __________________________,
are needed for a water exchange. One bucket should be empty and the other
two filled with either well water or prepared de-chlorinated tap water.
e. Siphon off two 5-gallon buckets of tank water into the empty bucket and
discard the water.
f. Slowly empty one full bucket into the tank.
g. Repeat, using the other full bucket of de-chlorinated water.
34
3. Contact information for help in emergencies:
a. Name _______________________________________
Land Line ____________________________________
Cell Phone ___________________________________
b. Name _______________________________________
Land Line ____________________________________
Cell Phone ___________________________________
I ran out of food. What do I do?
Contact a TIC volunteer or Coordinator.
35
CHAPTER 12. TEACHING AIDS
Here are some teaching aids that might help energize your students about TIC. While
they are fun, they also help teach about trout.
A. TROUT COLORING FEATURES:
1. The lateral line is often marked by color.
2. Most trout have small spots.
3. Many trout never lose their parr marks—the dark, oval-shaped splotches along
their bodies that can be a form of camouflage.
4. Coloring of a trout often matches their environment to some degree.
5. Males and females within a species can have different colors.
6. Colors can change over the lifetime of a trout, usually becoming more distinct and
vivid as they age.
7. Trout colors become even more vivid at spawning time.
B. TROUT PICTURE RESOURCES
Behnke, Robert J. Trout and Salmon of North America. Illustrated by Joseph R.
Tomelleri. New York: The Free Press, 2002.
Prosek, James. Go Fish: A Fishing Journal. New York: Stewart, Tabori & Chang, 2000.
_____. Trout: An Illustrated History. New York: Alfred A. Knopf, 1997.
_____. Trout of the World. New York: Stewart, Tabori & Chang, 2003.
James Prosek’s website is www.troutsite.com.
36
CHAPTER 13. POTENTIAL TIC
FUNDING SOURCES
MARYLAND DEPARTMENT OF NATURAL RESOURCES: AQUATIC
RESOURCES EDUCATION GRANTS
Maryland’s Aquatic Resources Education (ARE) Grants Program assists public and
private schools (pre-K-12) and environmental education centers that are part of the public
school system by providing funding for aquatic-based projects. Schools can apply for up
to $2,000 per school year for student-driven projects that benefit Maryland’s aquatic
resources.
http://www.dnr.maryland.gov/education/are/aregrants.asp
CHESAPEAKE BAY TRUST MINI-GRANTS
The Chesapeake Bay Trust Mini-Grant Program awards up to $5,000 to support activities
at schools and non-profit organizations that help promote awareness of and participation
in the restoration and protection of the Chesapeake Bay and its tributary rivers and
streams. The Mini-Grant Program is supported by a partnership with the National
Oceanic and Atmospheric Association Bay Watershed Education and Training Program.
http://www.cbtrust.org/site/c.miJPKXPCJnH/b.5457547/k.28ED/Mini_Grant.htm
TOSHIBA AMERICA FOUNDATION GRANTS
Applications for grants under $5,000 are accepted year-round. Check the Web site for
grades K-6 and 7-12 application rules. Deadline for grants over $5,000: February 1st or
August 1st. The Toshiba America Foundation encourages teacher-led, K-12 classroombased programs, projects, and activities that have the potential to improve classroom
experiences in science, mathematics, and technology.
CAPTAIN PLANET FOUNDATION
The mission of the Captain Planet Foundation (CPF) is to support hands-on
environmental projects for youth in grades K-12. Our objective is to encourage
innovative activities that empower children around the world to work individually and
collectively as environmental stewards. Through ongoing education, we believe that
children can play a vital role in preserving our precious natural resources for future
generations.
BEST BUY SUPPORT FOR INTERACTIVE TECHNOLOGY
The Best Buy (www.BestBuy.com) te@ch program recognizes creative uses of
interactive technology in K-12 classrooms. The purpose of te@ch is to reward schools for
successful interactive programs they have launched using available technology. This
program has deadlines; check the website to find them. To apply, educators must first
register as an applicant and identify a Best Buy store within a fifty-mile radius of the
school.
37
TOYOTA TAPESTRY GRANTS FOR TEACHERS
Open to K-12 teachers of science residing in the United States, or U.S. territories or
possessions. All middle and high school science teachers and elementary teachers who
teach some science in the classroom are eligible. This program has deadlines; check the
website to find them. Proposals must describe a project, including its potential impact on
students, and a budget up to $10,000 (up to $2,500 for mini-grants). Environmental
Education is one of their three target categories.
KIDS IN NEED TEACHER GRANTS
Kids In Need Teacher Grants provide K-12 educators with funding to provide innovative
learning opportunities for their students. The SHOPA Kids In Need Foundation (KINF)
helps to engage students in the learning process by supporting our most creative and
important educational resource – our nation’s teachers. Businesses work through KINF to
sponsor classrooms.
OUTDOOR CLASSROOM GRANT PROGRAM
Lowe’s Charitable and Educational Foundation, International Paper, and National
Geographic Explorer! Magazine have teamed up to create an outdoor classroom grant
program (TIC can be framed with stream study and release trips). The program focus is to
engage students in hands-on natural science experiences and allow enrichment across the
core curriculum. All K-12 public schools in the US are welcome to apply.
TARGET FIELD TRIP GRANTS
Education professionals who are employed by an accredited K-12 public, private, or
charter school in the United States that maintain a 501(c)(3) or a 509(a)(1) tax-exempt
status can apply for up to $1,000 for a class field trip. Educators, teachers, principals,
paraprofessionals, or classified staff of these institutions must be willing and able to plan
and execute a field trip that will provide a demonstrable learning experience for students.
38
39
APPENDIX A. STAGES OF TROUT GROWTH
EGG
Trout eggs have black eyes and a central line that show healthy development. Egg
hatching depends on the water temperature. It should be 50 to 55 degrees F (10 to 12.5
degrees C).
ALEVIN (Al-a-vin)
Once hatched, the trout have a large yolk sac used as a food source. Can you see it in this
picture? Each alevin slowly begins to develop adult trout characteristics. An alevin lives
close to the gravel until it “buttons up”.
40
FRY
Buttoning-up occurs when alevin absorb the yolk sac and begin to feed on insects found
in the water. Fry swim close to the water surface, allowing the swim bladder to fill with
air and help the fry float through water.
FINGERLING AND PARR
When a fry grows to 2 to 5 inches (5 to 13 cm), it becomes a fingerling. These trout are
being released at this stage into Great Seneca Creek in Germantown. When a trout
develops large dark markings, it then becomes a Parr.
41
JUVENILE
In the natural habitat, a trout avoids predators, including wading birds and larger fish, by
hiding in underwater roots and brush. As a juvenile, a trout resembles an adult but is not
yet old or large enough to have babies (or spawn).
ADULT
In the adult stage, female and male Rainbow Trout spawn in autumn. Trout turn vibrant
in color during spawning and then lay eggs in fish nests, or redds, in the gravel. The life
cycle of the Rainbow Trout continues into the egg stage again.
42
APPENDIX B. TANK INSPECTION RECORD
Day of
Week
Mon.
Tues.
Wed.
Thurs.
Fri.
50-55°F
(10-12.5°C)
Temp.
Remove
and count
Mortality
Water
Condition
Everything
working?
Equipment
6.5 - 7.6
pH
< 0.5 ppm
Ammonia
8 - 12 ppm
Dissolved
Oxygen
< 40 ppm
Nitrates
0 ppm
Nitrites
X
Clear?
Correct Level?
X
Filter _______
X
X
X
X
X
X
X
X
X
X
X
X
X
X
X
X
X
X
X
Clear ______
Bubbler_____
Chiller______
Level ______
Filter _______
Filter _______
Bubbler_____
Chiller______
Clear ______
Level ______
Clear ______
Bubbler_____
Chiller______
Level ______
Filter _______
Bubbler_____
Chiller______
Clear ______
Level ______
Filter _______
Bubbler_____
Chiller______
Clear ______
Level ______
Initials
of
Inspectors
43
APPENDIX C. THE NITROGEN CYCLE
When you first introduce fish to a new aquarium, the main problem is not the solid waste
produced by the fish, it is the ammonia (NH3) released into the water. This is very toxic
to the fish. The first of our friendly bacteria to spring into action are the Nitrosomonas
bacteria. These bacteria derive all the energy they need for growth and reproduction from
converting ammonia into nitrites. They live in several places such as soil, sewage, fresh
water, etc., and they thrive in places where there are high levels of nitrogen compounds.
These bacteria need large amounts of energy to divide and multiply and, because of this,
it takes a while for them to develop in the aquarium in such numbers as to be of use. It is,
therefore, very important that you do not stock a new tank to capacity immediately when
it is set up. Patience is a virtue and a minimal stocking level is needed to begin with (one
fish or maximum two or three fish depending on the size of the aquarium and the size of
the fish).
Once your first fish are installed and begin to feed, they will produce toxic ammonia and
carbon dioxide (CO2) from their gills, and solid waste matter. Ammonia is also
introduced into the aquarium by decaying matter such as solid fish waste, uneaten food,
and dead plant matter. Nitrosomonas bacteria present in the water will begin to convert
the ammonia into nitrites (NO2) and, in doing this, will begin to multiply. As the numbers
of Nitrosomonas increase and the ammonia levels correspondingly decrease, nitrite levels
in the water will rapidly start to increase.
Nitrite is almost as dangerous to fish as ammonia, and this is where the second batch of
“friendly” bacteria come into action—the Nitrobacter. These microscopic rod-shaped
bacteria begin to colonize the filter and feed on the nitrites (NO2) produced by the
Nitrosomonas bacteria. They convert them to nitrates (NO3), which are far less harmful to
fish and other animals. In doing this, they, too, begin to multiply their numbers until a
balance is achieved.
The byproducts, then, of this cycle are the carbon dioxide exhaled by the fish and the
nitrates produced by the bacteria. Both of these are used up to some degree by any
aquatic plants present. The carbon dioxide is used up by the plants in the action of
photosynthesis which produces oxygen back into the water, and the nitrates are consumed
by the plants as fertilizer to aid their growth.
In an ideal world, there would be nothing further to say, but, because we have aquariums
primarily to keep our fish, the stocking level of fish in relation to plants is almost always
too high on the side of the fish. There is nothing wrong with this but it does mean that
there will be more nitrates produced than the plants will need. Also, in some cases,
people set up aquariums without plants or with plastic plants as decoration. This means
that gradually, over a period of time, nitrates will build up in the aquarium to
unacceptable levels. It is for this reason that we perform partial water changes on our
aquariums at regular intervals.
44
As a final thought, when you clean out the filter in your tank to remove the solid wastes
that build up and clog it, it is vital that you use water taken directly from the tank to do
so. This is obviously best achieved at the same time as you do your partial water change,
thus utilizing the old water taken from the tank to clean your filters out with. The reason
for this is that if you use tap water to clean out your filter, the chlorine and chloramines
added to the water by the water board are deadly to the colonies of bacteria in the filter
media.
45


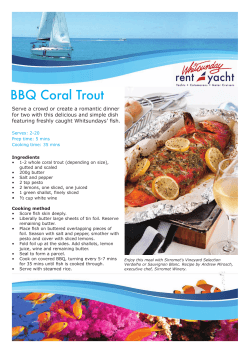


© Copyright 2026