
How to Coach Little League Baseball Coaches give Two Thumbs Up!
Coaches give
How to Coach Little League Baseball
Two Thumbs Up!
Straight shooting approach that
makes baseball fun again for the
players, coaches and the parents!
Jake Patterson has been coaching youth athletics for over twenty years. He holds a Graduate
Degree in Education and has a background in youth counseling. He has coached every level of
baseball from Tee-Ball to high school and has published several books on coaching youth
athletics. The book, How to Coach Little League: A Short Easy to Follow Guide on How to
Begin Your Little League Coaching Career has been used at some of the largest coaching
clinics in Northeast United States.
"Being the Webmaster of Baseball Almanac means I see a lot of coaching books over the
course of a year. Jake Patterson's How to Coach Little League was easily the best of the lot
during 2005. It was unique, informative, extremely valuable and easy enough to understand that
I found myself in the back yard with Erika (My 9-year-old daughter who plays coach pitch)
practicing actual techniques from the book minutes after I opened it."
- Sean Holtz, C.E.O. of Baseball Almanac, Inc.
“Great job on How to Coach Little League Baseball. It’s the first easy reading instruction
manual I found that helps me, the coach, deal with the not often talked about responsibilities of
coaching youth athletics.”
-Ed Charlton, President, Thompson Little League
Thompson, CT
“…The more information you get to the parents the fewer questions you have to answer during
the season. Love the schedules and the letters home, great section.”
-Lisa Lindstrom., President and Coach, Woodstock Little League
Woodstock, CT
How to Coach Little League Baseball
Second Edition
(2006)
Jake Patterson
Copyright © 2004, Jake Patterson
ISBN 1-59113-485-4
All rights reserved. No part of this publication may be reproduced or transmitted in any form or
by any means, electronic or mechanical, including photocopy, recording or any information
storage and retrieval system without written permission of the author.
Limit Liability and Limited Warranty:
The author and publisher have used their best efforts in preparing this book, they makes no
representations or warranties with respect to the accuracy and completeness of the contents of
this book and specifically disclaims any implied warranties. The information contained in this
book may not be suitable for all situations and age groups, you should consult the advise of a
professional where appropriate. Some of the exercise and stretching suggestions made herein
may not be suitable for all children or age groups and consultation with a physician or
professional is advised. The author or publish is not responsible for any legal information
contained herein. Information provided is provided as a coaching guideline only and the user
must seek the advise of legal counsel for any questions. The author and publisher are not
responsible for other coaching resources listed. The user is encouraged to contact those
resources directly for further information about the services and products they offer.
Booklocker.com, Inc.
2004
To the many coaches who made youth baseball a special part of my life and to the young
players that have made coaching a wonderful experience for me. Also, to Dad and JD who
always had time to play catch.
Acknowledgements
First and foremost, I would like to thank you, the volunteer coach. Without you the Little
League memories and dreams of many children would not be possible.
Jake Patterson
Former Little League Coach
SECOND EDITION
(February 2006)
DISCLAIMER
The clipart in this book has been obtained from publicly accessible file archives and royalty- free graphics
programs and software. They are used as “fair use” under 17 U.C.S. Section 107. Other graphic inclusions are
original works of the author.
“It was so long ago, I don’t remember how many games we
won or lost that year….
….but I do remember my dad coaching.”
Table of Contents
Acknowledgements ..........................................................................................................................................vii
Introduction .....................................................................................................................................................xiii
The Purpose of This Book................................................................................................................................ xv
Section 1. The Little League Coach ................................................................................................................... 1
1. YOUR MISSION AS A COACH................................................................................. 3
2. YOUR RESPONSIBILITIES AS A COACH.............................................................. 3
3. SUCCESSFUL COACHING ....................................................................................... 4
4. ESTABLISHING YOUR TEAM PHILOSOPHY ....................................................... 4
5. TEAM RULES ............................................................................................................. 5
6. THE QUESTION OF WINNING VERSUS TEACHING AND
DEVELOPING............................................................................................................. 6
7. TRYOUTS.................................................................................................................... 7
8. TRYOUT LETTER ...................................................................................................... 7
9. TRYOUT TALLY SHEET........................................................................................... 9
10. A WORD ABOUT ATTITUDE AND POTENTIAL .............................................. 10
11. THOUGHTS ABOUT TRYOUTS AND YOUR CHILD ....................................... 10
12. THOUGHTS ON PLAY TIME................................................................................ 11
13. ROLES AND RESPONSIBILITIES........................................................................ 12
14. RUNNING UP THE SCORE – WHEN IS ENOUGH, ENOUGH.......................... 15
Section 2: The Legal Responsibilities of The Coach ....................................................................................... 19
1. LEGAL DUTIES OF A COACH ............................................................................... 21
2. ADDITIONAL RESPONSIBILITIES ....................................................................... 21
Section 3. Safety............................................................................................................................................... 23
1. BATS .......................................................................................................................... 25
2. BALLS........................................................................................................................ 25
3. EQUIPMENT ............................................................................................................. 25
4. FIELD ......................................................................................................................... 25
5. OTHER ....................................................................................................................... 26
Section 4. Parents ............................................................................................................................................. 27
1. PARENTS’ CODE OF ETHICS ................................................................................ 29
2. OTHER ITEMS .......................................................................................................... 30
3. DIFFERENT TYPES OF PROBLEM PARENTS..................................................... 30
4. HEAR, UNDERSTAND, APPRECIATE, CONSIDER, FOLLOW UP
APPROACH............................................................................................................... 34
5. LETTERS TO THE PARENTS AND PLAYERS..................................................... 35
6. INTRODUCTION LETTER ...................................................................................... 35
ix
Jake Patterson
7.
8.
9.
PHILOSOPHY LETTER ............................................................................................ 36
RULES AND REGULATIONS ................................................................................. 38
TEAM MOM OR DAD .............................................................................................. 39
Section 5. Warming up and Exercise............................................................................................................... 41
WARMING UP THE PLAYERS ............................................................................................ 43
1. STRETCHING............................................................................................................ 43
2. HOW TO CONDUCT PROPER STRETCHING ...................................................... 43
3. DYNAMIC STRETCHING........................................................................................ 43
4. STATIC STRETCHING............................................................................................. 44
Section 6. Practices .......................................................................................................................................... 47
HOW TO CONDUCT A SUCCESSFUL PRACTICE........................................................ 49
1. PRACTICE CONSIDERATIONS.............................................................................. 49
2. ITEMS THAT HELP DURING A PRACTICE ......................................................... 50
3. PRACTICE SHEDULES ............................................................................................ 51
4. MASTER SCHEDULE............................................................................................... 52
DEFENSIVE POSITIONS AND FIELD NUMBERS ...................................................... 54
5. PRACTICE SCHEDULE DAY 1............................................................................... 55
6. PRACTICE SCHEDULE DAY 2............................................................................... 56
7. PRACTICE SCHEDULE DAY 3............................................................................... 57
8. PRACTICE SCHEDULE DAY 4............................................................................... 58
9. PRACTICE SCHEDULE DAY 5............................................................................... 59
10. PRACTICE SCHEDULE DAY 6............................................................................. 60
11. PRACTICE SCHEDULE (Blank) ............................................................................ 61
12. LAST THOUGHT ON PLANNING ........................................................................ 62
HOW TO GET AND KEEP THE PLAYERS’ ATTENTION ........................................ 63
1. MOTIVATION THROUGH MOVEMENT .............................................................. 63
2. GUIDELINES FOR MTM.......................................................................................... 64
3. ASKING FOR HELP.................................................................................................. 66
4. TOKEN PLAYTIME .................................................................................................. 67
Section 7. Basic Baseball/Softball Techniques................................................................................................ 71
THROWING A BASEBALL ................................................................................................... 73
1.
2.
3.
CHILDREN AND HOW THEY GROW AND THROW .......................................... 73
THE GRIP................................................................................................................... 74
THE THROW ............................................................................................................. 74
CATCHING A BASEBALL .................................................................................................... 76
1. THE GLOVE .............................................................................................................. 76
2. THE BASE (Lower Body) .......................................................................................... 77
3. THE UPPER BODY ................................................................................................... 78
4. THE CATCH .............................................................................................................. 78
x
How to Coach Little League Baseball
5. GROUND BALLS...................................................................................................... 78
SHORT TOSS RELAY DRILL ........................................................................................ 79
DOUBLE PLAY DRILL................................................................................................... 79
GROUND BALL CIRCLE DRILL................................................................................... 80
CATCHING AND THROWING DRILLS............................................................................ 81
TWO COACH GROUND BALL ROTATION DRILL ................................................... 83
OUTFIELD GROUND BALL/FLY BALL DRILL ......................................................... 84
ZIG ZAG DRILL............................................................................................................... 84
ROLL AND GO'S ............................................................................................................. 85
THE BASICS OF HITTING ................................................................................................... 86
1. THE BAT.................................................................................................................... 86
2. THE HANDS (Grip)................................................................................................... 87
3. THE STANCE ............................................................................................................ 88
4. THE HEAD ................................................................................................................ 88
5. THE UPPER BODY................................................................................................... 89
6. THE STRIDE.............................................................................................................. 89
7. THE SWING .............................................................................................................. 89
HITTING ADVICE ................................................................................................................... 90
HITTING DRILLS .................................................................................................................... 91
BATTING CAGE STATIONS.......................................................................................... 92
THREE TEAM ROTATION............................................................................................. 93
3-BOX STRIDE DRILL.................................................................................................... 93
BUNTING ................................................................................................................................... 94
1. TYPES OF BUNTING ............................................................................................... 94
2. THE BUNT................................................................................................................. 94
3. BUNTING DRILLS .................................................................................................. 95
BUNT CONE DRILL........................................................................................................ 96
BASE RUNNING ...................................................................................................................... 97
1. KEY ITEMS FOR THE RUNNER ............................................................................ 97
2. LEADS ....................................................................................................................... 97
3. PRIMARY LEAD ...................................................................................................... 97
4. SECONDARY LEAD ................................................................................................ 98
5. FACING THE FLY BALL AND TAGGING............................................................ 98
6. DIVING BACK TO THE BAG ................................................................................. 99
7. SLIDING .................................................................................................................... 99
8. RUNNING TO FIRST.............................................................................................. 100
MULTI TEAM RUN DRILL .......................................................................................... 101
SPRINT AND WALKS................................................................................................... 102
SIGNS ........................................................................................................................................ 103
xi
Jake Patterson
1.
2.
OFFENSIVE SIGNS................................................................................................ 103
DEFENSIVE SIGNS ............................................................................................... 104
CATCHING A POP FLY ....................................................................................................... 105
BASIC POP FLY COVERAGE ...................................................................................... 106
POP FLY DRILL ............................................................................................................. 106
CUT-OFF’S .............................................................................................................................. 107
CUT OFF'S (Man on first, fly ball to left field)............................................................... 108
CUT OFF'S (Man on first and second, hit to right field)................................................. 108
PITCHING ................................................................................................................................. 109
1. THE MOUND.......................................................................................................... 110
2. TWELVE STEP PITCHING ................................................................................... 111
3. PITCH COUNT (ARM SAFETY) ........................................................................... 114
1. THE FIELD GENERAL ........................................................................................... 117
2. CATCHING EQUIPMENT ...................................................................................... 117
3. BLOCKING THE BALL.......................................................................................... 118
4. FLY BALL BEHIND THE PLATE ......................................................................... 118
5. PICKING OFF A RUNNER..................................................................................... 119
RUN DOWNS .......................................................................................................................... 120
RUN DOWN (Second toThird) ....................................................................................... 121
RUN DOWN (First to Second) ........................................................................................ 121
GAME TIME ............................................................................................................................ 122
1. PRE-GAME .............................................................................................................. 122
2. DURING THE GAME.............................................................................................. 122
3. POST GAME ............................................................................................................ 122
Section 8. The Post Season ............................................................................................................................ 125
1. YEAR-END BANQUET .......................................................................................... 127
2. POST SEASON COACHES’ EVALUATIONS ...................................................... 129
Section 9. Appendices................................................................................................................................... 133
”KEEPING IT FUN” ....................................................................................................... 135
Who’s on First: Clueless Coaches .......................................................................... 137
OTHER RESOURCES FOR THE LITTLE LEAGUE COACH .............. 140
xii
Introduction
Becoming a coach is one of the most rewarding and enjoyable experiences you will ever
have. It is extremely important to the children you coach to be the best possible coach you can
be. This can only be accomplished one way. LEARN! There are two quotes that have guided me
throughout my coaching career. They are:
“He who dares to teach must never cease to learn.”
And
“The measure of a good coach is not how well he knows the
game, it’s how well he can teach it.”
There are many great books, videos and clinics available to the volunteer coach. The
Little League sponsors a great education program for coaches. You can obtain further
information by contacting the Little League at:
Little League Eastern Regional Headquarters
PO Box 2926
Bristol, CT 06011
Telephone: 860-585-4730
Fax: 860-585-4734
Email: [email protected]
xiii
The Purpose of This Book
The purpose of this book is to provide you, the Little League coach, with an easy-toread guide to assist you throughout your season. Please bear in mind I do not profess to know
everything there is to know about the game of baseball and softball. I have found, like many
things in life, that the more I learn, the more I realize how much there is to learn.
“The future Little League memories of our children are being made today.”
- Jake Patterson
xv
Section 1. The Little League Coach
How to Coach Little League Baseball
The Little League Coach’s Job
1. YOUR MISSION AS A COACH
Coaching Little League can be a very rewarding experience. It is very important
however, that you keep a proper perspective of what your priorities and mission should be at
this level of competition. Your primary responsibility is NOT to win! The pressure of winning
will come soon enough for these young athletes. Your primary mission as a Little League coach
is to:
TEACH & DEVELOP
Unfortunately, many coaches live their adult athletic lives through their young players.
Visions of days gone by cloud their judgment, and teaching and developing young players
takes a back seat to their own personal athletic gratification. While your personal experience, as
a former player will be very important throughout your coaching career, it is imperative to
remember that you are no longer a player, you are a coach. Knowing how to do something is
much different than knowing how to teach it. The later being a much more difficult endeavor.
2. YOUR RESPONSIBILITIES AS A COACH
It is important to remember that your players look up to you. You set the example. You
should always act like a coach when on the field and be aware of your actions when you are off
the field.
Other responsibilities include:
a. Safety.
b. Learning the game.
c. Being polite, kind and approachable.
3
Jake Patterson
d. Being fair by providing ALL players the opportunity to learn.
e. Making every player feel they are a part of the team regardless of their talent
level.
f. Dressing like, and looking like a coach.
g. Setting reasonable goals and expectations.
h. Teaching the fundamentals of the game.
i. Being positive no matter what the outcome.
j. Knowing and supporting Little League Baseball and Softball rules and
programs.
k. Being honest and not afraid of admitting your own mistakes.
l. Being open-minded.
m. Being a role model for the children.
n. Understanding that growth and progress come one small step at a time.
o. NEVER yelling at a child.
p. Setting rules and following them (See Rules section).
q. And remembering the game is for the children.
3. SUCCESSFUL COACHING
Determining whether or not you were successful at the end of the season is not as
difficult as some may think, and it does not only include your win/loss record. Evaluating your
success at the youth level can be determined by asking yourself the following questions:
a. Was I able to get the absolute best out of the athletes?
b. Did I leave the athletes feeling more confident about themselves as people,
and more confident in their abilities as athletes?
c. Did they enjoy themselves, and did they feel comfortable being an active
member of the team?
d. Did they excel in the concept of good sportsmanship and treating opponents,
teammates, fans and officials politely?
e. Did they learn the skills we taught them?
f. Did I leave them a little more prepared for life’s challenges?
4. ESTABLISHING YOUR TEAM PHILOSOPHY
Every coach is different and therefore his or her philosophies will vary. There are
however, basic expectations that should be required from the players. Establishing how you are
going to run the team and informing the players and parents on the first day is important for a
successful season. Your team philosophy should include:
a. Be the absolute best you can be at every practice and game.
b. Improve in your skills through practice.
c. Work hard at becoming physically fit.
d. Learn as much as you can about the game.
e. Always support the team and your teammates.
4
How to Coach Little League Baseball
f. Always conduct yourself in a respectful manner and represent the town and
your team with pride.
5. TEAM RULES
Team rules allow you run the team effectively and efficiently. They insure every
participant gets the most they can from the Little League experience by preventing the waste of
the team’s most precious resource; time. The following items should be reviewed with both
players and parents at the beginning of each season:
a. When the coach speaks everyone listens.
b. When you do not understand something, ask questions.
c. Stay focused.
d. Always use good sportsmanship.
e. Follow instructions.
f. No one leaves the field until all the equipment is stored and the field and
dugouts are clean. I sometimes tell the players, “I’m your coach, not your
maid.” Their mess, their responsibility.
g. Whistle blows, everyone stops.
h. When on the bench always yell encouragement, never yell instructions or
criticism.
i. Always work hard.
j. Learn the game.
k. No horseplay.
l. No one starts practice until the coach arrives.
Johnny Unitas
Many years ago I had the privilege of meeting one of America’s greatest athletes,
Johnny Unitas. Johnny and I were paired off as partners in a golf tournament.
During the match I found that Johnny was one of the most unpretentious guys I
have ever met and we quickly fell into, “a bunch of regular guys just playing golf
and talking routine.” I asked Johnny: “What was the most rewarding part of your
career?” He replied without batting an eye, “Teaching kids football. Of all the
things I accomplished, I enjoyed coaching kids the best.”
5
Jake Patterson
6. THE QUESTION OF WINNING VERSUS TEACHING AND DEVELOPING
Winning is a hotly debated topic in youth sports. Many sports psychiatrists feel that we
have gone too far, placing too much emphasis on winning. We developed the following table
several years ago with the help of college and professional coaches, and a sports psychologist.
It may help address your questions concerning this subject.
Table 1.1: Winning Versus Teaching and Developing
Categories
Category 1
Category 2
Category 3
Category 4
Category 5
Coaches’
Emphasis
WIN
WIN / DEVELOP
WIN / TEACH /
DEVELOP
DEVELOP / TEACH /
WIN
TEACH
Description
Primary function
is to WIN at all
costs. Jobs are
on the line.
Primary function
is to win while
further
developing.
Athlete is looking
at playing at a
higher level.
Primary function
is to teach the
finer points of
the game.
Winning IS
becoming a
priority.
Athlete has a basic
knowledge of the
game. Teaching and
developing is the key.
Winning is NOT the
priority.
Athlete has little to
no knowledge of
the game.
WINNING and
LOSING does not
matter. Teaching
the game to all
members of the
team is the priority.
Team Types
Level
Professionals
College
Olympic Team
National Teams
College
Semi-Pro’s
Olympic
Development
Teams
High School
American Legion
Babe Ruth
Little League AllStars
Tee Ball
Minor League
Little League
Recreation
Leagues
Typical Age
Group
Adults
Young Adults
Teenagers
(15-18)
High School JV
High School
Freshman
Middle School
Junior League
Senior League
Teenagers
(12-15)
Type of
Training
Training is very
hard and
vigorous. Those
that can’t keep
up are cut.
Athletes are
selected based
on their talent.
Expectation to
win is very high.
Training is hard
and vigorous
with emphasis
on development.
Athlete knows
the game and is
expected to
develop the finer
points.
Training is
somewhat hard.
Teaching is still
a key coaching
priority.
Commitment
Work is yearround.
Hard work
Seasonal Hard
Work, year
round
conditioning.
Work is
seasonal.
Athletes typically
play other
sports.
1
2
3
Fun Factor
(1= Hard Work,
10= Fun Play)
Copyright © 1999, Patterson Sports.
6
5-12 Year Olds
Training is NOT hard
and somewhat fun.
Coach is teaching and
developing the athlete
by improving basic
skills. Coach’s
primary job is to
prepare the athlete for
a good season of
play. Player effort
should be rewarded
with playtime
regardless of skill.
Seasonal and fun.
Athletes sometimes
play other sports.
Training is FUN
and fast moving
(game-like).
Coach’s only
concern is teaching
the game.
Everyone should
have an EQUAL
opportunity to play.
7
10
Seasonal and
always fun.
How to Coach Little League Baseball
7. TRYOUTS
Conducting tryouts is a very difficult process for a coach. Deciding who plays and who
does not, always results in broken hearts. While most Little Leagues provides guidelines for
this process, there are those instances where tryouts are necessary. Middle School teams, AAU
teams, and other non Little League teams can be used as examples. Keep in mind that most
Little Leagues are able to accommodate all players that want to play. Those players that don’t
make a Little League team are usually assigned to Minor League team.
There are several guidelines that can make the tryout or assignment process easier.
a. Establish standards prior to the tryouts. Ask yourself, “What are the criteria I
will use to select my players?” Avoid, at all costs the, “I know a good player
when I see him,” approach. The good players will not be your problem.
b. Communicate your standards via written letter to both parents and players. Ask
the parents to review the standards with their child at home. This helps both the
parent and the player understand what is expected and helps prepare the child
for their big day.
c. Do not allow parents on the field where tryouts are being conducted, unless they
are part of the coaching staff. It is unfair to both their child and to the other
players.
d. Review the tryout schedule and expectations with the players on the first day.
Tell them what you will be looking for and when you expect to make your cuts.
e. Plan for players that either cannot make tryouts or who are sick. The options of
how to handle this can range from special tryouts to no show/no play. The key is
to be prepared.
8. TRYOUT LETTER
The following is an example of a tryout letter I use. Please note, this letter would be
appropriate for players trying out on a school team and would have to be modified and adjusted
for the level you coach. It is best to get this letter out during a parent/player meeting prior to
tryouts. If this is not possible then I would suggest handing them out the first day of the tryouts.
7
Jake Patterson
Babson Tigers Baseball Tryouts
What To Expect And, What Is Expected
First and foremost welcome to the 2006 baseball tryouts. The reason for tryouts is simple;
we have more players trying out than there are team positions. If you do not make the
team and want to play DON’T get discouraged. KEEP PLAYING! The town has a
great Little League program.
We’ve listed three areas we are looking for during tryouts. Please remember that a spot
on last year’s team doesn’t necessarily mean an automatic place on this year’s team. We
expect returning players to work as hard as new players.
What we’re looking for:
#1.) ATTITUDE: Our coaching and playing philosophies puts attitude as the key
ingredient for having a successful team. We would rather work with a player with a good
work ethic and attitude than a person with exceptional skills that demonstrates poor
sportsmanship and is not willing to learn. Baseball is a team sport.
#2.) ABILITY: There are six key areas that you will be rated on. They are:
1.
2.
3.
4.
5.
Long and Short Distance Running: This gives us an idea of your speed,
and endurance, both essential elements of the game.
Catching
Throwing
Hitting
Overall Knowledge of the Game
#3.) POTENTIAL: Athletes develop at different rates. Some players demonstrate marginal
abilities but have exceptional talent. We will be looking at potential for future school teams.
This category however, will not count as much as attitude and abilities.
IF YOU HAVE QUESTIONS PLEASE ASK!
________________________________
Coach Patterson
[email protected]
8
How to Coach Little League Baseball
9. TRYOUT TALLY SHEET
To keep tryouts as fair as possible, it is necessary to develop measurable criteria. Do not
go into tryouts with preconceived notions on the player’s ability. Players develop at different
rates and there are always those that will surprise you.
I use a simple system that has helped me greatly over the years. Bear in mind it is not
the most talented players or the least talented players that present the challenge when selecting
your squad, the challenge usually lies in selecting those players from the middle of the group.
Having quantitative data helps. The following is an example of a tryout sheet. You may have to
adjust it to better fit your particular needs.
Table 1.2: Tryout Tally Sheet
Item
Player 1
Name:
Player 2
Name:
Player 3
Name:
Player 4
Name:
Player 5
Name:
Etc
RUNNING
Long Distance
Running
Shuffle Step
Cross Step
Back Step
Base Running
Speed
FIELDING
THROWING
Ground Balls
Fly Balls
Throwing
HITTING
Hitting
Bunting
OVERALL
Attitude
Potential
TOTAL
RANKING
I usually conduct school tryouts for three days, with the first cut being made on day
two. This gives me ample time to observe the player’s skills and abilities, and it gives the
players time to relax and demonstrate to the coaching staff what they can do. Little League
tryouts are usually held on one day, requiring heavy preparation from both the coaches and the
players.
9
Jake Patterson
When ranking the players I issue a tryout sheet to all my assistant coaches. They are
each tasked with scoring the player’s skills on their own. These sheets are kept with the coach
and are not reviewed with other coaches or players. Upon completion of the tryouts the coaches
meet to discuss their findings. Once the decision of who stays and who gets cut is made, the
sheets are destroyed and are not discussed with players or parents. I will not answer the
question, “Why did he make the team and I didn’t?” I will however, always take the time to
answer the question, “What do I need to work on in order to make the team next year?”
The scoring system I use is fairly simple and can be modified to suit your individual
needs. The scores are posted to each individual item and tallied at the end of the tryouts. The
top scores make the team. The scoring I use is as follows:
Table 1.3: Tryout Scoring
Points Awarded
Criteria
3
Player exhibits excellent mastery of this skill for this age group.
2
Player exhibits basic skills for this age group and can become proficient with further
training.
1
Player exhibits fair skill level for this age group and is trainable.
0
Player does not exhibit skills required for this level. Further development will be needed
before playing at this level.
10. A WORD ABOUT ATTITUDE AND POTENTIAL
As coaches we must recognize that attitude and potential are important elements when
selecting a team. I always reserve the right to award points to marginal players because they
exhibit exceptional attitude and potential. While these two elements are important, I do not rank
them above abilities. I will use them as a tiebreaker for the last few positions.
11. THOUGHTS ABOUT TRYOUTS AND YOUR CHILD
Having tryouts with your own child as a participant can be difficult. Drawing the lines
as to what is fair for your child and what is fair to other children is not always easy. There are
several reasonable guidelines I use that have helped me through this very difficult issue. They
are:
a. Paid Position. If you are a paid coach, you have the responsibility to be fair to all
children who participate. These positions are usually school teams. Your child needs
to be placed on the tryout squad with everyone else and they need to make the team
on their own abilities. Here, you are paid to do a job and are expected to do it well.
10
How to Coach Little League Baseball
b. Volunteer Position. Examples of volunteer positions include Little League,
recreation leagues, Pop Warner Football, etc. Here you are a volunteer and you
volunteer because of your child. I have always felt that certain latitude should be
given to the children of those willing to give their time. This does not mean
however, that your child should be given special treatment once the teams are
established and tryouts completed.
c. All Star Teams. Many coaches that do well during their regular seasons are asked to
become part of the All Star team coaching staff; this is especially true in Little
League. In this case your child should not be afforded special privileges. An All Star
team represents the league you belong to and must be made up of the league’s best
players. Most league volunteers have children that play, not all are good players. If
your child makes the team fine, if not, you will have to decide whether or not you
can coach the team without your child. I used my son as a team manager one year
and he loved it.
12. THOUGHTS ON PLAY TIME
Table 1.1 hopefully places some perspective to the topic of winning. Winning is
important in athletics. We don’t play to lose and I am not a big proponent of the, “Let’s not
keep score,” mentality, except at the Tee-Ball level. Children learn from winning, losing and
playing. The lessons they learn however are up to us as parents and coaches.
There are numerous books written by experts that explore the need for social
acceptance, and a sense of belonging in children. I won’t even attempt to go there. The
important thing is to recognize that a sense of belonging is critical to proper child development.
Many young athletes are made, or more importantly broken, by insensitive coaches that lose
track of individual playtime, or lack thereof. The Little League has guidelines for substitution
and playtime. Remember they are only guidelines and represent the minimum amount of time
each player should play.
Another important item here is that most coach-parent arguments are due to playtime.
Parents hate to see their children sit the bench and become angry when it happens too often.
Many headaches can be avoided by managing individual playtime well. Here are several
guidelines I use when coaching children.
11
Jake Patterson
Table 1.4: Playtime Guidelines
Level
Junior League
Senior League
Middle School Varsity
AAU
Travel Teams
Little League All Stars
Typical
Age
Items to Consider
12-16
1.
2.
3.
4.
5.
6.
7.
Little League (Regular Season)
Minor League
Tee-Ball
Town Recreation Leagues
Church Leagues
12 and
under
1.
2.
3.
4.
Start your best players.
Establish a role for everyone on the team, i.e.
back-up infielder, reliever, pinch runner, etc.
Try players at different positions during
practices and regular season games.
Include everyone during huddles.
In games that are clearly won or lost use
everyone on the bench
Rotate bench players so that the same players
do not sit game after game.
When ever possible, play everyone.
Rotate starters. Give everyone a chance to
shine during the regular season.
Everyone plays. Stay away from token
playtime (See article on Token Playtime).
Allow players to play various positions.
Include everyone during huddles.
Remember, the Little League also has guidelines concerning the amount of playtime
each player should receive per game. Keep in mind these are minimum guidelines and may not
necessarily represent the right amount of time for each of your players.
13. ROLES AND RESPONSIBILITIES
Well-established roles and responsibilities can be an important element to a successful
season. These roles include the head coach, assistant coach, team captain, manager and players,
and in some cases, a team mom or dad. This section will explain these roles and their
associated responsibilities.
It is important to note that I am not suggesting you utilize each of these roles for every
youth team. Every team’s needs are different and younger children may not possess the skills
necessary for the job of team captain or manager. I usually recommend using the roles of team
captain and manager at the middle school, high school, Junior League, Senior League, AAU,
and American Legion levels.
The following is and overview of each role and the associated responsibilities.
12
How to Coach Little League Baseball
Table 1.5. Roles and Responsibilities
Position
Overview
Responsibilities
HEAD
COACH
The head coach has the ultimate
responsibility for the team and team
activities. He/she is responsible for the
overall development of the team and
insuring every player has a positive
experience.
1.
2.
3.
4.
5.
Season master schedule
Daily practices schedules
Team’s Mission Statement
Establish team line-up
Discipline and counseling
ASSISTANT
COACH
The Assistant coach is there to assist
the head coach. They do not make
teams decisions or create situations
that are in conflict with the head coach.
They work at the discretion of the head
coach.
1.
2.
3.
Assist with practices
Advises head coach of problem areas.
Learn specific functions assigned by the
head coach such as hitting coach,
pitching coach, etc.
Perform duties required by the head
coach.
Learn the game.
Fills in for the head coach when
necessary.
Supports the head coach with parent
conflicts.
4.
5.
6.
7.
TEAM
CAPTAIN
Being selected Team Captain is an
honor. Coaches and players recognize
the Team Captain as a leader on the
team. Their main responsibilities
include leading warm-ups, exercises,
and performing other job functions
deemed necessary by the head coach.
It is important to note that the position
of team captain is a position of
responsibility, NOT a position of
authority. Team captains are part of the
team and NOT part of the coaching
staff.
Team Captain Selection Process:
Selection can be made in one of three
ways:
1.
Coaches select captains
based individual performance
and leadership ability.
2.
Players select captains based
on individual performance and
leadership ability by voting.
3.
Combination of 1 and 2.
13
A Team Captain:
1.
Shows up early for practice to assist with
equipment set up.
2.
Secures equipment after practice or
game.
3.
Helps insure all players have proper
equipment.
4.
Notifies coaches of problem areas.
5.
Notifies coaches of potential safety
problems.
6.
Leads warm-ups and exercises.
7.
Motivates through example.
8.
Assists teammates with problem areas
9.
Learns each position to the best of their
ability.
10. Insure team integrity is maintained by
including all players in all activities.
11. Assists with maintaining field after
practices and games.
12. Assists with pre-season field clean up and
the development of an, “our field, our job”
mentality.
13. Insures uniforms are properly worn.
14. Insures dugouts and buses are cleaned
after a game or practice.
Jake Patterson
TEAM
MANAGER
Team Manager’s primary responsibility is
team statistics, books and records. They
assist with administrative duties assigned
by the head coach. The position is an
appointed position that reports directly to
the head coach.
Team managers are selected based on
their ability to perform the necessary
assignments. Managers must have a
good working knowledge of baseball
statistics.
14
Team manger Is responsible for scorebooks
and team and individual statistics. They
include:
1. Batting averages
2. Hitting percentages
3. Slugging percentage
4. Stolen bases
5. RBI
6. ERA’s
7. Pitch counts
Other responsibilities can include:
Pre game:
1. Notify the coach if the team needs
water.
2. Insure game balls are available.
3. Insure medical kit is in the dugout
and available.
4. Report any absences (if known) to
coach.
Pre game (Book):
1. Obtain starting lineup from head
coach and neatly fill in scorebook,
lineup card, and umpire’s card.
2. Insure all player numbers, playing
positions and batting positions are
accurate, reporting any problems to
the head coach.
3. Obtain
starting
lineup
from
opponents
and
insure
both
scorebooks agree.
During the game:
1. Keep the book tracking strikes, balls,
hits, errors, stolen bases, RBI’s etc.
2. Stay available to coaches for lineup
questions.
3. Inform players of the batting order at
the beginning of every inning.
4. Insure the batters hit in sequence
announcing the next on-deck batter.
5. Inform coaches of opponent’s
previous at bats.
6. Insure all substitutions are recorded
properly and insure players are
aware of all changes.
7. Inform opponents of changes.
8. Cross check scorebook with other
team after the second, fourth and
sixth innings to insure they agree.
9. Insure the umpire’s count is well kept
reporting any problems to the head
coach.
How to Coach Little League Baseball
After the Game:
1. Insure the book is complete and
ready for statistical analysis.
2. Report scores and highlights to
school for school Website and/or
newsletter.
Keep in mind the above are guidelines only. You need to adjust the roles and
responsibilities you use based on your team’s specific needs.
14. RUNNING UP THE SCORE – WHEN IS ENOUGH, ENOUGH
We have all heard the stories of coaches that have gone too far with score management.
Unfortunately, games of 15-0 are not uncommon in all levels of baseball. I have even witnessed
a game with a score of 23-0, and that game was called in the fifth inning because the league
utilized a mercy rule. These games are going to happen; how you manage this type of game is
extremely important for the players on both teams. An easy way to avoid doing the wrong thing
is to ask yourself the question, “What are the children, on both teams learning?”
While there are considerable dynamics working in such a lopsided game, one thing is
certain - the children learn little when playing a game like this, if it remains unmanaged. An
unmanaged game is defined as a game where the winning coach does little to control the game
and his/her intent is to run the score up.
On the other hand, regardless of the score, I have never told a player to strike out, make
an error, or blow a play intentionally. There are many ways to curb a large score differential
while still winning or losing a game. There are several guidelines I have used over the years
that may be helpful. They are:
Table 1.6: Lopsided Games
League Level
Score
Items to Consider During a Lopsided The Game
Tee Ball
Score is not a priority.
1.
2.
3.
4.
Make sure everyone plays everywhere.
Move players around each inning.
Do not allow players or parents to emphasize score.
These games are strictly for fun and learning.
Minor League
League playoffs make
score
somewhat
important.
1.
2.
3.
4.
The intent of Minor League is still to learn.
Make sure everyone plays everywhere.
Put bench players in early.
Try new pitchers.
15
Jake Patterson
Little League
Playoffs make
important.
score
Little League
All Stars
Winning is the priority
Junior League,
Senior League
Playoffs make
important.
Junior League,
Senior League
All Stars
score
1.
2.
3.
4.
5.
6.
7.
8.
Make sure everyone plays everywhere.
Put the bench players in early.
Use different players at different positions.
Try different pitchers.
Avoid stealing for the sake of stealing.
Hold runners from taking extra bases.
Avoid bunting on weak defenses.
Avoid using better pitchers when not necessary.
1.
2.
3.
4.
5.
6.
Use bench players early.
Use relievers early.
Avoid stealing for the sake of stealing.
Hold runners from taking extra bases.
Avoid bunting on weak defenses.
Try new pitchers.
1.
2.
3.
4.
5.
6.
Use bench players early.
Use relievers early.
Avoid stealing for the sake of stealing.
Hold runners from taking extra bases.
Avoid bunting on weak defenses.
Try new pitchers.
Winning is the priority.
1.
2.
3.
4.
5.
6.
Use bench players early.
Use relievers early.
Avoid stealing for the sake of stealing.
Hold runners from taking extra bases.
Avoid bunting on weak defenses.
Avoid using better pitchers when not necessary.
Middle School
Varsity
Winning is the priority
1.
2.
3.
4.
5.
6.
Use bench players early.
Use relievers early.
Avoid stealing for the sake of stealing.
Hold runners from taking extra bases.
Avoid bunting on weak defenses.
Avoid using better pitchers when not necessary.
High
School
Junior Varsity
Playoffs make
important.
1.
2.
3.
4.
5.
6.
7.
Use bench players early.
Use relievers early.
Avoid stealing for the sake of stealing.
Hold runners from taking extra bases.
Avoid bunting on weak defenses.
Avoid using better pitchers when not necessary.
Try new pitchers.
High School
Winning is the priority
Note: Possible college
careers may hang in the
balance. This does not
however, override your
responsibility to the
game and all the
players.
score
1. Use bench players early.
2. Use relievers early.
3. Avoid stealing for the sake of stealing.
4. Hold runners from taking extra bases.
5. Avoid bunting on weak defenses.
6. Avoid using better pitchers when not necessary.
Note: the level of pitcher you use controls many of these
games.
16
How to Coach Little League Baseball
Both coaches also need to use common sense here, even the losing coach. I have had
games where, when up a considerable amount of runs, I replaced all my starters with bench
players in an effort to make the game better for both teams. The losing coach seeing an
opportunity began a relentless pounding on my inexperienced bench players. This resulted in
me re-entering my starters when there was only a one run difference, sealing the other team’s
fate. I was not about to lose a game we were easily winning.
In another incident I had a coach have his players steal third and home when he had a
fifteen run lead in the top of the last inning. I had already burned through, my now completely
demoralized pitching staff and there was no hope for us winning the game. I quietly asked him
to ease up, to which he replied, “Welcome to the big leagues coach.” His comment epitomizes
how some coach’s view coaching young players; they think they’re coaching in the big leagues.
Most of the lopsided games I have witnessed or have participated in during my career
occurred simply because one team dominated the other team, this will inevitably happen during
each season. Most coaches do the right thing. I have however, seen those coaches that will
simply run the score up. They accomplish little more than placating their own egos. Players, on
both teams, learn little during an unmanaged lopsided game. Again, the best way to avoid this
is to ask yourself the question, “What are the players on both team learning?” Most of all
remember, they’re just kids.
17
Section 2: The Legal Responsibilities of The
Coach
How to Coach Little League Baseball
Legal Responsibilities of the Coach
The legal liability associated with coaching is the most significant reason many states,
leagues, and school districts are certifying and formally training their coaches. Our litigious
society has made everyone paranoid about getting sued. First and foremost, don’t be frightened
by this process. If you use common sense you should never have a legal issue. Each state is
slightly different with regards to the legal requirements of coaching, but if you keep the
following in mind, you should never have an issue.
1. LEGAL DUTIES OF A COACH
a. Provide adequate supervision for your players. Do not allow them to practice
on their own unsupervised. Do not allow the players to continue to play after
practice is finished. You are responsible for them until their parents pick
them up.
b. Provide sound planning and preparation (See section on practice schedules).
c. Warn players of inherent safety risks (See safety section).
d. Provide a safe environment (See safety section).
e. Evaluate and accommodate any athlete’s disabilities. An example of this
would be resting an asthmatic player that is having difficulty breathing.
f. Match and equate your players. Pair off players based on their skill level and
size. Avoid having new players playing the corners, first or third during
batting practice.
g. Be able to provide emergency first aid. Always have a first aid kit available.
h. Provide emergency communications in the event of an accident or injury.
2. ADDITIONAL RESPONSIBILITIES
In addition to the above, the coach must also provide the following:
a. You must assure that the basic civil rights of the players are not violated.
This includes derogatory comments.
b. You must consider the spectators as well as the players. Unfortunately, you
share some responsibility for the players’ parents and family.
c. Keep good records, particularly in the event of an injury. Document each
accident listing the type of injury, care provided, time of accident, reason for
injury, witnesses, etc.
Bear in mind I do not profess to be a legal expert. If you have legal questions you
should seek the advise of a lawyer. Many leagues have counsel available to them.
21
Section 3. Safety
How to Coach Little League Baseball
Baseball Safety
Player safety is a key responsibility of all coaches and parents. The following is a list of
items that should be reviewed with the players during the first practice and always be
considered when practicing and playing.
1. BATS
a. Always swing the bat in control. Use the, “Double Distance” rule. Players
with bats must be more than two bat lengths away from the next closest
player.
b. Drop the bat. Never throw it.
c. Always wear a helmet during live batting practice.
d. Use the right size bat (See hitting section).
e. Make sure the bat grips are in good condition.
f. Make sure the bats are well cared for and are not damaged.
2. BALLS
a.
b.
c.
d.
Always have players throw in control.
Always have players face the ball during batting practice.
Ensure players face the ball and present a target when throwing.
Do not use damaged or wet baseballs. Note: Practicing in the spring will
inevitably result in wet baseballs. I have salvaged many wet baseballs by
placing them in the oven at 150° F for a half hour or so.
3. EQUIPMENT
a. Ensure all male catchers wear cups
b. Encourage all male players to wear athletic supporters
c. Ensure catchers wear their full equipment including shin guards, mask, cups,
helmet, and chest protector.
d. Clips OUT on shin guards. Clips in will get caught and trip the player.
e. Ensure players wear proper footwear. Many leagues have restrictions and
guidelines for approved footwear.
4. FIELD
a. Walk the field prior to every practice and game. Look for problem areas
such as holes, damaged fences, loose bags, etc.
b. Have players report all problems or potential safety hazards with the field to
the coaches immediately.
c. Ensure all players are aware of the fences and gates.
d. Keep fingers inside the dugout! A line drive hitting a finger grasping a chain
link fence is very painful.
25
Jake Patterson
5. OTHER
a. Perform dynamic stretching before every game and practice (See Warming
Up The Athlete).
b. Perform static stretching after every game and practice (See Warming up the
Athlete).
c. Ensure players who wear eyeglasses wear athletic eyeglasses or eyeglasses
with straps.
d. Prevent heat exhaustion and cramps by providing water and water breaks
before, during, and after the games or practices.
e. Ensure the players pay attention and never clown around.
f. Have players avoid heavy meals before games or practices.
g. Have players inform the coach immediately if they are sick. Don’t play
players who are ill, no matter how much they are needed.
h. Bandage all cuts and be aware of blood-borne pathogens. Always use
disposable gloves when bandaging an injury.
i. Report all injuries to the league and parents if they are not in attendance.
Follow-up with a phone call that day. Keep good records on injuries to
players.
j. Never allow players to move anyone who is hurt.
k. Never allow players to start the practice without the coach being present.
l. When in doubt as to the seriousness of the injury, call 911. Always err on the
side of caution.
m. The Little League also has guidelines for blunt force chest injuries. Make
sure you understand what is required of the coach when a player sustains a
blunt force chest injury.
26
Section 4. Parents
How to Coach Little League Baseball
Parents and Sports
Parents can present the most difficult challenge to you as a coach. We have all heard the
stories of parents whose inappropriate behavior have ruined youth sporting events. Many
organizations and leagues have incorporated a Parent’s Code of Ethics in an attempt to help
with this quickly growing problem. I use the following Code of Ethics when the league does
not provide one. I have the parents sign it at the beginning of the season.
1. PARENTS’ CODE OF ETHICS
Parents’ Code of Ethics
1. I will always remember the game is for my child, not for me.
2. I will respect all participants and spectators no matter what their race,
creed or ability.
3. I will always remain positive with my child and his teammates.
4. I will not shout instructions to my child from the sidelines.
5. I understand the responsibility of instructing my child during games and
practices belongs to the coach.
6. I will always encourage good sportsmanship and fair play.
7. I will hold all my input, comments, and criticism for the coach or officials
until after the game or practice and will present it in a positive manner
away from the players.
8. I will not interfere with practices or games.
9. I will insist that my child play in a safe and healthy environment.
10. I will insure my child is properly equipped.
11. I will support the umpires and other league officials.
12. I will always get my child to practice on time and pick him or her up on
time and I acknowledge the coach is not a babysitter.
13. I will require the league provide appropriate training for the coach and
his or her staff.
14. I will demand a drug, alcohol, and tobacco free environment and I will
refrain from their use at all youth sports events.
15. I will do my very best to make youth sports fun for my child.
Copyright © 2004, Patterson Sports
29
Jake Patterson
2. OTHER ITEMS
Other helpful guidelines concerning parents are:
a. Establish yourself and your coaching philosophies at the beginning of each
season. Send team letters home at the beginning of the season listing
expectations of both the players and parents.
b. Don’t avoid parents, even the troublesome ones. (See section on Problem
Parents). Always speak to them when they want to talk with you. Ask them
however, to wait until after the practice or game.
c. Avoid talking to the parents about playing time and position assignments.
d. If parents have suggestions or comments, listen to them and let them know
you will consider their input.
e. Avoid speaking with parents if you or they are angry.
f. Set rules with the parents. They can include:
1. If they have something to say, have them wait until after the practice
or game.
2. Ask them NEVER to shout instructions to the players as it may
conflict with what you are telling the players from the bench. This
will lead to confusion, which leads to player frustration.
3. Ask them to always cheer in a positive manner. This means a lot to
the players.
4. Remind them, their job is to take pressure OFF their child not put it
ON.
5. Ask them never to yell or argue with the umpires. This sets a bad
example for the children and detracts from the learning potential.
6. Ask them to be on time when dropping off and picking up their
children. Make sure they understand you are not a babysitter. You
should however, do your part by starting on time and finishing
practices on time.
g. Be careful about choosing who assists you with coaching and managing the
team. Good intentioned parents that know little about the game can become
a training distraction.
h. REMEMBER, you are a parent. You need to be fair with your own child.
Most coaches tend to be very hard on their own children, ruining the Little
League experience for them.
3. DIFFERENT TYPES OF PROBLEM PARENTS
During my coaching career I have participated in a number of coaches’ clinics. At the
end of numerous clinics, the coaches were asked to describe their number one challenge as a
volunteer coach. Each time the answer was the same; PARENTS!
30
How to Coach Little League Baseball
Some parents present the biggest challenge you may face as a coach. I have encountered
several types of problem parents over the years and found each requires a somewhat different
approach when addressing. The key is, don’t avoid problem parents. They won’t go away. The
following are several types of problem parents, their identifiers and suggestions on how to
handle them.
Table 4.1: Problem Parents
Problem
Parent Type
The Expert
Identifiers
•
•
•
•
Provides
unsolicited
advice.
Interrupts practices and
games
with,
“helpful
hints.”
Makes, “If I were you”
statements.
Contradicts or disagrees
openly with your teaching
methods.
Suggestions
•
•
•
•
•
Second Guesser
•
•
•
Second-guesses
coaching decisions and
discusses with everyone
except you.
Makes comments like
“We could have won that
game if he pitched
Bobby! What was he
thinking?”
Rolls his/her eyes and
makes it known he/she
does not agree with your
line-ups or batting orders.
31
•
•
•
•
Be open-minded. Many of these
parents have good input and they
really do know what they are talking
about.
Don’t dismiss advice that may help
you and the team.
Use
the
“Hear,
Understand,
Appreciate, Consider, Follow Up”
approach (see below).
You may want to consider using
this parent as an assistant.
Tell the parent to hold all input until
after the practice or game.
Take the parent aside after the
game. Tell him/her you understand
he/she has concerns and you would
like to talk about them openly.
Inform the parent that secondguessing the coach’s decisions with
players and other parents brings
little value to the process.
Set up a time with the parent to
discuss his/her concerns.
Use the, “Hear, Understand,
Appreciate, Consider, Follow Up”
approach (See below).
Jake Patterson
Disruptive Influence
•
•
•
•
•
•
•
Interrupts practices and
games with silly reasons.
Sticks their head in the
dugout to see, “How
things are going.”
Distracts the players.
“Hey Bobby! Keep your
hands up!”
Asks during a game “Hey
Coach! Why isn’t Bobby
playing shortstop?”
Embarrasses themselves
and their children.
Makes
inappropriate
remarks
to
players,
coaches, officials and
fans.
Usually has a negative
tone.
•
•
•
•
•
•
•
Never Gets Involved
•
•
•
Never commits to help.
Provides little to no
support.
Loner.
•
•
•
32
Address this problem immediately!
The longer you wait the worse the
problem becomes.
Be polite; speak with the parent
after the game. “Hey Mr. Smith
would you mind hanging around for
a few minutes after the game? I
have something to discuss with
you.”
Inform the parent the team would
be better served if all comments
were kept on a positive basis during
and after the game.
A videotaped recording may enable
the parent to better understand
his/her actions.
If
the
parent
continues
to
misbehave schedule a meeting with
league officials to solicit their help.
Some leagues have specific
protocols established.
If the parent continues to be a
disruptive influence, inform the
parent you may be forced to
remove his/her child from the team.
In extreme situations where the
parent is totally out of control, and
you cannot continue the game
peacefully, call the police and have
the parent removed.
An important fact to remember
when dealing with Little League
parents is that many parents simply
do not know how they can help or
what they should do. It is as new to
them as it is for their children.
Take the initiative and introduce
yourself and ask, “Would you like to
help with the team? There’s so
much to do and I could use all the
help I can get.”
These parents sometimes make
great team moms or dads.
How to Coach Little League Baseball
Never Satisfied
•
•
Everything is a problem.
“Why do we have to sell
candy? I gave you my
money at registration!”
“Why aren’t there enough
Porta Potties?”
They
complain
about
everything.
•
•
•
•
•
•
Irresponsible
•
•
•
•
Always late
Forgetful
Unorganized
•
•
•
•
Speak with them after the game or
practice.
Ask them what it is they would like to
see done.
Ask the parent how he/she would
resolve the issue.
If the issue is a team related item, use
the, “Hear, Understand, Appreciate,
Consider, Follow Up” approach (See
below).
If the issue is not team related, i.e.
field condition, fundraisers, schedules
etc., ask the parent to help organize a
solution.
These parents sometimes make great
team moms or dads.
Meet with the parent after a game or
practice.
Tell the parent, “Bobby could get so
much more out of the game if you
could get him here on time.”
If this does not work, tell the parent, “I
take what I do seriously. To make the
experience great for everyone, you
need to do your part.”
I have even had to tell a parent once
that their child will have to be removed
from the squad because of their
inability to get their child to practice on
time and pick them up on time.
Have the parent make alternative
arrangements.
Most of all don’t blame the kids!
33
Jake Patterson
4. HEAR, UNDERSTAND, APPRECIATE, CONSIDER, FOLLOW UP APPROACH
Problematic parents come with the territory. Few coaches go through their seasons, let
alone their entire coaching careers without having an issue with parents. Each coach needs to
develop an effective and comfortable way to handle problem parents. Everyone is different and
therefore his or her solutions and methods will also be different. Over the years I have
developed my own style on handling problem parents. I call it the Hear, Understand,
Appreciate, Consider, Follow up Approach. It is simply telling the parent:
“I HEAR what you are saying.
I UNDERSTAND your concern, and
I really APPRECIATE your input.
I will CONSIDER it carefully, and
I will FOLLOW UP with you later.”
The following would be a typical sequence of events concerning this approach.
a. A parent approaches you during a game or practice with comments, advice or
complaints.
b. If it does not concern an imminent safety problem tell the parent you really want to hear
what he or she has to say. I would suggest saying, “Would you mind hanging around
after the game (or practice) so I can give you my undivided attention.”
c. As soon as the post-game meeting or practice is finished, meet with the parent
somewhere private.
d. Listen intently to what he or she has to say and avoid impulsive comments or arguing.
Always remember, what the parent has to say may be helpful.
e. Tell the parent, “I hear what you are saying, I understand your concern, and I really
appreciate your input. I will consider it carefully and I will follow up with you later.”
f. Establish a follow up date and time.
Using the above approach has helped me through many difficult situations. It has also
allowed me to learn new things that I might not have had the opportunity to learn. This
approach gives the parents a chance to voice their concerns. It also forces you to listen to what
they have to say and gives you the time necessary to properly evaluate their input.
34
How to Coach Little League Baseball
5. LETTERS TO THE PARENTS AND PLAYERS
The following are examples of parent letters I have used in the past. You may need to
modify them to accommodate your particular philosophies, training methods, and
circumstances. The first letter establishes who you are and what your background is. This
helps introduce you and your assistant coaches to the parents and players.
6. INTRODUCTION LETTER
Babson Tigers’ Baseball
Introduction Letter
Dear Parents,
I am very excited about this season. This year we have Fred Smith joining the coaching
staff. Fred is no stranger to baseball. He is known in this area as one of the best players ever to
come from our local high school. He played college ball at McWilliam’s College. He continued his
baseball career as an assistant coach at Babson High School. During the day, Fred is a Service
Manager for Moon Beam Electronics.
This is my tenth year coaching baseball. I have a M.S. Degree in education and teach
here at Patterson Middle School. I am also a State Certified Coach and have attended and
organized many coaching clinics.
I was never known as a good player myself, but I played tenaciously and made up for my
lack of skills with hustle. Over the last ten years I have coached every level of players from
beginners to high school and enjoy coaching more than playing.
Our coaching philosophies are very basic. We feel there are six factors that have made us
successful as coaches. They are:
1.
2.
3.
4.
5.
6.
We were able to get the absolute best out of the players.
We left the athletes feeling more confident about themselves as individuals and they
developed more confidence in their abilities as athletes.
The players became, enjoyed and were comfortable being active members of the team.
The players excelled in the concept of sportsmanship and treating everyone politely.
The players learned the basic skills they were taught throughout the season.
We left the players a little more prepared for life’s challenges
.
You will not hear us berating the players about winning. We feel that everyone who puts
on a uniform, wears a glove or picks up a ball doesn’t do so to lose. We believe in the basics,
teamwork and sportsmanship. We will work hard for the athletes and expect hard work from
them. We will listen to them when they need help. We will also listen to you, the parents, when
you have suggestions and comments. We ask however, that you hold these comments or
35
Jake Patterson
suggestions until after the games or practices away from the players. We also ask that you
encourage and cheer for the team when they are playing. DO NOT yell instructions. They may be
in conflict with the instructions they are getting from the coaches. We won’t entertain the question
from either the athlete or the parent “Why am I not playing much and (so-and-so) is?” We will
however, ALWAYS answer the question, “What do I need to do to improve my game?” We feel
this to be fairer to the athletes and their teammates.
Again, we are very excited about this season. If you have any questions, please call me
at 800-555-1234 or contact me at: [email protected]
__________________
Jake Patterson
Head Coach
________________
Fred Smith
Coach
7. PHILOSOPHY LETTER
The following letter helps establish your team philosophy. It helps the athlete
understand what you expect from them. Each team may have a slightly different letter based on
the level of players you coach. The following letter would be considered appropriate for Little
League, middle school, Junior League, Senior League and high school ball.
36
How to Coach Little League Baseball
Babson Tigers Baseball
2004 Team Philosophy
Baseball is a team sport. One player not playing to their potential during the game
can mean the difference between a great game, and a not so great game, no matter
how hard the other players are playing. It is the responsibility of every player on
the team to:
•
Be the absolute best you can be at every practice and game.
•
Improve in your skills through practice.
•
Work hard at becoming physically fit.
•
Learn as much as you can about the game.
•
Always support the team and your teammates.
•
Always conduct yourself in a respectful manner and represent the town
with pride.
If you dedicate yourself to the above, success will follow. The desire to win goes
without saying. We will always play to win the game. Remember however,
improvement and sportsmanship are just as important as winning a game.
____________________
Coach Patterson
[email protected]
37
Jake Patterson
8. RULES AND REGULATIONS
A letter sent to each player and parent stating team rules will help you manage your
team effectively and efficiently. Keep in mind that many parents and players are first-time
participants in the Little League experience. They may not understand what is expected of
them. The following is an example of a letter I use at the middle school and high school level
and can be easily modified for Little League.
2004 Babson Tigers’ Baseball
Rules and Regulations
Absences:
Conduct:
Uniforms:
•
You are expected to make every practice on time. If you cannot make
the practice or games or expect to be late, it is your responsibility to notify
the coach. Unexcused practices may result in, “bench time.”
•
All players must adhere to the following, “Code of Conduct.”
1. No team member will use foul language at any time.
2. No horseplay or fighting at any time.
3. You will treat everyone with respect. This includes your
teammates, coaches, referees, opponents, and fans.
•
•
•
•
The uniform will be worn properly.
Shirts will be tucked in. Hat visor forward.
Uniforms will be clean for each game.
The full uniform will be worn during pre-game warm ups, unless the head
coach allows something different.
Playing Time:
• No one is guaranteed a starting or permanent position. Players will be
selected based on their abilities, performance and attitude during practices
and games.
Away Games:
• All players are required to ride the bus to and from the game. No player
may ride home with another player without a note from the parent. Each
player is required to dress appropriately for away games.
38
How to Coach Little League Baseball
Drugs / Alcohol / Smoking:
• Any one caught with drugs, alcohol, cigarettes or any other banned
substance will be disciplined in accordance with League or school policy.
Schoolwork:
•
Schoolwork comes first! Notify the coach if you are having problems or
need extra time or help with schoolwork.
Drop Off and Pick Up:
• It is your parent’s responsibility to insure you are picked up and dropped
off on time. You must make alternative plans if your parents cannot pick
you up on time. Students cannot be left alone at the school.
__________________
Coach Patterson
[email protected]
9. TEAM MOM OR DAD
Something you should consider at the beginning of each season is recruiting a team
mom or dad. There will be many parents who know nothing about baseball, softball, or the art
of coaching, but they are very willing to help the team with planning, transportation,
scheduling, and team refreshments. Inevitably you will have fundraisers, team parties, and cash
collections that will detract greatly from what you do best, coach. Recruiting a team mom or
dad to handle these tasks will take a huge burden off the head coach and the assistant coaches.
39
Section 5. Warming up and Exercise
How to Coach Little League Baseball
Warming up the Players
An essential part to every practice is properly warming up the players. Playing without
warming up the players is unsafe and will lead to injuries. A common mistake made by many
Little League baseball and softball coaches is allowing players to play catch in order to warm
up. Do not let players throw before they stretch and exercise. It’s very important to remember:
“Warm up to throw! Don’t throw to warm up!”
1. STRETCHING
Proper stretching is important for a successful practice. It helps by:
1. Increasing the pulse rate, which provides a maximum oxygen supply to
the body.
2. Eliminating waste products from the muscles.
3. Increasing the blood flow to the muscles.
4. Increasing muscle temperature, which allows for improved performance.
5. Preventing injury.
2. HOW TO CONDUCT PROPER STRETCHING
There are two types of stretching, dynamic and static. Static stretching is conducted on a
single plane, and gradually lengthens one muscle or muscle group at a time. Dynamic
stretching occurs in multiple planes and gradually lengthens more than one muscle group at a
time.
3. DYNAMIC STRETCHING
Dynamic stretching helps muscles prepare for movement. Good Little League dynamic
stretching can include:
a. Light jog around the field
b. Lumber jacks – Start with the glove in both hands up in front, on the right
side above the head. The player moves the glove down to the left hip, lifting
the right leg, knee to waist height. Perform 10-15 repetitions and then
change sides. This can also be done starting out in front of the shoulder
moving down to the outside of the opposite ankle.
43
Jake Patterson
c. Trunk twists – Hold the glove both hands out in front of the body, forearms
parallel to the ground, one hand on either side of the glove. Twist right, back
to center. Twist left, back to center. Perform 10-15 repetitions.
d. Butt kicks – Players run in place kicking the back of their thighs below the
butt.
e. Arm circles – Place arms straight out to the side. Players rotate their arms in
large circles for 15-20 seconds, and then reverse direction.
f. Squat thrusts – Place arms straight out, player squats in place. Perform 10-15
repetitions.
g. Crab walks – Players on all fours, inverted, butt down. Have them walk
approximately thirty feet, and then reverse direction.
h. High skips – Exaggerated arm swings while skipping across the field. Have
the players reach out as far as they can with each skip. The knees are brought
up to the belt.
i. Sliding jumping jacks – Player performs jumping jacks while side stepping
across the field. Have players perform exaggerated arm swings on top as
well as in front of their bodies.
j. Combination run drill – Sprint to first base, side step to second base, cross
step to third base, back step home. Run twice and reverse direction.
k. Finger squeezes – Hands straight out and in front of the body. Players
quickly squeeze fingers into a fist for one hundred cycles.
You should always insure the athletes break a light sweat while performing dynamic
stretching. All throwing drills should be conducted after the players perform dynamic
stretching and some running.
4. STATIC STRETCHING
There are more than twenty static stretches recommended by most stretching
professionals. They include stretches to the neck, arms, hands, legs, hamstrings, and ankles. I
would recommend the book, Stretching by Bob Anderson, ISBN #0-936070-01-3. Static
stretching can be done before and after the game or practice or if an athlete is injured.
Remember !
“Warm up to throw!
Don’t throw to warm up!”
44
How to Coach Little League Baseball
Table 5.1: Basic Little League stretches
45
Jake Patterson
The above are basic stretches that should be done at every practice. All are bi-lateral
and should be done with both sides of the body. Remember if it hurts – don’t do it!
46
Section 6. Practices
How to Coach Little League Baseball
How to Conduct a Successful Practice
When organizing your practice it’s important to remember children get bored very fast!
Come to practice prepared. Establishing a good practice schedule only takes a few minutes and
will make your practice much more successful and enjoyable for the children.
1. PRACTICE CONSIDERATIONS
There are several key considerations when establishing your practice schedule. They
are:
a. Age appropriate practice times. Not all age groups should practice the
same amount of time. Younger children get little out of the experience
when practices are too long. Use the following as a guide for maximum
practice times.
Table 6.1: Suggested Practice Times
Level
Age
Suggested Time in Minutes (Hours)
Tee-Ball
5-6
60
(1)
Minor League,
7-10
60 – 90
(1-1.5)
Little League
10-12
90
(1.5)
Junior League, Senior League, Middle
School
High School
13-16
90-120
(1.5 – 2)
15-18
120-180
(2 – 2.5)
49
Jake Patterson
b. Practices should begin with dynamic stretching and running. Make sure
the players have broken a light sweat before proceeding with the
practice.
c. Practices should always include throwing and catching drills.
d. You should review your last practice and today’s practice with the
players at the beginning of each practice. Ask the question, “What did
we learn yesterday?” Followed by, “OK, here’s what we’re going to be
doing today.”
e. Teach a new skill at every practice.
f. Have a game-like component at the end of each practice.
g. Keep the players constantly moving by having 7-8 different activities
planned.
h. Avoid line drills. When necessary use your assistant coaches and keep
everyone moving!
i. Start with the basics and work up. Use a building block approach.
2. ITEMS THAT HELP DURING A PRACTICE
Utilizing a whistle during practice helps eliminate confusion and makes your practice
more effective. Many coaches are reluctant to use a whistle. The whistle can be the coach’s
most effective weapon in maintaining order and control. Other items that help are:
a. Use cones. They are inexpensive and will help save a tremendous
amount of time by eliminating confusion. Kids can easily see a line
created by using two cones; they cannot see the imaginary line made by
the sweep of a hand. Cones are readily available at stores like K-Mart
and Wal-Mart.
b. Set up stations using assistant coaches. Have assistant coaches come to
practice a few minutes early in order to review their responsibilities for
the day’s instruction.
c. Use batting cages when available. Make sure however, that the coaches
are properly trained in how to use the cage effectively.
d. Use a white board to explain new concepts. Children are visual and do
their best when they can see what you are teaching.
e. When using a pitching machine, insure it is properly set. Coaches should
be trained in proper loading techniques in order to best simulate real
pitching. If using a pitching machine, set prior to practice. They can
sometimes take a while to set up. A whole book could be dedicated to
this topic so ensure your coaches are well versed in proper usage.
f. Always use your best throwing coach during batting practice.
50
How to Coach Little League Baseball
3. PRACTICE SHEDULES
I cannot stress the importance of practice schedules enough. They only take a few
minutes to develop and they save an incredible amount of time and energy in the long run.
They are key in helping the coach establish credibility with players and parents. Even coaches
that have never coached before can be effective if they are organized and well prepared.
Several important thoughts about practices and practice schedules include:
a. Use a building block approach when teaching young players. It is best
you assume they know nothing about the game. Do not take the simple
things for granted. How many of us have seen a young batter run the
wrong way after hitting the ball, or stand in the batters box after being
called out on strikes? Our job as coaches is to ensure that all players
know the basics.
b. Plan your season by establishing a pre-season master schedule. The
master schedule helps establish a balanced perspective to the season and
keeps you on track. It is a “living” document that provides organization
to the season. Specific master schedule items are similar for every level.
The speed in which you can cover those items however, varies
depending upon the level of the players you coach.
c. When conducting drills, use a whistle and stop watch and make a game
of every drill. Tracking players’ performance helps them to understand
the desired standards and their relative position and improvements to
those standards.
The following is an example of a master schedule and individual practices for the first
six days. You may have to adjust them to suit your team’s needs. Don’t worry about whether or
not they are perfect. Having a less than perfect written schedule is always better than a perfect
schedule in your head. If your schedule is not written down you will get easily distracted and
become inefficient with your practice time.
51
Jake Patterson
4. MASTER SCHEDULE
BABSON TIGERS
BASEBALL
Master Schedule
Each coach should establish a master schedule at the start of each season. The master
schedule is a list of basic skills that need to be taught and/or reviewed throughout the season.
Utilizing the building block approach, the skills should start with the basics and move to the
more complicated tasks as players develop. There are two safe assumptions when establishing
the master schedule. First, every team and every player is different. The timeline and lesson
intensity will also be different. Second, children and their bodies forget! Baseball/softball skills
require a great deal of muscle memory. Start with the basics every season.
The following is a suggested, “building blocks” Master Schedule for Little League:
Table 6.2: Master Schedule
Day
Topic
1
Team rules and expectations
1
Baseball/softball field and terms
1
Warming up
2
Throwing instruction
2
Catching instruction
3
The Glove
Item
Team rules and expectations
Team philosophy
Your expectations of the parents
Safety
Proper practice dress and equipment
Field review and playing positions
Baseball/softball terms
Rules of the game
Dynamic stretching
Static stretching
Exercise
Running
Proper grip (4-seam versus 2-seam)
Throwing techniques
Base - Ready position
Upper body
Hands (M’s and W’s)
Proper techniques in playing catch
How to size
How to wear
How to properly maintain and break in a glove
How to play catch with the glove
52
How to Coach Little League Baseball
3
Catching drills
4
Hitting
5
Base running
Other items
One handed self toss – Proper grip location
Short toss - (no glove)
Short toss - (glove)
Ground ball basics
Ground ball circle drill (tap/pass)
Ground ball circle drill (gloves)
Ground ball line drills, coach toss
Fly ball
Fly ball drills
3-man relay drill
The bat (How to size)
Proper grip
Stance (Base)
Head and eyes
Upper body
Stride and separation
Swing and finish
Primary, secondary leads
Slide and cross step
Base returns
Home to first
First to second
Second to third
Third to home
Pitching
The catcher
Field positions
Game like situations
Proper tagging techniques
Run down drills and techniques
Passed ball drills
Relays
Cut-offs
Dead ball drills
Offensive bunt work
Defensive bunt work
Bare hand drills
Backing up the bags and plate
Double plays
Outfield ground balls (Outfield fence drills)
First and third drills
Tagging
Bunting
Ground ball blocks
Sliding techniques and drills
Pre-game routines
Throw-downs
Squeeze plays
Etc.
53
Jake Patterson
There are literally thousands of drills that can help your players. You need to develop
drills that best suit your team. The Little League, professional clinics, local high school and
middle school coaches, the Internet, your local library and the American Baseball Coaches’
Association are all great resources.
Table 6.3: Defensive Positions and Field Numbers
DEFENSIVE POSITIONS AND FIELD
NUMBERS
The following are the numbers used for each
position.
1. Pitcher
2. Catcher
3. First Base
4. Second Base
5. Third Base
6. Shortstop
7. Left Field
8. Center Field
9. Right Field
10. Extra Fielder (Used only in Softball)
The above is covered during your first practice. I still find it amazing how many
children at the Little League level do not know the above. This is simply because they were
never taught.
54
How to Coach Little League Baseball
5. PRACTICE SCHEDULE DAY 1
BABSON TIGERS
BASEBALL
Today’s Emphasis: GETTING STARTED
Item
Time
Date: DAY 1
Coach
1.
10 Mins.
H/C
2.
5 Mins.
H/C
3.
4.
5 Mins.
30 Mins.
H/C
Assnt.
5.
15 Mins.
Assnt.
6.
15 Mins.
H/C
7.
10 Mins.
H/C
Item
Introductions:
a. Players
b. Coaches
Team Rules:
Cover how to dress and what equipment to
bring to each practice.
Safety
Review the playing field:
a. Dugout (why it’s there and proper
behavior while in the dugout).
b. Boundaries (Fences, backstops, etc.)
c. Foul lines
d. Outfield fences
e. Batter’s Box
f. Mound
g. Bases
h. Bullpen
i. Playing positions
Basic rules and terms of baseball:
a. Hits, fouls
b. Infield hits
c. Outfield hits
d. Ground balls, pop-ups, line drives
e. Strikes and balls (Strike zone)
f. Double plays
g. Slides, steals
Warming up and stretching:
a. Dynamic stretching
b. Exercise
Review:
a. Review practice.
b. Questions?
c. Review expectation letters for
parents.
Comment
See LL Manual
See LL Manual
See LL Manual
Don’t take anything for
granted.
Walk players around
the field.
Make a game of it. Call
a spot and have them
run to it.
Demonstrate
“Warm up to throw.
Don’t throw to warm
up!”
Have letters available
for parents.
Coaching Notes:
a. The first practice sets the stage for the entire season. Be prepared, look like a coach and act like
a coach.
b. Have fun with the kids and make a game out of today’s topics.
c. Send the parent letters home with the players. This is important to do on the first day. Most
problems with parents can be avoided by communicating your requirements early.
55
Jake Patterson
6. PRACTICE SCHEDULE DAY 2
BABSON TIGERS
BASEBALL
Today’s Emphasis: THROWING AND CATCHING
Item
Time
Coach
Date: DAY 2
Item
Comment
1.
10
Mins.
H/C
Review last practice:
a. Team rules
b. Safety rules
c. Review playing field
d. Basic rules and terms
e. Etc.
See yesterday’s schedule
2.
15
Mins.
20
Mins.
Assnt.
Warming up – stretching
See LL Manual
H/C
Throwing Class:
a. Grip
(Teach/demonstrate/practice)
b. Proper grip. 4-Seam – 2-seam
(How to use the “C”)
c. “Butterfly” technique
d. Bow and arrow technique
e. Fingers on top
f. Cross body throw
g. Teach/demonstrate/practice
h. Pocket finish
i. Practice short toss drill
Catching class (Start with no glove)
a. Body position and stance
b. Proper target, “M’s and W’s”
c. Receiving the throws
d. Practice / drills
Play short toss. No glove – correct
problems
Use tennis balls or
“Incredaballs.”
3.
4.
25
Mins.
H/C
5.
10
Mins.
Assnt.
6.
See LL Manual.
See LL Manual and handouts.
Coaches pair off. One coach
one side, one coach on the
other side.
Use cones to establish lines.
Ask questions. What did you
learn today?
10
H/C
Review practice
Mins.
Coaching Notes:
a. Throwing/catching is a critical skill. If the team is having trouble ask for help, use different drills.
b. First day of throwing/catching can be intimidating use tennis balls they are similar in size.
c. Concentrates on the basics- keep it simple!
d. Make all the drills fun. Keep them moving and avoid line drills
e. Keep in mind that some young players at the Tee-Ball level do not know if they are right
handed or left handed. They may need some help here.
56
How to Coach Little League Baseball
7. PRACTICE SCHEDULE DAY 3
BABSON TIGERS
BASEBALL
Today’s Emphasis: THROWING AND CATCHING DRILLS
Item
1.
Time
5 Mins.
Coach
Item
H/C
Date: DAY 3
Comment
Review last practice
See yesterday’s
a. Throwing
schedule
b. Catching (No glove)
c. Review how to play catch
2.
10 Mins.
Assnt.
Warming up and stretching
LL manual
3.
5 Mins.
Assnt.
One handed self-toss. Check for grip
3.
5 Mins.
H/C
Class on the baseball glove:
LL manual
a. Different types and how to use and wear
b. How to take care of the glove
c. How to size
Players having
4.
10 Mins.
Assnt.
Short toss (no glove):
a. Short toss – sit throw
problems should
b. Short toss - kneel throw
be taken aside.
c. Check for hand positions and throwing
Use assistant
coaches.
techniques M’s and W’s
d. Check for consistent presentation of a
target
e. Short toss (glove)
6.
15 Mins.
H/C
Ground ball class:
Tennis balls
a. Review proper “set, ready” position
b. Alligator catching (Clam-shell catch)
c. Button to button drill
7.
15 Mins.
Assnt.
Ground ball drills:
As your season
a. Coach toss one line
progresses you
b. Two line player toss
should increase
c. Small ground ball circle drill (no glove)
the difficulty of
d. Small ground ball circle drill (glove)
these drills.
8.
10 Mins.
H/C
Fly ball class:
a. “Ball” drill – Calling for the ball
b. Catching the ball out front
c. Drop step spot drills
9.
10 Mins.
Fly ball drill:
a. “Easy fly”
b. “No look fly-ball” drill“
c. “To and away” drill
10.
5 Mins.
H/C
Review
Coaching Notes: The intent today is to teach the players the basic techniques and drills. This will help
facilitate future practices.
57
Jake Patterson
8. PRACTICE SCHEDULE DAY 4
BABSON TIGERS
BASEBALL
Today’s Emphasis: BATTING AND HITTING
Item
Time
Coach
1.
2.
3.
5 Mins.
10 Mins.
30 Mins.
H/C
Assnt.
H/C
4.
20 Mins.
H/C
5.
20 Mins.
Assnt.
6.
5 Mins.
H/C
Date: DAY 4
Item
Review last practice
Warming up and stretching
Drills:
a. Short toss (no glove)
b. Short toss (glove)
c. Small ground ball circle drill (no
glove)
d. Small ground ball circle drill
(glove)
e. Fly ball drills
f. 3-Man relay drill
g. Ground ball sequence drills
Hitting class:
a. The bat (How to size)
b. Grip
c. Stance (Base)
d. Head (Eyes)
e. Upper body
f. Stride and separation
g. Swing
h. Safety first!
Drills:
a. Shoulder to shoulder drills
b. Slap the monkey
c. Small bat drills
d.
Review
Comment
See yesterday’s schedule
LL Manual
Keep these drills moving.
LL Manual
All coaches should be
coaching here. Use several
stations and keep batters
moving. Teach fielders while
hitting.
Coaching Notes:
a. Tell players if they have a bat in their hands they must be wearing a helmet.
b. Double distance drill. Two bat rule.
c. Limit batter to cycles of 10 hits.
d. The players are better off going through limited hits, multiple cycles.
e. 7-10 seconds between pitches. Let the batter reset and have a coach correct problem
areas.
Take problem batters aside for additional help. Be aware not to waste the time of many players for the
sake of one.
NOTES:
58
How to Coach Little League Baseball
9. PRACTICE SCHEDULE DAY 5
BABSON TIGERS
BASEBALL
Today’s Emphasis: RUNNING THE BASES
Date: DAY 5
Item
Time
Coach
Item
Comment
1.
5 Mins.
H/C
Review last practice
See yesterday’s
schedule
2.
10 Mins.
Assnt.
3.
25 Mins.
H/C
4.
25 Mins
Assnt.
5.
20 Mins.
H/C
Warming up and stretching
Catching – throwing drills:
a. 2-man short toss (no glove)
b. 2-man short toss (glove)
c. Ground ball sequence drill
d. Ground ball circle drill
e. Fly ball drill
f. No look fly ball drill
g. No look ground ball
h. 3-man relay
i. Long toss
Hitting drills:
a. Tee drills
b. Swing drills
c. Hitting (Batting practice)
Base running:
a. Side step / cross step
b. Basic running techniques (what to look for)
c. First base running – 3 options
d. Second base
e. Third base
f. Running drills
Review
LL Manual
Start mixing up
these drills. Make
them fun. Time the
drills and have the
players compete
against each other
and themselves.
Give them
expectations for
each drill i.e.: 3cycles of 3-man
relay in 30
seconds.
Set up stations.
Use every coach.
See Running
Section.
6.
5 Mins.
H/C
Coaching Notes:
a. Don’t overestimate the player’s knowledge of base running. This is an important aspect of the
game.
b. Be creative on drills. Establish names for each, so players will recognize them by week two.
c. Teach them to look for a fielding error on first base. It’s a basic of the game that often gets
ignored.
NOTES:
59
Jake Patterson
10. PRACTICE SCHEDULE DAY 6
BABSON TIGERS
BASEBALL
Today’s Emphasis: PULLING IT TOGETHER
Item
Time
Date: DAY 6
Coach
Item
1.
5 Mins.
H/C
Review last practice
2.
3.
10 Mins.
20 Mins.
Assnt.
H/C
4.
30 Mins
Assnt.
Warming up and stretching
Catching –throwing drills:
a. Short toss (no glove / glove)
b. Long toss
c. Ground ball sequence drill
d. 3-man relay
e. Ground balls (Outfield – infield rotate
players)
f. Fly ball drill
g. No look drills
h. Quick toss
Split into 3 groups:
a. HITTERS: Hitting (1 batter hitting, 1 batter
on tee, 1 batter swing drills)
b. FLY BALLS: Outfield, throw to bucket.
c. GROUND BALLS: GB’s, throw to bucket,
rotate
5.
20 Mins.
Assnt.
GAME LIKE SITUATION (Rotate) Include:
a. Running
b. Hitting
c. Fielding
d. Throwing
Comment
See yesterday’s
schedule
LL manual
Time these drills
and make a
game of it.
Keep players
moving. Can do
all three at once.
One coach for
each group.
Use buckets to
limit the amount
of time wasted
chasing balls.
Make sure every
player gets a
look at every
position.
Review with
players what
they are doing w/
each batter.
6.
5 Mins.
H/C
Review
Coaching Notes:
a. From this point on you will need to address a new topic every day (see Master Schedule).
Don’t forget to use a stopwatch and whistle.
NOTES:
60
How to Coach Little League Baseball
11. PRACTICE SCHEDULE (Blank)
BABSON TIGERS
BASEBALL
Today’s Emphasis: _____________________ Date: __________
Item
Time
Coach
Item
NOTES:
61
Comment
Jake Patterson
12. LAST THOUGHT ON PLANNING
I met Mick Williams at a coaches’ clinic I attended some time ago. He talked about the
need for sound planning in order to run an effective baseball program. His article Baseball is
Only as Good as Your Planning is worth reading.
about one hour of planning. Several things to
keep in mind are:
• Every season should have a master plan.
• You should review the master plan with
your players and coaches before your
season begins. This insures they are
aware of your expectations and goals
• The first practice sets the stage for the
season. If your go in unprepared, don’t
expect much from your players. You set
the example.
• Every practice should have a preestablished and posted schedule. The
schedule should be broken down into
three areas: warms ups and conditioning,
skill development, and a game like
component.
• Establish times for each activity and stick
with them. Use a team manager with a
stopwatch.
• Assistant coaches, team captains, and
managers should have clearly established
roles.
• Start practices on time and finish them on
time. Players needing extra work are dealt
with after the practice is over.
• Coaches are there to coach, not play.
Make sure coaches and assistant coaches
focus on their jobs and the players focus
on theirs.
Baseball is only as good as
your planning
By: MICK WILLIAMS
Reprinted with the permission of the author.
Someone asked me what I see as the
greatest coaching improvement opportunity in the
average high school baseball program. The
answer is simple, PLANNING!
Too many coaches rely on their personal
knowledge of the game to carry them effectively
through their team’s practice. There are several
problems I have with this. First, just because you
know the game, it doesn’t mean you know how to
teach it. Second, good teaching requires
considerable work and planning. A great explayer who can’t properly teach the game makes
for a bad coach. A coach, who can teach the game
but doesn’t plan properly, also makes for a bad
coach.
The greatest mistake a baseball coach can
make is not properly preparing their season. Poor
pre-season planning and bad practice schedules
can be the greatest single most contributing factor
to having a bad season. With all the training
information available to today’s coaching, I am
amazed at the amount of coaches at the high
school level that attempt to conduct practices with
nothing prepared.
Baseball requires significant skill, speed
and conditioning. A coach properly preparing for
this is as important as the player’s effort on the
field. Using every second of every practice is
crucial for a successful season. A good rule of
thumb I use is planning time should be about half
the field time. Two hours of practice should take
Conducting a practice that is ill prepared
is unfair to the players and the game. Good
planning makes a difference. When someone
asks me, “What do you see as the greatest
improvement opportunity on the average high
school baseball program,” the answer is
simple - PLANNING!
62
How to Coach Little League Baseball
How To Get And Keep The Players’ Attention
Controlling your players and maintaining good discipline is key to a successful season.
Without control, practice and game efficiency and effectiveness decline. One key element in
maintaining control throughout the season is establishing rules and guidelines, and reviewing
them with both the players and their parents at the start of the season. This insures there are no
misinterpretations or surprises during the season and the players know exactly what is
expected. The letters listed in Section 3 can be a great start.
While letters home will solve a majority of your potential problems, it won’t solve them
all. It is unreasonable to expect your players to behave themselves throughout the entire season.
They’re only kids. How you respond to these inevitable moments is as important as teaching
the players how to throw a ball properly. Coaches over the years have asked me, “How do you
discipline young players?” I have always felt uncomfortable with this question, especially when
dealing with young children. I prefer to address this question by placing my efforts on
establishing a good athletic learning environment at the beginning of the season, versus
correcting a wayward process with draconian methods during the season. This is not to say we
will not have our behavior challenges as coaches, we will. But I have found it more productive
to look at this challenge from a, positive action and behavior will result in rewards,
perspective.
1. MOTIVATION THROUGH MOVEMENT
Many coaches use running as punishment for bad behavior. In lieu of running I have
found it more useful to use the time focusing on other key physical elements of the game. I call
this Motivation Through Movement (MTM). Most children know how to run so why waste
precious practice time doing something they already know how to do? Activities such as the
following can be more effective in training the players:
a. Base running
b. Stealing drills
c. Drop step drills
d. Dynamic stretching
e. Ground ball chase drills
f. Sliding drills
g. Etc.
Many of the problems you will encounter with young players will be the players’
inability to focus. We must remember they are children. They inherently have difficulties
focusing. I learned long ago it is more effective adjusting to the players’ inability to stay
focused versus fighting it. Using MTM activities serve two purposes; first the players are
63
Jake Patterson
learning something about the game, and second they become somewhat tired making it easier
for them to focus on instruction.
2. GUIDELINES FOR MTM
When trying to get and keep the players attention, there are several guidelines that I use.
They include:
a. Insure the consequences fit the transgression.
b. Be consistent in applying MTM. A small lapse of attention should result in a
small MTM activity.
c. Insure the consequences are age and league appropriate. “Play to win,”
leagues such as traveling teams, AAU teams, or all-star teams will have
greater consequences than those leagues established strictly for fun.
d. Keep what you are doing in perspective, they’re children playing ball, not
U.S. Army basic training recruits.
e. Nip your problems in the bud. They will not go away if you ignore them.
f. Never yell at the players (It’s Ok to yell to them). Stay calm and in control.
g. Never embarrass a player in front of others.
h. Never reprimand a player for not understanding instruction. Responsibility
for player instructional understanding lies with the coach.
i. Be careful about reprimanding a player for a fielding or hitting error. I have
yet to see a player make an error on purpose.
j. Always follow up with an explanation as to what the player did wrong and
what he/she needs to do to correct the problem.
k. Always end your motivation meetings and discussions on a positive note.
Telling a player, “Hey Johnny, everyone makes mistakes. It’s what you
make of your mistakes that matters,” is much more effective than, “You’re a
real pain Johnny! I’ve never seen a kid more disruptive than you! Shape up
or ship out!”
To help you with what may be considered age appropriate for young players (Twelve and
under). I use the following guidelines:
Table 6.3: Consequence Guidelines
Item
Consequence
Comments
Players not paying attention
MTM activity for the
whole team
This instills some team pressure on those that
have difficulty focusing. If more than one player
is talking chances are that a good part of the
team is not paying attention to what you are
teaching.
64
How to Coach Little League Baseball
Item
Consequence
Comments
One player not paying attention
MTM activity for the
whole team
Again some peer pressure may be helpful. I
would not however, use this more than a few
times. If the problem persists take a team break
and explain to the player that his/her inability to
focus will result in them having to sit on the
bench away from the team so as to not disrupt
practice and waste precious time. After practice
review this with the player explaining why his/her
actions are disruptive. Offer helpful hints that
may help keep them focused. Something as
simple as, “Count to three before you talk,” can
sometimes be very helpful.
Players missing practice without a
good excuse (i.e. medical, school,
appointment, etc.)
Does not start game.
Many leagues require that every player
participate in every game. Make it known
however, that good performance during practice
is rewarded with time on the field during a game.
Those missing practice will not have as much
play time as those that attend and work hard. If
the problem persists, schedule a meeting with
the parents.
Arguing with the coach.
Player sits
If you treat the players with respect, you should
expect the same from them. When a player
argues with coach I sit the player immediately
and address the problem after practice. If the
problem is serious I schedule a meeting with the
parents. Further violations may result in
suspension. Little League has guidelines for
parents and coaches on how to handle serious
issues.
Player fighting with one another.
Player sits
I sit the player immediately. I discuss the
incident with the players involved and try to gain
understanding of the problem. I would then give
them the condition in which they need to return
the next day. I have the players shake hands
before going home. I follow up with both players
before the start of the next practice or game to
insure there are no remaining problems. Note –
there is a difference between a disagreement
and fight.
65
Jake Patterson
Arguing with umpires
Player sits
I sit the player immediately. I inform the players
that any and all issues with the umpires are to
be addressed by me, the coach, not them (Or
their parents). I have them shake hands and
apologize to the umpire before going home. I
follow up with the player before the start of the
next practice or game to insure there are no
remaining problems. Note – there is a difference
between a disagreement and an argument.
Late for practice
Extracurricular team
activity
I use items such as cleaning the dug outs,
policing up the paper on the field, etc. I don’t
make this a big deal of this if it’s only one time.
It’s the parents that usually cause this problem.
If the problem persists speak with the parents
reminding them that it is unfair to the rest of the
team, the coach, and their child as it wastes
valuable practice time. Remember: “Start on
time, finish on time.”
Violation of safety rules
Stop play
immediately and
correct the problem
Review with the player immediately. If the
problem is intentional and dangerous, remove
the player from the game or practice. Review
with the player and his or her parents after the
practice or game.
Lack of effort
Lack of play time
I do not reward lack of effort with playtime,
regardless of the player’s talent. I would rather
play a player with mediocre talent that works
hard, than a great player who exhibits little
interest in doing the job well. I take the player
aside at the end of the game or practice and
explain why they sat and what is expected for
them to correct.
3. ASKING FOR HELP
As a coach, we must be aware that disruptive behavior can sometimes be a cry
for help. Children sometimes exhibit bad behavior because of poor self-image, a feeling of
inadequacy, problems at home, problem with peers, problems in school, or just normal
issues with growing up. We do not need to be trained, certified youth counselors to help.
Lending an ear and giving extra support and attention to those that need it, is sometimes all
that is required. If you have a player however, that may have a more serious problem, seek
the advise of your league officials.
66
How to Coach Little League Baseball
4. TOKEN PLAYTIME
The following is an article I wrote some time ago concerning token playtime. It speaks
for itself.
The second thing that happens is the player and
his parents see token playtime for what it is; an
after thought for the untalented. Whether this is
true or not from the coach’s perspective is
irrelevant in the eyes of the player and parents.
They typically go home feeling bad about the
game and their opportunity to contribute.
We all know stories of young players
wanting to quit a team because they were not
playing. I can remember my youngest son
wanting to quit his middle school basketball
team because the only time the coach would
play him was when the team was winning by a
lot or losing by a lot. The coach even had her
token playtime players sit at the far end of the
bench so they wouldn’t interfere with the “real”
basketball players. It resulted in destroying his
love for the game. He wasn’t the best, the
tallest, or the most talented player, but he
worked hard and was reliable, important
athletic traits some coaches fail to recognize in
their players. His coach looked at basketball as
a five man game supported by random
substitutes. This left the bench feeling isolated
and the starters feeling overwhelmed. Few
lessons were learned and no one had fun.
Token Play Time
A Player’s Worst Moment, A
Coach’s Worst Excuse
By: Jake Patterson
Youth coaches, both experienced and
inexperienced, sometimes defend and justify
their starting and playtime decisions by using
token playtime. Token playtime is the process
of playing a bench player when there is no hope
of winning the game, there is no way to lose it,
or potential damage can be easily mitigated. It
typically occurs in the last moments of a game.
The coach scans the bench and without warning
yells, “Jones, get in there and hit!” The startled
player grabs a helmet and bat and runs to the
plate unprepared for the next few seconds of his
life.
More times than not, the nervous
player performs poorly. In many cases the
coach uses this to reinforce his or her decision
not to play the player often or start the player.
When the player inevitably fails, I have
witnessed coaches turning to parents, other
coaches, players or the fans and give them a,
“See that’s why I don’t play him,” look. The
end result of the whole process is the player
learns nothing and the coach misses the
opportunity to build and teach both the player
and the team.
Two things usually happen from a
player’s perspective. First, the player feels
embarrassed and angry because he was
unprepared for his only moment in the sun and
was not given a fair opportunity to succeed.
WHAT IS THE REASON FOR TOKEN
PLAYTIME?
The reason for token playtime is
simple: The coach wants to win! They play
their best players in hopes of winning every
game. While winning in itself is not a bad
thing, it must be balanced with teaching and
developing. Determining how much emphasis
is placed on each is determined by the age of
the players and the league in which you play.
67
Jake Patterson
Inexperienced coaches.
Few youth coaches come to coaching
with any background or training in coaching.
They are learning and simply miss things. They
get wrapped up in the moment and forget about
the player at the end of the bench.
The age of the players.
The younger the player, the more
emphasis there is on development and teaching.
Emphasis on winning must be age appropriate.
Stump Merrill, a great Major League Baseball
coach, helped me with this concept several
years ago during a coaches’ clinic. After
listening to Stump talk about youth athletics,
several of us developed a matrix that shows
appropriate levels of teaching, developing,
winning, fun, work the athletes must dedicate
to the sport and time needed to play and
practice, based on the type of league and age of
the player. The results were eye opening. Each
athletic level had varying amounts of emphasis
in every category. The point is, that every level
requires different coaching techniques and
winning emphasis.
Poor coaching.
Some coaches are just bad coaches.
They want to win and care little about the
player sitting the bench.
Favoritism.
Unfortunately, some coaches have
players they like more than the other players.
They overplay the favored players at the
expense of the less favored players. This is
difficult to hide and is usually detrimental to
the team as well as the players involved.
The type of league you play in.
A Minor League team will have
different goals and objectives than a traveling
AAU team that requires regional tryouts. The
town team will lean more toward fun while the
AAU team will lean more toward winning.
While the commitment in time, money, and
expectations are greater for the AAU team,
both coaches must be aware of the development
and teaching aspect of their responsibility.
Players who deserve little time.
Playtime is earned during practices.
There are those that deserve little playtime
because of poor practice habits. Establishing
rules at the beginning of the season and
reviewing them with players and parents help
prevent misunderstandings here. Poor conduct
in practice deserves less playtime in a game.
HOW TO PREVENT TOKEN PLAYTIME.
Next to cutting players at tryouts,
deciding who plays is the most difficult
decision a coach can make. There are several
items a coach can do to help with this.
WHO
ARE
THE
TOKEN
TIME
PLAYERS?
Players who are usually subjected to
token time are your least talented players. We
all have coached players who struggle with
basic skills no matter how hard they try. The
important thing to remember as a coach is the
reason they struggle can be either genetic or
developmental. Some young players have the
physical ability and attributes to play well, but
they require time to develop. Others will never
be good athletes, but should be afforded the
same opportunities to contribute to the team.
Other reasons for token playtime include:
Come to games prepared.
Take a few minutes to establish a game
plan. Going to a game prepared can eliminate
oversights made during a game.
Recognize your job is to teach and develop.
Many youth coaches live their own
athletic dreams through their players. They lose
sight that the game is about the athlete. An old
coach once told me, “Stop worrying about
68
How to Coach Little League Baseball
to catch on to what we were trying to teach.
During a hopeless game I told all the players on
the bench, “Ok, everyone’s in! Where do you
want to play?” Bob said he would like to try
pitching. Good pitchers in our league, (High
school) throw a fastball 70-80 MPH. Some hit
the mid to high 80’s. I felt there was no way he
would survive one batter. It turns out that Bob’s
hero is the famous under-hand Korean pitcher
Byung-Hyun Kim, a former starting pitcher for
the Boston Red Sox. Bob went to the mound,
threw his first pitch, knuckles almost dragging
the ground ala Byung-Hyun Kim and hit the
center of the strike zone with an 80-MPH
fastball. When he completed his warm ups we
were flabbergasted. How could we have
possibly missed this! Bob didn’t save the game
that day, but I did find a potential pitcher. The
point is there may be a diamond in the rough.
winning, you can’t control it. The only thing
you can control is how well you prepare your
team and how well you prepare yourself.”
Accept that a team is only a team when all
members feel they are part of the team.
Every player should have a role.
Examples include back-up infielder, reliever
and pinch runner. To be successful everyone
needs to know where he or she fits. Make the
game about the kids, all the kids. Yes it is more
fun to win, but you must balance that with a
sense of fairness to all players.
Balance short-term goals with the long-term
development of the team.
Win/loss records are important, but so
is teaching and developing. A coach should be
looking for every opportunity to play the
younger players. This should be viewed as an
investment in the team’s future. Every game,
every practice should be viewed as a teaching
and development opportunity.
Providing the athletes a fair
opportunity to succeed rather than an
opportunity to fail is your most important job as
a coach. Don’t look to justify your playing and
starting decisions with a few moments of
unexpected time for your bench players. Keep
everyone involved and develop roles for all
players. Remember the game is for the players.
The future athletic memories of our children
are being made today. Go and make good
memories!
When presented the opportunity, try
something VERY different.
When losing big or winning big try
new things. It’s fun and it gives you an
opportunity to teach and to discover new
talents. I had a young man struggled the entire
season. He worked hard but just never seemed
69
Section 7. Basic Baseball/Softball Techniques
How to Coach Little League Baseball
Throwing a Baseball
Throwing the ball properly is not an easy skill to teach or master, and is one of the
most difficult skills to correct later when taught wrong. Several basic items to consider when
teaching players to throw are as follows:
1. CHILDREN AND HOW THEY GROW AND THROW
Throwing a baseball properly is not a natural thing for the human body to do. Our
muscles and bones are not made to comfortably throw a ball and we have to train our bodies
to do it the most effective way. This takes a lot of time and proper instruction. The following
is what you may see as the child develops:
Table 7.1: How a Child Throws
Age
League
Typical Throwing Technique
2-5
Pre Tee-Ball
5-8
Tee-Ball – Minor League
Under hand throw, most times two-handed
Throw starts in front of the body with arm traveling straight
down the side of the body. Crossing the body is difficult.
8-10
Minor League – Little League
Modified baseball throw. Hand starts out back and is able to
cross the body. Limited hip rotation.
11-12
Little League and older
Good baseball throwing technique. Hand across the body
with good hip rotation.
73
Jake Patterson
The point here is to be patient. It is important you take all the time necessary to teach
the players proper throwing technique, and remember; proper technique is taught one small
step at a time.
2. THE GRIP
a. Have players move to a two-finger grip as soon as they can, one finger
width apart.
b. The pads of the fingers should be across a seam with finger pressure
applied slightly above the top knuckle. The best grip is a four-seam grip
(Shown below). The player should see a “C” off the side of the fingers.
Four Seam Grip
c. Place the thumb under the ball directly below the fingers, with the bony
part of the thumb on the ball.
d. Palm of the hand should not touch the ball. There should be a visible gap
between the fingers and thumb.
e. When starting the throw from behind the head, ensure the players keep
their throwing fingers on top of the ball.
3. THE THROW
a. Start the throw with the glove and ball in front of the chest. Separate the
hands such that the arms are extended on plane with the target.
b. When ready to throw, the throwing hand should be even with the top of the
head and behind the body, fingers on top. The body should be in a “bow
and arrow stance,” with the back of the glove pointing toward the target,
throwing hand directly back.
c. Upper part of the throwing arm should be somewhat parallel to the ground.
74
How to Coach Little League Baseball
d. Throw the ball off the fingertips with backspin. This allows the ball to
carry more.
e. Have the players throw at a target. Pick a spot on the receiver’s chest.
Avoid using the entire chest as a target and have them pick a six-inch circle
in the middle of the chest. Big target, big margin of error. Small target,
small margin of error.
f. Step toward the target with front foot.
g. Throw across the body at a 45-degree angle, finishing with the throwing
hand in the opposite “pocket.”
h. Rotate hips finishing by planting the toe of the throwing foot in the ground
out in front of the throwing side of the body.
i. Recover immediately, expecting the returned throw.
Who Quits Baseball?
At a recent baseball and softball clinic I met Harvey Dorfman. Harvey is a
well-known sports psychologist and has been around baseball for many
decades. He asked our group, “At what level do you think most kids quit
playing baseball?” We were surprised when he said Little League. Watch
the pressures you place on your child and players. Make sure the game
stays fun. By the way I would highly recommend Harvey’s book Coaching
The Mental Game.
75
Jake Patterson
Catching a Baseball
Catching a baseball is a basic skill of the game. Again, it’s more difficult to correct
bad habits than it is to teach the proper techniques. Catching the ball properly should always
include both hands when coaching Little League. Too many young players see the onehanded catches made by the pros and feel this is the way to catch a ball. At a young age it is
not! Do not let them do it! Other items include:
1. THE GLOVE
a. Little Leaguers should have a properly fitted leather glove. Avoid cheap
plastic gloves. They fall apart quickly and affect the player’s ability to
learn.
b. Gloves come in different sizes and types. There are softball and baseball
gloves, catcher’s mitts, first baseman’s mitts, infield gloves and outfield
gloves. All are different and, all come in different sizes. A 10” - 11”
infielder mitt is a good place to start for most Little Leaguers. Maximum
size for Little League is twelve inch. The size of the glove is usually
printed in the inside palm area and is measured from the top of the
forefinger to the base of the palm. The following chart can be used as a
guideline:
76
How to Coach Little League Baseball
Table 7.2: Glove Sizes
Age (Years)
League
Position
Glove Size
5-6
Tee-Ball
All
10” – 10 ½”
7-8
Minor League
All
10 ½” – 11”
Little League
Middle School
All
11” – 11 ½”
Outfield
12” – 12 ½”
Infield
11” 11 ½”
First base
12” – 12 ½”
9-12
Little League
12+
Little
12+
12+
Middle School
Junior League
Senior League
High School
Middle School
Junior League
Senior League
High School
Middle School
Junior League
Senior League
High School
c. The players should break in their glove by first oiling it with a good brand
glove oil and by working the glove. Working the glove is accomplished by
bending the top of each finger and thumb to the inside palm of the glove
repeatedly. This emulates the way our hands work. Avoid folding the glove
through the web.
d. Using a batter’s glove on the glove hand will help increase the life of the
glove by preventing dirt and sweat from breaking down the leather.
e. The difference between a mitt and a glove is a glove has fingers and a mitt
does not. The first baseman and the catcher are the only players permitted
to use a mitt on the field.
2. THE BASE (Lower Body)
Catching the ball starts with a good base. Get your players used to a good athletic
position. They should be in this position every time they are expecting the ball. I have the
players develop a routine before each pitch or catch that allows them to get into a good
defensive position.
a. Feet apart, slightly more than shoulder width apart.
b. Back straight.
c. Knees slightly bent.
d. Weight remains on the balls of the feet. You should be able to slide a piece
of paper under their heels.
77
Jake Patterson
e. Stay balanced.
f. Keep feet moving and stay loose.
3. THE UPPER BODY
a. Head up with both eyes looking for the ball.
b. Hands out front with fingers spread up and out.
c. Palms to the ball. When in the field do not allow players to get into the
habit of resting their hands on their knees when in the ready position.
4. THE CATCH
a. Always have the player move to the ball versus waiting for the ball to come
to them.
b. Catch the ball out in front of the body.
c. Transfer the ball fluidly. Use “butterfly” technique to transfer the ball.
d. Above the waist, fingers should point up and make “W’s”.
e. Below the waist, fingers should point down and make “M’s”.
f. Avoid one-handed catches. One-handed catches are prone to more errors
and it is more difficult to transition the ball to the throw.
5. GROUND BALLS
a. Start with a good athletic position.
b. Hands out front with the palms to the ball.
c. Stay relaxed and keep the feet moving.
d. Catch the ball slightly glove side, thigh to belly.
e. When catching a ground ball, keep the glove at a 45-degree angle to the
ground. You want to the palm of the glove facing the ball, not the fingers.
f. Use a clamshell catch. Glove underneath, throwing hand on top, ready to
capture the ball.
g. Watch the ball go into the glove; some coaches describe this as, “button to
button” (Button on the top of the hat moves toward the belly button).
h. Transfer the ball fluidly. Use “butterfly” technique to transfer the ball.
i. Teach the players to move to the ball versus letting the ball come to them.
“Baseball is the only field of endeavor where a man
can succeed three times out of ten and be considered
a good performer.”
- Ted Williams
78
How to Coach Little League Baseball
Table 7.3: Short Toss Relay
SHORT TOSS RELAY DRILL
1. Sequence for this drill should be short toss,
long toss, quick toss, and then short toss relay.
2. Insure players are properly stretched before
throwing. Remember, "Warm up to throw, don’t,
throw to warm up."
3. Key for coaches is to watch for technique and
insure players turn glove side.
4. Match players by arm strength.
5. Have players throw to a six-inch circle in the
center of the chest as a target.
Table 7.4: Double Play Drill
DOUBLE PLAY DRILL
1. On "Go!" coach tosses ball underhand out in
front of player breaking to second base.
2. Player tags second base and throws to first.
3. Player rotates from shortstop to first to the
bucket.
4. Coach at shortstop is teaching how to receive
the ball out front and how to tag second base
and make throw to first or how to throw or flip the
ball to second base.
5. Coach at first base is teaching how to catch
the ball, how to move to the bag, and how to find
and touch the bag with their throwing foot.
6. Move to coach-tossed ground balls.
79
Jake Patterson
Table 7.5: Ground Ball Circle Drill
GROUND BALL CIRCLE DRILL
1. Divide players in groups of five (more is OK).
2. Start with small circles, no gloves.
3. Balls are received and redirected to next
player using both hands out front.
4. Have players step back and use gloves.
5. Teach a good ready-set position, i.e. feet
apart, back straight, player on ball of the feet,
knees bent, head up, hands out front.
6. Go to two balls as the players improve.
80
How to Coach Little League Baseball
Catching and Throwing Drills
There are literally hundreds of effective age-appropriate throwing and catching drills.
If you have a problem with catching or throwing there is a drill to fix it. A little research can
make a big difference. If you are having difficulty finding the right drill contact us at
[email protected]. The following are several basic drills appropriate for the youth
levels:
a. TENNIS BALL DRILL: Tennis balls are great training aids for young children. It is
difficult to catch a tennis ball with one hand, forcing the players to use both hands.
This teaches the players to involve the throwing hand early. Best of all tennis balls
don’t hurt. This helps build player confidence. You can also use injury reduced balls,
tee balls, or Incredaballs. They are similar to baseball but softer.
b. ONE HANDED SELF-TOSS: Toss the ball in the air with the throwing hand and catch
it with the throwing hand. Have the players get used to rotating the ball finding a fourseam grip. This drill gets the players used to moving the ball quickly in their hands to
find the seams.
c. BACK OF THE GLOVE DRILL: Use the back of the glove to catch the ball. This
teaches two-hand involvement with the catching process. The players can’t catch a
ball with the back of the glove unless the throwing hand captures the ball.
d. SHORT TOSS – LONG TOSS: Have the players start about twenty feet apart. After 1520 throws move the players back several feet. Repeat the process until they reach their
maximum throwing distance. Match the players by their arm strength, size, and the
distance they can throw. Don’t put your best player with your worst. You know the
players have reached their maximum distance for this drill when they need a small
skip step to throw the ball hard enough to reach the target. It is not the intent of this
81
Jake Patterson
drill to see how far the players can throw. It’s used to loosen and strengthen their arms
and legs.
e. QUICK TOSS: Used only after the players have warmed up. Match the players based
on ability. The intent of this drill is to transition the ball quickly not throw the ball
hard. This drill is good for hand-eye coordination and teaching how to move the feet.
Great drill to time and count. Use 30-second cycles. Remember to catch the ball out
front. “Butterfly” transition, move the feet, throw, finish and recover. Use care with
this drill, as you do not want to have players hurt their arms.
f. “SET, READY” DRILL: On “SET” the player prepares for the infield ready position.
On “READY” infielder sets hands down and in front, fingers out, knees bent, eyes on
the ball, head up, back straight. This helps establish a defensive routine for every
pitch. While every player will be comfortable with something different I start with,
throwing foot forward one step, glove foot up and then a slight shuffle side to side.
g. ONE STEP CROSS OVER DRILL: Players start in the set position. Coach blows
whistle and points right or left. The player uses a cross over step and establishes a
good ground ball catching stance. Coaches check for movement and recover
techniques. To finish the drill roll a ball to the player once he or she reaches his or her
position.
h. 3-STEP CROSS OVER DRILL: Same as above except player moves three steps.
i. 2-LINE REACTION DRILL: Same as above, except players are formed into two lines
about 30-60 feet apart facing each other. Coach sets up behind the line catching the
ball. Coach points right or left. On “Go!” the opposite player rolls the ball in the
direction the coach points, about five feet to the side of the fielder. Rotate players after
several tries. Teaches players how to move laterally.
j. SHORT HOP DRILL: In this drill have the players set up about ten feet apart. Have
them bounce the ball about three feet from their partner. As they improve, have the
players bounce the ball closer to each other. Do both forehand and backhand. You can
start this drill as a line drill using several coaches.
k. POP FLY, NO LOOK DRILL: Player 1 starts on one knee looking down. Player 2
throws the ball in the air and says, “Go!” when the ball is at its peak. Player 1 stands,
locates the ball and makes the catch out in front. Rotate every three catches.
l.
AWAY AND FIND DRILL: Player gives ball to coach and runs away from coach. On
“Now!” coach throws ball to player. Player quickly turns, locates the ball and catches
82
How to Coach Little League Baseball
out in front. This can be added to by having the player set and throw to a bag. This is
similar to a football buttonhook drill.
m. COACH GIVE DRILL: In this drill the player gets extended as if throwing, glove to
target, throwing hand extended back fingers on top. When good form is established,
the coach sticks a ball into throwing hand and player completes throwing cycle. This a
great drill to teach proper throwing form and technique.
Table 7.6: Two Coach Ground Ball Rotation Drill
TWO COACH GROUND BALL
ROTATION DRILL
1. Coach hits ground balls across the infield in
rotation.
2. Ball is caught and then thrown to the same
side as the player’s position opposite of the
coach hitting.
3. Everyone gets one ground ball and then
rotates one position.
4. Players rotate into the buckets to catch for the
coaches.
5. Teach the players to keep a ball in the coach's
hand. This makes the drill more efficient.
6. Have players shag their own missed balls and
throw them in as not to interrupt the rotation.
83
Jake Patterson
Table 7.7: Outfield Ground Ball/Fly Ball Drill
OUTFIELD GROUND BALL/FLY BALL
DRILL
1. Great drill to run during any infield ground ball
drill.
2. Coach sets up in the outfield away from the
infield.
3. Use a pitching machine if available. Most
pitching machines are capable of throwing fly
balls a great distance accurately. 4. Balls are
thrown to a target set up in the outfield.
5. Player manning the bag yells, "Hit me, hit me!"
and gives a big target with extended hands. You
can also practice hitting the bag to simulate
throwing a runner out. Use a screen behind the
bag so you do not waste time chasing balls.
6. Bucket is brought in to the coach on the
rotation.
7. Vary the type of balls hit, i.e. short fly balls,
long fly balls, high fly balls, shallow fly balls, and
ground balls. When doing so however, do so in
groups in order to keep the practice efficient.
Table 7.8: Zig Zag Drill
ZIG ZAG DRILL
1. Coach hits ball to the far corner.
2. Ball is zig-zagged across the field.
3. Players rotate clock-wise after a specific
amount of ground balls.
4. One player rotates to the coach and flips balls
to the coach.
5. All errors are disregarded and policed up after
a cycle is complete.
6. Make a game of it by seeing how many balls
you can keep going at one time.
7. Good indoor drill (Use Incredaballs).
84
How to Coach Little League Baseball
Table 7.9: Roll And Go’s
ROLL AND GO'S
1. 1 & 3 are the fielders (1 is right handed, 3 is
left-handed).
2. On a whistle 2 and 4 roll the ball to a specific
area (dark area).
3. 1 and 3 chase the ball down sets over the top
of the ball, bare hands the ball with throwing side
away from the throwing target.
4. Players 1 and 3 sets to throws and throws ball
to 2 and 4.
5. 1 sets with right side back (right handed), 3
sets left side back (left handed).
6. Players return and alternate with partners.
"I'd like to be remembered. I'd like to think that someday two guys will be talking in a
bar and one of them will say something like, 'Yeah, he's a good shortstop, but he's not
as good as ole Ripken was.' "
- Cal Ripken
85
Jake Patterson
The Basics of Hitting
Many young hitters today try to emulate the homerun hitters of Major League
Baseball. Although very talented, they do little to help the Little Leaguer. Many professional
batting instructors and coaches would rather use the styles of Ted Williams and Joe Dimagio
as examples. Many regard them as two of the purest hitters the game ever saw. Who the
young players emulate is not as important as making sure they start with the basics. Having
heroes and role models are important for every child, but it’s the coach’s job is to make sure
they pick the right ones. Using one of today’s many long ball hitters that seldom leg out a
ground ball would not be a good example.
Hitting can be broken down into several basic elements. Some of the following items
may have to be slightly adjusted, as they may be too complicated for the real young players.
You will need to get a feel for what your players are capable of when you begin teaching.
Stick to the basics and work up. A good swing has a lot to do with muscle memory. Teach it
right and their muscles will take over.
1. THE BAT
a. The Little League metal bat is usually 27”–32” long and can weigh 3-9
ounces less than its length. Many leagues have restrictions on the length to
weight ratio. As an example a bat that is thirty inches long and twenty-five
ounces in weight is a minus five bat (25 – 30 = -5).
b. You should familiarize yourself with your league requirements. Baseball
has established the BESR (Bat Exit Speed Ratio) standard to regulate and
standardize baseball bats. Bats that meet BESR requirements are marked
on the barrel of the bat.
86
How to Coach Little League Baseball
c. Older youth leagues, such as middle school, Junior League, Senior League,
and American Legion Ball use a minus three (-3) bat. A –3 bat best
emulates a typical northern ash wooden bat controlling the effectiveness a
wide length to weight ratio can have. This limits the speed in which the ball
comes off the bat.
d. To determine appropriate bat size for a young batter, have the batter hold
the bat straight out, parallel to the ground, by its knob with the throwing
hand. They should be able to hold the bat steady for fifteen seconds. If they
waiver or it falls, the bat is too heavy. If they can hold it steady for more
than twenty seconds then the bat may be too light.
e. The following is a good starting point for bat size selection.
Table 7.10: Bat Sizes (In Inches)
Batter’s Weight/
Height
Under 50 lbs
3’-3’6”
3’7”-4’0”
4’0”-4’6”
4’7” –5”
26
27
28
29
50-60 lbs
27
28
29
30
30
61-70
27
5’1”-5’6”
5’7”- 6’
28
29
30
30
71-80
28
29
30
31
32
81-90
28
29
30
31
32
91-100
29
30
30
31
32
101-110
29
30
31
32
32
f. Make sure the grips are in good order. They are inexpensive and are easy to
repair.
g. Check for cracks. Yes, metal bats can and do crack. Look for tiny stress
cracks. Once a bat cracks, destroy and discard it.
2. THE HANDS (Grip)
a. In order to get a good grip on the bat, Ted Williams once said, “Grab the
bat like an axe.” This may be the easiest way to teach young players. Have
them make believe they are chopping wood on the plate with the bat. Bring
the bat straight overhead and have them check their hands. They should be
in a good relative position. When set, have them point their first fingers up.
Both fingers should both point in the same direction.
b. Hold the bat with the bottom three fingers and the base of the thumbs.
c. Grip with the lower part of the fingers, not the fingertips.
d. Don’t wrap the hand around the bat.
e. Hold bat lightly. The grip should get tighter as the batter swings the bat. I
use a scale of one to ten (1 – 10) to best describe this to children. Three
being loose enough for the bat to easily slide through the hands when
87
Jake Patterson
tugged by another person. Ten being as tight as the batter can possibly hold
it. The swing starts with a three and increases through the swing until the
player makes contact with the ball. The grip being 10 at contact.
3. THE STANCE
a. To determine proper distance from the plate, touch the top of the bat to the
outside of the plate with the front hand. This will ensure the whole plate is
covered.
b. Have the players set up in the middle of the box. Do not place too much
emphasis on whether the batter is up in the box or back in the box. The
average Little League pitcher cannot throw hard enough to make a
difference to the batter. The key is to cover the strike zone.
c. Feet should be slightly more than shoulder width apart.
d. Slight bend at the knees, back straight.
e. Weight on the balls of your feet.
f. Load up on back foot. To check a proper load, use the bat as a pendulum
by placing the knob of the bat at the player’s belly button and let the bat
hang loosely. Move the body back until the top part of the bat is hanging
over the inside of the back foot.
g. Keep the swing compact. Start the hands one-fist length from the body,
even with the back of the back of the shoulder. Hands that are extended too
far back or are extended too far from the body will make the swing
awkward and ineffective.
h. Bat is held at a 45-degree angle off shoulder. Arms should start in an
inverted “V.”
i. An imaginary line off the length of the bat should touch slightly behind the
far side of the plate.
4. THE HEAD
a. Head stays straight up with eyes parallel to the ground. This is very
important!
b. Both eyes facing forward. In order to be effective, the batter needs to see
the ball with both eyes in order to properly judge distance. Tell the batter to
close their front eye and ask, “Does your nose block part of the pitcher?” If
it does, the batter must turn his head more toward the pitcher.
c. Keep the mouth slightly open. It relaxes the face and keeps the eyes
opened.
d. Head should stay as still as possible during the swing. Head movement of
any kind makes it difficult to see the ball properly.
88
How to Coach Little League Baseball
5. THE UPPER BODY
a. Shoulders parallel to the ground. A good way to demonstrate this is to
place a bat at each shoulder and see if the bat is parallel to the ground
facing the pitcher.
b. Stay tall. Don’t slouch or bend over the plate.
c. Chin up and locked at the front shoulder. There should be a two to three
finger space between chin and shoulder.
d. Head over the back knee.
6. THE STRIDE
a. Keep hands and weight back as long as possible.
b. Don’t jump at the ball or lose balance. Don’t fall forward.
c. The stride is a slight step forward, with the front toe pointed slightly in,
weight on the ball of the foot.
d. Train the hitters to start their stride directly to the pitcher. A right-handed
batter stepping toward third, or a left-handed batter stepping toward first,
opens the hips and won’t allow for a good swing.
7. THE SWING
a. Get the players to think hit every pitch. It’s a lot easier to stop a swing than
it is to start one.
b. Do not allow the players to lose their balance or move their head when they
separate and begin their swing.
c. Swing shoulder to shoulder. Chin starts at the front shoulder and finishes at
the back shoulder.
d. Palm up, palm down through the hitting zone. Back palm up, front palm
down. Have the players practice this off to the side to get a good feel for
this.
e. Roll the wrists after the bat travels through the hitting zone. The bat is
through the hitting zone typically after the back arm is fully extended. Too
early and the batter will lose power at contact.
f. Demonstrating good timing with a golf swing can be effective. It will give
the players a feeling for how their timing should look.
g. The sequence of the swing is, set, load, separate, swing.
“My motto was always to keep swinging. Whether I was in a
slump or feeling badly or having trouble off the field, the only
thing to do was keep swinging.”
- Hank Aaron
89
Jake Patterson
Hitting Advice
1. Teach the strike zone to the hitter. Get the player accustomed to a ball and a strike
early. Having the batter at the plate while holding the ball in the all corners of the
strike zone can help. A great training aid here is a hitting stick.
2. Always use your best throwing coach during batting practice. It must be someone
who can throw strikes. Batters become frustrated quickly with someone who
cannot throw well and begin to develop bad batting habits.
3. When using a pitching machine, present the ball to the batter before loading. It’s
important that you establish a routine that emulates the timing of the pitcher.
4. When throwing batting practice, throw a ball every 7-10 seconds depending on the
batter. This allows the batter enough time to recover and reset properly. Set up the
pitching machine before practice.
5. Batting practice is a good time to rotate the players through the different field
positions. This gives everyone a feel for every position (See appendix).
6. Work with hitters having difficulty hitting off to the side. Don’t stop the practice
for one player.
7. Use a pitching screen when throwing batting practice; an injured coach really puts
a damper on a practice. One year I spent a bunch of hours in an emergency room,
compliments of a line drive hit by a twelve-year-old.
8. Have players in the outfield throw to a bucket at second base.
9. Have infielders throw to a bucket on first base.
10. Instead of having players throw each ball to the coach to get them in, have them
run full buckets to the mound and dump them into the coach’s bucket. This is
much more efficient and allows for more hitting practice.
11. Batting practice can be boring. Have a coach off to the side hitting ground balls to
the outfield and infield. Make sure you time it such that two balls are not going to
the fielders at one time.
12. On deck batters should be timing their swings, especially during a game. A good
guideline here is to have the players swing, timing their swings such that they hear
the crack of the catcher’s mitt just as they finish getting through the hitting zone.
"After I hit a home run I had a habit of running the bases with my head down.
I figured the pitcher already felt bad enough without me showing him up
rounding the bases."
-Mickey Mantle
90
How to Coach Little League Baseball
Hitting Drills
a. SHOULDER-TO-SHOULDER CHIN DRILL: Same as above. Used for players having
difficulty keeping their head up and still. Start with the chin at front shoulder; swing
through with the chin ending at the back shoulder. Make sure the head stays as still as
possible.
b. SLAP THE MONKEY DRILL:
1. Have the hitter set up in the batter’s box with his front hand on his stomach
and the back hand straight up, palm open as if taking an oath.
1. On “Set,” player moves to a good neutral hitting position, head looking
forward with both eyes to the pitcher. Batter stays lose with some
movement.
2. On “Load,” player moves weight back to ready position.
3. On “Separate,” player moves the front foot toward the pitcher, foot turned
slightly in. The back hand moves slightly back, keeping the palm of the
hand facing first base for right-handers and third base for left-handers.
2. On “Go,” player starts swing with hip and imagines slapping a monkey in
the head; belt high and slightly in front of front hip.
3. Using a batting tee with a Nerf ball waist high, in front is a good way to
conduct this drill.
c. 1-HANDED SMALL BAT DRILL:
1. Start with the front hand. Using soft toss, a coach flipping the ball to the
hitter from a few feet from the side of the batter, have the batter swing,
concentrating on the knob of the bat coming down in a straight diagonal
line to the ball. The swing should resemble a diagonal cut down to the ball
and push after contact. The idea here is form not hitting the ball hard.
2. The back hand should be similar to the, “Slap the Monkey Drill.” Knob of
the bat cuts diagonally down, palm up through the hitting zone, wrist
rolling after contact.
3. A good check in completing both drills properly is to insure back foot is on
its ball, some coaches call it squashing the bug, the heal is straight up with
the bottom of the foot facing straight back.
d. 1-KNEE SWING DRILL (Both hands): Same as above except on one knee, nonthrowing knee down. This works the upper body.
e. BATTING TEE: The batting tee can be a very useful training device for children if
used properly. Ensure hitters are using all the techniques discussed above. There are
91
Jake Patterson
many books that feature batting tee drills and I encourage coaches to research them
before using a batting tee.
1. Do not allow players to just go up and smack the ball. They must
concentrate on proper technique.
2. Batter faces the imaginary pitcher, concentrating on set up while looking
down field.
3. When the batter is ready, they take a deep breath, set, load, separate and
swing, hitting the top inside part of the ball.
4. If hitting into a fence, use tennis balls, as hard balls will damage the fence.
5. Coaches can effectively watch two or three stations at a time.
6. Have one player load while another is hitting.
Table 7.11: Batting Cage Stations
BATTING CAGE STATIONS
Running effective batting stations with a cage
can be a complicate task, especially with young
players. The following is a recommendation for
the Little League level.
1. 1- Hitter.
2. 2- Soft toss hitter.
3. 3- Soft toss tosser.
4. Tee drill hitter.
5. Tee drill loader.
6. Bombat/ single hand drills, with or with out tee.
7. Coach 1 loading-pitching machine.
8. Coach 2 coaching tee drills.
9. Coach 3 coaching on deck and hitter.
10. On "Rotate!" players rotate to next position.
Hitter and on deck player picks up balls in cage.
11. Keep number of hits to 10-15. More
controlled rotations are better than a lot of hits in
one session.
12. Coach at the pitching machine should
present the ball to the hitter and establish a
routine that would emulate the timing of a pitcher.
13. Use tennis balls when conducting soft toss
and tee drills. Hit into the side of the cage.
14. Separating a long cage into two short cages
with a screen or tarp allows you to have two
cages going at the same time.
92
How to Coach Little League Baseball
Table 7.12: Three Team Rotation
THREE TEAM ROTATION
1. Everyone hits 10-15 hits and then rotates.
More swings will tire the batter limiting their
ability to learn properly.
2. Coach 1 hits fly balls to team 1.
3. Coach 2 hits ground balls to team 2.
4. Coach 3 runs the on deck drills. Drills can
include, tee drills, Bombats, one-handed drills,
and soft toss.
5. Coach 4 throws hitting practice.
6. Use coaching screens for protection.
Note: The key here is to keep things moving.
Batters that are having difficulties should be
taken aside or helped after practice.
Table 7.13: 3-Box Stride Drill
3-BOX STRIDE DRILL
Box 3
Box 2
1. Dark areas indicate the area of the foot where
weight should be placed, the balls of the feet.
2. When starting the swing, 70% of the weight
should be on the back foot.
3. When stepping to box three, ensure the hitters
have the heel of the front foot turned slightly out
toward the mound. This helps with proper swing
rotation
4. Teach the young players to start their stride
directly toward the pitcher. You can work on
other variations of this later.
5. While striding forward the hands move back.
6. Great separation drill.
Box 1
Shoulder Width
Stride Direction
(Right Hand Hitter)
“People ask me what I do in winter when there's no baseball. I'll tell you what I do.
I stare out the window and wait for spring.”
- Roger Hornsby
93
Jake Patterson
Bunting
Bunting is an essential and important part of the offensive game. It is used to put
pressure on the opponents and to move runners. Although bunting is not allowed at the lower
levels of Little League, it should be taught properly at the levels that allow it. Here are several
considerations when teaching batters how to bunt:
1. TYPES OF BUNTING
There are several types of bunts, which are used for different reasons. At the Little
League level the most important bunt to teach is the sacrifice bunt. Different bunts include:
a. Sacrifice bunt: The sacrifice bunt is used to move the runners. There is
little done by the batter to mask its intent. As its name suggests, you are
sacrificing the batter for the sake of moving the runners.
b. Drag bunt: The batter is trying to catch the infield off guard. The move is
quicker and the batter attempts to drag the ball up the base line as he breaks
to first base. The intent is to catch the infield off guard
c. Squeeze bunt: The squeeze bunt is executed with less than two outs and is
used to score the runner on third. This must be carefully executed by both
batter and runner in order for the squeeze to work. The bunted ball needs to
be hit to the weak side of the field and far enough from the plate to give the
runner time to score. Remember the Little League runner can’t leave the
bag until the ball crosses the plate.
d. Slash bunt: The slash bunt is the most difficult bunt to teach and is usually
only used at the older levels. The slash bunt is a feint at a normal bunt with
the batter pulling the bat back at the last second and hitting an infield
ground ball. It is used to draw the infield in and get a base hit.
2. THE BUNT
There are many techniques and nuances to bunting. There are books written on just
this subject alone. In an attempt to keep things easy, I would suggest the following basic
steps:
a. The batter stands as far in front of the batter’s box as they can. This gives
them the best opportunity to hit the ball in fair territory.
b. The move starts by rotating the hips so they finish somewhat perpendicular
to the pitcher. This is accomplished by keeping the feet in place and
rotating on the balls of the feet. Toes finish by pointing in the direction of
the pitcher.
c. Knees are bent.
d. The bat is “presented” to the ball by sliding top hand up the barrel of the
bat, keeping the fingers behind the bat at the same time the batter rotates.
94
How to Coach Little League Baseball
e. At the Little League level, try to keep the bat as parallel to the ground as
possible. This gives the best opportunity to make contact with the ball.
f. Keep the bat out and in front of the plate and in fair territory.
g. Target the top half of the ball.
h. The objective at contact is to absorb the energy of the ball versus hitting it.
3.
BUNTING DRILLS
Again, as with every other skill there are a great number of bunting drills. The two that
I would recommend for this level, other than live practice, are the back of the glove bunt and
the bunt cone drill.
a. Back of the glove drill: A great drill at the Little League level is to pair off
the players facing each other. Player 1 will be the batter; player 2 will be
the pitcher. Have player 1 get in a batting stance. Player 2 tosses the ball
under hand to player 1. Player 1 bunts the ball with the back of the glove.
This allows the coach to train the whole team at once. Once player 1 gets
the concept, rotate and repeat with player number 2.
b. Cone Drill: Set up two sets of cones, two on the first base side and two on
the third base side about three feet from each other, perpendicular to the
foul line and about ten feet up the foul line. Set the batters up into teams
and let them compete against each other by bunting the ball between the
cones. Scoring is:
Table 7.14: Bunt Drill Scoring
Points Awarded
Requirement
3 Points
Through the cones, good technique.
2 Points
Through the cones, Less than good technique.
1 Point
Missed the cones, good technique.
0 Points
Missed the cones and less than good technique.
-1 Points
Popped up the ball
95
Jake Patterson
Table 7.15: Bunt Cone Drill
BUNT CONE DRILL
1. Form and proper methods is key. On deck
coach is used to correct individual problems.
2. Ball must go through the set of cones. Coach
states which cones they want to have the ball go
through before the pitch.
3. Make a game of it.
4. Use bunt signals to test the player’s
knowledge of signals.
“There was a point at which I thought I'd never get the most valuable player,
especially the years I played at Minnesota. We never won a pennant there,
we were far away from the big media centers of Los Angeles and New York,
and I wasn't a flashy power hitter but a guy who hit to spots,
who bunted and stole bases.”
- Rod Carew
96
How to Coach Little League Baseball
Base Running
"If my uniform doesn't get dirty,
I haven't done anything in the
baseball game."
-Rickey Henderson
Base running is one of the most under-taught skills in baseball and softball, but can be
the greatest offensive weapon on your team when executed properly. Aggressive base runners
like Maury Wills, Lou Brock, and Rickey Henderson have all made their mark on the game
because of their running skills and abilities. Every Little League coach should take the time to
teach the proper mechanics of running.
1. KEY ITEMS FOR THE RUNNER
a. The runner must always know the situation. Teach them to ask themselves
“What do I do if the ball is hit?” Every pitch.
b. The runner’s job is to start the movement toward the next base; the coach’s
job is to stop it.
c. When on base, the runner should anticipate every pitch in the dirt.
d. Teach the players to, make a decision and live with it.
e. The runner should always be aware of the location of the ball.
f. Once the decision is made to steal, the runner’s primary focus is the next
base.
2. LEADS
There are two parts of a proper lead, the primary lead and the secondary lead. Both are
needed for good base running. Although we do not technically use a primary lead at the Little
League level, the players should be aware and understand that there are two components to a
good lead.
3. PRIMARY LEAD
Move to the primary position off first base by:
a. Right foot steps toward the mound one full step.
b. Left foot crosses behind the right foot.
c. Right foot shuffles out right, followed by a left foot shuffle.
d. Stay low, hands out front and anticipate the dive back to the bag.
97
Jake Patterson
e. Never go beyond the point of no return. This point is different for every
runner. Have the players find their own point of no return at practice.
f. Always be aware of where the infielders are. A good habit for the runners
to develop is to physically point at the infielders.
g. Have the runner get the signal from the third base bag.
h. If a coach wants to give new instructions, have the runner return to the bag
before giving the new signal.
i. When talking to a runner at first or third make sure the runner watches the
ball while listening to you.
j. Always have the players acknowledge they understand the signal by
touching their helmets. If they don’t, call time out and talk to them. After a
few times, they’ll get it.
k. A primary lead off second base is several normal steps off the bag while
facing the pitcher.
l. A primary lead off third base is a shuffle step in foul territory facing the
pitcher.
4. SECONDARY LEAD
a. The best technique to teach runners is, out far, back fast. Avoid dancing. It
serves little purpose and slows the game down. Doing it once in a while to
rattle the defense is fine. Showboating detracts from the game and the
runner loses focus on what they are supposed to be doing.
b. When on third base, runners go down foul, and return fair. Going down
foul ensures that a runner hit by the ball is not called out. Returning fair
hides the bag from the catcher.
5. FACING THE FLY BALL AND TAGGING
a. When tagging, always face the ball. Back foot on the bag, runner goes
when ball is caught.
b. The distance in which the runner moves to the next base during a fly ball to
the outfield varies depending upon the situation, speed of the runners, the
ability of the fielders, how deep the ball is hit, and the maturity level of the
runner. The following chart is a good place to begin when teaching how far
down the baseline a Little League runner should move on a fly ball to the
outfield. Bear in mind these are guidelines.
98
How to Coach Little League Baseball
Table 7.16: Tagging on a Fly Ball You Expect to be Caught
Runner On
First Base
First Base
Second Base
Third Base
Location of the Outfield Fly
Ball
Right Field
Center Field
Left Field
Right Field
Center Field
Left Field
All Fields
Runner
Half way down facing the fly
ball.
Two-thirds down, facing left
field.
One-third the way down,
facing the ball.
Automatically tag and go on
coach’s signal.
6. DIVING BACK TO THE BAG
a. During a close pick-off attempt, have the players dive back to the bag low
with their face away from the ball, reaching for the bag with the right hand.
This presents the back of the helmet to the ball and tag, preventing injury to
the face and head.
7. SLIDING
a. The easiest way to teach how to slide is to begin with a static figure four.
The steps include:
1. Start with the players lying on the ground on their backs.
2. Move one leg up under the top leg placing the ankle under the knee
of the top leg, toes pointed up.
3. Top leg stays extended and slightly bent at the knee.
4. Upper body sits up with hands up and out with palms facing the
base they are sliding toward.
b. Once the players understand how they should look when they are sliding
have them move into a crab stance and on “Go!” have them pop to the
figure four. This helps them understand how to move their body to the
figure four position.
c. The next step would be to practice on wet grass or a sliding mat. Ensure the
players wear the appropriate gear, i.e. baseball pants and sliding pants.
They are inexpensive and prevent a great deal of pain.
d. Make sure the runners glide into the slide, don’t let them drop or fall into it.
e. Teach popping up on the bag, when appropriate. This allows the runner to
see the situation quicker.
f. When sliding, teach the runners to keep their hands up and out and their
head up.
g. Never teach headfirst sliding at the Little League level. Many leagues have
restrictions on head first sliding. Ask your league officials.
99
Jake Patterson
8. RUNNING TO FIRST
After the hit, glance at the first-base coach but don’t stare. There are several things the
runner is looking to do. They are:
a. STAY AT FIRST: Coach in upright position, both hands up yelling; “Here!
Here!” The runner crosses the base by touching the front of the bag and
immediately looking right for a missed ball.
b. TURN AND LOOK TWO: Coach points to second base with his right hand
while holding his left hand up. Coach yells, “Look two!” Runner turns and
locates the ball. Coach helps the player locate the ball by telling the player
where the ball is.
c. GO TO SECOND OR THIRD: Coach points to second base with his right
hand while making a circle motion with his left. Coach yells, “Go two!” or
“Go three!” Once the runner rounds first base they are to immediately pick
up the third base coach.
d. When turning toward second base after a base hit, have the runners run to
the right side of the first base line, two thirds the way up the line and start
an arcing turn toward second base, hitting the inside corner of the first base
bag.
Table 7.17: Runners Turning at First
Foul Line
First Base
Stay At First
Turn and Look Two
100
Turn And Go Two
How to Coach Little League Baseball
Other things to remember:
e. Teach the runners to run everything out! Even a standard routine infield
play can be dropped.
f. Don’t let the players develop bad habits young.
g. Be alert and aggressive. One lazy throw or a mental lapse from a fielder
can mean an extra bag.
h. Where appropriate, teach the players to automatically run on a third strike
swing and miss. Be relentless on this as a coach. You can use this as a
MTM drill. See Section Six on Motivation Through Movement.
i. Being fast is not the same as being quick. Teach the runners that getting a
good jump is more important than being able to run fast. One year my
fourth fastest runner had the most steals and set a school record.
Table 7.18: Multi Team Run Drill
MULTI TEAM RUN DRILL
1. Runner at the plate simulates a swing and
moves to First. On the way to first the runner
picks up the coach and looks for:
a. "Here!" - Stay at first run through the bag to
the right looking right for a past ball. Runner
turns right and returns to bag.
b. "Look two!" - Runner make a slight arc to
second base touches inside of the bag looking
for ball and second base.
c. "Go two!" - Runner runs to second base
picking up the third base coach half way.
2. Coach on third can practice hold or go home.
3. Teach primary and secondary leads at each
bag.
4. Coach can yell, "Back!" - Teach how to return
to each bag.
5. Third base runners teach down foul, back fair.
6. Home plate teach proper sliding techniques.
101
Jake Patterson
Table 7.19: Sprint and Walks
SPRINT AND WALKS
1. Sprint and walks are a good exercise after
practice or distance running. They are used to
help condition and prepare the player for short
bursts used in base running and defense.
2. Set up cones in the infield. Have players sprint
to cone and walk back to start point. This is not a
timed event.
3. 5 - 25 repetitions are used depending on age
and athletic condition.
“If I stole a base, it was to help us win a
game, and I like to think that's what
made me special.”
- Joe Morgan
102
How to Coach Little League Baseball
Signs
"Now we'd better go over our signs, young fellow. They may
be new to you, and you've
got to know them."
- Frank Pancho' Snyder to new
player Dave Bancroft
Signs are an important element of the game. They allow the coach to secretly
communicate with the players on the field. Signs can include, but are not limited to,
defensive, offensive, and catching and pitching signs. I would recommend you introduce signs
to your Little League players, but I would suggest you keep them simple.
1.
OFFENSIVE SIGNS
Here are some easy to remember offensive signs.
a. Bunt – Belt (“B” belt, “B” bunt)
b. Steal – Shirt (“S” shirt, “S” steal)
c. Hit and Run – Hat (“H” hat, “H” hit and run)
Other signs appropriate for this age group are the indicator, the “I got it coach” sign,
and the “re-do” sign.
a. INDICATOR: The indicator precedes the actual sign. It is used to alert the
batter of an up-coming signal. It is also used to confuse the opponents. The
bunt, steal, or hit and run sign, usually follows immediately after the
indicator. Common indicators include touching a wrist, elbow or cheek.
b. I GOT IT COACH: The batter should acknowledge every sign he receives
from the coach. Having the players touch the brim of their helmet is a good
way to do this.
c. RE-DO: The player uses the “re-do” sign when they are confused or
missed the sign. The “re-do” sign is accomplished by making a small quick
circle with the first finger of either hand.
103
Jake Patterson
2.
DEFENSIVE SIGNS
The amount of defensive signs you use is directly proportional to the league in which
you coach. For the younger levels I would again recommend you keep things simple. Here are
some suggestions.
a. Practice all your defensive signals and subsequence moves during practice.
This allows the players to see what they look like from the field. It is
important that everyone understands all the signals.
b. Appropriate signals at the Little, Junior League, Senior League and middle
school levels include:
1. Positioning the infield and outfield.
2. First and third situations (Runner on first and third).
3. Bunt coverage.
4. Who covers on steals.
5. Base coverage.
6. Pick offs.
7. Type of pitch. Note, this gets more complicated at the more
advanced levels and should not be a priority at the Little League
and Minor League levels. The key at this level is to throw
strikes.
104
How to Coach Little League Baseball
Catching a Pop Fly
“A batter is out on a batted ball, fair or foul, if
caught on the fly or after one bounce.”
- 1858 Rule of Baseball
Many routine pop-fly’s at the Little League level are dropped due to confusion. There are
simple items to teach to help with this.
a. Teach the players to yell, “Ball!” when they want the ball. Yelling “ball”
takes less time than, “I’ve got it!”
b. Teach everyone that the infielders have priority over the outfielders, but
it’s the outfielder’s responsibility to call off the infielder.
c. Infielders have priority over the pitcher.
d. Pitcher has priority over the catcher in front of the plate.
e. Catcher has everything behind the plate.
f. Call for the ball only when it gets to its peak.
g. Everyone should move on a fly ball, especially with runners on base. Get
the outfielders used to backing up the bags and each other. Teach a, “When
in doubt, do something!” mentality.
h. Catch the ball out and in front of the body moving in the direction of the
throw. For the catchers, this may mean moving out and turning to the ball
(See section on catchers).
i. Use tennis balls to start the training. A tennis ball to the head will not hurt
the players and it builds confidence.
j. In the outfield, have the players use a drop step to move back to the ball
versus drifting to the ball. A ball hit behind and to the player’s right starts
with the player stepping back with the right foot and running to the spot the
ball is expected to drop. Drifting typically occurs when a player steps
backwards toward a ball hit over their head.
105
Jake Patterson
Table 7.20: Pop Fly Coverage
BASIC POP FLY COVERAGE
Things to remember:
1. Infielder has priority over the outfielders, but
it's the outfielder’s job to call the infielder off.
2. Infielder has priority over the pitcher.
3. Pitcher has priority over the catcher in front of
the plate.
4. Call for the ball only when it reaches its peak.
5. Yell "Ball!" It's easier than yelling, "I got it!"
6. Keep the assignments simple.
Table 7.21: Pop Fly Drill
POP FLY DRILL
1. Players toss the coach a ball and runs up the
first or third base line.
2. Players open up to the coach looking for the
fly ball.
3. Coach tosses ball ahead of runner.
4. Make sure players catch ball over their
shoulders and never turn away from the ball.
5. Alternate sides.
6. Great gym drill.
106
How to Coach Little League Baseball
Cut-Off’s
Cut-off’s can be confusing and there are many different types of cut-off situations.
This is compounded by the fact that cut-offs are different than relays. At the Little League
level keep the responsibilities simple. Start with the second baseman and shortstop for throws
from the outfield. The first baseman can be used as the cut-off for throws home. Initially, I
would recommend very limited situational training. Several items to keep in mind when
teaching cut-offs are:
a. A cut-off for an outfield throw should be positioned approximately half
way between the target and the ball.
b. Have the cut-off shout, “Hit me! Hit me!” With both hands extended up.
This allows the fielder to use the sense of hearing and sight to pick up the
target quicker.
c. Have the player open up once the ball is on its way by having the player’s
throwing side point slightly toward the ball. This allows the player to
transition to the throw quickly. The 3-Man relay drill is a great teaching aid
here. It shows the players how to position themselves to transition the
throw quickly. Remember to always have the cut offs turn to the glove
side.
d. The player covering the bag should line up the cut-off man, by yelling
“Right” or “Left,” “In” or “Out.”
e. At this level the player covering the bag should call the cut by either
yelling, “Let it go” or “Cut.” If the ball is cut, train the cut-off man to turn
toward the play and run the ball into the infield quickly. See appendix for
actual player movement and positions.
107
Jake Patterson
Table 7.22: Cut Offs
CUT OFF'S (Man on first, fly ball to left
field)
The key with teaching cut offs and backing up is
getting the players to move on contact. Do not be
too concerned if the player misses an
assignment as long as they move.
At the Little League level keep the assignments
easy. The following would be considered good
coverage at this level.
1. 6 moves to cut the ball.
2. 4 moves to cover second base and locates the
cut off by telling cut-off to move "right," "left," "in,"
or "out".
3. 8 moves to left field to back up 7.
4. 9 moves to cover between first base and
second base.
5. 1 covers for the bad throw to second or first.
6. Cut off man should be giving a "big" target with
raised arms and be yelling, "hit me!"
CUT OFF'S (Man on first and second, hit
to right field)
1. 8 backs up 9.
2. 3 moves out for the cut.
3. 4 moves to cover first base.
4. 6 moves top cover second base.
5. 5 stays at third.
6. 7 moves to shortstop area to back up throw to
second or third.
7. 1 backs up plate.
8. Cut off man should be giving a "big" target with
raised arms and be yelling, "hit me!"
Note: You should adjust the above assignments
based on the skill level of your individual players.
Another variation of the above has 4 move out
for the cut off while 3 holds at first base.
108
How to Coach Little League Baseball
Pitching
“Good pitching always stops good hitting…”
- Casey Stengal
Sandy Kofax once said, “I became a better pitcher when I stopped pitching trying to
get the batters to miss, and started pitching to get them to swing.” This is great advice for the
Little Leaguer. Teach the players that the most important pitch in baseball is the first strike.
It is impossible to do the art of pitching any justice in such a short book. Each coach
should seek out individual lessons, read training manuals, or view instructional tapes before
you attempt to train. Local high school coaches are a great resource. In an attempt to provide
some information I will offer this. I once had the privilege of meeting Sam Ellis. Sam was a
long time Major League pitching coach for the Cincinnati Reds and other major league teams.
He told me there are four absolutes of pitching. They are:
Stay tall
Get back
Stay together
Move downhill
While great advise for older players it may be too general for the younger players to
understand. When breaking Sam’s four Key Elements down so a ten or an eleven-year-old can
understand it, I use the following steps:
1.
2.
3.
4.
5.
6.
Throwing foot set.
Glove foot set.
Establish balance.
Glove up.
Power breath.
Glove foot step back.
7. Throwing foot rotate.
8. Glove knee up - body
pivot.
9. Fall forward.
10. Butterfly and foot plant.
11. Rotate and throw.
12. Finish and defend.
109
Jake Patterson
1.
THE MOUND
Before I explain the above twelve steps, it is essential that young pitchers understand
what the mound should look like before they begin to pitch. Too often young pitchers go to
the mound with a three or four inch hole in the front of the rubber and they are reluctant to fix
it. They end up fighting through the inning with the hole becoming an impediment to good
form. While every pitcher is comfortable with something slightly different, there are several
rules of thumb they should understand.
a. Fix the mound every inning before the pitcher begins to pitch.
b. Establish what is comfortable before the game and maintain it during the
game. Even though the Little League has specific requirements for the
pitching mound, every rubber and mound is slightly different.
c. Make sure there is no hole in front of the rubber and the dirt transitions
smoothly to the front of the mound. Also fill and smooth the hole created
by the throwing foot after the throwing rotation is complete.
d. The difference between the top of the rubber and the ground in front of the
rubber should be no more than two inches.
Table 7.23: Mound Management Diagram
Back of mound
Back of Mound
Rubber
Toward Plate
Rubber
Toward Plate
Rubber
2” Maximum
Mound
Side view of the
rubber with a deep
hole in front of the
rubber. Deep hole
in front of rubber.
Not good.
Side view of the
rubber with no hole
in front of the
rubber with a good
smooth transition
forward.
Good
Maximum distance
between the top of
the rubber and the
front of the mound.
Back of the mound
should be even
with the top of the
rubber.
e. It is extremely helpful to bring the pitchers to the mound during a practice
and demonstrate to them how to properly fix it, and how to establish what
110
How to Coach Little League Baseball
is comfortable for them. I always have a rake with me and have the pitchers
fix their own mound after practice.
2.
TWELVE STEP PITCHING
Establishing a good and consistent pre-pitch routine is essential to good pitching. The
first step is to have the pitcher relaxed before they set up on the rubber. Don’t allow them
become too anxious to pitch the ball. Having them become methodical in what they do helps
them to relax and sequence their routines properly.
Step One - THROWING FOOT SET
Step one is to establish the throwing foot on the rubber with the ball of the foot
slightly over the front of the rubber.
Step Two - GLOVE FOOT SET
Once the throwing foot is set the glove foot is brought up and set several inches from
the throwing foot and several inches back.
Rubber
Right Hand Pitcher
Step Three - ESTABLISH BALANCE
A good start to insuring good balance is to have the ball of the throwing foot slightly
over the front of the rubber and the ball of the glove foot in the middle of the rubber. Have the
pitcher bounce on the balls of his feet. He should be able to maintain good balance.
Step Four - GLOVE UP
The glove comes up with the back of the glove pointing to the catcher, lower arm
somewhat perpendicular to the ground. Some pitchers like the top of the glove just below
their eyes, while others like the top of the glove at their chin. The key is to establish a place
where they are most comfortable. The ball is in the glove with the throwing hand on the ball
establishing the grip.
Step Five - POWER BREATH
Once the hands and feet are set, the pitcher takes a deep breath before starting the
pitching sequence. For older pitchers receiving signals from the catcher I recommend a power
111
Jake Patterson
breath before the signals and a less conspicuous breath after receiving the signals. Two power
breaths, one before the signals and one after the signal may give the other team an advantage
when men are on base.
Step Six - GLOVE FOOT STEP BACK
For a right-handed pitcher, the pitcher steps back to the left and back a few inches at a
forty-five degree angle. The key during the step back is to minimize head movement and
maintain good balance. A step too far back will pull the pitcher off balance. The body should
not rock back. More than a four to six-inch step at the Little League will usually result in a
balance problem.
Rubber
Direction of step for
right-hand pitcher
Step Seven – THROWING FOOT ROTATE
For a right-handed pitcher, weight is shifted to the ball of the back foot and the right
foot is lifted slightly, rotated and placed in front of the rubber. It is important to have the
pitcher stay tall during this transition.
Rubber
Pivot step for a
right hand pitcher
112
How to Coach Little League Baseball
Step Eight - GLOVE KNEE UP, BODY PIVOT
As the weight is shifted back to the front foot, the throwing knee is brought up belt
high as the body rotates ninety degrees to the plate. The pitcher should be able to maintain
balance for ten seconds in this position. Getting the pitchers into this position during practice
and having hem hold the position for ten seconds is a great balance drill.
Step Nine - FALL FORWARD
The move to the plate starts with a slight shift in weight down hill. Unchecked the
player will fall forward. This is natural.
Step Ten - BUTTERFLY AND FOOT PLANT
As the body begins to move forward the arms come apart in a butterfly motion. Back
of the glove points to the target, throwing arm straight back fingers on top. Arms form a
straight line to the target. This is important, as the typical Little League pitcher will tend to
throw with arms bent, their elbow down and their hand under the ball.
At the same time the pitcher’s weight moves forward and the arms butterfly, the front
foot slides forward and gets planted out front with the toe pointing home.
Table 7.24: Slide Step Forward
Rubber
Rubber
Mound
The above arrow shows the path of a good
slide step forward
Mound
The above arrow shows the path a bad slide
step forward
Step Eleven - ROTATE AND THROW
Once the front foot is planted the throw begins. There are different opinions as to what
rotates first. Some say the upper body while others say the hips. At the Little League level I
would recommend not spending too much time on this as long as the pitcher finishes well.
As the pitcher rotates, teach the pitchers to keep their elbows up with the upper arm
parallel to the ground. Different arm angles can be taught when they are older. A good start
has the upper arm, lower arm and wrist at ninety-degree angles to each other in the middle of
the throw.
Step Twelve - FINISH AND DEFEND
There are several musts for proper rotation and a good finish. They are:
a. Throwing hand cuts across the body and finishes in the opposite pocket.
113
Jake Patterson
b. The glove is tucked under the glove-side armpit. This is taught by having
the tip of the glove pointing home bringing the tip of the glove to the
armpit.
c. The throwing foot is rotated so that it lands slightly out in front of the plant
foot.
d. Head is up looking at the target.
e. Once the rotation is complete the hands come out, palms to the ball ready
to defend.
3. PITCH COUNT (ARM SAFETY)
This is a heavily debated topic. The Little League has developed guidelines that limit
the amount of games a pitcher can pitch in an attempt to protect players. Coaches sometimes
get carried away with pitch count by either becoming too obsessive with it or oblivious to it.
Factors that should be considered when trying to determine reasonable pitch count include:
a. PLAYER SIZE: Bigger players may have more strength than smaller players.
This is not to say small players cannot be effective pitchers. My smallest,
starting pitcher during one of my high school seasons was my best pitcher and
could outlast all the other pitchers on the roster.
b. PLAYER STENGTH: Some players are simply stronger than others. Children
develop at different rates and coaches should be aware that just because a
pitcher may be the oldest player on the team, it doesn’t necessarily mean he
can pitch more.
c. PLAYER TALENT LEVEL: Some players are genetically better pitchers than
others. They possess natural talent that allows them to be more effective on the
mound.
d. PLAYER AGE AND EXPERIENCE: Typically, experienced pitchers are able to
last longer than beginners. The only word of caution I will offer here is that
just because a pitcher has more experience, it does not necessarily mean they
have been trained properly. An improperly trained, experienced pitcher can
develop as many problems as a novice.
e. PITCH COUNT: The following is a table that I would suggest for the different
age groups. I suggest the following as a guideline only:
114
How to Coach Little League Baseball
Table 7.25: Pitch Count
Age (Years)
League
8-10
11-12
Minor League
Little League
Little League, Junior League,
Middle School
12-14
14-16
50
60
Suggested
Maximum
Games Per
Week
2
2
80
2
Suggested
Maximum Pitches
Per Game
Senior League, High School (JV),
Junior Legion
100
3 - With at
least one
day in
between
games
f. PITCHING PLAN: A great way of avoiding injury is to establish a weekly,
pitching plan. The pitching plan is made a week in advance and is used as a
guide. They are typically adjusted based on factors such as weather, injuries
and availability. The one I use is simple and looks like the following:
Table 7.26: Pitching Plan
Day (Date)
Versus
Starter
Reliever
Closer
Monday
Smithfield
Bobby
Frank
Jon
Tuesday
Woodstock
Ted
Bruce
Tommy
Wednesday
South East
Frank
Jon
Frank
Thursday
Palmer
Bobby
Don
Neal
Friday
North Side
Ted
Bruce
Tommy
Saturday
Franklin
Jon
Frank
Mitch
Sunday
Lincoln
Neal
Ted
Tommy
g. DOUBLE DUTY: It is not unusual for players to be playing in two leagues
simultaneously. A typical situation would be a player playing Little League
and middle school, or a player playing Senior League and high school. I
strongly suggest that you speak with the other coach to avoid pitchers pulling
double duty. My rule of thumb is school teams take priority over Little League.
The important thing is to establish a plan with the other coach.
h. DAILY THROWING: I developed a plan that has our pitchers throwing each
day (Unless their arms are hurting), limiting the number of throws, and the
speed in which they throw depending on their game-time activity. The best
way to develop a young arm is to have the pitchers throw properly everyday.
i. WARM-UPS: Insure the pitcher has plenty of time to warm up prior to a game.
I limit the speed in which they throw slowly building to about seventy-five
115
Jake Patterson
percent of their maximum throwing speed. There’s an old baseball adage about
warming up, “Don’t let your pitchers throw all their best pitches in the
bullpen.”
"Anybody's best pitch is the one the batters ain't hitting that day."
- Christy Mathewson
116
How to Coach Little League Baseball
The Catcher
"Catching is much like managing: managers
don't really win games, but they can lose
plenty of them. The same way with catching. If you're
doing a quality job you should be almost anonymous."
- Bob Boone
Catching has presented several different challenges for me over the years. I had
several seasons where everyone wanted to be the catcher. I also had seasons where nobody
wanted the job. As with every other position on the team, I would suggest that you give every
player a chance to experience the position. As your season progresses however, you may have
to settle on several players that are able to play the position effectively.
1. THE FIELD GENERAL
If pitching is the most important position on the field, catching is the toughest. Being a
catcher is not for the weak of heart. Good catchers must possess:
a.
b.
c.
d.
e.
f.
Above average courage.
Good field and game awareness.
High amount of confidence.
High level of energy.
Good intelligence.
Good mental and physical toughness.
The catcher also needs to be, what I call, a good “Field General.” They are always the
loudest and most enthusiastic player on the field. The catcher’s job is to constantly keep the
team aware of defensive game situations. This includes constantly making the team aware of
the number of outs, where the next play is, who’s backing up whom, etc. If there is a full-time
cheerleader on the team, the catcher is it!
2. CATCHING EQUIPMENT
Catching equipment comes in different types and sizes. Make sure the equipment is
properly fitted to the player. Properly fitted equipment does not move or flop around when the
catcher runs or throws. I always try to have two sets of equipment available to accommodate
different size players on the team. I also pre-fit each potential catcher with a set before each
game. Don’t be caught dealing with fitting equipment during the game, it is time consuming
and short cuts are always taken. Proper equipment includes:
117
Jake Patterson
a.
b.
c.
d.
e.
f.
Mask with throat guard.
Chest protector.
Shin guards.
Cup (on male players).
Helmet (or hockey style mask).
Catcher’s mitt.
3. BLOCKING THE BALL
Blocking a ball in the dirt is a game making, or game breaking skill for a catcher. A
game can be easily lost if a catcher has trouble blocking a ball in the dirt. More important than
the loss of a game, is the frustration the catcher develops feeling he/she is losing the game
single handedly. When training catchers, make sure they understand what they are responsible
for, and what they are not responsible for.
In order to keep it simple I tell my Little League catchers they are responsible for
every ball they can reach, a passed ball. The pitcher is responsible for every ball they cannot
reach, a wild pitch. When blocking a ball the catcher’s primary mission is to keep the ball in
front of him/her. Teach this by:
a. Having catchers slide their entire body laterally to the ball, keeping the
center of their body centered on the ball. The catcher’s chest remains
squared to the field. Ensure that they do not turn their body to the side or
attempt a one-handed catch. A good drill for this is to have one coach toss
a ball in the dirt to the right or left of the catcher, while another coach
slightly pushes the catcher by his or her shoulders to the ball.
b. Have the catcher keep his or her chin down against the chest. It is safer for
the catcher and a deflected ball off a catcher’s mask facing down will
typically deflect forward. A ball deflected off a mask turned away, will
usually deflect to the side or behind the catcher. A good way to help
catchers get used to this is to use tennis balls easily tossed off the mask.
c. Having the catcher keep his or her knees down on the ground with the
glove covering the hole between the knees.
d. Shoulders are turned in creating a bowl like upper body.
e. Teach the catchers with runners on, they should always locate the ball first,
and the runners second.
4. FLY BALL BEHIND THE PLATE
Locating, moving to, and catching a pop fly behind the plate is a very difficult task.
Coaches should teach the following to make it as easy as possible.
a. First, train your pitchers to point to the ball while in the air. They see it
before the catcher. This gives the catcher a general idea where the ball is,
making it easier for them to locate.
118
How to Coach Little League Baseball
b. The mask comes off with the throwing hand. The catcher grabs the bottom
of the mask and removes it by flipping it up and over the head.
c. Once the ball is located the catcher throws the mask to the ground away
from the play.
d. Have the catcher face the fly ball when possible. This means they must get
to the spot they expect the ball to fall and turn toward the ball. It is easier
catching a ball coming to you versus a ball moving away from you.
5. PICKING OFF A RUNNER
The ability of a catcher to pick off a runner stealing a base can take different forms
with young players. The best way to throw a runner out attempting to steal a bag is for the
catcher to start with a quick diagonal shuffle step with the throwing foot behind. This is
accomplished while the catcher stands. Older catchers may be able to reach the bag using this
method. Younger catchers however, may not be strong enough and will have to take a “windup” step to generate enough power to get the ball to the bag.
At the Little League level your primary mission is to teach catchers the most efficient
way for them to get the ball to the bag. You can help them accomplish this by making sure
their mask and other equipment is fitted tightly, and they learn how to properly throw a ball.
It’s the catcher’s job to get the ball to the bag and the infielder’s job to catch the ball and
make the tag. A perfect throw arrives at the bag at the same time as the fielder; knee high, on
the runner’s side of the bag.
119
Jake Patterson
Run Downs
While run downs do not happen every game, Little Leaguers should be taught how to
handle them and what their specific responsibilities are. Again, the key with Little League is
to keep the assignments simple. Run down assignments become more complicated at the
higher levels, but for now get them used to doing the basics. Several keys in teaching how to
properly handle a run down are:
a.
b.
c.
d.
e.
f.
g.
h.
i.
j.
k.
l.
Every player is involved in the play.
The first goal is to run the player back to the bag they came from.
The second objective is to get the out.
Try to make only one throw.
Hold the ball high so the fielder receiving the throw can see it.
The fielder with the ball runs at the runner with the ball in hand.
Never fake a throw; it usually results only in faking out the fielders.
The fielder expecting the throw presents a good target with their glove up and
out, palm of the glove facing the ball.
The fielder expecting the throw communicates to the player with the ball by
yelling, “Now!” when the fielder wants the ball.
Timing the throw is important and should always occur in the same direction
the runner is running.
Always cover two bags ahead of the runner.
Rotate out after a throw.
The objective is again to make one throw, but many times, especially at the younger
levels, more throws are necessary to get the out or to force the runner back to the bag they
came from. To help with this, I have the fielders rotate to the far side of the run down and
move in behind the line backing up the throw or covering the bag. They do this by rotating to
the outside of the play. The outside of the play is the opposite side of the throw coming at
them. The small black circle below shows this.
Table 7:27: Run Down Rotation
Throw
F
F
Follow the ball and go next in line
R
F
Bag
F
F
Bag
F= Fielder R= Runner
120
How to Coach Little League Baseball
Table 7.28: Run Downs
RUN DOWN (Second toThird)
1. Every player is in the play.
2. First goal is to run the runner back to the bag;
second goal is to get the out.
3. Make only one throw.
4. Throw with the throwing hand up, presenting
the ball to your teammate.
5. Don't fake a throw. This usually results in
faking out your teammate.
6. Communicate! The player that wants the ball
yells, "Now!" when they want the ball.
7. Always cover two bags ahead of the runner.
8. Follow the direction of the throw and rotate to
the back of the far line moving to the right.
9. Next player in line covers the bag and
anticipates the tag.
RUN DOWN (First to Second)
1. Same as above.
2. It is recommended that the catcher holds and
covers the plate at the Little League level.
121
Jake Patterson
Game Time
"Youngsters of Little League can
survive under-coaching a lot better
than over-coaching."
- Willie Mays
Hall of Famer
The most effective way to get the most out of each game is to be prepared and
organized. Each coach should have assigned responsibilities, prior to the game.
1. PRE-GAME
a. Have the players arrive ready to play 30-40 minutes before game time.
b. Have the players stretch and warm up before the game. This is usually
done in the outfield and can be managed by team captains.
c. Establish a warm up and throwing routine before the first game. Practice
this before your season starts. You can develop a great deal of game-time
confidence during your pre-game warm ups.
d. Establish how infield practice will be conducted at practice before the first
game. I practice this often. It only takes a few minutes and the players play
better when they look good in the pre-game warm ups.
e. In Little League, pre-game batting practice is usually shared with both
teams. Rotate players in from each team.
f. Use buckets to facilitate batting practice.
g. Shake hands with the opposing coach and the umpires.
2. DURING THE GAME
a. Stay organized. Have only one coach in charge of the scorebook and
constantly let the players know who’s batting next and who’s playing
where.
b. Inform players of substitutions at least a half inning before they are made.
This allows the players to get mentally prepared.
c. Have players cheer for teammates.
3. POST GAME
a. You and the team shake hands with everyone after the game. It is, “How
you play the game” that’s important.
122
How to Coach Little League Baseball
b. Meet with the team immediately after the game away from the parents and
review what went well and the improvement opportunities. Say something
positive about every player. Ask the other coaches if they have any
(positive) input from the game.
c. Give the players something to work on before the next practice.
d. Above all, be positive.
e. Meet briefly with your assistant coaches after the team meeting and
compare notes on improvement opportunities for the next practice.
“Baseball is a simple game. If you have good players and if you
keep them in the right frame of mind then the
manager is a success.”
- Sparky Anderson
123
Section 8. The Post Season
How to Coach Little League Baseball
Post Season
For most coaches, the season does not end with the last game. Two year-end items that
I feel warrant attention are, the year-end banquet and post-season coach’s’ evaluation.
1. YEAR-END BANQUET
Most leagues conduct a year-end awards banquet and coaches are usually expected to
say a few words. Done properly, it can be a great ending to a great season. Done poorly, it can
be an event that leaves players and parents shaking their heads.
Many coaches dread this part of the season. Speaking in public is not an easy thing to
do. The key to being successful is to be prepared. Write down what you want to say. Practice
it in front of a mirror, and say it over and over again. The more you practice, the more
comfortable you’ll be when the big day arrives.
The year-end awards banquet can have as much an impact on the future memories of
the players as the entire season. Many coaches make the mistake of finishing the season on a
sour note, usually because they try to do the right thing, the wrong way. Here are several
items to keep in mind as you prepare for your year-end sports banquet or final team gettogether.
1. Leave all the problems you had during the season at the field. What’s done is
done.
2. Say something positive about every player. Don’t leave anyone out.
3. Avoid backhanded compliments. Use statements like, “Bobby was one of the
hardest workers we had this season and he helped set a great example for the
team,” versus, “Bobby didn’t play well this year, but he sure tried hard.”
4. Avoid all attempts to tell jokes about your players; their families often fail to
see the humor.
5. Be familiar with the correct pronunciation of all names. There’s nothing worse
than using a player’s name incorrectly, especially after coaching him or her for
an entire season.
6. Make sure you thank everyone that was involved including coaches, team
moms or dads, and managers.
7. Keep your comments brief and succinct. Avoid all attempts at adlibbing.
8. Picking awards is difficult. The key here is use facts and numbers whenever
possible i.e. batting average, RBI’s, errors, slugging percentage, steals, etc. I
try to avoid awards such as Most Valuable Player and Most Improved Player,
unless there is one person who clearly stands out above all other players.
Baseball is a team sport and needs to be played as such in order to be
successful. One of your bullpen players could be the most valuable player even
though he or she didn’t have the best batting average. The point is, it is
difficult to determine who the most valuable player is. A good way to test this
127
Jake Patterson
is to ask, “Would everyone on the team and their parents agree with my
choice?” If not, I would suggest the following:
a. Substitute Outstanding Player Award for Most Valuable.
b. Substitute Coaches’ Award for Most Improved Player.
Remember
No matter what your outcome or your team record,
finish the season on a positive note.
128
How to Coach Little League Baseball
2. POST SEASON COACHES’ EVALUATIONS
Many research and educational experts define evaluation as the process of determining
the effectiveness, merit, or quality of a program. I agree with this definition and welcome
evaluation as a great way to identify improvement opportunities.
There are several sources of meaningful evaluation available to youth basketball
coaches. They can include:
a. The person you report to. This can be an athletic director, town recreation
manager, or league official.
b. Other coaches.
c. Experts such as college or professional coaches.
d. Players.
e. Parents.
A key with evaluations, is to view them for what they are, someone’s opinion on how
they viewed your performance as a coach. A great saying my grandmother used often was:
“You are what people perceive you to be,
not what you perceive yourself as.”
While I do not agree this statement applies to all aspects of our lives, it may have
some application in coaching. A large disconnect can exist if we view ourselves as good
coaches, while those around us, especially our players, think otherwise. Players, no matter
how young can provide very insightful opinions about our abilities. The trick is to first, get
their opinions in an orderly fashion, and then second, learn from them. At the beginning of
this book I use the quote, “The measure of a good coach is not how well he knows the game,
it’s how well he can teach it.” Keep this in mind as you learn.
The following is an example of an evaluation I use with parents, players and coaching
associates. It has helped me recognize my weaknesses and strengths. I also have a year-end
team meeting in which I allow the players to speak freely about the season and what they feel
can be improved upon for the next season. Both have been extremely helpful in my quest to
become a better coach.
129
Jake Patterson
Table 8.1: Coach’s Evaluation
PATTERSON SPORTS
Coach’s Post-Season Evaluation
Coach’s Name:_____________________ Date:___________________
Team:____________________________
Instructions: Each player is to carefully read each category and check the appropriate box.
Coach’s
Knowledge of the
Game
The coach
exhibits an indepth knowledge
of the game and
how to teach the
required skills.
The coach exhibits a
working knowledge of
the game and how to
teach the required
skills.
The coach has a less
than adequate
knowledge of the game
and has difficulty
teaching drills and
skills.
The coach does
not know the
game and he/she
does not know
how to teach the
skills and drills.
Coach’s
Organizational
Skills
Coach is highly
organized. No
time is wasted at
practices and
games.
Coach is mostly
prepared. Little time is
wasted at practices
and games.
Coach often
unprepared for
practices and games.
Practice time often
wasted.
Coach is never
prepared for
practice or games.
Practice time
always wasted.
Coach’s Ability to
Teach the Game
Coach is able to
break skills down
and explain well
Coach is able to break
most skill down and
explain. Has some
difficulty with several
skills
Coach is not able to
break most skills down.
Usually has a difficult
time making players
understand.
Coach is difficult
to understand or
has little ability to
teach
Coach’s Ability To
Affect the Players
Enthusiasm and
Motivation
Coach is highly
motivated and
made the season
extremely
enjoyable.
Coach motivated
players. Season
mostly enjoyable.
Coach motivated
players at times.
Season was not
always enjoyable.
Coach did little to
motivate players.
Not an enjoyable
season.
Coach’s Ability to
Manage Games.
Coach does an
excellent job
managing games
and gets the most
from the team
every game.
Coach does a good
job managing games.
Coach does a less
than fair job managing
games. Poor game
time management lost
several games.
Coach did a poor
job managing
games. Lost many
games due to
poor game time
management.
130
How to Coach Little League Baseball
Coach’s Ability to
Set an Example
Coach sets a
great example for
players.
Coach sets a good
example for the
players most of the
time.
Coach seldom sets a
good example for the
players.
Coach never sets
a good example
for the players.
Coach’s
Retainability
Coach should be
retained. No
changes needed.
Coach should be
retained with some
additional training.
Coach should be
retained. Significant
training required.
Coach should not
be retained.
Mentorship / Role
Model
Coach is an
excellent mentor
and a great role
model for players.
Coach is an OK
mentor and, someone
the players
occasionally look up
to.
Coach is not always a
good role model and is
someone players do
not always consider a
good role model.
Coach was not a
good mentor or
role model.
List three items we did well this year:
List three items we did not do well this year:
Comments (Use back of page for additional space):
Copyright © 2004 Patterson Sports
131
Jake Patterson
3. COLLECTING THE UNIFORMS AND EQUIPMENT
Collecting uniforms and equipment at the end of the season can be a real headache for
a coach. There are two easy ways to do this. The first way is to establish a specific area and
time a few minutes before the start of the year-end banquet. Have the players bring their
uniforms to the banquet and have a team mom or dad help organize. I found there is usually
moms or dads who are much better at coordinating this effort than me. The second way is to
have a one-hour pizza party at the end of the season. I also use this time to allow the players a
few minutes to evaluate the coaches’ performance and offer improvement opportunities for
the next season.
132
Section 9. Appendices
How to Coach Little League Baseball
”KEEPING IT FUN”
Little League Baseball and Softball Tips for Conflict Resolution
(Reprinted with permission from Little League Baseball)
In all aspects of life, conflict will arise.
So it’s not surprising that conflicts
would occasionally arise during a Little
League season. To help with potential
disputes, Little League offers these six
simple steps to conflict resolution. While
these steps may not be applicable to
every situation, these basic conflict
resolution skills should prove to be
helpful in many situations.
Find a way to resolve the problem
together that benefits you both.
Step 7: Agree on a Follow-up
Offer to meet again if the concern
persists
____________________________
“Seek first to understand, the to be
understood”
- Steve Covey, author of Seven Habits of
Highly Effective People
__________________________
Step 1: Speak to the Person in Private
Choose an appropriate time and place.
Never berate a person in public.
DISPUTE: A verbal controversy
between two or more people, a dispute is
not yet a conflict.
Step 2: Listen Actively
Listen fully to the concern.
Ask questions to clarify a point.
CONFLICT: is a state of disagreement
and disharmony.
Step 3: Repeat Step 1 With Roles
Reversed
Identify the person’s problem, as you
understand it.
Tell you side of the story. Described
WHAT happened, not WHY it
happened.
Use “I” statements.
Acknowledge their points of view and
feelings.
LISTEN
ACTIVELY:
involves
focusing entirely on what the other
person is saying, and confirms
understanding of both the content of the
message and the emotions and feelings
underlying the message. For example
you can begin the conversation with:
"“First help me understand your
concerns regarding your son," or later
clarify the concern by asking, “So you
view speed as your son’s best quality on
the field and you are upset because you
feel I am not utilizing that strength?”
Step 4: Expressing Feelings
Take turns expressing how you feel
about the situation.
Step 5: Solving the Problem
Suggest ways to resolve the situation.
FEELING WORDS: An important
aspect of effective communication.
Instead of stating opinions, describe how
Step 6: Select a Win/Win solution.
135
Jake Patterson
the situation or dispute makes you feel.
For example, say something like: "I get
angry when you insult my coaching in
front of others, because I know I am
trying my bet to help the kids.
Always talk to an upset parent after the
game or practice and never in front of
the kids.
Never discuss “why Tim is playing and
not your son.” Keep that discussion to
“This is what your son needs to do in
order to play more.”
OTHER SUGGESTIONS:
At the Beginning of the Year:
Send a letter home to the parents
establishing the rules in which you
would like to run the team. (A copy is
available in the back of the Little League
Coaches’ Clinic Manual) This will set
the tone for the year.
Never yell AT a player! Never embarrass
a player in front of their peers.
FEEL, FELT, FOUND method: “I
know how you feel I felt the same way
when my daughter was in the same
situation but what I found was that after
I really looked at all the possibilities the
coach made the right decision”.
Give the players a letter establishing
team rules, team philosophy, and team
goals.
REMEMBER ABOVE ALL ELSE the
game is for them NOT you!
__________________________
During the Year:
Never avoid a parent that wants to see
you. Always consider their input. Sleep
on what they tell you before you form an
opinion.
136
How to Coach Little League Baseball
Who’s on First: Clueless Coaches
Youth Leagues Need Managers, But Few Parents Know How; Four Strikes, You’re Out!
By Sam Walker
Staff Reporter of THE WALL STREET JOURNAL
24 March 2000
(Reprinted with permission from the Wall Street Journal)
unqualified. Many haven’t put on a pair
of cleats in 20 years a have zero
experience-teaching children. In sports
like soccer, some haven’t even seen a
game on TV, let alone booted a ball
around. It’s getting so bad that many
leagues are starting to require coaches to
attend training clinics. “It used to be that
somebody would just hand you a clip
board,” says Fred Engh, president of
NAYS, in West Palm Beach, Fla. “Now
you’re expect to know something”.
Indeed, a whole industry has
sprung up to teach fledging coaches, and
about 200,000 coaches are trained every
year. In San Mateo, Calif., Little League
coaches have to attend five meetings and
classes during the year umpires at least
two games, and soon- if some league
officials have their way- pass a
comprehensive quiz. Even coaches in
more lax programs are running out of
excuses
for
cluelessness.
New
instructional books are coming out every
year, and at least four new Internet
coaching sites have popped up, with tips
on everything from badminton to
lacrosse.
But for some novices, all the
training in the world doesn’t make a
difference, especially when it comes to
imported sports such as soccer. “I never
played in my life,” says Harry Glazer, a
technology lawyer from Great Falls, VA.
AS CHIEF EXECUTIVE of a
Washington Internet start-up called
SpeakOut.com, Ron Howard cuts a
powerful figure in the technology
business. But that didn’t help him much
when he took on his new job: head coach
of the Orioles, his son’s first-grade
baseball Team.
With no coaching experience,
Mr. Howard arrived at Norwood Park in
Potomac, MD, with a crude practice plan
and a list of talking points. Almost
immediately, his players staring at the
clouds, kicking dirt on one another and
asking him whether he’d ever played in
the major leagues.
Then came the
ultimate rebellion: The entire team
darted on to the field while he was still
talking. “That was the last day I brought
a whistle,” Mr. Howard says.
If you’ve ever flirted with the
idea of coaching your kids in anything
from soccer to inline hockey, you’re in
luck. From Connecticut to California,
organized youth sports programs are
bursting at the seams, almost doubling in
the past seven years by one estimate and
creating a steep demand for new
coaches. According to the National
Alliance for Youth Sports, the total
number of volunteer coaches this year
could top three million.
The only problem: A hefty
percentage of these folks are completely
137
Jake Patterson
With that kind of growth comes a
nearly unquashable demand for coaches,
and the rise of a new form of peer
pressure in towns across America: the
annual youth coach cattle call. In Jupiter
Fla., Chuck Yannette says he trotted out
all the usual excuses when a youthleague official asked him to coach his
daughter’s softball team this spring- too
busy at work, no experience, only if I’m
the last resort. “They called back five
minutes later and told me I was the last
resort,” says the landscape architect.
“How could I say no”.
It’s a decision that Mr. Yannette
wasn’t totally thrilled with at the end of
his first game, which the team lost 15-8.
Before the game even started, he had to
attend a sportsmanship clinic and watch
hours of videos just to learn how to
conduct a practice and teach batting. The
workload, he says is “like taking night
classes at a community college.”
But whatever drives them to
accept the job, most coaches say the real
challenge is absorbing it into work
schedules that don’t lend themselves to a
predictable afternoon clock. The busiest
coaches today say they have to take reeye flights home or buy cellular phones
to communicate with parents on the
road. Others disguise their coaching
duties by scheduling them as “business
meetings.” Fred Cooper may be vice
president of finance at Toll Brothers, a
luxury homebuilder, but on summer
evenings he’s forced to change clothes in
his car – on the way to batting practice in
Princeton, N.J.
Once there, Mr. Cooper says
there’s no shortage of other obstacles to
His introduction to soccer coaching went
something like this: After watching his
players run amok for a few minutes, Mr.
Glazer decided to drop his practice plan
and resort to the only trick he could think
of to restore order: teaching his kids to
do the Macarena. “It was insanity,” he
says. “I felt like a substitute teacher.”
Even now even after several
years of coaching, Mr. Glazer says he
still botches substitutions and often
defers to kids who know more about the
game than he does. Chief among them:
his son, Louis, who weighs in n
everything from choosing team mascots
to picking team colors to drafting
players. “I don’t get to goof off a lot,”
says the nine-year-old.
Not that new coaches who’ve
played sports always fare better. Charlie
Santos-Buch, a New York Financier who
runs the Little League program in
Darien, Ct. says he’ll never forget one
first-time coach who showed impressive
form whacking line drives to the
outfield. The only problem was that his
players were only six years old. “It was
funny until the kids started getting pelted
in the head,” he says.
Enrollment Up
According to American Sports Data Inc.
of Hartsdale N.Y., adults are about 50%
more likely to encourage their children
to participate in sports than they were 10
years ago. Combine that with favorable
demographics and wild growth in girl’s
sports, and you’ve got a ballooning
market for organized leagues. In Darien
alone, Little League enrollment has
nearly doubled in five years to 1300 kids
from 750.
138
How to Coach Little League Baseball
deal with: like the time a giant
groundhog appeared on the field in the
middle of a close game, or when his
players wandered off the field to chase
butter flies. And he once watched his
team bow an 11-run lead when an ice
cream truck unexpectedly dropped by. “I
considered threatening the driver,” he
says. For his part, Mr. Cooper’s 11-year
old son, Erik, has this assessment of his
dad’s struggles: Sometimes, he says, “I
start to feel sorry for him.”
Not surprisingly, the average
coach’s career is short- lived, usually
about two to three years. Mr. Howard,
the Washington Internet company CEO,
only made it through one season. His
take on the experience: Running a
practice with first-graders is like meeting
with 75 corporate investors, with a slight
difference. “I made the mistake of
treating them like little men, which
they’re not.” He says of the Orioles.
“Men you can reason with.”
139
Jake Patterson
OTHER RESOURCES FOR THE LITTLE LEAGUE COACH
National Alliance for Youth Sports (NAYS)
National Alliance For Youth Sports
2050 Vista Parkway
West Palm Beach, Florida 33411
Phone 561.684.1141
800.688.KIDS
800.729.2057
Fax 561.684-2546
www.nays.org
The National Alliance For Youth Sports (NAYS) is America’s leading advocate for positive and safe sports and
activities for children. Today, NAYS offers programs and services for everyone involved in youth sports
experiences, including professional administrators, volunteer administrators, volunteer coaches, officials, parents
and young athletes.
Athletes for a Better World
Athletes for a Better World Headquarters
PO Box 99007
Seattle, WA 98139-0007
Phone: 206-281-2684
Fax: 206-281-2784
www.aforbw.org
American Red Cross
The American Red Cross offers first aid and CPR training for coaches
all over the world. To find your nearest local chapter visit the Red
Cross at: www.redcross.org
For Northeast Connecticut contact the Red Cross at:
Tel: 1-860-678-2700
Email: http://charteroak.redcross.org
Jes-Soft
Copyright: 1998-2002 Jes-Soft.
The plays and drills listed in this book were created utilizing
Baseball Playbook Version 0.80, developed by J.E. Smit.
Jes-Sports is found at: www.jes-soft.com
140
Jes Baseball
How to Coach Little League Baseball
Little League Baseball and
Softball
Little League Eastern Regional
Headquarters
PO Box 2926
Bristol, CT 06011
Telephone: 860-585-4730
Fax: 860-585-4734
Email: [email protected]
America’s Game
170 Cross Road
Waterford, CT 06385
Phone: 860- 444-9687
Fax: 860-444-8790
Email: www.americasgame .com
Baseball Almanac
Where What Happened Yesterday is Being Preserved Today
"This site doesn't have any rivals. Every historical information or
feat you want on baseball is right here."
- Sports Collectors Digest (Top 10 Must See Sites)
Baseball Almanac can be found at: www.baseball-almanac.com
11400 SW 40th Terrace, Miami, FL 3316
Baseball Fever
A great online discussion forum for baseball enthusiasts of all
ages.
Baseball Fever can be found at: www.baseball-fever.com
141
Jake Patterson
Patterson Sports
Any questions about coaching Little League contact us at:
107 Providence Street
Putnam, CT 06260
Fax: 1-860-928-5611
Email: [email protected]
Hundreds of coaches have found How to Coach Little League Baseball: A Short East to Follow Guide on How to
Begin Your Little League Coaching Career, a great resource. You can order your copy from Book Locker Inc. at
www.booklocker.com
“He who dares to teach must never cease to learn!”
- Unknown
142
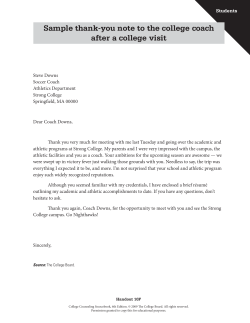


© Copyright 2026