
10ml fill infusion using APO-go PFS Equipment required:
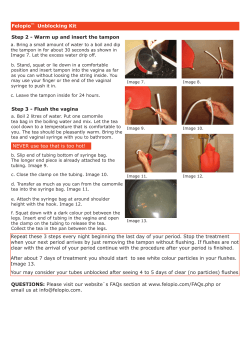
How to set up a 10ml fill continuous
infusion using APO-go PFS
Equipment required:
1 x APO-go PFS (Pre-filled syringe) 5mg/ml solution for infusion, 1 x Penta Ferte APO-go plastic syringe,
1 x rigid connector, 1 x infusion line, 1 x sharps bin or equivalent, 1 x APO-go Pump with spacer, 1 x APO-go
preparation tray. (Remember to always use a new line for each infusion).
It is recommended you use a preparation tray as it enables quicker and easier filling.
If you do not have a preparation tray, please call the APO-go Helpline on: 0844
1
880 1327
2
3
Ensure that there is free
movement of the black bung
inside the plastic syringe
chamber, by moving the syringe
stem up and down.
Pushing the stem, ensure that
the black bung is located as far
down the chamber of the plastic
syringe as possible.
5
6
7
Ensure the spacer device is
attached to the APO-go Pump.
The spacer came with the Pump
in the original packaging. Be
careful not to throw it away
by mistake when you disconnect
the Pump at the end of infusion!
Place the base of the plastic
syringe onto the APO-go Pump
and twist clockwise, to engage
the syringe wings.
9
10
11
12
Place the open end of the
APO-go glass PFS into the
open end of the connector and
invert the connected syringes to
ensure any bubbles rise up to
the black bung in the glass PFS.
Holding both syringes firmly,
push down on the glass syringe
stem (there may be a small
amount of resistance at this
stage, but once overcome, the
solution will transfer easily).
Ensure that all of the solution is
transferred so that the bung in
the plastic syringe has moved
down to touch the Pump spacer.
There should be no gap between
the bung and the spacer.
Take the APO-go plastic
syringe and its blue cap out of
the packaging. Dispose of the
needle and its casing in the
sharps bin. (Retain the blue
cap in a safe place as this will
be required when transfer of
solution is complete).
Holding the glass pre-filled
syringe (PFS) containing the
APO-go vertically with the
cap at the top, remove the
rubber cap.
PFS_Guide_Port_FINAL.indd 1
Take the connector and screw
firmly onto the open end of the
plastic syringe.
4
Unscrew the stem from
the black bung, turning
anticlockwise.
8
Insert the APO-go Pump
into the preparation tray
(if one is present) with the
syringe facing upwards.
20/04/2012 11:51
13
14
Depress and release the
stem of the glass PFS gently
a few times to dispel any
large bubbles from the plastic
syringe (small residual bubbles
may remain, these are not a
concern).
Tap the plastic syringe to
release any trapped bubbles.
17
15
Holding the connector
between thumb and forefinger
of one hand, unscrew the
connector and the glass PFS
from the plastic syringe.
16
Using the retained blue cap
from the original plastic syringe
packaging, screw the cap back
onto the plastic syringe.
18
Discard the empty connector
and the empty glass APO-go
PFS into the sharps bin.
Remove the line from its
packaging. Unscrew the blue
cap. Attach the line to the
plastic syringe and turn the
APO-go Pump on ready to
prime the line.
Additional information is available from your doctor or from Genus Pharmaceuticals.
Helpline 0844 880 1327
Part of the Package of Care provided by Genus Pharmaceuticals.
Orderline:
0844 880 1326
Park View House, 65 London Road,
Newbury, Berkshire, RG14 1JN
Tel: 01635 568400
APO-0312-1312a Date of preparation: April 2012
PFS_Guide_Port_FINAL.indd 2
(24 hours a day, 365 days a year)
Infusion
20/04/2012 11:51
How to set up a 20ml fill continuous
infusion using APO-go PFS
Equipment required:
2 x APO-go PFS (Pre-filled syringe) 5mg/ml solution for infusion, 1 x Penta Ferte APO-go plastic syringe,
1 x rigid connector, 1 x infusion line, 1 x sharps bin or equivalent, 1 x APO-go Pump, 1 x APO-go preparation tray.
(Remember to always use a new line for each infusion).
It is recommended you use a preparation tray as it enables quicker and easier filling.
If you do not have a preparation tray, please call the APO-go
1
Take the APO-go plastic
syringe and its blue cap out of
the packaging. Dispose of the
needle and its casing in the
sharps bin. (Retain the blue
cap in a safe place as this will
be required when transfer of
solution is complete).
5
Place the base of the plastic
syringe onto the APO-go Pump
and twist clockwise, to engage
the syringe wings.
9
Place the open end of the
APO-go glass PFS into the
open end of the connector and
invert the connected syringes to
ensure any bubbles rise up to
the black bung in the glass PFS.
PFS_Guide_Port_FINAL.indd 3
Helpline on: 0844 880 1327
2
3
Ensure that there is free
movement of the black bung
inside the plastic syringe
chamber, by moving the syringe
stem up and down.
Pushing the stem, ensure that
the black bung is located as far
down the chamber of the plastic
syringe as possible.
6
7
Take the connector and screw
firmly onto the open end of the
plastic syringe.
10
Holding both syringes firmly,
push down on the glass syringe
stem (there may be a small
amount of resistance at this
stage, but once overcome, the
solution will transfer easily).
Insert the APO-go Pump into
the preparation tray (if one is
present) with the syringe
facing upwards.
11
Ensure that all of the solution is
transferred so that the bung in
the plastic syringe has moved
down to touch the Pump spacer.
There should be no gap between
the bung and the spacer.
4
Unscrew the stem from
the black bung, turning
anticlockwise.
8
Holding the glass pre-filled
syringe (PFS) containing the
APO-go vertically with the cap at
the top, remove the rubber cap.
12
Tap the plastic syringe to
release any trapped bubbles.
20/04/2012 11:51
13
14
Holding the connector between
thumb and forefinger of one
hand, unscrew the empty glass
syringe, leaving the plastic
syringe and connector attached
to one another.
Discard the empty glass
APO-go PFS into the
sharps bin.
17
15
Taking the second glass
APO-go PFS, hold it in the
vertical position as before
and remove the rubber cap.
18
Holding both syringes firmly,
push down on the glass syringe
stem (there may be a small
amount of resistance at this
stage, but once overcome, the
solution will transfer easily).
Ensure that all the solution
is transferred to the plastic
syringe.
21
22
Holding the connector
between thumb and forefinger
of one hand, unscrew the
connector and the glass syringe
from the plastic syringe.
Using the retained blue cap
from the original plastic syringe
packaging, screw the cap back
onto the plastic syringe.
19
Depress and release the stem of
the glass PFS gently a few times
to dispel any large bubbles
from the plastic syringe (small
residual bubbles may remain,
these are not a concern).
23
Discard the empty connector
and the empty glass APO-go
syringe into the sharps bin.
16
Place the open end of the
APO-go glass PFS into the
open end of the connector and
invert the connected syringes to
ensure any bubbles rise up to
the black bung in the glass PFS.
20
Tap the plastic syringe to
release any trapped bubbles.
24
Remove the line from its
packaging. Unscrew the blue
cap. Attach the line to the
plastic syringe and turn the
APO-go Pump on ready to
prime the line.
Additional information is available from your doctor or from Genus Pharmaceuticals.
Helpline 0844 880 1327
Part of the Package of Care provided by Genus Pharmaceuticals.
Orderline:
0844 880 1326
Park View House, 65 London Road,
Newbury, Berkshire, RG14 1JN
Tel: 01635 568400
APO-0312-1312b Date of preparation: April 2012
PFS_Guide_Port_FINAL.indd 4
(24 hours a day, 365 days a year)
Infusion
20/04/2012 11:51


© Copyright 2026