
HOW TO build your own ACESII imitation
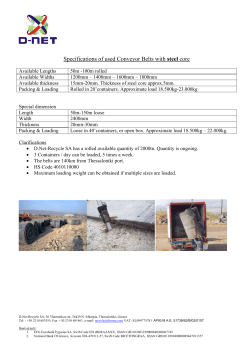
Http://go.to/simhangar e-mail: [email protected]
HOW TO build your own ACESII imitation
This is by no means an attempt to copy the original ACESII Ejection Seat exactly. It’s more like a
lookalike generic version of all the sub-types that are called the ACESII. I started to build mine as a
part of a complete (fysical) flightsimulator. After the completion I put some pictures on my website
(http://go.to/simhangar) and have since been asked often about the plans. So by popular demand I
have created a sort of How-To.
I have received plans for an ACESII replica earlier from Jeff Heeszel as a part of his own designed “Hell
Seat”. I did not use any of his plans to create my own. I took all measurements myself from a model and
scaled drawings. I do think he deserves credit for his work though, because his “Hell Seat” inspired me in a
great way. If you’re interested in building a more complete cockpit then just a Seat, check out his site at:
http://www.geocities.com/MadisonAvenue/Newsstand/4598/hellseat2.html or mail him at:
[email protected]
I am in no way familiar with technical drawings or any stuff. I learned myself how to use AutoCad so I am far
from an expert in this field. If anything is not clear, incomplete or false, please let me know... You can reach
me by e-mail at: [email protected]
None of these drawings are protected by any form of copyright (as far as I know ;-) and this complete
document is free for distribution to anyone by anyone as long as it’s for free. I don’t need to be credited in
any way and just hope that someone else might have as much fun building it as I did.
First here are some drawings to give you a general idea of what the Seat will look like.
From here we will start with the back part of the Seat, the part where your back and head rest against the
Seat.
Http://go.to/simhangar e-mail: [email protected]
Here you see the backpart of the seat with the main components coming together
4
8
5
7
8
6
4
3
5
7
3
1
2
2
1
9
Here are the dimensions of the different parts (not in scale!!) Sizes are all in mm. So if you live in one of the
last countries using inches and other strange measurement systems..... You’ll have to calculate a bit ;-)
Thickness: 12 mm
Thickness:12mm
6
1
Thickness: 22mm
9
Http://go.to/simhangar e-mail: [email protected]
Thickness 12 mm
Thickness 12 mm
3
Thickness 12 mm
8
2
Thickness 12 mm
4
Thickness 3 mm
a
Thickness 3 mm
Thickness of number 5 =12 mm. Number 7 = 22 mm
b
57
Thickness 3 mm
Of the numbers 1, 5, 6, 7, 8 and 9
you will need only one piece.
Of the numbers 2, 3 and 4 and A,B and C
you will need 2 pieces.
c
Http://go.to/simhangar e-mail: [email protected]
STEP 1 “the upright part”.
- 1 is used as the base to build from.
- The numbers 2 are attached against the sides of number 1.
- 6 is fitted inside the number 2 sidepanels.
- 9 is attached at a height of 425mm from the bottom of 1.
6
Top view
1 2
9
6
2
2
9
1
2
STEP 2 “the headrest”.
I think here the pictures speak for themselves
4
7
a
3
8
b
5
c
Http://go.to/simhangar e-mail: [email protected]
The Bottom Part of the Seat
4
5
3
3
6
4
1
5
2
2
2
2
6
1
1
1
Http://go.to/simhangar e-mail: [email protected]
3
4
6
5
b
a
4
Of number 6 you will need only one piece.
Of the other numbers you will need 2 pieces.
Numbers 1 and 2 are 12mm thick
and the rest is 22mm thick
Http://go.to/simhangar e-mail: [email protected]
1
2
4
3
5
a
b
a
6
Http://go.to/simhangar e-mail: [email protected]


© Copyright 2026