
How-to GuidE
How-To Guide
n
The San Diego Museum of art
E d u c at o r s ’ A r t Fa i r
March 6, 2010
How-To Guide
1
2
2 0 1 0 E d u c at o r s ’ a r t fa i r
n
M u s e u m H i ghl i ghts
Letter from the Education Department
This team of artists, art historians, educators, interns, and librarians
comprise the award-winning education department at The San Diego
Museum of Art. We work with staff within the Museum and with
colleagues from cultural and educational institutions throughout
California to provide programs that enhance the exhibitions presented
at the Museum. Exhibition texts are offered in English and Spanish.
We offer lectures, tours, workshops, music, film, family festivals, events
for educators, and art making programs for visitors of all ages. We
invite you to inspire your creativity, learn about art and its connection
to your life. We hope you find yourself appreciating the wide array of
art culture that is presented within the Museum.
Whether you are new to art or a long-time member who visits the
Museum frequently, we invite you to bring your family, grandchildren,
and friends, and participate at The San Diego Museum of Art.
We look forward to meeting you and hearing about any ideas you may
have about the Museum and our program efforts. We hope to see
you often!
Court Scene with Dancing and Feasting (detail), Artist
Unknown, ca. 1920. Ceramic. Museum purchase with
funds provided by the Asian Arts Committe and Mrs.
Irving T. Snyder. 1958.33.a.1.
The Education Department at The San Diego Museum of Art
Cover images:
Juan Sánchez Cotán, Quince, Cabbage, Melon, and
Cucumber, ca. 1602. Oil on canvas.
Gift of Anne R. and Amy Putnam. 1945:43.
Court Scene with Dancing and Feasting (detail), Artist
Unknown, ca. 1920. Ceramic. Museum purchase with
funds provided by the Asian Arts Committe and
Mrs. Irving T. Snyder. 1958.33.a.1.
The Educators’ Art Fair at The San Diego Museum of Art is made possible by
a generous grant from Bridgepoint Education.
Diego Rivera, Majandrágora,1939. Oil on canvas.
Gift of Mrs. Irving T. Snyder. 1967:159.
How-To Guide
n
The San Diego Museum of art
3
Table of Contents
2010 Educators’ Art Fair: Museum Highlights
Introduction: Learning through the Museum.............................................. 4
Museum-Inspired Lesson Plans*
Asian-Inspired Tile Design (elementary)...................................................... 5
Cut Paper Portrait Collage (elementary)..................................................... 9
Mixed Media Still Life (middle school; grades 6-8).................................... 13
Abstract Expressionist Painting (high school; grades 9-12)...................... 17
*Note: All lessons include suggestions for how to adapt them to other grade levels.
Art Education Website Resources............................................................ 21
San Diego Area Sources for Art............................................................... 22
California State Standards....................................................................... 23
Visual Art Terms Glossary........................................................................ 25
Credits..................................................................................................... 27
Hans Gustav Burkhardt, Signs of Our Times, 1966.
Oil on canvas. Gift of Dr. and Mrs. Alan Leslie. 1969:77.
4
2 0 1 0 E d u c at o r s ’ a r t fa i r
n
M u s e u m H i ghl i ghts
Introduction
Learning through the Museum
The San Diego Museum of Art first opened its doors on February 28th, 1926 as the Fine Arts Gallery
of San Diego, and since that time has been building a nationally renowned permanent collection that
includes European, North American, Modern Mexican, Asian, and contemporary art. In 2009, the Museum
announced a major acquisition of approximately 900 works from Oceania, Africa, and the Americas
given by the Sana Art Foundation, which vastly expanded the institution’s holdings of non-Western art.
In addition, the Museum regularly features major traveling exhibitions, as well as year-round supporting
programs and educational opportunities.
The lessons in this How-To Guide are meant to serve as a foundation for exploring highlights of the
permanent collection at The San Diego Museum of Art in your classroom and with your students. The
lessons focus on four distinct works of art from the collection representing the areas of Asia, North
America, Modern Mexico, and Europe. Each lesson has been written for a specific grade level (from
elementary to high school), but the artistic processes chosen can be easily adapted to suit the needs of
any student at any level. At the end of each lesson is a list of additional visual art and literary resources,
including relevant works from the collection currently on view that relate to the media, historical context,
or artistic genre explored in that lesson. Through the lesson plans, you will be given the tools to integrate
both two-dimensional and three-dimensional art into your curriculum and classroom.
The following lesson plans have been designed to help educators create elaborate classroom activities
that will enhance their students’ understanding of objects at The San Diego Museum of Art. The lessons
presented here can be explored solely in the classroom but are best supported with an accompanying field
trip to the Museum, and can be used as a resource both before and after the visit. Through these lessons,
students will be introduced to works of art currently on view in the galleries, which represent a wide
array of artistic mediums, styles, and cultures that are most fully experienced in person and through the
accompanying projects. Viewing these works of art first-hand will help to increase student understanding
of the visual art subjects explored in the lesson plans and add realism to each topic of study, further
sparking student interest as well as nurturing thinking skills.
Docent-led school tours are offered throughout the school year at no cost to educators and students and
can be arranged through an online request system available on the Museum’s website at www.sdmart.org.
We are eager to meet your needs and assist you in making the most of your educational experience!
Amy Briere, Coordinator, Educator and Student Programs
How-To Guide
n
5
The San Diego Museum of art
Asian-Inspired Tile Design
by Jane LaFazio, Art Educator
Collection Inspiration
The San Diego Museum of Art: Asian Art
Court Scene with Dancing and Feasting, ca. 1920
Grade Level
Elementary
Adaptable to all grade levels
General Description
Court Scene with Dancing and Feasting is the Persian tile work featured prominently in the Asian Court at The San Diego Museum of Art and the
centerpiece of the Museum’s Persian art collection. Through 77 pieced-together tiles, this work of art depicts an animated party scene of a king
and his court framed by an intricately-patterned border. The scene was most likely commissioned circa 1920 in Iran by a wealthy patron and
created by a guild (group of artists) for the interior of a home. The border of the tile is composed of floral and natural motifs, infinite patterns
that seem to dematerialize the wall, a characteristic of Islamic art. Glazes in the colors green, blue, yellow, and brown can be seen throughout the
work and reflect the Persian landscape in which it was created.
In this lesson, students will learn to identify and create patterns inspired by those found in Asian cultures, including the tile art of Persia and
will have the opportunity to observe the myriad of combinations and patterns that can be formed by rearranging a single design into different
configurations. Using small decorative components (gleaned from The San Diego Museum of Art’s Asian Art collection) and from what they see
around them, students will create an Asian-inspired design within a square template. They will copy their initial design and create three identical
squares (like tiles) and arrange all four pieces into one larger composition. Each initial design will become part of a larger, repeated pattern, and,
similar to the Persian tile work on display at the Museum, each “tile” will play an important role in shaping the larger whole.
Objective
Students will. . .
• learn to recognize and describe design motifs as found in various
works of Asian art (textiles, pottery, tile work, etc.).
• identify and create their own designs inspired by those found in
Asian art.
• combine shapes to create a design, that when repeated will become
a pattern.
• explore how environment influences pattern and color choices in
Asian art (optional).
Project time: This project can be done in two sessions, with time
in between to photograph, scan, or photocopy the students’ paper
tile designs.
Prep Time: Allow approximately one hour and a half to research
Asian motifs and patterns, prepare examples, and cut and organize
paper materials.
Vocabulary
Introduce the project and discuss associated vocabulary words (Visual
Art Vocabulary): balance, composition, cool colors, design,
motif, observational drawing skills, pattern, shape, trace,
and warm colors. Please see appendix for vocabulary definitions.
Adaptation Suggestions This particular lesson is geared towards elementary students, but the
art process is easily adapted to suit younger and older students.
For very young students, allow them to share a variety of shape
templates (made from heavier weight paper) to create their designs. By
overlapping outlines of the shapes, and erasing some of the lines and
leaving others, many simple designs can be created.
For older students, challenge them to find a direct visual connection
to the patterns they’ve found in Asian cultures. Students might use
specific parts of Court Scene with Dancing and Feasting for their inspiration,
such as the border of floral and natural motifs, and create a new design.
California State Standards: Please see appendix.
6
2 0 1 0 E d u c at o r s ’ a r t fa i r
Materials n
M u s e u m H i ghl i ghts
Note: Please see appendix for suggestions for online and local art suppliers.
• Heavy, white paper cut into 5” squares (4 for each student)
• Assorted construction paper in a variety of colors (crayons, paints,
•
•
•
•
•
•
•
•
•
•
oil pastels, or markers may be used as alternatives to cut paper for
adding color to the design).
10” x 10” light-colored, scratch paper (one for every student)
12” x 12” colored construction paper (for matting the final
compositions) (one for every student)
Markers (one set for every four students)
Ruler (one for every student)
Scissors (one pair for every student)
Glue stick (one for every student)
Pencil (one for each student)
Eraser (one for each student)
Scanner, digital camera or photocopy machine (for reproducing the
original tile designs)
Tracing paper Preparation
• Before implementing the lesson, create a finished example of the
•
•
•
•
project as well as additional samples that illustrate the steps of the
project (goals for each day). Even if you choose not to share these
works with students, they will help you have a better understanding of
the lesson.
Pre-cut paper into 5” squares and 12” x 12” background sheets.
Collect images of Asian-inspired patterns, such as tile patterns,
borders, printed fabric and embroidered clothing.
If possible, arrange a docent-led visit to The San Diego Museum of Art
to view the works in the Asian Court, as there are many shapes and
patterns to be extracted from the art and clothing on display in the
galleries.
Arrange materials on the table prior to the students’ arrival.
Session One
Motivation
For younger students, start with a description of ‘shape’ and ask them to
point out different shapes that see in the visuals presented. Discuss the
ideas of how a pattern is made.
Discussion
Humans have been working in patterns for centuries, each culture with
their symbols and colors. For example:
Chinese Pattern – Explore the blue on white ceramics, and ornate
woven and embroidered textiles. They are colorful and elegant with
detailed embroidery and rich symbolism. The symbols indicate social
status, depict the seasons, relay moral messages, and tell stories.
Japanese Pattern – Note the crisp, graphic line in the patterns of Japanese
textiles, such as printed fabric panels, fan designs, and glazed ceramics.
Indian Pattern – Study the rich patterns and symbols linked to spiritual
states and decorated in jewel colors, with gold and glimmering surfaces.
Persian Pattern – Notice the repeating geometric forms and fancifully
combined patterns; these forms often echo those of plants and animals
(arabesque) while other patterns symbolize the transcendent, indivisible
and infinite nature of the supreme being.
Introduce the project and discuss associated
vocabulary.
Project
Step I: Recording Inspiration
1.Provide a sheet of scratch paper and a pencil to each student.
2.Direct students to divide their paper into an 8-part grid (by folding
the paper in half three times and opening it back up).
3.Have students walk around the classroom or museum, and draw
patterns and shape that they see in each of their eight squares.
Remind students that this activity is just an exercise to help provide
ideas for their final design.
4.As students are drawing, check their work individually to make
sure they are not getting too detailed in the individual drawings.
Encourage a variety of different shapes and explorations.
Step II: Tracing the Design
1.Once students have their page of shapes completed, have them select
two to four of their favorite designs. These will be used as inspiration,
although it is fine if they eventually create something very different
from their original sketches.
2.Using a ruler, have students create a 5 inch square and cut it out as
a template (or have pre-cut paper ready for younger students). Trace
the square template onto the scratch paper to create a format to
design within.
How-To Guide
n
3.Have students begin drawing and testing out
combinations/arrangements of their designs and
shapes in their squares until they feel they have
found a well-balanced design on one of the 5
inch squares. (See example design at right)
Tip: The tracing paper can be used to assist students
in transferring their designs and layering the
elements onto one sheet to create a composition.
Step III: Color
1.Add color to the final design either by cutting
construction paper following the design
shapes (using tracing paper) and gluing onto a
background square of paper (recommended
for older students), or by drawing in color
with crayons, paints, oil pastels, and markers
and outlining the design in black permanent
marker (recommended for younger students).
(See cut paper example at right)
2.Once the tile is complete, consider having students use black pen to
add line work and accents to the shapes within the ‘tile.’
Session Two
7
The San Diego Museum of art
Extension Activities
Thinking about Color – As a review or introduction to color
relationships, consider assigning half of the class to work in cool
colors and the other half in warm colors (or use complementary
colors, primary colors, or secondary color groups). This could also be
a good place to further explore how environment influences pattern
and color choices in Asian art, using the colors from Court Scene with
Dancing and Feasting as an example. Consider using color schemes
based on the landscape of San Diego.
Mixing it Up – Consider having students draw and outline their final
5 inch square in black marker on white paper and photocopy or scan
it to create the 4 copies. Cut out the squares and have the students
color in their own patterns in four unique ways.
Add a Border – Reproduce multiple copies
of the ‘tile’ to create a border for artwork. (See
border example at right)
Working with Fabric – consider using
fabric, instead of paper, and iron fusible webbing
(available at fabric stores). Start with a square of
fabric, cut the design from pre-fused fabrics, and
iron to adhere. (See fabric example below)
To complete before class time:
Once the square designs are drawn and colored, make 4 copies of
each student’s 5 inch square. You can elect to photocopy, scan, or
photograph the images and print them out from a computer. (2 per
page at full size or reduced 75%).
Note: If these options aren’t available, have the students create 4 of the
same design using the same materials. Demonstrate how to transfer the
design by covering the back of the paper with pencil and using it as transfer
paper. Draw over the transferred designs to make sure that they are legible.
The act of creating four matching designs will be challenging, so do not
worry if they are not exact or even close. It’s the process!
Step I: Arranging the Pattern
1.Hand each student his or her 4 square tiles and have them cut them
out carefully with scissors (or do this beforehand with a paper cutter).
2.Using your project examples or a student’s squares, demonstrate
the wide variety of arrangements that can be made from 4 squares
(altering the direction of the designs) and talk about the many
possible compositions can be created with just 4 matching squares.
3.Allow students to play with and determine
their own final arrangement.
4.Using a glue stick, have students carefully
center and glue down their 4 tiles with
edges touching onto a larger sheet of 12”
x 12” colored construction paper of the
student’s choice. (You may want to point
out that the background color affects the
design.) (See example at right)
Display each set of 4 tiles individually by student or combine them with
other students’ work to create a large design or border on the wall.
initial fabric square
final design using 16 squares
Note: The final design was created by scanning the initial design and
formatting it on computer.
Consider Alternatives – consider using printed decorative paper
(such as Origami paper), recycled papers from magazines, or ceramic
tiles. (See ceramic example below)
initial tile design
final design with 4 tiles
Note: This blue and white ceramic tile was created with special markers that
must be baked in an oven to set. If you have access to a kiln, actual ceramic
tiles can be painted with glazes and fired.
8
2 0 1 0 E d u c at o r s ’ a r t fa i r
Teaching Tips n
M u s e u m H i ghl i ghts
• In mixed media projects, anything goes! Experiment with different
materials and open it up to students to choose what materials they
would like to combine.
• If teaching this lesson to more than one group of students, think
about displaying unique student examples from the first group for
students from later groups.
Resources
Examples of relevant work currently on view at
The San Diego Museum of Art:
Court Scene with Dancing & Feasting, ceramic tile, Iran, ca. 1900
Observe the architecture within the upper and lower Rotunda areas
of the Museum.
Visit the Asian Court at The San Diego Museum of Art to view a
variety of patterns found in ceramics, textiles, and other art forms
representing Japanese, Chinese, Tibetan, Persian, and Indian cultures.
Web resources:
While in Balboa Park, consider visiting the Persian Water Rug Fountain,
Balboa Park’s Lost Treasure. Located at the isolated end of a small garden
between the Casa de Balboa and the House of Hospitality, just off the El
Prado, is one of the most unique and subtle tile fountains in Balboa Park.
www.sandiegohistory.org/journal/2000-4/fountain.htm
Research John Chambers (1869-1945), Chief Designer at Pilkington’s
Tile and Pottery Company who was inspired by Persian tile designs. He
created designs for tiles by first painting them in watercolor on paper.
Resources from the San Diego County Library:
Pattern Motifs: A Sourcebook (2006), by Graham Leslie
McCallum. 745.4 MCC
Design Your Own Repeat Patterns: A Quick and Easy
Approach (1986), by V. Ann Waterman. 745.4 WAT
Other suggested titles:
Pattern Fish (2000), by Trudy Harris
There is not much of a story line in this appealing concept book, but
the rhyming prose and brightly colored cartoon fish inhabit a world of
increasingly complex patterns, and it can serve as a clear and effective
teaching tool for younger students.
Japanese Patterns (2002), Pepin Press
This book contains stunning images for use as a graphic resource or
inspiration.
Indian Textile Prints (2006), Pepin Press
This book contains stunning images for use as a graphic resource or
inspiration.
Notes
How-To Guide
n
9
The San Diego Museum of art
Cut Paper Portrait Collage
by Alyson Blum, Elementary Art Educator
Collection Inspiration
The San Diego Museum of Art: Art of the 20th Century
Majandrágora aracnilectrosfera en sonrisa, 1939
Diego Rivera, 1886-1957
Grade Level
Elementary
Adaptable to all grade levels
General Description
Diego Rivera was a 20th century artist from Mexico, most well-known for his large, mural paintings and his 25-year relationship to artist Frida
Kahlo. Rivera was a world renowned artist who studied in Europe and worked throughout the United States. His first mural paintings in 1922
stimulated a revival of mural painting, but following a slip into political disfavor in the mid-1930s, Rivera began to produce more easel paintings.
Many of these easel paintings were portraits, artistic representations of people. In his portrait Majandrágora aracnilectrosfera en sonrisa (Smiling
Arachnilectroheric Mandrake-Maiden), part of the permanent collection of works from the 20th century currently on view at The San Diego
Museum of Art, Rivera presents a portrait rich in detail and visual texture which uses traditional devices of portraiture, including pose, gesture,
expression, and props, to depict the external features and implied internal nature of the sitter.
In this lesson, students will view and discuss Rivera’s Majandrágora, and create three-dimensional, cut paper self-portrait collages incorporating
rich detail and visual texture similar to that of Rivera’s portrait. Students will learn the correct use of facial proportions and placement when
recreating their own faces first with pencil and then through cut paper collage. Exploration with three-dimensional paper techniques will
give students the opportunity to embellish and emphasize different features of their works, while study and consideration of pose, gesture,
expression, and props will let them reveal the external and internal natures of their own personalities through their portraits.
Objective
Students will. . .
• observe examples of portraiture and learn to distinguish portraits
from other art forms.
• view and discuss the portrait Majandrágora by Rivera.
• identify visual clues in a portrait, such as pose, gesture, expression,
and props to develop an interpretation of the individual depicted.
• create a self-portrait that includes visual clues to their
personalities with a cut and torn paper shapes.
• learn about and draw the proportions of the face.
• identify and draw the shapes that form their own faces, and cut those
shapes into templates to use them to create their self portrait.
• learn about and use the three-dimensional paper techniques fringing,
curling, and folding to create sculptural elements in their portraits.
Project Time: Allow approximately two hours, in two
60-minute sessions, from introduction to completion. Additional
time may be required depending on the amount of detail desired.
Prep Time: Allow approximately one hour and a half to
research portrait examples, prepare examples, and trim and organize
paper materials.
Vocabulary
Introduce the project and discuss associated vocabulary words (Visual
Art Vocabulary): composition, contour line, elements of
art (form, line, shape, color, texture, space, and value),
expression, frontal pose, proportion, mixed media, mood,
portrait, pose, and self-portrait. Please see appendix for vocabulary
definitions.
Adaptation Suggestions This particular lesson is geared towards elementary students, but the art
process is easily adapted to suit younger and older students.
For very young students, forego the facial proportion exercise,
using instead pre-cut templates for the face and facial features, still
allowing students practice with the skills of tracing, cutting, and assembling.
For older students, use a more complex seated or full figure portrait,
with additional materials (such as paint or chalk pastel for the face),
additional techniques such as shading, appliqué, and reverse appliqué, and
more in depth explorations into art history.
California State Standards: Please see appendix.
10
2 0 1 0 E d u c at o r s ’ a r t fa i r
Materials n
M u s e u m H i ghl i ghts
Note: Please see appendix for suggestions for online and San Diego art
suppliers
•
•
•
•
•
•
•
•
•
•
•
•
Motivation
Scissors (one per student)
Pencils (one per student)
Glue (one per student)
9” x 12” or larger skin-toned (varying shades of white, tan, beige,
dark brown, black, etc.) variety construction paper (two sheets per
student)
12” x 18” sulfite or white paper (one sheet per student)
12” X 18” assorted colored construction papers (three sheets per
student)
12” x 6” or larger patterned papers: scrapbooking paper, decorative
papers, wallpaper sheets, etc (one sheet per student)
Assorted embellishments: buttons, doilies, tissue paper, tin foil, found
objects, sequins, etc. (one assorted container per four students)
Skin-toned crayons (multicultural color set or varying shades of
white, tan, beige, dark brown, black, etc. (one pack per four students)
3D-Os or adhesive, foam tabs for creating additional dimensional
effects (optional)
hand-held or free-standing, small mirrors (one of each student)
art visuals (including reproduction of Diego Rivera’s Majandrágora
aracnilectrosfera en sonrisa portrait as well as other frontal view,
portrait examples that are similarly rich in detail and visual texture.
Tip: When selecting other portrait examples, consider a diverse range of
artists (women and men, as well as artists of varying cultures and time
periods).
Preparation
Session One
• Before implementing the lesson, create a finished example of the
project as well as additional samples that illustrate the steps of the
project (goals for each day). Even if you choose not to share these
works with students, they will help you have a better understanding
of the lesson.
• Cut a variety of skin-toned papers into 9x12 sheets for the faces.
• Prepare an assortment of 12” x 18” colored papers available
for backgrounds and hair colors, and an assortment of 12” x 6”
patterned and textured papers for use in the clothing.
• Display art reproductions of Majandrágora and other portrait
examples in the classroom.
Class Discussion
In the classroom or through a visit to The San Diego Museum of Art, view
and discuss as a group Majandrágora aracnilectrosfera en sonrisa by Rivera.
For Younger Students (Elementary)
Discuss what makes this work of art a portrait. Have students talk
about the range of colors, shapes, values, and textures used in the
piece. Ask students to identify visual clues in the portrait, such as
pose, gesture, expression, and props and use these to develop an
interpretation of the individual depicted.
For Older Students (Middle and High School)
Discuss how the artist’s use of conflicting imagery presents the viewer
with a dual-sided character of the sitter. It is a revealing portrait
portraying alternate sides of this woman’s nature, beautiful and calm,
yet dangerous and dark.
Introduce the project and discuss the associated
vocabulary.
Project
Step I: Facial Proportion Exercise
(approx. 30 minutes)
This in an introductory exercise in drawing a face, which will allow
students to explore facial proportions and placement as well as to
create templates for their cut paper portrait. Students should focus on
observing and recreating the contour areas (outside lines) that make
up the overall face and features, such as eyes, nose, mouth, hair etc.
Head
• Using a single sheet of 12” x 18” white
paper demonstrate drawing an oval for
the face shape in the top half of the page
(the size of a spread hand or larger).
• Loosely divide the oval into quarters
with one horizontal and one vertical
lightly drawn or dotted line (see illustrations above).
Eyes
• The cross at which the horizontal line and vertical line
meet marks the placement for the eyes (in the center
of the portrait), just to the left and right of the vertical
line (see illustration at right).
• Using table mirrors to observe their own features,
show students how to place their eye shapes - almond,
oval, or round, just below and above the horizontal line.
• Demonstrate creating other parts of the eyes, including
the iris, pupils, lid lines, and eyebrows with simple
shapes. (see illustration at right).
How-To Guide
n
Nose
Divide the vertical area between the eyes and bottom
of the oval shape (what will be the chin) in half with
another, lightly drawn or dotted horizontal line. Where
the vertical and newly-drawn horizontal line meet with
mark the base of the nose (see illustration at left).
Before drawing the nose, encourage students to use
their mirrors to observe the contours (outside lines)
that make up their noses and draw one nose shape,
triangular at top with curve shapes at the bottom to
designate nostrils (see illustration at left).
Mouth
The San Diego Museum of art
11
first with the shirt, followed by the face (slightly overlapping the
shirt), finally the hair (slightly overlapping the face). Note: Some
students may have gaps between their shapes, which is to be solved
during the second session when adding dimensional details.
6. Have students write their names on the backs of their projects, and the
backs of their face drawings. Store faces and projects until next lesson.
Session Two
Preparation
• Cut a variety of white, skin-toned, and colored papers into 5”x 5”
squares for eye, brow, nose and lip colors.
Divide the vertical area between the nose and bottom of the oval shape
(what will be the chin) in half with another, lightly drawn or dotted
horizontal line. Where the vertical and newly-drawn horizontal line meet
marks the location of the mouth. Keeping in mind expression (closed
mouth is easiest for beginners), create
a crescent shape for the lower lip (just
below the newly-drawn horizontal line),
and a stretched-out M-shape for the upper
lip, with a line in the middle to designate
the two lip areas (see illustrations at right).
• Cut a variety of patterned and colored construction papers into 5”
Other (see illustration below)
Step I: Cutting, Tracing, and Gluing Facial
Features (approx. 30 minutes)
• Add curved-line ear shapes starting at eye level and working down.
• Demonstrate how to modify the chin contour lines to create
different chin shapes, pointed, squared, or rounded.
• Create a shape for the hair, including an expressive line for bangs.
• Add two lines on either side of the face to create
the neck and shoulder shape, and demonstrate how
to use line create an interesting shirt/blouse collar.
As a final step in this exercise, have students identify
and label the three areas of their portrait (face, hair,
and shirt), writing directly on the back of each section.
Step II: Beginning Creation of Paper
Portrait Using Templates (approx. 30 minutes)
Cutting out Templates and Select Papers
1. Demonstrate how to cut out the drawn portrait from the
background, starting at bottom of the paper, cutting around the
shirt, neck, and hair and down the other side until it is free from the
background. Have students do the same.
2. Demonstrate how to cut the three sections of the portrait into
templates, starting with the shirt, then the face and neck, and last the
hair shape. Label each part with the student’s name. Have students
cut their templates while you supervise.
3. Invite students to make an initial selection of four papers, 3 solid
color and one patterned as follows: one skin tone color, one hair
color, one background color, and one patterned paper for use with
the shirt. Remind students to consider the mood of their selfportraits when selecting colors.
Tracing and Gluing
4. Demonstrate how to place and trace the templates onto colored paper
with pencil and then and cut the shape. Have students do the same.
5. Demonstrate how to glue the pieces down to background starting
x 5” squares for adding details.
• Cut a variety of colored papers for hair (consider browns, yellows,
blacks, and reds) into 9” x 12” rectangles for three-dimensional hair
techniques.
• Gather additional embellishment materials, such as buttons and
small found objects for adding details.
• Prior to the next session, photocopy each student’s face drawings
to use as placement guide for after they have cut out their facial
features to use as templates.
1. Review the project objectives and pass out face drawings, photocopies
of face drawings, and paper collages from the first session.
2. Demonstrate how to cut the eye, eyebrow, nose and mouth shapes
out from the original drawing for use as templates. Have students
carefully cut out features while you supervise, labeling each shape
with their name to prevent mix ups at the tables.
3. As students are cutting their templates, invite groups up to select
from the 5’x 5” colored papers and embellishments for the features
as follows:
•one sheet of white and one sheet of colored paper color for eyes
•one sheet of skin-toned paper for nose
•one sheet of color for the mouth
•one or two 9”x 12” colored papers for the hair and eyebrow shades
4. Have students trace, cut, and glue their facial features in place
with their selected color papers, using the photocopy of their face
drawing as a placement guide.
5. Demonstrate how to cut a simple curve shape if a chin line is desired.
6. Optional: Demonstrate how to gently add areas of shading along the
cheeks, across the brow and chin and around the eyes if desired,
using slightly darker skin-toned crayons.
Step II: Adding Three-Dimensional Paper
Techniques and Embellishments
Demonstrate the three dimensional paper techniques: curling, fringing, and
folding to students. Encourage them to use at least one technique in their
hair. Show them how to use the 3D-O’s to create added dimension if
desired. Allow students to utilize remaining time for additional decorative
detail to create more “clues” in their portraits: glasses, freckles, hair clips,
blouse buttons and collar, a necklace or earrings, or background imagery.
12
2 0 1 0 E d u c at o r s ’ a r t fa i r
Teaching Tips n
M u s e u m H i ghl i ghts
• In mixed media projects, anything goes! Experiment with different
materials and open it up to students to choose what materials they
would like to combine.
• If teaching this lesson to more than one group of students, think
about displaying unique student examples from the first group for
student from later groups.
• Allow the students to use their embellishments freely - buttons
make great eyes.
Extension Activities
Lower Grades (K – 5 grades): Royal Portrait
After viewing The Infante Don Felipe (Philip III of Spain) by Alonso Sánchez
Coelo currently on view at The San Diego Museum of Art, encourage
students to explore using features such as regal dress, jewels, crowns,
and props to convey royal status in their portraits.
Upper Grades (6 – 12 grades): Conflicting Imagery Portrait
Using 18” x 24” paper, students explore creating a more complex
seated or full figure self-portrait with an emphasis on incorporating
revealing visual details, symbolism, or conflicting imagery.
Resources
Examples of portrait work currently on view at
The San Diego Museum of Art:
Andy Warhol, Self Portrait, silkscreen ink on canvas, 1966
Faith Ringgold, Seven Passages to a Flight, hand-stenciled quilt and book,1995
Web resources:
About Diego Rivera:
http://diegorivera.com/index.php
Resources from the San Diego County Library:
Diego Rivera: Muralist, (2008) by Hillstrom, Kevin
ISBN: 9781420500189
Diego: Bigger Than Life, (2009) by Bernier-Grand, Carmen T
ISBN:9780761453833
Other suggested titles:
Diego (2007) by Jonah and Jeanette Winter – An accessible picture
book about the life and work of Diego Rivera.
The Colors of Us (2007) by Karen Katz – Pencil-and-gouache
pictures joyously convey the range of human pigmentation.
Notes
How-To Guide
n
13
The San Diego Museum of art
Mixed Media Still Life
Lesson Plan 3
by Kathleen Kane-Murrell, Elementary Art Educator
Collection Inspiration
The San Diego Museum of Art: European Art before 1900
Quince, Cabbage, Melon, and Cucumber, ca. 1602
Juan Sánchez Cotán, 1560-1627
Grade Level
Middle School (grades 6 – 8)
Adaptable to all grade levels
General Description
Juan Sánchez Cotán was a 17th-century Spanish painter that lived and worked during the Golden Age of Spain, a two hundred year period of
flourishing in arts and literature. He was born near Toledo and enjoyed success as an artist, painting religious subjects, portraits, and still lifes.
Most of his work is considered to be conventional with the exception of his still lifes, which have been described by scholars as ground breaking,
astonishing, and extraordinarily original. Only a handful of still lifes from this artist have survived over the past four centuries. One such example,
entitled Quince, Cabbage, Melon, and Cucumber, painted ca. 1602, is currently on view in the galleries of the collection of European Art before 1900
at The San Diego Museum of Art. Quince, Cabbage, Melon, and Cucumber has inspired much speculation regarding the unusual layout of the objects,
the artist’s choice of fruit and vegetables as the sole subject matter, and the use of a window frame as a compositional device.
In this lesson, students will examine the remarkable still life paintings by Sánchez Cotán and their place in the history of the still life genre.
They will follow up by creating their own still lifes inspired by the painting Quince, Cabbage, Melon, and Cucumber using collage and mixed media
and incorporating the artistic techniques of shadow, value, space, and light to create the illusion of space as well as the artist’s trademark
compositional device of a window.
Objective
Students will. . .
• examine the still life work Quince, Cabbage, Melon, and Cucumber by
Juan Sánchez Cotán.
• create a mixed media still life inspired by Quince, Cabbage, Melon, and
Cucumber.
• create a still life that includes the compositional device of a window.
• explore the use of shadow, value, space, and light in their
compositions to create the illusion of space.
Project Time: Allow approximately one hour and thirty minutes
from introduction to completion.
Prep Time: Allow approximately one hour and a half to research
Sánchez Cotán, prepare examples, and cut and organize materials.
Vocabulary
Introduce the project and discuss associated vocabulary words (Visual
Art Vocabulary): composition, contrast, illusion of space,
light (reflected), realism (observed reality), shadow
(cast), space, still life, tromp l’oeil, and value. Please see
appendix for vocabulary definitions.
Adaptation Suggestions This particular lesson is geared towards middle school level students,
grades 6 – 8, but the art process is easily adapted to suit younger and
older students.
For younger elementary grades, use cut out shapes and by
explore fewer shading techniques.
For high school students, challenge students to draw from
observation (from life) all elements of their composition, and to
further value and compositional development. This project could also
be completed with acrylic paint on canvas.
California State Standards: Please see appendix.
14
2 0 1 0 E d u c at o r s ’ a r t fa i r
Materials n
M u s e u m H i ghl i ghts
Session One Note: Please see appendix for suggestions for online and local art suppliers
• Newspaper or newsprint to cover students’ desks and art work
(14” x 14” size or larger)
•
•
•
•
•
•
•
•
•
student)
Black construction paper, pre-cut to 8” x 9” (one piece per student)
Glue stick (one per student)
Prang Pastello Art Chalk or other brand chalk pastels (one set for
every four students) Note: Sidewalk chalk and chalk board chalk will
not serve as good alternatives, as they do not hold enough pigment to
appear clearly on the paper.
Well-sharpened crayons or twist up crayons (any brand) (one set for
every four students)
Ruler 15” (one for every student)
Pencil (one for every student)
Magic Rub eraser or other white, plastic eraser (one for every
student) Note: Pink erasers and pencil tops are not recommended, as
they tend to leave residue on dark-colored papers.
Black, Sharpie marker (one for every four students)
Scissors (one pair for every student)
White drawing paper, 8” x 10” for drawing objects or magazine
images for collaging objects (at least one of either option for every
student)
One set of Baby Wipes (one wipe for every artist at the end of the
lesson)
Artists’ Fixative Spray or aerosol hair spray (for spraying and fixing
the chalk to the finished works)
Preparation
• Before implementing the lesson, create a finished example of the
•
•
•
•
Class Discussion
• Gray construction paper, pre-cut 13 ½” x 12” (one piece per
•
•
•
Motivation project as well as additional samples that illustrate the steps of the
project (goals for each day) – e.g. the black paper on gray paper, the
window frame -lines that create the frame around the black space,
and the window frame with suspended objects (drawn or collaged).
Even if you choose not to share these works with students, they will
help you have a better understanding of the lesson.
Ask students to bring images of objects pre-cut from magazines to
use in their compositions or real life objects that they wish to draw,
such as an apple, pear, etc.
Pre-cut all colored paper.
Gather visuals of Sánchez Cotán’s still life work and the still life
work of other artists and display them in the classroom.
If possible, arrange a docent-led visit to The San Diego Museum of
Art to view Quince, Cabbage, Melon, and Cucumber by Sánchez Cotán
as well as other still life works.
In the classroom or through a visit to The San Diego Museum of Art,
view and discuss as a group Quince, Cabbage, Melon, and Cucumber by
Juan Sánchez Cotán; what makes it a still life as well as what makes it
unique to the genre of still life.
There are examples of still lifes throughout the history of art, but as
an art form, it was still undeveloped in 17th-century Europe, and the
severe naturalism of Sánchez Cotán’s still lifes had little in common
with the artistic style then prevalent. His contributions to the artistic
genre of still life preceded those of other artists by several decades
and mark him as an artist truly ahead of his time.
Spanish artists of Sánchez Cotán’s era followed many rules regarding
religious paintings but there were no conventional rules about still
lifes. The still life genre was considered to be inferior because a still life
did not portray anything important—rather the every day “low life.”
To portray just vegetables and fruit as the entire subject matter was
unusual in European art. Also marking it as an unusual still life for its
time is the work’s curious layout of objects and the use of a window
frame as a compositional device.
Introduce the project and discuss the associated vocabulary.
Project Step I: Creating the Window Frame
1.Place the pre-cut, 8” x 9” black
construction paper on top of the larger
13 ½” x 12”, gray construction paper,
so that it is centered with the top of
the black paper (see image at right).
Use a glue stick to glue down the black
paper to the gray paper.
Note: The black paper is not square and
may go in either direction.
2.Using the ruler, draw two sets of parallel lines around the black
paper to form a frame (this will help to create the dimension of the
sides of the window). This step may
be done with pencil and then outlined
with black crayon. There isn’t an exact
width measurement (1½” is fine) –
allow students to choose how wide
they would like it. However, both the
left and right sides should be similar
in width. The window sill should be
slightly wider. Leave some space on
either side for the wall (See image at
right).
3.Using the ruler, draw diagonal lines that connect the corners of the
How-To Guide
n
black space to the edge of the window
to complete the illusion of perspective
and depth. (See image at right)
4.Draw over all pencil lines using a ruler
and black crayon. Erase any lines you
do not want to keep.
5.Use white, gray and black chalk to
create the values of the window
including the “cast” shadow. Colored
chalk can be added to the wall to distinguish it from the other areas.
(See left side of image above)
Step II: Select or Draw the Object to Be
Suspended
Use an object that has been cut from a magazine (proportional to
the window size) or draw an object of choice to suspend in the dark
space. There are several variations to this step including: cutting an
image from a magazine and gluing down, drawing an image on separate
paper and then cutting out and gluing down, or drawing directly onto
the black paper. Note: Keep in mind that Sánchez Cotán’s objects are true
to size, so encourage students to draw or select objects that are also true to
size. (See project examples below)
15
The San Diego Museum of art
Extension Activities
In the Artist’s Voice – create an interpretative poem or
composition inspired by Quince, Cabbage, Melon, and Cucumber in the
voice of Sánchez Cotán.
Math Connections – research the Hyperbolic Curve and
Pythagorean theory of numbers in relationship to Sánchez Cotán’s
paintings. Some art scholars believe Neo-Pythagorean philosophy
dominated Spanish thought. Mathematics and geometry were
expressions of harmony, spiritualism, and mysticism. This continues to
be a topic of debate among art scholars today.
Compare and Contrast - compare and contrast The San Diego
Museum of Art’s Quince, Cabbage, Melon, and Cucumber with The Art
Institute of Chicago’s similar painting by Sánchez Cotán, Still Life with
Game Fowl.
Looking at Light – consider doing additional drawing activities
with students to further the study of shadow and light and their effects
on objects. These activities could also be done prior to the project as
an introductory exercise to light and shadow.
Out the Window – compare Quince, Cabbage, Melon, and Cucumber
with other works of art that use a window as a compositional device
(e.g. René Magritte’s The Return, 1940)
Teaching Tips • Instruct students that when using glue sticks to place the black
object cut from magazine
object drawn and cut out
object drawn on black paper
1.If drawing an object, select something that can be easily drawn and
shaded. Artists may bring their own model. If cutting an object from
a magazine, use a black Sharpie marker to fill in small areas that are
too difficult to cut.
2.Have students use crayons to outline the shapes and chalk to show
values.
3.Have students glue down their object or complete their drawing on
the paper.
Step III: Finishing Touches
•
•
•
•
•
(See example below)
1. Free hand draw the string using gray or white crayon with small
touches of white chalk and connect it to the center object.
2. Depending upon the size and placement of
the object, use black chalk to create a cast
shadow that fits the object.
3.Use chalk to create the wall space around
the window.
4.Use crayon to outline areas of emphasis.
5.Use bright chalk to add highlights (areas
where the light would be brightest).
•
•
paper on the table and create a line of glue around the perimeter. It
is not necessary to cover the entire back of the paper with glue.
Students may create their frame in pencil first and then outline it in
black.
Students who may not feel confident about drawing an object may
want to select something as simple as a sphere (circle) or cube.
Adding values (lights and darks) and shading will give the shape
dimension.
Spend some time discussing the light and shadow in Sánchez Cotán’s
still life. Consider using a flashlight in a dark room can help to
demonstrate the effects of light and shadow on objects.
Use newsprint to cover the desk and again to place under finished
artwork before spraying it with fixative.
When using chalk do NOT blow or shake on the floor. Pastels must
be worked with fingers into the surface of the paper. Apply chalk in
small areas and then rub with fingers into the paper. Chalk may be
layered for intensity and blended to create a variety of colors.
Tip: The same rules about mixing complements (red/green, yellow/
purple, orange/blue) apply to chalk. Mixing two complements will create a
muddy/neutral color.
If using a magazine image, crayon on top of the image can create
further shadow or value. Chalk will not adhere to the magazine image
16
2 0 1 0 E d u c at o r s ’ a r t fa i r
Resources
n
M u s e u m H i ghl i ghts
Examples of relevant work currently on view at
The San Diego Museum of Art:
Raphaelle Peale, Still Life with Peaches, undated
José Agustín Arrieta, Still Life, ca. 1870
Henri Matisse, Bouquet, ca. 1916
Web resources:
About Juan Sánchez Cotán
www.wga.hu/frames-e.html?/bio/s/sanchez/cotan/biograph.html
www.lindamann.com/otherpainters/cotan.htm
The Art Institute of Chicago’s Online Collection
www.artic.edu/aic/collections (to view Still Life with Game Fowl by
Sánchez Cotán)
Resources from the San Diego County Library:
Still life: A History (1999), by Sybille Ebert-Schifferer. 758.4 EBE
Light (1956), by Rob Court - Presents examples of the use of light
and shadow in various objects of art throughout history. J701.8 COU
Painting in Spain (1998), by Jonathan Brown. 759.609 BRO
A Vanished World: Medieval Spain’s Golden Age of
Enlightenment (2005), by Chris Lowney. 946.02 LOW
Other suggested titles:
Spanish Still Life in the Golden Age 1600-1650, by William B.
Jordan, Kimbell Art Museum, 1985
Still Life: A History, by Sybille Ebert-Schifferer, 1998
Video: Into Great Silence, 2006 (Award winning documentary
about the lives of contemporary Carthusian monks)
An Infinity of Little Hours, by Nancy Klein Maguire, Public Affairs,
2006
The Consequences of Ideas, by R. C. Sproul, 2000
Notes
How-To Guide
n
The San Diego Museum of art
17
Abstract Expressionist Painting
by Elizabeth Wepsic, High School Art Educator
Collection Inspiration
The San Diego Museum of Art: Art of the 20th Century
Signs of Our Times, 1966
Hans Gustav Burkhardt, 1904 -1994
Grade Level
High School (grades 9-12)
Adaptable to all grade levels
General Description
Hans Gustav Burkhardt was a Swiss-born 20th-century Abstract Expressionist artist who used painting and mixed media art, a technique involving
the use of two or more art materials in a single composition, to make artistic statements about modern culture. Signs of Our Times, a 1966 oil
painting currently on view in the Art of the 20th Century installation at The San Diego Museum of Art, protests the inhumane treatment of
people in the Vietnam War of the 1960s. The painting is made both bold and meaningful through thick textures, layers of canvas, and long vertical
drips of paint. The Abstract Expressionist works created by Burkhardt address the process of art making itself; emotion and the thoughts of
the artist can be seen within the application of paint and the movements of the brush. Although abstract, they are works of human empathy
containing non-representational subject matter that is specific to a life, a time, and a location.
In this lesson, students will learn to appreciate Abstract Expressionist painting by studying the ideas behind it and by creating their own
emotionally-charged, mixed media paintings inspired by the work of Burkhardt. They will be asked to set aside their fears and judgments towards
art and openly explore expressive use of color, mark making, and composition through textures and mixtures of paint and canvas in order to
express, in an abstract style, their inner thoughts and feelings through a work of art.
Objective
Students will. . .
• create an abstract painting that is completely non-objective but
representative of a feeling or event.
• learn about the art of the Abstract Expressionists, in particular, the
work of Hans Gustav Burkhardt.
• explore the use of mixed media, using acrylic paint, gesso, and torn
•
•
•
•
canvas.
explore acrylic painting techniques using a palette knife and paint
brushes.
consider the emotional impact of colors as they select colors for
use in their own painting.
reflect on their individual process and completion of the work.
interpret the work of other students and Abstract Expressionist
artists.
Project Time: Depending on the time available and the depth in
which an educator wants to explore the art historical aspects of the
lesson, the time spent can span several hours or three to four class
meetings.
Prep Time: Allow approximately three hours to research Abstract
Expressionist artists and collect visuals, prepare project examples, and
organize classroom materials.
Vocabulary
Introduce the project and discuss associated vocabulary words
(Visual Art Vocabulary): abstract, Abstract Expressionism,
acrylic paint, gesso, mixed media, mood, palette knife,
sgraffito, structure, and value. Please see appendix for vocabulary
definitions.
Adaptation Suggestions This particular lesson is geared towards high school level students,
grades 9 – 12, but the art process is easily adapted to suit younger
students.
Younger students will enjoy the process of exploring mixed
media with an emphasis placed on the process of art making through
use of the body and mind.
Use discretion when discussing subjects like war with students.
Consider exploring the work of other Abstract Expressionist artists
whose work is not war-related, such as Jackson Pollock or referencing
Burkhardt’s work for its inspiring explorations with material and
three-dimensional paint.
California State Standards: Please see appendix.
18
2 0 1 0 E d u c at o r s ’ a r t fa i r
Materials n
M u s e u m H i ghl i ghts
Session One
Note: Please see appendix for suggestions for online and local art suppliers
• One gallon container of Gesso for every 15 students - Gesso is
•
•
•
•
•
•
•
•
•
•
•
•
•
•
an artist’s material used to prime a surface for painting. Gesso was
originally a chalk and glue mixture, but now Acrylic-based mixtures
are generally used (and less expensive if student grade).You can find
it almost anywhere art supplies are sold. (one cup container per
student)
Disposable gloves (to use when applying the canvas pieces with the
gesso)
Scissors (one per student)
Unprimed canvas or other heavy-duty, plain woven material (1 yard
for every 10 students)
12” x 14” canvas board (one per student); using smaller-sized
boards or alternative materials such heavyweight cardboard or thin
wood panel will reduce material costs
Acrylic paints (red, blue, yellow, orange, purple, green, brown, black,
and white) (gallon size containers of paint are more economical)
Plastic or wood painting palette, Styrofoam tray, small sheet of
Plexiglass, or heavy duty paper plate to mix colors and hold paint
(one per student)
2” utility brush or foam brush for applying Gesso (one per student)
Medium to heavy weight paint brushes in an assortment of shapes
and sizes (one set for every four students). Tip: Hardware stores
carry a variety of less expensive paint brushes and foam brushes in
varying sizes.
Sponges or paper towels (for blotting paint brushes – can be shared
among 3-4 students)
Palette knife – available in metal or nylon (more economical) (one
per student)
Water containers (paper cups, plastic cups, aluminum cans, etc – one
for every two students)
Pencil (one for every student)
Newspaper or plastic table cloths for covering tables
Images of Abstract Expressionist works of art
Preparation
• Before implementing the lesson, create a finished example of the
project as well as additional samples that illustrate the steps of the
project (goals for each day). Even if you choose not to share these
works with students, they will help you have a better understanding
of the lesson.
• If interested, further research the art and life of Hans Burkhardt and
other Abstract Expressionist artists (see page 4 for suggestions).
• Collect images of Abstract Expressionist paintings.
• Arrange materials on the table prior to the students’arrival.
Motivation
Discussion of Abstract Expressionism
Show a timeline of 20th-century American art scene, pointing out
significant styles of art and shifts in culture leading up to the 1950s
Abstract Expressionist movement.
Abstract Expressionism was an American post World War II art
movement (late 1940s–1960s) that emphasized the act of creating
art over the need for a recognizable object. The technical ability of
the artist is not obvious or the concern as the work is often nonrepresentational and the aesthetic value of the art is highly subjective.
Non-traditional techniques for applying materials to a canvas, such as
pouring, splattering, or throwing paint or other materials were used in
order to produce spontaneous, automatic, or subconscious creations.
Abstract Expressionist paintings share certain characteristics, including
the use of large canvases, an emphasis on the canvas’s inherent flatness,
and an “all-over” approach, in which the whole canvas is treated with
equal importance.
After viewing examples of Abstract Expressionist art, discuss how
expressive color, texture, mark making, and composition create visual
interest, and, in some cases, like the work of Hans Burkhardt, provoke
an emotional response. Point out to students the artists’ use of
brushstroke to direct the eye and create movement and rhythm and
discuss how Burkhardt’s work was created in response to the social
issues of the time in which he was living.
Project
Step I: Applying Canvas Pieces and
Working with Gesso
1. Introduce the project and discuss the materials you will be using
and how to approach using them. Clearly explain each step to the
students and remind them of the possible frustrations they could
encounter. Note: Abstract art is actually a great way to get students
involved in art without worries of the end result. Since abstract art doesn’t
always have to “look like” something, the stress level is less than with other
art projects.There’s no right or wrong way to create abstract art, which is
very freeing to those who may not feel confident in their artistic skills.
2. Have students select a current social issue that they care deeply
about, and would want to try and do something about. This issue
should serve as the inspiration for their abstract compositions and
help drive their works emotionally.
3. Demonstrate how to cut, rip, and tear the canvas – like fabric, create
a small tear on one end and pull each side in different directions.
The canvas will rip along the seam.
4. Demonstrate how to apply the Gesso to the canvas board (or
chosen sturdy surface).
Tips for working with gesso:
• Gesso also makes the work surface a little stiffer. It prevents paint
How-To Guide
n
from soaking into the support (canvas, paper, wood, etc.), and it gives
the surface more texture (called “tooth”), so the paint sticks better.
• It is useful for mixed media work as the Gesso can act as both a paint
and glue for attaching media to a canvas board or sturdy surface.
• When working with Gesso, the size of the brush depends on the
size of your canvas. A large canvas (18” x 24” on up) will require at
least a 3” brush and a 2” brush for anything smaller.
• When working with Gesso, use a very thick bristle brush used in
house painting. It hold a lot of Gessos and spreads fairly easily.
5. Demonstrate how the canvas is adhered to the surface, using the
Gesso as a glue, and how to create texture and movement with
those materials by folding and
bending the canvas pieces and placing
them down with overlaps in varying
directions (see image at right).
6.Have students experiment with these
processes on their own boards.
7.Allow the works to dry overnight.
Session Two
19
The San Diego Museum of art
• Pressing the edge of the knife down will produce fine lines.
• Pressing the blade flat down into the paint will produce ridges.
• Scraping back into the paint will reveal underlying layers (called sgraffito).
Step II: Finishing the Work
At this point, students can either choose to “clean up” their painting
by adding more distinct colorful marks or bold areas of form to
contrast or compliment their composition. The challenge will be to
create a unified feeling in the painting with bold expression.
Step III: Looking at the Work
Once the paintings have dried, invite the students to write about their
painting and include their own interpretation of the piece. Remind
them to consider that there may have been a starting point of intention
that could have changed through the process of creating their painting.
Bring the class together to share their works and encourage their
classmates to interpret each other’s paintings. Discuss how the life of
a painting does not exist solely in the relationship between the artist
and their painting, but also in the viewer’s eye.
Step I: Applying Color Using a Palette Knife
1.Review the project objectives and pass out dry canvas boards from
the last session.
2.Present the idea that some artists use color and contrasting
colors to have more visual impact and express emotion, as seen
in the work of many Abstract Expressionist artists, including Hans
Burkhardt.
3.Show how to mix paints, remove paint, and manipulate the paint on
the surface using a palette knife.
4.Discuss color selection and invite students to begin with one color
layer at a time, mixing their chosen color with white and black
paint to explore varying values, and applying them to their textured
canvas surface using a palette knife.
5.Invite students to use these methods when applying color and
additional texture using paint to their projects.
Tips for Working with a Palette Knife
• Painting with a palette knife is like putting butter or jam on bread
and produces quite a different result when compared to painting
with a brush. Palette knives are excellent for producing thickly
textured paint, sweeping areas of flat color, and tiny shapes of color.
• A palette knife can be used with any paint (including watercolor), but
is particularly effective with paint that has a relatively stiff consistency
to it, that retains its form and the marks made with the knife.
• To use a palette knife, hold the handle firmly so that you have a good
grip on it; it does not matter where exactly you arrange your fingers.
Use your wrist to change the angle of the knife in relation to your
paint, and remember that the knife can be used “upside down.”
• To apply paint to a canvas, use the side of the blade to spread paint
across your canvas, or press it onto the canvas, as you would spread
butter across a slice of bread.
• To remove paint from your canvas using a palette knife, scrape the
knife edge against the painted surface and pick up the paint (it will
not remove the paint completely).
• Using just the tip of the blade will produce small dots.
Extension Activities
Go Big – Abstract Expressionist artists worked big, with large-sized
canvases serving as arenas on which to fully express the form and
trace of their living bodies. Consider having students use large pieces
of canvas or primed cardboard to either individually or collaboratively
create similarly large-scale works of art.
Pollock-inspired Painting – Have students create individual or
large, group splatter paintings in reference to artist Jackson Pollock. Thin
tempera paint with water into disposable cups, place one paint brush
into each cup of paint. Using several large pieces of paper (or a roll of
paper), cover an area of the floor with the paper. Allow one student at
a time to drip and splatter. Knowing when to stop is the challenge.
Color Field Pastel – Color Field painting emerged as a type of
Abstract Expressionism. Artists like Mark Rothko, Kenneth Noland,
and Helen Frankenthaler were interested in the atmospheric effects
of vast expanses of color, covering their canvases with solid areas
of color. Using 18”x 24” watercolor paper and chalk pastels, allow
students to view the work of various Color Field artists and create
their own Color Field compositions.
Historical Connections – This project presents the possibilities
for connecting with historical landmarks of the 20th century and how
artists, poets, and community members responded to these situations.
Teaching Tips • This can become a messy painting activity, tabletop surfaces should
be well covered and aprons/smocks should be worn.
• One of the benefits to using acrylic paints is their quick drying
20
2 0 1 0 E d u c at o r s ’ a r t fa i r
n
M u s e u m H i ghl i ghts
time. Remind students that they may paint over areas that they are
dissatisfied with and make changes.
• Because of the weight of this project, the paintings should be made
on a flat surface and students might prefer to stand up and look
down onto their work.
• Students may work at different paces on this project and may need
another activity to begin while waiting for their peers to complete a
given step.
Students may feel challenged and frustrated by their “messy” painting
and may need encouraging words to remind them that the process of
making the work is not easy and that abstract art, especially when nonobjective, can feel unsuccessful until its completion. It is important to
remind the students to have fun and feel free in their expression.
Resources
Examples of relevant work currently on view at
The San Diego Museum of Art:
Arthur Garfield Dove, Formation I, 1943 (precursor to Abstract Expressionism)
Web resources:
About Hans Gustav Burkhardt
www.burkhardtfoundation.org
www.hollistaggart.com/artists/biography/hans_burkhardt/
About Abstract Expressionism
http://abstractexpressionism.net
www.pbs.org/wnet/americanmasters/database/abstract_expressionism.
htmlessionism.org
Resources from the San Diego County Library:
Hans Burkhardt: paintings, drawings, studies (1964) by The
San Diego Art Institute. 759.1
Abstract Expressionists (2003) by Rachel Barnes. 759.1309
Other suggested titles:
Grades K – 5
Close, Closer, Closest (1997) by Shelley Rotner –16 fairly common
objects are depicted and enlarged to show details that cannot be seen
by the naked eye.
What’s the Big Idea?: Activities and Adventures in Abstract
Art (2008) by Joyce Raimondo – Stories and activities that highlight
the work of six famous abstract artists.
Grades 6 –12
Abstract Expressionism (Art on the Wall) (2008) by Richard
Spilsbury – Introduces particular styles of painting to help aspiring
artists discover their style.
Notes
How-To Guide
n
The San Diego Museum of art
21
Art Education Website Resources
Teaching resources, art education activities (locally and around
California), professional development opportunities, and
grant resources for teachers.
California Alliance for Arts Education (CAAE)
www.artsed411.org
The CAAE promotes, supports, and advocates visual and
performing arts education for pre-school through post-secondary
students in California schools. It also sponsors the Emerging
Young Artists Awards to post-secondary students who intend
to pursue a career in the arts. CAAE posts information on the
Annual Arts Education Association Conference that promotes arts
education in schools, focuses on standards, curriculum, assessment,
administration, and professional development.
California Arts Council (CAC)
www.cac.ca.gov
The California Arts Council provides a variety of arts in education
grants that foster collaborative relationships between schools and
artists, schools and museums.
The California Arts Project (TCAP)
http://csmp.ucop.edu/tcap/
TCAP is California’s subject matter project in Visual and
Performing Arts. This website lists a number of programs that take
place year round.
Collaborative Arts Resources for Educators (CARE)
www.carearts.org
The Collaborative Arts Resources for Education web site consists
of California standards-aligned arts-based lesson plans and
resources for K-12 educators. CARE is a unique arts education
initiative offered collaboratively by the Museum of Contemporary
Art San Diego, the Museum of Photographic Arts, and the San
Diego Museum of Art.
Core Learnings
www.sandi.net/depts/vapa/
This presentation of content standards was initiated by the Visual
and Performing Arts Department of San Diego City Schools to
define the standards and how they can be deepened and applied
throughout the grade levels.
Incredible Art Department
www.princetonol.com/groups/iad/
The Incredible Art Department contains California standards-based
art lessons supplied by practicing art educators for K-12 educators,
as well as links to other art-related online resources, art educationrelated chat rooms, resources for supplies, and job postings in the
field of art.
Kinder Art (K-12)
http://kinderart.com
Kinder Art consists of arts-based lesson plans in all media for the
pre-K – 12 age range, as well as suggestions for adapting to special
needs students in the art classroom, and implementing art lessons
in non-traditional settings such as camps, Sunday schools, and afterschool programs.
National Art Education Association
www.naea-reston.org/
Founded in 1947 to promote art education through Professional
Development, Service, Advancement of Knowledge, and Leadership,
the NAEA is a non-profit, educational organization. The NAEA
website includes information on the mission and history of the
organization, arts-based lesson plans for educators, articles on art
education, and information on state and national art educationrelated conferences and workshops.
San Diego County Library
www.sdcl.org/
This website provides a link to the San Diego County Library
catalog, which provides visitors with the ability to search for titles
in all San Diego County libraries.
San Diego Museum of Art Image Gallery
www.sdmart.org/Image1/Index.html
Search for online images of works from SDMA’s permanent
collection.Visitors may search by artist or subject.
TeachingArts
www.teachingarts.org
The California Department of Education sponsored Web site
provides helpful information and links to art education resources.
Visual and Performing Arts Standards
www.cde.ca.gov/be/st/ss/index.asp
This California Department of Education website, adopted by
the State Board of Education in January 2001, offers art content
standards, which can be downloaded.
22
2 0 1 0 E d u c at o r s ’ a r t fa i r
n
M u s e u m H i ghl i ghts
San Diego Area Sources for Art
Local Art Suppliers General Art Supply Online
Resources Fine Art Museums
1911 San Diego Avenue, San Diego
619.688.1911
Crizmac Art and Culture Education
Materials
Blick Art Materials (formerly known
as The Art Store)
www.crizmac.com
1.800.913.8555
1439 El Prado, Balboa Park, San Diego
619.239.0003
www.mingei.org
1844 India Street, San Diego
619.687.0050
Teachers receive a 10% discount. Take advantage of their knowledgeable staff.
Crystal Art Education Resources
Museum of Contemporary Art
San Diego (Downtown)
www.crystalproductions.com
1.800.255.8629
1100 Kettner Blvd, San Diego
619.814.4670
www.mcasd.org
Artist & Craftsman Supply
Freeform Clay Supply
1912 Cleveland Avenue, National City
619.477.1004
Home Depot
Home Depot is a good resource for many
supplies, especially wire, plaster, and grout.
Also, look for the discounted paint that is
sometimes available.
LakeShore Learning Materials
7510 Hazard Center, San Diego
619.297.8494
Michaels Arts and Crafts
Michaels offers a variety of arts supplies
including decorator tools, stencils, and a
sponge value pack for printmaking.
Office Depot
Salmagundi Arts & Crafts
7765 Broadway, Lemon Grove
619.462.0123
If no other place has what you are looking
for, they probably have it!
Staples Office Supplies
Wal-Mart Stores
They have a good craft department.
Discount School Supply
Mingei International Museum
www.discountschoolsupply.com
1-800-627-2829
Museum of Contemporary Art
San Diego (La Jolla)
Dick Blick Art Materials
700 Prospect St., La Jolla
858.454.3541
www.mcasd.org
www.dickblick.com
1.800.828.4548
Nasco Arts and Crafts
Museum of Photographic Arts
www.eNasco.com
1.800.558.9595
1649 El Prado, Balboa Park, San Diego
619.238.7559
www.mopa.org
Oriental Trading Company
The New Children’s Museum
www.orientaltrading.com
1.800.875.8480
200 West Island Ave., San Diego
619.233.8792
www.thinkplaycreate.org
Oceanside Museum of Art
704 Pierview Way, Oceanside
760.435.3720
www.oma-online.org
Timken Museum of Art
1500 El Prado, Balboa Park, San Diego
619.239.5548
www.timkenmuseum.org
How-To Guide
n
The San Diego Museum of art
23
California State Standards
The content standards are organized by lesson plans
Source: CA Department of Education Website
www.cde.ca.gov/be/st/ss/index.asp
Cut Paper Portrait Collage
Asian-Inspired Tile Design
Kindergarten Visual and Performing Arts
Kindergarten Visual and Performing Arts
2.2 Demonstrate beginning skill in the use of tools and processes, such
as the use of scissors, glue, and paper in creating a three-dimensional
construction.
2.3 Make a collage with cut or torn paper shapes/forms.
4.2 Describe what is seen (including both literal and expressive content)
in selected works of art
Grade One Visual and Performing Arts
1.3 Identify the elements of art in objects in nature, in the environment,
and in works of art, emphasizing line, color, shape/form, and texture.
2.3 Demonstrate beginning skill in the manipulation and use of sculptural
materials (clay, paper, and papier maché) to create form and texture in
works of art.
2.5 Create a representational sculpture based on people, animals, or
buildings.
3.2 Identify and describe various subject matter in art (e.g. landscapes,
seascapes, portraits, still life).
1.1 Recognize and describe simple patterns found in the environment and
works of art.
2.1 Use lines, shapes/forms, and colors to make patterns.
2.2 Demonstrate beginning skill in the use of tools and processes, such
as the use of scissors, glue, and paper in creating a three-dimensional
construction.
2.3 Make a collage with cut or torn paper shapes/forms.
2.6 Use geometric shapes/forms (circle, triangle, square) in a work of art.
Grade One Visual and Performing Arts
1.1 Describe and replicate repeated patterns in nature, in the
environment, and in works of art.
1.3 Identify the elements of art in objects in nature, in the environment,
and in works of art.
2.8 Create artwork based on observations of actual objects and everyday
scenes.
Grade Two Visual and Performing Arts
Grade Two Visual and Performing Arts
1.3 Identify the elements of art in objects in nature, in the environment,
and in works of art, emphasizing line, color, shape/form, and texture.
2.1 Demonstrate beginning skill in the use of basic tools and art-making
processes, such as printing, crayon rubbings, collage, and stencils.
1.1 Perceive and describe repetition and balance in nature, in the
environment, and in works of art.
1.3 Identify the elements of art in objects in nature, in the environment,
and in works of art, emphasizing line, color, shape/form, and texture.
Grade Level Three Visual and Performing Arts
Grade Level Three Visual and Performing Arts
1.5 Identify and describe elements of art in works of art, emphasizing line,
color, shape/form, texture, space, and value.
3.4 Identify and describe objects of art from different parts of the world
observed in visits to a museum or gallery
1.1 Perceive and describe rhythm and movement in works of art and in
the environment.
1.5 Identify and describe elements of art in works of art, emphasizing line,
color, shape/form, texture, space, and value.
3.4 Identify and describe objects of art from different parts of the world
observed in visits to a museum or gallery
Grade Level Four Visual and Performing Arts
1.4 Describe the concept of proportion (in face, figure) as used in works
of art.
1.5 Describe and analyze the elements of art (e.g., color, shape/form, line,
texture, space, value), emphasizing form, as they are used in works of
art and found in the environment
2.2 Use the conventions of facial and figure proportions in a figure study
2.5 Use accurate proportions to create an expressive portrait or a figure
drawing or painting
Grade Level Four Visual and Performing Arts
Grade Level Five Visual and Performing Arts
1.3 Use their knowledge of all the elements of art to describe similarities
and differences in works of art and in the environment
4.2 Compare the different purposes of a specific culture for creating art
2.2 Create gesture and contour observational drawings
1.5 Describe and analyze the elements of art (e.g., color, shape/form, line,
texture, space, value), emphasizing form, as they are used in works of
art and found in the environment
4.4 Identify and describe how various cultures define and value art
differently.
Grade Level Five Visual and Performing Arts
24
2 0 1 0 E d u c at o r s ’ a r t fa i r
n
M u s e u m H i ghl i ghts
Mixed Media Still Life
Grade Level Six Visual and Performing Arts
1.1 Identify and describe all elements of art found in selected works of
art (color, shape/form, line, texture, space, value).
1.2 Discuss works of art as to theme, genre, style, idea, and differences in
media.
2.1 Use observational drawing skills to depict a variety of subject matter.
2.2 Apply the rules of two-point perspective in creating a thematic work
of art.
2.4 Create increasingly complex original works of art reflecting personal
choices and increased technical skill.
4.1 Construct and describe plausible interpretations of what they
perceive in works of art.
Grade Level Seven Visual and Performing Arts
1.1 Describe the environment and selected works of art, using the
elements of art and principles of design.
1.2 Identify and describe scale (proportion) as applied to two-dimensional
works of art.
1.3 Identify and describe the way in which artists convey the illusion of
space.
2.2 Use different forms of perspective to show the illusion of depth on a
two-dimensional surface.
2.3 Develop skill in using mixed media while guided by a selected
principle of design.
2.5 Interpret reality and fantasy in original two-dimensional works of art.
Grade Level Eight Visual and Performing Arts
1.1 Use artistic terms when describing the intent and content of works
of art.
1.2 Analyze and justify how their artistic choices contribute to the
expressive quality of their own works of art.
3.2 Compare, contrast, and analyze styles of art from a variety of times
and places in Western and non-Western cultures.
4.2 Develop a theory about the artist’s intent in a series of works of art,
using reasoned statements to support personal opinions.
Abstract Expressionist Painting
Grade Level Nine Thru Twelve Visual and Performing
Arts Proficient
1.1 Identify and use the principles of design to discuss, analyze, and write
about visual aspects in the environment and in works of art, including
their own.
1.5 Analyze the material used by a given artist and describe how its use
influences the meaning of the work.
2.6 Create a two- or three-dimensional work of art that addresses a
social issue.
3.3 Identify and describe trends in the visual arts and discuss how the
issues of time, place, and cultural influence are reflected in selected
works of art.
4.1 Articulate how personal beliefs, cultural traditions, and current social,
economic, and political contexts influence the interpretation of the
meaning or message in a work of art.
4.3 Formulate and support a position regarding the aesthetic value
of a specific work of art and change or defend that position after
considering the views of others.
Advanced
1.6 Describe the use of the elements of art to express mood in one or
more of their works of art.
1.8 Analyze the works of a well-known artist as to the art media selected
and the effect of that selection on the artist’s style.
2.1 Create original works of art of increasing complexity and skill in a
variety of media that reflect their feelings and points of view.
4.3 Analyze and articulate how society influences the interpretation and
message of a work of art.
5.2 Compare and contrast works of art, probing beyond the obvious and
identifying psychological content found in the symbols and images.
How-To Guide
n
The San Diego Museum of art
25
Visual Art Terms Glossary
The following visual art terms are organized
by order of the lesson plans.
Cut Paper Portrait Collage
Asian-Inspired Tile Design
composition – the arrangement of the elements of art (color,
balance – the equilibrium of various elements in a work of art
line, shape, value, texture, and form) in a work of art.
contour line – the drawing of an object as though the drawing
tool is moving along all the edges and ridges of the form.
elements of art (form, line, shape, color, texture, space,
and value) – the visual “tools” artists use to create art.
expression – the representation of a person’s face and
composition – the arrangement of the elements of art (color,
line, shape, value, texture, and form) in a work of art.
cool colors – colors in the green, blue, and purple family;
cool colors are culturally specific and symbolic but in general are
associated with water, sky, spring, and foliage, and suggest cool
temperatures. Psychologically, cool colors are said to be calming
and depressing. Optically, cool colors generally appear to recede.
suggestive of their mood
frontal pose – a portrait of an individual facing forward
mixed media – a technique involving the use of two or more
design – a preliminary sketch indicating the plan for something
motif – a distinctive and recurring form, shape, figure, etc., in a
design, as in a painting or tile work
art materials in a single composition
mood – feeling that the viewer gets from a work of art
proportion – a harmonious relation of parts to each other or
observational drawing skills – refers to skills learned
while observing firsthand the object, figure, or place
pattern – a design made by repeating a motif at regular intervals
to the whole; in this instance, as it applies to the areas of the face
portrait – a work of art that represents a specific person,
a group of people, or an animal. Portraits usually show what a
person looks like as well as revealing something about the subject’s
personality.
self-portrait – a portrait an artist makes using himself or
herself as its subject
shape – a two-dimensional area or plane that may be open or
closed, free-form or geometric. It can be found in nature or is
made by humans.
trace – to copy (as a drawing) by following the lines or letters as
seen through a transparent superimposed sheet of paper
warm colors – colors in the red, yellow, and orange family;
warm colors are culturally specific and symbolic but, in general,
are associated with fire and the sun, and are the opposite of cool
colors. Psychologically, warm colors are said to be stimulating and
passionate. Optically, warm colors generally appear to advance,
coming toward the viewer
26
2 0 1 0 E d u c at o r s ’ a r t fa i r
n
M u s e u m H i ghl i ghts
Mixed Media Still Life
Abstract Expressionist Painting
composition – the arrangement of the elements of art (color,
abstract – a form that has been simplified or geometricized
line, shape, value, texture, and form) in a work of art.
contrast – an effect in art created by using opposites near or
beside one another, such as a light object next to a dark object or
a rough texture next to a smooth texture
illusion of space – a technique for suggesting the idea of
a three-dimensional (3-D) scene by using value, space, light, and
overlapping
light (reflected) – a subtle phenomenon that occurs when
Abstract Expressionism – an American post World War II
art movement (late 1940’s – 1960’s) which emphasized the act of
creating art over the need for a recognizable object
Acrylic paint – a versatile, fast-drying paint that can be used
straight from the tube like oil paints and thinned with water or a
medium like watercolors
Gesso – an art material that can be used as a primer for painting
as well as a glue for mixed media works of art
light is reflected back upon the shaded side of an object; reflected
light can be seen within shadow and shading within highlighted
areas
mixed media – a technique involving the use of two or more
realism (observed reality) – the depiction of subjects as
mood – the feeling that the viewer gets from a work of art
they appear in everyday life
shadow (cast) – a shadow created by something blocking the
light source; for example, the shadow on a tabletop from an apple
sitting on it
space – refers to distances or areas around, between or within
components of a piece. In two-dimensional works of art, space is
not actually within a piece, but the illusion of it is
still life – an arrangement of inanimate objects as a subject for a
work of art
tromp l’oeil – French for “trick the eye,” an art technique
involving extremely realistic imagery in order to create the optical
illusion that the depicted objects appear in three dimensions,
instead of actually being a two-dimensional work of art
value – the lightness or darkness of a color
art materials in a single composition
palette knife – a blunt tool used for mixing or applying paint
sgrafitto – when an artist uses a palette knife or oil stick to
scratch out a design in a painting, leaving behind an image in the
color of the first coat of paint
structure – the way in which parts are arranged or put
together to form a whole
value – the lightness or darkness of a color
How-To Guide
n
The San Diego Museum of art
27
Credits
Lesson Plan Authors
Alyson Blum
Alyson Blum earned a B.F.A. in integrated art history and
studio art from Willamette University in Oregon. She
continued her graduate studies at the Portland Art Institute
and the Royal College of Art in London. In additional to
teaching in private and public Schools, Alyson has developed
education programs for the Newport Harbor Art Museum
and Portland Art Museum. She is the former director of the
Parent Child Art Center in Portland, Oregon, and is currently
an art educator at Bird Rock Elementary in La Jolla, and the
Art Academy of San Diego. This will be Alyson’s first year as
an instructor at the Educators’ Art Fair event.
Elizabeth Wepsic
Elizabeth Wepsic received her BFA from The School of
The Art Institute of Chicago in 1996. Since then she has
achieved a Masters in Education and has become a National
Board Certified Teacher in Art Education: Adolescent to
Young Adults. She is a committed and well known visual arts
instructor in the San Diego community and has developed
art education outreach programs through museum and
public school partnerships. As a classroom teacher, Elizabeth
serves as co-chair of the Visual Arts department at the
Bishop’s School in La Jolla. Elizabeth also served as an
instructor for the 2007 Educators’ Art Fair: Exploring Color.
Jane LaFazio
Jane LaFazio holds degrees in both Asian Studies and Graphic
Design. A full-time artist since 1998, she has cultivated a
wide range of skills as a painter, mixed media, and quilt artist.
Jane began teaching in 2004 and continues to teach art
quilts, mixed media, and watercolor journaling to adults and
children. Since 2007, Jane has taught the program “Mundo
Lindo ~ beautiful world,” at the California Center for the
Arts, Escondido, a free after school art program she created
for children from low income families (for more information,
please visit http://MundoLindoBeautifulWorld.blogspot.com).
This will be Jane’s first year as an instructor at the Educators’
Art Fair event.
Kathleen Kane-Murrell
Kathleen Kane-Murrell is an artist in residence at Ellen
Browning Scripps,Vista Grande, and Kumeyaay Elementary
schools in San Diego. She is author of the children’s art
program, Fine Artists™. Art work created through Fine
Artists™ has won numerous awards and is featured in the
permanent collections of the San Diego Airport and the
San Diego County Office of Education. Kathleen has had a
life long interest in art, education and the creative process.
Her highly successful art program has trained hundreds of
art docents and brought fine art to thousands of children
for the past 20 years. This will be Kathleen’s first year as an
instructor at the Educators’Art Fair event.
Museum Staff
Amy Briere, Coordinator, Educator and Student Programs
• Editor for How-To Guide
Lucy Eron, Education Department Intern
• Design of How-To Guide
Juan Sánchez Cotán, Quince, Cabbage, Melon, and Cucumber, ca. 1602.
Oil on canvas. Gift of Anne R. and Amy Putnam. 1945:43.


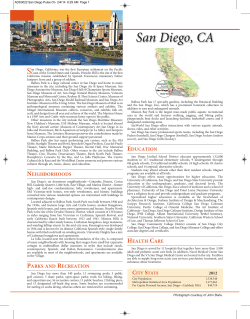
© Copyright 2026