
How to Handle a Crisis: Emergency Guide
How to Handle a Crisis Information on dealing with almost any type of emergency A must have book for everyone. By Dennis Evers & Dr. Roberto Silva DISCLAIMER While every effort has been made to ensure that the information is accurate at the time of publication, the authors are not responsible for any loss, liability, damage or injury that may be suffered or incurred by any person in connection with the information contained in this book, or by anyone who receives first aid treatment from a reader or user of this information. This information is advisory in nature and is not intended to identify all scenarios or situations a person might find themselves in. Following these guidelines will not guarantee your safety in any situation. How To Handle A Crisis Copyright © 2011 Dennis Evers (www.howtohandleacrisis.com) All rights reserved. No part of this book may be used or reproduced in any manner Whatsoever without written permission except for brief segments used in articles and reviews. ISBN-10: 0-615-47517-2 ISBN-13: 978-0-615-47517-2 Art B.J. Evers Cover By Annasgraphicdesigns.Com To my wife and children “It's better to be careful one hundred times than to get killed once.” Mark Twain The prudent see danger and take refuge, but the simple keep going and suffer for it. Proverbs 27:12 Special Thanks to: CPR-Pro--www.cpr-pro.com, Crime Doctor--www.crimedoctor.com, Airsafe—www.airsafe-media.com, Ncib.org (no such site) Marc Klaas--www.klaaskids.org Table of Contents Introduction ................................................................................ v AUTO EMERGENCIES .............................................................. 1 Automobile Accidents................................................................ 1 Disabled Vehicle ........................................................................ 5 Submerged Vehicles................................................................... 6 ACTIVE SHOOTER .................................................................... 9 AIRCRAFT SAFETY................................................................. 12 CHEMICAL EMERGENCIES ................................................. 16 Chemical Emergencies Overview ............................................ 16 Chemical Agents ...................................................................... 17 During a Household Chemical Emergency .............................. 22 HAZARDOUS MATERIALS .................................................... 24 HOTEL SAFETY & SECURITY .............................................. 26 IDENTITY THEFT .................................................................... 29 Identity Theft / Hotel Key Security Precautions ...................... 29 DOMESTIC VIOLENCE .......................................................... 31 MISSING CHILDREN PROTOCOLS ..................................... 32 TERRORISM .............................................................................. 34 Weapons of Mass Destruction (WMD’s) ................................. 34 Chemical Terrorism ................................................................. 35 Biological Terrorism ................................................................ 40 Bombs ...................................................................................... 41 Bombing Event ........................................................................ 49 Blastnjuries............................................................................... 50 Indicative Behaviors of Suicide Bombers ................................ 57 i NATURAL DISASTERS ........................................................... 59 Floods....................................................................................... 59 Hurricanes ................................................................................ 60 Thunderstorms and Lightning .................................................. 63 Tornadoes................................................................................. 64 Winter Storms and Extreme Cold ............................................ 67 Extreme Heat ........................................................................... 69 Earthquakes .............................................................................. 71 Volcanoes................................................................................. 74 Tsunamis .................................................................................. 75 Landslides ................................................................................ 76 Wildfires .................................................................................. 77 POST-DISASTER SAFETY CHECKLIST................................ 78 Personal Cautionary Measures ................................................. 78 Before You Enter Your Home ................................................. 79 Finding Family During a Disaster ............................................ 80 Carbon Monoxide Poisoning ................................................... 81 Utility Shut-off and Safety ....................................................... 82 FOOD AND WATER SAFETY ................................................ 83 Emergency Food Supplies ....................................................... 83 Storage Tips ............................................................................. 83 Shelf-Life of Foods for Storage ............................................... 84 How to Cook Without Power ................................................... 84 Severe Weather Events and Food Safety ................................. 85 Treatment of Drinking Water ................................................... 88 COPING WITH A TRAUMATIC EVENT.............................. 93 Effects of Traumatic Events ..................................................... 93 Helping Children Cope with Fear and Anxiety ............................. 96 What are the Warning Signs for Suicide? ................................ 97 FIRST AID .................................................................................. 98 Administering First Aid ........................................................... 98 Abdominal Injuries .................................................................. 99 Allergic Reactions / Anaphylaxis........................................... 100 Amputation ............................................................................ 102 Bites and Stings...................................................................... 104 ii Blast Injury............................................................................. 110 Bleeding ................................................................................. 111 Breathing Emergencies .......................................................... 113 Burns ...................................................................................... 116 Cardiopulmonary Resuscitation (CPR) .................................. 117 Chest Trauma ......................................................................... 121 Pregnancy, Labor, and Emergency Childbirth ....................... 123 Choking .................................................................................. 125 Concussion/ Head Injury ........................................................ 125 Cuts, Scrapes, and Bleeding ................................................... 126 Dental Injuries ........................................................................ 127 Diabetic Emergencies............................................................. 128 Diarrhea, Nausea, and Vomiting ............................................ 129 Drowning (Near-Drowning)................................................... 130 Electrocution .......................................................................... 130 Eye Injuries ............................................................................ 131 Fractures/Sprains/Dislocations ............................................... 132 Frostbite ................................................................................. 134 Gunshot Wounds .................................................................... 134 Heart Attack/Chest Pain ......................................................... 135 Heat Related Illnesses ............................................................ 136 Hypothermia........................................................................... 137 Influenza /Flu ......................................................................... 138 Lightning Strike ..................................................................... 139 Nosebleeds ............................................................................. 140 Poisoning / Intoxication ......................................................... 140 Puncture Wounds ................................................................... 141 Seizures .................................................................................. 141 Stabbing ................................................................................. 142 Stroke CVA/Tia ..................................................................... 142 Vomiting ................................................................................ 143 iii iv Introduction Because the vast majority of Americans aren’t trained to handle emergencies, “How to Handle a Crisis was written to give the general public a step by step guide for dealing with emergencies until help arrives. The book’s cornerstone is a unique first aid chapter that has protocols for emergencies not normally found in civilian books in addition to all common emergencies. There are hundreds of protocols and checklists for dealing with natural and manmade disasters, terrorism, nuclear, biological and chemical emergencies, traffic accidents, active shooters, crime and other life threatening situations. Tips for household, hotel, aircraft and travel safety as well as sheltering in place, emergency food and water and preparing for a disaster are also included. Every home should have this book as well as students, businesses and vehicles. Note that some of the protocols like How to Escape a Submerged Vehicle would be better off read before finding oneself under water wondering what to do. We all love our families and in today’s uncertain world, anything we can learn to make our loved ones safer is time well spent. Be safe and God Bless America, --Dennis Evers v vi Auto Accidents AUTO EMERGENCIES Automobile Accidents ! Disclaimer: this information is advisory in nature and is not intended to identify all scenarios or situations a person might encounter. ! Following these guidelines will not guarantee your safety. Motor Vehicle Accidents Each accident or breakdown can have numerous unseen and unknown hazards. Traffic, weather, alcohol, fire and countless other factors might come into play. No two accidents are alike, and as such, the following information is for general reference only. You must think of SAFETY when making any decision. • Take a moment, if you have time, to gather your thoughts and form a plan. • Pull your vehicle off the road if possible and only if safe to do so. Allowing cars to remain in the middle of the road or intersection could result in additional accidents and injuries. • Do not become a victim of road rage. If the other driver is or appears to be angry, call 911 and try to avoid confrontation. Note: Some states require accident vehicles to be moved out of the roadway if possible, others require leaving them where they come to rest. You need to determine what your states requirements are If You Leave Your Vehicle: • Always look for traffic and other hazards. • Think of everyone’s safety when exiting the vehicle. • Locate an area to wait for assistance that offers the most safety from traffic and never allow children or passengers to wander. • Never stand on the roadway or on the roadway side of the vehicle, the area between your vehicle and other moving vehicles is a Danger Zone! • Put out warning devices ( flares, triangles, cones) if available and only if safe to do so. Serious Accident - Need to Exit Vehicle. • If you must exit the vehicle due to fire or other life threatening hazard, get out immediately. • Pull your vehicle off the road if possible and only if safe to do so. • Think of everyone’s safety when exiting the vehicle. • Watch out for traffic and other hazards when leaving the vehicle. 1 How to Handle a Crisis • Locate an area to wait for assistance that offers the most safety from traffic, never allow children or passengers to wander and stay alert for potential hazards (power line on road, leaking fuel, dangerous drivers, etc.) • Never stand on the roadway or on the roadway side of the vehicle. • The area between your vehicle and the roadway is a Danger Zone! • Call 911 when safely away from the threat and advise location, type of emergency, injuries, number of victims, etc. • Determine the extent of injuries to all occupants, yourself included. • If there are injuries or possible injuries, and you are capable of safely assisting with first aid, do so. Ask how many people were in the vehicle(s), particularly children that could be thrown from the vehicle or pinned under the car. • Ask the 911 operator for instructions. Stay on the line until the 911 operator says it’s ok to hang up. • Put out warning devices (flares, triangles, cones) if available and only if safe to do so. Serious accident - trapped in vehicle / unable to exit • If you cannot exit your vehicle due to damage or entrapment, leave your seat belt on, turn off the ignition, turn on the emergency flashers, call or have someone call 911 and advise location, type of emergency, injuries, fire etc. • Pull your vehicle off the road if possible and only if safe to do so. • Ask the 911 operator for instructions. Stay on the line until the 911 operator says it’s ok to hang up. Serious Accident - Feel Safer Outside Vehicle. • Take a moment, if you have time, to gather your thoughts and form a plan. • Pull your vehicle off the road if possible and only if safe to do so. • If you decide to exit the vehicle due to dangerous traffic, your vehicles hazardous location in the roadway or other danger, and feel it would be safer away from the vehicle, think of everyone’s safety when exiting the vehicle. • Watch out for traffic and other hazards when leaving the vehicle. • Locate an area to wait for assistance that offers the most safety from traffic, never allow children or passengers to wander and stay alert for potential hazards (power line on road, leaking fuel, dangerous drivers, etc.) • Never stand on the roadway or on the roadway side of the vehicle. • The area between your vehicle and the roadway is a Danger Zone! 2 Auto Accidents • Call 911 when safely away from the threat and advise location, type of emergency, injuries, number of victims, etc. • Determine the extent of injuries to all occupants, yourself included. • If there are injuries or possible injuries, and you are capable of safely assisting with first aid, do so. Ask how many people were in the vehicle(s), particularly children that could be thrown from the vehicle or pinned under the car. • Ask the 911 operator for instructions. Stay on the line until the 911 operator says it’s ok to hang up. • Put out warning devices ( flares, triangles, cones) if available and only if safe to do so. Serious Accident – Feel Safer In Vehicle • Turn off the ignition, turn on the emergency flashers, call 911 and advise location, type of emergency, injuries, fire etc. • Pull your vehicle off the road if possible and only if safe to do so. Leaving cars in the middle of the road or intersection could result in additional accidents and injuries. • Determine the extent of injuries to all occupants, yourself included. If there are injuries or possible injuries, and you are capable of safely assisting with first aid, do so. • Put out warning devices ( flares, triangles, cones) if available and only if safe to do so. • If you feel it is safer to remain in the vehicle, after you have attended to injuries, and there are no additional threats like leaky fuel, smoke, fire, dangerous traffic or other hazards, put your seat belts on. • Ask the 911 operator for instructions. Stay on the line until the 911 operator says it’s ok to hang up. • Follow directions from emergency services. Minor Accidents • If it is a minor accident and you can safely pull off the side of the road (and state law allows) pull as far off as possible to avoid another collision. If the accident is at night, pull into a well-lit location if possible. • Stay as far away from the roadway as possible, unless it’s necessary to administer first aid or assistance and it can be done safely. • Put out warning devices ( flares, triangles, cones) if available and only if safe to do so. • Exchange information with the other driver: name, address, phone number, insurance company, policy number, driver license number and license plate number for the driver and the owner of each vehicle. If the driver's name is different from the name of the insured, establish 3 How to Handle a Crisis what the relationship is and take down the name and address for each individual. Also make a written description of each car, including year, make, model and color — and the exact location of the collision and how it happened. • In some jurisdictions, law enforcement will not respond to non emergency no injury accidents. If there are no injuries, and the vehicles are safe to drive, exchange insurance information and file a report with law enforcement. Accident with stationary object If you hit a parked car or other property, try to find the owner or driver. If you cannot, the law says you may drive away only after you leave behind, in a conspicuous place, your name, address and an explanation of the accident, and the name and address of your car’s owner (if other than yourself). You also must notify the local police or highway patrol either by telephone or in person as soon as possible. Vehicle Emergency Kit Keep an Emergency Kit in Your Glove box and a First Aid Kit in the trunk along with a fire extinguisher and warning devices (Flares, Cones or triangles). A bright flashlight, knife of rescue tool for breaking glass, cutting seatbelts, pen and paper for taking notes, a disposable camera to take photos of the vehicles, and a card with medical allergies or conditions that may require special attention if there are serious injuries. Resources: Chinook Medical Gear www.chinookmed.com 800-766-1365 Kits and tools for vehicles, business and home Chinook offers multipurpose adventure medical kits, travel medical kits, and many other travel medical supplies to address common ailments that occur during travel. Maydayindustries www.Maydayindustries.com 714 -893-5410 offers a full line of pre-assembled emergency kits for all types of motorists including Urban and Mountain applications. Supplier of emergency kits for homes, cars and business. Mayday also offers a full line of automotive rescue tools. Use the form on the next page if necessary. 4 Auto Accidents 5 How to Handle a Crisis Disabled Vehicle Flat Tires • When you get a flat tire, pull as far off the roadway as is safely possible. • Try to pull under a light if at night. • Turn on the emergency flashers • Put out warning devices ( flares, triangles, cones) if available and only if safe to do so. • If the flat is on the traffic side of the vehicle and you do not feel it is safe to change the tire or, you do not know how to change a flat, call the automobile club for assistance. Leave your seat belt on. • If your vehicle is a traffic hazard, call 911. • If you need to exit the vehicle due to traffic or other hazards, and feel it would be safer away from the vehicle, do so. Keep passengers safely away from the roadway as well. • Locate an area to wait for assistance that offers the most safety from traffic and never allow children or passengers to wander and stay alert for potential hazards like dangerous drivers, etc.) • Never stand on the roadway or on the roadway side of the vehicle. • The area between your vehicle and the roadway is a Danger Zone! Out of Gas, Broken Down • If your vehicle becomes disabled, pull as far off the roadway as is safely possible. • If the breakdown is at night, pull into a well-lit location if possible. • Turn on your emergency flashers. • Put out warning devices ( flares, triangles, cones) if available and only if safe to do so. • Call the automobile club for assistance if necessary. If your vehicle is a traffic hazard, call 911. • If you need to exit the vehicle due to traffic or other hazards, and feel it would be safer away from the vehicle, do so. Keep passengers safely away from the roadway as well. • Locate an area to wait for assistance that offers the most safety from traffic, never allow children or passengers to wander and stay alert for potential hazards like dangerous drivers, etc.) • Never stand on the roadway or on the roadway side of the vehicle. • The area between your vehicle and the roadway is a Danger Zone! Submerged Vehicles Each year, there are approximately 1,500 incidents and 600 deaths occur involving vehicles that have gone off the road and plummeted into 6 Auto Accidents water. Everyone needs to plan for these types of emergencies by rehearsing the steps necessary for a successful self-rescue from a vehicle in the water, and having the rescue/escape tools readily available for use during this type of emergency. Safety • It only takes 6” to 2' of water to float a vehicle off its wheels. Heed warnings about low water crossings and do not attempt to cross flooded highways. • 8” to 12” of new, clear, hard ice is required to drive a small vehicle onto the ice. 12” to 15” of new, clear, hard ice is required to drive a medium-sized truck onto the ice. • Wearing seatbelts will increase your chances of surviving a crash into the water. • If a vehicle leaves the road and lands in deep water, the vehicle's float time at the surface of the water may be as little as 30 seconds, or as much as 4 minutes. • Factors which effect the float time include closed, sealed, and intact windows and weather seals. Because of the location of the motor in the front of the vehicle, the vehicle will immediately assume an angled nose down position in the water. Escape Because of the relatively limited time frame for self-rescue, the decision to escape the vehicle must be made immediately. However, because of the angled nose-down position in the water and the pressure exerted by the water against the doors, as well as structural damage to the vehicle as a result the crash, it may be extremely difficult or impossible to open the driver's side and passenger doors of the vehicle in order to effect an escape. Therefore, the only avenue of escape may be through the car door windows. The electric power may stay on, or, the battery can short out immediately, making the electric window switches useless. In order to escape through the car door windows, the occupants must be able to punch out the windows. Because the door windows, as well as the rear window, are constructed of tempered glass, they will easily shatter using an appropriate rescue/escape tool, such as a life hammer device, or a spring-loaded window punch. Many of the commercially available rescue/escape tools also have an integrated seat-belt cutter/blade that provides the ability to slice away a seat belt should its release mechanism fail or jam. The decision to escape the vehicle must be made as soon as the vehicle leaves the road and enters the water. If the occupants delay their escape from the vehicle and the vehicle begins to sink, it may not be 7 How to Handle a Crisis possible to effect an escape until the water pressure has equalized inside the vehicle. Also, should the vehicle land in deep water, if the water depth is less than 14', the vehicle will often come to rest on the bottom on all four wheels, assuming there are no large rocks or other debris. However, water depths greater than 14' usually results in the vehicle turning turtle and landing on its roof. The principles of SOS-GO. S = Stay Calm, Assess the Situation, Slow your Breathing O = Open your Window(s) or Door(s) S = Disengage your Seatbelt GO = Get Out In order to accomplish this, these emergency procedures should be rehearsed before the emergency occurs. Use a body reference point to identify and locate the door latch, window crank or electric window switch. As an example, the driver should practice finding the location of these by touching his knee or hip with his/her left hand and then move the hand laterally to the door. A rescue/escape tool should be immediately available for punching out the window and cutting seatbelts. This tool should be mounted on the sidewall of the driver's side compartment, attached to the key ring, or located in some other conspicuous location that can be easily accessed during an emergency. Consideration should be given to additional tools for the passenger side and rear seat compartments as well. If there are multiple occupants, once an escape route has been opened, each occupant should hold hands in a human chain and escape from the same route. If young children are secured in car seats, based on a limited study, we found that of those car seats we evaluated, they were sufficiently buoyant to float a child on the surface of the water. Therefore, the car seat can be cut loose from the seat belt and removed from the vehicle with the child still secured in the car seat. For more information on water emergencies, visit www.lifesaving.com. Resources: www.Maydayindustries.com 714 -893-5410 Supplier of emergency rescue tools, kits for homes, cars and business, drinking water and food bars with a 5 year shelf life. Lights, first aid kits, communication and shelter products. 8 Active Shooter ACTIVE SHOOTER ! Disclaimer: this information is advisory in nature and is not intended to identify all scenarios or situations a person might encounter. ! Following these guidelines will not guarantee your safety. Note: This information should be read and understood immediately. During a shooting is no time to try to figure out what to do. Regular review and practice will help you prepare for an emergency. Profile of an Active Shooter An Active Shooter is an individual actively engaged in killing or attempting to kill people in a confined and populated area; in most cases, active shooters use firearms(s) and there is no pattern or method to their selection of victims. Active shooter situations are unpredictable and evolve quickly. Typically, the immediate deployment of law enforcement is required to stop the shooting and mitigate harm to victims. Because active shooter situations are often over within 10 to 15 minutes, before law enforcement arrives on the scene, individuals must be prepared both mentally and physically to deal with an active shooter situation. Personal Response Good practices for coping with an active shooter situation: • Be aware of your environment and any possible dangers • Take note of the two nearest exits in any facility you visit • If you are in an office, stay there and secure the door • If you are in a hallway, get into a room and secure the door • As a last resort, attempt to take the active shooter down. When the shooter is at close range and you cannot flee, your chance of survival is much greater if you try to incapacitate him/her. • Call 911 when it is safe to do so! Business Response Quickly determine the most reasonable way to protect your own life. Remember that customers and clients are likely to follow the lead of employees and managers during an active shooter situation. Evacuate If there is an accessible escape path, attempt to evacuate the premises. Be sure to: • Have an escape route and plan in mind • Evacuate regardless of whether others agree to follow • Leave your belongings behind • Help others escape, if possible 9 How to Handle a Crisis • Prevent individuals from entering an area where the active shooter may be • Keep your hands visible • Follow the instructions of any police officers • Do not attempt to move wounded people • Call 911 when you are safe Hide out If evacuation is not possible, find a place to hide where the active shooter is less likely to find you. Your hiding place should: • Be out of the active shooter’s view • Provide protection if shots are fired in your direction (i.e., an office with a closed and locked door) • Not trap you or restrict your options for movement To prevent an active shooter from entering your hiding place: • Lock the door • Blockade the door with heavy furniture If the active shooter is nearby: • Lock the door • Silence your cell phone and/or pager • Turn off any source of noise (i.e., radios, televisions) • Hide behind large items (i.e., cabinets, desks) • Remain quiet If evacuation and hiding out are not possible: • Remain calm • Dial 911, if possible, to alert police to the active shooter’s location • If you cannot speak, leave the line open and allow the dispatcher to listen Take action against the active shooter As a last resort, and only when your life is in imminent danger attempt to disrupt and/or incapacitate the active shooter by: • Acting as aggressively as possible against him/her • Throwing items and improvising weapons • Yelling • Committing to your actions 10 Active Shooter Working with law enforcement • Law enforcement’s purpose is to stop the active shooter as soon as possible. Officers will proceed directly to the area in which the last shots were heard. • Officers usually arrive in teams of four (4) • Officers may wear regular patrol uniforms or external bulletproof vests, Kevlar helmets, and other tactical equipment • Officers may be armed with rifles, shotguns, handguns • Officers may use pepper spray or tear gas to control the situation • Officers may shout commands, and may push individuals to the ground for their safety When law enforcement arrives: • Remain calm, and follow officers’ instructions • Put down any items in your hands (i.e., bags, jackets) • Immediately raise hands and spread fingers • Keep hands visible at all times • Avoid making quick movements toward officers such as attempting to hold on to them for safety • Avoid pointing, screaming and/or yelling • Do not stop to ask officers for help or direction when evacuating, just proceed in the direction from which officers are entering the premises Information to provide to law enforcement or 911 operator: • Location of the active shooter • Number of shooters, if more than one • Physical description of shooter/s • Number and type of weapons held by the shooter/s • Number of potential victims at the location The first officers to arrive to the scene will not stop to help injured persons. Expect rescue teams comprised of additional officers and emergency medical personnel to follow the initial officers. These rescue teams will treat and remove any injured persons. They may also call upon able-bodied individuals to assist in removing the wounded from the premises. Once you have reached a safe location or an assembly point, you will likely be held in that area by law enforcement until the situation is under control, and all witnesses have been identified and questioned. Do not leave the safe location or assembly point until law enforcement authorities have instructed you to do so. 11 How to Handle a Crisis AIRCRAFT SAFETY ! Disclaimer: this information is advisory in nature and is not intended to identify all scenarios or situations a person might encounter. ! Following these guidelines will not guarantee your safety. Note: This information should be read and understood immediately. During an emergency is no time to try and figure out what to do. Regular review and practice will help you prepare for an emergency. What to Do In Case of an Aircraft Emergency Although the U.S. airline system is the safest in the world, crashes do occur. However, nearly all crashes have survivors. The tips below, courtesy of the FAA, can help ensure that you survive a crash (which causes 10 percent of airline deaths) and the resultant fire and smoke (which causes the other 90 percent). Do not depend upon others. You are your own safety officer. Survival favors the prepared. Airport Dress • Dress casually (slacks, no tight fitting clothes, no skirts) in case you have to climb over obstacles to leave the plane. • Wear natural fibers. Synthetic clothing, including nylons, burns right through the skin causing severe injury. If you are wearing nylons and have to slide down the emergency chute, the friction could melt the material into your skin. • Wear bright colors. You can be seen better if you need emergency treatment outside the plane. If you collapse on the ground, you will hopefully not be run over by an emergency vehicle. • Do not wear high-heeled shoes; they could puncture the exit chute. • Do not wear pierced earrings. The safety vest inflates above the ears. The earrings could puncture the safety vest, losing 50 percent of buoyancy. If you are in cold water, the vest keeps your head above water, helping to retain your body heat. Losing the buoyancy of the vest dramatically increases the chance of body heat loss and death from hypothermia. • Wear laced shoes and keep them on during takeoff and landing. If preparing for a crash, put your shoes back on. In a crash, loafers may fly off from the G–forces. Avoid walking where there might be debris such as glass, razor-sharp metal shards, or fuel. Also avoid touching the cabin if there is a fire as the metal would be hot. • Because the plane is set to a low humidity (between 4 and 15 percent) you dehydrate while in the air. Drink plenty of water or juice at home and before boarding the plane. While in-flight, drink fluids, even if you are not thirsty. Dehydration parches your throat and nasal 12 Aircraft Safety passages, which will have a hard enough time from the smoke soot. A word of caution: alcohol speeds dehydration. • Do not take any medication that may slow think thinking and reaction time in an emergency (i.e., sedatives) unless prescribed by a physician. Regarding prescription medication, if you are traveling in different time zones, make sure you take your medication according to the number of hours between doses, not by the time on your watch. There is a good chance you could either overdose or underdose. Once In the Aircraft • Where to sit: The best place to sit is either on an exit row or within two rows of one. Most people instinctively exit a plane the way they entered. Make sure you know where the closest emergency exits are. Those sitting in exit rows are crucial to everyone’s safety. Make sure that those sitting on the exit rows speak and understand English. The FAA requires that they be able-bodied enough to remove the window (it weighs 40-70 pounds) or open the door. If you notice these rules not being followed, you have the right (and obligation) to report the situation to the flight attendants to arrange for a passenger to move to another seat. • Removal of the emergency exit window is an important first step in crash survival. • Be grateful for the tight leg room. It is safer because there is less room to be thrown around. • Check with the air carrier regarding the number and size of carry-on bags. Put a softer, lighter bag (with no sharp edges) in the top bin. In an emergency, these bins pop open (they are rated for only 3 Gs) and contents become projectiles. A heavier bag should be placed under the seat in front of you. In case of an emergency while the plane is still moving, brace your feet against the bag to keep it from traveling under your feet where you might trip in your haste to leave the plane. • While on the airplane, remember to keep items like your laptop computer near your seat and not in an overhead compartment away from your view. • Pay heed to the flight attendant’s emergency instructions. All planes (even the same models from the same manufacturers) are configured differently, particularly regarding the location and operation of emergency doors and window. Know where the nearest two exits are; doors can jam because of a crash. Count the number of rows you are away from these exits. When the plane fills up with smoke, visibility is zero. Back up what the attendant says by reading the emergency card in the flap in front of you. Caution: Look before you reach into the pocket. • Passengers have been stabbed with discarded hypodermic needles. 13 How to Handle a Crisis • Eighty percent of all accidents happen at takeoff and landing. Make sure you are buckled up securely as acceleration and deceleration causes the body to lurch forward and backward, which could cause injury. Never release your seatbelt until the plane comes to a complete stop. • Keep the seatbelt buckled when seated. Most injuries from air turbulence occur in a split second. One hundred percent of the injuries could be eliminated if seatbelts were worn. • Keep debris off the floor, especially magazines with slick covers, which could cause you to slip when in a hurry. Should the Worst Happen • Once the plane comes to a halt, what you do in the first 90 seconds may decide your fate; knowledge of your surroundings is crucial. Never release your seatbelt until the plane comes to a complete stop and you have observed your surroundings. If you find yourself upside down, releasing your seatbelt could prove hazardous. • The seat cushion floats do not work very well in water because they are unstable and force you to use energy to stay up. Use them until you find a better alternative, such as the exit chute that can serve as a raft. The inflatable safety vests are also good bets as they keep your head above water even if you are unconscious. When making reservations, you should ask the airline for flotation devices for children and infants. • If traveling with your family, get seats next to each other. Do not leave the lives of loved ones in the hands of panicky strangers. • Before removing an exit door or window, make sure you see no fire outside. You court disaster by allowing the fire and smoke to draft inside. • If the window must be removed, sit down to do it. If you stand, the person behind you will be pushing you and the window cannot be brought inside before it releases. Your knees can block panicky passengers until you can move the window. The airlines’ placards instruct you to place the removed exit window on the seat (it saves money). The best thing to do is to pull to release, rotate, then throw the window out the opening to get it out of the way. • Do not come out head first, unless it is a water landing. You could be pushed out, landing on your head. First put out a leg, then your body, then your other leg, thereby maintaining your balance. • If the plane breaks apart, consider using the new holes as exits. • There is an emergency rope in the cockpit. If it is the only way out, close the door behind you to block out the smoke, pop out the window, and climb down. This is not the best way to leave the plane, but it might be your only way. 14 Aircraft Safety • If the exit chute does not deploy, reach down and pull the handle at the base of the door jamb. • The steeper the chute, the faster you travel. • Jump feet first into the center of the slide; do not sit down to slide. Cross your arms across your chest, elbows in, with legs and feet together or crossed. If you try to brace yourself with your hands while traveling downward, severe friction burns can occur. • There are no exit chutes over the wings on some domestic flights. The pilot will bring the flaps down to enable people to slide off the wing to safety. • Leave belongings behind. Do not risk your life and the lives of others by slowing down to retrieve things. Do not carry bags out–if they get stuck, even for a few seconds, you are dooming those behind you. • Move away from the aircraft, fire, and smoke. If possible, help those requiring assistance. Never go back into a burning aircraft. • Remain alert for emergency vehicles. 15 How to Handle a Crisis CHEMICAL EMERGENCIES Regional Poison Control Center (1-800-222-1222) Center for Disease Control http://www.bt.cdc.gov/chemical/ ! Disclaimer: this information is advisory in nature and is not intended to identify all scenarios or situations a person might encounter. ! Following these guidelines will not guarantee your safety. Chemical Emergencies Overview What Chemical Emergencies Are A chemical emergency occurs when a hazardous chemical has been released and the release has the potential for harming people's health. Chemical releases can be unintentional, as in the case of an industrial accident, or intentional, as in the case of a terrorist attack. Types and Categories of Hazardous Chemicals Scientists often categorize hazardous chemicals by the type of chemical or by the effects a chemical would have on people exposed to it. The categories/types used by the Centers for Disease Control and Prevention are as follows: • Bio-toxins—poisons that come from plants or animals • Blister agents/vesicants—chemicals that severely blister the eyes, respiratory tract, and skin on contact • Blood agents—poisons that affect the body by being absorbed into the blood • Caustics (acids)—chemicals that burn or corrode people’s skin, eyes, and mucus membranes (lining of the nose, mouth, throat, and lungs) on contact • Choking/lung/pulmonary agents—chemicals that cause severe irritation or swelling of the respiratory tract (lining of the nose and throat, lungs) • Incapacitating agents—drugs that make people unable to think clearly or that cause an altered state of consciousness (possibly unconsciousness) • Long-acting anticoagulants—poisons that prevent blood from clotting properly, which can lead to uncontrolled bleeding • Metals—agents that consist of metallic poisons • Nerve agents—highly poisonous chemicals that work by preventing the nervous system from working properly • Organic solvents—agents that damage the tissues of living things by dissolving fats and oils • Toxic alcohols—poisonous alcohols that can damage the heart, kidneys, and nervous system 16 Chemical Emergencies • Tear Gas/Riot control agents—highly irritating agents normally used by law enforcement for crowd control or by individuals for protection (for example, mace) • Vomiting agents—chemicals that cause nausea and vomiting Chemical Agents Name Nerve Agents Tabun (GA) Sarin (GB) Soman (GD) VX Vesicants Impure sulfur mustard (H) Distilled sulfur mustard (HD) Lewisite (L) Color Smell Colorless to brown Colorless Colorless Colorless to straw color Fruity No odor Fruity; oil of camphor No odor Pale yellow to dark brown Pale yellow to dark brown Pure: colorless Agent: amber to dark brown Garlic or mustard Riot Control Agents Chlorobenzylidene White crystalline powder Malononitrile (CS) Chloroacetophenone Liquid or solid (CN) Diphenylaminearsine Yellow-green crystalline (DM) solid Pulmonary Agents Chlorine (Cl2) Clear to yellow gas Phosgene (CG) Colorless gas Cyanides (Blood Agents) Hydrogen Cyanide Gas (AC) Cyanogen Chloride Gas or liquid—colorless Incapacitating Agents BZ White crystalline powder Garlic or mustard Geranium Pepper Apple blossom No odor Bleach Freshly-mown hay Bitter almonds or peach kernels Pungent, biting odor No odor 17 How to Handle a Crisis Indicators of a Possible Chemical Incident Dead Not just an occasional incident, but numerous animals/birds/fish animals (wild and domestic, small and large), birds, and fish in the same area Lack of insect Normal insect activity (ground, air, and/or water) life missing, dead insects evident in the ground/water surface/shoreline Physical Numerous individuals experiencing unexplained symptoms water-like blisters, wheals (similar to bee stings), pinpointed pupils, choking, respiratory ailments and/or rashes Mass casualties Numerous individuals exhibiting unexplained serious health problems ranging from nausea to disorientation to difficulty in breathing to convulsions and death Definite pattern Casualties distributed in a pattern that may be of casualties associated with possible agent dissemination methods Illness associated Lower incidence of symptoms for people working with confined indoors than outdoors, or the reverse geographic area Unusual liquid Numerous surfaces exhibiting oily droplets/film; droplets numerous water surfaces displaying an oily film (no recent rain) Areas that look Not just a patch of dead weeds, but trees, shrubs, different in bushes, food crops, and/or lawns that are dead, appearance discolored, or withered (no current drought) Unexplained Smells ranging from fruity to flowery to odors sharp/pungent to garlic/horseradish-like to bitter almonds/peach kernels to newly mown hay; the particular odor is completely out of character with its surroundings Low-lying clouds Low-lying cloud/fog-like condition that is not explained by its surroundings Unusual metal Unexplained bomb/munitions-like material, debris especially if it contains a liquid (no recent rain) 18 Chemical Emergencies Protecting Yourself During a Chemical Emergency You can protect yourself during a chemical emergency, whether or not you know what chemical has been released. Chemical Agents: Facts About Evacuation Some kinds of chemical accidents or attacks, such as a train derailment or a terrorist incident, may make staying put dangerous. In such cases, it may be safer for you to evacuate, or leave the immediate area. You may need to go to an emergency shelter after you leave the immediate area. How To Know If You Need To Evacuate • You will hear from the local police, emergency coordinators, or government on the radio and/or television emergency broadcast system if you need to evacuate. • If there is a “code red” or “severe” terror alert, you should pay attention to radio and/or television broadcasts so you will know right away if an evacuation order is made for your area. • Every emergency is different and during any emergency people may have to evacuate or to shelter in place depending on where they live. What To Do • Act quickly and follow the instructions of local emergency coordinators, such as law enforcement personnel, fire departments, or local elected leaders. Every situation can be different, so local coordinators could give you special instructions to follow for a particular situation. • Local emergency coordinators may direct people to evacuate homes or offices and go to an emergency shelter. If so, emergency coordinators will tell you how to get to the shelter. If you have children in school, they may be sheltered at the school. You should not try to get to the school if the children are being sheltered there. Transporting them from the school will put them, and you, at increased risk. • The emergency shelter will have most supplies that people need. The emergency coordinators will tell you which supplies to bring with you, but you may also want to prepare a portable supply kit. Be sure to bring any medications you are taking. • If you have time, call a friend or relative in another state to tell them where you are going and that you are safe. Local telephone lines may be jammed in an emergency, so you should plan ahead to have an outof-state contact with whom to leave messages. If you do not have 19 How to Handle a Crisis private transportation, make plans in advance of an emergency to identify people who can give you a ride. • Evacuating and sheltering in this way should keep you safer than if you stayed at home or at your workplace. You will most likely not be in the shelter for more than a few hours. Emergency coordinators will let you know when it is safe to leave the shelter and anything you may need to do to make sure it is safe to re-enter your home. Facts About “Sheltering In Place” Some kinds of chemical accidents or attacks may make going outdoors dangerous. Leaving the area might take too long or put you in harm’s way. In such a case it may be safer for you to stay indoors than to go outside. “Shelter in place” means to make a shelter out of the place you are in. It is a way for you to make the building as safe as possible to protect yourself until help arrives. You should not try to shelter in a vehicle unless you have no other choice. Vehicles are not airtight enough to give you adequate protection from chemicals. Every emergency is different and during any emergency people may have to evacuate or to shelter in place depending on where they live. How to Prepare To Shelter in Place Choose a room in your house or apartment for the shelter. The best room to use for the shelter is a room with as few windows and doors as possible. A large room with a water supply is best—something like a master bedroom that is connected to a bathroom. For most chemical events, this room should be as high in the structure as possible to avoid vapors (gases) that sink. This guideline is different from the sheltering-inplace technique used in tornadoes and other severe weather and for nuclear or radiological events, when the shelter should be low in the home. You might not be at home if the need to shelter in place ever arises, but if you are at home, the following items, many of which you may already have, would be good to have in your shelter room: • First aid kit • Flashlight, battery-powered radio, and extra batteries for both • A working telephone • Food and bottled water. Store 1 gallon of water per person in plastic bottles as well as ready-to-eat foods that will keep without refrigeration in the shelter-in-place room. If you do not have bottled water, or if you run out, you can drink water from a toilet tank (not from a toilet bowl). Do not drink water from the tap. • Duct tape and scissors. 20 Chemical Emergencies • Towels and plastic sheeting. You may wish to cut your plastic sheeting to fit your windows and doors before any emergency occurs. How to Know If You Need To Shelter in Place • Most likely you will only need to shelter for a few hours. • If there is a “code red” or “severe” terror alert, you should pay attention to radio and television broadcasts to know right away whether a shelter-in-place alert is announced for your area. • You will hear from the local police, emergency coordinators, or government on the radio and on television emergency broadcast system if you need to shelter in place. What to Do • Act quickly and follow the instructions of your local emergency coordinators such as law enforcement personnel, fire departments, or local elected leaders. Every situation can be different, so local emergency coordinators might have special instructions for you to follow. In general, do the following: • Go inside as quickly as possible. Bring any outdoor pets indoors. • If there is time, shut and lock all outside doors and windows. Locking them may pull the door or window tighter and make a better seal against the chemical. Turn off the air conditioner or heater. Turn off all fans, too. Close the fireplace damper and any other place that air can come in from outside. • Go in the shelter-in-place room and shut the door. • Turn on the radio. Keep a telephone close at hand, but don’t use it unless there is a serious emergency. • Sink and toilet drain traps should have water in them (you can use the sink and toilet as you normally would). If it is necessary to drink water, drink stored water, not water from the tap. • Tape plastic over any windows in the room. Use duct tape around the windows and doors and make an unbroken seal. Use the tape over any vents into the room and seal any electrical outlets or other openings. • If you are away from your shelter-in-place location when a chemical event occurs, follow the instructions of emergency coordinators to find the nearest shelter. If your children are at school, they will be sheltered there. Unless you are instructed to do so, do not try to get to the school to bring your children home. Transporting them from the school will put them, and you, at increased risk. • Listen to the radio for an announcement indicating that it is safe to leave the shelter. • When you leave the shelter, follow instructions from local emergency coordinators to avoid any contaminants outside. After you come out 21 How to Handle a Crisis of the shelter, emergency coordinators may have additional instructions on how to make the rest of the building safe again. During a Household Chemical Emergency If There Is a Danger of Fire Or Explosion: • Get out of the residence immediately. Do not waste time collecting items or calling the fire department when you are in danger. Call the fire department from outside (a cellular phone or a neighbor’s phone) once you are safely away from danger. • Stay upwind and away from the residence to avoid breathing toxic fumes. Recognize and Respond To Symptoms of Toxic Poisoning: • Difficulty breathing. • Irritation of the eyes, skin, throat, or respiratory tract. • Changes in skin color. • Headache or blurred vision. • Dizziness. • Clumsiness or lack of coordination. • Cramps or diarrhea. If Someone Is Experiencing Toxic Poisoning Symptoms Or Has Been Exposed To a Household Chemical: • Find any containers of the substance that are readily available in order to provide requested information. Call the national poison control center at 1 (800) 222-1222. • Follow the emergency operator or dispatcher’s first aid instructions carefully. The first aid advice found on containers may be out of date or inappropriate. Do not give anything by mouth unless advised to do so by a medical professional. • Discard clothing that may have been contaminated. Some chemicals may not wash out completely. 22 Chemical Emergencies Hazardous Household Items Cleaning Products • Oven cleaners • Drain cleaners • Wood and metal cleaners and polishes • Toilet cleaners • Tub, tile, shower cleaners • Bleach (laundry) • Pool chemicals Indoor Pesticides • Ant sprays and baits • Cockroach sprays and baits • Flea repellents and shampoo • Bug sprays • Houseplant insecticides • Moth repellents • Mouse and rat poisons and baits Automotive Products • Motor oil • Fuel additives • Carburetor and fuel injection cleaners • Air conditioning refrigerants • Starter fluids • Automotive batteries • Transmission and brake fluid • Antifreeze Lawn and Garden Products • Herbicides • Insecticides • Fungicides/wood preservatives Miscellaneous • Batteries • Mercury thermostats or thermometers • Fluorescent light bulbs • Driveway sealer Other Flammable Products • Propane tanks and other compressed gas cylinders • Kerosene • Home heating oil • Diesel fuel • Gas/oil mix • Lighter fluid Workshop/Painting Supplies • Adhesives and glues • Furniture strippers • Oil- or enamel-based paint • Stains and finishes • Paint thinners and turpentine • Paint strippers and removers • Photographic chemicals • Fixatives and other solvents 23 How to Handle a Crisis HAZARDOUS MATERIALS In the Event of a Hazardous Material Spill/Release ! Disclaimer: this information is advisory in nature and is not intended to identify all scenarios or situations a person might encounter. ! Following these guidelines will not guarantee your safety in every situation. Should there be a hazardous material spill/release in your area, listen to local radio or television stations for detailed information and instructions. Follow the instructions carefully. You should stay away from the area to minimize the risk of contamination. Remember that some toxic chemicals are odorless. Follow these guidelines for the circumstances you find yourself in during a hazardous material emergency: • If asked to evacuate, do so immediately. • If you are caught outside: • Stay upstream, uphill, and upwind! • In general, try to go at least one-half mile (usually 8-10 city blocks) from the danger area. • Do not walk into or touch any spilled liquids, airborne mists, or condensed solid chemical deposits. • If you are in a motor vehicle: • Stop and seek shelter in a permanent building. • If you must remain in your car, keep car windows and vents closed and shut off the air conditioner and heater. • If you are indoors and are requested to stay indoors: • Close and lock all exterior doors and windows. Close vents, fireplace dampers, and as many interior doors as possible. • Turn off air conditioners and ventilation systems. In large buildings, set ventilation systems to 100 % recirculation so that no outside air is drawn into the building. If this is not possible, ventilation systems should be turned off. • Go into a pre-selected shelter room. This room should be above ground and have the fewest openings to the outside. • Seal the room by covering each window, door, and vent using plastic sheeting and duct tape. • Use material to fill cracks and holes in the room, such as those around pipes. 24 Hazardous Materials Safety Concerns When Sheltering In Sealed Rooms If you shelter in a sealed room during a hazardous material emergency, keep these details in mind: • Ten square feet of floor space per person will provide sufficient air to prevent carbon dioxide build-up for up to five hours, assuming a normal breathing rate while resting. • Local officials are unlikely to recommend that the public stay in a sealed room for more than 2-3 hours because the effectiveness of such sheltering diminishes with time as the contaminated outside air gradually seeps into the shelter. At this point, evacuation from the area is the better protective action to take. • Ventilate the shelter when the emergency has passed to avoid breathing contaminated air still inside the shelter. After a Hazardous Material Spill/Release The following are guidelines for the period following a hazardous materials incident: • Return to your home or work buildings only when authorities say it is safe. • Open windows and vents and turn on fans in your home or office to provide ventilation. • Act quickly if you have come into contact with, or have been exposed to, hazardous chemicals. Do the following: • Follow decontamination instructions from local authorities. You may be advised to take a thorough shower, or you may be advised to stay away from water and follow another procedure. • Seek medical treatment for unusual symptoms as soon as possible. • Place exposed clothing and shoes in tightly sealed containers. Do not allow them to contact other materials. Call local authorities to find out about proper disposal. • Advise everyone who comes in to contact with you that you may have been exposed to a toxic substance. • Find out from local authorities how to clean up your land and property. • Report any lingering vapors or other hazards to your local emergency services office. 25 How to Handle a Crisis HOTEL SAFETY & SECURITY ! Disclaimer: this information is advisory in nature and is not intended to identify all scenarios or situations a person might encounter. ! Following these guidelines will not guarantee your safety. Hotel Safety & Security • Avoid taking a street level room. Choose the second or third floors which are usually too high for easy outside access yet low enough to be reached by fire equipment. • Use elevators rather than stairwells. Stand near the control panel so if you are threatened, you can push the alarm button. • Locate exits within the hotel and develop a plan in case of fire or other emergency. • Report lost keys immediately and consider changing rooms. • When in the hotel room, secure the door and windows and keep them locked. • When you leave your room, put the “Do Not Disturb” sign on your door; do not leave indicators showing that you are out. In fact, leave the television or radio on, giving the impression that the room is occupied. • Do not leave anything of value (money, tickets, camera, etc.) or workrelated items (briefcases, computers, etc.) in your room when you go out, even if it is locked in your suitcase. • Do not accept deliveries to your room unless previously arranged and you are certain of the source and contents. • Be sure of the identity of visitors before opening the door of your hotel room. Don't meet strangers at your hotel room, or at unknown or remote locations. • Keep your room key with you instead of leaving it at the front desk. • Don’t advertise to others when you are out of your room. For example, request that housekeeping make up your room while you are at breakfast, rather than leaving a “Please Service This Room” sign on the door knob. Hotel Key Security When you check out of a hotel that uses swipe cards for keys, do NOT turn them in. Destroy them. They contain your address, phone number and credit card numbers. Someone with a card reader can easily access the information. Hotel fires You must aggressively take responsibility for the safety of yourself and your family. Think "contingency plan" and discuss it with your 26 Hotel Safety and Security dependents. Begin planning your escape from a fire as soon as you check into a hotel. When a fire occurs, you can then act without panic and without wasting time. • Request a lower floor, ideally the second or third. Selecting a room no higher than the second floor enables you to jump to safety. Although most fire departments can reach above the second floor, they may not get to you in time or position a fire truck on your side of the building. • Locate exits and stairways as soon as you check in; be sure the doors open. Count the number of doors between your room and exit or stairway. In a smoke-filled hallway, you may have to "feel" your way to an exit. Form a mental map of your escape route. • If the hotel has a fire alarm system, find the nearest alarm. Be sure you know how to use it. You may have to activate it in the dark or in dense smoke. • Ensure that your room windows open and that you know how the latches work. Look out the window and mentally rehearse your escape through it. Make note of any ledges or decks that will aid escape. • Check the smoke detector by pushing the test button. If it does not work, have it fixed or move to another room. Better yet, carry your own portable smoke detector (with the battery removed while traveling). Place it in your room by the hall door near the ceiling. • Keep the room key and a flashlight on the bedside table so that you may locate the key quickly if you have to leave your room. If a Fire Starts • If you awake to find smoke in your room, grab your key and crawl to the door on your hands and knees. Do not stand. Smoke and deadly gases rise while the fresher air will be near the floor. • Before you open the door, feel it with the palm of your hand. If the door or knob is hot, the fire may be right outside. Open the door slowly. Be ready to slam it shut if the fire is close by. • If your exit path is clear, crawl into the hallway. Be sure to close the door behind you to keep smoke out in case you have to return to your room. Take your key, as most hotel doors lock automatically. Stay close to the wall to avoid being trampled. • Do not use elevators during a fire. They may malfunction, or if they have heat-activated call buttons, they may take you directly to the fire floor. • As you make your way to the fire exit, stay on the same side as the exit door. Count the doors to the exit. • When you reach the exit, walk down the stairs to the first floor. Hold onto the handrail for guidance and protection from being knocked down by other occupants. 27 How to Handle a Crisis • If you encounter heavy smoke in the stairwell, do not try to run through it. You may not make it. Instead, turn around and walk up to the roof fire exit. Prop the door open to ventilate the stairwell and to keep from being locked out. Find the windward side of the roof, sit down, and wait for firefighters to find you. • If all exits are blocked or if there is heavy smoke in the hallway, you will be better off staying in your room. If there is smoke in your room, open a window and turn on the bathroom vent. • Do not break the window unless it cannot be opened. You might want to close the window later to keep smoke out, and broken glass could injure you or people below. • If your phone works, call the desk to tell someone where you are, or call the fire department to report your location in the building. Hang a bed sheet out the window as a signal. • Fill the bathtub with water to use for firefighting. Bail water onto your door or any hot walls with an ice bucket or waste basket. Stuff wet towels into cracks under and around doors where smoke can enter. Tie a wet towel over your mouth and nose to help filter out smoke. If there is fire outside your window, take down the drapes and move everything combustible away from the window. • If you are above the second floor, you probably will be better off fighting the fire in your room than jumping. A jump from above the third floor may result in severe injury or death. • Remember that panic and a fire's by-products, such as super-heated gases and smoke, present a greater danger than the fire itself. If you know your plan of escape in advance, you will be less likely to panic and more likely to survive. 28 Identity Theft IDENTITY THEFT Identity Theft / Hotel Key Security Precautions • Photocopy both the front and back of the entire contents of your wallet - credit cards, licenses, etc. and keep the copies in a safe and secure location. This will enable you to cancel your credit card as soon as possible if is lost or stolen. • Do not sign the cards. Instead, put “Photo Id Required” • Carry credit cards separately if possible. Carry only the minimum number of credit cards needed. • When you write a check, never allow the salesperson to write down your credit card number on the check. If paying by credit card, never let the salesperson write down your driver's license number. • Avoid signing a blank receipt, whenever possible. Draw a line through blank spaces above the when you sign card receipts. • When you use a credit card to make a purchase, maintain visual contact with the card and make sure no extra imrints of your card are made to other charge slips. Destroy all the carbons so no one can obtain your account number. • It is a good idea to retain your credit receipts and check them against the monthly billing statement. • In the event your credit card is lost or stolen. • Immediately notify the credit card company. Most issuing banks or companies can be reached 24 hours a day, 365 days a year. The majority of fraudulent purchases are made within 48 hours of the loss. • Credit card thieves may sometimes call the victim, inform the person that their credit card has been found and that it is being returned. This ploy gives the thief time to go on a charging spree because the card holder never calls to cancel the card. • File a police report immediately in the jurisdiction where your card was stolen. • Important! Call the three national credit reporting organizations immediately and put a fraud alert on your name and SS number. • By virtue of the Fair Credit Billing Act (FCBA), if you report the loss of a credit card before it is used, the card issuer cannot hold you responsible for any unauthorized charges. If a thief uses your credit card before you report it missing, the most you will owe for unauthorized charges on each credit card is $50.00. • Report credit card fraud to any one of the three major credit reporting bureaus, and they will contact the other two credit bureaus for you. 29 How to Handle a Crisis Credit bureaus Experian To Report Fraud: 888-397-3742 PO Box 9530 Allen, TX 75013 TDD 1-800-972-0322 To Order Your Credit Report 888-397-3742 PO Box 2002 Allen, TX 75013 Equifax To Report Fraud: 800-525-6285 PO Box 740241 Atlanta, GA 30374-0241 TDD 1-800-255-0056 To Order Your Credit Report 800-685-1111 PO Box 740241 Atlanta, GA 30374-0241 Transunion To Report Fraud: 800-680-7289 PO Box 6790 Fullerton, CA 92634 TDD 1-877-553-7803 To Order Your Credit Report 800-888-4213 PO Box 1000 Chester, PA 19022 Check Security • When writing a check to pay on your credit card accounts, do not use the complete number instead, and use only the last four digits – the card company knows the rest. • Never give out your Social Security number. • Put your initials on your checks instead of your full name. • Put your work phone on the checks instead of your home number • Use a PO box (if possible) instead of a home address ( to prevent burglary) • Don’t print or offer any more information than is necessary • If you've had checks stolen or bank accounts set up fraudulently in your name, call these check guarantee companies: Telecheck at 800366-2425; and the National Processing Company at 800-526-5380. They can flag your file so that counterfeit checks will be refused. If your social security number was used fraudulently, report the problem to the Social Security Administration's Fraud Hotline at 800269-0271. In extreme cases of fraud, it may be possible for you to get a new social security number. Federal trade commission identity theft complaint hotline at 1-877-id theft (1-877-438-4338) or online at www.consumer.gov/idtheft 30 Domestic Violence DOMESTIC VIOLENCE In an abusive relationship, the abuser may use a number of tactics other than physical violence in order to maintain power and control over his or her partner: Emotional and Verbal Abuse: Survivors of domestic violence recount stories of put-downs, public humiliation, name-calling, mind games and manipulation by their partners. Many say that the emotional abuse they have suffered has left the deepest scars. Isolation: It is common for an abuser to be extremely jealous, and insist that the victim not see her friends or family members. The resulting feeling of isolation may then be increased for the victim if she loses her job as a result of absenteeism or decreased productivity (which are often associated with people who are experiencing domestic violence). Threats and Intimidation: Threats -- including threats of violence, suicide, or of taking away the children -- are a very common tactic employed by the batterer. The existence of emotional and verbal abuse, attempts to isolate, and threats and intimidation within a relationship may be an indication that physical abuse is to follow. Even if they are not accompanied by physical abuse, the effect of these incidents must not be minimized. If You Are a Victim of Domestic Violence If you are injured or fear for your safety or the safety of a loved one(s), • Go to a safe location away from the attacker. • Call 911 or police, then call a friend, family member, neighbor or pastor. 31 How to Handle a Crisis MISSING CHILDREN PROTOCOLS What to Do If Your Child Disappears Checklist: Immediately call (911) and all other local law enforcement agencies: Do not stop after you have called 911. Depending on your circumstances, contact your local Police Department, County Sheriff, State Police or Highway Patrol, law enforcement in surrounding jurisdictions and the Border Patrol if applicable. Remember, there is no 24 or 48-hour waiting period. If you meet resistance demand to speak to the watch commander and insist that they take a report and enter the information into the National Crime Information Computer (NCIC) at once. Notify the Federal Bureau of Investigation: If you suspect a predatory abduction. The FBI will initiate a kidnapping investigation involving a missing child of tender years, defined as a child twelve years or younger, even though there is no known interstate aspect. The FBI will monitor other kidnapping situations when there is no evidence of interstate travel, and it offers assistance from various entities including the FBI Laboratory. They have written protocols, dedicated agents, unsurpassed resources and vast experience in this specialized investigative field. Log onto or refer the responding law enforcement agency to www.beyondmissing.com: This revolutionary Website allows registered law enforcement agencies to immediately create and distribute missing flyers to other targeted law enforcement agencies using powerful Internet tools. Parents can also create, download and print flyers for duplication, but not database or electronically distribute missing flyers. There is no cost for either service. Notify all local media assignment desks: The sooner television and radio begin notifying the community that a child has been kidnapped, the better the chances of recovery. It’s as simple as that. Notify your local non-profit Child Locator Service: They can provide an array of services pertinent to your situation. Child Locator Services exist to assist in the recovery of missing children. Do not overlook this important resource. If you believe that your child has been kidnapped: Contact the National Center for Missing and Exploited Children at 1-800-THELOST. If you believe that your child has been kidnapped: Contact Team H.O.P.E., a parent support network for families with missing children. Team H.O.P.E. volunteer parents have experienced the agony of searching for their own children. They provide practical 32 Missing Children and emotional support for parents whose children are victims of predatory kidnapping, parental abduction, international abduction, adult missing and runaways and can be reached at 1-800-306-6311. If you believe that your child has run away: Contact the National Runaway Switchboard www.1800runaway.org at 1-800-786 2929. Keep your home phone attended by someone your child knows: Install Caller ID if you do not already have that service and record conversations. This may be the only way your child knows how to reach you. Take care to preserve your physical and emotional welfare: Friends, neighbors and even total strangers will be working toward a successful resolution, but you must remember to eat and sleep regularly. This will be the most daunting and difficult journey that you will ever take and you will need sobriety, presence of mind and good judgment if it is to be successful. Seek emotional and psychological support from your church, a social service agency or even a professional counselor with experience in your type of situation. Remember that you alone are leading the battle for the return of your missing child. Remember - Never Give Up Hope! As long as you believe, hope remains eternal. . 33 How to Handle a Crisis TERRORISM ! Disclaimer: this information is advisory in nature and is not intended to identify all scenarios or situations a person might encounter. ! Following these guidelines will not guarantee your safety in every situation. Living with the threat We live with many dangers in our daily lives, ranging from everyday household accidents to natural disasters. We do so without relentless fear. Terrorism is a fact of contemporary life, but we do not have to live in constant fear of terrorism any more than other dangers. It is important to be aware of the threat and take steps to protect ourselves, but it is also important to keep the threat in perspective. While there is no absolute protection against terrorism, there are a number of reasonable precautions that can provide some degree of individual protection. Your biggest asset is the ability to learn how to maintain a state of awareness relative to your environment, and prepare to react if a terrorist event occurs.. Also, don’t ever discount what seems to be a sixth sense or premonition. They are sometimes the result of inadvertently picking up cues from your environment. It is better to take precautions and perhaps risk a little embarrassment than to disregard what might be lifesaving feelings. Weapons of Mass Destruction (WMD’s) A weapon of mass destruction (WMD) is any weapon that can kill large numbers of humans and can also cause great damage to man-made and natural structures. WMD’s are categorized as the following: 34 Terrorism CBRNE • Chemical • Biological • Radiological • Nuclear • Explosive Chemical Terrorism Chemical Emergencies A chemical emergency occurs when a hazardous chemical has been released and the release has the potential for harming people's health. Chemical releases can be unintentional, as in the case of an industrial accident or intentional, as in the case of a terrorist attack. Where Hazardous Chemicals Come From Some chemicals that are hazardous have been developed by military organizations for use in warfare. Examples are nerve agents such as sarin and VX, mustards such as sulfur mustards and nitrogen mustards, and choking agents such as phosgene. It might be possible for terrorists to get these chemical warfare agents and use them to harm people. Many hazardous chemicals are used in industry (for example, chlorine, ammonia, and benzene). Others are found in nature (for example, poisonous plants). Some could be made from everyday items such as household cleaners. These types of hazardous chemicals also could be obtained and used to harm people, or they could be accidentally released. Types and Categories of Hazardous Chemicals Scientists often categorize hazardous chemicals by the type of chemical or by the effects a chemical would have on people exposed to it. The categories/types used by the Centers for Disease Control and Prevention are as follows: • Biotoxins poisons that come from plants or animals • Blister agents/vesicants chemicals that severely blister the eyes, respiratory tract, and skin on contact • Blood agents poisons that affect the body by being absorbed into the blood • Caustics (acids) chemicals that burn or corrode people’s skin, eyes, and mucus membranes (lining of the nose, mouth, throat, and lungs) on contact • Choking/lung/pulmonary agents chemicals that cause severe irritation or swelling of the respiratory tract (lining of the nose and throat, lungs) 35 How to Handle a Crisis • Incapacitating agents drugs that make people unable to think clearly or that cause an altered state of consciousness (possibly unconsciousness) • Long-acting anticoagulants poisons that prevent blood from clotting properly, which can lead to uncontrolled bleeding • Metals agents that consist of metallic poisons • Nerve agents highly poisonous chemicals that work by preventing the nervous system from working properly • Organic solvents agents that damage the tissues of living things by dissolving fats and oils • Riot control agents/tear gas highly irritating agents normally used by law enforcement for crowd control or by individuals for protection (for example, mace) • Toxic alcohols poisonous alcohols that can damage the heart, kidneys, and nervous system • Vomiting agents chemicals that cause nausea and vomiting Chemical Agents: Facts About Evacuation Some kinds of chemical accidents or attacks, such as a train derailment or a terrorist incident, may make staying put dangerous. In such cases, it may be safer for you to evacuate, or leave the immediate area. You may need to go to an emergency shelter after you leave the immediate area. How to know if you need to evacuate • You will hear from the local police, emergency coordinators, or government on the radio and/or television emergency broadcast system if you need to evacuate. • If there is a “code red” or “severe” terror alert, you should pay attention to radio and/or television broadcasts so you will know right away if an evacuation order is made for your area. • Every emergency is different and during any emergency people may have to evacuate or to shelter in place depending on where they live. What to evacuate • Move away immediately in a direction upwind of the source • Act quickly and follow the instructions of local emergency coordinators, such as law enforcement personnel, fire departments, or local elected leaders. Every situation can be different, so local coordinators could give you special instructions to follow for a particular situation. • Local emergency coordinators may direct people to evacuate homes or offices and go to an emergency shelter. If so, emergency coordinators will tell you how to get to the shelter. If you have 36 Terrorism children in school, they may be sheltered at the school. You should not try to get to the school if the children are being sheltered there. Transporting them from the school will put them, and you, at increased risk. • The emergency shelter will have most supplies that people need. The emergency coordinators will tell you which supplies to bring with you, but you may also want to prepare a portable supply kit. Be sure to bring any medications you are taking. • If you have time, call a friend or relative in another state to tell them where you are going and that you are safe. Local telephone lines may be jammed in an emergency, so you should plan ahead to have an outof-state contact with whom to leave messages. • If you do not have private transportation, make plans in advance of an emergency to identify people who can give you a ride. • Evacuating and sheltering in this way should keep you safer than if you stayed at home or at your workplace. You will most likely not be in the shelter for more than a few hours. Emergency coordinators will let you know when it is safe to leave the shelter and anything you may need to do to make sure it is safe to re-enter your home. Chemical Agents: Facts About Sheltering In Place What “sheltering in place” means Some kinds of chemical accidents or attacks may make going outdoors dangerous. Leaving the area might take too long or put you in harm’s way. In such a case it may be safer for you to stay indoors than to go outside. “Shelter in place” means to make a shelter out of the place you are in. It is a way for you to make the building as safe as possible to protect yourself until help arrives. You should not try to shelter in a vehicle unless you have no other choice. Vehicles are not airtight enough to give you adequate protection from chemicals. Every emergency is different and during any emergency people may have to evacuate or to shelter in place depending on where they live. How to prepare to shelter in place Choose a room in your house or apartment for the shelter. The best room to use for the shelter is a room with as few windows and doors as possible. A large room with a water supply is best something like a master bedroom that is connected to a bathroom. For most chemical events, this room should be as high in the structure as possible to avoid vapors (gases) that sink. This guideline is different from the sheltering-inplace technique used in tornadoes and other severe weather and for nuclear or radiological events, when the shelter should be low in the home. 37 How to Handle a Crisis You might not be at home if the need to shelter in place ever arises, but if you are at home, the following items, many of which you may already have, would be good to have in your shelter room: • First aid kit • Flashlight, battery-powered radio, and extra batteries for both • A working telephone • Food and bottled water. Store 1 gallon of water per person in plastic bottles as well as ready-to-eat foods that will keep without refrigeration in the shelter-in-place room. If you do not have bottled water, or if you run out, you can drink water from a toilet tank (not from a toilet bowl). Do not drink water from the tap. • Duct tape and scissors. • Towels and plastic sheeting. You may wish to cut your plastic sheeting to fit your windows and doors before any emergency occurs. How to know if you need to shelter in place • Most likely you will only need to shelter for a few hours. • You will hear from the local police, emergency coordinators, or government on the radio and on television emergency broadcast system if you need to shelter in place. • If there is a “code red” or “severe” terror alert, you should pay attention to radio and television broadcasts to know right away whether a shelter-in-place alert is announced for your area. What to do Act quickly and follow the instructions of your local emergency coordinators such as law enforcement personnel, fire departments, or local elected leaders. Every situation can be different, so local emergency coordinators might have special instructions for you to follow. In general, do the following: • Go inside as quickly as possible. Bring any pets indoors. • If there is time, shut and lock all outside doors and windows. Locking them may pull the door or window tighter and make a better seal against the chemical. • Turn off the air conditioner or heater. Turn off all fans, too. • Close the fireplace damper and any other place that air can come in from outside. • Go in the shelter-in-place room and shut the door. • Turn on the radio. Keep a telephone close at hand, but don’t use it unless there is a serious emergency. • Sink and toilet drain traps should have water in them (you can use the sink and toilet as you normally would). If it is necessary to drink water, drink stored water, not water from the tap. 38 Terrorism • Tape plastic over any windows in the room. Use duct tape around the windows and doors and make an unbroken seal. Use the tape over any vents into the room and seal any electrical outlets or other openings. • Listen to the radio for an announcement indicating that it is safe to leave the shelter. • When you leave the shelter, follow instructions from local emergency coordinators to avoid any contaminants outside. After you come out of the shelter, emergency coordinators may have additional instructions on how to make the rest of the building safe again. • If you are away from your shelter-in-place location when a chemical event occurs, follow the instructions of emergency coordinators to find the nearest shelter. If your children are at school, they will be sheltered there. Unless you are instructed to do so, do not try to get to the school to bring your children home. Transporting them from the school will put them, and you, at increased risk. After a Chemical Attack Decontamination is needed within minutes of exposure to minimize health consequences. Do not leave the safety of a shelter to go outdoors to help others until authorities announce it is safe to do so. A person affected by a chemical agent requires immediate medical attention from a professional. If medical help is not immediately available, decontaminate yourself and assist in decontaminating others. Decontamination Guidelines Are As Follows: • Use extreme caution when helping others who have been exposed to chemical agents. • Remove all clothing and other items in contact with the body. Contaminated clothing normally removed over the head should be cut off to avoid contact with the eyes, nose, and mouth. Put contaminated clothing and items into a plastic bag and seal it. Decontaminate hands using soap and water. Remove eyeglasses or contact lenses. Put glasses in a pan of household bleach to decontaminate them, and then rinse and dry. • Flush eyes with water. • Gently wash face and hair with soap and water before thoroughly rinsing with water. • Decontaminate other body areas likely to have been contaminated. Blot (do not swab or scrape) with a cloth soaked in soapy water and rinse with clear water. • Change into uncontaminated clothes. Clothing stored in drawers or closets is likely to be uncontaminated. • Proceed to a medical facility for screening and professional treatment. 39 How to Handle a Crisis Biological Terrorism What Is Bioterrorism? A bioterrorism attack is the deliberate release of viruses, bacteria, or other germs (agents) used to cause illness or death in people, animals, or plants. These agents are typically found in nature, but it is possible that they could be changed to increase their ability to cause disease, make them resistant to current medicines, or to increase their ability to be spread into the environment. Terrorists may use biological agents because they can be extremely difficult to detect and do not cause illness for several hours to several days. Biological agents can be spread through the air, through water, or in food. Some bioterrorism agents, like the smallpox virus, can be spread from person to person and some, like anthrax, cannot. Bioterrorism Agent Categories Bioterrorism agents can be separated into three categories, depending on how easily they can be spread and the severity of illness or death they cause. Category A agents are considered the highest risk and Category C agents are those that are considered emerging threats for disease. Category A • These high-priority agents include organisms or toxins that pose the highest risk to the public and national security because: • They can be easily spread or transmitted from person to person • They result in high death rates and have the potential for major public health impact • They might cause public panic and social disruption • They require special action for public health preparedness. Category B • These agents are the second highest priority because: • They are moderately easy to spread • They result in moderate illness rates and low death rates • They require specific enhancements of CDC's laboratory capacity and enhanced disease monitoring. Category C • These third highest priority agents include emerging pathogens that could be engineered for mass spread in the future because: • They are easily available • They are easily produced and spread • They have potential for high morbidity and mortality rates and major health impact. 40 Terrorism Bombs Radiological (Dirty Bombs) People have expressed concern about dirty bombs and what they should do to protect themselves if a dirty bomb incident occurs. Because your health and safety are our highest priorities, the health experts at the Centers for Disease Control and Prevention (CDC) have prepared the following list of frequently asked questions and answers about dirty bombs. What is a dirty bomb? A dirty bomb is a mix of explosives, such as dynamite, with radioactive powder or pellets. When the dynamite or other explosives are set off, the blast carries radioactive material into the surrounding area. A dirty bomb is not the same as an atomic bomb. An atomic bomb, like those bombs dropped on Hiroshima and Nagasaki, involves the splitting of atoms and a huge release of energy that produces the atomic mushroom cloud. A dirty bomb works completely differently and cannot create an atomic blast. Instead, a dirty bomb uses dynamite or other explosives to scatter radioactive dust, smoke, or other material in order to cause radioactive contamination. What are the main dangers of a dirty bomb? The main danger from a dirty bomb is from the explosion, which can cause serious injuries and property damage. The radioactive materials used in a dirty bomb would probably not create enough radiation exposure to cause immediate serious illness, except to those people who are very close to the blast site. However, the radioactive dust and smoke spread farther away could be dangerous to health if it is inhaled. Because people cannot see, smell, feel, or taste radiation, you should take immediate steps to protect yourself and your loved ones. Protecting Yourself These simple steps recommended by doctors and radiation experts will help protect you and your loved ones. The steps you should take depend on where you are located when the incident occurs: outside, inside, or in a vehicle. If you are outside and close to the incident • Cover your nose and mouth with a cloth to reduce the risk of breathing in radioactive dust or smoke. • Don’t touch objects thrown off by an explosion they might be radioactive. 41 How to Handle a Crisis • Quickly go into a building where the walls and windows have not been broken. This area will shield you from radiation that might be outside. • Once you are inside, take off your outer layer of clothing and seal it in a plastic bag if available. Put the cloth you used to cover your mouth in the bag, too. Removing outer clothes may get rid of up to 90% of radioactive dust. • Put the plastic bag where others will not touch it and keep it until authorities tell you what to do with it. • Shower or wash with soap and water. Be sure to wash your hair. Washing will remove any remaining dust. • Tune to the local radio or television news for more instructions. If you are inside and close to the incident • If the walls and windows of the building are not broken, stay in the building and do not leave. • To keep radioactive dust or powder from getting inside, shut all windows, outside doors, and fireplace dampers. Turn off fans and heating and air-conditioning systems that bring in air from the outside. It is not necessary to put duct tape or plastic around doors or windows. • If the walls and windows of the building are broken, go to an interior room and do not leave. If the building has been heavily damaged, quickly go into a building where the walls and windows have not been broken. • If you must go outside, be sure to cover your nose and mouth with a cloth. Once you are back inside, take off your outer layer of clothing and seal it in a plastic bag if available. Store the bag where others will not touch it. • Shower or wash with soap and water, removing any remaining dust. Be sure to wash your hair. • Tune to local radio or television news for more instructions. If you are in a car when the incident happens • Close the windows and turn off the air conditioner, heater, and vents. • Cover your nose and mouth with a cloth to avoid breathing radioactive dust or smoke. • If you are close to your home, office, or a public building, go there immediately and go inside quickly. • If you cannot get to your home or another building safely, pull over to the side of the road and stop in the safest place possible. If it is a hot or sunny day, try to stop under a bridge or in a shady spot. • Turn off the engine and listen to the radio for instructions. • Stay in the car until you are told it is safe to get back on the road. 42 Terrorism What should I do about my children and family? • If your children or family are with you, stay together. Take the same actions to protect your whole family. • If your children or family are in another home or building, they should stay there until you are told it is safe to travel. • Schools have emergency plans and shelters. If your children are at school, they should stay there until it is safe to travel. Do not go to the school until public officials say it is safe to travel. How do I protect my pets? If you have pets outside, bring them inside if it can be done safely. Wash your pets with soap and water to remove any radioactive dust. Should I take potassium iodide? Potassium iodide, also called KI, only protects a person's thyroid gland from exposure to radioactive iodine. KI will not protect a person from other radioactive materials or protect other parts of the body from exposure to radiation. Since there is no way to know at the time of the explosion whether radioactive iodine was used in the explosive device, taking KI would probably not be beneficial. Also, KI can be dangerous to some people. Will food and water supplies be safe? Food and water supplies most likely will remain safe. However, any unpackaged food or water that was out in the open and close to the incident may have radioactive dust on it. Therefore, do not consume water or food that was out in the open. The food inside of cans and other sealed containers will be safe to eat. Wash the outside of the container before opening it. Authorities will monitor food and water quality for safety and keep the public informed. How do I know if I’ve been exposed to radiation or contaminated by radioactive materials? People cannot see, smell, feel, or taste radiation; so you may not know whether you have been exposed. Police or firefighters will quickly check for radiation by using special equipment to determine how much radiation is present and whether it poses any danger in your area. Low levels of radiation exposure (like those expected from a dirty bomb situation) do not cause any symptoms. Higher levels of radiation exposure may produce symptoms, such as nausea, vomiting, diarrhea, and swelling and redness of the skin. If you develop any of these symptoms, you should contact your doctor, hospital, or other sites recommended by authorities. 43 How to Handle a Crisis Clothing Some kinds of chemical accidents or attacks may cause you to come in contact with dangerous chemicals. Coming in contact with a dangerous chemical may make it necessary for you to remove and dispose of your clothing right away and then wash yourself. Removing your clothing and washing your body will reduce or remove the chemical so that it is no longer a hazard. This process is called decontamination. People are decontaminated for two primary reasons: 1. To prevent the chemical from being further absorbed by their body or from spreading on their body, and 2. To prevent the chemical from spreading to other people, including medical personnel, who must handle or who might come in contact with the person who is contaminated with the chemical. Most chemical agents can penetrate clothing and are absorbed rapidly through the skin. Therefore, the most important and most effective decontamination for any chemical exposure is decontamination done within the first minute or two after exposure. How to know if you need to wash yourself and dispose of clothing In most cases, emergency coordinators will let you know if a dangerous chemical has been released and will tell you what to do. In general, exposure to a chemical in its liquid or solid form will require you to remove your clothing and then thoroughly wash your exposed skin. Exposure to a chemical in its vapor (gas) form generally requires you only to remove clothing and the source of the toxic vapor. If you think you have been exposed to a chemical release, but you have not heard from emergency coordinators, you can follow the washing and clothing disposal advice in the next section. If your clothes are contaminated Act quickly and follow the instructions of local emergency coordinators. Every situation can be different, so local emergency coordinators might have special instructions for you to follow. The most important things to do if you think you may have been exposed to a dangerous chemical are to quickly remove your clothing, wash yourself, and dispose of your clothing: Removing your clothing: • Quickly take off clothing that has a chemical on it. Any clothing that has to be pulled over your head should be cut off instead of being pulled over your head. 44 Terrorism • If you are helping other people remove their clothing, try to avoid touching any contaminated areas, and remove the clothing as quickly as possible. • As quickly as possible, wash any chemicals from your skin with large amounts of soap and water. Washing with soap and water will help protect you from any chemicals on your body. • If your eyes are burning or your vision is blurred, rinse your eyes with plain water for 10 to 15 minutes. If you wear contacts, remove them and put them with the contaminated clothing. Do not put the contacts back in your eyes (even if they are not disposable contacts). If you wear eyeglasses, wash them with soap and water. You can put your eyeglasses back on after you wash them. Disposing of your clothes: • After you have washed yourself, place your clothing inside a plastic bag. Avoid touching contaminated areas of the clothing. If you can't avoid touching contaminated areas, or you aren't sure where the contaminated areas are, wear rubber gloves or put the clothing in the bag using tongs, tool handles, sticks, or similar objects. • Anything that touches the contaminated clothing should also be placed in the bag. If you wear contacts, put them in the plastic bag too. • Seal the bag, and then seal that bag inside another plastic bag. Disposing of your clothing in this way will help protect you and other people from any chemicals that might be on your clothes. • When the local or state health department or emergency personnel arrive, tell them what you did with your clothes. The health department or emergency personnel will arrange for further disposal. Do not handle the plastic bags yourself. • After you have removed and disposed of your clothing, and washed yourself, you should dress in clothing that is not contaminated. Clothing that has been stored in drawers or closets are unlikely to be contaminated, so it would be a good choice for you to wear. • You should avoid coming in contact with other people who may have been exposed but who have not yet changed their clothes or washed. Move away from the area where the chemical was released when emergency coordinators tell you to do so. Nuclear Frequently Asked Questions About a Nuclear Blast With the recent threats of terrorism, many people have expressed concern about the likelihood and effects of a nuclear blast. The Centers for Disease Control (CDC) has developed a fact sheet to describe what 45 How to Handle a Crisis happens when a nuclear blast occurs, the possible health effects, and what you can do to protect yourself in this type of emergency. What is a nuclear blast? A nuclear blast, produced by explosion of a nuclear bomb (sometimes called a nuclear detonation), involves the joining or splitting of atoms (called fusion and fission) to produce an intense pulse or wave of heat, light, air pressure, and radiation. The bombs dropped on Hiroshima and Nagasaki, Japan, at the end of World War II produced nuclear blasts. When a nuclear device is exploded, a large fireball is created. Everything inside of this fireball vaporizes, including soil and water, and is carried upwards. This creates the mushroom cloud that we associate with a nuclear blast, detonation, or explosion. Radioactive material from the nuclear device mixes with the vaporized material in the mushroom cloud. As this vaporized radioactive material cools, it becomes condensed and forms particles, such as dust. The condensed radioactive material then falls back to the earth; this is what is known as fallout. Because fallout is in the form of particles, it can be carried long distances on wind currents and end up miles from the site of the explosion. Fallout is radioactive and can cause contamination of anything on which it lands, including food and water supplies. What are the effects of a nuclear blast? The effects on a person from a nuclear blast will depend on the size of the bomb and the distance the person is from the explosion. However, a nuclear blast would likely cause great destruction, death, and injury, and have a wide area of impact. In a nuclear blast, injury or death may occur as a result of the blast itself or as a result of debris thrown from the blast. People may experience moderate to severe skin burns, depending on their distance from the blast site. Those who look directly at the blast could experience eye damage ranging from temporary blindness to severe burns on the retina. Individuals near the blast site would be exposed to high levels of radiation and could develop symptoms of radiation sickness (called acute radiation syndrome, or ARS While severe burns would appear in minutes, other health effects might take days or weeks to appear. These effects range from mild, such as skin reddening, to severe effects such as cancer and death, depending on the amount of radiation absorbed by the body (the dose), the type of radiation, the route of exposure, and the length of time of the exposure. People may experience two types of exposure from radioactive materials from a nuclear blast: external exposure and internal exposure. External exposure would occur when people were exposed to radiation 46 Terrorism outside of their bodies from the blast or its fallout. Internal exposure would occur when people ate food or breathed air that was contaminated with radioactive fallout. Both internal and external exposure from fallout could occur miles away from the blast site. Exposure to very large doses of external radiation may cause death within a few days or months. External exposure to lower doses of radiation and internal exposure from breathing or eating food contaminated with radioactive fallout may lead to an increased risk of developing cancer and other health effects. How can I protect my family and myself during a nuclear blast? In the event of a nuclear blast, a national emergency response plan would be activated and would include federal, state, and local agencies. Following are some steps recommended by the World Health Organization if a nuclear blast occurs: If you are near the blast when it occurs: • Turn away, close and cover your eyes to prevent damage to your sight. • Drop to the ground face down and place your hands under your body. • Remain flat until the heat and two shock waves have passed. If you are outside when the blast occurs: • Find something to cover your mouth and nose, such as a scarf, handkerchief, or other cloth. • Remove any dust from your clothes by brushing, shaking, and wiping in a ventilated area however, cover your mouth and nose while you do this. • Move to a shelter, basement, or other underground area, preferably located away from the direction that the wind is blowing. • Remove clothing since it may be contaminated; if possible, take a shower, wash your hair, and change clothes before you enter the shelter. If you are already in a shelter or basement: • Cover your mouth and nose with a face mask or other material (such as a scarf or handkerchief) until the fallout cloud has passed. • Shut off ventilation systems and seal doors or windows until the fallout cloud has passed. However, after the fallout cloud has passed, unseal the doors and windows to allow some air circulation. • Stay inside until authorities say it is safe to come out. • Listen to the local radio or television for information and advice. Authorities may direct you to stay in your shelter or evacuate to a safer place away from the area. • If you must go out, cover your mouth and nose with a damp towel. 47 How to Handle a Crisis • Use stored food and drinking water. Do not eat local fresh food or drink water from open water supplies. • Clean and cover any open wounds on your body. If you are advised to evacuate: • Listen to the radio or television for information about evacuation routes, temporary shelters, and procedures to follow. • Before you leave, close and lock windows and doors and turn off air conditioning, vents, fans, and furnace. Close fireplace dampers. • Take disaster supplies with you (such as a flashlight and extra batteries, battery-operated radio, first aid kit and manual, emergency food and water, nonelectric can opener, essential medicines, cash and credit cards, and sturdy shoes). • Remember your neighbors may require special assistance, especially infants, elderly people, and people with disabilities. Is a nuclear bomb the same as a suitcase bomb? The “suitcase” bombs that have been described in new stories in recent years are small nuclear bombs. A suitcase bomb would produce a nuclear blast that is very destructive, but not as great as a nuclear weapon developed for strategic military purposes. Is a nuclear bomb the same as a dirty bomb? A nuclear blast is different than a dirty bomb. A dirty bomb, or radiological dispersion device, is a bomb that uses conventional explosives such as dynamite to spread radioactive materials in the form of powder or pellets. It does not involve the splitting of atoms to produce the tremendous force and destruction of a nuclear blast, but rather spreads smaller amounts radioactive material into the surrounding area. The main purpose of a dirty bomb is to frighten people and contaminate buildings or land with radioactive material. Would an airplane crash in a nuclear power plant have the same effect as a nuclear blast? While a serious event such as a plane crash into a nuclear power plant could result in a release of radioactive material into the air, a nuclear power plant would not explode like a nuclear weapon. There may be a radiation danger in the surrounding areas, depending on the type of incident, the amount of radiation released, and the current weather patterns. However, radiation would be monitored to determine the potential danger, and people in the local area would be evacuated or advised on how to protect themselves. 48 Terrorism Bombing Event During a Bombing If there is an explosion, you should immediately: • Get under a sturdy table or desk if things are falling around you. When things stop falling, leave quickly, watching for obviously weakened floors and stairways. • As you exit the building, be especially watchful of falling debris. • Leave the building as quickly as possible. Do not stop to retrieve personal possessions or make phone calls. • Do not use elevators. WARNING! Secondary devices are always a possibility. A common tactic is to detonate a device attracting a crowd then detonate a second device to inflict heavy casualties. What you should do after a bombing • Leave the area immediately. • Avoid crowds. Crowds of people may be targeted for a second attack. • Avoid unattended cars and trucks. Unattended cars and trucks may contain explosives. • Stay away from damaged buildings to avoid falling glass and bricks. Move at least 10 blocks or 200 yards away from damaged buildings. • Call 9-1-1 once you are in a safe area, but only if police, fire, or EMS has not arrived. • Follow directions from people in authority (police, fire, EMS, or military personnel, or from school or workplace supervisors). • Help others who are hurt or need assistance to leave the area if you are able. If you see someone who is seriously injured, seek help. Do not try to manage the situation alone. • Leave and stay away from the scene of the event. Returning to the scene will increase the risk of danger for rescue workers and you. 9-1-1 services (police, fire, EMS and ambulance) might be delayed indefinitely following a terrorist event, therefore: • If rescue workers are not available to transport you or other injured persons, always have a back-up plan for transportation. • Follow advice from your local public safety offices (local health department, local emergency management offices, fire and police departments and reliable news sources). 49 How to Handle a Crisis • Triage. Following a terrorist attack or other disasters, injuries are generally treated on a “worst first” basis, called “triage.” Triage is not “first come, first served”. If your injuries are not immediately life threatening, others might be treated before you. The goal of triage is to save as many lives as possible. • Listen to your radio or television for news and instructions. Blast Injuries The four basic mechanisms of blast injury are termed as primary, secondary, tertiary, and quaternary “Blast Wave” (primary) refers to the intense over-pressurization impulse created by a detonated HE. Blast injuries are characterized by anatomical and physiological changes from the direct or reflective overpressurization force impacting the body’s surface. The HE “blast wave” (over-pressure component) should be distinguished from “blast wind” (forced super-heated air flow). The latter may be encountered with both HE and LE. When to Go To the Hospital or Clinic For First Aid, see “Blast Injury” in first aid section • Seek medical attention if you have any injuries including the following: • Excessive bleeding • Trouble breathing • Persistent cough • Trouble walking or using an arm or leg • Stomach, back or chest pains • Headache • Blurred vision or burning eyes • Dry mouth • Vomiting or diarrhea • Rash or burning skin • Hearing problems • Injuries that increase in pain, redness or swelling • Injuries that do not improve after 24 to 48 hours Where to Go For Care Go to a hospital or clinic away from the event if you can. Most victims will go to the nearest hospital. Hospitals away from the event will be less busy. Expect long waits. To avoid long waits, choose a hospital farther away from the event. While this might increase your travel time, you might receive care sooner. 50 Terrorism Limited information. In a large-scale emergency such as a terrorist attack, police, fire, EMS, and even hospitals and clinics cannot track every individual by name. Keep in mind that it may be difficult for hospitals to provide information about loved ones following a terrorist attack. Be patient as you seek information. Classification of Explosives Explosives are categorized as high-order explosives (HE) or loworder explosives (LE). HE produce a defining supersonic overpressurization shock wave. Examples of HE include TNT, C-4, Semtex, nitroglycerin, dynamite, and ammonium nitrate fuel oil (ANFO). LE create a subsonic explosion and lack HE’s over-pressurization wave. Examples of LE include pipe bombs, gunpowder, and most pure petroleum-based bombs such as Molotov cocktails or aircraft improvised as guided missiles. HE and LE cause different injury patterns. Explosive and incendiary (fire) bombs are further characterized based on their source. “Manufactured” implies standard military-issued, mass produced, and quality-tested weapons. “Improvised” describes weapons produced in small quantities, or use of a device outside its intended purpose, such as converting a commercial aircraft into a guided missile. Manufactured (military) explosive weapons are exclusively HEbased. Terrorists will use whatever is available – illegally obtained manufactured weapons or improvised explosive devices (also known as “IEDs”) that may be composed of HE, LE, or both. Manufactured and improvised bombs cause markedly different injuries. How to Recognize and Handle a Suspicious Package or Envelope WARNING! If a package or envelope appears suspicious, do not open it. Postal Service Mail There is a long list of possible indicators; these are some of the most common: • The package or letter has no postage, non-cancelled postage, excessive postage, has been hand delivered, or dropped off by a friend • Sender is unknown or no return address available • Addressee does not normally receive mail at that address • Common words are misspelled • Package emits a peculiar or suspicious odor 51 How to Handle a Crisis • Letter or package seems heavy or bulky for its size Package makes a ticking, buzzing, or whirring noise • An unidentified person calls to ask if the letter or package was received If the letter or parcel exhibits some of the indicators above, it could be considered suspect and the proper authorities should be notified. Never accept unexpected packages at your home, and make sure family members and clerical staff refuse unexpected mail. Handling of Suspicious Packages or Envelopes • Do not shake or empty the contents of any suspicious package or envelope. • Do not carry the package or envelope, show it to others or allow others to examine it. 52 Terrorism • Put the package or envelope down on a stable surface; do not sniff, touch, taste, or look closely at it or at any contents which may have spilled. • Alert others in the area about the suspicious package or envelope. • Leave the area, close any doors, and take actions to prevent others from entering the area. If possible, shut off the ventilation system. • Wash hands with soap and water to prevent spreading potentially infectious material to face or skin. Seek additional instructions for exposed or potentially exposed persons. • If at work, notify a supervisor, a security officer, or a law enforcement official. If at home, contact the local law enforcement agency. • If possible, create a list of persons who were in the room or area when this suspicious letter or package was recognized and a list of persons who also may have handled this package or letter. Give this list to both the local public health authorities and law enforcement officials IED’s (Improvised Explosive Devices) This is an overview of improvised explosive devices (IEDs). IED is a term for an explosive device that is constructed in an improvised manner designed to kill, maim, or destroy property. These devices are categorized by their container (i.e., vehicle bombs) and by the way they are initiated. IEDs are homemade and usually constructed for a specific target. ! Warning: This basic information should not be used in dealing with or dismantling an IED. Explosive ordnance disposal (EOD) technicians and local bomb squads are trained to accomplish this mission. Descriptions The design and placement of an IED is up to the imagination of the bomber. First and foremost, it is an object, regardless of its disguise, that is not supposed to be there. The best and most effective defense is to be aware of your surroundings. Based on your threat, if you think it does not belong in your area, consider it suspicious. WARNING! If an object is considered suspicious, Do not touch it or move it . Evacuate the area and notify authorities. Any movement, however slight, may cause it to function. External Appearances of an IED IEDs can be contained in almost anything. The item must be carried or driven to where it will placed, so concealment or masking of the device will be necessary. The outer container can be, but not limited to: 53 How to Handle a Crisis Pipe Bombs steel or PCV pipe section with end caps in nearly any configuration are the most prevalent type of containers. Briefcase/Box/Back pack any style, color, or size; even as small as a cigarette pack. Sampling of possible pipe bomb configurations Internally fused pipe bomb Vehicle Bombs By far the most devastating (may contain thousands of pounds of explosives), vehicle bombs can be the easiest to conceal. Indicators may include inappropriate decals or an unfamiliar vehicle parked in your area. The device can be placed anywhere in the vehicle. A vehicle bomb is intended to create mass casualties or cause extensive property damage. Existing Objects Items that seem to have a purpose can be substituted or used as the bomb container. Some examples are fire extinguishers, propane bottles, trashcans, gasoline cans, or books. 54 Terrorism Internal Components All devices require a firing train that consists of a fusing system, detonator, and main charge (explosive or incendiary). Any switch that can turn something on or off can be used to activate a device. Fusing systems can be categorized into the following: • Time preset to detonate or arm the device at an unknown interval of time. The timer may be mechanical such as a kitchen timer, wind-up wristwatch, pocket watch, or electronic, i.e. digital wristwatches, integrated circuit chips, or solid-state timers. • Victim activated may be designed to function by pressure, pull, movement, vibration, tension release, or tilting the item. Boobytrapped is the best way to describe it. • Command sending a signal via radio frequency or through a hidden wire from a remote location, i.e. cell phone, walkie talkie, garage door remote etc. • Environmental designed to function when there is a change in temperature, pressure, light, sound, or magnetic field. • The detonator or blasting cap is a small explosive component, widely available from military and commercial sources, which can be initiated by a variety of mechanical and electrical devices. With the increased availability of blasting caps, fabrication and use of improvised detonators are on the decline. How-ever, the possibility of encountering one cannot be excluded. • Main charges can be used to burn, detonate or both, depending on the bombers desired effect. Explosives fall into three general categories. 55 How to Handle a Crisis Commercial Explosives used for property demolition, mining and blasting operations. • Commercial explosives come in assorted shapes and consistencies including binary (two-part), slurries, gels, and standard dynamites. • Military Explosives differ from commercial explosives in several respects. Military explosives must have high rates of detonation, be relatively insensitive, and be usable underwater. TNT, C–4 plastic explosives, and military dynamite are some of the more common explosives associated with the military. • Improvised Explosives when manufactured explosives are not available, it is relatively easy to obtain all of the ingredients necessary to make improvised explosives, such as ammonium nitrate (fertilizer), and potassium/sodium chlorate. • Incendiary improvised devices may be designed to burn. Included are some common materials used in incendiary devices: gasoline, iodine crystals, magnesium, glycerin, and aluminum powder. • Because of the vast variety of explosives and incendiary materials, any unknown solid, powder, crystal, or liquid should be treated with respect and not handled. Where IEDs Can Be Placed IEDs may be placed anywhere. A bomber wants to succeed without being caught. The level of security and the awareness of personnel will determine where and how an IED will be placed. Common areas where IEDs might be placed include: • Outside areas: trash cans, dumpsters, mailboxes, bushes, storage areas, and parked vehicles. • Inside buildings: mail rooms, restrooms, trash cans, planters, inside desks or storage containers, false ceilings, utility closets, areas hidden by drapes or curtains, behind pictures, boiler rooms, under stairwells, recently repaired or patched segments of walls, floors, or ceilings, or in plain view. What to do In the event that a suspicious device is found, notify the proper authorities in accordance with existing bomb threat procedures. Security personnel should initiate and coordinate the evacuation in accordance with existing procedures, if necessary. Prior to their arrival, immediate actions should be taken. • Using adequate cover (frontal and overhead) get as far away from the device as possible. Do not panic! • Keep away from glass windows that can become lethal fragmentation. 56 Terrorism • If the device is located outside the building, get low to the floor and go to the other side. Do not look out the window to see what is going on! • Increasing your distance from a suspicious device increases the chances of survival after a detonation. Vehicle Bombs By far the most devastating (may contain thousands of pounds of explosives), vehicle bombs can be the easiest to conceal. Indicators may include inappropriate decals or an unfamiliar vehicle parked in your area. The device can be placed anywhere in the vehicle. A vehicle bomb is intended to create mass casualties or cause extensive property damage. Indicative Behaviors of Suicide Bombers There is no commonly accepted or developed profile of a suicide bomber. Studies indicate that the only characteristic accepted by experts is that the overwhelming majority are prepared to die in the service of their cause. Most are 18-23, male, Islamic and single. But: • Can be any race, color, sex • Can be older, married people • Nervousness, nervous glancing or other signs of being ill at ease. This may include sweating, “tunnel vision” (staring forward 57 How to Handle a Crisis inappropriately) and repeated inappropriate prayer (e.g., outside the facility) or muttering. This may also include repeated entrances and exits from the building or facility. • Attempt to “Blend In” to environment. Might seem “Out of Place” Inappropriate, oversized and/or loose-fitting clothes (e.g., a heavy overcoat on a warm day). Clothing gives impression that body is disproportionately larger than head or feet. • The appearance of carrying extra weight. Many bombs are packed with shrapnel such as ball bearings, screws, nails, nuts, bolts and screws that are blasted into the crowd upon detonation. • Profuse sweating that is inconsistent with weather conditions. • Bomber tries to avoid military, law enforcement. • No response to authoritative voice commands or direct salutation from a distance. • Deliberately walking toward a specific object or target, pushing their way through a crowd or going around barriers. • Constantly favoring one side or one area of the body as if wearing something unusual/uncomfortable (e.g., a bomb belt or vest). Pay attention to a person constantly adjusting waistbands or other clothing. • Bombers have been known to repeatedly pat themselves to verify that the bomb vest or belt is still attached. • Suspect may be carrying heavy luggage, bag, or wearing a backpack. • Keeping hands in pockets or cupping hands (as if holding a triggering device). • Newly shaved beards leaving unusual facial tan lines. • Scented anointing oil, which maybe obvious to someone in their vicinity. • Behavior is consistent with no future, e.g. individual purchases a oneway ticket or is unconcerned about receipts for purchases, or receiving change. 58 Post-Disaster Safety Checklist NATURAL DISASTERS ! Disclaimer: this information is advisory in nature and is not intended to identify all scenarios or situations a person might encounter. ! Following these guidelines will not guarantee your safety. Floods When indoors during a flood • Listen to the radio or television for information. • Be aware that flash flooding can occur anywhere. • If there is any possibility of a flash flood where you are, move immediately to higher ground. Do not wait for instructions to move. • Be aware of nearby streams, drainage channels, canyons, and other areas known to flood suddenly. Flash floods can occur in these areas with or without such typical warnings as rain clouds or heavy rain. When evacuating • Secure your home. If you have time, bring in outdoor furniture. Move essential items to an upper floor. • Turn off utilities at the main switches or valves if instructed to do so. Disconnect electrical appliances. Do not touch electrical equipment if you are wet or standing in water. • Do not walk through moving water. Six inches of moving water can make you fall. If you have to walk in water, walk where the water is not moving. Use a stick to check the firmness of the ground in front of you. Driving in flood conditions • Do not drive into flooded areas. • If floodwaters rise around your car, abandon the car and move to higher ground if you can do so safely. You and the vehicle can be quickly swept away. Nearly half of all flash flood deaths are vehiclerelated. • Avoid driving through even low levels of water. Six inches of water will reach the bottom of most passenger cars causing loss of control and possible stalling. A foot of water will float many vehicles. Two feet of rushing water can carry away most vehicles including sport utility vehicles (SUV’s) and pick-ups. • Be especially careful at night when flash floods are harder to recognize. • If your vehicle becomes caught in high water and stalls, leave it immediately and seek higher ground if you can do so safely. Rapidly rising water can sweep a vehicle and its occupants away. 59 How to Handle a Crisis After a flood • Listen for news reports to learn whether the community’s water supply is safe to drink. • Avoid floodwaters; water may be contaminated by oil, gasoline, or raw sewage and may be electrically charged from underground or downed power lines. • Avoid moving water. Be aware of areas where floodwaters have receded. Roads may have weakened and could collapse under the weight of a car. • Stay away from downed power lines, and report them to the power company. • Return home only when authorities indicate it is safe. • Stay out of any building if it is surrounded by floodwaters. Use extreme caution when entering buildings; there may be hidden damage, particularly in foundations. • Service damaged septic tanks, cesspools, pits, and leaching systems as soon as possible. Damaged sewage systems are serious health hazards. • Clean and disinfect everything that got wet. Mud left from floodwater can contain sewage and chemicals. Flood conditions--terms • Flood Watch: Flooding is possible. Tune in to NOAA Weather Radio, commercial radio, or television for information. • Flash Flood Watch: Flash flooding is possible. Be prepared to move to higher ground; listen to NOAA Weather Radio, commercial radio, or television for information. • Flood Warning: Flooding is occurring or will occur soon; if advised to evacuate, do so immediately. • Flash Flood Warning: A flash flood is occurring; seek higher ground on foot immediately. Hurricanes Before a hurricane • Listen to the radio or TV for information. • Secure your home, close storm shutters, and secure outdoor objects or bring them indoors. • Turn off utilities if instructed to do so. Otherwise, turn the refrigerator thermostat to its coldest setting and keep its doors closed. • Turn off propane tanks. • Avoid using the phone, except for serious emergencies. 60 Post-Disaster Safety Checklist • Ensure a supply of water for sanitary purposes such as cleaning and flushing toilets. Fill the bathtub and other large containers with water. Evacuating • You should evacuate under the following conditions: • If you are directed by local authorities to do so. Be sure to follow their instructions. • If you live in a mobile home or temporary structure—such shelters are particularly hazardous during hurricanes no matter how well fastened to the ground. • If you live in a high-rise building—hurricane winds are stronger at higher elevations. • If you live on the coast, on a floodplain, near a river, or on an inland waterway. • If you feel you are in danger. • If you are unable to evacuate, go to your wind-safe room. If you do not have one, follow the guidelines below. During a hurricane • Stay indoors during the hurricane and away from windows and glass doors. • Close all interior doors—secure and brace external doors. • Keep curtains and blinds closed. Do not be fooled if there is a lull; it could be the eye of the storm—winds will pick up again. • Take refuge in a small interior room, closet, or hallway on the lowest level and lie on the floor under a table or another sturdy object. Hurricane terminology • Tropical Depression: An organized system of clouds and thunderstorms with a defined surface circulation and maximum sustained winds of 38 MPH (33 knots) or less. Sustained winds are defined as one-minute average wind measured at about 33 ft. (10 meters) above the surface. • Tropical Storm: An organized system of strong thunderstorms with a defined surface circulation and maximum sustained winds of 39-73 MPH (34-63 knots). • Hurricane: An intense tropical weather system of strong thunderstorms with a well-defined surface circulation and maximum sustained winds of 74 MPH (64 knots) or higher. • Storm Surge: A dome of water pushed onshore by hurricane and tropical storm winds. Storm surges can reach 25 feet high and be 50100 miles wide. • Storm Tide: A combination of storm surge and the normal tide (i.e., a 15-foot storm surge combined with a 2-foot normal high tide over the 61 How to Handle a Crisis mean sea level creates a 17-foot storm tide). Hurricane/Tropical Storm Watch Hurricane/tropical storm conditions are possible in the specified area, usually within 36 hours. Tune in to NOAA Weather Radio, commercial radio, or television for information. • Hurricane/Tropical Storm Warning: Hurricane/tropical storm conditions are expected in the specified area, usually within 24 hours. Short Term Watches and Warnings These warnings provide detailed information about specific hurricane threats, such as flash floods and tornadoes. Saffir-Simpson Hurricane Scale Category Category Description Level of Damage 1 Wind Speed: 74 - 95 MPH Storm Surge: 4 - 5 Feet Above Normal Primary damaged to unanchored mobile homes, shrubbery, and trees. Some coastal road flooding and minor pier damage. Little damage to building structures. 2 Wind Speed: 96 - 110 MPH Storm Surge: 6 - 8 Feet Above Normal Considerable damage to mobile homes, piers, and vegetation. Coastal and lowlying escape routes flood 2 - 4 hours before arrival of hurricane center. Buildings sustain roofing material, door, and window damage. Small craft in unprotected moorings break moorings. 3 Wind Speed: 111 - 130 MPH Mobile homes destroyed. Some structural Storm Surge: 9 - 12 Feet Above damage to small homes and utility Normal buildings. Flooding near coast destroys smaller structures; larger structures damaged by floating debris. Terrain continuously lower than 5 feet. ASL may be flooded up to 6 miles inland. 4 Wind Speed: 131 - 155 MPH Storm Surge: 13 - 18 Feet Above Normal Extensive curtain wall failures with some complete roof structure failure on small residences. Major erosion of beaches. Major damage to lower floors of structures near the shore. Terrain continuously lower than 10 feet. ASL may flood (and require mass evacuations) up to 6 miles inland. 5 Wind Speed: Over 155 MPH Storm Surge: Over 18 Feet Above Normal Complete roof failure on many homes and industrial buildings. Some complete building failures. Major damage to lower floors of all structures located less than 15 feet ASL and within 500 yards of the shoreline. Massive evacuation of low ground residential areas may be required. 62 Post-Disaster Safety Checklist Hurricane Direct Hits by State Thunderstorms and Lightning Before a thunderstorm The following are guidelines for what you should do if a thunderstorm is likely in your area: • Postpone outdoor activities. • Get inside a home, building, or hard top automobile (not a convertible). Although you may be injured if lightning strikes your car, you are much safer inside a vehicle than outside. • Remember, rubber-soled shoes and rubber tires provide NO protection from lightning. However, the steel frame of a hard-topped vehicle provides increased protection if you are not touching metal. • Secure outdoor objects that could blow away or cause damage. • Shutter windows and secure outside doors. If shutters are not available, close window blinds, shades, or curtains. • Avoid showering or bathing. Plumbing and bathroom fixtures can conduct electricity. • Use a corded telephone only for emergencies. Cordless and cellular telephones are safe to use. 63 How to Handle a Crisis • Unplug appliances and other electrical items such as computers and turn off air conditioners. Power surges from lightning can cause serious damage. • Use your battery-operated NOAA Weather Radio for updates from local officials. During a thunderstorm Avoid the following: • Natural lightning rods such as a tall, isolated tree in an open area • Hilltops, open fields, the beach, or a boat on the water • Isolated sheds or other small structures in open areas • Anything metal—tractors, farm equipment, motorcycles, golf carts, golf clubs, and bicycles Thunderstorms and lightning conditions—terms • Severe thunderstorm watch: Tells you when and where severe thunderstorms are likely to occur. Watch the sky and stay tuned to NOAA Weather Radio, commercial radio, or television for information. • Severe thunderstorm warning: Issued when severe weather has been reported by spotters or indicated by radar. Warnings indicate imminent danger to life and property to those in the path of the storm. WARNING! Remember the 30/30 lightning safety rule: Go indoors if, after seeing lightning, you cannot count to 30 before hearing thunder. Stay indoors for 30 minutes after hearing the last clap of thunder. Tornadoes A tornado is a violently rotating column of air extending from a thunderstorm to the ground. Tornadoes may appear nearly transparent until dust and debris are picked up or a cloud forms within the funnel. The average tornado moves from southwest to northeast, but tornadoes have been known to move in any direction. The average forward speed is 30 mph but may vary from nearly stationary to 70 mph. The strongest tornadoes have rotating winds of more than 250 mph. Tornadoes can accompany tropical storms and hurricanes as they move onto land. Waterspouts are tornadoes which form over warm water. They can move onshore and cause damage to coastal areas. Tornadoes can occur at any time of the year. Tornadoes have occurred in every state, but they are most frequent east of the Rocky Mountains during the spring and summer months. In 64 Post-Disaster Safety Checklist the southern states, peak tornado occurrence is March through May, while peak months in the northern states are during the late spring and summer. Tornadoes are most likely to occur between 3 and 9 p.m. but can happen at any time. Before a tornado • Be alert to changing weather conditions. • Listen to NOAA Weather Radio or to commercial radio or television newscasts for the latest information. • Look for approaching storms • Look for the following danger signs: • Dark, often greenish sky • Large hail • A large, dark, low-lying cloud (particularly if rotating) • Loud roar, similar to a freight train. • If you see approaching storms or any of the danger signs, be prepared to take shelter immediately. During a tornado If you are under a tornado warning, seek shelter immediately! Use the following guidelines to determine your safest option: In a permanent building • Go to a pre-designated shelter area such as a safe room, basement, storm cellar, or the lowest building level. • If there is no basement, go to the center of an interior room on the lowest level (closet, interior hallway) away from corners, windows, doors, and outside walls. Put as many walls as possible between you and the outside. • Get under a sturdy table and use your arms to protect your head and neck. • Do not open windows. In a vehicle, trailer, or mobile home • Get out immediately and go to the lowest floor of a sturdy, nearby building or a storm shelter. Mobile homes, even if tied down, offer little protection from tornadoes. • Never try to outrun a tornado in urban or congested areas in a car or truck. Instead, leave the vehicle immediately for safe shelter. Outside with no shelter • Lie flat in a nearby ditch or depression and cover your head with your hands. • Be aware of the potential for flooding. 65 How to Handle a Crisis • Do not get under an overpass or bridge. You are safer in a low, flat location. • Do what you can to avoid flying debris. Flying debris from tornadoes causes most fatalities and injuries. After a Tornado Aiding the Injured • Check for injuries. Do not attempt to move seriously injured persons unless they are in immediate danger of death or further injury. If you must move an unconscious person, first stabilize the neck and back, then call for help immediately. • If the victim is not breathing, carefully position the victim for artificial respiration, clear the airway, and commence mouth-to-mouth resuscitation. • Maintain body temperature with blankets. Be sure the victim does not become overheated. • Never try to feed liquids to an unconscious person. Health • Be aware of exhaustion. Don’t try to do too much at once. Set priorities and pace yourself. Get enough rest. • Drink plenty of clean water. Eat well. Wear sturdy work boots and gloves. • Wash your hands thoroughly with soap and clean water often when working in debris. Safety Issues • Be aware of new safety issues created by the disaster. Watch for washed out roads, contaminated buildings, contaminated water, gas leaks, broken glass, damaged electrical wiring, and slippery floors. • Inform local authorities about health and safety issues, including chemical spills, downed power lines, washed out roads, smoldering insulation, and dead animals. 66 Post-Disaster Safety Checklist Fujita Pearson Tornado Scale Category Category Description Level of Damage F-0 Gale Tornado 40 - 72 MPH Chimneys damaged; branches broken off trees; shallow-rooted trees uprooted; sign boards damaged. F-1 Moderate Tornado 73 - 112 MPH Roof surfaces peeled off; mobile homes pushed off foundations or overturned; moving autos pushed off roads. F-2 Significant Roofs torn off frame houses; mobile Tornado homes demolished; box cars pushed 113 - 157 MPH over; large trees snapped or uprooted; light-object projectiles generated. F-3 Severe Roofs and some walls torn off wellTornado constructed houses; trains overturned; 158 - 206 MPH most trees in forest uprooted; heavy cars lifted off the ground and thrown. F-4 Devastating Well-constructed houses leveled; Tornado structures with weak foundations 207 - 260 MPH relocated; cars thrown and large projectiles generated. F-5 Incredible Strong frame houses lifted off Tornado foundations and carried considerable 261 - 318 MPH distance to disintegrate; automobilesized projectiles hurtle through the air in excess of 100 yards; trees debarked; other incredible phenomena expected. Winter Storms and Extreme Cold Dressing for the winter weather • Wear several layers of loose fitting, lightweight, warm clothing rather than one layer of heavy clothing. • The outer garments should be tightly woven and water repellent. Wear mittens, which are warmer than gloves. • Wear a hat. • Cover your mouth with a scarf to protect your lungs. 67 How to Handle a Crisis During a winter storm • The following are guidelines for what you should do during a winter storm or under conditions of extreme cold: • Listen to your radio, television, or NOAA Weather Radio for weather reports and emergency information. • Eat regularly and drink ample fluids, but avoid caffeine and alcohol. • Avoid overexertion when shoveling snow. Overexertion can bring on a heart attack —a major cause of death in the winter. If you must shovel snow, stretch before going outside. • When exposed to frigid temperatures and/or stormy conditions: • Watch for signs of frostbite. These include loss of feeling and white or pale appearance in extremities such as fingers, toes, ear lobes, and the tip of the nose. If symptoms are detected, get medical help immediately. • Watch for signs of hypothermia. These include uncontrollable shivering, memory loss, disorientation, incoherence, slurred speech, drowsiness, and apparent exhaustion. • If symptoms of hypothermia are detected, get the victim to a warm location, remove wet clothing, warm the center of the body first, and give warm, non-alcoholic beverages if the victim is conscious. Get medical help as soon as possible. • Conserve fuel, if necessary, by keeping your residence cooler than normal. Temporarily close off heat to some rooms. • Maintain ventilation when using kerosene heaters to avoid build-up of toxic fumes. Refuel kerosene heaters outside and keep them at least three feet from flammable objects. Winter weather conditions--terms • Freezing Rain: Rain that freezes when it hits the ground, creating a coating of ice on roads, walkways, trees, and power lines. • Sleet: Rain that turns to ice pellets before reaching the ground. Sleet also causes moisture on roads to freeze and become slippery. • Winter Storm Watch: A winter storm is possible in your area. Tune in to NOAA Weather Radio, commercial radio, or television for more information. • Winter Storm Warning: A winter storm is occurring or will soon occur in your area. • Blizzard Warning: Sustained winds or frequent gusts to 35 miles per hour or greater and considerable amounts of falling or blowing snow (reducing visibility to less than a quarter mile) are expected to prevail for a period of three hours or longer. • Frost/Freeze Warning: Below freezing temperatures are expected. 68 Post-Disaster Safety Checklist Wind Chill Table Extreme Heat During a heat emergency • Stay indoors as much as possible and limit exposure to the sun. • Stay on the lowest floor out of the sunshine if air conditioning is not available. • Consider spending the warmest part of the day in public buildings such as libraries, schools, movie theaters, shopping malls, and other community facilities. Circulating air can cool the body by increasing the perspiration rate of evaporation. • Eat well-balanced, light, and regular meals. Avoid using salt tablets unless directed to do so by a physician. • Drink plenty of water. Persons who have epilepsy or heart, kidney, or liver disease; are on fluid-restricted diets; or have a problem with fluid retention should consult a doctor before increasing liquid intake. • Limit intake of alcoholic beverages. • Dress in loose-fitting, lightweight clothes. When outdoors in the sun wear light-colored clothes that cover as much skin as possible. • Protect face and head by wearing a wide-brimmed hat. • Check on family, friends, and neighbors who do not have air conditioning and who spend much of their time alone. • Never leave children or pets alone in closed vehicles. 69 How to Handle a Crisis • Avoid strenuous work during the warmest part of the day. Use a buddy system when working in extreme heat, • and take frequent breaks. Heat Index Chart Extreme heat terminology: • Heat wave: Prolonged period of excessive heat often combined with excessive humidity. • Heat index: A number in degrees Fahrenheit (F) that tells how hot it feels when relative humidity is added to the air temperature. Exposure to full sunshine can increase the heat index by 15 degrees. • Heat cramps: Muscular pains and spasms due to heavy exertion. Although heat cramps are the least severe, they are often the first signal that the body is having trouble with the heat. • Heat exhaustion: Typically occurs when people exercise heavily or work in a hot, humid place where body fluids are lost through heavy sweating. Blood flow to the skin increases, causing blood flow to decrease to the vital organs. This results in a form of mild shock. If not treated, the victim’s condition will worsen. Body temperature will keep rising and the victim may suffer heat stroke. • Heat stroke: A life-threatening condition. The victim’s temperature control system, which produces sweating to cool the body, stops working. The body temperature can rise so high that brain damage and death may result if the body is not cooled quickly. • Sun stroke: Another term for heat stroke. 70 Post-Disaster Safety Checklist Earthquakes During an Earthquake When indoors • Minimize your movements to a few steps to a nearby safe place. • Stay indoors until shaking has stopped and you’re sure exiting is safe. • Take cover under a sturdy desk, table, or bench, or against an inside wall, and hold on. • If there isn’t a table or desk near you, cover your face and head with your arms and crouch in an inside corner of the building. • Stay away from glass, windows, outside doors and walls, and anything that could fall, such as lighting fixtures or furniture. • If you are in bed when the earthquake strikes, stay there. Protect your head with a pillow unless you are under or beside heavy items that could fall. In that case, move to the nearest safe place. • Use a doorway for shelter only if it is in close proximity to you and if you know it is a strongly supported, load-bearing doorway. • Stay inside until the shaking stops and it is safe to go outside. Most injuries during earthquakes occur when people are hit by falling objects when entering into or exiting from buildings. • Be aware that the electricity may go out or the sprinkler systems or fire alarms may turn on. • Do not use the elevators. When outside • Minimize your movements to a few steps to get you to a nearby safe place or away from potentially dangerous structures. • Move away from buildings, streetlights, and utility wires. In a moving vehicle • Stop as quickly as safety permits and stay in the vehicle. Avoid stopping near/under buildings, trees, overpasses, and utility wires. • Proceed cautiously once the earthquake has stopped, watching for road and bridge damage. After an Earthquake • Be prepared for aftershocks. These secondary shockwaves are usually less violent than the main quake but can be strong enough to do additional damage to weakened structures. • Open cabinets cautiously. Objects may fall off shelves. • Stay away from damaged areas unless your assistance has been specifically requested by police, fire, or relief organizations. 71 How to Handle a Crisis • Be aware of possible tsunamis if you live in coastal areas. These are also known as seismic sea waves (mistakenly called “tidal waves”). When local authorities issue a tsunami warning, assume If trapped under debris • Do not light a match. • Do not move about or kick up dust. • Cover your mouth with a handkerchief or clothing. • Tap on a pipe or wall so rescuers can locate you. Use a whistle if one is available. Shout only as a last resort— shouting can cause you to inhale dangerous amounts of dust. Earthquake Hazards by State Earthquake terminology • Earthquake: A sudden slipping or movement of a portion of the earth’s crust accompanied and followed by a series of vibrations. • Aftershock: An earthquake of similar or lesser intensity that follows the main earthquake. • Fault: The fracture across which displacement has occurred during an earthquake. The slippage may range from less than an inch to more than 10 yards in a severe earthquake. • Epicenter: The place on the earth’s surface directly above the point on the fault where the earthquake rupture began. Once fault slippage begins, it expands along the fault during the earthquake and can extend hundreds of miles before stopping. 72 Post-Disaster Safety Checklist • Seismic waves: Vibrations that travel outward from the earthquake fault at speeds of several miles per second. Fault slippage directly under a structure can cause considerable damage, the vibrations of seismic waves cause most of the destruction during earthquakes. • Magnitude: The amount of energy released during an earthquake, which is computed from the amplitude of the seismic waves. A magnitude of 7.0 on the Richter Scale indicates an extremely strong earthquake. Each whole number on the scale represents an increase of about 30 times more energy released than the previous whole number represents. Therefore, an earthquake measuring 6.0 is about 30 times more powerful than one measuring 5.0. The Modified Mercalli Scale Scale Range Level of Damage Richter Scale 1-4 Instrumental to Moderate No damage. </= 4.3 5 Rather Strong Damage negligible. Small, unstable objects displaced or upset; some dishes and glassware broken. 4.4 - 4.8 6 Strong Damage slight. Windows, dishes, glassware broken. Furniture moved or overturned. Weak plaster and masonry cracked. 4.9 - 5.4 7 Very Strong Damage slight-moderate in well-built structures; considerable in poorly-built structures. Furniture and weak chimneys broken. Masonry damaged. Loose bricks, tiles, plaster, and stones will fall. 5.5 - 6.1 8 Destructive Structure damage considerable, particularly to poorly built structures. Chimneys, monuments, towers, elevated tanks may fail. Frame houses moved. Trees damaged. Cracks in wet ground and steep slopes. 6.2 - 6.5 9 Ruinous Structural damage severe; some will collapse. General damage to foundations. Serious damage to reservoirs. Underground pipes broken. Conspicuous cracks in ground; liquefaction. 6.6 - 6.9 10 Disastrous Most masonry and frame structures/foundations destroyed. Some well-built wooden structures and bridges destroyed. Serious damage to dams, dikes, embankments. Sand and mud shifting on beaches and flat land. 7.0 - 7.3 11 Very Disastrous Few or no masonry structures remain standing. Bridges 7.4 - 8.1 destroyed. Broad fissures in ground. Underground pipelines completely out of service. Rails bent. Widespread earth slumps and landslides. 12 Catastrophic Damage nearly total. Large rock masses displaced. Lines of sight and level distorted. > 8.1 73 How to Handle a Crisis Volcanoes During a volcanic eruption Evacuate immediately from the volcano area to avoid flying debris, hot gases, lateral blast, heavy falling ash, and lava flow. Gases Most gases from a volcano quickly blow away. However, heavy gases such as carbon dioxide and hydrogen sulfide can collect in lowlying areas. The most common volcanic gas is water vapor, followed by carbon dioxide and sulfur dioxide. Sulfur dioxide can cause breathing problems in both healthy people and people with asthma and other respiratory problems. Other volcanic gases include hydrogen chloride, carbon monoxide, and hydrogen fluoride. Amounts of these gases vary widely from one volcanic eruption to the next. Although gases usually blow away rapidly, it is possible that people who are close to the volcano or who are in the low-lying areas downwind will be exposed to levels that may affect health. At low levels, gases can irritate the eyes, nose, and throat. At higher levels, gases can cause rapid breathing, headache, dizziness, swelling and spasm of the throat, and suffocation. Falling Ash • Wear long-sleeved shirts and long pants. • Use goggles and wear eyeglasses instead of contact lenses. • Use a dust mask or hold a damp cloth over your face to aid breathing. • Stay away from areas downwind from the volcano to avoid volcanic ash. • Stay indoors until the ash has settled unless there is danger of the roof collapsing. • Close doors, windows, and all ventilation in the house (chimney vents, furnaces, air conditioners, fans, and other vents). • Clear heavy ash from flat or low-pitched roofs and rain gutters. • Avoid running car or truck engines. Driving can stir up volcanic ash that can clog engines, damage moving parts, and stall vehicles. • Avoid driving in heavy ash fall unless absolutely required. If you have to drive, keep speed down to 35 MPH or slower. 74 Post-Disaster Safety Checklist The Volcanic Explosivity Index Category Category Description 0 Non-Explosive (Hawaiian) Plume: < 100 m/Volume: > 1000 m3 1 Gentle (Hawaiian - Strombolian) Plume: 100 - 1000 m/Volume: >10,000 m3 2 Explosive (Strombolian - Vulcanian) Plume: 1 - 5 km/Volume: > 1,000,000 m3 3 Severe (Vulcanian) Plume: 3 - 15 km/Volume: > 10,000,000 m3 4 Cataclysmic (Vulcanian - Plinian) Plume: 10 - 25 km/Volume: > 100,000,000 m3 5 Paroxysmal (Plinian) Plume: >25 km/Volume: > 1 km3 6 Colossal (Plinian - Ultraplinian) Plume: > 25 km/Volume: > 10 km3 7 No Adjectival Description Plume: > 25 km/Volume: > 100 km3 8 No Adjectival Description Plume: > 25 km/Volume: > 1,000 km3 Tsunamis During a tsunami • Turn on your radio to learn if there is a tsunami warning if an earthquake occurs and you are in a coastal area. • Move inland to higher ground immediately and stay there. WARNING! If there is noticeable recession in water way from the shoreline this is nature’s tsunami warning and it should be heeded. You should move away immediately! After a tsunami • Stay away from flooded and damaged areas until officials say it is safe to return. • Stay away from debris in the water; it may pose a safety hazard to boats and people. 75 How to Handle a Crisis Tsunami terminology • Tsunami advisory: An earthquake has occurred in the Pacific basin, which might generate a tsunami. • Tsunami watch: A tsunami was or may have been generated, but is at least two hours travel time to the area in Watch status. • Tsunami warning: A tsunami was, or may have been generated, which could cause damage; therefore, people in the warned area are strongly advised to evacuate. Landslides During a landslide or debris flow • Stay alert and awake. Many debris-flow fatalities occur when people are sleeping. Listen to a NOAA Weather Radio or portable, batterypowered radio or television for warnings of intense rainfall. Be aware that intense, short bursts of rain may be particularly dangerous, especially after longer periods of heavy rainfall and damp weather. • If you are in areas susceptible to landslides and debris flows, consider leaving if it is safe to do so. Remember that driving during an intense storm can be hazardous. If you remain at home, move to a second story if possible. Staying out of the path of a landslide or debris flow saves lives. • Listen for any unusual sounds that might indicate moving debris, such as trees cracking or boulders knocking together. A trickle of flowing or falling mud or debris may precede larger landslides. Moving debris can flow quickly and sometimes without warning. • If you are near a stream or channel, be alert for any sudden increase or decrease in water flow and for a change from clear to muddy water. Such changes may indicate landslide activity upstream, so be prepared to move quickly. Don't delay! Save yourself, not your belongings. • Be alert when driving. Embankments along roadsides are particularly susceptible to landslides. Watch the road for collapsed pavement, mud, fallen rocks, and other indications of possible debris flows. What to do if you suspect imminent landslide danger • Contact your local fire, police, or public works department. Local officials are the best persons able to assess potential danger. • Inform affected neighbors. Your neighbors may not be aware of potential hazards. Advising them of a potential threat may help save lives. Help neighbors who may need assistance to evacuate. • Evacuate. Getting out of the path of a landslide or debris flow is your best protection. • Curl into a tight ball and protect your head if escape is not possible. 76 Post-Disaster Safety Checklist After a landslide or debris flow • Stay away from the slide area. There may be danger of additional slides. • Check for injured and trapped persons near the slide, without entering the direct slide area. Direct rescuers to their locations. • Watch for associated dangers such as broken electrical, water, gas, and sewage lines and damaged roadways and railways. Wildfires During a wildfire • If a wildfire threatens your home and time permits, take the following precautions: • Shut off gas at the meter. Only a qualified professional can safely turn the gas back on. • Seal attic and ground vents with pre-cut plywood or commercial seals. • Turn off propane tanks. • Place combustible patio furniture inside. • Connect garden hose to outside taps. Place lawn sprinklers on the roof and near above-ground fuel tanks. Wet the roof. • Wet or remove shrubs within 15 feet of your residence. • Gather fire tools such as a rake, axe, handsaw or chainsaw, bucket, and shovel. • Back your car into the garage or park it in an open space facing the direction of escape. Shut doors and roll up windows. Leave the key in the ignition and the car doors unlocked. Close garage windows and doors, but leave them unlocked. Disconnect automatic garage door openers. • Open fireplace damper. Close fireplace screens. • Close windows, vents, doors, blinds or noncombustible window coverings, and heavy drapes. Remove flammable drapes and curtains. • Move flammable furniture into the center of the residence away from windows and sliding-glass doors. • Close all interior doors and windows to prevent drafts. • Place valuables that will not be damaged by water in a pool or pond. • If advised to evacuate, do so immediately. Choose a route away from the fire hazard. Watch for changes in the speed and direction of the fire and smoke. 77 How to Handle a Crisis POST-DISASTER SAFETY CHECKLIST ! Disclaimer: this information is advisory in nature and is not intended to identify all scenarios or situations a person might encounter. ! Following these guidelines will not guarantee your safety. Uncertainty about what and what not to do immediately following a disaster can intensify an already critical situation. Different types of disasters may call for different precautions before and during an emergency. Whether natural or man-made, the first priority following a disaster is the personal safety of everyone involved. Post-disaster measures can be taken to increase the safety of individuals affected by a disaster as well as those in positions to offer help. The following information is intended as a guide to protect individuals and their families in the immediate aftermath of disaster. Local officials and emergency relief workers will arrive on the scene after a disaster, but depending on the damages, they may not be able to get to everyone quickly. Taking the precautions discussed below could prevent additional injury and damage, protect individuals and families, and make the home safe until help arrives. Personal Cautionary Measures • Check yourself for injuries immediately following a disaster. You will be better able to care for others if you are uninjured or have taken care of your own first-aid needs. • Do not venture out until an “all-clear” is broadcast. • Avoid drinking tap water and/or well water until local emergency management officials declare that the water is safe to drink. • Avoid contaminated foods. • Avoid touching fallen or low-hanging wires or trees and objects in contact with or near power lines. • Avoid using elevators until advised by local emergency management officials that the elevators are safe. • Beware of roads, bridges, and porches that may have weakened and are at risk of collapsing, do not drive in water more than six inches deep. • Turn off all utilities to prevent further damage and minimize future hazards. • If you are away from home when disaster strikes, do not return home until local officials say that it is safe to return to your dwelling. • Open closet doors and cabinet doors with caution. Contents inside may have shifted and could fall causing further damage or injury. • Use the telephone only to report life-threatening situations, and to manage and execute your responsibilities in the disaster. 78 Post-Disaster Safety Checklist • Check out damages in your home using a flashlight. Do not use lights, matches, or candles, and do not turn on electrical switches. • Walk carefully around the outside and check for loose power lines, gas leaks, and structural damage. If you have any doubts about safety, have your residence inspected by a qualified building inspector or structural engineer before entering. Before You Enter Your Home Do not enter if: • You smell gas. • Floodwaters remain around the building. • Your home was damaged by fire and the authorities have not declared it safe. Going Inside Your Home Entering: Enter the home carefully and check for damage as you go. As you walk around, be aware of loose boards and slippery floors. Natural Gas: • If you smell gas or hear a hissing or blowing sound, open a window and leave immediately. • Turn off the main gas valve from the outside, if you can. Call the gas company from a neighbor’s residence. • If you shut off the gas supply at the main valve, you will need a professional to turn it back on. • Do not smoke or use oil, gas lanterns, candles, or torches for lighting inside a damaged home until you are sure there is no leaking gas or other flammable materials present. Electrical: • Look out for sparks and broken or frayed wires. • Check the electrical system unless you are wet, standing in water, or unsure of your safety. • If possible, turn off the electricity at the main fuse box or circuit breaker. • If the situation is unsafe, leave the building and call for help. • Do not turn on the lights until you are sure they’re safe to use. • You may want to have an electrician inspect your wiring. 79 How to Handle a Crisis Appliances: • If appliances are wet, turn off the electricity at the main fuse box or circuit breaker. Then, unplug appliances and let them dry out. • Have appliances checked by a professional before using them again. Structural integrity: • Check for roof, foundation, and chimney cracks. • If your basement has flooded, pump it out gradually (about one third of the water per day) to avoid damage. The walls may collapse and the floor may buckle if the basement is pumped out while the surrounding ground is still waterlogged. • If it looks like the building may collapse, leave immediately. Water and sewage systems: • If pipes are damaged, turn off the main water valve. • Check with local authorities before using any water; the water could be contaminated. • Pump out wells and have the water tested by authorities before drinking. • Do not flush toilets until you know that sewage lines are intact. Food and other supplies: Throw out all food and other supplies that you suspect may have become contaminated or come in to contact with floodwater or contaminants. Cleaning up: • Clean up household chemical spills. • Disinfect items that may have been contaminated by raw sewage, bacteria, or chemicals. • Call your insurance agent. • Take pictures of damages. • Keep good records of repair and cleaning costs. Finding Family During a Disaster The American Red Cross maintains a database to help you find family. Contact the local American Red Cross chapter where you are staying for information. Do not contact the chapter in the disaster area. 80 Post-Disaster Safety Checklist Carbon Monoxide Poisoning How to recognize CO poisoning Exposure to CO can cause loss of consciousness and death. The most common symptoms of CO poisoning are headache, dizziness, weakness, nausea, vomiting, chest pain, and confusion. People who are sleeping or who have been drinking alcohol can die from CO poisoning before ever having symptoms. Important CO Poisoning Prevention Tips • Generators, grills, camp stoves, or other gasoline, propane, natural gas, or charcoal-burning devices should never be used inside a home, basement, garage, or camper—or even outside near an open window. • Every home should have at least one working carbon monoxide detector. The detector’s batteries should be checked twice annually, at the same time smoke detector batteries are checked. • Carbon monoxide (CO) is an odorless, colorless gas that can cause sudden illness and death if inhaled. • When power outages occur during emergencies such as hurricanes or winter storms, the use of alternative sources of fuel or electricity for heating, cooling, or cooking can cause CO to build up in a home, garage, or camper and to poison the people and animals inside. • Never use a gas range or oven to heat a home. • Never use a charcoal grill, hibachi, lantern, or portable camping stove inside a home, tent, or camper. • Never run a generator, pressure washer, or any gasoline-powered engine inside a basement, garage, or other enclosed structure, even if the doors or windows are open, unless the equipment is professionally installed and vented. Keep vents and flues free of debris, especially if winds are high. Flying debris can block ventilation lines. • Never run a motor vehicle, generator, pressure washer, or any gasoline-powered engine outside an open window, door, or vent where exhaust can vent into an enclosed area. • Never leave the motor running in a vehicle parked in an enclosed or partially enclosed space, such as a garage. • If conditions are too hot or too cold, seek shelter with friends or at a community shelter. • If CO poisoning is suspected, consult a health care professional right away. 81 How to Handle a Crisis Utility Shut-off and Safety ! Disclaimer: this information is advisory in nature and is not intended to identify all scenarios or situations a person might encounter. ! Following these guidelines will not guarantee your safety. In the event of a disaster, you may be instructed to shut off the utility service at your home. Below is some general guidance for shutting off utility service. You should modify the information provided to reflect your shut off requirements as directed by your utility company. Natural Gas Natural gas leaks and explosions are responsible for a significant number of fires following disasters. It is vital that all household members know how to shut off natural gas. Because there are different gas shut-off procedures for different gas meter configurations, it is important to contact your local gas company for guidance on preparation and response regarding gas appliances and gas service to your home. When you learn the proper shut-off procedure for your meter, share the information with everyone in your household. Be sure not to actually turn off the gas when practicing the proper gas shut-off procedure. If you smell gas or hear a blowing or hissing noise, open a window and get everyone out quickly. Turn off the gas, using the outside main valve if you can, and call the gas company from a neighbor’s home. 82 Food and Water Safety FOOD AND WATER SAFETY ! Disclaimer: this information is advisory in nature and is not intended to identify all scenarios or situations a person might encounter. ! Following these guidelines will not guarantee your safety. Emergency Food Supplies Even though it is unlikely that an emergency would cut off your food supply for two weeks, consider maintaining a supply that will last that long. You may not need to go out and buy foods to prepare an emergency food supply. You can use the canned goods, dry mixes, and other staples on your cupboard shelves. Be sure to check expiration dates and follow the practice of first-in, first-out. Preparing an Emergency Food Supply As you stock food, take into account your families unique needs and tastes. Familiar foods are important. They lift morale and give a feeling of security in times of stress. Try to include foods that they will enjoy and that are also high in calories and nutrition. Foods that require no refrigeration, water, special preparation, or cooking are best. Individuals with special diets and allergies will need particular attention, as will babies, toddlers, and the elderly. Nursing mothers may need liquid formula, in case they are unable to nurse. Canned dietetic foods, juices, and soups may be helpful for ill or elderly people. Don’t forget nonperishable foods for your pets. Make sure you have a manual can opener and disposable utensils. Storage Tips • Keep food in a dry, cool spot—a dark area if possible. • Open food boxes and other re-sealable containers carefully so that you can close them tightly after each use. • Wrap perishable foods, such as cookies and crackers, in plastic bags and keep them in sealed containers. • Empty open packages of sugar, dried fruits, and nuts into screw-top jars or air-tight canisters for protection from pests. • Inspect all food for signs of spoilage before use. • Throw out canned goods that become swollen, dented, or corroded. • Use foods before they go bad, and replace them with fresh supplies, dated with ink or marker. Place new items at the back of the storage area and older ones in front. 83 How to Handle a Crisis Shelf-Life of Foods for Storage The following provides some general guidelines for replacement of common emergency foods. Use within six months: • Powdered milk - boxed • Dried fruit • Dry, crisp crackers • Potatoes Use within one year, or before the date indicated on the label: • Canned condensed meat and vegetable soups • Canned fruits, fruit juices, and vegetables • Ready-to-eat cereals and uncooked instant cereals • Peanut butter • Jelly • Hard candy and canned nuts • Vitamins May be stored indefinitely (in proper containers and conditions): • Wheat • Vegetable oils • Dried corn • Baking powder • Soybeans • Instant coffee, tea, and cocoa • Salt • Noncarbonated soft drinks • White rice • Bouillon products • Dry pasta • Powdered milk – in nitrogen-packed cans How to Cook Without Power If the electricity goes off 1. 2. 84 First, use perishable food from the refrigerator, pantry, garden, etc. Then use the foods from the freezer. To limit the number of times you open the freezer door, post a list of freezer contents on it. In a well-filled, well-insulated freezer, foods will usually still have ice crystals in their centers (meaning foods are safe to eat) Food and Water Safety for at least two days. Check to make sure the seal on your freezer door is still in good condition. 3. Finally, begin to use non-perishable foods and staples. For emergency cooking indoors, you can use a fireplace. A charcoal grill or camp stove can be used outdoors. You can keep cooked food hot by using candle warmers, chafing dishes, and fondue pots. Use only approved devices for warming food. Canned food can be eaten right out of the can. If you heat it in the can, be sure to open the can and remove the label before heating. Always make sure to extinguish open flames before leaving the room. When food supplies are low If activity is reduced, healthy people can survive on half their usual food intake for an extended period and without any food for many days. Food, unlike water, may be rationed safely, except for children and pregnant women. If your water supply is limited, don’t eat salty foods, since they will make you thirsty. Instead, eat salt-free crackers, whole grain cereals, and canned foods with high liquid content. Nutrition tips During and after a disaster, it is vital that you maintain your strength. Remember the following: ω Eat at least one well-balanced meal each day. ω Drink enough liquid to enable your body to function properly (two quarts or a half gallon per day). ω Take in enough calories to enable you to do any necessary work. ω Include vitamin, mineral, and protein supplements in your stockpile to ensure adequate nutrition. Severe Weather Events and Food Safety Severe weather events can mean power outages, floods, and other problems that can affect the safety of food. Knowing what to do before and after a weather event can help you reduce your risk of illness. By following these guidelines, you can also minimize the amount of food that may be lost due to spoilage. Especially in storm-prone areas, power outages can be a common problem. Power outages can occur at any time of the year and it may take from a few hours to several days for electricity to be restored to residential areas. Without electricity or a cold source, food stored in refrigerators and freezers can become unsafe. Bacteria in food grow rapidly at temperatures between 40 and 140 °F, and if these foods are consumed, people can become very sick. 85 How to Handle a Crisis Steps To Follow To Prepare For a Possible Weather Emergency • Keep an appliance thermometer in the refrigerator and freezer. An appliance thermometer indicates the temperature in the refrigerator and freezer. In the case of a power outage, it can help determine the safety of the food. • Make sure the freezer is at 0 °F or below and the refrigerator is at 40 ºF or below. • Freeze containers of water ahead of time for ice to help keep food cold in the freezer, refrigerator, or coolers after the power is out. Freeze gel packs for use in coolers. • Freeze refrigerated items such as leftovers, milk and fresh meat and poultry that you may not need immediately — this helps keep them at a safe temperature longer. • Plan ahead and know where dry ice and block ice can be purchased. • Have coolers on hand to keep refrigerated food cold if the power will be out for more than 4 hours. • Group food together in the freezer — this helps the food stay cold longer. • Store food on shelves that will be safely out of the way of contaminated water in case of flooding. Steps To Follow After the Weather Emergency • Keep the refrigerator and freezer doors closed as much as possible to maintain the cold temperature. • The refrigerator will keep food safe for about 4 hours if it is unopened. A full freezer will hold the temperature for approximately 48 hours (24 hours if it is half full) and the door remains closed. • Discard refrigerated perishable food such as meat, poultry, fish, soft cheeses, milk, eggs, leftovers, and deli items after 4 hours without power. • Food may be safely refrozen if it still contains ice crystals or is at 40 °F or below when checked with a food thermometer. • Never taste a food to determine its safety! • Obtain dry or block ice to keep your refrigerator and freezer as cold as possible if the power is going to be out for a prolonged period of time. Fifty pounds of dry ice should hold an 18-cubic foot full freezer for 2 days. • If the power has been out for several days, check the temperature of the freezer with an appliance thermometer. If the appliance thermometer reads 40 °F or below, the food is safe to refreeze. 86 Food and Water Safety • If a thermometer has not been kept in the freezer, check each package of food to determine its safety. If the food still contains ice crystals, the food is safe. During Snow and Ice Storms • During a snowstorm, do not place perishable food out in the snow. Outside temperatures can vary and food can be exposed to unsanitary conditions and animals. Instead, make ice. Fill buckets, empty milk containers, or cans with water and leave them outside to freeze. Use this ice to help keep food cold in the freezer, refrigerator, or coolers. If Flooding Occurs • Drink only bottled water that has not come in contact with flood water. Discard any bottled water that may have come in contact with flood water. • Discard any food that is not in a waterproof container if there is any chance it may have come in contact with flood water. Food containers that are not waterproof include those with screw caps, snap lids, pull tops, and crimped caps. • Discard wooden cutting boards, plastic utensils, baby bottle nipples, and pacifiers that may have come in contact with flood water. • Undamaged, commercially prepared foods in all metal cans and retort pouches (for example, flexible, shelf-stable juice or seafood pouches) can be saved. (See below) • Thoroughly wash all metal pans, ceramic dishes, and utensils that came in contact with flood water with hot soapy water. Sanitize by boiling them in clean water or by immersing them for 15 minutes in a solution of 1 tablespoon unscented, liquid chlorine bleach per gallon of drinking water. • When in doubt, throw it out! Steps to Salvage All-Metal Cans and Retort Pouches Undamaged, commercially prepared foods in all-metal cans and retort pouches (for example, flexible, shelf-stable juice or seafood pouches) can be saved if you do the following: • Remove the labels, if they are the removable kind, since they can harbor dirt and bacteria. • Thoroughly wash the cans or retort pouches with soap and water, using hot water if it is available. • Brush or wipe away any dirt or silt. • Rinse the cans or retort pouches with water that is safe for drinking, if available, since dirt or residual soap will reduce the effectiveness of chlorine sanitation. • Then, sanitize them by immersion in one of the two following ways: 87 How to Handle a Crisis • Place in water and allow the water to come to a boil and continue boiling for 2 minutes, or • Place in a freshly made solution consisting of 1 tablespoon of unscented, liquid chlorine bleach per gallon of drinking water (or the cleanest, clearest water available) for 15 minutes. • Air-dry cans or retort pouches for a minimum of 1 hour before opening or storing. • If the labels were removable, then re-label your cans or retort pouches, including the expiration date (if available), with a marker. • Food in reconditioned cans or retort pouches should be used as soon as possible, thereafter. • Any concentrated baby formula in reconditioned, all-metal containers must be diluted with clean, drinking water. Food & Water Safety Resource www.Maydayindustries.com 714 -893-5410 Supplier of emergency kits for homes, cars and business, drinking water and food bars with a 5 year shelf life. Lights, first aid kits, emergency tools, communication and shelter products. Treatment of Drinking Water ! Disclaimer: this information is advisory in nature and is not intended to identify all scenarios or situations a person might encounter. ! Following these guidelines will not guarantee your safety. Emergency Water Supplies Having an ample supply of clean water is a top priority in an emergency. A normally active person needs to drink at least two quarts (half gallon) of water each day. People in hot environments, children, nursing mothers, and ill people will require even more. You will also need water for food preparation and hygiene. Store at least one gallon per person, per day. Consider storing at least a two-week supply of water for each member of your family. If you are unable to store this quantity, store as much as you can. If supplies run low, never ration water. Drink the amount you need today, and try to find more for tomorrow. You can minimize the amount of water your body needs by reducing activity and staying cool. Prepare and store an emergency supply of water To prepare the safest and most reliable emergency supply of water, it is recommended that you purchase commercially bottled water. Keep bottled water in its original container, and do not open it until you need to use it. Store bottled water in the original sealed container, and observe the expiration or “use by” date. Mayday Industries (maydayindustries.com) 88 Food and Water Safety offers drinking water in sealed foil pouches that have a shelf life of 5 years. They also offer numerous water storage containers up to 55gallon drums with a chemical additive that makes the water safe for 5 years. You can go days or weeks without adequate food, but you need a clean supply of drinking water immediately. Many disasters like earthquakes and power outages will stop the flow of water. A backup supply of drinking water should be a TOP priority Hidden water sources in your home Safe water sources in your home include the water in your hot- water tank, pipes, and ice cubes. You should not use water from toilet flush tanks or bowls, radiators, waterbeds, or swimming pools/spas. You will need to protect the water sources already in your home from contamination if you hear reports of broken water or sewage lines, or if local officials advise you of a problem. To shut off incoming water, locate the main valve and turn it to the closed position. Be sure you and other family members know beforehand how to perform this important procedure. To use the water in your pipes, let air into the plumbing by turning on the faucet in your home at the highest level. A small amount of water will trickle out. Then obtain water from the lowest faucet in the home. To use the water in your hot-water tank, be sure the electricity or gas is off, and open the drain at the bottom of the tank. Mayday Industries (maydayindustries.com) has a water filter ( pt.# WA22-WH) designed to fit a water heater and filter the water as you use it. Start the water flowing by turning off the water intake valve at the tank and turning on a hotwater faucet. Refill the tank before turning the gas or electricity back on. If the gas is turned off, a professional will be needed to turn it back on. Emergency outdoor water sources If you need to find water outside your home, you can use these sources. Be sure to treat the water according to the instructions on the next page before drinking it. • Rainwater • Streams, rivers, and other moving bodies of water • Ponds and lakes • Natural springs • Avoid water with floating material, an odor, or dark color. Use saltwater only if distilled first. You should not drink flood water. Ways to Treat Water The instructions below are for treating water of uncertain quality in rare emergency situations in the absence of instructions from local authorities when no other reliable clean water source is available and you 89 How to Handle a Crisis have used all of your stored water. If you store enough water in advance, you will not need to treat water using these or other methods. In addition to having a bad odor and taste, contaminated water can contain microorganisms (germs, bacteria, and viruses) that cause diseases such as dysentery, typhoid, and hepatitis. You should treat all water of uncertain quality before using it for drinking, food preparation, or hygiene. There are many ways to treat water, though none are perfect. Often the best solution is a combination of methods. Boiling or chlorination will kill most microorganisms but will not remove other contaminants such as heavy metals, salts, and most other chemicals. Before treating, let any suspended particles settle to the bottom, or strain them through layers of paper towel, clean cloth, or coffee filter. Boiling Boiling is the safest method of treating water. In a large pot or kettle, bring water to a rolling boil for 1 full minute, keeping in mind that some water will evaporate. Let the water cool before drinking. Boiled water will taste better if you put oxygen back into it by pouring the water back and forth between two clean containers or add a pinch of salt. This will also improve the taste of stored water. You can use household liquid bleach to kill microorganisms. Use only regular household liquid bleach that contains 5.25 to 6.0 percent sodium hypochlorite. Do not use scented bleaches, color safe bleaches, or bleaches with added cleaners. Because the potency of bleach diminishes with time, use bleach from a newly opened or unopened bottle. Chlorination Add 16 drops (1/8 teaspoon) of bleach per gallon of water, stir and let stand for 30 minutes. The water should have a slight bleach odor. If it doesn’t, then repeat the dosage and let stand another 15 minutes. If it still does not smell of bleach, discard it and find another source of water. Other chemicals, such as iodine or water treatment products that do not contain 5.25 to 6.0 percent sodium hypochlorite as the only active ingredient, are not recommended and should not be used. Chemical disinfection Chemical disinfection with iodine, which is not as sensitive as chlorine to pH shifts, is an alternative method of water treatment when it is not feasible to boil water. However, using iodine cannot be relied on to kill Cryptosporidium. Cloudy water should be strained through a clean cloth into a container to remove any sediment or floating matter, and then the water should be treated with iodine. Two well-tested methods for disinfection with iodine are the use of tincture of iodine and tetraglycine 90 Food and Water Safety hydroperiodide tablets like Potable-Aqua, which available online from maydayindustries.com and select pharmacies and sporting goods stores. The manufacturer’s instructions should be followed. If water is cloudy, the number of tablets used should be doubled; if water is extremely cold (<41°F), an attempt should be made to warm the water, and the recommended contact time should be increased to achieve reliable disinfection. Iodine treatment of water is intended for short-term use only to avoid over exposure to iodine. When the only water available is iodine treated, it should be used for only a few weeks. Another product for making drinking water is maydayindustries.com KATADYN Water Purification Tablets. These EPA Registered Purification Tablets are effective against viruses, bacteria, cryptosporidium, and Giardia with no unpleasant taste. Water filters Portable filters currently on the market will provide various degrees of protection against microbes but are generally meant to be used in conjunction with disinfection for greatest protection from pathogens. Reverse-osmosis filters provide protection against viruses, bacteria, and protozoa, but they are expensive and larger than most filters used by backpackers, and the small pores on this type of filter are rapidly plugged by muddy or cloudy water. In addition, the membranes in some filters can be damaged by chlorine in water. Microstrainer filters with pore sizes in the 0.1- to 0.3-µm range can remove bacteria and protozoa from drinking water, but they do not remove viruses. To kill viruses, those using microstrainer filters should be advised to disinfect the water with iodine or chlorine after filtration, as described previously. Some filtration kits come with an additional filter effective against viruses. Protozoa can be highly (Cryptosporidium) to moderately (Giardia) resistant to halogen treatment, particularly in cold or turbid water. As a result, filtration or boiling should be considered as a safer alternative to chemical disinfection. As a last resort, if no source of safe drinking water is available or can be obtained, tap water that is uncomfortably hot to touch might be safer than cold tap water; however, proper disinfection and filtering, or boiling is still advised. Other effective filters are KATADYN Hiker and Vario and Aquamira Frontier as well as Water2Go from Maydayindustries.com Distillation While the two methods described above will kill most microorganisms in water, distillation will remove microorganisms that resist these methods, as well as heavy metals, salts, and most other chemicals. 91 How to Handle a Crisis Distillation involves boiling water and then collecting the vapor that condenses back to water. The condensed vapor will not include salt or most other impurities. To distill, fill a pot halfway with water. Tie a cup to the handle on the pot’s lid so that the cup will hang right-side-up when the lid is upside-down (make sure the cup is not dangling into the water), and boil the water for 20 minutes. The water that drips from the lid into the cup is distilled. (See illustration.) Resources: www.Maydayindustries.com 714 -893-5410 Supplier of emergency kits for homes, cars and business, drinking water and food bars with a 5 year shelf life. Lights, first aid kits, emergency tools, communication and shelter products. 92 Coping with Traumatic Events COPING WITH A TRAUMATIC EVENT ! Disclaimer: this information is advisory in nature and is not intended to identify all scenarios or situations a person might encounter. ! Following these guidelines will not guarantee your safety. Effects of Traumatic Events What Is a Traumatic Event? Most everyone has been through a stressful event in his or her life. When the event, or series of events, causes a lot of stress, it is called a traumatic event. Traumatic events are marked by a sense of horror, helplessness, serious injury, or the threat of serious injury or death. Traumatic events affect survivors, rescue workers, and the friends and relatives of victims who have been involved. They may also have an impact on people who have seen the event either firsthand or on television. Common Responses to Traumatic Events A person’s response to a traumatic event may vary. Responses include feelings of fear, grief and depression. Physical and behavioral responses include nausea, dizziness, and changes in appetite and sleep pattern as well as withdrawal from daily activities. Responses to trauma can last for weeks to months before people start to feel normal again. Most people report feeling better within three months after a traumatic event. If the problems become worse or last longer than one month after the event, the person may be suffering from post-traumatic stress disorder (PTSD). Post-Traumatic Stress Disorder (PTSD) Post-traumatic stress disorder (PTSD) is an intense physical and emotional response to thoughts and reminders of the event that last for many weeks or months after the traumatic event. The symptoms of PTSD fall into three broad types: re-living, avoidance and increased arousal. • Symptoms of re-living include flashbacks, nightmares, and extreme emotional and physical reactions to reminders of the event. Emotional reactions can include feeling guilty, extreme fear of harm, and numbing of emotions. Physical reactions can include uncontrollable shaking, chills or heart palpitations, and tension headaches. • Symptoms of avoidance include staying away from activities, places, thoughts, or feelings related to the trauma or feeling detached or estranged from others. 93 How to Handle a Crisis • Symptoms of increased arousal include being overly alert or easily startled, difficulty sleeping, irritability or outbursts of anger, and lack of concentration. • Other symptoms linked with PTSD include: panic attacks, depression, suicidal thought and feelings, drug abuse, feelings of being estranged and isolated, and not being able to complete daily tasks. Coping With Traumatic Events Things to Remember When Trying to Understand Disaster Events • No one who sees a disaster is untouched by it. • It is normal to feel anxious about you and your family's safety. • Profound sadness, grief, and anger are normal reactions to an abnormal event. • Acknowledging your feelings helps you recover. • Focusing on your strengths and abilities will help you to heal. • Accepting help from community programs and resources is healthy. • We each have different needs and different ways of coping. • It is common to want to strike back at people who have caused great pain. However, nothing good is accomplished by hateful language or actions. Signs that Adults Need Stress Management Assistance • Difficulty communicating thoughts • Difficulty sleeping • Difficulty maintaining balance • Easily frustrated • Increased use of drugs/alcohol • Limited attention span • Poor work performance • Headaches/stomach problems • Tunnel vision/muffled hearing • Colds or flu-like symptoms. • Disorientation or confusion • Difficulty concentrating • Reluctance to leave home • Depression, sadness • Feelings of hopelessness • Mood-swings • Crying easily • Overwhelming guilt and self-doubt • Fear of crowds, strangers, or being alone 94 Coping with Traumatic Events Ways to Ease the Stress • Understand that your symptoms may be normal, especially right after the trauma. • Find ways to relax and be kind to yourself. • Recognize that you cannot control everything. • Talk with someone about your feelings of anger, sorrow, and other emotions even though it may be difficult. • Don't hold yourself responsible for the disastrous event or be frustrated because you feel that you cannot help directly in the rescue work. • Take steps to promote your own physical and emotional healing by staying active in your daily life patterns or by adjusting them. This healthy outlook will help yourself and your family. (i.e. healthy eating, rest, exercise, relaxation, meditation.) • Maintain a normal household and daily routine, limiting demanding responsibilities for yourself and your family. Take the time to resolve day-to-day conflicts so they do not add to your stress. • Do not shy away from situations, people and places that remind you of the trauma. • Spend time with family and friends. • Participate in leisure and recreational activities. • Participate in memorials and rituals and use of symbols as a way to express feelings. • Use existing supports groups of family, friends, and church. • Establish a family emergency plan. Feeling that there is something that you can do can be very comforting. When to seek help If self-help strategies are not helping or you find that you are using drugs/alcohol in order to cope, you may have a difficult case of PTSD and should seek outside or professional assistance with your stress symptoms. When Should You Contact Your Doctor or Mental Health Professional? About half of those with PTSD recover within three months without treatment. Sometimes symptoms do not go away on their own or they last for more than three months. This may happen because of the severity of the event, direct exposure to the traumatic event, seriousness of the threat to life, the number of times an event happened, a history of past trauma, and psychological problems before the event. You may need to consider seeking professional help if your symptoms affect your relationship with your family and friends, or affect your job. If you suspect that you or 95 How to Handle a Crisis someone you know has PTSD, talk with a health care provider or call your local mental health clinic. Helping Children Cope with Fear and Anxiety Whether tragic events touch your family personally or are brought into your home via newspapers and television, you can help children cope with the anxiety that violence, death, and disasters can cause. Listening and talking to children about their concerns can reassure them that they will be safe. Start by encouraging them to discuss how they have been affected by what is happening around them. Even young children may have specific questions about tragedies. Children react to stress at their own developmental level. The Caring for Every Child's Mental Health Campaign offers these pointers for parents and other caregivers: • Encourage children to ask questions: Listen to what they say. Provide comfort and assurance that address their specific fears. It's okay to admit you can't answer all of their questions. • Talk on their level: Communicate with your children in a way they can understand. Don't get too technical or complicated. • Find out what frightens them: Encourage your children to talk about fears they may have. They may worry that someone will harm them at school or that someone will try to hurt you. • Focus on the positive: Reinforce the fact that most people are kind and caring. Remind your child of the heroic actions taken by ordinary people to help victims of tragedy. • Pay attention: Your children's play and drawings may give you a glimpse into their questions or concerns. Ask them to tell you what is going on in the game or the picture. It's an opportunity to clarify any misconceptions, answer questions, and give reassurance. • Develop a plan: Establish a family emergency plan for the future, such as a meeting place where everyone should gather if something unexpected happens in your family or neighborhood. It can help you and your children feel safer. • If you are concerned about your child's reaction to stress or trauma, call your physician or a community mental health center. 96 Coping with Traumatic Events What are the Warning Signs for Suicide? Seek help as soon as possible by contacting a mental health professional or by calling the National Suicide Prevention Lifeline at 1800-273-TALK if you or someone you know exhibits any of the following signs: • Threatening to hurt or kill oneself or talking about wanting to hurt or kill oneself • Looking for ways to kill oneself by seeking access to firearms, available pills, or other means • Talking or writing about death, dying, or suicide when these actions are out of the ordinary for the person • Feeling hopeless • Feeling rage or uncontrolled anger or seeking revenge • Acting reckless or engaging in risky activities - seemingly without thinking • Feeling trapped - like there's no way out • Increasing alcohol or drug use • Withdrawing from friends, family, and society • Feeling anxious, agitated, or unable to sleep or sleeping all the time • Experiencing dramatic mood changes • Seeing no reason for living or having no sense of purpose in life The National Suicide Prevention Lifeline is a 24-hour, toll-free suicide prevention service available to anyone in suicidal crisis. If you need help, please dial 1-800-273-TALK (8255) 97 How to Handle a Crisis FIRST AID ! Disclaimer This chapter is designed for use when emergency medical care may not be immediately available due to location, weather, disasters, terrorism or other factors. ! Disclaimer: The information in this book is not intended as a substitute for professional medical advice, emergency medical treatment or formal first-aid training. Do not use this information to diagnose or develop a treatment plan for a medical problem or disease without consulting a qualified health care provider. If you or someone near you is in a life-threatening or emergency medical situation, call for or seek professional emergency medical assistance immediately. Administering First Aid This chapter is designed for use when emergency medical care may not be immediately available due to location, weather, disasters, terrorism or other factors. • Always practice universal precautions: wear gloves and other personal protective equipment. • Always make sure the area is safe to enter or provide first aid. • Become familiar with the recovery position as it is useful is a number of first aid situations. Recovery Position 98 First Aid The ABC’s of First Aid In any first aid situation, always think ABC first. ABC—Airway, Breathing, and Circulation are the three most critical basic body functions necessary for life. This holds true for victims of trauma, poisoning, infection, and every other type of injury or illness. ABC can often be assessed quickly and easily, however sometimes a thorough survey is essential. A and B: Airway and Breathing If a person is conscious, assessment for an open airway is usually straightforward • Speaking, crying, and screaming all correlate with an open airway. A person with a blocked airway is not able to speak. • An unconscious person requires closer evaluation. • Place your ear close to the person’s mouth and listen for breath sounds. Feel for air on your cheek. Look for chest rising and falling with breaths. C: Circulation Circulation refers to the heart’s ability to effectively pump blood to the rest of the body. Signs of circulation include pulse, movement, normal skin color and warmth. If any of the ABCs are compromised, begin CPR immediately. See the section on CPR for details, page 117. Abdominal Injuries Abdominal injuries related to trauma can be obvious with open wounds and severe symptoms, however critical injuries can be present in a victim that appears normal or near-normal. Signs and symptoms of internal abdominal injuries after trauma: • Pain • Vomiting, hematemesis (vomiting blood) • Loss of bowel control, rectal bleeding • Rapid pulse, low blood pressure • Abdomen hard, bloated, or discolored Victims of trauma (even minor trauma) with these symptoms should be evaluated by emergency medical services immediately. Treating Abdominal Injuries • First, ensure safe surroundings • Call for emergency medical services immediately 99 How to Handle a Crisis • Support the victim by placing him in the recovery position, page 98. Do not give any food or liquids to him. • For open abdominal wounds: • Try to keep the victim and bystanders calm • Use gloves and personal protective equipment if available. • Try to control bleeding with direct pressure to bleeding site. • If there are protruding intestines or other organs, do not attempt to push them back into the body. Cover the organs with moist gauze or cloth. Do not touch or put pressure on protruding organs. ! WARNING: Continually monitor the victims ABCs and provide appropriate first aid until emergency services arrive. Allergic Reactions / Anaphylaxis A severe allergic reaction (anaphylaxis) is a life-threatening emergency. Symptoms of an allergic reaction can appear in seconds or take minutes to hours to appear. Symptoms of severe allergic reaction may include • Rash (hives) • Swelling of the throat • Confusion • Dizziness • Nausea and vomiting • Abdominal cramping If You Witness a Person Having Signs of Anaphylaxis: • Call for emergency medical services immediately • Check for allergy medications the person might be carrying (such as injectable epinephrine, EpiPen®). Give the drug as directed. For autoinjectable epinephrine, this consists of jabbing the auto-injector into the person’s thigh and holding for about 10 seconds followed by massaging the area for 30 seconds. Antihistamine allergy medications can be given if the person can safely swallow without choking. • If there is any vomiting, place the person on his/her side to prevent choking. (See rescue position on page ) If the person is not vomiting and breathing comfortably, he/she can be placed on back with feet elevated. • If the victim becomes unconscious, reassess ABCs (airway, breathing, circulation) to determine whether rescue breathing or CPR is necessary. ! WARNING: Continually monitor the victims ABCs and provide appropriate first aid until emergency services arrive. 100 First Aid Altitude Sickness Travelers, hikers, and mountain climbers are at risk of altitude sickness, which is potentially harmful or fatal if ignored. Symptoms of altitude sickness can develop after ascending too rapidly to high elevation, even of less than 8000 feet (about 2500 meters). Early symptoms of altitude sickness may include: • Headache • Fatigue • Sleepiness • Lack of coordination • Dizziness • Nausea and vomiting • Symptoms of severe altitude sickness include: • Shortness of breath • Rapid heart rate or heart palpitations • Coughing, sometimes with frothy sputum • Inability to stand or sit straight up or walk in a straight line • Bizarre or irrational behavior, such as denial of obvious symptoms Suspected Altitude Sickness The most important rule in managing altitude sickness is simple yet often ignored. If a person experiences symptoms of altitude sickness, he or she should not climb any higher until ALL symptoms have completely resolved. Failure to do so can cause mild altitude mountain sickness to progress to severe or fatal high-altitude pulmonary edema (fluid buildup in the lungs) or cerebral edema (swelling of the brain). Remember, it is common for persons to refuse to acknowledge symptoms of altitude sickness. • The person should rest and keep warm • Avoid smoking and alcohol • Acetaminophen (Tylenol®) can be given at the usual dose for headache if the person is not allergic or intolerant to this medication • If symptoms persist, consider descending by 1000-2000 feet (300-600 meters). • If symptoms worsen, descend immediately and call for emergency medical services immediately • Do not give altitude sickness medications or oxygen that is not prescribed to the person by his/her physician. This can mask the signs of worsening illness. ! WARNING: Continually monitor the victims ABCs and provide appropriate first aid until emergency services arrive. 101 How to Handle a Crisis Amputation Amputation is the total severing of a body part from the body. This is a severe injury and always requires professional emergency medical evaluation. Call local emergency medical services immediately. A victim of amputation needs emergency medical attention without delay. First Aid for Amputations: • The first aid provider should use disposable gloves and other personal protective equipment • Elevate the stump and apply direct pressure to the bleeding • If bleeding cannot be stopped with elevation and direct pressure, place a tourniquet. Apply a tourniquet to a wound only if there is severe blood loss and death from bleeding is imminent. Incorrect use of a tourniquet can lead to loss of the limb, so tourniquets should only be used in lifesaving situations and, when possible, only by trained individuals. Applying a tourniquet • First aiders should use disposable gloves and other personal protective equipment • Remember, elevation and direct pressure to stop bleeding should be attempted before use of a tourniquet. • Use a non-elastic material such as a towel or sheet. Fold it to a width of one or two inches. • Wrap the tourniquet around the limb, a few inches above the injury site, and tie a square knot. Use a strong item such as a stick, pipe, spoon, etc. to act as a windlass. Tie the windlass to the tourniquet with another square knot. • Twist the knot with the windlass to tighten the tourniquet until bleeding stops. • Secure the windlass and tourniquet structure by tying the ends to the victim’s limb. • If possible, mark the victim’s forehead with a large “T” with the time the tourniquet was placed. 102 First Aid ! DANGER: A tourniquet is only used on an arm or leg where there is a danger of the casualty losing his life (bleeding to death). What to Do With the Amputated Limb To save the amputated limb, wrap the part in dry, sterile gauze or clean dry cloth. Place the limb in a large plastic bag and seal the bag. Place the sealed bag into ice water. Do not allow the limb to get wet and do not place the limb directly on ice as this can damage the tissue. Note: The amputated part should not be thoroughly cleaned and no solutions should be poured on it at this time. ! WARNING: Continually monitor the victims ABCs and provide appropriate first aid until emergency services arrive. 103 How to Handle a Crisis Bites and Stings Dog/Cat/Human/Mammals/Aquatic Human and animal bites are common and are particularly susceptible to infection. First aid for animal bites includes ensuring safety, cleaning/dressing the wounds, and determining whether immediate physician evaluation is necessary. • As always, first ensure safe surroundings. Move the victim (or in some cases, the biting animal) so that the area is safe. • Always practice universal precautions: wear gloves and other personal protective equipment. • For serious wounds, call local emergency medical services immediately • Control bleeding by applying pressure to the area. Do not use a tourniquet unless there is massive bleeding and risk of bleeding to death (See tourniquet information in section on amputations). • Clean less serious wounds thoroughly with soap and warm water. Both closed and open wounds should be cleaned and rinsed for several minutes. • Dress the wounds with gauze bandages and tape. Antibiotic ointment may be applied if available. • Over the hours and days that follow, monitor for signs of infection: • Redness • Drainage of pus • Increased warmth at the area • Increasing pain • Swelling of the surrounding area • Contact a physician to determine if/when the victim needs to be seen. The following types of bites should always be evaluated by a physician: • Bite from a dog that cannot be immediately confirmed to be vaccinated against rabies • Bites with extensive lacerations that may need stitches • Deep puncture wounds (such as from cat bites) • Bites involving the hands, face, or head • Bites from wild animals such as raccoons, bats, foxes, and skunks • Human bites that break the skin The physician may recommend a tetanus booster shot if the wound is deep or dirty or if several years have passed since last tetanus booster. Leeches One recommended method of removal is using a fingernail or other flat, blunt object to break the seal of the oral sucker at the anterior end (the smaller, thinner end) of the leech, repeating with the posterior end, 104 First Aid then flicking the leech away. As the fingernail is pushed along the person's skin against the leech, the suction of the sucker's seal is broken, at which point the leech should detach its jaws. Internal attachments, such as nasal passage or vaginal attachments, are more likely to require medical intervention. Treatment After removal or detachment, the wound should be cleaned with soap and water, and bandaged. Bleeding may continue for some time, due to the leech's anti-clotting enzyme. Applying pressure can reduce bleeding, although blood loss from a single bite is not dangerous Insect Bites and Stings Most insect bites cause minor symptoms, but sometimes can cause significant pain and carry risk of allergic reactions and infections. Most of the time, it is impossible to determine the biting insect by the appearance of the bite. Caring for Bites and Stings • As always, ensure safe surroundings. Move to a safer area to avoid additional bites/stings. • Use universal precautions. Wear gloves and other personal protective equipment when giving first aid to others. • If a stinger is present, carefully scrape it off with a straight edge object such as a credit card or knife. Do not try and grasp and pull out a stinger (this can cause further injection of venom or infection) • Wash the area with soap and warm water • Apply an ice pack to the area. Never apply ice packs directly to skin; wrap ice packs in cloth. In general, cold compresses can be used for 20 minutes followed by 20 minutes off and repeated as desired. • Hydrocortisone cream or oral antihistamine medicines (such as Benadryl) can be used as directed on package, as needed for itching. Acetaminophen or ibuprofen can be used as needed for pain. • Watch for signs of concerning allergic reaction: • Hives • Swelling of the face, lips, or throat • Confusion • Dizziness • Rapid heart rate • Difficulty breathing • If any of the above symptoms are present, seek emergency medical care immediately. See also the section on allergic reactions for additional information 105 How to Handle a Crisis Spider Bites Most of the world’s spiders are not very dangerous to humans. Most bites can be monitored and treated as insect bites as described in the Insect Bite section above. Two spiders in the United States can cause particularly precarious problems. Black Widow The female black widow spider is commonly found in the states in the southern half of the United States. The female is usually about 1-2 inches (2-4 centimeters) in size. It has a shiny black appearance and has a bright red hourglass shaped spot on its belly. Black widow bites may not cause pain at the time of the bite or may feel like a thorn prick. A few hours later, however, these symptoms may develop: • Fever and chills • Severe abdominal pain and cramping • Nausea and vomiting • Sweating Brown Recluse The brown recluse spider is seen in the southeastern United States. It is approximately ¼ to ¾ inches (1-2 centimeters) and tan to brown in color. It has a brown violin-shaped mark on its top side. Its bite causes a burning stinging pain followed by severe pain after six to eight hours. A blister forms and later falls off and leaves a deep ulcer. The surrounding tissue cells can die (necrosis) and heal slowly (sometimes weeks or months). Symptoms in more severe cases include fever, chills, nausea, vomiting, body rashes, and joint pains. Suspected Black Widow or Brown Recluse Spider Bite: • After ensuring safe surroundings, try to make a positive identification of the biting spider. Take extreme care to avoid any further bite victims! • Use a cold pack or ice wrapped in cloth over the site of the bite • Seek emergency medical care immediately. Physicians will decide whether a black widow bite requires antivenin or a brown recluse bite requires treatment with steroids or other medications. • Do not place a tourniquet! 106 First Aid • Using the mouth or a first aid kit suction device in attempt to remove venom is not helpful and should be avoided. Tick Bites There are numerous types of ticks throughout the world. Many can cause infections, some serious or even fatal. In the United States, certain ticks can cause Lyme disease or Rocky Mountain Spotted Fever. Overall, the chance of getting a serious infection after a tick bite is small. Safe appropriate removal of the tick and monitoring for signs of infection, however, is essential. How to Remove the Tick: • First aiders should wear gloves if available. • Use tweezers to grasp the tick as close to the skin surface as possible. Be careful not to crush the tick’s head. • Do not squeeze, crush, or burn the body of the tick. This can cause injection of infectious fluids into the person’s skin. • Pull the tick away from the skin gently but firmly. Do not make any twisting or jerking motions with the tweezers. • If possible, save the tick in a jar or make note of its size and color. This could help doctors later if symptoms of illness develop. • After tick removal, wash the area thoroughly with soap and water. The person that removed the tick should also wash hands well. • If any parts of the tick’s head or mouth are embedded in the skin, leave them alone, they will be extruded on their own. Following a tick bite and tick removal, it is important to monitor for signs of illness and infection. See a doctor immediately if any of the following symptoms develop: • Fever • Rash • Muscle or joint aches • Stiff neck • Flu-like symptoms Snakebites Most snakebites are not fatal; however several species of snakes throughout the world have venom that is harmful to humans. Since few people have expertise in snake identification, we recommend all 107 How to Handle a Crisis snakebite victims be evaluated by medical experts. There are important steps to take as prior to arrival of emergency medical services. • As always, first ensure safe surroundings. Get the victim and first aiders away from the snake. Wear gloves and other personal protective equipment. • Call for emergency medical services immediately. • Try to keep the victim and people around him calm. • Do not attempt to capture or get close to the snake! Such attempts have led to a second or even a third person being bitten. Even a dead snake has a bite reflex that can last for an hour or more after its death. Note the snake’s colors and markings or photograph the snake from a safe distance. • Immobilize the bitten arm or leg. Do not elevate the limb. Keep the site of the bite below the level of the victim’s heart. • Remove tight clothing and jewelry because swelling can occur rapidly. • Do not use a tourniquet or apply ice! • Do not cut open the wound or attempt to suck venom from the wound! • If the victim cannot get to medical care within 30 minutes, apply a bandage a few inches above the bite location to slow circulation of venom. The bandage should not cut off blood circulation to the limb. It should be loose enough that a finger can slip between the bandage and the skin. Anatomic features of vipers 108 First Aid Features of Cobras, Kraits, and Coral Snakes Jellyfish Stings There are hundreds or thousands of jellyfish species in oceans around the world. Stings from jellyfish may cause minimal symptoms or cause severe pain or severe, potentially fatal allergic reactions. • As always, first ensure safe surroundings. First aiders and victims should be safely away from the water. Gloves and personal protective equipment should be used. • Continually monitor for symptoms of severe allergic reaction. (See section on allergic reactions for details). • If at any point there is doubt about the victim’s status or symptoms are worsening, contact emergency services immediately. If the jellyfish is known or suspected to be a box jellyfish (a particularly dangerous type of jellyfish) call for emergency services without delay. • First, rinse the skin with vinegar or seawater. Next, the tentacles should be removed. Stinging continues as long as contact with skin remains. Use a gloved hand, stick, or tweezers to carefully remove tentacles. Do not touch the tentacles with bare hands! For large amounts of tentacles, allow physician/medical professionals to perform removal. • If possible, soak the area in hot water (as hot as tolerable; take extreme care not to burn or scald the skin). • Seek professional medical evaluation for further treatment as soon as possible. • Additional notes: • Portuguese Man of War and Bluebottle are not technically jellyfish, but first aid for stings is as above. Medical evaluation should be sought immediately. 109 How to Handle a Crisis • Contrary to popular belief, urinating on stings does not seem to be an effective treatment. • For persistent pain and stinging, over-the-counter pain relievers may be used as directed on the packaging. Some experts recommend applying a baking soda-water paste to the sting sites. • Over the hours and days that follow the sting, monitor for signs and symptoms of infection. See Animal Bites, page 104 , for a list of symptoms Other Marine Related Injuries Related injuries include abrasions, stings, puncture wounds, etc. from other marine organisms such as anemones, urchins, and corals. These injuries can be treated like other land-based injuries: • Clean areas gently with soap and water • Monitor closely for signs and symptoms of allergic reaction or infection (See above). • Over the counter pain or allergy medication can be used for mild symptoms. Antibiotic ointment can be applied if desired. • Seek emergency medical care for any concerning symptoms or if victim’s status is worsening or uncertain. ! WARNING: Continually monitor the victims ABCs and provide appropriate first aid until emergency services arrive. Blast Injury Explosions from bombs or other sources can produce multiple types of life-threatening injuries on many people at one time. Victims of explosions who survive the initial blast may still be in danger from several types of injury. The intense highly-pressurized impulse from a blast can cause injury by rapid pressure changes, especially in gas-filled body structures (lungs, digestive tract, middle ear, for example). “Blast lung” is the most common fatal injury of blast injury victims who survive the initial explosion. Chest pain, shortness of breath, cough, and coughing up blood are some symptoms of blast lung. Onset of symptoms is sometimes delayed for up to 48 hours. Blast abdominal injury may be present in any victim with abdominal pain, nausea and vomiting, testicular/groin pain, or rectal pain. Any victim of a blast should be evaluated in an emergency department immediately. Any number of injuries can be caused by explosion. For information on first aid for specific types of injury refer to the additional sections in this book: • Penetrating injuries • Concussion 110 First Aid • Eye injuries • Fractures • Burns • Anxiety/Hyperventilation • Amputations • Breathing emergencies • Cuts and Bleeding ! WARNING: Continually monitor the victims ABCs and provide appropriate first aid until emergency services arrive. Bleeding The longer a person bleeds from a major wound, the less likely he will be able to survive his injuries. It is, therefore, important that the first aid provider promptly stop the external bleeding. In evaluating the casualty for location, type, and size of the wound or injury, cut or tear his clothing and carefully expose the entire area of the wound. This procedure is necessary to properly visualize injury and avoid further contamination. Clothing stuck to the wound should be left in place to avoid further injury. DO NOT touch the wound; keep it as clean as possible. Before applying a dressing, carefully examine the victim to determine if there is more than one wound. (Gunshot, Stabbing and Bombing Victims in Particular) Hold the dressing directly over the wound. If bleeding continues after applying a dressing direct manual pressure may be used to help control bleeding. Apply such pressure by placing a hand on the dressing and exerting firm pressure for 5to 10 minutes .Elevate an injured limb above the level of the heart to reduce the bleeding ! WARNING: Do not elevate a suspected fractured limb unless it has been properly splinted. If the bleeding stops, check shock; administer first aid for shock as necessary. If the bleeding continues, apply a pressure dressing. Pressure Dressing Pressure dressings aid in blood clotting and compress the open blood vessel. If bleeding continues after the application of a field dressing, continue manual pressure, and elevation, then a pressure dressing must be applied as follows: • Place a wad of padding on top of the field dressing, directly over the wound 111 How to Handle a Crisis • Keep the injured extremity elevated. Improvised bandages may be made from strips of cloth. These strips may be made from T-shirts, socks, or other garments • Place an improvised dressing (or cravat, if available) over the wad of padding. Wrap the ends tightly around the injured limb, covering the previously placed dressing • Tie the ends together in a nonslip knot, directly over the wound site Do Not tie so tightly that it has a tourniquet-like effect. • If bleeding continues and all other measures have failed, or if the limb is severed, then apply a tourniquet. • Use the tourniquet as a last resort. When the bleeding stops, check for shock; administer first aid for shock as necessary. • Distal end of wounded extremities (fingers and toes) should be checked periodically for adequate circulation. The dressing must be loosened if the extremity becomes cool, blue, or numb. • If bleeding continues and all other measures have failed(dressings and covering wound, applying direct manual pressure, elevating the limb above the heart level, and applying a pressure dressing while maintaining limb elevation) then apply digital pressure. See Tourniquet under Amputation, page 102. Digital Pressure Digital pressure (often called “pressure points”) is an alternative method to control bleeding. This method uses pressure from the fingers, thumbs, or hands to press at the site or point where a main artery supplying the wounded area lies near the skin surface or over bone (Figure below). This pressure may help shut off or slow down the flow of blood from the heart to the wound and is used in combination with direct pressure and elevation. It may help in instances where bleeding is not easily controlled, where pressure dressing has not yet been applied, or where pressure dressings are not readily available. 112 First Aid Pressure Points ! WARNING: Continually monitor the victims ABCs and provide appropriate first aid until emergency services arrive. Breathing Emergencies The body requires effective breathing to maintain survival. Any compromise of normal breathing can become a life-threatening emergency. There are numerous causes of respiratory distress including asthma, allergies, choking, trauma, heart disease, brain injury, and shock. There are common signs and symptoms of respiratory distress, including: • Abnormally fast or slow breathing • Gasping for air, inability to catch breath • Abnormal breathing sounds such as grunting or wheezing • Confusion, dizziness, anxiety • Pale or blue skin, most often starting in the fingers or around the lips 113 How to Handle a Crisis Persons with respiratory distress should be kept calm, assisted with taking their medications, and comfortably positioned in a location with adequate air ventilation. Expert medical care should be sought immediately. Asthma Attack Sometimes asthma attacks can be treated with inhaler medications, efficient breathing, and relaxation. Other times, treatment requires emergency transport to the hospital. Treating Asthma Attacks: • Try to keep the person calm. Increased muscle tension and anxiety can make breathing less effective. • Have the person start pursed-lip breathing—exhaling through pursed lips (as if blowing out a candle). Breathing should be slow and not forceful. • Assist the person with using their rescue inhaler. These are usually beta-agonist medications such as albuterol (Brand names include Proventil, ProAir, Ventolin, others) or levalbuterol (Brand name Xopenex) and others. In general, two puffs of these medications can be used up to every twenty minutes as needed. • Separate the person from asthma triggers if known. Persons with asthma often know what can trigger their attacks. Some examples of asthma triggers include dusts, pet dander, perfumes, smoke, exercise, and cold air. • Assess response to treatment. Evidence of good response may include improvement of work of breathing, ability to speak in full sentences, and decreasing wheezing and coughing (caution: decreasing wheezing can sometimes be a sign of worsening asthma attack!). Signs of poor response or worsening attack can include more rapid breathing, more difficulty with breathing, difficulty speaking, and blue color in lips or fingers. • When in doubt or if response is poor, immediately seek emergency medical care. Choking The “universal choking sign” is the choking victim clutching his neck with his hands. Other signs of choking include: difficulty or inability to breathe, cough, or speak. If the person is able to cough, encourage him to continue coughing. If the choking victim requires further assistance: • Tell the victim to lean forward and using 114 First Aid the heel of the hand, give five firm blows to the back • Next, give five fast thrusts of the abdomen by reaching around the person and placing a fist just above the level of the belly button. Grasp the fist with the other hand. • Repeat until the victim begins coughing or breathing or the object being choked on is forced out of the airway. Respiratory failure is a medical emergency. Signs of respiratory failure include loss of consciousness, loss of breath sounds and chest movements, and blue color of the skin. For respiratory failure begin rescue breathing and CPR immediately. See sections on CPR, page 117, for additional information. Inhalation Injury Inhalation injury can be caused by a large variety of inhalants including smoke and other gases or fumes. • Assess the scene. Make sure you can give first aid safely without placing yourself in danger. Safely move the victim away from the offending inhalant to an open, well-ventilated space. • Call for emergency services. • Assess the ABC’s. Make sure the victim is breathing effectively and has fresh air. • Try to make the victim's breathing as comfortable as possible. Change his positioning to the recovery position (see page 98) and loosen clothing, making sure to keep the victim warm. • Reassess ABCs frequently. If the person has compromised airway, breathing, and/or circulation, begin CPR as described on page 117. • Continue monitoring and supportive care until medical help arrives. Hyperventilation Rapid shallow breathing should never be assumed to be explained by “hyperventilation” (due to panic attack, stress, or anxiety) unless the victim has been diagnosed with a hyperventilation syndrome by their doctor. Any unexplained breathing difficulty should be evaluated by emergency medical personnel immediately. First aid for hyperventilating person with known diagnosis of a hyperventilation syndrome: The goal is to calm the person and encourage and coach the person toward a more comfortable breathing pattern. • Encourage slow deep breaths. • Ask the person to breathe with you and try to follow your breathing • If the person does not calm, seek medical help. • Breathing into a paper bag is not recommended. ! WARNING: Continually monitor the victims ABCs and provide appropriate first aid until emergency services arrive. 115 How to Handle a Crisis Burns First aid for burns varies based on the severity of the burn. In general, minor burns are small, superficial, and not located in high-risk areas (listed below). A burn should be considered a major burn if it is: • Deep (if muscle, fat, or bone is visible or if there is charring of tissue) • Larger than 3 inches in diameter • Painless • Located on face/head, groin, over a joint, or covers a considerable area of hands or feet. Minor Burns: • Pour cool water over the burn for 10 minutes, or place cool compress (towel soaked in cool water) on the burn wound. Do Not Apply Ice To A Burn Injury. • Dress the burn loosely with sterile gauze. If blisters are present, do not break them open. • Over-the-counter pain medications should be sufficient for pain management. Monitor for signs of infection, (worsening redness or pain, fever, pus or fluid drainage). • If signs of infection are present or if there is any question of a possibly more severe or worsening injury, professional medical attention should be sought. Major Burns: • Remember, always survey the scene and ensure safe surroundings first! • Call for emergency medical services immediately. • Cover the area with cool wet towels or gauze. • Do not remove the victim’s clothing. • Do not immerse large burns in water. • Do not apply ice to a burn injury. Help the victim to remain calm until help arrives. • Assess for possible lung injuries from inhalation of smoke or other toxins. • First aid for Chemical burns – • Flush the burned area with cool water for 20-30 minutes. • Cover the area with a cool wet towel or dress loosely with sterile gauze. • Call poison center 1-800-222-1222 if not sure of the toxicity of the chemical. • Seek emergency care for a major burn. 116 First Aid Sunburn Symptoms usually develop several hours after sun exposure and may include; • Redness and swelling of skin • Pain • Warmth of skin • Blisters If large areas of skin are affected by sunburn, additional possible symptoms include: • Fever • Headache • Fatigue Sunburn Treatment • Take a cool shower or bath. One-half to one cup (120-240ml) of cornstarch, oatmeal, or baking soda may be added to the bathwater and may provide additional relief • For pain, you may take acetaminophen (Tylenol) or ibuprofen (Motrin, Advil) in the usual over-the-counter doses, if necessary. • Drink plenty of water or electrolyte-containing sports drinks. • Aloe vera lotion or gel can be applied to sunburned skin several times per day, if desired. • If blisters are present, leave them intact. If blisters break on their own, they may be covered with antibiotic ointment. • If symptoms worsen or if there are signs of infection, seek medical evaluation immediately. ! WARNING: Continually monitor the victims ABCs and provide appropriate first aid until emergency services arrive. Cardiopulmonary Resuscitation (CPR) Adult CPR: Quick Review • Is the victim unresponsive, not breathing, or gasping? • Call 911 or Emergency Medical Services • Begin chest compressions • Push Hard, Push Fast • If not trained in rescue breathing, continue hard fast chest compressions until AED arrives or EMS takes over. If Rescuer Has Emergency CPR Training • Initiate breathing after 30 compressions • After 30 compressions, pause for 2 rescue breaths 117 How to Handle a Crisis • Continue 30 compressions : 2 breath cycles, pausing every 2 minutes to evaluate for breathing/movement or to allow the AED to evaluate for rhythm. • Continue until victim is breathing/moving or until emergency medical team arrives Detailed CPR Review CPR is a technique that can be used in emergency medical situations when a person’s heartbeat has stopped. The most recent recommendations by the American Heart Association are summarized below. We recommend taking a formal accredited CPR training course. Just about anyone can save a life with CPR, with or without advanced training. It is better to do something than nothing! Data shows that an attempt at CPR (even by untrained persons) is better than no attempt at all. Automated external defibrillators (AED) are medical devices that can deliver electrical shocks to the heart to attempt to reset a heart’s normal heartbeat and rhythm. These devices are becoming more and more readily available in public places. Many CPR courses have sections on using AEDs. The following instructions are for performing CPR on an adult. ( CPR for children and infants is discussed at the end of this section.) To Determine Whether CPR Is Necessary: • Determine whether the person is conscious. If she/he appears unconscious, tap the person on the shoulder and ask loudly “Are you OK?” • If the person is unresponsive ask someone to call for emergency services immediately. If you are alone with the victim and have immediate access to a telephone, call for emergency medical services before starting CPR*. • If the victim is unconscious because of drowning or suffocation, perform CPR for one minute before calling emergency medical services. • If an AED and trained user are immediately available, attach the AED to the victim. Deliver one shock if instructed by the AED before starting CPR. 118 First Aid The ABC’s (Airway, Breathing, Circulation) • Quickly assess airway, breathing, and circulation: • Keep victim's head and neck aligned with body To open the airway, place the victim on his back with the head tilted back. Gently push the chin forward. This allows air to flow to and from the lungs through both nose and mouth. If the victim has traumatic injuries, use extreme care and minimize movement of the neck. • If the victim is breathing, place him in the recovery position (see page 98). • If you have had appropriate training, check for pulse. • If the victim is not breathing or is gasping, begin chest compressions. Chest Compressions: Push Hard, Push Fast • Remember, ask for and listen closely for instructions from the EMS dispatcher when available. • Place the heel of one hand on the center of the victim’s chest. Put the other hand on top of the first and interlock the fingers. Position the shoulders directly above your hands • Compress the chest about 2 inches. Push Hard and Push Fast. The compression rate should be 100 per minute—or about 2 compressions per second. Count compressions aloud as you go. • Allow the chest to fully recoil after each compression. Keep hands on the chest during compressions; do not let your hands “bounce” 119 How to Handle a Crisis • You may feel popping or crunching sounds when you start. Keep going! If the victim has cardiac arrest, CPR is more important than avoiding broken ribs. • If trained first aiders are present, stop after 30 compressions and give 2 rescue breaths. This is one cycle of CPR. • If trained responders are not available, continue Hard Fast chest compressions with minimal interruptions until additional help arrives. • Continue cycles of CPR for about 2 minutes, then stop and check for breathing or movements. If an AED is available, follow its instructions. It may deliver a shock. • Resume 2 minute cycles of CPR until there are signs of movement or breathing or until emergency medical services arrives • Performing chest compressions is hard work! After a few cycles allow another first aider to take over to allow you to rest. Rescue Breathing • If you have not had training in rescue breathing, continue Hard Fast chest compressions! • If you have been trained in rescue breathing, position the airway as described above. Make a good seal on the airway with your mouth or rescue breathing device. Deliver a one second breath while watching for chest rise. If the chest rises, deliver a second rescue breath. If there is no chest rise, reposition the airway before delivering a second breath. • Continue 30 chest compressions to 2 rescue breath cycles until there are signs of movements or until EMS arrives . ! WARNING: Continually monitor the victims ABCs and provide appropriate first aid until emergency services arrive. CPR For Children and Infants Call 911 or Emergency Medical Services CPR for children age 1 thru 10 is almost the same as for adults. There are some important differences: • If no other help is present, perform 5 cycles of CPR (chest compressions and breaths; this should take about 2 minutes) before pausing to call emergency services or attaching an AED • Use less forceful breaths with rescue breathing • Perform chest compressions with only one hand • After five cycles of CPR (as in an adult, use the 30 compression to 2 breath cycle) place the AED pads if available. Use pediatric pads if available (if not, use adult pads). Note: Rescuer teams with advanced training may use a 15 to 2 cycle. 120 First Aid • Continue CPR until emergency medical professionals arrive or until the child shows signs of breathing and circulation (breathing, moving, pulse). Performing CPR on an Infant Call 911 or Emergency Medical Services Respiratory and/or cardiac arrest in otherwise healthy infants often results from airway obstruction (often related to choking or drowning). A thorough evaluation of the ABCs is critical. Airway and Breathing: With the infant lying on his back with his head tipped back, look, listen and feel for evidence of breathing (as described above). If he is not breathing, begin rescue breathing immediately. Rescue breathing for a baby: Seal your mouth over the infant’s nose and mouth. Deliver a onesecond breath using only the air from the mouth. Use cheeks to deliver the breath. Do not force air into the infant using your lungs. As the breath is delivered watch for the chest to rise as the lungs fill with air. If no chest rise is seen, reposition the infant using the head tilt and chin lift maneuvers, then resume rescue breaths. If there is still no chest rise seen with breaths, examine the mouth and throat for evidence of foreign object. Sweep the mouth with a finger and remove foreign material if possible. Performing chest compressions on a baby: Place two fingers on the center of the infant’s chest at the level of the nipples. Compress one-third to one-half the depth of the chest. Perform compressions at the same 100-per-minute rate as in an adult. Count compressions aloud. After every 30 compressions, perform 2 rescue breaths. Continue CPR until emergency medical personnel arrive or until the baby shows signs of breathing and circulation. ! WARNING: Continually monitor the victims ABCs and provide appropriate first aid until emergency services arrive. Chest Trauma See also Breathing Emergencies (page 113), Puncture Wounds (page 141), CPR (page 117). Blunt trauma to the chest can result in various injuries including bruising of the chest wall, ribs, or internal organs. Fracture of one or more ribs can cause severe pain and may affect breathing. Severe internal injury may be present even if the external chest appears normal. 121 How to Handle a Crisis If any of the following are present, seek emergency medical attention immediately: • Difficulty breathing • Coughing up blood • Severe pain • Dizziness, confusion, lightheadedness • Deformity of the chest • Asymmetric or abnormal chest movements with breathing Chest injury • Keep the injured person calm and still • Assess the ABCs (See section on the ABCs of first aid) • Do not move the victim’s neck • Gentle support with a hand or pillow over the injured area may ease breathing. Do not use a binder or elastic bandage that wraps around the entire chest as this can make deep breathing difficult. • Gentle repositioning may make breathing more comfortable for the injured person. Positioning with the injured side down may ease breathing. • Reassess ABCs frequently. Any breathing difficulty should be considered a medical emergency. Stay with the victim until help arrives. ! WARNING: Continually monitor the victims ABCs and provide appropriate first aid until emergency services arrive. Penetrating Chest Wounds Penetrating wounds like stab wounds or gunshot wounds can cause severe internal injuries even with a very small external entry wound. Spinal cord injuries should always be considered and victim should not be moved unless absolutely necessary. Positioning/repositioning of victim should be done with extreme caution. Treating a Penetrating Chest Wound • Assess scene safety. • Ensure safe surroundings before starting first aid. • Emergency medical services should be called immediately. • First aiders should wear disposable gloves and other personal protective equipment. • Assess and treat ABCs before treating other injuries. • Pressure should be placed on the penetrating chest injury site by a first aider or by the victim. This helps to slow bleeding and helps prevent air from entering the chest cavity. 122 First Aid • The victim should be placed in a relaxed slanted upright position with the wounded side slanting downward. Help the victim to try to breathe calmly. • If first aid supplies are available, a square or rectangle shaped bandage can be placed over the wound. The bandage should be sealed (taped) on three sides. The fourth side can be left unsealed (See figure). It may assist to gently lift the unsealed side while the victim is exhaling. This will allow air to escape the chest cavity. • When applying additional bandages, cover the soaked dressings with new bandages (do not remove the old soaked bandages). • Reassess ABCs frequently. • Start rescue breathing and/or CPR as necessary. ! WARNING: Continually monitor the victims ABCs and provide appropriate first aid until emergency services arrive. Chest Pain See Heart Attack, Page 135 Pregnancy, Labor, and Emergency Childbirth When childbirth is imminent, it is important to understand the normal course of labor and delivery and what you can do to help. The first and most important thing to remember is that labor is a natural process that has occurred billions of times! The following information can help you to guide and assist the natural labor and delivery process. As Dr. Gregory White writes in his book Emergency Childbirth, “when in doubt, do nothing”. How to Tell If a Pregnant Woman May Be in Labor: Signs and symptoms may include: • Contractions Women often describe contractions as tight, crampy pain. The pain can be in the abdomen, pelvis, or low back. Contractions often last several seconds to about a minute. During labor, contractions occur at regular intervals. Contractions in the early stages of labor may occur every 15 to 30 minutes. As labor progresses, contractions become more frequent, usually occurring every 2 to 5 minutes. • Rupture of membranes (breaking of the water bag) may occur as a large gush of fluid that soaks clothing and sheets. Sometimes, 123 How to Handle a Crisis however, there is only a small slow flow of fluid. Physicians and nurses can do tests to determine whether the fluid is amniotic fluid. • Bleeding (vaginal) during pregnancy should always be evaluated by medical professionals. It may or may not be related to labor. • Pressure in the low back, pelvis, or vagina. A woman in labor may describe an urge to push or have a bowel movement. If a woman feels extreme pressure or says she feels the baby coming, delivery may be about to occur. • If you can see the top of the baby’s head, delivery is imminent. Preparing For Delivery • The important first step is: Remain calm and help others around you to remain calm. Keep onlookers from crowding around the mother. • If you feel that birth is about to happen, do not try to transport the mother. A home or office is safer than the side of the highway! • Call for emergency medical services • The most experienced person should stay with the mother. Others can help gather supplies: • Clean blankets, sheets, pillows, towels, washcloths. If none of these are available, clean newspapers can be used. • Latex or nitrile gloves and other personal protective equipment • Wash hands thoroughly and remove watches and jewelry. Delivery of the Baby • When the top of the baby’s head is visible (the baby is “crowning” delivery will occur soon. • Encourage the mother to pant or give gentle steady pushes with contractions. This helps to prevent the head from delivering too fast and helps reduce the risk of injury to baby and mother. • As the head emerges, place your hand on the head to help guide its delivery. • When the head is out, run your fingers down the baby’s neck to make sure the umbilical cord is not wrapped around the neck. If you feel a cord, gently ease it over the baby’s head. • Remember, you are guiding the delivery. Do not pull on the baby to deliver the rest of the body. Usually the rest of the body will deliver quickly, before or with the next contraction. • Be careful! Newborn babies are very slippery! Hold the baby gently, but firmly as the rest of the body exits the vagina. • Gently wipe the baby’s face with a clean dry cloth. • Do not pull, cut, or tie the umbilical cord at this time! 124 First Aid After the Delivery of the Baby • Do not cut the umbilical cord unless specifically instructed by a healthcare professional • Wrap the baby in a clean towel or blanket • The baby probably will start crying immediately • If the baby does not breathe or cry, you can rub his back to stimulate crying. You can also gently clear mucus from the mouth with your finger. • If the cord is long enough, the mother can hold the baby in her arms. • One or two cups of vaginal bleeding is normal. Delivery of the Placenta • The placenta (afterbirth) usually delivers by itself within several minutes after delivery of the baby. • Do not pull on the cord to help remove the placenta. • When the placenta comes out, wrap it in a towel or newspaper and keep it close to the baby. Do not cut the umbilical cord. • If the mother is still having bleeding after delivery of the placenta, firmly massage her abdomen just below the belly button. This helps the uterus to remain firm and stop bleeding. It should feel like a hard grapefruit under the skin. • Having the baby nurse will help the uterus contract and slow bleeding. ! WARNING: Continually monitor the victims ABCs and provide appropriate first aid until emergency services arrive. Choking See Breathing Emergencies on Page 113. Concussion/ Head Injury An impact to the head can result in a wide range of injuries. Serious brain injuries including bleeding within the head (intracranial bleeding) can be difficult to diagnose without a physician’s evaluation in a hospital. First aiders of a victim of head trauma should monitor closely for several signs and symptoms that could indicate a severe brain injury. For a person who has sustained an impact to the head, emergency medical services should be called immediately if any of the following symptoms are present: • Loss of consciousness • Persistent confusion • Loss of balance • Slurred speech • Severe headache 125 How to Handle a Crisis • Unequal pupil size • Black/blue discoloration around the eyes or behind the ears • Bleeding or fluid draining from ears • Repeated vomiting • Seizure Treating Head Injuries • Keep the victim calm and still • Assess the ABCs (See section on the ABCs of first aid) • Have the victim lie down on his back, with head and shoulders slightly elevated • Avoid moving the neck • Stop bleeding to lacerations by applying pressure to the area. Do not apply pressure if skull fractures are suspected. • Continually monitor for alteration of consciousness and breathing. Remember the ABCs of first aid and begin CPR if necessary (See sections on ABCs and CPR). Remain with the victim until help arrives. ! WARNING: Continually monitor the victims ABCs and provide appropriate first aid until emergency services arrive. Cuts, Scrapes, and Bleeding Minor scrapes and cuts can often be treated without a trip to the clinic or emergency room. Good first aid is essential, however, to avoid complications that can make a minor injury into a more serious situation. Minor Cuts and Scrapes: • Ensure safe surroundings. Use gloves and other personal protective equipment. • Stop any bleeding by applying pressure to the area for several minutes. Avoid the urge to frequently check to see if bleeding has stopped. This can damage the fresh clot that is forming. If there is a large amount of bleeding, spurting blood, or if bleeding cannot be stopped within 20-30 minutes, seek medical attention immediately. • Clean the area with warm water. A small amount of soap may be used but may cause irritation to the wound. Gently remove any surface debris with tweezers or by gently wiping with a clean cloth. Wounds with large embedded debris or very dirty wounds should be evaluated by a physician. Cleaning minor wounds with alcohol, hydrogen peroxide, or iodine is not necessary. • If desired, apply a layer of antibiotic ointment over the wound. • Dress the wound with bandages. Band-Aid or similar bandages work well for small wounds. Larger wounds can be dressed using gauze 126 First Aid pads and tape. Change the dressing at least once a day. Change the dressings if they become dirty or wet. • Every time dressings are changed, look closely at wounds for any signs of infection: • Increasing redness • Swelling • Drainage of pus from the wound • Worsening pain • Warmth at the area • Contact a physician if any of these symptoms develop. • Tetanus booster shots are recommended for all adults every 10 years. If it has been more than 5 years since last tetanus booster or if wounds are deep or dirty, a tetanus booster may be necessary. Tetanus booster injections should be completed within 2 days (48 hours) of injury. Dental Injuries Toothache Most toothaches are related to dental caries (cavities) caused by tooth decay. This decay is related to the carbohydrates in the diet and the way sugars and starches are metabolized by bacteria in the mouth. When tooth enamel is worn away by chemicals produced by bacteria, cavities are created. Often the first symptom a person has is pain, commonly elicited by cold or hot liquids. Minor toothaches can be treated using the recommendations below. At some point, however, the toothache will need the evaluation and treatment of a dentist. Minor Toothaches: • Rinse mouth with mouthwash or warm water • Take over-the-counter pain medicine such as acetaminophen or ibuprofen as directed on the packaging • Use a toothbrush and dental floss to gently remove food fragments from between the teeth • Over-the-counter topical anesthetic medicine (such as benzocaine containing gels) can be applied to the area of pain where the tooth meets the gums If any of the following symptoms are present, seek dental evaluation immediately: • Signs of infection: severe pain (especially with biting), drainage of pus or sour tasting fluid, swelling of gums • Difficulty swallowing • Pain persists for several days 127 How to Handle a Crisis Tooth Loss After a tooth is knocked out, immediate dental care is essential. Dentists can sometimes replace the tooth if appropriate steps are taken immediately after the tooth loss. After a tooth has been knocked out: • Immediately plan for and seek care at a dentist’s office or emergency room. • Hold the tooth by the top (crown) only. Do not touch the root. • Do not scrape any debris from the tooth • Gently rinse the tooth in a bowl of warm water. Do not hold the tooth under running water • Try to replace the tooth into its socket. If it does not go all the way in to the socket, gently bite down to push the tooth into place. Hold the tooth in place until the dentist’s exam. • Sometimes replacing the tooth is not possible. If this is the case, transport the tooth in a container of milk, saliva, or warm saltwater (1/4 teaspoon of salt in 16 ounces of water) Diabetic Emergencies Diabetes mellitus is a medical condition in which blood sugar (glucose) concentrations can be abnormally high due to abnormality in the body’s normal glucose regulation. Insulin is a hormone that functions to lower blood sugar levels. To manage blood sugar, persons with diabetes may be on oral medications, injectable medications, both, or no medications at all. Urgent complications of diabetes include abnormally high blood sugar (hyperglycemia) and abnormally low blood sugar (hypoglycemia). Hypoglycemia can be caused by a higher than required dose of insulin or oral diabetes medicine (which can drop the blood sugar to dangerously low levels). Low blood sugar can also develop if a person taking blood sugar lowering medicine(s) misses necessary nutritional intake that balances effects of the medication. Hyperglycemia in a diabetic person may be caused by missed doses of diabetes medications, effects of other illnesses, or side effects of other medications Symptoms of each are similar and may include: • Confusion, irritability, and/or lightheadedness • Sweating • Cool clammy skin • Rapid shallow breathing 128 First Aid Diabetic Treatment • If the person is unresponsive, call for emergency medical services immediately. • If unconscious, place them into the recovery position (see page 98) and ABC’s should be monitored until help arrives. If he is conscious and alert, ask what is wrong. He may be able to tell you what needs to be done to help. • Many first aid kits contain glucose tablets or gel. This can be given if the person can safely swallow. If first aid glucose is unavailable, a small amount of juice or candy can be given. ! WARNING: Continually monitor the victims ABCs and provide appropriate first aid until emergency services arrive. Diarrhea, Nausea, and Vomiting There are several causes of gastroenteritis (inflammatory illness of the stomach, intestines, and colon). Causes include: • Infection (viruses, bacteria, parasites) • Toxins (usually produced by bacteria) from contaminated food or water • Side effects of medication • Food intolerances In addition to nausea, vomiting, and diarrhea, additional symptoms of gastroenteritis may include abdominal cramping, bloating, and fever. Treating Gastroenteritis: • Drink plenty of fluids. Water or sports drinks may be best. Do not drink large amounts of fluids in a short amount of time. This prevents the stomach from becoming full, which can worsen nausea. • Limit food intake on the first day. With gastroenteritis, fluids are more important than food. Allow the GI tract to rest for the initial part of the illness. • Return to regular foods slowly. Start with bland, soft foods and advance back to normal meals slowly. • Rest. Allow your body time and rest for recovery. Often, symptoms with improve and resolve over 2-3 days. If any of the following symptoms develop, seek medical attention immediately: • Inability to drink and keep down fluids for more than several hours. • Fever above 101 F (38.3 C) • Vomiting or diarrhea that persists for more than 3 days • Lightheadedness or dizziness • Severe abdominal pain • Bloody diarrhea or vomit 129 How to Handle a Crisis Drowning (Near-Drowning) Near drowning is always a medical emergency. It often occurs to victims without necessary swimming skills or when a victim falls through ice. Near Drowning: • As always, first ensure safe surroundings. Make sure any potential rescuers are strong enough and skilled enough to enter water to rescue a victim. Never walk onto ice to try to rescue a person who had fallen through ice. Do not attempt rescue unless you are sure it can be done safely. • Call for emergency services immediately! • If the victim is not breathing, begin rescue breathing immediately (for properly trained individuals, rescue breathing can be done while victim is still in the water). Give rescue breaths every 5 seconds. • Use extreme caution when moving a victim of near drowning. Assume the victim could have a neck or spine injury. • If the victim is breathing, place him in the recovery position (see page 98) and monitor for other problems. Assess the ABCs: Airway, breathing, and circulation. • If necessary, start CPR (See section on CPR) • Also, see section on first aid for hypothermia. Remove cold wet clothes from the victim and cover him with a blanket. ! WARNING: Continually monitor the victims ABCs and provide appropriate first aid until emergency services arrive. Electrocution Electrical shock may be a life-threatening emergency, depending on the degree of electrocution (how electricity was passed into/through the body and level of voltage to which the victim was exposed). Electrocution Treatment • First, ensure safe surroundings! Do not touch the victim. Electricity may still be flowing. • Call for emergency services immediately. • Turn off electrical source if possible. If not, move the source of electricity away from the victim using a non-conducting material such as plastic or wood. • Assess the ABCs of first aid. If necessary, start CPR. Do not move the victim except to move him/her from dangerous surroundings. See CPR, page 117, for additional information. 130 First Aid ! WARNING: Continually monitor the victims ABCs and provide appropriate first aid until emergency services arrive. Eye Injuries There are several types of eye injuries. Many can be treated without a trip to the clinic or emergency room. Knowledge of appropriate first aid and monitoring for signs and symptoms of a more serious injury is essential. First aiders should always ensure safe surroundings and use gloves and other personal protective equipment as necessary Traumatic Blow to the Eye (Black Eye) • Assess the injury, monitoring specifically for signs of a more severe injury: • Any vision change, including blurry vision and double vision • Severe pain • Bleeding from the eye or blood in the colored or white part of the eye • If any of these symptoms are present, seek professional medical care immediately • Apply gentle pressure with a cold pack or ice wrapped in cloth. Do not apply pressure directly to the eyeball. Continue 15 minute cold pack treatments every 3-6 hours for 24-48 hours. Do not apply ice directly to skin. Chemical Splash to the Eye • The affected eye(s) should be flushed with water immediately. This can be done with lukewarm tap water from a shower or sink. Flushing should be done for 20 minutes. Victim and first aiders should wash hands and any other body parts potentially exposed to the chemical irritant. • Do not rub the eye. This can cause further injury • Remove contact lenses. Do not use contact lenses until symptoms have completely resolved • Contact poison control center for additional advice. 1-800-222-2222 • If symptoms do not significantly improve following flushing, seek professional medical care immediately. Persistent pain, redness, swelling, and vision changes are particularly concerning symptoms. • The injured person should wear sunglasses for a few days; the eye(s) will be sensitive to light and wind. Foreign Particle in the Eye • Examine the eye gently by pulling down on the skin below the eye to reveal the inner lower eyelid. Ask the victim to look upward as the 131 How to Handle a Crisis lower eye is inspected. Upward pulling on the upper eyelid with the person looking downward can help inspection of the upper eye. • If a foreign body seems to be floating on the surface of the eye or eyelid, flush the eye with saline solution or lukewarm water. • Do not rub the eye • Do not attempt to remove or dislodge embedded particles If any of the following are present, seek medical care immediately: • Particle embedded in the eye or particle cannot be removed by flushing the eye with saline solution or water. • Victim has vision changes such as blurred or double vision • Pain, redness, or swelling persists after particle has been flushed away. Corneal Abrasion (Scratch on the surface of the eye) • Perform inspection for foreign particles as described above. • Saline solution or water can be used to rinse the eye. • Do not rub the eye • Do not touch the eyeball with fingers, cotton swabs, or other objects. • Seek medical attention as soon as possible. • Avoid use of contact lenses for several days • Sunglasses may help with sensitivity to bright light and wind. Cuts/Lacerations to Eye or Eyelid or Major Trauma to Eye • Gentle pressure can be applied to the area around the eye. Do not apply pressure directly to the eyeball • Call for emergency medical services or go to an emergency room immediately. Fractures/Sprains/Dislocations Injury to bones, ligaments, and tendons can range from mild bruising to complex fractures and soft tissue injuries requiring orthopedic surgery. Most minor injuries can be treated with the R.I.C.E. method: • Rest. The injured part should be rested until normal activity can be done without pain. Complete rest is not recommended. Gentle stretching and range of motion exercises can be started shortly after injury, as tolerated. • Ice. Cold packs or ice water baths can be used, ideally starting shortly after injury and continued a few times a day for the first few days following injury. Ice treatments should not exceed 15-20 minutes and ice should not be applied directly to skin. Doing so can cause damage to skin and soft tissues. 132 First Aid • Compression. Use ad elastic bandage or neoprene brace. Compression dressings should be snug but not tight enough to restrict circulation. • Elevation. Keep the injured limb above the level of the heart when possible. Additionally, over-the-counter pain relievers such as acetaminophen, ibuprofen, or naproxen can be used (as directed on packaging) to help with pain. More severe joint injuries may need additional care. Suspect a more serious injury in the setting of one or more of the following: • An audible popping sound at the time of the injury • Severe pain, inability to put any weight or force on the injured part. • There is no improvement in symptoms after a few days. • Symptoms of fractured or dislocated bone(s): • The limb or joint appears deformed • Severe pain with even slight touching of the injured area • Bone piercing the skin • Suspected severe ligament/tendon injury or fractures should be evaluated by a physician immediately. 911 or local emergency medical services should be called in the following situations: • There is major trauma and multiple injuries are suspected • The victim is confused or unconscious • There is numbness or blue discoloration of body parts below the level of injury (fingers or toes, for example) • Fracture is suspected in the head, neck, or back Treatment for Suspected Fracture, Severe Ligament/Tendon Injury, or Dislocation: • Assess the ABCs of first aid and treat accordingly • Control any bleeding if there is an open injury (See section on Cuts, Scrapes, Bleeding) • Immobilize the injured area. Minimize movement of the injured part. Do not attempt to reduce the fracture (realign the bones). Apply a splint if previously trained to do so. • Apply a cold pack to the area to help with pain and reduce swelling. Do not apply ice directly to skin. • If the victim is lightheaded and/or breathing rapidly (symptoms of shock), lay him down on his back and elevate the legs. ! WARNING: Continually monitor the victims ABCs and provide appropriate first aid until emergency services arrive. 133 How to Handle a Crisis Frostbite Frostbite occurs when cold causes freezing of soft tissue, most commonly in the fingers, hands, toes, and feet. Symptoms of frostbite include: • Skin appears pale and feels hard, and waxy • Area may be numb, person sometimes does not realize frostbite has occurred • As tissue thaws, skin may become red and painful Frostbite Treatment • Get the victim out of the cold • If possible, do not allow the victim to walk on frostbitten feet or toes. • Place the affected part into warm (not hot) water. The water should be tested for comfortable temperature with unaffected tissue first. • Alternatively, body heat can be used to thaw the tissue, for example, fingers can be placed in the underarm area. • Do not rub or massage the area. This can cause further tissue damage. • Do not use a fire, stove, heating pad, or heat lamp to thaw tissue. The numb tissue can be injured easily. • Do not allow tissue to refreeze. If the victim will be exposed again to freezing temperatures, wait to thaw. • Seek medical attention, even after tissue is thawed and symptoms improve. Gunshot Wounds Gunshot wounds are among the most severe and potentially fatal types of trauma. It is very difficult to assess the severity of a gunshot wound in the first aid setting. The size and location of bullet wounds are not always predictive of severity of injury. Appropriate first aid can help improve the chance of a nonfatal outcome, but death often occurs even with the best first aid. Gunshot Wound Treatment • As always, first ensure safe surroundings. Minimize the risk of additional injury whether the wound was accidental or intentional. • First aiders should use disposable gloves and other personal protective equipment. • Call for emergency services immediately. • Do not move the victim unless absolutely necessary for safety or if he or she has to be transported to (or closer to) the emergency department by first aiders. 134 First Aid • Apply direct pressure to wounds to slow bleeding. Use towels, gauze, or if nothing else available, use hands to apply pressure. Do not remove pressure dressings from the wound. If dressings become soaked, add more gauze or cloth over the soaked dressings. • Assess the ABCs of first aid (Airway, Breathing, Circulation). Begin rescue breathing or CPR if necessary. (See section on CPR for details). • Place the victim in the recovery position (see page 98). • Do not place a tourniquet on arm or leg with a gunshot wound unless bleeding cannot be stopped with direct pressure and risk of death from bleeding is high. (For additional information about tourniquets, see the section on amputations). • Do not elevate the legs as a treatment for shock in a gunshot wound victim. ! WARNING: Continually monitor the victims ABCs and provide appropriate first aid until emergency services arrive. Heart Attack/Chest Pain A heart attack occurs when blood flow to heart muscle is stopped by blockage of a coronary artery. Irreversible damage to muscle tissue occurs quickly after its oxygen supply is cut off. As the saying goes, “time is muscle”. Any time a heart attack is suspected, immediate medical evaluation is crucial. Important first aid steps can be taken before the victim arrives at the emergency department. There are numerous causes of chest pain. Some causes (not just heart attack) are potentially fatal. We recommend all chest pain be evaluated by a physician immediately. Symptoms of heart attack may include: • Chest pain caused by a heart attack is variable. It may feel like pressure or squeezing inside the chest. It may be made worse with exertion and improve with rest. • Radiation of chest pain. Pain may extend to the abdomen, arms, neck, jaw, or face. • Shortness of breath • Sweating, nausea, vomiting • Dizziness, lightheadedness, fainting Suspected Heart Attack: • Immediate medical evaluation. Call 911 or local emergency services number. If phone access to emergency services is unavailable, transport the victim to the nearest hospital. Persons with chest pain should not drive themselves to the hospital. 135 How to Handle a Crisis • Aspirin. The victim should chew an aspirin while waiting for ambulance or on the way to the hospital, unless the person is allergic to aspirin or has been told by a doctor never to take aspirin. • Nitroglycerin. Some persons with known heart disease carry nitroglycerin tablets. These can be used as directed by the person’s physician. Never give nitroglycerin that is prescribed to someone else. This could make things worse. • If the victim is unconscious, assess the ABCs of first aid. Start CPR if necessary. See the section on CPR for additional information. ! WARNING: Continually monitor the victims ABCs and provide appropriate first aid until emergency services arrive. Heat Related Illnesses Heat related illnesses including heat exhaustion and heatstroke are occur when the body cannot keep itself cool. This is often related to heavy exercise in hot environments. Symptoms can range from mild muscle cramps to unconsciousness and coma. Heat Cramps Heat cramps are painful muscle spasms that can involve any muscles. The most commonly affected muscles, however, are calves, arms, back, and abdominal muscles. Heat Cramps Treatment • Ask the person to rest and cool off. Move the person to a shaded or air-conditioned area • Give water or electrolyte-containing sports drink • Do gentle muscle stretching and massage to affected areas • Seek medical care if symptoms do not improve in 30-60 minutes Heat Exhaustion Symptoms often begin after heavy exercise in hot environments. Signs and symptoms may include: • Fatigue, lightheadedness, and/or dizziness • Headache • Heat cramps • Rapid heart rate, low blood pressure • Elevated temperature Heat Exhaustion Treatment • Ask the person to rest and cool off. Move the person to a shaded or air-conditioned area. • Ask the person to lay down with feet elevated. 136 First Aid • Give water or electrolyte-containing sports drink. • If a thermometer is available, check temperature • If the person loses consciousness (faints), is becoming more confused, or has a temperature above 102 F (38.9° C), call emergency medical services immediately. Heatstroke Heatstroke is the most severe of the heat-related illnesses. Like heat cramps and heat exhaustion, it is usually associated with heavy exercise in hot surroundings, often in the setting of inadequate fluid hydration. Young children, elderly persons, and chronically ill persons are at higher risk of heatstroke. Alcohol use is also an important risk factor for heatrelated illnesses. Signs and symptoms may include: • Elevated temperature. • Rapid heart rate and breathing rate • Nausea and vomiting • Abnormally high or low blood pressure • Skin may be moist or dry (if body is unable to produce sweat) • Dizziness, lightheadedness, or fainting • Feeling worried or anxious • Headache, irritability, confusion Suspected Heatstroke • Move the person to a shaded or air-conditioned area. • You may spray mist cool water on the person or cover him with a damp towel or sheet. You may fan cool air toward the patient. • Call for emergency medical services. • If the person can safely swallow, give water or sports drink. ! WARNING: Continually monitor the victims ABCs and provide appropriate first aid until emergency services arrive. Hypothermia Hypothermia is defined as core body temperature less than 95 degrees Fahrenheit (35 degrees Centigrade). Hypothermia can cause a wide range of symptoms from mild chills to loss of consciousness, coma, and death. Hypothermia often occurs when victims are inadequately prepared for cold weather conditions. Common contributing factors include insufficient clothing and wet clothing. Cold, windy, and wet conditions can lead to rapid loss of body heat. 137 How to Handle a Crisis Symptoms of hypothermia include: • Cold, pale or red skin • Shivering • Fatigue • Confusion • Slurred speech • Shortness of breath • Slow breathing Suspected Hypothermia: • As always, first ensure safe surroundings. First aiders are also at risk of hypothermia. Move victims out of cold conditions. If indoor shelter is not immediately available, cover the victim’s body and head and protect him from the wind. • Call for emergency medical services. • Evaluate the ABCs (airway, breathing, circulation). If breathing stops or becomes severely slow, start CPR (See section on CPR) • Remove wet clothing and replace with dry covering. • Do not apply direct heat (such as hot water, heat lamp, or fire) to the body. You can use warm compresses to the chest, neck, and groin. • Do not attempt to rewarm arms and legs first! This can encourage circulation of cold blood back to the body (brain, heart, lungs), which can cause further drop in core body temperature and worsening symptoms! • Do not give the victim alcohol. If the victim can safely swallow, give warm (not hot) fluids such as tea, coffee, or hot chocolate. • Stay with the victim and monitor for worsening symptoms until emergency medical services arrives. ! WARNING: Continually monitor the victims ABCs and provide appropriate first aid until emergency services arrive. Influenza /Flu Influenza is a viral infection of the respiratory tract. It is highly contagious. Symptoms can vary from mild common cold symptoms to severe respiratory compromise including respiratory failure and death. There are numerous types of influenza including the 2009 H1N1 strain that caused numerous recent outbreaks worldwide. First aid for influenza consists mainly of assessment of the severity of symptoms, supportive care for the infected person, and prevention of spread of infection. 138 First Aid Symptoms of influenza infection • Fever, often above 101 F (38.3 C) • Lethargy • Cough • Sore throat • Runny or stuffy nose • Headache • Chills • Body aches • Nausea and vomiting Supportive Care for Suspected Influenza: • Encourage the infected person to drink plenty of fluids • Treat fever, aches, and cough with over-the-counter medications such as acetaminophen, ibuprofen, and cough syrup. Follow the dosing instructions on the packaging. • Prescription drugs to treat influenza are helpful if started within the first 48 hours of the start of symptoms. • Encourage hand washing and covering coughs and sneezes. The infected person should rest at home until feeling better and fever has resolved for at least a full day. Seek Medical Care Immediately For Any of the Following: • The sick person is an infant or child or is elderly or has chronic medical problems • Difficulty breathing • Vomiting with inability to drink plenty of fluids • Dizziness, confusion Lightning Strike • Seek medical help immediately. • Assess the situation. Is it safe to help the victim(s)? Do not risk more casualties. If necessary, move the victim to a safer location before providing first aid. • Check ABC’s • If not breathing and no heartbeat, immediately begin CPR, and continue until rescue arrives. (If not responsive after 30 minutes, the chances of survival are slim.) Lightning Related Injuries In addition to cardiac and respiratory arrest, other lightning-caused injuries are burns, shock, brain injury, muscular and skeletal damage, 139 How to Handle a Crisis blunt trauma injuries including broken bones and ruptured organs. Treat all symptoms until help arrives. ! WARNING: Continually monitor the victims ABCs and provide appropriate first aid until emergency services arrive. Nosebleeds Nosebleeds occur commonly. Most often, the source of the bleeding is just inside the nose; however, sometimes the blood comes from deeper inside and can be difficult to stop, occasionally requiring physician evaluation. Nosebleed Treatment • Use your fingers to pinch the nose just above the nostrils • Sit down, lean forward and breath through your mouth • Remain in this position for 5 to 10 minutes. • If bleeding continues, you may use a decongestant nasal spray (such as Afrin or Neosynephrine) in each nostril, followed by repeating 10 minutes of nostril pinching. If bleeding continues for more than 20 minutes, seek medical attention • Medical attention should be considered sooner with nosebleeds caused by trauma and in persons taking blood-thinning medicines. Prevention of nosebleeds caused by drying and cracking can be improved by keeping the nose moist with nasal saline spray or waterbased nasal lubricants. Poisoning / Intoxication Serious illness or death can result from accidental or intentional intoxication from thousands of different drugs, chemicals, and medications. As may be suspected, the large number of potential poisons can cause a very wide range of symptoms (in addition, many toxins cause no obvious symptoms at all). Common possible symptoms will be reviewed; however, whenever poisoning is known or suspected, a poison control center and/or emergency medical services should be called immediately. Signs and symptoms of poisoning: • Evidence such as empty pill bottles, chemical containers, or drug paraphernalia. • Victim with altered mental status (confusion, slurred speech, unconsciousness) • Chemical odor on breath (such as gasoline, nail polish remover) • Chemical odors or burns on clothing, furniture, or carpet 140 First Aid Call for Emergency Medical Services Immediately If: • The victim is unconscious or has altered level of consciousness • Victim is not breathing or breathing very rapidly or very slowly. • Severely agitated or having seizures. If the victim appears to have a normal level of consciousness and is breathing comfortably, but poisoning is suspected: • Call a poison control center immediately. In the United States, the phone number is 1-800-222-1222. • Be prepared to give information about the victim’s symptoms and the chemical in question (if known) • Help the victim remain calm. Keep him/her in a comfortable position in a well-ventilated area. • Follow the instructions given by the poison control center. • Do not induce vomiting with ipecac syrup or any other method. This practice is no longer recommended. • If advised to go to the hospital, bring the medication or chemical containers for physicians to examine. • Reassess the victim frequently for changes or new symptoms. ! WARNING: Continually monitor the victims ABCs and provide appropriate first aid until emergency services arrive. Puncture Wounds Puncture wounds often leave a relatively small skin defect. The deeper tissues, however, are the sites of potential injury or infection. For puncture wounds caused by bites, thorns, or splinters, (See the first aid instructions in the section on animal bites). First aid comprises managing bleeding, cleaning and dressing the wound and monitoring for signs of infection. Tetanus booster may be necessary. Information on first aid for other types of puncture wounds can be seen in the sections on: penetrating chest wounds, abdominal injury, and cuts/scrapes/bleeding. Seizures Seizures are the result of sudden abnormal electrical and chemical activity in the brain. there are many types of seizures and symptoms can range from abnormal movements or sensation of one body part (partial seizure) to full loss of consciousness and muscle shaking/convulsions (grand mal seizure). There are numerous possible causes of seizures, including: • Epilepsy (a disorder that may cause recurrent unprovoked seizures) • Fever (these seizures are known as febrile seizures) 141 How to Handle a Crisis • Several medical conditions including stroke, head injury, medication toxicity, eclampsia (during pregnancy), alcohol withdrawal, and many others. Seizures First Aid In most cases of seizure, the mainstay of emergency aid revolves around keeping the person safe from self-injury. • Move the person away from sharp edges • Place the person in the recovery position (see page 98). • Place something soft (a pillow or blanket) beneath the head. • Do not try to restrict movements or stop convulsions by holding the person down. • Don’t place anything into the person’s mouth. Contrary to common belief, it is not possible for people to swallow their own tongue. • If the person begins vomiting, allow the material to flow out of the side of the mouth on its own. • Call emergency services After a seizure, it is common for a person to be very sleepy, confused, and exhausted. This is known as the post-ictal state. It can last minutes or even hours. As a person recovers, she may not know she just had a seizure. It is important to support and reassure her until normal state of consciousness returns. An infant or child with a febrile seizure may be sponged with lukewarm water, but should not be immersed in water. ! WARNING: Continually monitor the victims ABCs and provide appropriate first aid until emergency services arrive. Stabbing See Cuts (page126 ), Penetrating Chest Wounds (page 122), Abdominal (page 99) and Eye Injuries (page 131), depending upon location. Stroke CVA/Tia A stroke occurs when part of the brain’s blood supply is blocked by a clogged artery or if there is bleeding into the brain. Once deprived of oxygen, brain cells begin to die in a matter of minutes. A stroke is a true medical emergency! If stroke is suspected (See below), call for emergency medical care immediately. Every minute is crucial to minimize permanent brain damage. Unless CPR is necessary, there’s not much one can do for someone having a stroke—no aspirin! Get patient to the hospital! The National Institute of Neurological Disorders and Stroke (NINDS) reports the following as common symptoms of stroke. If any of 142 First Aid the following occur, call emergency services or go to the emergency room immediately: • Sudden numbness or weakness in the face or limbs, often on one side of the body • Difficulty speaking or loss of ability to speak. • Sudden changes in vision (blindness, blurring, dimming) in one or both eyes • Sudden severe unexplained headache, confusion, dizziness, or falls may accompany the symptoms listed above. ! WARNING: Continually monitor the victims ABCs and provide appropriate first aid until emergency services arrive. Vomiting See Section on Diarrhea, Nausea, and Vomiting, page 129. First Aid Resources: Chinook Medical Gear: chinookmed.com 800-766-1365 Since 1992, Chinook Medical Gear, Inc. has been providing custom medical solutions for the harshest environments on earth. We specialize in supporting government agencies, military units, private military contractors, corporations, outfitters and individuals with the latest technology in medical containers, modules, supplies, and kits. Our line of products includes the Gamow Bag (portable hyperbaric chamber), pulse oximeters, oxygen systems, survival gear, insect protection, evacuation and transport equipment, and the latest in trauma, intubation, and resuscitation supplies. Chinook offers Kits and tools for vehicles, business and home including multipurpose adventure medical kits, travel medical kits, and many other travel medical supplies to address common ailments that occur during travel. Mayday Industries www.Maydayindustries.com 714 -893-5410 offers a full line of pre-assembled emergency kits for all types of motorists including Urban and Mountain applications. Supplier of emergency kits for homes, cars and business. 143 144 Index INDEX Abdominal Injuries, 99 Active Shooter, 9, 10, 11 Aircraft Emergency, 12 Allergic Reactions, 100 Amputation, 102, 112 Anaphylaxis, 100 Automobile Accidents, 1 Biological Terrorism, 40 Bites, 104, 105, 106, 107, 110 Blast Injury, 50, 110 Bleeding, 105, 111, 124, 126, 131, 133 Bombing, 49, 111 Bombs, 41, 46, 48, 51, 53, 54, 57, 58, 110 Bombs, 41 Breathing Emergencies, 113, 121, 125 Burns, 12, 15, 46, 116, 139, 140 Carbon Monoxide Poisoning, 81 Cardiopulmonary Resuscitation, 117 Chemical Agents, 17, 19, 36, 37 Chemical Attack, 39 Chemical Emergencies, 16 Chemical Terrorism, 35 Chest Pain, 110, 135 Chest Trauma, 121 Childbirth, 123 Choking, 18, 35, 100, 113, 114, 121, 125 Cold, Extreme, 67 Concussion, 110, 125 Cook Without Power, 84 CPR, 99, 100, 115, 117, 118, 120, 121, 123, 126, 130, 135, 136, 138, 139, 142 Dental Injuries, 127 Diabetic Emergencies, 128 Diarrhea, 22, 43, 50, 129 Dirty Bombs, 41 Disabled Vehicle, 6 Dislocations, 132 Domestic Violence, 31 Drinking Water, 8, 48, 87, 88, 89, 91, 92 Drowning, 130 Earthquakes, 71, 73, 89 Electrocution, 130 Evacuate, 9, 36 Explosion, 22 Extreme Heat, 70 Eye Injuries, 131 Finding Family, 80 Fire, 14, 26, 77 First Aid, 98 Floods, 59, 62, 85 Flu, 107 Food And Water, 43, 46 Food Safety, 85 Food Supplies, 83 Fractures, 126, 132, 133 Frostbite, 68, 134 Gunshot Wounds, 134 Hazardous Materials, 25 Head Injuries, 126, 142 Heart Attack, 68, 123, 135 Heat Related Illnesses, 136 Heatstroke, 137 Hotel Safety, 26 Household Chemical, 22, 80 Hurricane, 60-63 Hypothermia, 12, 68, 130, 138 Ice, 7, 68, 130 Identity Theft, 29 Influenza, 138, 139 Intoxication, 140 Jellyfish, 109 Labor, 123 Landslides, 73, 76 Leeches, 104 Lightning, 63 Lightning Strike, 139 145 Index Missing Children, 32 Nausea, 17, 18, 36, 43, 81, 93, 106, 110, 129, 135 Nosebleeds, 140 Poisoning, 22, 140 Post-Traumatic Stress Disorder, 93 Puncture Wounds, 141 Seizures, 141, 142 Shelter, 19 Sheltering, 20, 37 Shock, 111, 133, 135 Snakebites, 107 Snow, 87 Spider, 106 Sprains, 132 Stabbing, 111, 142 Stings, 104, 105, 109 Stroke, 142 Submerged Vehicles, 6 146 Suicide, 97 Suicide Bombers, 57 Sunburn, 117 Thunderstorms, 63 Ticks, 107 Toothaches, 127 Tornadoes, 64, 65 Trapped, 2, 72, 77 Trauma, 93 Traumatic Events, 93 Tsunamis, 75 Utility Shut-Off, 82 Volcanoes, 74 Vomiting, 129, 143 Water, Treatment, 90 Weapons Of Mass Destruction, 34 Weather Emergency, 86 Wildfires, 77 Winter Storms, 67


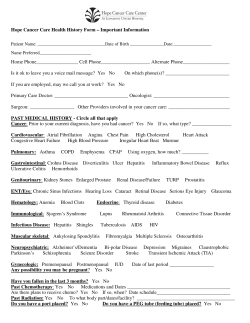


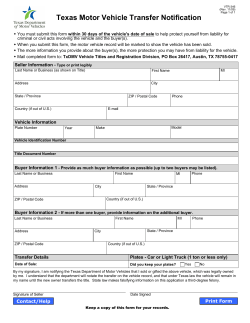
© Copyright 2026