
How to change your filters?
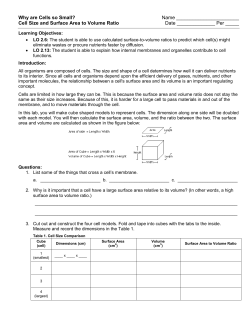
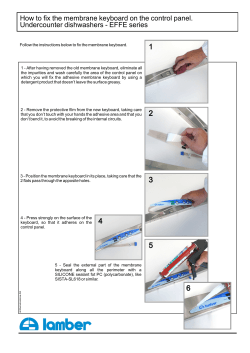
How to change your filters?
Never attempt to open a filter that is under pressure. You can’t do it.
Changing filters means that You may spill water so have a small bucket and
some rags ready. Make certain that you are not in danger from any electrical
systems or connections. You may goof and wet the area down. So turn off any
nearby electrical equipment or supply. Remember the floor may become wet and
slick, causing you too loose your footing.
The correct procedure for filter changes is as follows:
Turn off the water supply to the filter.
Open the filter system faucet and allow the filter system to drain off any
remaining water pressure.
(RIGHT tight left LOOSE) This little statement is how plumbers remember how to
open and close faucets, filters housings.
Please keep in mind that you are working on a water filter system. Clean hands
and proper safety precautions are a must. You do not need to waste water if just
changing the filters.
Replacing the standard filter element
The only important thing here is to remove the existing filters. Clean the housing
with warm water and soap and to make certain the you have not disturbed the oring or lost it. The o-ring lays in a groove near the top of the filter housing. Make
sure it is there and in place.
Standard Drinking water systems Has 3 filters across the bottom. The first is a 10
micron sediment, the second a 5 micron carbon and third a one micron carbon.
These need to be replaced at least annually
There is a horizontal inline post carbon after the storage tank. It LIES IN a
(HORIZONTAL) position and is labeled G.A.C. or taste and odor. It has a flow
direction arrow on it; please pay attention to the direction.
The larger horizontal cartridge holds the reverse OSMOSIS MEMBRANE. RO
membranes typically last 3-5 years. The membrane is a replaceable item. See
instructions below
Compact reefkeeper has the same 3 filters across the bottom, the membrane.
and A DI. The di is the second horizontal filter. it is smaller than the R.O.
membrane housing and has only two connection points
(in / out). Please pay attention to the flow direction arrow.
Dual Home/Reef. The dual Home reef is the same as the standard drinking water
plus it has a Horizontal DI at the top. The dual differs mainly in the way it is
plumbed two streams of water
When to change Filters, DI and Membrane:
Sediment filters need to be replaced when system performance drops off
(slows down).
The carbon filters have a specific life based on chlorine content of your water.
We have found that the average customer can easily go one year .Most city
water contains at least (1) ppm. Of chlorine so divide the rating by the chlorine
content. Feel free to e-mail for more complete instructions.
Membranes need to be replaced when any of the following are true.
You notice Poor taste or water quality. You may have changed all of the other
filters and the water still tastes bad. Your membrane has degraded with age and
is not performing as well as it should. Typical membrane life is (3-5) years,
typical.
Excessive poor tasting water, the membrane has been compromised and water
is flowing freely through it. Most common cause is CHLORINE exposure. Poor
filter maintenance or poor quality carbon filters are usually to blame. Or, when
not much water is available, the system seems to have lost its pressure. The
membrane has become fouled and is not making enough water.
DI Change
The DI in-line cartridge: It is best to test the TDS (total dissolved solids) with a
reliable Meter. However the cartridge is odor alert. You will notice a weird odor in
the finished water when this cartridge is exhausted.
The DI is the second horizontal filter. it is smaller than the RO membrane
housing and has only two connection points (in / out). Please pay attention to the
flow direction arrow.
Reefkeeper (TYPHOON) has the same 3 filters across the bottom plus the 4th
Cartridge is the DI. The Membrane is held in the horizontal cartridge. The DI
cartridge may be color changing. If it is the color changing type of cartridge than
it will turn a different color indicating that it is time to replace it, or you start
getting a strange odor. If you have non color changing cartridge test the TDS.
(need a TDS Meter? contact us)
Replacing the Membrane: Remember you need to flush the system after
replacing the membrane (waste some water).
If you are replacing your existing reverse osmosis membrane please remember
to lubricate the o-rings. You should use water resistant silicone lubricant If you
don’t have any, use plain old dish soap, its slick and it helps clean up.
Once you have opened the membrane housing you will see a small plastic tube.
That small plastic tube in the center of the membrane is what you want to pull
ON. you can run wire thru the hole, or you can just grasp the tube with a pliers.
you need to understand that you are only pulling for the first inch of movement.
After about the first inch of movement the membrane is free and will come right
out. So don’t pull to hard or to long. Be prepared for the quick release of the
membrane. After you replace the membrane allow the system to fill and then
empty it completely. Your fill time may vary from 2- 6 hours.
If your system is a reefkeeper than just waste the first three to five gallons of
water made.
The H2o Guru
Walter Sudymont
Air, Water & ice Inc.
Email: [email protected]
Web site: www.airwaterice.com
772-461-0256


© Copyright 2026