
How to Setup NEC IP Phones on NEC Univerge SL1000
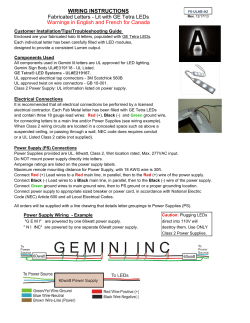
How to Setup NEC IP Phones on NEC Univerge SL1000
The objective of this document is to provide the necessary configuration steps to assist
the installer to setup IP terminals connected to the NEC Univerge SL1000 system. This
exercise shall consist of the following explanations and procedures.
Note: this configuration setup only gives you the guide on how to setup using standard
NEC IP terminal (IP4WW-24TIXH-C-TEL), in a static IP environment for the IP
terminals.
1. Overview
The IP terminals connect to the NEC Univerge SL1000 system in the following manner;
IP terminal powered locally by AC/DC adaptor
• IP terminal (with AC/DC adaptor, AC-LE)
(VoIP)
L2 switch
SL1000 CPU
IP terminal powered by L2 PoE switch
• IP terminal* L2 Power over Ethernet (PoE) switch SL1000 CPU (VoIP)
* NEC IP Terminal 24TIXH supports standard IEEE802.3af
In order to setup IP terminals in an NEC Univerge SL1000 environment, the following
specified items are required;
Hardware =>
• VoIP board (IP4WW-VOIPDB-C1) – Mandatory
• Expansion Memory card (IP4WW-MEMDB-C1) - Mandatory
• L2 Power over Ethernet (PoE) switch or AC/DC adaptor [AC-LE] (to provide
power for the hard phone itself) - Mandatory
Software License =>
• No licenses is required for deploying NEC IP Terminal 24TIXH, with a
maximum of 16 IP phones registered to NEC SL1000
How to Setup IP Phones on NEC Univerge SL1000 (Rev 1.0)
By: Chunfa [email protected]
Created on 1st Sept 11
1/10
2. Registration Types
There are 3 types of registration methods that can be used to connect the IP terminals to
the NEC Univerge SL1000 system. The 3 methods as follows;
•
•
•
Plug and Play
o Plug and Play requires no user name and password. Extension number
automatically assign by the system based on the first free number.
o Advantage: Good for fast deployment.
Automatic
o Automatic requires a user name and password and it can be entered into
the configuration so the user never has to enter. User ID and Password
need to be input in the phone configuration setting.
o Advantage: Good for fixed number tagged to the phone set.
Manual
o Manual requires a user name and password and the user is prompted to
enter after the phone has initialized.
o Advantage: Good for hot-desking. Able to have extension mobility for the
users. The user can then logout from the terminal and the next user can
login to his phone with his own number assigned.
Key Note when Deploying softphone (supported in the near future)
Manual registration is required if the Soft Phone is to override an IP multiline phone
and use the same extension number. When this is done, the IP multiline phone goes
into a Log Off state and the Soft Phone comes up as the extension the IP phone used
to be. This allows a user to use the same extension whether in the office or on the
road.
If automatic or manual mode is used the Desktop Application must enter a user name
and password. If the Desktop Application is run in deskset mode (controlling a
physical phone) and the deskset phone used is an IP phone, the user name and
password used for the Desktop Application is different than that of the actual IP
phone.
How to Setup IP Phones on NEC Univerge SL1000 (Rev 1.0)
By: Chunfa [email protected]
Created on 1st Sept 11
2/10
3. Configuration
Follow this section to assist you to setup the IP terminal for connection to the NEC
Univerge SL1000 system. Perform a SL1000 PCPro login and follow the flow of the
guide as follows;
•
Step A
3.1 Common Configuration
•
Step B:
3.2 Plug and Play Configuration or
3.3 Automatic / Manual Configuration
•
Step C:
3.4 IP Terminal Configuration or
3.5 Desktop Application Suite Application Configuration
3.1 Common Configuration
Follow the steps given here to setup the common configuration required for IP telephony
setup;
1. Declare the VOIPDB card in the system
a. Login to NEC GE SL1000 PCPro.
b. Select the ‘Standard’ tab at the bottom left and click ‘Blade
Configuration’.
c. Declare all the cards in your system including VOIPDB as shown below;
2. Check the current IP address given for the CPU & VoIP board
a. Still in the ‘Blade Configuration’ screen, right-click on slot 1 which is
your CPU board which you had declared earlier and select ‘Configure
Blade / 10-12: CD-CP00 Network Setup’
b. Check to see that your current IP address for the CPU is
01: ‘192.168.0.10’ and the subnet mask is 02: ‘255.255.255.0’
How to Setup IP Phones on NEC Univerge SL1000 (Rev 1.0)
By: Chunfa [email protected]
Created on 1st Sept 11
3/10
c. Check to see that your current VoIP IP address for the CPU is
09: ‘172.16.0.10’ and the subnet mask is 02: ‘255.255.0.0’ and apply the
changes.
*Important Note: if you changed the IP address of the VoIP card, please
perform the additional steps below;
d. Go to 84-26: VOIPDB Basic Setup (DSP) and input the 1 new IP address
required for the VOIPDB DSP resources. (The IP addresses need to be in
the same subnet as the VOIPDB card)
For example;
IP Address of VOIPDB card: 10.22.0.5
Subnet Mask: 255.255.255.0
IP Address of VOIPDB DSP Resources: 10.22.0.6
(note that it is in the same network, 10.22.0.X)
*Note that if you need to change any IP configuration, you need to reset the
system in order for the changes to take effect.
How to Setup IP Phones on NEC Univerge SL1000 (Rev 1.0)
By: Chunfa [email protected]
Created on 1st Sept 11
4/10
3.2 Plug and Play Configuration
Follow the steps given here to setup the common configuration required for Plug and
Play setup;
1. Setup the Plug and Play Register Mode
a. Select the ‘System’ tab at the bottom left and click ’10-XX: System
Configuration’
b. Click on ’10-46: DT700 Server Information Setup’, and under ‘01
Register Mode’ select ‘Plug and Play’
2. Check the IP port number
a. In the same screen check under ’06 Registrar Port’ that the port number is
5080 and apply the changes.
b. This L4 IP port number is used by NEC IP Proprietary (ITL-series)
terminals.
3.3 Automatic & Manual Configuration
Follow the steps given here to setup the common configuration required for Automatic /
Manual setup;
1. Reserve system extension numbers to be used for IP terminals
a. Under Menu click on ‘Programming / Unregistered Phones / IP Phone
List’.
b. Click on the checkbox to select the numbers you are reserving for IP
extensions as shown below;
How to Setup IP Phones on NEC Univerge SL1000 (Rev 1.0)
By: Chunfa [email protected]
Created on 1st Sept 11
5/10
2. Setup the Automatic / Manual Register Mode
a. Select the ‘System’ tab at the bottom left and click ’10-XX: System
Configuration’
b. Click on ’10-46: DT700 Server Information Setup’, and under ’01
Register Mode’ select ‘Automatic’ or ‘Manual’.
or
3. Check the IP port number
a. In the same screen check under ’06 Registrar Port’ that the port number is
5080.
b. This L4 IP port number is used by NEC IP Proprietary (24TIXH)
terminals.
4. Define the IP terminal extension number in the SL1000 system
a. Select the ‘System’ tab at the bottom left and click ’11-XX: System
Numbering Plan’.
How to Setup IP Phones on NEC Univerge SL1000 (Rev 1.0)
6/10
By: Chunfa [email protected]
Created on 1st Sept 11
b. Click on ’11-02: Extension Numbering’, and note down the ‘Station Port’
number for the IP extension which you had reserved earlier under
‘Common Configuration’.
c. Select the ‘System’ tab at the bottom left and click ’15-XX: Extension
Setup’.
d. Click on ’15-05: IP Phone Basic Setup’, on the top right corner select the
IP extension you want.
e. Go to ’27: Personal ID Index’ and input the station port number that you
had recorded earlier.
f. Select the ‘System’ tab at the bottom left and click ’84-XX: VoIP
Hardware Setup’.
g. Click on ’84-22: DT700 Logon Information’, at the top right corner select
the ‘Personal ID Index’ you need.
h. In the correct ‘Personal ID Index’ input the ‘User ID’ (e.g. username or
extn number) & ‘Password’ (up to 16 chars)
3.4 IP Terminal Configuration
Follow the steps given here to setup the common configuration required for IP terminal
setup;
1. Ensure the IP terminal is powered.
2. Enter configuration mode by keying Hold, Transfer, *, #.
3. Input the following and press OK;
a. Username: ADMIN
How to Setup IP Phones on NEC Univerge SL1000 (Rev 1.0)
By: Chunfa [email protected]
Created on 1st Sept 11
7/10
b. Password: 6633222
4. Key 1 to select ‘Network Setting’.
5. Key 1 to select ‘DHCP Mode’ and Key 1 to select ‘Disable’ and press OK.
6. Key 2 to select ‘IP Address’ and input the IP address given for this phone and
press OK. (* press * to input dot).
* Note must be in the same IP subnet as the VoIP card
7. Scroll down and Key 4 to select ‘Subnet Mask’ and input the subnet mask given.
* Note must be the same IP subnet mask as the VoIP VOIPDB card
8. Key 2 to select ‘SIP Settings’, Key 2 to select ‘Server Address & URI’ and Key 1
to select ‘1st Server Address’ and input the IP address of the VoIP card and press
OK.
9.
Scroll down and Key 4 to select ‘SIP Server Port’, Key 1 to select ‘1st Server
Port’ and input ‘5080’ and press OK.
(Do this only when you are registering the phone in Automatic Mode)
10. Key 2 to select ‘SIP Settings’, Key 1 to select ‘SIP User’, and Key 1 to select
‘User ID’ and input the User ID.
11. Key 2 to select ‘SIP Settings’, Key 1 to select ‘SIP User’, and Key 2 to select
‘Password’ and input the Password.
How to Setup IP Phones on NEC Univerge SL1000 (Rev 1.0)
By: Chunfa [email protected]
Created on 1st Sept 11
8/10
4. Phone Registration
If you have completed the 3. Configuration section, the phone now should be in the
following behavior;
•
Plug and Play mode
o The phone should reboot after your IP terminal configuration and upon
booting up, it will register to the NEC Univerge SL1000 system.
o The system will auto assign one free number for IP terminal to this phone
set.
o Phone now registered and able to make / receive calls.
•
Automatic Mode
o The phone should reboot after your IP terminal configuration and upon
booting up, it will register to the NEC Univerge SL1000 system.
o Since the extension number is already pre-set in the phone and system,
the phone will boot up using the assigned number.
o Phone now registered and able to make / receive calls.
•
Manual Mode
o The phone should reboot after your IP terminal configuration and upon
booting up, it will register to the NEC Univerge SL1000 system.
o Since the extension number is only pre-set in the system, the phone will
boot up with the login screen.
o Input the extension number and password (If prompted with the
‘Override’ message, just key Yes). The system will match this with the
current setting in the database and when matched the phone will use this
number.
o Phone now registered and able to make / receive calls.
o To sign out from the phone, perform the following;
Look at the phone and press the Key which corresponds to
‘PROG’
How to Setup IP Phones on NEC Univerge SL1000 (Rev 1.0)
By: Chunfa [email protected]
Created on 1st Sept 11
9/10
Press the key which corresponds to ‘ ’ and press it to scroll down
until you see ‘LogOff’
Press the Key which corresponds to ‘LogOff’ to logout your
extension number
Press the key which corresponds to ‘Yes’ to confirm
Press the key which corresponds to ‘Exit’ to finish
Now the phone will boot up with the login screen
How to Setup IP Phones on NEC Univerge SL1000 (Rev 1.0)
By: Chunfa [email protected]
Created on 1st Sept 11
10/10


© Copyright 2026