
How to make a Military Challenge Coin Display
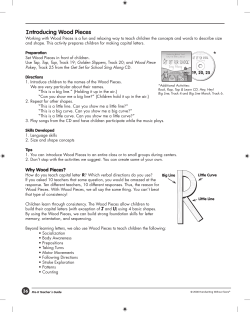
How to make a Military Challenge Coin Display
Brought you by The Military Challenge Coin Blog
:A tutorial on building a high quality stadium style display for your
coins
For starters...
A little safety goes a long way. Make sure you are careful using all the tools. Make sure you get
trained to use all the equipment sufficiently - the displays may be nice, but they are not worth
any fingers! Also make sure to wear hearing protection while operating equipment - it is simply
the smart thing to do.
Gather your Supplies...All in all you are looking at about $30.00
●
●
●
●
●
You should start by getting a nice piece of wood. A piece of ~2” thick by ~8” wide
wood with the length dependant on how many coins you plan to display. A nice
hard wood, like Oak is a good choice, buying a small piece from a lumber yard is
going to be your best bet - 2” by 8” furniture grade oak will generally run about
$5.00/ board foot (FSC certified wood – which we prefer – will cost about $2.00
more than that). Just getting one foot from a lumber yard is a fat chance, you
might have to buy at least 5 feet, but it never hurts to ask.
220 sand paper ~$2.50 for a pack
Wood conditioner ~$10.00 for quart (This is optional, but recoomended)
Wood Stain ~ $5.00 for a ½ pint
Lacquer – polyurethane (oil based) or polycrylic (water based) ~ $6.00 for ½
pint
●
●
4 Pads for the bottom ~ $1.00 for a pack
Some scrap plywood for making the jig that will run through the planar with your
piece.
NOTE: (Make sure that the conditioner and stain you buy are both of the same type, that is,
water based or oil based)
Get the right Tools...For this job you will need the following tools.
Most are pretty
standard in a military post wood shop.
●
●
●
●
●
●
●
Planar (most 2” by 8” wood you buy will be in the rough, so it will need planed
down, but you can buy finished wood, it just costs a little more)
Table saw
Waddle blade
Miter saw
Brush for applying stain
Brush for applying finish
Some old rags
Step by Step Instructions...I have tried to make these clear.
TASK 1: Make a jig that will “slope” the coin display as it runs through the planar.
The jig holds the wood at an angle so that the planar blade cuts a slope (See FIG 1). This is
about the toughest part of the whole project, get it done right, and you are well on your way to a
nice display.
FIGURE 1. The blue is the jig, the thatched block is your piece of wood, and the orange line is
where the planar will cut down to, and the purple outline is what will be left after you have
planed. The height you hold up your wood is going to determine how steep or shallow your
slope.
CAUTION: Make sure that your jig doesn't have any exposed nails, you don't want those going
through the planar, or scratch you piece of wood up.
TASK 2: Cut the width of the board.
Determine how wide you want your display to be, that is, how deep back it will be. I use eight
inches which provides ample space for coin rows.
Once you have determined the width you want, set the table saw for the measurement and rip
your piece of wood. When you are running the board through the table saw, keep a good steady
space, if you go too slow, the blade has a tendency to burn the wood, and that means either
having to run it again, or lots of sanding – which is no fun!
TASK 3: Run the board through the planar.
Run the board through the planar without the jig, on both sides, once or twice, to get rid of the
rough edges and dips in board (if any).
Now put the board on the jig, make sure the board is secured in the jig (If its not, put some
support pieces on the jig to hold it in place), and run it through the planar. I like to reduce the
height ever so little at a time. Make sure you are always running the board through the same
way each time. Monitor the depth of the cut, until you are satisfied with the slope.
TASK 4: Cut the coin channels
Now install the waddle blade onto the table saw. I like to disconnect power to the table saw
before doing this, it ensures that the saw could not inadvertently turn on. Set the waddle blade
to cut at 1/4” wide, and set the height of the blade to provide about a 1/4” depth cut. I leave the
waddle blade straight up and down, doing so slightly cants the channels forward, and holds the
coins at a great display angle.
Now get a piece of scrap wood, and determine where you want your first channel to be., the first
channel is at the front of the display, the thinnest part of the wood. I like to leave 1 ½” at the
front of the display, this leaves room for a little placard if you want one.
Run the wood over the waddle blade, make sure to keep your fingers clear of the blades as it
come out the other end. Make sure you keep a smooth, good paced push over the waddle
blade, or else the cuts will get burned, and trying to the sand out burn marks from the channel is
about as fun as sanding burn marks from a channel.
Once you have the first channel cut, you need to decide the spacing you want between each
channel. I like 3/4”. Now since the waddle blade cuts 1/4”, you generally have to make your
measurement about 1” from the last cut. Clear as mud? Lets say your table saw was set to 1 ½”
for the first cut. Add an inch to that measurement, and your next row will start around 3/4” from
the end of the last row. The best option, is try it on a piece of scrap wood. Once you have the
spacing determined, just keep adding it to the table saw index for each consecutive cut, until
you run our of channels.
TASK 5: Cut the Length of the Display.
If you started with the length of wood that you needed, then you can skip this step, otherwise
you need to cut the length of the wood. Get some of your coins and line them up to get your
desired length. When you cut with the miter saw, make sure the side with the coin channels is
facing up, this keeps the top looking nice.
TASK 6: Sand
Get some 220 grit sand paper and start sanding all over the wood, make sure to break all the
edges and get down in the channels. Once the wood is smooth to the touch, wipe it off with a
rag or air hose to get all the wood dust off.
TASK 7: Condition the Display
If you decide to apply wood conditioner, now is the time. In our experience it is best to use a
brush, instead of a rag, because this allows you to get into the channels very well, otherwise
you are straining to get the rag through and apply the same thickness of a coat. To dry, set the
piece on a drying rack, or support it with a small piece of scrap wood or something underneath
to keep it from sitting flat on a work bench. We use an environmentally friendly water based
wood conditioner that takes about 3 hours to dry. Just follow the recommended instructions and
drying time on your product.
TASK 8: Stain the Display
This is the part that always makes me nervous, you really only have one chance to get this right.
Test out the wood stain on a scrap piece of sanded wood to make sure it is the color you are
going for. Let the stain soak in for different lengths of time, and remember what looks best to
you. Make sure your piece of wood is cleaned off. Now, normally I like to use rags to apply stain,
but this is one of the few instances that using a brush is beneficial (getting into those the
channels is difficult with a rag). Brush on your desired amount, let the stain set for your
predetermined time, then wipe it off with a rag (here a brush won't do the trick, so you need to
make do). To dry, set the piece on a drying rack, or support it with a small piece of scrap wood
or something underneath to keep it from sitting flat on a work bench.
TASK 9: Lacquer the Display
Don't shake the lacquer! Stir it. Then, with a brush, apply a thin coat of lacquer onto the display.
You will be tempted to lay it on thick – don't. You will put on three coats, and by the end it will be
plenty thick. Let the lacquer dry sufficiently between each coat and sand lightly with 220 grit
sand paper after each coat.
TASK 10: Apply Pads
Once the lacquer has dried, you simply add four pads to the bottom. I use pads made from a
recycled fiber. I suppose felt pads would work just fine, but the fiber pads are a little more
robust.
TASK 11: Celebrate!
Congratulations, you are finally done! It generally takes at least 2 to 3 days to complete a quality
Challenge Coin Display, depending on how quick your conditioner, stain, and lacquer take to
dry.
Consider Joining our Email Newsletter...If you like Challenge Coins, you should
consider signing up for our quarterly newsletter.
Sign Up for our quarterly Newsletter
That’s more work than I thought!...It does take a little time to build a display, if you
would prefer to purchase a display, then I welcome you to check out our Military Challenge Coin
Display for a good deal.


© Copyright 2026