
How To Use a Reciprocating Saw
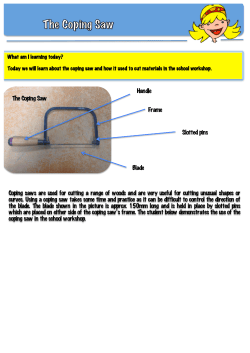
How To Use a Reciprocating Saw
brought to you by BARELYBAD.COM
Introduction Thanks for volunteering to help at a construction site. Your efforts will make a difference not
only to one particular family in need of decent, affordable housing but also the whole neighborhood.
In this Construction Volunteer How-To article we discuss a powerful power tool called a reciprocating saw. It
is not nearly as safe or easy to use as a cordless drill or even a circular saw, but it is the perfect tool for certain
purposes.
Table of Contents
Reciprocating saw described . . . . . . . . . . . . . . . . . . . . . . . . . .
Parts and controls . . . . . . . . . . . . . . . . . . . . . . . . . . . . . . . .
Trigger . . . . . . . . . . . . . . . . . . . . . . . . . . . . . . . . . . . . . .
Forward grip . . . . . . . . . . . . . . . . . . . . . . . . . . . . . . . . .
Foot . . . . . . . . . . . . . . . . . . . . . . . . . . . . . . . . . . . . . . . .
Gear setting . . . . . . . . . . . . . . . . . . . . . . . . . . . . . . . . . .
Cordless verus corded . . . . . . . . . . . . . . . . . . . . . . . . . . . .
Uses for a reciprocating saw . . . . . . . . . . . . . . . . . . . . . . . .
Reciprocating saw versus circular saw . . . . . . . . . . . . . . . . . . .
Blades . . . . . . . . . . . . . . . . . . . . . . . . . . . . . . . . . . . . . . . . . . . .
Blade type . . . . . . . . . . . . . . . . . . . . . . . . . . . . . . . . . . . . . .
Metal blade . . . . . . . . . . . . . . . . . . . . . . . . . . . . . . . . . .
Wood blade . . . . . . . . . . . . . . . . . . . . . . . . . . . . . . . . . .
Combination blade . . . . . . . . . . . . . . . . . . . . . . . . . . . . .
Blade length . . . . . . . . . . . . . . . . . . . . . . . . . . . . . . . . . . . .
Upside-down and sideways blades . . . . . . . . . . . . . . . . . . .
Changing the blade . . . . . . . . . . . . . . . . . . . . . . . . . . . . . . .
Blacksmithing the blade . . . . . . . . . . . . . . . . . . . . . . . . .
Bending the blade . . . . . . . . . . . . . . . . . . . . . . . . . . . . . . . .
How to use a reciprocating saw . . . . . . . . . . . . . . . . . . . . . . . .
Cutting out bottom plates in doors . . . . . . . . . . . . . . . . . . . .
Cutting out a window – plunge cut . . . . . . . . . . . . . . . . . . . .
Cutting off a big post . . . . . . . . . . . . . . . . . . . . . . . . . . . . . .
Safety . . . . . . . . . . . . . . . . . . . . . . . . . . . . . . . . . . . . . . . . . . . .
Who should use recip saws and who shouldn’t . . . . . . . . . .
Conclusion . . . . . . . . . . . . . . . . . . . . . . . . . . . . . . . . . . . . . . . .
Reciprocating saw described
1
2
2
2
2
2
2
3
3
3
4
4
4
4
4
4
5
5
5
5
5
6
7
8
9
9
TOP
Certain saws cut materials by rotating a toothed blade about a central point, such as a circular saw and a table
saw and a band saw. Other saws move a straight blade back and forth, such as a hand saw and a jigsaw.
A reciprocating saw, as you can tell by the name, reciprocates, i.e., the
blade moves back and forth (at just over an inch per stroke). In the photo
you can see the power cord below the yellow D-handle that encloses the
black trigger. Left of that are the motor and, in black, the forward grip. Left
of that are the yellow blade-changing tab, the foot, and finally, of course, the
business end, the blade, which in this case is also yellow.
reciprocating saw
A reciprocating saw is sometimes referred to just as a “recip saw.” It might also be referred to as a Sawzall,
which is a brand name, regardless of its brand.
Construction Volunteer How-To Articles
–
How To Use a Reciprocating Saw
page 1 of 9
Recip saws are designed to cut through a variety of materials. You install the correct blade, and you push it
against the material and pull the trigger to start the back-and-forth sawing.
Parts and controls
TOP
A reciprocating saw is a pretty simple tool compared to, say, a circular saw. Here are the parts and controls.
Trigger Like a drill, reciprocating saws have a variable-speed trigger. You can pull so little that the blade
barely moves. At full steam some can reciprocate 3,000 times per minute.
You need to decide where in that speed range is best for your circumstances. You never want to go so slowly
that the blade binds in the material. If the blade is at the proper speed it will cut, but when it slows down
enough it will stop cutting and instead it can get bound up in the material you’re cutting, which is both
inefficient and also potentially dangerous.
When the blade of any saw binds in the material, called kickback, the result is that the entire tool tries to move
in opposition to the movement of that blade. You don’t want this to happen, so be extra careful to hold on tight
when the blade is moving slowly.
Sometimes the orientation that’s best requires you to pull the trigger not with your index finger but your pinky
finger. Don’t do this until you’re sure you’ve got a good, solid grip on the tool.
Forward grip All recip saws are designed to be used with two hands on the tool. One hand necessarily goes
on the rear handle, where a finger thereof operates the trigger. Your other hand should be on the forward grip
unless circumstances require otherwise.
It is usually the forward hand that presses the blade into the material and steers it as necessary. Feel free to
try different ways of grasping the saw to make sure you’ve chosen the best one.
Foot The foot of the tool (see image above) is more useful than some novice users realize. It is designed to
be used as a fulcrum for many types of cut, to help ensure that it’s the blade that reciprocates and not the
body of the saw. Remember to look for opportunities to stabilize the saw by resting the foot against some
handy surface or other.
Sometimes the foot gets in the way and you wish it weren’t there. When that happens, consider whether the
cut can be made easier with the blade reversed. If that won’t work either, you’ll just have to make do, such as
in “Cutting out bottom plates in doors” below.
Gear setting There might be a gear setting on your recip saw, typically a control labeled “1" and “2.” Just as
with a car, the lower “1" gear provides more power at a slower speed, and vice versa for the “2" setting. For
more solid materials such as a wet 6 by 6 post you’ll want to use the “1" setting, but if you’re cutting through
half-inch OSB you can afford to shift up to second to get the job done faster.
Cordless verus corded
TOP
The model shown above is powered by an electric cord, but some reciprocating saws you might find on a
volunteer job site are powered by a rechargeable battery. Generally, battery-powered recip saws are smaller
and lighter than corded models, and an obvious drawback is that their batteries run down, usually pretty
quickly under heavy load, which means you’ll probably want to make sure you have at least one spare battery
charged and ready to go.
Furthermore, corded recip saws tend to be more powerful. They can scrape deeper into harder materials
under higher pressure for longer than battery-powered models, which tend to slow down and even stop under
extreme circumstances. Slowing down too much, as you now know, can be dangerous because of kickback.
Construction Volunteer How-To Articles
–
How To Use a Reciprocating Saw
page 2 of 9
Uses for a reciprocating saw
TOP
If you have enough time and enough blades, you can use a reciprocating saw to cut an entire house in half.
For that reason, recip saws are used often in demolition; whatever needs to be sawn through probably can be,
and usually pretty quickly.
On job sites reciprocating saws are invaluable during certain early phases of construction. Wielding a
reciprocating fitted with the proper blade saw, you can cut through stick lumber and roof sheathing and siding
and floor decking and engineered I-joists and big posts and drywall and plastic pipes and nails and screws and
bolts and various other metals and even mortar and brick.
Reciprocating saw versus circular saw
TOP
If circular saws are in use on a job site, there’s a good chance a reciprocating saw is too. Sometimes you
need to decide which tool to use for a particular task. (We hope you have or will soon read the How-To article
from the construction department on circular saws.)
If you need to cut a loose 2 by 4 to 104-3/8 inches, a circular saw is your best bet, because it’s difficult to be
that accurate with a recip saw, and even if you can be the end of the wood can end up being ragged.
A circ saw is less dangerous than a reciprocating saw primarily because of the difference in how much of the
blade is exposed. During normal, expected use, very little of a circ saw’s blade is ever exposed, whereas
during normal, expected use a lot more of a recip saw’s blade is often exposed and capable of cutting into
things you don’t want it to cut into – such as flesh – not just along the toothed edge but also at the very sharp
tip and even along the non-toothed edge.
For these reasons, if you have an otherwise identical choice between a circular saw and a recip saw, choose
the circ saw.
But a recip saw can make cuts that would be difficult or impossible with a circular saw. For example, you can
saw between two pieces of wood that are face-nailed together and cut only the nails, whereas a circular saw’s
blade isn’t long enough even if you did have it fitted with a metal-cutting blade. As another example, the
bottom plates of walls between doors, sticks of 2-inch wood that run horizontally flat along the deck, must be
cut out at some point, and a circular saw simply will not fit.
You can prune tree branches and roots easier with a reciprocating saw than a circular saw. You can lop off a
big post or a beam in one pass where a circular saw would take two or even four. You can cut at tight angles
a circ saw can’t accommodate, and you can position a recip saw in ways you can’t with a circ saw.
A circular saw’s blade is typically 7-1/4 inches in diameter and is perfectly rigid, which means that once you’ve
cut fully into the material, especially thicker material, it’s difficult to change direction. You have to get the cut
started right or it will be wrong. When you drift off the straight and narrow, steering back onto your line with a
circular saw is difficult and ugly. A recip saw is much more steerable because its blade is only about an inch
instead of seven. Even in quite thick material you can steer a recip saw’s blade at much tighter angles than
with a circ saw.
In each circumstance you face where a circular saw isn’t quite right, keep in mind that a
reciprocating saw might be.
Blades
TOP
There’s more to know about the blades used in reciprocating saws than there is to
know about the whole rest of the saw. The whole rest of the saw consists of two places
to put your hands, a trigger, and a foot.
wood blade
Construction Volunteer How-To Articles
page 3 of 9
–
How To Use a Reciprocating Saw
Before you can use a reciprocating saw successfully you must make sure the correct blade of the correct
length is installed. Although there’s a wide variety of blades made for recip saws, the most common you’ll find
on volunteer sites are a metal blade, a wood blade, and a combination blade. They come in different lengths,
typically 6 to 10 inches.
Blade type
TOP
Metal blade Blades designed to cut metal have many teeth per inch, around 14 to 20, whereas blades
designed to cut wood have a lot fewer, around 6 to 8. They are not interchangeable, so make sure you’ve got
the correct type installed before you start trying to cut. Now, having said that, it is true that a metal blade will
cut wood and vice versa, but neither combination is efficient. Using a metal blade to cut wood takes a lot
longer, because the tiny teeth of a metal blade don’t dig very deep with each reciprocation of the blade.
They’re designed to cut away small amounts of a more solid substance a little at a time.
Because its teeth are smaller, a metal blade leaves a smoother cut edge.
You can sometimes identify a metal blade by a marking on it near the aft end, whether the word “Metal” or an
icon of a steel I-bar.
Wood blade Cutting metal with a wood blade is even worse. Although you can chew off nails and cut into
other metals with a wood blade installed, the result is that the blade will get dull much more quickly, and after
not all that many encounters with harder material than it expects, a wood blade will get so dull it must be
thrown away. Needless to say, all these blades cost money.
Where you have a choice, choose a wood blade with fewer teeth if you don’t care about the result as long as
you tear something up. The fewer teeth per inch the faster but more ragged the cut will be. If you do care
about a clean cut edge, such as for shortening a 6 by 6 post, choose a wood blade with more teeth.
You can sometimes identify a wood blade by a marking on it near the aft end, whether the word “Wood” or an
icon of a piece of lumber.
Combination blade There is also a type of blade called a combination blade, and it is designed to cut
primarily through wood but also metal such as a few nails. A combination blade is not designed to cut through
metal much bigger than nails. For example, you wouldn’t use one to cut through a quarter-inch piece of
reinforcing rod (rebar).
Some combination blades are marked with the words “Metal” and “Wood” or icons of a steel I-bar and a piece
of lumber.
Blade length
TOP
Ideally you will have a choice of whether to install a long blade or a short one. Generally, you always want to
use the shortest blade that will do the job. The reason is that sometimes the part of the blade that runs
beyond whatever you’re cutting can get to whapping back and forth at a high rate of speed and surprisingly far
from one side to the other. This is not only dangerous to anyone or anything in range, it will quickly damage
the blade beyond repair. The less the blade sticks out the other side, the better.
Upside-down and sideways blades
TOP
All reciprocating saws and blades are designed so the blade can be installed either way. Sometimes it’s
easier if the teeth of the blade point down, other times up.
And sometimes only one way will work. There’s no default orientation, whether up or down or left or right; it’s
just whichever is best for the situation.
Construction Volunteer How-To Articles
–
How To Use a Reciprocating Saw
page 4 of 9
Changing the blade
TOP
Fortunately, almost all recip saws you’ll find on job sites are of the sort that makes blade-changing easy.
You’ll find an obvious tab or lever of some sort, just behind the foot, that you pull on to loosen the locking
mechanism. Then you change the blade as desired and lock it by pushing the lever back into position.
You might encounter a reciprocating saw whose blade must be changed using a tool, typically an Allen
wrench. Be careful not to lose the screw or the wrench.
Before you use the saw be sure to test whether the blade is truly seated and locked in properly, by grabbing it
with your fingers and trying to pull it out. If you can, you did something wrong and you have to start over.
Blacksmithing the blade Before you use or install a blade you should check it for straight. If it is not
straight, you should make it so before you proceed. Some blades get damaged so severely that they cannot
be rehabilitated, but many bends and creases can be removed with a little blacksmithing. These blades cost
money, so do try to rehab a non-straight blade or ask someone else to try before throwing it into the trash.
Generally, the idea is to place the blade carefully against some sort of anvil and strike it repeatedly with a
hammer till it straightens out. Each hammer blow will change its angle only a small amount, but a few or a
dozen such carefully placed blows can add up to a re-straightened blade.
You can use any handy corner as an anvil, such as a piece of lumber. Place the bend of the blade against the
edge of the anvil such that when you hammer the blade just beyond the bend, it tends to get straighter.
Examine the results every few blows to check your progress. It’s a matter of trial and error, but if you pay
attention you can do it. If you don’t want to try, ask a site supervisor or any other experienced carpenter.
Bending the blade
TOP
The three types of blade described above are designed to bend a bit. For example, if you need to remove a
stud, you might choose to start by cutting through the vertical nails that anchor it to the bottom plate. To do so
you would lay the blade flat against the bottom plate, even if the back end of the saw has to be an inch or two
higher.
This is a feature of most recip saw blades that most novice volunteers fail to recognize, so now you know.
How to use a reciprocating saw
TOP
Because a recip saw can perform so many cuts in so many situations, it’s difficult to generalize how to use one
except to say that you choose a blade and pull the trigger and it saws back and forth.
So, let’s look at the steps in three specific situations you might encounter in order to see some of the details.
First we’ll cut out the bottom plates of door openings, then we’ll cut out the OSB sheathing over a window
using a plunge cut, and finally we’ll lop off a big post.
Not surprisingly, these exact procedures may be modified as circumstances dictate.
Cutting out bottom plates in doors
TOP
This is an example of making a cut that needs to be made several times on every house, usually by
volunteers. When a wall with a doorway in it is stood up and attached to the deck, there’s always a long piece
of 2 by 4 or 2 by 6 lumber, called a bottom plate, that runs flat at the bottom of the door. At a certain point in
construction those pieces need to be cut out flush to the deck and flush to each side of the door. The best
tool by far for this procedure is a reciprocating saw, and here’s one way to do it. (Assume below that we’re
cutting at the right side of the door.)
Construction Volunteer How-To Articles
–
How To Use a Reciprocating Saw
page 5 of 9
1. Choose a wood-cutting blade, i.e., the type with big teeth, not little ones.
2. Install it in the saw so the teeth face up, which will give you more clearance at the deck than the other way.
3. Place the right side of the blade against the left face of the vertical 2 by framing member, called a jack stud
(which will be face-nailed inside the king stud, if that helps you). Place the teeth of the blade against the
top face of the bottom plate.
4. Pull the trigger pretty far, so the blade goes pretty fast, at the same time you press down with your left
hand on the forward grip, pressing the teeth into the wood.
! The exact speed you should maintain is something you will quickly figure out. Generally, the faster the
better.
! But be prepared during the first several strokes of the saw for it to misbehave. Sometimes you have to
try different starting speeds to get the best one for your particular combination of blade length and
angles and wood hardness and your own grip strength.
5. Feel free to rock the blade up and down a bit to get a new cutting surface started. While pressing down on
the forward grip, you raise the back of the saw to lower the tip of the blade, then you rock the blade back
by lowering the back of the saw. Then you saw off the top of the triangle you’ve created till you’re level
again, and continue.
If you just keep pressing in the same direction you will quickly be sawing across the longest possible
distance. If you rock it back and forth the blade will mostly be sawing into corners, which goes faster.
6. When you get close to the deck, whether it’s wood or concrete, make sure the blade is level and proceed
down with a little less pressure till you’ve cut through.
! You want to push down more slowly at the end so you don’t saw into the concrete or wood deck.
! If you don’t cut all the way through to the bottom of the bottom plate, that’s OK. When you think you’re
really close you can stop and whack the piece with a hammer to see whether it moves. You can also
try prying up that end of the bottom plate with the claw end of a hammer or with a pry bar. Saw and
whack and pry as necessary.
! If your last whacking or prying severs the piece but the wood tears and it turns out a little slab is still left
on the deck, those hangers-on can always be removed with a little more careful sawing or a chisel or a
utility knife or even the claw end of a hammer.
7. Repeat on the other side of the door, then repeat for all the other doors in the house. You’ll get better with
practice, which for many volunteers is unexpectedly satisfying.
Cutting out a window – plunge cut
TOP
In this second example of using a reciprocating saw, sometimes you need to make a plunge cut, which means
starting the cut somewhere in the middle of the wood, typically a sheet of OSB-type plywood that’s 7/16" thick.
A common example is cutting out a window opening that’s been sheathed over on the outside with OSB.
Your goal is to cut out the window from the inside with your reciprocating saw. There’s no end or edge as
there usually is from which to start sawing, so you have to plunge the blade into the wood at some point, and
that’s a tricky maneuver that not all novices can handle. If you think you’re qualified, here’s one method.
1. Install a blade designed to cut wood.
Construction Volunteer How-To Articles
–
How To Use a Reciprocating Saw
page 6 of 9
2. Choose which of the four sides of the window you’re going to cut out first. If you’re right-handed, start with
the right side of the window so you’re sawing down vertically, with the blade at the top, which means you’ll
grab the forward grip of the tool with your left hand.
3. Place the right side of the blade against the left face of the vertical 6-inch framing member, called a jack
stud. Choose whatever starting height is least awkward for you.
4. Position the saw so the tip of the blade is almost touching the OSB and the tool is otherwise as vertical as
it can be. You want to dig into the OSB at as shallow an angle as the tool’s shape and blade length will
allow.
5. Pull the trigger and then use your left hand to press the tip of the blade into the OSB. The idea is for the
tip of the blade to gradually wear its way into the wood till you’ve pierced through to the outside.
A number of problems with this Step 5 can arise. Here are the common ones.
! The very tip of the blade wants to push away from the OSB on the push stroke. This causes the whole
rest of the saw to push back towards you, which you don’t want.
! The first tooth or two of the blade wants to dig into the OSB and hold onto it rather than cutting it. This
causes the whole rest of the saw to pull forwards away from you, which you don’t want.
! The blade tries to whap back and forth from right to left rather than staying flush against the jack stud.
6. As you hack a trench deeper through the 7/16-inch wood, gradually raise the back of the tool with your
right hand while you press forward and then down with your left. Continue doing this – slowly changing the
angle of the blade – till you’ve cut through to the other side and your tool is positioned horizontally.
7. Now that the hard part is over, continue sawing till you get close to the next corner. Do not saw all the way
to the end but rather steer the saw 90 degrees and keep sawing. If you want to switch hands or pull the
trigger with your pinky finger, go ahead and do so. If you need to remove the saw and reposition it or the
blade, that’s OK too.
8. Repeat Step 7 till you meet up with where your plunge cut started. Needless to say, make sure the piece
of OSB doesn’t cause any harm when it finally falls loose.
9. There will still be a radius of wood in each corner that needs to be removed so the corner is square.
Simply dig in one way with your saw, then 90 degrees the other way, and the corner will fall away.
Once you’ve got the saw lined up you can cut pretty fast through such light material as this OSB, but don’t go
so fast that you swerve off-line. You want to be as close as possible to your built-in cut “lines” without gouging
into those framing members. If you find it easier to tip the saw very slightly so it cuts the outside of the sheet a
tiny bit deeper than the inside, that’s OK. This is another procedure that’s fun to get good at.
Cutting off a big post
TOP
In this third example of using a reciprocating saw, you might be called on to cut to length a big wooden post
such as a 4 by 4 or a 6 by 6. Here are five options for making such a cut.
A miter saw is a fine choice because it always makes a square cut. In some situations that cut can also be
made in one pass.
A table saw can also be used although, unlike with the other four tools, the post itself must be moved rather
than a blade. Sometimes that post weighs well over 50 pounds.
Construction Volunteer How-To Articles
–
How To Use a Reciprocating Saw
page 7 of 9
A chainsaw also cuts all in one pass, but there isn’t usually one available and, besides, you probably won’t be
given permission to use one, but you could watch.
A circular saw can be used (read exactly how here), but it requires two passes to cut through a 4 by 4. It
requires four passes for a 6 by 6, and at that there’s still some at the very center left unsawn. And unless
you’re careful you can end up with non-square cuts or mis-matched surfaces or both.
A reciprocating saw is a fifth option. The benefit over a circular saw is that it cuts all in one pass, but you still
have to take care to be accurate. Here’s one way to do it.
1. As always with a reciprocating saw, install the correct blade, in this case a wood-cutting blade.
2. Make sure the cut lines you’ve marked really are straight and square and at the correct distance.
! Feel free to rely heavily on the Carpenter’s Rule: Measure twice, cut once.
! (And remember the corollary to that rule: If you’re gonna cut wrong, cut long.)
! These posts are expensive, and we never order extras for you to practice on. If you want to practice,
which might not be a bad idea if you’ve never done this before – and if the post is long enough – you
can make one or more test cuts out near the scrap end to spot problems and learn how to correct
them.
3. Align the blade on the scrap side of the cut line a few millimeters above the wood, pull the trigger, and
lightly drop the blade into the wood at the top corner nearer you. If you’re on your mark keep going; if
you’re not, make the correction.
4. Gradually rotate the blade till the teeth lie flat across the whole face you’re cutting into. As you do so,
make really sure the blade is always following the cut line. When it’s flat against the face, press straight
down – making sure you’re pressing dead square to the face – a ways to set that kerf deeper.
! If you’ve done this right, this will be the line you should follow for the rest of the cut. If it isn’t perfect,
the time to catch and correct the problem is now, not later. Never stop paying attention to how well
you’re doing, and never stop steering toward perfection.
5. As with cutting out bottom plate above, rock the blade forward to the far corner and saw for a while, then
rock back to the near corner and saw a while, then return to level and saw till you’re back to flat again.
Repeat this rocking process till the cut is finished.
! It’s important to stay on your cut line till you’re well into the wood, but it is equally important that your
cut line be square to the length of the post. You’ve got two angles to get right, so take your time.
! Near the end of the cut you’ll need to have a helper make sure the scrap side doesn’t sag in any
direction and bind up the blade.
The variety of cuts a reciprocating saw can make on a job site is too large to try to list them all, but the three
examples above describe several of the important details.
Safety
TOP
A typical reciprocating saw comes fresh from the factory with absolutely no safety features whatsoever. No
blade guard, no clutch-brake, no big sign that says, “Don’t cut humans with this saw.” The only safety feature
is your own good sense. The safety rules below are in no particular order, so please read them all.
Construction Volunteer How-To Articles
–
How To Use a Reciprocating Saw
page 8 of 9
! You should feel free to use hearing protection and eye protection.
! Like circular saws, reciprocating saws use big motors that take awhile to spin down after you let go of the
trigger. But unlike a circular saw, a recip saw has no blade guard that snaps into place, so you must
carefully hold onto the tool when you’re finished with the cut till it stops completely.
! If you stop in the middle of a cut, perhaps to change your grip, when you start up again try to back the saw
off just a hair so the teeth aren’t touching the material when you pull the trigger. The blade will bite in more
predictably if it’s reciprocating before you urge it back to work.
! As with a circular saw, be careful to avoid kickback, which arises when the material you’re cutting through
tries to make the blade hold still, which then causes the body of this saw to reciprocate instead of the
blade, which is always bad. If you experience more than mild kickback, do these two things immediately:
(1) Let go of the trigger and (2) struggle against the saws’ motions, i.e., use all your muscular power to
resist the saw’s tendency to want to push back and forth in your hands, and do keep struggling till the
motor winds down, which can take a second or two. You’ve got to be in control of this tool and not the
other way around.
! Because of the possibility of kickback and other unexpected recip saw behaviors, it is especially important
to maintain control when you’re on a ladder or when you’re forced to use the blade near a human.
Who should use recip saws and who shouldn’t
TOP
A reciprocating saw can be significantly more dangerous to use than other tools on volunteer job sites. It’s a
simple-minded device with only one control, the trigger. It’s also a brutal device that has no respect for human
flesh or anything else.
Some cuts with a recip saw are simple and easy and safe, but some more novel cuts need to made in
awkward positions from atop a ladder at ungainly angles across uncooperative materials, with unexpected and
occasionally undesirable consequences.
If you’re convinced you are ready to use a recip saw, make sure you’ve read all of this article. If you still aren’t
convinced you can use it safely and accurately in a particular situation, spend some time watching others use
it before you decide, and feel free to ask for a lesson from authorized personnel.
Conclusion
TOP
Using a reciprocating can be easy or difficult depending on the circumstances, but you always have to pay
attention lest it turn on you, or someone else, or, for that matter, a part of the house you didn’t mean to saw
into. If you are new to the tool, and even if you aren’t, do treat its aggressive personality with respect.
But also keep in mind the large variety of cuts a reciprocating saw can make that other tools can’t.
We thank you volunteers for your efforts. We hope you learn something, we hope you have a good
time, and we hope you have a good feeling about yourself for trying hard to help a worthy family afford
a home you built.
H ow To U se a Reciprocating S aw – last edited January 22, 2010
Return to: | The hom e page of this How-To series | Barelybad.com | HabitatKC.org
Construction Volunteer How-To Articles
–
How To Use a Reciprocating Saw
page 9 of 9


© Copyright 2026