
Document 217442
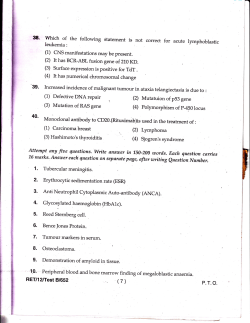
How to Program Your RB5X 1 2UWY^^Ubc 7eYTU d_ B3< Q^T >C3 DY^i 2QcYS 3 ? B @ ? B 1 D 9 ? > 1978 South Garrison Street, Unit 6 , Lakewood, Colorado 80227-2243 How to Program Your RB5X A Beginners Guide to RCL™ and NSC Tiny Basic™ Version 2.0, May 2000 Copyright © 2000 General Robotics Corporation General Robotics Corporation 1978 South Garrison Street, Suite 6 Lakewood, Colorado 80227-2243 Toll-Free: 800.422.4265 Local: 303.988.5636 Fax: 303.988.5303 Information: [email protected] Technical Support: [email protected] Products & Corporate Information: www.generalrobotics.com The RB5X and Education: www.edurobot.com “RB5X,” “RB5X The Intelligent Robot” and “RCL” (Robot Control Language) are trademarks of General Robotics Corporation. “NSC Tiny Basic” is a trademark of National Semiconductor Corporation. 2 Table of Contents: Forward 4 Platform Conventions 5 Connecting RB5X to Your Computer 5 About RCL 6 Programming Conventions Used in this Document 6 Using Variables in RCL 7 Using Random Numbers in RCL 9 Using Subroutines in RCL 10 Data Input 11 Data Output 13 Creating Your Own RCL Program 14 Editing an RCL Program 16 Program Size and Memory Limits 18 About Calibration 19 Calibrating the Com Port 19 Calibrating the Bumper-Start Delay 20 Setting Other Calibration Parameters 21 Calibrating the Sonar 22 3 Forward This document is provided free for downloading from the General Robotics Corporation website. It was written to provide a summary of programming procedures formerly scattered throughout several earlier GRC publications. This summary represents the most current compilation, and incorporates corrections and updates useful to those who want to program their RB5X. Many RB5X owners have tried writing their own robot control programs, but were frustrated by incomplete or confusing instructions. How to Program Your RB5X provides everything you need to know to start programming your robot today. This document is not intended to replace existing materials. It provides sufficient information to accomplish most programming tasks, but is not a comprehensive guide to all RCL commands or programming procedures. Nor is it a tutorial on the art of programming itself, which spans everything from flow charts to debugging. Rather, it should be seen as a supplement to other materials provided with the robot or available directly from GRC. These include: RB5X: The Intelligent Robot™ — Reference Manual (old version) General Robotics Corporation — Reference Manual (new version) Robot Control Language with SAVVY® RB5X Voice / Sound Synthesis Package — Manual Robotics Instructional Materials — Workbook Programming The RB5X Robot — Using Robot Control Language with SAVVY® all of which are useful to anyone experimenting with programming. Unfortunately, the existing materials span a history of over 15 years and are inconsistent in their use of command formats and terminology. GRC is now beginning the arduous task of rectifying this situation, and hopes you will find this document helpful in the interim. Note: The material in this document is an excerpt from RB5X: Mission to Mars, GRC’s newest curriculum package. Read more about Mission to Mars on our website at: http://www.edurobot.com 4 Platform Conventions The procedure for interfacing your RB5X with a computer is detailed in your Reference Manual and is platform-specific. The procedure given here is for the PC DOS environment, running any version of DOS ≥ 2.0. In other environments, the user will have to interpret these procedures with respect to platform-specific instructions in the Reference Manual. Connecting RB5X to Your Computer Before you do anything else, make a backup copy of your RCL disc. Programs can only be saved to this disc. When it’s full (1.44 Mbytes) you will need another to continue. Do this now. The first step is to connect RB5X to your computer and establish a two-way communication link. Follow these steps in the exact sequence indicated: 1. Connect RB5X to your computer’s COM1 port using the RS-232 cable. COM1 is RCL’s default setting. If COM1 is already used by another device, you can reset RCL to use COM2 by running the routine described on page 24 (Initial Robot Calibration). 2. Ensure the RS-232 switch next to RB5X’s battery level indicator is set to “STD” (standard). 3. Carefully remove any EPROM module installed in the socket on RB5X’s interface panel — this is a memory chip, so take the usual antistatic precautions. You can leave it installed if, after powering-up the robot, you press bumpers 2 and 4 to enter the command mode. 4. Turn on RB5X. 5. Turn on your computer and boot to DOS. 6. Insert the “RCL for DOS” disc into the floppy disc drive. 7. Type: A: <RET> 8. Type: RCL <RET> This will launch RCL and display the title screen along with system information. RCL will then prompt you for a command by printing: 9. WHAT WOULD YOU LIKE ME TO DO NOW? This is the main command mode prompt from RCL. You could, at this point, create a new program, or edit an existing program. However, before proceeding you should verify that two-way communication between your computer and RB5X has been established. 10. Type: DUMBO <RET> If you get the error message ROBOT AND COMPUTER ARE NOT COMMUNICATING!!!, first be sure the robot is turned on and in “command mode” (press bumpers 2 and 4). Then check the cable connections, communications port calibration, and your Reference Manual (in that order). If you get the message COMMUNICATION WITH ROBOT IS WORKING, all systems are go. Enter F7 (the function key) to return to RCL. 5 About RCL RCL (Robot Control Language) is an easy and intuitive programming environment. It is powerful enough for most robot control functions without having to resort to NSC Tiny Basic subroutines. We strongly recommend you acquire and refer to the GRC publication “Robot Control Language with Savvy® — Programmers Manual” for a complete listing of RCL commands and syntax. If you’ve done programming in other languages you’ll need to relearn some vocabulary. In RCL the words “program” and “command” are replaced by the single word “task,” since its language commands are themselves programs (in NSC Tiny Basic). Other differences will be come clear as you work with the language. It is strongly recommended that even experienced programmers go through the steps of the sample program provided later in this section. It will acquaint you with the most important procedures and vocabulary for RCL programming. An important feature of RCL is the way it accepts and processes individual program lines as they are entered. RCL is a dynamic programming environment, thus when you enter a command you often need enter only the first word — RCL will fill in the rest and provide the input fields for the parameters needed. In some cases, a few more words may be required to specify the command uniquely. For example, to command the robot to move forward 5 feet you would enter: 1. MOVE DISTANCE FORWARD <RET> and RCL will respond with: 2. MOVE DISTANCE FORWARD FOR THIS MANY FEET ___ You then enter a “5” in the distance field, hit <RET>, and the line is complete. In fact, if you try to enter the entire line with distance included, RCL will not accept it. To program a loop, you need to enter more than the just first word since there are three different types of loops, all of which start with the word BEGIN, i.e., BEGIN A LOOP BEGIN A COUNTED LOOP BEGIN A LIMITED LOOP Programming Conventions Used in this Document , , , , , Text typed in Arial caps is text you actually type, e.g., PREPARE THE ROBOT. Text typed in Arial italics is a prompt or output from RCL, e.g., INVENT A TASK CALLED ___ The symbol <RET> means you should press the “Return” or “Enter” key. Anything in square brackets is an argument (number, variable, or function) you can specify, e.g., MOVE DISTANCE FORWARD THIS MANY FEET [5]. Note: The brackets are not entered. Though not shown in the examples provided, all variables entered in an RCL command must be placed in quotes, e.g. SET “B” EQUAL TO 3. The same rule applies to the logical operators ( <, >, =, <> ). Numbers can be entered without quotes. 6 Using Variables in RCL RCL by itself is fine, provided all you need to do is program motions or voice events. However, the use of variables (the key to higher-level programming) requires inclusion of NSC Tiny Basic subroutines. Many of the RCL commands that are designed to handle variables are not functional and generate errors when used. Fortunately, NSC Tiny Basic provides the means for arithmetic and logical operations not otherwise possible. There are 26 single-letter variables (A-Z) available for use by RCL. Some may already be taken by primary RCL tasks, so to avoid conflicts use only A,B,C,E,F,G,H,J and U. Nine variables are usually enough for all but the most complex problem solving. If you really need more, you can easily check which variables are in use by entering the command: SHOW VARIABLES which will display a screen showing the variables in use, and those still available, in the program most recently listed or edited. Other variables will occasionally be available, depending on what internal tasks RCL is using to run your program. Two important functional commands for manipulating variables in RCL are: RESERVE THE TINY BASIC VARIABLE [VARIABLE] CLEAR ALL ITEMS The first command is required at the start of a program to enable the use of a variable. The second sets all variables equal to zero (including any variables currently in use by NSC Tiny Basic). One of the most powerful functional commands in RCL is: SET THE TINY-BASIC VARIABLE [VARIABLE] EQUAL TO [EXPRESSION] which can be used to set a variable equal to any valid integer (-32767 to +32767) or to a variable or variable expression. It will generate a non-fatal REPORT MATH ERROR! message in the latter two cases, but this will not affect the operation of the program (i.e., it’s non-fatal). Examples of legal SET statements include: SET THE TINY-BASIC VARIABLE [A] EQUAL TO [3] SET THE TINY-BASIC VARIABLE [A] EQUAL TO [B] SET THE TINY-BASIC VARIABLE [A] EQUAL TO [(B+C)/2] The following command sequence is also functional, and can be used to create loops that repeat or terminate on variable values. Again, the use of a variable in more than one field of the same RCL command (i.e., line 3) will generate a non-fatal REPORT MATH ERROR! message. 1. BEGIN A LIMITED LOOP 2. (do something) 3. REPEAT THE LIMITED LOOP UNLESS [VARIABLE or VALUE] IS [<] TO [VARIABLE or VALUE] 7 Another functional loop sequence is the counted loop: 1. BEGIN A COUNTED LOOP CALLED [VARIABLE] BEGINNING AT [VARIABLE or VALUE] ENDING AT [VARIABLE or VALUE] 2. (do something) 3. REPEAT THE COUNTED LOOP FOR THE COUNTER [VARIABLE] Note that when you use a counted loop, the underlined VARIABLE must be the same in both lines. Unfortunately, there are some non-functional RCL commands that would seem to severely restrict what can be done with this language. In case you haven’t already discovered them, they are: CALCULATE [VARIABLE] = [VARIABLE or VALUE] [ + , - , * , / ] [VARIABLE or VALUE] TEST IF [VARIABLE or VALUE] IS [ = , > , < , <> ] COMPARED TO [VARIABLE or VALUE] Fortunately, we can recover these important operations. By using the COMPILE command we can insert equivalent NSC Tiny Basic statements into the program. The form of this command is: COMPILE THE BASIC STATEMENT [STATEMENT] WHICH MEANS [COMMENT] The argument STATEMENT can be a calculation using variables and integers, such as A=2 A=A+1 A=(A+B)*C/100 or any other legal operation. All calculated values will be truncated (rounded down) to integers. It is possible to include more than one STATEMENT in a single COMPILE command by using a colon (:) to separate individual STATEMENTS. For example: COMPILE THE BASIC STATEMENT [A=3:IF A.>B GOTO 42] WHICH MEANS [COMMENT] There is no limit to the number of individual STATEMENTS that can be included within a single COMPILE command, save for that imposed by program size restrictions. The argument STATEMENT can also be a logical conditional such as IF A<=10 GOTO 50 IF A=B GOTO 50 IF (A>3) AND (C=3) GOTO 42 Note that in compound conditionals such as the last example, each conditional must be enclosed in parentheses. Conditional statements can be used to simply jump to another line number in the program, or to terminate a loop by jumping out of it. When using a GOTO statement in a COMPILE command you cannot GOTO an RCL line number. The line number specified must be the line number in the compiled NSC Tiny Basic version of the program. To see what that line number will be, temporarily enter a dummy line number like 333. 8 Then go into the RCL command mode and enter: 1. BUILD <RET> 2. BUILD A PROGRAM FROM THE ROBOT TASK ___ 3. [NAME OF YOUR PROGRAM] <RET> with the name of your program placed in quotes. Your RCL program will be compiled into NSC Tiny Basic. To list the program showing its NSC Tiny Basic commands and line numbers, enter LTP <RET> and scroll around to discover the actual line numbers. You can then return to RCL and edit the dummy line numbers accordingly. Finally, the argument COMMENT in the command COMPILE THE BASIC STATEMENT [STATEMENT] WHICH MEANS [COMMENT] is simply a comment by you regarding the function of the command, such as COMPARE A&B or CALCULATE C. These comments can be helpful when reviewing and debugging programs. Some of these methods may seem awkward, but they are the only way to regain full programming functionality. As you acquire experience using variables you will see the real problem-solving potential of this language, for it is the logical processing of variables that allows an autonomous machine to respond intelligently to changes in its internal state or external environment. Using Random Numbers in RCL It is sometimes desirable to incorporate random elements into a program. Artificial intelligence problem-solving algorithms often require this feature. The COMPILE statement provides a means to enter a random factor into an RCL program by using the RND function. The command: COMPILE THE BASIC STATEMENT [A=RND(X,Y)] WHICH MEANS [RANDOM INTEGER] will assign a integral value from X to Y inclusive to the variable A. The value of integer X must be less than the value of integer Y, and Y can be any integer from 1 to 32767. The RND function can be used without a “seed” value, in which case it will return the identical sequence of pseudo-random numbers each time the robot is activated. To generate a somewhat less “pseudo” sequence, use the following command before calling the RND function: RANDOMIZE USING A SEED VALUE OF: [U] where U is an integer between 0 and 1000 inclusive. By using a variable that takes on different values based on some input (e.g., a counted loop for U that is exited on some external event) the random number generated becomes truly unpredictable. 9 Using Subroutines in RCL The COMPILE command also allows the inclusion of subroutines, something that cannot be done in RCL alone. The use of subroutines for procedures that are executed often in the same program can tremendously reduce program size and complexity. The advantage of a subroutine over an [IF something GOTO somewhere] statement is that the program execution sequence can jump into the subroutine from anywhere in the program and then return to where it jumped from without reference to a specific line number. You can also use a GOTO or JUMP statement to exit a subroutine before reaching the RETURN command. This concept is best illustrated with a specific example. Consider a program that requires the robot to honk its horn a number of times equal to the variable B. Consider also that this variable could be set to different values at different points in the program. The flowchart below shows a simple program that follows this scheme. START SET B=2 HONK HORN B TIMES SET B=3 HONK HORN B TIMES END To execute these steps in an RCL program we can use the following code. HONK: An RCL Program to Demonstrate Subroutine Use 1. 2. 3. 4. 5. 6. 7. 8. 9. 10. 11. 12. 13. 14. 15. PREPARE THE ROBOT RESERVE THE TINY-BASIC VARIABLE [A] RESERVE THE TINY-BASIC VARIABLE [B] SET THE TINY-BASIC VARIABLE [B] EQUAL TO [2] COMPILE THE BASIC STATEMENT [GOSUB 36] WHICH MEANS [HONK] SET THE TINY BASIC VARIABLE [B] EQUAL TO [3] COMPILE THE BASIC STATEMENT [GOSUB 30] WHICH MEANS [HONK] JUMP TO THE LINE CALLED [DONE] CALL THIS ROBOT TASK LINE [HONK] BEGIN A COUNTED LOOP CALLED [A] BEGINNING AT [1] ENDING AT [B] HONK THE HORN FOR [1] SECONDS WAIT FOR [1] SECONDS REPEAT THE COUNTED LOOP FOR THE COUNTER [A] COMPILE THE BASIC STATEMENT [RETURN] WHICH MEANS [RETURN] CALL THIS ROBOT TASK LINE [DONE] Note how lines 9-13 are executed twice {by the GOSUB), but written only once. In this trivial example only four lines of code are eliminated, but the savings in a more complex program can be substantial. Note also that the subroutine itself is called as line 36 — this is the NSC Tiny Basic line number in the compiled version of the program. By starting the subroutine with a named line (HONK) we make its line number easier to find when scrolling through the compiled program listing. Remember that you must BUILD a program before you can LTP (list) it. 10 Data Input The ability to accept input and provide output is crucial for many robotics applications. Input can come from the robot’s local environment or from a remote programmer. Sensory information in the form of bumper contacts, sonar echoes, or IR (infrared) readings allow the robot to respond to what it encounters. Output in the form of horn, LED or voice signals can provide feedback to the programmer when acting in a teleoperational mode. Unfortunately, there is no way to enable I/O (Input/Output) via onscreen prompts or printouts while a program is executing, even with the robot connected to the computer by cable (or the RF communications link option). There are, however, several alternate means for accomplishing I/O. RB5X can sense its environment in three ways: bumper contacts, sonar and IR. In each of these cases, internal memory registers or NSC Tiny Basic variables take on certain values that can be used for decision-making or calculations within a program. Bumper input is the easiest data to handle, as it requires nothing more than a few standard RCL commands. The bumpers are numbered clockwise, starting with #1 at the front of the robot, and will display an LED signal (on the correspondingly numbered red LEDs) when pressed. Here is an example of RCL code that uses bumper contact for decision-making in a program: 1. BEGIN A LOOP 2. EXIT IF BUMPER NUMBER [1] IS TOUCHED 3. REPEAT THIS LOOP 4. (do something) where the bumper number entered can range from 1-8. Alternatively, line 2 could be replaced by 2. EXIT IF ANY BUMPER IS TOUCHED If you need the robot to react to a specific bumper contact for manual data input while a program is executing, individual bumper values can be incorporated into a COMPILE statement. When any bumper is activated, its ID value is stored in a register accessible through NSC Tiny Basic. Here is an example of RCL code that uses bumper contact for numerical data input: 1. COMPILE THE BASIC STATEMENT [Y=@#7800:IF Y=251 GOTO 3] WHICH MEANS [BUMPER #1] 2. JUMP TO THE LINE CALLED [NEXT BUMPER] 3. SET THE TINY-BASIC VARIABLE [B] EQUAL TO [1] where the value of the variable Y depends on which bumper is activated (in this case bumper 1), and the variable B is assigned whatever value is needed. Numerical data can be entered into a program by a series of such commands. Individual bumper values are shown in the adjacent chart. The bumper value is initially stored at hexadecimal address @#7800, and then transferred to the variable Y (already reserved by NSC Tiny Basic). 11 BUMPER Y=? 1 2 3 4 5 6 7 8 251 254 247 127 239 191 223 253 Sonar input can be accessed by RCL code modeled after the following example: 1. 2. 3. 4. 5. 6. BEGIN A LOOP EXIT IF SONAR DISTANCE IS [MORE] THAN [0.1] FEET REPEAT THIS LOOP CALL THIS ROBOT TASK LINE [MEASURE] COMPILE THE BASIC STATEMENT [LINK#1100:DELAY20] WHICH MEANS [GET D] COMPILE THE BASIC STATEMENT [A=(30*D - 30*73)/22] WHICH MEANS [CALC CM] The loop in lines 1-3 is required to activate the sonar, and only needs to be used once near the start of the program. After that, any time the code in line 5 is used the variable D is assigned a value equal to the number of “counts” between sonar transmission and echo reception. To convert this value into an actual distance we need line 6, the specific details of which depend the units desired (“cm” in this case) and the calibration parameters of the robot (see Calibrating the Sonar). IR input can be accessed by RCL code modeled after the following example: 1. 2. 3. 4. 5. 6. 7. COMPILE THE BASIC STATEMENT [X=#02] WHICH MEANS [TURN ON IR] COMPILE THE BASIC STATEMENT [@#7801=@#7801 OR X] WHICH MEANS [SET BIT] COMPILE THE BASIC STATEMENT [IF (@#7802 AND #40)=0 GOTO 6] WHICH MEANS [LIGHT] SET THE TINY-BASIC VARIABLE [A] EQUAL TO [0] JUMP TO THE LINE CALLED [CONTINUE] SET THE TINY-BASIC VARIABLE [A] EQUAL TO [1] CALL THIS ROBOT TASK LINE [CONTINUE] The conditional “=0” in line 3 will sense light colors against a dark background. If you need to sense dark colors against a light background, change this to “=64.” In this example, if the robot senses a light color, the variable A will be assigned a value of “1.” If not, the variable A remains at a value of “0.” Direct, real-time, numerical input via keyboard is, as stated earlier, not possible once a program is executing, but by using the hierarchical nature of RCL it can be accomplished, albeit circuitously. The robot must, of course, be connected to the computer by cable or RF link. Consider a program named MOVE that calls, as a task, the sub-program named INPUT consisting of the following lines: 1. CALL THIS ROBOT TASK LINE [INPUT] 2. SET THE TINY-BASIC VARIABLE [A] EQUAL TO [42] 3. SET THE TINY-BASIC VARIABLE [B] EQUAL TO [33] where the variables represent, for example, distances to move. When executed, MOVE terminates at a point intended for new data input. On termination, the operator/programmer can easily edit INPUT to include new variable values, and then re-BL (build and load) MOVE. Since INPUT is a task in MOVE, as MOVE is re-compiled these new values will be incorporated as input. MOVE must be structured to accommodate this type of cyclic data input by including INPUT as a command line preceding any operations on the variables A and B. 12 Data Output As stated in the preceding section, there is no way for RB5X to report data directly to the screen of your computer, even when it is connected via cable or RF com link. Again, there are several alternative means by which the robot can communicated with its programmer. These include the horn, the LEDs, and the voice (if available). The easiest method here is to use the horn. Conditional loops with included horn commands can be used to count off integral values, or signal any predefined code — even Morse if “text” output is required. Here is an example of a loop that signals the value of a calculated value B: 1. 2. 3. 4. 5. 6. CALL THIS ROBOT TASK LINE [HONK] SET THE TINY-BASIC VARIABLE [B] EQUAL TO [C+E/2] BEGIN A LOOP CALLED [A] BEGINNING AT [1] ENDING AT [B] HONK THE HORN FOR [1] SECONDS WAIT FOR [1] SECONDS REPEAT THE COUNTED LOOP FOR THE COUNTER [A] Though not as omnidirectional as the horn, the robot’s LEDs, if visible in the application, can also be used to signal output codes. There are four individually controllable LEDs numbered as shown in the adjacent diagram. This provides, essentially, four bits of information and allows for much more complex signal codes. As with the horn, conditional loops are used for converting the values of internal variables into observable output. In practice, line 4 of the preceding example would be replaced by some combination of TURN ON LED NUMBER 2 TURN ON LED NUMBER 3 TURN ON LED NUMBER 4 TURN ON LED NUMBER 5 FRONT OF ROBOT LED 5 LED 4 LED 3 LED 2 Note that LED 1 is the IR emitting diode located on the underside of the robot. You can turn it on with this command, but it provides no visible output. The final output option is the voice, available only through the optional voice/sound synthesis package. Using the voice eats up more memory, but provides a method of output most efficiently interpreted by humans. The RCL code for creating words from phonemes, and for speaking those words, is explained clearly in the manual included with that option. Suffice it to say that using a series of SPEAK commands in the form SPEAK THE PHRASE CALLED: [DIGIT or WORD] with conditional JUMPs provides a powerful means for reporting any type of data. 13 Creating Your Own RCL Program You are now ready to begin writing your own RCL programs. This is done by using an onscreen text-based editor. Programs can then be saved to the RCL disk, or downloaded to the robot and executed. If you select “Mode: Free” (as opposed to “Mode: Literal”) RCL will assist you by correcting faulty language syntax. This may be helpful to novice programmers. The following example will step you through the programming process. Try this one for practice, and you will soon be sufficiently fluent in RCL to create your own RB5X programs. You will be creating a simple test program called BEEPLITE. This program will cause RB5X to sound its horn and turn its LED lights on and off. It performs no useful function beyond verifying correct programming procedures. Start out by typing 1. INVENT <RET> RCL will respond with 2. INVENT A TASK CALLED ___ prompting you for the name of the program you want to create. Note that you cannot have two tasks with the same name. If you want to reassign a name, the RENAME function (described later in this example) allows you to do just that. Enter 3. BEEPLITE <RET> The RCL screen will change, list your program name as “Task BEEPLITE,” and prompt: 4. -> ___ You are actually in the edit mode at this point, and can create the program by entering each line in sequence. The flashing cursor is where you begin entering your program. As you enter the lines, RCL will number them sequentially for you. Enter the following line of code: 5. PREPARE THE ROBOT <RET> This command resets the memory registers to receive a new program. The most current version of RCL (v2.5, 1994) is said to no longer require this line, but programs seem to run more consistently when it is used. The command only costs you 5 bytes, so go ahead and use it. It is frequently advisable to incorporate a delay between the loading and execution of a program. This allows you time to disconnect the cable (essential if any robot motion is involved), prepare for data acquisition, get out the way, or simply sit back and anticipate, with dramatic pause, your creative masterpiece in action. To include a controlled delay between the loading and execution of this program, enter 6. WAIT FOR ANY BUMPER PRESS <RET> 14 RCL will respond with 7. WAIT FOR ANY BUMPER PRESS AND THEN WAIT FOR ___ SECONDS MORE allowing you to input the desired delay time. For now, enter 8. 3 <RET> For programs without any physical motion, the above commands are the only ways to insert such a delay. For programs that do involve motion, RCL provides a calibration parameter that will do this for you automatically without requiring a command within the program. This parameter will be explained in the next section (Initial Robot Calibration). Now we get to the fun part. Time to program some real actions. Enter 9. HONK <RET> RCL will respond with 10. HONK THE HORN FOR ___ SECOND(S) prompting you here for the number of seconds to honk the horn. Enter 11. 3 <RET> 12. TURN ON ALL THE LIGHTS <RET> 13. WAIT <RET> RCL will respond with 14. WAIT FOR ___ SECOND(S) prompting you here for the number of seconds to wait. Enter 15. 3 <RET> 16. TURN OFF ALL THE LIGHTS <RET> This completes the entry of BEEPLITE. You must now save the program to disc, download it to the robot, and run it. Enter 17. Q <RET> This quits the edit mode, saves your program to the floppy disc, and returns you to the command mode. RCL will respond with 18. WHAT WOULD YOU LIKE ME TO DO NOW? 15 Note that you will not see this program listed on the disc if you list its directory in DOS — it has been assimilated into the file named RCL.SVY which acts as the RCL task library. You could see it in RCL, however, by using the SHOW TASKS command. Try this now. Then enter 19. BUILD AND LOAD (or more simply) BL <RET> The RCL screen will change again and prompt you with 20. PLEASE ENTER THE NAME OF THE ROBOT TASK ___ 21. BEEPLITE <RET> The RCL screen will change several times as BEEPLITE is compiled into NSC Tiny Basic and download to the robot. When the download is complete the program would normally be executed immediately — in this case you’ll need to press a bumper to begin the show. RB5X should wait three seconds, beep its horn for three seconds, and then turn on its LED lights for three seconds. If the cable is still connected, you can easily execute the program again. Just type RUN and the program will repeat. Editing an RCL Program If you want to experiment with RCL commands on your own, BEEPLITE can be modified by using the edit mode. Enter 1. LIST <RET> RCL will respond with 2. LIST THE ___ 3. BEEPLITE <RET> RCL will list the program and also display its size (38 bytes). This is a small program. RCL will accommodate programs up to 1000 bytes, so fairly complex problem-solving is indeed possible. To edit this program enter 4. EDIT <RET> RCL will prompt with 5. EDIT THE ___ 6. BEEPLITE <RET> RCL will list your program and place the cursor after the program’s final line. Look it over and review the lines you entered earlier. If you need to add, delete or modify any program lines, this is the place to do it. You are now in the edit mode. 16 While in the edit mode you can use the following tools: CURSOR KEYS: to move cursor up and down through the program lines TAB: to move cursor to the next input field in the current line SHIFT + TAB: to move cursor to the previous input field in the current line NUMBER: moves cursor to program line with that number When the cursor is positioned in the right place, simply enter the desired program line and RCL will renumber all the other lines accordingly. You also have these options: E <RET>: D <RET>: L <RET>: Q <RET>: to edit the line above cursor to delete the line above cursor to list the program showing changes to quit the edit mode and save the program There is no way to directly save an edited program under a new name. If you want to modify an existing program and rename it, you must first create a copy of the original with the desired new name before editing the original. Follow these steps from the main command prompt: 1. 2. 3. 4. 5. 6. WHAT WOULD YOU LIKE ME TO DO NOW? CLONE A TASK <RET> MAKE A CLONE FROM THE TASK NAMED .. ___ [NAME OF TASK YOU WANT TO EDIT] <RET> GIVE THE NEW TASK A NAME .. ___ [NAME YOU WANT FOR NEW TASK] <RET> RCL will process your request, create a copy the original program, rename it, and save it to disc. You can then edit the cloned program as desired using the EDIT command explained earlier. To simply rename as existing program, follow these steps from the main command prompt: 1. 2. 3. 4. 5. 6. WHAT WOULD YOU LIKE ME TO DO NOW? RENAME <RET> RENAME OLD NAME ___ [OLD PROGRAM NAME] <RET> RENAME OLD NAME [OLD PROGRAM NAME] TO NEW NAME ___ [NEW PROGRAM NAME] <RET> Program names can be up to 256 characters long including spaces. For convenience, keep them short and DOS-like or your SHOW TASKS screen can become very confusing. Remember that you cannot have two programs with the same name on the same RCL disc. When you’re done with RCL and want to return to DOS, enter BYE <RET> 17 Program Size and Memory Limits BEEPLITE was a small program (38 bytes) that barely scratched the surface of RB5X’s potential. Individual programs up to 1000 bytes (≈72 lines) in size can be created, saved and run as needed. Even larger programs can be written by exploiting the hierarchical command structure of RCL. Perhaps you recall reading that RB5X has 8000 bytes (8k) of standard RAM, and were wondering what the other 7k is doing. The short answers is: waiting for more programs. The 1k size limit on programs is built into RCL itself, and has nothing to do with physical memory space. If you need more than 1k, RCL provides a solution. We explained earlier how the term “task” can mean either “program” or “command.” This is the essence of RCL’s hierarchical structure. Programs you have already created and saved to disk can be used as commands within other programs. Using this capability of RCL is simple. All you need to do is include, as an RCL program line, the name of a previously created program. When that line executes, the program it names will run like a subroutine. When complete, it will return control to the following program line. Of course, the “called” program must be present on the RCL disk currently in use. In addition, it must not use any line names (as defined by the CALL THIS ROBOT TASK LINE ... command) already in use by any of the programs preceding it. In other programming languages this is known as “linking” or “chaining.” It provides a way to utilize most (but not all) of RB5X’s 8000 byte memory — there’s a few hundred bytes taken up by internal tasks relating to the robot’s self-diagnostic startup routine. Here’s an example of how to do this. Suppose you have already created a program called MATH that performs several calculations needed for determining whether RB5X will move. Suppose also that during the execution of MATH the variable A is assigned some value. 1. 2. 3. 4. 5. 6. PREPARE THE ROBOT MATH BEGIN A LOOP COMPILE THE BASIC STATEMENT [IF A>10 GOTO 37] WHICH MEANS [CHECK A] REPEAT THIS LOOP MOVE DISTANCE FORWARD FOR THIS MANY FEET [3] Note that the variable A needs to be reserved in the program MATH, but not in the program that calls MATH as a subtask. Note also that the statement IF A>10 GOTO 37 refers not to an RCL program line, but to the NSC Tiny Basic program line corresponding to RCL line 6. Enter this RCL program, BUILD it, and then list it in NSC Tiny Basic (using LTP) to see the line numbers. To paraphrase the ever-prescient Mr. William Gates, 8k should be enough memory for anybody. But for extremely complex programs you may still run into the 8000 byte memory limit. If this starts to occur too often in your own robot applications, consider purchasing the 16k RAM option offered by General Robotics. 24k should be enough memory for anybody. 18 About Calibration There are a few initial calibrations that must be done before you can program RB5X to perform specific tasks. “Calibration” is the process of setting values or states for internal processes that are normally invisible to the user during operation. It controls how RB5X, RCL and NSC Tiny Basic respond to input and generate output. Calibration settings are saved to the RCL floppy disc and are reapplied every time you BUILD AND They are, however, specific to whatever serial number RB5X is currently being used. If you are fortunate enough to have more than one RB5X, and require different calibration settings for each, you should have and use separate “RCL for DOS” discs for each robot. LOAD a program. See your Reference Manual for a complete listing of calibration parameters. For most purposes, only a few are important. If you have students advanced in technology skills, you might want to assign them the responsibility of calibration. To begin calibration, connect RB5X to your computer and go to the RCL command mode. If you don’t understand what this means, return to the section titled Connecting RB5X to Your Computer and read it start to finish. Then come back here, empowered by your new-found fluency in RCL. Calibrating the Com Port If your computer has a serial (15 pin) mouse it is probably connected to COM1. Even though the mouse is not used while working in RCL, this can cause conflicts. RB5X must be connected to a free serial communications port on your computer. Since the default port for RCL is COM1, you will probably need to change it to COM2 and connect the robot to that port. Enter: 1. CALIBRATE <RET> RCL will respond with 2. CHANGE THE CALIBRATION PARAMETER NAMED __ 3. COMMPORT <RET> RCL will respond by telling you which port it is currently using (1,2,3 or 4) and prompt: 4. SET THE VALUE TO __ 5. 2 <RET> (or whatever port you need to use) RCL will verify your setting and return to the command mode. If your computer has no available serial communication ports you will need to make one available and set it for 1200 baud. Consult your operating system’s documentation for instructions. 19 Calibrating the Bumper-Start Delay This calibration setting will save you some programming steps later. It requires a program loaded into the robot to be activated by a bumper press, giving you time to disconnect the cable before motion begins. It also creates a three second delay (default value) between the bumper press and program execution. With this parameter set to Y (yes), an initial RCL program line of WAIT FOR ANY BUMPER PRESS is no longer required in programs that involve robot motion. (In programs that do not involve robot motion this parameter has no effect. To create a delay in these cases, use the WAIT FOR ANY BUMPER PRESS command at the start of the program.) To enable this “bumper start” feature for programs involving robot motion, enter 1. CALIBRATE <RET> RCL will respond with 2. CHANGE THE CALIBRATION PARAMETER NAMED __ 3. BUMPER.START <RET> RCL will respond with 4. BUMPER.START IS N 5. Y <RET> or BUMPER.START IS Y If you want to change the three second delay between bumper press and program execution, enter 6. 7. 8. 9. CALIBRATE <RET> CHANGE THE CALIBRATION PARAMETER NAMED __ DELAY.START <RET> DELAY.START IS 3 SET THE VALUE TO __ at which point you can specify the exact delay time. There is another calibration parameter called BUMPER NEEDED, but I don’t recommend using it as its value Y or N is not saved. All it seems to do is generate an onscreen reminder about disconnecting the cable. It does not create the bumper press requirement or program execution delay that BUMPER.START so conveniently provides. 20 Setting Other Calibration Parameters Most of the other parameters have acceptable default settings. But if you need RB5X to execute very accurate motions, some of these parameters may need to be tweaked slightly. One motion that sometimes needs adjustment is rotation. This can be done by changing the parameters: CALIBRATE SPIN.DEG/SEC = [62] CALIBRATE SPIN.SECS/90DEG = [1.38] CALIBRATE SPIN.SECS/TURN = [4.95] For the first parameter, decrease the setting if the robot doesn’t turn far enough, and increase it if the robot turns too far. Reverse this logic for the second two parameters. Note that each of these parameters affects specific rotation commands. The first affects commands that involve specified rotation angles, such as SPIN CLOCKWISE FOR [45] DEGREES. The second affects commands that invoke right-angle turns, such as SPIN RIGHT 90 DEGREES. The third affects only the SPIN AROUND CLOCKWISE (or COUNTERCLOCKWISE) [VALUE] TIMES command. For some robot applications you may want to use metric values in commands involving distances, e.g., the command MOVE DISTANCE FORWARD FOR THIS MANY FEET [VALUE] This can be done by setting the following parameter: CALIBRATE MOVE.SECS/FT = [9.84] Note: If you make this change, movement commands will still prompt you for distances in FEET (as shown above). This text is built into RCL. Ignore it, and treat all distance prompts as if they actually read METERS. If your intended use of RB5X does not include calculations, or if you just feel more comfortable working with imperial units, leave this parameter at its default setting of 3. If your intended use requires very accurate movements, further fine-tuning of this parameter may be necessary. For sonar applications, the loop exit command EXIT IF SONAR DISTANCE IS [LESS or MORE] THAN [VALUE] FEET also expects the VALUE to be in units of FEET. To use a VALUE in units of METERS instead, change the following parameter from its default setting of 22 to: CALIBRATE SONAR.COUNTS/FT=[72.6] Again, after making this change, the command will still prompt for distances in FEET. If your intended use requires very accurate movements, further fine-tuning may be required. See the following section for detailed instructions on sonar calibration. 21 Calibrating the Sonar If your robot applications require very accurate sonar range measurements, fine tuning of the sonar offset may be necessary. CALIBRATE SONAROFFSET = [73] Note that this command does not require a period after the word SONAR. The default setting of 73 is the “usual” minimum value of the variable D returned by a series of sonar range measurements. However, we have found this value can vary from one robot to the next. To check your robot, you need a program that reports D as a series of horn beeps or other easily counted signals. Enter the following program: D-TEST: An RCL Program to Measure Sonar Offset 1. 2. 3. 4. 5. 6. 7. 8. 9. 10. 11. 12. 13. 14. 15. 16. PREPARE THE ROBOT RESERVE THE TINY-BASIC VARIABLE [A] BEGIN A LOOP EXIT IF SONAR DISTANCE IS [MORE] THAN [0.1] FEET REPEAT THIS LOOP CALL THIS ROBOT TASK LINE [START] COMPILE THE BASIC STATEMENT [LINK#1100:DELAY20] WHICH MEANS [GET D] SET THE TINY-BASIC VARIABLE [A] EQUAL TO [0] BEGIN A LOOP HONK THE HORN FOR [0.1] SECONDS WAIT FOR [0.2] SECONDS COMPILE THE BASIC STATEMENT [A=A+1] WHICH MEANS [INCREMENT A] COMPILE THE BASIC STATEMENT [IF A=D GOTO 47] WHICH MEANS [EXIT LOOP] REPEAT THIS LOOP WAIT FOR ANY BUMPER PRESS AND THEN WAIT [1] SECOND MORE JUMP TO THE LINE CALLED [START] Note: The initial loop in lines 3-5 are needed to simply activate the sonar; it isn’t the most elegant method, but none of the LINK codes work by themselves. For convenience, you can write a program called SONARON consisting of these three lines. In future programs, the sonar can then be activated by the simple one-word command SONARON. Set the robot in an open area where the test can be run. Place a flat, smooth vertical barrier to reflect the sonar 60 inches from the transmitter. Load D-TEST and get ready to count beeps. Record data from 60 inches to 12 inches in 6 inch increments. Run each distance a few times to make sure you get a representative value — spurious readings sometimes occur. Next, graph your data with “counts” on the vertical axis and “distance” on the horizontal axis. Although details will vary from one robot to the next, you should end up with a plot that looks something like the following. 22 COUNTS 200 190 180 170 160 150 140 130 120 110 100 90 80 70 60 50 40 30 20 10 6 12 18 24 30 36 42 48 54 60 DISTANCE (INCHES) Finally, calculate the slope and Y-intercept of your plot. Note that the data bottoms out near 90 counts, due to limitations in the sonar response time. The Y-intercept is not this bottomed-out value, but the one extrapolated from the plot itself (either mathematically or graphically). In this case the correct Y-intercept is about 72. Likewise, when you calculate the slope, ignore this bottomed-out data. Express the slope in units of “counts/foot” (not counts/inch) to three significant figures. You are now ready to recalibrate the sonar. Set the following parameters: CALIBRATE SONAR.COUNTS/FT=[SLOPE] CALIBRATE SONAROFFSET = [Y-INTERCEPT] RB5X’s sonar can now be used to measure distances with errors of 1-5%. Residual errors are due to variations in the air through which the sonar must propagate. 23


© Copyright 2026