
CNet how to sell yourself
how to
sell
yourself
communication
and presentation
techniques
a CNet
guide for
voluntary and
community
groups
CNet
EMPOWERING
COMMUNITIES
How to do Communications and Presentations : page 2
Contents
Part Three:
Writing for the Newspapers:
Press Releases, Stories and Letters
Part One:
Ccommunication and Presentations
1 Reasons for ineffective listening
page 2
2 Different Techniques:
Writing versus Speaking
page 3
3 A final thought
page 3
4 What you need to know about
your audience
page 3
28 Publicity
page 22
29 Creating a Newsletter
page 23
30 How to present Copy and Layout
page 25
31 Writing a Copy
page 25
32 Some other hints
page 25
33 Layout and Design
page 25
34 Timing your Advertisement
page 25
page 26
5 Check list for speaking to
external audiences
page 4
35 Six Classic Rules
6 Start with general objectives
page 5
36 And some other hints
page 26
7 Mind-Mapping
page 5
37 Poster Design and Production
page 26
8 Making Your First Impression
page 5
9 Closing Sentences
page 6
10 Avoid Jargon and Abbreviations
page 6
11 How to Design Visual Aids
page 6
12 Considerations for Visual Aids
page 7
13 How to look professional when
using visual aids
page 8
14 The Overhead Projector
Part One
COMMUNICATION AND
PRESENTATIONS
page 9
15 Laptop Computers
page 10
1. Reasons for ineffective listening
16 35mm Slides
page 11
You may begin to wonder whether there is any
point in your attempting to speak if no one is likely
to listen to you.
Part Two:
Presentation
Here are some other reasons why people may not
be giving you their full attention:
17 Reading a Paper
page 12
18 Planned Improvisation
page 13
19 Why is Body Language important?
page 15
20 Eye Communication
page 15
21 Hands
page 15
22 Position and Posture
page 16
23 Why should you Practice?
page 17
24 Check list for
Conference Appearances
They can’t hear or they find your voice dull
page 19
25 Where are you Speaking?
page 19
26 Familiarity Breeds Confidence
page 21
27 How to use Interest Prompts
page 21
They anticipate what is going to be said and
switch off.
They are planning what to say when it’s their
turn.
They may be tired or worried, i.e. they may
have too much on their mind to concentrate.
and monotonous.
You can also download a copy of this booklet and others in the
series by going on our website: www.cnet.org.uk
The topic is too complex and difficult to follow
or the topic is too simple and basic.
You lack credibility, confidence and structure,
and use too much jargon.
The chairs are hard; it’s either too hot or too
cold; and the sound of traffic is very
distracting.
How to do Communications and Presentations : page 3
2. Different Techniques:
Writing versus Speaking
You should be aware of the difference between
listening and reading so that you can adjust your
approach and successfully reach your audience.
Writer
Speaker
Writer can’t see
reader.
Speaker can see
listener.
Writer can’t react.
Speaker can slow
down/speed up/repeat
and involve listeners.
Writer relies on words
only.
Speaker can use body
language and voice
for emphasis,
enthusiasm and
emotion.
Writer can carefully
choose words, but
cannot change them.
suit the listeners.
Speaker can be more
flexible and relevant
by modifying and
altering words and
phrases to suit the
listeners.
Writer explains topic
only once and reader
can reread.
Speaker must have a
simple, easy-to-follow
structure, frequent
summaries and
relevant examples
because listeners
can’t relisten.
3. A final thought
After a 10 minute talk listeners will have
understood and retained approximately half of
what was said and a couple of days later they’ll
only remember about a quarter.
Summary
Learn how to become a more effective listener.
Remember a speaker has the flexibility to alter
their message for different audiences.
Create a positive impression – keep in mind
that how you speak is as important as what
you say.
4. What you need to know about
your audience.
You know why you are speaking, but do they? So
ask the following questions:
Why are they there?
What do they expect?
What do they want or need?
What’s their level of knowledge/
What is their attitude likely to be to you and
your views?
Have they any past experiences that will
influence them towards or against you?
Why are they there?
If you are speaking at a meeting in your own
workplace it is possible your audience has no
choice about attending: they are there because it
is the Friday afternoon meeting.
Sometimes you have invited your audience to
listen to you, for example you are making a
presentation to a prospective customer.
Alternatively, a client may have asked you to give
a progress report on their project. At a public
conference, your audience may have paid to
attend.
Ask yourself whether your audience have chosen
to listen to you and are there of their own free will,
or whether they were sent – this can make a
significant difference in their attitude towards you.
What do they expect?
You must satisfy your audiences expectations – if
they are expecting a report on your experience
with flexitime for office staff, telling them about
problems you have finding a suitable garage to
service the company vans will not be relevant.
Beware of confusing your objective with your
audience’s expectations. They are not the same.
What do they want or need?
To achieve your objective, or reach your
destination with all your fellow travellers, you must
make the journey relevant to them. Your message
must satisfy their needs. This doesn’t mean that
you change the content of your message, but
simply that you put yourself in your audience’s
shoes and present it from their point of view.
A breakdown of needs listed below should be
satisfied by your argument:
Saving money.
Increasing productivity.
How to do Communications and Presentations : page 4
Saving time.
Improving quality.
This is by no means a complete list; you’ll be able
to identify the needs of your own audience when
you start to think about them in this way.
What’s their level of knowledge?
Here are some questions you must ask as part of
your audience research:
How much do they already know about the
topic?
How much do they think they know?
How much do they want to know?
How much do they need to know so that you
achieve the result you want?
The last question is the most important, but you
can only answer it when you have some idea of
the knowledge they have already.
In a situation where you are aware that there will
be a varied level of knowledge, you can give
enough background information to enable
everyone to understand your talk. For example:
‘you’ll probably remember that the dip in sales
revenue last October was due to the cancellation
of the large Australian order. I think we need to
bear this in mind when looking at these figures.’
Avoid using phrases like ‘for the benefit of those
who don’t know…’ or ‘for the less experienced
among you…’ No one wants to be identified (even
to him – or herself) as one of the ignorant.
Proper preperation and practice prevent poor
performance
What is their attitude likely to be to you and
your views?
In favour? Against? Indifferent? Open- minded?
If, before you speak, you are aware of any
negative attitudes you can attempt to overcome
objections within your talk:
You maybe wondering how we can achieve this
without taking on more staff.
If this sounds like an expensive proposal, may I
suggest you look at it this way?
Many people say I look too young to have
enough experience to cope with the problems of
this department.
Have they any past experiences that will
influence them towards or against you?
Bad experiences colour people’s judgements and
often create an invisible barrier that prevents your
message from being received and understood.
You must acknowledge and remove this obstacle if
you are to reach your destination with your
listeners;
I know that a similar experiment using
temporary staff failed last year, but let me show
you how my scheme is different.
5. Check list for speaking to external
audiences.
On occasion you may be asked to speak outside
your own workplace as a panellist, a guest
speaker or a workshop leader chairing a
discussion, or as an after-lunch or dinner speaker.
The more you can discover about the audience
and the location, the more confident and effective
you will be as a speaker. This check list will help
you.
Who? Find out about your audience; ask your
contact all the specific questions listed below:
How many will be present?
What is their position/occupation/title?
What is their background/education/
culture/race?
What is their sex, male/female/male and
female?
What is their age?
Where? Make sure you know the exact address
and telephone number, available parking, nearest
railway station/airport. What type of room/hall/
office/conference centre will you be in?
When? What is the day of the week, the date and
the exact time?
What? What is the topic and any specific angle,
as well as the reason foe inviting you?
How? Will there be a stage? Is there a microphone
and, if so what type? What equipment is
available? How will the audience be sitting? In
rows/ a semi-circle/with tables?
Duration? How long should you speak and does
this include question time? When will the
How to do Communications and Presentations : page 5
questions be taken? Will there be a panel
discussion?
SOLUTIONS
Other speakers? Names and telephone numbers
of any other speakers would be useful.
MORALE
COSTS
MONEY
6. Start with general objectives
General objectives fall into the following
categories:
To inform/teach/train.
To stimulate/motivate/inspire.
To persuade/convince/sell.
To explore/debate/negotiate.
To amuse/entertain.
Writing down your objective in clear, precise terms
is often difficult, but if you refer to the general
objectives, they should help you. Remember that
you will sometimes need to combine several
objectives for example: my objective is to sell
training to them. However, I also inform them of
the content of the courses, inspire them with
previous successes, motivate them by showing
them how economical our training is in
comparison with other companies and persuade
them with logical arguments. Remember that one
general objective should predominate; don’t
confuse yourself with a mixture of too many
general objectives, but always aim to include
some entertainment.
Do write out your objective. Remember it must be
specific, but also achievable.
7. Mind-Mapping
So far in your preparation you’ve discovered as
much as you can about your fellow travellers and
you have chosen your destination. Your third step
is to study the map. What routes will be most
effective in helping you reach your destination?
What material should you include in your talk to
help you achieve your objective?
Draw a circle in the centre of your paper and write
in it the subject of your talk and, as you let your
mind free-wheel around it, jot down any ideas that
come to you. Place down your ideas on lines
radiating from the central topic. You’ll find that
each idea triggers off others so that you can
continuously build on them. The advantage of this
mind map (see diagram below) is that you have
plenty of space to add new thoughts and you can
HIGH STAFF
TURNOVER
REASONS
LOW MORALE
EFFECTS
POOR SERVICE
also expand on those you have already jotted
down.
Summary
Who is going to listen? Find out about the
audience.
Brain-storm a mind map. Don’t be judgemental;
be creative
Select ideas. Choose a few key points to
achieve your objective.
In other words, get to know your fellow
travellers, choose your destination, study the
map and finally choose the paths that will take
you there together.
As you can see you need to spend sufficient time
and effort on the body of your talk before you
reach the stage where you can choose your
opening sentences.
8. Making Your First Impression
Your opening words to your audience must be
enticing, seductive and should make them want to
listen to you. You need to capture their attention,
stop their minds wandering and show them you’re
worth listening to. It’s a tall order, but essential if
you expect to achieve your objectives.
It’s as simple as A, B, C and D:
Attention – capture their attention.
Benefits – show them what they will gain from
listening.
Credentials – give them your credentials for
speaking.
How to do Communications and Presentations : page 6
This may seem a lot to fit into one paragraph, but
it can be covered in less than a minute.
abbreviations at the beginning of your talk. If you
feel you must use shorthand because the
abbreviated names are too long, remember to
include the full name from time to time.
Ask a question:
11. How to Design Visual Aids
Direction and Destination – tell them your
structure.
‘Can you remember what you were doing on
Tuesday 11 August last year?
‘Have you any idea how many hours you spend
in you car each week?
As you read through those questions, you may
have quickly thought of your own answers and
that is what the audience does, or else they listen
for an answer from the speaker.
Questions engage the minds of the audience and
make them concentrate. Don’t make your opening
question too involved otherwise they will be
working out the answer and won’t be listening to
your next sentence; do make the question relevant
to the audience.
9. Closing Sentences
Your listeners’ attention will always be at its highest
at the beginning and at the end of your talk, so
you must take advantage of this and conclude with
a positive restatement of your message. Your
conclusion shouldn’t come as a surprise. It should
be predictable in order to allow the audience to
pay maximum attention. It should be brief and not
include material.
Below are some ways that you can end decisively.
Summarise. Use phrases like ‘’in conclusion’, ‘to
sum up’ or ‘finally’, to indicate that you are about
to finish. Be sure to end shortly after these words
– don’t continue for another 5 minutes.
10. Avoid Jargon and Abbreviations
Beware of speaking in terms that are unfamiliar to
your audience – this can be very distracting and
can cause many of your listeners to switch their
energy to pondering on the meaning of a phrase or
an abbreviation and so lose the thread of your
argument.
Some terminology or abbreviations, which are part
of your everyday vocabulary when talking to
colleagues, could be misleading or even
incomprehensible to many people. Carefully trim
these distractions from your talk. Explain
Visual aids properly used, are an effective way to
hold your audience’s attention.
Adding Audience Value:
The object of most presentations is to inform or
persuade, or a combination of both, but
information received by listening is retained for
less time than that which is received by seeing.
This means that visual aids help to make your talk
more memorable. They also help to explain
complex ideas in a form that is easily understood;
relationships and comparisons can be shown
more clearly in a visual format; statistics, figures
and financial data in general are more digestible
and comprehensible when presented visually.
Visuals can reinforce an idea that you have already
discussed in words; for instance you could outline
a cost-saving theory and then show visually what
the actual savings would be in practice.
Avoiding Aid Dependency:
Make sure your visual is an aid and not a
distraction, and make sure your aid is visual.
Beware of adding visuals to your presentation for
the wrong reasons; they can take time, be difficult
to use and confuse the audience. Many speakers
use them as a prompt. They have most of their
presentation on slides and refer to them
throughout their talk. This is an insult to the
audience! Such speakers are ignoring all the
advantages of talking to a live audience and
suffering all the disadvantages of reading. Your
audience can be reminded of your key points after
you have spoken them, so use a visual to
summarise but not as a prompt.
Don’t use visuals to brighten up an uninteresting
talk – improve your talk and only use a visual to
illustrate it more vividly. Also use visuals to;
Present facts, concepts, figures, in a
comparative or structured form.
Aid comprehension and prevent
misunderstandings.
Reinforce your message.
How to do Communications and Presentations : page 7
Focus your listener’s attention.
Maintain interest and help retention.
Motivate the audience to make a decision.
Add humour and spice.
Keep them uniform.
Don’t use too many types of visual and don’t
attempt to make them too diverse. A jumble of
typefaces and styles and a mixture of colours
gives the impression that both speaker and
company are disorganised and confused. Choose
a clear, simple font like Arial or a classic font like
Times New Roman, and a type no smaller then
28 point, and use it throughout your slides with a
bold background colour to create a smart effect.
Maintain a consistent style throughout for borders,
headings and company logo position. If you are
using transitions, ensure they are uniform and only
use the special effects sparingly for impact.
12. Considerations for Visual Aids
Once you have decided that your talk would
benefit from the inclusion of some visual material,
choosing how to display it can be difficult. The
table below shows the advantages and
disadvantages of the various types of visual aid
and you’ll see that not one of them is perfect.
However, here are some of the considerations for
you to bear in mind, when selecting a visual style.
Visual Aids
Advantages Disadvantages
Blackboards:
No mechanisms to go wrong; flexible; mistakes
easily corrected; can be quickly erased
Chalk is messy to use; creates a classroom
atmosphere; difficult to erase well if old; suitable
for small groups only; not portable
Whiteboards:
Similar advantages to blackboards; also
presentation clearer with special pens; easy and
cleaner to use.
Limited to small groups; generally only available
in training rooms; not portable.
Flip Chart:
Easy to use; not much can go wrong; readily
available; cheap; versatile – can be used
pre-written or constructed during the course of the
talk; portable.
Can be difficult to write on quickly; only suitable
for small audience of less than 25.
Overhead Projector:
Transparencies easily and economically
produced on PowerPoint; flexible; possible to
change order or omit slides during presentation;
build up of information possible with several
slides; screen is bright and clear in normal room
light; suitable for small or large audiences; can be
used like the flip chart with a continuous roll of
acetate so that the speaker can write calculations
or notes on to it.
Can break down or suffer bulb failure, usually
fan cooled so produces background noise that can
be distracting; must be constantly switched on
and off so as not to leave irrelevant material or
blank screen showing; speaker has to be careful
not to obscure audience’s view of the screen with
the projector.
Laptops/Data Projectors:
Have all the advantages of overhead projector
and 35mm slides; available to most presenters;
smooth transitions between slides; looks
professional; use of special effects and sound
adds impact and interest; can check visual by
looking at laptop, not over shoulder to screen.
Maximum of two people can see laptop screen
so usually a data projector is required; extended
set-up time and technical failure can reflect badly
on the presenter; presenter can be tied to laptop
unless remote control is used; colour on PC may
change when projected.
Video Clips:
Can be incorporated into laptop presentation or
played on monitors; adds movement and external
presenters.
Sound reproduction on laptop can be low
quality so use external speakers; use sparingly or
the video will dominate your presentation.
33mm Slides:
Very sharp, bright image; focuses attention of
audience; wide variety of material can be shown;
easily stored and carried; projectors readily
available; fast and smooth operation; suits any
size audience; useful for more formal method of
presentation.
Low light makes it difficult for audience to make
notes and for the speaker to maintain eye contact;
less flexible than overhead projector; cannot
change order or omit slides; artwork can be
expensive largely replaced by data projectors.
How to do Communications and Presentations : page 8
Physical Objects:
Can save a lot of unnecessary description;
ensures everyone has uniform idea of what
speaker is talking about; members of the audience
can handle them – direct contact is always useful;
versatile; models; objects and props often easily
available.
Passing round objects is time consuming and
distracting; small groups only, holding up article
unsuitable for small objects or large audiences;
models can be expensive to prepare.
Available Equipment
Most organisations have either a data projector or
an overhead projector and flip chart, but if you are
presenting a talk off site, check the specifications
of the data projector.
Size of Audience
If the audience can’t see what’s on the visual, you
are likely to antagonise them and lose their
attention. Certain aids aren’t suitable for groups of
more than 25 people. I.e. flip chart, blackboard,
whiteboard. This is a rough estimate, and the size
and layout of the room may allow you to increase
or decrease that number. If you are presenting to a
small group of five or six people, don’t dismiss
the idea of visuals as inappropriate; a large screen
is not always necessary as you can easily project
on to a blank wall.
Size and layout of room
Long, narrow rooms with poor lighting are not
suitable for the smaller aids such as flip charts.
Sometimes conference facilities are located in
rooms with pillars or asymmetric walls that can
make it difficult to set up a screen, which is visible
to all the audience. If you are sitting on a platform
you may have to rearrange the speakers’ chairs so
that they don’t obstruct the screen.
Lighting
You may have to darken the room, as some
offices may not have blinds at the windows.
Overhead projector slides can be shown in natural
light, but occasionally you will need to block out
sunlight directly on to the screen. Also, 35mm and
low power data projectors need dimmed lights.
Avoid shadows on the flip chart if possible and
don’t place it against a window or another source
of bright light as this will make it difficult to read.
Seating arrangements.
Make sure you arrange the seating so that
everyone has a clear view of the screen.
The Colour Wheel
RED
PURPLE
ORANGE
BLUE
YELLOW
GREEN
If you want vibrant colours use the ones from
opposite sides for example, orange and blue or
yellow and purple. An image stands out strongly
when a warm colour is combined with a cool
colour. A common example of this is yellow on a
blue background.
However, some colours change or lose their
intensity when they are projected. Always avoid
white letters on a yellow background or vice versa
and pink on red, as they become invisible. You can
use a primary background colour to indicate the
various sections of your talk, i.e. the sales
manager could use blue on the slides when
illustrating her section on key accounts, and
change to red when she moved on to new
business. Avoid combinations of green and red, as
these will be indistinguishable to people who are
colour blind. The key to using colour successfully
is to keep it simple.
13. How to look professional when
using visual aids
It is one thing to have excellent visuals to hand,
but it’s important to use them competently. Here
are some tips to help you look professional.
Flip charts:
Always carry your own marker pens as they
can dry out quickly and those supplied may not
write well; also, you can be sure that you have
the right thickness and colour for your purpose.
How to do Communications and Presentations : page 9
You can prepare the flip chart in advance, but if
the paper is thin, only write on every other
page, otherwise some of your audience will
attempt to decipher what is written on the next
page. Use block capitals in a variety of colours
to ensure that your visual is easy to read and
attractive to look at. Remember to hide your
prepared flip chart until it is relevant so that it
creates maximum impact. Flip chart pads are
usually 60cm by 80cm, but they are also
available in larger sizes and a smaller variety for
use with desktop easels. If you are drawing
graphs or working out calculations seek out
paper printed with faint squares – they are
invisible to the audience but make it easier to
write in a straight line.
The heights of some easels are adjustable.
Practice turning the pages over and if there is
any difficulty, lower the easel or arrange for one
of your listeners to help you at the appropriate
time.
Use a paper-clip or fold over the corner of the
page to indicate your next visual or a visual to
which you want to refer back during the course
of your talk.
Flip charts are not suitable for large audiences
so their use is limited to informal groups of
approximately 25 people or fewer, and are used
most effectively during the course of a
presentation to note information given by
members of the audience, to calculate, to show
organisational change, to illustrate a
management model or to highlight and
summarise essential points. This can serve as
a visual reminder and a listener who has been
distracted can tune back in by glancing at the
flip chart. Your main points on the flip chart
can help you to summarise at the end of your
talk.
Consider using two flip charts so that one can
display the key ideas, while the other is used as
a scribbling pad.
Using a flip chart in mind-mapping sessions is
helpful as it enables all the points to be visible
to your group. As each sheet is completed you
can tear it off and stick it onto the walls around
the room so that you can make up a complete
picture.
Writing clearly and quickly in front of an
audience is not easy and, if you’re planning to
use it frequently, find time to practise as it’s a
skill that can be learnt.
Hints on using the flip chart:
Always remove the previous speaker’s chart.
Stand to one side of the easel, on the left if
you’re right-handed and on the right if you’re
left-handed, so that as you write you are not
obstructing the audience’s view; this position
allows you to glance over your shoulder
occasionally, to keep eye contact with your
listeners. Also stand to one side of the easel if
you are indicating points on the flip chart.
Don’t hang on to the easel for support.
Never write and speak at the same time. This is
one of the most difficult rules to follow but
remember that anything that you say while you
are writing will not be heard by your listeners;
they will be concentrating on what you are
writing and not listening, and your voice will be
muffled as it will be directed at the flip chart
and not at your audience.
Don’t hold a marker pen in your hand when
you’re not writing.
Look at the audience and not at the flip chart.
Speakers break this rule more often than any
other because eye contact with the audience is
difficult and looking at a familiar flip chart is
comforting. Learn to overcome this problem
and stand square to the audience and not half
turned to the flip chart.
14. The Overhead Projector
This visual aid is suitable for large and small
audiences, and slides are easy to make. The
smaller desk version can be carried to locations
that don’t have suitable equipment.
Most overhead projectors are used to project
slides on to a screen, but when a roll of acetate
film covers the top it can be used in a similar
manner to a flip chart, i.e. to note down audience
contributions, to summarise decisions, to show
calculations or to use as a scribbling block for the
speaker to illustrate theories and suppositions
visually.
You can use pre-drawn diagrams or outlines and
then complete them in front of the audience while
How to do Communications and Presentations : page 10
explaining the significance of the additional
material. Alternatively you can place an incomplete
transparency under the acetate roll and draw on
the finishing lines without marking a transparency
you may want to use on another occasion.
As the speaker sits alongside the projector facing
the audience, he can continue to make eye contact
as he writes, which he can’t do while using the flip
chart. This secondary use of the overhead
projector is generally more suited to lectures and
informal training sessions.
Hints on using the OHP:
Always switch off the projector before
removing your transparency. The speaker who
waves her transparency over the projector is
providing a minor distraction and a blank
screen is unpleasant to look at. If you have a
series of slides simply move the next slide into
place without switching off.
Point at the transparency and not at the screen
to indicate any vital information.
15. Laptop Computers
Laptop presentations have become very common.
If you are wanting help in this sort of
presentation, contact Bradford CVS or Keighley
CVS for advice.
The advantage of using laptop visuals are:
New material can be incorporated e.g. up-tothe-minute accurate sales figur.
Presentations can be customised easily.
The transition between slides are smooth.
Text builds are hassle-free and key points can
be highlighted.
Video clips can be added.
Colour, backgrounds and professional
templates add impact.
The disadvantages are also all the points listed
above. Presenters (and their audiences) can get
carried away with the technology, so instead of
adding value, the visuals hijack the presentation.
Screen:
If you are presenting to a couple of people you
can do it directly from the laptop. Ensure that the
screen is not catching any reflected light and that
the image is visible to your listeners.
In the absence of a screen, or in a small space,
you may wish to project directly onto a plain wall;
however, you should expect a reduction in the
quality of the image.
Where you position the screen will depend on how
dominant you want your slides to be. If you are
illustrating 80 percent of your presentation, place
the screen centrally; if only 20 percent of your talk
has visual support, you should be centre stage.
Place the screen to your left, which makes it
easier for the audience to look from you to the
screen and read visuals from left to right.
For larger, more formal presentations you may
wish to use rear screen projection. The projector is
placed behind the screen and is invisible to the
audience. A special opaque screen is needed for
back projection, together with a projector with a
reverse image feature.
Projector:
Data or LCD projectors are portable and usually
used with a laptop. It is possible to download your
presentation on to a memory card (PCMCIA) and
eliminate the need for a laptop. However, some
functions such as transitions will not be projected.
DLP (Digital Light Processing) projectors,
particularly the three-chip design, give a better,
clear picture, but you should aim for 750/800
ANSI lumens (which is the brightness
measurement) for an audience of approximately
20. Be sure to have an appropriate stand for the
projector – an OHP trolley is too low.
Plasma screens are installed in some boardrooms
and used as a n alternative to a projector, and also
double up as a monitor for video-conferencing.
They are not portable so cannot replace the data
projector for offsite presentations. Although the
picture quality is very high, they can only be used
for audiences of under fifteen because of their
size.
Laptop:
The rule of thumb for laptops is simple – get the
fastest you can lay your hands on and always run
it from the mains.
Ensure you have a video display card if you want
to show clips and a video card so that you can
input from TV, video or from your own camcorder.
You will also need a sound card. Be aware of
infringing on copyright laws if you use audio or
How to do Communications and Presentations : page 11
video that is not in the public domain. Video is
very memory hungry and you will need a CD-ROM
(and drive) and not a floppy disk for this type of
presentation.
You could even fire up Netscape Navigator or
Internet Explorer to show off your company’s
website. You would obviously need a phone line or
a mobile phone if you wish to do this.
Hints on using a laptop with a data projector:
Always make a hard copy of your visuals, i.e.
handouts and acetates in case of equipment
failure.
Put your presentation on two separate disks or
CDs in case one of them has a fault.
If possible put your presentation on the hard
drive of your laptop to save time and hiccups
with downloading the disk.
Ensure that you have an extension lead if your
presentation is away from you home base.
Experiment with the colour and contrast
controls on the projector to get the best picture
and, if necessary, switch off any overhead light
in the room that shines directly on the screen.
Switch off the screen saver on your laptop.
The projected image should fill the screen and
not overlap onto the wall or ceiling behind- use
the zoom control on the projector for
adjustment. If necessary, place a book under
the projector if the legs are insufficient to raise
it to an adequate height.
Check the volume of your speakers
It is unnecessary to show a continuous stream
of slides. Some areas of your presentation may
require you to be the sole point of focus.
Alternatively, you may be asked a question and
wish to remove a slide while you answer.
Press the B key on your keyboard and the
screen will go black. Press it again and the
image will reappear.
Print out your visuals six to a page and number Use a remote control if possible, so that you
them as they appear in the slide sorter. This
will enable you to locate a specific slide rapidly,
perhaps in order to answer a question from the
audience. This aide-memoire will also help
should you need to omit slides due to
shortness of time. On your keyboard you
simply press the number of the slide followed
by Enter to project the slide.
Allow double the time you think is sufficient to
set up.
Ensure that the laptop is connected to your
projector and switch on the projector before
you start up the computer.
When you switch on your laptop you will
notice that the presentation is only projected on
the screen. In order to have them showing on
both the screen and laptop, press Fn and F5
(on some laptops F4) again and it will appear
on both. This function is particularly useful if
by accident you come out of your presentation
or there is a technical hitch. You will be able to
sort it out on the laptop without the audience
seeing your frantic efforts.
Run through your presentation at least once
with a data projector, as colour that works on
the PC or laptop may change when projected.
are not tied to the laptop when you want to
advance slides.
If you switch off the projector when it is not
needed, for instance, over lunch, remember to
allow one minute for it to warm up before you
can project your next slide.
16. 35mm Slides
It is important to remember that 35mm slides are
not flexible. Once the carousel is loaded, it is
impossible to change the order or omit slides
during your talk. However you can project 35mm
slides more quickly and more smoothly than using
an overhead projector.
They have the disadvantage of needing a darkened
room, making it difficult for the audience to take
notes or for the speaker to see the audience; you
arrange for a spotlight to shine on during the slide
show so that your listeners can see you and also
to help you read your notes. Because of the need
to change the lighting, your slides should not be
sprinkled throughout your talk but shown together
in one section.
If you are arranging a meeting or conference using
35mm slides, here are some of the equipment you
will need.
How to do Communications and Presentations : page 12
The Screen:
Place the screen in the centre of the room and use
a remote control to change slides. If this is not
available you will need to work in close harmony
with the projectionist to indicate the moment to
move from one slide to another. For informal
groups, you may choose to project the slides on
to a suitable blank wall.
The Projector:
Place the projector directly in front of the screen;
making sure that it doesn’t obstruct the audience’s
view. The focus adjustment is generally located on
the front of the projector around the lens, and you
should ensure that there is a spare bulb and
enough extension cable to reach the socket.
Consider using two projectors to avoid the
unprofessional blank screen at the point where the
slide changes over. A twin-dissolved unit adds an
efficient touch to the presentation, and can be
hired at a relatively low cost.
Slides:
A carousel holds 80 slides, so try to avoid having
85 and have your slides mounted professionally in
hinged cases with glass that can be easily
cleaned. These ensure that the slide stays in
focus, whereas the cheaper type tends to move in
the projector.
The Carousel:
When you load your slides, stand by the carousel,
looking towards the front of the room, following
the beam of the projector’s light, and hold the
slide above the tray in a position so that you can
read it. Place the slide in the carousel upside
down, so that the top of the slide enters first.
Many speakers make the mistake of turning the
slide over before loading, which causes it to be
projected back to front.
Hints on using 35mm slides:
Number all your slides and make sure your
script is marked so that you know where each
should appear.
Double check that the carousel is correctly
loaded.
Practise your entire presentation at least twice,
with the projectionist or by using a remote
control.
Mark on the floor the exact position of the
projector in case it is moved after the rehearsal.
Use a pointer to indicate particular areas of
interest, but put it down when not in use and
resist the temptation to use it as a walking
stick, or to conduct the audience like an
orchestra.
General hints on using projectors:
Never switch on the projector without a visual
in place. A blank, bright screen attracts
everyone’s eyes.
Allow enough time for your audience to absorb
the content of your slide.
Prior to showing a complex visual, explain what
it is intended to illustrate.
Allow a few moments silence before
commenting on the slide.
Explain the visual when appropriate
Never look at the screen yourself.
Never walk between the projector and the
screen.
On an OHP use a pen, not your hand, to
indicate.
Remove the visual as soon as it is no longer
relevant.
Use transitions with a laptop so that your
information only appears when it is relevant.
Fade down bullet points as you move on.
Never assume equipment will not be touched,
moved or adjusted if you leave the room.
Summary:
Familiarise yourself with the equipment.
Rehearse in situ, including setting up and
closing down.
Have a back-up plan in case of equipment
failure.
Part Two
Presentation
17. Reading a Paper
Reading from a paper is the worst method that
you can choose and you should try and avoid it. It
is particularly ineffective for small groups, but
there are many disadvantages whatever the size of
the audience.
How to do Communications and Presentations : page 13
An impressive speaker has sincerity, enthusiasm
and vitality, and unless you are a professional
actor you will find it difficult to express these
emotions when you are reading.
Consider some of the other disadvantages:
You can’t keep good eye contact – one of the
essential elements of effective speaking.
Your body language is restricted – your script
is like a ball and chain limiting your
movements.
You will sound unnatural and therefore
insincere.
Script dependence will mean you will never
learn to be a convincing speaker or develop
self-confidence.
Memorising your script:
Memorising your script is another method to be
avoided because all your energy will be directed
inwards instead of outwards to your audience.
They will fell an invisible barrier and a lack of
warmth, even if they don’t understand the reason
for it. Your talk will sound mechanical and will
lack the vital ingredients of enthusiasm and
spontaneity.
18. Planned Improvisation
This is the most effective delivery style as it has
all the benefits of impromptu speaking and none of
the drawbacks of reading. Your talk is prepared
carefully, with a punchy beginning, a logical
structure and a conclusive ending; it’s well
rehearsed and you can use brief outline notes to
give you the confidence to sound enthusiastic,
behave with vitality and look at the audience with
sincerity.
Using your mind as a safety net:
You will recall that on the mind map you put all
possible facts and details about the subject of
your talk and you didn’t attempt to evaluate them
or fit them into a structure. At the next stage you
studied the map to choose the ideas most
appropriate for helping you achieve your objective
in regard to your practical audience.
If you are using the mind map as your safety net
you’ll find the original map contained many fruitful
ideas that were later discarded, so you will need to
draw a second map that shows only the essential
arguments and material. Draw the ideas in a
logical sequence following a clockwise direction
so that when you are delivering your talk you can
simply glance occasionally at the map to reassure
yourself that you are including all the salient
points.
A mind map has the advantage of being visual and
displays your talk in its entirety. This is helpful if
you need to cut or condense during the course of
your presentation. The details of your talk should
be well known to you, so you will only need a
prompt of a few words if your memory fails you.
Sometimes your mind may go blank between
ideas; you finish one point and suddenly realise
you can’t remember what comes next. The mind
map can put you back on track when this
happens.
Your script as a safety net:
In your preparation, you will have moved through
the following stages:
Researching the audience.
Setting an objective.
Drawing a mind map.
Choosing a path.
Use a coloured pen to underline the key ideas so
that they are conspicuous. As you rehearse, you
should aim to describe each idea and link it with
the next one without reading or memorising the
words ion your script. Simply glance at it from
time to time to check the next point. Using a script
in this way increases your ability to speak fluently
and decreases your dependence on the prepared
text.
The key ideas are highlighted to assist you to
follow your predetermined structure but you have
the freedom to use your own choice of words to
travel from one point to the next. Practice speaking
round each point and don’t be tempted to rely on
the script; you should only use it as a guide to
your destination and not as a vehicle to take you
there.
Using confidence cards as safety net:
You can prepare confidence cards directly from
your mind map, or from your full script.
Remember that confidence cards should never
contain full sentences as you don’t read the cards
- you only glance at them in moments of
uncertainty.
How to do Communications and Presentations : page 14
How to write confidence cards:
Look at your script or mind map and mark the key
points in red; next check the links you have used
to move from one point to another and mark these
in blue. If you have included anecdotes and
illustrations, mark these in green. This will provide
the skeleton of your talk.
Using 102mm by 152mm index cards write out in
capital letters your key points, your links and your
illustrations in the order in which they appear in
your talk. Write on one side of the cards only.
If you are working from a full script, you must be
very self-disciplined to avoid including all your
persuasive phrases and scintillating sentences.
Only single key words will help you.
Remember it’s your speech with your ideas so
you don’t have to absorb and learn a host of alien
concepts that you might forget. You only need
learn the sequence of ideas and the links between
them to give a good talk.
The test for effectiveness of your confidence cards
is how few words you have on them, not how
many.
Why cards?
I suggest you use 102mm by 152mm cards,
because they are less distracting than paper. You
can hold them in your hand, or rest them on the
lectern or table and you will look professional.
Should you suffer from trembling hands, cards
won’t reveal this as much as a flapping piece of
paper.
What’s on them?
As well as reducing your talk to key words and
ideas, on your confidence cards you can add
instructions to yourself such as `smile’, `loom at
the audience’, `stand still’, etc., and you can mark
the point where you want to use a visual aid or
write on the flip chart.
Only two full sentences:
Although it’s essential to mark key words on your
cards, there are two exceptions to this rule. To
give a strong framework you can write out in full
the opening and closing sentences of your talk.
You will probably find that your anxiety is at it’s
highest point immediately before you speak and
it’s reassuring to see in front of you the exact
words with which you’ll begin. Similarly, you will
need a clear end to your talk and if the final
sentence is written out in full, you will be able to
resist the temptation to run past the finishing post.
Memorising the opening and closing sentences
can also be a boost to your confidence and will
enable you to make positive eye contact with your
listeners at the two periods in your talk when you
know you are likely to have their maximum
attention.
You should also write out in full any quotations
you intend to include as it’s essential to use the
exact words.
Remember to number them:
If your confidence cards are untied, be sure to
number them, because dropping unnumbered
cards moments before you speak would be a
calamity.
What are the advantages?
Using confidence cards will help you to:
Sound natural – because you will be choosing
your own words as you speak.
Be confident – because you will have a safety
net in the event of a blank mind.
Look at the audience – because you won’t
need to read a script.
Use expressive body language – because you
will be free to move.
Show sincerity, enthusiasm and vitality:
If you have to give the same talk several times
confidence cards will allow you to use a different
vocabulary and even different illustrations for each
audience. This will help you to remain fresh and
spontaneous and prevent the material from
becoming repetitious for you.
Pitfalls to avoid with confidence cards:
Using confidence cards effectively will allow you to
be an enthusiastic and sincere speaker but beware
of these pitfalls:
Don’t shuffle or play with them during your talk.
Don’t keep staring at them to avoid looking at
the audience.
Don’t use fillers, e.g. ‘eh, umm, you know, I
mean’ etc., as you choose your words –
remember the power of the silent pause.
Visual aids as a safety net:
Provided you plan to stand or sit close to the
projector, you can write prompts to yourself on the
How to do Communications and Presentations : page 15
notes pages of your PowerPoint presentation. A
few key words should be sufficient to provide a
structure that you can follow easily.
Visual aids themselves can also act as a prompt
but beware of using unimaginative and wordy
slides simply to provide cues for yourself during
your talk. Using words on the visual aid merely as
a prompt is a misuse of it and an insult to the
audience. During a talk, words are for speaking not
for reading.
Using a combination of creative visuals and
confidence cards provides you with an effective
safety net, which won’t prevent you from looking
at your audience and using appropriate gestures.
19. Why is body language important?
However you look or move, you will be giving off
signs to your audience as to your inner feelings –
you cannot not communicate. Being aware of your
particular mannerisms and nervous gestures
enables you to correct them and present a
confident unselfconscious image.
The perils of bad body language:
If your inner panic shows itself in your fidgety feet
and fiddling gingers, your audience will feel
uncomfortable because they want and expect you
to be in control. In addition, they will not have
confidence in you, your ideas or your product or
service. They will not believe in you, they won’t
listen well and will quickly forget what you have
said. If you look confident and believe in yourself,
you will have credibility and your listeners will be
eager to hear what you have to say.
20. Eye Communication
Looking at someone demonstrates that you are
interested in them. Eye contact also denotes
authority. Powerful people give more eye contact
than those who are less confident.
Where is the audience?
Some speakers follow the ludicrous advice,
sometimes given to novice public speakers, to find
a friendly face in the audience and speak to it.
After a few minutes of continuous scrutiny, the
poor victim in the audience is asking, why me?
The rest of the audience is feeling excluded from
what appears to be an exclusive monologue;
finding a friendly face is unfair both to the `face’
and to the rest of the listeners present. Avoid
speaking only to the most powerful or influential
person present for the same reason.
Speakers tend to look at their notes, at the back of
the room, at their visual aids or even at a blank flip
chart – anywhere but at the audience.
Why is it difficult to look at the audience?
You know instinctively that you express your
emotions through your eyes, so if you don’t look at
them, they won’t be able to see how nervous you
are.
Having people looking at you is unnerving, you
feel put on the spot, cornered and trapped, so you
distance yourself from the situation by looking out
of the window. You feel, quite illogically, that if you
don’t look at them, they will be able to see less of
you.
What happens when you don’t make eye contact.
People who are interested in each other make eye
contact when they are talking because they want to
know how their listener is receiving their message.
When you don’t look at the audience, they feel
(probably unconsciously) that you are not
interested in them, or in their reaction to your talk;
they feel the same way as you do if someone at a
party talks while looking over your shoulder; they
feel you don’t care whether they listen or not;
because they do not feel involved by you their
concentration lags.
How is your eye contact?
During the course of your everyday life, pay
attention to the eye contact other people make with
you, and try and note how easy or difficult you find
it to look at people when you are talking in a
variety of different situations. Ask friends for feedback on you own eye contact. Practise
maintaining contact for longer than usual without it
becoming uncomfortable.
21. Hands
When a speaker is fairly accomplished, it is often
their hands that reveal apprehension.
What not to do with your hands:
Fiddle with rings, watch, cuff links, buttons,
pens, elastic bands, paper-clips, spectacles,
cuticles and nails, confidence cards, coins in
pocket, pointers.
Touch and pat face, hair, pockets, desk, table.
Clutch back of chair, notes, side of lectern.
How to do Communications and Presentations : page 16
Scratch any part of the body.
Hide them behind back, in pockets, in lap, by
folding arms, or by sitting on hands.
Rub them together in enthusiasm.
Wring them in despair.
Point at the audience.
What can you do with your hands:
You hands do not have a separate identity – they
are part of your arms and, in general, only need to
move if you are making a gesture, and should only
hold your confidence cards.
Arm gestures:
Remember that your arm begins at the shoulder –
always use your entire arm. Don’t tuck in your
elbows to your waist or make jerky, half-hearted,
meaningless gestures. Useless gestures, as
opposed to those with a purpose, reveal
nervousness and become a distraction to the
audience. Don’t be afraid to use your arms,
though, because standing rigid like a wooden
soldier is as unnatural as waving your arms about
unnecessarily.
What can you do with your hands when you are
not using your arms.
Keep your hands empty and still by the sides of
your body. This will feel odd, but it looks natural.
But don’t keep your arms glues to your sides,
because when a gesture is required, your hands
will only make little waving movements
somewhere down by your thighs.
If you are holding confidence cards, be sure to
gesture with the other hand. Remember you can
change hands so that you are able to use both
during your talk.
22. Position and Posture
Avoiding barriers:
Facing an audience, whether it is of five, 50 or
500, is difficult and speakers like to hide behind
desks, tables or lecterns. If you want to be a good
speaker, you must learn to stand totally exposed in
front of your audience. Always stand in front of all
the barriers.
Pitfalls of lecterns:
Try to stand to one side of the lectern so that you
can refer to your notes and your listeners can see
all of your body. This will also make it easier for
you to make natural gestures and to move around.
Id the lectern is fixed with a microphone, you have
no choice but to stand behind it. Stand on a box if
you are short so that your upper body can be
seen. Ask for a radio microphone if you want to
move away from the lectern.
Standing and sitting:
Standing gives you authority, enables you to
breathe properly and project your voice, and to
make better eye contact. The disadvantages of
sitting are:
Your chest is restricted and it is difficult to use
your lungs effectively.
Your eye contact may be limited and you may
be tempted to look down at your notes too
much.
Your listeners may not be able to see you.
It will be very tempting to play with pens and
paper-clips on the table.
The advantages of standing are:
You are more visible and have more authority.
Your voice projection will be better.
You will have room to make gestures (don’t
lean on the table or clutch the back of the chair
if you are standing behind it).
Stand tall:
Act confidently, even if you are quivering inside.
Push back your shoulders and open up your chest
as if you are about to begin the first day of your
yourself, your listeners will accept and retain what
you say.
Finding your feet:
Like hands, these creatures on the ends of our
legs seem to be stimulated by nerves to act very
strangely. I have seen otherwise normal men and
women:
Hopping from one foot to another.
Taking two steps forward and two steps back.
Standing on one leg.
Crossing their legs in the ‘I want to go to the
toilet’ stance.
Rocking to and fro.
Swaying from side to side.
Flexing at the knees.
Rising up on their toes on every third word.
How to do Communications and Presentations : page 17
Rising up on their toes on every third word on a Develop an effective speaking voice.
squeaky floor board.
Use positive and appropriate body language.
Sticking
out
one
foot
and
‘boring
for
oil’
with
You’ve probably spent sufficient time planning the
the heel.
Going on little, undirected walkabouts.
Tracking the pattern of the carpet with the curve
of their shoe.
Walking up and down like a caged animal.
Standing on the sides of their shoes.
If you can identify any of these traits in your own
performance, imagine that you are standing in
weighted boots, so that it is impossible to move
without a conscious decision. You should be
aiming for steady, relevant movements, not cat-ona-hot-tin-roof jerks. You don’t have to stay nailed
to one spot, but you should be consciously
deciding when to move to another spot - to the
flip chart, towards a questioner in the audience, to
pick up a visual aid – and you should not be at the
mercy of your fidgeting feet.
Stand upright on two feet a few centimetres apart,
so that your hips are balanced over them and your
shoulders and the rest of your body are balanced
over your hips. Don’t slump or lean on one foot
with your hip sticking out.
Summary:
Use your eyes to make contact with your
audience and show that you are interested in
their reaction to you.
Your face should say, ‘I am happy to be here
and I’m glad you’re here too’.
Your hands should be empty and still.
Gestures start from the shoulder.
Don’t hide behind barriers.
Stand tall, don’t sit.
Balance on both feet and wear imaginary lead
weighted boots.
Let the beam of calm confidence shine out
from your chest.
23. Why should you practice?
Rehearsing helps you to:
Become familiar with the flow of your material.
Conquer the blank mind syndrome.
Feel more confident and control nerves.
content and choosing the words, but fail to
allocate enough time to what will make the
difference between a mediocre and a memorable
talk – practice. Remember, if you can get up an
hour earlier you gain an extra hour in which to
practise.
The three-step approach:
Take it one step at a time – practice, rehearsal and
dress rehearsal. Practising is done by yourself,
rehearsing in front of one or several people and a
dress rehearsal is on site with props. All you
practising and rehearsing should be spoken aloud.
Guidelines:
Your first run through will probably help you to add
examples and even anecdotes that you hadn’t
thought of in your original preparation. Also, if you
are reading it out for the first time, you may find
that some sentences are too long or complicated,
your choice of words may sound clumsy or you
may feel some ideas could be expressed more
clearly. You must set yourself a time limit for
changes otherwise you will always be rehearsing
new material and the main purpose of your
practice, to become familiar with your talk, will
never be achieved.
Don’t forget your body language:
You’re practising to familiarise yourself with the
ideas in your talk and words that convey them:
you are also practising your body language and
your voice.
Always stand when you are practising, so that you
can use gestures and become used to holding
your cards. Look around the room as if you were
making eye contact with the audience. A fulllength mirror helps at this stage, although there is
nothing to beat recording yourself on video.
Using a tape recorder:
If you can’t video yourself, the next best thing is to
record yourself on a tape recorder. Listen critically
to your voice. Is it clear? Are you varying the
pitch, volume and speed? Are you using powerful
silent pauses or are you filling up the spaces with
non-words? Above all, is there enthusiasm and
vitality in your voice? Does it sound interesting?
If not, analyse how you can improve it and
How to do Communications and Presentations : page 18
practice again and again. If you know that you will
be addressing a large audience without the help of
a microphone, place your tape recorder at the far
side of the room and project your voice to it.
Make sure you are not straining your voice.
Remember if you have lungs full of air, your voice
will carry further and you won’t need to force it.
Rehearsing with feedback:
Use colleagues or friends, but be sure to give
them the background to your talk – who the
audience is, what they expect, what your objective
is and what you hope to achieve. Make eye
contact, use gestures and sound enthusiastic.
Use your cards and if you lose your place, don’t
make any comment, simply continue as you would
in front of a real audience; this will give you
practice in overcoming fluffs.
Be sure to ask your audience to give you positive
feedback as well. Not general praise, but specific
instances of good performance – you need to
know what to keep.
Guidelines for feedback:
These are some questions your rehearsal audience
can use in order to assess whether or not you are
presenting a successful talk.
You can use this checklist to evaluate your own
talk.
Introduction:
Is the first sentence attention grabbing?
Have you shown why you are qualified to
speak on this subject?
Have you announced your structure?
Have you revealed understanding and
knowledge of the listener’s attitudes and
possible problems in the first minute or two?
Have you shown the benefit to the audience in
listening to you?
Have you identified with the audience early on?
Body talk:
Have you announced your first point clearly?
Have you used facts, examples, anecdotes,
comparisons and statistics to support your
main points?
Have you summarised regularly?
Have you recapped on the previous point
before moving on to the next one?
Have you used rhetorical questions to guide
your audience along your path?
Have you avoided jargon and abbreviations?
Have you use visual aids in order to explain
complex material or to add interest at a dull
moment?
Are the links between each point clear and
logical?
Conclusion:
Have you indicated that the end of your talk is
coming?
Have you summarised your key points?
Have you asked for action?
Have you ended on a high note?
Check your timing:
Always time every practice so that you know
whether you need to add or amend your talk. If
you overrun on time, avoid what so many
experienced speakers do – either ignore it and
continue to the end of the talk or speak faster in
order to include every precious point. Running
over is a discourtesy to everyone and shows lack
of professionalism. Speaking faster means that
your audience will not be able to follow and may
stop listening. If you have too much material for
the time cut or condense.
Write the timings on your cards, so that when you
are delivering your talk, you will know how much
time you have left at any given moment. This is
particularly important with longer speeches or on
the occasions when you have to deal with
unexpected questions that use up the time
allocated to your talk.
Summary:
Make time to practice, aloud and standing up.
Use gestures and vary your voice.
Use a tape recorder and/or video recorder.
Practice in front of friends and colleagues and
ask for feedback.
Remember you are the most important visual
aid to your talk. Make sure that even before you
open your mouth the audience feels that you
are an enthusiastic and interesting speaker.
How to do Communications and Presentations : page 19
24. Checklist for Conference
Appearances
Introduction.
Make sure that the chairperson
has a couple of paragraphs so that you can be
introduced appropriately.
end. If you can identify a few faces when you
begin, it will help to calm your nerves.
Speaking from the lectern. It is better to come
out from behind the lectern if possible, even if
only for a minute or two. In advance check that
the audience can see more than the top of your
head when you are behind the lectern.
Delegates’ Pack. If your paper or presentation
is to be given to the delegates, make sure that
the actual talk has different examples and
anecdotes to bring it alive. You don’t want the
whole audience reading your script along with
you.
Timing. Always aim to speak for less time than
your time slot; for a 20 minute slot aim for 15
minutes. Most speakers overrun in the heat of
the moment and the conference organisers will
be delighted if you underrun.
Other Speakers. Contact them in advance so
that you don’t overlap in your subject material.
Also check that your clothes don’t colour clash.
It is advisable to find out the background colour
of the stage setting for the same reason.
Microphones. Find out what is being provided.
Are they fixed on the lectern, or radio mikes
with power packs?
Visual Aids. How will the visuals be projected?
Who has control of them? Are they operated by
the speaker or by a technician?
Question Time. Find out in advance how
questions are going to be handled. Are they
through a chairperson or will each speaker
select questions from the floor? Will there be
questions for individual speakers or a panel
discussion at the end of each session?
Rehearsal. Check when you have entry to the
venue and ensure that you have a complete
run-through in situ with your visual aids and
using the microphone. Practise crossing the
stage if necessary from your seated position to
the lectern.
Lights. Often you can’t see the audience
because of spotlights on your face. You may be
able to ask for the house lights to be turned up
so the audience is not in total darkness.
Audience. Mix with them before the talk if
possible. Ask them what they are interested in.
Encourage them to ask you questions at the
Body language. The bigger the audience the
bigger the gestures and facial expressions need
to be.
Voice. With a slide presentation you will be
looked at less so your voice has to be more
interesting.
Summary:
Don’t worry excessively about the grammar.
Use simple but precise words. And keep your
sentences short.
Abbreviate words like cannot, do not, should
not, and so on.
Read the script aloud several times to test its
naturalness and until it is very familiar.
Practise reading aloud from newspapers or
from a book.
Learn to read ahead and look up at the
audience.
25. Where are you speaking?
Whether you’ve planned to give your speech to
delegates at a conference or a small gathering of
your colleagues it is important to check out the
venue for your presentation.
Business talks are usually given in one of the
following situations:
Round-the-table meetings on your own
premises, for example, board meetings, sales
meeting, departmental meeting, formal and
informal.
Clients/customer meetings in your offices or on
their premises, generally a group of less than
twelve.
Regional meetings in hotels, such as a sales
meeting with a medium-sized audience of 20
or more.
Conferences in hotels or conference centres
with large audiences of over 50.
How to do Communications and Presentations : page 20
The visit:
Always attempt to visit the site where you will be
talking, allowing sufficient time to change or rectify
any details that might prevent you from presenting
well and efficiently.
Here is a list of points that you should bear in
mind when you are visiting sites of different sizes.
Small venues:
Check list for small venues.
Ask yourself how you want the audience
sitting. Do they need tables? Would a
semi-circle without tables facing the speaker be
a better arrangement? Are there any members
you want sitting together or separated or close
to you? Can everyone see each other, you and
the screen (if you are using visual aids)?
Is there adequate space for your notes, visual
aids, handouts? Can you escape from the
barrier of a table between you and the
audience, or will you be trapped behind it?
Where will you position your flip chart and
projector?
Where are the sockets for the equipment? Will
you need an extension lead?
How do you dim the lights if you need to? Is a
pointer available to you to identify details on the
screen? How can you adjust the heating or air
conditioning? Can you open the windows?
Who is providing tea/coffee and at what time?
Imagine how your entire presentation could be
jeopardised by the appearance of refreshments
at a critical moment!
Is there a clock in the room or should you take
your own? It’s often easier to read a small
clock than your wristwatch, even if you remove
it and place it in front of you.
Who is providing pens, pads, drinking water?
Is it to be a smoking or non-smoking meeting?
Medium sized venues:
Check list for medium-sized venues.
Check everything on the list for small venues.
If you are using a hotel, check the name of the
manager in charge of hiring the room you are to
use.
What time will you be able to get into the room?
Are you operating your own visual aids and, if
not, what cues will you give to the technician?
Check where the lighting switches are and who
will operate them. Can only half the room be
dimmed if necessary? Do the windows need to
be covered?
Where are the toilets and telephones; will you
need a phonecard or loose change to make a
call?
What facilities does the hotel offer for taking
messages?
When and how will tea/coffee be served? Will it
be served in the meeting room or in an adjacent
room? If it is in the same room, ensure that the
cups are laid out before the meeting. You don’t
want to give your talk to the accompaniment of
rattling china.
Who will be in charge and who will be on duty?
Are the chairs comfortable? Can they be
substituted by better one if your meeting is
long? Ensure that surplus chairs will be
removed. Remember to provide a seating layout
plan.
Make sure that no telephones in the meeting
room will ring and disturb you.
Ask to see the visual aids equipment. Are you
familiar with the projector? Do you know how
to focus this particular model? What type of
screen will be provided?
If you are using a lectern, how high is it? Can it
be powered or can they provide something for
you to stand on if this is necessary? Does it
have a light so that you can read your notes if
the main lights are dimmed?
Large venues:
For large conferences, most of the details should
be organised by the conference co-ordinator. If
that happens to be you, you will need to buy
another book, because this is not the place to list
everything you need to know. As a speaker your
responsibility is to consider every aspect of your
own talk and how you can ensure that your
presentation will be professional and trouble free.
Here are some points to consider:
Check list for large venues.
How will you approach the platform/stage?
How to do Communications and Presentations : page 21
Where will you stand?
Will there be other people on the stage with
you?
Is there a teleprompt?
Can you see the audience or are the lights
shinning into your eyes?
How are the visuals cued up?
What type of microphone is provided? Is it fixed
or will you be able to move around?
Is the text of your talk being distributed to
delegates and, if so, when?
26. Familiarity Breeds Confidence
These are probably the most important three
words in the booklet and if you only follow this
advice, you will become a better speaker.
Most of our worries about speaking in public are
based on the fear that we will make a fool of
ourselves, or worries about what people will think
of us. We want the audience to respond and react
and our biggest fear is that they won’t. in fact it is
unlikely that the audience will fail to respond, but
in order to realise this, we need confidence.
Unfortunately you can’t conjure confidence out of
the air; it will only come with practice. You
audience will believe in you if you believe in
yourself. Practising gives you confidence and
enthusiasm – a winning formula.
Summary:
Find out where you will be doing your
presentation.
Check the venue to make sure everything you
need is there.
Try to book time for a rehearsal at the site
before the big day.
Remember knowing about the site and its
facilities will help you feel more confident.
27. How to use interest prompts
There is frequently a low period in the middle of
the concentration span and it’s up to you to
include interest prompts in your talk to keep the
audience’s attention. Here are some useful interest
prompts.
Change your position:
Move from behind a lectern to centre stage; and in
a smaller room, move from a flip chart to stand
closer to one of the listeners. If you have been
sitting, stand; and vice versa. In an informal
setting, consider perching on the edge of a table in
order to vary your position.
Use a visual aid:
Be careful not to use a visual aid only as an
interest prompt. Write on the flip chart, show a
slide or pass round a table a sample.
Do something unexpected:
Take off your shoe and bang it on the desk to
make your point.
Ask a question:
Involve the audience by asking one of the
following kinds of questions:
Rhetorical – the listeners will be prompted to
give a mental response, e.g. ‘where can we find
the solution to this problem?’
General question - answered by a show of
hands: ‘who has installed a new computer
system in the last year? Put up your hand.’
General question - answered by one or two
people with a direct answer: ‘who here can give
me the details of a problem that they have
encountered?’
Direct question: Mr Smith, what did you do
when the fire destroyed all your records?’
Involve the audience in action:
Ask them to work out a calculation, using their
own situation as a base and applying the theory
which you have just presented.
Ask the small/medium audience to move to a
demonstration table to see a model in action
and, better still, get involved in some way.
Ask for a volunteer to write on the flip chart.
Ask them to turn to the person sitting next to
them and discuss a point raised in your talk.
Summary:
Bear in mind that different-sized audiences
behave differently.
Research your audience.
Watch their body language.
Use comprehension questions in small groups.
Control the interruptions.
Use interest prompts.
How to do Communications and Presentations : page 22
Part Three. Writing for the
Newspapers: Press Releases,
Stories and Letters
28. Publicity can be the lifeblood of a
community group.
Effective publicity might help you gain more
members or lead to better relations with others in
the community.
Effective publicity might help ensure that your
group is seen as more legitimate by local
authorities and others and might even help your
funding. Perhaps most importantly, it will help to
motivate your group. There is nothing so
motivating as when someone else recognises your
efforts. Effective publicity does not happen by
itself. There are a number of things that you need:
Publicity and Promotion Officer:
Does your group have one? Even very small
groups should consider making sure there is
someone who can take the lead on generating
publicity. Ideally, this person should be
well-informed about the group’s work and have
access to a phone and even a computer.
A Plan or Strategy:
This shouldn’t be terribly complicated or long
winded, but it is well worth half an hour to sit
down and discuss what you are trying to achieve
with your publicity and how you will go about it.
The approach you need to take for a recruitment
drive will be very different to the approach you
need to boost the reputation of your group.
Imagination:
Let your imagination run riot. The most effective
publicity campaigns are the ones that stand out
from the crowd.
First decide on your audience. If you want to
increase your membership in a local area – say a
village or estate – then perhaps posters and
leaflets might be effective. If you want to increase
your membership across a county then perhaps
getting articles in newspapers or magazines would
be a better idea. Think about the resources you
have available. A large residents group might well
have enough members to push leaflets through
everyone’s letterbox. A small group will be pushed
even to put up a few posters and place leaflets in
the doctors surgery.
Posters:
Make sure you have enough, they are the
appropriate size and that they stand-out. Most
people don’t stop to read posters, they expect to
see instantly what they are about. Make them
short and snappy, with eye-catching artwork and
give a telephone number for more information.
Colour posters are very noticeable but they are
expensive to copy. By using clever design and
coloured paper, single-colour posters can be just
as eye-catching. Computers can produce very
high quality posters but so can artistic humans.
Leaflets:
Leaflets can give more information than posters
and if they are left in places like libraries and
community centres then people will only pick them
up if they are interested. The cover of a leaflet
needs to be eye-catching and attractive and the
text inside needs to be crisp and to the point.
Bear in mind that the question anyone reading
your leaflet will be asking themselves is ‘what’s in
it for me’. If you are looking for new members for
example then the first paragraph might read:
‘Hiddleswick thingamajig Group is a local group
for local people who care about thingamajigs, If
you or any of your family cares about Widgets,
then you should join now and help us in our
important work’.
These days, most people will expect leaflets to be
produced on a computer and so it probably is not
worth hand-writing them. Leaflets should always
give the name and address of the person
producing them.
Local Media:
People are often mistrustful of journalists but in
general, journalists on local papers and radio
stations are interested in good news story about
successes in their local area. These days
journalists tend to be very busy and often never
leave the office, contacting everybody via phone.
They will get a great number of their stories from
news releases issued by local authorities,
hospitals and switched-on voluntary groups.
On the other hand, some journalists find that they
are swamped with badly targeted and uninteresting
stories from organisation large and small. A few
quick checks should help to ensure good relations
with your local media and good coverage for your
group.
How to do Communications and Presentations : page 23
Is the story you have appropriate for that
publication? A regional daily paper will concern
itself with crime, politics and scandal, it won’t be
interested in a tree-planting day at your local
school. The local weekly paper might well be really
interested.
Are there any good pictures? It is pictures that sell
newspapers, will your tree-planting take place in a
dramatic setting. Will there be lots of people there?
Will the newspaper be able to photograph
something unusual and interesting? Even if the
newspaper doesn’t send a photographer, they might
be happy to print photographs that you have taken.
Have you written a good news release? A news
release need not be long, in fact the shorter the
better but it should answer the journalist’s key
questions: Who? What? When? Where? And Why?
A good example might be:
‘Kettle Bridge villagers, will be planting bulbs, this
weekend around the village in their bid to win a
Britain in Bloom competition.”
In the first paragraph, the journalist has everything
they need to know. If you give a little background
to the story, that will help them write the story.
You must include contact details for your group on
the news release, preferably with the telephone
number of someone who can be contacted, by
phone, during the day.
With a little effort and thought, you could find that
news articles concerning your group could
become a regular feature of local media coverage.
If at the same time, you distribute leaflets and
posters widely, you could increase your
membership and your standing in the local area
very easily.
mail on our mats and desks. The ability to publish
from your desk doesn’t mean you’ll publish well.
Even if you write brilliantly, your message can all
too easily be lost in poor presentation on the page.
This article aims to make you think about some of
the hurdles you’ll encounter – design, editing,
presentation – asking first:
Do we need a newsletter?
Newsletters are most successful when providing
regular information to a specific audience with a
common interest. Normally related and informed in
style, they will contain a number of short articles
– most are dipped into for short periods of time
over a few days or a week or two – and end up in
the waste paper basket. A good newsletter should
be a welcome, regular visitor that can be relied
upon for accurate, factual information not readily
available from any other source.
Ask yourself two, brief questions:
What is the purpose of the newsletter?
Does the newsletter contain news?
What is news?
News is events, developments, decisions that
affect the reader, outcomes of meetings, new
policy decisions, changes in council and
government strategy, fund-raising success, the
progress of a campaign or lobby… what isn’t
news? Personal titbits about community members
– marriages, birthdays and so on. Not only does
this not truly interest your existing readership, but
if circulation widens, it excludes others, who don’t
know those involved, from an interest in the
newsletter. And remember it is your readers who
will say, ‘do I care about this?’ You must pick
topics that your readers will want to learn about.
29. Creating a Newsletter
People will read what they want to read… not
what they ought to read.
Perfect prose and gorgeous grammar:
Probably the best writing style for a newsletter
would make your old English teacher’s hair stand
on end. You’re aiming to get information across to
the reader during brief dips into the publication.
You’re competing with a mass of other
publications, plus all the usual distractions of
noise in the home.
Newsletter writing must be fast, informal, crisp
and simple. It should reflect the best and most
natural spoken language. When you talk to a friend
Anyone can write a simple newsletter - can’t they?
Newsletters are one of the fastest growing
methods of communication. The ability to produce
limited print runs from simple desk top publishing
systems has increased their growth further. Any
one of us can look around and spot several
newsletters or local magazines that are visited
upon us both in our community and at work.
This often leads to the false conclusion that
newsletters are a ‘good thing’.
Newsletters can be a ‘good thing’ but they can
also contribute to the ever-growing pile of junk
How to do Communications and Presentations : page 24
you tend to use simple language and east, familiar
images. So it is with the best newsletters.
Do understand how difficult this can be. It’s
debunking the habits of a lifetime. Since we
learned to write our name at school through
school essays, college exams, to office
memoranda – we are encouraged to write to
impress the reader. We want to show not only our
grasp of the subject matter, but also our
knowledge of the jargon.
Please forget it all. Write to express your thoughts
in the simplest way you can.
Are you writing stories the readers want to read?
Have you included three short stories for each
long one?
Sprucing up the pages:
There are two main items that attract readers to
particular pages or stories. First, there is a
photograph or drawing.
Good photos are worthwhile – but they must be
good. Locals newsletters are all too often full of
pictures of buildings, groups waving vaguely at
some point to the left of the photographer – or,
worst of all, grips and grins (cheque handovers!).
The best are of eyes, faces and action –
remembering to study the background for conflict
of interest. Think caption! A photo without a
caption looks unfinished and you miss a chance to
grab reader’s attention.
Secondly, attention is grabbed by good headlines.
Make no mistake, the craft of writing good
headlines probably causes more anguish among
newsletter editors than most other parts of the job.
Here’s a practical tip – a headline writing formula.
Start with a simple story heading – how about:
Man
bites
dog
Jot them in columns on a piece of paper and fill in
each column with alternative words, i.e. for dog
you could have pooch, pup, poodle, spaniel, mutt,
bitch; for man you ask: what sort of man? Vicar,
pensioner, postal worker etc; for bites, try tears,
devours, sucks, savages, mauls etc.
When you have filled a page turn it over and ask
the 5Ws – who, what, why, when and where.
Who and what are already in the headline; Why –
starving? Angry? Revenge? Training? When –
yesterday? Monday? Etc. Where – church?
Obedience class? Street? Then go and create.
Don’t try to include all the information in the
headline, distil the most interesting bits. Man bites
dog could become ‘Angry pensioner mauls poodle’
– or something equally factually correct! I
promise your readers will love it!
Creating character:
Giving your newsletter a touch of character is
surprisingly easy. Of all the building blocks used
for identity, the nameplate (or masthead to use the
common newspaper term) of the publication is
probably the most important. When you first meet
someone you make instant judgements on
appearance, hairstyle, facial expression,
enthusiasm, handshake and so on.
So in the newsletter, the first impression is the
nameplate. ‘Dormanstown Shout,’ the name taken
by the community paper for part of Redcar, is
another strong title that immediately lets you know
that you are dealing with some forthright people.
Think carefully about a title and a nameplate –
most importantly don’t use the word newsletter.
Anyone publishing something called ‘the
newsletter of…’ is bound to be boring. In a
nameplate, focus, briefing, bulletin, spotlight,
update, issues, strike a much more interesting and
positive image.
Many writers and editors spend hours of energy
and effort on the first lines of an article – then
aren’t quite sure how to finish. Here are five
alternative finishes for you:
1. On a challenge:…so now you’ve got my
guidelines for basic editing, can you do better?
Tell us your best editorial tips for publication in
a future issue!
2. On a hook:...and that’s all we’ve space for
today, more tips to follow in a regular column
in the… issue
3. On a fact:…more of this information that
improves your editing skills is available at just
11p per page.
4. On a quote: …which is why Simon Smith,
the editor, said, ‘Thank Goodness this article is
coming to an end!’.
5. When all else fails – repeat the lead
…now you know how easy it is, you
understand why newsletters are one of the
fastest growing methods of communication.
How to do Communications and Presentations : page 25
30. How to present Copy and Layout
33. Advertisement Layout and Design
The copy (wording) should be typed. If this is not
possible, make your handwriting clear.
Whether typed or handwritten, double space your
lines.
For press releases, letters to the editor or news
stories:
Use half A4 sized paper (A5) – it matches their
system
Be sure all pages are numbered
Use only one side of the page
End the message with the word ‘end’
Leave plenty of space and big margins.
Editors and subeditors need this (...page at the
top of the first page and 5 – 7 cm margins are
good guidelines)
If you have an idea for a heading, use it – though
it may be changed.
Avoid the boring:
Regularity is not interesting, but a logical sequence
of ideas is important.
31. Writing Copy
Clarity is all-important. Use straightforward
language and short sentences.
Keep paragraphs short.
Make your major points early e.g. date, time,
location, name of events, who it is for.
Give special thought to attention getting first section.
Check you have given all essential information –
e.g. headline acts, venue, dates, where to buy
tickets.
32. Some other hints
Provide a contact number and person who can
give further information or clear up any ambiguity.
Find out the paper’s policy on proofs. Proofing
might be done formally (a copy of the typeset
material) or informally (the reporter shows you a
copy of what he or she has written).
Where possible develop personal media contacts.
Provide supporting material – e.g. your
programme, bio’s on performers etc.
Circulate your press releases as widely as
possible. Send a copy to:
Radio.
TV.
Weekly newspapers.
Other publications that cover your area of
interest, e.g. farming, youth, motoring
magazines.
Eye direction:
The natural movement is from left to right.
Faces and eyes and illustrations should face
the main idea. Outward facing leads the eye
away from your message.
Arrows and lines can lead the eye through
desired sequences.
Use borders with care:
Many believe borders stop the eye moving
easily to your advertisement.
But they can tie together loose ideas.
If you use a border don’t crowd text against it.
Coupons/Entry Forms:
Always position coupons or entry forms at the
base of your advertisement and ask the paper
to position your ad on the outside of the page.
People do not like “spoiling” printed material
by cutting into it.
Use your logo and name:
This has long term advertising value.
But the logo shouldn’t be larger than your main
heading.
Give directions for the newspaper staff:
Present the advertisement in the layout you
would prefer – e.g. where the logo, photos,
etc, should go. Typesetters and layout artists
have wide experience and may change this to
make it more effective.
Indicate:
- The size of the advertisemen.
- Which classified section or run-of-paper
(displays ads.
- Special instructions (e.g. borders).
- Dates the ads need to appear.
34. Timing your Advertisement
Remember you can never have too much
advertising – cost is only a restraint.
A series of advertisements are often worthwhile.
Different sizes can save money while maintaining
a constant awareness of your event. Instead of
running the big, full-message as everytime,
How to do Communications and Presentations : page 26
consider running alternate smaller ads with just
the main message. Or, have a series of ads with
different messages. Variety will freshen the alert to
your event each time.
BUT the timing of the advertisement has to be
decided together with all publicity approaches.
35. Six Classic Rules
1. Gain attention, arouse interest:
Use shape, colour, size, layout
Use catchy words
Aim to make the intention clear at a glance
2. Promise benefits:
Self interest is a powerful motivator
Make the gain clear
Make the gain desirable
3. One theme should predominate:
The heading should flash this idea
Supporting ideas should follow a logical order
4. Don’t drown the message:
A sea of words does not help – keep them to
the minimum.
In general, the sooner and the bolder the main
idea the better. If it is a long advertisement,
repeat the main idea more than once.
5. Induce conviction and action:
Be believable, sincere, factual.
Encourage the reader to do something.
6. Keep the goal in sight:
What exactly do you wish to promote.
Make the advertisement relevant to reader’s
needs.
36. And some other hints
Truth is essential – slickness without substance is
bad publicity.
Customer satisfaction is the best advertisement.
Negative approaches (e.g. criticism and sarcasm)
seldom help.
Language should be:
Pertinent Clear Concise Enthusiastic
Direct Honest Lively
Headlines may be:
Provocative Commands Curious
Promising Questions News
37. Poster Design and Production
All over town you can see posters advertising all
kinds of events. They tell you about concerts,
exhibitions, or bands playing at the local pub.
Most posters are also aimed at specific audiences.
They are trying to communicate the right
information to the right people, like the street
posters produced by local rock bands.
A poster is poorly designed if it fails to
communicate, when design elements – words,
images and empty space – compete for attention.
But a well designed poster leaps out at you,
demanding your attention. Why does such a
poster work? It’s not just a matter of making the
poster look good. The information must be
accessible, and arranged in order of priority.
What is being advertised? Where is the event to be
held? When? Is there anything else important to say?
Image: What kind of image should you use on
your poster? It can be a logo or symbol, a
photograph, a line drawing or a random squiggle.
But keep it bold and keep it simple – it will
reproduce better, and look better from a distance.
Typography: The words you use must also work
for you. Type has to be big, bold and readable at a
distance.
Sometimes, the words themselves are the image.
Handwritten or in a specific chosen typeface a
particular event, message or idea. And in looking
for the right combination, it’s useful to know a few
basic rules of design.
Balance: Each image or block of type has a
certain “weight” (size and impression). A welldesigned poster balances the design elements
against each other.
Shape: Shapes should be used with caution. While
they catch the eye, they can also set up barriers or
distant the viewer from the main message. The
circle, for example, may act as a focussing device,
but written information should be kept outside the
shape, avoiding unnecessary visual ‘clutter’.
Contrast: Contrast adds excitement and
movement to poster design. You can have contrast
in moods, space, colour, dark against light, large
against small. These are contrasts in value.
If you are using colour in your poster, you might
want to employ chromatic contrasts – muted
How to do Communications and Presentations : page 27
colours against colours of high intensity, cool
colours (blues, greens) against warm colours (red,
yellows). You might even try deliberately clashy
colours!
Colours of the same visual weight, for instance
primary colours – red, blue and yellow – are often
used together successfully.
Perspective: Illusions of depth and perspective
are commonly used in poster design. By
overlapping the edge of a frame, an image can
seem closer to the viewer. And because of the
way we see foreground and background in
everyday life, with things nearest us occupying the
lower third of our vision, the bottom part of the
poster always seems closer to the viewer than the
top.
Some posters work in spite of the rules. The
image itself may make such an impact that it
carries the other information along with it. The
main job is to get your information across the best
way you can.
Production schedule: If you want to produce your
paper on a certain date – and it is a good
discipline to have a target date, and to stick to it –
you need to plan all the tasks that lead up to that
day to ensure that everything gets done at the right
time.
Your production schedule will have to take in all
the local peculiarities of your system bur here is a
model schedule that indicates the things you
should be including. You can lengthen or shorten
the time it will take to accomplish these tasks
according to your own experience of the time it
has taken you in the past.
Allow more time than you think if there is any
doubt.
The chart below shows how the whole job is done
in five weeks, the kind of schedule you would
probably need to work to on a publication that
comes out once every twomonths.
Date and Job
To be accomplished by
Feb 1:Create
Schedule
Make up this table, decide size of issue based on budgets, news values and
ad potential (if relevant). Notify printer your print plans and confirm price.
Feb 7:
Planning
Meeting
Decide / discuss contents of next issue, and people to be involved.
Commission people where possible. Writers, illustrators, photographers,
puzzle compilers should all be notified what is required of them, and when.
Feb 17:
Copy Chasing
Check that everybody is keeping their promises, take action now to
secure alternatives if anyone looks as if they will fail to deliver.
Feb 21: Copy
Delivery Date
The editor should have all the copy, pix etc, promised by now.
Take urgent action to plug gaps – like raiding other editorials.
Feb 21:
Ads
Deadline
Deadline for confirmation that people will take out advertising space, so that
you know what space is left for news and features. If new ads arrive after
this, it is up to you whether you bend the rules for the sake of the money.
Feb 25:
Notify
Printer
Ring your printers to let them know that you will be delivering your
job to them in five days. Reconfirm delivery date, print run and any details
which are different from previous issues.
Feb 28: Plan
Distribution
Alert your delivery team, and arrange for them to start work in 10 days.
Feb 28: Finish
Production
Some pages should be completed before this date, but the last one should
now be ready for the printer, including proof-reading.
Mar 2: Job to
Printers
Mar 7:
Delivery
Deliver the job to printers and reconfirm delivery dates
Organise someone to take delivery of the issue and then get it delivered to
to readers as fast as you can,
People
involved
CNet, Bradford and District
Community Empowerment
Network
What we do:
CNet
CNet is a Community Empowerment Network. We
work with agencies across Bradford to ensure
that the views of voluntary and community groups
and individual advocates are heard on key
decision- making partnerships.
Partners
We work with a number of partners across the
District to help plan and improve the delivery of
services.
Individuals
We offer support and training for individuals
who want to engage in community advocacy
and public decision making.
We promote the benefits of getting involved in
groups and networks.
Groups
We support groups by providing small grants
to enable them to fund an idea or project
which will benefit the community.
We link groups to networks and encourage
them to share information and good practice.
Networks
We work with existing networks and get
actively involved in the development of new
ones.
We distribute a wide range of information for
networks to share with their members.
We provide meeting facilitate and resources.
CNet
EMPOWERING
COMMUNITIES
How to find us
385 Canal Road, Frizinghall, Bradford,
West Yorkshire BD2 1AW
Tel: 01274 714144
Fax: 01274 714140
Email: [email protected]
Check our website: www.cnet.org.uk
You can also download a copy of this booklet and
others in the series by going on our website.
Thanks to Voluntary Action Calderdale for the
help and support in producing these booklets.


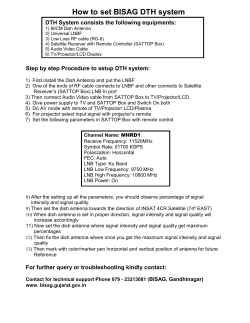


© Copyright 2026