
HP Scitex XL1500 Software Version 5.021A Installation Guide
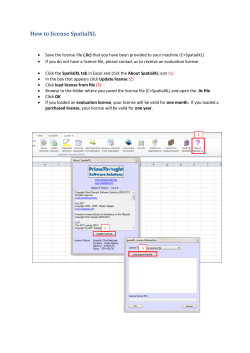
Product Support Group
8b Hatzoran St POB 8743
Netanya 42505 Israel
Tel: 972-9-892-4700
Fax: 972-9-892-4900
www.hp.com/go/scitex
Application Note
Product
HP Scitex XL1500
A/N #
5
Subject
XL1500 Software Version 5.021A
No. pages
11
Written by
Daniel Schott
Approved by
Vladimir Bull
Edited by
Daphne Tal, Natasha Zaltsman
Date
December 29, 2008
Confidential
No
AN #5, XL1500 Software Version 5.021A
Overview
This AN describes the HP Scitex XL1500 SW version 5.021A installation including the
new HASP security and dongle SW.
The s/w can be installed on the IBM, Excellnet, and the new HP computers.
The s/w can be installed in the Windows 2000, 2003 and XP OS.
Required tools
▪
HP Scitex Xl1500 S/W CD 5.021A
Catalog numbers
Description
Part number
S/W CD 5.021A
CC903-10025-
Quantity
1
Procedure
1.
Remove the HASP dongle from PC.
2.
Insert the S/W CD 5.021. The following window appears; click Printer Software:
December 29, 2008
2/14
AN #5, XL1500 Software Version 5.021A
3.
Select Yes to start the installation:
4.
Type HP 5.021A in User Name; click Next:
Note: If the Company Name/Machine serial number field is empty, write the same
name that is written in the User Name field.
December 29, 2008
3/14
AN #5, XL1500 Software Version 5.021A
5.
Select Complete to install the XL software in the destination folder (C:\Program
Files\Hewlett-Packard\XL\5.021A) or click Browse… to define another destination
(e.g. to install the software on another hard disk). Click Next.
6.
Click Install.
December 29, 2008
4/14
AN #5, XL1500 Software Version 5.021A
7.
Select Yes.
The next steps describe the installation of the HASP S/W and driver.
Important: Make sure the HASP dongle is not connected to the USB port.
8.
Click Yes.
9.
Click Next.
December 29, 2008
5/14
AN #5, XL1500 Software Version 5.021A
10.
Select I accept the license agreement and click Install:
11.
The installation runs and at the end the following window appears; click Finish:
December 29, 2008
6/14
AN #5, XL1500 Software Version 5.021A
12.
Click OK.
13.
Connect the HASP USB dongle to the USB port on the back of the PC and click OK.
Aladdin s/w starts its installation; wait till the following window appears:
14.
Click Next.
December 29, 2008
7/14
AN #5, XL1500 Software Version 5.021A
15.
Click Finish and follow the steps below:
An .xml file is created; search for the XML file in the following folder: C:\Program
Files\Hewlett-Packard\XL\5.010\HASP\HaspProperties.
16.
Send this .xml file by email to the regional HP Scitex Care Center.
December 29, 2008
8/14
AN #5, XL1500 Software Version 5.021A
A license file for your machine is created by the specifications of the .xml file and
your system type:
The file contains the Host ID of the computer and the HASP Dongle_SN.
You will receive from HP a new file with .svl extension. For installation of the new
license refer to Appendix 1: Receiving the New License.
17.
Restart the computer.
18.
Right click the XL icon and open the Properties.
19.
Verify the Target field: "C:\Program Files\Hewlett-Packard\XL\5.021\XL.exe"
/tech /darklite; click Apply and then click OK.
December 29, 2008
9/14
AN #5, XL1500 Software Version 5.021A
The software installation is complete. Now you are ready to start the XL1500 application
and specify the settings - see Appendix 2: Specifying Settings.
Appendix 1: Receiving the New License
1.
Exit the XL1500 application.
2.
Copy the new license you received by email to the Desktop:
3.
Double click the .svl file and wait for a few seconds; the following message appears.
Click OK and then Finish.
December 29, 2008
10/14
AN #5, XL1500 Software Version 5.021A
The license installation is complete. Now you are ready to start the XL1500 application
and specify the settings.
December 29, 2008
11/14
AN #5, XL1500 Software Version 5.021A
Appendix 2: Specifying Settings
1.
To open the System Setup window, press F8 or select Preferences Æ Setup.
2.
Under the Hardware tab, verify that the settings are as shown in the picture below.
3.
Click Apply and then OK.
4.
Under the Software tab, verify that the settings are as shown in the picture below.
5.
Click Apply and then OK.
December 29, 2008
12/14
AN #5, XL1500 Software Version 5.021A
6.
In the Machine box, select the correct machine size 2, 3, or 5 m in the Machine
filed.
Note: In case the installation is performed on the machine computer with two
partitions of the hard drive, copy the Pictures and Tests folders, which are created
during the installation from C:\ to D\:
Press F8 or select Preferences -> Setup and specify Picture’s Path as shown in
the picture below. Click the browser button and specify the new destination of the
folders.
1
2
3
December 29, 2008
13/14
AN #5, XL1500 Software Version 5.021A
Note. For the Tests folder, press Ctrl+L and follow the instruction above to set the
Test’s Path of the folder to the D:\
December 29, 2008
14/14


© Copyright 2026