
Fifth Grade Science Sample Lessons
Fifth Grade Science Sample Lessons The following documents are sample lesson plans to accompany some of the essential standards. These lessons are only suggestions, and possible ways to help teach the standards through the 5E inquiry model. Fifth Grade Science Sample Lessons Unit Scientific Inquiry Forces and Motion Matter: Properties and Change Energy: Conservation and Transfer Earth Systems, Structures, and Processes Ecosystems Structures and Functions of Living Organisms Evolution and Genetics Lesson Titles 1. What is Soil? 2. Drops on a Penny 3. Build Your Own Rollercoaster 4. Ramp It Up! 5. Cloud in a Cup 6. Weight and Matter 7. Solar Still 8. Warming and Melting 9. Conduction 10. Conduction and Convection 11. Radiation 12. What Will Tomorrow Bring? 13. Clouds 14. It’s Instrumental 15. Energy in Ecosystems 16. Aquatic Ecosystems Research 17. The Skeletal System 18. Human Body Systems 19. The Muscles that Move Us 20. Cells 21. A Family Affair 22. Genetics Bingo This document was compiled by Kate Martin (Duda) and Dee Chinault. 1. What is Soil? Unit Essential Standard Clarifying Objective Essential Questions Scientific Inquiry n/a n/a What are the characteristics of a good scientific observer? What are the components of soil, and what do they look like? Teacher Notes Soil is the solid material on Earth’s surface that results from the interaction of weather and biological activities with the underlying geologic formation. Soil is produced from broken down rocks, organic matter (decayed plant and animal life), water, and air. All soil types are made of varying amounts of three main components – silt, sand, and clay. Dirt is soil that is out of place in the human world – on the bottom of your shoe or on your shirt. Vocabulary Observation, Scientific Inquiry, Process Skills, Soil, Dirt, Silt, Sand, Clay Materials/Resources Access to varying types of soil (sand, silt, and clay), water, jars, sandstone pieces, white glue, index cards, newspaper, plastic cups, magnifiers, water Resource: Dig In: Hands-On Soil Investigations by NSTA Press Engage Start by explaining that today they will be practicing their observation skills. They will also practice recording information, following directions, and working with a team. (This is the REAL purpose of the lesson) Explain that today they will learn through observation and acting like real scientists by using our senses! Ask students about the difference between soil and dirt. Discuss. Then demonstrate that soil contains air by filling a plastic jar half-full with soil. Slowly add water to approximately 2 centimeters from the top of the jar; air bubbles will ride as water displaces the air in the soil. Ask students why the air bubbles occur and guide them to use the correct terminology and answer – that soil contains air. The air is contained in the pore spaces in the soil. Optional: Demonstrate that soil is created by the breakdown of rocks by choosing a sandstone (such as limestone) and placing it in a jar of water. Shake it vigorously and notice that the water is no longer clear – but why? The students should understand that the rock is broken down into small pieces. Explore TW cover a demonstration table with newspaper. Spread a dollop of glue on each of the three index cards. Sprinkle one type of soil in the glue on each of the cards and use a marker to label samples “silty soil,” “clayey soil,” and “sandy soil.” Allow index cards to dry. Prepare student work areas by covering with newspaper. Each 2 Explain Elaborate Evaluate work area should have dry paper towels, damp paper towels, a magnifier, a spoon, three labeled cups each filled with the three types of soils. 1. TW demonstrate how to use the magnifiers and notice the tiny little details about an object. To model, the teacher may observe the newspaper. Notice how you can see the ink differently than you do with just your eyes, and how you notice the smaller items on the paper. This is what a great observer does too! Allow students to practice observing their clothing, the newspaper, or even their fingers for a few minutes. 2. 2. Have students put the silty soil onto a dry paper towel and examine with magnifiers. Ask students what they see in the soil, and list the discoveries on the board. Students can also record this in a table in their notebooks. Students may be able to distinguish between the pieces of rock, plant material, and twigs. Students can also choose to touch and smell the soil and record that in their notebooks. 3. SW continue this process with the 2 other types of soil. A focus should be on using their senses to observe the soil and record the information properly. SW share their observations with the class – create a class chart on the board of their observations. What made each soil unique? What did they have in common? What types of things did you keep in mind in order to observe every tiny detail? Discuss as a class. The students should have shared that the clay is the smallest particle, and the sand is the largest. TW model these three sizes by showing a golf ball, a softball, and a basketball. The golf ball is the clay, the softball is the silt, and the basketball is the sand. Ask students to predict what might happen to each pile of soil as drops of water are added. List predictions on the board. Add a few drops to each group’s piles. 1. Have one student from each group make three soil balls using the soil. (A smock might be preferable for these students!) 2. Ask students to describe what happens when they make soil balls. SW discover that wet, clayey soil forms a lump, welt silty soil crumbles easily, and wet sandy soil runs through their fingers. Discuss observations and record on the board. 3. Confirm their observations and discuss how they are similar and different. What conclusions can we draw about these soils? *Remember – as your discuss, focus on the process of observing, recording, and drawing conclusions about the information. Today you learned about the three main types of soil. If you had a garden, which type of soil would you prefer? Why? 3 2. Drops on a Penny Unit Essential Standard Clarifying Objective Essential Questions Scientific Inquiry n/a n/a Why does a scientist follow a certain set of procedures when they complete experiments? How does a scientist observe objects? Teacher Notes Organize the students into groups of 4-5. Give each student a job such as the recorders, materials managers and reporters. Explain the importance of working together cooperatively, and how everyone must “do their part” for the group. Vocabulary Process Skills, Scientific Method, Observation, Predict, Measure, Classify, Trial, Average, Procedure, Conclusion Materials/Resources Blank paper for engage, Observing pictures for engage, “Drops on a Penny” Experiment Booklet (provided), 1 eyedropper per group, 2 pennies per group, 1 cup of soapy water and 1 cup of regular water per group, paper towels. Engage TW begin the lesson by saying, “In order to become better thinkers and learners, I want you to start by drawing a picture of what you think a scientist looks like.” Allow students 5 minutes to draw a sketch of their vision of a scientist. TW walk around to choose a large variety of pictures, and post them on the front board for the class to see. Most students will draw the “mad scientist”, who has a lab coat, glasses, and crazy hair. Some may draw a variation of this picture. Explain that YOU could be a scientist! Scientists can be boys, girls, adults, and they can all look different. There are plenty of famous scientists who have made an impact on our world, (Albert Einstein, Isaac Newton, Sally Ride, Jane Goodall) and the next great scientist could be you! In order to become a great scientist, you will need to know two important things: science process skills and the scientific method. -Your process skills are the things you do every day, like think critically, observe, predict, measure, and classify. (Explain/demonstrate each skill) Let’s test your observation skills first! TW show the students the two pictures (provided). Give the students 1 minute to find the “hidden” pictures. Discuss how they had to look carefully and slowly. 4 Explore Explain -In order to do the scientific method well, you’ll need your process skills. The main parts of the scientific method are: 1. Question- Great scientists always start with a question they are wondering about. 2. Hypotheses- What do you think will happen? 3. Procedure-How are you going to answer your question and which steps will you take? 4. Observation- Carefully observe your experiment and record what you see. 5. Results- What happened? 6. Conclusion- Was your hypothesis correct? Did you answer your question? Do you need to modify your experiment? TW pass out the “Drops on a Penny Experiment” booklet to each student. Explain that they will be practicing their process skills and the scientific method by completing an experiment! TW walk the students through the booklet, explaining how to complete it and how to do the experiment. TW model how to hold the dropper and how to take turns with a partner when dropping the water onto the penny. Model recording on the chart on the booklet. SW then need their materials manager to come gather the materials from you. Once each group has their materials, they should begin by reading the question, and thinking of their hypothesis using the “If, then” statements in the booklet. They should carefully read the procedure, and begin to complete the experiment. Once the students have completed the experiment, the students should gather all materials again and return them to the materials area. Then they should complete the conclusion section of the booklet on their own. Once all groups have completed their booklets, the teacher should ask all students to come together for a class discussion. TW ask the following questions to lead a discussion about the experiment: -Which process skills did you need in order to complete this experiment? Record on the board. Why was it important to observe carefully? -Why do you think all scientists use the scientific method when they complete experiments? They like to use it for consistency; throughout the world there is an accepted way of doing science – this is it! -Was your hypothesis correct? Why do you think they were so different from what you originally predicted? -After completing this experiment, what do you think you could test that would be different? What else do you want to find out? 5 Elaborate Evaluate -Why do you think there were different answers is each group? What types of things could we keep the same for the next time we do an experiment (Which side of the penny we use, what year of penny we use, the cleanliness of the penny, etc.) You just saw three important forces tugging on the water: gravity, cohesion, and adhesion. Gravity flattens the droplets, cohesion holds the droplets together, and adhesion holds the drops on the surface of the coin. We often call the cohesion force “surface tension”. It’s what makes water drops look like they are wrapped in invisible skins! It’s also the reason that bugs can “walk” on water! Soap reduces the cohesion and the surface tension. Soapy water makes smaller drops than regular water. Since soapy water drops are smaller, more soap drops will fit on a penny than regular water drops. SW watch the Discovery Education Video, “How Scientists Work: What is the Scientific Method?” As the video is playing, the students should be noticing the similarities to what they did today. They acted just like the scientists in the video! Students will complete any remaining questions in their booklet, and self-evaluate themselves on their experiment. 6 7 8 9 10 3. Build Your Own Rollercoaster Unit Essential Standard Clarifying Objective Forces and Motion 5.P.1 Understand forces and motion and the relationship between them 5.P.1.1 Explain how factors such as gravity, friction, and change in mass affect the motion of objects. 5.P.1.2 Infer the motion of objects in terms of how far they travel in a certain amount of time and the direction in which they travel. 5.P.1.4 Predict the effect of a given force or a change in mass on the motion of an object. Essential Questions How does an engineer incorporate the concepts of gravity, friction, and change in mass of an object when designing, constructing, and operating a roller coaster? Teacher Notes This is a culminating activity for the Forces and Motion unit Students will have completed Engineering is Elementary for 5th grade as part of this unit Students will work in groups of 3 Students will use their lab notebook to create designs, make predictions, and record results of coaster tests Students will be encouraged to use unit vocabulary when planning and creating their coasters Vocabulary gravity, friction, mass, matter, distance, speed, force, motion, slope, acceleration, deceleration, momentum, weight, force, inertia, kinetic and potential energy Materials/Resources foam tubes, science journals, duct tape, marbles, scissors Discovery Education video: The Ties That Bend: The Science of Roller Coasters (1st 3 segments) Informational Text: • Amusement Park Science by Dan Greenberg • Roller Coaster by Interact Website: learningscience.org Physical Science middle grades program: Making Tracks • http://www.funderstanding.com/slg/coaster/ Engage TTW introduce the coaster project with the students by sharing the DE video TTW ask students to define what an engineer does and the process (Engineering is Elementary) Students will list and coaster ideas or comments in their science notebook for discussion after the video TTW explain that the students will work in groups of 3 as Engineers to design and construct a working coaster using the supplies provided which will demonstrate the physics concepts used in this unit. 11 Explore Explain Elaborate Evaluate TTW demonstrate how to use the tubes and set guidelines for the project: students may work in the hallway and classroom, students must have illustrations for each step in building the coaster, all group members must be involved in both design, construction, and presentation of the coaster Students will review the lesson expectations on attached lab sheet TTW explain the assessment section of the lesson after the coasters have been presented to the class TSW answer the question in their science journals and will share answers at their tables TSW develop one answer to share and discuss with the class TSW work in their groups on Learningscience.org Physical Science middle grades program: Making Tracks Objective: 1. Working in your small group, design a roller coaster with three hills that a marble can travel from start to finish 2. Build and modify that coaster until the marble can successfully travel from start to finish 3. Draw what the coaster looked like after modifications 4. Compare to the original drawing, explain what changes had to be made and why (use physics vocabulary when writing explanations) 5. Design a coaster with three hills and a loop. The loop can be placed wherever the team decides 6. Complete steps 2-4 7. Design a mega-coaster. This coaster has no limitations 8. Complete steps 2-3 Each group of students will present their mega-coaster to the other groups. They will explain how their finished coaster compared to their original design and how it uses the laws of physics to work. TTW participate in a group discussion comparing their model coasters to real coasters Students will work in their group to create an ad and magazine article about their coaster for a fictional scientific journal. The ad will include a drawing of the coaster where the students will label using as many of the vocabulary words as possible. They must create a name for the coaster that represents the physics of the coaster, ex. The Banker (a coaster designed where the marble banks every curve) The ad must describe what made the coaster work and the physics behind the coaster. This will serve as the assessment for the project. Ads will be displayed at 12 Endhaven Amusement Park (the fifth grade hallway) 13 Unit Essential Standard Clarifying Objective Essential Questions Teacher Notes 4. Ramp It Up! Forces and Motion 5.P.1 Understand force, motion and the relationship between them. 5.P.1.1 Explain how factors such as gravity, friction, and change in mass affect the motion of objects. How does the mass of an object, friction, and gravity affect an object’s movement? Is there a change in that movement when the mass of the object changes? Does the height of the slope make a difference in speed? This lesson will follow background lessons defining gravity, friction, mass, matter, distance and time Students will be divided into table groups or groups of 4-5 students Each group will complete the lab sheet with students rotating as recorder of data Students will hypothesize and test different surfaces for friction Students will test the distance traveled and time of travel when the mass of the car changes Vocabulary gravity, friction, mass, matter, distance, time, force, motion, slope Materials/Resources Toy cars, I lab sheet/group, 1 wooden ramp, I sheet of sandpaper, waxed paper, bubble wrap, textbooks, stopwatch, pennies Engage TTW ask the students what type of surface they would choose for a new super slide at Carowinds if they were designing for speed and distance of travel? TTW lead the class in a discussion of their suggestions and why they chose the surfaces they did TTW will demonstrate the lab procedure and show the students the 3 surfaces they will be testing. Students will create a hypothesis about which surface will create the fastest car movement and the slowest and the results will be recorded for the class to compare with their results Allow a few minutes for the students to practice with the stop watches. Explore TSW construct three different height ramps Students will test the speed of their car on each ramp Students will choose the ramp with the fastest speed and the farthest distance of travel to test the different surfaces for the effect of friction Students will modify the car by adding six pennies to the top to add mass. Explain The lab sheet provides an opportunity for the students to reflect on each stage of the activity before they move forward to the next stage. Each group of students will record their data on a Smartboard data sheet Each group will share their results with the class 14 Elaborate Evaluate 1. Which ramp resulted in the greatest amount of speed and farthest distance of travel? 2. Which surface created the most friction? 3. Did the increase in the mass of the car affect its speed and distance of travel 4. What conclusions can we draw from our data? TSW use the information obtained in class to design a super slide on paper to share with the class. They must choose one of the three surfaces used in class and its height must be based on data from the 3 ramps. Science Journal: The students will write a conclusion about the lab. They will include their super slide design and notes. They will name the slide and share it with the class. 15 16 17 18 5. Cloud in a Cup Unit Essential Standard Clarifying Objective Matter: Properties and Change 5.P.2 Understand the interactions of matter and energy and the changes that occur. 5.P.2.2 Explain how the sun’s energy impacts the processes of the water cycle (including, evaporation, transpiration, condensation, precipitation, and runoff). Essential Questions What is the water cycle and can we simulate it in class? Teacher Notes Review safety precautions since both of these activities involve a heat source and hot water. Vocabulary Water cycle, evaporation, condensation, precipitation, runoff, transpiration, water vapor Materials/Resources Hot plate, tea kettle, water, aluminum tray, bag of ice, 2 clear cups/group Engage TTW play The Water Cycle Song (with lyrics Youtube) to review the stages of the water cycle TSW have prior knowledge of the stages of the water cycle TSW view the Discovery Education Animation of The Water Cycle and discuss Explore TTW ask the students if they think it is possible to simulate the water cycle in the classroom and create rain and clouds TTW actually demonstrate the first activity at a table with the students sitting all around her. She will ask the students what each item in the simulation represents in the real water cycle. She will explain that the hotplate represents the sun heating the water on Earth creating evaporation, the steam is the water vapor. TTW hold the pan containing the bag of ice, over the steam. TSW see that the steam collects on the bottom of the pan representing condensation. The students will come forward in small groups to see the rain falling down. The students will complete the second activity in small groups of 2 or 3 Each group will have one room temperature cup which the teacher will fill with hot water The students will immediately place a cold cup that has been kept in the refrigerator, upside down over the bottom cup and place a chunk of ice on the top of the cold cup TSW see a cloud form in the cup Explain TTW review the stages of the water cycle and have students identify when they observed them during the simulations Science Journal- Question: How is a tea kettle like the Water Cycle? Students may illustrate and write Science Journal- Illustrate and explain the stages of the water cycle through the cloud in the cup activity Elaborate Students will work in small groups on learningscience.org Earth and Space Science grades 5-8 19 The name of this learning tool is called The Water Cycle Movie. In this lesson students will learn about the water cycle, water storage, water movement, and other aspects of the water cycle. This site comes from the Kids Site of the Environmental Protection Agency. Evaluate TSW Pair and Share with other students in the class to tell 3 things they know about the water cycle. (Pair and Share is a Kagan strategy where students move about the room then pair with the student nearest them to share their information.) 20 6. Weight and Matter Unit Essential Standard Clarifying Objective Essential Questions Teacher Notes Matter: Properties and Change 5.P.2 Understand the interactions of matter and energy and the changes that occur. 5.P.2.2 Compare the weight of an object to the sum of the weight of its parts before and after an interaction. What is the relationship between the weight of objects and the sum of their parts? This is an integrated science and math lesson using estimation, fractional parts, weight Students will have prior knowledge of whole and fractional parts of a whole Suggested Fraction parts: whole, half, thirds, fourths, etc. Vocabulary estimate, weight, measurement, balance, matter, mass Materials/Resources Unifix cubes, science journal, scales to weigh the objects, balance scales No Loss, No Gain reading passage Discovery Education Engage TTW give the students time to build shapes using the fraction cubes TTW build two 4 x 4 solid cubes using Unifix cubes and ask the students to estimate how much one of the cubes will weigh She will record the estimates on the board After weighing the cube and discussing their estimates, she will ask the students how the cube can be divided into fractional parts, demonstrating and recording them on the board Will the fractional parts be equal to a whole cube on the balance scale? Will the fractional parts weigh as much as the cube when it was assembled? TTW record the weight of the fractional parts and compare it to the weight of the whole cube. Explore TSW build irregular shapes using their Unifix cubes They will record in their science journal: 1. Draw the shape and number of cubes it took to build it 2. Weigh and record the weight of the shape 3. Divide the shape into fractional parts and record data 4. Weigh fractional parts Explain TTW have students share their irregular shapes, fractional parts, and weights with their peers. Elaborate TSW add fractions to equal a whole recording all addition problems in their journals TSW read No Loss, No Gain reading passage and will conduct the investigation (TTW have the water bottles available as well as bottles of frozen water) 21 Evaluate TTW rotate to each group of students while they are working for them to demonstrate their work. 22 7. Solar Still Unit Essential Standard Clarifying Objective Matter: Properties and Change 5.P.2 Understand the interactions of matter and energy and the changes that occur. 5.P.2.1 Explain how the sun’s energy impacts the processes of the water cycle (including: evaporation, transpiration, condensation, precipitation, and runoff) Essential Questions How does the sun’s heat affect the water transfer between the Earth and the atmosphere? Teacher Notes These activities may take more than one class period to complete The Water Cycle Song can be taught to the students at the beginning of the water cycle lessons and played each day as a review Vocabulary water cycle, evaporation, condensation, precipitation, runoff, transpiration, vapor, gas Materials/Resources 1. YouTube Video: The Water Cycle Song (with lyrics) 2. Teacher.scholastic.com/activities/studyjams/water_cycle/ (animation, vocabulary, quiz) 3. Book- A Drop Around The World by Barbara Shaw McKinney 4. Discovery Education Water Cycle-Animations and Explorations 5. 1 class set of Reader’s Theater play Water in its Never-Ending Cycle (20 copies) 6. 5 plastic cups, soil, plastic wrap, pebbles, water, plastic container, measuring cup Engage TTW play The Water Cycle Song which the students can sing along TTW read the story A Drop Around the World and have students work with their table groups to brainstorm and create a list in their science journal, of the various forms of water and its uses and misuses. TSW share their notes with the entire class Show the video animation teacher.scholastic.com/activities/studyjams/water_cycle/ TTW review the vocabulary with the students (the quiz will be completed at the end of the class) TTW show a Solar Still and review the directions for constructing one TTW review the rules for this project 1. Work cooperatively in small groups and ensure everyone has sufficient opportunities to see and understand the activity 2. Handle equipment and water responsibly 3. Handle and dispose of waste responsibly Explore TSW write a prediction for what will happen when the solar still is placed in a warm sunny position 23 Explain Elaborate Evaluate TSW work in table groups to create a mini-solar still using the direction sheet placed at their table Illustrate the still and explain how it was created in the science journal Place the still in a sunny position to observe at intervals determined by the teacher Ask one group to volunteer to put one still in the shade (teacher can use her still if the groups want to be in the sun) TSW record the amount of water in the cup after the last observation and will compare it to the amount of water which was poured into the still TSW record their observations and create an illustration showing the effects of the sun’s heat on the Earth’s water Answer question: How does the amount of water poured into the still compare to the water in the cup Students will participate in the water cycle skit Water in its Never-Ending Cycle Each table group of students will answer one question to share with the class Questions: 1. Where did the water in the cup come from and what caused the water to collect there? 2. What happened to the still that was placed in the shade? Why? 3. Do you think a still would work in the middle of a desert? Rainforest? 4. Where does the water that evaporates from the soil go when it is not trapped in the still? 5. What does each stage of the the still process represent in the water cycle? TSW return to the animation from the introduction of the lesson and complete the 5 question quiz in their science journals. Check answers together 6. Reteaching: Discovery Education Water Cycle-Animations and Explorations 24 25 26 27 28 29 30 31 Unit Essential Standard Clarifying Objective Essential Questions Teacher Notes Vocabulary Materials/Resources Engage (15 min) Explore (15 min) Explain (10 min) 8.Warming and Melting Energy: Conservation and Transfer 5. P.3 Explain how the properties of some materials change as a result of heating and cooling. 5. P.3.1 Explain the effects of the transfer of heat (either by direct contact or at a distance) that occur between objects at different temperatures. (Conduction, convection or radiation). What are the effects of combining warmer objects and cooler objects? This lesson is intended to last one hour long class. radiation, thermal energy, transfer, equilibrium, convection, conduction Thermometers, heating plate, beakers, water, ice, sealed containers of the same size, cooler, The teacher will measure the temperature of a container of frozen water and a container of heated water. The students will predict what will happen when the teacher combines the two containers. The teacher will call on several students to share their hypothesis and justification. Next, the teacher will combine the two containers of water into a third container with the thermometer in it. The class will observe the temperature readings on the thermometer. The students may also make observations about the state of the water (i.e. melting) The teacher can discuss with the class how heat energy is transferred from on object to another. Next, the teacher will place a container of frozen water and a container of heated warm water in an empty cooler. The students will predict and record their hypothesis of what will happen to the items by the end of class. The teacher may choose to model how to collect data on the containers beforehand (temperature, mass, etc). The students can share their hypothesis with a small group and/or class. The students can work in small groups. Each group will receive a cup of warm water and cup of ice water. The students will collect temperature data and record it in a table. The students will then combine the two cups of water and immediately collect temperature data again. The class will continue to collect data every 2 minutes for the next 10 minutes. Allow the students several minutes to analyze and discuss their results. The groups will briefly share an observation statement of their data. The teacher will call on students to share other experiences where heat transfer was observed. The class can then watch a short discovery education clip. While students watch the video, they will reflect on the following questions: 1. What happens to molecules when they are heated? 32 2. What happens to molecules when they are cooled? 3. In what other ways does heat energy transfer from one object to the next? 4. Define and give an example of each of the following: Radiation, convection, conduction. Elaborate (10 min) Evaluate (10 min) Discovery Education Video Clip-(Temperature and Heat) - 5 minhttp://player.discoveryeducation.com/index.cfm?guidAssetId=E45E9DFA-8C07-42BA-AA44438D7AB2506F&blnFromSearch=1&productcode=DSCE Have the students stand behind their chairs. Have the students move and wiggle their bodies as though they were a heated molecule. While they do this, be sure to point out their characteristics they should be portraying (moving fast, spread out). Then ask the students to move as though they were a colder molecule (moving slowly, closer together). Next the teacher will have the students change their movements as they heat up and cool off. If time allows, the teacher may split the class into two separate groups. One group will be the warm water from the demonstration and the other group will represent the cold water. Have each group move to opposite sides of the room. The teacher will say “go” and the molecules will heat up and cool off until they are all moving with the same amount of energy. The students will write a reflection to the following prompt: “When object become cool, are they gaining or releasing energy? Explain how you know using specific examples.” 33 9. Conduction Unit Essential Standard Clarifying Objective Energy: Conservation and Transfer 5.P.3 Explain how the properties of some materials change as a result of heating and cooling. 5.P.3.1 Explain the effects of the transfer of heat (either by direct contact or at a distance) that occurs between objects at different temperatures. (conduction, convection or radiation). Essential Questions What are some examples of conduction in your everyday life? Teacher Notes In the engage demonstration, students will get their first look at both conduction and insulation. Conduction is the passing of heat from one molecule to the other, while insulation is a material that slows or stops the heat from moving. In this activity, use caution to be sure students remove wire as it gets warm. Vocabulary Conduction, Heat transfer, energy transfer, insulator, conductor Materials/Resources Two corks , two six inch lengths of stiff wire , candle , journal, “Test Time” reading passage from Discovery Education, wooden, plastic, and metal spoons, marshmallows, butter. Engage Before starting, have the materials prepared. 1. One length of wire should be pushed all the way through one of the corks. 2. One length of wire should be cut in half. Push half into the cork from each end making sure they do not touch. Do not tell the students about this wire. They should think both wires are the same. (You, the teacher, need to know which cork is which.) 3. Choose two students to help with the demonstration. 4. Give the cork that has the wire pushed all the way through to one of the students. 5. Give the other cork, wires not touching, to the other student. 6. Light the candle. Be sure students have safety goggles on and are safety conscious with the open flame. 7. Ask the students to hold one end of their wires over the flame. 8. Have students tell when their wires begin to get warm. 9. When the wires begin to get warm, have them remove the wires from the flame. 10. Have students write in their journals and explain the results. 11. Discuss conduction and insulation, then let the students modify their journals. (It is up to you, the teacher, to decide how much information to give about this demonstration.) 34 Explore Watch the Discovery Education video segment called “Transferring Thermal Energy: Conduction” together. Discuss the two examples of conduction. Create a list on the board of any other examples. Now explain that the students will be answering the following question with their group: Which spoon (wooden, plastic, or metal) conducts heat best? Explain that the students will be “gluing” a marshmallow onto the spoon by putting a dab of butter on the spoon. Then, they will pour a small amount of hot water onto each spoon and timing how long it takes for the heat to melt the butter sufficiently enough to let the marshmallow drop. SW test this in their groups, and the teacher should allow time for the students to record their results in their notebooks. Explain SW come back together with the class to answer the question they tested. Which spoon let the marshmallow go first? Second? Last? Why do you think the metal was first? What properties of metal allow it to be a good conductor? TW continue with these questions to allow discussion time. TW lead a reading of “Test Time” from Discovery Education. Stop to discuss the first three questions in the passage, and then read the passage together. Students may take notes in a 3-column chart to compare the three forms of energy transfer. SW answer in their notebooks: Let’s say you wanted to create an object that would hold an ice cube and keep it frozen for as long as possible. What would your object be made of? Why? Elaborate Evaluate 35 Unit Essential Standard Clarifying Objective 10.Conduction and Convection Energy: Conservation and Transfer 5.P.3 Explain how the properties of some materials change as a result of heating and cooling. 5.P.3.1 Explain the effects of the transfer of heat (either by direct contact or at a distance) that occurs between objects at different temperatures. (conduction, convection, or radiation) How do you know that heat is moving; what is the evidence? This is an introductory lesson conduction, radiation, heat transfer Essential Questions Teacher Notes Suggested Vocabulary Materials/Resources Hershey Chocolate Kisses 1/child 10 pictures of examples of conduction and radiation in day to day life Chart paper http://www.mansfieldct.org/schools/mms/staff/hand/convcondrad.htm Engage TTW ask the students what happens when you hold a chocolate bar in your hand for 20 minutes. Students will most likely answer that the chocolate will melt. TTW ask the students to explain why. Explanation: The heat moves from your hand to the chocolate bar which raises the temperature of the chocolate, causing it to melt. A person’s hand is at a higher temperature (98.6) than the chocolate bar which is at room temperature. Give each student a Hershey Kiss and have them feel how hard it is without unwrapping it. Then have the students place the candy in their pocket. They will take the chocolate out of their pocket after the Explore part of the lesson and discuss what they noted. (Heat moves when matter at different temperatures interact. Heat moves from warmer matter to cooler matter.) Explore TTW explain to the students that there are 10 photos displayed around the room on chart paper. They depict everyday situations involving heat transfers. Students will work with a partner visiting and observing each chart. They will write their answer to the following questions on each chart: 1. What makes you think the heat is moving; what is the evidence? 2. Where does the heat come from and where does it go? 3. What questions do you have about this situation? Explain TTW ask the class in which pictures did they think that heat transfer was the easiest to identify and in which 36 Elaborate Evaluate pictures was it more difficult. TTW share and discuss http://www.mansfieldct.org/schools/mms/staff/hand/convcondrad.htm with the students Ask the students to look at the scenes again to answer the question: Is heat moving the same way in each photo? Instruct students to take out their candy, unwrap and observe it. What has happened? Ask students: In what other way could the chocolate be melted other than it being in direct contact with a person’s hand? Students will be given the definitions for conduction, radiation, and heat transfer: Conduction- the transfer of heat through direct contact Radiation- the transfer of heat from the sun Heat transfer- moving exchange of heat Students will write a journal entry to answer the essential question: How do you know that heat is moving; what is the evidence? 37 11. Radiation Unit Energy: Conservation and Transfer Essential Standard 5.P.3 Explain how the properties of some materials change as a result of heating and cooling. Clarifying Objective 5.P.3.1 Explain the effects of the transfer of heat (either by direct contact or at a distance) that occurs between objects at different temperatures. (conduction, convection or radiation). Essential Questions How is heat energy transferred by radiation? Teacher Notes Matter must be present in order for heat to move by conduction or convection. Radiation is another method of heat transfer, one that does not rely upon any contact between the heat source and the heated object. For example, we feel heat from the Sun or a fire even though we are not touching them. Radiation can occur through objects and empty space. Radiation is the transfer of energy by electromagnetic waves. All objects possess thermal energy and emit some electromagnetic waves. Hotter objects are more energized than cooler ones. This method of heat transfer is one that middle school students may more fully appreciate after they have studied electromagnetic waves in high school. The focus should be on developing the concept of heat transfer by radiation using experiences familiar to students: the warmth of the Sun, a campfire, or an open oven door. In these contexts, students will recognize that matter is not necessary for this type of transference to occur. In most situations, more than one method of heat transfer takes place. For example, in the boiling water and pasta convection example above, water becomes warmer due to the transfer of heat from the stove burner to the pot and then from the pot to the water (conduction). Developing the idea that heat transfers occur in a variety of ways should be emphasized rather than defining in absolute terms the differences between conduction, convection, and radiation. Vocabulary Conduction, Convection, Radiation, Heat Transfer, Heat, Temperature Materials/Resources A Sunny Day, Thermometers, Bowls, black construction paper, white construction paper, aluminum foil, Science Journals Teachers Domain: Heat Transfer, An interactive tutorial explaining convection, conduction, and radiation. http://www.teachersdomain.org/asset/lsps07_int_heat- transfer Three Methods of Heat Transfer: Conduction, Convection, and Radiation http://www.vtaide.com/png/heat2.htm 38 Convection, Conduction, and Radiation http://www.mansfieldct.org/schools/mms/staff/hand/conv- condrad.htm Teacher Tube Rap Video http://www.teachertube.com/viewVideo.php?video_id=159713 Engage Explore To introduce the third method of heat transfer, or if you are introducing heat transfer for the first time, show the students: Teacher Tube Rap Video http://www.teachertube.com/viewVideo.php?video_id=159713 You may want to watch it all the way through once, and then replay it, asking the students to record one important fact about each heat transfer method. TW explain that today they will try an experiment to learn more about radiation and how it affects the heating of objects. The experiment procedure is below: a) Place the same amount of ice water into three bowls that are preferably made of the same material, such as plastic or ceramic. Obtain three different covers where one is black, one is white, and the other shiny. For example, colored paper and aluminum foil will suffice, and so will plastic bags. Cover or wrap the bowls with the materials. Place them outside when it is sunny or under the heat source for twenty to thirty minutes. At least every five minutes record the temperature and the time. The water in the black container will heat up more quickly than the others. The experiment can also be done using one bowl at a time and with one thermometer. Switch the bowl covering and change the water to compare how the water heats under different materials. You may substitute containers that are black, white, and shiny, instead of using covers. The containers should be as uniform as possible, and should be of the same material such as metal or plastic. 39 b) Repeat the experiment, but this time fill the bowls with hot water and do not place them under a heat source. Record the amount of time it takes for the water to cool. The water in the black container should cool more quickly than the others. Explain Elaborate Evaluate Students should graph the temperature versus time by placing the dependent variable temperature on the y-axis, and the independent variable time on the x axis. Do this for every object. Compare your results. SW discuss in their groups the changes they see as they compare the objects. Then share as a class and discuss. TW then show the students a demonstration of radiation: Incandescent Light Bulb Demonstration–Review (Radiation) Turn on the light bulb and let it glow for a few moments. Without touching the bulb, ask a volunteer to place his or her hands near the bulb and feel the heat from the bulb. Safety: Do not allow students to touch the bulb. Ask students to record their observations of what happened in their scientists’ notebooks and to describe how the heat got from the bulb to the volunteer’s hands. Remind students to label the heat source and the direction heat travels (Where is the heat coming from and where is it going?). Ask students what kind of heat transfer this is an example of and why. SW draw a diagram in their notebooks showing radiation. (Feeling heat from an oven as you open to door, microwave heating food, Sun heating the earth, Campfire heating marshmallows, etc.) 40 Unit Essential Standard Clarifying Objective Essential Questions Teacher Notes 12. What Will Tomorrow Bring? Earth Systems, Structures, and Processes 5. E.1 Understand weather patterns and phenomena, making connections to the weather in a particular place and time. 5. E.1.2 Predict upcoming weather events from weather data collected through observation and measurements. How can weather data be used to analyze and predict changing weather? This lesson is intended to last one hour long class. It can follow a lesson on weather instruments and the type of data they collect. Students should be familiar with air pressure, wind direction, wind speed, humidity, and precipitation. In the beginning of this lesson, the students begin a weather data collection table. This table can be used throughout the unit. Vocabulary Materials/Resources Engage (15 min) By the end of this lesson, students should be able to identify correlations between various weather conditions (for example, low pressure and precipitation). wind speed, wind direction, precipitation, temperature, barometer, air pressure, anemometer, rain gauge, wind vane, thermometer, hygrometer, humidity, precipitation, print outs of weather charts from various months (color prints if possible)- an example is included below (http://www.wunderground.com/weatherstation/WXDailyHistory.asp?ID=KNCCHARL43&day=24&year=2010 &month=3&graphspan=month) The students will watch a short video clip about predicting weather. While they watch, they will answer the following question: What kind of information do meteorologists use to predict the weather? Discovery Education Video Clip (Predicting the Unpredictable)- 6 min. http://player.discoveryeducation.com/index.cfm?guidAssetId=211D9034-A336-4265-A5B79D2922237147&blnFromSearch=1&productcode=US Students can share their answers after the video. 41 Explore (15 min) Students will create a table in their notebook. They will use this table over the next month to record weather data every day at about the same time. Research the current weather conditions using weatherbug.com, weather.com, or another reliable weather data source. Have the students record the data in their table. Date Explain (10 min) Elaborate (10 min) Temperature Air Pressure Cloud Cover Precipitation *Be sure to collect your data from the same website each day. You may choose to also record humidity, wind speed, and/or wind direction as well. As students continue to recorder this information they will notice a correlation between air pressure and precipitation. Students will receive a print out of weather data graphs (example included below). Give the students a couple of minutes to analyze the data and develop a few observation statements. Then have them answer the following questions using the information in the graphs. 1. On which day(s) was there the most precipitation? Do you notice any changes in temperature, pressure, or wind speed during this time? Explain. 2. On which day(s) was the pressure the highest? What other weather conditions occurred on this day? 3. Does temperature correlate with any other weather data? Explain. Allow students several minutes to answer the questions and then share their understandings. The class can create a list of predictable weather patterns. The teacher will display a weather map for students to see (either from a website or provide a printout for the students). In groups, the students will identify the weather features on the map, such as fronts, pressure systems, and precipitation. The teacher will display the following questions to help guide student discussion: 1. What weather features do you see on the map? 42 Evaluate (10 min) 2. What effect will these features have on our weather? 3. What creates the weather features that you see on the map? 4. Based on the information you see on the map, what might Charlotte’s weather belike in the next 3‐4 days? The students will write one concluding statement about predicting weather in 10 words or less. 43 44 45 Unit Essential Standard Clarifying Objective 13.Clouds Earth Systems, Structures and Processes 5.E.1 Understand weather patterns and phenomena, making connections to the weather in a particular place and time. 5.E.1.2 Predict upcoming weather events from weather data collected through observation and measurements (Students can identify atmospheric conditions (presence and type of clouds [stratus, cirrus, cumulous], and fronts) that are associated with predictable weather patterns. How do meteorologists name clouds? This is a cloud research lesson that may take more than one day to complete. Meteorologist, cirrus, cumulus, stratus, condensation Essential Questions Teacher Notes Suggested Vocabulary Materials/Resources Cloud Cover: http://www.wxdude.com/cloud.mp3 Cloud Review: http://www.msnucleus.org/membership/storybooks/cloudpoem.html Weather Wiz Kids: http://www.weatherwizkids.com/cloud Jet Stream Clouds: http://www.srh.noaa.gov/srh/jetstream/synoptic/clouds_max.htm Types of Clouds: http://eo.ucar.edu/webweather/cloud3.html Engage Explore Science journals TTW show http://www.youtube.com/watch?v=ur0k7UDrrvg Explain to students that they will be using online sources to research various cloud types They will complete all work in their science journal 1.Go to Cloud Cover and scroll down to cloud classifications. Learn how meteorologists classify and name clouds then answer the following questions: What does “Too Clean for Clouds” mean? What are the 2 ways meteorologists name clouds? What are the 3 causes of moisture rising into the sky? 46 Complete #1 under Weather Ideas for students 2. Watch Cloud Review . Write your own original cloud poem and illustrate. 3. Scroll down to the cloud chart on Weather Wiz Kids and create your own cloud chart using the information. Below the chart, read about the various types of clouds. 4. Click on each of the cloud types on the JetStream Clouds website. Notice the different ways clouds with the same name can look. Refer to your cloud chart to review the meaning of the words. 5. Game time! Scroll down to the bottom of Types of Clouds and click on Cloud Concentration. In your science journal, record two or more clouds from this game that were listed as Special Clouds on your Cloud Chart. Explain Elaborate Students will share their poems with their peers Students can choose from the menu to create a cloud presentation: (some activities that could be on the menu) Write and perform a cloud rap or song Make a cloud power point Create a cloud game Evaluate TTW create a rubric for the lesson including journal work and presentation 47 14. It’s Instrumental! Unit Earth Systems, Structures and Processes Essential Standard 5. E.1 Understand weather patterns and phenomena, making connections to the weather in a particular place and time. Clarifying Objective 5.E.1.1 Compare daily and seasonal changes in weather conditions (including wind speed, direction, precipitation, and temperature) 5. E.1.2 Predicting upcoming weather events from weather data collected through observation and measurement. Essential Questions Can you design a way to evaluate data to predict changes in weather? In what ways do weather tools aid in comparing weather changes? Teacher Notes TSW have prior knowledge of the various weather instruments and their use TTW divide the students into groups of 5 to complete the weather station All materials should be on the table for students to pick them up as needed TTW create a Weather Log to be used by the entire class, this will be like the log that the small groups are using Vocabulary wind speed, anemometer, wind vane, wind direction, precipitation, rain gauge, temperature, thermometer , barometer, air pressure, cirrus, stratus, cumulus, meteorologist Materials/Resources Weatherwizkids.com Forecasts and Weather Instruments The Sky-Watchers by Patricia Baehr Models of weather instruments Laminated weather map All materials listed on the attached directions to construct the Weather Station Engage TTW share the book The Sky-Watchers by Patricia Baehr with the students. The story is about a student their age who visits a friend who has a working weather station TTW have the models of weather instruments available for the students reference when making their own TTW go over the directions for how the station is to be built with students working in teams of 5 Each student will have a different weather tool to build which will be placed in the group station: barometer, thermometer, hydrometer, anemometer, rain gauge, wind vane, data recording folder TTW provide each group with an outdoor thermometer and pinwheel (students can make their own 48 Explore Explain Elaborate Evaluate pinwheel however they do not work as well) TSW may work on their individual weather instruments or they can team up to build the instruments Students assist others when their instrument has been constructed Students take the completed station outside each day to collect data which is recorded on the weather log After the first day, begin each class with the students checking their predictions for the current day weather Discuss whether they predicted correctly, why or why not Allow time at the end of each class for students to forecast the weather for the following day based on the data collected Calculate the averages from the data collected from each small group and use that data for the whole class weather log Discuss the class data and make a whole group prediction for the following day The students should take time to record data correctly Analyze the data collected within the small groups and make a prediction for the following day Discuss data and predictions as a whole groups Record data on the whole class weather log TSW work with a partner on site www.weatherwizkids.com They will select from the left menu bar Meteorologist and Weather Instruments Students may reenact a weather forecast for a television network using the data they collected. TSW complete weather logs and will complete the writing prompt: Why is the weather data collected by meteorologist so important in making long-term predictions of weather 49 50 51 52 53 54 15. Energy in Ecosystems Unit Essential Standard Clarifying Objectives Ecosystems 5.L.2 Understand the interdependence of plants and animals with their ecosystem. 5.L.2.2 Classify the organisms within an ecosystem according to the function they serve: producers, consumers, or decomposers (biotic factors). 5.L.2.3 Infer the effects that may result from the interconnected relationship of plants and animals to their ecosystem. Essential Questions What is the relationship between producers, consumers, or decomposers? How can you classify organisms according to these categories? If a population of primary consumers decreases, how will it affect the rest of the food web? Teacher Notes Students will need to be organized into small groups of 4-5. Discuss the importance of working cooperatively in a group during this time. Students will need to have background knowledge on what an abiotic and biotic factor is, and that animals and plants live together in a community. Students will also need a basic understanding of what a food chain is, and how an energy pyramid is very similar to a food chain. An energy pyramid shows the exchange of energy in a visual way. Vocabulary Food chain, energy pyramid, producers, (primary, secondary, tertiary) consumers, decomposers, interconnected, community, population, nocturnal Materials/Resources 1 set of engage pictures (provided) per group, large open area at least 8 ft x 8ft, connecting cubes, activity recording sheet, Discovery Education reading passage titled “Food Chains” (Level: 5 dot) Engage TW begin by explaining that today’s lesson will focus on how animals and plants rely on each other in order to survive – in other words, how they are interconnected. TW then ask the students to view the pictures in their small groups. Begin a discussion by telling the students, “Determine which abiotic and biotic factors are in the pictures.” Students should write their findings on their recording sheet. To begin the discussion, start by asking each group of share one abiotic factor. As students respond, discuss why each abiotic factor is needed for the biotic factors to survive. Then repeat the process with each group sharing a biotic factor. Discuss how this animal lives in its community: “What types of activities does it do?”, “What other animals does it hunt?”, “Who preys upon this animal?”, “Is this animal nocturnal? If yes, why?” Finally ask, “Which ecosystem would these animals and plants likely live in, and how do you know?” Elicit 55 Explore Explain responses from the groups. TW explain that, “in order to better understand how animals are interconnected, we will pretend to be in a food chain, which can also be a food pyramid.” TW organize the students into an energy pyramid on a large, open area on the floor. In order to do this with a class of 28 students, split the students up based on the type of animal or plant that they will act as. One example might be: The teacher as the sun, 9 students as grass, 7 students as a grasshopper, 6 students as mice, 4 students as snakes, and 2 students as hawks. Ask the students to sit in a energy pyramid, with one row of students acting as the grass, then behind them will sit the students acting as grasshoppers, then behind them the students acting as mice, then the students acting as snakes, and in the final row, the students acting as hawks. (Grassland or Deciduous forest ecosystem) Visually, it should look like an energy pyramid from birds-eye-view. Now explain to the students that, “I am acting as the sun. You are each an animal representing your population in the community. As the sun, I give energy to the grass (and all producers) so that they can do photosynthesis and grow.” The TW hand each student acting as grass 5 connecting cubes. Explain, “Each grass now has the energy from the sun in the form of a cube. They will need some energy to grow, but they will get eaten by the grasshopper, so the grasshopper will receive their energy.” SW keep one cube, and pass on the rest to the grasshoppers behind them. (Please note: Some animals will get more cubes that others when the energy is passed. Just explain that if they have more cubes, they should keep 2 cubes to live this time.) “The grasshoppers will need some energy to live and survive, but they will get eaten by the mice.” Ask all grasshoppers to keep one (or two) cubes that they needed to survive, and pass the rest on to the snakes. “The snakes need more energy to survive because they are larger and require more energy to hunt and live. But eventually some will get eaten by a hawk.” Snakes will keep 2 energy cubes and pass the rest onto the hawks. “The hawk also needs lots of energy, and will keep it because he isn’t eaten by anything else until he dies and is decomposed.” Try another variation of this activity from the following list, re-passing the energy cubes each time: -Decrease the snakes. Who will get more/less energy if there are less snakes? How will this affect the other populations? -Increase the hawks. How will having more hawks affect the populations of snakes? -Decrease the grass. What will happen to all of the other populations in this food chain? -Decrease the mice and increase the hawks. How will this affect the rest of the food chain? Back in their groups, the students should come back together to summarize the activity, and what was learned from each variation completed. The students should each individually record their activity summary 56 on the sheet provided. Begin by asking the students to share their summaries. “Why did we just act as a food pyramid, and what did you learn from our activities?” If it didn’t come up during the class discussion, explain “Today we acted as animals and plants from a food pyramid to show that there is an energy transfer between organisms. The animal that is eating the other organism is receiving their energy. We showed that by passing the connecting cubes between each other. We also saw how one small change in a food chain can cause big changes everywhere else. For example, if the snakes decreased, it would initially cause: - the hawks to decrease because they will not have as many snakes to hunt - the mice to increase because they are not hunted as much by the snakes -the grass to decrease because there are more snakes to eat it Eventually, the food chain would balance itself out because some animals will die and some will begin hunting more of another animal that they prey upon. There are more producers because there needs to be enough energy to pass through the pyramid/food chain. No animal exists alone; all organisms within a community are all interconnected. When one small change occurs, it affects everything else. In their groups, the students will read the Discovery Education passage called “Food Chains”. While reading, the students will write three important facts from the passage on their recording sheet. As a class, come back together and allow students to share their important facts from the passage. Discuss the similarities to our activity. Individually, students should respond to this writing prompt on their recording sheet: Imagine you are a deer in the deciduous forest, and you typically eat grass, moss, and berries. You are hunted by wolves, coyotes, and grizzly bears. How would your community become affected if your population increased? Explain. Elaborate Evaluate 57 58 My Responses Abiotic and Biotic Factors Found in the Pictures Activity Summary (what did you do? What did you learn?) Discovery Education Passage “Food Chains” Three Important Facts in My Own Words: 1. 2. 3. Writing Prompt Imagine you are a deer in the deciduous forest, and you typically eat grass, moss, and berries. You are hunted by wolves, coyotes, and grizzly bears. How would your community become affected if your population increased? Explain. ________________________________________________________________________________ ________________________________________________________________________________ ________________________________________________________________________________ ________________________________________________________________________________ ________________________________________________________________________________ ________________________________________________________________________________ ________________________________________________________________________________ ________________________________________________________________________________ _______________________________________________________________________________ 59 16. Aquatic Ecosystems Research Unit Essential Standard Clarifying Objective Ecosystems 5.L.2 Understand the interdependence of plants and animals with their ecosystem. 5.L.2.1 Compare the characteristics of several common ecosystems, including estuaries and salt marshes, oceans, lakes and ponds, forests, and grasslands. Essential Questions What are some examples of water ecosystems? What are some ways that water ecosystems are different from each other? Why can different organisms survive in some water ecosystems but not in others? Teacher Notes Students should come to this lesson with a basic understanding of ecosystems. They should know that an ecosystem includes all of the living and nonliving things in an environment and their interactions. They also need to recognize that animals and plants are uniquely suited to live in their ecosystems. They should understand that energy flows through ecosystems through a food web. Prior experience with different water ecosystems is useful, but not necessary. It is helpful for students to have seen or been to an ocean, a river, or an estuary. Vocabulary Ecosystem, river, marsh, water, wetland, estuary, stream, pond, ocean Materials/Resources Computer access Resource: www.discoveryeducation.com Engage Open the session by asking students what they know about ponds. Record all responses on the board. Be sure to have students describe the type of water, the movement of the water, and organisms that live there. Repeat the discussion focusing on oceans. Take note of what students know or believe about ponds and oceans. Have students compare ponds and oceans, identifying ways that they are alike and different. Point out that different types of organisms live in each. Have students work in pairs to brainstorm why ponds and oceans have different organisms living there. Then come back together as a class to compile a list of the different hypotheses. Show students part of the Discovery Education video segment Oceans. Ask students to use what they saw in the video to add to their description of the ocean. Challenge them to name as many different characteristics as they can think of. Explain that oceanographers—scientists who study oceans—continue to learn more about the oceans and the organisms that live there. Tell students that the oceans are so large that they contain many ecosystems within them. Lastly, TW model reading the Discovery Education passage “Freshwater Ecosystems” and “Ocean Ecosystems”. Explore Each student should choose a specific water ecosystem explored in the lesson and make a diorama of it. Students 60 Explain Elaborate Evaluate will create a scene in a shoebox that includes the key characteristics of their water ecosystem. They should include models or representations of some organisms that live there; these models should demonstrate or otherwise show why the organisms can survive in those ecosystems. For example, a clay model of a fish might have gills scratched into its sides and fins attached; students should be able to explain that the gills allow the fish to breathe underwater and the fins allow the fish to move and steer through the water. The diorama should also show the flow of energy in the ecosystem. That is, students should include organisms that make part of a food chain. On the back of the diorama, students should identify which water ecosystem they chose and explain why each element of the diorama was included. You may need to allow students to take their dioramas home to finish them. When students have finished their dioramas, have them display them around the room and give students time to look at their classmates’ work in a “gallery walk.” To organize this, divide students into groups. The students in the first group should stand by their dioramas so they can explain their choices to the other groups. Then have the second group switch with the first group, and proceed in this way until every group has had a chance to present its dioramas to the other groups. The students will then share the information they’ve learned with the class. Have students record their new knowledge about each aquatic ecosystem in a table in their notebooks. Optional Project Ideas: -Students should explore a water ecosystem in their neighborhood. They should define the ecosystem by telling what kind of water it is and identifying different organisms that live there. -Students can create their own water ecosystem using a three-liter plastic bottle. They would choose the kind of water and organisms that could survive in their ecosystem. -Students can research the water supply problem on the Earth and what actions are being taken to try to provide all humans with the fresh water they need for survival. Have students write a paragraph or two to summarize their findings. TW have students answer their essential questions in their notebook. Discuss together. 61 17.The Skeletal System Unit Structures and Functions of Living Organisms Essential Standard 5.L.1 Understand how structures and systems of organisms (to include the human body) perform functions necessary for life. Clarifying Objective 5.L.1.2 Compare the major systems of the human body (digestive, respiratory, circulatory, muscular, skeletal, and cardiovascular) in terms of their functions necessary for life. Essential Questions What is the purpose of the skeletal body system? Teacher Notes This is an introductory lesson for the skeletal system. (The elaboration takes place a week later) Vocabulary Skeletal system, bones, calcium, body systems, (names of bones) Materials/Resources “Ballad of a Boneless Chicken” by Jack Prelutsky from The New Kid on the Block (Annotated in English Language Arts: A Bibliography for the Elementary Level, 1992 p. 198) http://yucky.discovery.com/noflash/body/pg000124.html Science journals Engage Explore TSW listen to the song “Dry Bones” and list as many bones as they can in their science journal Divide the students into small groups and brainstorm what they know about the skeletal system. As a whole group, record the students’ facts on the K-W-L chart. Record known facts under the “K” column (what we know about bones). If uncertain about information presented, record as a question under the “W” column (what we want to find out about bones). Read to students “Ballad of a Boneless Chicken” and discuss the function of the skeleton. The skeleton gives our bodies shape and support, allows movement, protects tissues and organs, and produces blood cells. TSW draw what they think a human being would look like without bones and share with the class. TTW share: http://yucky.discovery.com/noflash/body/pg000124.html TTW provide the students with cooked chicken bones for this activity. Have students try to break cooked chicken bones. Ask them to record their observations in their notebooks. Soak some of the chicken bones in vinegar. Ask students to predict what will happen and to record their 62 predictions. (See Elaborate below) Elaborate Evaluate Explain TSW share their predictions for the effects of the vinegar on the chicken bones TTW explain that it will take a week to see the effects After a week, ask students to try and break the bones. Have them compare the results of this experiment to their predictions. Explain that the vinegar took the calcium out of the bones. Discuss the importance of calcium for bone growth and strength. Students can research foods that are rich in calcium and create a display for the class. Students will create a human skeleton using instructions from: http://www.enchantedlearning.com/crafts/halloween/bones/ Write a journal entry to describe how the skeletal system is crucial to the human body 63 18. Human Body Systems Unit Structures and Functions of Living Organisms Essential Standard 5.L.1 Understand how structures and systems of organisms (to include the human body) perform functions necessary for life. Clarifying Objective 5.L.1.2 Compare the major systems of the human body (digestive, respiratory, circulatory, muscular, skeletal, and cardiovascular) in terms of their functions necessary for life. Essential Questions What are the major body systems? How are the body systems alike and different? How do the major body systems work together? Teacher Notes This is the first lesson introducing the body systems. Students should be placed in small groups of 5 Vocabulary Circulatory System (heart, blood vessels), Respiratory System (nose, trachea, lungs), Skeletal System (bones), Muscular System (muscles),Digestive System (mouth, esophagus, stomach, intestines), Nervous System (brain, spinal cord, nerves) Materials/Resources Model of the human body Computer Butcher Block paper human body 5th grade Science textbook pgs. R20-R40 (Reference pgs. Body Systems) Engage TTW introduce body systems through www.learningscience.org Physical Science, Structures and Functions in Living Systems grades 5-8, Web Interactive Lesson 2 All Systems Go All Systems Go will be introduced as an entire class activity then students will work on the lesson individually TTW show the butcher block paper human body which the students will use to draw and label the different body systems Explore TSW work in small table groups Each group will be assigned a body system to research, illustrate as part of the whole class paper human body TSW use the science textbook pgs. R 20-R40 to record data in their science notebook TSW use the human body model TSW use the graphic organizer: Interesting Facts, Important Information, Need to Know 64 Explain Elaborate Evaluate TSW share their information with the class TSW add their body system illustrations to the group paper human body TSW will label the diagram with major parts of the system Use the Discovery Ed Science Lab Skill builder: “The Human Body” to review the body systems The students are responsible for presenting their body system to the class and completing their body system on the diagram. 65 19. The Muscles that Move Us Unit Structures and Functions of Living Organisms Essential Standard 5.L.1 Understand how structures and systems of organisms (to include the human body) perform functions necessary for life. Clarifying Objective 5.L.1.2 Compare the major systems of the human body (digestive, respiratory, circulatory, muscular, skeletal, and cardiovascular) in terms of their functions necessary for life. Essential Questions Why are muscles important to the body? What are the two main types of muscles? How are muscles different throughout the body? Teacher Notes This lesson can be done to introduce the muscular system, and can be split up into 2-3 days. Vocabulary Muscles, Involuntary, Voluntary, System, anatomy, muscle, tendon Materials/Resources TW/SW need computer access. Resource: www.discoveryeducation.com Engage TW begin by asking the students: What makes humans different from plants? Share and record on the board. Students will list a myriad of ways, and this question will get them thinking about our bodies. Next, show students the brief video segment How Plants Are Different from and Similar to Other Living Things. This video was originally designed for lessons about plants, but does point out many of the structural differences between plants and animals. After the video, ask students how humans are able to move. If they know that our bones and muscles help us move, ask further questions to assess what they know about muscles and to flesh out any misconceptions they may have. Explore Have students respond to the essential questions by exploring the Discovery Education resources listed in the Explore section. Ideally, each student will use more than one resource for information, but no student is expected to use all of the resources within the time allotted. Encourage students to take notes as they explore. Review the three essential questions for this lesson, and have a brief discussion about the many ways that we can learn this information. We can read texts, watch video segments, or study glossary terms. Suggest that glossary terms might be a good way to build a foundation of knowledge, and recommend that students begin by learning important terms such as anatomy, muscle, and tendon. From there, ask students to brainstorm a good way to supplement this information. You may want to suggest that they view the video segment Voluntary Muscular System because it appears to relate to at least one of the essential questions. Model this process to the entire 66 class for at least a few resources. Encourage students to proceed through the resources in this way. Explain Elaborate Evaluate Discovery Education Resources: -Different Types of Muscles Reading Passage -Skeletal Muscles – Move That Body! Reading Passage -Your Muscles: On the Move Reading Passage -Voluntary Muscular System Video -Involuntary Muscular System Video -Muscular System Video Begin by pointing out the names of several muscles that students may not know, such as the hamstring, quadriceps, bicep, and deltoid. Then, tell students that as you call out a muscle, they will attempt to move that muscle and that muscle only. They will find that, while they may be able to isolate a muscle, there are always other muscles working in conjunction with specific muscles. You may elect to have students sitting or standing for this exercise. Then continue by calling out some of the bigger muscles, like quadriceps and biceps. Point to the muscle as you call it out, reminding students to try to move only that muscle. Move through all of the muscles that you taught students, and tell them that the movement of these muscles is voluntary. Ask them to explain what this means. Then, tell them that other muscles are involuntary. To prove this, tell students to control or move their heart. Or, tell students to not blink their eyes. The heart is an example of a muscle that we cannot control. While we can tell our bodies to not blink, the involuntary nature of the muscle kicks in, and our bodies essentially force us to blink. From this, have students explain the difference between voluntary and involuntary muscles, and encourage them to think of other examples of both kinds of muscles. SW complete the Discovery Education Exploration called “Muscular System” with a partner. Then, bring the class back together for a few minutes and have them think back on the first question you posed to the class: How are humans different from plants? They should now know how our muscles help us move. Ask other questions to get your students thinking, such as, “What would happen if we didn’t have muscles? What would happen if all of our muscles were voluntary?” Encourage your students to think critically and creatively to not only understand the essential questions but to fully grasp why our muscular system is so important. SW answer the following question in their notebooks: How does the muscular system help the body move? Or, what is the difference between involuntary and voluntary muscles? 67 20.Cells Unit Structures and Functions of Living Organisms Essential Standard 5.L.1 Understand how structures and systems of organisms (to include the human body) perform functions necessary for life. Clarifying Objective 5.L.1 Explain why some organisms are capable of surviving as a single cell while others require many cells that are specialized to survive. Essential Questions How are single and multi-cellular organisms alike and different? Teacher Notes Students will know that a unicellular organism consists of a single cell and perform all life processes within a single cell. Multi-cellular organisms consist of more than one cell and have differentiated cells that perform specialized functions in the organism. They will know that humans are multi-cellular Vocabulary Single, (Unicellular) and multi-cellular organisms Additional vocabulary: cell membrane, nucleus, cytoplasm, vacuole, organelles Materials/Resources Discovery Education- Introducing the Cell (grades 3-8) Discovery Education- Explorations: How a cell functions, Single cellular, Multi-cellular Microscope with single and multi-cellular slides www.enchantedlearning.org cells Looking at Cells by Rebecca L. Johnson Leveled Texts for Science (Life Science Shell Education) Cells Engage TTW introduce the lesson with Discovery Education- Introducing the Cell TSW view various microscope slides of cells and create an illustration of each TTW explain the difference between single and multi-cellular using Discovery Education Fundamentals Explore TSW use the microscope at their table and will view both single and multicellular organisms TSW make a sketch of each cell in their science journal categorizing and comparing them TSW read leveled text titled Cells and complete the graphic organizer TSW answer the comprehension question for that level in their journal Explain TSW share their answers from the graphic organizer and the teacher will add them to a class chart TSW share the answers to their comprehension questions with the class (Each leveled text has a different 68 Elaborate Evaluate question) TSW use enchantedlearning.org to obtain further cell information Journal entry: Why are cells referred to as the “Building blocks of life” 69 70 71 72 21.A Family Affair Unit Essential Standard Evolution and Genetics 5.L.3 Understand why organisms differ from or are similar to their parents based on the characteristics of the organism. Clarifying Objective 5.L.3.1 Explain why organisms differ from or are similar to their parents based on the characteristics of the organism. Essential Questions How can you prove that organisms differ from or are similar to their parents? Teacher Notes This is meant as an introductory lesson on heredity and genetics. You will need to create a “Trait Tree” before this lesson on the wall. You will need 12 branches: 1-Attached Earlobes, 2-Free Earlobes, 3-Can Roll Tongue, 4-Cannot Roll Tongue, 5-Has Freckles, 6-Do not have Freckles, 7Brown Hair, 8-Blonde Hair, 9-Black Hair, 10-Red Hair, 11-Right Thumb on Top, 12- Left Thumb on Top. (If you also do Widow’s Peak, you will need 13-Has Widow’s Peak, 14-Does not Have Widow’s Peak) Vocabulary Heredity, genetics, gene, inherit, traits, characteristics Materials/Resources Engage pictures, set up “Trait Tree” before class session, 5 construction paper leaves per student, tape, Engage TW begin by asking the students to observe the pictures of families. “Do you see any ways these children are similar to their parents or brothers and sisters?” SW discuss in their groups and then share as a class. Students should realize that the children share similar features as their parents and the siblings look alike because they have the same parents. TW explain, “Look around. Is anyone just like you? You and everyone else are unique. No two people are exactly alike, including identical twins. However, many of your traits are inherited. People in a family have things in common. They can share traits. You can inherit traits from your parents. Your genes determine whether or not you possess certain physical traits. Your genes make you blue eyed or brown eyed, or have brown or blond hair. These traits are highly complex, and involve the interaction of many genes.” Explore TW explain that, “we are going to explore the observable characteristics that we inherit from our parents.” Each student will need 5 leaves. They will need to put their first name on each leaf. Some traits are more common in a population than others. Let’s find out the most common combination of traits in the group and the least common combination of traits in the group. Begin by going through each characteristic, sharing what it is and how to determine if you have it. -Earlobes: Attached or Free -Tongue Rolling: Yes or No 73 Explain Elaborate Evaluate -Freckles: Yes or No -Hair Color: Brown, Black, Red, Blonde -Hand Clasping: Right thumb on top or left thumb on top. -Optional- Widow’s Peak: Yes or No On your class tree, each student should come up and place their leaf on the corresponding branch. In their science notebooks, the students should create a tree of their own, and should label how many students in the class share that trait. (i.e. 10 students have brown hair, 2 have blonde, etc.) SW also write why they think more students share one character trait over another. Optional: Increase your data pool by including additional groups in the exercise, taping all leaves to one tree. TW explain, “We can tell from our Trait Tree that we can share traits, but there is a great variety of traits here too. What is the most common combination of traits in the group? What is the least common combination of traits in the group?” TW repeat these questions for each of the five trait groups. Every person has a unique combination of traits. If we were to look at more traits than three, we would eventually need a branch on the Trait Tree for each person in the group. TW explore the website http://learn.genetics.utah.edu/ with the students to learn more about genetic traits if time. As a class or in small groups, read the Discovery Education passage titled, “A Litter of Kittens”. Discuss how animals and plants both share traits with their parents. Writing Prompt: Do you think that all plants and animals receive traits from their parents? How do you know? Explain and justify your opinion. Homework: What are three traits that you share with your parents? What’s different between you and your parents? 74 75 76 Name_______________________________Date___________ Evaluation Do you think that all plants and animals receive traits from their parents? How do you know? Explain and justify your opinion. ______________________________________________________________________________________________________________________________________________________________ ______________________________________________________________________________________________________________________________________________________________ ______________________________________________________________________________________________________________________________________________________________ ______________________________________________________________________________________________________________________________________________________________ __________________________________________________________________________________________________________________________________________________________ 77 22.Genetics Bingo Unit Essential Standard Evolution and Genetics 5.L.3 Understand why organisms differ from or are similar to their parents based on the characteristics of the organism Clarifying Objective 5.L.3.1 Explain why organisms differ from or are similar to their parents based on the characteristics of the organism 5.L.3.2 Give examples of likenesses that are inherited and some that are not Essential Questions In what ways can you classify similar traits of parents and offspring as inherited and not inherited? Teacher Notes TSW need to be familiar with dominate and recessive genes (see attachment) TSW need to be familiar with traits listed on the bingo card Vocabulary Inherited traits, dominate traits, recessive traits, genetics, characteristics Materials/Resources Trait list Bingo Cards http://player.discoveryeducation.com http://www.youtube.com/watch?v=dPk_V1KkMuU Engage http://player.discoveryeducation.com/index.cfm?guidAssetId=6989D8E3-321F-45B6-A285BFF6DDB74138&blnFromSearch=1&productcode=DETB TTW show the kitten picture and have the students discuss and answer the questions as a class TTW show the list of dominate and recessive genes and have the students circle the ones that apply to them Explore Distribute a Bingo card to each participant and instruct them not to mark any squares unless told to do so. Explain Elaborate Read the Bingo questions one by one (in order or randomly), instructing participants to mark the squares with an X or color them in. Continue to read Bingo questions until a participant obtains a Bingo. TTW discuss Bingo results throughout the game Show Bill Nye Genetics Video: http://www.youtube.com/watch?v=dPk_V1KkMuU Use gummy bears to illustrate the concept of genetics and cross-breeding in this fun experimental lesson. Give each student or small group of students a bag of gummy bears to work with. Each group should sort 78 the gummy bears by an obvious trait, such as color or size. They should record their findings on a piece of paper and compare the results with the other groups. Students then use this data to analyze how mixing different colors can create different variations of offspring. (like mixing paint in Art Class) Evaluate Writing prompt: What are your physical traits that you inherited from your parents? Also- See evaluation below. 1. The image shows a single litter of kittens. How are they similar to one another? 2. How do they differ from one another? 79 80 This document was compiled by Kate Martin (Duda) and Dee Chinault. 81


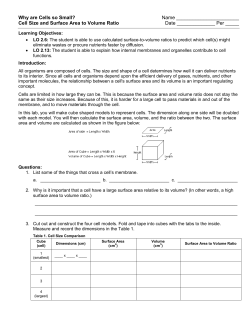


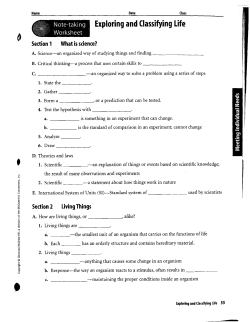


© Copyright 2026