
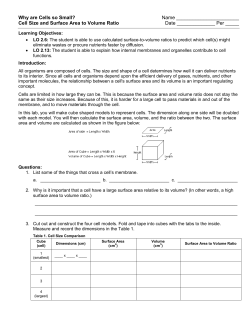
Sample Specification for the application of De Boer Duo HT... Slates/F C180 Two-Layer waterproof warm roofing membrane
Sample Specification for the application of De Boer Duo HT 4
Slates/F C180 Two-Layer waterproof warm roofing membrane
system to plywood.
This system incorporates a vapour barrier and Equus PIR
insulation system
Page 1 of 5
Version: 2013-1
Dated: September 2013
1.0
PREAMBLE:
This specification is for the application of a De Boer Duo HT4 C180 Slate roll-roofing
membrane system, in a two-layer configuration over rigid insulation board to create a warm roof
system.
Duo roofing membrane provides a hard UV-resistant but flexible coating on the upper side and
an elastic adhesive mass on the underside. Both are then supported by a polyester and glass
fibre combination carrier to act as a shrink-free and strong reinforcing agent.
This specification allows for a vapour barrier of De Boer Deboplast 2.5mm T/F K180 to the
substrate followed by the application of the PIR insulation board.
The two layer system consists of a basesheet of 2.5mm thick polyester reinforced De Boer
DeboPlast 2.5mm T/F K180 mechanically fixed on top of the Equus PIR insulation board. The
cap sheet is a 4mm thick De Boer Duo HT 4 Slates/F C180 membrane torched over the
basesheet to form a 6.5mm thick total system.
A two-layer system as detailed has a particular advantage over a single layer system apart from
being thicker and stronger. The basesheet can be laid overall to provide waterproofing and
protection, while other trades carry out their tasks over the surface. Upon completion of other
trade access the basesheet is checked, repaired as required, and then the mineral capsheet is
applied as the final installation on the roof surface. This reduces the likelihood of presenting a
patched new roof as can occur with single layer systems.
De Boer Duotherm water proofing membrane system has been assessed for the use on roofs,
decks and gutters installed on treated plywood or concrete substrate on buildings within the
following scope:
Note: A prestart meeting will be held by all parties including, Project Manager, Equus Certified
Applicator and Equus Industries Representative to determine best practices for the following
scope of works.
2.0
SURFACE PREPARATION:
2.1 General - Responsibility:
Unless expressly agreed otherwise at time of contract pricing, all work in this section shall be
the responsibility of the main contractor, whether carried out by his own staff, other sub-trades
or the roofing membrane sub-contractor.
Page 2 of 5
EQS
2.2 Plywood:
.1 Plywood Grade and Thickness – Standard:
Plywood shall be minimum 17mm C-D structural plywood complying with AS/NZS
2269, with the sanded C face upwards.
Plywood shall be treated to a minimum grade of H3 CCA treated.
The moisture content prior to installation of the membrane system must not exceed
20%. LOSP treated plywood must not be used.
When applying to existing substrates and structures, they must be thoroughly
inspected to ensure that they will not affect the performance of the membrane when
applied.
Closed-in construction spaces under membrane roofs and decks shall have adequate
ventilation to prevent the accumulation of moisture under the membrane. There should
be a minimum gap of 20 mm between the underside of the substrate and any
insulation.
.2 Sheet Layout:
All sheets shall be laid out so as to maximise the use of whole sheets. All sheet joints
shall be laid over framing members, in a staggered brick-bond pattern, running across
the fall in the roof in accordance with E2/AS1.
.3 Sheet Spacing:
Sheets shall be laid tight butt jointed, i.e. with sheets butted but not cramped up,
except where tongue and grooved joints are used in accordance with E2/AS1.
In areas where condensation is likely, prepare sheet edges and underside with
Chevaprime PBT.
.4 Sheet Fixing:
Plywood must be fixed in accordance with the Manufacturers instructions taking into
account wind loading, frame spacing and ply thickness.
Screw-fix using countersunk stainless steel screws, gauge 10 and a length 3 times the
thickness of the plywood in accordance with E2/AS1.
All sheets should be laid in a bead of construction adhesive along all framing
members. Where two-layer plywood surfaces are installed, the first layer may be
power-nailed, but the second layer must be screw-fixed with all joints offset from the
first layer. All fastener heads shall be recessed below the level of the sheet face.
Screws shall be fixed at 150mm centres on sheet perimeter and 200mm through the
body of the sheet.
Substrate framing must support the plywood at a minimum 400mm centres each way.
All sheet joints must be fully supported.
The substrate preparation may change to meet “specific design” requirements
or engineering requirements. Confirmation will be required prior to application.
Page 3 of 5
EQS
.5 Falls:
Seams should be constructed parallel with the fall, minimising ponding and flow
restriction whenever possible.
Roof, deck and gutter falls must be laid in accordance with E2/AS1 of the New Zealand
Building Code.
.6 Corners
All leading edges of plywood shall be chamfered with a 5mm radius corner. All internal
corners shall have min. 20x20 H3.2 treated timber fillets installed.
.7 Outlet Types:
Roof and deck outlets shall be installed as per clause 8.5.6 of E2 External Moisture
of the New Zealand Building Code.
Outlets shall be sized in accordance with E1 Surface Water of the New Zealand
Building Code.
3.0 VAPOR BARRIER MEMBRANE APPLICATION
3.1 Primer:
To the dried and prepared surface apply one (1) full coat of De Boer Duo Primer by
brush/roller at a spreading rate of 5sqm/litre. Allow to dry for 4-24 hours depending upon
prevailing weather conditions.
3.2 De Boer Deboplast 2.5mm T/F K180:
Decide the most suitable direction to follow then unroll and align the first roll, cut to length as
required, re-roll both ends to the middle then torch evenly overall to both basesheet and primer
as this is unrolled. Ensure even heat application. Repeat in sequence with all rolls, maintaining
laps of 80mm. This lap automatically closes during the torching process. Offset end laps in
adjacent runs.
4.0
EQUUS PIR INSULATION INSTALLATION
Install Equus PIR Insulation in a brick pattern and use full lengths where possible. One fastener
per board to secure in place before the loose laying of the basesheet.
On site cutting of boards is permitted and should be done using either a fine toothed saw or by
scoring with a knife and snapping the board over a straight edge. Ensure accurate trimming to
achieve a close tight butt finish
Refer to Equus project specific data for working patterns and full installation instructions.
Page 4 of 5
EQS
5.0
MEMBRANE APPLICATION:
5.1
De Boer Deboplast 2.5mm T/F K180 (Base Sheet):
Decide the most suitable direction to follow then unroll and align the first roll. Refer to Deboer
wind uplift documentation for fixing spacing requirements.
Laps at each sheet edge shall be 130mm.
Allow to place fixings on the sheet edge approx 20mm in from the edge, following the project
specific mechanical engineering plan. Ensure the base plates are securely fastened but not
overly tightened so as to deform and cut the basesheet.
Repeat in sequence with all rolls, maintaining laps over fixing at approximately 130mm. Torch
this lap closed. Offset end laps in adjacent runs if possible.
Allow to have onsite QA confirmation of basesheet and mechanical fixing patterns before
proceeding with capsheet application.
5.2
De Boer Duo HT4 C180 Slate Cap Sheet:
This is applied in the same manner as the basesheet. All laps shall be offset to prevent
coincidence with the base-sheet laps. Following application of the cap sheet all joints are back
sealed separately to ensure they are neatly and correctly closed.
If required, during the back-sealing operation, Duo Mineral Chip may be carefully scattered
over the joint to provide a uniform appearance. This may also be required in areas of detailing.
5.3
Detailing:
This shall include all outlets, pipe penetrations, gutter stop ends, parapet upstands, machinery
plinths and anything above or below the roof surface. This is carried out before, during or in
some cases after laying of the membrane depending on the detail type. All detailing shall be
done in accordance with the manufacturer’s technical literature, Duo Application Manual current
at the time of design, use, installation and maintenance.
5.4
Completion:
Upon completion of the system it shall be inspected and left for a short period (up to 2-3 weeks)
to stabilise. At this time the entire installation shall be rechecked prior to any warranties being
issued. Where possible, particularly on the deck areas, a pond-test (24 hours) should be
carried out.
Note:
Any damage caused to the completed installation by other trades working over the
membrane after the initial inspection shall be the responsibility of the Main Contractor,
who shall arrange appropriate protection as required.
5.5 Trafficable:
The above system is suitable for foot traffic after the installation of duckboards, roofwalk, or
pedestal and pavers.
Page 5 of 5
EQS
6.0
MAINTENANCE AND WARRANTY:
6.1
Maintenance:
Equus Industries Limited recommends as normal maintenance, the finished roof areas are
inspected every six months for cleaning and annually by a Certified Installer to ensure weather
tightness and durability.
Ensure the roof and all outlets are free of blockages and clear of unwanted debris, all
associated flashings and cappings are sound, the general condition of the membrane, the
membrane is free from surface moss, mould or lichen.
Check all associated building elements that can impact on the durability of the membrane.
Higher risk areas such as sheet joints, substrate movement, edging, gutters, penetrations,
corners, upstands, outlets and overflows require a thorough weather tight inspection on an
annual basis.
4.2
Warranty:
The De Boer Duo Two-Layer Warm Roofing System described in this specification may be
warranted as to sheet integrity and to be waterproof for a period of up to twenty (20) years
providing that:
.1 All work is carried out by a Certified Equus Applicator.
.2 De Boer Duo and Equus PIR Insulation must be installed in accordance with the
manufacturer’s technical literature, Duo Application Manual current at the time of
design, use, installation and maintenance
.3 The Warranty is issued in conjunction with an appropriate Maintenance Statement.
The period of warranty is determined by the situation of the installation; e.g.: old or
new, substrate, plain roof or open plant roof etc.. The warranty period shall be
determined for any contract in consultation with the Manufacturer or his representative.
The warranty is provided to the client by the Equus Applicator carrying out the work and
is backed by the Manufacturer as to the fitness for the purpose of the materials
supplied for the contract.
--oo0oo--


© Copyright 2026