
LETTERING TECHNIQUES EDITION DATE: SEPTEMBER 1994 SUBCOURSE
SUBCOURSE
EDITION
SS0525
A
LETTERING TECHNIQUES
EDITION DATE: SEPTEMBER 1994
LETTERING TECHNIQUES
Subcourse Number SS0525
EDITION A
United States Army Signal Center and School
Fort Gordon, GA 30905-5074
5 Credit Hours
Edition Date: September 1994
SUBCOURSE OVERVIEW
This subcourse presents the procedures and techniques you will use in
lettering.
It provides the methods used in classifying letters and
describes freehand lettering using several lettering tools.
This
subcourse also identifies the various applications of mechanical,
prepared, and computer-generated lettering.
There are no prerequisites for this subcourse.
This subcourse reflects the doctrine which was current at the time it was
prepared. In your own work situation, always refer to the latest official
publications.
Unless otherwise stated, the masculine gender of singular pronouns is used
to refer to both men and women.
TERMINAL LEARNING OBJECTIVE
ACTION:
You will identify and describe the procedures for letter
classification, lettering principles, freehand lettering,
and mechanical and prepared lettering techniques.
CONDITION:
You will be given information from Naval Education
Training (NAVEDTRA) Illustrator Draftman Manual 10472.
STANDARD:
To demonstrate competency of this task, you must achieve a
minimum score of 70% on the subcourse examination.
i
and
SS0525
TABLE OF CONTENTS
Subcourse Overview .......................................................i
Administrative Instructions .............................................iv
Grading and Certification Instructions ..................................iv
Lesson 1:
Introduction to Lettering ...................................1-1
Part A:
Letter Classification .............................1-2
Part B:
Lettering Principles ..............................1-9
Part C:
Use of Basic Strokes with Guidelines and a Grid ...1-15
Practice Exercise
.........................................1-23
Answer Key and Feedback
Lesson 2:
...................................1-26
Freehand Lettering Tools and Their Uses
....................2-1
Part A:
Pencils ...........................................2-2
Part B:
Techniques of Lettering Using Different
Types of Pens .....................................2-5
Part C:
Techniques of Lettering Using Different
Types of Brushes and Felt Tip Markers .............2-9
Practice Exercise
.........................................2-17
Answer Key and Feedback ....................................2-18
Lesson 3:
Mechanical, Prepared, and Computer-Generated
Lettering Techniques .......................................3-1
Part A:
Use and Application of Mechanical and
Prepared Lettering ................................3-2
Part B:
Use and Application of Computer-Generated
Lettering Techniques ..............................3-9
Practice Exercise
.........................................3-15
Answer Key and Feedback
...................................3-16
Examination ............................................................E-1
ii
SS0525
Section
Page
Appendix A: List of Acronyms and File Extensions ......................A-1
Appendix B: Guidelines and Grids ......................................B-1
Appendix C: Fixed Proportional Fonts and Paragraph
Formats ....................................................C-l
Student Inquiry Sheets
iii
SS0525
LESSON I
INTRODUCTION TO LETTERING
Critical Task: 113-579-1037
OVERVIEW
LESSON DESCRIPTION:
In this lesson you will learn the purpose and method of classifying
letters.
You will also learn the principles necessary to construct
letters using guidelines and grids.
TERMINAL LEARNING OBJECTIVE:
ACTIONS:
a.
Describe the classification of letters.
b.
Describe
letters.
c.
Identify the basics of lettering strokes.
d.
Describe how to use guidelines and a grid.
the
principles
necessary
from
to
NAVEDTRA
construct
CONDITION:
You will be given information
Draftsman Manual 10472.
Illustrator
STANDARD:
You will identify the classification of letters and
describe the basic strokes to construct letters in
accordance with NAVEDTRA Illustrator Draftsman Manual
10472.
REFERENCES:
The material contained in this lesson was derived from the
following
publication:
NAVEDTRA
Illustrator
Draftsman
Manual 10472.
INTRODUCTION
Lettering, not printing, is the correct term for producing letters by
hand. Printing involves the use of a printing press. You draw lettering
either by hand or by some mechanical means, such as a Leroy set.
Lettering is not new.
Before the invention of the printing press, all
documents were produced by lettering.
Lettering is an art form and the
design of modern letters have, Egyptian hieroglyphics as their root.
Across the ages, letters were modified to suit the talent and taste of the
artist.
Later in this lesson you will be exposed to various types, of
letters in use today.
1-1
SS0525
PART A - LETTER CLASSIFICATION
1.
Lettering.
As a graphics documentation specialist, you are required to demonstrate
proficiency by lettering diverse projects that vary from simple name
plates for military housing to complex presentation materials.
There is
only one way to become proficient at lettering--practice.
All projects
you letter are some form of communication (e.g., the name plate tells or
communicates who dwells in the quarters; presentations communicate ideas).
For a lettering project to communicate effectively it must, above all
else, be legible.
The following list includes the lettering factors,
discussed later in this subcourse, that have the greatest bearing on
legibility.
a.
b.
c.
d.
e.
2.
Style of letter.
Size of letter.
Space between letters.
Space between words.
Space between lines.
Letter Classification.
a. Introduction.
As mentioned earlier, lettering is a form of
communication.
Words alone do not convey the entire message.
Letter
size, style, and other characteristics also help to convey a message.
Consider how these factors are used in some documents to which you are
exposed.
(1) The style of letters in part, determines how readable a document
is. For this reason, magazine articles use letter styles that are easy to
read.
The size of letters can attract the readers' attention, such as
headlines in a newspaper or titles on charts.
The size and style of
letters is often used to deter a person from reading the "fine print."
(2) Properly used, letter styles convey the feeling or mode of the
message you are communicating.
They may be warm, brisk, dignified,
modern, old-fashioned, or some other variation.
To select the style
appropriate to the message, you must be able to recognize various styles
and be familiar with their appropriate use.
(3) Letter styles are often referred to
displays the six main classes of letters commonly
1-2
as
faces.
Figure
1-1
SS0525
used today.
In general, all letters are classified as one of the six
displayed in figure 1-1.
Figure 1-1.
Six classes of letters
(a) Divide each letter style into two groups, capital letters and
small letters. You can refer to capital letters as upper-case and small
letters as lower-case.
(b) These designations come down from the time when all
typesetting was performed by hand.
The typesetters divided the letters
and put them into two types of cases. In the upper case they stored the
capital letters and put the small letters in the lower case.
b. Roman. Ancient Romans developed and refined our capital (or uppercase) letters.
These ancient artists carved letters in stone.
As a
guide, they painted the letters to be carved using a flat brush always
held at the same angle. When they moved the brush vertically, it made a
thick stroke. When they moved it horizontally, it made a thin stroke. As
a result, Roman letters are composed of thick vertical strokes and thin
horizontal strokes. The thin lines have cross-strokes at the end. These
cross-strokes are called serifs.
Serifs lend unity to Roman letters,
blend them together, and make them easy to read.
(1) Old style and modern are the two classifications of Roman types.
The chief means of distinguishing between these two classifications is the
serif. Refer to figure 1-2 and compare the serifs. Notice that the old
style letter has softer and more rounded serifs while the serifs on the
modern letter are sharper and the horizontal lines are thinner than the
old style.
(2) Roman letters are most commonly used for the text of magazines,
newspapers, and books.
It was chosen for these purposes because most
people are familiar with it and because Roman letters are the easiest to
read, particularly in small size and lengthy articles.
Some qualities
attributed to Roman letters are: dignity, refinement, and stateliness.
Figure 1-2
1-3
SS0525
provides a comparison between the old style and modern Roman typefaces.
Figure 1-2.
Comparison between old style and modern Roman
c. Gothic. Refer to figures 1-3 and 1-4. Compare the Gothic style to
the Roman style.
Observe that both the horizontal and vertical strokes
are the same thickness on the Gothic style, and that it does not have any
serifs.
The Gothic style letter is plain.
Because of its simplicity,
refer to the Gothic letter as the block letter. Refer to figure 1-4.
Figure 1-3.
Figure 1-4.
A sample of Roman style letters
A sample of Gothic typefaces
1-4
SS0525
The sans-serif Gothic face shown in figure 1-4 is in common use today.
Compare the Roman typefaces shown in figure 1-3 with the Gothic typefaces
shown in figure 1-4.
Notice that the Roman face is easier to read than
the Gothic face, particularly in the smaller sizes.
You can use Gothic
style letters in a wide variety of applications today.
The following
paragraphs list a few of these applications.
(1) You generally use Copperplate Gothic for letterheads, envelopes,
cards, announcements and many types of official forms.
(2) Use
headings.
News
Gothic
in
the
body
of
newspapers
for
titles
and
(3) You primarily use Franklin Gothic, Alternate Gothic, and Poster
Gothic to letter display work.
They are popular for posters and as
headers on viewgraphs, charts, and tables.
d. Script and Cursive. Script and cursive (a style of printed letter
that imitates handwriting) type are classified together.
Script letters
have small connecting links called kerns that link the letters together
giving the lettering an appearance of handwriting. Cursive letters do not
have these kerns.
Refer to figure 1-5 and compare the Bernhard Cursive
style with the Ariston Bold style.
Notice that the Ariston Bold more
closely resembles handwriting than does the Bernhard Cursive.
This is
because the Ariston has kerns, while the Bernhard does not. Cursive type
is patterned after old-fashioned hand lettering, while script imitates the
old slanting handwriting.
Figure 1-5.
Script and cursive typefaces
1-5
SS0525
(1) Both script and cursive have the characteristics of elegance and
charm.
For these reasons, a common use is to letter invitations and
announcements. You also use them to lend elegance to display work.
(2) Figure 1-5 illustrates some of the variations of script letters
in use today.
e. Text.
Text is also referred to as "old English." Text was among
the first type styles used. It is both difficult to read and to construct
by nonmechanical methods.
Words consisting of all capital letters in
either script or text are virtually illegible.
Their most common
application is religious in nature such as prayer books.
Another common
use is as titles of certificates.
Limit the use of this style to a few
lines and avoid works with all capital letters such as those shown in the
last lines of figure 1-6. Figure 1-6 displays some of the variations of
text letters in use today.
Figure 1-6.
Text typefaces
f. Italics. Italics is not a style in and of itself, but a variation
of Roman, Gothic, Contemporary, and certain other lettering styles.
Italics are slanting versions of letter styles. Refer to figure 1-7 and
compare the Copperplate Gothic italic style to the Copperplate Gothic
style shown in figure 1-4.
Use italics to add contrast and interest to
lettering projects.
One common use of italics is to draw interest
(emphasize) to that portion of the project lettered in italics. You also
use italics to identify water features on maps.
Italics were originally
used for text.
However, this variation is rather difficult to read in
lengthy articles and have fallen into disuse for this purpose. You will
learn more about italics later in this lesson.
1-6
SS0525
Figure 1-7.
Varieties of italics
g. Swash Lettering. Another style variation is swash lettering. They
are similar to italics but they are embellished with swirls and curves
called swashes.
They provide an alternative to or may be combined with
italics as a method of adding contrast, emphasis, or inviting attention to
certain portions of a lettering project.
Figure 1-8 is an example of
swash lettering.
Figure 1-8.
Example of swash letters
h. Contemporary.
As with many other art forms, fads creep into
lettering. New styles come and go. Some new styles catch on and endure
while others experience a relatively short, useful life.
Two distinctly
new styles that are gaining in popularity are the square serif and the
sans-serif.
The sans-serif closely resembles Gothic.
However, sansserif, unlike Gothic, has balance and near perfect geometric proportion.
Because of these characteristics, you may classify sans-serif as a
contemporary letter style.
Figure 1-9 presents some variations of sansserif type styles currently in use.
3.
Other Letter Characteristics.
a. Families and Type Series.
As a professional, you must know the
correct terms used within your profession.
Always use the correct term
when discussing lettering.
Thus far, we have discussed the six broad
classifications of letters and you have seen examples of each. There are
other terms used to classify letters with which you must be familiar. As
you have seen from these examples (figures 1-2 through 1-4) there are both
similarities and differences between letters within a specific style.
1-7
SS0525
Figure 1-9.
Sans-serif typefaces
(1) Families. Typefaces that are similar, though not exactly alike,
are grouped into classifications known as families.
For example, Gothic
is a family of typefaces, not a single typeface.
Take another look at
figure 1-4.
(2) Type series. Notice that all the typefaces shown in that figure
share the elements of Gothic style, yet there are subtle differences
between Poster Gothic and News Gothic. Notice also that within a family,
a specific family member may vary in size.
An example of this is the
Bodoni style shown in figure 1-3.
All the sizes of a specific family
member are called a type series.
b. Type Units of Measure. Type size has two units of measure, points.
(height) and pica (line length).
(1) Points are the unit of measure that describes the height of
letters.
One point is equal to 1/72 of an inch.
For example, a letter
1/2 inch high (36/72) is 36 points, 1/4 inch high (18/72) is 18 points.
To determine the height of letters, measure from the top of a capital
letter to the bottom of a small letter.
(2) Pica is the unit of measure that describes the length of a line
of letters.
A pica is 1/6 of an inch, thus, there are 6 picas to the
inch.
c. Weight.
Letters are also classified based on the relative weight
of the lines you use to construct them. The three weights in general use
are light, medium, and bold. There is no unit of measure for these terms.
1-8
SS0525
4.
Height to Width Ratio.
Another classification of letters is a function of their height to width.
These classifications are condensed and extended.
a. Condensed letters are narrow compared
condensed letters when space is limited.
to
their
b. Extended letters are wide compared to their height.
letters as a means of adding prominence.
5.
width.
Use
Use extended
Summary.
This concludes the discussion of letter classification.
Remember, the
selection of letter style, size, and other characteristics are a matter of
preference.
There are no hard and fast rules.
Lettering is a form of
communication and above all else, lettering must be legible or the message
will be lost.
PART B -LETTERING PRINCIPLES
The overall effectiveness of your work depends strongly on its overall
composition.
Lettering either by itself, or as part of a presentation,
involves properly arranging letters, words, and lines of letters with any
other graphics components of the project. In this part of the lesson, you
will learn how to space between letters, words, and lines.
6.
Spacing Letters.
For any lettering project to appear balanced, the white space (the
irregular backgrounds between the letters) must appear equal. This is not
an easy task and requires detailed work.
Vary the spacing between
adjacent letters depending on whether they have straight sides (H/I/M/N),
slanted sides (A/V/W), round sides (O/Q/C/G), or open sides (L/J). In the
past, several attempts were made to develop hard and fast rules to space
letters; however, they were not successful.
In general, leave the same
amount of white space between letters as appears within the previous
letter in the word. Refer to figure 1-10 and pay particular attention to
the spacing marks above the letters.
a. Look at line 1 in figure 1-10. All the letters in this line have
straight sides; therefore, the spacing between them should be equal.
Determine the spacing by the following method. Using a printer's rule, an
engineer's rule, or some other scaled device that provides a variety of
graduates (inches, centimeters, or any other unit of linear measurement),
measure the distance between the insides of the vertical strokes of the
first letter in the word. In this case, the capital
1-9
SS0525
letter N. Record this distance. This is the appropriate distance between
the letters. Notice that all the letters on line 1 are separated by the
amount of white space in the first letter in the group, therefore, they
appear to form a word.
This procedure works well for spacing between
letters with straight sides.
Figure 1-10.
Spacing between letters
b. Now refer to line 2 in figure 1-10.
This line retains the same
spacing as line 1. However, the upper-case letter 0 does not occupy the
same amount of space as the letter N; therefore, the spacing between the
letters appears unequal.
By reducing the space between the N and O and
between the 0 and the N from three measured units to two measured units,
you restore balance.
Notice how much better the word "NONE" appears on
line 3 than it does on line 2. As a general rule, the space between round
letters and straight letters should be less than the space between two
straight sided letters.
c. Look at line 4 in figure 1-10. Balance is obtained on this line by
reducing the space between two round letters to one measured unit, and
retaining the spacing between round and straight letters at two measured
units.
d. Now look at lines 5 and 6 in figure 1-10. The spacing of letters
that have odd shapes such as these deserve special attention.
Those on
line 5 present no particular problems and can even overlap such as the V
and J. For such combinations, use your best judgement. Space the letters
whichever way best achieves balance.
The letters on line 6, however,
present some special problems.
One way to achieve balance is to shorten
the horizontal stroke on such letters as L and T. Again, there are
1-10
SS0525
no hard and fast rules.
Use your best judgement and seek the advice of
more experienced personnel if they are available to you.
When time
permits, examine magazine articles and advertisements for other ideas on
letter spacing.
7.
Word Spacing.
Another issue that impacts on legibility is spacing between words.
As
with other matters regarding lettering techniques, experts in the field do
not always agree on any one approach. Generally speaking, there must be
enough space to separate words from one another, but not so much as to
cause us to read one word at a time.
In general, follow the guidelines
specified in figure 1-11.
a. Using the letter 0 is convenient, the letterer needs only to make a
circular movement above the paper next to the preceding word.
Figure 1-11.
Spacing between words
b. When spacing words, you must consider the characteristics of the
last letter in the previous word and those of the first letter in the next
word.
The following paragraphs provide some techniques to help you
achieve proper word spacing.
(1) Leave a space equal to the capital letter O between two halfheight, straight-stemmed letters such as H and E, or D and B. If one or
both letters are curved, reduce the spacing by about 1/3.
(2) If the two letters are lower-case, use the lower-case letter o
using the conditions explained previously.
(3) If one letter is upper-case and one is lower-case, use a space
equal to 1/2 of the upper-case O plus 1/2 of the lower-case o. Figure 112 is an example of balanced spacing that employs all the techniques
discussed thus far in this lesson. This concludes our discussion of word
spacing. Next we will discuss line spacing.
1-11
SS0525
8.
Line Spacing.
Line spacing is as important to the legibility and overall quality of a
project as letter and word spacing.
Again, there are no hard and fast
rules. However, there are some general guidelines that when combined with
your good judgement will help you determine the line spacing appropriate
to your project.
a. In general, the line spacing should be between 1/2 to 1 1/2 times
the height of the letters.
b. Do not use a line spacing equal to the letter height.
c. In general, line spacing that is equal to 2/3 of the letter height
enhances the balance and legibility of your project. Figures 1-13 and 114 are both examples of balanced line spacing.
Figure 1-12.
Balanced letter spacing
1-12
SS0525
Figure 1-13.
Figure 1-14.
9.
Balanced line spacing
Balanced word and line spacing
Centering.
The letters of the alphabet vary in width.
This characteristic
lettering makes it difficult for the letterer to center a line of text.
of
a. One method that you can use to minimize this difficulty is to
letter the required line of letters on a piece of scratch paper.
Then
determine and mark its center using a printer's rule or other graduated
ruler. Align the center mark on the scratch paper with the center mark on
your project and use the scratch paper as a guide to construct your
project.
b. Centering lines is an effective means of drawing attention to
information.
The observer's eye is naturally drawn to centered text.
There is a difference between the true center and the optical center. Due
to an optical illusion, text located in the true center will appear as if
it were below center.
To achieve balance in your centered work, do the
following:
(1) Determine and mark the exact (true) center.
This is the point
on the work area that is of equal distance from each corner.
(2) Measure the vertical length of the work area and divide this
length by 10. Make a mark on the work above the
1-13
SS0525
true center equal to the distance determined by your calculation.
This
mark is the optical center of the work area. For example, if the length
of your work area is 15, you would place a mark on the work 1 1/2 inches
above the true center (15 ÷ 10 = 1.5).
Use this mark as the vertical
center of your work.
The horizontal center is that point of equal
distance from each side of the work.
c. Refer to figure 1-15.
This figure provides a comparison between
work placed in the optical center (the text on the left) with work placed
in the true center (the text on the right). Notice that the work in the
true center appears below center, while the work in the optical center
appears balanced.
10. Distortions and Optical Illusions in Lettering.
The eye is often bothered by certain distorting effects that occur in
lettering designs. Many of these effects are of great concern to you as
they can cause an otherwise excellent lettering project to appear
distorted.
One illusion you are probably familiar with is the one that
makes certain forms (letters or letter combinations) of the same height
appear quite different in height when you place them side by side.
One
example of this optical illusion is when triangles, circles, and
rectangles (or letters that have these shapes) appear side by side.
Figure 1-16 demonstrates this illusion.
When such an illusion occurs in
your work, you must correct it to retain balance and legibility.
Employ
the following techniques to correct such optical illusions.
Figure 1-15.
Comparison of true and optical centers
1-14
SS0525
Figure 1-16.
Optical illusions in lettering
a. Enlarge the letters that have either circular or rectangular shapes
by extending the rectangular shapes above the guideline, and extending
circular-shaped letters both above and below the guidelines.
b. Use this same principle to adjust the apparent height of lower-case
letters.
11. Summary.
This concludes our discussion of lettering principles.
In this part of
the lesson, you have learned several techniques that will improve your
lettering skills.
In the next part of this lesson, you will learn the
basic strokes necessary to form balanced letters. You will also learn how
to use guidelines and grids to form balanced, well-constructed letters.
PART C - USE OF BASIC STROKES WITH GUIDELINES AND A GRID
In the previous part of this lesson, you learned the importance of
legibility in lettered work. You also learned some techniques to achieve
legibility in your lettering projects.
In this part of the lesson, you
will learn how to use some tools to achieve consistency and balance in
your lettering.
12. Guidelines.
Guidelines are light pencil-ruled lines you place on your work. You then
form your letters between these guidelines.
The overall appearance of
your work will depend largely on how well you measure and construct
guidelines.
Accurate guidelines help you achieve balanced line spacing
and uniform letters, both of which are important elements of legibility.
To construct accurate guidelines, you will need a printer's rule or
another device that is graduated in points and picas, a sharp soft lead
pencil, and a set of dividers.
There are four guidelines, each has a
name, each has a purpose, and a defined relationship exists both between
and among them. Refer to figure 1-17.
1-15
SS0525
Figure 1-17.
Guidelines
a. Cap Line. This is the line that defines the top of capital letters
and the top of ascenders of small letters. Start the strokes for capital
letters and for the ascenders of small letters from this line.
b. Waist Line. Use this line as the top of lower-case letters that do
not have ascenders or to begin the swell of lower-case letters that do not
have ascenders.
c. Base Line. The base line is the bottom guideline for the swell of
lower-case letters. It is also the bottom line for upper-case letters.
d. Drop Line. This is the line that serves as the guideline for the
bottom of lower-case letters that have descenders.
NOTE:
We explain the terms ascender, descender, and swell later in this
part of the lesson.
13. Guideline Spacing.
You determine the spacing between guidelines by the size of the letters
you use. Regardless of the size of the letters, the spacing between the
lines must always have the same relationships.
The spacing between the
cap line and the waist line should be approximately one half (1/2) that of
the spacing between the waist line and the base line.
Use these
guidelines to assist you in achieving balance and stability in projects
you letter.
1-16
SS0525
14. Calculating Guideline Spacing.
If your capital letters are to be 36 points high, then make the distance
between the cap line and the base line 36 points (1/2 inch). If the line
you are to letter includes lower-case letters, you also need to draw the
waist line and the drop line.
Make the distance between the waist line
and the cap line approximately 1/2 the distance between the cap and base
line, in this example 18 points or 1/4 inch.
This is also the correct
distance between the base line and the drop line. Maintain these ratios
between guidelines regardless of the size of the letters you draw.
Use
dividers and a printer's rule to ensure accurate measurement of the
distances between guidelines.
15. Grids.
Grids are another useful tool you use to achieve balance and stability in
projects you letter. Graph paper is one example of grids. You can also
construct your own using dividers and a printer's rule. Additionally, you
can use grids and guidelines in a combination.
Refer to figures 1-18
through 1-21 for examples of how to use grids and guidelines.
NOTE:
The arrows and numbers shown on figures 1-18 through 1-21 represent
the order in which you make your strokes to construct letters.
Figure 1-18.
Vertical and horizontal strokes
1-17
SS0525
Figure 1-19.
Vertical, horizontal, curved, and
combination strokes
Figure 1-20.
Gothic numerals
1-18
SS0525
Figure 1-21.
Lower-case letters
16. Grids and Italic Letters.
Grids are also useful as a tool to achieve balance and uniformity when you
construct italic letters. Refer to figures 1-22 and 1-23.
To construct
italic letters, make the stems of italic letters at a 67 1/2 degree angle
measured counterclockwise from the horizontal.
Make the major angle of
curved letters at a 45 degree angle measured counterclockwise from the
horizontal.
All the other techniques you have learned in this subcourse
for spacing apply to italic letters as well as those you learned in this
paragraph.
Figure 1-22.
Italic letters
1-19
SS0525
Figure 1-23.
Balance and uniformity
17. Fundamental Lettering Strokes.
Figures 1-24 and 1-25 include arrows and numbers that indicate the
direction and order of the strokes used to construct letters. Notice that
there are only six basic strokes you must learn in order to construct the
entire alphabet and numbers. Figure 1-24 depicts these six basic strokes.
There is only one way to learn how to construct these basic strokes-practice! Appendix B of this subcourse contains some guidelines and grids
to assist you in learning these strokes. After you have completed reading
through this subcourse, use the grids and guidelines in appendix B and
practice the basic strokes. Ask your supervisor to review and comment on
your skills or compare your results with figure 1-24.
Appendix B also
includes guidelines for you to follow when you practice these strokes in
various combinations to form letters.
Once you have practiced the basic
strokes and are satisfied with your results, practice forming the letters.
If you have little experience drawing letters, use a carpenter's pencil
sharpened to a chisel point. You will learn more about pencils and other
hand lettering tools in lesson 2 of this subcourse.
Figure 1-24.
Fundamental lettering strokes
18. Letter Nomenclature.
To communicate instructions about letters, you must know the names of the
various parts of letters.
Using the correct names provides a common
language to both give and receive instructions regarding letters.
For
example, if your supervisor states that you need more practice drawing
swashes, you need to know what he
1-20
SS0525
is talking about.
definitions.
Refer to figure 1-25 and read through the following
Figure 1-25.
Letter nomenclature
a. Serifs.
Serifs are thin, short finishing strokes at the top and
bottom of letters. Serifs are typically part of Roman letters.
b. Stem.
The stem of a letter is the straight, vertical line that
forms the basis for most letters of the alphabet.
c. Fillet.
A fillet is a thick downward stroke usually made with a
broad nibbed pen with the nib held parallel to the line of lettering.
d. Hairline.
A hairline is a thin stroke either horizontal or
vertical.
You can produce a hairline with a thin nibbed pen.
You can
also produce one by holding a broad nibbed pen parallel to the line of
work and moving it horizontally.
e. Ascender.
The ascender is the stem of lower-case letters that
extend above the body of the letter.
1-21
SS0525
f. Descender.
The descender is that portion of lower-case letters
that extends below the body.
g. Bowl.
The bowl (also referred to as the counter) is the white
space inside the curved portions of letters.
h. Swell.
The swell (also referred to as the curve) is the curved
portion of letters.
Make the swell slightly wider than the stem,
otherwise it will appear thinner.
i. Cross Bar. The cross bar (also referred to as the cross stroke) is
the thin cross stroke you make on lower-case letters f and t, and the
horizontal stroke of some upper-case letters such as T and E.
j. Miscellaneous.
Kerns and swashes are embellishments to letters.
You will find the definitions of these terms in paragraphs 2d and 2g of
this lesson. The other terms shown on figure 1-25 are self explanatory.
19. Summary.
This concludes lesson 1. Complete the practice exercise on the following
pages, then proceed to lesson 2.
1-22
SS0525
LESSON 1
PRACTICE EXERCISE
The following items will test your grasp of the material covered in this
lesson.
There is only one correct answer for each item.
When you
complete the exercise, check your answer with the answer key that follows.
If you answer any item incorrectly, study again that part of the lesson
which contains the portion involved.
1.
You have been tasked to letter a project.
Your supervisor tells you
to use a lettering style that imitates old-fashioned handwriting.
Given this information, which of the following should you use to
letter the project?
A.
B.
C.
D.
2.
You have been tasked to add prominence to a certain portion of a
lettering project by using letters that are wide compared to their
height.
Your supervisor asks you to recommend a method of
accomplishing this. Which of the following should you recommend?
A.
B.
C.
D.
3.
Roman
Script
Gothic
Cursive
Use
Use
Use
Use
bold letters
swash letters
extended letters
condensed letters
You are reviewing a lettering project and the line spacing appears to
be imbalanced.
Using a printer's rule you measure both the letter
height (18 points) and the line spacing which is 36 points. Which of
the following ranges of line spacing is appropriate for letters that
are 18 points high?
A.
B.
C.
D.
9 to 27 points
10 to 20 points
15 to 21 points
Equal to the height of the letter (18 points)
1-23
SS0525
THIS PAGE IS INTENTIONALLY LEFT BLANK.
1-24
SS0525
4.
Every specialty in the Army has a vocabulary of terms peculiar to it.
Illustrators are no exception.
The various parts of letters each
have a name and you must be familiar with them.
Which of the
following terms do you use to describe the white space inside the
curved part of letters?
A.
B.
C.
D.
Kern
Bowl
Swell
Swash
1-25
SS0525
LESSON 1
PRACTICE EXERCISE
ANSWER KEY AND FEEDBACK
Item
Correct Answer and Feedback
1.
B.
Script
Remember that script has kerns.
Kerns make the letters flow
together much as the letters do when you write.
Therefore, of
the choices offered, script most resembles handwriting (page 15, para 2d).
2.
C.
Use extended letters
Extended letters are wider than they are high and they tend to
stand out from other types of letters (page 1-9, para 4b).
3.
A.
9 to 27 points
The appropriate line spacing is between
the letters. In this case, the letters
half of 18 is 9, one and one half of 18
are no hard and fast rules for line
judgement (page 1-12, para 8a).
4.
B.
1/2 and 1 ½ the size of
are 18 points high (one
is 27). Remember, there
spacing, use your best
Bowl
The terms associated with letters are not all self-explanatory.
However, as an illustrator you must become familiar with the
correct terms associated with letters. If you missed this item,
you should review the section on letter nomenclature (page 1-22,
para 18g).
1-26
SS0525
LESSON 2
FREEHAND LETTERING TOOLS AND THEIR USES
Critical Task: 113-579-1037
OVERVIEW
LESSON DESCRIPTION:
In this lesson you will learn the techniques necessary to letter using
pencils and pens and learn the types of pencils/pens available. You will
also learn the techniques necessary to letter using felt tip markers and
brushes and the types available.
TERMINAL LEARNING OBJECTIVE:
ACTIONS:
a.
Identify the different types of pencils and pens and
their uses.
b.
Describe the techniques necessary for lettering when
using pencils and pens.
c.
Identify the different types
types of markers available.
d.
Identify the techniques of lettering using different
types of brushes and felt tipped markers.
of
from
felt
tip
NAVEDTRA
pens
and
CONDITION:
You will be given information
Draftsman Manual 10472.
Illustrator
STANDARD:
You will identify the various types of pens, pencils, felt
tip markers, and brushes and their uses in accordance with
NAVEDTRA Illustrator Draftsman Manual 10472.
REFERENCES:
The material contained in this lesson was derived from the
following
publication:
NAVEDTRA
Illustrator
Draftsman
Manual 10472.
INTRODUCTION
You freehand letter without mechanical aids using the basics strokes for
each letter.
Pencils, pens, markers, or brushes are the traditional
freehand lettering tools. In this lesson you will learn how to identify
the various types of these tools and their appropriate use.
2-1
SS0525
PART A – PENCILS
1.
Pencil Identification.
Manufacturers make drawing pencils in a wide variety of graphite densities
(relative hardness).
For ease of identification, pencil manufacturers
stamp or emboss the hardness on the pencil.
In general, all drawing
pencils are classified as either soft, medium, or hard.
The letter "B"
denotes a soft, dark graphite; whereas the letter "H" indicates a hard,
light graphite.
In addition to the letters "B" and "H," pencils are
identified with a number that represents its relative hardness compared to
other pencils.
For example, both 2B and 6B drawing pencils are soft
pencils; however, of the two drawing pencils, the 2B is a harder drawing
pencil.
You will notice though that in the B category, the lower the
number the harder the pencil, unlike the H category. Refer to figure 2-1
that illustrates various drawing pencils.
Figure 2-1.
Drawing pencils
a. Use the following information as a general guide to select the
correct pencil. Use soft leads for illustrative drawings; they work well
for shading and toning.
Use medium leads for general purpose technical
drafting, tracing, and lettering.
Use hard leads for charts, graphs, or
diagrams that require precision.
b. Choosing the correct drawing pencil for a lettering project also
depends on the roughness of the paper. The rougher the paper, the harder
the pencil lead must be to produce quality lettering. You must choose a
pencil hard enough to prevent excessive wear of the point, but soft enough
to produce jet-black lettering. As an aid to selecting the proper pencil,
try several different pencils until you find the one that best suits the
needs of the project and paper.
c. The size of the lettering you construct for a project also affects
the drawing pencil to use.
When drawing small letters, use a drawing
pencil sharpened to either a conical or chisel point.
If you are
constructing medium-sized letters,
2-2
SS0525
then use a thick, soft lead drawing pencil, sharpened to a chisel point.
2.
Lettering With Pencils.
In order to use any tool effectively, you must learn to use it correctly.
There are no hard and fast rules for using a pencil, but there are some
guidelines that will improve your ability to use pencils. Figures 2-2 and
2-3 illustrate one good method for holding a pencil.
Figure 2-2.
Figure 2-3.
Horizontal strokes
Vertical strokes
2-3
SS0525
a. Hold the pencil with the thumb, forefinger, and second finger in
your normal writing position.
b. Use only enough pressure to hold the pencil.
If you grip the
pencil too hard, you will lock up your forearm muscles and you cannot
produce fluent, graceful strokes.
c. Draw vertical, slanting, and curved strokes with a steady even
movement with a slight pivoting at the wrist.
d. Avoid exerting too much pressure on the point. Excessive pressure
may dull or break the point or perhaps cut grooves on the surface of your
work.
e. The ideal pencil, for a given project, is one that does not smudge
(too soft), and does not leave unwanted marks (too hard) on your work.
3.
Making Your Point.
In order for your work to demonstrate your professionalism, you must
maintain the point on your pencil.
In general, a high quality pencil
sharpener will perform its task properly. However, you may need a chisel
point on a carpenter's pencil or other drawing pencil, to make the broad
flat strokes and thin lines necessary to construct both Gothic and Roman
letters (figure 2-4). Use the following steps to make a chisel point.
Figure 2-4.
Front and side views of chisel points
a. Use a sharp single-edged razor blade and cut away enough of the
topside and underside wood to expose about 1/4 inch of lead. Exposing too
much makes the point fragile and subject to breaking. Exposing too little
causes the point to wear away quickly.
b. Shave the lead and make it flat on the top and bottom.
Do not
exert too much pressure or the lead will break.
Make the sides of the
lead parallel.
2-4
SS0525
c. Rest the pencil on a table or other firm surface, then cut off the
tip using a sharp single-edged razor blade held at a right angle to the
pencil. Exert a firm steady pressure until the tip snaps off.
d. After you satisfactorily complete steps a through c, the lead will
have the correct shape, but it will be rough. To smooth the tip, hold the
pencil at a right angle to the paper and make several strokes. This will
remove any burrs from the tip.
e. An alternative to the process described in the preceding paragraph
is to use sand paper to shape the lead. Use this process if you do not
have a sharp single-edged razor blade. Never use a dull razor blade as it
may slip and cut you.
4.
Summary.
This completes our discussion of the pencil as a lettering tool. In the
next part of this lesson, you will learn similar information about the
lettering pen.
PART B - TECHNIQUES OF LETTERING USING DIFFERENT TYPES OF PENS
5.
Introduction to Lettering Pens.
Before the invention of the printing press, authors hand lettered all
books and other documents using a broad, flat pen.
a. Freehand lettering with a technical fountain pen, standard fountain
pen, speedball lettering pen, or a flexible quill with ink is still a
valid and useful technique to letter posters, signs, charts, and displays.
There are a wide variety of inks presently available. They range from a
high pigment, opaque India ink to a low pigment writing ink and are
available in an assortment of colors.
There are multiple pens suitable
for lettering the projects assigned to you. Just as with the pencil, you
must know how to select the proper pen for your task and how to use it
correctly.
b. In this part of the subcourse, you will learn the features of
technical fountain pens, speedball pens, and text writing pens. These are
the most common and the ones you will most likely use.
(1) Technical fountain pens.
Several manufacturers produce these
pens and their greatest advantage is that they have a reservoir that holds
ink. Figure 2-5 shows a cutaway drawing of a technical fountain pen.
2-5
SS0525
Figure 2-5.
Typical technical fountain pen
(a) The particular pen shown in figure 2-5 has a plunger control
knob.
Turn the knob counterclockwise to drain the reservoir, turn it
clockwise to fill it.
Always follow the manufacturer's instructions to
maintain this type of pen, pay particular attention to the point. These
pens are expensive.
As with other tools, proper maintenance will extend
their useful life.
(b) Most pens of this type include a cleaning pin, designed to
keep the ink flowing evenly from the reservoir to the point.
After you
fill the pen, wipe the point, then shake the pen lightly. Shake the pen
periodically during use, to promote smooth operation.
(c) Hold the pen perpendicular to the paper at all times. This is
necessary to keep the point from wearing at the edges. The design of this
pen is such that you cannot perform the precise tasks with a worn point.
(2) Speedball pens. Speedball pens have four different point or nib
styles, each designated by a number and a letter, that produce different
sizes and styles of lines.
(a) The number designation ranges from 0 to 6. It indicates the
size (width) of the point.
The smaller the number, the wider the line.
For example, a point designated by a 3 creates a wider line than a point
designated by a 6.
(b) The letter indicates the style of the point, described as
follows:
•
The "A" (square) style speedball pen point has a flat, square tip
that creates a line of uniform width with square edges.
Use the
"A" point for square Gothic and block lettering.
•
The "B" (round) style point has a round tip that produces uniform
lines with round edges. Use the "B" nib for Gothic lettering and
uniform lines.
2-6
SS0525
•
The "C" (oblong) style point has a chisel-shaped point that
produces thick and thin strokes.
Because the "C" nib produces
thick and thin strokes, it is useful for lettering projects that
require Roman and old English letters.
•
The "D" (oval) style point has an oval-shaped point that produces
thick and medium lines.
Use it to letter projects that require
either bold Roman or italic faces.
(c) Speedball pens are equipped with a brass clip on the underside
of the point (nib) that serves as a small reservoir or well for the ink.
The four styles of speedball pen points as well as the line styles and
widths are shown in figure 2-6.
Figure 2-6.
Speedball pens
(d) Use the quill attached to the stopper of the ink bottle to
fill the well. Keep the pen point clean. Wipe it with a lint-free cloth
after filling it.
Always clean it thoroughly after use and prior to
storage.
(3) Text writing pens.
These pens have neither a reservoir nor a
well. They resemble the type C speedball pen. However, they are made of
thinner metal and produce a much sharper line than the speedball pen.
Figure 2-7 displays the text writing pen.
2-7
SS0525
Figure 2-7.
Text writing pen
(a) Notice that the nibs of text writing pens are slanted so that
they touch the paper uniformly when the pen is held in a normal
comfortable position.
(b) Hold this and other pens with the same firm, yet relaxed grip
you use to hold a drawing pencil.
6.
Proper Use of Pens.
a. How to Hold the Pen. When using a pen to apply lettering, hold the
pen as you would a drawing pencil.
Do not hold the pen tightly because
you lose the sense of feel required to construct letters correctly.
Always pull the pen in the direction it is leaning when you are holding
it. If you try to push the pen, the tip digs into the paper and splatters
ink over the project.
(1) Once you have selected the style and the type of pen to use,
lightly draw the guidelines and letters. When you have the guidelines and
lettering in place, rearrange the drawing surface to a comfortable
position that provides a constant point of view (perspective).
(2) Positioning the work surface at a 60-degree angle to the
horizontal (as shown in figure 2-8) provides a comfortable working angle
and a constant point of view.
It also helps you to produce uniform
lettering.
b. Using and Caring for Pens. If the pen does not have a reservoir,
apply ink by dipping the tip of the pen into the ink bottle. Remove any
excess ink from the tip by touching it to the side of the bottleneck.
Each time you re-ink the pen and before you apply ink to the project, make
two or three trial strokes on a piece of scrap paper.
This ensures the
tip has the correct amount of ink in the nib.
The trial strokes also
allow
2-8
SS0525
you to check the quality of the lines and to ensure no foreign matter is
lodged in the tip.
Figure 2-8.
Work position for using pens
c. Cleaning the Pen.
Do not allow any foreign matter to collect in
the nib.
Clean the nib as often as necessary.
When you have completed
lettering the project, thoroughly clean the pen with pen cleaner and pat
the nib dry with a lint-free cloth.
d. Correcting Mistakes. Even the best illustrators make mistakes. If
you make a mistake while using ink, correct the error by lightly scraping
the mistake with a steel eraser.
Then reburnish and re-ink the surface,
or cover the error with whiteout and re-ink the surface.
7.
Summary.
This concludes the discussion of pens as a lettering tool.
learn to identify and use markers and brushes to letter.
Next you will
PART C - TECHNIQUES OF LETTERING USING DIFFERENT TYPES OF
BRUSHES AND FELT TIP MARKERS
8.
Brush Lettering.
This is another lettering tool that requires practice to obtain and
maintain proficiency.
Use brushes to produce letters ranging from 1/4inch to 10 feet or more in size. All brushes have three major components:
(1) hairs, (2) ferrule, and (3) a handle.
There are three differentshaped brushes you use to letter: (1) round, (2) bright, and (3) flat
(figure 2-9).
a. Round Brush (brushes A and B). The hairs of the round brush come
to either a sharp point (brush A) or a blunt point (brush B). The shape
and the pressure exerted on the brush while applying paint determines the
type of lettering for which
2-9
SS0525
you may use the brush. To use this brush to produce Gothic lettering, it
must have a blunt, round point (brush B) and you must apply even pressure
while lettering.
If the round brush has a sharp tip (brush A) and you
vary the pressure, you can create cursive lettering.
Figure 2-9.
Lettering brushes
When using the round brush to produce lettering, you can control the size
of the line by controlling the amount of pressure applied on the brush.
The more pressure you apply, the wider or broader the lines; conversely,
the less pressure you apply, the thinner the lines. A high quality round
brush presents a fullness of the hairs when wet, whereas a poor quality
brush looks concave at the sides and ragged.
b. Bright Brush (brush C). This brush has hairs that are 1 1/2 times
longer than their width and are flat with sharp corners. Use this type of
brush to letter show cards, posters, and small signs.
c. Flat Brush (brush D). This brush has hairs 2 1/2 times longer than
their width, square corners, and a flat ferrule. The long hairs of this
brush allow for smoother application of the paint when making curves and
long strokes.
This brush also holds more paint than a bright brush;
therefore, you can cover more area before resupplying the brush with
paint.
9.
Brush Quality and Shape.
The finest bristles for brushes are red sable. This is the hair from the
tail of the Siberian mink, also called the Red Tartar Martin.
No other
hair or man-made fiber has the springiness or durability of this hair. It
is delicately tapered, the tip is slender and comes to a fine point. It
is thicker in the middle (the belly) and tapers again toward the root.
The best brushes are shaped like brush B in figure 2-9.
Brushes shaped
like brush A in figure 2-9 are inferior.
a. There are several other types of brush hair that are suitable for
lettering, most are known as "camel's hair." In
2-10
SS0525
fact, these brushes are made from just about every other animal but the
camel.
Of this type, the best is made from the hair of the common
squirrel tail.
b. A low quality red sable brush is preferable to the best "camel's
hair" brush.
10. Caring for Your Brushes.
For lettering brushes to perform properly and have a long life, you must
clean and store them properly.
All paints are not compatible with all
thinners. Therefore, when you clean lettering brushes, ensure the thinner
is compatible with the paint.
Figure 2-10 provides a cross-reference
between paints and thinners. If you use an incorrect thinner to clean the
brush, you could ruin the lettering brush.
Figure 2-10.
Paint/thinner compatibility chart
a. Proper cleaning and storage of lettering brushes prolongs their
life. After you have cleaned the lettering brushes used in oil paints or
lacquers, fill them with linseed oil, shape the hairs, and place them on
their sides. Never rest brushes on their hairs.
b. An expedient way of storing a brush is to fill the hairs with motor
oil.
The oil prevents any remaining paint from hardening.
Hardening
causes brushes to become useless. You must clean the brush and change the
oil after a month of nonuse.
c. A paint brush conditioner helps keep the larger brushes soft and
pliable.
2-11
SS0525
11. Using Brushes to Letter.
a. Introduction.
To construct letters with a brush, choose a brush
with hairs equal to the size of the lettering (width of the stroke).
After filling the brush with paint, use a scrap piece to work the tip of
the brush into a chisel point that is the same size as the normal spread
of the brush hairs. Then, form each stroke of the letter with the tip of
the brush and maintain equal pressure with each stroke.
Excessive
pressure causes uneven strokes and shortens the life of the brush.
b. Gripping the Brush. There are two different ways to grip the brush
for lettering: pencil and two-finger.
The pencil grip is the same grip
you use to hold a drawing pencil. Use whichever grip with which you feel
most comfortable.
No matter which grip you use, you must position the
brush at a right angle (perpendicular) to the drawing surface so you
finish each stroke with a clean-cut edge.
(1) Most illustrators prefer the two-finger grip (figure 2-11)
because it provides more maneuverability of the brush on curved strokes.
To use this grip, hold the brush by its ferrule between your thumb and
first finger. Keep the brush at a right angle to the drawing surface and
rest your other two fingers and the heel of your hand on the drawing
surface.
Figure 2-11.
Two-finger brush grip
(2) Make each stroke with a coordinated arm, wrist, and finger
action.
For vertical strokes, pull the brush toward you.
To make
horizontal strokes, move the brush from left to
2-12
SS0525
right. To draw a curve of uniform width, roll the brush with your fingers
in the direction of the stroke.
(3) Figure 2-12 illustrates how to make vertical and curved brush
strokes for the letters D and O.
•
Step 1.
•
Step 2.
Turn the brush sideways and square off the top and
bottom of the vertical stroke.
•
Step 3.
Make the left half of the curve (holding the brush
between the thumb and forefinger) twisting the brush in the
direction of the stroke.
•
Step 4.
Make a vertical stroke.
Connect the curve as required to finish the letter.
To draw the letter O, you start by creating two curves and then turn the
brush on its side to complete the letter.
Figure 2-12.
Sequence of vertical and curved brush strokes
c. Learning to letter or to perform other tasks with brushes takes
significant practice.
Always draw guidelines using the techniques you
learned in lesson 1.
Be careful to apply the proper amount of paint.
Refer to figure 2-13 for examples of proper and improper paint
consistency.
This concludes our discussion of brushes. As a conclusion to this lesson,
you will learn how to use one final lettering tool--markers.
2-13
SS0525
12. Marker Lettering.
An illustrator who can use markers well is an asset to his unit. A marker
is a flexible tool with many applications and it is one of the easiest to
use.
a. The Felt Tip Marker. The typical felt tip marker has
from 1/8 to 1/4 inch across that is cut to a 45-degree
resembles the "C" speedball pen tip. The felt tip marker is
to construct flip charts, headings, and titles.
Figure 2-14
three styles of lettering constructed using this tool.
Figure 2-13.
a tip width
angle.
It
very useful
illustrates
Proper paint consistency
Figure 2-14.
Felt tip lettering
b. Use of the Felt Tip Marker.
Hold the marker using the same grip
you use for pencils, at an angle 45-degrees from the horizontal.
To
construct strokes, use the technique you learned earlier in this lesson
for the carpenter's pencil.
2-14
SS0525
13. Summary.
This concludes our discussion of lettering tools and their use.
In the
next lesson, you will learn some mechanical lettering tools and their use.
Complete the practice exercise on the following pages, then proceed to
lesson 3.
2-15
SS0525
THIS PAGE IS INTENTIONALLY LEFT BLANK.
2-16
SS0525
LESSON 2
PRACTICE EXERCISE
The following items will test your grasp of the material covered in this
lesson.
There is only one correct answer for each item.
When you
complete the exercise, check your answer with the answer key that follows.
If you answer any item incorrectly, study again that part of the lesson
which contains the portion involved.
1.
You are sharpening a carpenter's pencil to a chisel point. How much
lead should you expose to prevent breaking the point or excessive
wear?
A.
B.
C.
D.
2.
tasked to letter
pen available to
in sizes 0 to 6.
Of the following,
a project in Gothic typeface using
you is a speedball. You have styles
Your supervisor tells you to use the
which should you use?
A0
B1
C2
D3
You have just completed lettering an outdoor sign for the Director of
Engineering and Housing using a brush and lacquer paint.
Which of
the following cleaning solutions is preferable for cleaning this type
of paint from your brush before you put it away?
A.
B.
C.
D.
4.
inch
inch
inch
inch
You have been
ink. The only
A, B, C, and D
widest point.
A.
B.
C.
D.
3.
1/8
1/4
3/8
1/2
Water
Gasoline
Motor oil
Mineral spirits
You are practicing lettering with a brush. One of the letters is the
capital letter 'D'.
To create this letter properly, which stroke
should you make first?
A.
B.
C.
D.
Vertical
Upper horizontal
Lower horizontal
Connecting curve
2-17
SS0525
LESSON 2
PRACTICE EXERCISE
ANSWER KEY AND FEEDBACK
Item
Correct Answer and Feedback
1.
B.
1/4 inch
This is not an exact measurement, however, it is a good starting
point. This amount has proven to be the best compromise between
frequent point breaking and the need to sharpen the pencil
often.
Also remember, never use a dull razor blade because it
might slip and cut you deeply (page 2-4, para 3a).
2.
A.
A0
Gothic letters resemble block letters.
To make
you need a pen that produces clean square lines.
speedball pen makes such lines.
The size "O"
widest size, the smaller the number the wider the
6 and 2-7, para 5b(2)(b) and figure 2-6).
3.
D.
these letters,
The "A" style
point is the
line (pages 2-
Mineral spirits
while lacquer thinner is the most preferred cleaning solvent for
lacquer paint, it was not a choice for this item.
Mineral
spirits is also suitable for cleaning lacquer paint from
brushes.
Always read the label on the paint container and
follow the directions.
If the label is not readable or is
missing, then follow the guidance in figure 2-10 (page 2-11,
figure 2-10).
4.
A.
Vertical
The vertical stroke is the foundation stroke of most letters.
If it is not made correctly, you cannot construct the letter
properly (page 2-13, para 11b(3) and figure 2-12).
2-18
SS0525
LESSON 3
MECHANICAL, PREPARED, AND COMPUTER-GENERATED LETTERING
TECHNIQUES
Critical Task: 113-579-1037
OVERVIEW
LESSON DESCRIPTION:
In this lesson you will learn the use and application of mechanical and
prepared lettering techniques, including Leroy and Kroy.
You also will
learn the use and application of computer-generated lettering techniques.
TERMINAL LEARNING OBJECTIVE:
ACTIONS:
a.
Describe the use of mechanical and prepared lettering
techniques.
b.
Identify the procedures in mechanical lettering using
the Leroy set.
c.
Describe the
techniques.
use
of
computer-generated
information
from
NAVEDTRA
lettering
CONDITION:
You will be given
Draftsman 10472.
Illustrator
STANDARD:
You will identify the use and application of mechanical,
prepared, and computer-generated lettering in accordance
with NAVEDTRA Illustrator Draftsman 10472.
REFERENCES:
The material contained in this lesson was derived from the
following publication: NAVEDTRA 10472.
INTRODUCTION
In lesson 2 you learned the techniques of preparing lettering by hand. In
this lesson you will learn how to use a variety of mechanical, prepared,
and computer lettering tools.
3-1
SS0525
PART A - USE AND APPLICATION OF MECHANICAL AND PREPARED
LETTERING
1.
Advantage of Mechanical and Prepared Lettering.
Compared to hand lettering, both mechanical and prepared letters provide
you the advantage of producing uniform letters. There are several methods
of producing letters mechanically.
In this lesson, you will learn the
most common methods.
To effectively use these methods, you must develop
the necessary skills.
As with hand lettering, you must practice using
mechanical lettering tools to become proficient.
2.
The Leroy Lettering Set.
Because of its popularity, the Leroy lettering set has become the industry
standard for mechanical lettering. The basic Leroy lettering set includes
12 templates or guide sizes, each expressed in thousandths of inches. The
template sizes are 80, 100, 120, 140, 175, 200, 240, 290, 350, 425, and
500 with the height of the letters indicated in thousandths of an inch.
The other components of a Leroy set and their function follows. Refer to
figures 3-1 and 3-2 that illustrate the Leroy set and its parts.
Figure 3-1.
Leroy lettering set
3-2
SS0525
Figure 3-2.
Leroy pen and template
a. Three-Legged, Adjustable Scriber. One leg holds the pen or pencil,
the other two legs are tracer points. One of the tracer points rides in
the straight groove etched across the bottom of the template. This point
also serves as the swivel point for the scriber. The other tracer point
traces the letters etched in the template. As you rotate the scriber by
following the contours of the letter, the leg holding the pen or pencil
replicates the letter on the work surface.
b. Pens and Pen Holders. There is an adjusting screw mounted on the
same leg of the scriber containing the pen and holder.
The purpose of
this adjusting screw is to position the pen or pencil correctly relational
to the work surface.
Adjust this screw so that the pen or pencil makes
light, but constant contact with the work. Use a piece of scrap paper and
adjust the pen until you achieve the correct contact.
The pens are
vertical and held in place by a clamping screw. Tighten this screw until
the pen does not move. Do not overtighten this screw or you will damage
the pen or pencil.
To use the Leroy set correctly, you must select the
proper pen for the template you use. Use figure 3-3 to select the correct
pen.
3.
Using the Leroy Set.
a. Introduction.
The adjusting screw controls how much pressure or
contact the pen point makes on the drawing surface. You set the adjusting
screw so the tip of the cleaning pin just touches the drawing surface. If
the pen point exerts too much pressure on the drawing surface, the pen may
cut grooves on the drawing surface and too much ink flows from the pen.
When too much ink flows from the pen's reservoir, the letters have a
tendency to run and smear.
The Leroy set also has the capability to
letter italics. To letter italics, you adjust the slant of the scriber's
tracer arm to 22 1/2".
3-3
SS0525
Figure 3-3.
Leroy template to pen size correlation
b. Step-by-Step Use of the Leroy Set. After you have determined the
letter requirements and correctly fastened the graphics project to the
drawing surface, you can letter the project using the Leroy lettering set.
Use characters of uniform height, thickness, and slant by performing the
steps listed in the following paragraphs:
(1) Draw the correct size guidelines for the lettering you have
chosen for the project.
Remember from lesson I that you measure the
height of letters in points and that there are 72 points to the inch.
Given this, each point is approximately equal to 13.8 thousandths of an
inch. Use this information to convert Leroy letter guide sizes to points.
Example, your task calls for an 18 point letter.
To identify the Leroy
guide closest to this, multiply 18 points by 13.8 thousandths per point.
The result is 248.4 thousandths.
Therefore, you would use the size 240
template.
(2) Lay the selected template along the top edge of a T square or
the straight edge of a drafting machine.
(3) Select the pen appropriate to the template you use as figure 3-3
identifies.
3-4
SS0525
(4) Insert the selected pen into the socket of the scriber arm until
the shoulder of the pen rests on the scriber arm.
(5) Tighten the screw on the side of the scriber arm.
(6) Loosen the locknut on the adjusting screw in the scriber arm.
(7) Set the tailpin of the scriber in the straight guide groove of
the template.
(8) Set the tracer pin of the scriber in the groove of the character
you will letter.
(9) Lower the pen gently to the surface of the drawing paper.
(10) Raise or lower the scriber arm by turning the adjusting screw
until the tip of the cleaning pin within the pen just touches the drawing
surface. Tighten the locknut when the pen reaches the desired height.
NOTE:
To prevent blotting, make this adjustment before inking the pen.
(11) Remove the scriber from the template.
(12) Fill the reservoir of the pen with ink. Use the same procedure
to ink the Leroy pen as you use to ink speedball pens or other common
drafting instruments.
(13) Wipe the pen with a lint-free cloth to remove excess ink.
(14) Gently lower the pen to the drawing surface after
inserted the tail and tracer pins into the proper grooves.
you
have
(15) Letter the project by moving the tracer pin in the grooves of
the characters. Be sure to keep the tail pin in the straight groove.
e. Caring for the Leroy Set.
(1) If you must discontinue lettering for a short period, cover the
tip of the pen with moist cotton while it is still in the scriber. This
ensures smooth lettering and ink flow when you resume work.
3-5
SS0525
When you have completed the project, remove the pen from the scriber and
clean the pen by flushing it with the cleaning solution appropriate to the
ink you used. Do not flush the pen in a sink. These pens are very small
and it is easy to drop them down the drain.
Either a syringe or eye
dropper is a good tool to clean Leroy pens. Return all parts of the Leroy
set to their case and store the case in its proper location.
4.
Options for the Leroy Lettering Set.
As mentioned earlier in this part, the largest lettering guide provided
with the standard Leroy lettering set is 500.
The following guides are
available as options.
Figure 3-4 lists these optional guides with the
appropriate pen size.
Figure 3-4.
Optional Leroy lettering guides
a. Another option available for the Leroy lettering set is the lettersize adapter. With this adapter, you can increase or decrease the size of
characters you prepare with any of the templates. With this tool, you can
create letters in sizes between 1/3 smaller and 1/3 .larger than the
template you are using (from 66 2/3 percent to 133 1/3 percent).
For
example, you are using a size 300 template. Using this template and the
letter-size adapter, you can create letters that range in size from 200 to
400.
b. There is also an adjustable scriber available. With this scriber,
you can create letters from 60 percent to 150 percent of the height of the
template you are using. For example, you are using a size 300 template.
With this template and the adjustable scriber, you can create characters
as small as 180 to as large as 450. Another feature of this tool is that
you can slant letters as much as 45 degrees.
5.
Other Mechanical Lettering Tools.
a. Other Lettering Machines.
Other mechanical means of producing
lettering are the Kroy or Merlin pressure lettering machines.
These
machines produce characters through a pressure
3-6
SS0525
or dry carbon transfer process using a lettering
various styles and sizes (8 to 36 points) of letters.
font
or
wheel
with
(1) Some of these font wheels print vertical lines of letters. Such
letters are very handy to letter the spines of books or binders.
The
machine prints the characters on 1/2-inch paper or plastic strip that is
clear or colored with an adhesive back and a protective, peel-off coating.
(2) These machines range from a simple, one character at a time
process, to automatic with computer memory, editing functions, and a
display screen. Figure 3-5 shows a pressure lettering machine.
Figure 3-5.
Typical pressure lettering machine
b. Making Curved Lines of Letters. The strips of letters produced by
pressure lettering machines enable you to make curved lines of letters
quickly and relatively simply.
(1) Draw the curved line in light pencil on your work surface. Use
the lettering machine following the manufacturer's instructions and
prepare the lettering.
Use an "exacto" knife or single-edged razor and
make a vertical cut between each letter to the bottom of the letter. Be
careful not to cut all the way to the bottom or you will tear the strip
when you curve it. Peel off the backing, then curve the strip of letters
to follow the line on your work.
3-7
SS0525
(2) If you make a mistake, and you will at some time, insert the tip
of the knife or razor under one corner of the strip of letters and gently
remove it. Then replace it in the proper location (refer to figure 3-6).
The adhesive backing on letters prepared by pressure-sensitive lettering
machines is designed to enable you to remove the letter strip from the
paper without damaging either the paper or the letters. Yet it is strong
enough to adhere the letters to the work surface.
Figure 3-6.
6.
Curving a line of type
Prepared Lettering.
a. Introduction. As a graphics documentation specialist, you have an
assortment of sizes and styles of pressure-transfer lettering sheets to
choose from when lettering a graphics project using this method.
A
lettering sheet has the letters of the alphabet printed on the back side
of a waxed acetate sheet. Each lettering sheet has a protective backing
sheet to protect the letters from sticking to another letter sheet during
storage.
(1) When you apply pressure-transfer lettering, the only guideline
you must use is the base line.
After you have determined the size and
style of lettering for the graphics project, draw the base line for the
letters.
Then remove the protective backing from the lettering sheet,
align one letter at a time with the guidelines, burnish the letter into
place with a plastic burnishing tool, and lift the letter sheet (figure 37).
(2) If you do not have access to a plastic burnishing tool, you may
use any rod-like object with a narrow, round end (e.g., the end of a
comb).
When burnishing a letter on the lettering sheet, ensure you
burnish only the letter you must transfer to the graphics project. If you
burnish two or more letters simultaneously, they may stick or not align
correctly.
3-8
SS0525
Figure 3-7.
Burnishing a letter into place
(3) Do not use a pencil as a burnishing tool.
Pencils leave
graphite on the lettering sheets that could transfer to the graphics
project and ruin the project.
b. Making Corrections. If you apply the incorrect letter, remove it
by applying masking tape over the incorrect letter and carefully lifting
it up with the masking tape. Then insert the correct letter in the space.
c. Uses of Lettering Sheets.
Pressure-transfer lettering sheets
provide quality letters for indoor use. However, you should only use them
for small jobs since they require much time to apply and have a limited
number of each letter on a sheet.
7.
Summary.
This completes the discussion of mechanical and prepared lettering. With
the advent and wide availability of personal computers, many projects
formerly done using such techniques are losing popularity.
However, you
may find yourself in a situation where the computer may not be available
and you must retain your mastery of the techniques you learned in this
part of the lesson.
PART B - USE AND APPLICATION OF COMPUTER-GENERATED
LETTERING TECHNIQUES
The first personal computer was introduced in the work place in 1977. No
one then could envision the role it would play in the life of nearly every
American in the 15 short years since its invention. The personal computer
has replaced or soon will replace almost every common tool found in the
office environment. As a lettering tool, it is unsurpassed in speed and
diversity. With the use of a mouse or with a few key strokes, you
3-9
SS0525
can create and edit documents consisting of many fonts in various sizes.
You can scan in art or other images and insert them into your document.
For example, this subcourse includes figures that were scanned and saved
as a graphics file, then imported into the text.
You can purchase
diskettes with symbols and graphic pictures called clip art and use them
in a variety of application programs such as word processing and desk-top
publishing. You also can buy libraries of font sets that can be used with
other programs.
It is essential that all illustrators have at least a
working knowledge of some terms common to most lettering and graphics
software programs.
If this knowledge is not required for your military
occupational specialty (MOS) at this time, it may be in the future.
Obviously, a thorough discussion of any software application is beyond the
scope of this subcourse.
However, the information included in this part
is designed to familiarize you with the common terms and procedures. This
information will make it easier for you to learn to use specific programs.
8.
Fonts.
You learned in lesson 1 that the word font describes a set of typefaces
such as Roman or Gothic.
It has the same meaning with respect to
computers.
However, to understand how the computer deals with fonts you
must learn some additional terms.
These terms describe attributes
particular to handling fonts in computers and the related software
programs.
a. Soft Fonts. Soft fonts, sometimes known as downloadable fonts, are
resident in the computer, not in the printer. You can store these fonts
in a separate directory in a computer and use them with numerous
applications. For example, you can purchase a variety of fonts stored on
floppy disks. Once you load them on the computer's hard disk, you can use
them with any compatible software and hardware.
Following the software
vendor's instruction, you download (load) the fonts you need to use in
your document to the printer. The advantage of soft fonts is that storage
(memory) space on the hard disk is less expensive than memory in the
computer.
b. Hard Fonts. Hard fonts, also known as resident fonts, are stored
in the printer rather than in the computer.
You select hard fonts for
your document through printer control software or through switches on the
printer's front panel.
Some laser printers have hard fonts available in
cartridges. To switch fonts, you switch cartridges. In all cases, follow
the manufacturer's instructions.
3-10
SS0525
c. Scalable Fonts. Some software programs include the ability to size
(change the scale) fonts through keyboard controls.
With most scalable
fonts, the size you see on the computer screen (monitor) is the same size
as the finished document.
This is referred to as "what you see is what
you get" (WYSIWYG).
Scalable fonts are normally available with desktop
publishing software such as Ventura.
d. Proportional Fonts. Proportional fonts assign more space to wider
letters than they do to thinner letters.
The font this subcourse is
prepared in is courier. Courier is a fixed font, all letters are assigned
the same amount of space.
Appendix C provides a comparison between fixed and proportional fonts.
There are no particular advantages or disadvantages to either fixed or
proportional fonts. The choice is a personal one.
e. Font Sizes.
The font sizes used in most computer programs are
expressed in points just as they are in hand and mechanical lettering.
One exception to this is Harvard Graphics.
This software program uses
sizes that are expressed as a percentage of the narrowest margin in the
paper size selected. Standard paper is 8 1/2 inches by 11 inches and the
narrowest margin is 8 1/2 inches whether you are printing in the portrait
mode (8 1/2 inches wide by 11 inches high) or the landscape mode (11 wide
by 8 1/2 inches high).
f. In Harvard Graphics, a letter 8 1/2 inches high equals size 100.
In points, this would be 72 points per inch times 8.5 inches or 612
points. The question now is how to convert from points to size and vice
versa. The key to this conversion is percentage. Remember that the size
used in Harvard Graphics represents a percent of the narrowest size of the
paper.
Using this information you then can convert from points to size
regardless of the dimensions of the paper you use.
(1) First calculate the number of points contained in the narrowest
dimension of the paper. Example: 8.5 inches multiplied by 72 points per
inch equals 612 points.
(2) Next, divide the height of the desired letter (in points) by the
number of points contained in the narrowest dimension of the paper and
multiply the result by 100 (to convert it to a percent).
Round your
answer to one decimal place. In this example, 612 points. If you want to
create a letter 72 points high (1 inch), then divide this number by 612.
The result is .1176.
Now multiply this by 100 giving you an answer of
11.76, rounded to one decimal place is 11.8. This is the size you would
enter in Harvard Graphics to create a letter 72 points high.
3-11
SS0525
9.
Block Operations.
The capability to perform block operations is one of the most useful
features of text management software. A block can be as small as a single
character or as large as an entire document. You use block operations to
delete text, move text, and copy text.
In some word processors you can
even move blocks of text from one file to another. This block operation
is called an external copy.
a. In general, the block operation requires you to move the cursor to
the beginning of the text to block.
If you are using WordPerfect, you
then press the Alt-F4 function key to turn on the block option. Next, you
move the cursor to the end of the text you wish to block and press the
Ctrl-F4 function key to choose what block operation to perform (i.e.,
move, copy, delete).
In some word processors you may have to depress
another function key at this time.
b. Another application of block operations is to format (change or
assign attributes) blocks of text such as paragraphs.
The following
paragraphs describe some common paragraph formats.
(1) Centering text. You can center a line or a line of text with a
few key strokes. In WordPerfect for example, you move the cursor to the
first character in the line of text to be centered.
Then, press the
Shift-F6 function key and the computer executes the command.
(2) Justifying text. A paragraph of justified text is one in which
both the left and right margins are flush (even). Appendix C provides an
example of a justified paragraph.
Text paragraphs are normally left
flush. This paragraph is left justified. With some word processors you
can justify either the left margin, the right margin, or both.
c. Summary. Word processing programs provide you, the user, with the
ability to create a wide variety of documents from letters to entire
manuals.
They include such features as spell checking, automatic
pagination, and numerous other features including the ability to import
graphics directly into the document for printing.
Just as with hand
lettering, it takes practice and training to become a proficient user.
10. File Types.
The last topic in this lesson is file types.
Data can be stored in the
computer in many different ways.
However, not all software can use all
the different types of files. Some software
3-12
SS0525
programs can use or create only text files, others only graphic files, and
yet others can use and create both. You identify file types by the file
extension. The file extension is a three character code that follows the
file name, separated by a decimal (.).
For example, you can assign the
file name MEMO.DOC to a memorandum.
The DOC extension identifies this
file as a text file. The following paragraphs identify some of the common
graphic files.
Remember, always refer to the software users manual to
determine what type of files you can use with a specific software package.
a. PCX files are widely used in graphics programs. These files store
graphics images as patterns of dots (bitmapped).
When you scale these
files to a larger size, the lines and images appear to have ragged edges.
b. IMG files are also bitmapped files and are used by the Ventura
desktop publishing program and others.
c. TIFF, that stands for tagged image file format, is a graphic file
type.
Many word processing packages have the capability to import this
type of graphics file.
d. CGM, that stands for computer graphics metafile, is an object
graphics format.
Object format means that the image is stored as a
geometric shape and for this reason, retains its clarity when you scale it
to a larger or smaller size.
11. Summary.
This completes lesson 3 and the subcourse.
Before beginning the
examination, complete the practice exercise found on the following pages
and compare your answers with those on the answer key and feedback sheet.
If any of your answers are incorrect, review the area indicated until you
understand the material.
3-13
SS0525
THIS PAGE IS INTENTIONALLY LEFT BLANK.
3-14
SS0525
LESSON 3
PRACTICE EXERCISE
The following items will test your grasp of the material covered in this
lesson.
There is only one correct answer for each item.
When you
complete the exercise, check your answer with the answer key that follows.
If you answer any item incorrectly, study again that part of the lesson
which contains the portion involved.
1.
You are lettering a project using a Leroy set. The letters are to be
36 points high. Which size template and pen should you use?
A.
B.
C.
D.
2.
Available to you is a standard Leroy set and an optional adjustable
scriber. What is the largest size letter, in thousands of an inch,
you can create with these tools?
A.
B.
C.
D.
3.
500
675
750
900
There are several terms that describe the fonts installed in printers
and computers.
Which of the following terms describes the font you
use that assigns more space to wide letters than to narrow letters?
A.
B.
C.
D.
4.
100,0
200,3
350,4
500,6
Soft fonts
Hard fonts
Scalable fonts
Proportional fonts
You are using Harvard Graphics software to letter a project.
Your
paper is 10 by 12 inches.
You need to produce letters that are 72
points high. Which size letter do you select from the menu?
A.
B.
C.
D.
8
10
12
14
3-15
SS0525
LESSON 3
PRACTICE EXERCISE
ANSWER KEY AND FEEDBACK
Item
Correct Answer and Feedback
1.
D.
500,6
To answer this item correctly requires two steps.
First you
must convert points to thousands of an inch.
To do this,
multiply 36 by 13.6; the result is 489.6; the closest template
is size 500. You may also remember that 36 points is 1/2 inch,
and that 500 is 1/2 of one thousand and therefore, is also 1/2
inch.
The second part of this item requires you to refer to
figure 3-3 and select the proper pen point for the template
(page 3-4, para 3b(l) and figure 3-3).
2.
C.
750
The largest template provided with a standard Leroy set is 500.
The adjustable scriber provides the capability to increase this
by 150% or 1.5 times (500 x 1.5 is 750) (page 3-6, para 4b).
3.
D.
Proportional fonts
Proportional fonts follow instructions imbedded in the computer
to assign space to letters.
Instructions are similar to those
you learned in this subcourse (page 3-11, para 8d and appendix
C).
4.
B.
10
To correctly respond to this item you must understand that the
size of a letter produced by Harvard Graphics is a function of
the paper size.
If you desire a letter that is 72 points (1
inch high) you must calculate this as a function of the paper
size.
In this situation 1 inch divided by 10 inches is 10%.
Therefore, select size 10 letters (page 3-11, para 8f(2)).
3-16
SS0525


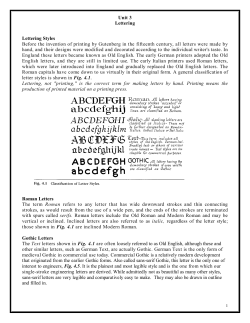


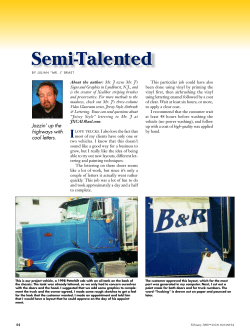

© Copyright 2026