
Document 288878
Sample Chapters
Copyright © 2010 by Tony Northrup and Mike Snell.
All rights reserved.
To learn more about this book visit Microsoft Learning at:
http://go.microsoft.com/fwlink/?Linkid=206094
Contents
Acknowledgments
Introduction
xxv
xxvii
Hardware Requirements . . . . . . . . . . . . . . . . . . . . . . . . . . . . . . . . . . . . . . . . xxviii
Software Requirements. . . . . . . . . . . . . . . . . . . . . . . . . . . . . . . . . . . . . . . . . xxviii
Using the Companion Media. . . . . . . . . . . . . . . . . . . . . . . . . . . . . . . . . . . . xxviii
How to Install the Practice Tests
xxix
How to Use the Practice Tests
xxix
How to Uninstall the Practice Tests
xxxi
Microsoft Certified Professional Program . . . . . . . . . . . . . . . . . . . . . . . . . . xxxi
Errata and Book Support. . . . . . . . . . . . . . . . . . . . . . . . . . . . . . . . . . . . . . . . . xxxi
We Want to Hear from You. . . . . . . . . . . . . . . . . . . . . . . . . . . . . . . . . . . . . . . xxxii
Stay in Touch. . . . . . . . . . . . . . . . . . . . . . . . . . . . . . . . . . . . . . . . . . . . . . . . . . . xxxii
Chapter 1 Introducing ASP.NET 4
1
Before You Begin. . . . . . . . . . . . . . . . . . . . . . . . . . . . . . . . . . . . . . . . . . . . . . . . . . 2
Lesson 1: Understanding Web Communications . . . . . . . . . . . . . . . . . . . . . . 3
The Web Server’s Role
4
The Web Browser’s Role
5
Understanding the Role of HTTP
5
Lesson Summary
14
Lesson Review
14
Lesson 2: Creating a Website and Adding New Webpages. . . . . . . . . . . . . 15
Creating Websites
15
Creating ASPX Pages
23
Website Compilation
28
Using Assemblies
29
Lesson Summary
31
Lesson Review
31
ix
Lesson 3: Working with Web Configuration Files. . . . . . . . . . . . . . . . . . . . . 32
Understanding the Configuration File Hierarchy
33
Processing the Configuration Files
34
Changes to .NET Framework 4 Configuration Files
34
Editing Configuration Files
34
Lesson Summary
38
Lesson Review
38
Case Scenarios. . . . . . . . . . . . . . . . . . . . . . . . . . . . . . . . . . . . . . . . . . . . . . . . . . . 38
Case Scenario 1: Creating a New Website
39
Case Scenario 2: Placing Files in the Proper Folders
39
Suggested Practices. . . . . . . . . . . . . . . . . . . . . . . . . . . . . . . . . . . . . . . . . . . . . . 39
Create a New Website by Using Visual Studio 2010
39
Add a Webpage to the Website
40
Program a Web Application
40
Examine Settings for a Web Application
40
Take a Practice Test. . . . . . . . . . . . . . . . . . . . . . . . . . . . . . . . . . . . . . . . . . . . . . . 40
Chapter 2 Using Master Pages, Themes, and Caching
41
Before You Begin. . . . . . . . . . . . . . . . . . . . . . . . . . . . . . . . . . . . . . . . . . . . . . . . . 42
Lesson 1: Using Master Pages. . . . . . . . . . . . . . . . . . . . . . . . . . . . . . . . . . . . . . 43
x
Contents
Overview of Master and Content Pages 44
Creating a Master Page
45
Creating Content Pages
47
Attaching Master Pages to Content Pages
48
Referencing Custom Master Page Properties, Methods,
and Controls from Content Pages
48
Creating Nested Master Pages
51
Dynamically Changing Master Pages 52
Lesson Summary
58
Lesson Review
59
Lesson 2: Using Themes . . . . . . . . . . . . . . . . . . . . . . . . . . . . . . . . . . . . . . . . . . 60
Themes Overview
60
Creating a Theme
61
Creating a Skin File
64
Adding a Cascading Style Sheet to Your Theme
65
Rules for Applying Themes
66
Applying a Theme Programmatically
67
Lesson Summary
73
Lesson Review
74
Lesson 3: Caching. . . . . . . . . . . . . . . . . . . . . . . . . . . . . . . . . . . . . . . . . . . . . . . . 75
Application Caching
75
Page Output Caching
80
Programmatically Invalidating Cached Pages
85
Lesson Summary
91
Lesson Review
91
Case Scenarios. . . . . . . . . . . . . . . . . . . . . . . . . . . . . . . . . . . . . . . . . . . . . . . . . . . 92
Case Scenario 1: Providing Consistent Formatting
for an External Web Application
92
Case Scenario 2: Improving the Performance of
a Public Website
93
Suggested Practices. . . . . . . . . . . . . . . . . . . . . . . . . . . . . . . . . . . . . . . . . . . . . . 94
Implement Master Pages and Themes
94
Implement Caching
95
Take a Practice Test. . . . . . . . . . . . . . . . . . . . . . . . . . . . . . . . . . . . . . . . . . . . . . . 95
Chapter 3 Handling Events and Managing State
97
Before You Begin. . . . . . . . . . . . . . . . . . . . . . . . . . . . . . . . . . . . . . . . . . . . . . . . . 98
Lesson 1: Understanding the ASP.NET Life Cycle
and Handling Events. . . . . . . . . . . . . . . . . . . . . . . . . . . . . . . . . . . . . . . . . . . 99
The ASP.NET Application Life Cycle
100
Understanding the Life Cycle of an ASP.NET Webpage
and Its Controls
103
Lesson Summary
119
Lesson Review
119
Contents
xi
Lesson 2: Using Client-Side State Management . . . . . . . . . . . . . . . . . . . . . 120
Choosing Client-Side or Server-Side State Management
121
View State
123
Hidden Fields
128
Cookies
129
Query Strings
133
Lesson Summary
141
Lesson Review
142
Lesson 3: Using Server-Side State Management. . . . . . . . . . . . . . . . . . . . . 143
Application State
144
Session State
145
Lesson Summary
154
Lesson Review
154
Case Scenarios. . . . . . . . . . . . . . . . . . . . . . . . . . . . . . . . . . . . . . . . . . . . . . . . . . 155
Case Scenario 1: Selecting the Proper Events to Use
155
Case Scenario 2: Remembering User Credentials
156
Case Scenario 3: Analyzing Information for Individual
Users and for All Users
156
Suggested Practices. . . . . . . . . . . . . . . . . . . . . . . . . . . . . . . . . . . . . . . . . . . . . 157
Respond to Application and Session Events
157
Create Event Handlers for Pages and Controls
157
Manage State by Using Client-Based
State Management Options
158
Manage State by Using Server-Based
State Management Options
158
Maintain State by Using Database Technology
158
Take a Practice Test. . . . . . . . . . . . . . . . . . . . . . . . . . . . . . . . . . . . . . . . . . . . . . 159
Chapter 4 Using Server Controls
161
Before You Begin. . . . . . . . . . . . . . . . . . . . . . . . . . . . . . . . . . . . . . . . . . . . . . . . 162
Lesson 1: Exploring Common Server Controls. . . . . . . . . . . . . . . . . . . . . . . 163
xii
Contents
Web Server Controls
163
The Label Control
167
The Literal Control
169
The TextBox Control
171
The CheckBox Control
172
The RadioButton Control
172
The DropDownList Control
173
The ListBox Control
175
The Button Control
175
HTML Server Controls
177
Lesson Summary
184
Lesson Review
185
Lesson 2: Exploring Specialized Server Controls. . . . . . . . . . . . . . . . . . . . . 186
The Table, TableRow, and TableCell Controls
187
The Image Control
189
The ImageButton Control
191
The ImageMap Control
192
The Calendar Control
197
The FileUpload Control
202
The Panel Control
205
The MultiView and View Controls
207
The Wizard Control
210
The Xml Control 214
Lesson Summary
223
Lesson Review
223
Case Scenarios. . . . . . . . . . . . . . . . . . . . . . . . . . . . . . . . . . . . . . . . . . . . . . . . . . 224
Case Scenario 1: Determining the Type of Controls to Use
225
Case Scenario 2: Determining How to Prompt for Data
225
Case Scenario 3: Implementing a Calendar Solution
225
Suggested Practices. . . . . . . . . . . . . . . . . . . . . . . . . . . . . . . . . . . . . . . . . . . . . 226
Implement Server Controls
226
Take a Practice Test. . . . . . . . . . . . . . . . . . . . . . . . . . . . . . . . . . . . . . . . . . . . . . 226
Contents
xiii
Chapter 5 Input Validation and Site Navigation
227
Before You Begin. . . . . . . . . . . . . . . . . . . . . . . . . . . . . . . . . . . . . . . . . . . . . . . . 228
Lesson 1: Performing Input Validation. . . . . . . . . . . . . . . . . . . . . . . . . . . . . 228
Understanding the Validation Framework
229
Understanding the RequiredFieldValidator Control
232
Using the CompareValidator Control 232
Using the RangeValidator Control
234
Using the RegularExpressionValidator Control
234
The CustomValidator Control
235
Lesson Summary
244
Lesson Review
244
Lesson 2: Performing Site Navigation. . . . . . . . . . . . . . . . . . . . . . . . . . . . . . 245
Is Page Navigation Necessary?
246
Choosing a Method to Navigate Pages
246
Client-Side Navigation
247
Cross-Page Posting
248
Client-Side Browser Redirect
250
Server-Side Transfer
251
Using the Site Map Web Server Control
252
Lesson Summary
259
Lesson Review
259
Lesson 3: Using Web Parts. . . . . . . . . . . . . . . . . . . . . . . . . . . . . . . . . . . . . . . . 260
xiv
Contents
What Are Web Parts?
261
The WebParts Namespace
263
Defining Web Part Zones
264
Creating Web Parts
265
Enabling Users to Arrange and Edit Web Parts
266
Connecting Web Parts
269
Personalizing Web Parts 274
Lesson Summary
286
Lesson Review
286
Case Scenarios. . . . . . . . . . . . . . . . . . . . . . . . . . . . . . . . . . . . . . . . . . . . . . . . . . 287
Case Scenario 1: Determining the Proper Validation Controls
to Implement on a User Name
288
Case Scenario 2: Implementing a Site Map
288
Case Scenario 3: Meeting Customization Requirements
for an Internal Insurance Application
288
Suggested Practices. . . . . . . . . . . . . . . . . . . . . . . . . . . . . . . . . . . . . . . . . . . . . 289
Validate User Input
289
Create Page Layout
290
Take a Practice Test. . . . . . . . . . . . . . . . . . . . . . . . . . . . . . . . . . . . . . . . . . . . . . 290
Chapter 6 Globalization and Accessibility
291
Before You Begin. . . . . . . . . . . . . . . . . . . . . . . . . . . . . . . . . . . . . . . . . . . . . . . . 292
Lesson 1: Configuring Globalization and Localization. . . . . . . . . . . . . . . . 292
About ASP.NET Resources
293
Using Local Resource Files
293
Using Global Resources
300
HTML Layout Best Practices
304
Setting the Culture
305
Lesson Summary
311
Lesson Review
311
Lesson 2: Configuring Accessibility. . . . . . . . . . . . . . . . . . . . . . . . . . . . . . . . 312
Public Accessibility Guidelines
313
How ASP.NET Controls Support Accessibility
313
Improving Visual Accessibility
314
Improving the Accessibility of Forms That
Require User Input
316
Testing Accessibility
318
Lesson Summary
324
Lesson Review
324
Contents
xv
Case Scenarios. . . . . . . . . . . . . . . . . . . . . . . . . . . . . . . . . . . . . . . . . . . . . . . . . . 325
Case Scenario 1: Upgrading an Application
for Multiple Languages
325
Case Scenario 2: Making a Web Application Accessible
326
Suggested Practices. . . . . . . . . . . . . . . . . . . . . . . . . . . . . . . . . . . . . . . . . . . . . 326
Implement Globalization 326
Implement Accessibility
327
Take a Practice Test. . . . . . . . . . . . . . . . . . . . . . . . . . . . . . . . . . . . . . . . . . . . . . 327
Chapter 7 Creating Custom Web Controls
329
Before You Begin. . . . . . . . . . . . . . . . . . . . . . . . . . . . . . . . . . . . . . . . . . . . . . . . 330
Lesson 1: Creating User Controls. . . . . . . . . . . . . . . . . . . . . . . . . . . . . . . . . . 331
Creating User Controls
331
Defining User Control Events
333
Defining Properties in User Controls
337
Adding a User Control to a Page
339
Dynamically Loading User Controls
339
Creating a Templated User Control
340
Lesson Summary
353
Lesson Review
353
Lesson 2: Creating Custom Web Server Controls. . . . . . . . . . . . . . . . . . . . 355
Creating a Custom Web Server Control
356
Adding Toolbox Support for a Custom Web Server Control
364
Creating a Custom Designer for a Custom Web Server Control 370
Creating a Composite Control
372
Creating a Templated Custom Web Server Control
377
Registering Your Controls in Web.config
378
Lesson Summary
383
Lesson Review
383
Case Scenarios. . . . . . . . . . . . . . . . . . . . . . . . . . . . . . . . . . . . . . . . . . . . . . . . . . 384
xvi
Contents
Case Scenario 1: Sharing Controls Between Applications
385
Case Scenario 2: Providing Layout Flexibility
385
Suggested Practices. . . . . . . . . . . . . . . . . . . . . . . . . . . . . . . . . . . . . . . . . . . . . 385
Create a New User Control
385
Create a New Custom Web Server Control
386
Create a New Composite Web Server Control
386
Create a New Templated Control
386
Take a Practice Test. . . . . . . . . . . . . . . . . . . . . . . . . . . . . . . . . . . . . . . . . . . . . . 386
Chapter 8 Debugging and Deploying
387
Before You Begin. . . . . . . . . . . . . . . . . . . . . . . . . . . . . . . . . . . . . . . . . . . . . . . . 388
Lesson 1: Debugging Websites. . . . . . . . . . . . . . . . . . . . . . . . . . . . . . . . . . . . 389
Configuring ASP.NET for Debugging
389
Defining Custom Error Pages
392
Debugging Remotely
394
Debugging Client-Side Script
396
Lesson Summary
400
Lesson Review
401
Lesson 2: Troubleshooting Websites. . . . . . . . . . . . . . . . . . . . . . . . . . . . . . . 402
Implementing Tracing
402
Monitoring a Running Web Application
412
Lesson Summary
416
Lesson Review
416
Lesson 3: Deploying Websites . . . . . . . . . . . . . . . . . . . . . . . . . . . . . . . . . . . . 418
Publishing Web Applications
419
Web Deployment Projects
425
Web Setup Projects
427
Deploying Web Applications by Using the Copy Web Tool
439
Precompiling and Publishing ASP.NET Websites 441
Installing ASP.NET 4 on IIS 442
Lesson Summary
446
Lesson Review
447
Case Scenarios. . . . . . . . . . . . . . . . . . . . . . . . . . . . . . . . . . . . . . . . . . . . . . . . . . 448
Case Scenario 1: Debugging 448
Case Scenario 2: Troubleshooting
448
Case Scenario 3: Deploying a Website
449
Contents
xvii
Suggested Practices. . . . . . . . . . . . . . . . . . . . . . . . . . . . . . . . . . . . . . . . . . . . . 449
Debug a Website
449
Troubleshoot a Website
450
Publish a Web Application
450
Use a Web Setup Project 450
Use the Copy Web Tool
451
Precompile and Publish a Web Application 451
Take a Practice Test. . . . . . . . . . . . . . . . . . . . . . . . . . . . . . . . . . . . . . . . . . . . . . 451
Chapter 9 Working with Client-Side Scripting, AJAX, and jQuery
453
Before You Begin. . . . . . . . . . . . . . . . . . . . . . . . . . . . . . . . . . . . . . . . . . . . . . . . 454
Lesson 1: Creating AJAX-Enabled Web Forms. . . . . . . . . . . . . . . . . . . . . . . 455
Introducing ASP.NET AJAX
456
The AJAX Server Controls
457
Lesson Summary
469
Lesson Review
470
Lesson 2: Creating Client Scripts with the Microsoft AJAX Library . . . . . 471
Creating Your Own Client Scripts
472
Creating Your Own Client Callbacks
480
Working with the Microsoft AJAX Library
483
Building Client Capabilities with AJAX
494
Lesson Summary
518
Lesson Review
518
Lesson 3: Implementing jQuery. . . . . . . . . . . . . . . . . . . . . . . . . . . . . . . . . . . 520
xviii
Contents
Introducing the jQuery Library
521
Selecting and Traversing the DOM 524
Handling Client-Side Events
530
Adding Effects and Animations to a Page
533
Implementing AJAX with jQuery
534
Lesson Summary
545
Lesson Review
546
Case Scenarios. . . . . . . . . . . . . . . . . . . . . . . . . . . . . . . . . . . . . . . . . . . . . . . . . . 547
Case Scenario 1: Using the ASP.NET AJAX Extensions
548
Case Scenario 2: Using the Microsoft AJAX Library
548
Case Scenario 3: Using jQuery
549
Suggested Practices. . . . . . . . . . . . . . . . . . . . . . . . . . . . . . . . . . . . . . . . . . . . . 549
Add Partial-Page Update Support to a Page
549
Create Client Code by Using the Microsoft AJAX Library
550
Write Interactive Client Code with jQuery 550
Take a Practice Test. . . . . . . . . . . . . . . . . . . . . . . . . . . . . . . . . . . . . . . . . . . . . . 550
Chapter 10 Writing and Working with HTTP Modules and Web Services
551
Before You Begin. . . . . . . . . . . . . . . . . . . . . . . . . . . . . . . . . . . . . . . . . . . . . . . . 552
Lesson 1: Creating HTTP Handlers and HTTP Modules. . . . . . . . . . . . . . . 552
Creating a Custom HTTP Handler
553
Asynchronous Handlers and Pages
558
Creating a Custom HTTP Module
566
Lesson Summary
573
Lesson Review
574
Lesson 2: Creating and Consuming XML Web Services. . . . . . . . . . . . . . . 574
Creating an ASP.NET Web Service
576
Consuming an ASP.NET Web Service
580
Authentication and XML Web Services
586
Lesson Summary
591
Lesson Review
592
Lesson 3: Creating and Consuming WCF Services. . . . . . . . . . . . . . . . . . . . 593
Introducing WCF
594
Creating a WCF Service with ASP.NET
596
Consuming a WCF Service in an ASP.NET Page
600
Calling a WCF Service from Client Script by Using
AJAX (REST and JSON)
603
Creating WCF Data Services
607
Lesson Summary
619
Lesson Review
619
Contents
xix
Case Scenarios. . . . . . . . . . . . . . . . . . . . . . . . . . . . . . . . . . . . . . . . . . . . . . . . . . 620
Case Scenario 1: Working with HTTP Requests
620
Case Scenario 2: Selecting a Service Model
621
Suggested Practices. . . . . . . . . . . . . . . . . . . . . . . . . . . . . . . . . . . . . . . . . . . . . 621
Work with XML HTTP Handlers and Modules
621
Work with XML Web Services
622
Work with WCF Services
622
Take a Practice Test. . . . . . . . . . . . . . . . . . . . . . . . . . . . . . . . . . . . . . . . . . . . . . 622
Chapter 11 Connecting to and Querying Data with LINQ
623
Before You Begin. . . . . . . . . . . . . . . . . . . . . . . . . . . . . . . . . . . . . . . . . . . . . . . . 624
Lesson 1: Getting Started with LINQ. . . . . . . . . . . . . . . . . . . . . . . . . . . . . . . 625
Introducing LINQ
625
Querying Data with LINQ
628
Transforming Data with LINQ
637
Lesson Summary
647
Lesson Review
647
Lesson 2: LINQ and ADO.NET. . . . . . . . . . . . . . . . . . . . . . . . . . . . . . . . . . . . . 649
LINQ to DataSet
649
LINQ to SQL
664
LINQ to Entities
672
Lesson Summary
680
Lesson Review
681
Case Scenarios. . . . . . . . . . . . . . . . . . . . . . . . . . . . . . . . . . . . . . . . . . . . . . . . . . 682
Case Scenario 1: Writing LINQ Queries
682
Case Scenario 2: Working with LINQ and ADO.NET
682
Suggested Practices. . . . . . . . . . . . . . . . . . . . . . . . . . . . . . . . . . . . . . . . . . . . . 683
Write LINQ Queries
683
Work with LINQ and ADO.NET
683
Take a Practice Test. . . . . . . . . . . . . . . . . . . . . . . . . . . . . . . . . . . . . . . . . . . . . . 684
xx
Contents
Chapter 12 Working with Data Source Controls and Data-Bound Controls
685
Before You Begin. . . . . . . . . . . . . . . . . . . . . . . . . . . . . . . . . . . . . . . . . . . . . . . . 686
Lesson 1: Connecting to Data with Data Source Controls. . . . . . . . . . . . . 687
Understanding the Data Source Controls
687
Using Objects as Data Sources with ObjectDataSource
690
Connecting to Relational Databases by Using SqlDataSource 698
Working with Access Data Files and
AccessDataSource Controls
702
Connecting to an Entity Model by Using EntityDataSource
703
Connecting to XML Data by Using XmlDataSource 707
Connecting to LINQ-Based Data by Using LinqDataSource
711
Connecting to Site Navigation Data
by Using SiteMapDataSource 712
Lesson Summary
719
Lesson Review
720
Lesson 2: Working with Data-Bound Web Server Controls. . . . . . . . . . . . 721
Introducing Data-Bound Controls
721
Simple Data-Bound Controls
724
Composite Data-Bound Controls
728
Hierarchical Data-Bound Controls
741
Lesson Summary
753
Lesson Review
754
Lesson 3: Working with ASP.NET Dynamic Data. . . . . . . . . . . . . . . . . . . . . 755
Getting Started with Dynamic Data Websites
756
Extending and Customizing Dynamic Data
763
Using Dynamic Controls in Existing Sites
777
Lesson Summary
781
Lesson Review
782
Case Scenarios. . . . . . . . . . . . . . . . . . . . . . . . . . . . . . . . . . . . . . . . . . . . . . . . . . 783
Case Scenario 1: Choosing Data Source Controls
783
Case Scenario 2: Implementing a Master-Detail Solution
783
Case Scenario 3: Adding ASP.NET Dynamic Data to a Website
784
Contents
xxi
Suggested Practices. . . . . . . . . . . . . . . . . . . . . . . . . . . . . . . . . . . . . . . . . . . . . 784
Create Pages by Using Each of the Controls
784
Create a Master-Detail Solution by Using
the Data-Bound Server Controls
784
Work with Dynamic Data Websites
785
Take a Practice Test. . . . . . . . . . . . . . . . . . . . . . . . . . . . . . . . . . . . . . . . . . . . . . 785
Chapter 13 Implementing User Profiles, Authentication, and Authorization
787
Before You Begin. . . . . . . . . . . . . . . . . . . . . . . . . . . . . . . . . . . . . . . . . . . . . . . . 788
Lesson 1: Working with User Profiles. . . . . . . . . . . . . . . . . . . . . . . . . . . . . . . 788
User Profile Basics
789
Configuring a User Profile Provider
790
Defining the User Profile
792
Identifying Users
794
Setting and Saving a User Profile 796
Recognizing a Returning Visitor
797
Lesson Summary
802
Lesson Review
802
Lesson 2: Using ASP.NET Membership . . . . . . . . . . . . . . . . . . . . . . . . . . . . . 804
Using the WSAT to Configure Security
804
Logon Controls
807
The FormsAuthentication Class
813
The Membership Class
815
The Roles Class
816
Configuring Websites to Require Windows Authentication
817
Restricting Access to ASP.NET Websites, Files, and Folders
818
Lesson Summary
824
Lesson Review
824
Case Scenarios. . . . . . . . . . . . . . . . . . . . . . . . . . . . . . . . . . . . . . . . . . . . . . . . . . 827
xxii
Contents
Case Scenario 1: Configuring Website Authorization
827
Case Scenario 2: Configuring Website Authentication
828
Suggested Practices. . . . . . . . . . . . . . . . . . . . . . . . . . . . . . . . . . . . . . . . . . . . . 829
Configure Authentication and Authorization
829
Configure Profiles
830
Take a Practice Test. . . . . . . . . . . . . . . . . . . . . . . . . . . . . . . . . . . . . . . . . . . . . . 830
Chapter 14 Creating Websites with ASP.NET MVC 2
831
Before You Begin. . . . . . . . . . . . . . . . . . . . . . . . . . . . . . . . . . . . . . . . . . . . . . . . 832
Lesson 1: Understanding ASP.NET MVC Applications . . . . . . . . . . . . . . . . 832
The ASP.NET MVC Architecture
833
The Structure of an ASP.NET MVC Application
837
Running Your First ASP.NET MVC Webpage
839
Lesson Summary
845
Lesson Review
846
Lesson 2: Creating Models, Views, and Controllers . . . . . . . . . . . . . . . . . . 847
Defining a Model and Business Rules
848
Creating Controllers
851
Creating Views
856
Customizing MVC Routing 867
Lesson Summary
875
Lesson Review
876
Case Scenarios. . . . . . . . . . . . . . . . . . . . . . . . . . . . . . . . . . . . . . . . . . . . . . . . . . 878
Case Scenario: Creating an ASP.NET MVC Application
878
Suggested Practices. . . . . . . . . . . . . . . . . . . . . . . . . . . . . . . . . . . . . . . . . . . . . 878
Work with Controllers, Views, and Routing
879
Take a Practice Test. . . . . . . . . . . . . . . . . . . . . . . . . . . . . . . . . . . . . . . . . . . . . . 879
Answers
881
Index
925
About the Authors
967
What do you think of this book? We want to hear from you!
Microsoft is interested in hearing your feedback so we can continually improve our
books and learning resources for you. To participate in a brief online survey, please visit:
www.microsoft.com/learning/booksurvey/
Contents
xxiii
CHAPTER 8
Debugging and Deploying
A
large part of the development process involves removing bugs and resolving other issues
in your application. Microsoft Visual Studio and Microsoft ASP.NET provide several tools
to support these tasks. These tools allow you to set breakpoints in code, step through your
code by using the Integrated Development Environment (IDE), view variable values in watch
windows and DataTips, execute code in the command window, and more. These debugging
tools work for all the applications you create with Visual Studio, not just websites. Websites
do, however, present their own set of challenges. A website runs in a distributed environment
in which the network, database, and client are all running on separate processes. This can
make it difficult just to get debugging set up and to get the right troubleshooting information
from your application and its environment.
After you’ve developed and tested your application, it’s time to deploy it to a production
environment. In most real-world scenarios, deployment involves moving an application from
a staged area, where users have reviewed and tested its functionality, to one or more production servers. The deployment process can be automated with tools and scripts, managed and
governed by IT departments, or deployed directly by developers through Visual Studio. The
method you will use to build, verify, and deploy your application really depends on your
scenarios, the type of application, and the environment.
This chapter explores how you debug, monitor, troubleshoot, and deploy websites. The
first lesson covers setting up debugging, creating custom error pages, debugging on a
remote server, and debugging client script. The second lesson is about troubleshooting
and monitoring a running ASP.NET site. The third lesson explores those tools and features
of Visual Studio that make deploying websites easier.
Exam objectives in this chapter:
■
Configuring and Extending a Web Application
■
Debug a Web application.
■
Deploy a Web application.
Lessons in this chapter:
■
Lesson 1: Debugging Websites 389
■
Lesson 2: Troubleshooting Websites 402
■
Lesson 3: Deploying Websites 418
CHAPTER 8
387
Before You Begin
To complete the lessons in this chapter, you should be familiar with developing applications
with Visual Studio by using Microsoft Visual Basic or Microsoft Visual C#. In addition, you
should be comfortable with all of the following:
■
The Visual Studio 2010 IDE
■
Debugging Windows applications
■
Using Hypertext Markup Language (HTML) and client-side scripting
■
Creating ASP.NET websites and forms
Real World
Tony Northrup
I
f you’re like me and you hate debugging, give this chapter extra attention. After
you learn how to use the ASP.NET and Visual Studio 2010 debugging tools, you’ll
be able to diagnose and fix bugs faster than ever.
I prefer to debug an ASP.NET website the same way I debug a traditional Windows
application. I run the website on my local computer, and I make use of breakpoints,
watch lists, and DataTips to examine the inner workings of the website. Those technologies are all discussed in the first lesson. I only resort to tracing, as discussed in
the second lesson, when a website is running on a remote server and I can’t set up a
remote debugger.
For more complex problems, I make use of troubleshooting tools that I don’t
describe in this book. Microsoft Network Monitor (or any sniffer) allows you to see
the communications sent between browsers and web servers. For troubleshooting
communications between the web server and the database, I use the Microsoft SQL
Server Profiler. For troubleshooting performance issues, I use Page Speed (available
at http://code.google.com/speed/page-speed/ ) when I can reproduce the problem
locally, and WebPagetest (available at http://webpagetest.org) when I need to
analyze requests sent across the Internet.
388
CHAPTER 8
Debugging and Deploying
Lesson 1: Debugging Websites
Debugging websites is more complex than debugging Windows applications because web
requests are very short-lived, the client and server are typically running on different computers, and client browsers have widely varying capabilities. In addition, the state that the
application uses is also distributed among database, web server, cache, session, cookie, and so
on. Fortunately, Visual Studio and ASP.NET have several tools that allow you to get debugging
information from your site during development.
This lesson covers the setup and configuration of the ASP.NET debugging features. Coverage
includes remote debugging and client-side script debugging.
Note Scope of chapter content
This lesson covers the configuration and setup of debugging with ASP.NET and Visual Studio.
It does not cover the basics of using the Visual Studio debugger, such as how to set breakpoints and how to view variables in watch windows. Rather, it focuses on managing the
debugging of an ASP.NET website.
After this lesson, you will be able to:
■
Configure a website for debugging with Visual Studio.
■
Set up remote debugging between a development machine and a server.
■
■
Redirect users to a default error page or custom error pages based on Hypertext
Transfer Protocol (HTTP) status codes.
Debug client-side script.
Estimated lesson time: 30 minutes
Configuring ASP.NET for Debugging
You can debug an ASP.NET application by using the standard features of the Visual Studio
debugger, such as breakpoints, watch windows, code step-through, and error information.
To do so, you must first configure ASP.NET for debugging. There are two areas where you set
this information: the project’s property page and the Web.config file.
Lesson 1: Debugging Websites
CHAPTER 8
389
Activating the ASP.NET Debugger
The first step is to configure the ASP.NET debugger settings in your project’s Property
Pages dialog box, including those that determine whether or not to allow Visual Studio
to run the debugger. When installed, Visual Studio enables ASP.NET debugging and
establishes default debugger settings. However, if you need to set or modify this setting,
you can do so by following these steps:
1. Right-click the website in Solution Explorer and then click Property Pages. This will
open the Property Pages dialog box for the website, as shown in Figure 8-1.
2. Select Start Options from the left side of the dialog box.
3. In the Debuggers section, at the bottom of the dialog box, select (or clear) the ASP.NET
check box to enable (or disable) the ASP.NET debugger for Visual Studio.
Figure 8-1 The project Property Pages dialog box for an ASP.NET website.
Configuring Debugging
Assuming that you allow Visual Studio to run the ASP.NET debugger, the second step is
to enable debugging either for your entire site or on a page-by-page basis. Even though
ASP.NET debugging in general might be enabled from a Visual Studio perspective, individual
sites can disable debugging for security reasons. By default, websites that Visual Studio creates
individually disable the debugger for just this reason. Enabling debugging for your site will add
debug symbols into the compiled code. Visual Studio uses these symbols to provide debugging
support. However, this can slow the performance of your website. In addition, turning on
debugging will transmit error information to the web browser when you run the page outside
of Visual Studio. This can present a security risk, because error information provides potential
attackers with a lot of information about how your site works. For these reasons, you should
only turn debugging on during development.
390
CHAPTER 8
Debugging and Deploying
You enable debugging for your entire site by editing a setting in the Web.config file. In
Web.config, you set the debug attribute of the compilation element to true. If you use Visual
Studio to start debugging, Visual Studio will prompt you to automatically enable this setting. The
following markup shows an example that includes the nesting level of the compilation element.
<configuration>
<system.web>
<compilation debug="true" targetFramework="4.0"/>
<system.web>
</configuration>
You might not always want to turn on debugging for your entire site. In these cases, you
can switch debugging on and off at the individual page level. This will ensure that only the
designated pages will be compiled with the debug symbols. The rest of the site will be compiled
without debugging. To enable page-level debugging, set the Debug attribute of the @ Page
directive (found at the top of the markup for an ASPX page). The following shows an example.
<%@ Page Debug="true" ... %>
After you have debugging enabled, you can use the many features of the Visual Studio
debugger. When you run your application, Visual Studio automatically attaches to the running ASP.NET web server process (unless you are developing remotely, which is discussed
later in this lesson). You can then set breakpoints in your code, step through line by line,
and view variable values in the watch window. In addition, if debugging is enabled, you
can get error information sent to the browser window even when you are not running
your application through Visual Studio.
New Debugging Features in Visual Studio 2010
This book assumes that you have some familiarity with the Visual Studio development
environment and does not explain the details of setting breakpoints and monitoring values.
It is assumed that you know that you can set a breakpoint to pause a running webpage at a
specific line and then examine the values of different variables.
In Visual Studio 2010, you can export and import a set of breakpoints by using the Debug
window. First, display the window by clicking the Debug menu, selecting Windows, and then
selecting Breakpoints. On the Breakpoints toolbar, click the Export button to save the current
set of breakpoints to a file. Later, use the Import button to read them back in. This allows you
to quickly set up debugging for a recurring problem.
While debugging, you can point to a variable to view its current value in a DataTip. With
Visual Studio 2010, you can click the pushpin icon on the DataTip, as shown in Figure 8-2. The
value will then always appear in the debugger, and you can add comments that you can view
later. After you stop debugging, Visual Studio displays a pushpin icon in the left margin. Point
to the pushpin to view the DataTip’s value from the last debugging session. You can import
and export pinned DataTips by using the Debug menu.
Lesson 1: Debugging Websites
CHAPTER 8
391
Figure 8-2 Pinning a value in Visual Studio 2010.
There are many other useful debugging improvements. For detailed information, see
“VS 2010 Debugger Improvements” at http://weblogs.asp.net/scottgu/archive/2010/04/21
/vs-2010-debugger-improvements-breakpoints-datatips-import-export.aspx.
Defining Custom Error Pages
In your production environment, it is likely that you do not want to show users the default
ASP.NET error page if your site breaks. This holds true for the default Internet Information
Services (IIS) error pages as well. Rather, you most likely want users to see a page that tells
them how to contact support to resolve the problem. You can also configure your site to
display a generic error page if users encounter an unhandled error. You can set this page
at the site level. You can also set individual pages for specific error types.
Configuring a Custom Site-Level Error Page
You configure custom errors inside the Web.config file by using the <customErrors> element
nested inside <system.web>. This element has the mode and defaultRedirect attributes. The
mode attribute can be set to on to turn custom errors on, off to turn them off, or RemoteOnly
to turn custom errors on for remote clients only. With RemoteOnly, if the user (typically an
administrator) is on the server, he or she will not get the custom error, but instead will get
the real error message.
The defaultRedirect attribute is used to indicate the path to a default error page. This
page will be displayed when an unhandled exception occurs on the site. The only time
this will not happen is when a specific custom error page is added to the <error> child
elements of <customErrors> (as discussed in the next section). The following example
shows markup for a custom error definition inside Web.config.
<configuration>
<system.web>
<customErrors defaultRedirect="SiteErrorPage.aspx" mode="RemoteOnly">
</customErrors>
<system.web>
</configuration>
Notice that in this markup, the page is set to an ASPX page. You can set this to an HTM
page, an ASPX page, or another resource to which the web server can redirect.
392
CHAPTER 8
Debugging and Deploying
On redirection, the server passes the path of the page that caused the error. This path is
provided as part of the query string by using the named parameter aspxErrorPath; you can use
this information to track errors on your site. For example, the following shows the browser’s URL
when the SiteErrorPage.aspx page is displayed based on an error thrown on Default.aspx:
http://localhost/examples/SiteErrorPage.aspx?aspxerrorpath=/examples/Default.aspx
Configuring Error-Specific Error Pages
It is also possible to define specific pages for various HTTP status codes. This allows you to
provide more specific information to users when a configured status code is returned. For
example, if users do not have access to a requested page or resource, their request results
in an HTTP 403 return code. This status code indicates that they are denied access to the
resource. You can then write a custom page that explains the process for requesting access
to the page. Use the <error> element to redirect to that custom page. The following markup
shows an example.
<configuration>
<system.web>
<customErrors defaultRedirect="SiteErrorPage.aspx" mode="RemoteOnly">
<error statusCode="403" redirect="RestrictedAccess.aspx" />
</customErrors>
<system.web>
</configuration>
There are many HTTP status codes. Errors fall in the range from 400 to 600. Codes with
numbers 400 to 499 are reserved for request errors and codes 500 to 599 are set aside for
server errors. Table 8-1 lists some common HTTP status codes for errors. For a complete list,
see http://www.w3.org/Protocols/rfc2616/rfc2616-sec10.html#sec10.
Table 8-1 Common HTTP Status Codes
Code
Description
400
The request is not understood (unintelligible).
403
The user does not have access to the requested resource.
404
The file is not found at the requested URL.
405
The request method is not supported.
406
The requested Multipurpose Internet Mail Extensions (MIME) type is not accepted.
408
The request has timed out.
500
An internal server error has occurred.
503
The capacity of the server has been reached.
Lesson 1: Debugging Websites
CHAPTER 8
393
More Info IIS 7 HTTP status codes
The HTTP status codes in IIS 7 have been extended to provide some additional information—
they now include decimal point values. For example, the 403 code indicating that access
is forbidden includes 403.1 to 403.19, to provide details on why access was forbidden. For
more information, see “The HTTP status codes in IIS 7.0” (which also applies to IIS 7.5) in
the MSDN Knowledge Base at http://support.microsoft.com/kb/943891.
Debugging Remotely
In most scenarios, you debug a website by running it locally on your development machine. This
puts the client browser, the development environment (Visual Studio), and the web server on a
single machine. In this case, Visual Studio automatically connects to the running site’s process
and allows you to debug your website. However, there might be occasions when you need
to debug an issue against a remote server—when an error appears after a website has been
deployed to the production environment, for example. In these scenarios, you will need to
enable remote debugging.
Some of the details of enabling remote debugging are specific to the environment.
There are slight modifications to the process depending on your domain, credentials,
and the operating systems in use by the developer and the server. However, the process
of enabling remote debugging is made easier with the Visual Studio Remote Debugging
Monitor (msvsmon.exe). You run this tool on the server you intend to debug. The tool can
be found inside your 32-bit development environment installation folder (for example,
Program Files\Microsoft Visual Studio 10.0\Common7\IDE\Remote Debugger\). If you have
installed a 64-bit version of Visual Studio, it will be installed within the Program Files (x86)
folder. You can copy the file to a file share or over to the server. You can also install the tool
from the Visual Studio DVD set.
When you run the tool, it first determines whether Windows Firewall is configured to allow
remote debugging, and prompts you to open the remote debugging port if necessary. You can
find a detailed walkthrough of manual configuration of the firewall in the MSDN documentation (see “How to: Manually Configure the Windows Vista Firewall for Remote Debugging,” at
http://msdn.microsoft.com/library/bb385831.aspx). When it is running, the remote debugger
(as shown in Figure 8-3) displays debugging events.
Figure 8-3 The Remote Debugging Monitor user interface.
394
CHAPTER 8
Debugging and Deploying
You can use the Remote Debugging Monitor tool to set remote debugging security options
on the server. To do so, from the Tools menu, select Options. This opens the Options dialog
box, as shown in Figure 8-4. Here you set the server name to a user and a server. Each instance
of the remote debugger running on a server has a unique server name. You typically run an
instance of the remote debugger for each developer who is doing remote debugging on the
server. The Options dialog box also allows you to set the user authentication mode and permissions. Typically this is set to Windows Authentication. You then give the appropriate user
in the Active Directory repository access rights to remotely debug.
Figure 8-4 The Options dialog box for the Remote Debugging Monitor.
You begin a remote debugging session by opening Visual Studio and a solution that
includes the code you intend to debug. You can then attach to the server that is running
the Remote Debugging Monitor application by selecting Attach To Process from the Debug
menu. This opens the Attach To Process dialog box shown in Figure 8-5.
Figure 8-5 The Attach To Process dialog box in Visual Studio.
Lesson 1: Debugging Websites
CHAPTER 8
395
In this dialog box, you set the qualifier to the name of the server running the Remote
Debugging Monitor. Recall that this is the server name you set in the Options dialog box
for the Remote Debugging Monitor and typically is defined as User@Server. You will then
see a list of running processes on the server. Select the ASP.NET web server process, and
click Attach to start remote debugging. You can then access the server through a browser
to cause a breakpoint to fire or an error to occur. Doing so will send you into debug mode
in Visual Studio.
Exam Tip
For the exam, and for real life, know how to configure ASP.NET debugging for a remote
Web server running IIS. Be sure you understand the permissions you need and how to
attach to a remote process.
For information on debugging an ASP.NET application running on a Server Core installation
of Windows Server 2008 R2, see “How to Get Started with ASP.NET Applications on Server Core”
at http://code.msdn.microsoft.com/R2CoreASPNET.
Debugging Client-Side Script
Visual Studio also allows you to debug client script running in a browser. This is useful if you
write a lot of JavaScript and need to walk through the code line by line and use the other
features of the debugging toolset.
To get started, you need to enable script debugging support in the browser. To do so,
open Windows Internet Explorer and select Tools | Internet Options. Click the Advanced tab
of the Internet Options dialog box, as shown in Figure 8-6. Find the Browsing node in the
Settings tree and clear the Disable Script Debugging (Internet Explorer) check box.
You can then begin debugging client script. You can get started by setting a breakpoint in
your client script and running the site through Visual Studio. You can also manually attach to
code running in a browser. You do this by first opening the source code in Visual Studio and
then using the Attach To Process dialog box discussed in the previous section to attach to the
browser’s process. Any error will give you the option to debug.
Note Debugging AJAX
For more information on debugging client script that uses the Microsoft Asynchronous
JavaScript and XML (AJAX) Library, see “Tracing AJAX Applications” in Lesson 2 of this
chapter.
396
CHAPTER 8
Debugging and Deploying
Figure 8-6 Using the Internet Options dialog box to enable script debugging for Internet Explorer.
Quick Check
1 . In which dialog box do you enable the ASP.NET debugger for a project?
2 . What is the name of the element in the Web.config file that you use to define
the debug attribute to turn on debugging for your site?
Quick Check Answers
1 . You can enable the ASP.NET debugger from your project’s Property Pages
dialog box.
2 . You can turn on debugging by using the debug attribute of the compilation
element.
Lesson 1: Debugging Websites
CHAPTER 8
397
Pr actice
Configuring Debugging in ASP.NET
In this practice, you configure a website to support debugging and custom error pages. You
also set up Internet Explorer to support script debugging.
On the Companion Media
If you encounter a problem completing an exercise, you can find the completed projects
in the samples installed from this book’s companion CD. For more information about the
project files and other content on the CD, see “Using the Companion Media” in this book’s
Introduction.
E xercise 1 Configuring a Website for Debugging
In this exercise, you create a website and configure it for debugging.
1. Open Visual Studio. Create a new, file-based website.
2. Open the Web.config file and navigate to the compilation node. Change the default
<compilation debug /> setting from false to true.
3. Create a new web form named Default2.aspx without a master page. Inside the
Page.Load event handler (which you will need to add if you are using Visual Basic),
throw an exception. The following code shows an example.
Sample of Visual Basic Code
Protected Sub Page_Load(ByVal sender As Object, _
ByVal e As System.EventArgs) Handles Me.Load
Throw New ApplicationException("Example exception.")
End Sub
Sample of C# Code
protected void Page_Load(object sender, EventArgs e)
{
throw new ApplicationException("Example exception.");
}
4. Run the Default2.aspx page in a browser by right-clicking the page in Solution
Explorer and choosing View In Browser. This displays the debugging error information, as shown in the example in Figure 8-7.
398
CHAPTER 8
Debugging and Deploying
Figure 8-7 The ASP.NET debugging error information in a web browser.
E xercise 2 Adding a Custom Error Page
In this exercise, you create a custom error page and configure your site to redirect to it for a
specific HTTP status code.
1. Open the project you created in the previous exercise. Alternatively, you can open the
completed Lesson 1, Exercise 1 project in the samples installed from the CD.
2. Add a new web form to the site. Name this form ResourceNotFound.aspx. Add text
to the body of this page to display a custom error message to users when they try to
access a resource that is not on the web server. You can use the aspxerrorpath query
string parameter to display the path of the requested resource in the message.
3. Open the Web.config file again. Add the customErrors section and turn on custom
errors. Add an error element for HTTP status code 404 (resource not found). The
following markup shows an example.
<customErrors mode="On">
<error statusCode="404" redirect="ResourceNotFound.aspx" />
</customErrors>
Lesson 1: Debugging Websites
CHAPTER 8
399
4. View Default.aspx in a browser again. Notice that the debugging error message is no
longer shown. This is because the on setting in the customErrors node indicates that the
site should only display custom errors. Next, change the URL in your browser to request
fakepage.aspx (which should not exist in your site). This will redirect the browser to the
ResourceNotFound.aspx page.
E xercise 3 Enabling Script Debugging
In this exercise, you enable client script debugging for a website.
1. Open the project you created in the previous exercise. Alternatively, you can open the
completed Lesson 1, Exercise 2 project in the samples installed from the CD.
2. Add a new web form to your site. Name the page ScriptDebug.aspx.
3. Add a JavaScript function to the markup. This can be a simple script, as follows.
<script language="javascript" type="text/jscript">
function buttonClick() {
alert('Button clicked.');
}
</script>
4. Add an HTML button to the page. Set the OnClick event to call the JavaScript function,
as follows.
<input id="Button1" type="button" value="button" onclick="buttonClick()" />
5. Open Internet Explorer and select Tools | Internet Options. Click the Advanced tab and
clear the Disable Script Debugging (Internet Explorer) check box. If Internet Explorer
is not currently your default browser, configure it as the default to allow client script
debugging from Visual Studio. To make it the default browser, click the Make Default
button on the Programs tab. Click OK.
6. Return to Visual Studio. Set a breakpoint on the buttonClick function in the markup.
You can do so by clicking the margin area in the code editor (on the left side).
7. Run the application from Visual Studio by choosing Start Debugging from the Debug
menu (or by simply pressing F5). Navigate to the ScriptDebug.aspx page. Click the button
to break into the script debugger.
Lesson Summary
400
■
You turn on debugging for your website in the Web.config file by setting the debug
attribute of the compilation element to true. You can also turn on debugging at the
individual page level by using the Debug attribute of the @ Page directive.
■
You can set a custom error page for your entire site by setting the defaultRedirect
attribute of the customErrors element. You can also map specific pages to HTTP
status codes by using the errors child element.
CHAPTER 8
Debugging and Deploying
■
The Remote Debugging Monitor (msvsmon.exe) allows you to configure debugging
on a remote server. After it is configured, you need to attach to your site’s ASP.NET
process from Visual Studio.
■
You can set an option in Internet Explorer to allow you to debug client script from
Visual Studio. This allows you to use the debugging features of Visual Studio with
client-side JavaScript.
Lesson Review
You can use the following questions to test your knowledge of the information in Lesson 1,
“Debugging Websites.” The questions are also available on the companion CD as a practice
test, if you prefer to review them in electronic form.
Note Answers
Answers to these questions and explanations of why each answer choice is correct or
incorrect are located in the “Answers” section at the end of the book.
1. You are debugging an application on a test server. You have an issue on a particular
page and need to get the error details. You do not want to turn on debugging for the
entire site. What actions should you take? (Choose all that apply.)
A. In the Web.config file, set the debug attribute of the compilation element to true.
B. In the Web.config file, set the debug attribute of the compilation element to false.
C. On the page that throws the error, set the debug attribute of the @ Page directive
D. On the page that throws the error, set the debug attribute of the @ Page directive
to true.
to false.
2. You are deploying your application to a production environment. You want to redirect
users to a default error page if they encounter any unhandled exceptions or HTTP errors
within the site. You also want to indicate the user’s requested resource on the error page
to help with support calls. What actions should you take? (Choose all that apply.)
A. Set the redirect attribute of the error element to an error page within your site.
B. Set the defaultRedirect attribute of the customErrors element to an error page
C. Use the statusCode query string parameter to retrieve the requested resource to
within your site.
display on the error page.
D. Use the aspxerrorpath query string parameter to retrieve the requested resource
to display on the error page.
Lesson 1: Debugging Websites
CHAPTER 8
401
3. You are investigating an error that only occurs when the application is deployed to the
development or test server. You need to debug this error remotely. What actions should
you take? (Choose all that apply.)
A. Run the Remote Debugging Monitor (Msvsmon.exe) on the development computer
that is doing the debugging. Use the tool to define connection rights to the server
you want to debug.
B. Run the Remote Debugging Monitor (Msvsmon.exe) on the server you want to debug.
Use the tool to define connection rights for the developer doing the debugging.
C. In Visual Studio, use the Attach To Process dialog box to attach to the ASP.NET
process on the server you want to debug.
D. In Visual Studio, use the Attach To Process dialog box to attach to the browser
process that is running the application you want to debug.
Lesson 2: Troubleshooting Websites
Not all issues can be found by using Visual Studio. Therefore, ASP.NET provides tools with which
you can trace and monitor your code as it executes in a test or production environment. These
facilities of ASP.NET can be used to troubleshoot and diagnose problems that might otherwise
prove impossible to recreate. In addition, these features allow you to examine statistics and
usage on your website.
This lesson first covers enabling and configuring tracing in ASP.NET. It then explores how
you can monitor a running website.
After this lesson, you will be able to:
■
Enable and configure ASP.NET tracing.
■
Understand the data that is available through ASP.NET tracing.
■
Work with monitoring tools to evaluate a running ASP.NET site.
Estimated lesson time: 20 minutes
Implementing Tracing
Tracing is the process of emitting data about a running application. In ASP.NET, this data
is logged to a trace log file that you can access through a web browser. The data provides
important information about your site, such as who accessed the site, what the results were,
what the HTTP data looked like, and much more. You can also inject your own tracing calls
into your code. This data will be emitted alongside the ASP.NET data.
You enable tracing through the Web.config file. You can edit this file manually, or you can
use the ASP.NET Web Site Administration Tool (WSAT) to provide an administrator-friendly
interface to enable and configure tracing.
402
CHAPTER 8
Debugging and Deploying
Enabling Tracing by Using the WSAT
The following steps show how to enable and configure the trace facility by using the WSAT:
1. Open the WSAT by selecting Website | ASP.NET Configuration from the Visual
Studio menu.
2. On the home page, click the Application tab of the WSAT. This will bring up settings
for your application.
3. On the Application tab, click Configure Debugging And Tracing (in the lower-right
corner). This will display the configuration options for debugging and tracing, as
shown in Figure 8-8.
Figure 8-8 The debugging and tracing options in the WSAT.
4. Select the Capture Tracing Information check box. This enables the tracing features to
be changed as necessary.
Lesson 2: Troubleshooting Websites
CHAPTER 8
403
As you can see from Figure 8-8, there are many options you can configure with respect
to tracing. These options also map to Web.config settings (because that is what the WSAT
administers). Table 8-2 describes each of the options, from the perspective of both the
WSAT and Web.config.
Table 8-2 ASP.NET Trace Settings
WSAT Setting
404
Web.Config Setting
Description
Capture Tracing
Information
enabled
Enables tracing for your application. When this is
set to true, the other trace options are also made
available.
Display Tracing
Information On
Individual Pages
pageOutput
Displays the trace information directly on the webpage that is being traced. Depending on the page
content, the trace information displays either at
the bottom of the webpage or behind the regular
webpage content.
Display Trace
Output For
localOnly
Designates whether you intend to display tracing
just for local requests or for all requests. When set
to Local Requests Only, the trace facility operates
only with requests from the computer on which
the web server is running. The All Requests setting
enables tracing for all requests from any computer
to the website.
Select The Sort
Order For Trace
Results
traceMode
Enables sorting of the trace output either by time
or by category.
Number Of Trace
Requests To Cache
requestLimit
Sets the number of records to hold in the cache
(or trace log).
Select Which Trace
Results To Cache
mostRecent
Designates whether to store the most recent trace
result or the oldest trace results. When set to Most
Recent Trace Results, the cache continues to update,
holding only the latest results. When set to Oldest
Trace Results, as soon as the number of requests
has been met, the cache no longer updates until
after the website is restarted or the log is cleared.
CHAPTER 8
Debugging and Deploying
Enabling Tracing by Using the Web.config File
You can enable tracing manually by editing the Web.config file of an ASP.NET site. You
do so by editing attributes (as listed in Table 8-2 in the previous section) of the <trace>
element. This element is nested under <configuration><system.web>. The following
markup shows an example.
<configuration>
<system.web>
<trace enabled="true"
requestLimit="100"
pageOutput="false"
traceMode="SortByTime"
localOnly="false"
mostRecent="true" />
<system.web>
</configuration>
In the preceding markup, tracing is enabled (enabled="true") for all requests to the server
(localOnly="false"). The trace log will cache the most recent 100 requests (requestLimit="100"
and mostRecent="true"). The trace log will be sorted by time (raceMode="SortByTime").
The data will only be viewable through the trace log and not on each individual page
(pageOutput="false").
Enabling Tracing at the Page Level
You can also enable tracing for specific pages only. This is useful if you do not want to turn
on tracing at the site level, but instead enable it only on a page that you are troubleshooting.
You enable tracing at the page level by setting the trace attribute of the @ Page directive to
true. This attribute is found at the top of the page’s markup. The following shows an example.
<@Page trace="true" ... />
Viewing Trace Data
After ASP.NET trace data has been configured and turned on, you can view the data on each
webpage (Trace="true") or view the trace output by navigating to the Trace.axd page on the
current website (http://server/application/trace.axd). When viewed on the same page, the
trace information is appended to the bottom of the page (for pages that use flow layout).
Figure 8-9 shows an example.
Lesson 2: Troubleshooting Websites
CHAPTER 8
405
Figure 8-9 Trace information displayed on an ASP.NET page.
To view your entire log, you navigate to the Trace.axd page for your site. This page
will show a log event if pageOutput is set to true. The first page of the log is a summary
page. This page contains a list of trace results that are in the cache. Figure 8-10 shows an
example.
406
CHAPTER 8
Debugging and Deploying
Figure 8-10 The Trace.axd page.
You can click one of the cached results to view the details of the trace record for a single
page request. These details are similar to the information that is shown on each webpage (as
shown previously, in Figure 8-9).
Security Alert
If you opt to display the trace information on individual pages, the trace information can be
displayed on any browser that makes a request. This is a potential security threat, because
sensitive information such as server variables will be displayed. Be sure to disable page tracing
on production web servers.
The trace result page is separated into sections, as described in Table 8-3. The information
in these sections can be very useful when you are trying to identify performance issues and
resource usage.
Lesson 2: Troubleshooting Websites
CHAPTER 8
407
Table 8-3 Trace Result Sections
Trace Result Section
Description
Request Details
Provides general details about the page request.
Trace Information
Displays performance information related to the webpage’s lifecycle events. The From First(s) column displays the running time
from when the page request started. The From Last(s) column
shows the time elapsed since the previous event.
Control Tree
Displays information about each control on the webpage, such as
the size of the rendered controls.
Session State
Displays all session variables and their values.
Application State
Displays all application variables and their states.
Request Cookies
Collection
Displays the list of cookies that are passed to the server as part of
the request.
Response Cookies
Collection
Displays the list of cookies that are passed to the browser as part of
the response.
Headers Collection
Displays the list of HTTP headers that are sent to the web server as
part of the request.
Form Collection
Displays the list of values that are posted back to the web server.
QueryString
Collection
Displays the list of values that are included in the query string.
Server Variables
Displays all server variables.
Emitting Custom Trace Data
You can use the Trace class in the System.Diagnostics namespace to add your own trace messages
to the data that is displayed by ASP.NET tracing. This class is exposed as a member of the Page
object. This allows you to call Page.Trace (or just Trace). You use the Write method of this object to
write a message to the trace log. When doing so, you can provide a category and the message.
The following shows an example of writing to the trace log. Here a message is added to the
log when the page is loaded and when a user clicks the button on the page. The category of
the message is set to Custom Category. This category allows you to find your message easily.
Custom messages are embedded in the Trace Information section of the trace details.
408
CHAPTER 8
Debugging and Deploying
Sample of Visual Basic Code
Protected Sub Page_Load(ByVal sender As Object, _
ByVal e As System.EventArgs) Handles Me.Load
Trace.Write("Custom Category", "Page_Load called")
End Sub
Protected Sub Button1_Click(ByVal sender As Object, _
ByVal e As System.EventArgs) Handles Button1.Click
Trace.Write("Custom Category", "Button1_Click called")
End Sub
Sample of C# Code
protected void Page_Load(object sender, EventArgs e)
{
Trace.Write("Custom Category", "Page_Load called");
}
protected void Button1_Click(object sender, EventArgs e)
{
Trace.Write("Custom Category", "Button1_Click called");
}
Tracing AJAX Applications
Debugging an AJAX application presents its own issues. You do not have a server process on
which to rely. Instead, you have to try to debug the code as it executes in the browser. In the
previous section, you saw how to do this. However, AJAX-enabled applications tend to have a
lot of client code, so they might present more issues when they are being debugged. For this
reason, the Microsoft AJAX Library provides the Sys.Debug client-side namespace.
The tracing you enable on the server is not fired for AJAX partial-page requests. Therefore,
you will see nothing in the Trace.axd log for these types of requests. Instead, you must use the
features of Sys.Debug to write out trace messages. The Debug class includes the assert, trace,
clearTrace, traceDump, and fail methods. These methods can be used to display and manage
messages to a trace log based on your needs.
As an example, suppose you write out a message by using Sys.Debug.trace. Of course, your
page must include the Microsoft AJAX Library JavaScript file. You make this happen by adding a
ScriptManager control to your page. (See Chapter 9, “Working with Client-Side Scripting, AJAX,
and jQuery,” for more details on working with AJAX.) The following markup shows part of an
ASPX page that includes a ScriptManager control and a JavaScript function named button1_
onclick. When this function is fired (when the user clicks button1), the trace method is called.
Lesson 2: Troubleshooting Websites
CHAPTER 8
409
<html xmlns="http://www.w3.org/1999/xhtml">
<head id="Head1" runat="server">
<title>AJAX Trace Example</title>
<script language="javascript" type="text/javascript">
function button1_onclick() {
Sys.Debug.trace("Button1 clicked");
}
</script>
</head>
<body>
<form id="form1" runat="server">
<div>
<asp:ScriptManager ID="ScriptManager1" runat="server">
</asp:ScriptManager>
<input id="Button1" type="button" value="button"
onclick="button1_onclick()" />
</div>
</form>
</body>
</html>
Real World
Tony Northrup
V
isual Studio 2010 is definitely the best tool for writing and debugging ASP.NET
code. When it comes to debugging complex problems in client-side JavaScript,
however, you can do better. Visual Studio almost always gives you broad errors that
make it difficult to isolate the real problem, and it often highlights code within a
library, rather than in your JavaScript.
The most efficient tool I’ve found for debugging JavaScript is the free Firebug plug-in
for the Firefox browser. It provides excellent warnings about inconsistencies in your
code (such as a missing quote or bracket), and it gives genuinely useful feedback
about problems.
You can view the trace messages displayed by the Microsoft AJAX Library in the Visual
Studio Output window. This works if you are using Internet Explorer and Visual Studio, and
if you are debugging on the same machine on which the website is running. However, you
can also create a TextArea control on the page that includes your JavaScript. If you set the
TextArea control’s ID to TraceConsole. this tells the Microsoft AJAX Library to display its trace
messages to this TextArea for you to view. If the browser you are using for debugging has
410
CHAPTER 8
Debugging and Deploying
a debugging console (as the Apple Safari and Opera browsers do), that console can also be
used to view the trace messages. Figure 8-11 shows the result of the preceding markup as
displayed to the Visual Studio Output window (at the bottom of the screen).
Figure 8-11 The Sys.Debug.trace message in the Output window.
Quick Check
1 . How can you make trace data display on your webpage?
2. What is the name of the virtual page that you can request to view trace data
when the trace data is not displayed on its corresponding webpage?
Quick Check Answers
1 . Set Trace="true".
2. The virtual page is called Trace.axd.
Lesson 2: Troubleshooting Websites
CHAPTER 8
411
Monitoring a Running Web Application
Tracing provides diagnostic information about a page. This can be very useful for troubleshooting problems with pages in a test environment. However, you often need information
about the overall health of your application. You should be able to monitor the application and
be notified of various events such as error conditions, security issues, and request failures. You
can do so by using the features of ASP.NET health monitoring.
ASP.NET health monitoring provides a set of classes in the System.Web.Management
namespace for tracking the health of your application. You can use these classes to create
your own events and your own custom event listeners (and viewers). You can also use the
default features exposed by these classes to monitor most aspects of any running website.
This section focuses on the latter option.
The Health Monitoring Classes
The health monitoring system works by raising and logging ASP.NET events based on your
configuration. You enable these events based on what you want to monitor with respect to
your application’s performance and health. The monitoring occurs in a deployed environment. You can use the features of health monitoring to receive email messages about
important activities, log information to the event log, and log information to SQL Server.
The first step in health monitoring is to determine which events to listen for. These events
are defined as classes. The classes are based on a class hierarchy that defines the data that is
logged with the event. For example, a web health monitoring event class might contain information about the process that is executing your code, the HTTP request, the HTTP response,
and error conditions.
You can also use the base web event classes in the System.Web.Management namespace
to write your own web events for health monitoring purposes. Table 8-4 lists the key web
event classes and their basic use.
Table 8-4 The Web Event Classes in ASP.NET
412
Class Name
Description
WebBaseEvent
The base class for creating your own web events
WebManagementEvent
The base class for creating web events that contain application
process information
WebHeartbeatEvent
Serves as a periodic event that raises information about your
application at set intervals
WebRequestEvent
The base class that contains web request information
WebApplicationLifetimeEvent
Raised when a significant application event occurs, such as
application start or shutdown
WebBaseErrorEvent
The base class for creating error-based events
WebErrorEvent
Used to provide information about an error when it occurs in
your application
CHAPTER 8
Debugging and Deploying
Class Name
Description
WebRequestErrorEvent
Contains request data for request errors
WebAuditEvent
The base class for creating audit (security) events
WebSuccessAuditEvent
Raised when a successful security operation occurs for your
application
WebAuthenticationSuccessAuditEvent
Used to provide information when a successful user authentication
occurs on the site
WebFailureAuditEvent
Raised when a failed security operation occurs
WebAuthenticationFailureAuditEvent
Used to provide information when a failed attempt at user
authentication occurs on the site
WebViewStateFailureAuditEvent
Raised when the view state fails to load (typically as a result of
tampering)
When you know which events to listen for, the second step is to enable a listener (or log). The
ASP.NET health monitoring system defines a set of providers (or listeners) that are used to collect the web event information. These listeners consume the web health events and typically
log the event details. You can use the default listeners or write your own by extending the
existing WebEventProvider class. The default providers include EventLogWebEventProvider,
WmiWebEventProvider, and SqlWebEventProvider. You configure web events and web providers in ASP.NET configuration files, which are discussed next.
Configuring Health Monitoring
To configure health monitoring, you turn on web events and connect them to listeners
in the Web.config file. You do so by configuring the <healthMonitoring> element of the
<system.web> section of the Web.config file. The <healthMonitoring> element contains
the enabled attribute, which you set to true to enable health monitoring. It also contains the
heartbeatInterval attribute, which you can set to the number of seconds to wait between
raising the WebHeartbeatEvent events. The individual events themselves also contain the
minInterval attribute, which works in a similar fashion.
The process of configuring a web event and provider is as follows:
1. Add an eventMappings child element to healthMonitoring. You use the add element
to add the web event class you want to use.
2. Add a providers child element to healthMonitoring. This indicates your health monitoring
listener(s).
3. Finally, add a rules element to healthMonitoring. You use the add child element of rules
to indicate an association between a registered web event and a registered listener.
Fortunately, you do not need to register the default web events and providers. These are
already registered for you by the overall configuration file on your server. Therefore, you need
only add rules to your Web.config file to turn these events on. As an example, the following
Lesson 2: Troubleshooting Websites
CHAPTER 8
413
configuration turns on the heartbeat and application lifetime events. These events are written
to the EventLogProvider.
<configuration>
<system.web>
<healthMonitoring enabled="true" heartbeatInterval="1">
<rules>
<add name="Heart Beat"
eventName="Heartbeats"
provider="EventLogProvider"
profile="Default"/>
<add name="App Lifetime"
eventName="Application Lifetime Events"
provider="EventLogProvider"
profile="Default"
minInstances="1" minInterval=""
maxLimit="Infinite"/>
</rules>
</healthMonitoring>
<system.web>
<configuration>
Notice that this configuration requires you to know the configured name of the event class
and the provider. You can look up these names in your root configuration file. You can also find
them on MSDN in the “healthMonitoring Element (ASP.NET Settings Schema)” article. The default
configuration markup is listed there.
Figure 8-12 shows a logged event in Event Viewer. Notice that this event fired when the
application unexpectedly shut down. This was the result of the firing of the application lifetime
event (WebApplicationLifetimeEvent).
Figure 8-12 The web event data displayed in the Event Viewer.
414
CHAPTER 8
Debugging and Deploying
Pr actice
Using the ASP.NET Trace Facility
In this practice, you create a basic website and enable ASP.NET tracing. You then execute the
site and view the trace details both at the page level and by using the ASP.NET trace listener.
On the Companion Media
If you encounter a problem completing an exercise, you can find the completed projects
in the samples installed from this book’s companion CD. For more information about the
project files and other content on the CD, see “Using the Companion Media” in this book’s
Introduction.
E xercise Enabling ASP.NET Tracing
In this exercise, you work with ASP.NET tracing to view details about a running page in your site.
1. Open Visual Studio. Create a new, file-based website called TracingCode.
2. Open the WSAT from the Visual Studio menu by selecting Website | ASP.NET Configuration.
3. Click the Application tab to display the application settings. Click Configure Debugging
And Tracing.
4. Select the Capture Tracing Information check box. This enables tracing for your site.
Make the following additional changes on this page:
■
Ensure that the Display Tracing Information On Individual Pages check box is cleared.
■
Set the Display Trace Output For option to Local Requests Only.
■
Set the Select The Sort Order For Trace Results option to By Time.
■
Set Number Of Trace Requests To Cache to 50.
■
Set the Select Which Trace Results To Cache option to Most Recent Trace Results.
■
Close the WSAT when finished.
5. Open the Web.config file. Navigate to the trace element. The trace element should
look as follows (notice that the defaults are not listed; only the items that had to be
overridden must be specified).
<trace
enabled="true"
mostRecent="true"
requestLimit="50" />
6. Run the website. Refresh the webpage a few times to write more results to the trace log.
7. In the Address bar of the browser, change the URL to access Trace.axd for the site. This
will bring up the trace log. You should see an entry for each time you requested the page.
Click one of the View Details links to open a record. Notice that the Trace Information section contains the timings for the events in the webpage life cycle. Close the web browser.
8. Open Default.aspx in Visual Studio. Add the Trace="true" attribute to the @ Page directive
at the top of the page. Run the site again; notice that the page now includes the trace
information written out. Close the web browser.
Lesson 2: Troubleshooting Websites
CHAPTER 8
415
9. Open the code-behind file for Default.aspx in Visual Studio. Add an event handler for
the Page_Load event, the handler for which will already exist in the code-behind file if
you are using C#. In the event handler, use Page.Trace to write out a tracing message.
Your code should look as follows.
Sample of Visual Basic Code
Protected Sub Page_Load(ByVal sender As Object, _
ByVal e As System.EventArgs) Handles Me.Load
Trace.Write("Custom Category", "Page.Load called")
End Sub
Sample of C# Code
protected void Page_Load(object sender, EventArgs e)
{
Trace.Write("Custom Category", "Page.Load called");
}
10. Run the application again. Notice your custom tracing message in the Trace Information
section of the page’s trace output.
Lesson Summary
■
You can use ASP.NET tracing to troubleshoot and diagnose problems with a page in your
website. It displays information about the request, the response, and the environment.
■
You can use the trace method to display custom trace messages to the trace log.
■
An AJAX-enabled page can use the client-side Sys.Debug.trace method to render
tracing information to a webpage (by using a TextArea control), to the Visual Studio
Output window, or to a browser’s debug console.
■
ASP.NET provides health monitoring tools (which you’ll find in the System.Web.
Management namespace) to enable you to monitor a running website. You can configure web events with listeners by using rule child elements of the <healthMonitoring>
element inside Web.config.
Lesson Review
You can use the following questions to test your knowledge of the information in Lesson 2,
“Troubleshooting Websites.” The questions are also available on the companion CD as a
practice test, if you prefer to review them in electronic form.
Note Answers
Answers to these questions and explanations of why each answer choice is correct or
incorrect are located in the “Answers” section at the end of the book.
416
CHAPTER 8
Debugging and Deploying
1. You want to identify which event in the webpage life cycle takes the longest time to
execute. How can you accomplish this?
A. Turn on ASP.NET tracing and run the website. After that, review the trace results.
B. To each of the life-cycle events, add a line of code that will print the current time.
C. In the Web.config file, add the monitorTimings attribute and set it to true.
D. In the website properties, turn on the performance monitor and run the website.
After that, open the performance monitor to see the timings.
2. You want to run a trace continuously to enable you to quickly look at the 10 most recent
traces from anyone using your website, but you are concerned about filling your hard
drive with excessive data. Which of the following settings will accomplish your objective?
A. <trace
enabled="false"
requestLimit="10"
pageOutput="false"
traceMode="SortByTime"
localOnly="true"
mostRecent="true"
/>
B. <trace
enabled="true"
requestLimit="10"
pageOutput="true"
traceMode="SortByTime"
localOnly="true"
mostRecent="true"
/>
C. <trace
enabled="true"
requestLimit="10"
pageOutput="false"
traceMode="SortByTime"
localOnly="true"
mostRecent="false"
/>
D. <trace
enabled="true"
requestLimit="10"
pageOutput="false"
traceMode="SortByTime"
localOnly="false"
mostRecent="true"
/>
Lesson 2: Troubleshooting Websites
CHAPTER 8
417
3. You are interested in examining the data that is posted to the web server. What trace
result section can you use to see this information?
A. The Control Tree section
B. The Headers Collection section
C. The Form Collection section
D. The Server Variables section
4. You want to configure ASP.NET health monitoring to log information every time a user
fails to log on to the server. Which web event class should you use?
A. WebRequestEvent
B. WebAuditEvent
C. WebApplicationLifetimeEvent
D. WebAuthenticationSuccessAuditEvent
Lesson 3: Deploying Websites
With Windows applications, you have no choice but to consider deployment; typically, the
client needs to be installed on every user’s computer. With websites, deployment tends to be
an afterthought, because users already have their web browsers installed.
However, developers often need to deploy code to staging and production servers on a
regular basis, which can be tedious. In addition, many websites are deployed to multiple web
servers simultaneously to provide high availability and performance. Finally, many web developers must release their applications commercially; this means that other people need to be
able to deploy them in environments that the developer knows nothing about.
For each of these scenarios, the developer must create a plan to deploy the application
and any updates that need to be released in the future. This lesson describes the different
techniques available for deploying websites: manually copying files, publishing web applications, creating a Web Deployment Project, creating a Web Setup Project, using the Copy
Web tool, and publishing websites.
After this lesson, you will be able to:
■
■
■
Create a Web Setup Project and use the resulting files to deploy your application.
Update and deploy websites in environments with multiple developers and servers
by using the Copy Web tool.
Precompile websites by using the Publish Web Site tool.
Estimated lesson time: 60 minutes
418
CHAPTER 8
Debugging and Deploying
Publishing Web Applications
Depending on the scenario, a Microsoft .NET Framework website can be extremely easy
to deploy. Websites, by default, are entirely file based. This means that the source code
is usually deployed to the server. The server then compiles that code when pages are
requested. In this scenario, you can deploy a website to a web server by simply copying
the files to the correct directory on the server.
Even if you are deploying a new version of your site, in most cases you can simply overwrite
the old files with the new ones. In addition, if you are creating a website that works on a single
server and is file based, there is often no real need to run any type of setup process, edit the
registry, or add items to the start menu. Configuration settings are defined with the Web.config
file, and application code is contained entirely within the website folder structure. This means
that you can deploy the entire website by using the simple xcopy shell command; no special
deployment software is required.
This simplicity provides a great deal of flexibility in other scenarios, too. If your website is
to be deployed to an array of web servers (in which multiple web servers host the same website for scalability and availability), you can use any file-synchronization tool to copy the files
between the servers. This allows you to deploy to a master server and have the deployment
synchronized across the web farm.
If your website has a database, requires special web server configuration, or needs different
configuration settings in a release environment, simply copying files will be insufficient. In these
cases, publishing a website typically involves:
■
Configuring an application in IIS.
■
Copying website files to the web server.
■
Setting up a database.
■
Configuring the website with the production database connection.
■
Modifying other configuration settings, such as disabling detailed error messages.
Visual Studio 2010 includes a new Publish Web dialog box that allows you to configure
each of these settings once, and then publish a website to one or more web servers with a
single click. This section describes this tool in more detail.
Web.config Transformations
Applications that have different debugging, staging, and release environments typically have
different application settings as well. For example, during debugging, an application might
use a local file system database. However, in the production environment, the application
might connect to a central database running Microsoft SQL Server.
Lesson 3: Deploying Websites
CHAPTER 8
419
Web.config transformations allow you to create separate Web.config files for different
release types. Therefore, you can create debugging, staging, and release versions of the
Web.config file with settings specific to each release type. To simplify management, you
only need to specify settings that must be added, changed, or removed from the base
Web.config file.
By default, Visual Studio adds Web.config transformations for the Debug and Release
configurations for new ASP.NET Web Application projects. You can view and edit the transformations from Solution Explorer by expanding the Web.Config node and then double-clicking
either Web.Debug.Config or Web.Release.Config. If you add more configurations (such as a
staging configuration), you can add an associated transformation by right-clicking Web.config
in Solution Explorer and then clicking Add Config Transformations.
The sections that follow describe the syntax for adding, replacing, and removing settings. For
detailed information about more complex transformations, read “Web.config Transformation
Syntax for Web Application Project Deployment” at http://msdn.microsoft.com/en-us/library
/dd465326.aspx.
Adding a Setting
Web.config transformations contain only those settings that should be different from the
standard Web.config file. To add a new setting to a Web.config file that is generated when
publishing a web application, simply add the setting to the Web.config transformation file.
For example, defining the following Web.Release.Config file will add the connection string
to the Web.config file when you publish the web application by using the Release setting:
<configuration>
<connectionStrings>
<add name="MyDatabase"
connectionString="data source=.\SQLEXPRESS;Integrated
Security=SSPI;AttachDBFilename=|DataDirectory|\mydb.mdf;User Instance=true"
providerName="System.Data.SqlClient" />
</connectionStrings>
</configuration>
Replacing a Setting
If you need to define different settings for the same value in your base Web.config file and in
a Web.config transformation, add the element to the Web.config transformation and specify
the xdt:Transform="Replace" property. Any settings defined within the element will replace
those in the base Web.config file when your web application is published.
For example, to replace the settings for custom errors so that the release version of your
web application does not display detailed error information to remote users, you could add
the following code to the Web.Release.Config file. Notice the xdt:Transform property in bold.
420
CHAPTER 8
Debugging and Deploying
<configuration>
<system.web>
<customErrors defaultRedirect="GenericError.htm"
mode="RemoteOnly" xdt:Transform="Replace">
<error statusCode="500" redirect="InternalError.htm"/>
</customErrors>
</system.web>
</configuration>
You can use the xdt:Locator property to selectively replace settings when a property matches
a specified value. Set the value of xdt:Locator to a conditional method call. For example, to verify
that one of the properties you specify must match the property in the base Web.config file, use
the Match method. The following example would replace an <add> connection string element
only if the name property matched exactly.
<configuration>
<connectionStrings>
<add name="MyDB"
connectionString="Data Source=ReleaseSQLServer;
Initial Catalog=MyReleaseDB;Integrated Security=True"
xdt:Transform="SetAttributes" xdt:Locator="Match(name)"/>
</connectionStrings>
</configuration>
If you were to remove the xdt:Locator property, the Web.config transformation would
replace all connection strings.
Removing a Setting
You can remove an attribute by using the RemoveAttributes() method and specifying the
name of the attribute to remove as the parameter. For example, to remove the <debug>
attribute from the <compilation> section, you would add the following code to your
Web.Release.Config file:
<configuration>
<system.web>
<compilation xdt:Transform="RemoveAttributes(debug)" />
</system.web>
</configuration>
Configuring Deployment
You can deploy databases along with your web application. To configure the database to
be deployed, right-click the project in Solution Explorer and then click Package/Publish
Settings. Then click Package/Publish SQL. The Package/Publish SQL tab appears, as shown
in Figure 8-13.
Lesson 3: Deploying Websites
CHAPTER 8
421
Figure 8-13 The Package/Publish SQL tab.
From this tab, click Import From Web.config to automatically configure any databases you
have added to the <connectionStrings> section. For databases not in the Web.config file, click
the Add button to configure a database to be deployed, and then type a connection string or
click the ellipses to connect to the database.
If the database does not yet exist on the server to which you are deploying your web application, select the Pull Data And/Or Schema From An Existing Database check box to have Visual
Studio create a database schema and optionally populate the database with data. Then configure the connection string for the source database from which Visual Studio will create the new
database. Click the Database Scripting Options list to select whether to deploy the schema,
the data, or both. Finally, you can add SQL scripts to perform additional, custom database
configuration.
422
CHAPTER 8
Debugging and Deploying
After you have configured the database, you can configure additional deployment settings
by selecting the Package/Publish Web tab (as shown in Figure 8-14).
Figure 8-14 The Package/Publish Web tab.
If you configured databases for deployment, select the Include All Databases Configured
In Package/Publish SQL Tab check box. If your application requires settings configured in IIS
manager (but not defined in Web.config), select the Include All IIS Settings As Configured
In IIS Manager check box. This setting also enables you to specify the Physical Path Of Web
Application On Destination Server check box. The remaining settings define whether Visual
Studio will create a .zip file containing all of your project files and where it will be stored.
Lesson 3: Deploying Websites
CHAPTER 8
423
Publishing a Website
After you have configured the publishing settings, you can publish a web application by rightclicking the project in Solution Explorer and then clicking Publish. Visual Studio displays the
Publish Web dialog box, as shown in Figure 8-15.
Figure 8-15 The Publish Web dialog box.
You can use the Publish Web dialog box to define the publication settings and save them
as a publish profile by defining the profile name. The individual settings are:
■
Publish Method This is the communications protocol that Visual Studio will use to con-
nect to the web server. Web Deploy uses HTTPS (HTTP Secure), FTP uses unencrypted File
Transfer Protocol (FTP) communications, FPSE uses encrypted FTP communications, and
File System uses standard network file sharing. Any of the settings allows you to deploy
files. If you choose Web Deploy, you can publish IIS web server settings, database schema
and data, database scripts, security settings, and more.
■
Service URL This is the URL of the remote server’s web service, which the web server’s
systems administrator will provide for you. If the hosting provider supports the Windows
Management Service, the path will include MsDeploy.axd.
■
Site/Application This is the name of the IIS website, which can include a virtual
directory.
424
CHAPTER 8
Debugging and Deploying
■
■
Mark As IIS Application On Destination Select this check box if your website is the
root of an IIS website or if the virtual directory should act as a separate application
from the parent folder.
Leave Extra Files On Destination Clear this check box to delete existing files in the
web server virtual directory.
■
Credentials This allows you to provide credentials to connect to the web server.
After you have defined the settings, click the Save button to save the profile. Click Publish
to deploy the web application to the remote server.
After saving profile settings, you can publish the website by using the Web One-Click Publish
toolbar; simply select the profile and then click the Publish Web button on the toolbar.
Deployment Packages
If you will not be deploying the website directly, you can package it (along with the database and settings) into a .zip file that a systems administrator can install. After configuring
publishing for the project, right-click the project in Solution Explorer and then click Build
Deployment Package. Visual Studio generates several files in the folder you specified in the
Location Where Package Will Be Created box in the Package/Publish Web dialog box:
■
<Application>.zip Your web application’s files, database, and settings.
■
<Application>.deploy.cmd The script that the IIS systems administrator will run,
with administrative credentials, on the web server. The web server must have Web
Deploy (MSDeploy.exe) installed. For more information about Web Deploy, go to
http://go.microsoft.com/?linkid=9278654.
■
<Application>.deploy-readme.txt The traditional “readme” file that administrators
refer to before installing. You can edit this just like any text file to provide customized
instructions.
■
<Application>.SourceManifest.xml Contains settings to be added to the IIS manifest.
You or the administrator can edit this prior to deployment.
■
<Application>.SetParameters.xml Contains IIS parameters to be added during
installation. You or the administrator can edit this prior to deployment.
You must provide all of the files to the administrator, who must keep them in the same
folder. You cannot deploy the .zip file alone.
Web Deployment Projects
After the release of Visual Studio 2010, Microsoft released the Web Deployment Projects tool to
extend Visual Studio 2010 by adding a user interface to manage build configurations, merging,
and using pre-build and post-build tasks. Web Deployment Projects work with both ASP.NET
web applications and websites.
Lesson 3: Deploying Websites
CHAPTER 8
425
Web Deployment Projects provide several capabilities not provided by other deployment
technologies:
■
The ability to precompile websites.
■
The ability to merge all files into a single assembly, merge folders into individual
assemblies, or create separate assemblies for each page and control. If you merge
content into assemblies, users with access to the web server will not be able to
directly access your source code.
■
Strong naming and delayed signing of assemblies.
As with publishing websites, Web Deployment Projects allow you to change the Web.config
file for the release environment and create IIS virtual directories.
To download the Web Deployment Projects tool, search the Microsoft Download Center
for “Web Deployment Projects RTW” or go to http://www.microsoft.com/downloads/en
/details.aspx?FamilyID=89f2c4f5-5d3a-49b6-bcad-f776c6edfa63. After you have the tool
installed, you can add a Web Deployment Project to a website or web application by clicking the solution in Solution Explorer and then clicking Add Web Deployment Project. Then
double-click the Web Deployment Project to edit its properties, as shown in Figure 8-16.
Figure 8-16 Web Deployment Project properties.
After configuring the Web Deployment Project, right-click it in Solution Explorer and then
click Build to generate the assembly or assemblies.
Exam Tip
For the real world, know that you need to use Web Deployment Projects when you do not
want to store the source code on the web server or when management requires signed
assemblies. Because it is an add-on for Visual Studio 2010, you probably will not see any
questions about it on the exam, however.
426
CHAPTER 8
Debugging and Deploying
Web Setup Projects
Publishing websites gives you a great deal of control over the website configuration while still
providing a high level of automation. However, it requires administrators to have specially configured the web server to allow you to publish the website. Even if you create a package for the
administrators to perform the installation, administrators will not be able to easily take advantage of a software distribution infrastructure that requires Microsoft Windows Installer (MSI)
packages. Finally, Visual Studio does not precompile published websites.
The sections that follow describe how to create a Web Setup Project, which provides the
highest level of flexibility for deploying a website. Although Web Setup Projects are more
complex for the developer, they allow you to generate an MSI package, precompile a website,
and perform virtually any setup task that your application might require. This section describes
how to configure deployment properties, how to configure deployment conditions, and how to
deploy websites that meet the requirements of the aforementioned scenarios.
Creating a Web Setup Project
Web Setup Projects are very similar to the standard setup projects used for Windows Forms
applications; however, Web Setup Projects provide specialized capabilities that are required
by websites. To add a Web Setup Project to a website, follow these steps:
1. Open your website in Visual Studio.
2. From the File menu (or by right-clicking your solution in Solution Explorer), select Add,
and then select New Project to launch the Add New Project dialog box.
3. Under Installed Templates, expand Other Project Types, expand Setup And Deployment,
and then select Visual Studio Installer. From the list of available templates, select Web
Setup Project. In the Name text box, type a name for your project. An example of the
Add New Project dialog box is shown in Figure 8-17.
Figure 8-17 Adding a new project to a website to create a Web Setup Project.
Lesson 3: Deploying Websites
CHAPTER 8
427
4. After you have created a new Web Setup Project, Visual Studio adds the project to
your solution and displays the File System editor. The typical next step is to create
a project output group by right-clicking the Web Application Folder, selecting Add,
and then selecting Project Output. In the Add Project Output Group dialog box, you
select the project to deploy, the Content Files option, and the configuration (which
is Active by default). This ensures that your setup project will deploy the contents of
the selected project.
After you have created a Web Setup Project, you can add more folders, files, assemblies,
and configuration settings that are not part of your project output to the Web Setup Project.
This might be necessary if, for example, you have a separate folder containing images that
you have not added to your website project, or if you need to define registry values.
Building a Web Setup Project
Web Setup Projects are not automatically built when you build or run your website. You must
manually select the Web Setup Project in Solution Explorer and choose Build. You can do so
by right-clicking the project or by using the Build menu.
When you build the setup project, Visual Studio validates your code in the website. It then
builds an MSI file and packages each element of your site in the MSI. You can follow the build
process in Visual Studio in the Output window (View | Output). The script in the Output windows shows you each step and where the MSI file is generated. By default, the file is placed
in the folder that contains your solution file. Figure 8-18 shows an example of a process as
shown in the Output window.
Figure 8-18 An MSI build in the Output window of Visual Studio.
Many websites do not require custom configuration. In these cases, you can simply build
your MSI file and be ready to deploy. However, more complex scenarios include dependencies (such as particular operating system versions or service packs), custom registry entries,
or administrator configuration. Web Setup Projects allow you to deploy websites that meet
these requirements. The sections that follow help you with each of these specific scenarios.
428
CHAPTER 8
Debugging and Deploying
Creating Launch Conditions
A launch condition is used to define the server requirements for your application installation.
For example, you can check for specific versions of Windows or verify that specific service packs
are present before you allow an installation. The web setup template includes the IIS launch
condition. This searches for the presence of the correct version of IIS and displays an error
message to users if this version is not present, as shown in Figure 8-19.
Figure 8-19 The Launch Conditions error message.
To create and manage launch conditions, you use the Launch Conditions editor in Visual
Studio. You can access this tool by selecting your project in Visual Studio and then clicking the
View menu. You will see an Editor submenu that contains several setup editors, including those
for Registry, File System, File Types, User Interface, Custom Actions, and Launch Conditions.
Selecting the Launch Conditions submenu opens the Launch Conditions editor, as shown in
Figure 8-20. Notice that you right-click the Launch Conditions folder to add a new condition
(this is discussed more fully in the next section).
Figure 8-20 Using the Launch Conditions editor to configure requirements for a target computer.
Lesson 3: Deploying Websites
CHAPTER 8
429
There are two main branches of the Launch Conditions editor: Search Target Machine and
Launch Conditions. Each is described here:
■
Search Target Machine This branch allows you to define the criteria to search for prior
to installation. By default, this node contains nodes for searching for major and minor versions of IIS. You can add file, registry, and Windows Installer search conditions. Typically,
you pair a search condition that determines whether a change is necessary with a launch
condition that performs the change.
■
Launch Conditions This branch allows you to create new launch conditions that
define conditions that must be met prior to installation. These conditions can be
based on search conditions or other criteria (such as the operating system version). A
launch condition can provide a useful message to the user if a requirement is missing.
It can then automatically retrieve a webpage. By default, Web Setup Projects include
conditions for ensuring the presence of the correct version of IIS (later than version 7,
for example).
Typically, you must add an item to each of these two nodes to require a single component
as part of your installation. For example, if you want to verify that a specific DLL is present, you
must create a search condition under Search Target Machine and store the result of the search
in a property. You then create a launch condition that uses the search condition’s property.
If the required condition is not met (if the file is missing), you specify an error message to be
displayed to the user. You can also choose to add a URL that directs the user to the required
component for download.
Adding a Simple Search Condition
You can add both search and launch conditions manually by right-clicking the appropriate folder
and choosing an item to add. This allows you to create both search and launch conditions at a
granular level and decide how to connect them.
To add a basic search condition, start by right-clicking the Search Target Machine node in
the Launch Conditions editor. You will have three search condition types to choose from: Add
File Search, Add Registry Search, and Add Windows Installer Search. Each is a different search
type. Depending on your selection, different property values must be set. The following provides an overview of each search type’s options.
430
■
File Search This search type allows you to define a search for a file. You set FileName
to the name of the file you are searching for, Folder to the name of the folder in which to
search, and Property to a variable name to be used for tracking the results of the search.
■
Registry Search This search type allows you to specify a registry search. You set the
Root property to a place to start looking in the registry, RegKey to a registry key to
search for, and the Value property to a value you expect to be set for the specified key.
You store the results of your search in the Property property as a variable name that
can be used in a related launch condition.
CHAPTER 8
Debugging and Deploying
■
Windows Installer Search This search type allows you to search for a registered component. You set the ComponentId property to the globally unique identifier (GUID) of
the component for which you are searching. You set the Property property to a variable that indicates the results of your search.
You can also rename your search and launch conditions to something that makes sense to
your specific scenario.
Adding a Simple Launch Condition
You can manually add a launch condition that must be met before your website can be installed.
To do so, you right-click the Launch Conditions folder, and then select Add Launch Condition.
With the new launch condition selected, you access the Properties window to configure your
launch condition. You can set the Condition property to match the Property value of a search
condition or to specify a different condition entirely. To allow the user to download software to
resolve the launch condition, provide a URL in the InstallUrl property. In the Message property,
type a message to be displayed to the person installing your website if a condition is not met.
You can configure launch conditions to require specific operating system versions, specific service pack levels, and other criteria by setting the Condition property to an environment variable or
keyword and using both an operand and a value. Table 8-5 lists some common launch conditions.
Table 8-5 Windows Installer Launch Conditions
Condition
Description
VersionNT
The version number for operating systems based on Windows NT,
including Windows 2000, Windows XP, and Windows Server 2003
Version9X
The version number for early Windows consumer operating
systems, including Windows 95, Windows 98, and Windows
Millennium Edition
ServicePackLevel
The version number of the operating system service pack
WindowsBuild
The build number of the operating system
SystemLanguageID
The default language identifier for the system
AdminUser
The tool that determines whether the user has administrative privileges
PhysicalMemory
The size of the installed RAM in megabytes
IISMAJORVERSION
The major version of IIS, if installed
IISMINORVERSION
The minor version of IIS, if installed
To evaluate environment variables, preface the variable name with a % symbol, as this
example illustrates.
%HOMEDRIVE = "C:" (verify that the home drive is C)
Lesson 3: Deploying Websites
CHAPTER 8
431
To simply check a property for a specific value, you can use the = operator, as the following
example shows.
IISVERSION = "#6" (check for IIS 6.0)
VersionNT = 500 (check for Windows 2000)
You can also check for ranges.
IISVERSION >= "#7" (check for IIS 4.0 or later)
Version9X <= 490 (check for Windows Me or earlier)
You can also check for multiple conditions by using Boolean operators: Not, And (which returns
true if both values are true), Or (which returns true if either value is true), Xor (which returns true
if exactly one value is true), Eqv (which returns true if both values are the same), and Imp (which
returns true if the left term is false or the right term is true). The following example demonstrates
a Boolean operator.
WindowsBuild=2600 AND ServicePackLevel=1 (check for Windows XP with Service Pack 1)
Creating Pregrouped Launch Conditions
You can also create pregrouped search and launch condition sets for common scenarios. Doing so simply creates both a search and a launch condition, with both items preconfigured to
work together. You simply need to adjust their properties according to your needs. To create
a grouped launch condition, you right-click the root node in the Launch Conditions editor
(Requirements On Target Machine) and select one of the following:
■
Add File Launch Condition
■
Add Registry Launch Condition
■
Add Windows Installer Launch Condition
■
Add .NET Framework Launch Condition
■
Add Internet Information Services Launch Condition
As an example, adding file-based conditions (such as DLL conditions) is a common practice.
The following steps walk through the creation of a file-based, pregrouped launch condition:
1. In the Launch Conditions editor, right-click the Requirements On Target Machine root
node. Select Add File Launch Condition to get started.
The Launch Conditions editor adds a search condition (Search For File1) to the Search Target
Machine node and a launch condition (Condition1) to the Launch Conditions node. The new
search condition’s Property property value has a default name of FILEEXISTS1. This value
links it to the Condition property of the launch condition.
2. You can rename both the new search condition and the new launch condition so that
the names indicate the file you are searching for.
Figure 8-21 shows an example of both conditions added to the Launch Conditions editor.
Notice that the Search For File1 condition is selected and its Properties window is displayed. Notice that the Property property is set to FILEEXISTS1.
432
CHAPTER 8
Debugging and Deploying
Figure 8-21 The file search criterion and related condition.
3. In Figure 8-21, notice that there are several search condition properties in the Properties
window. For a file search, you typically configure these properties as described in Table 8-6.
Table 8-6 File Search Condition Properties
Property
Description
FileName
The name of the file to look for. Just specify the file name with
its extension, not the folder.
Folder
The folder in which to search for the file. Here you can select a
special folder such as [CommonFilesFolder] or [WindowsFolder].
You can also hardcode a direct path to the file. You can search
subfolders by specifying the Depth field.
Depth
The number of nested folders within the specified folder to
search.
MinDate,
MaxDate
The minimum and maximum last modified date of the file.
MinSize, MaxSize
The minimum and maximum size of the file.
MinVersion,
MaxVersion
The minimum and maximum version of the file.
Property
The name of the property that stores the results of this search.
You specify this property name in the corresponding launch
condition.
Lesson 3: Deploying Websites
CHAPTER 8
433
4. Next, you select the new launch condition and view its Properties window. The properties
are typically configured as described in Table 8-7.
Table 8-7 Launch Condition Properties
Property
Description
Condition
The condition that must evaluate to true for installation to continue. By
default, this is the name of a property assigned to a search condition,
and if the search finds the required file or other object, the launch condition is fulfilled. You can specify more complex conditions to check for
operating system version, service pack levels, and other criteria.
InstallUrl
The URL to be retrieved by the setup project if the launch condition
is not met. The user can access this resource to install the required
component. This is an optional setting.
Message
The message that is displayed to the user if the launch condition is
not met.
In this example, the setup project would look for the dependent file as configured in the
search condition. The launch condition would then execute and throw an error if the file is
not found.
Writing to the Registry as Part of Deployment
Storing information in the registry used to be the preferred way to store application settings.
With the .NET Framework, the best practice for configuring .NET Framework applications is to
store settings in configuration files. However, there might still be times when you need to add
registry entries during setup (although such situations are rare). For example, you might need
to configure an aspect of the operating system or another application.
To configure a Web Setup Project to add a registry entry during setup, follow these steps:
1. In Solution Explorer, select your setup project.
2. From the View menu, select Editor, and then select Registry. The Registry editor opens.
3. The core folders of the registry are shown by default. To add a registry setting in a
nested key, you need to add each nested key to the editor. For example, to add a setting to HKEY_LOCAL_MACHINE\SOFTWARE\Microsoft\ASP.NET\, you need to add
the SOFTWARE, Microsoft, and ASP.NET keys to the HKEY_LOCAL_MACHINE hive in the
Registry Settings editor.
4. Right-click the key to which you want to add a setting, select New, and then select String
Value, Environment String Value, Binary Value, or DWORD Value. Type the name of the
value, and then press Enter.
5. To define the value, select the registry value, view the Properties window, and set the
Value property. To make the installation of the value conditional, define the Condition
property.
434
CHAPTER 8
Debugging and Deploying
Figure 8-22 shows an example of the Registry editor in Visual Studio.
Figure 8-22 Adding a registry entry to the deployment process.
By default, registry keys are not removed when an application is uninstalled. To automatically
remove a registry key during uninstallation, select the key and view the Properties window. Then
set the DeleteAtUninstall property to true.
Adding a Custom Setup Page
Administrators responsible for deploying and managing your websites can customize settings
by editing your Web.config file. To enable simpler configuration at setup time, you can add
custom setup wizard pages. With these pages, you can prompt users to custom-configure
information and then provide that information as parameters for custom actions. When
combined, custom setup wizard pages and custom actions enable you to perform the following types of tasks at setup time:
■
Display a license agreement The Web Setup Project template provides a dialog box
■
Modify settings in the Web.config file You can use user input to modify configura-
template for requiring the user to accept a license agreement.
tion settings without requiring administrators to know how to configure an Extensible
Markup Language (XML) file.
■
Perform custom configuration You can use a custom configuration to prompt the
user for information that will be stored in the registry or in another unusual location.
■
Activate or register your application You can prompt the user for a product key or
registration information. Prompts can specify either required or optional responses.
Lesson 3: Deploying Websites
CHAPTER 8
435
To add a custom setup wizard page to your Web Setup Project, you use the User Interface
editor (View | Editor | User Interface). The User Interface editor displays the different setup
phases for both standard and administrative installations of your application. Figure 8-23
shows the default view of the User Interface editor.
Figure 8-23 Using the User Interface editor to add pages to a setup wizard.
To add a custom setup page, you right-click the setup phase to which you want to add,
and then select Add Dialog. Normally you add dialog boxes to the Start phase under the
Install node. The Add Dialog window, shown in Figure 8-24, shows you the dialog boxes that
can be added to the selected installation setup.
Figure 8-24 The Add Dialog setup pages.
436
CHAPTER 8
Debugging and Deploying
The Administrative Install node is more restrictive. There you can add only a splash page, a
license agreement page, or a readme page.
Each dialog box template allows you to collect a different type of information during
setup. You can customize these dialog boxes only by hiding some controls and displaying
different labels.
You customize these controls through the Properties window. There you can configure all
aspects of a dialog box; Visual Studio does not provide a designer. To control the information
for which a dialog box prompts the user, edit the labels and property names for the dialog box.
For the text box and radio button types of dialog boxes, you can configure the label for each
field (for example, Edit1Label or Button1Label), the name in which the value is to be stored (for
example, Edit1Property or ButtonProperty), and the default value (for example, Edit1Value or
DefaultValue). The License Agreement template allows you to specify a license agreement file,
and the Splash template allows you to display a bitmap file.
You can also control the order in which your dialog boxes are shown to a user during setup.
To do so, right-click a dialog box node in the editor, and then click Move Up or Move Down.
You can delete a step in the process by right-clicking the step and then selecting Delete.
When you run the Web Setup Project, your custom dialog boxes appear as setup wizard
pages. If you configured pages to collect custom information from users, you can reference
that data in custom actions, as described in the next section.
Adding Custom Actions to Your Deployment
Web Setup Projects provide a great deal of flexibility and can meet most setup requirements.
If you have more demanding requirements, such as submitting registration information to a
web service or validating a product key, you can add custom actions to your setup project.
Custom actions can run in any of the four phases of setup:
■
Install This phase performs the bulk of the work done during setup by adding the
files and creating the configuration settings that are required to run your application.
■
Commit After the Install phase is complete and all of the changes that are required to
run your application have been made, the Commit phase finalizes these changes. After
the Commit phase is complete, setup cannot be rolled back, and the application must
be uninstalled with Add Or Remove Programs if removal is required.
■
Rollback The Rollback phase runs only if setup fails or is cancelled. In such a case, the
Rollback phase occurs instead of the Commit phase and removes any new files or settings.
■
Uninstall This phase removes files and settings from the computer when the application is removed with Add Or Remove Programs. Often, uninstall routines leave settings
and databases in place so that they can be restored if the application is later reinstalled.
You add a custom action to your setup project through the Custom Actions editor. You can
access this editor by first selecting your setup project in Solution Explorer and then selecting
View | Editor | Custom Actions.
Lesson 3: Deploying Websites
CHAPTER 8
437
The Custom Actions editor displays the four setup phases. You can right-click the phase to
which you want to add a custom action. You then select Add Custom Action. Doing so launches
the Select Item In Project dialog box. From here you can choose to add a custom .exe or script
file that will execute at the appropriate phase of deployment. If you add more than one custom
action to a single phase, you can rearrange the custom actions by right-clicking an action and
then clicking Move Up or Move Down.
Deploying Web Applications by Using a Web Setup Project
After you configure your Web Setup Project and build it with Visual Studio, you are ready to
deploy it to an application server. To do so, you need to use the files generated as part of the
build process. There are typically two generated to the target build directory for Web Setup
Projects: an .exe file and an MSI file. These files are described in more detail here:
■
Setup.exe This is an executable file that installs the files and settings you added to
your Web Setup Project. When the file is being run, the setup wizard guides the user
through the installation process and prompts for any required configuration settings,
such as the website, virtual directory, and application pool (or process). Figure 8-25
shows an example.
Figure 8-25 Web Setup Projects use a setup wizard to install a website.
■
<WebSetupProjectName>.msi This is the Windows Installer file that contains any
files you added to your Web Setup Project. The user can install this file by doubleclicking it and launching the setup wizard. This is equivalent to running the Setup.exe
file. Alternatively, network administrators can distribute the MSI file by using Active
Directory software distribution.
Although most users are probably more familiar with using Setup.exe to install an application, the Windows Installer file is smaller, far more versatile, and familiar to most systems
administrators.
438
CHAPTER 8
Debugging and Deploying
Deploying Web Applications by Using the Copy Web Tool
Web Setup Projects are useful if you are providing a website to many users or to an administrative team. However, if you are responsible for updating the website, it might be impractical
to log on to the web server, copy over an installation, and run the Windows Installer package
each time you make an update to the site. This is especially true if you frequently deploy to a
development or test server.
For some development scenarios, you might be able to edit the website directly on the web
server. However, changes you make are immediately implemented on that server. Of course, this
includes any bugs that might be lurking in the new code.
There are many scenarios in which you simply need to copy changes between two servers.
These might be changes from your development environment up to staging, or even from
staging to production, in some limited scenarios. In these cases, you can use the Copy Web
tool to publish changes between any two web servers.
The Copy Web tool can copy individual files or an entire website. You can select a source
and a remote site and move files between them. You can also use the tool to synchronize files.
This involves copying only changed files and detecting possible versioning conflicts in which the
same file on both the source and the remote site have been separately edited. The Copy Web
tool, however, does not merge changes within a single file; it only does complete file copies.
You launch the Copy Web tool from Visual Studio. To do so, you typically open the website you intend to use as the source (from which to copy). You can then right-click the site in
Solution Explorer and choose Copy Web Site. This launches the Copy Web tool, as shown
in Figure 8-26.
Figure 8-26 Using the Copy Web tool to synchronize two websites.
Lesson 3: Deploying Websites
CHAPTER 8
439
The Copy Web tool displays two panes: Source Web Site and Remote Web Site. The source
website is the site from which you want to copy. The remote website is the copy-to site or
destination. To set up a remote website, you must create a connection by clicking Connect at
the top of the tool. This launches the Open Web Site dialog box, which allows you to find a
website. There are four options for navigating to a remote website:
■
File system This option provides a destination website on a local hard drive or a
shared folder. A network drive connected to a shared folder on the remote web
server is the fastest way to transfer a website to a server on your intranet. You must
have previously configured the website on the server and shared the website folder.
This technique transfers your source code across the network in clear text unless
you have network-layer encryption, such as that provided by Internet Protocol
security (IPsec).
■
Local IIS This provides a destination website running within IIS on your local computer.
You can use this interface to create a new website on your local server.
■
FTP site This provides a destination remote website for which the server is configured
to run an FTP server and allow uploads and downloads to the website folder. You must
have previously configured the website on the server and shared the website folder. This
technique transfers your user credentials and your source code across the network in
clear text, and therefore is not recommended.
■
Remote site This provides an interface with which you can transfer files to and from
a remote website by using HTTP, if you have configured the web server to allow this
type of update. You can use this interface to create a new website on your server. To
prevent your source code from being sent across the network in clear text, configure
the website with a Secure Sockets Layer (SSL) certificate and select the Connect Using
Secure Sockets Layer check box in the Open Web Site dialog box.
Visual Studio will save configured connections for future use. After the connection has been
established, you can copy or synchronize files between the source and the remote website in
several different ways:
■
Copy individual files Select files in either the source or the remote website, and then
click the directional Copy Selected Files buttons.
■
Copy the entire site Right-click the Source Web Site pane, and then select Copy Site
To Remote. To copy the Remote Web Site to the source website, right-click the Remote
Web Site pane, and then select Copy Site To Source.
■
Synchronize individual files Select files in either the source or the remote website,
and then click Synchronize Selected Files.
■
Synchronize the entire site Right-click the Source Web Site pane, and then select
Synchronize Site.
440
CHAPTER 8
Debugging and Deploying
When you are copying or synchronizing files, versioning conflicts might arise if another
developer modifies the remote copy of a file that you edited. Visual Studio doesn’t have the
capability to merge or analyze these changes. Therefore, the Copy Web tool simply notifies
you of the conflict and lets you choose whether to overwrite the remote file with your local file,
overwrite your local file, or not overwrite either file. Unless you know exactly what changed
on a file, you should never overwrite it. Instead, you should analyze the file, determine what
changed, and attempt to manually merge the changes. Otherwise, you might overwrite a
coworker’s development effort.
Precompiling and Publishing ASP.NET Websites
Projects created with the ASP.NET Web Site template are compiled by the web server the first
time a user requests a page from a new or updated website. Compiling doesn’t usually take
long (often less than a second or two), but the first few webpage requests are delayed while
the website is compiled. To avoid this delay, you can precompile your website before you
publish it to a server.
Note Precompiling web applications
This section applies to ASP.NET websites, but not to ASP.NET web applications. Projects
created with the ASP.NET Web Application template are always precompiled.
To precompile and publish a website, follow these steps:
1. Open the website you want to precompile and publish. Next, right-click your website
in Solution Explorer and select Publish Web Site. Alternatively, you can select the Build
menu and then choose Publish Web Site.
2. In the Publish Web Site dialog box, specify a location to which to publish. If you click
the ellipsis button (…), you can browse the file system, local IIS, an FTP site, or a remote
site, exactly as you would if you were using the Copy Web tool.
3. In the Publish Web Site dialog box, select your options:
■
Allow This Precompiled Site To Be Updatable This check box, when selected,
specifies that the content of ASPX pages are not compiled into an assembly; instead,
the markup is left as is, allowing you to change HTML and client-side functionality
after precompiling the website. Selecting this check box is equivalent to adding the
-u option to the aspnet_compiler.exe command.
■
Use Fixed Naming And Single Page Assemblies This option specifies that batch
builds are turned off during precompilation to generate assemblies with fixed names.
Themes and skin files continue to be compiled to a single assembly. This option is not
available for in-place compilation.
Lesson 3: Deploying Websites
CHAPTER 8
441
■
Emit Debug Information Select this check box if you might need to debug the site
after you publish it.
■
Enable Strong Naming On Precompiled Assemblies This check box, when selected,
specifies that the generated assemblies are strongly named by using a key file or key
container to encode the assemblies and to ensure that they have not been tampered
with. After you select this check box, you can do the following:
■
Specify the location of a key file to use to sign the assemblies. If you use a key
file, you can select Delay Signing, which signs the assembly in two stages: first
with the public key file, and then with a private key file that is specified later
during a call to the aspnet_compiler.exe command.
■
Specify the location of a key container from the system’s cryptographic service
provider (CSP) to use to name the assemblies.
■
Specify whether to mark the assembly with the AllowPartiallyTrustedCallers
property, which allows strongly named assemblies to be called by partially
trusted code. If you do not specify this declaration, only fully trusted code
can use such assemblies.
4. Click OK to compile and publish the website.
Publishing a website can be an easy way to move a website from a development server to
a staging or production server.
Installing ASP.NET 4 on IIS
The .NET Framework 4 was released after Windows 7 and Windows Server 2008 R2 were
released. Therefore, as of the time of this writing, no operating system has built-in support
to run ASP.NET 4 applications. Before you can run an ASP.NET 4 application on a server,
you will need to install the .NET Framework 4. Naturally, Visual Studio 2010 installs the
.NET Framework 4 automatically, so your development computer will run your websites
correctly with no additional software.
Microsoft released an optional Windows Update package to install the .NET Framework 4
on computers with Windows XP, Windows Vista, Windows 7, Windows Server 2003, Windows
Server 2008, and Windows Server 2008 R2 operating systems. Therefore, systems administrators might have already installed the necessary components. If not, have the systems
administrators install the update.
After the .NET Framework 4 is installed, you need to configure IIS to run ASP.NET 4 applications by using the aspnet_regiis.exe command-line tool. The tool is located in the .NET
Framework directory, which is typically %windir%\Microsoft.NET\Framework\v4.0.30319
\aspnet_regiis.exe (for 32-bit systems) or %windir%\Microsoft.NET\Framework64\v4.0.30319
(for 64-bit systems).
442
CHAPTER 8
Debugging and Deploying
Usually you will only need to use the following options:
■
-i This installs ASP.NET 4 and updates both the IIS Classic mode and IIS Integrated
mode handlers and script mappings. When you use this option, aspnet_regiis.exe
updates the standard DefaultAppPool and Classic .NETAppPool application pools to
use the .NET Framework 4 version of the Common Language Runtime. This will not
usually cause compatibility problems. However, because it changes the configuration
of all existing ASP.NET websites, you should thoroughly test your applications with the
newer version of the CLR prior to using this option. This option also interrupts running
applications, causing active users to be logged out (when you are using forms-based
logons) and ViewState to be lost. For those reasons, avoid using this option on production servers.
■
-ir Like -i, this installs ASP.NET 4. This option does not change the existing application
pools, however, reducing potential application compatibility problems.
■
-iru This performs a -i installation if ASP.NET is not currently registered. If ASP.NET is
currently registered, this performs a -ir installation.
■
-enable This enables the ASP.NET Internet Server Application Programming Interface
(ISAPI) extension for IIS 6.0 or IIS 7.0 in Classic mode.
■
-s path This option updates scriptmaps and application-pool assignments for the
specified path and all subdirectories to ASP.NET 4. If the server is running IIS 6.0, aspnet_
regiis.exe updates the scriptmaps. If the server is running IIS 7.0, aspnet_regiis.exe maps
the application to a new ASP.NET 4 application pool. Specify the metabase path, which
might resemble W3SVC/1/ROOT/myapp or W3SVC/1634748923. To find the path for
IIS 6.0, search the metabase.xml file in the %windir%\system32\inetsrv\ folder for the
name of your website.
■
-sn path This updates scriptmaps and application-pool assignments for the specified
path to ASP.NET 4. Unlike –s, -sn does not apply to subdirectories.
■
-lv This option displays the installation path of all versions of ASP.NET.
For a description of all available options, see “ASP.NET IIS Registration Tool” at
http://msdn.microsoft.com/en-us/library/k6h9cz8h.aspx.
Quick Check
1 . What launch condition does a Web Setup Project include by default?
2. What are the four phases of a Web Setup Project deployment?
Quick Check Answers
1 . By default, a Web Setup Project checks for an IIS version later than 4.0.
2. Install, Commit, Rollback, and Uninstall are the four phases of Web Setup Project
deployment.
Lesson 3: Deploying Websites
CHAPTER 8
443
Pr actice
Deploying Web Applications
In this practice, you deploy applications by using two techniques: a Web Setup Project and
the Copy Web tool.
On the Companion Media
If you encounter a problem completing an exercise, you can find the completed projects
in the samples installed from this book’s companion CD. For more information about the
project files and other content on the CD, see “Using the Companion Media” in this book’s
Introduction.
E xercise Creating a Web Setup Project
In this exercise, you create a new ASP.NET website and a related Web Setup Project.
1. Open Visual Studio and create a new website by using the language of your preference.
This site will serve as the basis for your setup project.
2. Add some simple pages to the site. This will give you something to set up and deploy.
These pages could include order.aspx, product.aspx, customer.aspx, and vendor.aspx.
3. Add a Web Setup Project to your solution. To do so, from the File menu, select Add, and
then select New Project. Under Project Types, expand Other Project Types, expand Setup
And Deployment, and then select Visual Studio Installer. Under Templates (on the right
side), select Web Setup Project. Name the project MyWebSetup, and click OK.
You should see a new project in Visual Studio Solution Explorer. You should also see
the File System editor for the setup project.
4. Next, you need to connect the setup project to your website. Within the left pane of the
editor, right-click Web Application Folder, select Add, and then select Project Output. In
the Add Project Output Group dialog box, select Content Files, and click OK.
If you were to build and install your project at this point, it would copy the site pages
and code-behind files to the location specified by a user during setup.
5. In the File System editor, expand the Web Application Folder. Notice that there is a Bin
directory. This is where you would embed any DLL files that might need to be included
by your solution. You would embed these files by right-clicking Bin and selecting Add
to add a file. For this practice, there are no dependent DLL files, so you can skip this.
6. Next, add a folder and a file that should be included with the build. To do so, right-click
the Web Application Folder in the File System editor. Select Add, and then select Web
Folder. Name the folder Images.
7. Right-click the Images folder, select Add, and then select File. Navigate to the Pictures
folder on your computer. Select a few sample pictures, and click Open.
444
CHAPTER 8
Debugging and Deploying
8. Now add a launch condition. From the View menu, select Editor, and then select
Launch Conditions. In the Launch Conditions editor, right-click Requirements On
Target Machine, and then select Add File Launch Condition. Rename the new search
condition (currently named Search For File1) to Search for Browscap. Select the new
search condition and view the Properties window.
■
Set the FileName property to Nothing.ini. (This file doesn’t exist, but you’ll fix the
error later.)
■
Set the Folder property to [WindowsFolder] and set the Depth property to 4. This
tells setup to search the system folder and all subfolders four levels deep for a file
named Nothing.ini. Note that the Property value is set to FILEEXISTS1.
9. Rename the new launch condition (currently named Condition1) to Browscap Condition.
Select the new launch condition and view the Properties window.
■
Set the InstallUrl property to http://blogs.iis.net/dmnelson/archive/2009/05/14
/updating-browscap-ini-for-internet-explorer-8.aspx, which contains information about the Browscap.ini file. In the real world, you would provide a link with
instructions on how to fulfill the requirement.
■
Set the Message property to You must have a Browscap.ini file to complete
installation. Would you like more information?. Notice that the Condition property
is already set to FILEEXISTS1, which corresponds to the search condition Property value.
10. Build the Web Setup Project. Right-click your setup project in Solution Explorer and then
select Build. In the Output window, make note of the folder containing the output files.
Open the output folder in Windows Explorer and examine the files that are present. You
should see both an MSI and a setup.exe file.
11. Open the folder that contains the MSI file. Double-click the MSI file to launch setup.
After a few seconds, you should see an error message indicating that the Browscap.ini
file does not exist, as shown in Figure 8-27.
Figure 8-27 The MSI file error message.
Recall that we added this condition in step 9. We also set the FileName property of the
search condition to Nothing.ini in step 8, which is why this error is being thrown.
12. Click Yes. You will be taken to the InstallUrl set as part of the condition.
13. Return to Visual Studio. Open the Launch Conditions editor for the Web Setup Project.
Lesson 3: Deploying Websites
CHAPTER 8
445
14. Select Search For Browscap under Search Target Machine. View the Properties window.
Change the FileName property to look for the file Browscap.ini.
15. Rebuild the Web Setup Project (right-click and select Rebuild).
16. Return to the directory in which the MSI file exists. Rerun the MSI file. This time, the
computer should meet the setup requirements because the Browscap.ini file exists in
the Windows folder.
Note Installation issues
Depending on your environment, you might run into additional issues. If, for example,
you are running Windows Vista and IIS 7.0, you need an IIS 6-compatible metabase for
the IIS condition to validate. You can tweak the condition or add the IIS 6 metabase to
IIS 7.0 from Control Panel (classic view) | Programs And Features | Turn Windows Feature
On Or Off | Internet Information Services | Web Management Tools | IIS 6 Management
Compatibility. Another issue is security in Windows Vista and Windows 7. You might have
to run the Setup.exe file (and not the MSI file) by right-clicking Setup.exe and selecting
Run As Administrator.
17. On the Select Installation Address page, notice that you have the opportunity to select
the website, virtual directory, and application pool. Choose a unique virtual directory
name and make note of it. Click Next.
18. Finish walking through the installation steps.
19. Open the Internet Information Services console (Control Panel | Administrative Tools
| Internet Information Services [IIS] Manager). Find the virtual directory in which you
installed the website. Verify that the pages, code-behind files, and images exist.
As you can see, deploying a website can be as easy as installing a Windows Forms application. Although this process takes you through a manual installation of a Windows Installer
package, you can also deploy the MSI file in an automated manner.
Lesson Summary
446
■
Web Setup Projects allow you to create executable Setup.exe files and Windows Installer
packages (MSI files) that administrators can use to easily deploy your applications to a
web server.
■
The Copy Web tool can synchronize a website between a remote server and your local
computer. This is useful if you want to do deployment and testing on your local computer
and then upload the website to a remote web server. The Copy Web tool can also be useful in environments with multiple developers because it detects versioning conflicts.
■
Precompiling a website removes the delay that occurs when ASP.NET compiles an
application after the first user request. To precompile a website, use the Publish
Web Site tool.
CHAPTER 8
Debugging and Deploying
Lesson Review
You can use the following questions to test your knowledge of the information in Lesson 1,
“Deploying Websites.” The questions are also available on the companion CD in a practice
test, if you prefer to review them in electronic form.
Note Answers
Answers to these questions and explanations of why each answer choice is correct or
incorrect are located in the “Answers” section at the end of the book.
1. You need to add a registry entry to make your application function. In which phase of
the Web Setup Project should you add the registry entry?
A. Install
B. Commit
C. Rollback
D. Uninstall
2. You need to make a change to an operating system–related registry entry to make your
application function. You want to ensure that you remove this change if setup is cancelled
or the application is removed from the computer. In which phases should you undo your
registry modification? (Choose all that apply.)
A. Install
B. Commit
C. Rollback
D. Uninstall
3. Which of the following deployment tools enables multiple developers to work on a site
simultaneously while detecting potential versioning conflicts?
A. A setup project
B. A Web Setup Project
C. The Copy Web tool
D. The Publish Web Site tool
4. Which of the following deployment tools has the potential to improve responsiveness
of the website to end users?
A. A setup project
B. A Web Setup Project
C. The Copy Web tool
D. The Publish Web Site tool
Lesson 3: Deploying Websites
CHAPTER 8
447
Case Scenarios
In the following case scenarios, you apply what you’ve learned in this chapter. If you have difficulty completing this work, review the material in this chapter before beginning the next chapter.
You can find answers to these questions in the “Answers” section at the end of this book.
Case Scenario 1: Debugging
You are an application developer for Fabrikam, Inc., a financial services company. You have been
told that users are receiving errors on certain pages in the site. You need to turn off the detailed
errors in production and direct users to a default error page. However, administrators executing
code directly on the server should still be able to see the errors.
You also need to debug these errors. You cannot reproduce them on your machine.
Therefore, you need to debug them against the staging server.
Answer the following questions based on the scenario just defined.
1. How will you disable transmitting error detail to users of the site?
2. How will you implement a default error page for users?
3. How will you ensure that errors are still available for administrators to view?
4. How can you debug against the staging environment?
5. How can you apply these settings when you publish the web application in the future,
while keeping the current settings for use in your development environment?
Case Scenario 2: Troubleshooting
You are an application developer for Fabrikam, Inc., a financial services company. The configuration changes you made to your application in the previous scenario have been very successful.
However, you still have one persistent issue that you cannot seem to solve in development or
staging. Therefore, you want to turn tracing on for the specific page and view the results by
accessing the page from the server. In addition, your manager has asked you to begin monitoring key events in the system to verify the application’s health.
Answer the following questions based on the scenario just defined.
1. How should you configure tracing for the issue?
2. How should you enable health monitoring for your application?
448
CHAPTER 8
Debugging and Deploying
Case Scenario 3: Deploying a Website
You are a developer for Contoso, Ltd, a video streaming company. You are the sole developer
of the company’s external website, which allows customers to rent and view videos online. The
reliability of the application is critical, so the quality assurance team must test any changes you
make on a staging server before you make changes to the production web server.
You frequently work from your home. Unfortunately, Contoso’s virtual private network (VPN)
is unreliable, so you must do your development on your laptop computer. You can only access
the staging and production web servers from the internal network or the VPN, but that’s not a
problem because you don’t need to make updates to those servers very frequently. Additionally,
your Internet connection is a low-bandwidth cellular link, so you need to avoid sending large
updates across the connection.
Answer the following questions.
1. Which tool would you use to update the staging server?
2. Which tool should the quality assurance people use to update the production server?
Suggested Practices
To successfully master the exam objectives presented in this chapter, complete the
following tasks.
Debug a Website
For this task, you should complete the first practice to gain experience working with remote
debugging. Practice 2 helps with client script debugging.
■
Practice 1 Find some ASP.NET code that matches code deployed on a development
server. Deploy the remote debugging tool to the development server. Run the remote
debugging tool from the server. Use Visual Studio to open the code, attach to the
running server process, and step into code based on a request.
■
Practice 2 Find (or write) some code that contains client-side JavaScript. You can find
appropriate code on this book’s CD (in the samples for Chapters 7 and 8. Open the code
in Visual Studio. Run the webpage in a browser. Configure Internet Explorer to allow
script debugging. Use Visual Studio to connect to the browser’s process and step into
the client-side code.
Suggested Practices
CHAPTER 8
449
Troubleshoot a Website
For this task, you should complete the first item for practice with tracing. The second practice
should help with health monitoring.
■
Practice 1 Turn on tracing for one of your existing websites. Be sure to do so only in a
test environment. Review the trace data about your pages. Look carefully and determine
whether there are unexpected results.
■
Practice 2 Turn on health monitoring for one of your existing websites. Again, be sure
to do so only in a test environment. Review the data logged over a few days and assess
the results.
Publish a Web Application
For this task, complete at least Practices 1 and 2. If you want experience publishing to a public
hosting provider, complete Practice 3 as well.
■
Practice 1 Complete the one-click publishing walkthroughs listed at
http://msdn.microsoft.com/en-us/library/dd394698.aspx.
■
Practice 2 Configure an IIS Web server to support one-click publishing. For detailed
instructions, read “Configuring MSDeploy in IIS 7” at http://william.jerla.me/post
/2010/03/20/Configuring-MSDeploy-in-IIS-7.aspx.
■
Practice 3 Publish a database-driven web application to a public hosting provider
that supports one-click publishing. Although none of them are free, Microsoft
provides a list of hosting providers at http://www.asp.net/find-a-hoster.
Use a Web Setup Project
For this task, you should complete at least Practices 1 and 2 to get a solid understanding of
how to use Web Setup Projects. If you want a better understanding of how applications are
distributed in enterprises and you have sufficient lab equipment, complete Practice 3 as well.
■
Practice 1 Create a Web Setup Project that prompts the user to provide database
connection information, and then stores the connection information as part of a connection string in the Web.config file.
■
Practice 2 Using the most recent real-world application you created or one of the
applications you created for an exercise in this book, create a Web Setup Project.
Deploy the Web Setup Project to different operating systems, including Windows
2000, Windows XP, Windows Server 2003, and Windows Server 2008. Verify that the
deployed application works on all platforms. If it does not work, modify your Web
Setup Project to make it work properly. Make note of how the Web Setup Project
handles computers that lack the .NET Framework 4.
■
Practice 3 Create a Web Setup Project and generate a Windows Installer file. If you
have sufficient lab equipment, use Active Directory software distribution to distribute
the website automatically to multiple servers.
450
CHAPTER 8
Debugging and Deploying
Use the Copy Web Tool
For this task, you should complete both practices to gain experience with using the Copy
Web tool.
■
Practice 1 Use the Copy Web tool to create a local copy of your most recent real-world
website. With your computer disconnected from the network, make an update to the website. Then use the Copy Web tool to update that single file on the remote web server.
■
Practice 2 Using a local copy of a website, make an update to different files on both
your local copy and the remote website. Then use the Copy Web tool to synchronize
the local and remote websites.
Precompile and Publish a Web Application
For this task, you should complete the practice to gain an understanding of the performance
benefits that can be realized by precompiling an application.
■
Enable tracing in a website. Then modify the Web.config file and save it to force the
application to restart. Open a page several times, and then view the Trace.axd file to
determine how long the first and subsequent requests took. Next, use the Publish Web
Site tool to precompile the application. Open a page several times, and then view the
Trace.axd file to determine how long the first and subsequent requests took with the
precompiled application.
Take a Practice Test
The practice tests on this book’s companion CD offer many options. For example, you can test
yourself on just the lesson review questions in this chapter, or you can test yourself on all the
70-515 certification exam objectives. You can set up the test so it closely simulates the experience of taking a certification exam, or you can set it up in study mode so you can look at the
correct answers and explanations after you answer each question.
More Info Practice tests
For details about all the practice test options available, see the “How to Use the Practice
Tests” section in this book’s Introduction.
Take a Practice Test
CHAPTER 8
451
CHAPTER 12
Working with
Data Source Controls
and Data-Bound Controls
M
icrosoft ASP.NET provides several server controls that build on top of the features
of Microsoft ADO.NET, LINQ to SQL, and LINQ to Entities. These controls simplify
the development of data-driven websites. They make it easier to build webpages that
access, display, manipulate, and save data. Using these controls can provide development
efficiency when you are building business applications that rely heavily on data.
This chapter first presents the ASP.NET data source controls. You use these controls
to configure access to data that you intend to use on a webpage. A data source can be a
relational database, data stored inside of in-memory objects (such as a DataSet or an Entity
Data Model), XML-based data, or data you retrieve via Microsoft Language-Integrated
Query (LINQ). The second lesson in this chapter demonstrates how you can bind to data to
allow users to interact with it. The lesson covers using web server controls such as GridView,
Repeater, DetailsView, and many more. The last lesson presents the new Dynamic Data
features of ASP.NET that allow you to easily create websites for working with the create,
read, update, and delete (CRUD) operations of an entire data model that exists as either
a DataContext (such as LINQ to SQL) or an ObjectContext (such as LINQ to Entities).
Exam objectives in this chapter:
■
Displaying and Manipulating Data
■
Implement DataSource controls.
■
Implement data-bound controls.
■
Create and configure a Dynamic Data project.
Lessons in this chapter:
■
Lesson 1: Connecting to Data with Data Source Controls 687
■
Lesson 2: Working with Data-Bound Web Server Controls 721
■
Lesson 3: Working with ASP.NET Dynamic Data 755
CHAPTER 12 685
Before You Begin
To complete the lessons in this chapter, you should be familiar with developing applications
with Microsoft Visual Studio 2010 by using Microsoft Visual Basic or Microsoft Visual C#. In
addition, you should be comfortable with all of the following:
■
The Visual Studio 2010 Integrated Development Environment (IDE)
■
Using Hypertext Markup Language (HTML) and client-side scripting
■
Creating ASP.NET websites and forms
■
Adding web server controls to a webpage
■
Understanding how generic types work in C# or Visual Basic
■
Understanding how to use ADO.NET to connect to and work with data
■
Writing LINQ queries and working with LINQ data–specific providers
Real World
Mike Snell
N
ot all applications require developers to write custom, abstracted data layers and
reusable frameworks. I’ve seen many simple business applications that suffered
from over-engineering. Many of these smaller applications can take advantage of
the simple data-binding techniques built into the Visual Studio ASP.NET tools. These
applications can be created quickly, typically do not require much testing, and allow
developers to focus on solving business problems rather than building frameworks
and reusable objects that might never realize the goal of reusability. In fact, ASP.NET
and ADO.NET can now generate a data layer for you by using LINQ to Entities.
Applications that can benefit from this approach often have a common profile: they
typically have compressed schedules, are meant to be websites from beginning
to end, and might fill a somewhat temporary need. When optimizing for these
considerations, you might find that building data-bound applications by using
the server controls in ASP.NET is fast, easy, and economical.
686 CHAPTER 12
Working with Data Source Controls and Data-Bound Controls
Lesson 1: Connecting to Data with Data Source
Controls
Data source controls are server controls that you can drag onto your page at design time.
A data source control does not have a direct visual component (you use data-bound controls
for actual data display, as discussed in the next lesson). Instead, they allow you to declaratively
define access to data found in objects, XML, and databases. This lesson examines how you
can use data source controls to make connecting to and working with data in an ASP.NET
webpage a fast and straightforward development process.
After this lesson, you will be able to:
■
Use the data source controls (LinqDataSource, ObjectDataSource, SqlDataSource,
AccessDataSource, XmlDataSource, SiteMapDataSource, and EntityDataSource) to
select data and bind it to a data-bound control.
■
Pass parameter values to data source controls to allow data filtering.
■
Enable data sorting with data source controls.
■
Modify data and save the changes to a data store by using data source controls.
Estimated lesson time: 40 minutes
Understanding the Data Source Controls
The data source controls in ASP.NET manage the tasks of selecting, updating, inserting, and
deleting data on a webpage. They do so in combination with data-bound controls. The databound controls provide the user interface (UI) elements that allow a user to interact with the
data by triggering events that call the data source controls.
There are multiple data source controls in ASP.NET. Each is meant to provide specialized
access to a certain type of data, such as direct access to a database, objects, XML, or LINQbased queries. These controls can be found in the System.Web.UI.WebControls namespace.
Figure 12-1 shows an overview of the data source controls in ASP.NET.
Lesson 1: Connecting to Data with Data Source Controls
CHAPTER 12 687
Figure 12-1 The DataSource web control classes.
Each data source control is used in a similar manner. You can drag the control onto your
webpage from the Toolbox in Visual Studio. You can then use the Configure Data Source
Wizard to connect to your data and generate markup for the data source control. Connecting
to data with markup (instead of code) is referred to as declarative data binding, because you
are declaring your data access rather than writing ADO.NET code. Figure 12-2 shows the step
for selecting data in this wizard.
This wizard creates the declarative markup used to define the data source connection information. This markup can contain connection information, data manipulation statements (such
as SQL), and more. The following shows an example of the SqlDataSource control’s markup for
connecting to the Products table in the Northwind database.
<asp:SqlDataSource ID=”SqlDataSource1” runat=”server”
ConnectionString=”<%$ ConnectionStrings:NorthwindCnnString %>”
SelectCommand=”SELECT * FROM [Alphabetical list of products]”>
</asp:SqlDataSource>
688 CHAPTER 12
Working with Data Source Controls and Data-Bound Controls
Figure 12-2 The Configure Data Source Wizard in Visual Studio allows you to select the data to be
exposed by your data source control.
Exam Tip
The wizard-based UI is a great tool for defining many of your data source declarations.
However, it is important that you know the markup syntax for working with these controls.
This will help with both programming against the controls and taking the exam. Therefore,
the rest of this lesson focuses on the markup (and not the wizard-based UI).
Each data source control is specialized for the type of data with which it is meant to work.
The following sections provide an overview of what makes each of these controls unique. The
discussion includes some of the common uses of data source controls, such as binding, filtering,
sorting, and modifying data.
Lesson 1: Connecting to Data with Data Source Controls
CHAPTER 12 689
Using Objects as Data Sources with ObjectDataSource
Many web applications work with a middle tier, or business layer, for retrieving and working with
application data. This middle tier encapsulates database code inside classes. Web developers can
then call methods on these classes to select, insert, modify, and delete data. With this structure,
developers do not have to write direct ADO.NET code, because the code is written by whoever
wrote the middle tier. In addition, this middle tier is often reusable across different applications.
You can use the ObjectDataSource control in ASP.NET to connect to and work with middletier objects in much the same way that you would work with the other data source objects. This
control can be added to a page and configured to create an instance of a middle-tier object
and call its methods to retrieve, insert, update, and delete data. The ObjectDataSource control is
responsible for the execution lifetime of the object. It creates it and disposes of it. Therefore, the
business layer code should be written in a stateless manner. Alternatively, if the business layer
uses static methods (or shared methods, in Visual Basic), the ObjectDataSource can use these
methods without creating an instance of the actual business object. In this case, however, keep
in mind that you could end up with performance issues related to thread contention as multiple
requests try to access the same static method.
You configure an ObjectDataSource to connect to a class by setting its TypeName attribute
to a string that represents a valid type to which the web application has access. This class might
be inside your App_Code directory or inside a DLL file to which the website has a reference (it
should not be in your webpage’s code-behind file). You then set the SelectMethod attribute to a
valid method name on the class. The ObjectDataSource control will then call this method when
the data is requested.
As an example, imagine that you need to write an interface to allow a user to manage the
shipper table inside the Northwind database. You might have a business object that can return
all the shippers in the database and that looks as follows.
Sample of Visual Basic Code
Public Class Shipper
Private Shared _cnnString As String = _
ConfigurationManager.ConnectionStrings("NorthwindConnectionString").ToString
Public Shared Function GetAllShippers() As DataTable
Dim adp As New SqlDataAdapter( _
"SELECT * FROM shippers", _cnnString)
Dim ds As New DataSet("shippers")
adp.Fill(ds, "shippers")
Return ds.Tables("shippers")
End Function
End Class
690 CHAPTER 12
Working with Data Source Controls and Data-Bound Controls
Sample of C# Code
public class Shipper
{
private static string _cnnString =
ConfigurationManager.ConnectionStrings["NorthwindConnectionString"].ToString();
public static DataTable GetAllShippers()
{
SqlDataAdapter adp = new SqlDataAdapter(
"SELECT * FROM shippers", _cnnString);
DataSet ds = new DataSet("shippers");
adp.Fill(ds, "shippers");
return ds.Tables["shippers"];
}
}
The Shipper class just listed returns a DataTable as a result of a call to GetAllShippers. You
can configure an ObjectDataSource control to provide this data to a webpage by setting the
TypeName and SelectMethod attributes as in the following code.
<asp:ObjectDataSource
ID="ObjectDataSource1"
runat="server"
TypeName="Shipper"
SelectMethod="GetAllShippers">
</asp:ObjectDataSource>
You can then use this data source control to bind to a web control (more on this in the
next lesson). For example, the following markup binds the ObjectDataSource to a DetailsView
control to display the information to the user.
<asp:DetailsView
ID="DetailsView1"
runat="server"
DataSourceID="ObjectDataSource1"
AllowPaging="true">
</asp:DetailsView>
Figure 12-3 shows an example of the output.
Lesson 1: Connecting to Data with Data Source Controls
CHAPTER 12 691
Figure 12-3 An ObjectDataSource bound to a DetailsView control.
Notice that the Shipper.GetAllShippers method returns a DataTable. An ObjectDataSource
class can work with any data that implements any of the following interfaces: IEnumerable,
IListSource, IDataSource, or IHierarchicalDatasource. This means that as long as your business
object class returns data as a DataTable, a DataSet, or some form of a collection, you can be
sure that this data can be used with an ObjectDataSource control.
Passing Parameters
The business objects with which you work will undoubtedly define methods that take parameter
values. These parameters might define a filter on the data or indicate values to be used when
inserting or updating data. Fortunately, you can use the ObjectDataSource to map various pagelevel elements to parameters to be passed to your objects.
There are multiple sets of parameters you can define for an ObjectDataSource. These
sets include Select, Insert, Update, Delete, and Filter parameters. These parameters work in
conjunction with the method of the same name. For example, the <SelectParameters> set
works with the method defined by the SelectMethod attribute.
The source of a parameter’s value can come from multiple places in your page or site, including
Cookie, Control, Session, QueryString, Form, or Profile objects. These options make defining and
mapping a data source an easier task. You can also define the source value in code.
As an example, suppose that you have a business object name Customer. Assume that
this object contains the GetCustomersByCity method, which takes a city value as string. The
method then returns a list of customers for the specified city parameter. Now suppose that
692 CHAPTER 12
Working with Data Source Controls and Data-Bound Controls
you need to create a data source control to map to this class. The ObjectDataSource should
pass the value for the city to the method from the query string. In this case, you would create a
SelectParameters set that includes a QueryStringParameter definition. The QueryStringParameter
definition would map between the name of the query string parameter and the name of the
method’s parameter. The following code shows an example.
<asp:ObjectDataSource
ID="ObjectDataSource1"
runat="server"
TypeName="Customer"
SelectMethod="GetCustomersByCity">
<SelectParameters>
<asp:QueryStringParameter
Name="city"
QueryStringField="city"
Type="String" />
</SelectParameters>
</asp:ObjectDataSource>
You might then attach this data source to a GridView or similar control. You can then call
the page by passing in the appropriate query string value, as follows.
http://localhost:5652/DataSourceSamples/Customers.aspx?city=London
You can use this same technique to pass multiple parameters of various types and from
various sources. You can also use this same technique to pass parameters meant to handle
inserting, updating, and deleting, as discussed in the next section.
Inserting, Updating, and Deleting
You can also use an ObjectDataSource control to define how data should be inserted, updated,
and deleted. The InsertMethod, UpdateMethod, and DeleteMethod attributes can be mapped
directly to the methods of an object that are to be called when these activities are invoked. You
then use parameter definitions to map values to these method calls.
As an example, recall the Shipper class discussed previously. Now suppose that additional
methods have been added to this object. These method signatures might look as follows.
Sample of Visual Basic Code
Public Shared Function GetAllShippers() As DataTable
Public Shared Sub InsertShipper(ByVal companyName As String, ByVal phone As String)
Public Shared Sub UpdateShipper(ByVal shipperId As Integer, _
ByVal companyName As String, ByVal phone As String)
Public Shared Sub DeleteShipper(ByVal shipperId As Integer)
Sample of C# Code
public
public
public
public
static
static
static
static
DataTable GetAllShippers()
void InsertShipper(string companyName, string phone)
void UpdateShipper(int shipperId, string companyName, string phone)
void DeleteShipper(int shipperId)
Lesson 1: Connecting to Data with Data Source Controls
CHAPTER 12 693
You can map an ObjectDataSource control to each of these methods. In doing so, you need
to define the parameters each method expects. The following markup shows an example.
<asp:ObjectDataSource ID="ObjectDataSource1" runat="server" TypeName="Shipper"
SelectMethod="GetAllShippers" InsertMethod="InsertShipper"
UpdateMethod="UpdateShipper" DeleteMethod="DeleteShipper">
<DeleteParameters>
<asp:Parameter Name="ShipperId" Type="Int32" />
</DeleteParameters>
<UpdateParameters>
<asp:Parameter Name="shipperId" Type="Int32" />
<asp:Parameter Name="companyName" Type="String" />
<asp:Parameter Name="phone" Type="String" />
</UpdateParameters>
<InsertParameters>
<asp:Parameter Name="companyName" Type="String" />
<asp:Parameter Name="phone" Type="String" />
</InsertParameters>
</asp:ObjectDataSource>
You can then use this ObjectDataSource control with a data-bound control such as a
DetailsView. The following markup is an example. In this case, the fields are bound individually.
This allows granular control over the ShipperId field because it is an auto-generated primary
key (identity) in a Microsoft SQL Server database. Therefore, you set the InsertVisible property
to false, to make sure that the DetailsView does not try to pass a value for ShipperId to the
InsertMethod of the ObjectDataSource. You also set the ReadOnly attribute of the same field
to true, to indicate that the value should not be available to change during an edit operation.
<asp:DetailsView ID="DetailsView1" runat="server" AllowPaging="True"
DataSourceID="ObjectDataSource1" AutoGenerateRows="False" Width="450px"
DataKeyNames="ShipperID">
<Fields>
<asp:BoundField DataField="ShipperID" HeaderText="ShipperId"
ReadOnly="true" InsertVisible="false" />
<asp:BoundField DataField="CompanyName" HeaderText="CompanyName" />
<asp:BoundField DataField="Phone" HeaderText="Phone" />
<asp:CommandField ShowInsertButton="True" ShowDeleteButton="True"
ShowEditButton="True" />
</Fields>
</asp:DetailsView>
Defining a Filter
You can also apply filters to an ObjectDataSource. Filters apply to data returned from the
object’s methods as a DataSet or DataTable. This is because the filter is a valid filter expression
as defined by the ADO.NET DataColumn class.
To define a filter for an ObjectDataSource control, you set the FilterExpression attribute to
a valid filter. This filter will be applied after the data is retrieved from the database. You can
also use FilterParameters to map values from the page to the filter expression by defining a
filter expression that contains parameter mappings as numbers enclosed in braces. You then
add the appropriate filter parameters.
694 CHAPTER 12
Working with Data Source Controls and Data-Bound Controls
The following code shows an example. Here, the Customer.GetAllCustomers method is bound
to an ObjectDataSource control. When the data is returned, the filter expression city=’{0}’ is
applied to the result. The query string value for city is then passed as the {0} parameter to the
filter expression.
<asp:ObjectDataSource
ID="ObjectDataSource1"
runat="server"
TypeName="Customer"
SelectMethod="GetAllCustomers"
FilterExpression="city='{0}'">
<FilterParameters>
<asp:QueryStringParameter
Name="city"
QueryStringField="city"
Type="String" />
</FilterParameters>
</asp:ObjectDataSource>
Sorting and Paging
The data-bound controls that work with an ObjectDataSource control can be configured to
page and sort the data returned by the data source control. However, it is often better to sort
and page this data when the data is requested from the database. Doing so can reduce the
consumption of resources on your server.
The ObjectDataSource control defines specific attributes for managing sorting and paging.
You set these attributes to parameters of your SelectMethod. The SelectMethod must also
define these properties and use them for sorting and paging. In addition, by using these
specific properties, data-bound controls such as GridView can automatically work with your
data source to provide input for sorting and paging.
As an example, suppose you want to provide a business object method to control how
customer data is sorted and paged as it is retrieved before it is shown to the user. You could
define a business method as follows.
Sample of Visual Basic Code
Public Shared Function GetPagedCustomersSorted( _
ByVal sortCol As String, ByVal pageStart As Integer, _
ByVal numRecords As Integer) As DataTable
If numRecords <= 0 Then numRecords = 10
If sortCol = "" Then sortCol = "CompanyName"
Dim cnn As New SqlConnection(_cnnString)
Dim sql As String = "SELECT * FROM customers"
Dim cmd As New SqlCommand(sql, cnn)
Dim adp As New SqlDataAdapter(cmd)
cnn.Open()
Lesson 1: Connecting to Data with Data Source Controls
CHAPTER 12 695
Dim ds As New DataSet("customers")
adp.Fill(ds, pageStart, numRecords, "customers")
Dim dsSort = From cust In ds.Tables("customers").AsEnumerable()
Order By cust.Field(Of String)(sortCol)
Select cust
return dsSort.CopyToDataTable()
End Function
Sample of C# Code
public static DataTable GetPagedCustomersSorted(
string sortCol, int pageStart, int numRecords)
{
if (numRecords <= 0) numRecords = 10;
if (sortCol == "") sortCol = "CompanyName";
SqlConnection cnn = new SqlConnection(_cnnString);
string sql = "SELECT * from customers";
SqlCommand cmd = new SqlCommand(sql, cnn);
SqlDataAdapter adp = new SqlDataAdapter(cmd);
DataSet ds = new DataSet("customers");
cnn.Open();
adp.Fill(ds, pageStart, numRecords, "customers");
var dsSort = from cust in ds.Tables["customers"].AsEnumerable()
orderby cust.Field<string>(sortCol)
select cust;
return dsSort.CopyToDataTable();
}
Notice that this business method defines three parameters: one for sorting the data, one
for setting the starting record (or page), and one for setting the number of records in a page.
You can then use these parameters when defining an ObjectDataSource. You set the control’s
SortParameterName attribute to the parameter of your business object that is used for sorting
data. You set the StartRowIndexParameterName to the parameter that defines the row number
at which you want to start retrieving data. You then set the MaximumRowsParameterName to
the parameter that is used to define the number of rows you want to include in a data page.
The following markup shows an example.
<asp:ObjectDataSource
ID="ObjectDataSource1"
runat="server"
TypeName="Customer"
SelectMethod="GetPagedCustomersSorted"
SortParameterName="sortCol"
EnablePaging="true"
StartRowIndexParameterName="pageStart"
MaximumRowsParameterName="numRecords">
</asp:ObjectDataSource>
696 CHAPTER 12
Working with Data Source Controls and Data-Bound Controls
You can then bind this data source to a control such as a GridView. The following markup
shows an example.
<asp:GridView ID="GridView1" runat="server"
DataSourceID="ObjectDataSource1"
AllowPaging="True" PageSize="10" AllowSorting="true">
</asp:GridView>
When the page is run, the GridView control passes sorting and paging information to the
data source. However, because the paging is happening before the GridView is bound, the
GridView does not know the number of pages to display. Therefore, you need to implement
your own custom paging in this scenario to advance the PageIndex property of the GridView
control on the user’s request. After you reset this value, the GridView will pass the value on to
the ObjectDataSource.
Caching Data
You can tell ASP.NET to cache your ObjectDataSource control. This will keep the data in memory
between page calls and can increase the performance and scalability of your application if the
data is to be shared and accessed often.
To indicate caching of an ObjectDataSource, you set the EnableCaching attribute to true.
You then set the CacheDuration property to the number of seconds you want to have ASP.NET
cache the data. The following shows an example of these settings.
<asp:ObjectDataSource
ID="ObjectDataSource1"
runat="server"
TypeName="Shipper"
SelectMethod="GetAllShippers"
EnableCaching="true"
CacheDuration="30">
</asp:ObjectDataSource>
The first call to this page will call the object and return its data. Subsequent calls within
30 seconds (such as moving through data pages) will use the cached data (and not call the
underlying object).
Creating a DataObject Class
There are not many restrictions on which objects you can use as the source of ObjectDataSource
controls. If you know that your business object will be used as an ObjectDataSource, you can
define attributes on your class that make consuming your class inside an ObjectDataSource
easier in the designer. These attributes are used to predefine which methods to use as Select,
Insert, Update, and Delete methods.
To get started, you set the DataObject attribute at the top of your class. This simply
indicates that your class is meant to be a DataObject. Again, this is not required for use with
ObjectDataSource controls but simply makes things easier. The following shows an example
of the class declaration and attribute.
Lesson 1: Connecting to Data with Data Source Controls
CHAPTER 12 697
Sample of Visual Basic Code
<System.ComponentModel.DataObject()> _
Public Class Shipper
Sample of C# Code
[DataObject()]
public class Shipper
You then add the DataObjectMethod attribute to the top of each method you intend to use
as a data object method. You pass a DataObjectMethodType enum value to this attribute to
indicate Delete, Insert, Update, or Select. The following code shows an example of the method
signature and attribute.
Sample of Visual Basic Code
<System.ComponentModel.DataObjectMethod(ComponentModel.DataObjectMethodType.Select)> _
Public Shared Function GetAllShippers() As DataTable
Sample of C# Code
[DataObjectMethod(DataObjectMethodType.Select)]
public static DataTable GetAllShippers()
By defining these attributes, you make the designer aware of your business object’s
intentions. This can ease the burden of configuring an ObjectDataSource control when
large business objects with many methods are involved.
Connecting to Relational Databases by Using
SqlDataSource
The SqlDataSource control is used to configure access to relational databases such as SQL Server
and Oracle. It can also be configured to work with Open Database Connectivity (ODBC) and
Object Linking and Embedding (OLE) Db data connections. You configure the control to connect
to one of these database types. The code inside the control will then use the appropriate data
provider based on your configuration settings, including ADO.NET provider classes for SqlClient,
OracleClient, OleDb, and Odbc.
You configure the SqlDataSource control by first setting its ID property to a unique identifying string value. This property is similar to any other web control ID property. However, the
value is used when referring to the data source during data binding (which will be discussed
later in this section). You then set the ConnectionString property either to a valid connection
string or to page script that reads the connection string from the Web.config file (as shown in
the next code example).
You then set various command properties, including commands for selecting, inserting, updating, and deleting data. The command properties you set are based on how you intend to use
the control. For example, you use the SelectCommand to define an SQL statement that can be
used to retrieve data from a database. In this case, you would use the Text SelectCommandType
(which is the default). You can also set the SelectCommandType to StoredProcedure and then
provide a stored procedure name for the SelectCommand attribute.
698 CHAPTER 12
Working with Data Source Controls and Data-Bound Controls
The DataSourceMode attribute is used to define how the SqlDataSource control should
retrieve your data. You have two options: DataSet and DataReader. The former connects to the
database and returns all records as a DataSet instance. It then closes the database connection
before continuing to process the page. The latter, DataReader, keeps an open connection to
the database while it reads each row into the data source control.
The following markup shows an example of connecting to a Microsoft SQL Server Express
Edition database by first reading the connection string from the Web.config file. It uses a textbased SQL statement and a DataReader. It then binds the data source to a GridView control
for display.
<asp:SqlDataSource
ID="SqlDataSource1"
runat="server"
ConnectionString="<%$ ConnectionStrings:NorthwindConnectionString %>"
SelectCommandType="Text"
SelectCommand="SELECT * FROM [products]"
DataSourceMode="DataReader">
</asp:SqlDataSource>
<asp:GridView
ID="GridView1"
runat="server"
DataSourceID="SqlDataSource1">
</asp:GridView>
You can also work with the data source controls from code. When doing so, you replace the
markup attribute settings with object property settings. You first create the data source control
inside the Page_Init method. You then add the data source control to the page to ensure that
it is available to be bound to other controls. The following code shows the preceding markup
example translated as code in a code-behind page.
Sample of Visual Basic Code
Partial Class _Default
Inherits System.Web.UI.Page
Protected Sub Page_Init(ByVal sender As Object, _
ByVal e As System.EventArgs) Handles Me.Init
Dim sqlDs As New SqlDataSource
sqlDs.ConnectionString = _
ConfigurationManager.ConnectionStrings("NorthwindConnectionString").ToString
sqlDs.ID = "SqlDataSource1"
sqlDs.SelectCommandType = SqlDataSourceCommandType.Text
sqlDs.SelectCommand = "SELECT * FROM [products]"
sqlDs.DataSourceMode = SqlDataSourceMode.DataReader
Me.Controls.Add(sqlDs)
End Sub
Protected Sub Page_Load(ByVal sender As Object, _
ByVal e As System.EventArgs) Handles Me.Load
GridView1.DataSourceID = "SqlDataSource1"
End Sub
End Class
Lesson 1: Connecting to Data with Data Source Controls
CHAPTER 12 699
Sample of C# Code
public partial class DefaultCs : System.Web.UI.Page
{
protected void Page_Init(object sender, EventArgs e)
{
SqlDataSource sqlDs = new SqlDataSource();
sqlDs.ConnectionString =
ConfigurationManager.ConnectionStrings[
"NorthwindConnectionString"].ToString();
sqlDs.ID = "SqlDataSource1";
sqlDs.SelectCommandType = SqlDataSourceCommandType.Text;
sqlDs.SelectCommand = "SELECT * FROM [products]";
sqlDs.DataSourceMode = SqlDataSourceMode.DataReader;
this.Controls.Add(sqlDs);
}
protected void Page_Load(object sender, EventArgs e)
{
GridView1.DataSourceID = "SqlDataSource1";
}
}
Working with data source controls in code is less common than working with them in
markup. Declaring your data source in markup is very straightforward;, the attributes you define
in markup are the same as the properties you set in code. Therefore, the majority of this lesson
assumes that you are working with markup only, and will not provide examples in code.
Using Parameters
The SqlDataSource control can also be configured to use parameters for Select, Insert, Update,
Filter, and Delete commands. This is done by defining parameters inside your SQL statements
by using the @ param syntax. You then map parameter values to these parameter definitions by
using parameter declarations.
As an example, suppose that you are creating a SqlDataSource control to return products
based on their category ID. The category ID will be passed to the page as a value from
the query string. You can define this parameter inside the SelectParameters collection as
a QueryStringParameter. The following shows the markup of this example.
<asp:SqlDataSource
ID="SqlDataSource1"
runat="server"
ConnectionString="<%$ ConnectionStrings:NorthwindConnectionString %>"
SelectCommandType="Text"
SelectCommand="SELECT * FROM [products] WHERE CategoryID=@CategoryId"
DataSourceMode="DataSet">
<SelectParameters>
<asp:QueryStringParameter
Name="CategoryId"
QueryStringField="catId"
Type="Int16" />
</SelectParameters>
</asp:SqlDataSource>
700 CHAPTER 12
Working with Data Source Controls and Data-Bound Controls
You can then bind this control to a GridView (or similar control). When the page is accessed,
the data is filtered based on the query string parameter. The following shows an example Uniform
Resource Locator (URL) for this call:
http://localhost:5652/DataSourceSamples/Products.aspx?catId=2
You use the same method for defining InsertParameters, UpdateParameters, and
DeleteParameters. These parameters are mapped to the respective InsertCommand,
UpdateCommand, and DeleteCommand commands. Controls such as GridView and
DetailsView work to trigger update, insert, and delete actions and, in doing so, pass
parameter values to the appropriate command. This is similar to what was demonstrated
previously in the ObjectDataSource section.
Filtering Data with SqlDataSource
As with the ObjectDataSource control, you can also filter data inside a SqlDataSource control.
Again, the data must be a DataSet because the filter is applied to the ADO.NET DataColumn
or DataView.RowFilter property.
To define a filter, you set the FilterExpression attribute to a valid filter. This filter will be applied
after the data is retrieved from the database. You can also use FilterParameters to map values
from the page to the filter expression by defining a filter expression that contains parameter
mappings as numbers enclosed in braces. You then add the appropriate filter parameters.
The following code shows an example of a SqlDataSource control that first selects all
products from the database. It then applies a FilterExpression to show only those products
that have been discontinued.
<asp:SqlDataSource
ID="SqlDataSource1"
runat="server"
ConnectionString="<%$ ConnectionStrings:NorthwindConnectionString %>"
SelectCommandType="Text"
SelectCommand="SELECT * FROM [products]"
DataSourceMode="DataSet"
FilterExpression="Discontinued=true">
</asp:SqlDataSource>
Caching SqlDataSource Data
As with ObjectDataSource, you can also configure a SqlDataSource control to be cached
by the server. When doing so, however, you must set the DataSourceMode property to
DataSet. DataReader sources cannot be cached, because they would hold open a connection to the server.
You indicate the caching of a SqlDataSource control the same way you would an
ObjectDataSource control: by setting the EnableCaching and CacheDuration attributes.
The following shows an example.
Lesson 1: Connecting to Data with Data Source Controls
CHAPTER 12 701
<asp:SqlDataSource
ID="SqlDataSource1"
runat="server"
ConnectionString="<%$ ConnectionStrings:NorthwindConnectionString %>"
SelectCommandType="Text"
SelectCommand="SELECT * FROM [products]"
DataSourceMode="DataSet"
EnableCaching="True"
CacheDuration="30">
</asp:SqlDataSource>
Working with Access Data Files and AccessDataSource
Controls
The AccessDataSource control is meant to connect to and work with Microsoft Access file-based
databases (.mdb files). This control is very similar to the SqlDataSource control. In fact, it derives
from the SqlDataSource class. Therefore, you can expect to work with the AccessDataSource
control in a very similar manner when passing parameters, caching, filtering data, and calling
Access stored procedures.
Note The new Access database engine
The Access database engine has been changed in recent versions from Microsoft Jet to
one based on SQL Server. The AccessDataSource control is used to work with Jet-based
databases. These can be identified by the .mdf file extension. Newer Access files have the
.accdb extension. You can connect to these database files by using the SqlDataSource
control (not the AccessDataSource control).
One of the main differences between the AccessDataSource control and the SqlDataSource
control is how they connect to the database. The AccessDataSource control replaces the
SqlDataSource.ConnectionString property with the DataFile property. You pass a path to a
database file to this property to define a connection to an Access database. The following
markup shows how you configure the AccessDataSource control to connect to an .mdb file
in the App_Data folder.
<asp:AccessDataSource
ID="AccessDataSource1" runat="server"
DataFile="~/App_Data/AccessNorthwind.mdb"
SelectCommand="SELECT * FROM [Products]">
</asp:AccessDataSource>
The code inside this data source control uses the ADO.NET System.Data.OleDb provider for
connecting to an Access data file. Of course, this code is abstracted for you by the control itself.
You need only define the markup to begin accessing and working with data in the Access file.
702 CHAPTER 12
Working with Data Source Controls and Data-Bound Controls
Note Configuring access to a file-based database
To ensure that the webpage has access to this file, configure the ASP.NET process identity to
allow file-based access to the .mdb file.
Connecting to an Entity Model by Using EntityDataSource
The EntityDataSource control works much like the SqlDataSource control. However, the
SqlDataSource control is tied to a specific database model, whereas the EntityDataSource
control works with an Entity Data Model that gets mapped to an actual data store (see
Chapter 11, “Connecting to and Querying Data with LINQ,” for more information on
creating and working with Entity Framework’s Entity Data Model).
You configure the EntityDataSource control to provide a connection to the entity model’s
underlying data store, which is done through the ConnectionString property. This value is set
to a named entity model connection string that uses the System.Data.EntityClient provider. The
connection string is generated and stored in the Web.config file when you set up your entity
model (EDMX file).
You can then indicate an EntitySetName to point to the data you want to select and expose
through the data source control. This entity set is a named collection of data in your model.
Alternatively, you can use the CommandText attribute to define a custom LINQ query to define
your selection (more on this later in this section).
The following markup shows an example. This assumes that an entity model named
NorthwindEntities has been created. Notice the connection string reference. This string is
stored in the Web.config file. Also, notice that the EntitySetName is set to Orders. This
is used to establish a default entity set and will return all orders in the data store. Finally,
the results are bound to a GridView control for display.
<asp:EntityDataSource ID="EntityDataSource1"
runat="server"
ConnectionString="name=NorthwndEntities"
DefaultContainerName="NorthwndEntities"
EnableFlattening="False"
EntitySetName="Orders">
</asp:EntityDataSource>
<asp:GridView ID="GridView1" runat="server"
DataSourceID="EntityDataSource1">
</asp:GridView>
Lesson 1: Connecting to Data with Data Source Controls
CHAPTER 12 703
Selecting Data to Return
You saw in the previous example that you can return the entire collection for an entity by using
the EntitySetName attribute. The EntityDataSource allows you to get more specific with your
selection. You can do so through the Select attribute. You define a string in this attribute that
will be passed to ObjectQuery<T>. In this way, you can write LINQ to Entities code against the
data source for the Select, Where, and Order By attributes.
For example, suppose you want to return only specific fields from the OrderDetails collection
in an entity model. You might also want to rename some of these fields and even generate a
field based on a calculation. As with a LINQ to Entities query, you can specify a Select statement
that will do just that. Recall from Chapter 11 that this is called a projection, because you are
projecting the results into a collection of a new, anonymous type. The following markup shows
an example.
<asp:EntityDataSource ID="EntityDataSource1"
runat="server"
ConnectionString="name=NorthwndEntities"
DefaultContainerName="NorthwndEntities"
EnableFlattening="False"
EntitySetName="OrderDetails"
Select="it.OrderId as Id, it.UnitPrice, it.Quantity, it.UnitPrice * it.Quantity as
LineItemTotal">
</asp:EntityDataSource>
Specifying A Custom Query
You can specify an entire query (and not just the Select) by using the CommandText property
of the EntityDataSource. In this case, you need not set the EntitySetName. The query will
indicate the data to select. This query is written as an Entity SQL expression, which uses
different syntax than LINQ for Entities. The following markup shows an example (line
breaks in the CommandText property are added for clarity.
<asp:EntityDataSource ID="EntityDataSource1" runat="server"
ConnectionString="name=NorthwndEntities"
DefaultContainerName="NorthwndEntities"
CommandText =
"Select o.OrderId as Id, o.UnitPrice, o.Quantity,
o.UnitPrice * o.Quantity as LineItemTotal
from OrderDetails as o
where o.Discount > 0
order by o.ProductId">
</asp:EntityDataSource>
Note that you can write the same query by using the independent Select, Where, and
OrderBy properties of the EntityDataSource control. You will see more on this in upcoming
sections.
704 CHAPTER 12
Working with Data Source Controls and Data-Bound Controls
Specifying Objects to Return
You can specify that additional object collections be returned in the result (in addition to the
collection being queried). These additional objects are added to your collection by using
the Include attribute. These objects should exist as a navigation property in the entity data
model. For example, the following markup returns all Orders. For each order object, the
results will also include the OrderDetails collection.
<asp:EntityDataSource ID="EntityDataSource1" runat="server"
ConnectionString="name=NorthwndEntities"
DefaultContainerName="NorthwndEntities"
EntitySetName="Orders"
Include="OrderDetails">
</asp:EntityDataSource>
Ordering Results
You can use the OrderBy property of the EntityDataSource control to specify an order by
statement that will be passed to ObjectQuery<T>. The following markup shows an example
of ordering the OrderDetails entity by ProductId.
<asp:EntityDataSource ID="EntityDataSource1" runat="server"
ConnectionString="name=NorthwndEntities"
DefaultContainerName="NorthwndEntities"
EntitySetName="OrderDetails"
OrderBy="it.ProductId">
</asp:EntityDataSource>
Filtering Data
You can use the Where property of the EntityDataSource control to specify a Where statement
that will be passed to ObjectQuery<T> without modification. The following markup shows an
example of filtering orders for only those that have a discount applied.
<asp:EntityDataSource ID="EntityDataSource1" runat="server"
ConnectionString="name=NorthwndEntities"
DefaultContainerName="NorthwndEntities"
EntitySetName="OrderDetails"
OrderBy="it.ProductId"
Where="it.Discount > 0">
</asp:EntityDataSource>
Defining Parameters
The EntityDataSource control allows you to define several parameters that can be used with the
@ paramName syntax inside various properties, including Select, Where, and CommandText.
These ParameterCollection objects include CommandParameters, DeleteParameters,
OrderByParameters, SelectParameters, UpdateParameters, and WhereParameters.
Lesson 1: Connecting to Data with Data Source Controls
CHAPTER 12 705
Each of these parameter collections might contain an ASP.NET parameter control
such as ControlParameter, FormParameter, QueryStringParameter, CookieParameter,
and similar parameters. This allows you to pass values from your website dynamically
to the EntityDataSource control.
As an example, suppose you want to filter orders based on their value. You might ask a
user to enter a value into a TextBox control. You could then create a <ControlParameter/>
in the WhereParameters collection of an EntityDataSource control to map the TextBox.Text
field to the Where clause. The following is an example; the parameter is defined as @
OrderValue, which aligns with the parameter name, OrderValue.
<asp:EntityDataSource ID="EntityDataSource1" runat="server"
ConnectionString="name=NorthwndEntities"
DefaultContainerName="NorthwndEntities"
EntitySetName="OrderDetails"
OrderBy="it.ProductId"
Where="(it.Quantity * it.UnitPrice) > @OrderValue">
<WhereParameters>
<asp:ControlParameter
ControlID="TextBoxValue" Name="OrderValue"
DbType="Int32" PropertyName="Text"
DefaultValue="0" />
</WhereParameters>
</asp:EntityDataSource>
Enter an order value on which to filter:<br />
<asp:TextBox ID="TextBoxValue" runat="server"></asp:TextBox>
<asp:Button ID="ButtonUpdate" runat="server" Text="Button" />
<asp:GridView ID="GridView1" runat="server"
DataSourceID="EntityDataSource1">
</asp:GridView>
Note that you can set the AutoGenerateWhereClause or AutoGenerateOrderByClause attributes to true if you want to have the EntityDataSource control automatically map a parameter to
a field in the results. The parameter and field must have the same name for this to work.
Paging, Sorting, Editing, and Updating Data
The EntityDataSource control supports a few additional attributes that you can use to enable
specific scenarios. These attributes include AutoPage, AutoSort, EnableInsert, EnableUpdate,
and EnableDelete. These are all Boolean properties that, if set to true, will enable these features
for your EntityDataSource. Of course, the features are provided by the underlying entity model;
they then need to be exposed via a visible control such as a GridView.
The following markup shows an example of both a fully enabled EntityDataSource control
and a GridView control that leverages all of these features. A user can access this page and
view, sort, edit, update, and delete data.
706 CHAPTER 12
Working with Data Source Controls and Data-Bound Controls
<asp:EntityDataSource ID="EntityDataSource1" runat="server"
ConnectionString="name=NorthwndEntities"
DefaultContainerName="NorthwndEntities"
EntitySetName="OrderDetails"
AutoPage="true"
AutoSort="true"
EnableDelete="true"
EnableInsert="true"
EnableUpdate="true">
</asp:EntityDataSource>
<asp:GridView ID="GridView1" runat="server"
DataSourceID="EntityDataSource1"
AllowPaging="True"
AllowSorting="True">
<Columns>
<asp:CommandField
ShowDeleteButton="True"
ShowEditButton="True"
ShowSelectButton="True" />
</Columns>
</asp:GridView>
Connecting to XML Data by Using XmlDataSource
The XmlDataSource control provides a means to create a binding connection between controls
on your page and an XML file. The XmlDataSource control is best used when you want to bind
to XML data that is represented as hierarchical. In these cases, the outer elements of the XML
represent data records. The child elements can themselves be subrecords related to the outer
records. In addition, the child elements and attributes of these outer “record” elements are
typically bound to as fields. You can think of these fields as columns of data on the record.
Due to this hierarchical nature, the XmlDataSource control is typically bound to controls that
show data in a hierarchical manner, such as the TreeView control. However, XmlDataSource
controls can be used to display data in tabular formats, too.
You configure the XmlDataSource control at design time to point to an XML file. XML data
in your project is typically stored in your project’s App_Data folder. To bind to a file, you set the
DataFile attribute on the data source control to point to the path of the XML file. The following
code shows an example of defining an XmlDataSource control that points to a file containing
product data.
<asp:XmlDataSource
ID="XmlDataSource1"
runat="server"
DataFile="~/App_Data/products.xml" >
</asp:XmlDataSource>
You can also bind directly to a string value that represents XML. The XmlDataSource class
provides the Data property for connecting to a string value in your code-behind page.
Lesson 1: Connecting to Data with Data Source Controls
CHAPTER 12 707
Transforming XML with the XmlDataSource Control
You can use the XmlDataSource control to define an Extensible Stylesheet Language (XSL)
transformation to change the shape and content of your XML data. You do so by setting the
TransformFile attribute to a valid XSL file. The XSL file will be applied to your XML data after
your XML is loaded into memory and before the XML is bound for output.
As an example, consider the following XML file that defines a set of products across varied
categories.
<?xml version="1.0" standalone="yes"?>
<Products>
<Product>
<Category>Beverages</Category>
<Name>Chai</Name>
<QuantityPerUnit>10 boxes x 20 bags</QuantityPerUnit>
<UnitPrice>18.0000</UnitPrice>
</Product>
<Product>
<Category>Condiments</Category>
<Name>Aniseed Syrup</Name>
<QuantityPerUnit>12 - 550 ml bottles</QuantityPerUnit>
<UnitPrice>10.0000</UnitPrice>
</Product>
<Product>
<Category>Condiments</Category>
<Name>Chef Anton's Cajun Seasoning</Name>
<QuantityPerUnit>48 - 6 oz jars</QuantityPerUnit>
<UnitPrice>22.0000</UnitPrice>
</Product>
<Product>
<Category>Produce</Category>
<Name>Uncle Bob's Organic Dried Pears</Name>
<QuantityPerUnit>12 - 1 lb pkgs.</QuantityPerUnit>
<UnitPrice>30.0000</UnitPrice>
</Product>
<Product>
<Category>Beverages</Category>
<Name>Guaraná Fantástica</Name>
<QuantityPerUnit>12 - 355 ml cans</QuantityPerUnit>
<UnitPrice>4.5000</UnitPrice>
</Product>
<Product>
<Category>Beverages</Category>
<Name>Sasquatch Ale</Name>
<QuantityPerUnit>24 - 12 oz bottles</QuantityPerUnit>
<UnitPrice>14.0000</UnitPrice>
</Product>
<Product>
<Category>Beverages</Category>
<Name>Steeleye Stout</Name>
<QuantityPerUnit>24 - 12 oz bottles</QuantityPerUnit>
<UnitPrice>18.0000</UnitPrice>
</Product>
</Products>
708 CHAPTER 12
Working with Data Source Controls and Data-Bound Controls
Suppose that you have to transform this data by first sorting it and then adding descriptive
text to each field to help a user when viewing the data in a TreeView control. In this case, you
can write an XSL transform file. The following code represents an example.
<xsl:stylesheet version="1.0"
xmlns:xsl="http://www.w3.org/1999/XSL/Transform">
<xsl:template match="Products">
<Products>
<xsl:for-each select="Product">
<xsl:sort select="Name" order="ascending" />
<Product>
<Name>
<xsl:value-of select="Name"/>
</Name>
<Category>
<xsl:text>Category: </xsl:text>
<xsl:value-of select="Category"/>
</Category>
<QuantityPerUnit>
<xsl:text>Quantity: </xsl:text>
<xsl:value-of select="QuantityPerUnit"/>
</QuantityPerUnit>
<UnitPrice>
<xsl:text>Price: </xsl:text>
<xsl:value-of select="UnitPrice"/>
</UnitPrice>
</Product>
</xsl:for-each>
</Products>
</xsl:template>
</xsl:stylesheet>
Next, you set the TransformFile attribute of the XmlDataSource control to point to the XSL
file. The following shows an example of how the configured data source control would look
in your markup, followed by an example of how the XmlDataSource control is bound to a
TreeView control in markup.
<asp:XmlDataSource
ID="XmlDataSource1"
runat="server"
DataFile="~/App_Data/products.xml"
TransformFile="~/App_Data/ProductTransform.xsl" >
</asp:XmlDataSource>
<asp:TreeView
id="TreeView1"
runat="server"
DataSourceID="XmlDataSource1">
<DataBindings>
<asp:TreeNodeBinding DataMember="Name" TextField="#InnerText" />
<asp:TreeNodeBinding DataMember="Category" TextField="#InnerText" />
<asp:TreeNodeBinding DataMember="QuantityPerUnit" TextField="#InnerText" />
<asp:TreeNodeBinding DataMember="UnitPrice" TextField="#InnerText" />
</DataBindings>
</asp:TreeView>
Lesson 1: Connecting to Data with Data Source Controls
CHAPTER 12 709
When the page is rendered, ASP.NET loads the XML file into memory. It then applies the XSL
file to the XML data. Finally, the result is bound to the TreeView and embedded in the HTTP
response. Figure 12-4 shows this data as it would look in a browser window. Notice that the
data is sorted and the additional descriptive text has been added to several nodes.
Figure 12-4 The transformed file displayed in a browser window.
Filtering XML with the XmlDataSource Control
The XmlDataSource control also allows you to set a data filter to define a subset of your
XML. This is done via the XPath attribute. You set this attribute to a valid XPath expression
that represents a filter expression. For example, to retrieve a subset of the product data in
the XML file defined in the previous section, you could set the XPath attribute as in the
following markup.
<asp:XmlDataSource
ID="XmlDataSource1"
runat="server"
DataFile="~/App_Data/products.xml"
TransformFile="~/App_Data/ProductTransform.xsl"
XPath="/Products/Product[Category='Category: Beverages']" >
</asp:XmlDataSource>
In this example, the data is filtered for only those products with a category value set
to “Beverages.” Notice that the value is actually set to “Category: Beverages.” This is because
the XPath expression is applied following any XSL transformations. Recall that in the previous
example, the “Category: ” text was added to data. Therefore, you have to account for it in the
XPath expression.
710 CHAPTER 12
Working with Data Source Controls and Data-Bound Controls
Note Inserting, deleting, modifying, and saving XML data
The XmlDataSource control is typically used to read XML data. Unlike many of the other
data source controls, it does not provide automatic attributes for inserting, deleting,
updating, and saving XML data. Instead, you have to write your own custom code if you
require this behavior.
Connecting to LINQ-Based Data by Using LinqDataSource
You can use the LinqDataSource control to easily connect to data supplied by any data source
that represents a collection of data. This includes lists, arrays, LINQ to SQL objects, and more.
In this way, it is the most flexible data source control and typically requires the least amount
of supporting code.
The LinqDataSource control uses the ContextTypeName attribute to define the database
context of your LINQ-based data. This attribute can be set to point to the name of the class
that represents your database context. As an example, suppose you have created a DBML
DataContext file to represent the Northwind database by using LINQ to SQL (see Chapter
11). This file would include the NorthwindDataContext class, which represents the tables in
your database. The following markup shows how you would connect to this class by using
the LinqDataSource control.
<asp:LinqDataSource
ID="LinqDataSource1"
runat="server"
ContextTypeName="NorthwindDataContext"
EnableDelete="True"
EnableInsert="True"
EnableUpdate="True"
OrderBy="CompanyName"
TableName="Suppliers"
Where="Country == @Country">
<WhereParameters>
<asp:QueryStringParameter
DefaultValue="USA"
Name="Country"
QueryStringField="country"
Type="String" />
</WhereParameters>
</asp:LinqDataSource>
The LinqDataSource control is similar to other data source controls. It allows you to define
parameters, indicate sorting, enable paging, and more. However, its LINQ-style declarative syntax makes it unique. Consider the preceding markup. Notice that the TableName attribute is set
to Suppliers. You then use attributes to define a query that indicates both a Where clause and
an OrderBy clause. The Where clause uses the WhereParameters parameter, which represents a
query string that filters the data based on the value of country on the query string.
Lesson 1: Connecting to Data with Data Source Controls
CHAPTER 12 711
You can use LINQ language constructs in the markup of your LinqDataSource control. For
example, by default, if no Select attribute is specified, the data source will return all fields in
the collection. However, you can use a LINQ expression to indicate a new anonymous type.
You can even create calculated fields as you would with any Select statement in a LINQ query.
The following markup shows an example. Notice that the Location field is made up of three
different fields from the data source.
<asp:LinqDataSource ID="LinqDataSource1" runat="server"
ContextTypeName="NorthwindDataContext"
EntityTypeName=""
TableName="Suppliers"
Where="Country == @Country"
Select="new(SupplierId As Id,
CompanyName As Name,
Address + ' ' + City + ' ' + PostalCode As Location)">
<WhereParameters>
<asp:QueryStringParameter DefaultValue="USA" Name="Country"
QueryStringField="country" Type="String" />
</WhereParameters>
</asp:LinqDataSource>
You can also bind a LinqDataSource control to a data-bound control, as you would with
any other data source. You can set values on the LinqDataSource to indicate whether to allow
deleting, inserting, and updating of data. The data-bound control will then work with the
LinqDataSource as appropriate.
Connecting to Site Navigation Data by Using
SiteMapDataSource
The SiteMapDataSource control is used to connect to site navigation data for your website. The
data for this control is defined in a special XML file called a web.sitemap. You can define one
sitemap file in the root of your website. The file includes information about the pages in
your site and their hierarchy. It also includes page names, navigational information, and a
description of each page. It is meant as a central place for managing the navigational data
of your site; it is used by controls such as Menu and TreeView to allow users to easily navigate
your application.
As an example, suppose that the following web.sitemap file is defined at the root of your
web application.
<?xml version="1.0" encoding="utf-8" ?>
<siteMap xmlns="http://schemas.microsoft.com/AspNet/SiteMap-File-1.0" >
<siteMapNode url="" title="Home" description="">
<siteMapNode url="products.aspx" title="Products" description="">
<siteMapNode url="productDetails.aspx"
title="Product Details" description="" />
</siteMapNode>
<siteMapNode url="services.aspx" title="Services" description="" />
<siteMapNode url="locations.aspx" title="Locations" description="" />
<siteMapNode url="about.aspx" title="About Us" description="" />
</siteMapNode>
</siteMap>
712 CHAPTER 12
Working with Data Source Controls and Data-Bound Controls
You can connect to this data by using a SiteMapDataSource control. You simply add the
control to your page. You cannot configure it to point to a specific file. Instead, it automatically
picks up the web.sitemap file defined at the root of your web application. The following markup
shows an example. You bind to this data the same way you bind to the other data source controls.
The following code also demonstrates binding to a Menu control.
<asp:SiteMapDataSource
ID="SiteMapDataSource1"
runat="server" />
<asp:Menu ID="Menu1"
runat="server"
DataSourceID="SiteMapDataSource1">
</asp:Menu>
The result of this binding is shown in Figure 12-5.
Figure 12-5 The site map data bound to a Menu control and displayed in a browser.
Filtering the Data Shown in the SiteMapDataSource
Sometimes, you might want to display only a portion of the data in your sitemap data file.
The SiteMapDataSource control provides a couple of attributes that you can use to control
the data that is provided to a visual control for display. The first, StartingNodeUrl, is used to
indicate the node in the sitemap file that should be used as the root of the data source.
Lesson 1: Connecting to Data with Data Source Controls
CHAPTER 12 713
As an example, consider the sitemap file discussed previously. Suppose you need to display
only the Products node and its subnodes. You can do so by setting the SiteMapDataSource
control’s StartingNodeUrl property to product.aspx, as shown in the following sample markup.
<asp:SiteMapDataSource
ID="SiteMapDataSource1"
runat="server"
StartingNodeUrl="products.aspx" />
You can also use the ShowStartingNode attribute to indicate whether to display the node
where the SiteMapDataSource control is set to start. You set this value to false if you want to
hide the starting node. This property works with the other properties of the SiteMapDataSource
control, such as StartingNodeUrl.
You might find that you want your navigation controls to display navigation data based on
the current active page in the browser. You can do so by setting the StartFromCurrentNode
attribute to true. This evaluates the name of the current page, finds it in the sitemap, and uses
it as the start node for any bound controls on that page. This setting is especially useful if you
embed your navigation and SiteMapDataSource controls inside a master page.
Finally, the StartingNodeOffset attribute is used to move the starting node up or down the
sitemap data tree. You set the value to a negative number to move the start node up the tree
from its current evaluated position. A positive number moves it deeper into the tree hierarchy.
Quick Check
1 . Which attribute of the SqlDataSource control do you use to define a connection
to the database?
2. How do you define an ObjectDataSource to connect to a business object?
3. Which attribute of the LinqDataSource control do you use to indicate the O/R
class used for connecting to and working with LINQ-based data?
4. Which attribute of the EntityDataSource control do you set to indicate a default
entity set for your control to expose?
Quick Check Answers
1 . You use the ConnectionString attribute.
2. You use the TypeName attribute.
3. You use the ContextTypeName attribute.
4. You use the EntitySetName attribute.
714 CHAPTER 12
Working with Data Source Controls and Data-Bound Controls
Pr actice
Using a Data Source Control on a Webpage
In this practice, you work with Visual Studio to create a website to work with an EntityDataSource
control that exposes data from the Northwind database.
On the Companion Media
If you encounter a problem completing an exercise, you can find the completed projects
in the samples installed from this book’s companion CD. For more information about the
project files and other content on the CD, see “Using the Companion Media” in this book’s
Introduction.
E xercise 1 Creating the Website and Defining the Entity Model
In this exercise, you create a new website and define the Entity Model.
1. Open Visual Studio and create a new website called DataSourceLab by using your
preferred programming language.
2. Add the northwnd.mdf file to your App_Data directory. You can copy the file from
the sample files installed from this book’s CD.
3. Add a new ADO.NET Entity Data Model to your website. Name this model
Northwind.edmx. When prompted, allow Visual Studio to add the model to
the App_Code directory.
4. Using the Entity Data Model Wizard, select Generate from database on the first step
and click Next.
5. On the next page, select the northwnd.mdf data file. Make sure to select the check
box to save the connection string in the Web.config file. Name this connection string
NorthwndEntitiesCnn and click Next.
6. On the next page, select the Customers, Order Details, and Orders tables. Make sure
that both check boxes are selected, and set the Model Namespace to NorthwndModel.
Click Finish to complete the wizard and generate your database model.
7. Rename items in the model to better identify them. First, select the Order_Detail entity
in the model, right-click it, and choose Rename. Rename the entity to OrderDetail. Then
select the Order_Details navigation property from the Order entity and rename it to
OrderDetails.
8. Save and close the model.
Lesson 1: Connecting to Data with Data Source Controls
CHAPTER 12 715
E xercise 2 Binding to the EntityDataSource Control
In this exercise, you create a webpage that defines an EntityDataSource that will be used to
work with the entity model created in the previous exercise.
1. Continue editing the project you created in the previous exercise. Alternatively, you can
open the completed Lesson 1, Exercise 1 project in the samples installed from the CD.
2. Open the Default.aspx page. Set the title over the grid (<h2>) to Customers, and delete
the default markup content. In Design view, drag an EntityDataSource control onto the
page from the Data tab of the Toolbox. This control will be used to expose a list of
customers in the database.
3. Click the smart tag in the upper-right corner of the EntityDataSource control to open
the EntityDataSource Tasks list. Select Configure Data Source to open the Configure
Data Source Wizard.
a. On the first page of the wizard, from the Named Connection list, select
NorthwndEntitiesCnn.
b. On the second page of the wizard, select the Customers EntitySetName. Set the
Select fields to CustomerID, CompanyName, City, Region, Country, and Phone.
c. Finish the wizard, and switch to Source view for your page. Edit the EntityDataSource
markup to include AutoPage and AutoSort. Also, include an OrderBy statement
to order the results by CompanyName (you can do so inside markup or use the
Properties window). Your markup should look similar to the following.
<asp:EntityDataSource ID="EntityDataSource1" runat="server"
ConnectionString="name=NorthwndEntitiesCnn"
DefaultContainerName="NorthwndEntitiesCnn"
EnableFlattening="False"
EntitySetName="Customers"
AutoPage="true"
AutoSort="true
OrderBy="it.CompanyName"
Select="it.[CustomerID], it.[CompanyName], it.[City], it.[Region],
it.[Country], it.[Phone]">
</asp:EntityDataSource>
4. Add a GridView control to the page. Set the DataSourceID property to point to the
EntityDataSource created previously.
5. Define bound columns and change the HeaderText for each field in the result set.
6. Enable AllowPaging and AllowSorting.
7. Add a HyperLinkField to the GridView to call orders.aspx and pass the customer ID
as a query string parameter.
716 CHAPTER 12
Working with Data Source Controls and Data-Bound Controls
Your GridView markup should look as follows.
<asp:GridView ID="GridViewCustomers" runat="server" AllowPaging="True"
AllowSorting="True" AutoGenerateColumns="False"
DataSourceID="EntityDataSource1">
<Columns>
<asp:BoundField DataField="CustomerID" HeaderText="ID"
ReadOnly="True" SortExpression="CustomerID" />
<asp:BoundField DataField="CompanyName" HeaderText="Company"
ReadOnly="True" SortExpression="CompanyName" />
<asp:BoundField DataField="City" HeaderText="City"
ReadOnly="True" SortExpression="City" />
<asp:BoundField DataField="Region" HeaderText="Region"
ReadOnly="True" SortExpression="Region" />
<asp:BoundField DataField="Country" HeaderText="Country"
ReadOnly="True" SortExpression="Country" />
<asp:BoundField DataField="Phone" HeaderText="Phone"
ReadOnly="True" SortExpression="Phone" />
<asp:HyperLinkField DataNavigateUrlFields="CustomerID"
DataNavigateUrlFormatString="orders.aspx?custId={0}"
HeaderText="Orders" Text="view orders" />
</Columns>
</asp:GridView>
8. Run the page. Your page should look similar to that shown in Figure 12-6.
Figure 12-6 The EntityDataSource control bound to a GridView.
9. Add an Orders.aspx page to your site.
Lesson 1: Connecting to Data with Data Source Controls
CHAPTER 12 717
10. Add an EntityDataSource control to the page. Set attributes to connect to the Customers
entity. Define a Where clause to select a customer by a specific ID. Set the ID as a
QueryStringParameter. Finally, indicate that the results should include the customer’s
Orders collection. The following markup shows an example.
<asp:EntityDataSource ID="EntityDataSourceCust" runat="server"
ConnectionString="name=NorthwndEntitiesCnn"
DefaultContainerName="NorthwndEntitiesCnn"
EnableFlattening="False"
EntitySetName="Customers"
Where="it.CustomerID=@custId"
Include="Orders">
<WhereParameters>
<asp:QueryStringParameter
QueryStringField="custId"
Name="custId"
DbType="String"/>
</WhereParameters>
</asp:EntityDataSource>
11. Next, add a DetailsView control to the page and name it DetailsViewCust. In Design
view, use the smart tag to set the data source to the EntityDataSource set previously.
Select Refresh Schema from the same smart tag task list to generate columns bound
to the data source.
12. Add a GridView control under the DetailsView and name it GridViewOrders.
This will be used to show custom orders. You cannot, at present, bind this to the
included collections of the EntityDataSource by using markup. Instead, you must
write some code.
13. Add an event handler for the DetailsViewCust DataBound event. This event fires
when the DetailsView control has been bound to data. You can use it to pull the
bound Customer from the control and use its Orders collection for the GridView
control. Your code should read as follows.
Sample of Visual Basic Code
Protected Sub DetailsViewCust_DataBound( _
ByVal sender As Object, ByVal e As System.EventArgs) _
Handles DetailsViewCust.DataBound
Dim cust As NorthwndModel.Customer =
CType(DetailsViewCust.DataItem, NorthwndModel.Customer)
Me.GridViewOrders.DataSource = cust.Orders
Me.GridViewOrders.DataBind()
End Sub
718 CHAPTER 12
Working with Data Source Controls and Data-Bound Controls
Sample of C# Code
protected void DetailsViewCust_DataBound(object sender, EventArgs e)
{
NorthwndModel.Customer cust =
(NorthwndModel.Customer)DetailsViewCust.DataItem;
this.GridViewOrders.DataSource = cust.Orders;
this.GridViewOrders.DataBind();
}
14. Run the application. Select different customers. Click the view orders link and view the
results. You should see something similar to the screen shown in Figure 12-7.
Figure 12-7 The orders.aspx page has two controls that are bound to two different collections
exposed by the same EntityDataSource control.
Lesson Summary
■
ASP.NET provides several data source controls (LinqDataSource, ObjectDataSource,
SqlDataSource, AccessDataSource, EntityDataSource, XmlDataSource, and
SiteMapDataSource) that allow you to easily work with various types of data. These
controls allow you to bind to data by using data-bound web server controls.
■
You can pass parameters to most data source controls. A parameter can be bound to a
value in a cookie, in the session, in a form field, in the query string, or in a similar object.
■
Many of the data source controls allow you to cache data. Those that do include the
ObjectDataSource, SqlDataSource, and AccessDataSource controls.
Lesson 1: Connecting to Data with Data Source Controls
CHAPTER 12 719
Lesson Review
You can use the following questions to test your knowledge of the information in Lesson 1,
“Connecting to Data with Data Source Controls.” The questions are also available on the
companion CD in a practice test, if you prefer to review them in electronic form.
Note Answers
Answers to these questions and explanations of why each answer choice is correct or
incorrect are located in the “Answers” section at the end of the book.
1. You have a data context map for your SQL Server database defined inside a class file. You
need to connect to this data by using a data source control. Which data source control
should you use?
A. ObjectDataSource
B. SqlDataSource
C. SiteMapDataSource
D. LinqDataSource
2. You are using an ObjectDataSource control to connect to a business object. Which
attributes of the control must you set to return data for the data source? (Choose all
that apply.)
A. TypeName
B. SelectMethod
C. DataSourceId
D. SelectParameters
3. You want to apply caching to your data source control to increase your scalability for
frequently used data. You want to set the cache to expire every 60 seconds. Which
attributes of your data source control should you set to do so? (Choose all that apply.)
A. CacheTimeout
B. CacheDuration
C. EnableCaching
D. DisableCaching
4. You are using an EntityDataSource control on your page. You need to write a custom
query that uses a parameter in the Where clause. What actions should you take?
(Choose all that apply.)
A. Set the command by using the EntitySetName property.
B. Set the command by using the CommandText property.
C. Add a WhereParameters section to the EntityDataSource control markup.
D. Name the parameter by using the @ ParamName construct inside the Where
parameter definition.
720 CHAPTER 12
Working with Data Source Controls and Data-Bound Controls
Lesson 2: Working with Data-Bound Web Server
Controls
Lesson 1 showed you how to connect to various data sources by using the data source controls.
After it has been accessed, the data needs to be displayed to users so that they can interact
with it. ASP.NET provides a large set of controls for doing so. These controls are referred to
as data-bound controls. Data-bound controls are controls that provide web-based UI output
(HTML and JavaScript) and also bind to data on the server.
This lesson presents an overview of data binding in ASP.NET. It then presents the many
data-bound controls found inside ASP.NET.
After this lesson, you will be able to:
■
■
■
Understand the basics of how data-bound controls operate.
Use simple data-bound controls such as DropDownList, ListBox, CheckBoxList,
RadioButtonList, and BulletedList.
Use composite data-bound controls such as GridView, DetailsView, FormView,
DataList, Repeater, ListView, DataPager, and Chart.
■
Use hierarchical data-bound controls such as TreeView and Menu.
■
Use the data visualization control, Chart.
Estimated lesson time: 60 minutes
Introducing Data-Bound Controls
The data-bound controls in ASP.NET can be classified as simple, composite, hierarchical, or
visualization controls. Simple data-bound controls are the controls that inherit from ListControl.
Composite data-bound controls are classes that inherit from CompositeDataBoundControl, such
as GridView, DetailsView, FormsView, and similar controls. Hierarchical data-bound controls are
the Menu and TreeView controls. Finally, the Chart control is a data visualization control that
inherits directly from DataBoundControl.
The Microsoft .NET Framework provides several base classes that are used to provide
common properties and behavior for the concrete data-bound controls. These classes form
the basis of many of the data-bound controls. In this way, all of the data-bound controls
work in a similar manner. Figure 12-8 shows the hierarchy of the base classes used for databound controls in ASP.NET.
Lesson 2: Working with Data-Bound Web Server Controls
CHAPTER 12 721
Figure 12-8 The base data-bound class hierarchy.
The BaseDataBoundControl is the first control in the hierarchy (inheriting from
WebControl). This class contains the DataSource and DataSourceID properties used in data
binding. The DataSource property gets or sets the object that the data-bound control uses
to retrieve its data items. This property is most often used when binding to data in code, and
it was the default binding property in early versions of ASP.NET. However, the DataSourceID
property was introduced later to provide a declarative means of binding to data. You use the
DataSourceID property to get or set the ID of a data source control that contains the source
of the data, such as the data source controls discussed in Lesson 1. You typically set either
the DataSource or the DataSourceID property (not both). If both properties are set, the
DataSourceID takes precedence.
You can bind a data-bound web control to any data that implements IEnumerable,
IListSource, IDataSource, or IHierarchicalDatasource. The data-bound control will automatically connect to the data source at run time by calling the DataBind method (which
also raises the DataBound event). You can also call this method yourself in code to force a
rebinding of data to the control.
The next control in Figure 12-8, HierarchicalDataBoundControl, inherits from the
BaseDataBoundControl. It is the parent class for controls that display hierarchical data
such as the Menu and TreeView controls.
The DataBoundControl inherits from the BaseDataBoundControl and is the parent class
to the CompositeDataBoundControl, ListControl, and Chart. These classes are the parent
classes to controls that display tabular data such as the GridView and DropDownList controls. The DataBoundControl control’s DataMember property is a string data type that is
used when the DataSource contains more than one tabular result set. In this scenario, the
DataMember property is set to the name of the tabular result set that is to be displayed.
722 CHAPTER 12
Working with Data Source Controls and Data-Bound Controls
Mapping Fields to Templates
Templated binding can be used on controls that support templates. A template control is a
control that has no default UI. The control simply provides the mechanism for binding to data.
The developer supplies the UI in the form of inline templates. The template can contain declarative elements such as HTML and Dynamic Hypertext Markup Language (DHTML). The template
can also contain ASP.NET data-binding syntax to insert data from the data source. Controls
that support templates include GridView, DetailsView, and FormView, among others. A typical
control might allow the following templates to be programmed:
■
HeaderTemplate This is an optional header, which is rendered at the top of the
control.
■
FooterTemplate This is an optional footer, which is rendered at the bottom of the
control.
■
ItemTemplate The item template is rendered for each row in the data source.
■
AlternatingItemTemplate This is an optional template; if it is implemented, every
other row is rendered with this template.
■
SelectedItemTemplate This is an optional template; if implemented, the template is
used to render a row that has been selected.
■
SeparatorTemplate This is an optional template that defines the markup used to
indicate the separation of items from alternate items.
■
EditItemTemplate This is an optional template that is used to render a row that is
in edit mode. This usually involves displaying the data in a TextBox instead of a Label
control.
Some of the upcoming examples look at defining these templates for specific controls. For
the most part, this process is similar regardless of the control with which you are working.
Using the DataBinder Class
In addition to automatically binding data with data-bound controls, you sometimes will need
to have more granular control over which fields get bound to which controls on your page.
For this, ASP.NET provides the DataBinder class. This class can be used to define code inside
your script that controls how a data source is bound.
The DataBinder class provides the static Eval method to help bind data in this manner. The
Eval method uses reflection to perform a lookup of a DataItem property’s underlying type
by looking at the type metadata that is stored in the type’s assembly. After the metadata is
retrieved, the Eval method determines how to connect to the field. This makes writing data
binding syntax on your page an easy task. For example, the following shows binding to the
Vin property of a Car object:
<%# Eval("Vin") %>
Lesson 2: Working with Data-Bound Web Server Controls
CHAPTER 12 723
The Eval method also provides an overloaded method that allows a format string to be
assigned as part of the data binding. As an example, if you were to bind to a field called Price,
you can modify the display of this field by providing currency formatting, as shown here.
<%# Eval("Price", "{0:C}") %>
The Eval method is great for one-way (or read-only) data binding. However, it does not
support read-write data binding and thus cannot be used for insert and edit scenarios. The
Bind method of the DataBinder class, however, can be used for two-way data binding. This
makes Bind preferable when you need to edit or insert records.
Just like the Eval method, the Bind method has two overloads: one without a format and
one with the format parameter. The code for the Bind method looks the same as that for
the Eval method. However, the Bind method does not work with all bound controls. It only
works with controls that support read, insert, update, and delete scenarios, such as GridView,
DetailsView, and FormView.
Simple Data-Bound Controls
Several controls in ASP.NET provide basic, list-based data binding. These controls are not
meant to work with pages of data or provide elaborate editing scenarios. Instead, they allow
you to provide a list of data items with which a user can operate. Figure 12-9 shows these
simple data-bound controls, including their common base class, ListControl.
Figure 12-9 The ListControl class hierarchy.
The ListControl class is an abstract base class that provides common functionality for the
classes that derive from it. This functionality includes an Items collection, which is a collection
of ListItem data objects. Each ListItem object contains a Text property that is displayed to the
user and a Value property that is posted back to the web server.
724 CHAPTER 12
Working with Data Source Controls and Data-Bound Controls
You can add items to the ListItems collection in code or declaratively in markup. You can also
bind data to the controls that inherit from ListControl by setting the DataSource property (or
the DataMember property if the source data has more than one table). You can also declaratively data-bind a ListControl-derived object by setting the DataSourceID property to the ID
of a valid data source control on your page.
You can also choose the fields in your results that you will bind to the ListItem.Text and
ListItem.Value properties. You can do so in code or through declarative markup by using the
DataTextField and DataValueField properties, respectively. The text displayed for each item
in the list control can also be formatted by setting the DataTextFormatString property. As an
example, the following shows the declarative syntax for a ListBox bound to a SqlDataSource
that provides the Northwind shipper table data.
<asp:ListBox
ID="ListBox1"
runat="server"
DataSourceID="SqlDataSource1"
DataTextField="CompanyName"
DataValueField="ShipperID">
</asp:ListBox>
The SelectedIndex property lets you get or set the index of the selected item in the ListControl.
By using the SelectedItem property, you can access the selected ListItem object’s properties. If you
only need to access the value of the selected ListItem, use the SelectedValue property.
The ListControl also contains the property called AppendDataBoundItems, which can be
set to true to keep all items that are currently in the ListControl, in addition to appending the
items from the data binding. Setting this property to false clears the Items property prior to
binding the data.
The ListControl also provides the SelectedIndexChanged event, which is raised when the selection in the list control changes between posts to the server. Recall that you need to set a control’s
AutoPostback property to true if you intend it to post back to the server for this type of event.
The DropDownList Control
The DropDownList control is used to display a list of items to users to allow them to make a
single selection. The Items collection contains the child ListItem objects that are displayed
in the DropDownList control. To determine the item that the user has selected, you can
retrieve the SelectedValue, SelectedItem, or SelectedIndex property.
In the following example, a DropDownList control is bound to a SqlDataSource control that
returns data from the Territories database table in the Northwind database. Notice that the
DataTextField and DataValueField attributes are set to fields in the database table.
<asp:DropDownList runat="server" Width="250px"
ID="DropDownList1"
DataSourceID="SqlDataSource1"
DataTextField="TerritoryDescription"
DataValueField="TerritoryID" >
</asp:DropDownList>
Lesson 2: Working with Data-Bound Web Server Controls
CHAPTER 12 725
Suppose that this page also contains a button with an event that captures the selected
item from the DropDownList and displays it on a label. This button control’s event code
might look as follows.
Sample of Visual Basic Code
Label1.Text = "You selected TerritoryID: " & DropDownList1.SelectedValue
Sample of C# Code
Label1.Text = "You selected TerritoryID: " + DropDownList1.SelectedValue;
When the page is run and the user makes a selection in the DropDownList control and then
clicks the button, the results are displayed in the label.
The ListBox Control
The ListBox control is used to select and display items from a longer list rather than one at a
time as done in the DropDownList. With the ListBox control, users can see more data at once.
You can also configure the control to allow the selection of a single item or multiple items. To
do so, you set the SelectionMode property. The ListBox control also has the Rows property,
which is used to specify the number of items displayed on the screen. The following shows
an example of a ListBox that is set to allow multiple selections and show up to 13 rows.
<asp:ListBox runat="server" Height="225px" Width="275px"
ID="ListBox1"
Rows="13"
DataSourceID="SqlDataSource1"
DataTextField="TerritoryDescription"
DataValueField="TerritoryID"
SelectionMode="Multiple">
</asp:ListBox>
The Items collection contains the collection of ListItem objects in the ListBox control. To
determine which items the user has selected, you can enumerate the ListItem objects in the
Items collection by examining the Selected value for each ListItem element. The following code
shows an example of processing the selected items and displaying them inside a Label control.
Sample of Visual Basic Code
For Each i As ListItem In ListBox1.Items
If i.Selected Then
Label1.Text = Label1.Text & "You selected TerritoryID: " & i.Value & "<br />"
End If
Next
Sample of C# Code
foreach (ListItem i in ListBox1.Items)
{
if(i.Selected)
Label1.Text = Label1.Text + "You selected TerritoryID: " + i.Value + "<br />";
}
726 CHAPTER 12
Working with Data Source Controls and Data-Bound Controls
The CheckBoxList and RadioButtonList Controls
The CheckBoxList and RadioButtonList controls are very similar. Both are used to display lists
of items to users to allow them to make selections but use a check box or button to make the
selection. The RadioButtonList control is used to make a single selection. The CheckBoxList
control allows users to make multiple selections.
These controls contain a RepeatColumns property that is used to indicate the number of
columns to be displayed horizontally. In addition, the RepeatDirection can be set to Horizontal
or Vertical (the default) to indicate whether the data should be rendered across by rows or
down by columns.
The following shows a CheckBoxList control configured to work with the Territory data and
show data across five columns.
<asp:CheckBoxList runat="server"
ID="CheckBoxList1"
DataSourceID="SqlDataSource1"
DataTextField="TerritoryDescription"
DataValueField="TerritoryID" RepeatColumns="5">
</asp:CheckBoxList>
The Items collection contains the ListItem objects that are inside the CheckBoxList and the
RadioButtonList controls. Use the SelectedValue property to determine the item that has been
selected for the RadioButtonList. To find the selected CheckBoxList item or items, you can
enumerate the ListItem objects in the Items collection by examining the value of the Selected
property for each ListItem element.
The BulletedList Control
The BulletedList control displays an unordered or ordered list of items that renders as HTML <ul>
or <ol> elements, respectively. The BulletedList control inherits from the ListControl control. This
control renders as either bulleted or numbered, depending on the BulletStyle property.
If the control is set to render as bulleted, you can select the bullet style to Disc, Circle, or
Square. Note that the BulletStyle settings are not compatible with all browsers. A custom image
can also be displayed instead of the bullet.
If the BulletedList control is set to render numbered, you can set the BulletStyle to
LowerAlpha, UpperAlpha, LowerRoman, and UpperRoman fields. You can also set the
FirstBulletNumber property to specify the starting number for the sequence.
The DisplayMode property can be set to Text, LinkButton, or HyperLink. If set to LinkButton or
HyperLink, the control performs a postback when a user clicks an item to raise the Click event.
The following example shows a data-bound BulletedList control. The control is bound to a
data source control that selects the Shippers table data from the Northwind database.
<asp:BulletedList runat="server"
ID="BulletedList1"
DataSourceID="SqlDataSource1"
DataTextField="CompanyName"
DataValueField="ShipperID" BulletStyle="Circle">
</asp:BulletedList>
Lesson 2: Working with Data-Bound Web Server Controls
CHAPTER 12 727
Composite Data-Bound Controls
There are several data-bound controls that use other ASP.NET controls to display bound data to
the user. For this reason, these controls are referred to as composite data-bound controls. These
controls inherit from the CompositeDataBoundControl base class. This class implements the
INamingContainer interface, which means that an inheritor of this class is a naming container
for child controls.
The classes that inherit from CompositeDataBoundControl directly are FormView, DetailsView,
and GridView, as shown in Figure 12-10. These controls are covered in this section, along with the
related ListView, DataPager, Repeater, Chart, and DataList data-bound controls.
Figure 12-10 The CompositeDataBoundControl classes (and related controls).
The GridView Control
The GridView control is used to display data in a tabular format (rows and columns). The control
renders in the browser as an HTML table. The GridView control makes it easy to configure
features such as paging, sorting, and editing data without having to write much code.
The basic structure of the GridView is shown in Figure 12-11. The GridView control consists
of a collection of GridViewRow (row) objects and a collection of DataControlField (column)
objects. The GridViewRow object inherits from the TableRow object, which contains the Cells
property. This property is a collection of DataControlFieldCell objects.
728 CHAPTER 12
Working with Data Source Controls and Data-Bound Controls
Columns
Rows
Column
Column
Column
Row cells
Cell
Cell
Cell
Row cells
Cell
Cell
Cell
Row cells
Cell
Cell
Cell
Row cells
Cell
Cell
Cell
Row = GridViewRow
Column = DataControlField
Cell = DataControlFieldCell
Figure 12-11 The basic GridView control structure.
Although the GridViewRow object holds the collection of cells, each DataControlField
(column) object provides the behavior to initialize cells of a specific type in the DataControlField
object’s InitializeCell method. The column classes that inherit from DataControlField override
the InitializeCell method. The GridView control has an InitializeRow method that is responsible for creating a new GridViewRow and the row’s cells by making calls to the overridden
InitializeCell method when the row is being created.
The DataControlField class hierarchy is shown in Figure 12-12. The derived classes are used
to create a DataControlFieldCell with the proper contents. Remember that you don’t define cell
types for your GridView control; you define column types and your column object supplies a
cell object to the row by using the InitializeCell method. The DataControlField class hierarchy
shows the different column types that are available in a GridView control.
Figure 12-12 The DataControlField class hierarchy.
Lesson 2: Working with Data-Bound Web Server Controls
CHAPTER 12 729
Using Styles to Format the GridView Control
You use styles to format the GridView. There are several styles available for you to manage, including an overall GridViewStyle and a HeaderStyle, FooterStyle, RowStyle, AlternatingRowStyle,
SelectedRowStyle, EditRowStyle, and more. You can set these styles declaratively at design time.
In addition, the RowCreated and RowDataBound events can also be used to control the style
programmatically. In these event handlers, the Cells collection on the newly created row can
be used to apply a style to a single cell in the row. The difference between the two events
is that the RowCreated event takes place first, before the data is available. You can use the
RowDataBound event when you need to apply a different style to a cell based on the data in
the cell. These events fire after the styles are applied, which means that you can override any
existing styles. Applying a different style to a cell based on the data in the cell allows you to
apply business rules to determine whether a cell should stand out from other cells (such as
making negative “quantity on hand” numbers red, but only when an item is shipped more
than once per month).
As an example, consider a page that contains a SqlDataSource control bound to the
Products table in the Northwind database. Suppose that this data source control provides
SQL statements for selecting, updating, inserting, and deleting data. You can use this data
source control to configure a GridView control that allows for this editing. The following
markup shows an example of how the GridView would look in Source view.
<asp:GridView ID="GridView1" runat="server"
AllowPaging="True"
AllowSorting="True"
AutoGenerateColumns="False"
DataKeyNames="ProductID"
DataSourceID="SqlDataSource1">
<Columns>
<asp:CommandField ShowDeleteButton="True" ShowEditButton="True"
ShowSelectButton="True" />
<asp:BoundField DataField="ProductID" HeaderText="ProductID"
InsertVisible="False" ReadOnly="True" SortExpression="ProductID" />
<asp:BoundField DataField="ProductName" HeaderText="ProductName"
SortExpression="ProductName" />
<asp:BoundField DataField="SupplierID" HeaderText="SupplierID"
SortExpression="SupplierID" />
<asp:BoundField DataField="CategoryID" HeaderText="CategoryID"
SortExpression="CategoryID" />
<asp:BoundField DataField="QuantityPerUnit" HeaderText="QuantityPerUnit"
SortExpression="QuantityPerUnit" />
<asp:BoundField DataField="UnitPrice" HeaderText="UnitPrice"
SortExpression="UnitPrice" />
<asp:BoundField DataField="UnitsInStock" HeaderText="UnitsInStock"
SortExpression="UnitsInStock" />
<asp:BoundField DataField="UnitsOnOrder" HeaderText="UnitsOnOrder"
SortExpression="UnitsOnOrder" />
<asp:BoundField DataField="ReorderLevel" HeaderText="ReorderLevel"
SortExpression="ReorderLevel" />
<asp:CheckBoxField DataField="Discontinued" HeaderText="Discontinued"
SortExpression="Discontinued" />
</Columns>
</asp:GridView>
730 CHAPTER 12
Working with Data Source Controls and Data-Bound Controls
Notice the Columns collection in the markup. Each column is defined along with the
DataField and the text to be displayed as the column header (HeaderText). When this webpage is executed and displayed, each row is shown to the user along with action buttons for
editing, deleting, and selecting the row. A user can click the Edit link on one of the rows to
place the row into edit mode. Figure 12-13 shows an example.
Figure 12-13 The GridView control showing a row in edit mode.
The DetailsView Control
The DetailsView control is used to display the values of one record at a time from a data
source in an HTML table. The DetailsView control allows you to edit, delete, and insert
records. If the AllowPaging property is set to true, the DetailsView can be used by itself to
navigate the data source. However, the DetailsView can also be used in combination with
other controls such as the GridView, ListBox, or DropDownList, for scenarios in which you
want to display a master-detail form.
The DetailsView control does not directly support sorting, whereas the GridView control
does. However, you can use the DataSource control, as discussed in Lesson 1, to manage data
sorting. You should also note that the GridView does not automatically support inserting new
records, whereas the DetailsView does support this feature.
Lesson 2: Working with Data-Bound Web Server Controls
CHAPTER 12 731
The DetailsView supports the same formatting options that are available with the GridView control. You can format the DetailsView control by using the HeaderStyle, RowStyle,
AlternatingRowStyle, CommandRowStyle, FooterStyle, PagerStyle, and EmptyDataRowStyle
properties.
As an example, again consider a page that has a SqlDataSource control used for defining
selection, insertion, updates, and deletion of product data in the Northwind database. You
can configure a DetailsView to show this product data as pages and allow users to edit this
data, insert new records, and delete existing ones. The following markup shows an example.
<asp:DetailsView runat="server" Width="300px"
ID="DetailsView1"
AllowPaging="True"
AutoGenerateRows="False"
DataKeyNames="ProductID"
DataSourceID="SqlDataSource1">
<Fields>
<asp:BoundField DataField="ProductID" HeaderText="ProductID"
InsertVisible="False" ReadOnly="True" SortExpression="ProductID" />
<asp:BoundField DataField="ProductName" HeaderText="ProductName"
SortExpression="ProductName" />
<asp:BoundField DataField="SupplierID" HeaderText="SupplierID"
SortExpression="SupplierID" />
<asp:BoundField DataField="CategoryID" HeaderText="CategoryID"
SortExpression="CategoryID" />
<asp:BoundField DataField="QuantityPerUnit" HeaderText="QuantityPerUnit"
SortExpression="QuantityPerUnit" />
<asp:BoundField DataField="UnitPrice" HeaderText="UnitPrice"
SortExpression="UnitPrice" />
<asp:BoundField DataField="UnitsInStock" HeaderText="UnitsInStock"
SortExpression="UnitsInStock" />
<asp:BoundField DataField="UnitsOnOrder" HeaderText="UnitsOnOrder"
SortExpression="UnitsOnOrder" />
<asp:BoundField DataField="ReorderLevel" HeaderText="ReorderLevel"
SortExpression="ReorderLevel" />
<asp:CheckBoxField DataField="Discontinued" HeaderText="Discontinued"
SortExpression="Discontinued" />
<asp:CommandField ShowDeleteButton="True" ShowEditButton="True"
ShowInsertButton="True" />
</Fields>
</asp:DetailsView>
Notice that each column in the data table is set inside the Fields collection. The DataField
attribute maps to the name of the column in the data source. The HeaderText property is
used as the label that describes the data field. When the page is executed and displayed, the
DetailsView shows Edit, Delete, and New buttons. When users click the Edit button, they are
taken to edit mode for the selected record, as shown in Figure 12-14.
732 CHAPTER 12
Working with Data Source Controls and Data-Bound Controls
Figure 12-14 The DetailsView control in edit mode after the user has clicked the Edit button.
The FormView Control
Like DetailsView, the FormView control is used to display a single record from a data source.
However, the FormView control does not automatically display the data in a predefined HTML
table. Instead, it allows developers to create templates that define how the data should be displayed. You can define different templates for viewing, editing, and updating records. Creating
your own templates gives you the greatest flexibility in controlling how data is displayed.
The FormView contains the following template definitions: ItemTemplate, EditItemTemplate,
InsertItemTemplate, EmptyDataTemplate, FooterTemplate, HeaderTemplate, and PagerTemplate.
You define a template by placing markup inside it and adding binding code within this
markup. You then set the appropriate mode of the FormView control to switch to the
specified template.
As an example, consider a page that defines a data source control for selecting the
shipper data from the Northwind database. You can configure a FormView control to work
with this data. For display, you can define the ItemTemplate. Here you set the controls and
HTML used to lay out this data. You use the binding syntax (Eval and Bind) to connect data
from the SqlDataSource to the FormView. The markup on the next page shows an example.
Lesson 2: Working with Data-Bound Web Server Controls
CHAPTER 12 733
<asp:FormView runat="server"
ID="FormView1"
AllowPaging="True"
DataSourceID="SqlDataSource1">
<ItemTemplate>
Shipper Identification:
<asp:Label runat="server" Font-Bold="True"
ID="Label1"
Text='<%# Eval("ShipperID") %>'>
</asp:Label>
<br />
<br />
Company Name<br />
<asp:TextBox runat="server" Width="250px"
ID="TextBox1"
Text='<%# Bind("CompanyName") %>'>
</asp:TextBox>
<br />
Phone Number<br />
<asp:TextBox runat="server" Width="250px"
ID="TextBox2"
Text='<%# Bind("Phone") %>'>
</asp:TextBox>
</ItemTemplate>
</asp:FormView>
When you run the page, the custom template is used with the FormView to display data as
defined. Figure 12-15 shows the results in a browser window.
Figure 12-15 The FormView control showing the ItemTemplate in a browser.
734 CHAPTER 12
Working with Data Source Controls and Data-Bound Controls
The Repeater Control
The Repeater control also uses templates to define custom binding. However, it does not show
data as individual records. Instead, it repeats the data rows as you specify in your template. This
allows you to create a single row of data and have it repeat across your page.
The Repeater control is a read-only template. That is, it supports only the ItemTemplate.
It does not implicitly support editing, insertion, and deletion. You should consider one of the
other controls if you need this functionality, otherwise you will have to code this yourself for
the Repeater control.
The following markup is similar to that for the FormView control example. It displays shipper
data from the Northwind database as bound to a Label and two TextBox controls.
<asp:Repeater runat="server"
ID="Repeater1"
DataSourceID="SqlDataSource1">
<ItemTemplate>
<br /><br />
Shipper Identification:
<asp:Label runat="server" Font-Bold="True"
ID="Label1"
Text='<%# Eval("ShipperID") %>'>
</asp:Label>
<br />
<br />
Company Name<br />
<asp:TextBox runat="server" Width="250px"
ID="TextBox1"
Text='<%# Bind("CompanyName") %>'>
</asp:TextBox>
<br />
Phone Number<br />
<asp:TextBox runat="server" Width="250px"
ID="TextBox2"
Text='<%# Bind("Phone") %>'>
</asp:TextBox>
</ItemTemplate>
</asp:Repeater>
When this data is displayed, however, it is repeated down the page. Figure 12-16 shows the
results in a browser window.
Lesson 2: Working with Data-Bound Web Server Controls
CHAPTER 12 735
Figure 12-16 The Repeater control showing the ItemTemplate in a browser.
The ListView Control
The ListView control also uses templates for the display of data. However, it supports many
additional templates that allow for more scenarios when working with your data. These templates include the LayoutTemplate, which allows you to indicate an overall layout inside of which
rows of your data will be displayed. The rows themselves are defined with the ItemTemplate. At
run time, rows are placed within the LayoutTemplate placeholder identified by a control that
has its ID attribute set to itemPlaceholder.
Another template is the GroupTemplate, which allows you to define groups of data. You can
then set the GroupItemCount value to indicate the number of items in a group, and you can set
the control to lay out groups of data and allow users to page through them.
The ItemSeparatorTemplate allows you to define content that should be placed between
rows of items. This allows you to put graphic separators or other data between rows.
The ListView control (unlike DataList and Repeater) also implicitly supports the ability to
edit, insert, and delete data by using a data source control. You can define individual templates
for each of these scenarios. You can then change the mode of the ListView control through a
server-side call and thus invoke the template for the user.
736 CHAPTER 12
Working with Data Source Controls and Data-Bound Controls
As an example, consider a page that includes a data source control that exposes the Product
table from the Northwind database. You can create a ListView control to work with this data. The
following markup shows such an example. In this example, a LayoutTemplate defines a <div> tag
that includes the itemPlaceholder setting. The ItemTemplate is then defined by a <div> tag. At
run time, each row will be added as a <div> tag in the placeholder.
<asp:ListView runat="server"
ID="ListView1"
DataKeyNames="ProductID"
DataSourceID="SqlDataSource1">
<LayoutTemplate>
<div id="itemPlaceholder" runat="server"></div>
<br />
<div style="text-align: center">
<asp:DataPager ID="DataPager1" runat="server" PageSize="4">
<Fields>
<asp:NextPreviousPagerField
ButtonType="Button"
ShowFirstPageButton="True"
ShowLastPageButton="True" />
</Fields>
</asp:DataPager>
</div>
</LayoutTemplate>
<ItemTemplate>
<div style="text-align: center">
<b>ProductName:</b>
<asp:Label ID="ProductNameLabel" runat="server"
Text='<%# Eval("ProductName") %>' />
<br />
<b>QuantityPerUnit:</b>
<asp:Label ID="QuantityPerUnitLabel" runat="server"
Text='<%# Eval("QuantityPerUnit") %>' />
<br />
<b>UnitPrice:</b>
<asp:Label ID="UnitPriceLabel" runat="server"
Text='<%# Eval("UnitPrice") %>' />
<br />
</div>
</ItemTemplate>
<ItemSeparatorTemplate>
<hr />
</ItemSeparatorTemplate>
</asp:ListView>
Lesson 2: Working with Data-Bound Web Server Controls
CHAPTER 12 737
Notice also that the ListView control uses the ASP.NET DataPager control. This control
allows you to provide custom data pagers for your data lists. Here the control is embedded
at the end of the LayoutTemplate. The ListView control automatically uses the DataPager to
move the user through data.
Finally, notice the use of the ItemSeparatorTemplate. This is used to put a horizontal rule
between data rows. Figure 12-17 shows the results in a browser window.
Figure 12-17 The ListView control rendered in the browser.
The Chart Control
The Chart control allows you to display data by using chart visualization. You bind a data
source to this control much like you do for the other data-bound controls. The big difference
is that you then indicate fields from the data source that should be bound to an axis or data
series in a chart.
There are more than 25 different chart types for displaying data. When the chart control runs
on the server, it generate a graphic file (which is a PNG file by default, but you can change this
setting) and then sends this to the browser as part of the response.
738 CHAPTER 12
Working with Data Source Controls and Data-Bound Controls
There are hundreds of properties you can set to define your chart and how it displays data.
The chart definition typically includes the Series and ChartAreas elements. A Series represents
a group of data to be shown on a chart. A Series element has a ChartType that defines the visualization of the data (choices are Bar, Area, Bubble, Line, Column, Pie, Radar, Range, and many
more). A ChartArea element is used to indicate specifics about areas on your chart, such as an x
and y axis. Here you can set intervals, formatting, and related visual items.
As an example, suppose you have the following SqlDataSource control that exposes sales
by region.
<asp:SqlDataSource ID="SqlDataSource1" runat="server"
ConnectionString="<%$ ConnectionStrings:NorthwindConnectionString %>"
SelectCommand="SELECT SUM([Order Details].UnitPrice * [Order Details].Quantity) AS
Total, Orders.ShipCountry FROM Orders INNER JOIN [Order Details] ON Orders.OrderID =
[Order Details].OrderID GROUP BY Orders.ShipCountry Order By Total"></asp:SqlDataSource>
You could then bind this to a Chart control to display each country and the total sales for
that country. The following markup shows an example.
<asp:Chart ID="Chart1" runat="server"
DataSourceID="SqlDataSource1"
Width="702px" Height="581px">
<Series>
<asp:Series Name="Series1"
XValueMember="ShipCountry"
YValueMembers="Total"
ChartType=" "Bar"
XValueType="String"
IsValueShownAsLabel="True"
LabelBackColor="White"
LabelFormat="{c}">
<SmartLabelStyle CalloutBackColor="White" />
</asp:Series>
</Series>
<ChartAreas>
<asp:ChartArea Name="ChartArea1">
<AxisY>
<LabelStyle Format="{c}" />
</AxisY>
<AxisX Interval="1">
</AxisX>
</asp:ChartArea>
</ChartAreas>
</asp:Chart>
Running this page will produce results similar to those shown in Figure 12-18.
Lesson 2: Working with Data-Bound Web Server Controls
CHAPTER 12 739
Figure 12-18 The Chart control rendered in the browser.
The DataList Control
The DataList control works like the Repeater control. It repeats data for each row in your data set,
and it displays this data according to your defined template. However, it lays out the data defined
in the template within various HTML structures. This includes options for horizontal or vertical
layout, and it also allows you to set how the data should be repeated, as flow or table layout.
The DataList control does not automatically use a data source control to edit data. Instead,
it provides command events in which you can write your own code for these scenarios. To
enable these events, you add a Button control to one of the templates and set the button’s
CommandName property to the edit, delete, update, or cancel keyword. The appropriate
event is then raised by the DataList control.
The following markup shows an example of a DataList control configured to show product
data from the Northwind database. This control’s RepeatDirection is set to show data vertically
by using a RepeatLayout of flow. The product data is bound to the DataList control inside the
ItemTemplate code.
740 CHAPTER 12
Working with Data Source Controls and Data-Bound Controls
<asp:DataList runat="server"
DataSourceID="SqlDataSource1"
RepeatDirection="Vertical"
ID="DataList1"
RepeatLayout="flow">
<ItemTemplate>
<asp:Label ID="Label1" runat="server"
Text='<%# Eval("ProductName") %>'
Font-Bold="True">
</asp:Label>
<asp:Label ID="Label2" runat="server"
Text='<%# Eval("UnitPrice", "{0:C}") %>'>
</asp:Label>
<br />
</ItemTemplate>
</asp:DataList>
Hierarchical Data-Bound Controls
The HierarchicalDataBoundControl control serves as a base class for controls that render
data in a hierarchical fashion. The classes that inherit from HierarchicalDataBoundControl
are TreeView and Menu, as shown in Figure 12-19.
Figure 12-19 The HierarchicalDataBoundControl class hierarchy.
The TreeView Control
The TreeView control is a data-bound control that is used to display hierarchical data, such as
a listing of files and folders, or a table of contents in a tree structure. Each entry in the tree is
called a node. The nodes of this control can be bound to XML, tabular, or relational data. This
control can also provide site navigation when used with the SiteMapDataSource control.
You can programmatically access and control the properties of the TreeView control. The
TreeView can also be populated via client-side script by using modern browsers. In addition,
nodes can be displayed as either plaintext or hyperlinks, and you can opt to display a check
box next to each node.
Lesson 2: Working with Data-Bound Web Server Controls
CHAPTER 12 741
Each node is represented by a TreeNode object. A node that contains other nodes is called a
parent node. A node that is contained by another node is called a child node. A node can be both
a parent node and a child node. A node that has no children is called a leaf node. A node that is
not contained by any other node but is the ancestor to all the other nodes is the root node.
The typical TreeView tree structure has only one root node, but you can add multiple root
nodes to the tree structure. This means that you can display a tree hierarchy without being
forced to have a single root node.
The TreeNode has a Text property that is populated with the data that is to be displayed.
The TreeNode also has a Value property that is used to store the data that is posted back to
the web server.
You can configure a node to be a selection node or a navigation node by setting the
NavigateUrl property. If the NavigateUrl property is set to an empty string (string.Empty),
it is a selection node, and clicking the node simply selects it. If the NavigateUrl property is
not set to an empty string, the node is a navigation node, and clicking it navigates to the
location specified by the NavigateUrl property.
Populating the TreeView Control
The TreeView control can be populated by using static data or by using data binding. To
populate the TreeView control with static data, you can use declarative syntax by placing
opening and closing <Nodes> tags in the TreeView element and then creating a structure
of nested <TreeNode> elements within the <Nodes> element. Each <TreeNode> has properties that you can set by adding attributes to the <TreeNode> element.
To use data binding to populate the TreeView control, you can use any data source that
implements the IHierarchicalDataSource interface, such as an XmlDataSource control or a
SiteMapDataSource control. Simply set the DataSourceID property of the TreeView control
to the ID value of the data source control, and the TreeView control automatically binds to
the specified data source control.
You can also bind to an XmlDocument object or a DataSet object that contains DataRelation
objects by setting the DataSource property of the TreeView control to the data source and then
calling the DataBind method.
The TreeView control contains a DataBindings property that is a collection of TreeNodeBinding
objects that define the binding between a data item and the TreeNode. You can specify the
binding criteria and the data item property to display in the node. This is useful when binding
to XML elements when you are interested in binding to an attribute of the element.
Assume that you want to use a TreeView control to display customer data from a file called
Customers.xml, which contains a list of customers, their orders and invoices, and the items for
each order. This data is stored in a hierarchical format in the XML file. The Customers.xml file
looks like the following.
<?xml version="1.0" encoding="utf-8" ?>
<Customers>
<Customer CustomerId="1" Name="Northwind Traders">
742 CHAPTER 12
Working with Data Source Controls and Data-Bound Controls
<Orders>
<Order OrderId="1" ShipDate="06-22-2006">
<OrderItems>
<OrderItem OrderItemId="1" PartNumber="123"
PartDescription="Large Widget" Quantity="5"
Price="22.00" />
<OrderItem OrderItemId="2" PartNumber="234"
PartDescription="Medium Widget" Quantity="2"
Price="12.50" />
</OrderItems>
</Order>
<Order OrderId="2" ShipDate="06-25-2006">
<OrderItems>
<OrderItem OrderItemId="5" PartNumber="432"
PartDescription="Small Widget" Quantity="30"
Price="8.99" />
<OrderItem OrderItemId="4" PartNumber="234"
PartDescription="Medium Widget" Quantity="2"
Price="12.50" />
</OrderItems>
</Order>
</Orders>
<Invoices>
<Invoice InvoiceId="6" Amount="99.37" />
<Invoice InvoiceId="7" Amount="147.50" />
</Invoices>
</Customer>
<Customer CustomerId="2" Name="Tailspin Toys">
<Orders>
<Order OrderId="8" ShipDate="07-11-2006">
<OrderItems>
<OrderItem OrderItemId="9" PartNumber="987"
PartDescription="Combo Widget" Quantity="2"
Price="87.25" />
<OrderItem OrderItemId="10" PartNumber="654"
PartDescription="Ugly Widget" Quantity="1"
Price="2.00" />
</OrderItems>
</Order>
<Order OrderId="11" ShipDate="08-21-2006">
<OrderItems>
<OrderItem OrderItemId="12" PartNumber="999"
PartDescription="Pretty Widget" Quantity="50"
Price="78.99" />
<OrderItem OrderItemId="14" PartNumber="575"
PartDescription="Tiny Widget" Quantity="100"
Price="1.20" />
</OrderItems>
</Order>
</Orders>
<Invoices>
<Invoice InvoiceId="26" Amount="46.58" />
<Invoice InvoiceId="27" Amount="279.15" />
</Invoices>
</Customer>
</Customers>
Lesson 2: Working with Data-Bound Web Server Controls
CHAPTER 12 743
An XmlDataSource and a TreeView control are added to the webpage and configured. The
following shows the markup for the TreeView control.
<asp:TreeView ID="TreeView1" runat="server"
DataSourceID="XmlDataSource1"
ShowLines="True" ExpandDepth="0">
<DataBindings>
<asp:TreeNodeBinding DataMember="Customer"
TextField="Name" ValueField="CustomerId" />
<asp:TreeNodeBinding DataMember="Order"
TextField="ShipDate" ValueField="OrderId" />
<asp:TreeNodeBinding DataMember="OrderItem"
TextField="PartDescription" ValueField="OrderItemId" />
<asp:TreeNodeBinding DataMember="Invoice"
TextField="Amount" ValueField="InvoiceId"
FormatString="{0:C}" />
</DataBindings>
</asp:TreeView>
In this example, the configuration is kept to a minimum, but configuration is required to
display information that is more important than the XML element name, such as the customer’s
name instead of the XML element name (Customer). The following code is added to the codebehind page to simply display the value of the selected node.
Sample of Visual Basic Code
Partial Class TreeView_Control
Inherits System.Web.UI.Page
Protected Sub TreeView1_SelectedNodeChanged(ByVal sender As Object, _
ByVal e As System.EventArgs) Handles TreeView1.SelectedNodeChanged
Response.Write("Value:" + TreeView1.SelectedNode.Value)
End Sub
End Class
Sample of C# Code
public partial class TreeView_Control : System.Web.UI.Page
{
protected void TreeView1_SelectedNodeChanged(object sender, EventArgs e)
{
Response.Write("Value:" + TreeView1.SelectedNode.Value);
}
}
When the webpage is displayed, the Customers node is visible. You can also click the plus
(+) sign to expand the nodes, as shown in Figure 12-20.
744 CHAPTER 12
Working with Data Source Controls and Data-Bound Controls
Figure 12-20 The TreeView displays the nodes as configured.
The Menu Control
The Menu control is a data-bound control that is used to display hierarchical data in the form
of a menu system. The Menu control is often used in combination with a SiteMapDataSource
control for navigating a website.
The Menu control can be populated by using static data or by using data binding. To populate
the Menu control with static data, you can use declarative syntax by placing opening and closing
<Items> tags in the Menu element, and then you can create a structure of nested <MenuItem>
elements within the <Items> element. Each <MenuItem> has properties that you can set by
adding attributes to the <asp:MenuItem> element.
To use data binding to populate the Menu control, you can use any data source that
implements the IHierarchicalDataSource interface, such as an XmlDataSource control or a
SiteMapDataSource control. Simply set the DataSourceID property of the Menu control to
the ID value of the data source control, and the Menu control automatically binds to the
specified data source control.
You can also bind to an XmlDocument object or a DataSet object that contains DataRelation
objects by setting the DataSource property of the Menu control to the data source, and then
calling the DataBind method.
Lesson 2: Working with Data-Bound Web Server Controls
CHAPTER 12 745
The Menu control contains a DataBindings property that is a collection of MenuItemBinding
objects that define the binding between a data item and the menu item it is binding to in a
Menu control. You can specify the binding criteria and the data item properties to display in
the items. This is useful when binding to XML elements when you are interested in binding to
an attribute of the element.
Assume that you want to use a Menu control to display menu data from a file called
MenuItems.xml, which contains a list of the menu items to be displayed. The data is stored
in a hierarchical format in the XML file. The MenuItems.xml file looks like the following.
<?xml version="1.0" encoding="utf-8" ?>
<MenuItems>
<Home display="Home" url="~/" />
<Products display="Products" url="~/products/">
<SmallWidgets display="Small Widgets"
url="~/products/smallwidgets.aspx" />
<MediumWidgets display="Medium Widgets"
url="~/products/mediumwidgets.aspx" />
<BigWidgets display="Big Widgets"
url="~/products/bigwidgets.aspx" />
</Products>
<Support display="Support" url="~/Support/">
<Downloads display="Downloads"
url="~/support/downloads.aspx" />
<FAQs display="FAQs"
url="~/support/faqs.aspx" />
</Support>
<AboutUs display="About Us" url="~/aboutus/">
<Company display="Company"
url="~/aboutus/company.aspx" />
<Locations display="Location"
url="~/aboutus/locations.aspx" />
</AboutUs>
</MenuItems>
An XmlDataSource, a Menu, and a Label control are added to the webpage. The
XmlDataSource is configured to use the XML file. The Menu control is configured to
use the XmlDataSource. The following is the webpage markup.
<asp:Menu runat="server"
ID="Menu1"
DataSourceID="XmlDataSource1"
OnMenuItemClick="Menu1_MenuItemClick">
</asp:Menu>
In this example, showing the root MenuItems element in the XML file is not desirable, so
an XPath expression is supplied to retrieve the elements that exist under the root MenuItems
element. The following code is added to the code-behind page to simply display the ValuePath
property of the selected MenuItem. When the webpage is displayed, the Menu appears and
you can point to a menu item to see its child menu items.
746 CHAPTER 12
Working with Data Source Controls and Data-Bound Controls
Sample of Visual Basic Code
Partial Class Menu_Control
Inherits System.Web.UI.Page
Protected Sub Menu1_MenuItemClick(ByVal sender As Object, _
ByVal e As System.Web.UI.WebControls.MenuEventArgs) _
Handles Menu1.MenuItemClick
Label1.Text = e.Item.ValuePath
End Sub
End Class
Sample of C# Code
public partial class Menu_Control : System.Web.UI.Page
{
protected void Menu1_MenuItemClick(object sender, MenuEventArgs e)
{
Label1.Text = e.Item.ValuePath;
}
}
Quick Check
1 . What method should you call on a data-bound control when the data is ready to
be read from the data source?
2. What method is used in a FormView to perform two-way data binding?
3. What GUI object can provide a data source that allows you to connect middletier objects to data-bound controls?
Quick Check Answers
1 . You should call the DataBind method.
2. The Bind method is used to perform two-way data binding.
3. The ObjectDataSource control can provide a data source that allows you to
connect middle-tier objects to data-bound controls.
Pr actice
Using the GridView and DetailsView Controls
In this practice, you use the GridView and DetailsView data-bound controls together to create
a master-detail page.
On the Companion Media
If you encounter a problem completing an exercise, you can find the completed projects
in the samples installed from this book’s companion CD. For more information about the
project files and other content on the CD, see “Using the Companion Media” in this book’s
Introduction.
Lesson 2: Working with Data-Bound Web Server Controls
CHAPTER 12 747
E xercise Creating the Website, Adding Controls to the Page, and Configuring the
Controls
In this exercise, you create a new website and add the database and data source control.
You then add the data-bound controls and configure them accordingly.
1. Open Visual Studio and create a new website called UsingDataBoundControls by
using your preferred programming language.
2. Add the northwnd.mdf file to your App_Data directory. You can copy the file from
the samples installed from the CD.
3. Open Default.aspx. Delete the default content on the page. Add a SqlDataSource
control to the page from the Toolbox; name it SqlDataSourceReadList. This control
will read data for display by the GridView control.
4. In Design view of the Default.aspx page, click the smart tag in the upper-right corner
of the SqlDataSource control to launch the Configure Data Source Wizard.
a. On the first page, set the connection to the northwnd.mdf file in the App_Data
directory and click Next.
b. When prompted, save the connection string as ConnectionStringNorthwind,
and then click Next again.
c. On the Configure Select Statement page, select the Customers table from the
Name list box. Select the CustomerID, CompanyName, ContactName, City,
Country, and Phone fields. Click Next, and then click Finish to close the wizard.
Your SqlDataSource markup should look similar to the following.
<asp:SqlDataSource ID="SqlDataSource1" runat="server"
ConnectionString="<%$ ConnectionStrings:ConnectionStringNorthwind %>"
SelectCommand="SELECT [CustomerID], [CompanyName], [ContactName], [City],
[Country], [Phone] FROM [Customers]">
</asp:SqlDataSource>
5. Drag a GridView control onto the Default.aspx page. Using either Design or Source
view, configure the GridView control as follows:
■
Set the DataSourceId to SqlDataSourceReadList, created previously.
■
Set Enable Paging (AllowPaging property) to true.
■
Set Enable Sorting (AllowSorting property) to true.
■
Set AutoGenerateColumns to false.
■
Configure the CustomerID, CompanyName, ContactName, City, Country, and Phone
fields to be displayed.
■
Add a CommandField to allow a user to select a row of data (you can do so in Design
view by clicking Enable Selection).
748 CHAPTER 12
Working with Data Source Controls and Data-Bound Controls
Your markup should look similar to the following.
<asp:GridView ID="GridView1" runat="server"
AllowPaging="True" AllowSorting="True"
AutoGenerateColumns="False"
DataKeyNames="CustomerID"
DataSourceID="SqlDataSource1"
width="700px">
<Columns>
<asp:CommandField ShowSelectButton="True" />
<asp:BoundField DataField="CustomerID" HeaderText="ID"
ReadOnly="True" SortExpression="CustomerID" />
<asp:BoundField DataField="CompanyName" HeaderText="Company"
SortExpression="CompanyName" />
<asp:BoundField DataField="ContactName" HeaderText="Contact"
SortExpression="ContactName" />
<asp:BoundField DataField="City" HeaderText="City"
SortExpression="City" />
<asp:BoundField DataField="Country" HeaderText="Country"
SortExpression="Country" />
<asp:BoundField DataField="Phone" HeaderText="Phone"
SortExpression="Phone" />
</Columns>
</asp:GridView>
6. If you want, select the GridView in Design view and click the AutoFormat link on the
task pane (from the smart tag). Select Professional or another formatting option.
7. Run the website; you should be able to page through data, sort data, and select a row.
8. Next, add another SqlDataSource control to the Default.aspx page; name it
SqlDataSourceUpdate. Configure this control as before, by using the Configure
Data Source Wizard.
a. On the first page, select ConnectionStringNorthwind and click Next.
b. The next step is to configure the SELECT statement to pick up the CustomerID
parameter from the selected row on the GridView control. On the Configure The
Select Statement page, select the Customers table. This time, select each field in
the table. Then click the Where button to launch the Add WHERE Clause dialog
box. Set the column to CustomerID. Set the Operator to = (the equal sign). Set the
Source to Control. Under Parameter Properties, set the Control ID to GridView1.
Click the Add button, and then click OK to close the dialog box.
c. Click the Advanced button. In the Advanced Sql Generation Options dialog box,
select the Generate INSERT, UPDATE, And DELETE Statements option. Click OK to
close this dialog box. Click Next, and then click Finish to close the wizard.
Lesson 2: Working with Data-Bound Web Server Controls
CHAPTER 12 749
Your SqlDataSource control’s markup should look as follows.
<asp:SqlDataSource ID="SqlDataSourceUpdate" runat="server"
ConnectionString="<%$ ConnectionStrings:ConnectionStringNorthwind %>"
DeleteCommand="DELETE FROM [Customers] WHERE [CustomerID] = @CustomerID"
InsertCommand="INSERT INTO [Customers] ([CustomerID], [CompanyName],
[ContactName], [ContactTitle], [Address], [City], [Region], [PostalCode],
[Country], [Phone], [Fax]) VALUES (@CustomerID, @CompanyName, @ContactName,
@ContactTitle, @Address, @City, @Region, @PostalCode, @Country, @Phone, @Fax)"
SelectCommand="SELECT [CustomerID], [CompanyName], [ContactName],
[ContactTitle],
[Address], [City], [Region], [PostalCode], [Country], [Phone], [Fax] FROM
[Customers] WHERE ([CustomerID] = @CustomerID)"
UpdateCommand="UPDATE [Customers] SET [CompanyName] = @CompanyName,
[ContactName] = @ContactName, [ContactTitle] = @ContactTitle, [Address] =
@Address,
[City] = @City, [Region] = @Region, [PostalCode] = @PostalCode, [Country] =
@Country, [Phone] = @Phone, [Fax] = @Fax WHERE [CustomerID] = @CustomerID">
<DeleteParameters>
<asp:Parameter Name="CustomerID" Type="String" />
</DeleteParameters>
<InsertParameters>
<asp:Parameter Name="CustomerID" Type="String" />
<asp:Parameter Name="CompanyName" Type="String" />
<asp:Parameter Name="ContactName" Type="String" />
<asp:Parameter Name="ContactTitle" Type="String" />
<asp:Parameter Name="Address" Type="String" />
<asp:Parameter Name="City" Type="String" />
<asp:Parameter Name="Region" Type="String" />
<asp:Parameter Name="PostalCode" Type="String" />
<asp:Parameter Name="Country" Type="String" />
<asp:Parameter Name="Phone" Type="String" />
<asp:Parameter Name="Fax" Type="String" />
</InsertParameters>
<SelectParameters>
<asp:ControlParameter ControlID="GridView1" Name="CustomerID"
PropertyName="SelectedValue" Type="String" />
</SelectParameters>
<UpdateParameters>
<asp:Parameter Name="CompanyName" Type="String" />
<asp:Parameter Name="ContactName" Type="String" />
<asp:Parameter Name="ContactTitle" Type="String" />
<asp:Parameter Name="Address" Type="String" />
<asp:Parameter Name="City" Type="String" />
<asp:Parameter Name="Region" Type="String" />
<asp:Parameter Name="PostalCode" Type="String" />
<asp:Parameter Name="Country" Type="String" />
<asp:Parameter Name="Phone" Type="String" />
<asp:Parameter Name="Fax" Type="String" />
<asp:Parameter Name="CustomerID" Type="String" />
</UpdateParameters>
</asp:SqlDataSource>
9. Add a DetailsView control to the page; place it under the GridView control.
750 CHAPTER 12
Working with Data Source Controls and Data-Bound Controls
10. Switch to Design view and configure the DetailsView control by using the smart tag
and related task list.
11. Set the control’s data source to SqlDataSourceUpdate.
12. Enable inserting and editing. (Deleting requires management of a foreign key con-
straint, so leave that cleared for this example.)
13. Click Edit Templates from the task list of the DetailsView control.
14. Select the EmptyData Template from the Display list in the task list.
15. In the template, type No customer is currently selected.
16. Add a LinkButton control to the template. Set the LinkButton control’s CausesValidation
property to false (from the Properties pane). Set its CommandName property to New,
and set its Text property to New.
17. In the DetailView Tasks window, click End Template Editing.
Your DetailsView markup should look as follows.
<asp:DetailsView ID="DetailsView1" runat="server" Height="50px" Width="125px"
AutoGenerateRows="False" DataKeyNames="CustomerID"
DataSourceID="SqlDataSourceUpdate">
<EmptyDataTemplate>
<b>No customer is currently selected<br />
<asp:LinkButton ID="LinkButton1" runat="server"
CausesValidation="False"
CommandName="New">New</asp:LinkButton>
</b>
</EmptyDataTemplate>
<Fields>
<asp:BoundField DataField="CustomerID" HeaderText="ID"
ReadOnly="True" SortExpression="CustomerID" />
<asp:BoundField DataField="CompanyName" HeaderText="Company"
SortExpression="CompanyName" />
<asp:BoundField DataField="ContactName" HeaderText="Contact"
SortExpression="ContactName" />
<asp:BoundField DataField="ContactTitle" HeaderText="Contact Title"
SortExpression="ContactTitle" />
<asp:BoundField DataField="Address" HeaderText="Address"
SortExpression="Address" />
<asp:BoundField DataField="City" HeaderText="City"
SortExpression="City" />
<asp:BoundField DataField="Region" HeaderText="Region"
SortExpression="Region" />
<asp:BoundField DataField="PostalCode" HeaderText="Postal Code"
SortExpression="PostalCode" />
<asp:BoundField DataField="Country" HeaderText="Country"
SortExpression="Country" />
<asp:BoundField DataField="Phone" HeaderText="Phone"
SortExpression="Phone" />
<asp:BoundField DataField="Fax" HeaderText="Fax"
SortExpression="Fax" />
<asp:CommandField ShowEditButton="True"
ShowInsertButton="True" />
</Fields>
</asp:DetailsView>
Lesson 2: Working with Data-Bound Web Server Controls
CHAPTER 12 751
18. If you want, select the DetailsView control in Design view and click the AutoFormat
link in the task pane (from the smart tag). Select Professional or another formatting
option.
19. Next, add code to update the GridView when a record has been inserted or edited in
the DetailsView control. To do so, add event handlers for both the ItemUpdated and
ItemInserted events of the DetailsView control. Inside each event, rebind the GridView
control. The following code shows an example.
Sample of Visual Basic Code
Protected Sub DetailsView1_ItemInserted(ByVal sender As Object, _
ByVal e As System.Web.UI.WebControls.DetailsViewInsertedEventArgs) _
Handles DetailsView1.ItemInserted
GridView1.DataBind()
End Sub
Protected Sub DetailsView1_ItemUpdated(ByVal sender As Object, _
ByVal e As System.Web.UI.WebControls.DetailsViewUpdatedEventArgs) _
Handles DetailsView1.ItemUpdated
GridView1.DataBind()
End Sub
Sample of C# Code
protected void DetailsView1_ItemUpdated(object sender,
DetailsViewUpdatedEventArgs e)
{
GridView1.DataBind();
}
protected void DetailsView1_ItemInserted(object sender,
DetailsViewInsertedEventArgs e)
{
GridView1.DataBind();
}
20. Add a title to the top of the page for Manage Customers. Add another title for
Customer Details.
21. Run the webpage. Notice that the empty DetailsView control allows you to add a new
record. Select a row from the GridView. Notice that it appears in the DetailsView section,
as shown in Figure 12-21. Click the Edit link (which will appear when a row is selected in
the GridView), and then edit a record.
752 CHAPTER 12
Working with Data Source Controls and Data-Bound Controls
Figure 12-21 The master-detail form shown in the browser window.
Lesson Summary
■
Simple data-bound controls consist of controls that inherit from the ListControl, such
as DropDownList, ListBox, CheckBoxList, BulletedList, and RadioButtonList. For these
controls, you set the DataTextField to the name of the column that contains the data
you want to display to the user. You set the DataValueField to the column that contains
the value or values you want to return to the server for a selected item.
■
Composite data-bound controls consist of the GridView, DetailsView, FormView,
Repeater, ListView, and DataList controls. The GridView and DetailsView controls
show data as tables. The other controls allow you to define templates for laying
out your data.
■
Hierarchical data-bound controls consist of the Menu and TreeView controls. These
controls are used for displaying data that contains parent-child relationships.
Lesson 2: Working with Data-Bound Web Server Controls
CHAPTER 12 753
Lesson Review
You can use the following questions to test your knowledge of the information in Lesson 2,
“Working with Data-Bound Web Server Controls.” The questions are also available on the
companion CD in a practice test, if you prefer to review them in electronic form.
Note Answers
Answers to these questions and explanations of why each answer choice is correct or
incorrect are located in the “Answers” section at the end of the book.
1. You are creating a data-bound CheckBoxList control that allows a user to select
options for configuring a vehicle. When the data is displayed to the user, you want
the OptionName column to display. When the data is posted back to the server,
you need the OptionId column value for all selected items. Which of the following
attribute definitions would you set? (Choose all that apply.)
A. DataTextField=OptionId
B. DataTextField=OptionName
C. DataValueField=OptionId
D. DataValueField=OptionName
2. You want to display a list of suppliers on a webpage. The supplier list must display 10
suppliers at a time, and you require the ability to edit individual suppliers. Which web
control is the best choice for this scenario? (Choose all that apply.)
A. The DetailsView control
B. The Repeater control
C. The GridView control
D. The ListView control
3. You want to display a list of parts in a master-detail scenario so that users can select a
part number from a list that takes a minimum amount of space on the webpage. When
the part is selected, a DetailsView control displays all the information about the part
and allows users to edit the part. Which web control is the best choice to display the
part number list for this scenario?
A. The DropDownList control
B. The RadioButtonList control
C. The FormView control
D. The TextBox control
754 CHAPTER 12
Working with Data Source Controls and Data-Bound Controls
Lesson 3: Working with ASP.NET Dynamic Data
ASP.NET Dynamic Data is a set of user interface templates and controls for creating data-driven
websites. You attach a data context to a Dynamic Data MetaModel object and can then work
with that data to read, filter, insert, update, and delete. Dynamic Data does not generate code
specific to a particular data schema. Rather, it is a series of extensible templates that can work
with any LINQ to SQL, Entity Framework, or custom data context. If you need to customize a
template to change the way data is displayed or behaves, you can do so by following the conventions of ASP.NET Dynamic Data.
This lesson helps you get started with using ASP.NET Dynamic Data to either create a new
website or add these capabilities to an existing one. The lesson covers creating the scaffolding
for using Dynamic Data and customizing the technology, including creating custom routes,
fields, pages, and business logic.
After this lesson, you will be able to:
■
Create the scaffolding for using Dynamic Data against a data context.
■
Create custom routing, field templates, page templates, and business logic.
■
Add Dynamic Data scaffolding and/or features to an existing website.
Estimated lesson time: 40 minutes
Real World
Mike Snell
I
have personally written a number of custom web store fronts using ASP and
ASP.NET. In each case, most of the work actually involved creating screens to
allow administrators to manage the data in the site. This meant adding and editing
products, orders, customer information, sales, and more. Dynamic Data would have
cut what was weeks (often months) of work down to days.
Lesson 3: Working with ASP.NET Dynamic Data
CHAPTER 12 755
Getting Started with Dynamic Data Websites
ASP.NET Dynamic Data works at run time to extract information from your data context and
apply that information to template pages for handling CRUD operations against your data
source. Recall that a data context is created by using LINQ to SQL or LINQ to Entities (see
Chapter 11 for more details).
Dynamic Data uses the information from your model, such as table relationships and field
data types, to create meaningful pages. For example, if you are showing data in a list, Dynamic
Data will use foreign-key relationships to allow you to filter that data (into product categories,
for example). It will also allow you to link to related data from a specified data record (such as
customer orders). In addition, fields will be shown based on their underlying data type, and
when users update or insert data, validation rules will be enforced based on the model.
To start creating a new website with Dynamic Data, you typically follow these steps:
1. Create a scaffold site that includes the default presentation layer templates used by
ASP.NET Dynamic Data.
2. Define a data context that represents your data source and model by using either
LINQ to SQL, LINQ to Entities, or a custom model.
3. Register your data context with the website’s MetaModel instance inside the Global.asax
file.
4. Customize the URL routing, page and field templates, business logic, and validation in
the website. (This step is optional.)
You will walk through each of these steps in the upcoming sections.
Creating a Dynamic Data Website
You can create a new ASP.NET Dynamic Data website or add Dynamic Data features to an
existing site. This section covers the former; you will see how to add these features to existing
sites later in the lesson.
Visual Studio ships with two ASP.NET Dynamic Data project templates: ASP.NET Dynamic
Data Entities Web Site and ASP.NET Dynamic Data LINQ to SQL Web Site. The first is used
to create sites that use the Entity Framework as the data context; the second is for sites that
connect to a LINQ to SQL data context. You must choose between the two, because the
templates only support a single data context in a site (as it is defined within the application’s
Global.asax file).
Figure 12-22 shows the structure of a newly created Dynamic Data website. Note that
you do not select a data source when you create the website. Instead, you can connect to a
data source as a later step. The website only contains templates that use your data context
information at run time. The next section covers this website structure in detail.
756 CHAPTER 12
Working with Data Source Controls and Data-Bound Controls
Figure 12-22 The structure of an ASP.NET Dynamic Data website.
Dynamic Data Website Structure
The Dynamic Data website contains the DynamicData folder and several files in the root of
the site. You will look at the contents of the DynamicData folder soon. First, the files in the
root of the site are listed here, along with a brief description of each:
■
Default.aspx This file is used to display all tables in the data context. It includes
a GridView control that is bound to the MetaModel.VisibleTables collection. The
MetaModel is exposed through an application variable (from the Global.asax file)
called DefaultModel. It is referenced as follows:
ASP.global_asax.DefaultModel.VisibleTables.
■
Global.asax This file contains code that is run for application events, including
Application_Start. Dynamic Data uses this file to call RegisterRoutes at Application_
Start. This method connects your data context to a meta-model and uses ASP.NET
routing to handle page requests for tables and actions (such as List, Details, Edit,
and Insert).
■
Site.css This file represents a style sheet used by the master page and related page
templates. You can customize this style sheet to change the look of your Dynamic
Data site.
■
Site.master This is the master page for the Dynamic Data site. By default, it defines
navigation for the site, a ScriptManager control, and the main ContentPlaceHolder
control. The Site.master page is used by the page templates.
■
Web.config This is a less verbose version of the Web.config file that is created for
standard ASP.NET websites.
Lesson 3: Working with ASP.NET Dynamic Data
CHAPTER 12 757
The DynamicData folder contains several subfolders and another Web.config file. The
Web.config file registers an HTTP handler for System.Web.HttpNotFoundHandler. The folders
and their naming convention define a pattern that is used by Dynamic Data to route requests
accordingly. Each folder is listed here, along with a brief description of its contents:
■
Content This folder contains content used by Dynamic Data, including images for the
pager control and a custom GridViewPager user control.
■
CustomPages By default, this folder is empty. You use this folder if you need to create
custom templates for displaying or editing data. The convention is to create a new folder
under CustomPages with the name of the item in your data model that you want to
customize (such as Customers). You then typically copy a page template (from the
PageTemplates directory) to this new folder, customize it, and save it. The Dynamic
Data routing will look in this CustomPages folder first for items that are named with
this convention (and thus use those instead of the default templates).
■
EntityTemplates This folder contains user controls that are used by the page
templates for displaying and editing data. These user controls include Default.ascx,
Default_Edit.ascx, and Default_Insert.ascx.
■
FieldTemplates This folder contains a set of user controls (ASCX files) that define
the UI for displaying table fields in either a view or edit mode. There are user controls
based on the type of data being worked with, including Boolean, DateTime, Text, Url,
Decimal, Email, and more. These fields are rendered based on the data type in the data
context or on additional attributes that you add to extend the meta-model. You can
also create custom field templates to display or edit data with other controls (including
third-party controls).
■
Filters This folder contains user controls to define the UI that is used to filter data
that is displayed in a list. These controls include Boolean.ascx, Enumeration.ascx, and
ForeignKey.ascx.
■
PageTemplates This folder contains the default templates for working with data.
These template pages can show a table in a list (List.aspx), allow you to create a new
record (Insert.aspx), edit an existing record (Edit.aspx), view the details of a record
(Details.aspx), and show a list of data and a selected record’s details on the same
page (ListDetails.aspx).
Defining a Data Context
You create a data context by adding either a LINQ to SQL Classes (DBML) file or an ADO.NET
Entity Data Model (EDMX) file to your project (see Chapter 11 for more details). You can also
create a custom model through code.
As an example, suppose that the Northwind database is in the App_Data directory of your
site. You can then create a LINQ to SQL DBML file based on tables found inside this database.
Figure 12-23 shows an example.
758 CHAPTER 12
Working with Data Source Controls and Data-Bound Controls
Figure 12-23 An example LINQ to SQL DBML model.
Registering Your Data Context with the MetaModel
The next step is to register your data context with System.Web.DynamicData.MetaModel. The
MetaModel defines the connectivity or mapping between the scaffold templates and your
data layer.
You register your data context inside the Global.asax file. Here you will notice that, at the top
of the file, the MetaModel is actually defined as a private application variable and exposed as a
read-only property. The following code shows an example.
Sample of Visual Basic Code
Private Shared s_defaultModel As New MetaModel
Public Shared ReadOnly Property DefaultModel() As MetaModel
Get
Return s_defaultModel
End Get
End Property
Lesson 3: Working with ASP.NET Dynamic Data
CHAPTER 12 759
Sample of C# Code
private static MetaModel s_defaultModel = new MetaModel();
public static MetaModel DefaultModel {
get {
return s_defaultModel;
}
}
Further down in the file, notice that the RegisterRoutes method is called at application
start. The following code shows an example.
Sample of Visual Basic Code
Private Sub Application_Start(ByVal sender As Object, ByVal e As EventArgs)
RegisterRoutes(RouteTable.Routes)
End Sub
Sample of C# Code
void Application_Start(object sender, EventArgs e) {
RegisterRoutes(RouteTable.Routes);
}
The RegisterRoutes method is used to connect your data source to the MetaModel. You do
so through the DefaultModel.RegisterContext method and pass the type name of your data
context. You might also want to set the ScaffoldAllTables property to true to make sure that the
site will return all tables in the data context by default. The following code shows an example of
registering the NorthwindDataContext LINQ to SQL object with the MetaModel.
Sample of Visual Basic Code
Public Shared Sub RegisterRoutes(ByVal routes As RouteCollection)
DefaultModel.RegisterContext( _
GetType(NorthwindDataContext), New ContextConfiguration() _
With {.ScaffoldAllTables = True})
routes.Add(New DynamicDataRoute("{table}/{action}.aspx") With {
.Constraints = New RouteValueDictionary(New _
With {.Action = "List|Details|Edit|Insert"}),
.Model = DefaultModel})
End Sub
Sample of C# Code
public static void RegisterRoutes(RouteCollection routes) {
DefaultModel.RegisterContext(typeof(NorthwindDataContext),
new ContextConfiguration() { ScaffoldAllTables = true });
routes.Add(new DynamicDataRoute("{table}/{action}.aspx") {
Constraints = new RouteValueDictionary(
new { action = "List|Details|Edit|Insert" }),
Model = DefaultModel
});
}
760 CHAPTER 12
Working with Data Source Controls and Data-Bound Controls
That is all that is required to create a basic Dynamic Data website. You can now run the
site and view, edit, insert, and delete data by using the template user interface. Figure 12-24
shows an example of the Products table in a web browser. Notice the URL, Products/List.aspx.
This table/action convention is defined in the routing. It simply indicates that the List.aspx
template page should be called and the Product data should be displayed from the model.
Figure 12-24 An example LINQ to SQL DBML model.
Notice also the default filters created for this list. The Discontinued filter is based on a
Boolean field in the data. The Category filter is based on the relationship between Product
and Category. In fact, relational IDs won’t be displayed in the table, but related data will be.
You can see that this was possible for the Category, because it exposed the CategoryName
field. However, this was not possible for SupplierID because this table does not include a
SupplierName field.
You can also see that the form allows you to page the data; select how many rows to show
in a page; edit, delete, and view the details of an item; insert a new item; and connect to data
related to a particular row (View Order_Details). Figure 12-25 shows an example of inserting
a product. Notice that here you again get the Category drop-down list. You can also see that
default data validation is being used. The validation is based on stored data types.
Lesson 3: Working with ASP.NET Dynamic Data
CHAPTER 12 761
Figure 12-25 Automatic data validation in insert mode.
This site behavior is the default behavior with the template scaffolding. You can see that
there was no code or customization done to this site. In upcoming sections, you will see how
to customize the routing, create new page and field templates, and add custom business
logic to validate data.
The Dynamic Data Classes
ASP.NET Dynamic Data relies on several classes inside the System.Web.DynamicData
namespace. These classes include controls for defining custom field user controls, managing
the routing, and using Dynamic Data inside a webpage. The MetaModel classes are found
in the System.Data.Linq.Mapping namespace. Figure 12-26 shows some of the key classes
used by Dynamic Data. Many of these classes will be discussed in upcoming sections.
762 CHAPTER 12
Working with Data Source Controls and Data-Bound Controls
Figure 12-26 Some of the key classes related to ASP.NET Dynamic Data.
Extending and Customizing Dynamic Data
ASP.NET Dynamic Data is fully extensible. You can customize how fields are edited, how data
is displayed, the look of the pages, the URL routing, data validation, and more. You can create
customizations to existing templates that will be applied to all data elements. You can also
create new, entity-specific templates for customizations that are specific to a particular entity.
This section walks you through common customizations you might want to make when using
ASP.NET Dynamic Data.
Defining Custom Routing
Dynamic Data uses the same routing features from System.Web.Routing that are used by
ASP.NET model-view-controller (MVC) (see Chapter 14, “Creating Websites with ASP.NET
MVC 2”). This routing engine maps intelligent Uniform Resource Identifiers (URIs) that are
defined based on user actions to actual pages in your site, which makes the URIs easier to
understand for users and search engines.
Lesson 3: Working with ASP.NET Dynamic Data
CHAPTER 12 763
For example, Dynamic Data exposes the List.aspx, Edit.aspx, Insert.aspx, and Details.aspx
page templates for working with data. These pages are called by the routing engine based on
the user’s action: List, Edit, Details, or Insert. A DynamicDataRoute class is created and added
to the RouteTable.Routes collection inside the Global.asax file. This DynamicDataRoute indicates that a URI should be mapped as table/action.aspx. The following shows the code from
the Global.asax file that does this.
Sample of Visual Basic Code
routes.Add(New DynamicDataRoute("{table}/{action}.aspx") With {
.Constraints = New RouteValueDictionary( _
New With {.Action = "List|Details|Edit|Insert"}), .Model = DefaultModel})
Sample of C# Code
routes.Add(new DynamicDataRoute("{table}/{action}.aspx") {
Constraints = new RouteValueDictionary(
new { action = "List|Details|Edit|Insert" }), Model = DefaultModel
This code ensures that a call to http://mysite/products/Edit.aspx?ProductID=1 will be routed
to the /DynamicData/PageTemplates/Edit.aspx page. When accessed, the page will know the
right table to edit (Products) and right record to edit (ProductID=1).
Editing the URI Structure
You can customize this routing by editing this code. For example, you might want to change
the structure of the URL or even add a custom action. You can switch the table and action
in the route definition to read {action}/{table}.aspx and get the same results but a different
URL. New requests will be made as http://mysite/Edit/Products.aspx?ProductID=1. In this
case, the table is used for the ASPX page name, and the action precedes the table name.
Editing the Route Table to Show a List and Details on the Same Page
The Dynamic Data page templates include the ListDetails.aspx file. This page supports viewing
a table in a list and selecting an item from the list to view its details. You can also edit the item
or delete it, and you can insert a new item into the list by using this page. However, by default,
requests are not routed to this page. You can change this behavior by removing the existing
routing and adding entries for the action’s List and Details that both point to the ListDetails.aspx
page. The following code shows an example.
Sample of Visual Basic Code
routes.Add(New DynamicDataRoute("{table}/ListDetails.aspx") With {
.Action = PageAction.List,
.ViewName = "ListDetails",
.Model = DefaultModel})
routes.Add(New DynamicDataRoute("{table}/ListDetails.aspx") With {
.Action = PageAction.Details,
.ViewName = "ListDetails",
.Model = DefaultModel})
764 CHAPTER 12
Working with Data Source Controls and Data-Bound Controls
Sample of C# Code
routes.Add(new DynamicDataRoute("{table}/ListDetails.aspx")
{
Action = PageAction.List,
ViewName = "ListDetails",
Model = DefaultModel
});
routes.Add(new DynamicDataRoute("{table}/ListDetails.aspx")
{
Action = PageAction.Details,
ViewName = "ListDetails",
Model = DefaultModel
});
The result is that all calls to view a record’s details or show a table in a list will be routed
to the ListDetails.aspx page. From there, users can do everything they need to with the data.
Note that ListDetails.aspx also handles inline editing in the GridView control.
Creating a Custom Route to a Specific page
ASP.NET Dynamic Data can already route to custom pages you create. You simply need to follow the conventions already set up. You do not need to add custom routes. Instead, you create
a new folder in the CustomPages folder and name this new folder with the name of an entity
from your model. You then place appropriate action pages inside this folder (List.aspx, Edit.aspx,
Insert.aspx, and so on). The default routing will look for pages in CustomPage first. You will walk
through an example of creating a custom template page in an upcoming section.
Adding Metadata to Your Data Context
The classes in your data context are partial classes that include partial methods. This allows you to
add to these classes and their methods outside the generated code. Doing so ensures that your
changes are not overwritten if the model’s code gets regenerated when the database changes.
You create partial classes so that you can add metadata that defines how your fields are to
be displayed and validated (see “Creating Custom Field Templates,” later in this lesson). You
can also add custom business logic inside a partial method (see “Adding Custom Validation,”
also later in this lesson).
To start, you simply add a class to the App_Code directory and give it the same name as
the class in your data context. Of course, you mark this class as partial. You then create a
related metadata class (typically added to the same file). You can name this class by using
the EntityMetadata convention.
Inside this metadata class, you redefine the properties contained in your data context
class (but as simple object types, because the underlying type already has strongly typed
properties). You then mark your partial class with the MetadataType attribute from the
System.ComponentModel.DataAnnotations namespace. This attribute should pass the metadata class type as a parameter.
Lesson 3: Working with ASP.NET Dynamic Data
CHAPTER 12 765
You can then add attributes to your metadata class to change how your fields are rendered
by Dynamic Data. As an example, if you want to exclude a field from display, you can add the
ScaffoldColumn attribute and pass in false. Additionally, if you want to format a value for display, you can use the DisplayFormat attribute. This attribute allows you to indicate whether to
only format the value when it is displayed or also when it is being edited. You can also use the
Display attribute to change the name of a column.
The following shows an example from the Products entity partial class and metadata class.
Notice the use of ScaffoldColumn, Display, and DisplayFormat.
Sample of Visual Basic Code
Imports Microsoft.VisualBasic
Imports System.ComponentModel.DataAnnotations
<MetadataType(GetType(ProductMetadata))> _
Partial Public Class Product
End Class
Public Class ProductMetadata
Public
Public
Public
Public
Property
Property
Property
Property
ProductID As Object
ProductName As Object
SupplierID As Object
CategoryID As Object
<ScaffoldColumn(False)> _
Public Property QuantityPerUnit As Object
<DisplayFormat(ApplyFormatInEditMode:=False,
DataFormatString:="{0:c}")> _
<Display(Name:="Price")> _
Public Property UnitPrice As Object
<ScaffoldColumn(False)> _
Public Property UnitsInStock As Object
<ScaffoldColumn(False)> _
Public Property UnitsOnOrder As Object
<ScaffoldColumn(False)> _
Public Property ReorderLevel As Object
Public Property Discontinued As Object
End Class
766 CHAPTER 12
Working with Data Source Controls and Data-Bound Controls
Sample of C# Code
using
using
using
using
using
System;
System.Collections.Generic;
System.Linq;
System.Web;
System.ComponentModel.DataAnnotations;
[MetadataType(typeof(ProductMetadata))]
public partial class Product
{
}
public class ProductMetadata
{
public object ProductID { get; set; }
public object ProductName { get; set; }
public object SupplierID { get; set; }
public object CategoryID { get; set; }
[ScaffoldColumn(false)]
public object QuantityPerUnit { get; set; }
[DisplayFormat(ApplyFormatInEditMode=false,
DataFormatString="{0:c}")]
[Display(Name = "Price")]
public object UnitPrice { get; set; }
[ScaffoldColumn(false)]
public object UnitsInStock { get; set; }
[ScaffoldColumn(false)]
public object UnitsOnOrder { get; set; }
[ScaffoldColumn(false)]
public object ReorderLevel { get; set; }
public object Discontinued { get; set; }
}
When you run the application, this metadata is added to the Product class. Dynamic
Data then picks up on this metadata and displays your fields accordingly. Figure 12-27
shows the results in a browser. Notice the missing fields, formatted UnitPrice column, and
changed name.
Lesson 3: Working with ASP.NET Dynamic Data
CHAPTER 12 767
Figure 12-27 Using metadata and partial classes to indicate field display options.
There are many additional annotations you can add to your metadata from the System.
ComponentModel.DataAnnotations namespace. You will see some of these in the upcoming
sections. Table 12-1 provides a partial list of these classes (note that all are attribute classes).
Table 12-1 Commonly Used Metadata Annotation Classes
Class
Description
Association
Used to mark a property as a data relationship, such as a foreign key.
CustomValidation
Used to indicate a custom validation method to use for validating a
property.
DataType
Used to indicate the data type to associate with the field.
Display
Allows you to indicate many things about the display of a field,
including its order and its name.
DisplayFormat
Allows you to change how the data in a field is displayed. You can
apply the formatting to affect only the view mode (and not the edit
mode) if you want.
Editable
Used to indicate whether a property can be edited.
EnumDataType
Allows you to set an enum data type for a property.
768 CHAPTER 12
Working with Data Source Controls and Data-Bound Controls
Class
Description
Key
Allows you to set one or more properties as unique keys for a
collection of objects.
MetadataType
Used to set the metadata class to associate with a type from your
data context.
Range
Allows you to add a numeric range constraint to a property. You can
also set an error message to be shown if the range is not valid.
RegularExpression
Used to add a regular expression constraint to a property.
Required
Used to indicate that a property is required when inserting or editing.
ScaffoldColumn
Indicates whether the column should be part of the scaffold (shown).
ScaffoldTable
Indicates whether an entire table should be part of the scaffold (shown).
StringLength
Allows you to set a constraint on a property based on the specified
minimum and maximum number of characters for a property.
UIHint
Used to specify a custom field user control that should be used to
display the property.
Adding Custom Validation
You can see from Table 12-1 that you can use attributes to mark your metadata with specific
constraints. These constraints will then be enforced by Dynamic Data, and ASP.NET validation
controls will be rendered and invoked.
The validation attributes include Range, StringLength, Required, and RegularExpression
(among others). You use these controls to enforce additional constraints on your data. For
example, suppose you want to add the Range validator to the ReorderLevel property to
indicate that users can only reorder stock in quantities of 1 to 144 units. You could do so
with the following code.
Sample of Visual Basic Code
<Range(1, 144, ErrorMessage:="Quantity must be between 1 and 144")> _
Public Property ReorderLevel As Object
Sample of C# Code
[Range(1, 144, ErrorMessage = "Quantity must be between 1 and 144")]
public object ReorderLevel { get; set; }
This business logic is then processed by Dynamic Data. You can see the results of a row edit
in Figure 12-28. Here the user set the ReorderLevel to a value that is out of range (0). You can
follow this same construct for other validation attributes, including StringLength and Required.
Of course, you can apply more than one attribute to any property.
Lesson 3: Working with ASP.NET Dynamic Data
CHAPTER 12 769
Figure 12-28 The Range constraint running in a browser window.
Custom Validation with Partial Methods
The data content model includes partial methods that allow you to add custom code that will
be added to the method when the partial class is assembled. In fact, you can see these partial
methods inside the Extensibility Method Definitions region of the generated code for a LINQ
to SQL model. There are partial methods for OnChanging and OnChanged for each property
in the data context. This means that the Product table has an OnUnitPriceChanging and
OnUnitPriceChanged partial method. In fact, when you type “partial” into your partial class,
Visual Studio’s IntelliSense provides you with a list of all partial methods that you can extend.
You can use these partial methods to write customized validation rules. Remember,
your partial class is an instance of the actual class representing the entity. Therefore, you
have access to all fields on the record. The OnChanging partial method is also passed the
value to which the property is being changed. You can use these fields and this value to
write custom business logic. If you encounter an error, you throw a ValidationException from
System.ComponentModel.DataAnnotations. Dynamic Data will present the exception to the
user as an ASP.NET validation error.
As an example, suppose you want to write custom business logic that processes when the
Product.UnitPrice is being changed. This logic might prevent a user from lowering the price
of an object if there are items still in stock and the product has not been discontinued. You
would add this code to the Product partial class as follows.
770 CHAPTER 12
Working with Data Source Controls and Data-Bound Controls
Sample of Visual Basic Code
Private Sub OnUnitPriceChanging(ByVal value As System.Nullable(Of Decimal))
'rule: can only lower the price if product is discontinued
If (Me.UnitsInStock > 0 And Me.UnitPrice > value) _
And (Me.Discontinued = False) Then
Throw New ValidationException( _
"Cannot lower the price of an item that is not discontinued.")
End If
End Sub
Sample of C# Code
partial void OnUnitPriceChanging(decimal? value)
{
//rule: can only lower the price if product is discontinued
if ((this.UnitsInStock > 0 && this.UnitPrice > value)
&& (this.Discontinued == false))
{
throw new ValidationException(
"Cannot lower the price of an item that is not discontinued.");
}
}
Figure 12-29 shows an example of this logic processing. Notice that the validation message
is shown as part of the validation summary controls in ASP.NET.
Figure 12-29 The custom business logic being processed in the browser.
Lesson 3: Working with ASP.NET Dynamic Data
CHAPTER 12 771
Creating Custom Field Templates
Recall that the Dynamic Data templates include the FieldTemplates folder. Inside this folder
is a set of user controls that inherit from FieldTemplateUserControl. These controls are used
to render the appearance and functionality of your data context properties when they are
displayed on a details or edit page (or page section).
Field template controls are named as either display controls or edit controls for a
specific data type and functionality. For example, the controls used to render DateTime
values are DateTime.ascx and DateTime_Edit.ascx. The former is simply a Literal control
that is used when a DateTime value is rendered for display. The edit version includes a
TextBox, a RequiredFieldValidator, a RegularExpressionValidator, a DynamicValidator,
and a CustomValidator control. This composite user control is used whenever a DateTime
value is displayed for editing.
You can edit the field template controls or create new ones in order to provide additional
behavior in your website. Edits to an existing control will apply to all uses of that control within
your website. When you create a new control, you use metadata to specify which properties
in your data model use the new control. You will look at both examples next.
Customizing an Existing Field Template
You can customize an existing field template user control as you would any other user control. This
means adding client-side script, changing the appearance, and modifying the processing logic.
For example, you could modify the code-behind file for each of the core edit pages (Text_
Edit.ascx, DataTime_Edit.ascx, Decimal_Edit.ascx, Integer_Edit.ascx, and MultilineText_Edit.ascx)
to change the background color of the control if a different background color is required. To do
so, you would add code to the OnDataBinding event. At this point, the SetupValidator methods
have already run and any validation controls, including the RequiredFieldValidator, will already
be set as either enabled or disabled. You could then add the following code to this event to set
the background color accordingly.
Sample of Visual Basic Code
Protected Overrides Sub OnDataBinding(ByVal e As System.EventArgs)
MyBase.OnDataBinding(e)
If Me.RequiredFieldValidator1.Enabled = True Then
TextBox1.BackColor = System.Drawing.Color.SandyBrown
End If
End Sub
Sample of C# Code
protected override void OnDataBinding(EventArgs e)
{
base.OnDataBinding(e);
if (this.RequiredFieldValidator1.Enabled == true)
TextBox1.BackColor = System.Drawing.Color.SandyBrown;
}
772 CHAPTER 12
Working with Data Source Controls and Data-Bound Controls
You can then add the RequiredAttribute class to any properties in your metadata class that
you want to be required. When the control is rendered, Dynamic Data will mark the edit versions for these properties with the color if they are required fields.
Creating a New Field Template Control
You can create your own custom field template user controls. You can do so by copying an
existing user control in Dynamic Data/FieldTemplates or by selecting the Dynamic Data Field
template from the Add New Item dialog box.
When you use the Dynamic Data Field item template, Visual Studio will actually generate
two controls: one for display (ControlName.ascx) and one for editing (ControlName_Edit.ascx).
The display version by default is just a Literal control. The edit version will include a TextBox
control and the various validation controls used by DynamicData, some of which were shown
in Table 12-1. You can then customize these controls to your needs.
As an example, suppose you want to create a new user control to allow users to use a
Calendar control when picking a date in edit mode. To do so, you can add a new Dynamic
Data Field to your project named CalendarPicker.ascx. Again, this will create two controls.
You can leave the display version as is. You might then modify the markup in the
CalendarPicker_Edit.ascx control to use a Calendar control, as follows.
<%@ Control Language="VB" CodeFile="CalendarPicker_Edit.ascx.vb"
Inherits="DynamicData_FieldTemplates_CalendarPicker_EditField" %>
<asp:Calendar ID="Calendar1" runat="server"
CssClass="DDTextBox"></asp:Calendar>
You would then add code to the code-behind page for the control to set the value of the
Calendar control when data binding occurs. This code might look as follows.
Sample of Visual Basic Code
Protected Overrides Sub OnDataBinding(ByVal e As System.EventArgs)
MyBase.OnDataBinding(e)
Dim dte As DateTime = DateTime.Parse(Me.FieldValue)
Calendar1.SelectedDate = dte
Calendar1.VisibleDate = dte
End Sub
Sample of C# Code
protected override void OnDataBinding(EventArgs e)
{
base.OnDataBinding(e);
DateTime dte = DateTime.Parse(this.FieldValue.ToString());
Calendar1.SelectedDate = dte;
Calendar1.VisibleDate = dte;
}
Lesson 3: Working with ASP.NET Dynamic Data
CHAPTER 12 773
The last step is to mark your metadata properties to indicate that they should use this new
control. You do so with the UIHint attribute. You pass the name of your control to this attribute.
Dynamic Data will then find your control and use it for all display and edits (including GridView
edits) that involve this field. As an example, the following metadata marks the HireDate and
BirthDate properties of the Employee class to use the custom CalendarPicker control.
Sample of Visual Basic Code
<MetadataType(GetType(EmployeeMetadata))> _
Partial Public Class Employee
End Class
Public Class EmployeeMetadata
<UIHint("CalendarPicker")> _
Public Property HireDate As Object
<UIHint("CalendarPicker")> _
Public Property BirthDate As Object
End Class
Sample of C# Code
[MetadataType(typeof(EmployeeMetadata))]
public partial class Employee
{
}
public class EmployeeMetadata
{
[UIHint("CalendarPicker")]
public object HireDate { get; set; }
[UIHint("CalendarPicker")]
public object BirthDate { get; set; }
}
Figure 12-30 shows the control in use on a webpage.
774 CHAPTER 12
Working with Data Source Controls and Data-Bound Controls
Figure 12-30 The custom field template being used in the browser.
Creating Custom Page Templates
Recall that the Dynamic Data templates are not specific to an object in your data context. Rather,
they are generic templates that get information about the data they display from your data context at run time. You can customize how these templates display your data by using a metadata
partial class and the data annotation attributes. However, you might find scenarios in which you
need to create an entity-specific version of a page to control exactly how that entity is rendered
to the browser. In this case, you need to create a custom page template.
Custom page templates are specific to a single entity in your data context. You create them
by first creating a new folder inside the CustomPages folder. This folder should have the same
name as your entity object. To create custom pages for working with products, for example,
you would create a Products folder inside CustomPages. You then copy one or more of the
page templates from the PageTemplates directory into your new folder. The Dynamic Data
routing will look first in the CustomPages/EntityName folders for action pages such as
Edit.aspx, Insert.aspx, and List.aspx. If the file it is looking for is there, it will use this custom
page for display. If not, it will use the default action page inside the PageTemplates directory.
Lesson 3: Working with ASP.NET Dynamic Data
CHAPTER 12 775
As an example, suppose you want to create a custom version of the List.aspx page for use
with Products. You would create a Products folder in CustomPages. You would then copy the
List.aspx page to that folder. You can then open this page and edit the markup and codebehind accordingly. A common edit is to bind the GridView control more tightly with the
specific product. You can do so by setting the AutoGenerateColumns property to false. You
can then add a series of DynamicField properties to represent your bound data. The following
markup shows an example.
<asp:GridView ID="GridView1" runat="server"
DataSourceID="GridDataSource" EnablePersistedSelection="true"
AllowPaging="True" AllowSorting="True" CssClass="DDGridView"
RowStyle-CssClass="td" HeaderStyle-CssClass="th" CellPadding="6"
AutoGenerateColumns="false">
<Columns>
<asp:DynamicField DataField="ProductID" HeaderText="ID" />
<asp:DynamicField DataField="ProductName" HeaderText="Name" />
<asp:DynamicField DataField="UnitPrice" HeaderText="Price" />
<asp:DynamicField DataField="UnitsInStock" HeaderText="Stock" />
<asp:TemplateField>
<ItemTemplate>
<asp:DynamicHyperLink runat="server" Action="Edit" Text="Edit"/>
<asp:LinkButton runat="server"
CommandName="Delete" Text="Delete" OnClientClick=
'return confirm("Are you sure you want to delete this item?");'/>
<asp:DynamicHyperLink runat="server" Text="Details" />
</ItemTemplate>
</asp:TemplateField>
</Columns>
<PagerStyle CssClass="DDFooter"/>
<PagerTemplate>
<asp:GridViewPager runat="server" />
</PagerTemplate>
<EmptyDataTemplate>
There are currently no items in this table.
</EmptyDataTemplate>
</asp:GridView>
Figure 12-31 shows this custom page running in a browser.
776 CHAPTER 12
Working with Data Source Controls and Data-Bound Controls
Figure 12-31 The custom page template being displayed in the browser.
Using Dynamic Controls in Existing Sites
You can use the features of Dynamic Data in existing sites. For example, you can add the full
scaffolding and connect to a data context for CRUD operations, and you can create custom
webpages (or customize existing ones) to take advantage of the lower code, lower markup
solution that Dynamic Data offers.
Adding Dynamic Data Scaffolding to an Existing Website
You can add Dynamic Data scaffolding to an existing website. To do so, you must have a data
context defined in your site (or you must create one). Remember, Dynamic Data works with
either LINQ to SQL classes, the ADO.NET Entity Framework, or a custom data context.
You then edit the Global.asax file to register your context and enable custom routing. This
code can be copied from the Global.asax file for a blank Dynamic Data site. Refer back to
“Getting Started with Dynamic Data Websites” earlier in this lesson for details.
Finally, you copy the DynamicData folder from a blank Dynamic Data site into your existing site.
You can then make customizations and use Dynamic Data features as discussed in prior sections.
Lesson 3: Working with ASP.NET Dynamic Data
CHAPTER 12 777
Enabling Dynamic Data Inside a Webpage
You can use Dynamic Data inside completely custom webpages that do not use the scaffolding or
routing common to Dynamic Data. For this scenario, you can create pages that use data-bound
controls such as GridView, DetailsView, ListView, and FormView, and use Dynamic Data for
displaying, editing, and validating data. In this case, you get the default behavior of Dynamic
Data, including data validation. You can then customize this behavior by adding more information to your meta-model as described previously.
As an example, suppose you have a standard ASP.NET website (not one built with the
Dynamic Data template). Suppose that this site has an ADO.NET Entity Data Model for
working with the Northwind database.
You can then add an EntityDataSource control to the Default.aspx page for the site. This
control can be set to use the entity model for selecting, inserting, updating, and deleting. Recall
that you set EntitySetName to indicate the entity used by the data source. The following markup
shows an example.
<asp:EntityDataSource ID="EntityDataSource1" runat="server"
ConnectionString="name=northwndEntities"
DefaultContainerName="northwndEntities" EnableDelete="True"
EnableFlattening="False" EnableInsert="True" EnableUpdate="True"
EntitySetName="Products">
</asp:EntityDataSource>
Next, you can add a data display control to the page. In this example, assume you add a
GridView to the page. You would then configure this control to auto-generate columns and
enable editing. The following markup shows an example.
<asp:GridView ID="GridView1" runat="server"
DataSourceID="EntityDataSource1"
AllowPaging="True" AllowSorting="True"
AutoGenerateColumns="true">
<Columns>
<asp:CommandField ShowEditButton="True" />
</Columns>
</asp:GridView>
The final step is to add code to the Page_Init event to enable the Dynamic Data. The following code shows an example.
Sample of Visual Basic Code
Protected Sub Page_Load1(ByVal sender As Object, _
ByVal e As System.EventArgs) Handles Me.Load
GridView1.EnableDynamicData(GetType(northwndModel.Product));
End Sub
Sample of C# Code
protected void Page_Init()
{
GridView1.EnableDynamicData(typeof(northwndModel.Product));
}
778 CHAPTER 12
Working with Data Source Controls and Data-Bound Controls
Figure 12-32 shows the results. Notice that the attempt to edit the first record failed. You
can see the asterisk next to the ProductName field. This is because this field cannot be blank,
as defined in the model. You can further customize this page to use even more features from
Dynamic Data.
Figure 12-32 Dynamic Data being used on a standard webpage.
Quick Check
1 . What data models can you use with Dynamic Data?
2. Where do you register your data model with the site’s MetaModel?
3. Which of the data annotation classes would you use to define metadata to
change the display format of a property?
Quick Check Answers
1 . Dynamic data must use a data model based on DataContext or ObjectContext.
This includes LINQ to SQL classes and ADO.NET Entity Framework models.
2. You register your data context inside the Global.asax file.
3. You would use the DisplayFormatAttribute.
Lesson 3: Working with ASP.NET Dynamic Data
CHAPTER 12 779
Pr actice
Creating a Dynamic Data Website
In this practice, you create a Dynamic Data website and edit the default routing.
On the Companion Media
If you encounter a problem completing an exercise, you can find the completed projects
in the samples installed from this book’s companion CD. For more information about the
project files and other content on the CD, see “Using the Companion Media” in this book’s
Introduction.
E xercise Creating a Dynamic Data Website and an Entity Model
In this exercise, you create a new Dynamic Data website, add a database to the site, and define
an Entity Data Model. You then configure the site to work with the model and customize
the routing.
1. Open Visual Studio and create a new ASP.NET Dynamic Data Entities Web Site. Name
the site DynamicDataLab. Select your preferred programming language.
2. Add the northwnd.mdf file to your App_Data directory. You can copy the file from the
samples installed from the CD.
3. Add an ADO.NET Entity Data Model to your site. Name the model Northwind.edmx.
When prompted, allow Visual Studio to add this to your App_Code directory. Use the
Entity Data Model Wizard to connect to all tables in the database; use the default
settings throughout the wizard.
4. Open the Global.asax file. Inside RegisterRoutes, uncomment the line that calls
RegisterContext. Change this code to register your new entity model and set
ScaffoldAllTables to true. Your code should look as follows.
Sample of Visual Basic Code
‘VB
DefaultModel.RegisterContext(GetType(northwndModel.northwndEntities), _
New ContextConfiguration() With {.ScaffoldAllTables = True})
Sample of C# Code
DefaultModel.RegisterContext(typeof(northwndModel.northwndEntities),
new ContextConfiguration() { ScaffoldAllTables = true });
5. Run the application and view the results. Select Products. Click to edit a product.
Notice the URL routing. On the product editing page, clear the name field and click
update. Notice the validation that is displayed.
780 CHAPTER 12
Working with Data Source Controls and Data-Bound Controls
6. Return to the Global.asax file to enable routing to ListDetails.aspx. This page allows
you to edit a row directly in the GridView as well as in a DetailsView on the same page.
To enable row editing, comment out the routes.Add call for {table}/{action}. Then
uncomment both routes.Add calls at the bottom of the method. Notice that these
routes indicate that the List and Details actions should route to ListDetails.aspx. This
page handles all other actions inline with the page.
7. Rerun the site. Select the Products table. Notice the new URL. Click the Edit link for a
product in the GridView control. Notice the inline editing and data validation.
Lesson Summary
■
There are two Dynamic Data website templates in ASP.NET: one for working with the
Entity Framework and one for working with LINQ to SQL models. Both create a set of
page and field template files inside the DynamicData folder. Both allow you to connect
your data context to the site inside the Global.asax file.
■
You can use the System.Web.Routing inside the Global.asax file to indicate how
your Dynamic Data site maps entity requests and actions formatted in a URI to
page templates.
■
You use partial classes to extend the metadata of your data context. This metadata
includes attributes from the DataAnnotations namespace that define display formatting properties and validation rules.
■
You can write additions to the OnChanging partial methods from your data context
model to extend individual properties to include additional business logic.
■
You can create custom field templates that change how properties are displayed
and edited. These field templates inherit from FieldTemplateUserControl. You apply
a custom field template as metadata to a property in your partial entity class by using
the UIHintAttribute.
■
You can create custom page templates that are entity specific inside the CustomPages
folder. You add a folder with the same name as your entity. You then define custom
action pages such as List.aspx and Edit.aspx.
■
You can use the EnableDynamicData method of the data view controls (such as GridView)
to add Dynamic Data features to existing websites that do not contain the standard
scaffolding.
Lesson 3: Working with ASP.NET Dynamic Data
CHAPTER 12 781
Lesson Review
You can use the following questions to test your knowledge of the information in Lesson 3,
“Working with ASP.NET Dynamic Data.” The questions are also available on the companion
CD in a practice test, if you prefer to review them in electronic form.
Note Answers
Answers to these questions and explanations of why each answer choice is correct or
incorrect are located in the “Answers” section at the end of the book.
1. You need to add metadata to your data context object, Invoice, in order to change
how invoices are handled by Dynamic Data. Which actions should you take? (Choose
all that apply.)
A. Create a new partial class called Invoice in the App_Code directory.
B. Create a new class called InvoiceAnnotations in the App_Code directory.
C. Decorate the Invoice class with the MetadataTypeAttribute class.
D. Decorate the InvoiceAnnotations class with the ScaffoldTableAttribute class.
2. You have defined a custom field template user control for changing the way an
Invoice number is edited. You want to apply this control to the Invoice.Number
property. Which data annotation attribute class would you use to do so?
A. MetadataType
B. Display
C. Editable
D. UIHint
3. You want to implement custom business logic that should run when the InvoiceNumber
property is modified. What actions should you take? (Choose all that apply.)
A. Add a CustomValidator control to the DynamicData/FieldTemplates/Integer_Edit.asax
file. Set this control to process custom logic to validate an invoice number.
B. Extend the OnInvoiceNumberChanged partial method inside the Invoice partial
class to include additional validation logic.
C. Extend the OnInvoiceNumberChanging partial method inside the Invoice partial
class to include additional validation logic.
D. If the logic fails, throw a ValidationException instance.
782 CHAPTER 12
Working with Data Source Controls and Data-Bound Controls
Case Scenarios
In the following case scenarios, you apply what you’ve learned in this chapter. If you have
difficulty completing this work, review the material in this chapter before beginning the next
chapter. You can find answers to these questions in the “Answers” section at the end of this book.
Case Scenario 1: Choosing Data Source Controls
You are a developer at Contoso, Ltd, a car insurance company. You have been asked to write an
application that allows a customer service agent to provide an insurance quote to a customer
over the phone. However, there are many factors that go into pricing the insurance policy. Each
of these factors contains data from different sources. This data is displayed to the agent for
selection. Based on his or her selection, a price is generated.
You identify most of the data sources as follows:
■
Location premium markup data Provided as XML from a web service.
■
Year, make, and model rates Provided inside a SQL Server database.
■
Driver history Provided through an XML web service.
■
Existing customer information Provided through a shared customer object to which
the application has a reference.
Thinking about how you will access the data, answer the following questions:
1. Which data source control would you use for accessing the data returned by the location
and driver history web services? How would you configure the data source control to
receive this data?
2. Which data source control would you use for accessing the year, make, and model
rate data?
3. How would you access the data provided by the customer object?
Case Scenario 2: Implementing a Master-Detail Solution
You are a developer who is creating a webpage for displaying customers and their orders in a
master-detail scenario. The top of the webpage will provide a list of customers that contains the
customer numbers and names. The bottom of the webpage will provide a list of the orders containing the order numbers, the order dates, the order amounts, and the ship dates. The orders
will be displayed for the customer that is selected.
Thinking about how you will display your data, answer the following questions:
1. What controls would you use to display the customer and orders?
2. If you want to use this webpage to add customers and orders, what are some ways
that you can provide this functionality?
Case Scenarios
CHAPTER 12 783
Case Scenario 3: Adding ASP.NET Dynamic Data to a
Website
You are a developer working on an existing website. There are several core tables in the
database that users cannot edit. This is becoming a problem, because maintenance is
needed. You have been asked to quickly enable this editing for some of these tables not
already exposed by the functionality of your website.
Answer the following questions about how you would enable this functionality using
Dynamic Data.
1. How can you add Dynamic Data scaffolding to this existing site?
2. How would you indicate which tables to expose through Dynamic Data?
Suggested Practices
To help you successfully master the exam objectives presented in this chapter, complete the
following tasks.
Create Pages by Using Each of the Controls
For this task, you should complete Practice 1 for the data source controls. Practice 2 should
be completed for additional use of the data-bound web controls. If attempting Practice 2,
you should complete Practice 1 first. Practice 3 provides experience with using the insert,
update, and delete parts of a data source control.
■
Practice 1 Create a new website and add a new page for each of the data source con-
trols in this chapter, especially those not defined in the practice for Lesson 1. Configure
these controls to access data.
■
Practice 2 Add the ability to display the data defined in the pages in Practice 1. For
each data source, select a different display control. Use the Menu control for XML
data. Also, be sure to define a layout control that uses templates.
■
Practice 3 Return to the practice for Lesson 1. Edit the site to enable customer editing.
Create a Master-Detail Solution by Using the Data-Bound
Server Controls
This practice gives you experience with using data-bound server controls.
■
Create a new website that uses a domain familiar to you, such as customers and orders,
owners and vehicles, employees and sick days, or albums and songs. Add a webpage
that is configurable as a master-detail page to provide access to related data.
784 CHAPTER 12
Working with Data Source Controls and Data-Bound Controls
Work with Dynamic Data Websites
For this task, you should complete Practices 1 and 2 to gain experience creating custom field
and page templates. Complete Practice 3 for experience with using Dynamic Data outside a
Dynamic Data website.
■
Practice 1 Return to the practice from Lesson 3. Create a custom field template for
selecting dates. Use the CalendarPicker example from the chapter. Apply this control
to date values in the site.
■
Practice 2 Return to the practice from Lesson 3. Create a custom page template for
displaying only portions of an Employee object.
■
Practice 3 Create a new, standard ASP.NET website. Define a data context connected
to a database. Enable Dynamic Data for a single page within the site (without adding
the scaffolding support).
Take a Practice Test
The practice tests on this book’s companion CD offer many options. For example, you can
test yourself on just the lesson review questions in this chapter, or you can test yourself on
all the 70-515 certification exam objectives. You can set up the test so it closely simulates
the experience of taking a certification exam, or you can set it up in study mode so you
can look at the correct answers and explanations after you answer each question.
More Info Practice tests
For details about all the practice test options available, see the “How to Use the Practice
Tests” section in this book’s Introduction.
Take a Practice Test
CHAPTER 12 785

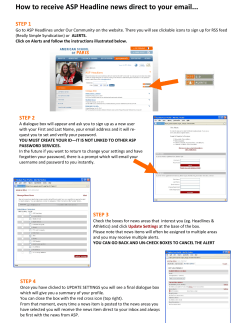


© Copyright 2026