
Freedom 2100 Motor Control Center Installation and Maintenance Manual IM04302004E Contents
Instruction Booklet IM04302004E Effective October 2010 Supersedes June 2010 Freedom 2100 Motor Control Center Installation and Maintenance Manual Contents Part Description Page 1 2 3 4 5 6 7 8 9 10 11 12 GeneralInformation . . . . . . . . . . . . . . . . . 2 Receiving,Handling,andStorage . . . . . . . 4 InstallingControlCenterSections . . . . . . . 5 InstallingConduitandWiring . . . . . . . . . . 9 IncomingLineConnections . . . . . . . . . . 11 OvercurrentProtectionDevices . . . . . . . 15 OverloadRelayHeaterSelection . . . . . . 16 InspectionPriortoEnergizing . . . . . . . . . 20 UnitInstallationandAdjustment . . . . . . . 22 Maintenance . . . . . . . . . . . . . . . . . . . . . . 24 PlanViews . . . . . . . . . . . . . . . . . . . . . . . . 29 RelatedInstructionLeaflets . . . . . . . . . . 31 Thiselectricalcontrolequipmentisdesignedtobe installed,operated,andmaintainedbyadequately trainedworkmen .Theseinstructionsdonotcover alldetails,variations,orcombinationsoftheequipment,itsstorage,delivery,installation,check-out, safeoperation,ormaintenance .Caremustbe exercisedtocomplywithlocal,state,andnational regulations,aswellassafetypractices,forthis classofequipment .Themaximumshortcircuit capabilityoftheequipmentshouldnotbeexceededbyconnectiontoasourcewithhighercapacity . Ifmaintenanceortroubleshootingassistanceis required,contactyournearestEatonsalesoffice . Freedom 2100 Motor Control Center Installation and Maintenance Manual InstructionBookletIM04302004E Effective October 2010 part 1. General information TheMotorControlCenter TheEatonFreedom2100MotorControlCentermaybejoinedto existingFiveStar,Series2100,andAdvantageinstallationsusing thesplicebarkitscommontoboth .UnitsdesignedfortheFreedom 2100canbemountedinFiveStarSeriesandSeries2100sections, buttheoppositeisnotrecommended,becauseFiveStarandSeries 2100unitsmaylackterminalblocksandsufficientinterruptingcapacity .TheFreedom2100MCCmaybejoinedtoexistingEatonFreedom UnitrolandF10UnitrolMCC’swithaspecialsplicebarkit,butunits arenotinterchangable Theoperatinghandleonthecontrollerunit(3)movesvertically .In theONorTRIPPEDpositions,thehandleinterlockswiththeunit doortopreventitsopening .Inthisposition,authorizedpersonnel canopenthedoorbyturningthedefeatermechanismscrew .(21) WiththeunitdooropenandtheoperatinghandleintheONposition, anotherinterlocktothedividerpanpreventsremovaloftheunit . Thissameinterlockpreventsinsertionoftheunitunlessthehandle mechanismisintheOFFposition .Toensurethatunitsarenotenergizedaccidentallyorbyunauthorizedpersonnel,thehandlemechanismcanbepadlockedintheOFFposition .Spaceforaminimum ofthreepadlocksisprovidedoneachhandle .Thedevicepanel(5) ismountedonthedrawoutunit .Itwillaccommodateuptosixpilot devices .Theoverloadresetbuttonismountedontheunitdoor . ControlCenterNomenclature Thenumbersshowninparenthesesinthefollowingtextrefertothe balloonlegendsinFigure2 . TheEatonFreedom2100MotorControlCenterconsistsofoneor moretotallyenclosed,deadfront,freestandingstructuralassemblies90incheshighwhicharecompartmentalizedtohouseindividualcontrolunits .(2)Withcontrolunitsmountedinthefrontsideonly, thestructuremaybe16or21inchesdeep .Formountingunitsbackto-back,thestructureis21inchesdeep .Steelcovers(7)enclose thestructureatthetop,sidesandattherearoffront-mounted-only structures . Averticalbussysteminstalledineachverticalsectionisconnected tothehorizontalbustofeedtheindividualcontrolunits .Thevertical busisisolatedbyafullheightbarrier .(6)Anoptionallabyrinthbarrierprovidesbothisolationandinsulation .Anautomaticshutteris includedwiththelabyrinthbarriersystemtocoverthestabopenings foreachcontrolunit . Atthetopofeachsection,adoorprovidesreadyaccesstothetop horizontalwireway(11)andgroundbus .Thehorizontalwireway isisolatedfromthebussystemsbysteelbarrierswhichcanbe removedforinstallationandmaintenanceoperations .Adequate spaceisprovidedforcontrolwiringandtopcableentry . Atthebottomofeachsection,adoor(18)providesreadyaccessto thebottomhorizontalwireway,andneutralbus(ifprovided) .The bottomofeachsectioniscompletelyopentoprovideunrestricted bottomentryofcableandconduit .Channelsillsmaybeinstalled acrossthebottomofthecontrolcenterifspecified,andanoptional bottomplatemayalsobespecified . Averticalwireway8inchesdeep,extendingthefull90inchheightof thecontrolcenterislocatedtotherightofeachunitcompartment . Thiswirewayiscoveredbytwohingeddoors(15)andcontainscable supportstosecurewirebundlesandcables .Theverticalwireway joinsthehorizontalwirewayatthetopandbottomtoprovideunobstructedspaceforinterwiring . Eachverticalsectionprovidesspacetomountuptosixcontroller units(2)withaminimumheightof12inches,inincrementsofsix inches,foratotalof72inchesofusablespace .Controllersthrough NEMASize5aredrawouttype(exceptreduced-voltagestarters) . Thesedrawoutunitassembliesareacompletelyself-containedpackageconsistingofasteelenclosure,operatinghandleandelectrical components .Thedrawoutassemblyslidesintothiscompartment onguiderails(11)toprovideeasywithdrawalandreinsertionand toensureprecisealignmentoftheunitstabswiththeverticalbus . Eachdrawoutunitisheldinplacebyasinglequarter-turnlatch(4) whichcanonlybeengagedwhentheunitstabsarefullymatedwith theverticalbus .Eachunithasaseparatedoor,(1)heldclosedbya minimumoftwoquarter-turnfasteners . 2 eaton Corporation www.eaton.com Figure1.Nameplate Ratings EachFreedom2100MotorControlCenterhasaratingnameplate attachedtothedoorofthetophorizontalwirewayoftheprimary section .SeeFigure1andFigure2 .Thisnameplateshowsthegeneralordernumberunderwhichthemotorcontrolcenterwasbuilt anditscontinuouselectricalratings,intermsofincominglinevoltage,phases,andfrequency,andampereratingsofthehorizontal busandtheverticalbusforeachsection .Inaddition,thisnameplate showsthepassiveshort-circuit(withstand)ratingofthehorizontal andverticalbussystem .Theactiveshort-circuit(interrupting)ratings ofthemainandunitshort-circuitprotectivedevicesareshownon labelsattachedtotheinsideofeachunit .Beforeinstallingamotor controlcenter,calculateandrecordthefaultcurrentavailableatthe incominglineterminals .Verifythattheshort-circuitwithstandard short-circuitinterruptingratingsoftheunitsinthemotorcontrolcenterareappropriateforthefaultcurrentavailable . QualifiedPersonnel Individualswhoinstall,operate,ormaintainMCCsmustbetrained andauthorizedtooperatetheequipmentassociatedwiththe installationandmaintenanceofanMCC,aswellastheoperation oftheequipmentthatreceivesitspowerfromcontrollerunitsin theMCC .Suchindividualsmustbetrainedintheproperprocedures withrespecttodisconnectingandlockingOFFpowertotheMCC andwearingpersonalprotectiveequipment,whichincludesarc flash,insulating,andshieldingmaterials,andalsouseinsulatedtools andtestequipment,followingestablishedsafetyproceduresas outlinedintheNationalElectricalSafetyCode(ANSIC2)and ElectricalEquipmentMaintenance(NFPA70E) . Freedom 2100 Motor Control Center Installation and Maintenance Manual (7) Top & Side Cover s InstructionBookletIM04302004E Effective October 2010 (6 ) Vertical Bus Barrier Labyrint h (Optional ) (5) Device Panel and Devices (4) Quarter Turn Latch (3) Operatin g Handl e (1) Unit Door ) (2) Drawout Unit (15 ) Vertical Wireway Door (21) Defeater Mechanism Screw (18) Bottom Wireway Door Figure2.MotorControlCenterNomenclature eaton Corporation www.eaton.com 3 Freedom 2100 Motor Control Center Installation and Maintenance Manual InstructionBookletIM04302004E Effective October 2010 part 2. receiving, Handling, and Storage OverheadCrane 1. SeeFigure3forrecommendedliftingconfiguration . warning MCC - Heavy equipMent StateMent tHiS MCC Can weigH in exCeSS of 2,000 poundS. refer to SHipping ManifeStS for exaCt weigHt of equipMent. to prevent SeriouS injury or deatH, or equipMent daMage, froM unintended MoveMent of equipMent during tranSport, inStallation or any otHer operationS, enSure tHat (1) only Material Handling equipMent of adequate CapaCity and rating for tHe load involved iS uSed; (2) only qualified perSonnel are involved; and (3) all lifting/braCing SHipping labelS and MarkingS inStruCtionS SHipped witH tHe MCC MuSt be followed. Receiving Beforeandafterunloadingthemotorcontrolcenter,inspecteach sectionandunitexteriorforevidenceofdamagethatmayhavebeen incurredduringshipment .Ifthereisanyindicationthatthecontrol centerhasbeenmishandledorshippedonitsbackorside,remove thedrawoutunitsandmakeacompleteinspectionoftheinternal structure,busbars,insulators,andunitcomponentsforpossiblehiddendamage .Reportanydamagefoundtothecarrieratonce . Handling Thefollowingguidelinesareprovidedtohelpavoidpersonalinjury andequipmentdamageduringhandling,andtofacilitatemovingthe motorcontrolcenteratthejobsite . 2. Selectoradjusttherigginglengthstocompensateforany unequalweightdistribution,andtomaintainthemotorcontrol centerinanuprightposition . 3. Toreducetensionontheriggingandthecompressiveload ontheliftingangles,donotallowtheanglebetweenthelifting cablesandverticaltoexceed45degrees .Useslingswithsafety hooksorshackles .Donotpassropesorcablesthroughlifting angleholes. Lift Point The height of the lift point above the spreader should be at least 1/2 of “A” (the distance between eye bolts). This ensures a maximum angle of 45º as shown. Max. 45º A Don’t pass ropes or cables through lift holes. Use slings with safety hooks or shackles. Lift Hole MOTOR CONTROL CENTER Lift Angle Figure3.CorrectUseofLiftingAngle 4. Afterremovingtheliftingangles,replacethemountinghardware topreventtheentranceofdirt,etc . Fork-lifttruck GeneralHints 1. Handlethemotorcontrolcenterwithcaretoavoiddamageto componentsandtotheenclosureoritspaintfinish . Motorcontrolcentersarenormallytopandfrontheavy .Balancethe loadcarefully,andsteady,asnecessary,whilemoving .Alwaysusea safetystrapwhenhandlingwithafork-lift. 2. Keepthemotorcontrolcenterinanuprightposition . Rollers 3. Ensurethatthemovingmeanshasthecapacitytohandlethe weightofthemotorcontrolcenter . 4. Thecontrolcentershouldremainsecuredtotheshippingskid untilthemotorcontrolcenterisinitsfinallocation . 5. Exercisecareduringanymovementandplacementoperations topreventfallingorunintentionalrollingortipping . 6. Liftinganglesforhandlingbyoverheadcraneareboltedtothe topofeachshippingsection .Handlingbyoverheadcraneis preferable,butwhencranefacilitiesarenotavailable,themotor controlcentercanbepositionedwithafork-lifttruckorbyusing rollersundertheshippingskid . 4 eaton Corporation www.eaton.com Rodorpiperollers,withtheaidofpinchbars,provideasimple methodofmovingthemotorcontrolcenterononefloorlevel,if thereisnosignificantincline .Rollthemotorcontrolcenterslowly, andsteadytheloadtopreventtipping . Storage Whenanmotorcontrolcentercannotbeinstalledandplacedinto operationimmediatelyuponreceipt,takestepstopreventdamage bycondensationorharshenvironmentalconditions .Ifthemotorcontrolcentercannotbeinstalledinitsfinallocation,storeitinaclean, dry,ventilatedbuilding,heatedtopreventcondensation,andprotectedfromdirt,dust,water,andmechanicaldamage .Whenstorage conditionsarelessthanideal,installtemporaryelectricalheating, typicallyintheformoflightbulbs,totaling150wattspersection, hungintheverticalwireway,orbyapplyingpowertoself-contained spaceheatersthatthemotorcontrolcentermaybeequippedwith . Removeallloosepackingandflammablematerialsbeforeenergizing anyoftheheatingelements . Freedom 2100 Motor Control Center Installation and Maintenance Manual part 3. installing Control Center Sections General Freedom FlashGardmotorcontrolcenters(MCCs)aredesignedfor installationinaccordancewithboththeNationalElectricalCodeT (NECT),NFPA70,andtheNationalElectricalSafetyCode(NESC), ANSIC2 . Caution if work iS involved in ConneCting tHe Control Center witH exiSting equipMent, enSure tHat inCoMing power iS diSConneCted before work beginS. diSConneCting MeanS SHould be loCked out and/or tagged out of ServiCe. wHere it iS not feaSible to de-energize tHe SySteM, tHe following preCautionS SHould be taken: A. Personsworkingnearexposedpartsthatareormaybeenergizedshouldbeinstructedandshouldusepractices(including appropriatepersonalprotectiveequipment,whichincludesarc flash,insulating,andshieldingmaterials,andinsulatedtoolsand testequipmentinaccordancewiththeNFPA70E) . B. Personsworkingonexposedpartsthatareormaybeenergized should,inaddition,bequalifiedpersonswhohavebeentrained toworkonenergizedcircuits . Installation 1. Beforeanyinstallationworkbegins,consultalldrawings furnishedbyEaton,aswellasallapplicablecontractdrawings fortheinstallation .Giveparticularattentiontothephysicallocationofunitsinthecontrolcenterandtheirrelationtoexisting orplannedconduit,busways,etc .Provideforfutureconduit entrancepriortocontrolcenterinstallation . 2. Locatethecontrolcenterintheareashownonthebuildingfloor plans .Ifinawetlocationoroutsideofthebuilding,protectthe controlcenterfromwaterenteringoraccumulationwithinthe enclosure .Recommendedclearancesorworkingspacesare asfollows: a. Clearancefromwalls(wherenotrearaccessible)— aminimumof1/2inchforindoorand6inchesforoutdoor orwetlocations . b. ClearancefromfrontofMCC(workingspace)—minimum of3feetforcontrolcenterswithoutexposedliveparts . SeeNEC110-13 . Notee: Thisworkingspaceshouldnotbeusedforstorageandshould haveadequatelighting . 3. SinceMCCsareassembledatthefactoryonsmoothandlevel surfacestoensurecorrectalignmentofallparts,MCCsshould besecurelymountedonalevelsurface .Thefoundationfurnished bythepurchasermustbetrueandlevel,orthebottomframes mustbeshimmedtosupporttheentirebaseinatrueplane .Itis recommendedthatleveledchannelsillsunderboththefrontand rearofthecontrolcenterbeusedtoprovidethislevelbase .Drill andtapthechannelsillsformountingboltsinaccordancewith theapplicablefloorplandrawingandtheneitherinstalltheMCC levelwith,orontopof,thefinishedfloor .Ifsillsaregroutedin concrete,themountingboltsshouldbescrewedinplaceand remainuntiltheconcretehashardened . InstructionBookletIM04302004E Effective October 2010 4. Forbottomentry,positiontheMCCsothattheconduitstubs orflooropeningsarelocatedintheshadedareasshownonthe MCCfloorplandrawings(refertopage29andpage30forfloor plandimensions) .Theshadedareasrepresenttheopenspace availableforconduitentrythroughthebottomofeachsection . Ashadedareamayberestrictediflargecontrollersorauto- transformersaremountedinthebottomofthesections .If optionalbottomplatesaresupplied,theplatesmayberemoved anddrilledforconduitentry . 5. InstalltheMCCinitsfinalposition,progressivelylevelingeach sectionandboltingtheframestogetheriftheyareseparated . Ifnecessary,securetheMCCtowallsorothersupporting surfaces .Donotdependonwoodenplugsdrivenintoholesin masonry,concrete,plaster,orsimilarmaterials .SeeNEC110-13 . 6. Iftwoormoreshippingsectionsaretobejoinedintoanintegral assemblyorashippingsectionistobejoinedtoanexisting section,refertoparagraphsbelowbeforeproceedingwith theinstallation . 7. GroundandbondtheMCCasfollows: a. MCCsusedasserviceequipmentforagroundedsystemor asanincominglinesectionforaseparatelyderived,previouslygroundedsystem: 1. Runagroundingelectrodeconductor(groundwire) havingasizeinaccordancewithNEC250-94fromthe groundingelectrodetotheMCCgroundbusorground terminal provided .SeealsoNEC250-92(A)and92(B) . 2. Ifthesystemisgroundedatanypointaheadofthe MCC,thegroundedconductormustberuntotheMCC inaccordancewithNEC250,andconnectedtothe ground busterminal . 3. Donotmakeanyconnectionstogroundontheloadside ofanyneutraldisconnectinglineoranysensorusedfor ground-faultprotection .Donotconnectoutgoinggroundingconductorstotheneutral . b. MCCsusedasserviceequipmentforanungroundedsystem orasanincominglinesectionforaseparatelyderived, previouslyungroundedsystem: 1. Runagroundingelectrodeconductor(groundwire) havingasizeinaccordancewithNEC250-94fromthe groundingelectrodetotheMCCgroundbusterminal . SeeNEC250-92(A)and92(B) . c. MCCsnotusedasserviceequipmentnorasanincomingline sectionforaseparatelyderivedsystem,andusedoneithera groundedorungroundedsystem: 1. GroundtheMCCgroundbusbymeansofequipment groundingconductorshavingasizeinaccordancewith NEC250-95orbybondingtotheracewayenclosing themainsupplyconductorsinaccordancewith NEC250-92(B) . 8. Whenallwiringandadjustmentsarecomplete,closeallunitand wirewaydoors . 9. Indampindoorlocations,shieldtheMCCtopreventmoisture andwaterfromenteringandaccumulating . 10. UnlesstheMCChasbeendesignedforunusualservice conditions,itshouldnotbelocatedwhereitwillbeexposed toambienttemperaturesabove40°C(104°F),corrosiveor explosivefumes,dust,vapors,drippingorstandingwater, abnormalvibration,shock,ortilting . eaton Corporation www.eaton.com 5 Freedom 2100 Motor Control Center Installation and Maintenance Manual InstructionBookletIM04302004E Effective October 2010 JoiningCompatibleSections Iftwomoreshippingsectionsaretobejoinedintoanintegral assembly,orasectionaddedtoanexistinginstallation,splicingof horizontalbus,groundbus,neutralbus,andjoiningoftheadjacent verticalsectionsmustbeplannedwiththeinstallation . 1. Removethesidesheetsfromadjacentverticalsectionstobe joined .(Thesesheetswillhavebeenremovedfromfactoryassembledsections .) 2. Thehorizontalbusspliceplatesandconnectionhardwarewillbe shippedwiththeMCCattachedtooneendofshippingsection . RefertoFigure4 . 3. Thismethodprovidesthemostconvenientaccesstothebolts, andeliminatestheneedtoremovethehorizontalbusbarriersin thatstructure .Shouldtheexistingbusbeoxidized,sandlightly withafinealuminumoxidepaper . Caution do not uSe eMery ClotH or any abraSive Containing Metal. 4. Removetheupperhorizontalwirewaydoorfromthestructureon therightsideoftheleft-hand(LH)section,andremovethetwopiecewirewaybarriertoprovideaccesstotheendsofthebusin thatsection . Figure4.SplicePlatesAttachedtoRight-HandSection 5. Movethesectionintoplace,aligningtheuprightstructuralchannelsandbottomchannels .Alignmentofthesectionwithfloor sillsandfoundationprovisionswillbefacilitatedbyremoving thebottomhorizontalwirewaydoors .Usingthe“U”typeframe clampsprovided,clampadjacentfrontuprightchannelstogether atthetop,bottom,andapproximatecenterofthevertical structure .“U”clampplacementsmustbeplaced4inches (101 .6mm)aboveorbelowthedrawoutunit—1/4turnlatch andunitinterlockfeatureonthecovercontrolmodule;see detailsonpage30bottomleft-handcorner .Thisoperationwill befacilitatedbyremovingtheverticalwirewaydoorsfromthe left-handstructureandoneormoredrawoutunitsfromthe right-handstructure .SeePart9,page22 . 6. Ifrearaccessisavailable,“U”clampsshouldalsobeusedto clamptherearuprightchannelstogether .Infront-mounted-only structures,thiswillrequireremovaloftheadjacentbacksheets . Inaback-to-back-mountedstructure,removetheverticalwirewaydoorsandoneormoredrawoutunitsasabove . 7. Securethesectionstothefloorsillsormountingboltsas providedfortheinstallation . 8. Boltthehorizontalbusspliceplatestothebusintheleft-hand structure,torquingallbusspliceboltsto360pound-inches (30pound-feet) .SeeFigure5 . 9. Replaceallunits,busbarriers,anddoors . JoiningIncompatibleSections JoiningaFreedom MCCtootherequipment,suchasTypeWand 11-300controlcenters,willusuallyinvolveatransitionsection installedbetweenthetwovarietiesofequipment .This transitionsectionwillbedetailedondrawingsprovidedbyEaton andtheapplicablecontractdrawings .Ifprovidedseparately, itshouldbeinstalledfirst .Reviewtheoverallinstallationtaskto determinewhetherthetransitionsectionshouldbeattachedtothe existingequipmentortotheFreedomFlashGardsection,beforeit ismovedintoplace,andselectthesequencethatwillprovidebest accesstobussplicingandjoiningofthestructures . 6 eaton Corporation www.eaton.com Figure5.AccesstoLeft-HandSplicePlateConnections SplicePlates Eachspliceplatekitconsistsofshortpiecesofbusbarthesame widthasthemainhorizontalbusoftheMCCthekitisshippedwith, fourboltsperphase,andappropriatequantitiesofrelatedhardware . Forasinglebusbarperphase,thehardwareisusedasshownin Figure6foreither16-or21-inchdeepenclosures .Eachspliceplate ispunchedwithrectangularholestoacceptasquareshankcarriage boltthatwillnotrotateasthenutistightened . WheretheMCCisbuiltwithtwohorizontalbusbarsperphase,the spliceplatesareinstalledasshowninFigure7 .Thetopedgeof Figure7throughFigure10representsthebacksideoftheMCC . Thetopportionofeachofthesefiguresappliesto21-inchdeep enclosuresandthelowerportionto16-inchdeepenclosures .Note thatforallbutthesingle-barperphase(Figure6)installation,the 16-inchdeepenclosuresrequiretheuseofanutplatethatis mountedwiththesamecarriageboltusedtoattachthehorizontal busbarstothechannel-shapedinsulators .Installthesenutplates beforemountingthespliceplates .Tightenthespliceplateboltswith adrivingtorqueof360pound-inches(30pound-feet) . Freedom 2100 Motor Control Center Installation and Maintenance Manual InstructionBookletIM04302004E Effective October 2010 Type 3R Enclosures WheretheMCCissuppliedinaType3Renclosureforanoutdoor application,applyroofsplicecapsateachshippingblockjunctionto maintaintheenclosureintegrity . Carriage Bolt Splice Plate 21" Deep 3/8" -16 Nut Flat Washer Lock Washer Front Face Figure6.Single-BarSpliceKit 21" Deep Nut Plate 21" Deep 16" Deep 16" Deep Hex–Head Bolt Flat Washer Lock Washer Figure9.Quadruple-BarSpliceKits Figure7.Double-BarSpliceKit 21" Deep Six Bars per Phase—21" Deep 16" Deep Figure8.Triple-BarSpliceKit Eight Bars per Phase—21" Deep Front Face Figure10.Six-andEight-BarSpliceKits eaton Corporation www.eaton.com 7 InstructionBookletIM04302004E Effective October 2010 Freedom 2100 Motor Control Center Installation and Maintenance Manual Joining to a Freedom FlashGard, Freedom Unitrol, orF10Unitrol ConsulttheassemblyinstructionsuppliedwitheveryFreedomMCC setupforsplicetoFreedomFlashGard,FreedomUnitrol,orF10 Unitrol . warning SpeCifiC Safety note for inStalling and reMoving MCC unitS— reCoMMend tHe uSe of new aCCeSSory. Figure13.SplicePlateAttachedtoFreedomFlashGardGround BusatBottom Figure11.SplicePlatesAttachedtoFreedom2100Horizontal BusandGroundBusatTop Figure14.SplicePlateAttachedtoFreedomFlashGard NeutralBus Figure12.HorizontalBusSpliceFreedomUnitrolonLeft, Freedom2100onRight 8 eaton Corporation www.eaton.com Freedom 2100 Motor Control Center Installation and Maintenance Manual part 4. installing Conduit and Wiring Conduit Installconduitinsuchamannerastopreventwaterfromentering andaccumulatingintheconduitortheenclosure .Eliminatesags inconduit .Havetheconduitenterthemotorcontrolcenter(MCC) intheareasdesignatedforconduitentryontheplanviews .See page29andpage30ofthisbookletandoutlinedrawingsshipped withtheMCC .Keepingconduitwithintheshadedareasshownin theplanviewswillavoidcableinterferencewithstructuralmembers andlivebus .SeePart12 . InstructionBookletIM04302004E Effective October 2010 Bringloadwiringfromtheverticalwireway,underthebottomrighthandsideoftheunit,toterminationswithintheunit .Ifoptional loadterminalsareprovided,terminateloadwirestoloadterminals locatedadjacenttotheverticalwireway .Togainaccesstothese terminals,placetoolbetweenright-handwrappersideandwireway postasshowninFigure15a . Wiring Installthelineandloadconductorssizedinaccordancewith theNEC .Usecopperwireonlyforcontrolterminations.Use copperwireonlyforpowerterminationsunlesstheyaremarked “CU/AL.”Useconductorswithatemperatureratingof167ºF(75°C) orhigher,butregardlessoftheinsulationtemperaturerating,select thewiresizeonthebasisof167ºF(75°C)wire ampacity .Usingahighertemperaturewireampacitytableoften resultsinasmallercross-sectionofcopperavailableforcarrying heatawayfromterminals . Installinsulatedwireandcableatatemperaturesufficientlywarmto preventtheinsulationfromcrackingorsplitting . Whenmorethanoneconduitisrunfromacommonsourceortoa commonload,besuretohaveeachconduitcarryconductorsfrom eachphaseandthesamenumberofconductorsperphase .Ifthe phaseconductorsarenotdistributeduniformly,eddycurrentswill begeneratedinthesteelbetweentheconduits . Figure15.UnitTerminalBlocks LocateconductorswithintheMCCtoavoidphysicaldamageand toavoidoverheating .Secureincomingpowerlinesinamanner adequatetowithstandtheforcesthatwillacttoseparatethe conductorsundershort-circuitconditions .Usethecableties furnishedinbothhorizontalandverticalwirewaystosupportthe loadandinterconnectionwire .Useashieldedcommunicationscable insideofflexiblemetalconduittoprotectverylowvoltagesignals transmittedtoorfromacomputerorprogrammablecontroller . LugsfurnishedwiththeMCCanditscomponentsareforClassB andClassCstranding .Verifythecompatibilityofwiresize,type,and strandingwiththelugsfurnished .Wheretheyarenotcompatible, changethewireorlugsaccordingly .Ifcrimplugsareused,crimp withthetoolsrecommendedbythemanufacturer . Usecareinstrippinginsulationtoavoidnickingorringingthemetal . Allfieldwiringtocontrolunitsshouldbemadeinaccordancewith thewiringdrawingsthatarefurnishedwiththecontrolcenter .Load andcontrolwiringcanbebroughtinthroughtheupperand/orlower horizontalwireways .Determinethetypeofwiringinstalledinthe controlcenter(NEMATypeBorC)andproceedperthefollowing appropriateparagraph . Thephasesequenceofthepowercircuitloadterminals(top-tobottom:T1,T2,T3)inunitsmountedontherearsideoftheMCCis oppositetothatoftheloadterminalsinunitsmountedonthefront sideofaback-to-backMCC .Toobtainthesamedirectionofrotation foramotorconnectedtoarear-mountedunitasforoneconnected toafront-mountedunit,re-labeltheterminalsintherear-mounted unit:T3,T2,T1,andwireaccordingly .Refertothewarningsticker suppliedwithrear-sideunits .Whenmakingpowerconnections tothestarterterminals,besuretoleavesufficientslackinthe wiressothattheunitcanbewithdrawntothedetentpositionfor maintenance .SeeTable8 . NEMATypeBWiring Eachcontrolunitisfactoryassembledwithdevicesinter-wiredwithin theunit .Inaddition,allcontrolwiringiscarriedtounitterminal blocksmountedontheright-handsideoftheunit .SeeFigure15 . Bringthefieldwiringofcontrolwiresfromahorizontalwirewayinto theverticalwirewayontheright-handsideoftheapplicablecontrol unitandterminatethemattheunitterminalblocks . Figure15a.Pull-ApartTerminalBlocks EngagingPull-apartTerminalBlocks Themaleportionofthepull-apartterminalblockislocatedina plasticbagtiedtothepivotrodinsidetheunit .Thisterminalblock canbewiredoutsideoftheverticalwireway .Toengagetheterminal block,alignthefingersofthemaleconnectorwiththeslotatthe backofthefemaleportionoftheterminalblock .Thenrotatethe maleportionforwardandtotheleftintothefemaleportionofthe terminalblock .Eachmaleportionofthepull-apartterminalblock hastwocavitiesadjacenttothecenterterminalscrewtoaccept thebladeofanelectrician’sscrewdriverusedtocamtheblockinto andoutofengagement .Eachmaleportionalsohasarearslotthat canengagetheedgeoftheunitframewhereitcanbemountedfor easeintroubleshooting . eaton Corporation www.eaton.com 9 InstructionBookletIM04302004E Effective October 2010 Freedom 2100 Motor Control Center Installation and Maintenance Manual NEMA Type C Wiring Eachcontrolunitisfactoryassembledwithdevicesinter-wired withintheunit .Inaddition,allcontrolwiringiscarriedtounit terminalblocksonthesideoftheunitandfromtheseunitblocks, alongwithloadwiringthroughSize3,tomasterterminalblocks locatedatthetoporbottomofthestructure .SeeFigure16 .Master terminalblockscanbeeitherfixedordrawoutmounted .Inthe drawoutdesign,theterminalblocksarerackmountedtopermit withdrawaloftheentireassemblyforeaseofwiringduring installationandmaintenance .Bringfieldwiringfromthehorizontal wirewaytothemasterterminalblocksexceptforloadwiring largerthanSize3 .Theselatterloadwiresshouldbecarriedinto theverticalwirewayandunderthebottomright-handsideofthe unittoterminationswithintheunit . Figure16.MasterTerminalBlock 10 eaton Corporation www.eaton.com Freedom 2100 Motor Control Center Installation and Maintenance Manual InstructionBookletIM04302004E Effective October 2010 part 5. incoming Line Connections OvercurrentProtection Allungroundedconductorsinamotorcontrolcenter(MCC) installationrequiresomeformofovercurrentprotectioninorderto complywithSection240-20oftheNEC .Suchovercurrentprotection fortheincominglinestotheMCCisintheformoffusesoracircuit breakerlocatedatthetransformersecondarythatsuppliestheMCC . Theconductorsfromthetransformersecondaryconstitutethe feedertotheMCC,andthe“10-footrule”andthe“25-footrule” ofNEC,240-21apply .Theselatterexceptionstothegeneralrule allowthedisconnectmeansandovercurrentprotectiontobe locatedintheMCC,providedthefeedertapsfromthetransformer aresufficientlyshortandotherrequirementsaremet . Note that with reverse feed, the bottom terminals of the circuit breaker are still energized when the circuit breaker is turned off! Acircuitbreakeroracircuitinterruptercombinedwithfuses controllingthepowertotheentireMCCmayprovidethe overcurrentprotectionrequiredasdescribedaboveormaybe asupplementarydisconnect(isolation)means .SeeFigure17, Figure18,andFigure19 . WhentheMCChasamaindisconnect,bringtheincominglines (thefeeders)tothelineterminalsofthecircuitbreakerorcircuit interrupter .Theloadsideofthecircuitbreakerortheloadsideof thefusesassociatedwiththecircuitinterrupterhasalreadybeen connectedtotheMCCbusbardistributionsystem .Inthecaseof maindisconnectsrated400Aorless,thisloadconnectionismade bystabconnectionstoverticalbusbarsthatconnecttothe horizontalbusdistributionsystem .SeeFigure17 . Figure18.MainCircuitBreakerwithReverseFeed Vertical Wireway Stab Connections Figure17.MainDisconnectwithStabLoadConnections OvercurrentProtectiontobeLocatedintheMCC,Providedthe FeederTapsfromtheTransformerareSufficientlyShortand OtherRequirementsareMet Figure19.MainCircuitBreaker eaton Corporation www.eaton.com 11 InstructionBookletIM04302004E Effective October 2010 Freedom 2100 Motor Control Center Installation and Maintenance Manual Incoming Line Lugs WheretheovercurrentprotectionfortheMCCisataremote location,theMCCfeederlinesareconnectedtoincominglinelugs attachedtothebusbardistributionsystem .SeeFigure20 .Forhighampereratedhorizontalbusbarsystems,theincominglinelugsare mountedonverticalrisersthatconnecttothehorizontalbusbars . SeeFigure21 . Figure20.IncomingLineLugConnections Figure21.IncomingLineCompartment,2000A 12 eaton Corporation www.eaton.com Freedom 2100 Motor Control Center Installation and Maintenance Manual Short-circuit Bracing Allincominglinestoeitherincominglinelugsortomaindisconnects mustbebracedtowithstandthemechanicalforcescreatedbya highfaultcurrent .WiththeremainderofaFreedom2100MCCrated fornotlessthan65,000A(rmssymmetrical),theinstallingelectrician needstoanchorthecablesattheincominglineconnectionssufficientlyandtightenthelugscorrectly . Eachincominglinecompartmentisequippedwithtwo-piecesheet steelbracketsthatformacablebracingsupportbracketthatis approximately9inchesfromtheconduitentrypoint,forbothtop- andbottom-feedapplications .Usethebracketandappropriate lashingmaterialtotiethecablessecurelytogetherifbundledorto holdapartwhentheyarerequiredtobeseparated .SeeFigure22, whichshowsthetwo-partmounting/bracingbracket,inatopentry incominglugconfiguration . InstructionBookletIM04302004E Effective October 2010 MakingConnection Caution all inCoMing line CoMpartMentS preSent an obviouS Hazard wHen tHe door iS opened or CoverS are reMoved witH power on. wHen working in tHiS area, tHe inCoMing feeder SHould be de-energized. Beforebeginningworkonincominglineconnections,refertoall drawingsfurnishedbyEaton,aswellasallapplicablecontract drawingsfortheparticularinstallation . Dependingonthelocation,size,andtypeoftheincomingarrangement,removeoneormorehorizontalandverticalwirewaydoors, andselectedunitstoprovidecompleteaccess .SeePart9,page22 forunitremovalinstructions . Fortopentry,thetopcoverplatesareeasilyremovedfordrillingor punchingoperations . Figure22.IncomingLineCompartmentShowingTwo-Piece SupportBracket,withOpeningforCables eaton Corporation www.eaton.com 13 Freedom 2100 Motor Control Center Installation and Maintenance Manual InstructionBookletIM04302004E Effective October 2010 MCC with a Magnum or a main lug only incoming line (Figure21)section—cablebracing/lashingfortop-and bottom-feedarrangements 1. Allcablemustbeterminatedwithtwo-holemountedcompressionormechanicalset-screwtypelugs . 2. Allnon-current-limitingcircuitbreakersratedabove42kAand withcircuitsratedfor800Aandbelowrequirecablelashing perFigure23 . 3. Circuitbreakerrated42kAand belowrequirenocablelashing . 4. Nocablelashingisrequiredforcurrent-limitingcircuitbreakers . 5. Nocablelashingisrequiredforcircuitsusingmorethanfour(4) cablesof500kcmilorlargersizewireperphase,regardlessof shortcircuitrating . Rope Requirements: 3/8" diameter Nylon, twisted Size = #12 3 strand Tensile strength = 3340 lbs (1515 kg) Working load = 278 lbs (126 kg) Cable Rope Note 1 Cable Lugs (Note 2) Note 1 6.00 (152.4) 6.00 (152.4) 12.00 (304.8) Instructions: 1. Route cable as close together as possible. 2. Wrap rope around the cable 6 in (152.4 mm) from lugs (see Note 1). 3. The second wrap is to be applied 6 in (152.4 mm) from the first wrap. 4. After the second wrap, the cables should be wrapped at 12 in (304.8 mm) increments to the entry or exit point of the switchgear. 5. Verify that each set contains 5 loops and that all ropes are pulled as tight as possible. Note 1: The goal is to bundle all cables together in one bundle, but near the lug landings, so the bundles may need to separate. In this case, the rope between cables should be wrapped to provide support. Note 2: The center pole cable lugs are shown in-line with outer poles; Figure 21 shows lugs with center pole offset either leading or lagging outer poles, depending on top or bottom feed cables. The six-inch dimension shown in these arrangements is from the closed lug, which is the center pole for top entry and outer poles for bottom entry as shown in Figure 21. Figure23.CableLashingInstallationInstructions 14 eaton Corporation www.eaton.com Freedom 2100 Motor Control Center Installation and Maintenance Manual InstructionBookletIM04302004E Effective October 2010 part 6. overcurrent protection devices C306OverloadRelaySetting DeviceSelection FLADialAdjustment—Formotorshavinga1 .15servicefactor, rotatetheFLAadjustmentdialtocorrespondtothemotor’sFLA rating .EstimatethedialpositionwhenthemotorFLAfallsbetween twolettervaluesasshowninFigure25 . Articles240and430oftheNECcontaintherulesforselecting fuses,circuitbreakers,andoverloadrelaysbytypeandbyvoltage andampererating .Followtheserulesforfeedercircuits,andthe instructionsattachedtotheinsideoftheleft-mostverticalwireway door,formotorbranchcircuits .Selectandinstalloverloadrelay currentelements(heaters)basedonthemotorservicefactorand full-loadcurrent .Ambient-compensatedoverloadrelaysareusedin motorcontrolcenters(MCCs)tooffsetthetemperaturegradient thatoccursfromtoptobottominaloadedverticalsection . Heatersmustbeinstalledinthestarteroverloadrelay assembliesbeforethestarterisenergized. C306ThermalOverloadRelays(Figure24) Formotorshavinga1 .0servicefactor,rotatetheFLAdialone-half positioncounterclockwise(CCW) . Manual/AutomaticReset—Theoverloadrelayisfactoryset“M” formanualresetoperationasshowninFigure25 .Forautomatic resetoperation,turntheresetadjustmentdialtothe“A”position . Automaticresetisnotintendedfortwo-wiredevices . TestForTripIndication—Totestoverloadrelayfortripindication wheninmanualreset,pullouttheblueresetbutton .Anorangeflag willappearindicatingthatthedevicehastripped .Pushresetbutton toreset . C306overloadrelaysareprovidedonFreedomstarters .Foursizes areavailableforoverloadprotectionupto114A .Featuresinclude: • Selectablemanualorautomaticresetoperation • Interchangeableheaterpacksadjustable±24%tomatchmotor FLAandcalibratedforusewith1 .0and1 .15servicefactor motors .Heaterpacksfor32Aoverloadrelaywillmountin75A overloadrelay—usefulinderatingapplicationssuchasjogging • Class10or20heaterpacks(Figure24) .UseClass10heaters withfusibleorthermal-magneticbreakerdisconnectsonly • Bimetallic,ambient-compensatedoperated .Trip-freemechanism • ElectricallyisolatedNOandNCcontacts(pullRESETbutton totest) • Overloadtripindication • Single-phaseprotection • ULlisted,CSAcertified,andNEMAcompliant warning to provide Continued proteCtion againSt fire or SHoCk Hazard, tHe CoMplete overload relay MuSt be replaCed if burnout of tHe Heater eleMent oCCurS. FLADialAdjustment 1 .0Service Factor ResetAdjustmentDial 1 .15Service Factor A M Exampleof12 .0FLASettingforHeater PackNumberH2011BShowingPosition for1 .0or1 .15ServiceFactorMotors ExampleofSetting forManualReset Figure25.OverloadRelaySettings CurrentTransformers Whencurrenttransformersareusedwithoverloadrelays,the currentthroughtheoverloadrelayheaterisrelatedtothemotor full-loadbytheinverseofthecurrenttransformerratio . warning do not ever reMove HeaterS froM Size 5 and larger StarterS to CHeCk unit operation. tHeSe StarterS uSe Current tranSforMerS to drop tHe Current to tHe range of tHe Size 1 overload relay. operation witH HeaterS reMoved will not interrupt voltage to tHe Motor and will generate dangerouS voltageS in tHe open SeCondary of tHe Current tranSforMer. Figure24.C306ThermalOverloadRelayandHeaterPack eaton Corporation www.eaton.com 15 InstructionBookletIM04302004E Effective October 2010 Motor Circuit Protector (HMCP) Afterinstallationofthecontrolcenter,eachMCPmustbe adjustedtoactualmotorfull-loadamperes(FLA)sothatitwill tripatanycurrentthatexceedsstartinginrush.Thissetting provideslow-levelfaultprotection .Thefirsthalf-cycleinrushwill varywiththemotorcharacteristics .Motorswithlocked-rotor currentsof6timesmotorfull-loadampereswillusuallyrequirean instantaneousmagneticsettingof7to11timesmotorfull-load amperestopreventtrippingwhenstarting . Freedom 2100 Motor Control Center Installation and Maintenance Manual ThePUSH-TO-TRIPbuttonchecksthetrippingfunctionandisused toperiodicallyexercisethebreakeroperatingmechanism .Thebutton isdesignedtobeoperatedbyusingasmallscrewdriver . Oncethebreakerhastripped,applyforcewhenmovingtheunit operatinghandlefromtheTRIPPEDtotheRESETposition,whichis slightlypassedtheOFFposition Freedom2100MCCsaresuppliedwithTypeHMCPmotorcircuit protectorshavinganinterruptingratingtomatchtheshort-circuit withstandratingofthebusbarsystem .ForHMCPsin225,400,and 600Aframesizes,themagnetic-tripadjustmentissetforeachpole . Athree-poleHMCPhasthreetripsettingstoadjust .Placeallthree polesatthesamesetting . CurrentLimitersforUsewithTypeHMCPandFDBreakers Theadditionofthecurrentlimiterprovidesinterruptingcapacity abovetherangehandledbytheHMCPinmotorstartersorbyFD thermal-magneticfeederbreakers . EachHMCPorFDbreakerratedupto150Ahasitsowncurrent limitertoprovidecoordinatedprotectionagainstfaultsupto 100,000A,rmssymmetrical . Figure26.HMCPMagneticAdjustment Acamtoacceptasmallnarrow-bladeelectrician’sscrewdriver isnearthelowerleftcornerandaroundthatareeightlettered adjustmentpoints,calibratedintripamperes .SeeFigure26 . Adjustmentshouldneverexceed13timesFLA,whichisin accordancewithNECrequirementsformagnetic-trip-only breakers .Adjustmentshouldbemadeasfollowse: 1. ObtainFLAfrommotornameplate . 2. MultiplyFLAby13 . 3. Setthecamtothehighesttripsettingthatdoesnotexceedthe calculatedfigureofItem2 .Thisisthemaximumsettingthat shouldbeused . 4. Depressandturnthescrewdriveradjustmentcounterclockwise onesettingatatime,untilthebreakertripsinstartingandthen adjustupwardonesettingposition .Thiswillensurethatthecircuitwillopeninstantlyonanycurrentabovethemotorinrush, usually7to11timesFLA . 16 eaton Corporation www.eaton.com Built-intripindicatorsineachphaseimmediatelyshowwhenafault hasblownthecurrentlimiterandtrippedthecircuitbreaker .Thisprovidesprotectionagainstsinglephasing .Afterinterruptingafault, thecurrentlimiterwillrequirereplacement.Afterthefaulthas beencleared,thecurrentlimiterisreplacedbytheremovalofthree screws .Thebreakercanthenberesettoprovideforsubsequent highovercurrentprotection . TypeHMCPandFDCircuitBreakerswithTerminalEnd Covers Circuitbreakersinstalledinunitsconnectedto600Vdistribution systemsrequireaterminalendcaptobeinstalledonthelineside . Replacetheterminalendcapwhenreplacingcircuitbreakersin suchunits . Freedom 2100 Motor Control Center Installation and Maintenance Manual InstructionBookletIM04302004E Effective October 2010 part 7. overload relay Heater Selection Theoverloadisnowsetfor1.15servicefactor. HeaterSelectionandInstallation D. If the motor nameplate is 1.0 service factor, rotate the FLA adjustment dial counterclockwise one-half (1/2) position. Heatersshouldbeselectedonthebasisoftheactualfullload currentandservicefactorasshownonthemotornameplateorin themotormanufacturer’spublishedliterature . Whenmotorandoverloadrelayareinthesameambientand theservicefactorofthemotoris1 .15to1 .25,selectheaters andsetFLAadjustmentdialfromtheheaterapplicationtable . Iftheservicefactorofthemotoris1.0,orthereisnoservice factorshown,rotatetheFLAadjustmentdialcounterclockwise one-half(1/2)position. E. The overload is factory set for M(MANUAL) reset operation. If automatic reset is required, turn the reset adjustment dial to A(AUTO). Automatic reset is not intended for two-wire control devices. B B C A D A C A D M Theconductorsattachedtotheterminalsofanoverloadrelayact asaheatsinkandareaconsiderationinestablishingthecurrent ratingofeachheaterelement .Topreventnuisancetripping,which willoccurifundersizedconductorsareused,selectthewiresize asiftheconductorshadaninsulationtemperatureratingof167ºF (75°C),eveniftheconductorsactuallyusedhaveatemperature ratinghigherthan167ºF(75°C) . ToRemoveHeaterPacks Protectheaterandstarteragainstshortcircuitsbyprovidingbranch circuitprotectioninaccordancewiththeNationalElectricalCode . Loosentwo(2)heaterpackmountingscrewsandremoveheater packfromoverloadrelay . Notee: Beforeinstallingheaterpacks,refertothemotornameplateforFLA (fullloadamps)andservicefactor(1 .5or1 .0) .Selecttheheaterpackfromthe propertableonthispage . OverloadRelaySetting Toinstalle: 1.15 Service Factor 1.0 Service Factor Thisbimetallicambient-compensatedoverloadrelayisadjustable withintheFLArangeoftheheaterpack .Eachheaterpackismarked withitsFLAratings .Withproperheaterselection,theoverloadrelay willultimatelytripat125%FLAfora1 .15servicefactormotorandat 115%FLAfora1 .0servicefactormotor . HeaterSelection/installation Selecttheappropriateheaterpacknumberthatcorrespondstothe motorFLAratingforyourapplication .Inserteachheaterintothe overloadrelayandtightenheatermountingscrewssecurelypertable below . HeaterPack MountingScrew Notee: Atotalofthreeindividualheatersmustbeinstalledinorderforthe overloadrelaytoworkproperly . Heater pack numbers torque H2001B thru H2017B H2018 thru H2024 9 lb-in 24–30 lb-in FLADialAdjustment Formotorshavinga1 .15servicefactor,rotatetheFLAadjustment dialtocorrespondtothemotor’sFLArating .EstimatethedialpositionwhenthemotorFLAfallsbetweentwolettervaluesasshown intheexample .Formotorshaving1 .0servicefactor,rotatetheFLA dialone-half(1/2)positioncounterclockwise(CCW) . Figure27.HeaterPack A. Insertthree(3)identicallynumberedheaterpacksintotheoverloadrelaywithanFLAratingthatincludesthemotornameplate FLA(fullloadamps) . FLA ADJUSTMENT DIAL B. Tightentheheaterpackmountingscrewssecurelyperrecommendedtorquevalueslistedbelow . Exampleofa12 .0FLAsettingforaheaterpacknumberH2011B showingpositionfor1 .0or1 .15servicefactormotor . Heater pack numbers recommended torque H2001B thru H2017B H2018 thru H2024 9 lb-in (1 Nm) 24-30 lb-in (2.7–3.4 Nm) 1 .0 SERVICE FACTOR C. Adjust the FLA adjustment dial to the motor nameplate FLA (full load amps). eaton Corporation www.eaton.com 17 Freedom 2100 Motor Control Center Installation and Maintenance Manual InstructionBookletIM04302004E Effective October 2010 Manual/automatic Reset Table2. NEMASize2HeaterPackSelectionTable Theoverloadrelayisfactorysetat“M”formanualresetoperation asshownintheillustration .Forautomaticresetoperation,turnthe resetadjustmentdialtothe“A”position .Automaticresetisnot intendedfortwo-wirecontroldevices . Motor FLa rating a FLa Dial positions RESET ADJUSTMENT DIAL Exampleof settingfor manualreset . A M TestforTripIndication Totestoverloadrelayfortripindicationwheninmanualreset,pull outtheblueResetbutton .Anorangeflagwillappearindicatingthat thedevicehastripped .PushResetbuttonintoreset . Formoreinformation,gotowww .1800oldunit .comorcall 1-800-OLD-UNIT . Table1. NEMASize0and1HeaterPackSelectionTable Motor FLa rating FLa Dial positions B C D Size F Standard trip Class 20 0.254 0.375 0.560 0.814 1.20 0.306 0.452 0.676 0.983 1.45 0.359 0.530 0.791 1.15 1.71 0.411 0.607 0.907 1.32 1.96 H2001B H2002B H2003B H2004B H2005B 1.79 2.15 3.23 4.55 6.75 2.16 2.60 3.90 5.50 8.17 2.53 3.04 4.56 6.45 9.58 2.90 3.49 5.23 7.40 11.0 H2006B H2007B H2008B H2009B H2010B 9.14 14.0 18.7 23.5 10.8 16.9 22.7 28.5 12.4 19.9 26.7 33.5 14.0 22.8 30.7 — H2011B H2012B H2013B a H2014B a A a After the above referenced settings have been made, rotate the FLA dial one position clockwise for these heaters (see table). If less than one position is available, rotate dial maximum. This does not apply when these heaters are used with adapter base. Catalog No. C306TB1. Exception: does not apply to AN16DN0. Notee: Formaximumratings,seetablebelow .Use75°Ccopperconductors only .Maximumwiresize—8AWG . neMa Size amperes Size amperes 0 18 — — 1 27 F 32 warning to provide Continued proteCtion againSt fire or SHoCk Hazard, tHe CoMplete overload relay MuSt be replaCed if burnout of tHe Heater eleMent oCCurS. 18 eaton Corporation www.eaton.com B C D Size J and K Standard trip Class 20 3.23 4.55 6.75 9.14 14.0 3.90 5.50 8.17 10.8 16.9 4.56 6.45 9.58 12.4 19.9 5.23 7.40 11.0 14.0 22.8 H2008B H2009B H2010B H2011B H2012B 18.7 23.5 29.0 39.6 53.9 22.7 28.5 34.0 45.5 60.9 26.7 33.5 39.1 51.5 67.9 30.7 38.5 44.1 57.4 74.9 H2013B H2014B H2015B H2016B b H2017B b a a For motor FLA values not listed, turn the dial clockwise for higher or counterclockwise for lower ratings. b After the above reference settings have been made, rotate the FLA dial one position clockwise for these heaters (see table). If less than one position is available, rotate dial to maximum. This note does not apply when these heaters are used with adapter base. Catalog No. C306TB1. Notee: Formaximumratings,seetablebelow .Use167ºF(75°C)copper conductorsonly .Maximumwiresize—3AWG . neMa Size amperes Size amperes 2 45 J 60 — — K 73 Table3. NEMASize3and4HeaterPackSelectionTable Motor FLa rating a FLa Dial positions A B C D Size n Standard trip Class 20 18.0 24.6 33.5 45.7 20.2 27.6 37.5 51.2 22.3 30.5 41.5 56.7 24.5 33.4 45.6 62.1 H2018 H2019 H2020 H2021 62.2 84.7 106.0 69.7 94.9 118.0 77.1 105.0 131.0 84.6 115.0 144.0 H2022 H2023 H2024 a For motor FLA values not listed, turn the dial clockwise for higher or counterclockwise for lower ratings. Notee: Formaximumratings,seetablebelow .Minimumwiresize—6AWG . neMa Size amperes Size amperes 3 90 N 14 4 135 — — Freedom 2100 Motor Control Center Installation and Maintenance Manual InstructionBookletIM04302004E Effective October 2010 Table6. MagneticReduced-VoltageStarterClassesF600,F700, F890withC306ThermalOverloadRelay Table4. NEMASize5HeaterPackSelectionTable Motor FLa rating a FLa Dial positions a B C D Standard trip Class 20 34 49 72 41 59 87 48 69 103 54 79 118 H2003B H2004B H2005B Starter type 107 129 194 130 156 234 152 182 274 174 209 — H2006B H2007B H2008B Autotransformer Part-winding Star-delta Class Multiply actual Motor Full Load Current by Factor Below and refer to adjusted Full Load Current Column in tables Quantity of Heaters required per Starter F600 1 3 F700 0.5 6 F800 0.575 3 a FLA rating marked on heater pack multiplied by a transformation ratio. For motor FLA values not listed, turn the dial clockwise for higher or counterclockwise for lower ratings. Notee: Formaximumratings,seetablebelow .Minimumwiresize—2AWG . neMa Size amperes 5 270 Table5. NEMASize6HeaterPackSelectionTable Motor FLa rating a FLa Dial positions a B C D Standard trip Class 20 144 215 174 259 205 304 235 348 H2005B H2006B 258 388 312 468 365 547 419 — H2007B H2008B a FLA rating marked on heater pack multiplied by a transformation ratio. For motor FLA values not listed, turn the dial clockwise for higher or counterclockwise for lower ratings. Notee: Formaximumratings,seetablebelow . neMa Size amperes 6 540 eaton Corporation www.eaton.com 19 Freedom 2100 Motor Control Center Installation and Maintenance Manual InstructionBookletIM04302004E Effective October 2010 part 8. inspection prior to energizing 1. Beforeenergizingthemotorcontrolcenter(MCC),conducta thoroughinspectiontomakecertainthatallforeignmaterials, suchastools,scrapsofwire,andotherdebris,areremoved fromallunitsandthestructure .Removeanyaccumulationof dustanddirtwithavacuumcleaner . 2. Allcircuitconnectionsaretightenedattimeofassembly bypower-driventoolswithcontrolledtorque .However,the vibrationsexperiencedintransitmayloosensomeofthese connections .Checkatleast10%ofthetotalconnectionsfora tightconnection .Shouldthisspot-checkrevealsomeloose connections,itwillbenecessarytocheckallconnection points.Theconnectionstobecheckedincludebushardware, circuitbreakerandswitchterminals,contactorandrelay terminals,andterminalblocks .Alwayschecktheincomingline connections .TightentothetorquevaluesshowninTable7 . 3. Removeallblocksorothertemporaryholdingmeansusedfor shipmentfromallcomponentdevicesintheMCCinterior . 15. Topreventpossibledamagetoequipmentorinjurytopersonnel, checktoensurethatallpartsandbarriersthatmayhave beenremovedduringwiringandinstallationhavebeen properlyreinstalled . 16. Conductanelectricalinsulationresistancetesttomakesure thattheMCCandfieldwiringarefreefromshortcircuitsand grounds .Dothistestphase-to-phase,phase-to-ground,and phase-to-neutral,withtheswitchesorcircuitbreakersopened . 17. IftheMCCcontainsalabyrinthverticalbusbarriersystem, verifytheoperationoftheautomaticshutters .SeePart9for adjustmentsofthismechanism . 18. Installcovers,closedoors,andmakecertainthatnowires arepinchedandthatallenclosurepartsareproperlyaligned andtightened . 19. TurnallcircuitbreakersandfusibleswitchestotheOFFposition beforeenergizingthebus . Table7. DrivingTorque 4. Checktheenclosuretoseethatithasnotbeendamagedsoas toreduceelectricalspacings . Description 5. Compareallcircuitsforagreementwiththewiringdiagramsthat accompanytheMCC .Besurethateachmotorisconnectedto itsintendedstarter . Coil leads Relays Pushbuttons Control fuse blocks Auxiliary contacts 6. Makecertainthatfieldwiringisclearoflivebussesand physicallysecuredtowithstandtheeffectsoffaultcurrent . 7. Checktodeterminethatallgroundingconnectionsare madeproperly . 8. Checkalldevicesfordamage .Makeallnecessaryrepairsor replacements,priortoenergizing . 9. Manuallyexerciseallswitches,circuitbreakers,andother operatingmechanismstomakecertainthattheyareproperly alignedandoperatefreely . 10. Testanyground-faultprotectionsystemsthatwerefurnished . 11. Setanyadjustablecurrentandvoltagetripmechanismstothe propervalues . 12. Ensurethatoverloadrelayheaterelementsareinstalledand selectedtothefull-loadcurrentshownonthenameplateof eachmotor . 13. Installpowercircuitfusesinthefusibleswitchesinaccordance withNECapplicationrequirements .Makesurethatfusesare completelyinsertedintheclipsprovided .Donotattemptto defeattherejectionfeatureonthefuseclip,whenprovided . 14. Donotoperateacurrenttransformerwithitssecondarycircuit open .Ensurecurrenttransformerisconnectedtoaload,ora secondaryshortingbarisinstalled . 20 eaton Corporation www.eaton.com lb-in Control wiring 8 lb-in 8 lb-in 8 lb-in 8 lb-in 8 lb-in Control wiring terminal blocks Side-mounted lug/compression Rail-mounted lug type Rail-mounted compression type 9 lb-in 12 lb-in 18 lb-in Freedom 2100 Motor Control Center Installation and Maintenance Manual InstructionBookletIM04302004E Effective October 2010 Table9. FusedSwitches Table8. PowerWiringe:Starters For Freedom Starters with C306 overload & Freedom Contactors tightening torque Conductors Size 1 Contactor 20 lb-in Use 75°C copper conductors Size 2 Contactor Size 3 and Freedom Compact Size 4 (CN15MN) Wire size (AWG) Torque (lb-in) 14–10 35 8 40 6–4 45 3–2 50 Wire size (AWG) Torque (lb-in) Slotted head screw 8 40 6–4 45 3–1/0 50 Socket head screw lb-in 30A fuse assembly 60A fuse assembly 100A fuse assembly 25 lb-in 50 lb-in 50 lb-in 200A fuse assembly 400A fuse assembly 600A fuse assembly 300 lb-in 300 lb-in 300 lb-in Breakers—Refertotorquevaluesonbreakercase . Table10. IncomingLineLugs Description lb-in #2/0–350 MCM #2/0–650 MCM 360 lb-in 360 lb-in #2/0–750 MCM 500–1000 MCM 500 lb-in 600 lb-in Socket size (in) Torque (lb-in) 3/16 120 1/4 200 Table11. BusBolts 5/16 250 Description lb-in All 276 lb-in (23 lb-ft) Size 4 275 lb-in Size 5 500 lb-in Starter with C440 Solid State overload Wire size (AWG) Torque (lb-in) NEMA 1 & 2 12-10 23 8-6 28 6-1 28 NEMA 3 Description eaton Corporation www.eaton.com 21 InstructionBookletIM04302004E Effective October 2010 Freedom 2100 Motor Control Center Installation and Maintenance Manual part 9. Unit installation and adjustment DoorRemovalandInstallation All doors on the control center are mounted on pin hinges to facilitate removal for installation and maintenance operations. With the operating handle on the OFF position, rotate the quarter-turn latches, open the door, remove the hinge pins as shown in Figure 28, partially close the door and lift it from the structure. Reverse this procedure for installation. UnitRemovalandInstallation Afteropeningand/orremovingtheunitdoor,thecontrolunitis exposed .Withascrewdriver,pushinonthelatchatthetopcenter oftheunitandrotate¼turncounterclockwise . Caution unitS 18” or More HigH Have a retaining braCe at tHe lower edge of eaCH Side of tHe unit fraMe to add Stability in SHipping. tHe SHipping braCeS May be retained or reMoved after inStallation; unSCrew prior to unit witHdrawal. Figure28.HingePInRemoval Pull-apartterminalblocksintheverticalwirewaymustbedisengaged (seeFigure29andpage9)andwiringfromtheunittootherunits, tomasterterminalblocksortoloaddevicesmustbedisconnected beforetheunitisremoved .GrasptheunitasshowninFigure30 andpullitoutward .Thefirstinchoftravelpullsthestabsfreefrom theverticalbus,andthegroundingcliponthesideoftheunitframe isalsodisengaged . Toreplaceacontrolunit,positionthemountingpointsontheunit framewiththematingguiderails .Slidetheunitinwarduntilallfour mountingpointsareengaged,thenmoveitinwardwithaquick push .Thismovementeasilyovercomesthecompressionofthe stabsastheyengagetheverticalbus .Withtheunitinitscorrect position,thequarter-turnlatchiseasilyengagedbypushinginward androtating¼turnclockwise . Figure29.DisengagingPull-ApartTerminalBlocks Figure30.WithdrawingaUnit 22 eaton Corporation www.eaton.com Freedom 2100 Motor Control Center Installation and Maintenance Manual InstructionBookletIM04302004E Effective October 2010 Detent Position Formaintenanceandtestpurposes,theunitcanbepartiallywithdrawn(approximately1½inches)untilthestabsarefreeofthebus . Inthisposition,thequarter-turnlatchcanberotatedclockwiseto engagethedetentpositionslot;thiswillsecuretheunittoensure thestabsremaindisengagedduringmaintenance .SeeFigure31 . Thelatchcanbepadlockedinthisposition . Operating Handle Linkage Adjustment Movementoftheoperatinghandleintheverticalplaneshouldnot berestrictedbythehandlecavityateitherthetoporbottomtoits travel .Shouldrestrictionoccur,eliminateitadjustingthelengthof theoperatinglinkageasshowninFigure32 .Dependingonthetype ofprimarydisconnectdevicecontainedinthecontrolunit,itmaybe necessarytolengthenorshortenthelinkage . Automatic Shutter Travel Adjustment Figure31.UnitLockedinDetentPosition Whentheoptionallabyrinthverticalbusbarrierisinstalledinthe controlcenter,ashutterisprovidedtoautomaticallycoverthestab openingswhenacontrolunitiswithdrawn .Theshutterisopenedby engagementoftheleft-handsideofthecontrolunitwiththeshutter armlinkageattachedtotheleft-handverticalstructuralmembers . Whentheunitiswithdrawnfreeofthelinkage,aspringautomaticallymovestheshuttertoitsclosedposition .SeeFigure33and Figure4 . Withthecontrolunitremoved,theshuttershouldcompletelycomer thestabopenings .Ifitdoesnotcovertheopenings,useanadjustablewrenchtobendthelinkarmtotherightuntiltheshuttercovers thestabopenings . If,onre-insertionofthecontrolunit,interferenceisfeltbetweenthe stabassemblyattherearoftheunitandtheshutter,theengagementofthecontrolunitwiththeshutterarmlinkageisinsufficient tofullyopentheshutter .Useanadjustablewrenchtobendthelinkagearminwardtowardtheunittoincreaseitsengagementwiththe unit .Aninwardbendofapproximately¼inchwillprovidesufficient additionalshuttertravel Figure32.OperatingHandleLinkageAdjustment InstallingPilotDevices The device panel can accommodate up to six pilot devices such as oil-tightpushbuttons,indicatinglights,selectorswitchesandminiaturemeters .Ifunusedspaceisavailableandtheadditionofother devicesisdesired,observethefollowingprocedure . Afteropeningtheunitdoor,loosenthetwoscrewsatthetopofthe devicepanel .Slidethepanel½inchlefttopermitittoswingdown foraccess .SeeFigure34 .Withthepeenendofaball-peenhammer orwithadriftorchisel,removethedesiredknockout . Figure33.ShutterArmLinkage eaton Corporation www.eaton.com 23 InstructionBookletIM04302004E Effective October 2010 Caution braCe tHe panel Solidly to avoid breaking tHe Hinge pintS. uSe a knife or SMall file to reMove reMaining plaStid burrS. inStall and wire tHe new deviCe and re-attaCH teH top of tHe deviCe panel to tHe unit. Freedom 2100 Motor Control Center Installation and Maintenance Manual part 10. Maintenance PreventiveMaintenance Preventivemaintenanceshouldbeaprogram,ascheduledperiodic actionthatbeginswiththeinstallationoftheequipment .Atthat time,specificmanufacturer’sinstructionliteratureshouldbe consulted,thenstoredforfuturereference .Follow-upmaintenance shouldbeatregularintervals,asfrequentlyastheseverityofduty justifies .Timeintervalsofoneweek,oronemonth,oroneyear maybeappropriate,dependingontheduty .Itisalsodesirableto establishspecificchecklistsforeachcontrol,aswellasalogbook torecordthehistoryofincidents .Asupplyofrenewalpartsshould beobtainedandstored . Thiscontrolequipmentisdesignedtobeinstalled,operated,and maintainedbyadequatelytrainedworkmen .Theseinstructionsdo notcoveralldetails,variations,orcombinationsoftheequipment, itsstorage,delivery,installation,check-out,safeoperation,or maintenance .Caremustbeexercisedtocomplywithlocal,state, andnationalregulations,aswellassafetypractices,forthisclass ofequipment . Authorizedpersonnelmayopenaunitdoorofamotorcontrolcenter (MCC)whilethestarterunitisenergized .Thisisaccomplished bydefeatingthemechanicalinterlockbetweentheoperating mechanismandtheunitdoor .Aclockwisequarterturnoftheslotted headscrewlocatedabovetheoperatinghandlewillallowthedoorto open .SeeFigure355 . Figure34.UnitDevicePanel InstallingaNewUnit Itisrecommendedthatanewunitbeinstalledinaunitspaceat thetopofaverticalcompartmentordirectlybelowanexistingunit . Materialprovidedwiththenewunitbythefactoryincludes:Adividerpanwithintegralguiderails,aunitdoor,hinges,catchesandhardware .Observethefollowingsequenceofoperationsforinstallation . 1 . Removetheexistingblankdoor . 2 . Positionthenewunitdoorovertheopenspacetoensurethe hingesandlatchesarealigned .Ifthespacesdiffer,thehinges andlatchesonthestructuremustbere-locatedtomatchtheunit doorhingesandlatches .Mountthedoor,usingthehingepins provided . 3 . Installthenewdividerpaninthenotchesprovidedintherear barriersothatitisalignedwiththebottomofthenewdoor . Attachthepantotheverticalstructurechannelswithonethreadformingscrewoneachside . 4 . Removefromtheverticalbusbarriertheflatplatewhichcovers thestabholesthatwillalignwiththestabsonthenewunit .Ifan optionallabyrinthverticalbusbarrierisinplace,installanautomaticshutteroverthestabcutouts .Followtheinstructionsheet providedwiththeshutterkit . Whenservicingandadjustingtheelectricalequipment,refertothe applicabledrawingscoveringthespecificmotorcontrolcenterMCC andanyotherrelatedinterconnectiondrawings .Followanyinstructionsthatmaybegivenforeachdevice .Alistofinstructionleaflets coveringstandardcomponentsisshownonpage31ofthismanual . Anyoftheseleafletsmaybeobtainedbycontactingyournearest Eatonrepresentative . GeneralGuidelines—Thewholepurposeofmaintainingelectrical equipmentcanbesummarizedintworules: 1. Keepthoseportionsconductingthatareintendedto beconducting . 2. Keepthoseportionsinsulatedthatareintendedtobeinsulated . Goodconductionrequiresclean,tightjoints,freeofcontaminants suchasdirtandoxides . Goodinsulationrequirestheabsenceofcarbontrackingandthe absenceofcontaminants,suchassaltanddustthatbecome hydroscopicandprovideanunintendedcircuitbetweenpointsof oppositepolarity . Figure35.DefeaterMechanism 24 eaton Corporation www.eaton.com Freedom 2100 Motor Control Center Installation and Maintenance Manual Caution MaintenanCe of tHe Control CoMponentS requireS tHat all power to tHeSe CoMponentS be turned off by opening tHe branCH CirCuit diSConneCt MeanS and witHdrawing tHe unit to tHe detent poSition (See figure 31) or reMoving tHe unit entirely froM tHe MCC. wHen unitS are fully inSerted into tHe MCC, tHe line Side of eaCH diSConneCt iS energized. do not work on fixed unitS unleSS tHe Main diSConneCt for tHe MCC iS off.. WhenworkingonportionsofabranchcircuitremotefromtheMCC, lockthedisconnectmeansforthatcircuitintheOFFposition .To positivelylocktheoperatingmechanismintheOFFposition,ametal lockingbarrecessedinthehandlemaybeextendedandpadlocked withfromonetothreepadlocks .SeeFigure36 . InstructionBookletIM04302004E Effective October 2010 thatarepresent .Itisessentialthattheforeigndebrisberemoved fromthecontrolcenter,notmerelyrearranged .Controlequipment shouldbecleananddry .Removedustanddirtinsideandoutside thecabinetwithoutusingliquidcleaner .Removeforeignmaterial fromtheoutsidetopandinsidebottomoftheenclosure,includinghardwareanddebris,sothatfutureexaminationwillrevealany partsthathavefallenoffordroppedontotheequipment .Ifthereare liquidsspreadinside,determinethesourceandcorrectbysealing conduit,addingspaceheaters,orotheractionasapplicable . MechanicalChecks.Tightenallelectricalconnections .Lookfor signsofoverheatedjoints,charredinsulation,discoloredterminals, andthelike .Mechanicallycleantoabrightfinish(don’tuseemery paper)orreplacethoseterminationsthathavebecomediscolored . Determinethecauseoftheloosejointandcorrect .Beparticularly carefulwithaluminumwireconnections .Aluminumwireisbest terminatedwithacrimptypelugthatisattachedtothecontrol component .Whenscrewtypelugs(markedCU/AL)areusedwith aluminumwire,thejointshouldbecheckedfortightnessevery200 operationsofthedevice . Wiresandcablesshouldbeexaminedtoeliminateanychafing againstmetaledgescausedbyvibration,thatcouldprogressto aninsulationfailure .Anytemporarywiringshouldberemovedor permanentlysecuredanddiagramsmarkedaccordingly . Theintendedmovementofmechanicalparts,suchasthe armatureandcontactsofelectromechanicalcontactors,andmechanicalinterlocksshouldbecheckedforfreedomofmotion andfunctionaloperation . Wrap-up.Checkallindicatinglamps,mechanicalflags,doors, latches,andsimilarauxiliariesandrepair,ifrequired . Logchangesandobservationsintorecordbookbeforereturning equipmentintoservice .Donotremoveanylabelsornameplates . Restoreanythataredamaged . Figure36.LockingOutaDisconnect ContactWearandReplacement WiththedooropenandthedisconnectdeviceOFF,theoperating handleismechanicallyinterlockedtopreventinadvertentlybeing pushedON .Todefeatthisinterlock,thebaronthetopofthemechanismshouldbepushedinslightly,allowingthehandletomove upwardtotheONposition . Contactorsaresubjecttobothmechanicalandelectricalwear duringtheiroperation .Inmostcases,mechanicalwearis insignificant .Theerosionofthecontactsisduetoelectricalwear . Duringarcing,materialfromeachcontactis vaporizedandblown awayfromtheusefulcontactingsurface . warning Acriticalexaminationoftheappearanceofthecontactsurfaces andameasurementoftheremainingcontactover-travelwillgive theusertheinformationrequiredtogetthemaximumcontactlife . if fully inSerted, tHe power and Control CirCuitS will be energized. padloCking to prevent tHiS Handle MoveMent May be aCCoMpliSHed by tHe SaMe MetHod aS deSCribed above. Separatecontrolsourcesofpowermustalsobedisconnected .If controlpowerisusedduringmaintenance,takestepstoprevent feedbackofahazardousvoltagethroughacontroltransformer .Be alerttopowerfactorcorrectioncapacitorsthatmaybecharged . Dischargethembeforeworkingonanypartoftheassociated powercircuit . Cleaning.Soot,smoke,orstainedareas(otherthaninsidearc chutes),orotherunusualdeposits,shouldbeinvestigatedandthe sourcedeterminedbeforecleaningisundertaken .Vacuumorwipe cleanallexposedsurfacesofthecontrolcomponentandtheinside ofitsenclosure .Equipmentmaybeblowncleanwithcompressed airthatisdryandfreefromoil .(Bealerttobuilt-inoilersinfactory compressedairlines!)Ifairblowingtechniquesareused,removearc coversfromcontactorsandsealopeningstocontrolcircuitcontacts Over-travelMeasurement Contactlifehasendedwhentheover-travelofthecontacts hasbeenreducedto0 .02inch . Over-travelofthecontactassemblyisthatpartofthestrokethat themovingcontactswouldtravelaftertouchingthefixedcontacts iftheywerenotblockedfrommovementbythefixedcontacts . Amethodofmeasuringover-travelisasfollows: A. Placea0 .02-inchfeelergaugebetweenthearmatureand magnet,withthearmatureheldtightlyagainstthemagnet . B. Checkcontinuallyineachphase,i .e .,determineifcircuitfrom terminal-to-terminalforeachpoleisopenundertheseconditions . C. Ifthereiscontinuitythroughallphases,theremainingover-travel issufficient .Ifthereisnotcontinuitythroughallphases,replace allstationaryandmovingcontactsplusmovingcontactovertravelsprings .Afterreplacingparts,manuallyoperatecontactor tobesurebindingdoesnotoccur . eaton Corporation www.eaton.com 25 Freedom 2100 Motor Control Center Installation and Maintenance Manual InstructionBookletIM04302004E Effective October 2010 Table12. ContactorTroubleshootingChart Defect Cause remedy Short contact life Low contact force Adjust over-travel, replace contacts, and replace contact springs as required to correct contact force. Overheating Welding of contacts Contact bounce on opening or closing Correct improper voltage applied to coil. Correct any mechanical defects or misalignment. Abrasive dust on contacts Do not use emery cloth to dress contacts. Load current is too high Reduce load. Use larger contactor. Jogging cycle is too severe Reduce jogging cycle. Check factory for more durable contact material. Use larger contactor. Load current too high Install arc box. Loose connections Replace broken or eroded insulating parts, arc horns, and grid plates. Clean or replace insulating parts having a heavy coating of foreign conducting material. Over-travel and/or contact force too low Remove contaminating materials that may have accumulated on arc horns and steel-grid plates. Ambient temperature is too high Reduce load. Provide better ventilation. Relocate starter. Use larger contactor. Line and/or load cables are too small Install terminal block and run larger conductors between contactor and terminal block. Over-travel and/or contact force is too low Adjust over-travel, replace contacts, and replace contact springs as required to correct contact force. Magnet armature stalls or hesitates at contact touch point Correct low voltage at coil terminals as coil draws inrush current. Contactor drops open to Maintain voltage at coil terminals. contact-touch position Install low voltage protective because of voltage dip device, sometimes called “Brownout Protector.” Excessive contact bounce on closing Correct coil overvoltage condition. MaintenanceofMotorControllersafteraFault Notee: ReproducedbypermissionoftheNationalElectricalManufacturers AssociationfromNEMAStandardsPublicationNo .ICS2-2000(R2005), IndustrialControlDevices,ControllersandAssemblies,copyright2000 byNEMA . Inamotorbranchcircuitthathasbeenproperlyinstalled, coordinated,andinservicepriortothefault,openingofthe branch-circuitshort-circuitprotectivedevice(fuse,circuitbreaker, motorshort-circuitprotector,andsoon)indicatesafaultcondition inexcessofoperatingoverload .Thisfaultconditionmustbe correctedandthenecessaryrepairorreplacementsmadebefore re-energizingthebranchcircuit . Itisrecommendedthatthefollowinggeneralproceduresbe observedbyqualifiedpersonnelintheinspectionandrepair ofthemotorcontrollerinvolvedinthefault . 26 eaton Corporation www.eaton.com Procedure Caution all inSpeCtionS and teStS are to be Made on ControllerS and equipMent tHat are de-energized, diSConneCted, and iSolated So tHat aCCidental ContaCt Cannot be Made witH live partS and So tHat all plant Safety proCedureS will be obServed. Enclosure.Substantialdamagetotheunitdoororframe,suchas deformation,displacementofparts,orburning,requiresreplacement oftheentireunit . CircuitBreaker.Examinetheunitinteriorandthecircuitbreaker forevidenceofpossibledamage .Ifevidenceofdamageisnot apparent,thebreakermayberesetandturnedON .Ifitissuspected thatthecircuitbreakerhasopenedseveralshort-circuitfaultsorif signsofcircuitbreakerdeteriorationappearwithintheenclosure, thecircuitbreakershouldbereplaced . DisconnectSwitch.Theexternaloperatinghandleofthedisconnect switchmustbecapableofopeningtheswitch .Ifthehandlefails toopentheswitchorifvisualinspectionafteropeningindicates deteriorationbeyondnormalwearandtear,suchasoverheating,contactblade,orjawpitting,insulationbreakageorcharring,theswitch mustbereplaced . FuseHolders.Deteriorationoffuseholdersortheirinsulating mountsrequirestheirreplacement . TerminalsandInternalConductors.Indicationsofarcingdamage and/oroverheating,suchasdiscolorationandmeltingofinsulation, requirethereplacementofdamagedparts . Contactor.Contactsshowingheatdamage,displacementofmetal, orlossofadequatewearallowancerequirereplacementofthe contactsandthecontactsprings .Ifdeteriorationextendsbeyond thecontacts,suchasbindingintheguidesorevidenceofinsulationdamage,thedamagedpartsortheentirecontactormustbe replaced . OverloadRelays.Ifburnoutofthecurrentelementofanoverload relayhasoccurred,thecompleteoverloadrelaymustbereplaced . Anyindicationthatanarchasstruckand/oranyindicationofburning oftheinsulationoftheoverloadrelayalsorequiresreplacementof theoverloadrelay . Ifthereisnovisualindicationofdamagethatwouldrequire replacementoftheoverloadrelay,therelaymustbeelectricallyor mechanicallytrippedtoverifytheproperfunctioningoftheoverload relaycontact(s) . ReturntoService.Beforereturningthecontrollertoservice,checks mustbemadeforthetightnessofelectricalconnectionsandforthe absenceofshortcircuits,grounds,andleakage . Allequipmentenclosuresmustbeclosedandsecuredbeforethe branchcircuitisenergized . Freedom 2100 Motor Control Center Installation and Maintenance Manual InstructionBookletIM04302004E Effective October 2010 Contact Tip Contact Plate (Brass or Copper) New Figure37.NormalServiceWear Corner of Contact Worn Away Still Serviceable Replace Figure38.EndofServiceLife CLEAN FILTER ON A REGULAR BASIS. ACCESS FILTER FROM THE OUTSIDE OF THE ENCLOSURE. CLEAN FILTER ON A REGULAR BASIS. ACCESS FILTER FROM THE OUTSIDE OF THE ENCLOSURE. Figure39.NEMA3RMCC-AllFiltersRequireCleaningonRegularBasis eaton Corporation www.eaton.com 27 Freedom 2100 Motor Control Center Installation and Maintenance Manual InstructionBookletIM04302004E Effective October 2010 Table13. RenewalContactKits,Coils,andOverloadRelays part number Description Coil Suffix Renewal Parts Pub. neMa Size 1 Series B1 neMa Size 2 Series B1 neMa Size 3 neMa Size 4 neMa Size 5 Series B1 22177 22177 20426 20428 20429 6-65 6-65-2 6-65-9 6-65-10 6-65-7 6-65-8 6-65-15 6-65-16 6-43-5 6-43-6 — — 6-44 6-44-2 — — 6-45 6-45-2 — — Contact kits 2-Pole 3-Pole 4-Pole 5-Pole Magnet Coils 120V 60 Hz or 110V 50 Hz 240V 60 Hz or 220V 50 Hz 480V 60 Hz or 440V 50 Hz 600V 60 Hz or 550V 50 Hz A B C D 9-2703-1 9-2703-2 9-2703-3 9-2703-4 9-2703-1 9-2703-2 9-2703-3 9-2703-4 9-2756-1 9-2756-2 9-2756-3 9-2756-4 9-1891-1 9-1891-2 9-1891-3 9-1891-4 9-1891-1 9-1891-2 9-1891-3 9-1891-4 208V 60 Hz 277V 60 Hz 208/240V 60 Hz 240V 50 Hz E H J K 9-2703-9 9-2703-7 — 9-2703-14 9-2703-9 9-2703-7 — 9-2703-14 9-2756-5 9-2756-9 — 9-2756-13 9-1891-13 9-1891-26 — 9-1891-20 9-1891-13 9-1891-26 — 9-1891-20 380–415V 50 Hz 380V 50 Hz 415V 50 Hz 550V 50 Hz L L M N 9-2703-8 — — — 9-2703-8 — — — — 9-2756-12 9-2756-8 9-2756-14 — 9-1891-14 9-1891-21 9-1891-8 — 9-1891-14 9-1891-21 9-1891-8 C306GN3B C306GN3B C306KN3 C306NN3 C306DN3B Overload Relays For replacement on existing starters three-pole— ambient-compensated bimetallic Table14. StarterType Unit Catalog number Designation (Class) Disconnect Means Description Fusible Circuit Breaker Circuit Breaker with Current Limiter Full voltage, non-reversing F204 F206 F207 Full voltage, reversing F214 F216 F217 Reduced voltage, autotransformer type F604 F606 F607 Reduced voltage, part-winding type F704 F706 F707 Reduced voltage, closed transition star-delta F894 F896 F897 Full voltage, non-reversing, two-speed, two windings F954 F956 F957 Full voltage, non-reversing, two-speed, one winding F944 F946 F947 28 eaton Corporation www.eaton.com Freedom 2100 Motor Control Center Installation and Maintenance Manual InstructionBookletIM04302004E Effective October 2010 part 11. plan Views Removable Top Cover Top Conduit Space 16.00 (406.4) 5.41 (137.4) 2.20 (55.9) 1.25 (31.7) 17.50 (444.5) 20.00 (508.0) Top Conduit Space Top View 1.25 (31.7) Vertical Wireway Door 2.20 (55.9) 1.25 (31.7) 1.25 (31.7) 1.25 (31.7) See Note 5 5.41 (137.4) 13.97 (354.8) 6.81 (172.9) 1.58 (40.1) 0.53 (13.5) Dia. See Notes 1 and 1B 7.31 (185.7) Vertical Wireway 16.00 (406.4) 0.70 (17.8) Bottom Conduit Space See Notes 2 and 3 0.53 (13.5) Dia. See Notes 1 and 1A Figure40.20InchesWide,16InchesDeep, FrontMountedOnly(4710A30) 16.00 (406.4) 5.41 (137.4) 2.20 (55.9) 1.25 (31.7) 21.50 (546.1) 24.00 (609.6) Bottom View 1.25 (31.7) See Note 5 17.50 (444.5) 4.81 (122.2) 18.35 (466.1 5.78 (146.8) 5.41 (137.4) 0.53 (13.5) Dia. See Notes 1 and 1B Removable Top Cover Top Conduit Space 20.38 (517.7) Top View 5.41 (137.4) Vertical Wireway Door 2.20 (55.9) 1.25 (31.7) 1.25 (31.7) 21.50 (546.1) 24.00 (609.6) Cross Section 21.50 (546.1) 5.41 (137.4) 6.81 (172.9) 1.58 (40.1) 0.53 (13.5) Dia. See Notes 1 and 1B 20.00 (508.0) Vertical Wireway 8.81 (233.7) 1.25 (31.7) Removable Bottom Frame Members See Note 5 13.97 (354.8) Bottom Conduit Space See Notes 2 and 3 0.70 (17.8) 2.00 (50.8) 0.53 (13.5) Dia. See Notes 1 and 1A Figure41.24InchesWide,16InchesDeep, FrontMountedOnly(4710A33) Notese: Top View Vertical Wireway Door 1.25 (31.7) Wire Tie Brackets Cross Section 7.31 (185.7) 1.25 (31.7) See Note 5 Vertical Wireway Removable Bottom Frame Members See Note 4 Bottom Conduit Space 0.70 (17.8) See Notes 2 and 3 16.00 2.00 (50.8) (406.4) 0.53 (13.5) Dia. See Notes 1 and 1A 1.58 (40.1) Wire Tie Brackets Bottom View 7.31 (185.7) 1.25 (31.7) Figure42.20InchesWide,21InchesDeep, FrontMountedOnly(4710A31) Removable Top Cover Top Conduit Space Wire Tie Brackets Cross Section 5.41 (137.4) Removable Bottom Frame Members See Note 4 Top View Vertical Wireway Door 1.25 (31.7) 17.50 (444.5) 20.00 (508.0) Wire Tie Brackets 4.81 (122.2) 17.50 (444.5) 20.38 (517.7) 5.41 (137.4) Cross Section Bottom View Removable Top Cover Bottom View 1.25 (31.7) See Note 5 5.41 (137.4) 5.78 (146.8) 5.41 (137.4) 1.58 (40.1) 0.53 (13.5) Dia. See Notes 1 and 1B 21.50 (546.1) 1.25 (31.7) 7.31 (185.7) Vertical Wireway 8.81 (223.8) Removable Bottom Frame Members 18.35 See Note 5 (466.1) Bottom Conduit Space See Notes 2 and 3 0.70 (17.8) 20.00 2.00 (50.8) (508.0) 0.53 (13.5) Dia. See Notes 1 and 1A Figure43.24InchesWide,21InchesDeep, FrontMountedOnly(4710A34) 1 . Minimumlengthofanchorboltis2 .00(50 .8)(0 .38-16grade5torqued at31lb-ft) . A . Fornon-seismic,mountwithtwocenterboltsperenclosure . B . Forseismic,mountwithminimumfourcornerboltsperenclosure . 2 .Recommendedmaximumconduitheightabovefloorlineis3 .50inches (88 .9mm) . 3 .Maximumconduitspacewithchannelsillsis17 .50x9 .73inches (444 .5x247 .1mm) . 4 .Formultiplestructureassemblies,eitheroneorbothofthesemembers isremovedtoprovidemaximumunrestrictedconduitspaceatthe bottomoftheMCC . 5 .Thisconduitspaceisnotrecommendedwhenaneutralbusand/oraspace heaterisrequired .Otherwisethisspaceisavailableforconduit . SeeFigure4646forverticaldimensions . eaton Corporation www.eaton.com 29 Freedom 2100 Motor Control Center Installation and Maintenance Manual InstructionBookletIM04302004E Effective October 2010 2.20 (55.9) Removable Top Cover 3.22 (81.8) Top Conduit Space 21.00 (533.4) Top View 4.62 (117.3) Wire Tie Brackets Rear Vertical Wireway 17.50 (444.5) See Note 5 1.25 (31.7) Vertical Wireway Removable Bottom Frame Members See Note 5 18.35 (466.1) Bottom View 5.41 (137.4) 16.00 (406.4) 1.32 (33.5) 2.00 (50.8) 0.53 (13.5) Dia. See Notes 1 and 1A Figure44.20InchesWide,21InchesDeep, FrontandRearMounted(4710A32) Removable Cover Top Conduit Space 5.41 (137.4) 2.20 (55.9) 1.25 (31.7) 10.00 (254.0) 1.58 (40.1) 0.53 (13.5) Dia. (2) See Note 1 Removable Bus Barrier Flat Cover Supplied on Rear of Front Mounted Only Structure Vertical View 7.50 (190.5) 5.00 (127.0) Floor Line 3.0 (76.2) 1.00 (25.4) 18.35 (466.1) Bottom Conduit Space See Notes 2 and 3 0.70 (17.8) 5.00 (127.0) 15.73 (399.5) or 20.11 (510.8) Neutral Bus Location When Specified 1.00 (25.4) 3.00 (76.2) Channel Sills Supplied Only When Specified 3.00 (76.2) 9.73 (247.1) or 14.11 (358.4) 10.50 (266.7) 12.12 (307.8) 10.50 (266.7) Ground Bus Location 2.25 (57.2) 15.73 (399.5) or 20.11 (510.8) Neutral Bus Location When Specified Horizontal Bus Location See Note 9 Vertical Bus Location Removable Bus Barrier 3.12 (79.2) A 15.00 (381.0) 4.62 (117.3) 4.62 (117.3) See Note 9A Horizontal Wireway 7.16 (181.9) Deep C See Note 7 Rear Horizontal Wireway 4.97 (126.3) Deep See Note 7 D See Note 7 See Note 7 See Note 9A Floor Line 5.00 E (127.0) B 14.11 (358.4) 20.11 (510.8) 1.00 (25.4) 10.50 (266.7) 1 . Minimumlengthofanchorboltis2 .00(50 .8)(0 .38-16grade5torqued at31lb-ft) . A . Fornon-seismic,mountwithtwocenterboltsperenclosure . B . Forseismic,mountwithminimumfourcornerboltsperenclosure . 2 .Recommendedmaximumconduitheightabovefloorlineis3 .50inches (88 .9mm) . 3 .Maximumconduitspacewithchannelsillsis17 .50x9 .73inches (444 .5x247 .1mm) . 4 .Formultiplestructureassemblies,eitheroneorbothofthesemembers isremovedtoprovidemaximumunrestrictedconduitspaceatthe bottomoftheMCC . 30 5.00 (127.0) 3.00 (76.2) Channel Sills Supplied Only When Specified 3.00 (76.2) Neutral Bus Location When Specified Bottom View Figure45.10InchesWide,16or21InchesDeep, TransitionStructure(4710A35/6) Notese: B Floor Line 3.00 (76.2) Channel Sills Supplied Only When Specified 9.73 (247.1) or 14.11 (358.4) 10.50 (266.7) See Note 5 5.41 (137.4) 3.12 (79.2) 4.62 (117.3) 4.62 (117.3) Horizontal Wireway 7.16 (181.9) Deep Removable Bottom Frame Members See Note 4. (Not to be removed for seismic) 7.50 (190.5) 1.25 1.25 (31.7) (31.7) 5.78 (146.8) Horizontal Bus Location 2.25 (57.2) 1.25 (31.7) Top View 5.41 (137.4) See Note 7 Figure46.SideViewA Ground Bus 12.12 (307.8) Location 20.38 (517.6) or 16.00 (406.4) Minimum Rated Vertical Bus Supplied as Standard in Front Mounted Only Structure See Note 9A Bottom Conduit Space See Notes 2 and 3 0.53 (13.5) Dia. See Notes 1 and 1B Flat Cover Supplied on Rear of Front Mounted Only Structure See Note 7 7.31 (185.7) 5.41 (137.4) 5.78 (146.8) Removable Bus Barrier See Note 8 Horizontal Wireway 7.16 (181.9) Deep 4.81 (122.2) 4.81 (122.2) 1.25 (31.7) 4.62 (117.3) See Note 9A 7.31 (185.7) Cross Section Vertical Bus Location A 2.25 (57.2) Vertical Wireway Door 1.25 (31.7) 17.50 (444.5) 20.00 (508.0) Horizontal Bus Location 3.12 (79.2) 5.41 (137.4) 2.20 (55.9) 1.25 (31.7) 12.12 (307.8) 10.50 (266.7) Ground Bus Location eaton Corporation www.eaton.com Figure47.SideViewB 5 .Thisconduitspaceisnotrecommendedwhenaneutralbusand/oraspace heaterisrequired .Otherwise,thisspaceisavailableforconduit . SeeFigure4747forverticaldimensions . 7 . MasterTerminalBlock(MTB)assemblyisfurnishedforTypeCwiring onlywhenlocationnotspecified .MTBsuppliedatthebottom . 8 .Rearhorizontalbusbarriernotsuppliedwithfrontmountedonlystructure . 9 .Standardstructurearrangement: A . Infront WithoutMTB:AandB=9 .00(228 .6mm) WithMTBatbottom:AandB=9 .00(228 .6mm) WithMTBattop:AandB=3 .00(76 .2mm) B . Inrear WithoutMTB:C=0,D=72(1828 .8mm),E=3 .00(76 .2mm) WithMTBatbottom:C=0,D=66 .00(1676 .4mm), E=9 .00(228 .6mm)" WithMTBattop:C=12,D=60(1524 .0mm),E=3 .00(76 .2mm) Freedom 2100 Motor Control Center Installation and Maintenance Manual InstructionBookletIM04302004E Effective October 2010 part 12. related instructional Leaflets publication publication no. Starters Size 5, Non-Reversing and Reversing, vacuum IL17087 Contactors Size 5, Non-Reversing and Reversing, vacuum IL16999 Size 5, Non-Reversing and Reversing, vacuum IL17088 Circuit breakers Magnum DS I.B. 2C12060H08 RotoTract Remote Racking Operating Manual IL04300001E Series C, F-Frame IL01219018E Series C, F-Frame IL29C101 Series C, J-Frame IL01204004E Series C, J-Frame IL29C103 Series C, K-Frame IL29C104C Series C, L-Frame IL01207002E Series C, L-Frame IL29C105 Series C, N-Frame IL01209003E Series C, N-Frame IL29C106 Series C, R-Frame IL29C613B Series C, R-Frame IL29C107 Series G, EG-Frame IL29C515C Series G, JG-Frame IL01207009E Series G, LG-Frame IL01207001E Transfer Switches IL14477 eaton Corporation www.eaton.com 31 InstructionBookletIM04302004E Effective October 2010 Freedom 2100 Motor Control Center Installation and Maintenance Manual EatonCorporation ElectricalSector 1111SuperiorAve . Cleveland,OH44114 UnitedStates 877-ETN-CARE(877-386-2273) Eaton .com ©2010EatonCorporation AllRightsReserved PrintedinUSA PublicationNo .IM04302004E/TBG000341 October2010 PowerChainManagementisaregistered trademarkofEatonCorporation . Allothertrademarksarepropertyoftheir respectiveowners .


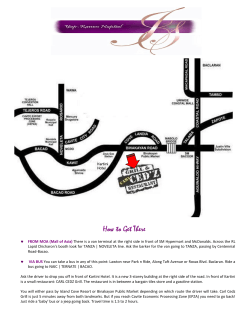


© Copyright 2026